


|
Getting your Trinity Audio player ready...
|
Explore Rocky Mountain National Park by backpacking. See its hidden gems, like Glacier Gorge and the Never Summer Mountains, inaccessible by car. Choose from many hiking options for a unique experience in this 265,000-acre park. Here are five multi-day treks to get you started.
Overview
Some National Parks you can visit and admire without spending much time out of your car. Occasionally, these are referred to as drive-through parks, not because they’re ugly but because a good chunk of their best features are visible through a car window.
Despite Trail Ridge Road, the ultra scenic path that bisects Rocky Mountain National Park, it’s easy to argue that the best locations in Rocky aren’t visible from your car. Glacier Gorge, Wild Basin, and the Never Summers require some commitment to get to. Which is why backpacking in the park is such a treat.
265,000 acres is a lot of mountain terrain to explore, so don’t misread; Trail Ridge, Bear Lake, and the Kawuneeche Valley are all worth seeing from your car. But to really understand the lay of the land, you need some hiking boots and a few days.
Backpacking in Rocky Mountain National Park opens up a special kind of experience that most visitors to the area miss out on, with many only having time for just one day of sightseeing. Your outdoor expedition will be different with each visit, and will depend on when you go, how many days you intend to stay, which section of the park you explore, and how hard you want to push yourself. All of these factors are decided by you, the traveler.
Lucky for you, the backpacking options in RMNP are bountiful. No matter if you’re looking for a single overnight trip, a circuit hike, or a multi-day route, there’s something for everyone. To help you out, we’ve put together five excellent multi-day hikes in Rocky Mountain National Park to get you started.
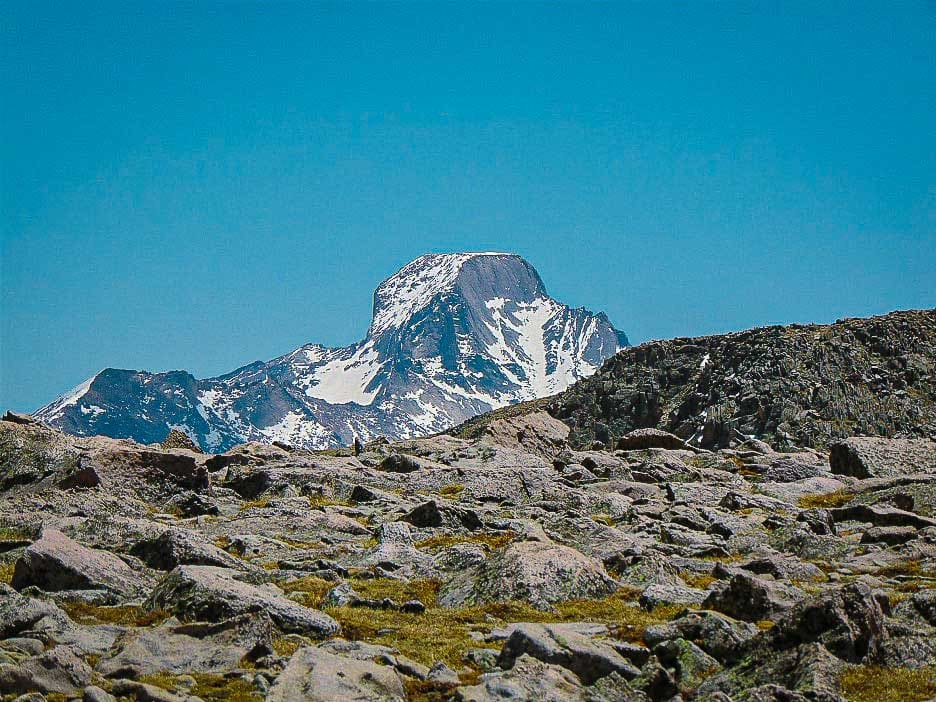
Longs Peak from near the summit of Flattop Mountain in Rocky Mountain National Park, Colorado. Photo by Timo Holmquist
Table of Contents
Article Navigation: Click on any of the listed items in the table of contents below to jump to that section of the article. Similarly, clicking on any large, white section header will jump you back to the Table of Contents.
- Overview
- Backpacking in Rocky Mountain National Park
- Things To Know
- Best Seasons to Visit
- Bear Lake to Lake Nokoni/Nanita
- Lake Verna Basecamp
- Thunder Lake Basecamp
- Lawn Lake Basecamp
- Never Summer Slam
Backpacking in Rocky Mountain National Park
The process isn’t too convoluted, but if you want to backpack in Rocky Mountain National Park, there is a process. First, you need to figure out your itinerary. Then, you need to book your wilderness campsites. Campsites go on sale early in the year, so advanced planning certainly helps you get the sites you want.
In the past few years, RMNP has adopted a timed entry and reservation system for entering the park. You need both a timed entry slot and a reservation pass to enter the park between May and late October. If you have questions about parking or passes, please visit the park’s official website here, or give them a call. This is the main number listed on the website. You may be transferred to a relevant area: (970)-586-1206.
Please note:
- Between April 1 and October 31, you must store your food in a bear canister.
- There are NO campfires allowed in the backcountry.
There are plenty of resources available online for bringing backpacking essentials. Remember to bring enough supplies for all days of effort, including clothing, tenting equipment, food, cookware, navigation tool, /headlamps, personal items, etc.
Some of the trips below make use of day trips. In this instance, leave all the heavy stuff at camp. If you have the space, bring an extra day pack for these adventures. You can also just empty your backpacking pack and use that.
Thunder Lake is the ultimate classic RMNP backpacking trip. Wild Basin offers hidden gems away from the crowds. Visit multiple waterfalls, hidden cirques and optional off-trail adventures in the high country.
Things to Know
All of these backpacking possibilities were constructed using existing trails. There are many variations listed where you can go off-trail, but that’s a decision you or your group needs to make. Off-trail adventures can be rewarding but also come with increased danger. Getting lost off-trail can have serious consequences.
All of the adventures in this roundup range from 3-5 days, with options to extend or reduce the duration. For the mountain fit and capable, these itineraries are on the lighter side, with daily distances between 3-10 miles. Cumulatively, the adventures range from about 15-30 miles with substantial elevation gain.
Horses are allowed on many parts of these trails. Please practice appropriate trail etiquette. There are NO campfires allowed in the RMNP backcountry.
Two massive wildfires tore into parts of the park in 2020. Both the Cameron Peak Fire and East Troublesome Fire have scarred thousands of acres. All the trips below were created with the intent of avoiding these burn areas. There are options to head through burn scars on reopened trails, but the scenery is pretty sobering.
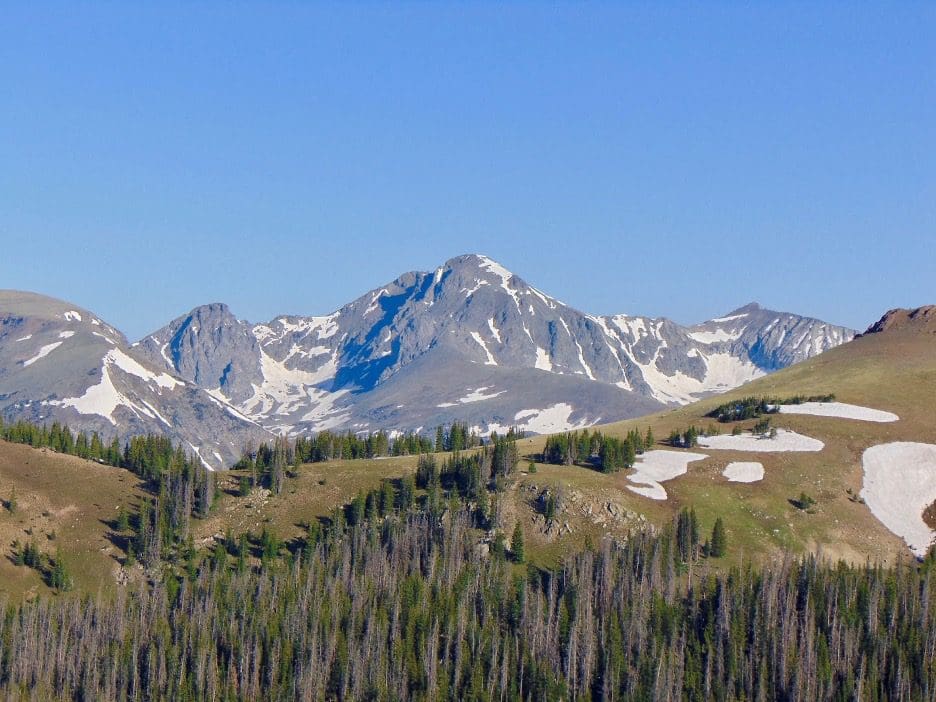
Mt. Richthofen, the highest peak in the Never Summer Mountains. Photo by: Timo Holmquist
Best Seasons To Visit and a Note About Wildfires
If it’s your first time in the area, be aware that snow lingers in the high country for a lot longer than you may be used to. In fact, the best times to do these hikes are later in the summer and into the early autumn.
If you’re prepared for snow and don’t mind potentially digging out a backcountry site, then May and early June are good times to go. Mid-June through early July are transitional. Some years, the snow melts early, and July is fantastic with vibrant green vegetation. Other times, you’ll be dealing with snow patches, wet terrain, and bugs. Most Junes and Julys are defined by afternoon thunderstorms, which can be frightening in the alpine. If afternoon thunderstorms are forecast, make sure you’re out of the alpine by noon.
The ideal time is mid-August through early October. In this time frame, your biggest concerns should be higher temperatures, dry weather, and cold mornings/evenings. The dry weather is nice but can come with wind, which dramatically elevates wildlife risks. Please, again, NO fires in the backcountry. At its best, the weather is calmer, the bugs are gone, the temperature is nice, and summer traffic starts to wane.
Keep in mind that in higher elevations, accumulating snowfall is possible by mid-September. As your trip approaches, keep refreshing those weather forecasts. Make sure you’re prepared.
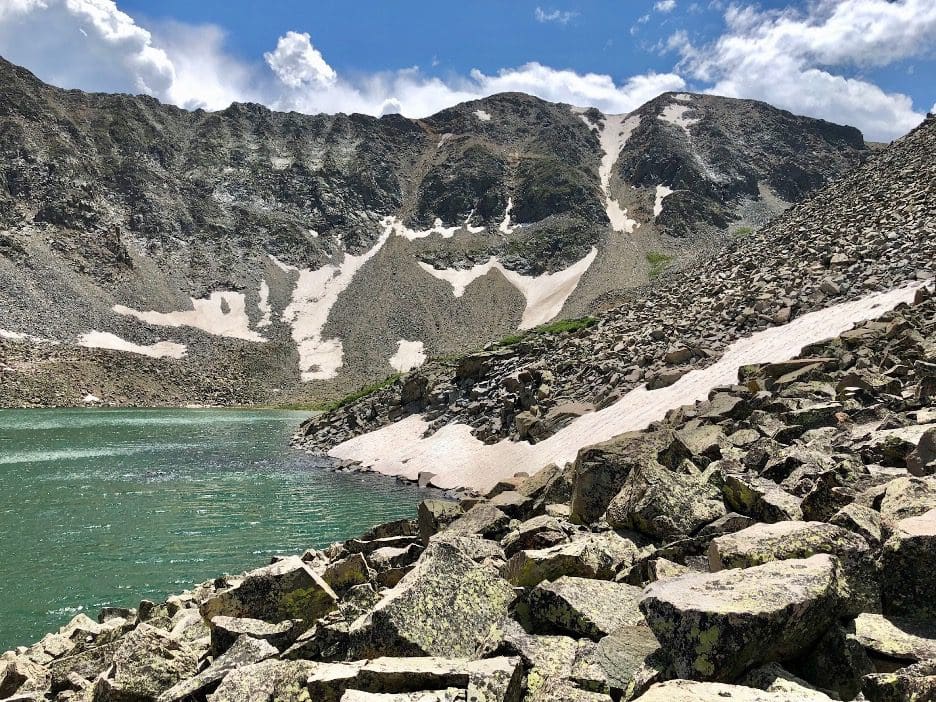
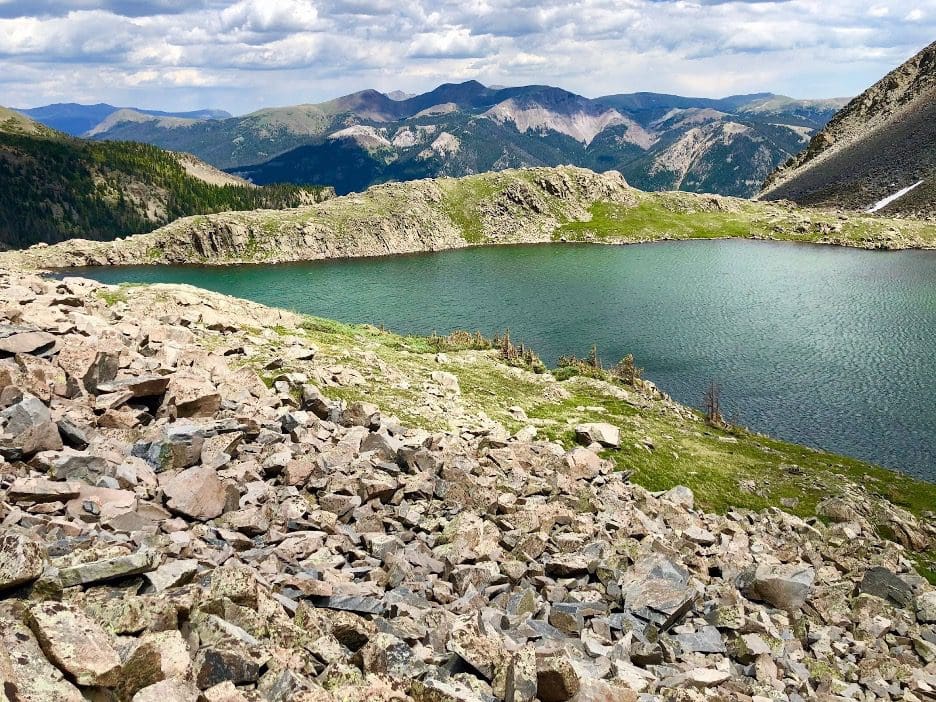
The rugged terrain around Lake of the Clouds. Photo: Timo Holmquist
1. Bear Lake to Lake Nokoni/Nanita
Popular, beautiful, and difficult, this is one of the premier backpacking opportunities in the park. In past years, I would’ve recommended the western Continental Divide Trail (CDT) loop or a car positioning setup to even out the days. However, wildfires have severely altered the landscape in parts of the park.
The chosen route aims to give you all the big-time views while trying to minimize your exposure to entire valleys scarred by the fury of the East Troublesome Fire of 2020. While informative, traveling through a large burn area can have a huge effect on your mood and outlook, especially if you’re walking through miles and miles of scarred forest. If you want to save some time, effort, and distance, I’ve listed the alternative finish below.
If you’re unsure of which option to take, please read and take a look at the pictures in our article on Lake Nakonia and Nanita. They should help you iron out which version is best suited for you.
Planning tips:
- 3-day itinerary: Reserve two nights at either July Camp, Pine Marten, North Inlet Falls, or North Inlet Junction
- 4-day itinerary: Reserve one night at July Camp and 2 nights at Pine Marten, North Inlet Falls, or North Inlet Junction.
- Total Mileage/effort: 26 miles over 3 or 4 days. Elevation Gain/Loss: ~7,600 ft.
The large and impressive Lake Nanita.
Day 1: Bear Lake Trailhead to July Camp
- Distance: ~8 miles
- Elevation Gain/Loss: +2850 ft. (-1660 ft.)
- Markers: Bear Lake, Flattop Mt. trail Junction, Flattop Mt. Summit and exceptional views above treeline, long descent to camp
- Highlights: This is a big day; start early. First, park at Bear Lake and make your way north, following trail signs for Flattop Mt. Once on the proper Flattop Mt. Trail, weave your way higher. Eventually, you lose the trees and have a long, gorgeous alpine stroll to the highest point. This can be a windy area; check the forecast before you go. Once you summit Flattop, you’re on the Continental Divide! Descend west to meet the Continental Divide Trail (a.k.a. North Inlet Trail). You’ll take this initially south (left) as you descend gradually amongst a rolling alpine landscape with stunning views. Eventually, you’ll descend off the rounded ridgeline and towards your camp for the night, which is below treeline.
Day 2: July Camp to North Inlet Falls or Pine Marten Camp
- Distance: 2 miles
- Elevation Gain/Loss: +32 ft. (-1175 ft.)
- Markers: Easy descent, short day, optional old patrol cabin ruins, and creekside views. Remember to take a left at the only trail junction you’ll run into.
- Highlights: This is a repositioning day. It’s designed to give you a break if the first day knocked you around a bit. It’s also not the only thing you can do today. If you’re used to mountain terrain (or on a tight schedule), you can combine Day 2 and Day 3. In this case, reserve two nights at July Camp, and please note that today’s effort will also be significant (10.5 miles, +/- 3,075 ft). If you do have the time and want a day to soak in some pristine nature amongst the quiet western hillsides and creeks, I suggest packing camp early, setting up at Pine Marten or North Inlet Falls, and doing some stretching to prep for Day 3.
Day 3: Camp to Lake Nakoni/Nanita and back
- Distance: ~6.4 miles
- Elevation Gain/Loss: +/-1860 ft.
- Markers: Camp, a long switchback ascent to Lake Nokoni, up and over a shoulder to Lake Nanita.
- Highlights: This is the highlight day, on par with Day 1 for views with the added benefit of two stunning and pristine alpine lakes. If you brought a small hammock or a big camera, this would be the day to use it. The day starts with a substantial climb up to Lake Nokoni. However, you can just dump your heavy gear at camp since you’ll be coming back. Continue over a small shoulder to get to the just-as-stunning Lake Nanita. Once you get to the lake, take time to enjoy their shorelines, the intimidating Ptarmigan Towers, and Andrews Peak in the distance. Getting here early in the day gives you more time to set up a camp chair or hammock.
Day 4: Return to Bear Lake
- Distance: ~9.6 miles
- Elevation Gain/Loss: +/- 2840 ft.
- Markers: Camp to treeline (heading east), long alpine stretch on the way up to Flattop Mt. Initially easy alpine descent from Flattop Mt. toward treeline. Then, switchback and a long descent to Bear lake and trailhead.
- Highlights: Distance-wise, this is the longest day; however, you get to repeat the lovely 360-degree alpine portion up to and over Flattop Mt. Once you crest Flattop, it’s all downhill to your car!
Day 4: alternate ending
- Distance: 7.6 miles
- Elevation Gain/Loss: +410 ft. (-1400 ft.)
- Markers: Take a left (west) on North Inlet Trail. Follow it through substantial burn areas to the North Inlet Trailhead.
- Highlights: Easier effort and mostly downhill; this is the logical conclusion for those worried about pushing their daily distance limit. However, the fire damage is hard to ignore and will stay with you for miles.
2. Lake Verna/East Inlet Basecamp
The East Inlet was largely spared from the destruction of the East Troublesome Fire, though you will see evidence of it if you drive across Trail Ridge to get to the trailhead. This is a straightforward out-and-back camping adventure along a pristine valley with 5 gorgeous lakes to explore.
Planning tips:
- Horses allowed on trails
- Reserve 3 nights at Lake Verna
- If unavailable, try Slick Rock, Solitaire, or Upper East Inlet sites.
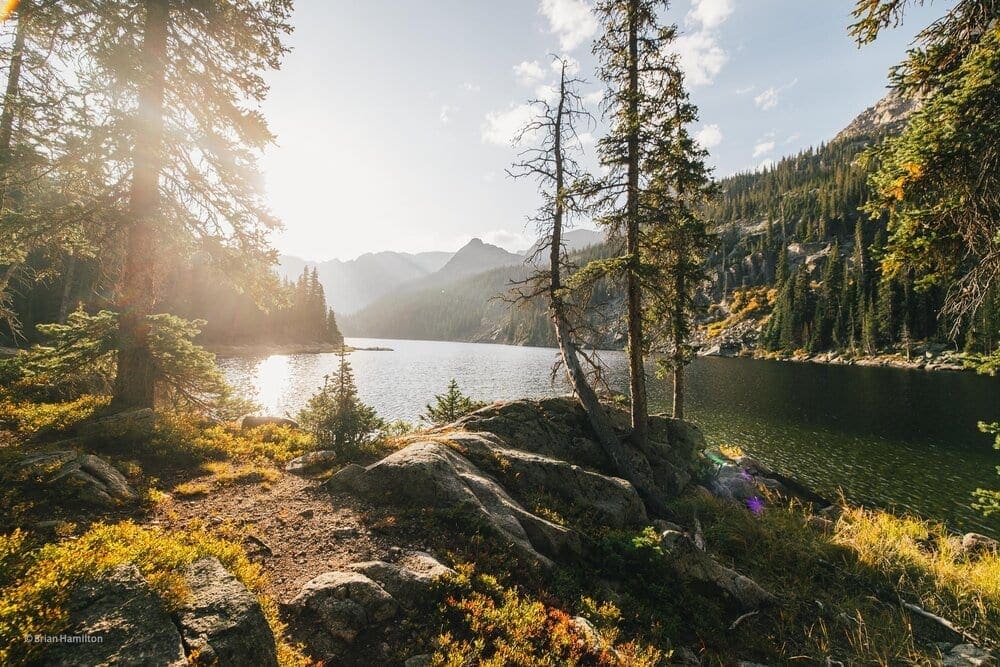
Sunrise at Lake Verna
Day 1: East Inlet to Lake Verna
- Distance: 6.8 miles
- Elevation Gain/Loss: +2,045 ft. (-265 ft.)
- Markers: East Inlet trailhead, Adams Falls, mountain meadows, Lone Pine Lake, Lake Verna.
- Highlights: This hike is a great example of the hidden beauty of the western side of the park. Not visible from any road, this trail gets you near thundering Adams Falls, gorgeous mountain meadows, meandering valleys, Lone Pine Lake, and the outrageously beautiful Lake Verna. Your campsite will give you fantastic access to the long shoreline, where you can find multiple places to set up, kick back and enjoy the majesty of the mountains.
Day 2: Lake Verna day trips
- Distance: 4.35 miles
- Elevation Gain/Loss: +/-720 ft.
- Markers: Official trail continues to the east end of Lake Verna. An easily identifiable but non-official footpath leads to Spirit Lake and Fourth Lake. From there, it’s off-trail in a western and then southern direction.
- Highlights: This is a very rewarding but very difficult day hike. The distance and elevation aren’t bad, but once you pass Fourth Lake, the trail disappears. Until then, enjoy the views south from Spirit Lake, where granite domes dominate the horizon. After Fourth lake, there’s a faint trail that heads up Boulder-Grand Pass, but that’s not what you want. Travel off-trail and close to the stream for about half a mile. Then, find a good place to cross East Inlet. From there, piece together the path of least resistance (still following the general trajectory of the creek) and clamber up to Fifth lake. Basic orienteering skills are needed, especially in adverse weather. For a much easier alternative, from lake Verna, hang out by Spirit lake and Fourth Lake.
Day 3: Lake Verna to East Inlet
- Distance: 6.8 miles
- Elevation Gain/Loss: +265 ft. (-2,045 ft.)
- Markers: Retrace your journey from day 1.
- Highlights: If you didn’t get a chance to explore Lone Pine Lake, you can do so on this day. The highlights are the same as day one, just in reverse. All in all, it’s a beautiful, downhill-oriented trail back to your car!
3. Thunder Lake Basecamp
Many people associate Rocky Mountain National Park with three or four primary areas; Trail Ridge Road, the Bear Lake area, the Glacier Gorge area, and Longs Peak. As evidenced by the adventures above and below, there’s a lot more out there to see! Wild Basin is one of those places. It’s located on the southeastern side of the park and hides its splendor behind longer approach trails. This generally limits the crowds, but the trailhead parking fills up quickly.
Planning Tips:
- Horses allowed up to Thunder Lake
- Reserve 3 nights at Thunder Lake
- If unavailable, day trips become a lot longer (~6 miles more), but you can still use North St. Vrain and Siskin Campsites.

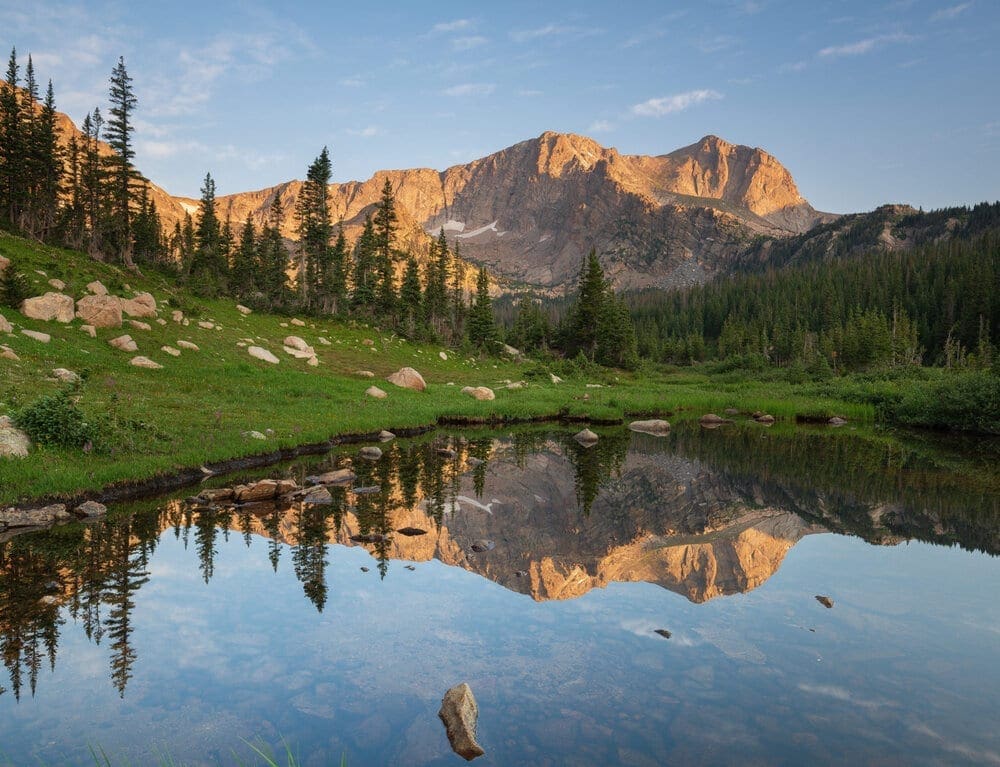
Thunder Lake with Mt. Alice behind it. Photo by: Timo Holmquist.
Day 1: Wild Basin Trailhead to Thunder Lake
- Distance: 5.65 miles
- Elevation Gain/Loss: +2170 ft.
- Markers: Wild basin trailhead, Copeland Falls, bypass trail, junction with Lion lakes trail, Thunder Lake campsites.
- Highlights: This is a tougher day because you’ll be loaded down with all your supplies. However, once you set up camp, you can stash a lot of the heavier gear for future days. You’ll pass by the popular Copeland Falls and follow the North St. Vrain River upstream. Eventually, you’ll come to a junction that seems to feature a ton of campsites along the righthand spur; take that trail. If you hang left, you’ll pass Calyspos Cascades and Ouzel Falls, but those will add distance. It’s easier to visit these destinations on the way out. Take the campsite spur until it rejoins the main trail. From there, continue west. Your last trail junction is with the Lion Lakes Trail. Continue to Thunder Lake. Be aware that you’ll arrive at the campsite before you get to Thunder Lake. Be aware that you’ll arrive at the campsite before you get to Thunder lake. Once you’re set-up, head to the shoreline and enjoy the views. There’s also a well-maintained patrol cabin there.
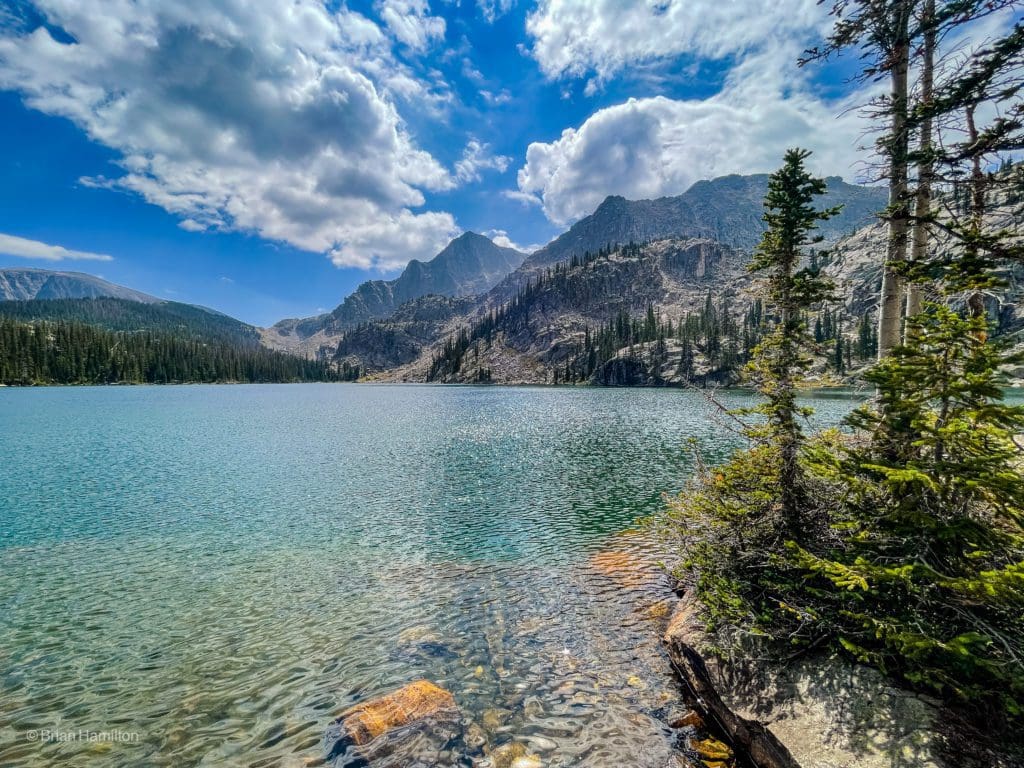
Day 2: Thunder Lake to Eagle Lake
- Distance: 2.75 miles
- Elevation Gain/Loss: +/- 730 ft.
- Markers: Camp, Thunder Lake, use-trail to Box Lake, Eagle Lake
- Highlights: This is a special day but features unofficial paths. Make sure you follow the route as closely as you can. There are several cliffs to avoid both above and below the route. For a detailed report, read our trail review on Box and Eagle Lake. These two lakes are gorgeous and part of a hanging valley that’s hard to get to from any other direction. Enjoy the two lakes, especially Eagle Lake, whose large size and stunning views of the Eagle’s Beak are particular highlights. The route is fairly straightforward in good weather but much harder in fog, rain, or sleet; plan accordingly. Return the way you came.
Day 3: Thunder Lake to Boulder-Grand Pass
- Distance: 3.15 miles
- Elevation Gain/Loss:+/-1590
- Markers: Thunder Lake views, Lake of many winds, Boulder Grand Pass, optional Tanima Pk, The Cleaer, or Mt. Alice
- Highlights: This is a simple day with killer views and opportunities to adventure a bit farther. There is a well-worn path from the patrol cabin around the northern shoreline of Thunder Lake. Take it, continuing up the valley as you weave between stands of trees, meadows, and big boulders. Eventually, you’ll break treeline and ascend up to the beautiful Lake of Many Winds (read our review here). From there, an infrequent path leads up to the top of Boulder Grand Pass. It is loose; a helmet is recommended. A large snow patch remains on the pass through early summer. The views are awesome. If you really want to stand on top of something, head south and east to the summit of Tanima Peak, which requires a bit of talus hopping and light scrambling (Class 2). You can continue south to scramble The Cleaver if you so choose (much tougher scrambling). Mt. Alice is also available to the north, though if you’re in the area for a while, I’d highly recommend climbing it via the Hourglass Ridge. Any additional adventure beyond the pass will add mileage and effort. Descend from Boulder-Grand Pass back to your campsite.
Day 4: Thunder Lake back to Trailhead
- Distance: 6.4 miles
- Elevation Gain/Loss: (-2170 ft.)
- Markers: Camp, junction with Lion Lakes, Ouzel Falls spur, Calypso Cascade, Copland Falls, Trailhead
- Highlights: If you take the scenic route back, you’ll get to enjoy both Ouzel Falls and Calypso Cascade. Start by packing up camp and deciding if you want a few more views of Thunder Lake before leaving the area. Then march back east, passing the junction for Lion lakes Trail. You can read about that trail in our Lions Lakes Trail Review. At the following intersection, follow signs for Ouzel Falls and Calypso Cascade (this will be different than Day 1). These features are popular, so you’ll likely see people, but they are quite pretty. The trail will rejoin the campsite spur. From there, head east, pass Copeland Falls, and arrive back at the trailhead!
4. Mummy Range: Lawn Lake Basecamp
The Mummy Range is a northeastern spur of mountains visible from the Loveland area of the Front Range urban corridor. They are rounded on their northwestern side while sporting some notably rugged areas on the southeastern. Lawn Lake is a great base camp to launch beautiful day trips from.
Planning Tips:
- Horses allowed up to Lawn Lake
- Reserve 3 nights at Lawn Lake
- In unavailable, Tileston Meadows works as well. It is on the Black Canyon trail. When you reach the intersection between the Lawn Lake Trail and Black Canyon Trail, take a right instead of continuing to Lawn Lake. The campsite is 0.7 miles from the junction.
The Mummy Range from Hidden Valley. Photo by: Timo Holmquist.
Day 1: Lawn Lake Trailhead to Lawn Lake
- Distance: 6.25 miles
- Elevation Gain/Loss: +2460 ft. (-5 ft.)
- Markers: Trailhead, junction with Ypsilon Lake trail, creekside scenery, junction with Black Canyon Trail, Lawn Lake
- Highlights: You’ll start at the trailhead and begin a quick ascent into a mountain pocket where The Roaring River flows. There was a massive flood in 1982 after an earthen dam built to inflate Lawn Lake broke. Damage from the flood is still visible around the creek. After roughly 1.4 miles, you’ll pass the junction with Ypsilon Lake Trail. Continue up the valley, following the Roaring River for another 4.2 miles before an intersection with Black Canyon Trail. From there, it’s another 0.7 to the campsites, which sit above Lawn Lake.
Day 2: Lawn lake to Crystal Lake
- Distance: 3 miles
- Elevation Gain/Loss: +575 ft. (-70 ft.)
- Markers: Lawn lake trail, junction with Crystal Lake Trail, little Crystal Lake, Crystal Lake
- Highlights: Lawn Lake is close to treeline, and from the shore, you can see where the trees end, but this is the day you get above that. Crystal Lake is located in a small hanging valley. It’s gorgeous and surrounded by impressive rock walls. On the way, you’ll also pass the equally lovely Little Crystal Lake. If the sun’s out, this is a great place to relax. Return the way you came to camp.
Day 3: Lawn Lake to Mt. Fairchild
- Distance: 6 miles
- Elevation Gain/Loss: +/- 2560 ft.
- Markers: Camp, trail junction with Crystal Lakes, the Sadlle, ridgeline ascent to Fairchild Mountain.
- Highlights: This is your peak day. While you can also get to Mummy Peak and Hagues Peak from Lawn lake, Fairchild is the simplest and most straightforward. Take the trail from lawn Lake up the valley, passing the Crystal Lakes trail en route. The trail will climb to a broad saddle aptly called “The Saddle.” Hagues Peak is to the northeast but will require intense scrambling and careful route selection. The gentle rolling lump of Fairchild is much more palatable. Plus, it’ll get you over 13,500 ft. in height, and the summit will have commanding views of the surround, especially south toward Estes Park and Longs Peak. There is no trail; choose your accent path. Be careful, rocks move, and a twisted ankle out here would be more than a little problematic. For mountain aficionados, you can shorten the distance by angling an ascent toward Fairchild before you get to the saddle. But, again, this is trailless alpine. Choose your days and ascent paths wisely.
Day 4: Lawn Lake back to Lawn Lake Trailhead
- Distance: 6.25 miles
- Elevation Gain/Loss: -5 ft. (+2460 ft.)
- Markers: Camp, junction with Black Canyon Trail, long descent along the Roaring River, junction with Ypsilon lake Trail, Trailhead
- Highlights: This is just Day 1 in reverse. You might feel a spring in your step, knowing that it’s all downhill and features some lovely sections of forest and creeks. There’s a mile and a half left when you pass the Ypsilon Lake junction. Stay on Lawn Lake Trail all the way down.
5. Never Summer Slam: Colorado River Trailhead (start/end)
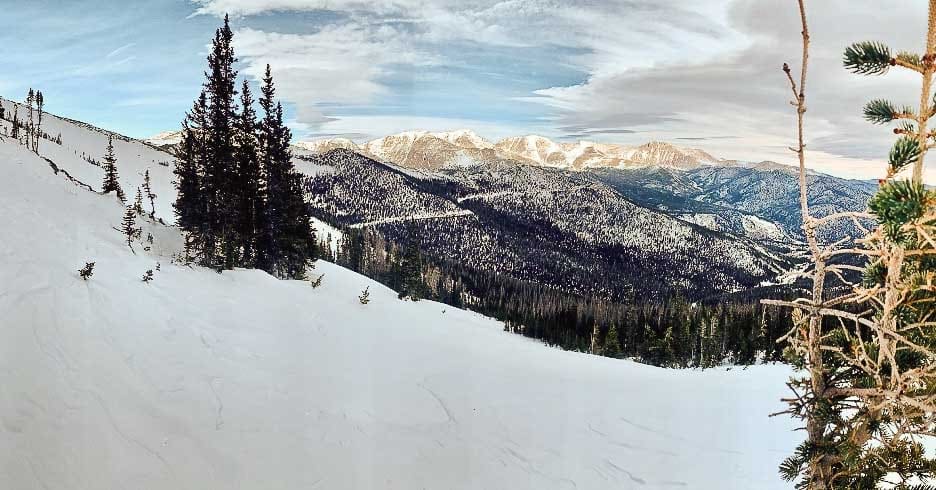
The Never Summers are a gnarly, rugged, and altogether overlooked portion of the park.
There are several reasons for their illusive nature: one is the remote nature of the range, and another is the Grand Ditch. In the 1920s, a huge ditch was built (with an accompanying road) that caught snowmelt from the range and transported it north to the Cache la Poudre River watershed. This was done before the national park was created, so its existence and management have been grandfathered in.
Some might not be interested in hiking along a long dirt road, which connects a lot of the campsites and points of interest on the eastern side of the range. Conversely, the ease of access is pretty sweet for both backcountry skiing and longer-range adventures like scrambling Lead Mountain or backpacking.
Perhaps their biggest flaw is their lack of height. The tallest Never Summer Peaks don’t reach 13,000 ft. The tallest peak in the park, Longs Peak, is 14,259 ft. tall.
However, if you value hidden gems, rugged ridges, and solitude, this is the trip for you. The range exudes big mountain energy with alpine scenery and a smattering of gorgeous lakes. True to its name, snow lingers here longer than many higher portions of the park. Expect large snow patches on the taller ridges through early July.
Planning Tips
- Horses are allowed up to Thunder Pass
- Reserve 2 nights at Box Canyon, 1 night at Dutch Town, OR Hitchens Gulch
Lake of the Clouds, Never Summer Mountains. Photo by: Timo Holmquist
Day 1: Colorado River Trailhead to Box Canyon Campground
- Distance: 6.14 miles
- Elevation Gain/Loss: +1785 ft. (-345 ft.)
- Markers: Lulu City, a bridge across the Colorado River, significant ascent to the Grand Ditch road, ascent to camp
- Highlights: This day is a bit subdued, but it cues up a fantastic day 2. You’ll start at the Colorado River Trailhead and head north, enjoying views of the tranquil valley. You’ll cross the river near Lulu City, where the slowly fading ruins of an old logging town remain. The biggest ascent comes in two parts. First, you’ll ascend on the thunder Pass Trail until the trail dead ends. Then, take a right to get to the Grand Ditch. Once on the Ditch road, take a left and look for signs for Thunder Pass and a small bridge that crosses the ditch. From there, ascend to your backcountry campsite in Box Canyon. You’ll spend two nights here.
Day 2: Day trip from Box Canyon to Snow Lake & Thunder Pass
- Distance: ~5 miles
- Elevation Gain/Loss: +/-1500 ft.
- Markers: Camp, Thunder Pass, trail junction with American Lakes Trail, Snow Lake
- Highlights: This is a great day. From camp, travel north, gaining elevation to Thunder Pass, where you’ll be given fantastic long-range views of the Northern Colorado mountains. For a little extra effort, you can head to the high point just south of the pass for even better views. Thunder Pass is on the border of the National Park, so you’ll cross into Colorado State Forest state park by continuing north. This leads to a stunning alpine basin with multiple bodies of water and fields where you can spot elk or moose. Keep a lot of distance between you and any wildlife. Take a left on the American Lake Basin Trail when your trail dead-ends and work your way up a final rise to the surprisingly large Snow Lake, tucked under the intimidating walls of Static peak. Return the way you came.
Day 3: Box Canyon Hitchens Gulch
- Distance: 4.3 miles
- Elevation Gain/Loss: +620 ft. (-375 ft.)
- Markers: Descent to Grand Ditch Road, junction with HItchen Gulch Trail, Camp
- Highlights: After the views of yesterday, this day will seem much more subdued. In reality, it’s a positioning day. You’ll pack camp, hit the Grand Ditch, hike it for a couple of miles, and find the trail to Hitchen gulch. It’ll be to your right and starts with a narrow bridge crossing the Grand Ditch, similar to the Thunder Pass Trail. Once on the trail, make your way higher before reaching the campsite, which is below treeline. The campsite is nice and sheltered. If you have a ton of energy and daylight left over, you can launch into the day trip listed below. For the rest, take a load off, stretch, and enjoy a quiet afternoon at camp.
Day 3 (or 4): Lake of the Clouds
- Distance: ~1.75 miles
- Elevation Gain/Loss: +/- 800 ft.
- Markers: Alpine, off-trail talus fields, waterfall, alpine lake
- Highlights: Like Day 2, this day trip is big on views and options. First, proceed on the Hitchens Gulch Trail until it disappears right at treeline. In front of you will be a talus-strewn moraine. You can either climb it or skirt to the left and find Big Dutch Creek. For a detailed approach, visit our article on Lake of the Clouds. This is off-trail navigation but largely straightforward. The lake is beautiful, and once you come up to it, the flat rocks and interspersed grassy tufts to your left (east) make for a fine picnic spot. Inspired mountaineers can continue up to the pass between Mt. Cirrus and Howard, but it’s steep, loose, and have snow on it through early July. The Never Summers are beautiful, but the rock quality in this part of the range is pretty crumbly, be very careful and wear a helmet if you go past Lake of the Clouds. Retrace your steps to get back to camp.
Day 4 (or 5): Hitchens Gulch back to Colorado River Trailhead
- Distance: 5.65 miles
- Elevation Gain/Loss: +265 ft. (-1,950 ft.)
- Markers: Grand Ditch Road, junction with Red Mountain Trail, bridge over the Colorado River, Colorado River Trailhead
- Highlights: This is a longer day, but mostly flat and downhill. You’ll break camp and descend back to the Ditch Road. From there, take a right (south) and walk the road for about 1.75 miles. The Red Mountain Trail will appear to the left of the road and has a trail sign. You’ll take this meandering trail down for the next few miles as you lose elevation amongst thick forests and stream crossings. At the bottom, you’ll emerge back at the Colorado River. Cross on a sturdy bridge, and the rail dead ends into the Colorado River Trail. Take a right and follow it for less than half a mile to the trailhead and your car.
Conclusion
Rocky Mountain National Park is a playground waiting to be explored. Be safe, practice leave no trace principles, and always let others know your backpacking plans.
Popular Articles:
Thunder Lake and the Wild Basin Waterfalls, Rocky Mountain National Park, Colorado
Hiking The Mummy Range Peaks, Rocky Mountain National Park, Colorado
Hiking To Lake Verna via the East Inlet Trail, Rocky Mountain National Park, Colorado
Scrambling To The Lake Of The Clouds, Rocky Mountain National Park, Colorado
Hiking To Black Lake Via The Glacier Gorge Trail, Rocky Mountain National Park
Best Hikes Within An Hour Of Boulder, Colorado
Best Lake Hikes In Rocky Mountain National Park
Grand Lake Is An Off-The-Beaten-Path Mountain Adventure Town
Terms of Use:
As with each guide published on SKYBLUEOVERLAND.com, should you choose to this route, do so at your own risk. Prior to setting out check current local weather, conditions, and land/road closures. While taking a trail, obey all public and private land use restrictions and rules, carry proper safety and navigational equipment, and of course, follow the #leavenotrace guidelines. The information found herein is simply a planning resource to be used as a point of inspiration in conjunction with your own due-diligence. In spite of the fact that this route, associated GPS track (GPX and maps), and all route guidelines were prepared under diligent research by the specified contributor and/or contributors, the accuracy of such and judgement of the author is not guaranteed. SKYBLUE OVERLAND LLC, its partners, associates, and contributors are in no way liable for personal injury, damage to personal property, or any other such situation that might happen to individuals following this route.


