


High Point:
10,686 feet

Total Ascent:
~2,300 feet

Difficulty:
Hard

Distance:
12.3 miles

Waypoints:
40.20845, -105.56672

Route Type:
Out and Back with Loop extension to waterfalls
Thunder Lake lies 6.6 miles from the Wild Basin Trailhead in Rocky Mountain National Park. It’s a moderate hike with stops at Copeland Falls, Calypso Cascades and Ouzel Falls, and offers excellent fishing and plenty of backcountry campsites.
Overview:
Wild Basin is one of the largest protected mountain basins on the eastern side of Rocky Mountain National Park and is, perhaps unsurprisingly, wild. There is only one road that gets into Wild Basin, and even then, it only goes two miles. The rest of the nearly 21,000-acre basin is networked with trails, but many ridges, alpine cirques, and lakes are only accessible via substantial cross-country travel.
Wild Basin is also blessed with numerous waterfalls and cascades that add to the natural allure of the area. Combining a trip to Thunder Lake with Copeland Falls, Calypso Cascade, and Ouzel Falls makes for an excellent and well-rounded, albeit long, adventure into Wild Basin.
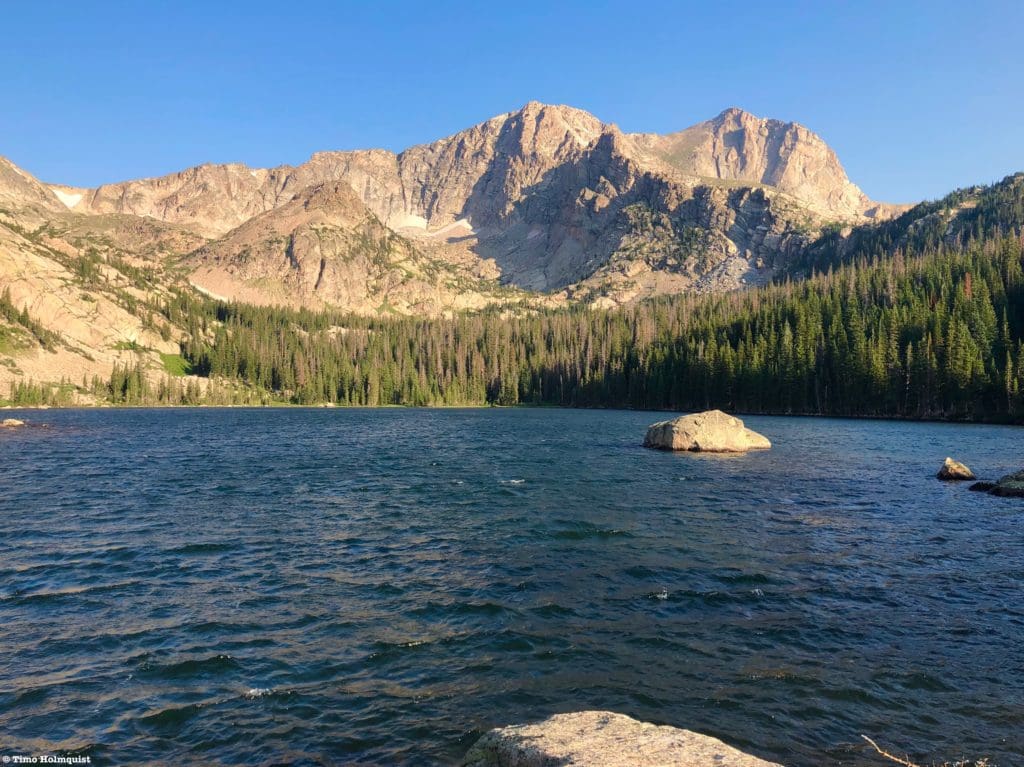
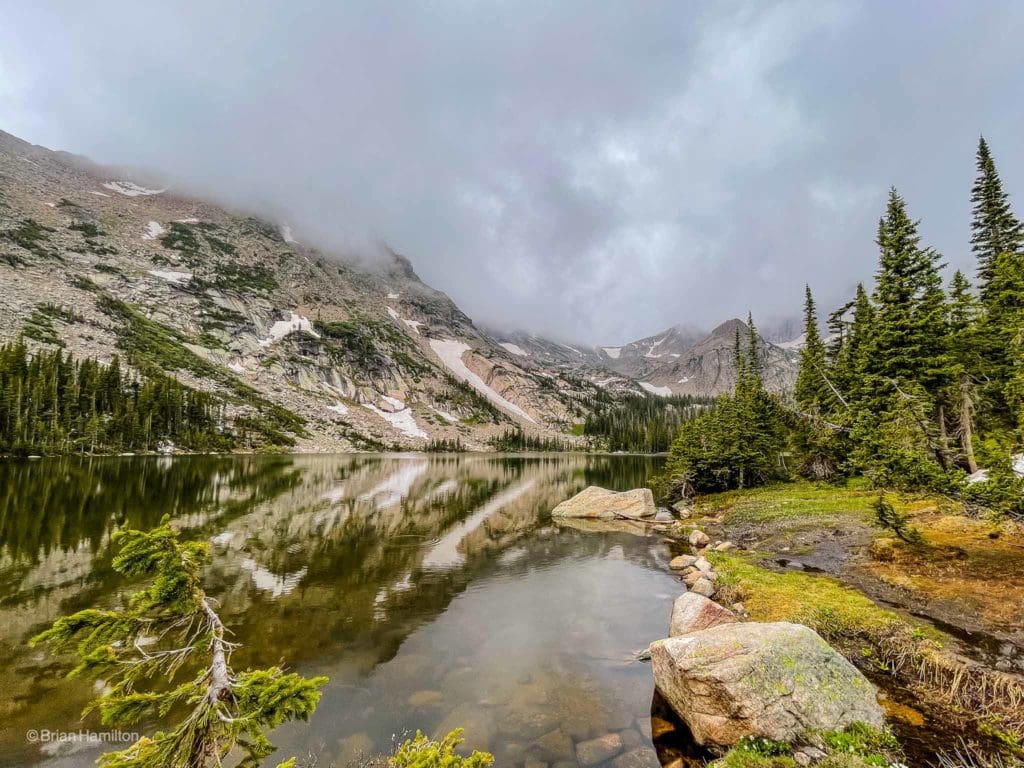
The beautiful Thunder Lake with towering Mt. Alice behind it on a clear July day.
Table of Contents:
Article Navigation: Click on any of the listed items in the table of contents below to jump to that section of the article. Similarly, clicking on any large, white section header will jump you back to the Table of Contents.
The Ultimate Offline GPS Hiking & Ski Maps
See why onX Backcountry is the ultimate GPS navigation app for your outdoor pursuits. Try Today for Free. No credit card required.
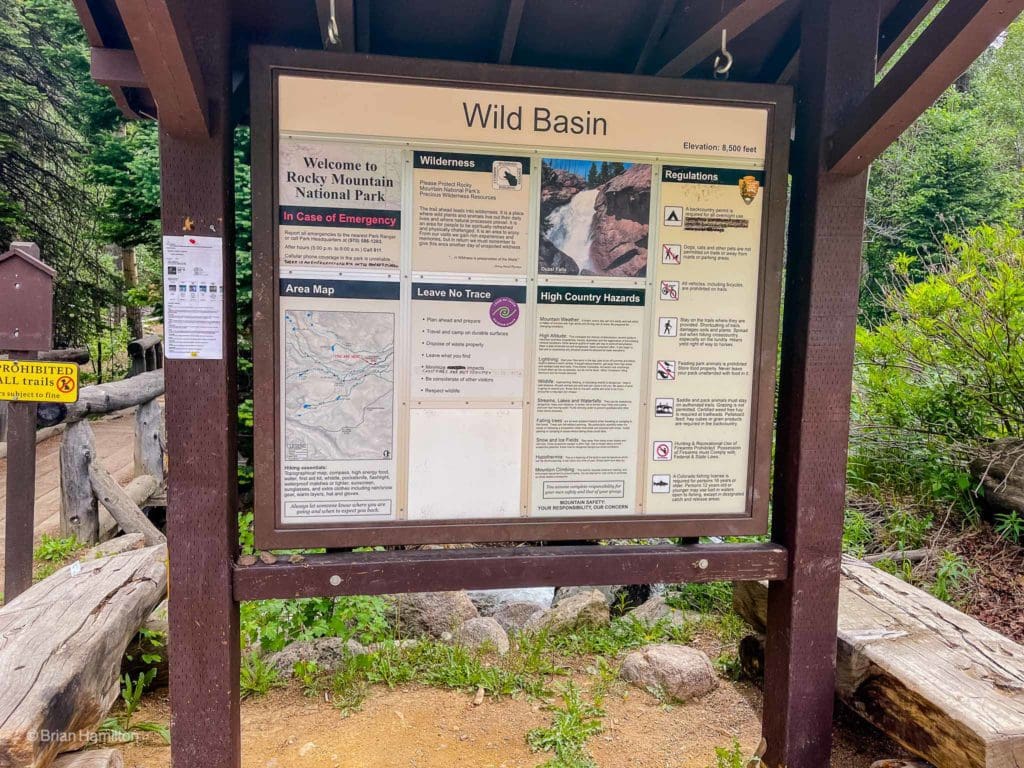
Directions to Trailhead:
This hike takes off from the main Wild Basin trailhead. It is located off of US 7, just north of Allenspark. Find US 7 and approach from either the north (Estes area) or the south (Allenspark, Lyons, Boulder, Nederland, etc.). If approaching from the south, make your way through Allenspark and look for a large brown sign for Wild Basin; there is a small left turn lane in the middle of the road. Once you see the sign, slow down, the turn is abrupt. You’ll make a hard left onto a small road and proceed past some houses and the Wild Basin Lodge. The National Park gate is located on the right side of the road and is visible when you approach.
From the north, there will be a large Wild Basin sign on your right after you pass the Meeker Park Overflow Campground. While the sign is large, there is only one, so when you see it, slow down. It’ll be a right-hand turn onto a small road. Proceed until seeing the National Park gate on your right. Approach the gate and drive through to enter into Wild Basin.
Regardless of how you get to the Park gate, you’ll want to drive the dirt road into Wild Basin for its entire length until coming to a parking lot. Make sure to follow the one-way road signs and park where able. The trail takes off from the lower loop portion.
The trail near Ouzel Falls.
Places to Stay:
Camping near Rocky Mountain National Park will cost you. The options for free area camping are limited. On a positive note, there are plenty of options, and the National Park is within driving distance of Fort Collins, Boulder, and Denver.
- Estes Park: Known as the gateway to Rocky Mountain National Park, Estes sees nearly 80% of park traffic as opposed to the much quieter western entrance near Grand Lake. The town has a ton of lodging options.
- Allenspark: A small town near Wild Basin that has a few lodging options, including the Wild Basin Lodgeand the Sunshine Mountain Lodge and Cabins.
- Rocky Mountain National Park Camping
- Moraine Park Campground: $30 per site. $20 in winter. Established campground with perks, facilities, campfire grate, wood for sale in summer, and bear boxes to store food. Only loop B is open in the winter, and it’s first-come, first-serve.
- For summer, a reservation is needed quite a ways in advance to secure a spot.
- Glacier Basin Campground: $30 per site. Established campground with the same perks as Moraine Park. Reservation required.
- Backcountry Campsites: Rocky Mountain National Park has backcountry sites that you could book in advance. There is no open camping in the backcountry; it must be at designated backcountry sites. Please check the park website for more details. Backcountry sites require an overnight permit of $30.
- Camping near Estes Park
- Estes Park Campground at Mary’s Lake: Established campground, pricey $45-55. Good backup if other campgrounds are full.
- Hermit Park Open Space: $30 for a tent site, price increases if towing a trailer or for group spots.
- Estes Park Koa: Rates dependent on what you’re bringing with you but will run more than $50 a night in the busy season.
- Olive Ridge Campground in Roosevelt National Forest is the closest campground to the Lookout Mt. trail. ~$20 for a standard nonelectric site.
- Free or close to free: but a little farther (if you’re willing to drive)
- Ceran St. Vrain Trail Dispersed Camping ($1)
- County Road 47. Users have reported trash and ATV noise at this location, but it is free.
- Meeker Park Overflow Campground
Overlooking the eastern part of the basin, Meadow Mountain is in the top right corner.
Field Notes:
Wild Basin trails are well known for their long approaches, in many cases, preventing day hikers from committing to longer adventures. To those seeking some form of solitude, the shores around Thunder lake can provide that. The waterfall features (Copeland, Calypso, and Ouzel) are probably the most popular destinations in Wild Basin, so expect people on the trail to them.
All features described in this trail review are accessible via well-managed and obvious trails. There is a cutoff option to Thunder Lake that saves roughly a mile of travel, so if you’re hitting all four features, I’d go to Thunder Lake first and hit the waterfalls on your way back. This way, if energy is lacking, you get the farthest destination done first and can then assess your energy on the way back. Ouzel Falls and Mt. Alice, two stellar destinations in Wild Basin, are also included in our review of the best trails in Rocky Mountain National Park. Make sure to check that article out by clicking here.
For your weather needs, start with Allenspark’s extended forecast. The mountain forecast for Mt. Aliceis a good option for the higher portions of Wild Basin. Lake Verna, on the western side of the divide, is near enough to make a good third weather forecasting option. Remember to check the forecast religiously until the minute you leave for the trailhead, mountain weather changes. While Thunder Lake is fairly forested, the shores are open, and the subalpine location means it can be in the crosshairs of some nasty afternoon thunderstorms. Make sure you are watching the skies.
Your top elevation won’t exceed 11,000 feet unless you’re venturing up to Lake of the Winds or Boulder-Grand pass. Regardless, familiarize yourself with the signs and symptoms of altitude sickness. If you are coming from a low-lying area and haven’t had a chance to acclimatize, a splitting headache, lethargy, and nausea tend to dampen the mountain spirit.
The National Park has instituted a time slot system in addition to their normal entrance pass system for the summer of 2021. Do yourself a favor and take the time to understand these components by visiting the Park website. If you do not have an entrance pass or time slot, you will be turned back. The short version is that ALL visitors must have an entrance pass. If you arrive in Wild Basin anywhere between 9 AM and 3 PM, you will also be required to produce a timed entry pass. You will be turned around if you do not have a timed entry pass. IF you have an entrance pass, AND you arrive before 9 AM, you are free to park and enjoy your day (make sure your pass is visible on your windshield), hence the “arrive early” mantra. If you exit the park between 9 AM and 3 PM, you will be required to produce a timed entry slot to reenter, or you’ll have to wait until after 3 PM to reenter.
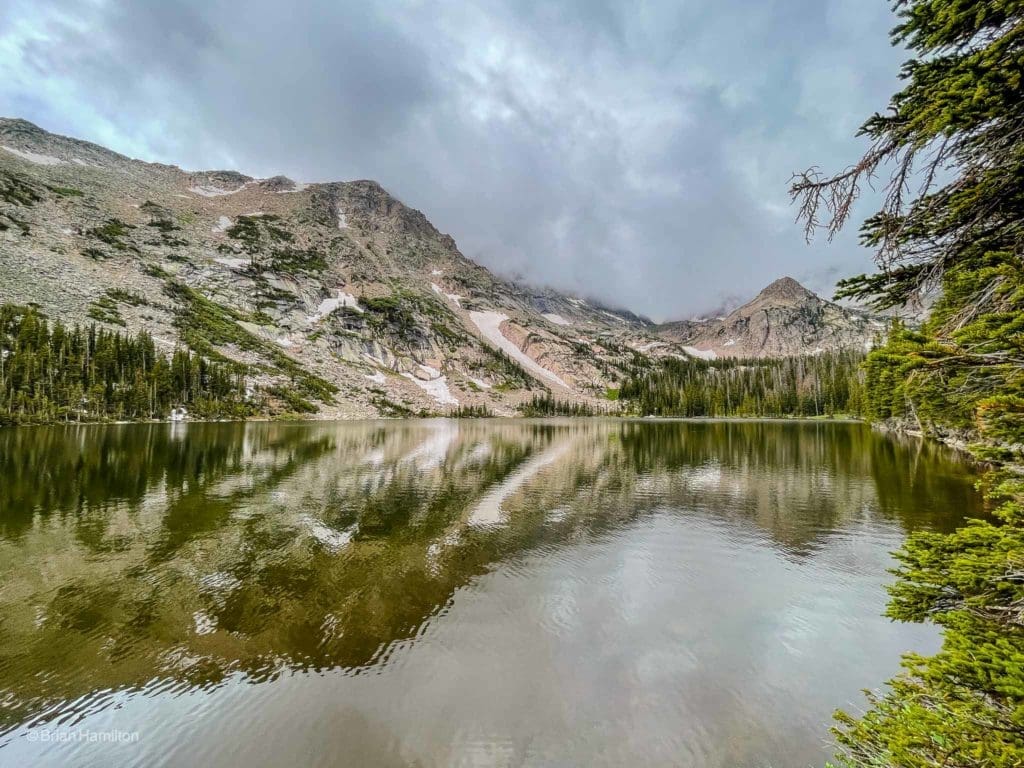
Clouds and contrasts at Thunder Lake.
Journal:
Once you’ve parked, locate the Wild Basin Trailhead sign on the lower portion of the parking lot loop.
The Wild Basin Trailhead sign.
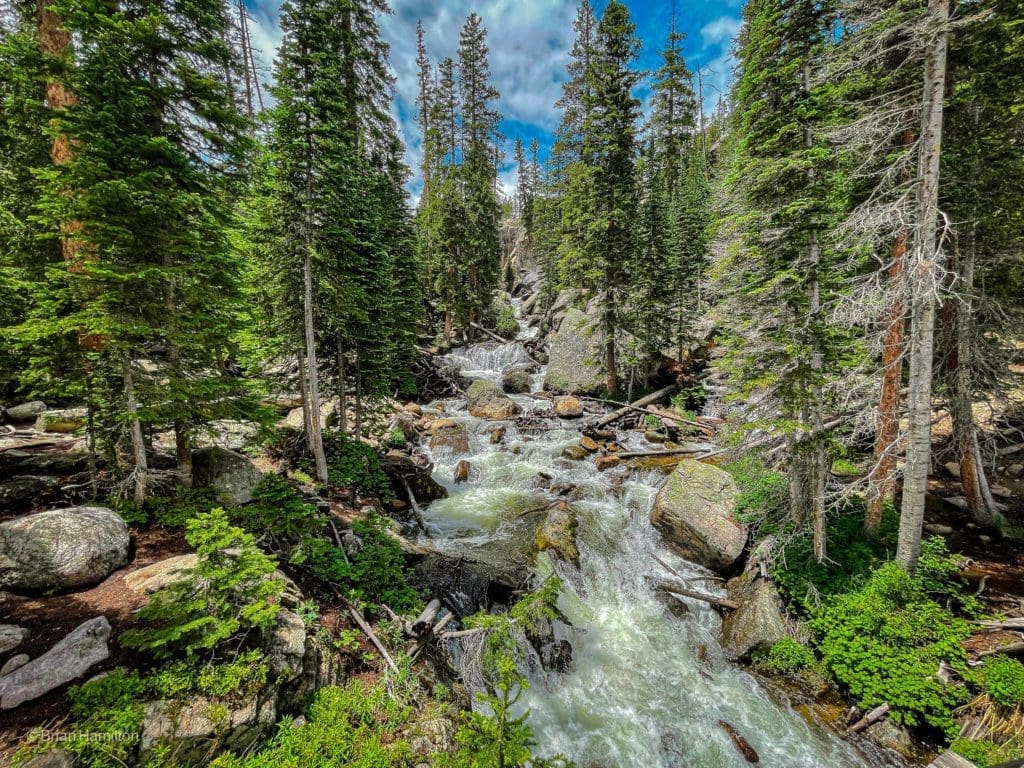
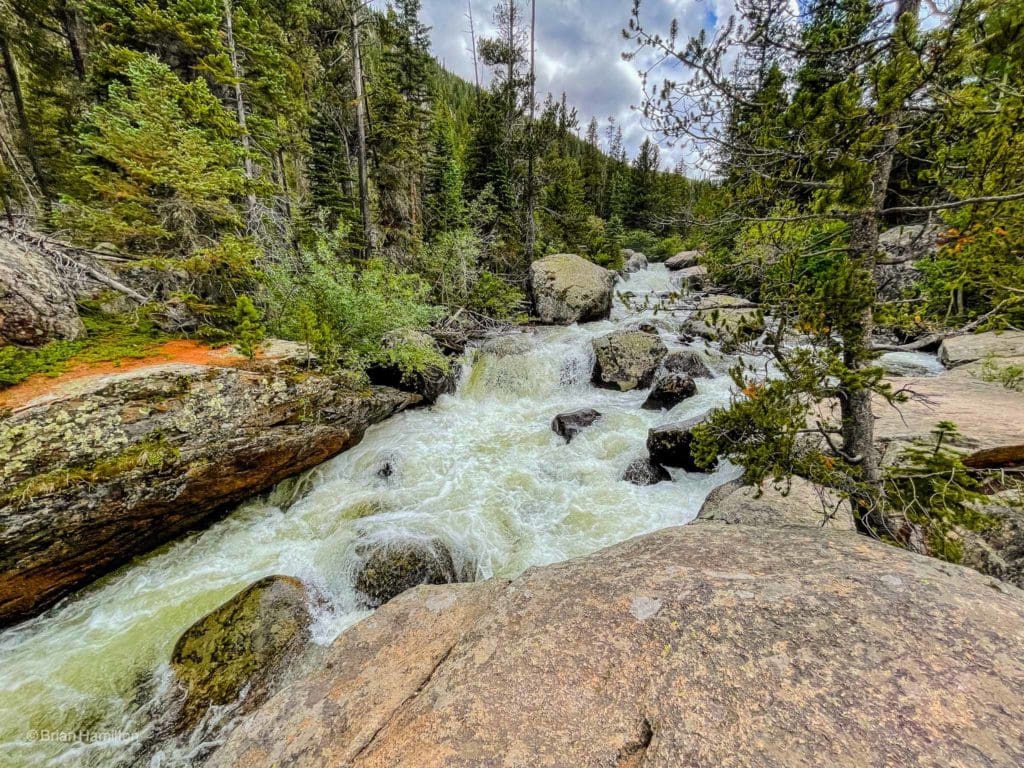
The first mile and a half of the trail is like a highway, broad, smooth, and well-marked. If you’re trying to put some distance behind you, this is the place to stride out. After 0.3 miles, you’ll pass the cutoff for Copeland Falls. The trail will parallel North St. Vrain Creek, which is a thundering mountain river through July and provides an excellent backdrop.
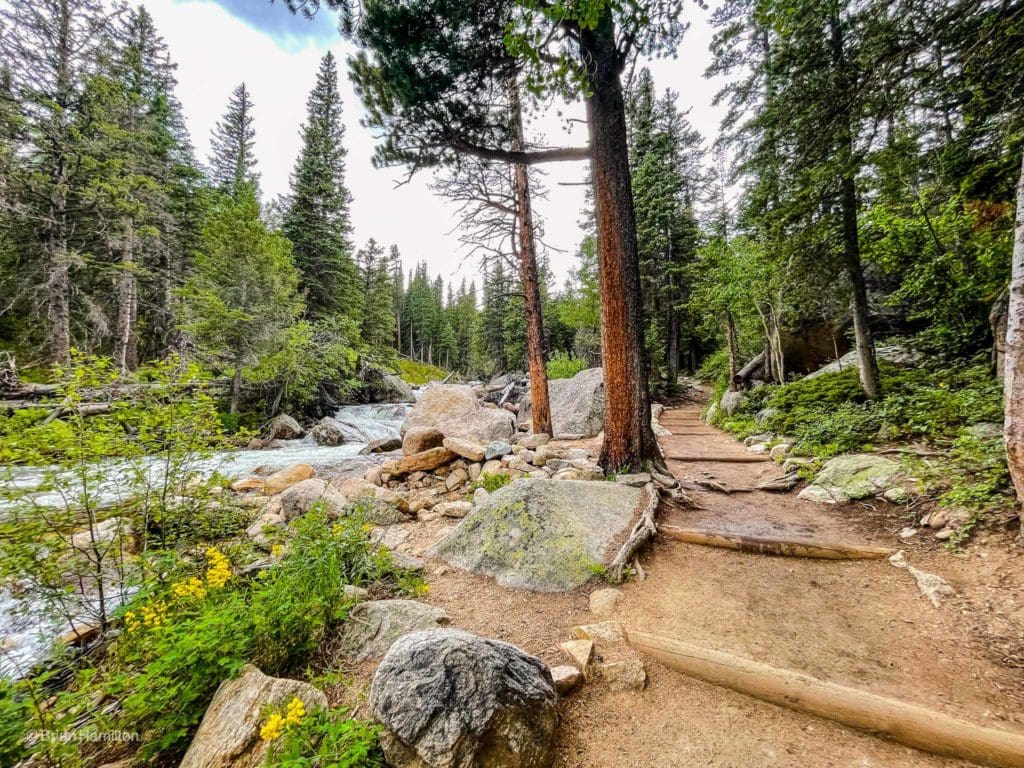
North St. Vrain Creek next to the trail.
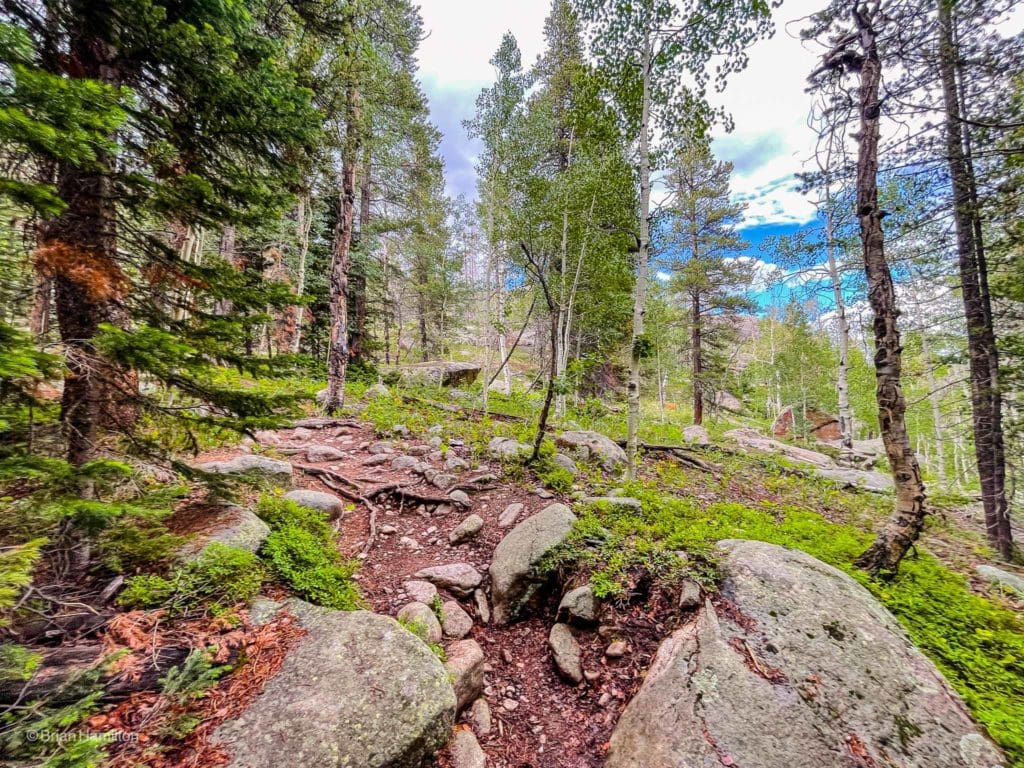
Parts of the trail feature some eye-catching trail work across rocky slabs with the thundering river to your left.
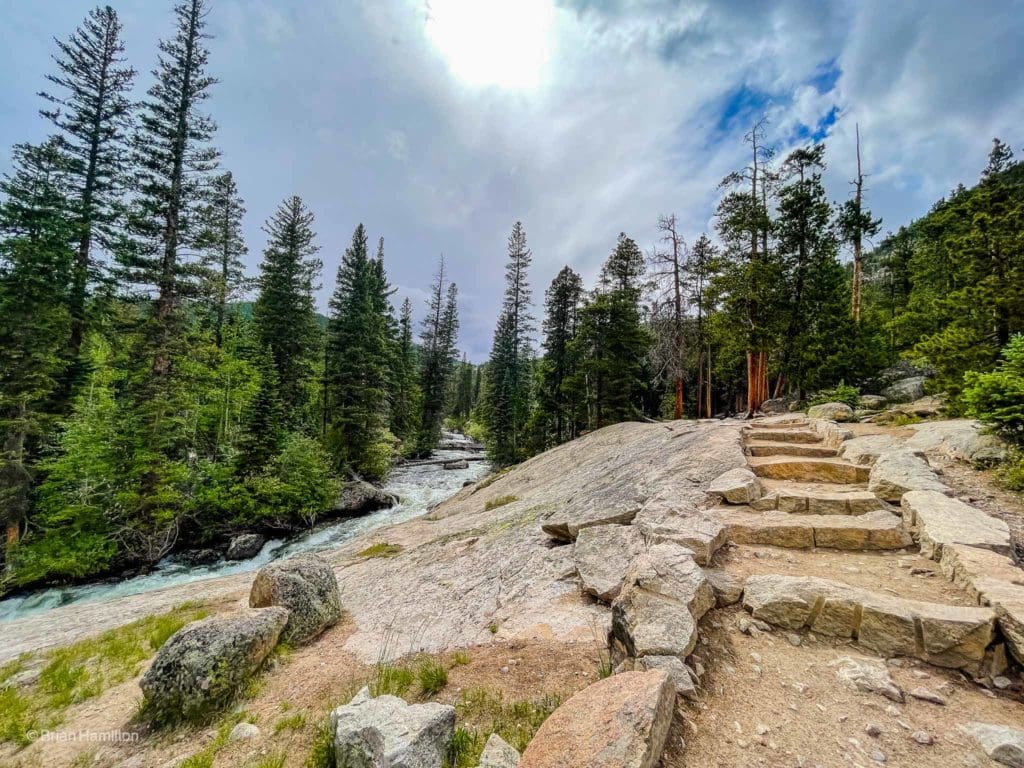
Well-spaced rock stairs on the trail.
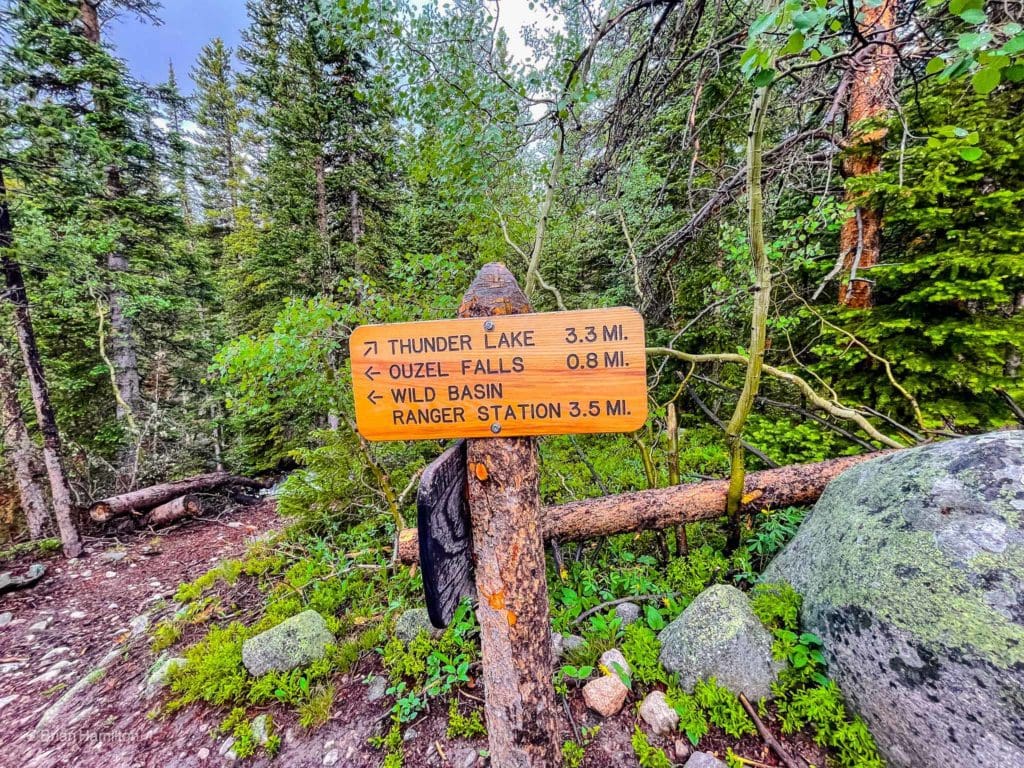
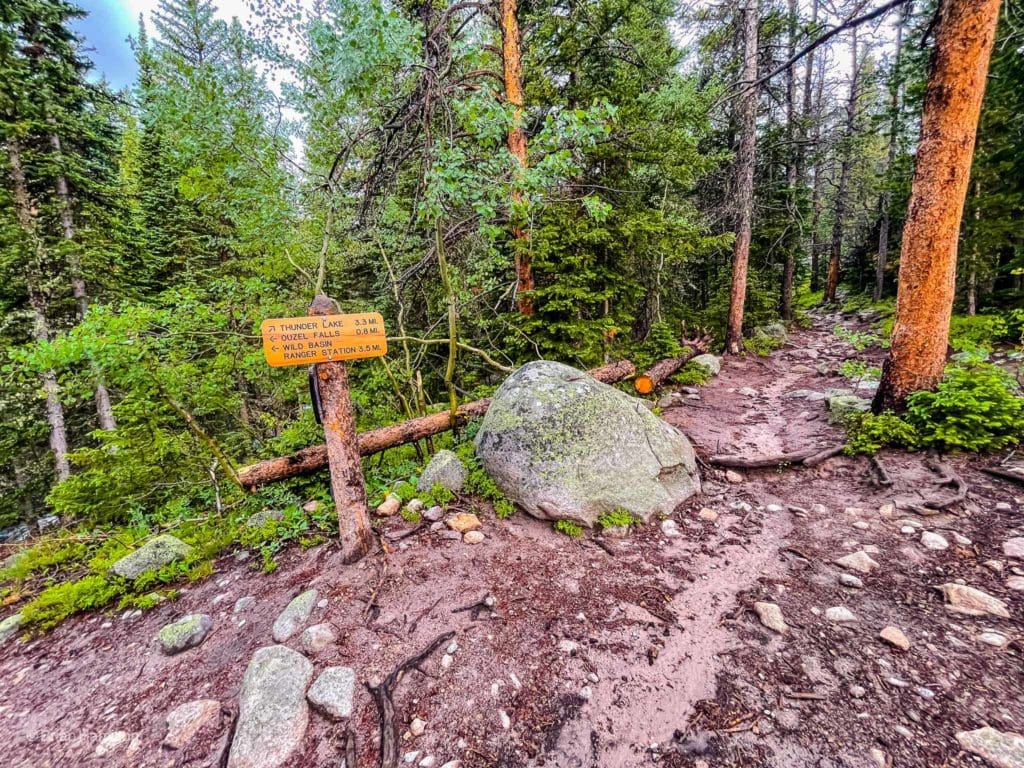
After 1.4 miles, you’ll come across a trail junction. The lower sign says campsites and points to a spur trail heading off to the right. Calypso Cascade and Ouzel Falls are along the main part of the trail as it veers left and crosses North St. Vrain Creek. It takes 6.8 miles to get to Thunder Lake via the waterfalls; you can cut a mile of that distance off by taking the Campsites trail. If Thunder Lake is your first destination, take a right and pass the various campsites on your way higher. If you’re only here for the waterfalls, simply continue on the main trail.
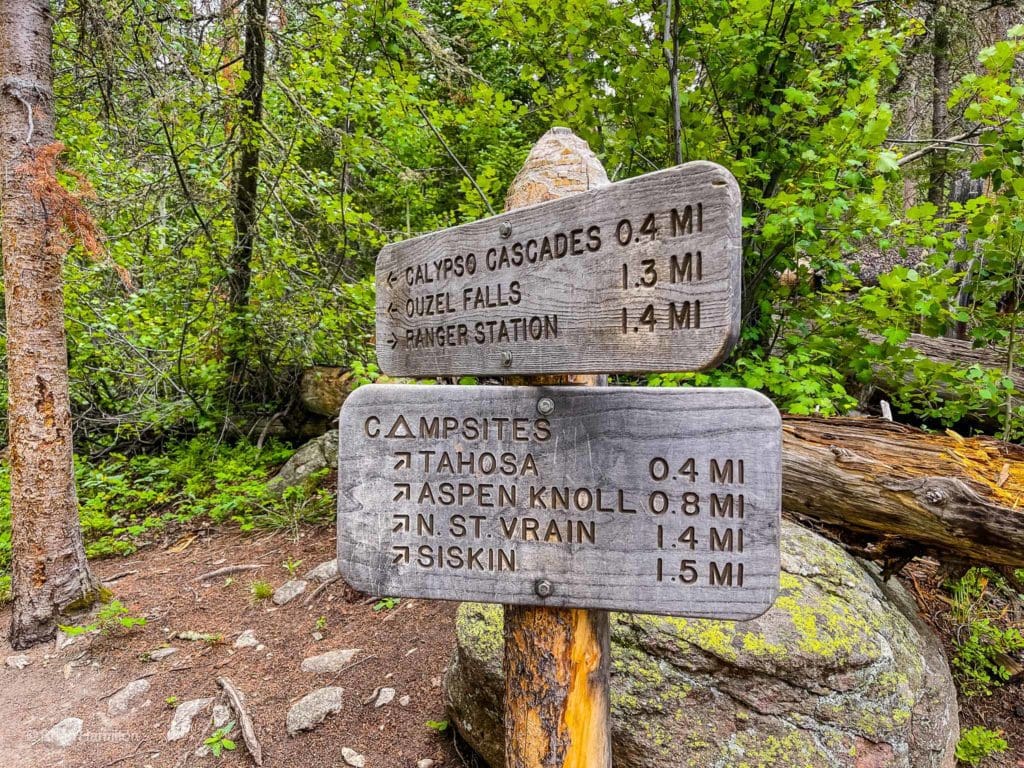
The Campsites spur trail, take a right here.
The Campsites trail is a little rougher and rockier than the main trail but is still easy to follow. You’ll begin to gain elevation along this stretch as the various campsites splinter off.
Typical terrain along the Campsites spur.
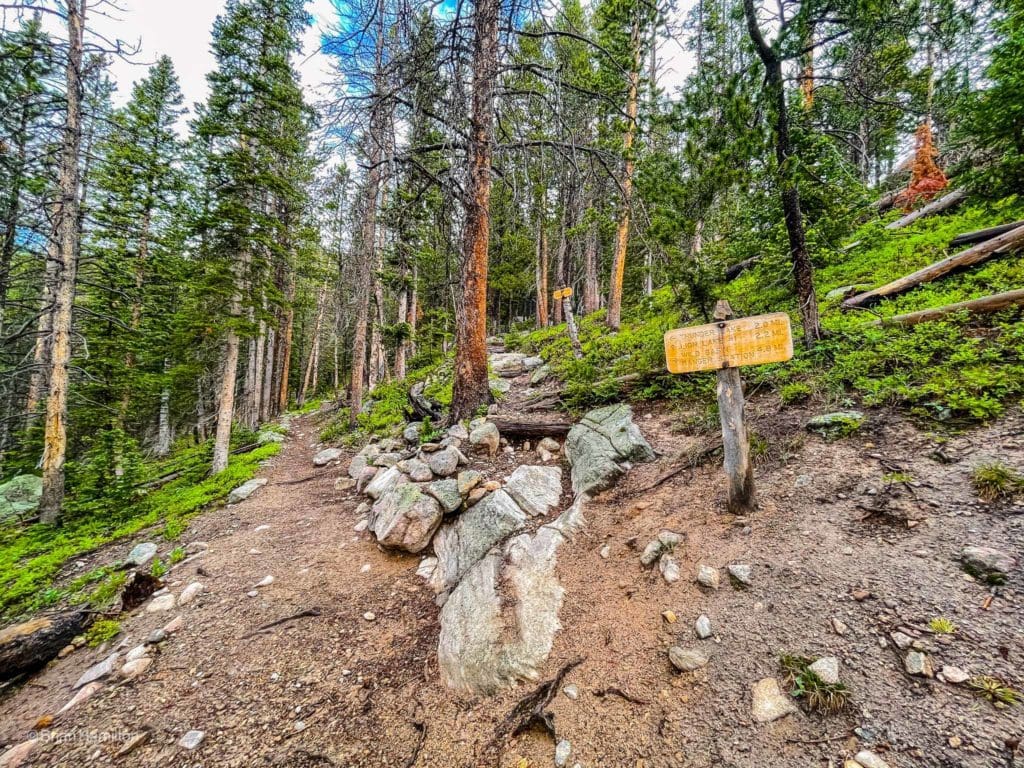
After another 1.3 miles of travel, the main trail will merge back with the Campsites spur.
Trail sign at the trail merger.
You’ll continue to rise along the tree-lined trail, picking up elevation with occasional glances to the mountains around you. A little after four miles of total hiking, you’ll pass your last trail junction with the Lion Lakes Trail. This variation gets to a series of beautiful alpine tarns, the Continental Divide, and provides access to Chiefs Head Peak and Mount Alice via the Hourglass Ridge.
Trail junction with Lion Lakes. Stay left for Thunder Lake.
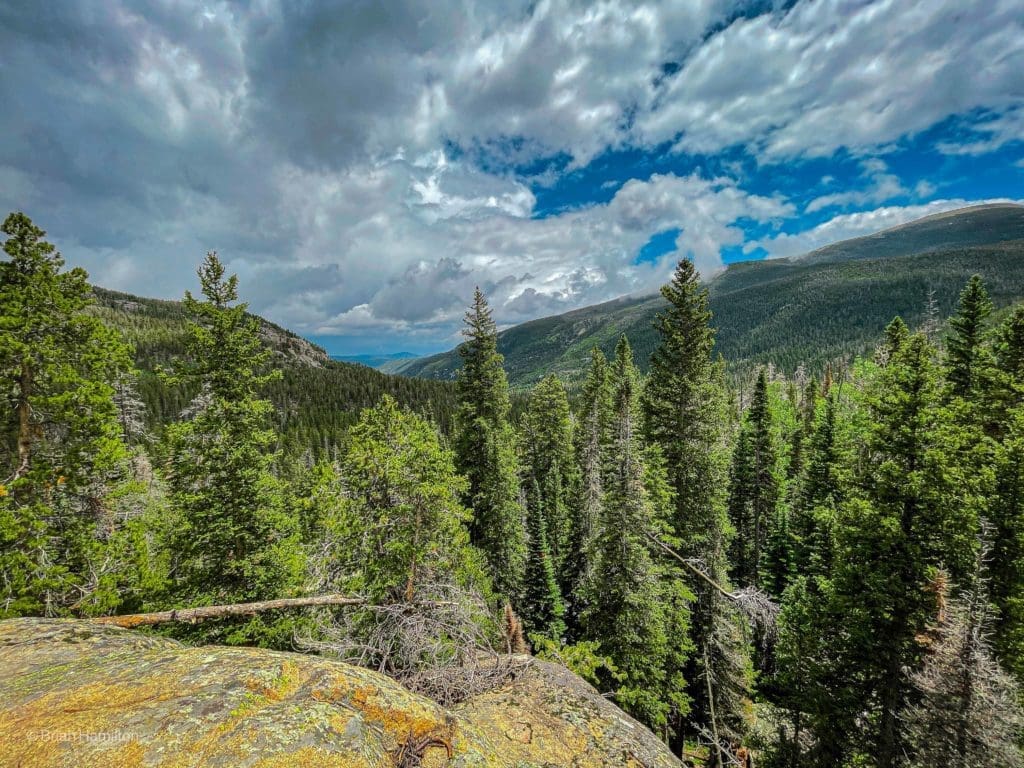
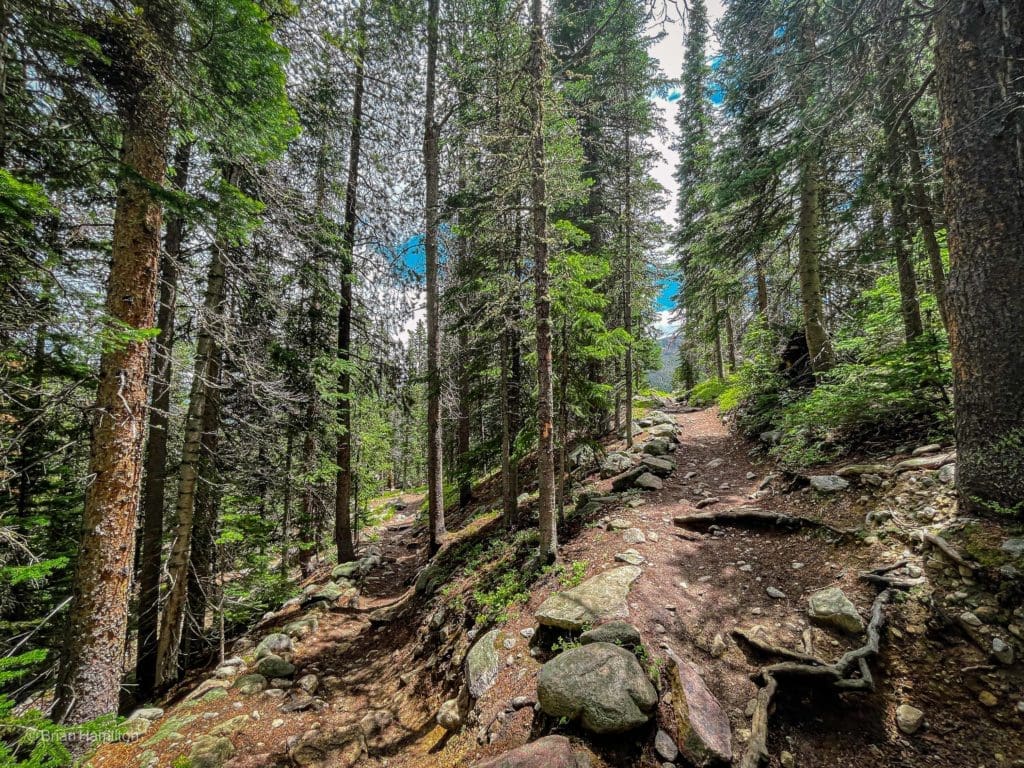
The next section of trail features a more consistent elevation gain and offers occasional glimpses to the high country through thinning forests of pine trees.
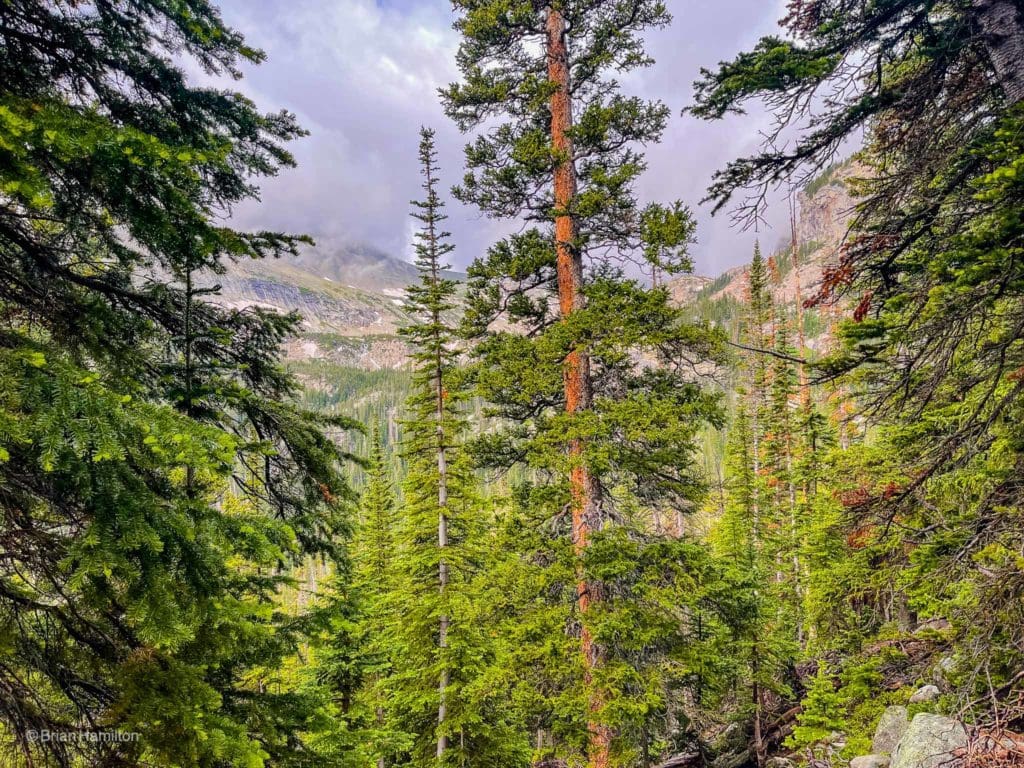
Looking to higher ground.
A recent trail reconstruction project has changed the final layout of the trail. Instead of rising through a series of marshes, the trail now heads to the northeast side of Thunder Lake and reaches its highest point at a campsite sign with a spur trail to a Privy.
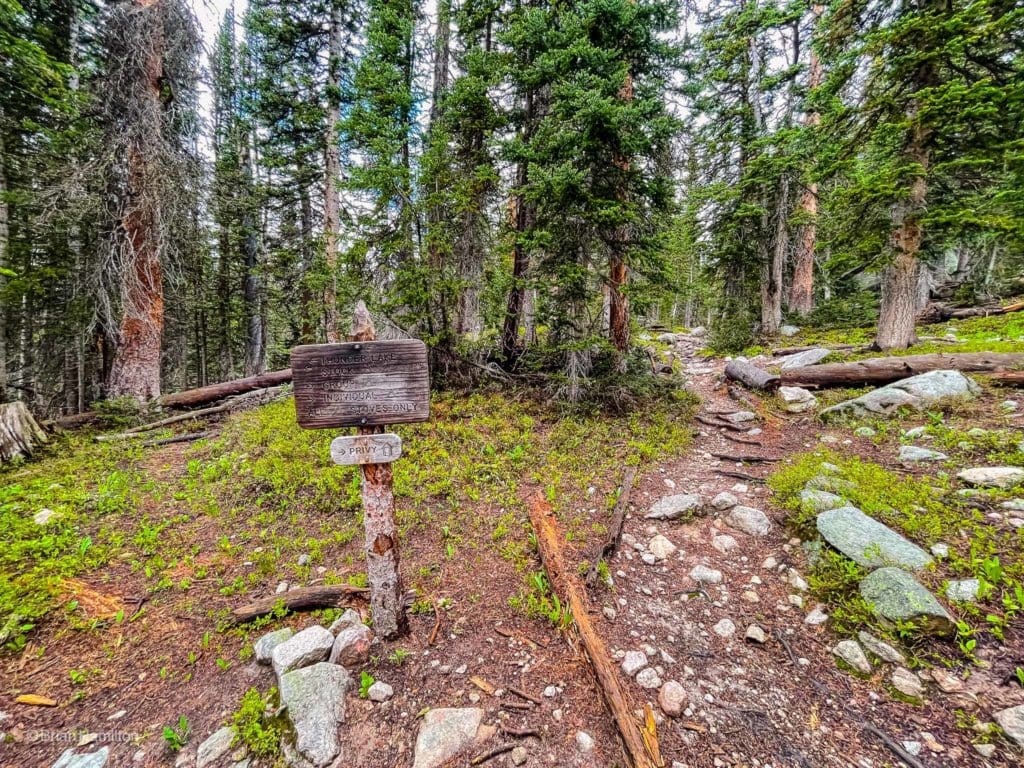
The deceptive highest point of the trail.
From here, if you stay on the main trail, it actually drops a bit in elevation before flattening out and reaching a meadow with an old USFS cabin along its right margin.

The USFS cabin.
Once you see the cabin, you’ll know you’ve made it. Either drop your pack or proceed to the edge of the lake and enjoy the pristine waters and mountainous views.
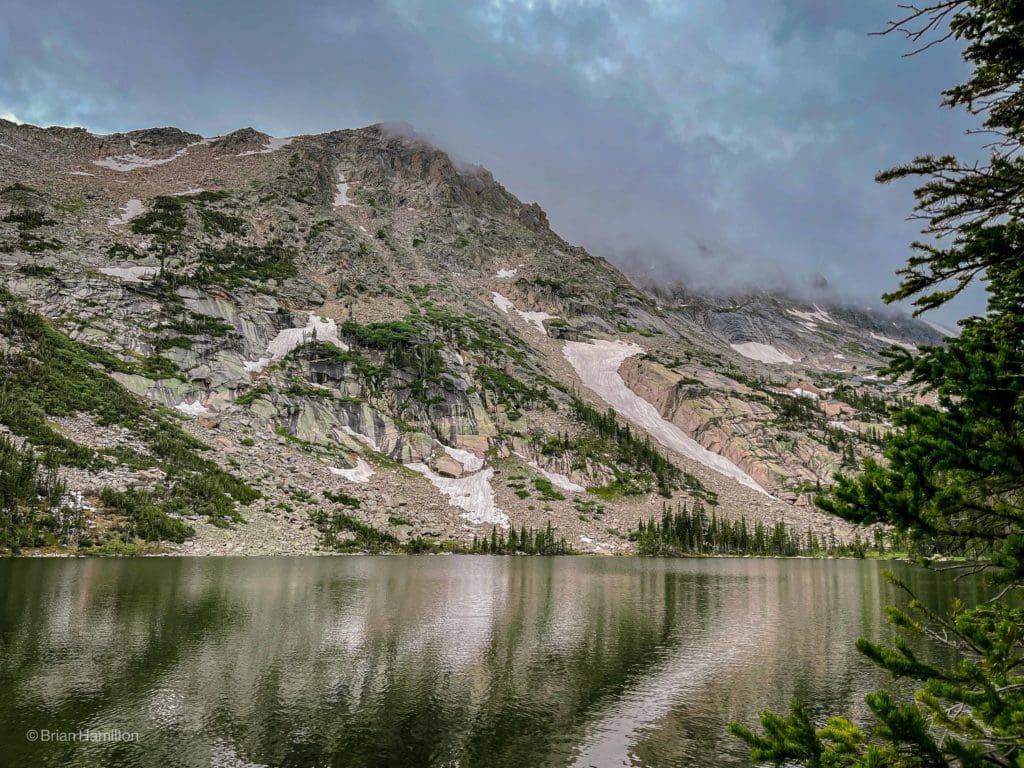
Looking SW across Thunder Lake to the slopes of Tanima Peak.
There are various ways to get fantastic views around Thunder Lake. The easiest is to take a distinct trail that follows the northern shore of the lake. The lake is actually quite large, and each side provides different and interesting perspectives of the high country.
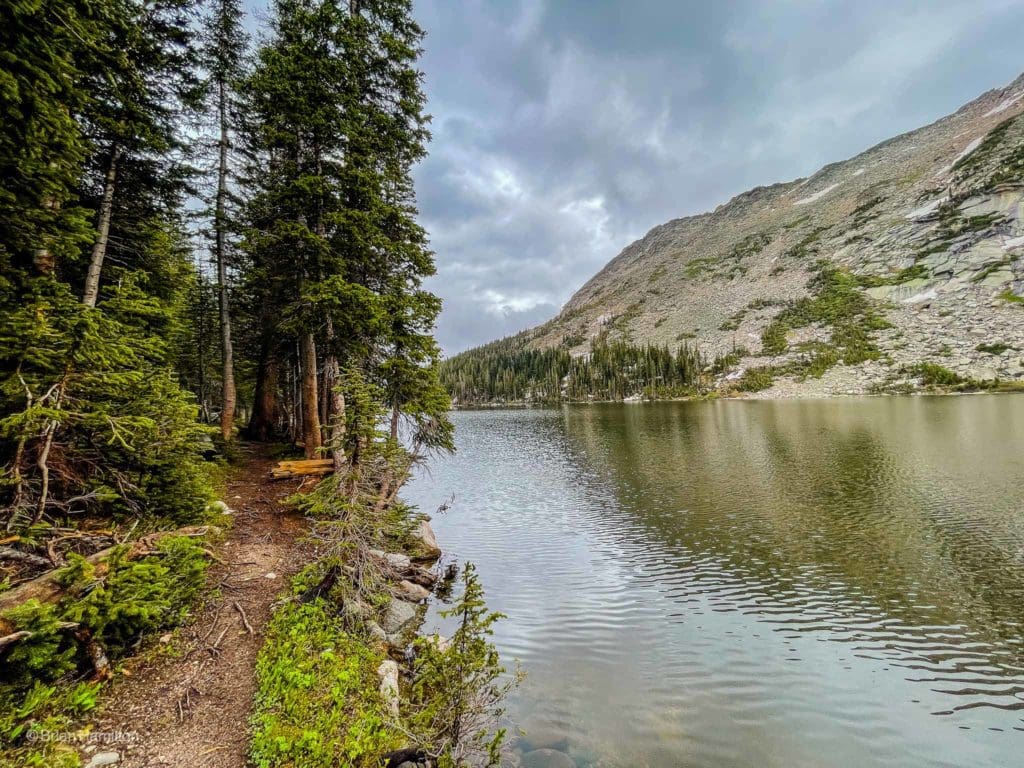
Along the northern shore of Thunder Lake.
The western edge of the lake features bubbling streams and green landscapes.
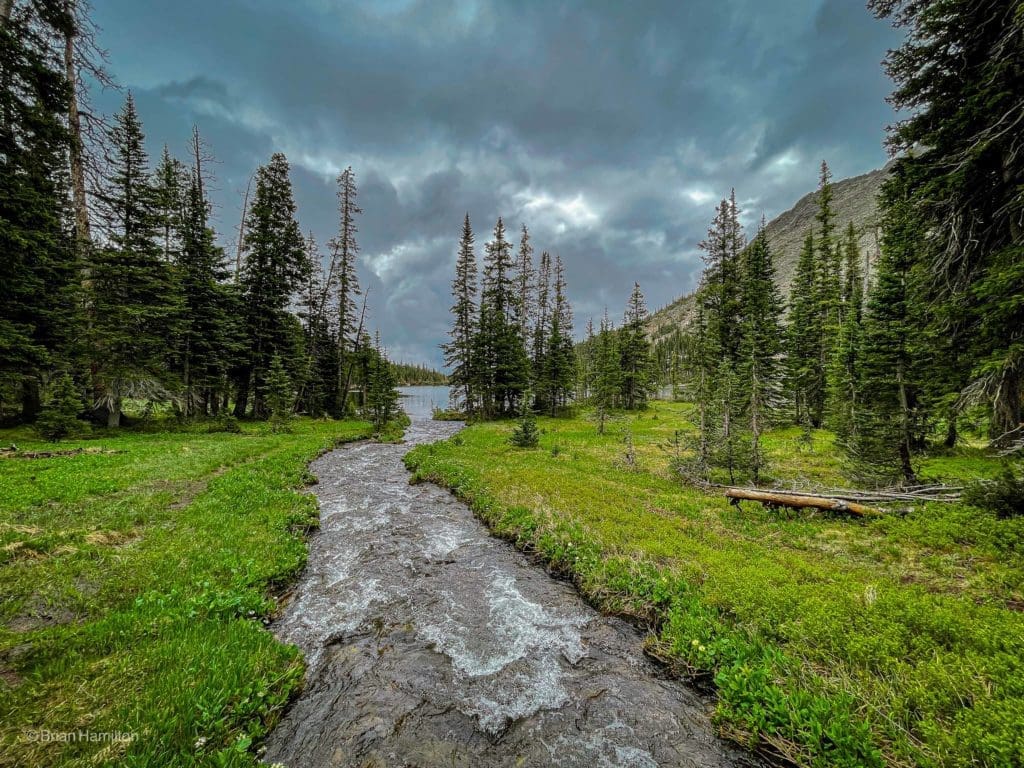
One of two major feeder streams that dump into Thunder Lake. This one originates from snowfields around Falcon Lake
Following the social trails westward will eventually get you up to Lake of Many Winds and the Boulder-Grand Pass. There are also a series of trails that circle the far side of Thunder Lake. With options in all directions, taking some time to explore the stunning vistas here is highly recommended.
Looking west, the compact patch of snow at a low-point in the far ridge and just underneath the clouds is Boulder-Grand Pass.
Once you’ve had your fill of the area, retrace your steps to the eastern side of Thunder Lake and pick up the main trail. Since you’ve now visited the farthest destination, take stock of your energy levels. Two miles down the trail, you’ll run into the familiar split between the Campsites spur and the main trail to the waterfalls. Instead of taking the Campsites spur, take a right on the main trail and head for Ouzel Falls.
Follow the arrows for Ouzel Falls.
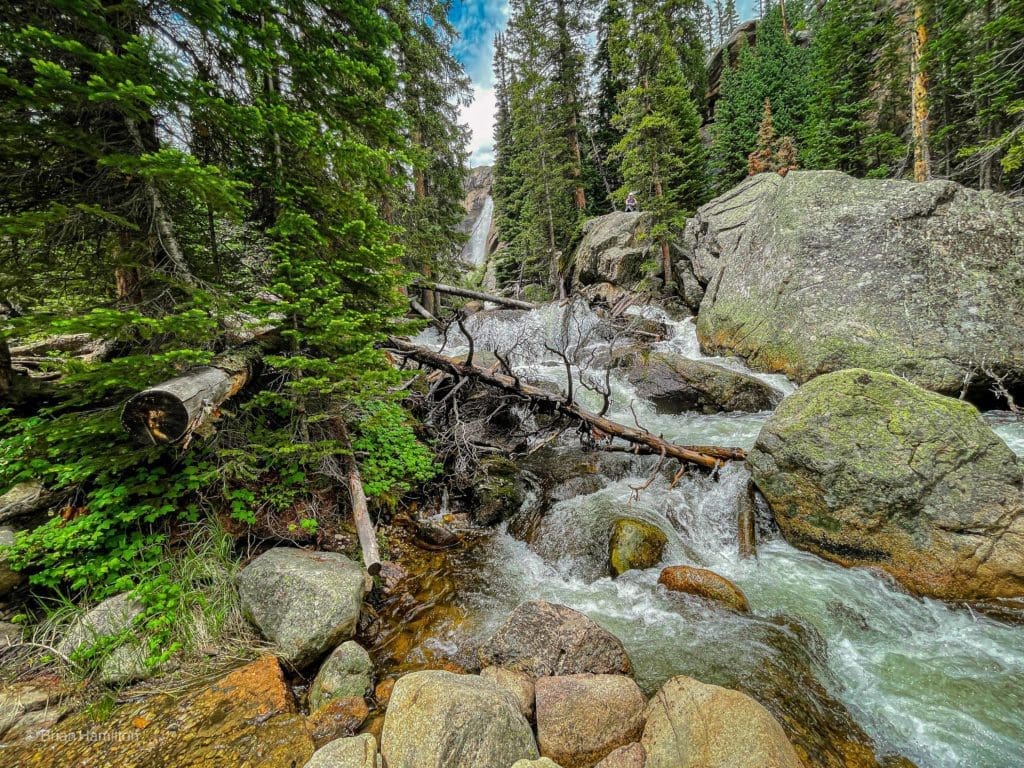
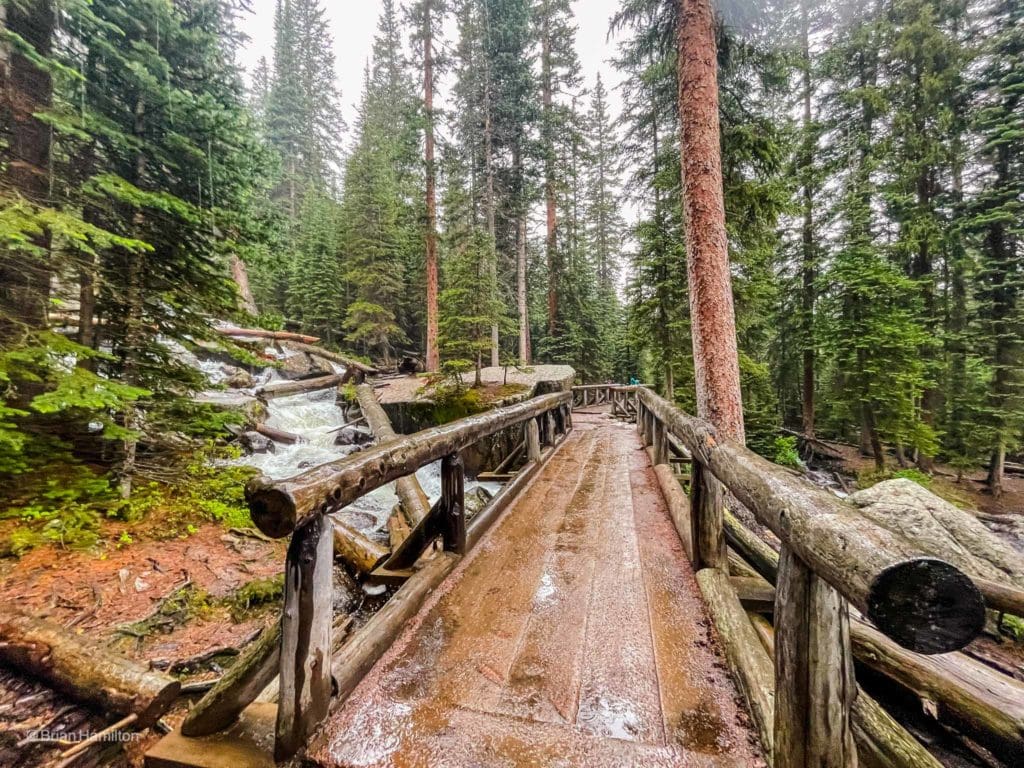
You’ll cross the North St. Vrain Creek to its southern side and pick up a little elevation gain as you thread alongside a series of steep hillsides and gullies.
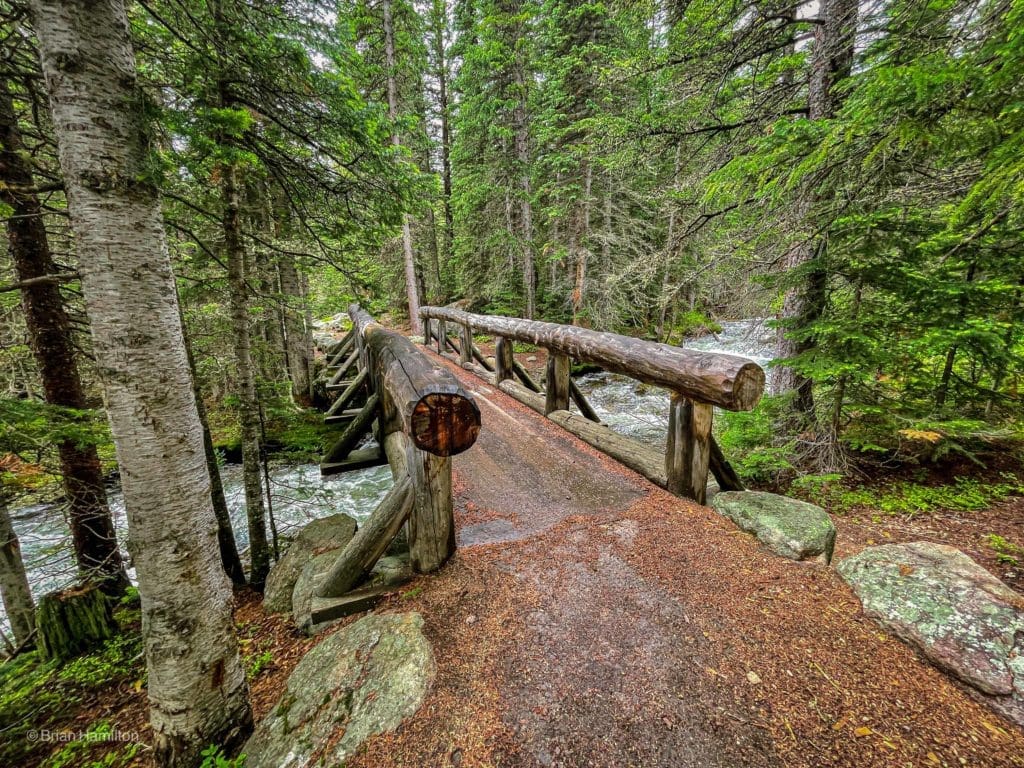
Well-constructed bridge across the creek.
On the other side of the creek, you’ll pass the junction for Bluebird and Ouzel Lakes, worthy destinations in their own right. Continue beyond the junction to get to the falls. The trail in this section does a great job of sticking to the undulating ridges and thread through some rockier sections on its way to Ouzel Falls.
Switchbacks on the way to the falls.
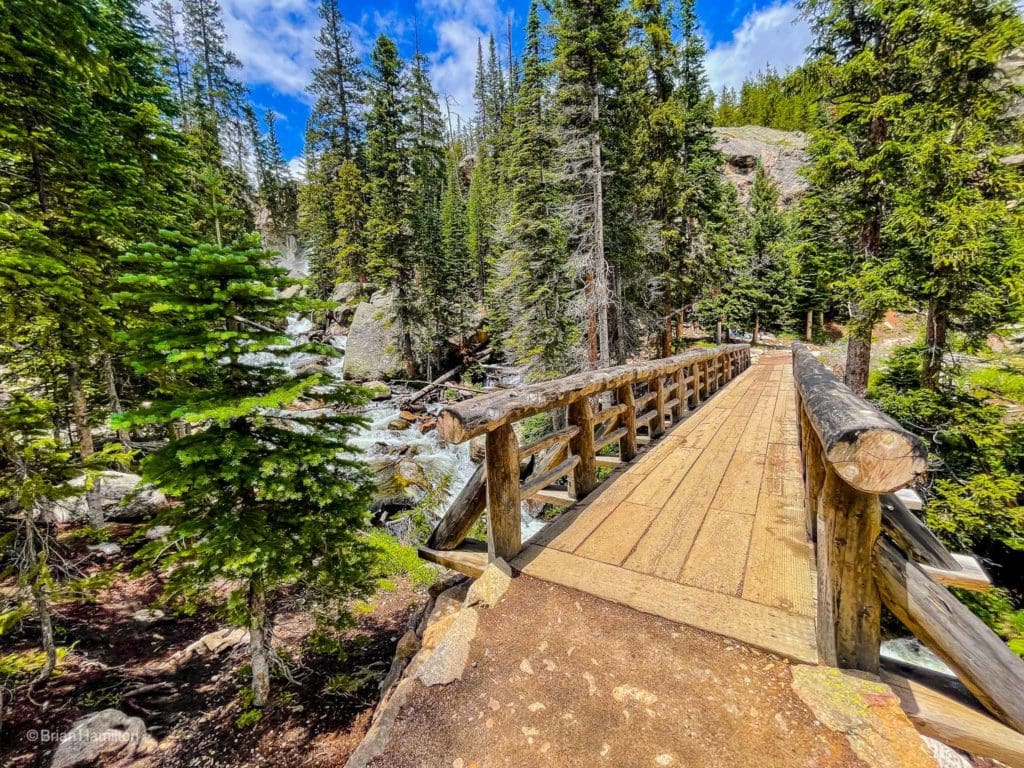
When you get to the falls, you’ll cross another well-constructed bridge with views south along the thumping creek. Ouzel Falls will remain semi-hidden behind the vegetation.
A full Ouzel Creek, fueled by mid-summer snowmelt and rain.
On the other side of the bridge (east), you can pick up some social trails that parallel the creek uphill. You can carefully make your way closer to the main waterfall as long as it’s dry. The chances for slips and trips into the creek increase if the rocks and vegetation are wet. Remember, no picture is worth an injury in the backcountry.
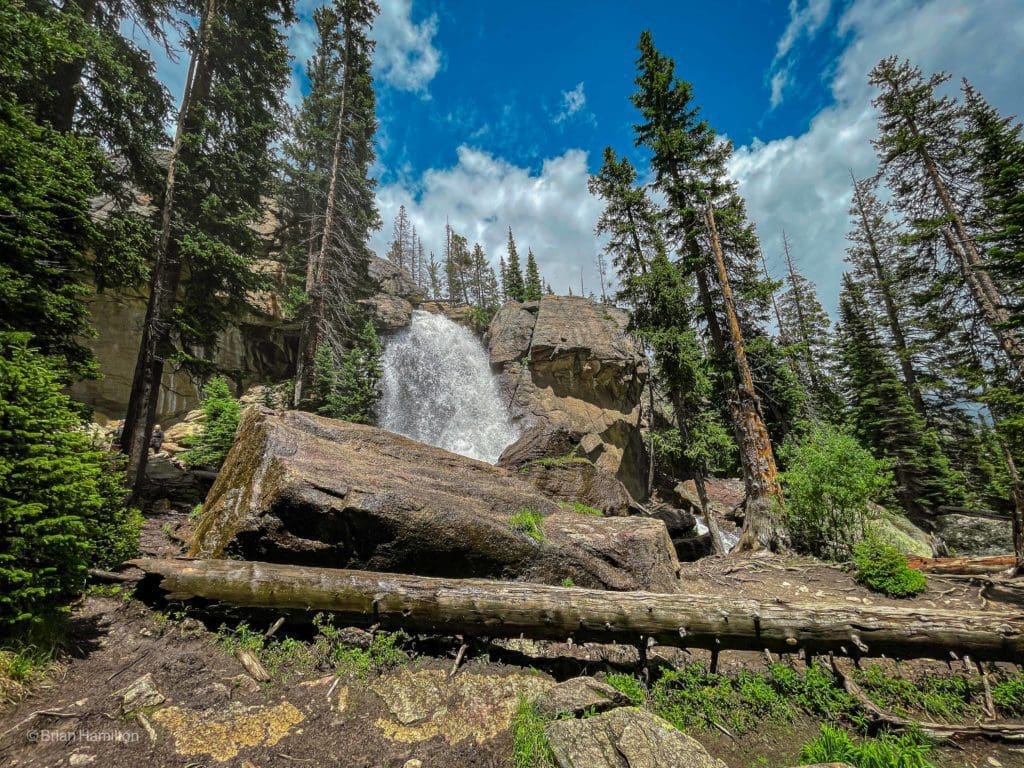
The main plume of Ouzel Falls.
The best time to see the falls are from roughly May-early August. During this window, the water volume is usually at its impressive best. As summer rolls on and transitions to fall, the volume will drop significantly.
Rapids along the creek with Ouzel Falls in the background.
When you’ve had enough of Ouzel Falls, continue on the main trail as it continues to head east. About half a mile later, you’ll come across a series of bridges that cross various stream braids. The largest and most picturesque is Calypso Cascade.
Calypso Cascade.
The bridges that cross in front of the cascade are lovely, but they also limit space to pass others. On clear and warm days, the bridges tend to be chokepoints where many people gather and inadvertently block the trail. Be patient through here and find space alongside the creek and off the trail to let others by.
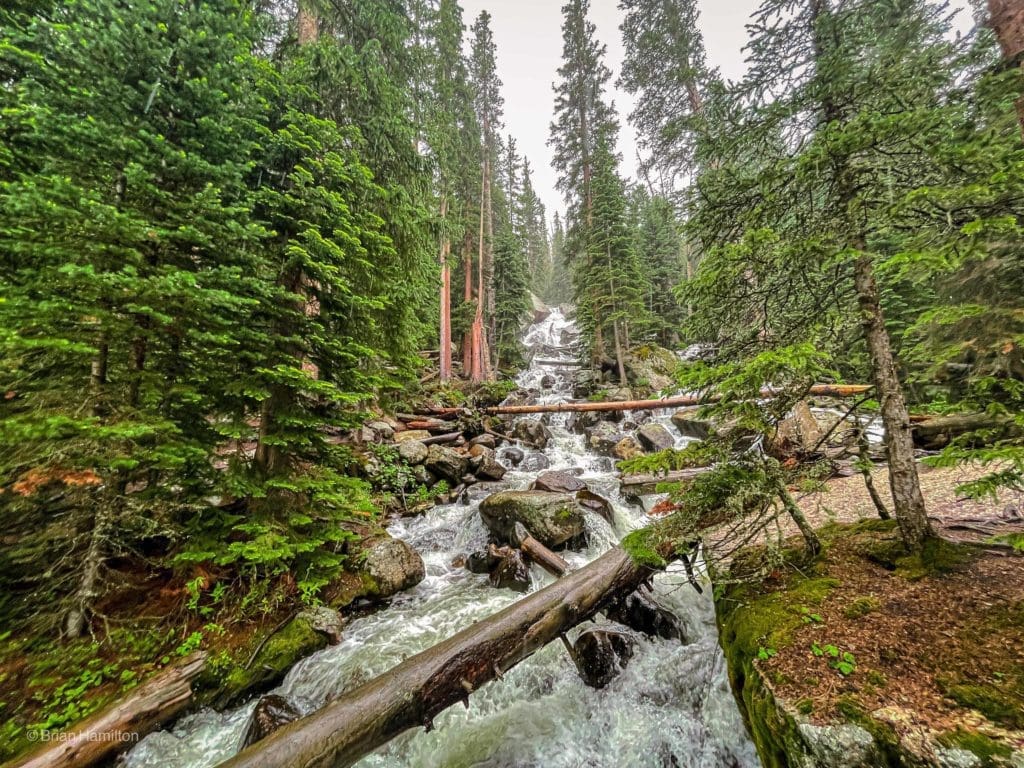
Rainy days often feature fewer crowds and more chances to take quality photos.
After Calypso Cascades, you’ll pass a few other stream cascades and cross back over North St Vrain Creek. Once you merge back with the Campsites cutoff, it’s roughly 1.4 miles to the trailhead. If you haven’t, make sure to check out Copeland Falls before making it back to your car.
A very saturated Copeland Falls, almost unrecognizable due to rainfall and snowmelt.
For semi-arid Colorado, it’s nice to string together an alpine lake and multiple water features on a hike in a pristine mountain basin only an hour from major metropolitan areas.
Final Thoughts:
Copeland Falls, Calypso Cascades, and Ouzel Falls are some of the easiest destinations to reach in Wild Basin. They are, however, far below treeline and don’t offer the mountainous panoramas common in places like Upper Glacier Gorge. If you want to add some views on top of the waterfalls, make the journey to Thunder Lake and circle the shoreline for excellent perspectives of numerous peaks and serrated ridgelines. In addition to the destinations described in this trail review, Wild Basin is absolutely brimming with other stellar peaks, lakes, scrambling, and even glacial remnants. As long as you don’t mind long treed approaches, the mountain majesty of Wild Basin is hard to ignore.

Photography for this article provided by Brian Hamilton, who hiked this trail on an overnight backpacking outing on June 25 and 26, 2021. Skyblue Overland uses SmugMug, a paid image sharing, image hosting service, and online video platform on which users can upload photos and videos. The SmugMug also facilitates the sale of digital and print media for amateur and professional photographers. See Skyblue Overland’s Adventure Photo Galleries from the Best Trails in Colorado at SmugMug.com. Here is the entire Wild Basin Trail Gallery:
Popular Articles:
- Guide to the Best Hiking Trails in Rocky Mountain National Park, Colorado
- The Dyrt: The 10 Best Campgrounds In Colorado
- Top Adventure Sports Towns 2021: Boulder, Colorado
- Epic Adventures with the Best Guides In Colorado
- Sky Pond via Glacier Gorge Trail, Rocky Mountain National Park, Colorado
- Scrambling Hallett Peak’s East Ridge, Rocky Mountain National Park, Colorado
- Scrambling Mt. Alice via the Hourglass Ridge, Rocky Mountain National Park, Colorado
- Gorge Lakes Rim Scramble, Rocky Mountain National Park, Colorado
- Black Lake Via Glacier Gorge Trail, Rocky Mountain National Park, Colorado
- Scrambling To The Lake Of The Clouds, Rocky Mountain National Park, Colorado

Skyblue Overland Strongly Recommends That You Enroll With Global Rescue Prior To Embarking On Your Next Adventure.
With more people outside now more than ever, Global Rescue expanded services to include field rescue within 100 miles of home. With Local Field Rescue — automatically included in any travel protection services membership — Global Rescue is there whether you’re hiking, kayaking, snowmobiling, fishing or simply enjoying the outdoors and get ill or injured and you’re unable to get to safety on your own. Purchase a Global Rescue membership for your next adventure and travel with peace of mind. Single trip, annual and family options are available.
Memberships start at $119.
Terms of Use:
As with each guide published on SKYBLUEOVERLAND.com, should you choose to this route, do so at your own risk. Prior to setting out check current local weather, conditions, and land/road closures. While taking a trail, obey all public and private land use restrictions and rules, carry proper safety and navigational equipment, and of course, follow the #leavenotrace guidelines. The information found herein is simply a planning resource to be used as a point of inspiration in conjunction with your own due-diligence. In spite of the fact that this route, associated GPS track (GPX and maps), and all route guidelines were prepared under diligent research by the specified contributor and/or contributors, the accuracy of such and judgement of the author is not guaranteed. SKYBLUE OVERLAND LLC, its partners, associates, and contributors are in no way liable for personal injury, damage to personal property, or any other such situation that might happen to individuals following this route.


