


High Point:
11,007 feet

Total Ascent:
~2,235 feet

Difficulty:
Hard

Distance:
7.2 miles (~8 if adding Lily Lake loop)

Waypoints:
40.3069, -105.5380

Route Type:
Out and Back
Estes Cone, a modest peak near Estes Park, offers 360-degree views and is perfect for acclimatization or training. Begin at Longs Peak Trailhead or Lily Lake for a quieter hike totaling just over eight miles.

Overview:
Estes Cone is a distinct mountain south of Estes Park. The best vantage points of the peak are from neighboring Twin Sisters, Lily Lake, Lily Mountain, Battle Mountain, and along US 7. You can also see Estes Cone from Mount Meeker and Longs Peak. Despite breaking 11,000 feet, the modest summit is overshadowed by taller peaks around it and doesn’t get all that much attention. The rocky summit doesn’t quite break treeline but is prominent enough to grant 360-degree views.
For the effort, Estes Cone is a rewarding hike and a great candidate for acclimatization. If you’re looking to get in shape for tougher outings in Rocky Mountain National Park, Estes Cone is also an effective training hike. Even though there is a trail to the top, it’s easy to lose on the final push, so watch for cairns. In order to get to the very highest rock, some light scrambling will become necessary. If you haven’t summited a mountain in Colorado, Estes Cone is a good (but tiring) first outing.
Most people start from the Longs Peak Trailhead when tackling Estes Cone. For a few extra points of a mile, you can start at Lily Lake and take a much quieter approach with an optional loop around Lily Lake. Including the lake brings the total mileage to just over eight.
- Estes cone summit rocks: Brief Class 2+ (optional Class 3)
Mt. Meeker and Longs Peak from the summit area of Estes Cone.
Table of Contents:
Article Navigation: Click on any of the listed items in the table of contents below to jump to that section of the article. Similarly, clicking on any large, white section header will jump you back to the Table of Contents.
- Overview
- Scales and Criteria
- Directions to Trailhead
- Places to Stay
- Field Notes
- Journal
- Final Thoughts
Scales and Criteria:
This article utilizes three separate rating systems: Difficulty, Popularity, and a Scramble Rating indicating the hardest move or set of moves encountered. The scramble rating employs the Yosemite Decimal System. In 99% of Estes Cone summits, only a few Class 2+ moves are needed to get to the top; however, there are some nice optional rock ribs that could provide more intense Class 3-5 terrain. Since the possibility is there, I’ll break down the rating system below, but if your goal is to simply ascend Estes Cone, you won’t need to do anything more than Class 2.
Difficulty Ratings:
- Easy: less than 5 miles, less than 500 ft. of elevation gain
- Moderate: 5-10 miles, 500-2000 ft of elevation gain
- Hard: 5-15 miles, more than 2000 ft. of elevation gain
- Very Hard: 10+ miles, more than 3,500 ft. of elevation gain
Popularity Ratings:
- Low: Large sections of trail all to yourself
- Moderate: Sizeable trail sections to yourself, crowding possible on busy summer weekends
- High: You’ll be seeing people, still a chance for solitude in spring/fall/winter.
- Very High: Almost always busy.
Scramble Rating:
- Class 1: Established hiking trail the entire length of the adventure. Low chance for injury.
- Class 2: Typically involves cross-country navigation, possibly using hands for balance but not required, steeper than Class 1.
- Class 3: Hands and feet used to scale areas, must use hands to proceed (either for balance or to help pull you up a section), increased exposure, a fall could be fatal. Helmet recommended, along with grippy hikers.
- Class 4: Climbing on very steep terrain just shy of vertical, falls could be fatal, hands employed for grip and balance continuously, ropes advisable but scalable without. Helmets are highly recommended, along with grippy hikers.
- Class 5-5.4: Near vertical and vertical climbing that involves technical rock-climbing moves, exposed, falls likely to be serious or fatal, possible to scale without ropes but only for very experienced veterans. Helmets, grippy hikers, and/or rock-climbing shoes necessary.
- Class 5.5 and up: Not covered as scrambling, full-on rock climbing with ropes, helmets, etc.
The YDS system is widely used in North America but can be quite subjective, so it is not perfect. The biggest differences I’ve encountered between Class 3 and Class 4 sections have to do with slope angle, exposure, and putting weight and pressure on hand grips (4) instead of using hands and feet interchangeably as supporting points of contact (3). It is not possible to climb a Class 4 section without using your hands to pull up some or all of your body weight. Typically, a Class 4 section will also require some type of rock-climbing move, like stemming, where hands or feet are pressed in opposition as if climbing the inside of a chimney. If downclimbing, a key difference is that most people will descend a Class 4 section facing inward, i.e., your back faces the exposure.
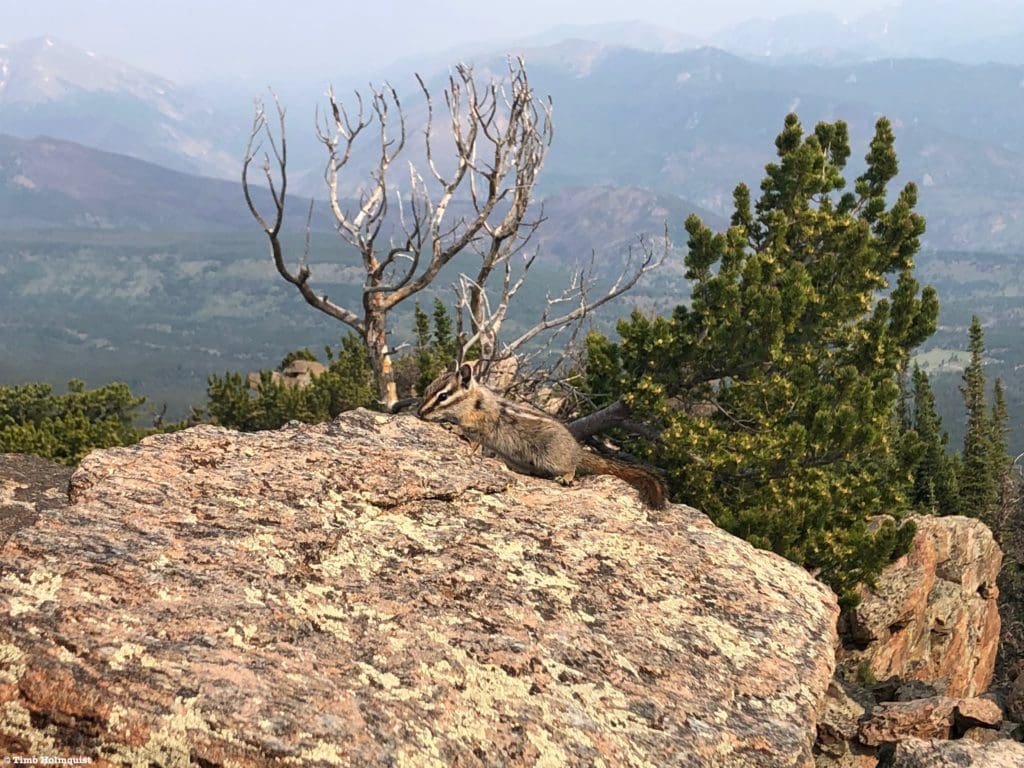
Chipmunks are common along portions of the trail.
The Ultimate Offline GPS Hiking & Ski Maps
See why onX Backcountry is the ultimate GPS navigation app for your outdoor pursuits. Try Today for Free. No credit card required.
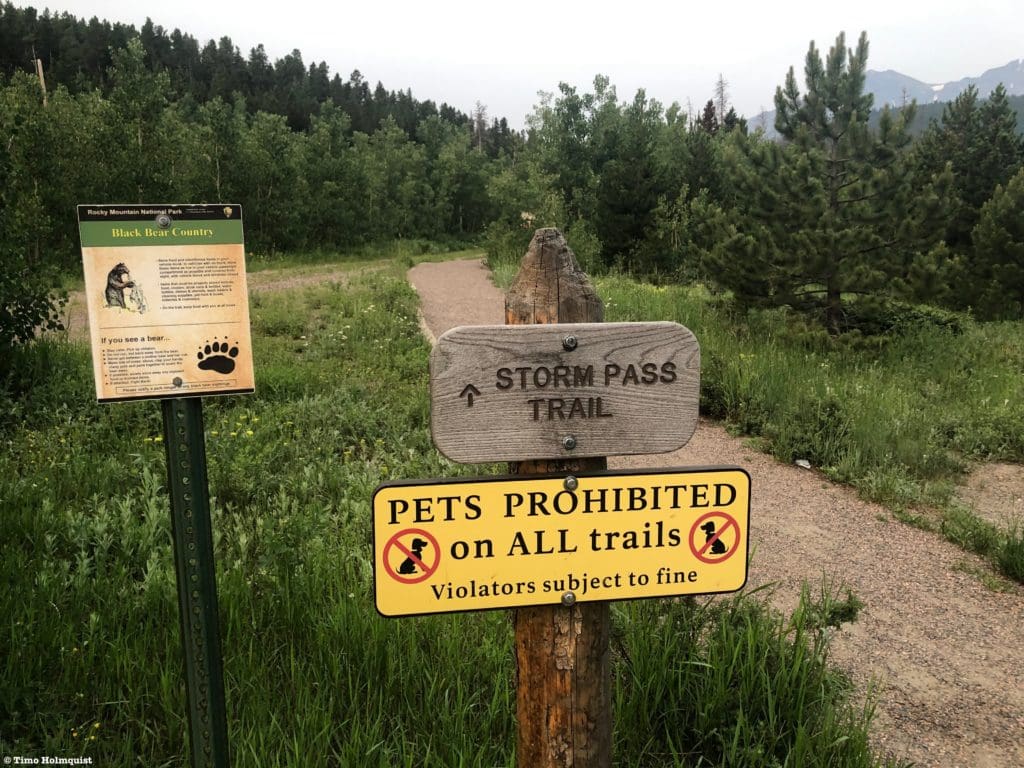
Directions to Trailhead:
Estes Cone is usually hiked from the Longs Peak Trailhead, though ascending from Lily Lake provides a nice alternative with more elevation gain and fewer people. Both routes are shown in the nearby map. To get to the Longs Peak Trailhead, take US 7 south from Estes Park (or north from Allenspark). The trailhead is located on the western side of the road 10.5 miles south of Estes Park and 7.9 miles north of Allenspark. If you’re arriving from Estes Park, you’ll pass Lily Lake and Twin Sisters before reaching the turnoff for the trailhead. In both scenarios, once you find the turnoff (indicated by signs for Longs Peak), follow the dirt road west another mile to the trailhead.
Lily Lake Trailhead is even easier to reach as US 7 passes right next to the Lake. If you’re coming from Estes, it’s at the top of a long rise south of town; the lake and trailhead will be on the right. There is also a parking lot on the left-hand side of the road providing access to Twin Sisters Peak but can be used for additional parking if there is space. From Allenspark (and all points SE including Denver), head north on US 7, passing Wild Bain, Meeker Park, and the Longs Peak Trailhead. Before the road crests a ridge and begins a long descent to Estes, you’ll see signs for Lily Lake on the left.
Due to the Covid era fee system put in place in 2020 and carried over to 2021, the usually pass-less areas of Lily Lake and Longs Peak get a little more complicated. Echoing the park website, ALL visitors must have an entrance pass. If you arrive at either Longs Peak Trailhead or Lily Lake before 9 AM, the entrance pass is the only thing you’ll need. Between 9 AM-3 PM, you will need an additional Timed Entry Permit to be able to park without getting a ticket. Check the park website here for additional details. As has become commonplace with most National Park hikes we cover on this site, getting there early is the easiest and most proactive way to avoid the Timed Entry Permit system. Getting to the park early DOES NOT alleviate the need for an entrance pass. Hopefully, the Park Service will offer more clarity regarding future years once the summer fee system ends on October 11. Until then, this is the way it is.
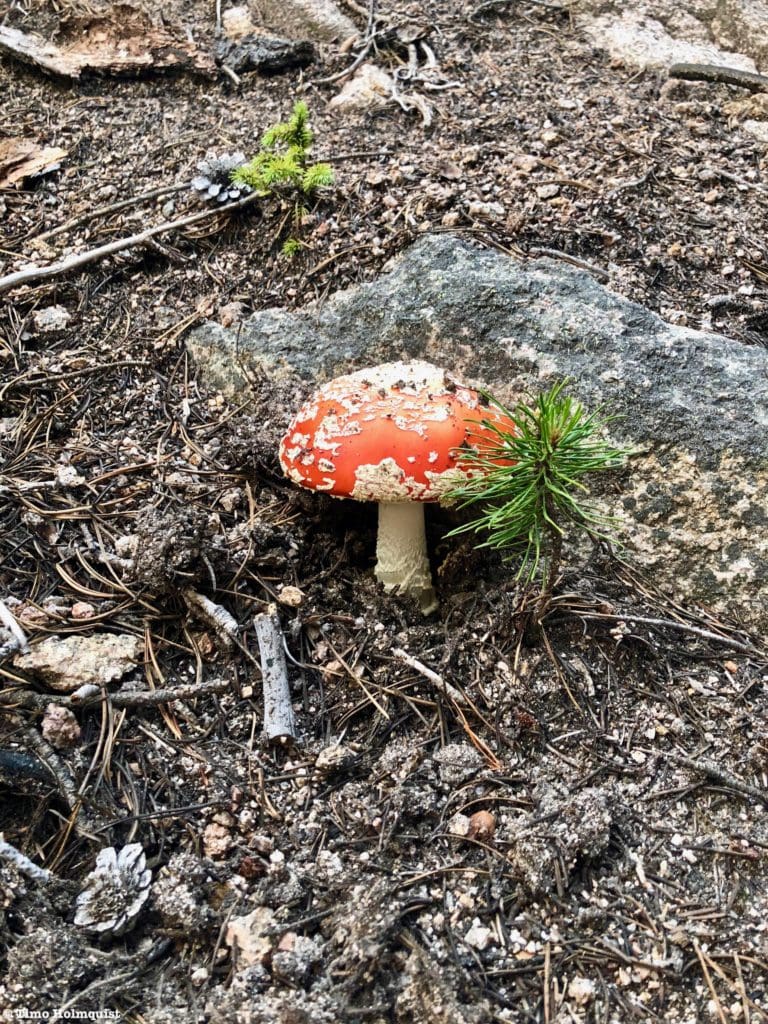
Amanita Muscaria, a.k.a the Mario Mushroom, found along the trail to Estes Cone.
Places to Stay:
Camping near Rocky Mountain National Park will cost you. The options for free area camping are limited. On a positive note, there are plenty of options, and the National Park is within driving distance of Fort Collins, Boulder, and Denver.
- Estes Park: Known as the gateway to Rocky Mountain National Park, Estes sees nearly 80% of park traffic as opposed to the much quieter western entrance near Grand Lake. The town has a ton of lodging options.
- Allenspark: A small town near Wild Basin that has a few lodging options, including the Wild Basin Lodgeand the Sunshine Mountain Lodge and Cabins.
- Rocky Mountain National Park Camping
- Moraine Park Campground: $30 per site. $20 in winter. Established campground with perks, facilities, campfire grate, wood for sale in summer, and bear boxes to store food. Only loop B is open in the winter, and it’s first-come, first-serve.
- For summer, a reservation is needed quite a ways in advance to secure a spot.
- Glacier Basin Campground: $30 per site. Established campground with the same perks as Moraine Park. Reservation required.
- Backcountry Campsites: Rocky Mountain National Park has backcountry sites that you could book in advance. There is no open camping in the backcountry; it must be at designated backcountry sites. Please check the park website for more details. Backcountry sites require an overnight permit of $30.
- Camping near Estes Park
- Estes Park Campground at Mary’s Lake: Established campground, pricey $45-55. Good backup if other campgrounds are full.
- Hermit Park Open Space: $30 for a tent site, price increases if towing a trailer or for group spots.
- Estes Park Koa: Rates dependent on what you’re bringing with you but will run more than $50 a night in the busy season.
- Free or close to free: but a little farther (if you’re willing to drive)
- Ceran St. Vrain Trail Dispersed Camping ($1)
- County Road 47. Users have reported trash and ATV noise at this location, but it is free.
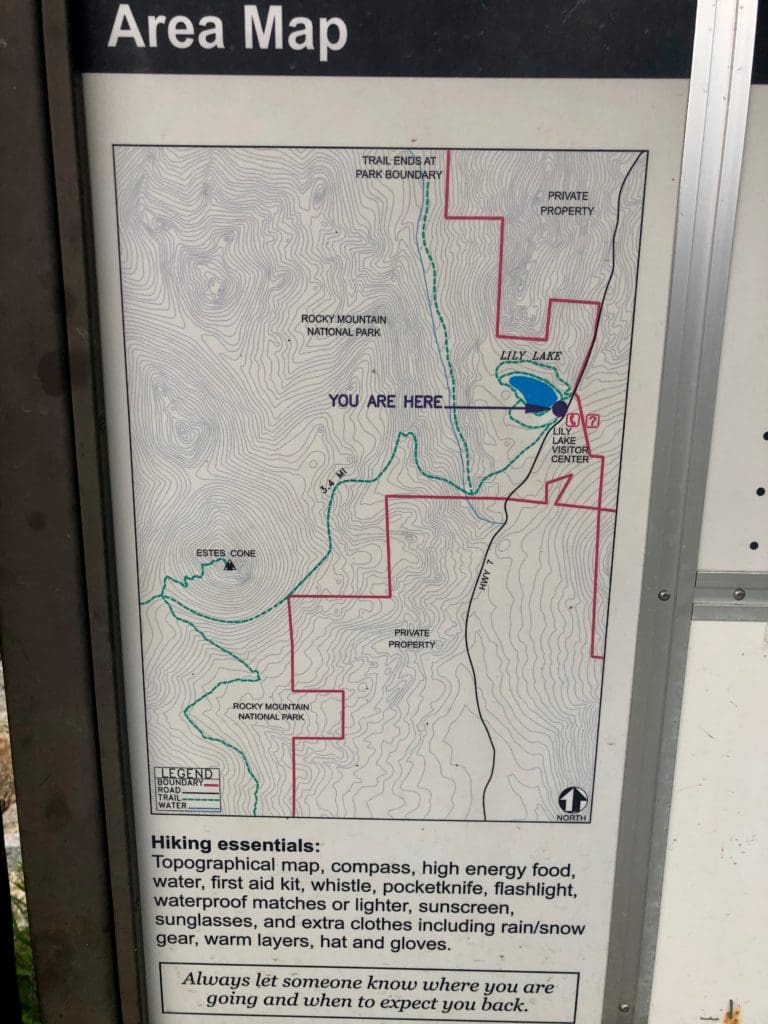
Area map at the trailhead.
Field Notes:
If you get an early start on Estes Cone, the hike should really only take about half a day. Despite its sizeable elevation gain, the trails are clearly signed and easy to follow. During peak summer, Longs Peak Trailhead will fill early with hundreds of people attempting the Keyhole Route. Lily Lake will also fill, but if you arrive by 7 AM on weekdays, there’s a strong chance you can find a good parking spot. In terms of popularity within the National Park, Lily Lake doesn’t usually make the top five, so there can be a little leeway in terms of parking. Longs Peak Trailhead is a little less forgiving since it accesses not only the Keyhole Route but Chasm Lake, Mt. Meeker, Jim’s Grove, and a smattering of popular backcountry sites.
For weather forecasting, Estes Park and Allenspark are good starting points. The forecast for Twin Sisters Peaks is useful as well. Opensummit has a forecast for Estes Cone, but long-range forecasts (greater than 2 days out) require a premium subscription. Remember, mountain weather can change rapidly; the last forecast you check often contains the most accurate information.
A lot of the hike is tree-covered, but the summit is open, and water sources are limited to below Storm Pass; make sure you have adequate nutrition and hydration. Estes Cone is not the tallest mountain around, but it does reach over 11,000 feet above sea level. For those coming up from the flats, pacing is important. Don’t rush if you don’t need to. Additionally, familiarizing with the signs and symptoms of altitude sickness is useful.
Journal:
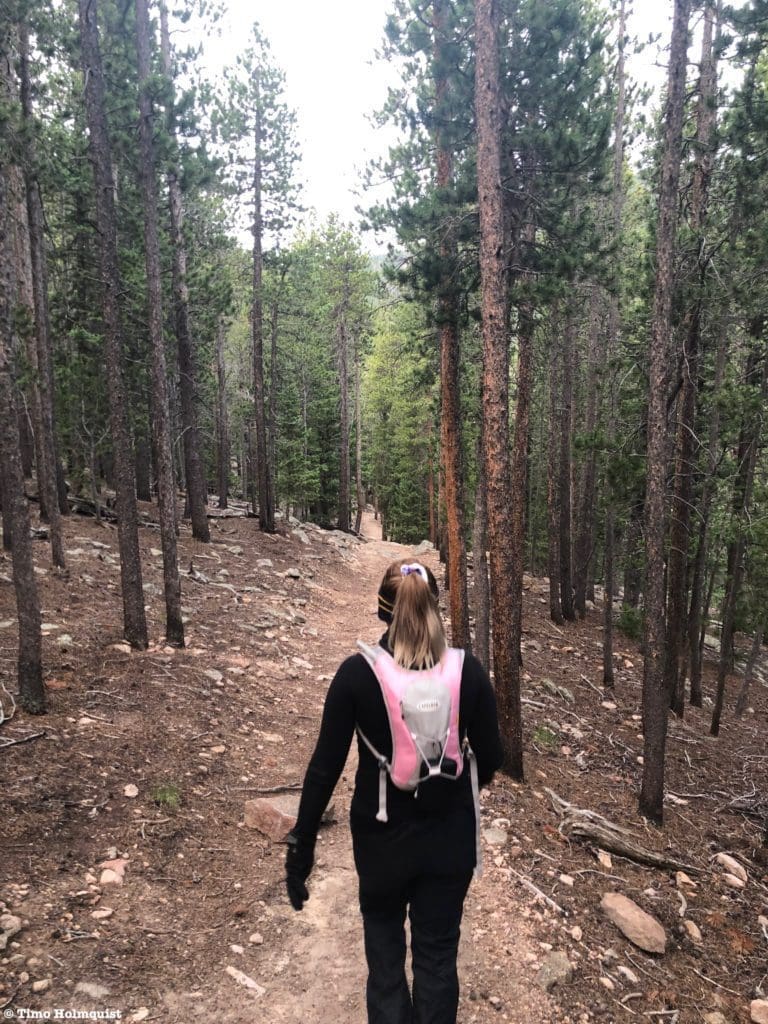
This trail review is written from Lily Lake, but as mentioned above, you can also hike Estes Cone from Longs Peak Trailhead. Once you pull into a parking spot, look for a wide trail heading south and paralleling US 7.
The sign at the beginning of the trail.
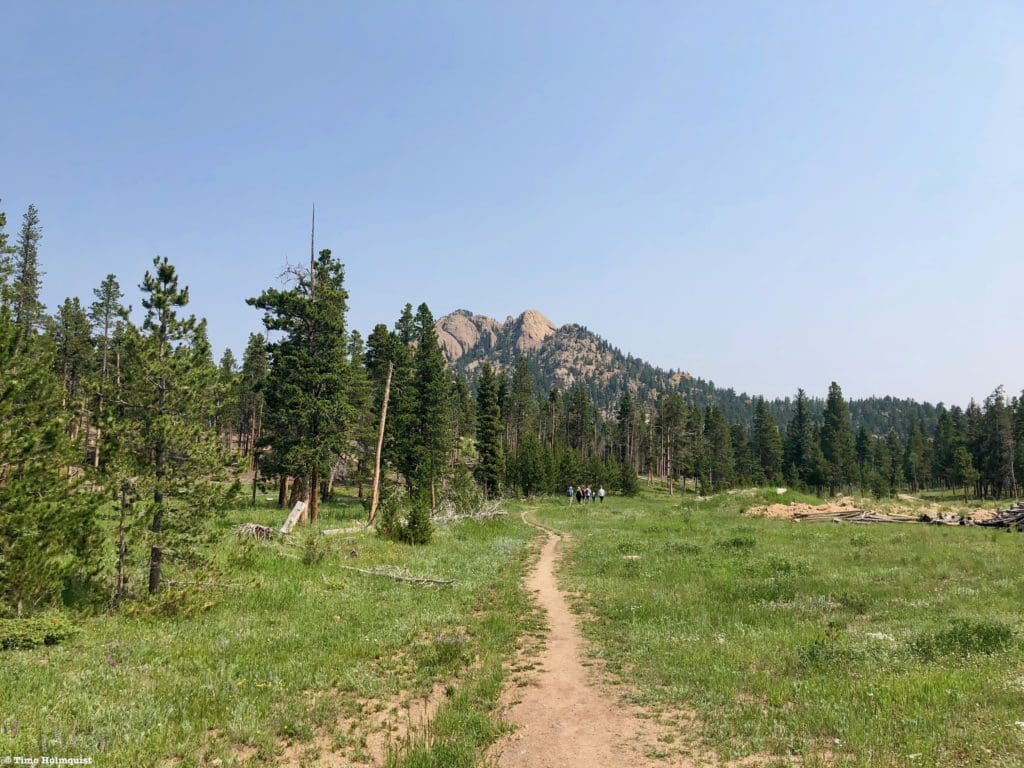
The first part of this trail is easy to follow and slowly curves away from US 7. Almost immediately, you’ll be able to see Estes Cone ahead of you.
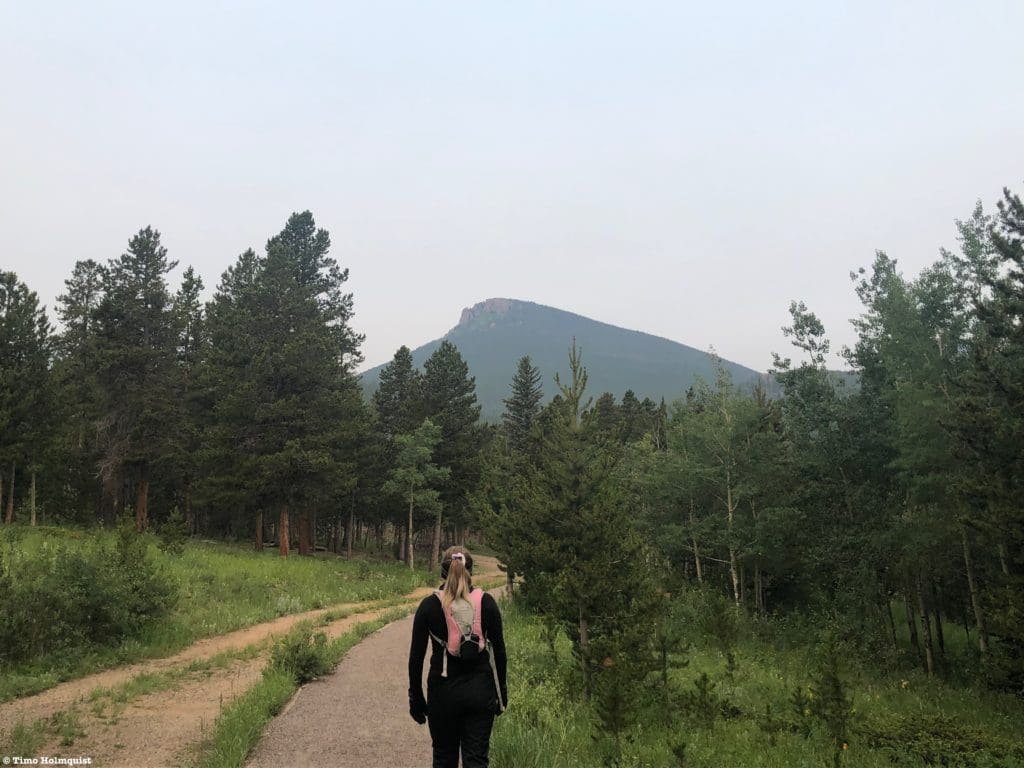
Estes Cone.
After a couple points of a mile, you’ll hit your first trail junction, take a left to continue to Storm Pass. If you take a right, the trail will circle back to Lily Lake.
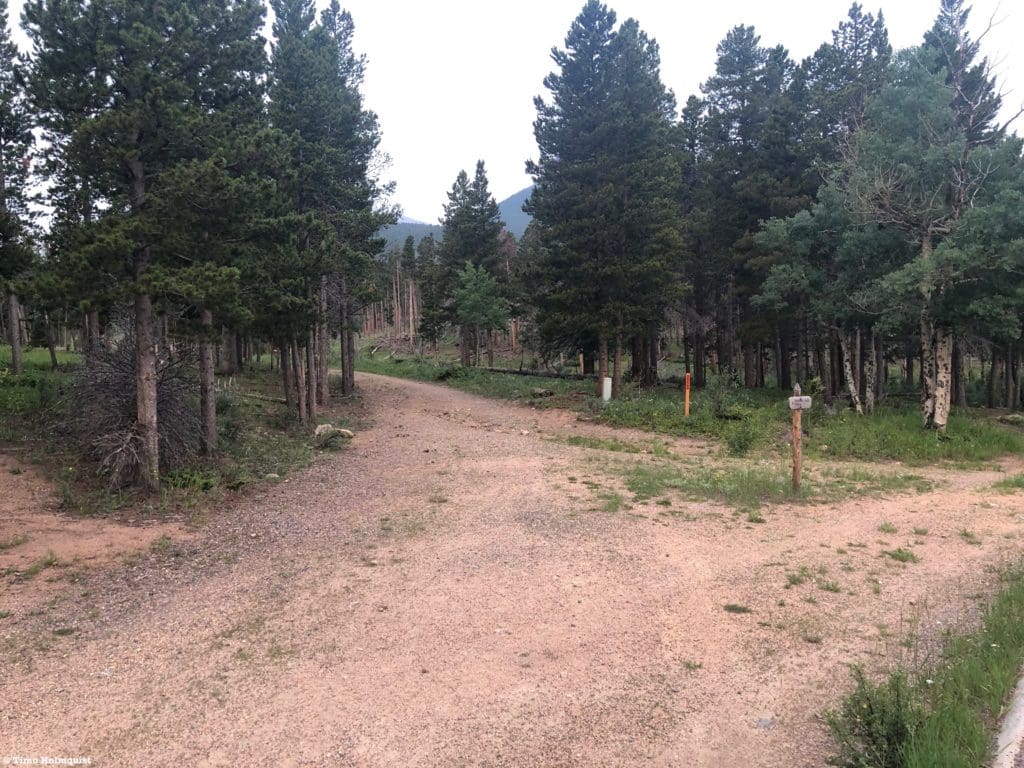
First trail junction.
The trail will reduce width and continue through a field interspersed with clusters of Pine trees. You’ll pass a few trail signs with approximated mileages to Storm Pass and Estes Cone. The signs are helpful, but the mileages may be slightly off.
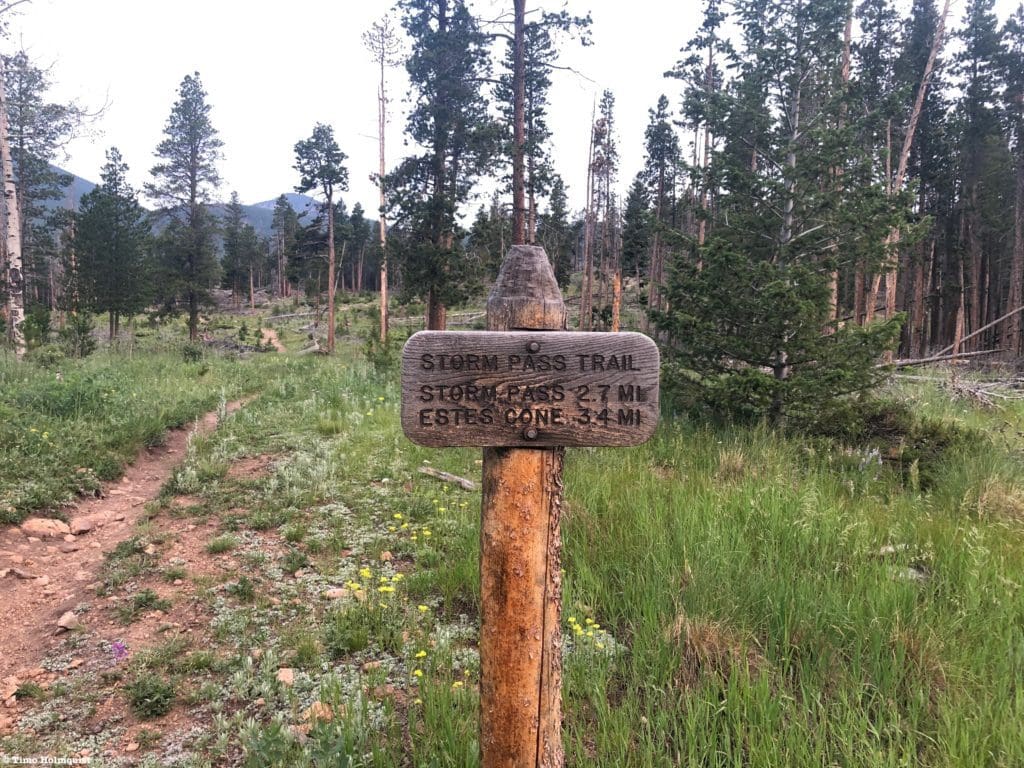
Signs along the trail.
As the trail continues to veer away from US 7, the Pine Tree coverage becomes more pronounced. You’ll crest a small roll of land and then begin a brief descent to Aspen Brook.
Increasing tree coverage as you descend.
The trail will cross Aspen Brook on a nicely constructed log bridge. This is also the lowest point of the trail. It helps to remember that you will have a bit of an ascent on the return journey, but it’s a short section.
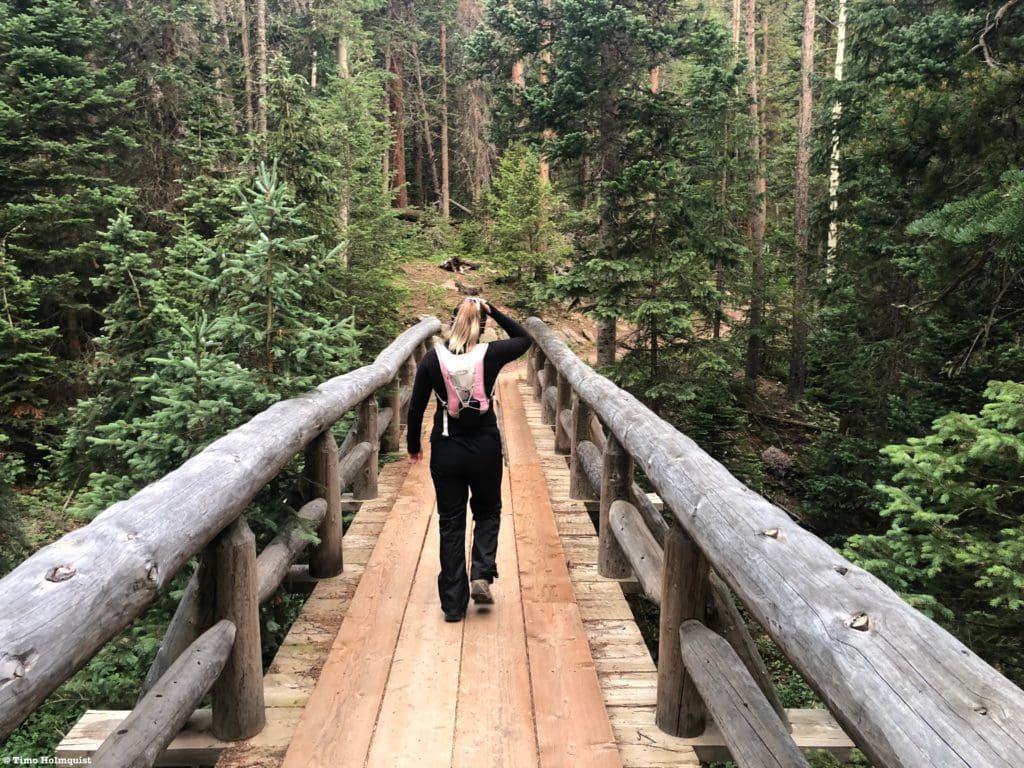
Bridge across Aspen Brook.
On the other side of the bridge, the trail will veer right and begin climbing up the side of a ridge. At one point, the trail threads through some rock features, offering perspectives back to Lily Mountain and the shelf holding Lily Lake.
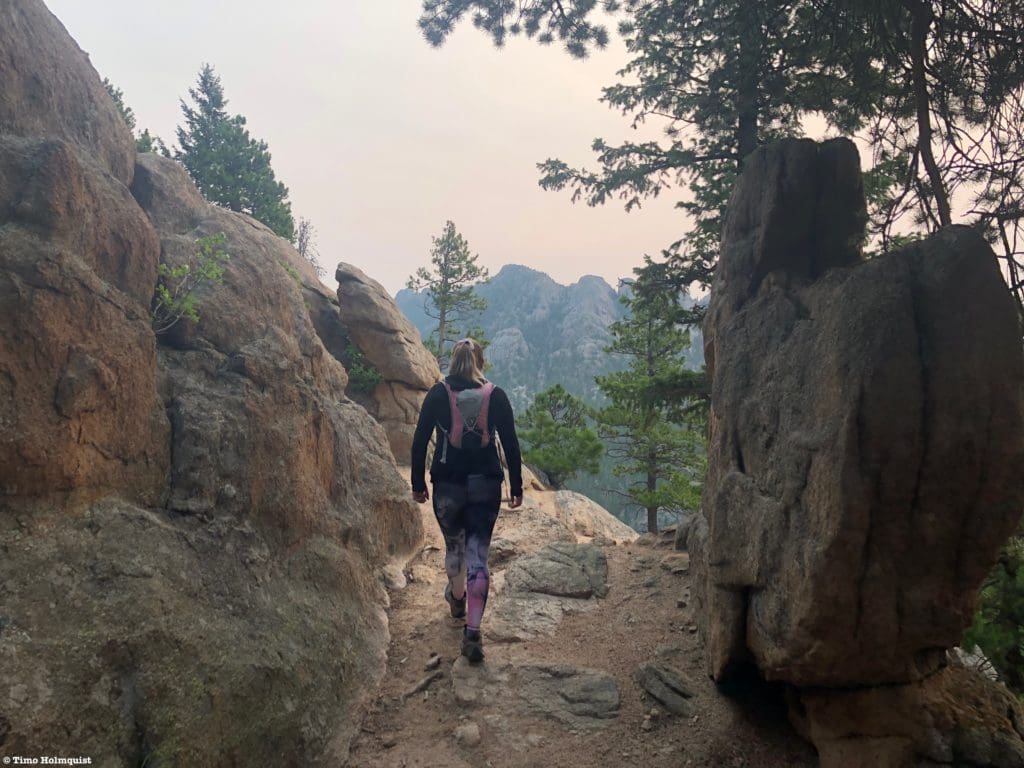
Passing through some nice rock features.
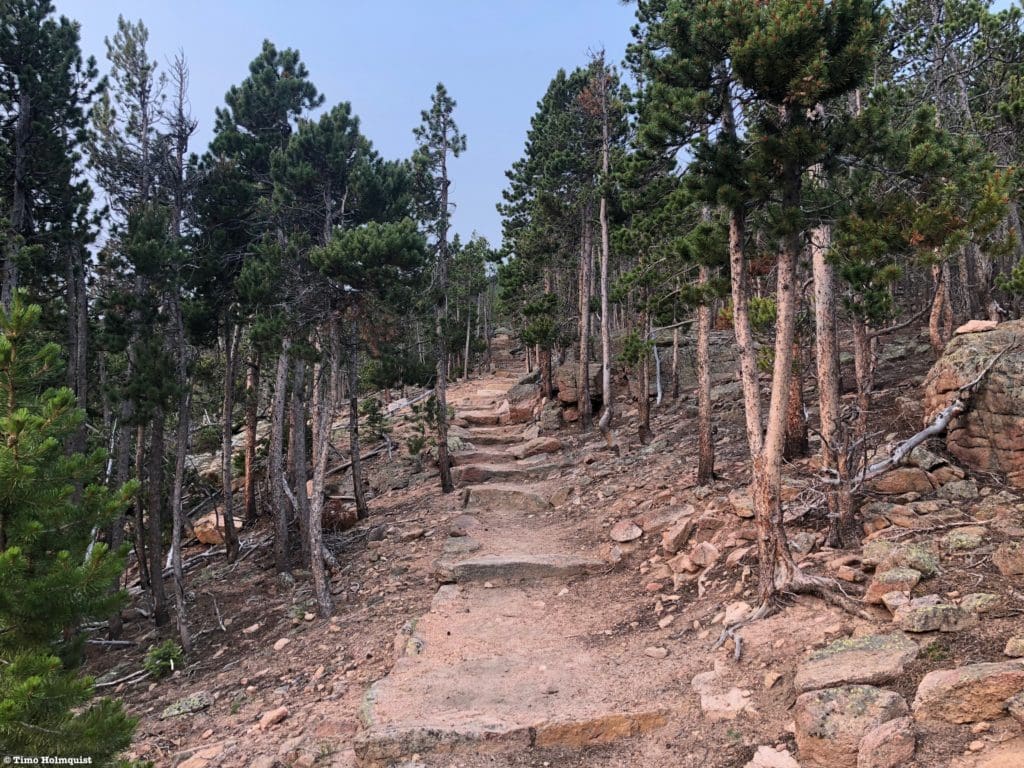
The trail is well constructed and easy to follow, featuring well-spaced log steps, switchbacks, mono walls, and a consistent but not particularly demanding ascent.
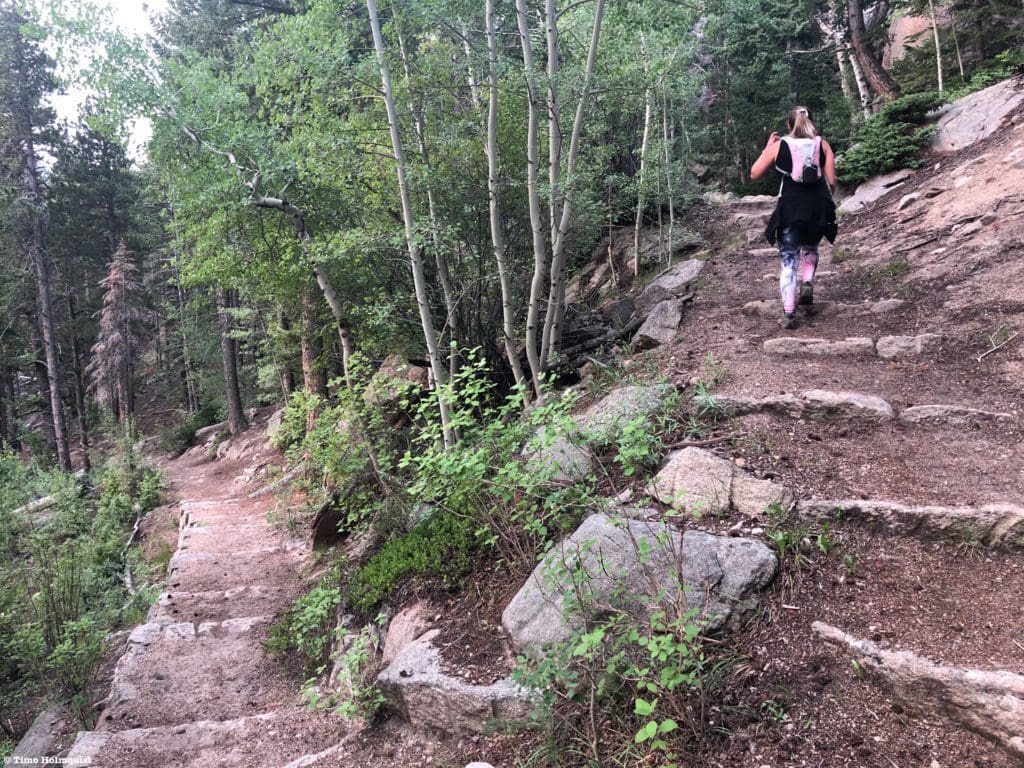
One of a few switchbacks as you climb.
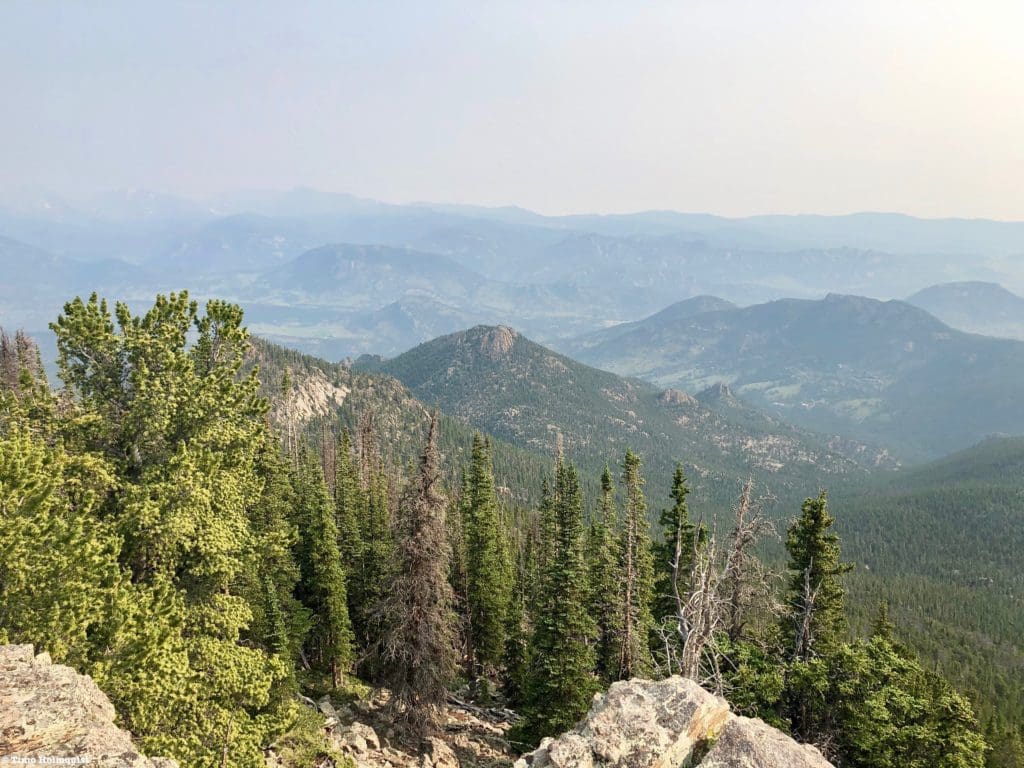
Since Aspen Brook, the vegetation has been fairly lush with a healthy understory, occasional flowers, and some mushrooms. As you increase your elevation, the terrain will dry out until you are passing through a semi-arid Pine Forest. The changing vegetation is one of the visible standouts on this hike.
Back to a drier forest environment.
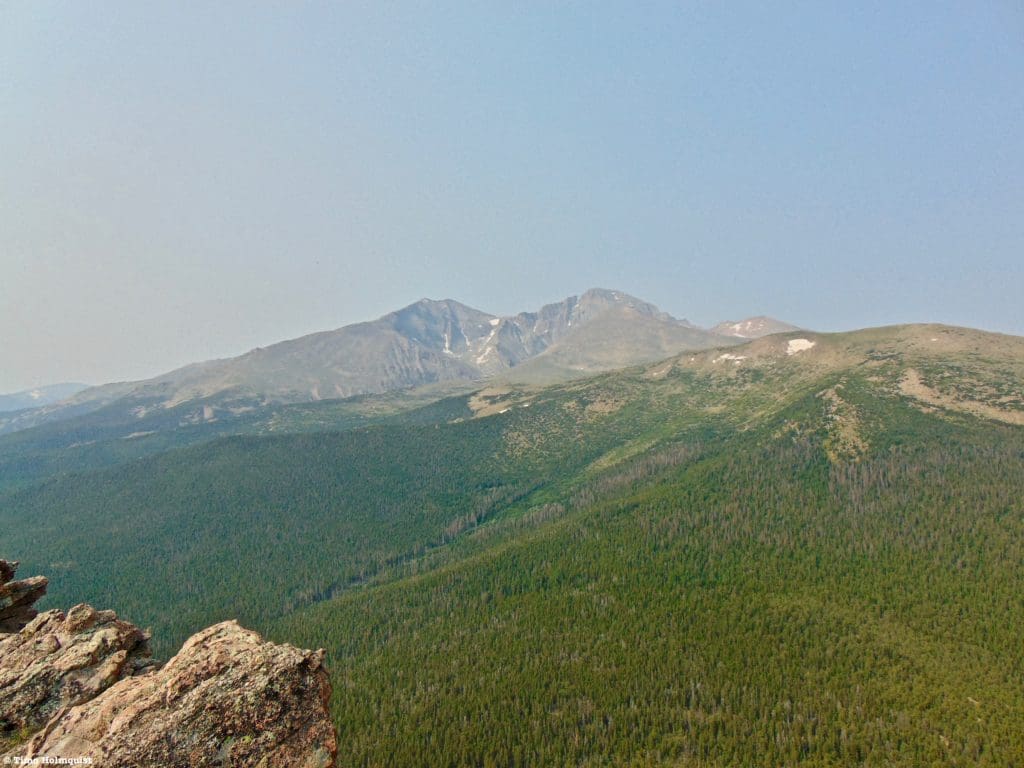
The trail will rise to a shoulder of Estes Cone and then actually drop down before getting to Storm Pass. There is an obvious sign at the Pass itself, so if you start losing a little elevation, don’t panic; wait until you find the sign. As you get closer to Storm Pass, occasional views of Mt. Meeker and Longs Peak break out to the south.
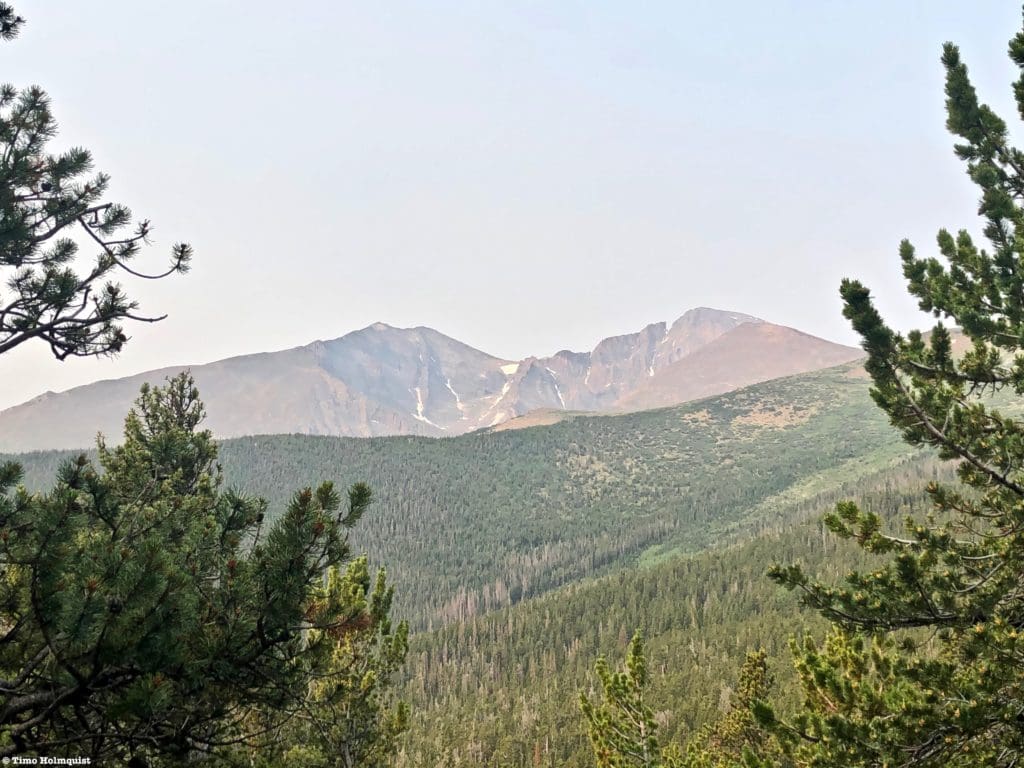
The two highest mountains in the Park.
It’s a good idea to take a break at Storm Pass; the final 0.7 miles to the summit is strenuous. After taking a right at the sign, follow the initially easy path to Estes Cone.
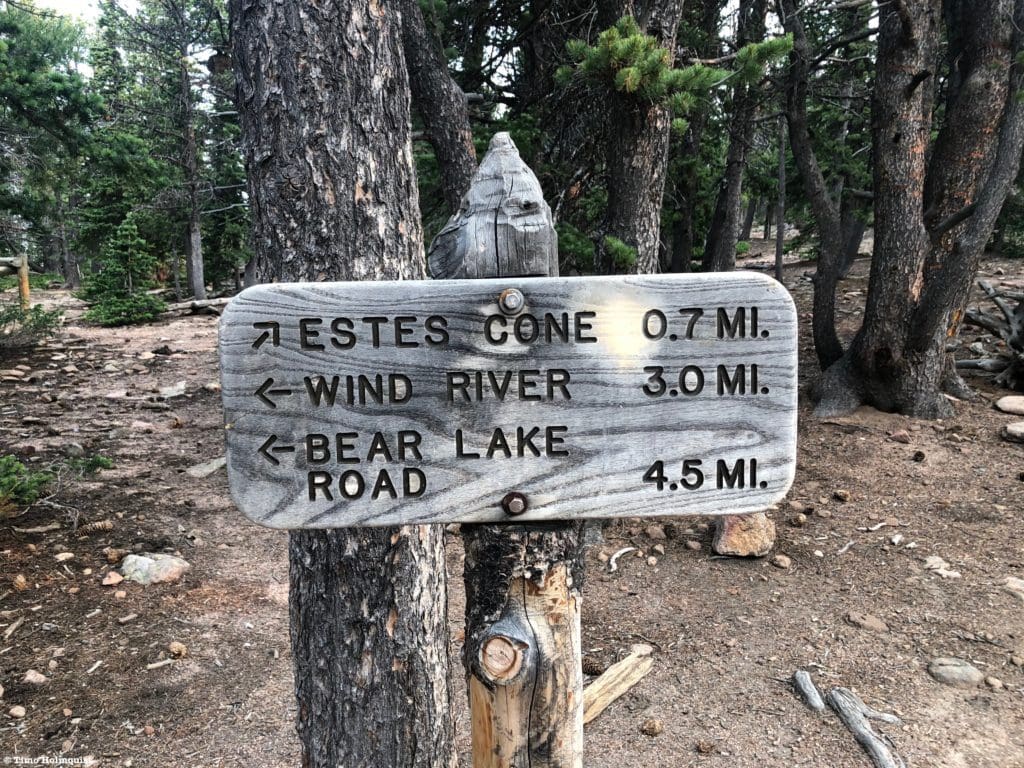
The real climb begins here.
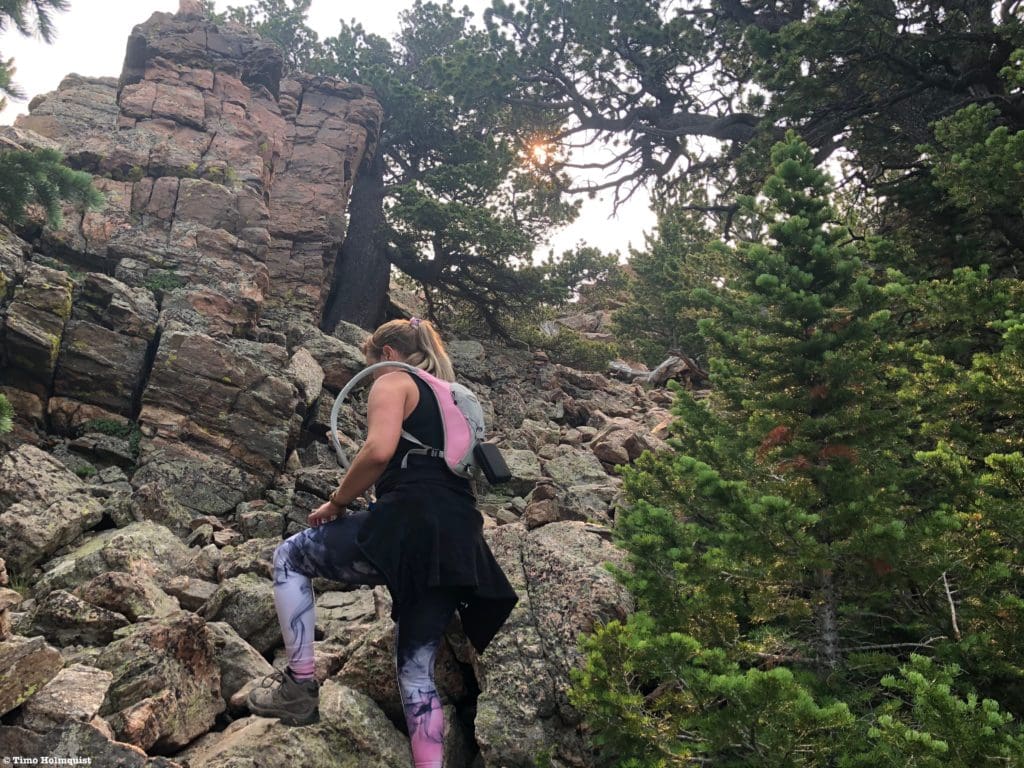
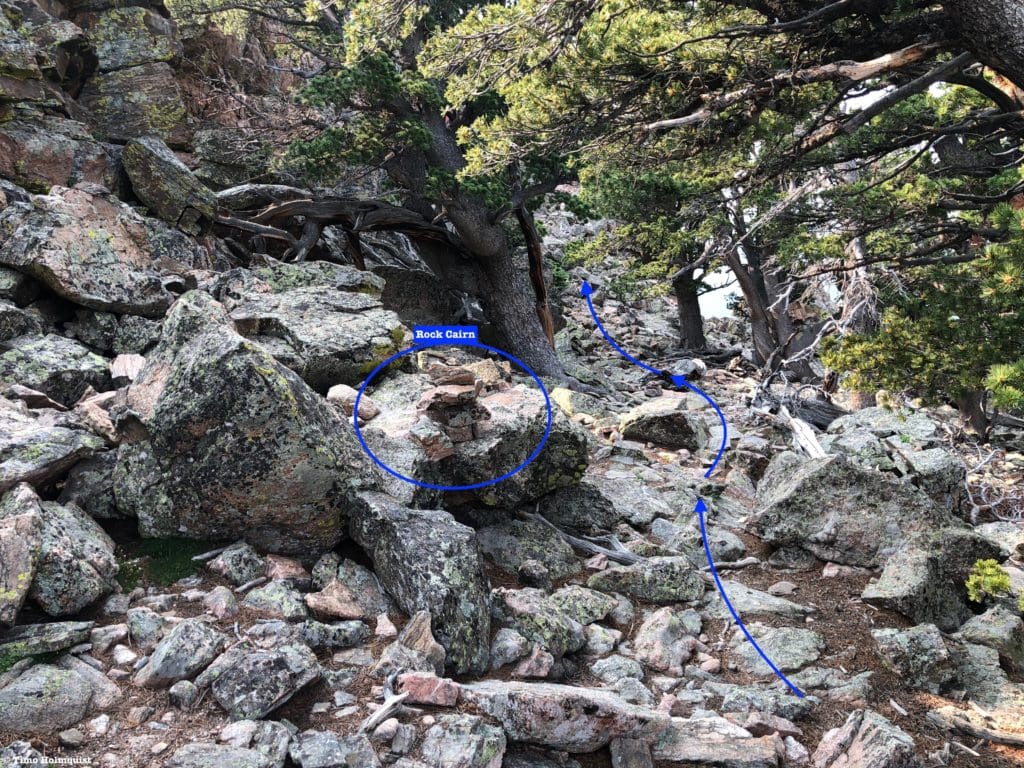
Within five minutes of setting out to the Cone, the trail reduces to an almost unrecognizable path through terrain that all looks the same. Keep an eye out for little rock stacks known as cairns. Since they’re the same color as other rocks, it may be hard to spot them from a distance, but there are a decent amount of them, and they do a better job at helping you navigate than trying to discern where the actual trail goes.
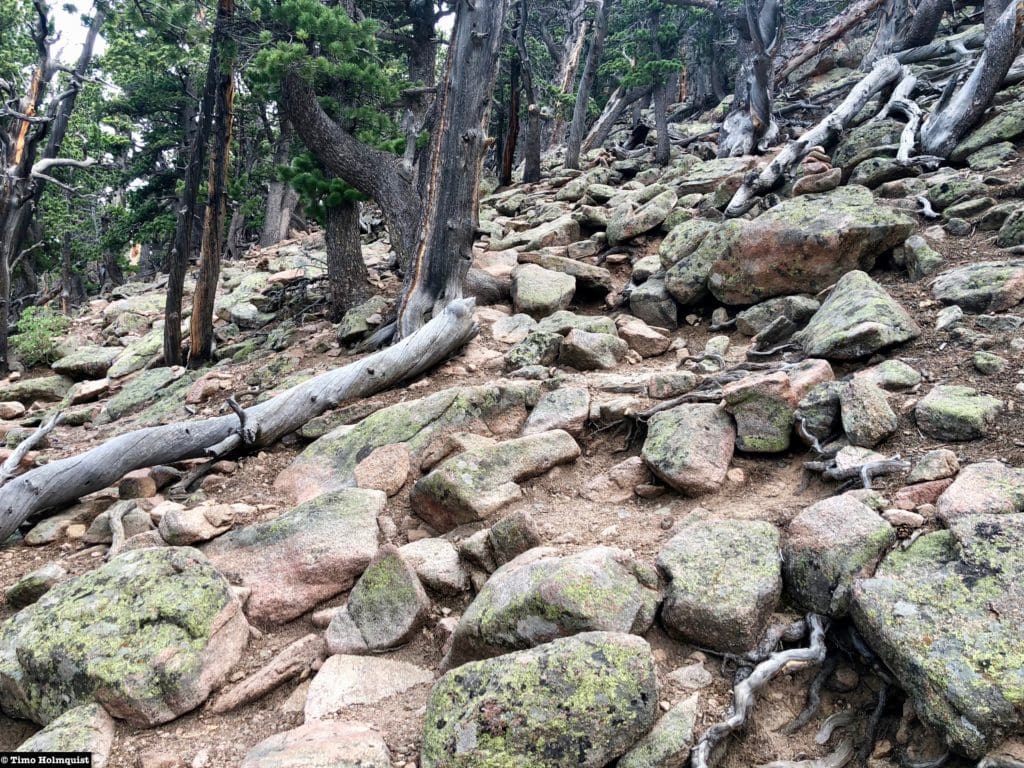
Typical ground conditions along this portion of the hike.
This part of the hike can be frustrating because you gain roughly 750 feet in only 0.7 miles, and with tree cover, it’s hard to gauge progress. Keep at it, and eventually, you’ll see more cohesive sets of rocks rise next to the trail.
Getting to the summit area.
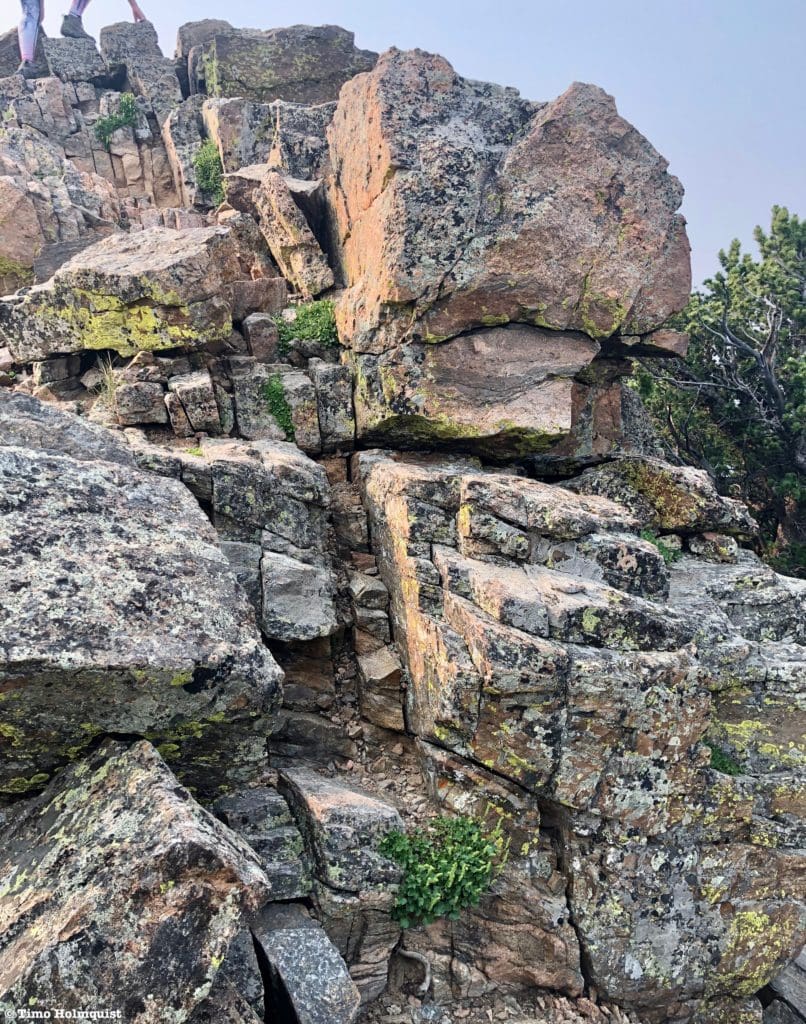
The first rock walls to the left of the trail can be skipped to the right, but offers some low-mid scrambling opportunities if you want them. By the easiest path, follow the cairns as they guide you up to a larger rock rib.
At the foot of the second summit rib.
Getting onto this second rock rib is likely the most challenging set of individual moves on the hike, although the gain from Storm Pass to the summit area can feel more draining. For those curious about what scrambling entails, this is a good, quick introduction.
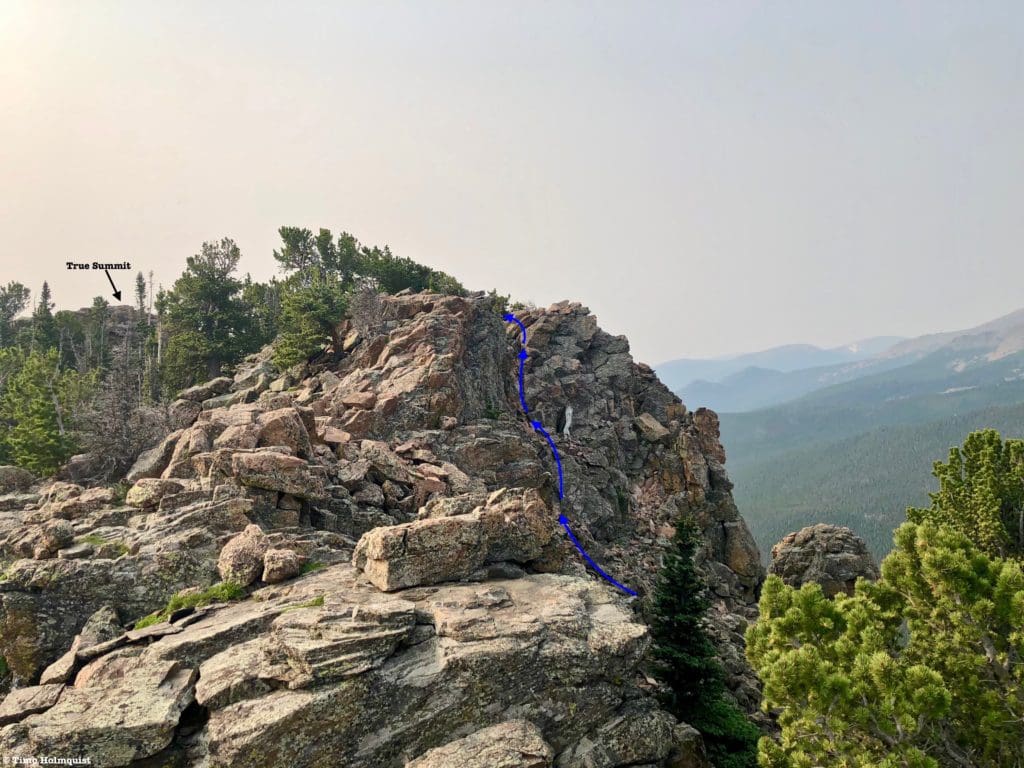
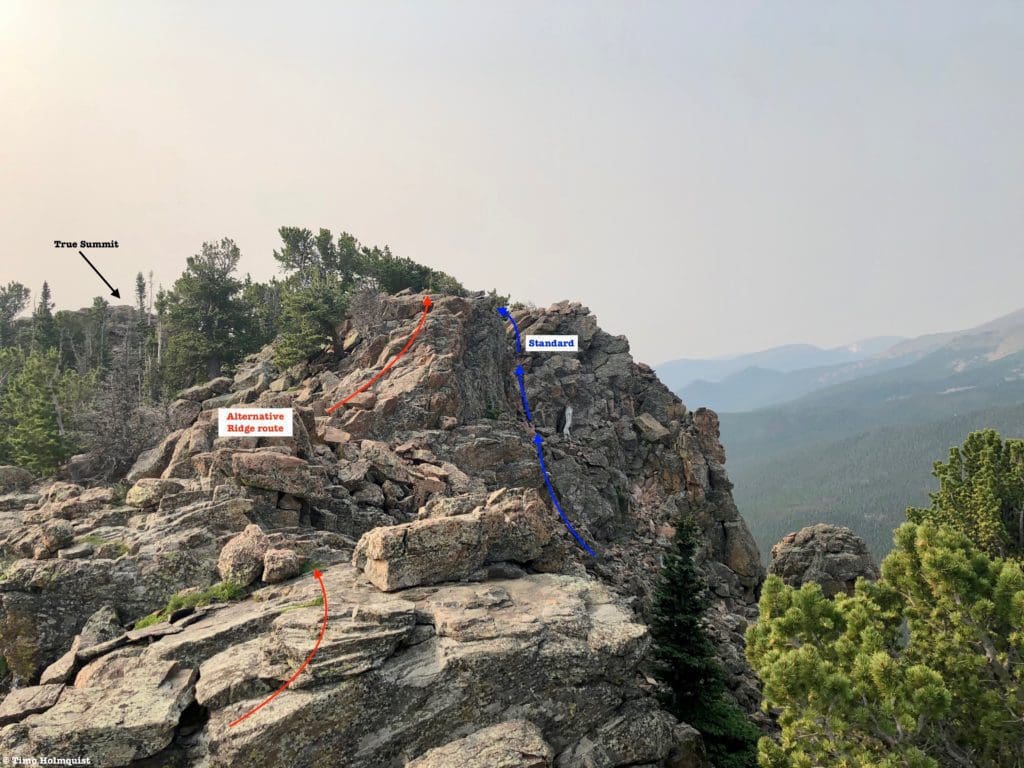
Looking at the standard route up the rock. The perspective here makes it seem steeper than it is. This option goes at Class 2+
Once you crest the rock rib, follow alongside it (or on top of the rock). For those who want to scramble the length of the rock rib (light Class 3), break left as indicated in the picture below.
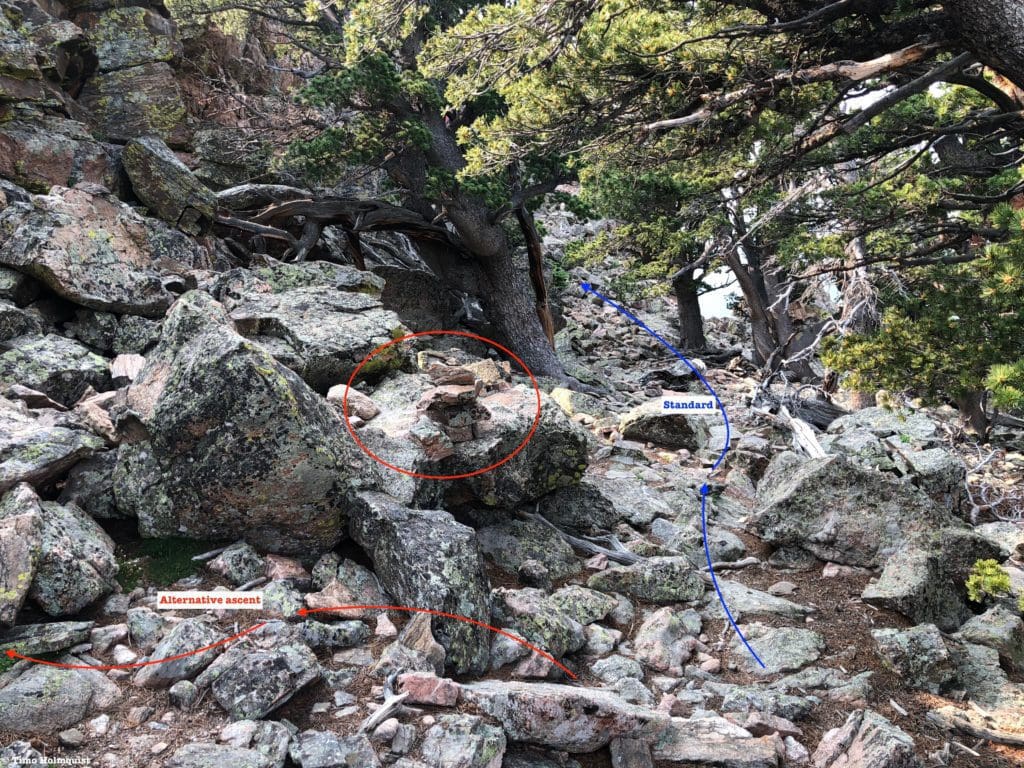
Breaking left early will lead to more scrambly terrain.
The initial climb to the top of the rock is a little steeper than the standard approach but shorter.
Onto the second summit rib via optional route.
If you go this way, there is one very brief Class 3 downclimb.

The optional Class 3 downclimb
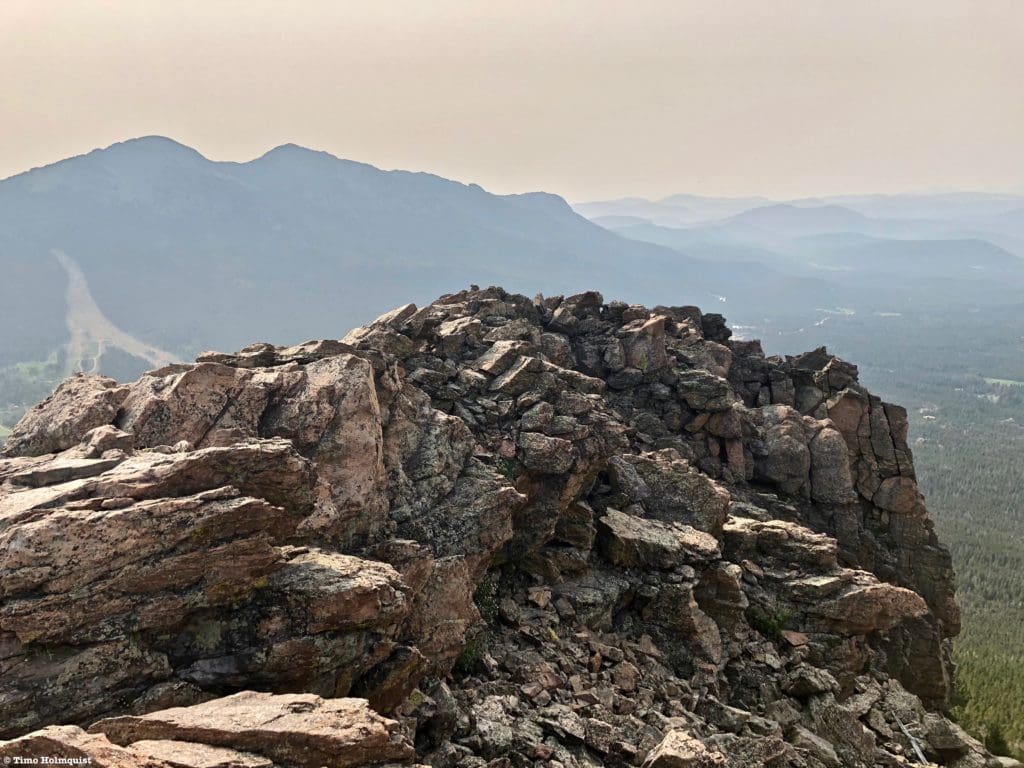
Regardless of how you get on top of this prominent rock ridge, it is not the actual summit.
The actual summit.
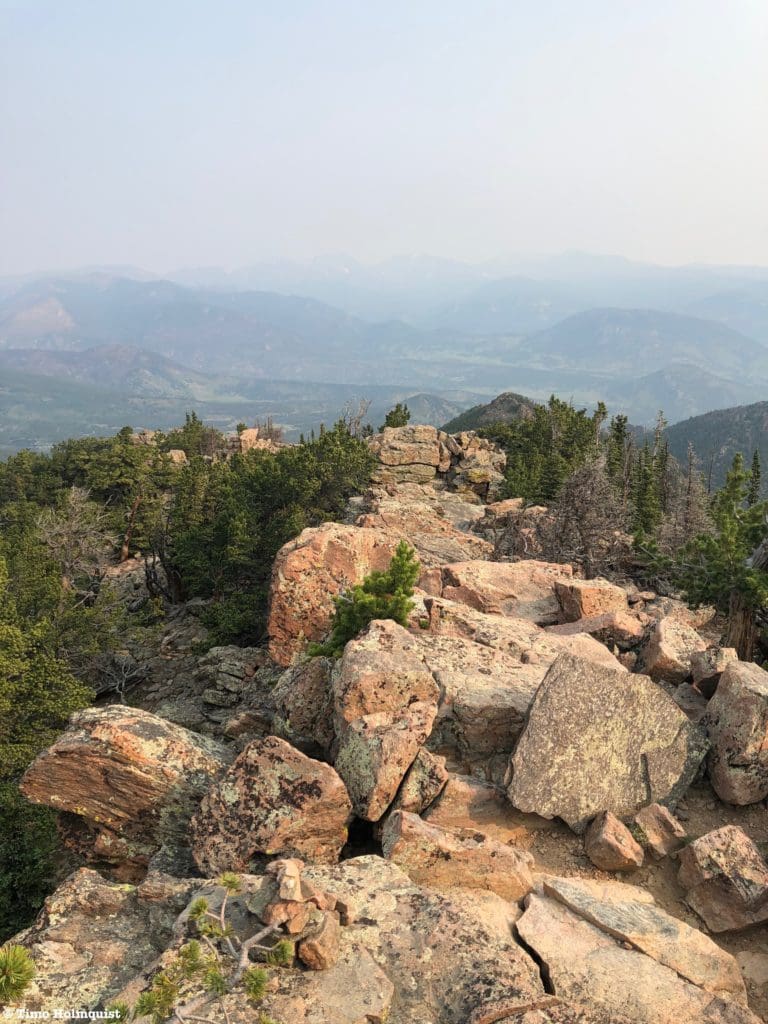
When you find a good place, head left and traverse the dozen or so yards it takes to get to the summit rib. There’s another brief set of scrambly moves to get on top of the rocks, but it doesn’t break Class 2. Voila, you are on top!

The summit view back to Lily Lake and your car.
From any of the rocks near the summit, you’ll be given fantastic views of Meeker and Longs. You’ll know you’re on the highest set of rocks if you can also see down to Lily Lake and where you started the hike.
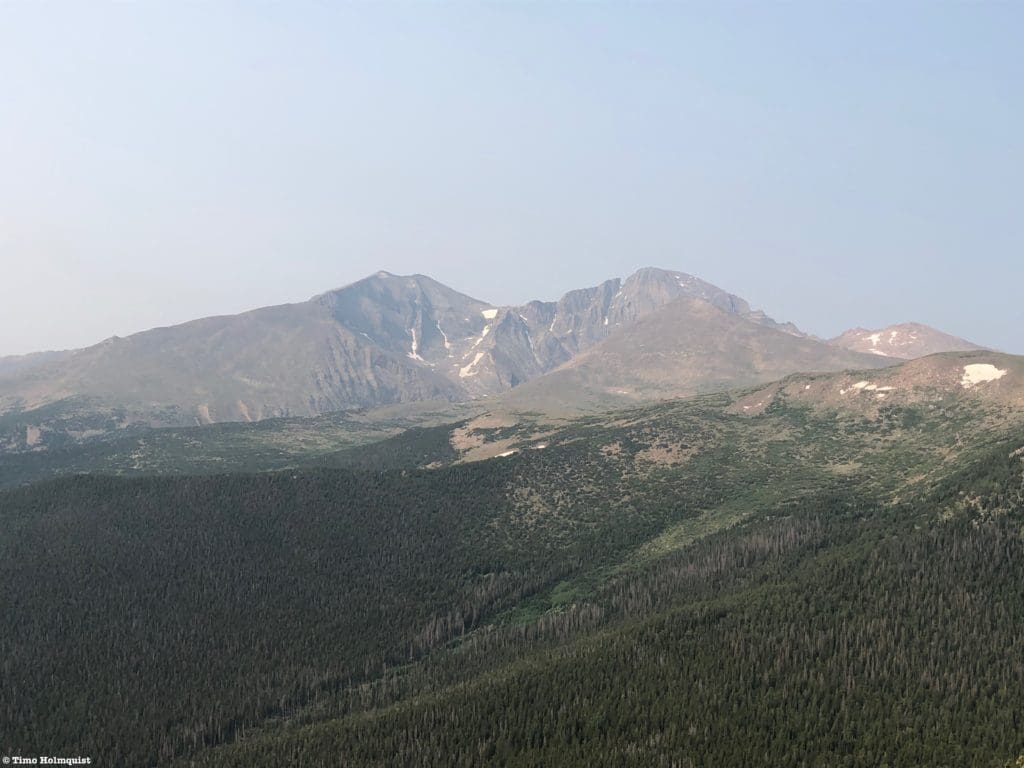
Meeker (L.) and Longs (R.)
If you have a strong phone or camera, it’s worth zooming in on Longs and Meeker. The rock features and sharp profiles of both mountains make it one of the Parks most dramatic areas.
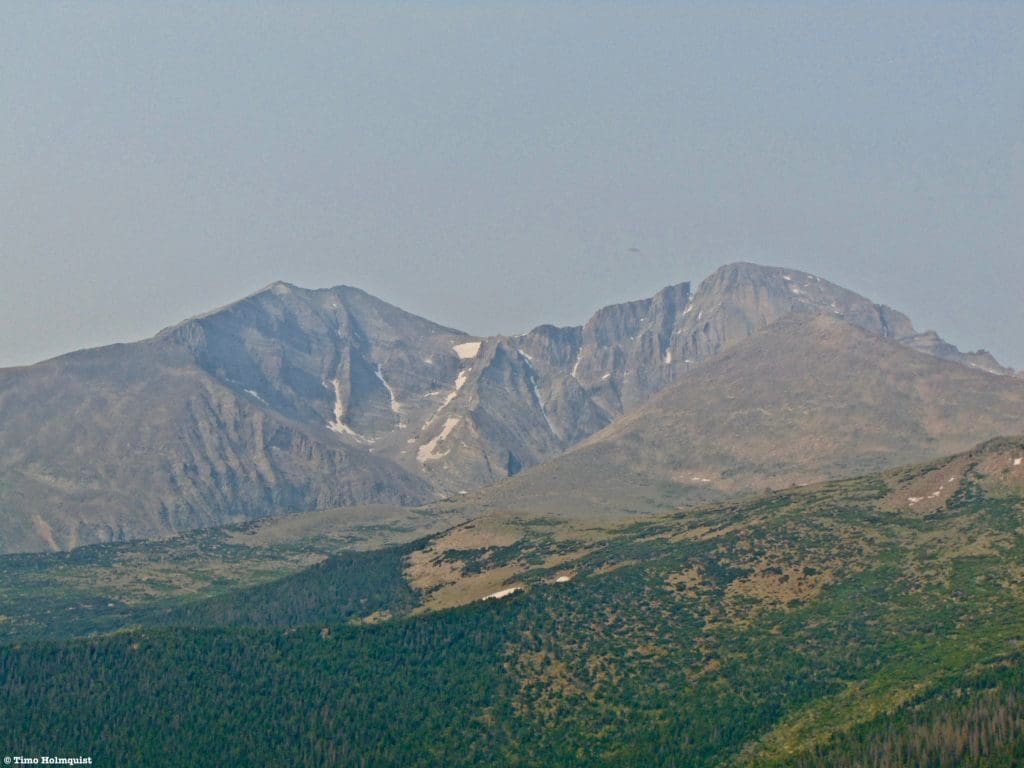
Zoomed in Meeker and Longs.
You’ll also be able to see Twin Sisters Peak across the valley and the rest of the summit rib, which features a dramatic drop off to the SW.
Twin Sisters and the summit rib.
To the north, you’ll be able to stare into the bowl containing Estes Park. On clear days, the Mummy Range will stand out as well. Unfortunately, the day I went up, wildfire smoke from Oregon and California was impacting our weather. Despite the less than ideal weather, I think it’s important to mention since the fire season out west is only increasing. Smoke and haze may be more common in the future than we’d like to think. Always heed fire restrictions.
View northward.
Looking to the west, you’ll be able to see Hallett Peak, Otis Peak, and Andrews Glacier poking out from behind Battle Mountains northern ridge.
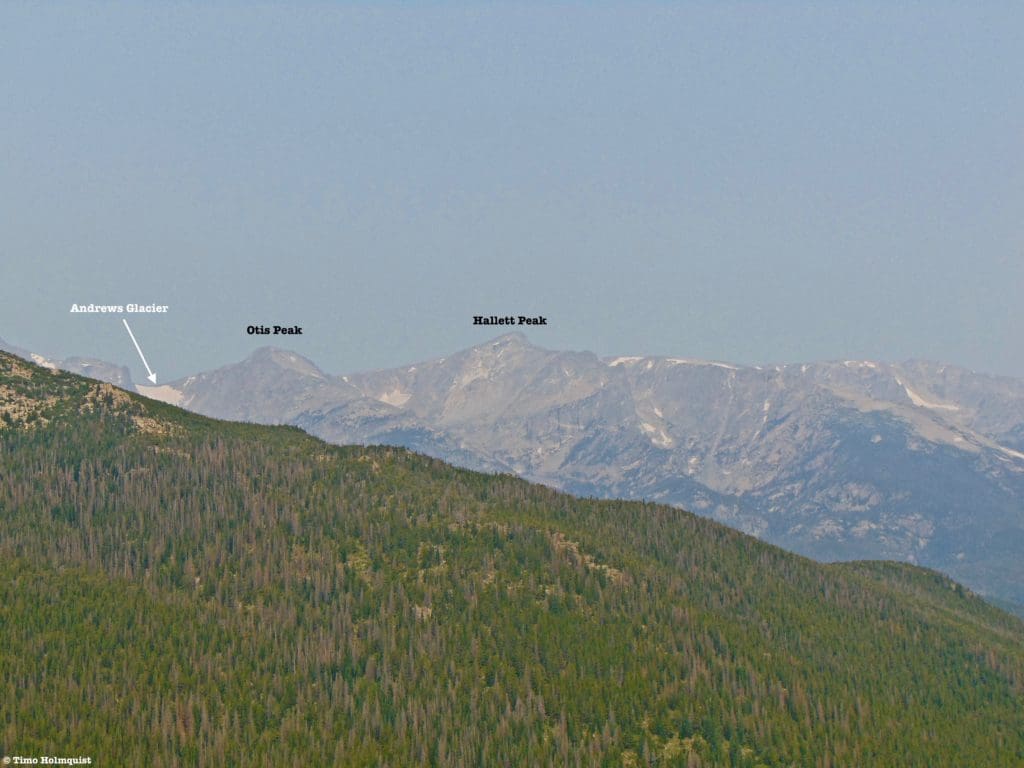
West to the Continental Divide.
When you’ve had your fill of the summit, head back to the second rock rib. From there, it’s easy to miss the standard route down but look out for cairns and peer left along the rib until sighting the gully you used to climb up. Alternatively, you can continue down the rock crest and drop off where able. This option may have you climb up a short Class 3 section, but there is minimal exposure.
Options on the way down.
Once you’ve successfully gotten off of the summit rocks, find the path as it heads back into the trees. Take your time on the descent and follow cairns as the trail twist and weaves down the steep sides of Estes Cone. Your navigational issues should abate once you find yourself back at Storm Pass. For Lily Lake hikers, take a left and repeat the first portion of the hike back to your car.
Lily Ridge becomes more prominent up as you walk the last mile to the parking lot.
Final Thoughts:
National Parks attract a huge variety of visitors and not all of them will find Estes Cone to be a good hike. If your time in the Park is limited and you want to get all the highlights, Estes Cone might not make the list. However, if your goal is to tackle some of the tougher hikes in the Park, it can absolutely be used a convenient training/acclimatization hike. For semi-locals and locals, Estes Cone via Lily Lake offers what few trails left on the eastern side of the park can, relative solitude and a great summit perch.
Popular Articles:
- Guide to the Best Hiking Trails in Rocky Mountain National Park, Colorado
- The Dyrt: The 10 Best Campgrounds In Colorado
- Top Adventure Sports Towns 2021: Boulder, Colorado
- Epic Adventures with the Best Guides In Colorado
- Sky Pond via Glacier Gorge Trail, Rocky Mountain National Park, Colorado
- Scrambling Hallett Peak’s East Ridge, Rocky Mountain National Park, Colorado
- Scrambling Mt. Alice via the Hourglass Ridge, Rocky Mountain National Park, Colorado
- Gorge Lakes Rim Scramble, Rocky Mountain National Park, Colorado
- Black Lake Via Glacier Gorge Trail, Rocky Mountain National Park, Colorado
- Scrambling To The Lake Of The Clouds, Rocky Mountain National Park, Colorado

Enroll With Global Rescue Prior To Embarking On Your Next Adventure.
When a travel emergency arises, traditional travel insurance may not come to your aid, and a medical evacuation can cost up to $300,000.
The cost when you have a Global Rescue membership? $0. That’s why when the unexpected happens, you want the leader in rescue, evacuation and medical advisory behind you. You want Global Rescue.
Terms of Use:
As with each guide published on SKYBLUEOVERLAND.com, should you choose to this route, do so at your own risk. Prior to setting out check current local weather, conditions, and land/road closures. While taking a trail, obey all public and private land use restrictions and rules, carry proper safety and navigational equipment, and of course, follow the #leavenotrace guidelines. The information found herein is simply a planning resource to be used as a point of inspiration in conjunction with your own due-diligence. In spite of the fact that this route, associated GPS track (GPX and maps), and all route guidelines were prepared under diligent research by the specified contributor and/or contributors, the accuracy of such and judgement of the author is not guaranteed. SKYBLUE OVERLAND LLC, its partners, associates, and contributors are in no way liable for personal injury, damage to personal property, or any other such situation that might happen to individuals following this route.


