


High Point:
12,930 feet on top of Mt. Julian

Total Ascent:
~5,000 feet

Difficulty:
Very Hard

Distance:
13.5 miles from Milner Pass (14.7 if adding Terra Tomah)

Route Type:
Out and Back
The G.L.R. Scramble is an exhilarating challenge in Rocky Mountain National Park, Colorado. Its remote location and intricate scramble will keep you alert. This 13-15 mile hike along the Continental Divide includes multiple summits and offers an unforgettable adventure.

Overview
The G.L.R. (Gorge Lakes Rim) Scramble detailed in this trail review is most commonly accessed from two different ways. The first and by far the most popular is from the summit of Mount Ida. From the summit of Ida, the rest of the mountains lining the cirque can be seen. From Ida to Cracktop (hitting Chief Cheley along the way), it’s little more than a Class 2+ scramble with some small Easy snow slopes to deal with through June.
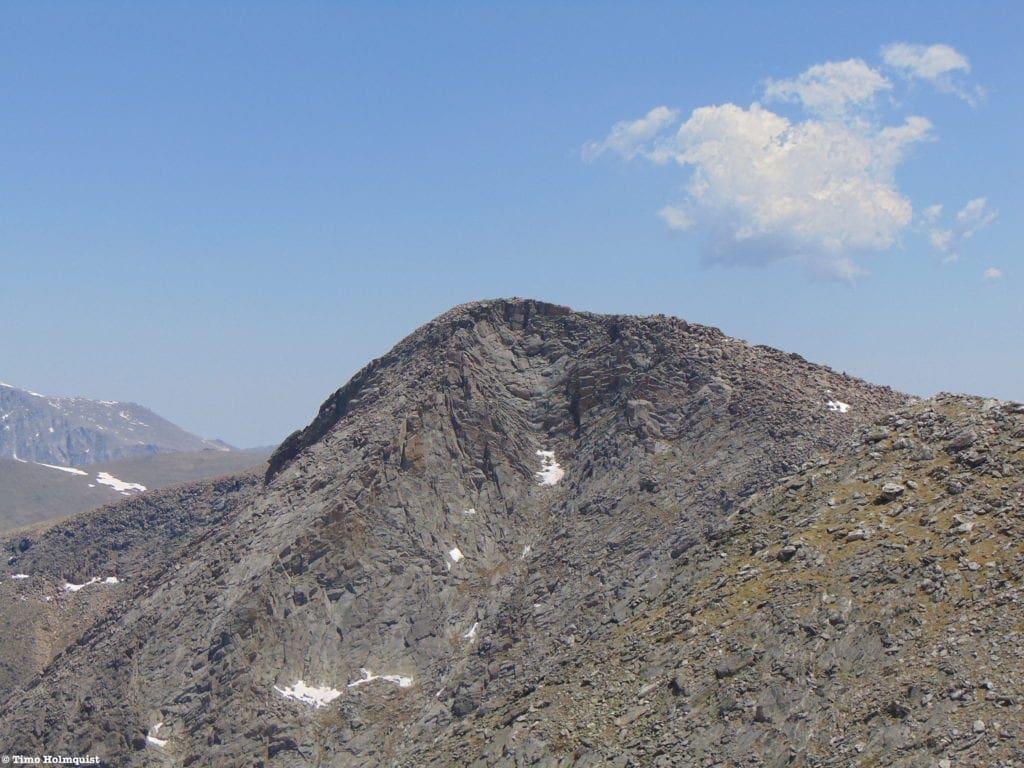
Once you commit to tacking on Julian, the route gets serious with a Class 3 rating and optional Class 4 and 5 moves along the ridge crest from Cracktop to Julian. The star section of the scramble is the east ridge of Cracktop, where route finding, exposure, scrambling, and good weather are all necessary.
The second method of doing the scramble would be to launch from the Little Rock Lake backcountry site, work your way up the basin, passing a slew of pristine lakes along the way, and tackling the cirque in whatever way seems most appropriate. In either scenario, these are remote peaks and require hours spent above treeline with little relief from the summer sun or places to hide in the event of a thunderstorm.
The remote nature of the peaks adds to their overall allure, and the surprisingly complex nature of the scramble certainly keeps you on your toes. It’s a worthy addition to any Rocky Mountain National Park outing and can provide that elusive feeling of solitude that more famous peaks in the area cannot.
If you’re ready to tackle a 13-15-mile hike along a remote stretch of the Continental Divide with mandatory scrambling and as many as five summits traversed, consider this route.
- Scramble Rating:
- Ida to Chief Cheley and Cracktop: Class 2+
- Cracktop East Ridge: Class 3 (Optional Class 4 and 5).
- Julian: Class 2
- Terra Tomah (optional add on): Class 2
- Snow Rating: Easy when present. Snow likely gone by the beginning of July.
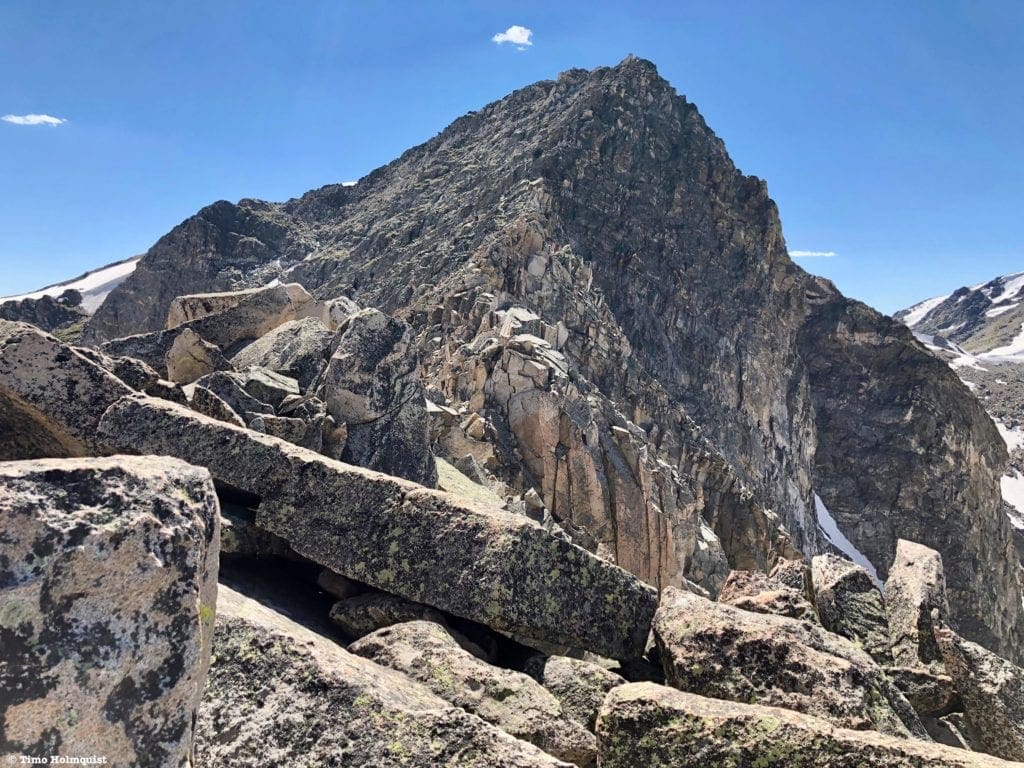
The intimidating East Ridge of Cracktop.
Table of Contents:
Article Navigation: Click on any of the listed items in the table of contents below to jump to that section of the article. Similarly, clicking on any large, white section header will jump you back to the Table of Contents.
Best Alpine Scrambles in Colorado
Reach non-technical mountain summits while exploring low angle rock, traveling through talus and scree, crossing streams, navigating dense forest growth, and walking on snow-covered slopes.
Scales and Criteria:
This article utilizes four separate rating systems: Difficulty, Popularity, a Snow Rating, and a Scramble Rating indicating the hardest move or set of moves encountered. The scramble rating employs the Yosemite Decimal System. The Snow Rating refers to the steepness of any snowy sections encountered and the time of year snow is most likely encountered. There are two snowy areas on this route, both between Chief Cheley and Cracktop, though they are only factors through late June.
Chief Cheley Peak with Mt. Ida behind and to the left.
Difficulty Ratings:
- Easy: less than 5 miles, less than 500 ft. of elevation gain
- Moderate: 5-10 miles, 500-2000 ft of elevation gain
- Hard: 5-15 miles, more than 2000 ft. of elevation gain
- Very Hard: 10+ miles, more than 3,500 ft. of elevation gain
Popularity Ratings:
- Low: Large sections of trail all to yourself
- Moderate: Sizeable trail sections to yourself, crowding possible on busy summer weekends
- High: You’ll be seeing people, still a chance for solitude in spring/fall/winter.
- Very High: Almost always busy.
Scramble Rating:
- Class 1: Established hiking trail the entire length of the adventure. Low chance for injury.
- Class 2: Typically involves cross-country navigation, possibly using hands for balance but not required, steeper than Class 1.
- Class 3: Hands and feet used to scale areas, must use hands to proceed (either for balance or to help pull you up a section), increased exposure, a fall could be fatal. Helmet recommended, along with grippy hikers.
- Class 4: Climbing on very steep terrain just shy of vertical, falls could be fatal, hands employed for grip and balance continuously, ropes advisable but scalable without. Helmets are highly recommended, along with grippy hikers.
- Class 5-5.4: Vertical climbing that involves technical rock-climbing moves, exposed, falls likely to be serious or fatal, possible to scale without ropes but only for very experienced veterans. Helmets, grippy hikers, and/or rock-climbing shoes necessary.
- Class 5.5 and up: Not covered as scrambling, full-on rock climbing with ropes, helmets, etc.
Snow Rating
- Easy: Less than 30 degrees
- Moderate: 30-40 degrees
- Steep: 40-50 degrees
- Very Steep: 50+ degrees
The YDS system is widely used in North America but can be quite subjective, so it is not perfect. The biggest differences I’ve encountered between Class 3 and Class 4 sections have to do with slope angle, exposure, and putting weight and pressure on hand grips (4) instead of using hands and feet interchangeably as supporting points of contact (3). It is not possible to climb a Class 4 section without using your hands to pull up some or all of your body weight. Typically, a Class 4 section will also require some type of rock-climbing move, like stemming, where hands or feet are pressed in opposition as if climbing the inside of a chimney. If downclimbing, a key difference is that most people will descend a Class 4 section facing inward, i.e., your back faces the exposure.
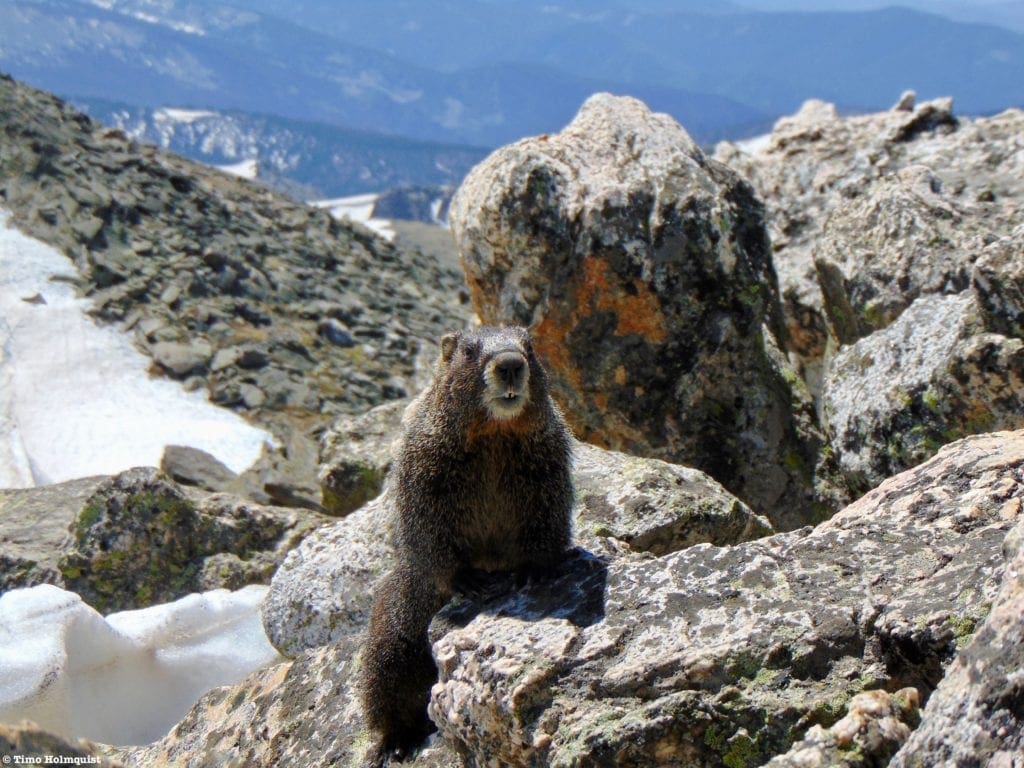
A marmot near the summit of Chief Cheley.
The Ultimate Offline GPS Hiking & Ski Maps
See why onX Backcountry is the ultimate GPS navigation app for your outdoor pursuits. Try Today for Free. No credit card required.

Directions to Trailhead:
Whether by Mt. Ida or the Little Rock Backcountry site, the best place to start is Milner Pass off of Trail Ridge road. From the east, enter Rocky Mountain National Park by one of two entrances, US 34 or US 36, and make your way west across the alpine portions of the road. You’ll pass the Alpine Visitor Center and descend below treeline on the western side before reaching Milner Pass. There is a parking area on the left-hand side of the road with space for a dozen cars or so. There is also a pit toilet at the trailhead.
From the west, enter the park near Grand Lake and drive up the Kawuneeche Valley. The road will eventually wind up the ridges, passing by the Lake Irene trailhead on its way to Milner Pass. Park on the right and locate the trailhead by the large kiosk on the north end of the parking area.
Since this trail takes off from a national park, there are fees and passes to consider. For the 2021 season, the park service requires two separate passes for each visitor: an entrance pass and a time slot. An entrance pass is always required, and prices can be found here. The time slot is necessary if entering Trail Ridge between 9 AM and 3 PM. For early starters (recommended), you can enter the park on Trail Ridge before 9 AM. If you do, you only need an entrance pass. Bear Lake Road has its own time slot issue, so it’s best to avoid that area entirely. The eastern entrance via US 34 by Old Fall River Road is generally less busy than Beaver Meadows.
The majority of the route from the summit of Mt. Ida.
The Ten Essentials: How to Equip Yourself for the Backcountry
Packing the “Ten Essentials” whenever you step into the backcountry, even on day hikes, is a good habit. When something goes awry, you’ll truly appreciate the value of carrying these items that could be essential to your survival.
Field Notes:
This is a long and tiring hike. While the overall mileage may not be as long as other routes in the area, the trailless scramble between Ida and Julian is time-consuming, especially the eastern ridge of Cracktop. You are also above treeline for more than 11 miles, making water consumption and hats/sunscreen a mandatory planning component. I’d recommend bringing at least four liters. Early in the summer, you’ll be able to melt snow for water, but by July this option is largely gone. In a pinch, you can descend to Highest Lake beneath Chief Cheley for a top-up, but generally speaking, water is scarce above the trees.
These mountains are also remote, and any medical situation encountered here would likely involve a complicated rescue operation. A complete medical kit, communication, and a backup plan are all highly encouraged for anyone set on completing this scramble. The route is a challenging endeavor, but with careful scouting, you shouldn’t have to deal with anything more than Class 3 scrambling.
The review below is written from the top of Ida so as to focus on the toughest portions. This means you still need to hike four miles to get to the top of Ida before committing to the scramble. The top of Julian is the halfway point of the route described; if you tag Terra Tomah, anticipate another ~1.2 miles added to your total.
Even though the mountains on this route don’t break 13,00 feet, you’ll be spending hours upon hours at elevations over 12,000 feet, so understanding the signs and symptoms of altitude sickness is useful. Altitude sickness is generally mild, but it’s important to understand what it means and how to combat it. The large alpine portion of the hike also means that bail-out options are few and far between. It is imperative that you choose a clear day with minimal storm potential before attempting this route.
For your forecasting needs, start with the Trail Ridge forecast, which is measured at the Alpine Visitor Center. There’s a fairly accurate mountain forecast for Mt. Ida as well, which is useful for the first and last 4 miles of the day. Mt. Julian also has a forecast that helps with the farther portions of the route. Check the wind and lightning chances often because mountain weather can change rapidly, and fighting 40-mile an hour winds in the alpine is a decidedly negative experience.
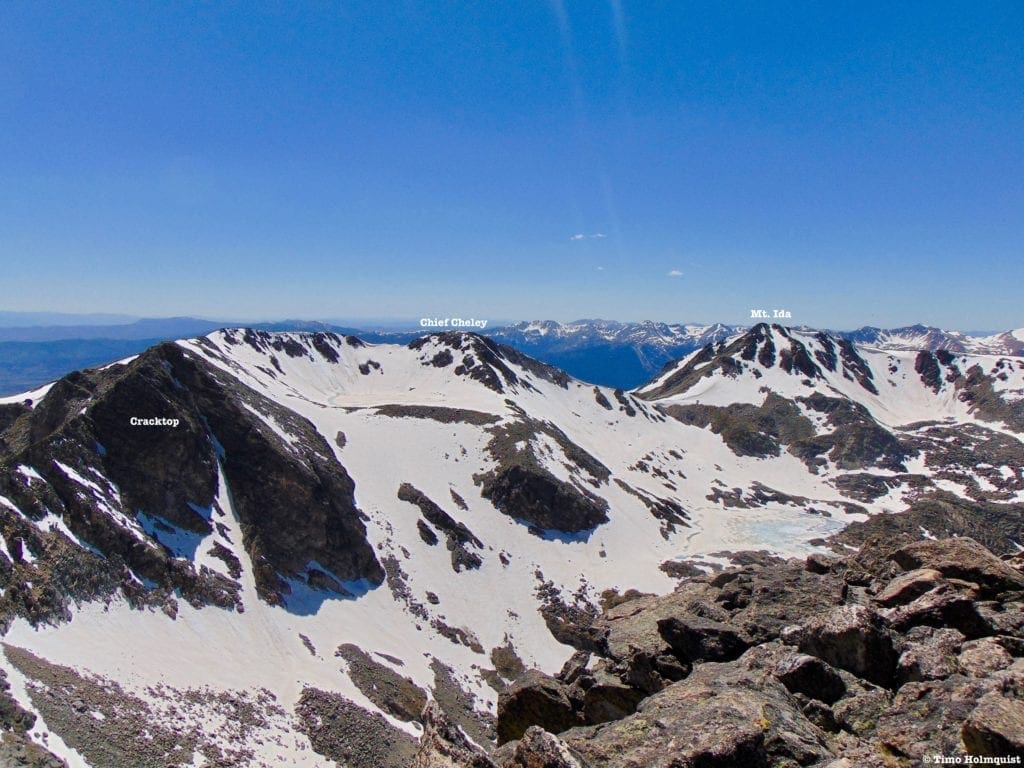
The view southwest from the summit of Cracktop.
Enroll With Global Rescue Prior To Embarking On Your Next Adventure

Global Rescue is there for you in an emergency when you’re hiking, kayaking, snowmobiling, fishing or enjoying the outdoors and get injured or ill. Push the red button and their medical and security experts will come to your aid.
Places to Stay:
Camping near Rocky Mountain National Park will cost you. The options for free area camping are limited. On a positive note, there are plenty of options, and the National Park is within driving distance of Fort Collins, Boulder, and Denver.
- Estes Park: Known as the gateway to Rocky Mountain National Park, Estes sees nearly 80% of park traffic as opposed to the much quieter western entrance near Grand Lake. The town has a ton of lodging options.
- Grand Lake: Located near the sleepier western entrance, Grand Lake sits on the edge of the deepest natural lake in Colorado and within half an hour of two more lakes (Shadow Mountain and Lake Granby).
- Rocky Mountain National Park Camping
- Moraine Park Campground: $30 per site. $20 in winter. Established campground with perks, facilities, campfire grate, wood for sale in summer, and bear boxes to store food. Only loop B is open in the winter, and it’s first-come, first-serve.
- For summer, a reservation is needed way in advance to secure a spot.
- Glacier Basin Campground: $30 per site. Established campground with the same perks as Moraine Park. Reservation required.
- Backcountry Campsites: Rocky Mountain National Park has backcountry sites that you could book in advance. There is no open camping in the backcountry; it must be at designated backcountry sites. Please check the park website for more details. Backcountry sites require an overnight permit of $30.
- Camping near Estes Park
- Estes Park Campground at Mary’s Lake: Established campground, pricey $45-55. Good backup if other campgrounds are full.
- Hermit Park Open Space: $30 for a tent site, price increases if towing a trailer or for group spots.
- Estes Park Koa: Rates dependent on what you’re bringing with you but will run more than $50 a night in the busy season.
- Free or close to free: but a little farther (if you’re willing to drive)
- Ceran St. Vrain Trail Dispersed Camping ($1)
- County Road 47. Users have reported trash and ATV noise at this location, but it is free.
Journal:
From the top of Mt. Ida, you’ll be able to see the rest of the scramble. Directly to the east, you have a 530-foot drop to a saddle and then a 470-foot rise to the top of Chief Cheley. Going over this dip the first time isn’t too bad, but it can be a real pain on the way back.
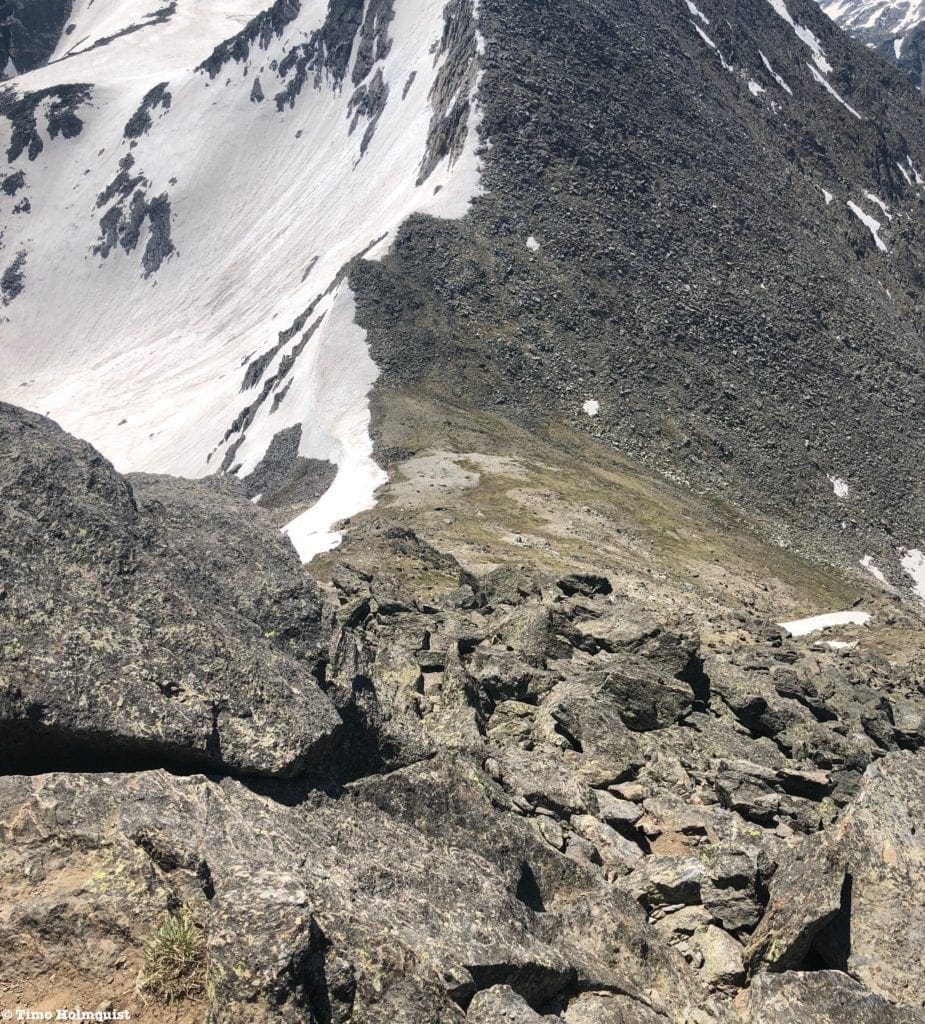
Looking down to the saddle from near Ida’s summit.
While it looks quite precipitous, there is a way to drop from the summit ridge and descend directly to the saddle without dealing with any downclimb over a Class 2+. Take your time and scout the right path. The nose of the ridge shouldn’t have any lingering snow cover but test out your foot and handholds in case rocks shift. As you get down to the saddle, the talus will be replaced with smaller rocks strewn across an alpine grassy area.
The climb up Chief Cheley is best executed by sticking near the ridge crest. Like descending off Ida, the ascent features loose rocks and grass before turning to an all talus affair near the top. The last little ridge scramble to Chief Cheley’s obvious summit rock is fun.

Chief Cheley from the slopes of Ida.
Chief Cheley is an interesting mountain because it clearly occupies a high point but is next to a long unnamed ridge crest that, from certain angles, appears taller than Chief Cheley.
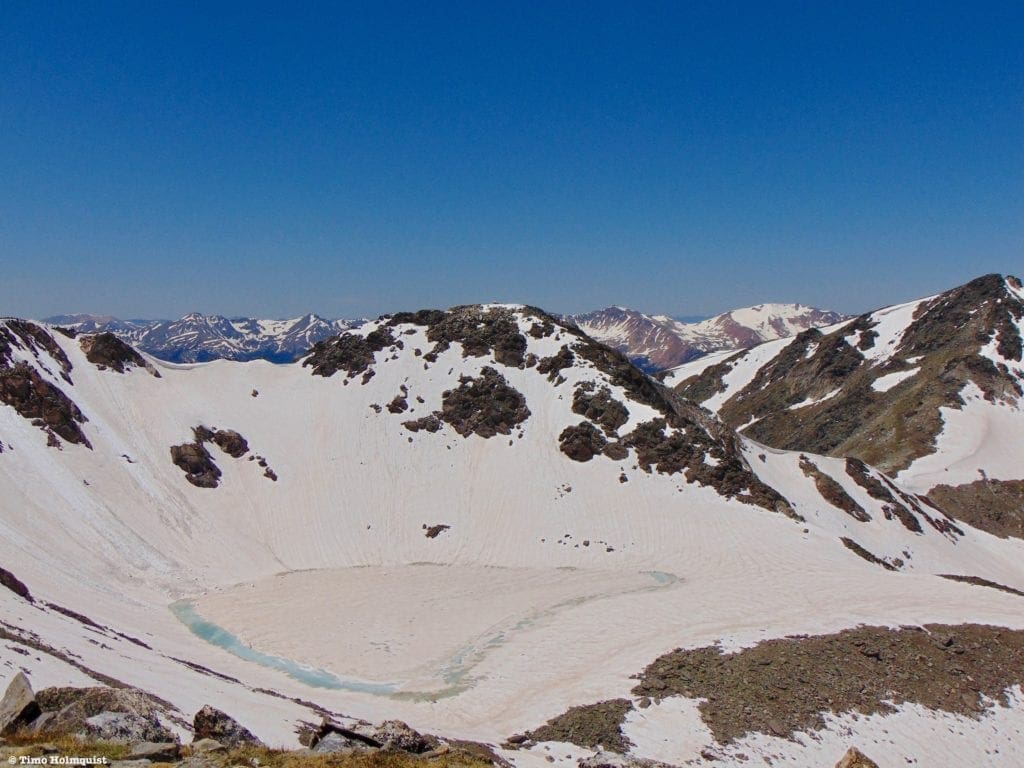
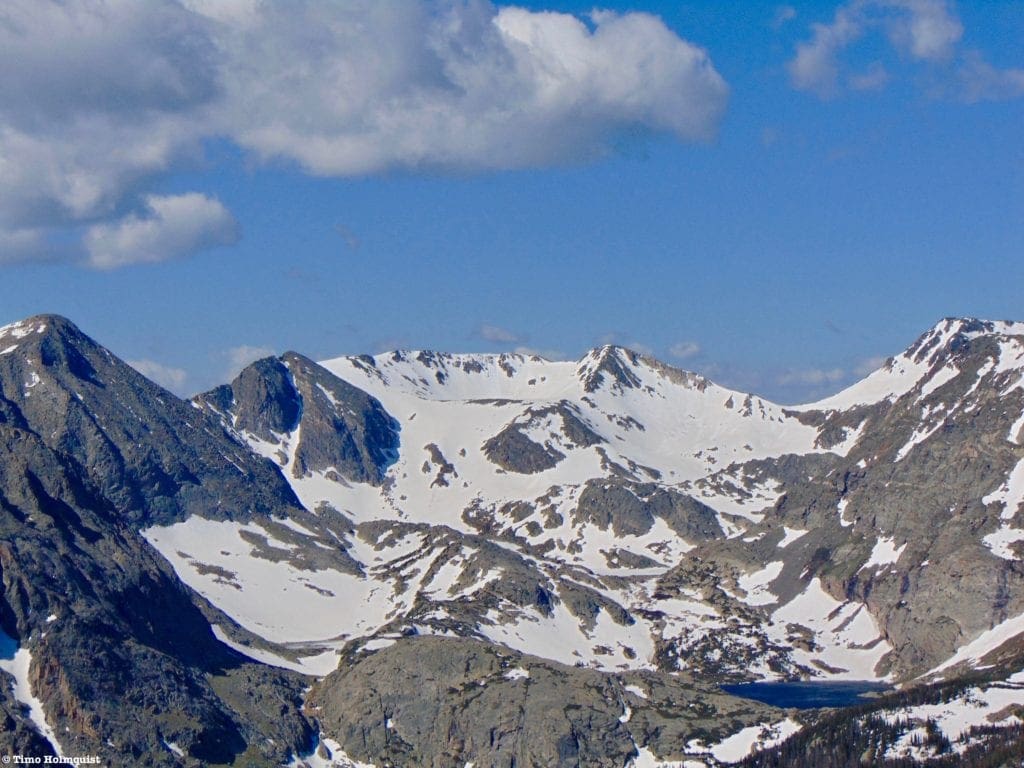
Chief Cheley from the slopes of Cracktop. Highest Lake is below it, and Mt. Ida is to the right. The Never Summers are the mountains in the background.
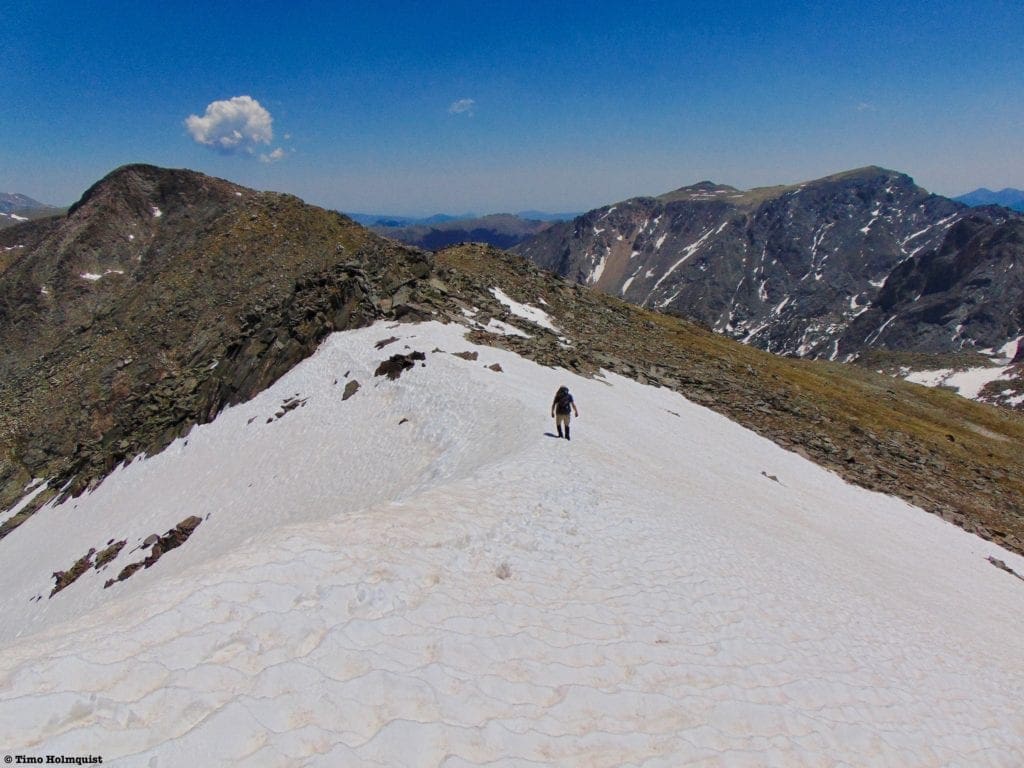
This part of the scramble is very straightforward and enjoyable; just follow the ridge as it circles Highest Lake.
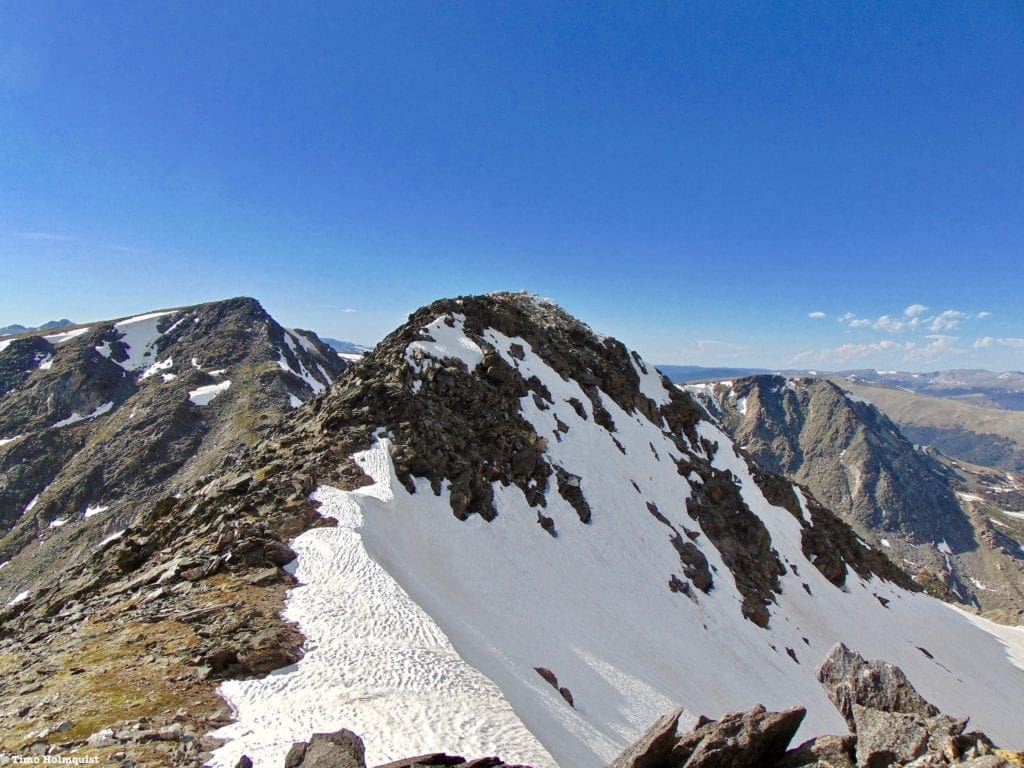
The next part of the scramble from Chief Cheley’s summit.
Before you get to Cracktop, you may encounter your first snowfield. By mid-July, the snow will have melted, but for June attempts, it’s an easy slope to cross.
Crossing the first potential snowfield.
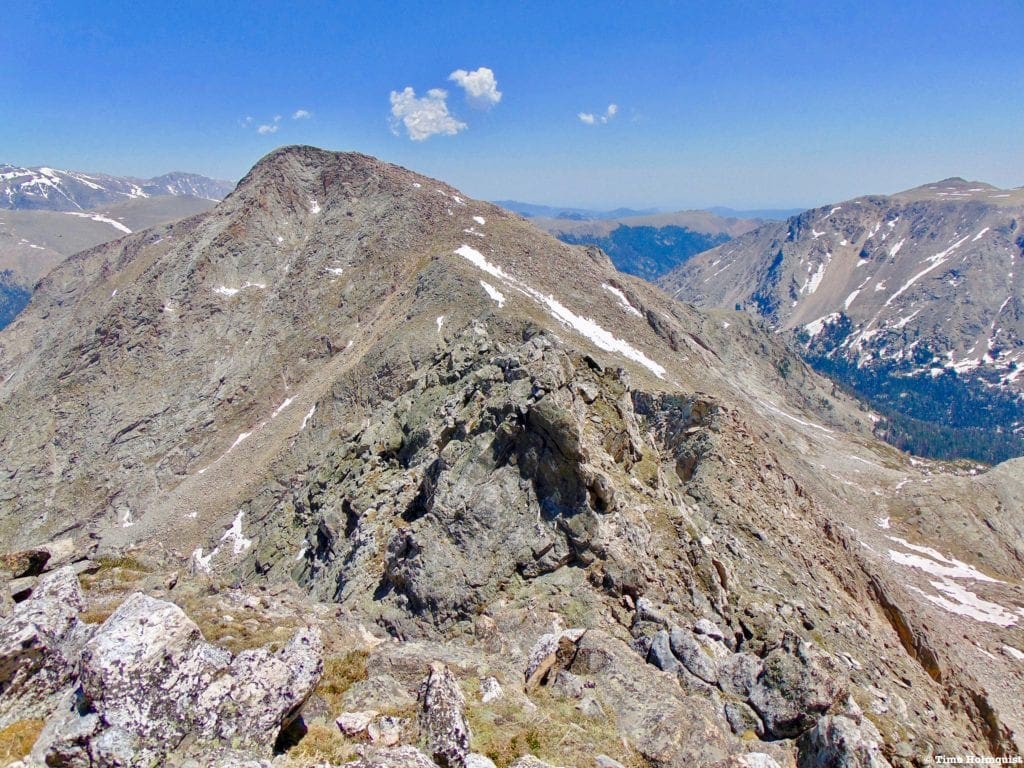
The ridge continues on, crossing another easy snowy slope before finally hitting the saddle with Cracktop.

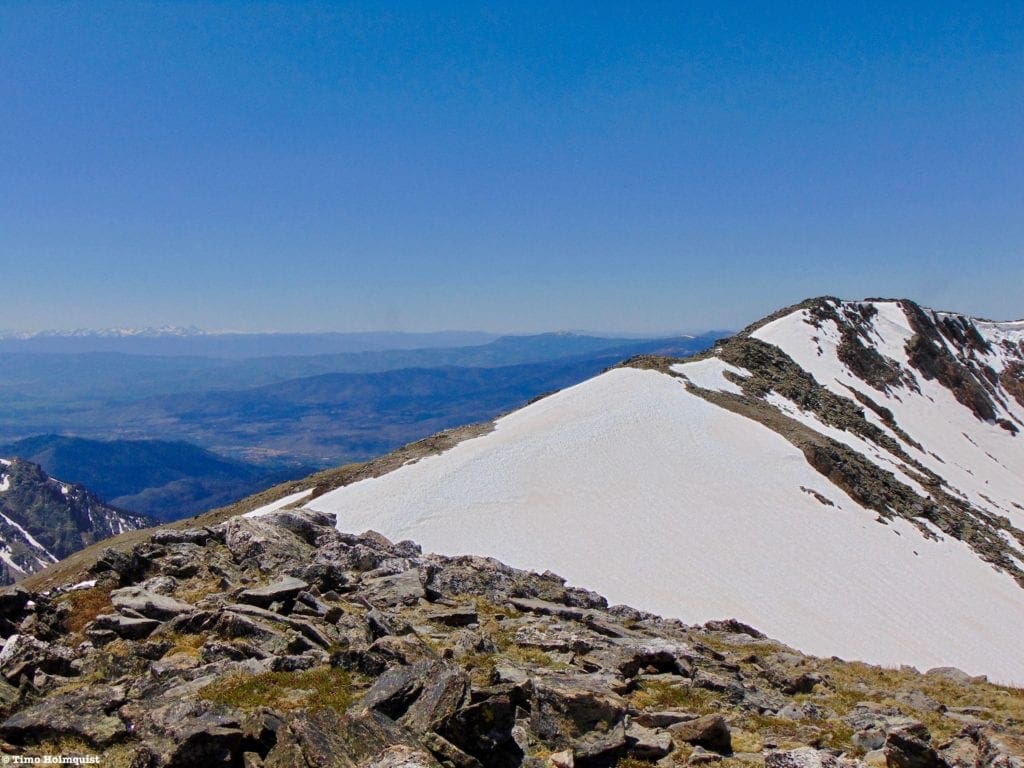
The ridge to Cracktop with Julian poking out behind.
The climb to Cracktop is minimal, you can spice it up by sticking to the ridge crest, but even then, it’s hardly more than a few Class 2+ moves.

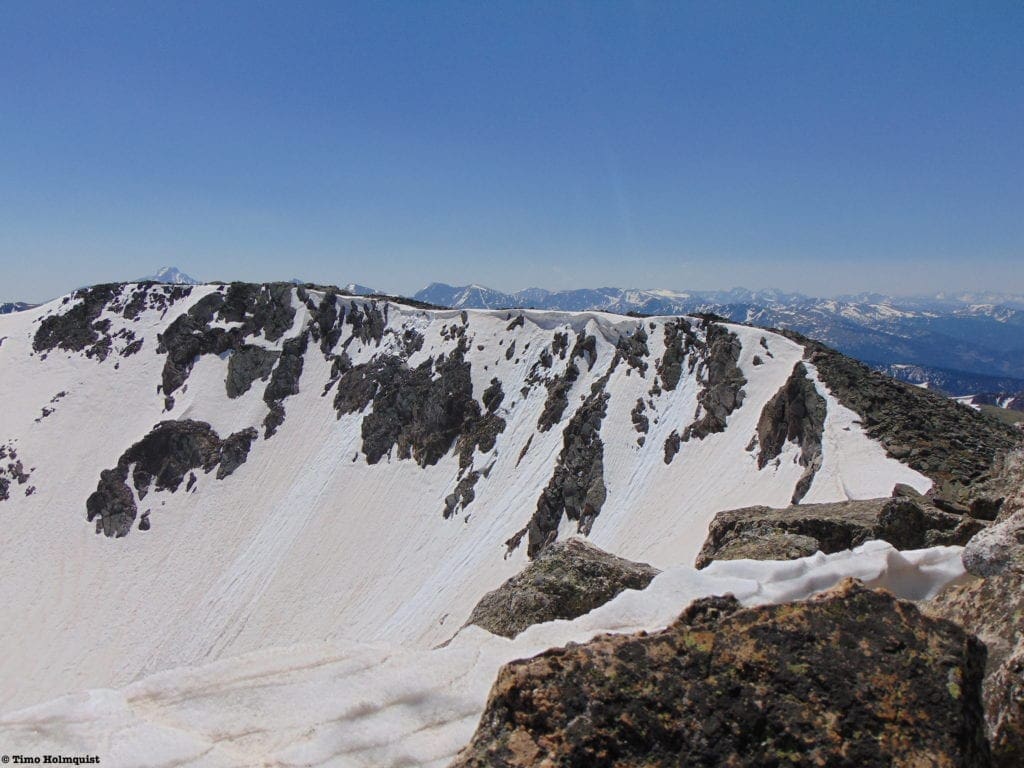
Looking back at the high ridge near Chief Cheley and Highest Lake
Enjoy the summit of Cracktop and the panoramic views in either direction. Once you commit to Julian, the route gets tough.
After you start descending east, you’ll notice the character of the route change immediately. Cracktop’s hidden eastern ridge is dramatic and complicated. Unlike other scrambles, you’ll be tested descending first before redoing the ridge on the way back.
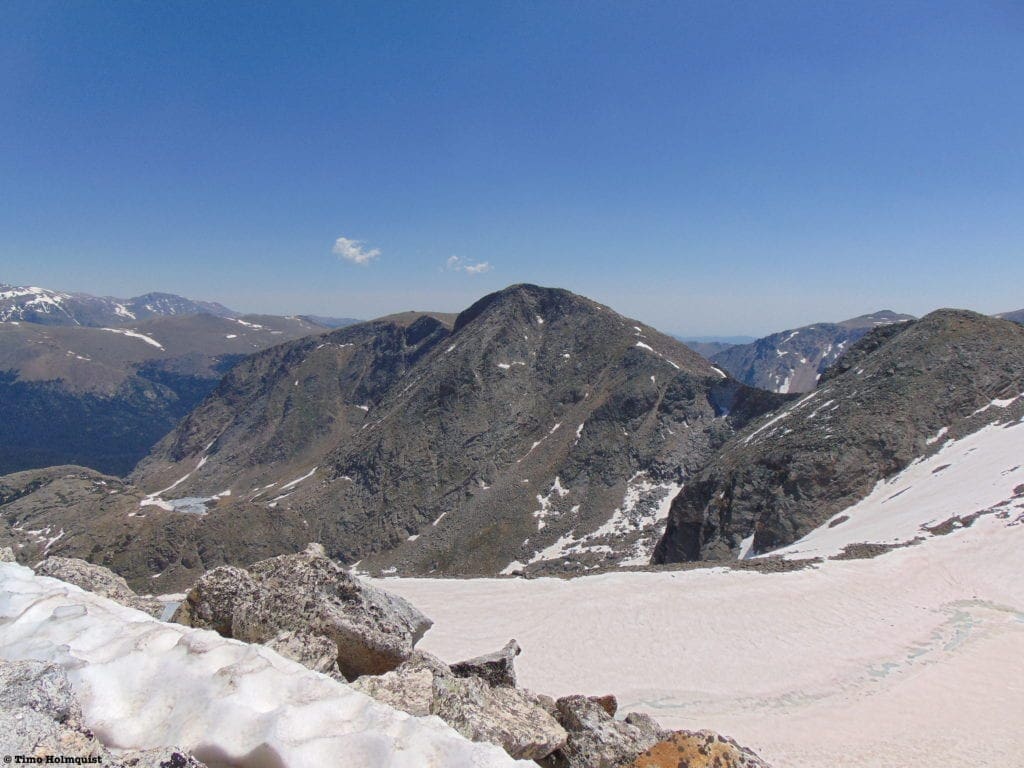
Looking ahead to Julian.
It is tempting to stay close to the ridge crest, and this mentality will save you a lot of elevation gain/loss; however, there are two points on the ridge where detours are more than likely mandatory. If you are a proficient Class 5 climber or have ropes with you, it’s possible to stay on the crest the whole way, but for mere mortals, descending a Class 5 section is not the best method.
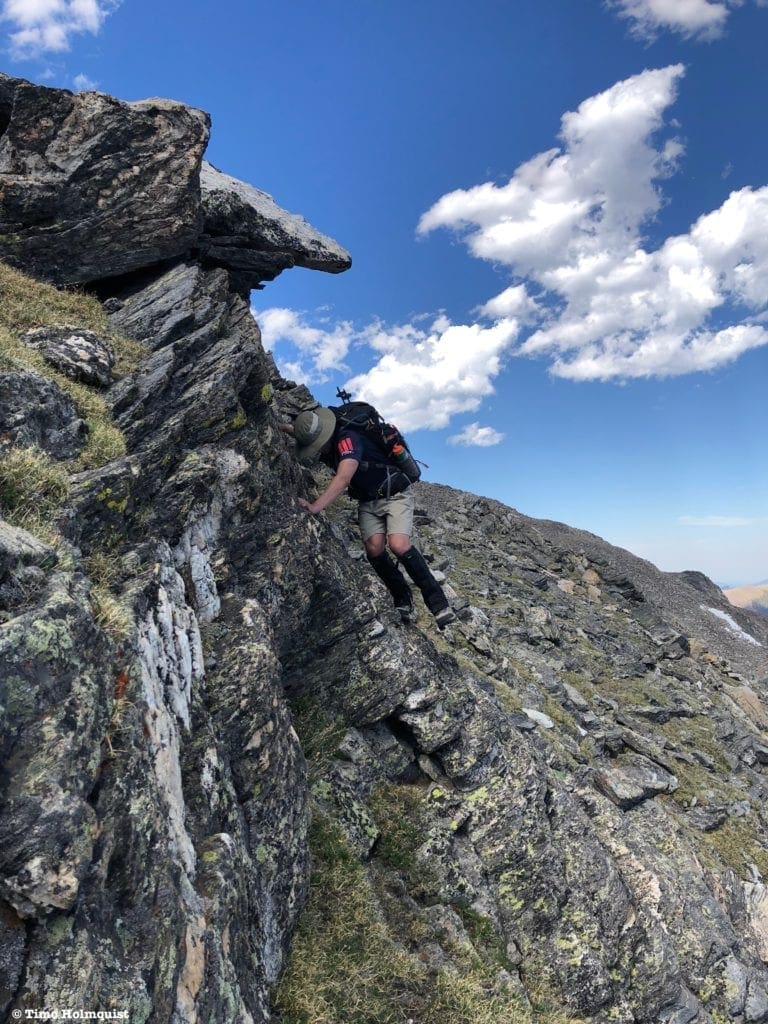
Start by aiming for the subpeak just to the east of the summit and staying along the ridge. Alternatively, you can drop below the subpeak, but some Class 3 traversing will be necessary. If traversing, be aware that the south side of Cracktop is composed of a series of diagonal grass benches interspersed with cliff bands that you’ll need to navigate around.
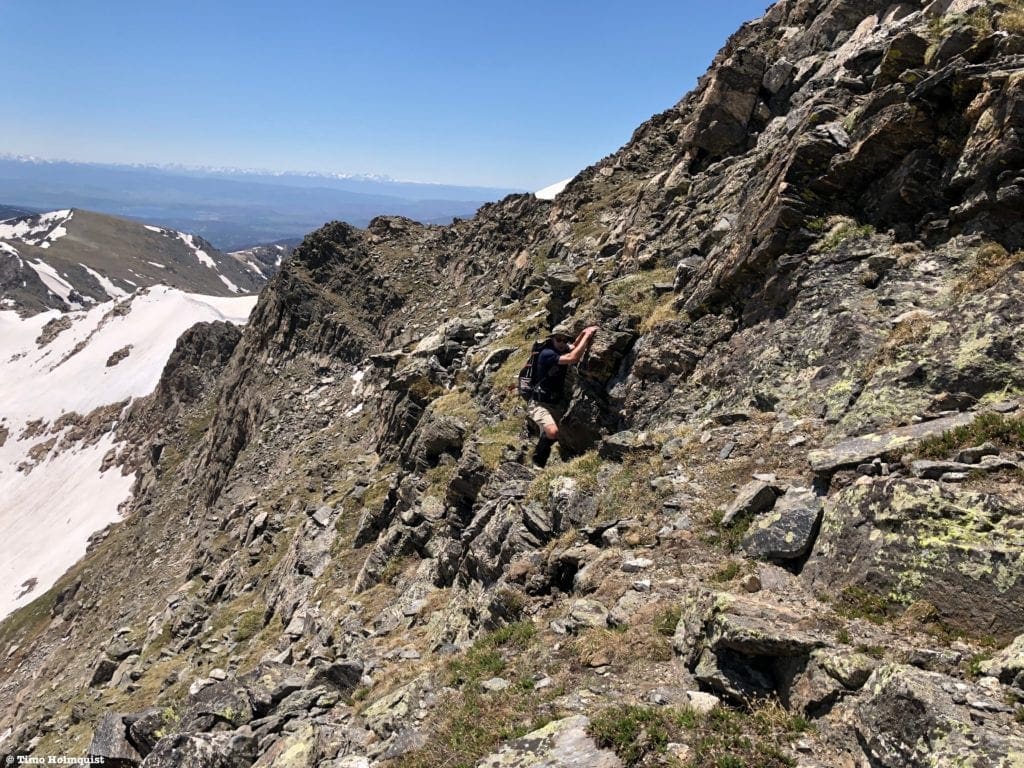
An example of the traversable terrain below the ridge top
If you stick to the ridge, take a second to find where Cracktop Couloir chisels into the north slope. The couloir ends into the ridge you’re downclimbing, and the exposure is airy and severe.
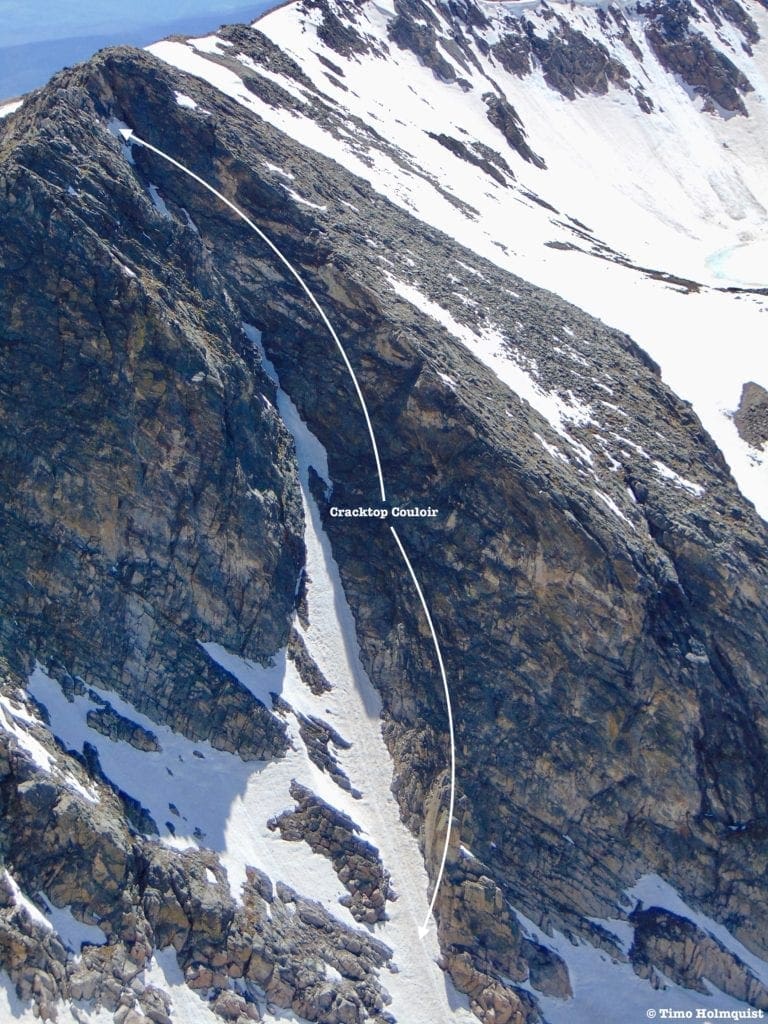
Cracktop Couloir from Mt. Julian
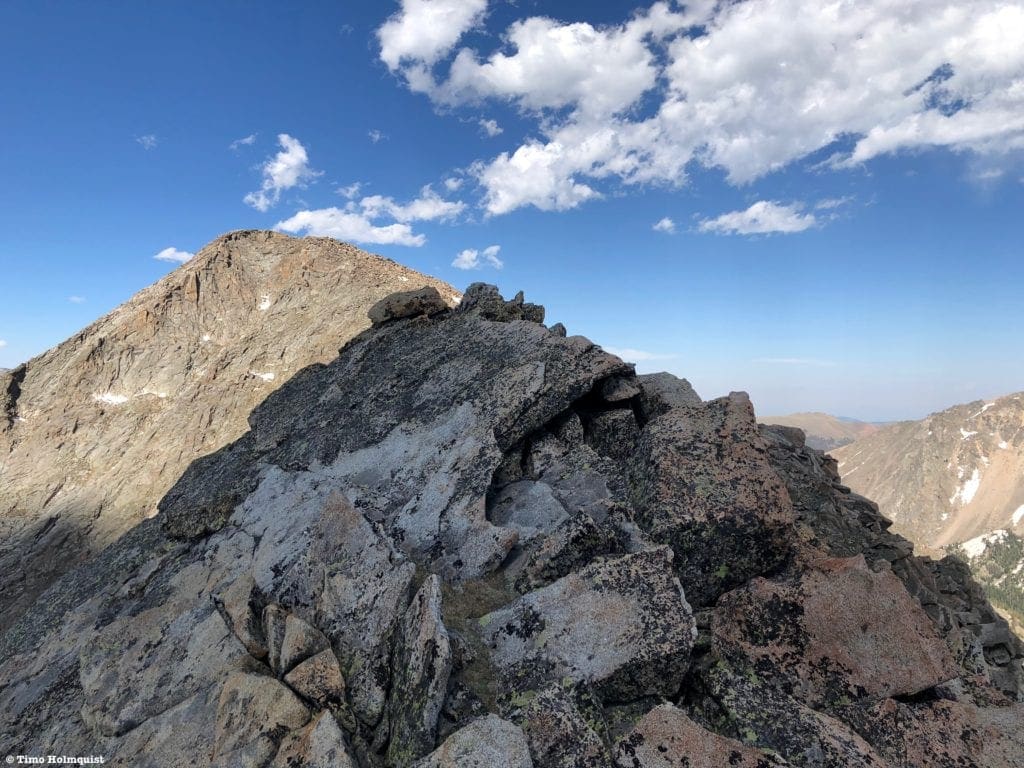
On the other side of the subpeak, you can keep descending while keeping the difficulty at an upper Class 3 rating.
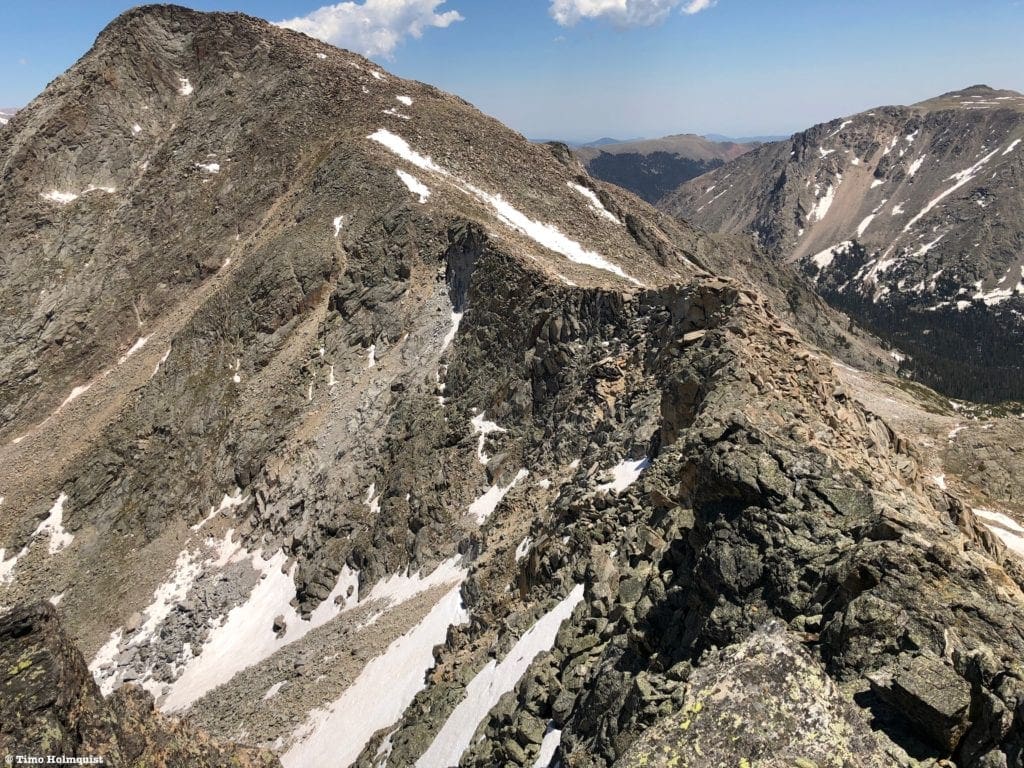
The profile of the narrow ridge with Mt. Julian looming behind
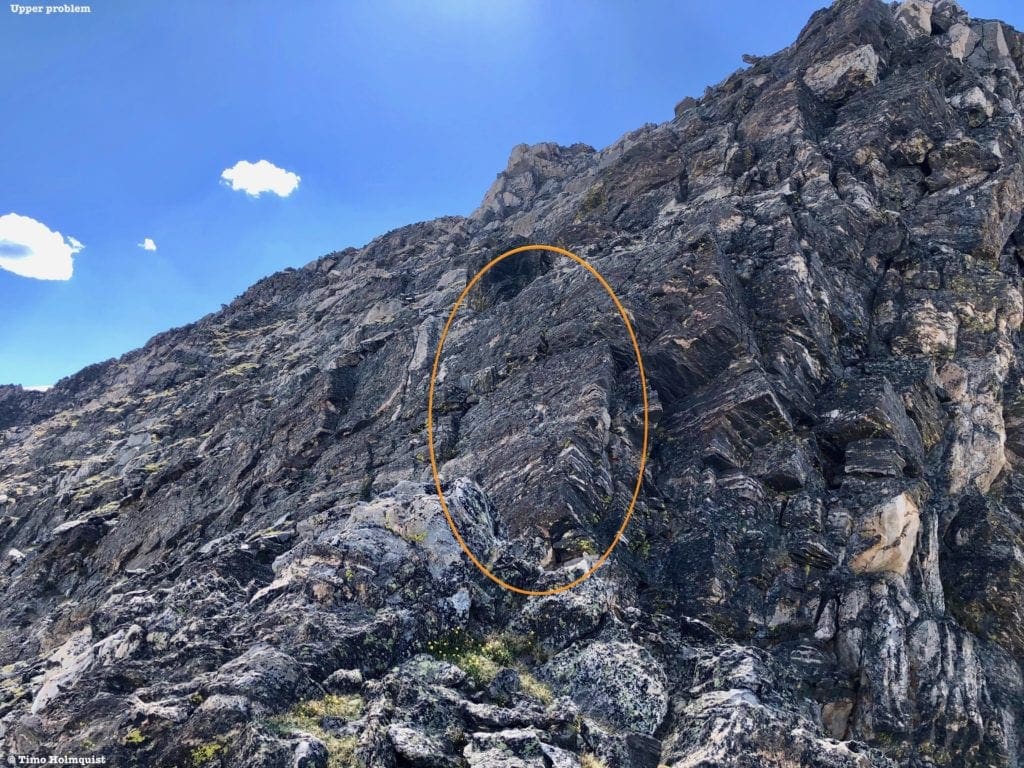
Don’t get too excited though, you’ll run into the first Class 5 section fairly quickly.
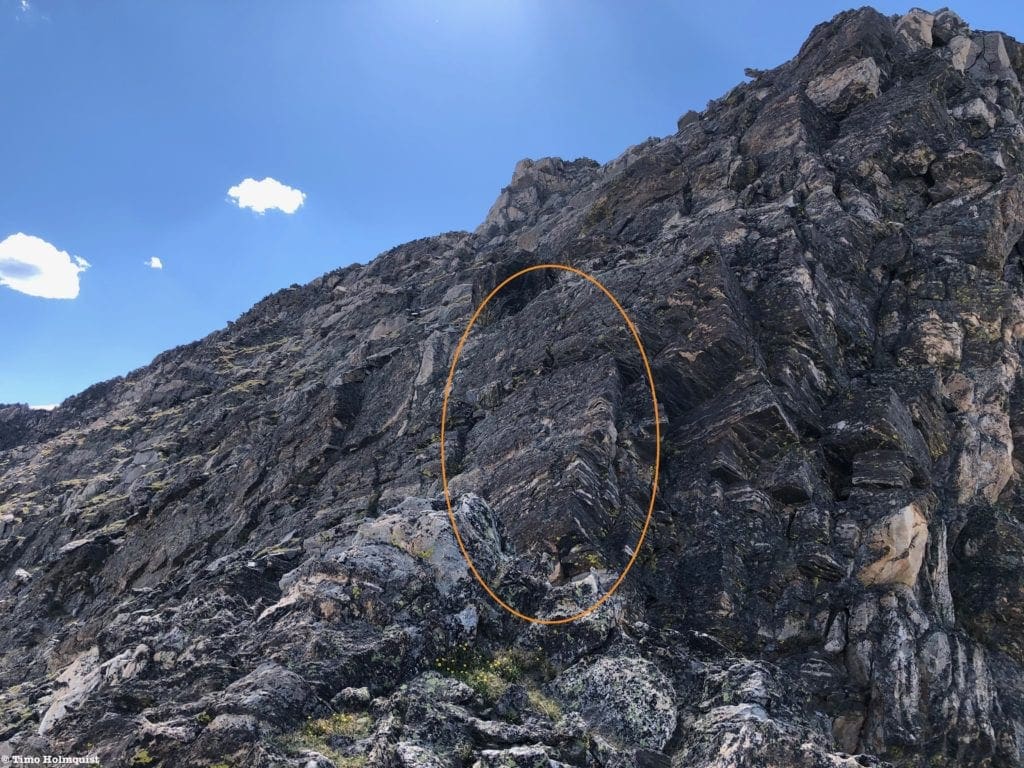
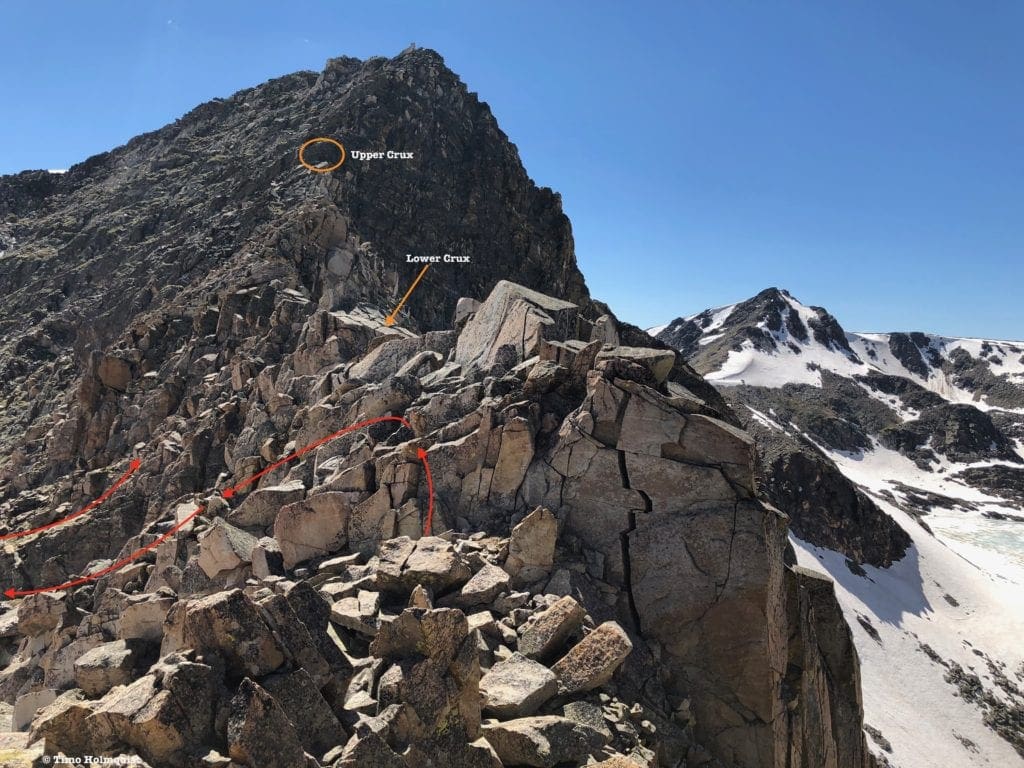
The upper crux.
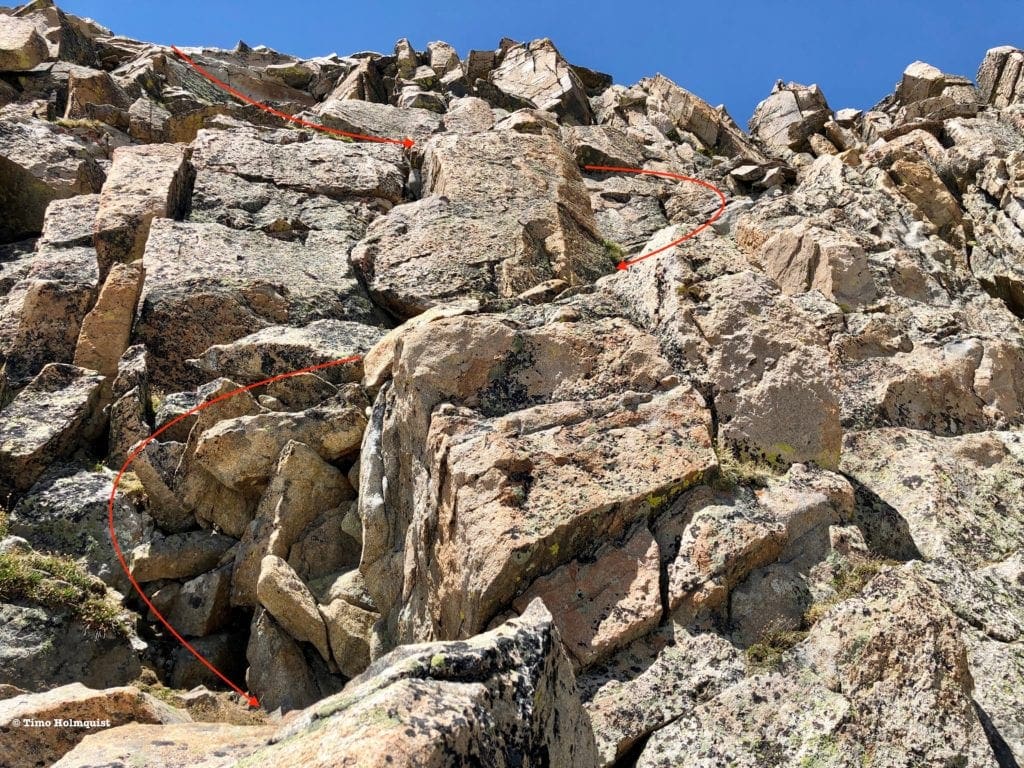
To bypass, find a sneaky Class 4 downclimb that breaks through one of the cliff bands to the south (your right). It’s possible to scout for a Class 3 method, but some additional gain/loss will be required.
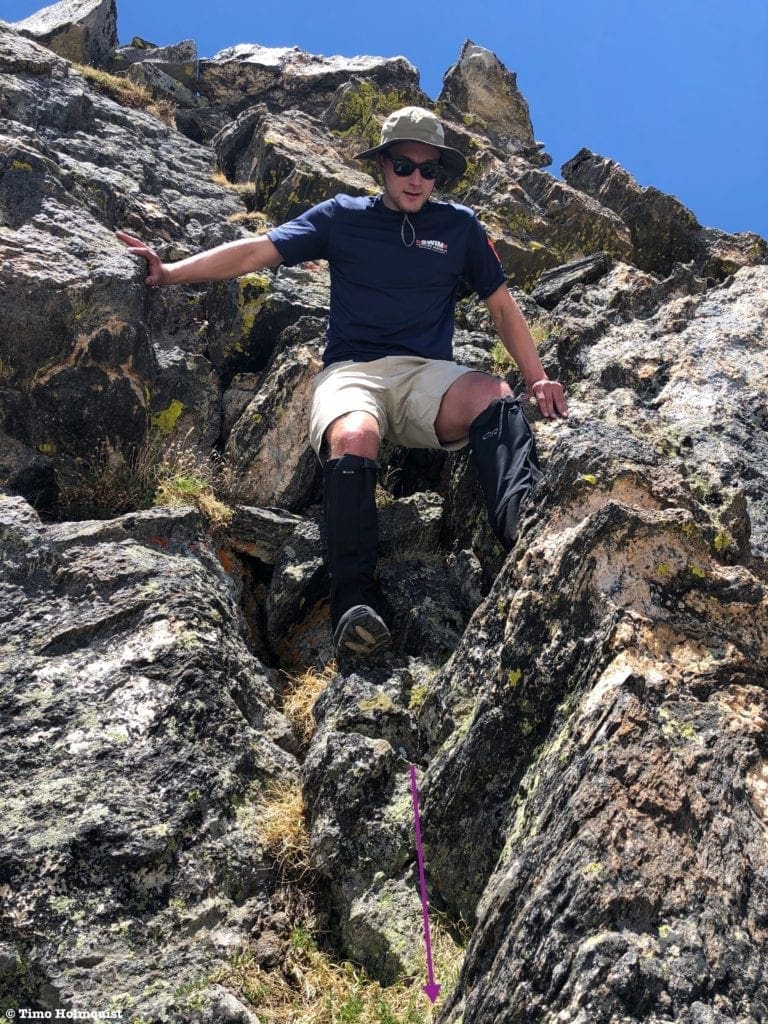
One of many down climb options that avoid the upper crux.
Once you find a way to downclimb or avoid the upper crux, the rock will change color from a darker variety to a lighter, almost sandy color.
Passing below the first crux.
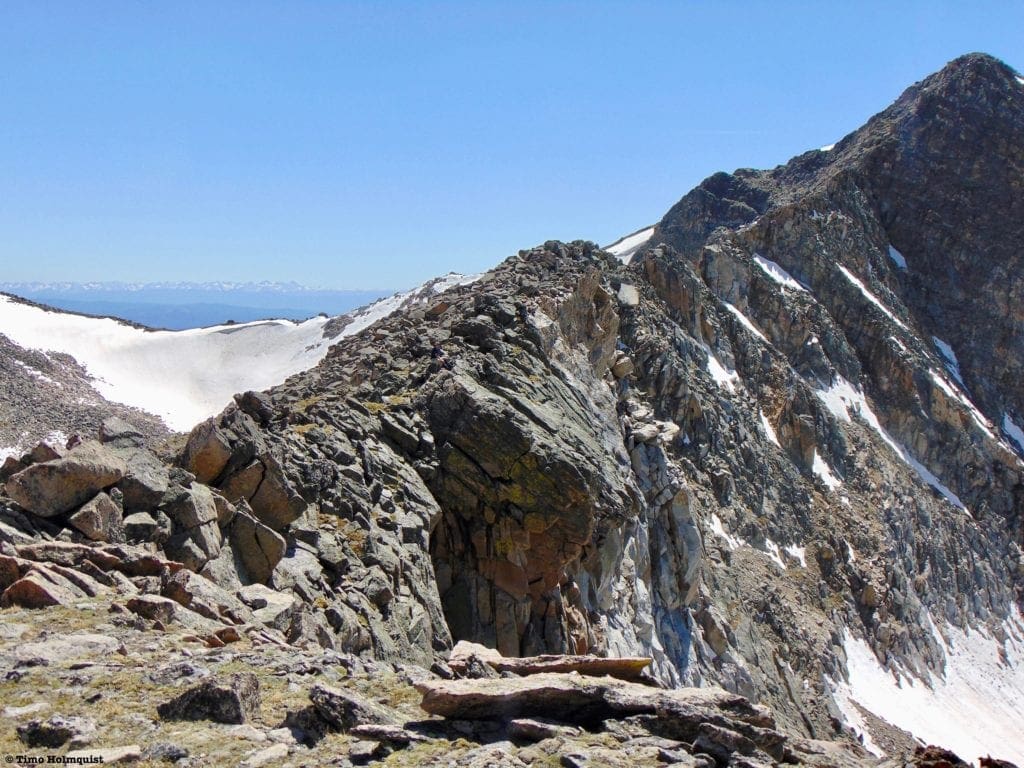
From here, you can successfully stay on or very near the ridge for a while until running into the lower crux.

Descending along the ridge crest with imposing Cracktop behind.
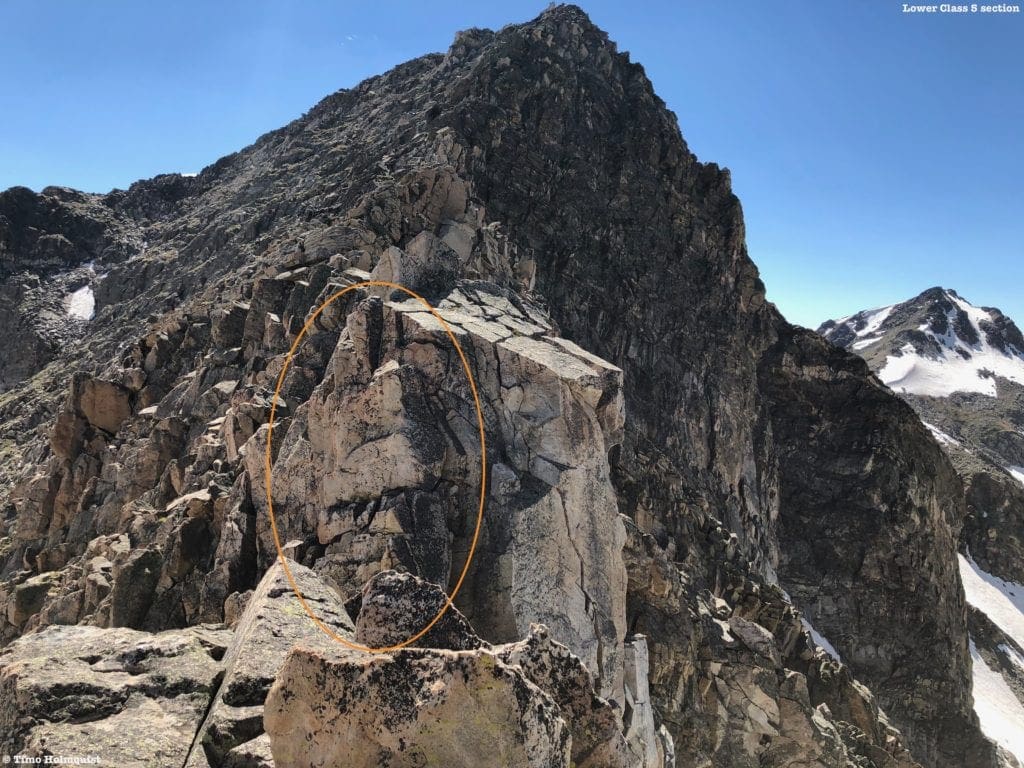
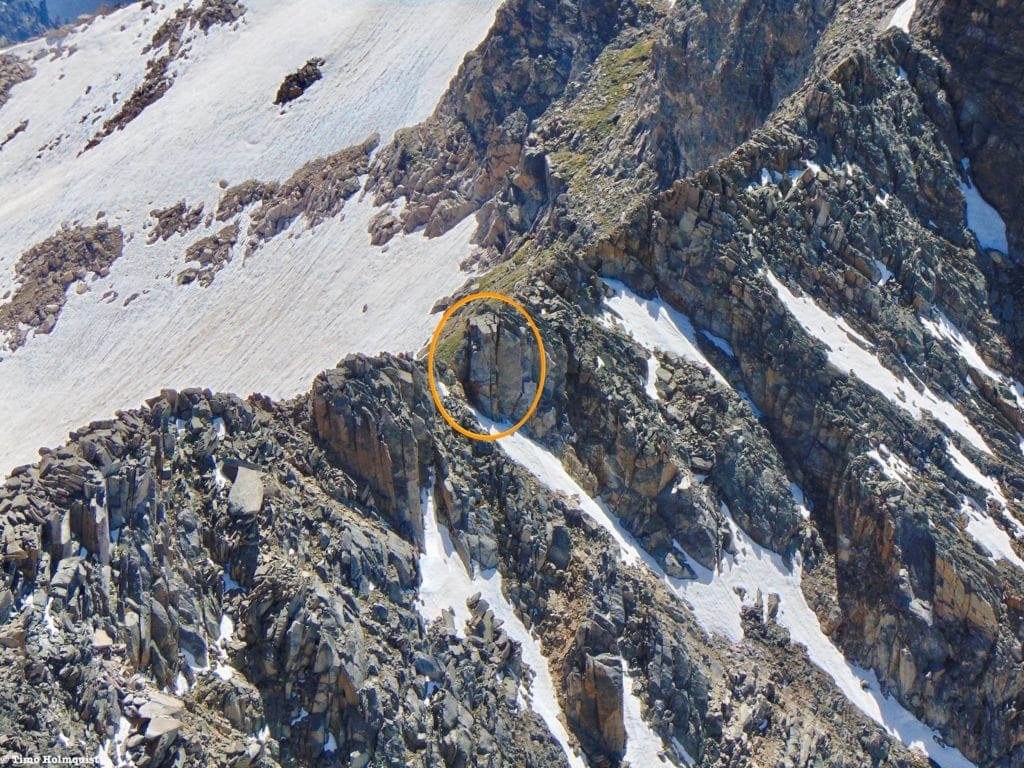
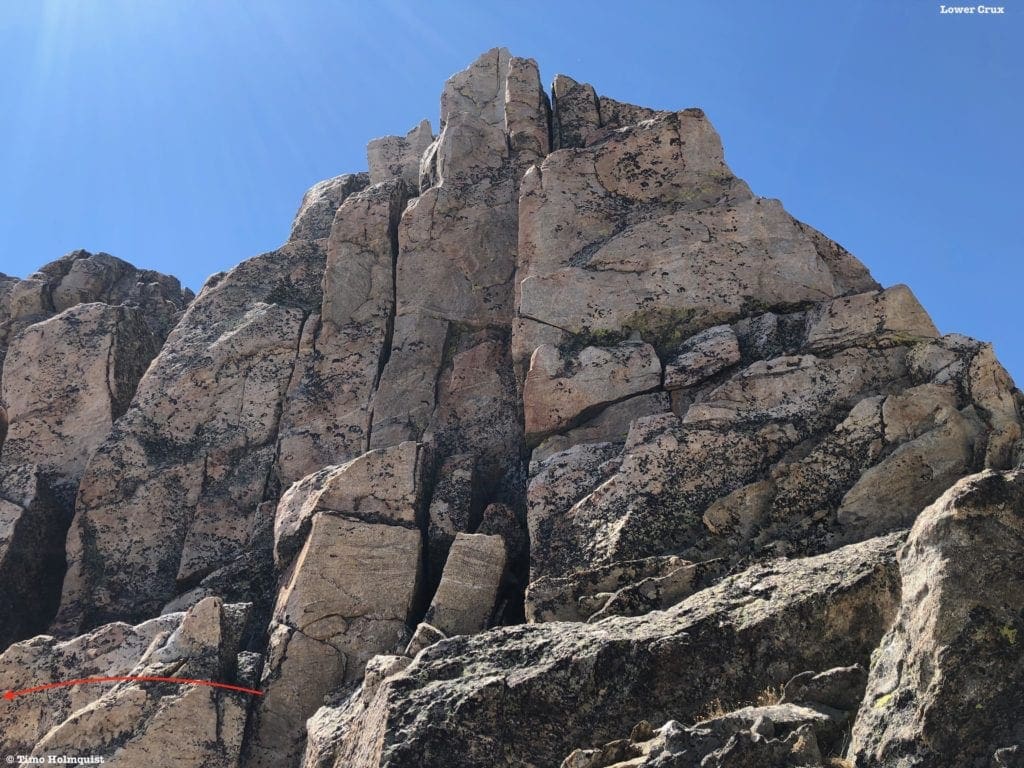
The lower crux is the toughest part of the ridge and involves another Class 5 downclimb.
What the ridge looks like right before cliffing out into the crux.
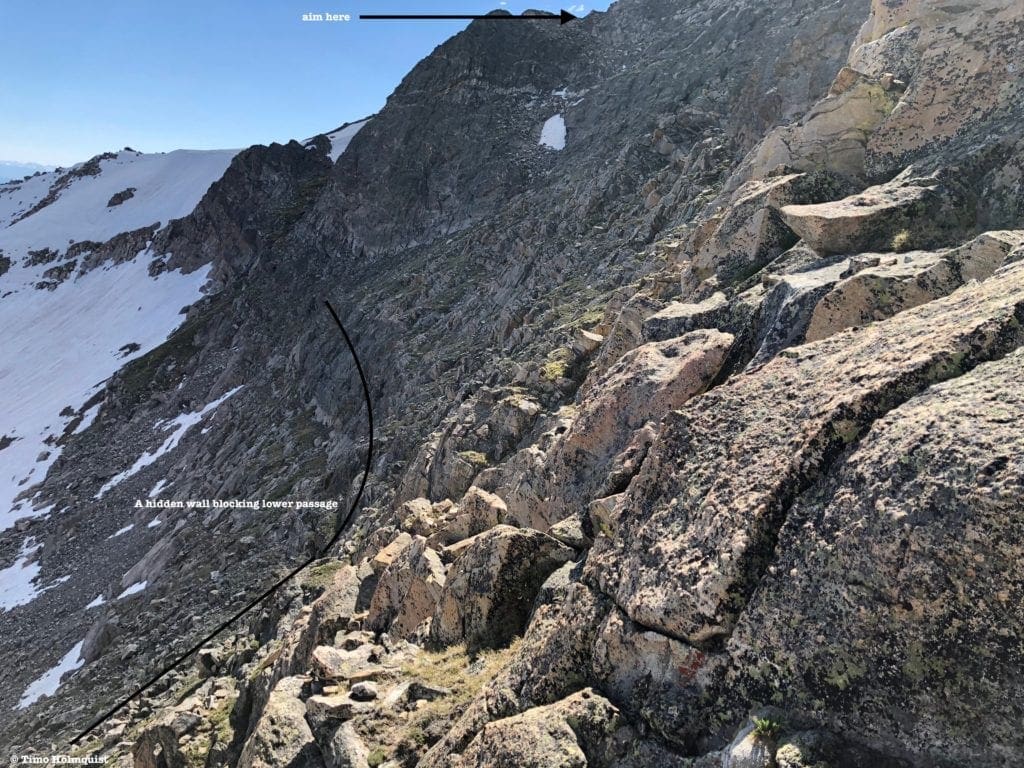
The best option is to follow one of the grass benches to the south until the cliff band underneath breaks, and you can descend off of it. This workaround is the most significant detour on the ridge and can be a frustrating experience.
An example of the terrain you’ll need to descend in order to avoid the lower crux.
From below, the Class 5 section is clearly visible on the ridge.
Lower crux, Cracktop and Ida behind.
It’s also visible from further down the slope as the scrambling begins to ease off.

The two Class 5 sections from lower on the ridge and most of the lower Crux workaround.
Excluding the two crux workarounds, the ridge is generally steep on both sides but contains stable rock with good hand and footholds. You can keep the whole run at Class 3 with some creative route finding. Take mental notes as you descend because you will be reclimbing this section later, and the effort involved will inevitably slow your pace down.
Past the challenges, looking back at the ridge. Notice the undercut sections of the ridge.
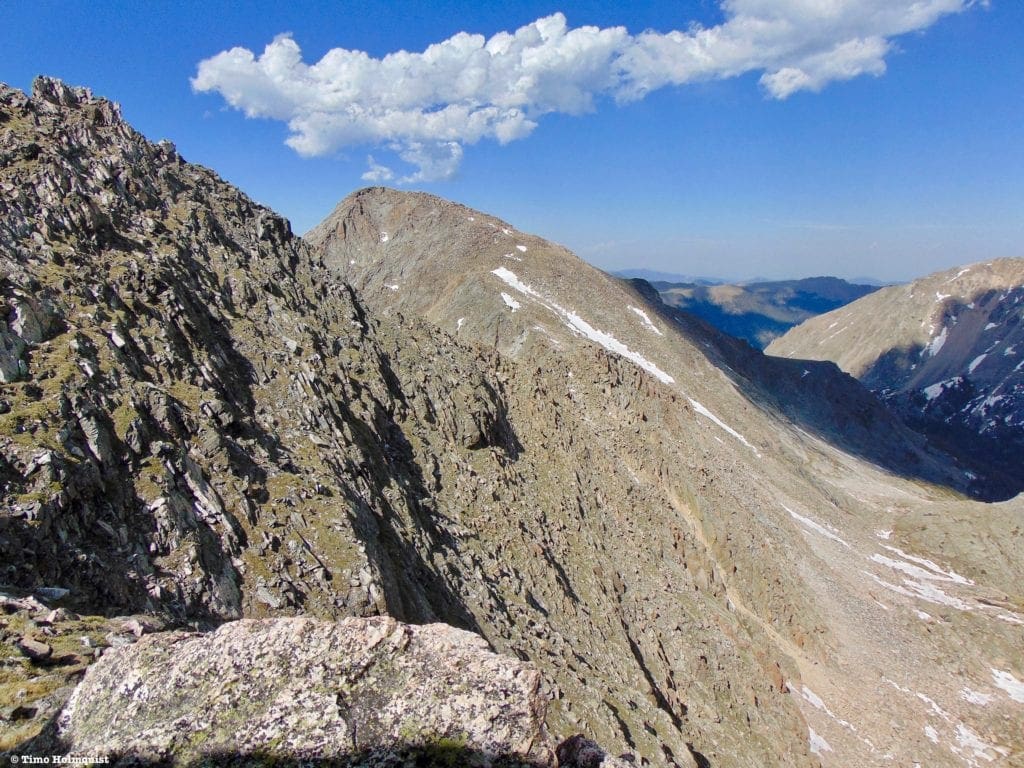
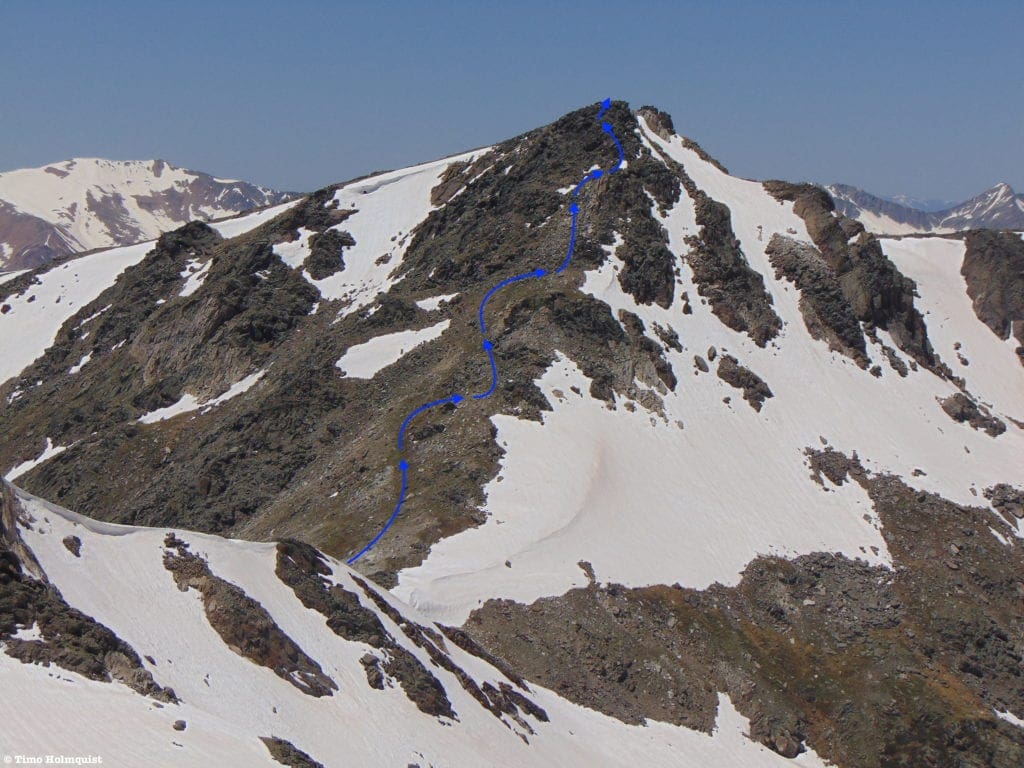
The last bit up to Julian will take some effort but nothing like what you just crossed. Find the path of least resistance and enjoy a Class 2 boulder fest to the top.
Julian from earlier in the ridge scramble.
The views from the top are fantastic and offer great perspectives back to what you’ll have to deal with on the way out.
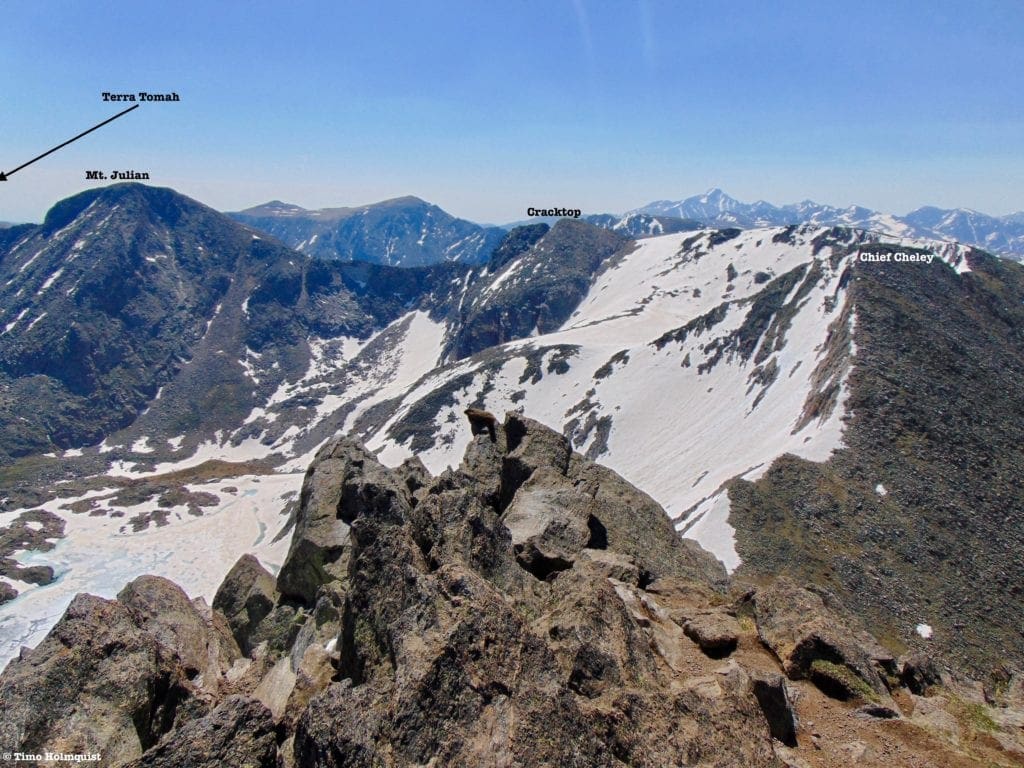
All three of the mountains you’ve climbed, from Julian.
From the summit of Julian, it’ll take more than a mile and an extra ~1500 feet of gain/loss to make it to Terra-Tomah and back. It helps to make a preliminary call before the Cracktop ridge and then a realistic one after. While not particularly difficult, it’s another mile above treeline and extra ascents up Terra-Tomah and Julian to factor in.
When returning to Cracktop, remember to try and find the crux sections. The lower area is easier to identify because it’s closer to you and features a puzzle piece arrangement of sloped rocks.
Good perspective of the lower challenge.
Up to that point, you can cruise along the ridge crest and enjoy the airy exposure on the north side.
Re-ascending Cracktop is a labor-intensive effort, and you may be tempted to traverse lower than the crest to avoid the summit and meet up with your route further on. While possible, the south side of Cracktop is dominated by these diagonal rock ribs that do not allow for easy passage.
An example of the complex north side of Cracktop. The shadows are good indicators of where dozens of cliff bands exist.
In order to get around these rock ribs, you’ll need to gain and lose some elevation until you find the easiest bypasses. For a more direct approach, stick with the ridgeline and break at the two crux sections if necessary.
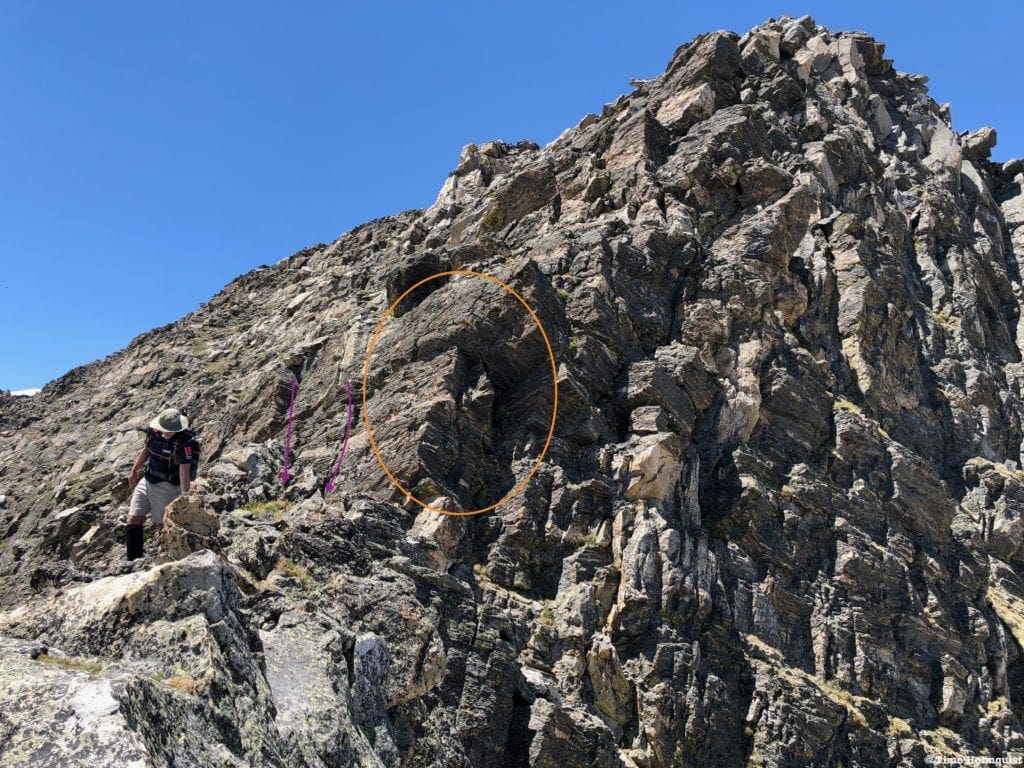
Getting close to the lower crux on the return.
Finding a workaround to the south is the best way to avoid the lower crux, but you need to travel down a grass ledge for a few dozen meters before finding an ascent.
Break left in front of the crux, following the rock rib.
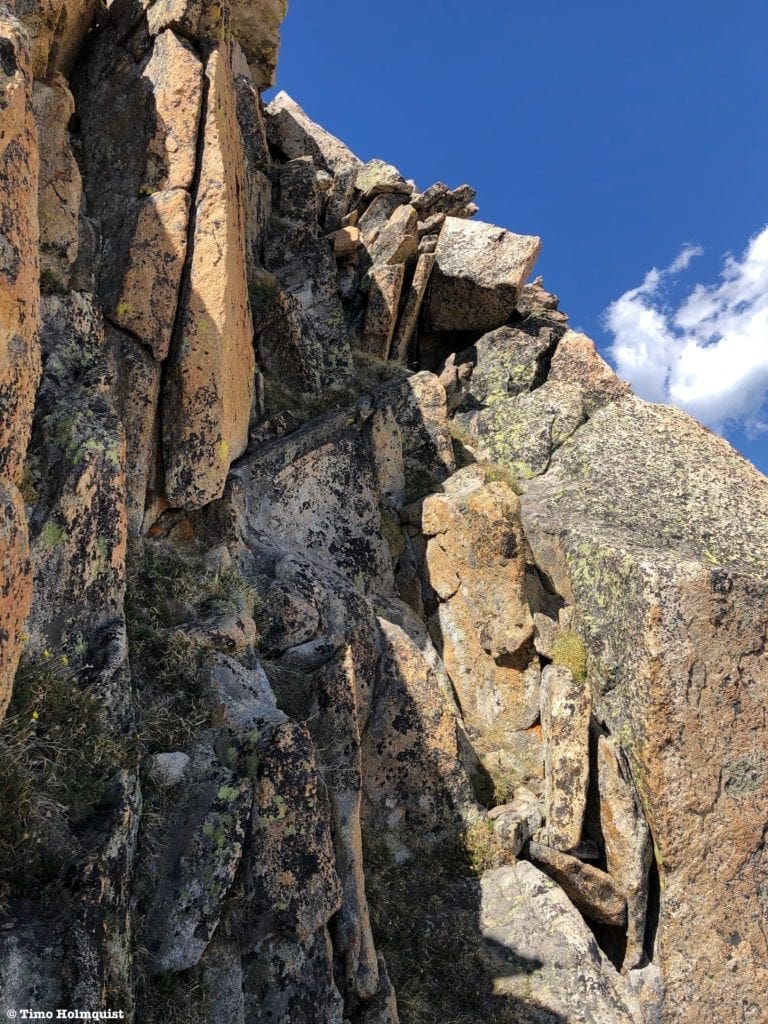
Looking up at the Class 3+ ascent route I used.
While steep as far as workarounds are concerned, this bypass settles into a higher Class 3 rating and provides good holds. Be cautious putting weight onto rocks you haven’t tested.
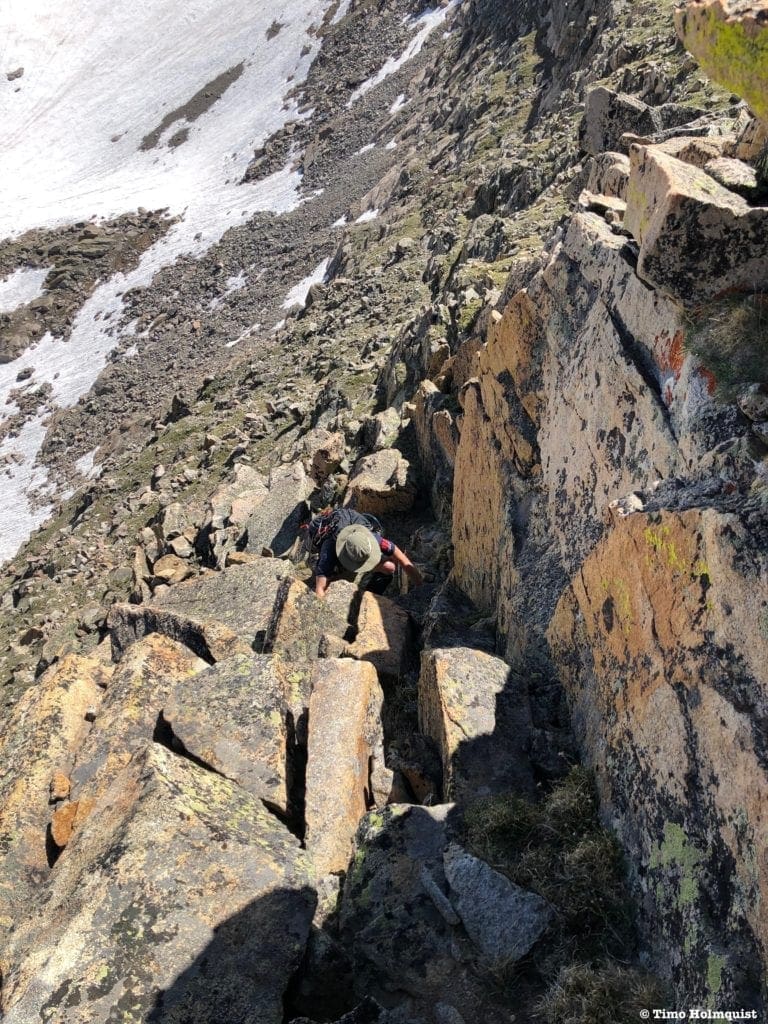
Making it up the detour.
Continue near the ridgeline and work your way up to the higher crux. The workarounds are more numerous here and can stretch from light Class 3 to Class 4. Pick a line you like and ascend the rock.
Back at the upper crux.
From there, keep the ridgeline to your right and carefully scout Class 3 moves to ease your climb back to the summit of Cracktop.
If traversing seems like a fun challenge, the best time to perform an ascending traverse is right after you re-ascend the upper crux.
Typical terrain required to cross the dozens of rock ribs along the ridge.
Keep in mind, there will be some Class 3 moves involved with traversing as well, but if you pick your line correctly, you can avoid the final few hundred feet of climbing back up to Cracktop.
Ascend this way, avoiding Class 5 cliffs when encountered.
Work your way toward a saddle between Cracktop’s summit and a small nub on the south side. When you do finally hit the ridge you’re going for, you’ll be slightly lower than where you arrived hours earlier.
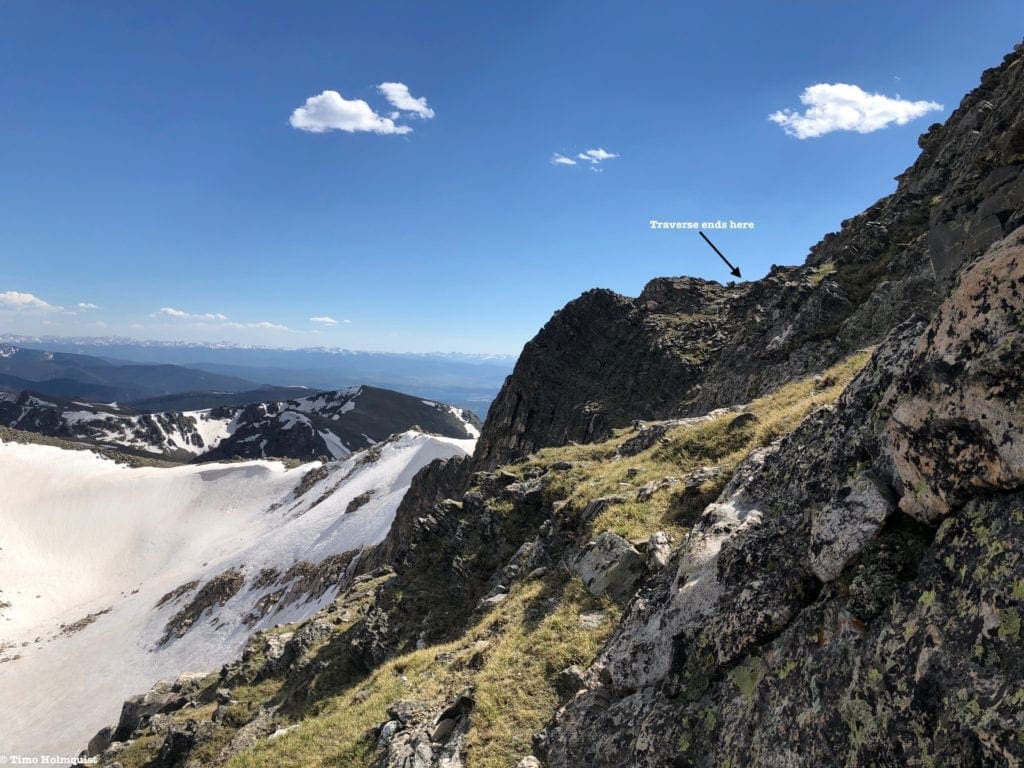
Nearly to the ridgeline after the traverse.
Not a problem, climb up roughly 50-75 feet to a broad saddle, turn west and start heading back to Chief Cheley.
Cautiously, I’d bookmark at least two hours for the out and back to Julian from Cracktop. It’s not far as the crow flies, but when you aren’t avoiding the two cruxes, you’ll be concentrating on route finding, sustained Class 3 scrambling, and dealing with some steep exposure on the north side of the ridge.
Once you’re ready, reclimb the high ridge protecting Highest Lake. Once you make it to Chief Cheley, you’ll have a nice view back to Julian.
Mount Julian from Chief Cheley.
The distance you’ve put between yourself and Julian will now start to feel significant. The rest of the descent down to the saddle with Mt. Ida is relatively easy; however, the more than 500-foot reclimb of Ida can feel like a gut punch this late into the hike.
Looking at the mandatory reclimb of Ida from near Cracktop.
After wheezing back to the top of Ida, you’ve completed the G.L.R. scramble. Be aware that there are still 4 miles separating you from your car, so don’t get complacent. A twisted ankle now would be an unfortunate end to a splendid route. Keep tabs on the sky and when you’re ready, begin what will feel like the longest descent in history. Since there are quite a few trail braids near the summit of Ida, stick closer to the ridge crest on your right and follow the trails as they all converge once you’re off of the summit block. From there, it’s a fairly easy downhill walk to treeline, albeit a long one. Hope you brought that sunscreen!
A nice perspective of the route from Trail Ridge Road. Ida is the summit farthest to the right; Chief Cheley is the next summit to the left, followed by the unnamed ridge above Highest Lake. Continuing left, Cracktop and Cracktop Couloir are visible, with the summit of Mt. Julian making it into the edge of the frame.
Final Thoughts:
This was a surprising and complicated scramble. In order to keep the difficulty at Class 3, careful route finding is necessary. Mt. Ida is already a fairly committing adventure so tagging the rest of them (with or without Terra Tomah) takes a lot of extra stamina. The toughest sections are confined to the ridge between Cracktop and Julian, making an adventure to the top of Cracktop and back a Class 2 option. Mt. Julian is, however, the highest of the five mountains there, so its appeal is obvious.
Armed with sufficient water, sun defense, and good weather, it’s hard to find a reason not to give this route a whirl. Expect long stretches of solitude once you leave Ida’s summit and fun ridge scrambling on Cracktop. It is NOT fun being here in a thunderstorm as descent options are limited by remote terrain, hidden cliff bands, and a lack of nearby trails. Leave this one in your pocket unless you’re absolutely positive you have the weather window for it. If the skies are clear, have a blast exploring this regularly photographed but seldom explored corner of Rocky Mountain National Park.

Enroll With Global Rescue Prior To Embarking On Your Next Adventure.
When a travel emergency arises, traditional travel insurance may not come to your aid, and a medical evacuation can cost up to $300,000.
The cost when you have a Global Rescue membership? $0. That’s why when the unexpected happens, you want the leader in rescue, evacuation and medical advisory behind you. You want Global Rescue.
Popular Articles:
Guide to the Best Hiking Trails in Rocky Mountain National Park, Colorado
Sky Pond via Glacier Gorge Trail, Rocky Mountain National Park, Colorado
Scrambling Hallett Peak’s East Ridge, Rocky Mountain National Park, Colorado
Scrambling Mt. Alice via the Hourglass Ridge, Rocky Mountain National Park, Colorado
Terms of Use:
As with each guide published on SKYBLUEOVERLAND.com, should you choose to this route, do so at your own risk. Prior to setting out check current local weather, conditions, and land/road closures. While taking a trail, obey all public and private land use restrictions and rules, carry proper safety and navigational equipment, and of course, follow the #leavenotrace guidelines. The information found herein is simply a planning resource to be used as a point of inspiration in conjunction with your own due-diligence. In spite of the fact that this route, associated GPS track (GPX and maps), and all route guidelines were prepared under diligent research by the specified contributor and/or contributors, the accuracy of such and judgement of the author is not guaranteed. SKYBLUE OVERLAND LLC, its partners, associates, and contributors are in no way liable for personal injury, damage to personal property, or any other such situation that might happen to individuals following this route.


