


High Point:
12,715 feet

Total Ascent:
3,500 feet

Difficulty:
Very Hard

Distance:
~8.15 miles

Waypoints:
40.3119, -105.64587

Route Type:
Loop
Hallett Peak is a typical mountain of the Rocky Mountains with an easy side and dramatic east ridge. Many park visitors will be relieved to find the easier options, but more experienced mountaineers can discover great routes and variations off its east ridge.
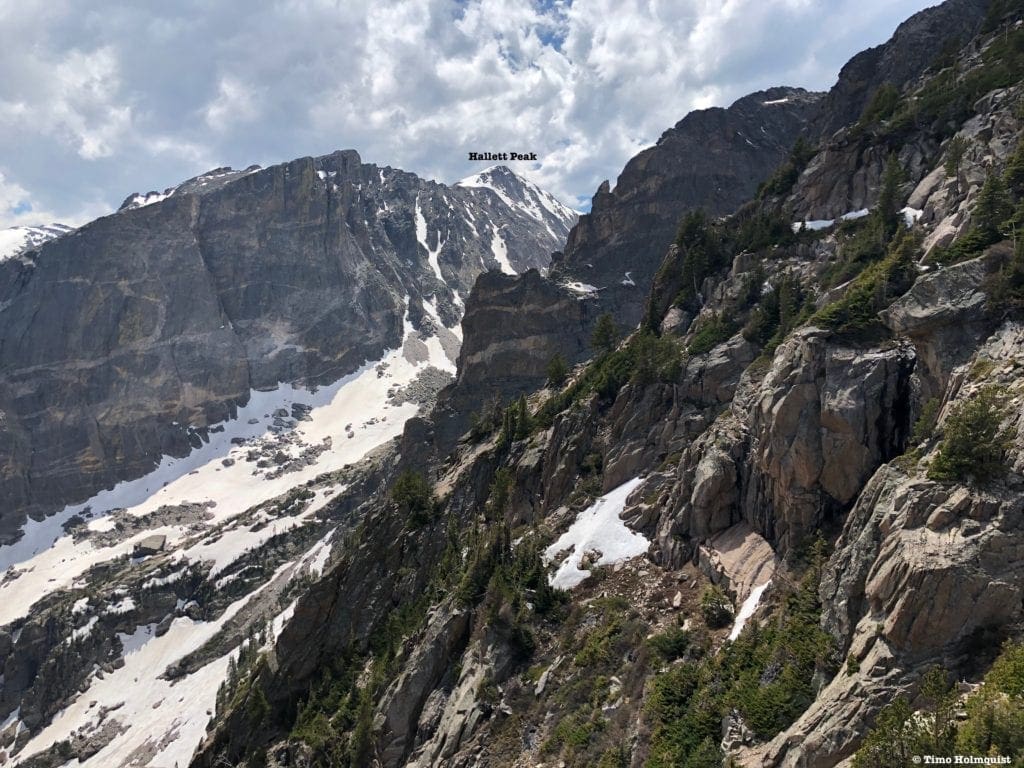
The Iconic Eastern Walls of Hallett Peak
Overview:
Hallett Peak is a very typical example of the topography in Rocky Mountain National Park. Unlike Longs Peak, the most famous mountain in the park, Hallett and its neighbors are a bit bi-polar. Generally speaking, they have an easy side, which can be accessed from various points along the wide and gentle ridgetops of the Continental Divide. They also have a dramatic side, most often facing east, where vertical sheets of rock and precipitous ridges draw the gaze of thousands upon thousands of National Park visitors. For most, it’ll come as a relief knowing there is an easier side to climb. However, for the enthusiastic mountaineers out there, it may be surprising to learn that fantastic routes and variations exist off of Hallett’s dramatic east ridge.
Conquering Hallett by its East Ridge adds layers of gravitas to an already iconic peak. The route described in this review is special for a few reasons: it’s very visible from popular places like Bear Lake, Dream Lake, and Lake Haiyaha, it features undulating ridge crests, consecutive sections of scrambling, and the crux is roughly 500 vertical feet of steep couloir climb. Because of the snow component, the route is “in season,” between roughly April and late June depending on snowmelt. Without snow in Chaos Couloir, the route becomes a tedious and time-consuming scree fest.
Due to the complexity of the route, it’s not only distance and elevation that any potential hiker needs to worry about. See the article section titled Scales and Criteria for a more comprehensive explanation of the ratings given.
- Scramble Rating: Class 3.
- Snow Rating:
- Chaos Couloir (Steep Snow)
- Summit snowfield: (Easy Snow)
- Navigation: Most of this route is trail-less
- Distance:
- East Ridge/Flattop Loop: ~8.15 miles
- East Ridge/Otis Peak Loop: ~7.72 miles
- East Ridge/Andrews Glacier Loop: ~9.44 miles
- Trail Status: The trailed portions are open
- Popularity: Low
- Technical Rating: Class 3+
- Snow rating:
- Upper Chaos Couloir: Steep
- Snowfield below Hallett’s summit: Easy
Table of Contents:
Article Navigation: Click on any of the listed items in the table of contents below to jump to that section of the article. Similarly, clicking on any large, white section header will jump you back to the Table of Contents.
- Overview
- Scales and Criteria
- Directions to Trailhead
- Field Notes
- Places to Stay
- Journal
- Final Thoughts
Scales and Criteria:
This article utilizes four separate rating systems: Difficulty, Popularity, a Snow Rating, and a Technical Rating indicating the hardest move or set of moves encountered. The technical rating employs the Yosemite Decimal System. The Snow Rating refers to the steepness of any snowy sections encountered. There are two snowy areas on this route, the upper portion of Chaos Couloir and a secondary snowfield just below Hallett Peaks true summit.
Difficulty Ratings:
- Easy: less than 5 miles, less than 500 ft. of elevation gain
- Moderate: 5-10 miles, 500-2000 ft of elevation gain
- Hard: 5-15 miles, more than 2000 ft. of elevation gain
- Very Hard: 10+ miles, more than 3,500 ft. of elevation gain
Popularity Ratings:
- Low: Large sections of trail all to yourself
- Moderate: Sizeable trail sections to yourself, crowding possible on busy summer weekends
- High: You’ll be seeing people, still a chance for solitude in spring/fall/winter.
- Very High: Almost always busy.
Technical Rating:
- Class 1: Established hiking trail the entire length of the adventure. Low chance for injury.
- Class 2: Typically involves cross-country navigation, possibly using hands for balance but not required, steeper than Class 1.
- Class 3: Hands and feet used to scale areas, must use hands to proceed (either for balance or to help pull you up a section), increased exposure, a fall could be fatal. Helmet recommended, along with grippy hikers.
- Class 4: Climbing on very steep terrain just shy of vertical, falls could be fatal, hands employed for grip and balance continuously, ropes advisable but scalable without. Helmets are highly recommended, along with grippy hikers.
- Class 5-5.4: Vertical climbing that involves technical rock-climbing moves, exposed, falls likely to be serious or fatal, possible to scale without ropes but only for very experienced veterans. Helmets, grippy hikers, and/or rock-climbing shoes necessary.
- Class 5.5 and up: Not covered as scrambling, full-on rock climbing with ropes, helmets, etc.
Snow Rating
- Easy: Less than 30 degrees
- Moderate: 30-40 degrees
- Steep: 40-50 degrees
- Very Steep: 50+ degrees
The YDS system is widely used in North America but can be quite subjective, so it is not perfect. The biggest differences I’ve encountered between Class 3 and Class 4 sections have to do with the slope angle, the exposure, and putting weight and pressure on hand grips (4) instead of using hands and feet interchangeably as supporting points of contact (3). It is not possible to climb a Class 4 section without using your hands to pull up some or all of your body weight. Typically, a class 4 section will also require some type of rock-climbing move, like stemming, where hands or feet are pressed in opposition as if climbing the inside of a chimney. If downclimbing, a key difference is that most people will descend a Class 4 section facing inward, i.e., your back faces the exposure.
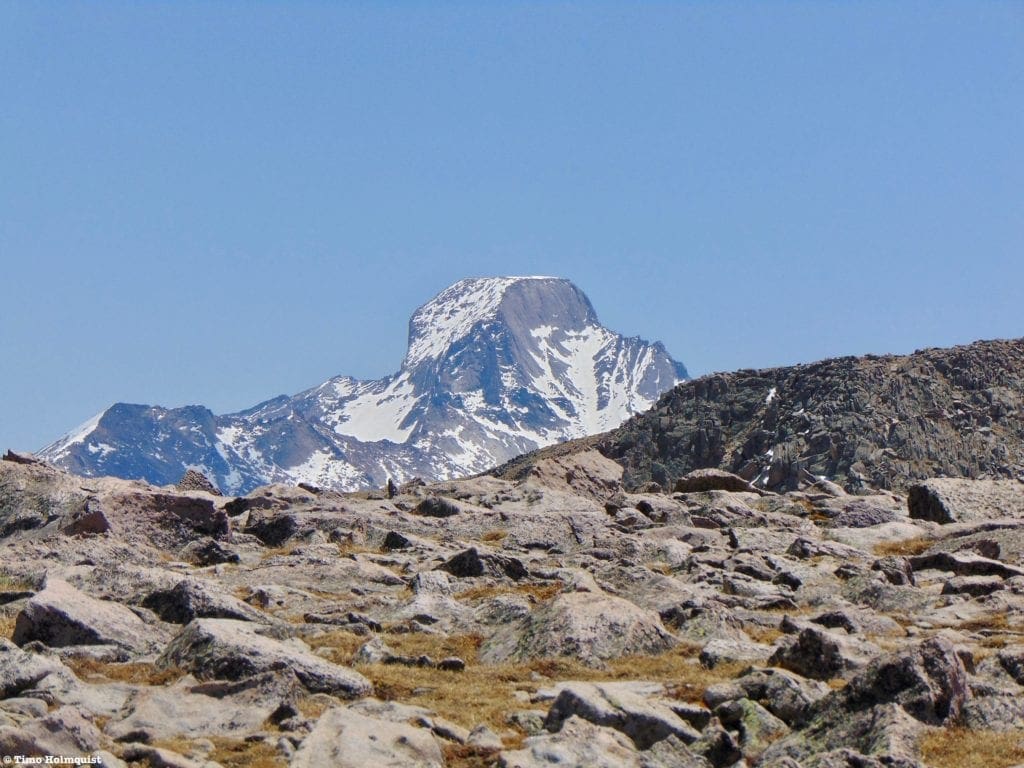
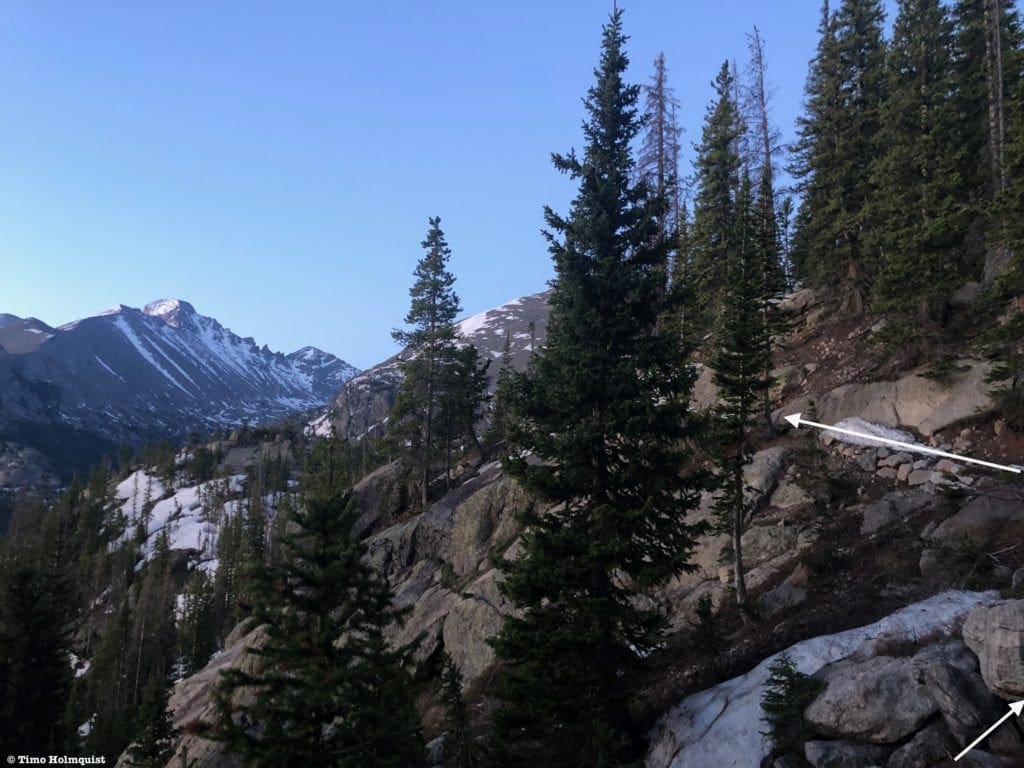
Longs Peak will be visible for the majority of the route and acts as a good marker, seen here from the Flattop Mountain Trail.
The Ultimate Offline GPS Hiking & Ski Maps
See why onX Backcountry is the ultimate GPS navigation app for your outdoor pursuits. Try Today for Free. No credit card required.
Directions to Trailhead:
The route starts at the Bear Lake Parking Area in Rocky Mountain National Park. As of 2021, there is a reservation system in place, along with an entrance fee to the park. Do yourself a favor and take the time to understand both of these components by visiting the Park website. If you do not have an entrance pass or time slot, you will be turned back.
From the east, enter Rocky Mountain National Park on US36 through Beaver Meadows. Less than a minute after you pass the entrance booths, take a left onto Bear Lake Road and drive it until reaching the parking lot at the end of the road. From the west, enter the park on US34 near Grand Lake, traverse Trail Ridge and continue on US 36 until taking a right onto Bear Lake Road. Drive to the end of the road and park.
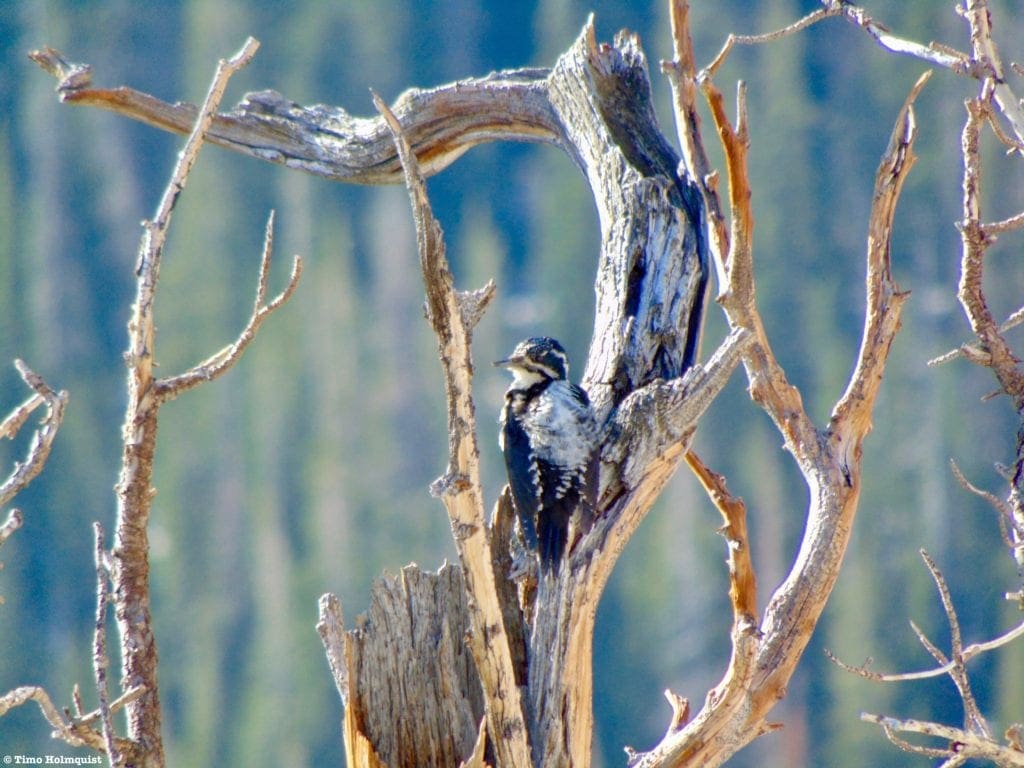
One of many possible animals encounters.
One of many possible animal encounters. Expect to see (or hear) many different birds, marmots, pikas and if you’re lucky, bighorn sheep.
Field Notes:
This is a complicated mixed climb with a fair amount of scrambling, ridge walking, and a crux couloir climb. There are ways to do this route without the presence of snow, but it makes for a long and cumbersome journey. Chaos Couloir is the steepest part of the route, but it is also one of the sections that make the whole adventure memorable. There are TONS of variations on this route, and I will do my best to explain them and review the route that I ultimately took. The best time to do this route is when Chaos Couloir is filled with snow and avalanche danger is low to non-existent, roughly April- mid/late June. Before April, it is a winter route, and additional precautions have to come into play. From July onward, the snow in Chaos Couloir will be patchy or gone, replaced by a tedious and time-consuming scree fest.
Unlike a low-end scrambling route or a regular hike, some gear is necessary. As always, helmets are highly recommended, along with light to medium waterproof gloves, a typical mountaineering axe (ice-specific axe not necessary), crampons, and microspikes. In addition, gaiters, sunscreen, bug spray, sunglasses, a hat, layers, nutrition, water, and a first aid kit are all recommended. If you do not have crampon or axe experience, check out these two articles (crampons, ice/mountaineering axe) and then put together some comprehensive practice sessions before attempting this route. During my adventure up this route, I had two liters of water and ended up purifying another liter and a half along the way. Later in the summer, water options dwindle once you are on the ridgelines. Up until mid-July, you may be able to melt snow to create additional water.
For weather forecasting, start with Estes Park’s extended forecast, which will provide details up to the trailhead. Once you get higher, check out the mountain forecast for Hallett Peak. Pay attention to temperature, wind speed, and thunderstorm potential. If attempting this route before June, check CAIC for avalanche forecasts and snowpack conditions. Generally speaking, if the mountain experienced below-freezing temperatures the night before your adventure, the snow firmness will hold for longer. Climbing a couloir in slush is not only difficult, it’s also quite dangerous. In any scenario, aim to be out of Chaos Couloir by 10-10:30 AM at the very latest.
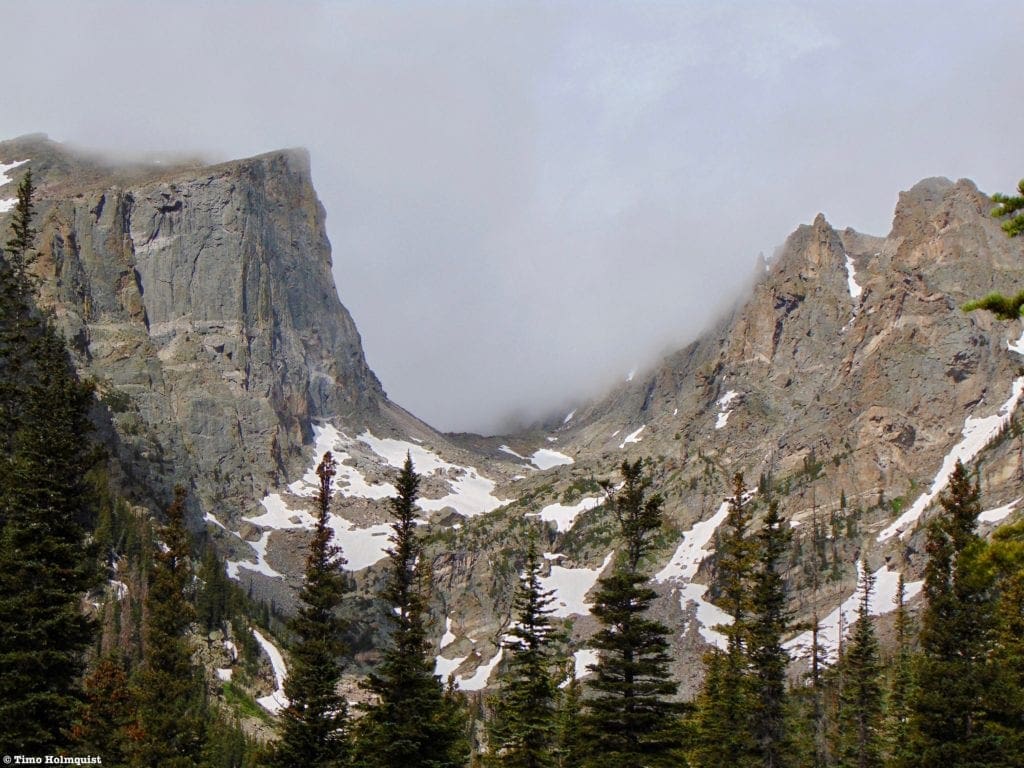
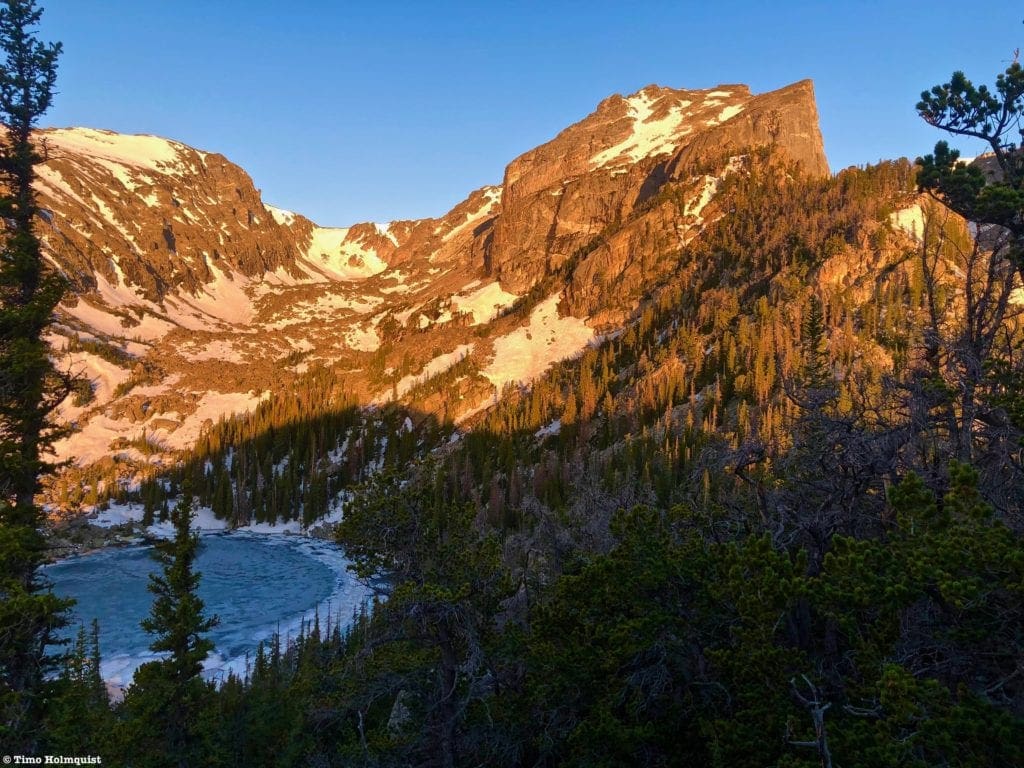
The walls of Hallett Peak, seen from Dream Lake.
Places to Stay:
Camping near Rocky Mountain National Park will cost you. The options for free area camping are limited. On a positive note, there are plenty of options, and the National Park is within driving distance of Fort Collins, Boulder, and Denver.
- Estes Park: Known as the gateway to Rocky Mountain National Park, Estes sees nearly 80% of park traffic as opposed to the much quieter western entrance near Grand Lake. The town has a ton of lodging options.
- Allenspark: A small town near Wild Basin that has a few lodging options, including the Wild Basin Lodgeand the Sunshine Mountain Lodge and Cabins.
- Rocky Mountain National Park Camping
- Moraine Park Campground: $30 per site. $20 in winter. Established campground with perks, facilities, campfire grate, wood for sale in summer, and bear boxes to store food. Only loop B is open in the winter, and it’s first-come, first-serve.
- For summer, a reservation is needed quite a ways in advance to secure a spot.
- Glacier Basin Campground: $30 per site. Established campground with the same perks as Moraine Park. Reservation required.
- Backcountry Campsites: Rocky Mountain National Park has backcountry sites that you could book in advance. There is no open camping in the backcountry; it must be at designated backcountry sites. Please check the park website for more details. Backcountry sites require an overnight permit of $30.
- Camping near Estes Park
- Estes Park Campground at Mary’s Lake: Established campground, pricey $45-55. Good backup if other campgrounds are full.
- Hermit Park Open Space: $30 for a tent site, price increases if towing a trailer or for group spots.
- Estes Park Koa: Rates dependent on what you’re bringing with you but will run more than $50 a night in the busy season.
- Free or close to free: but a little farther (if you’re willing to drive)
- Ceran St. Vrain Trail Dispersed Camping ($1)
- County Road 47. Users have reported trash and ATV noise at this location, but it is free.
Journal:
As explained in the Directions to Trailhead section above, this route starts and ends in Rocky Mountain National Park. As of 2021, you will need both an entrance pass and a timeslot to enter Bear Lake between the hours of 5 am and 6 pm.
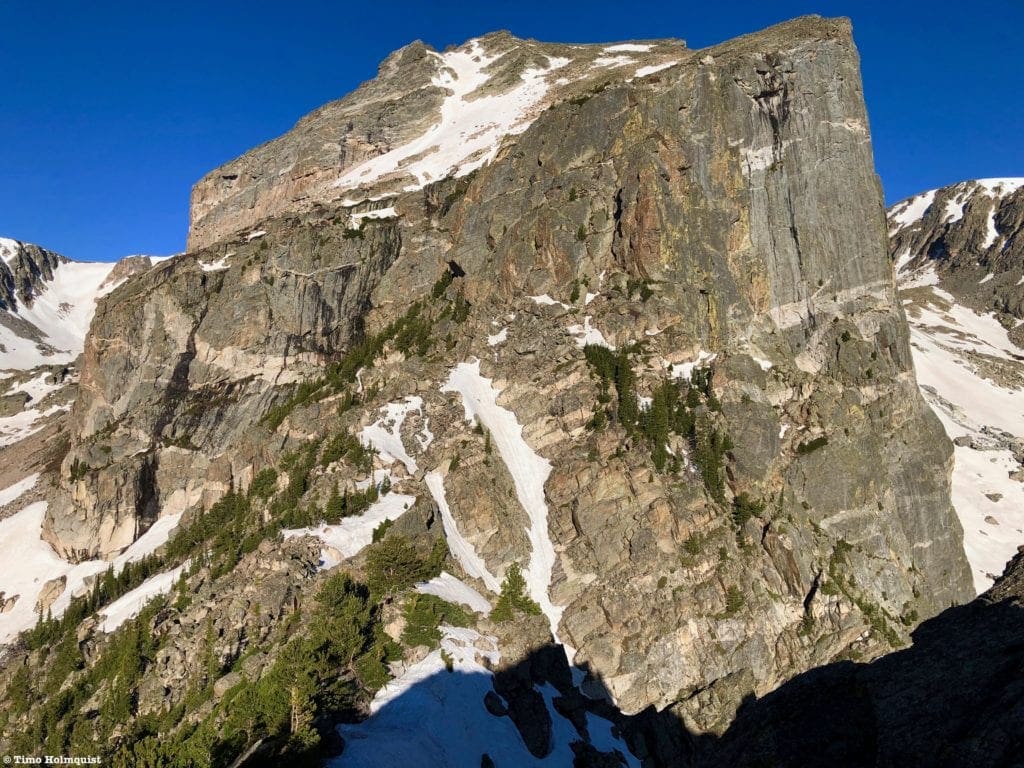
If you’ve ever been to Bear Lake in Rocky Mountain National Park, you’ve already seen Hallett Peak.
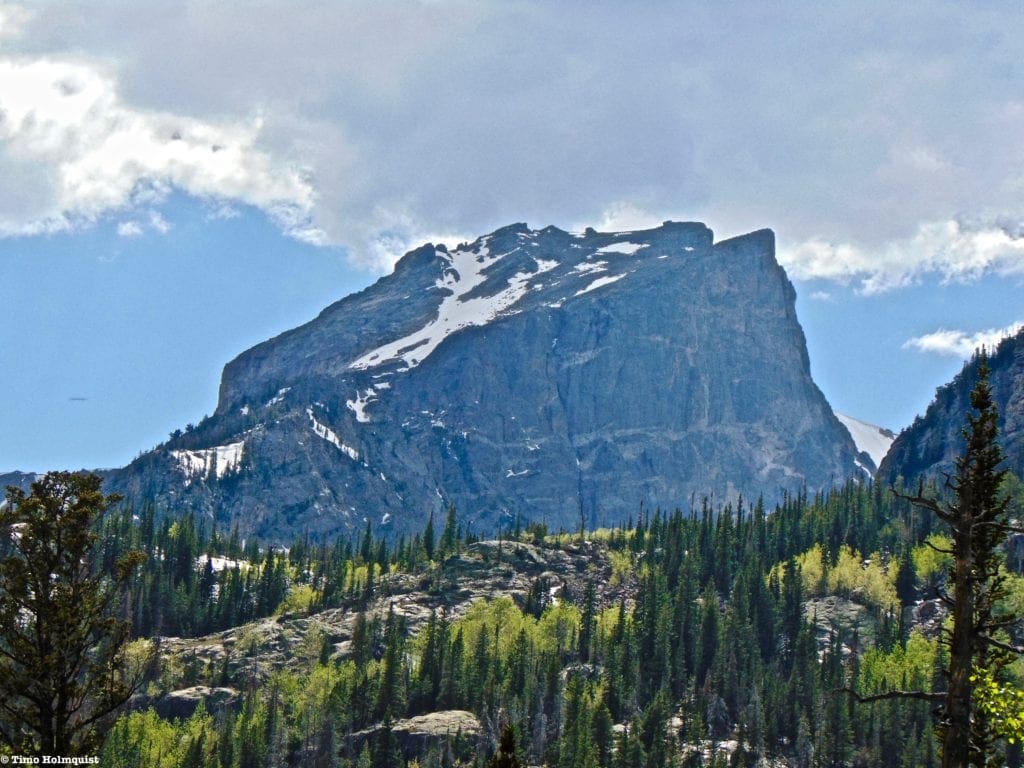
The blocky and imposing view of Hallett Peak’s East Ridge from Bear Lake.
It’s a striking mountain and one of the most photographed peaks in the park. The standard ascent route climbs Flattop mountain to the Continental Divide and then circles around Tyndall Gorge and up Hallett’s westside. That route is only Class 2 and can be accomplished by any altitude acclimated hiker in reasonable shape. For capable mountain scramblers with experience climbing snow, ascending Hallett by its eastern ridge is a roller coaster of an experience with multiple Class 3 sections, a steep couloir climb, persistent rockfall potential, and national geographic worthy views.
As explained in the Field Notes section, this route requires planning, skill, and mandatory gear like helmets, crampons, a mountaineering axe, and a helmet. DO NOT attempt this route if you haven’t met the following criteria:
- Experience scrambling a Class 3 route with significant exposure (if backcountry skiing between Jan-May, the route jumps up to a Class 4)
- Experience couloir climbing steep snow up to 50 degrees
- Possess the following gear items (and know how to use them): Helmet, mountaineering axe, crampons, waterproof gloves, and a headlamp if starting before dawn
From the Bear Lake Parking Lot, proceed to the head of the lot and walk across a pedestrian bridge. Right after, you’ll see a trail junction. Take a left to begin your journey up to Dream Lake. This part of the trail is super easy to navigate, so starting an hour or so before sunrise is recommended. If you’re familiar with the area, you can leave even earlier. Even if snow-covered, hauling yourself up to Dream Lake should be fairly straightforward.
Right before you get to Dream Lake, the trail will flatten out, and you’ll see a sign indicating the route to Lake Haiyaha. Take a left onto it. If it’s early and/or the trail is snow-covered, it helps to have a downloaded map of the trail from Alltrails or a similar site. The first part of the trail tackles a north-facing slope which holds snow a lot longer than other areas. Take your time and find a way to either follow the trail, tracks in the snow, or ascend to the crest of the ridge. You may have to avoid some cliff bands if you stay too low, so if the trail is hard to find, aim higher and perform a southwestern trending ascent to get to the ridge crest. If the trail is clear or easy enough to follow, rise and traverse around the ridge before arriving in a flatter area near Lake Haiyaha.
The Lake Haiyaha Trail as it circles the nose of Hallett’s long East Ridge
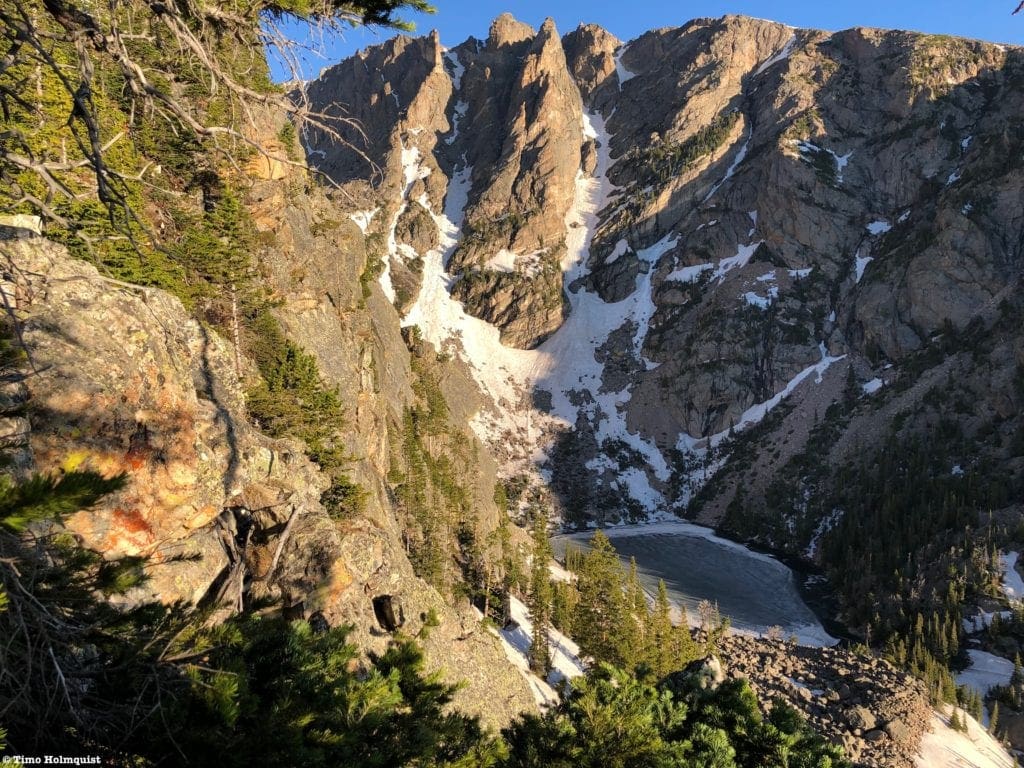
If you want to avoid the jaunt to Haiyaha AND are comfortable slapping a second couloir climb onto your route, you can continue around Dream Lake and make your way up to Emerald Lake. From the shores of Emerald, climb boulders on the left side of the lake until you have an uninterrupted view of Hallett Peaks’ Eastern wall. Between you and the wall is the East Couloir, which heads diagonally left (south). The couloir hovers between 40-45 degrees when filled and will take you up to the ridge crest.
Looking up the East Couloir from above Emerald Lake, with Hallett Peak’s Eastern Walls rising to the right.
If you make it over to near Lake Haiyaha, the trail will flatten out. You can either continue to the lake itself and plan your next steps or break from the trail heading west. If you break early, start by paralleling the treed slope on your right (the beginnings of Hallett Peaks East Ridge). When opportunity strikes, begin ascending to the right until hitting the ridge crest. I chose this option because once you hit the ridge crest, you stay on it all the way up to the eventual summit.
Ascending up the ridge.
If you decide to head to Lake Haiyaha, you can proceed around the lake and find a low point to ascend the ridge or continue west into Chaos Canyon, locate the bottom of Chaos Couloir and climb up the entire thing. As mentioned before, there are a TON of ways to start this route.
The benefits of finding the ridge crest early become increasingly apparent as you’re presented with jaw-dropping views of the next part of your route. From a navigation standpoint, staying on the ridge crest is the simplest option. For snow hounds, adding the East Couloir from Emerald Lake or climbing Chaos Couloir from the bottom are worthy alternatives.
Hallett Peak and Lake Haiyaha from the ridge crest.
Assuming you are now on top of the ridge separating Dream Lake and Lake Haiyaha, follow the undulating crest as you near the imposing bulk of Hallett. This section is not difficult, but there are some unique hazards to be aware of. Early June means large snowy areas could be encountered, especially on the north side of the ridge. Microspikes are helpful here. You are still below treeline as well, and getting skull checked by a rigid tree branch is an unfortunate way to start your day. I wore my helmet through this part.
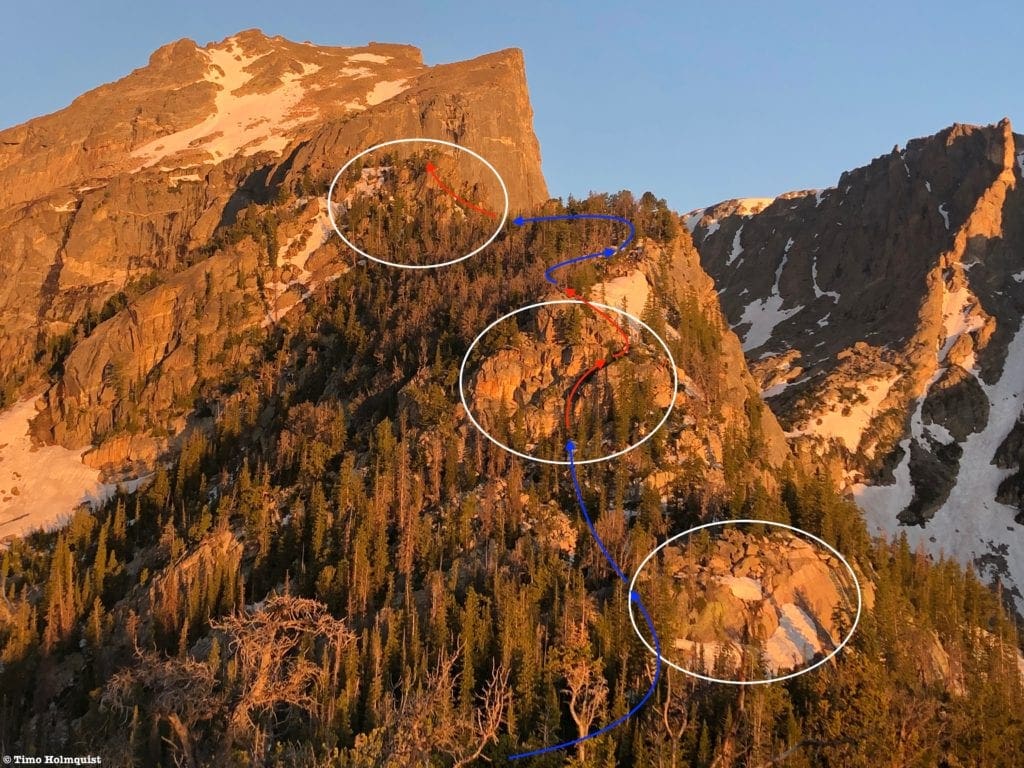
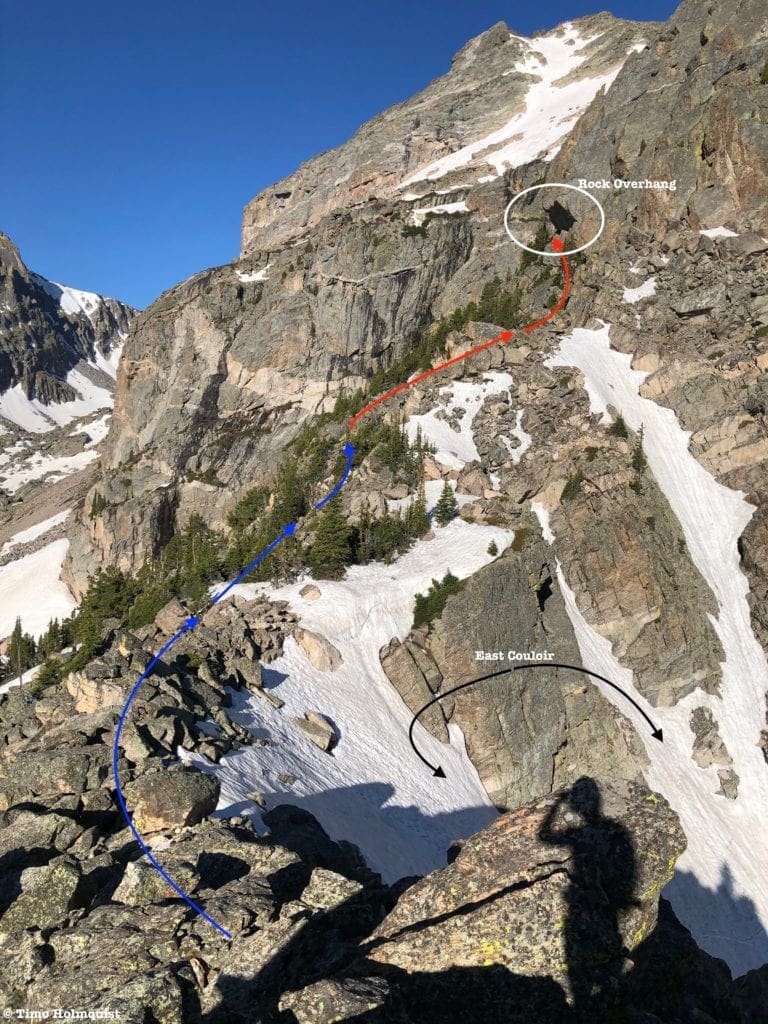
The ridge route heads west towards the imposing cliffs on Hallett. White circles indicate rocky obstacles. Blue is Class 2, Red is Class 3.
As you traverse west, you’ll encounter a series of rockier sections. Take your time and scout each side of the ridge to find the best way to bypass. While some sections are more fun to tackle head-on, if they are wet or snow saturated, it’s best to avoid them and circle around.
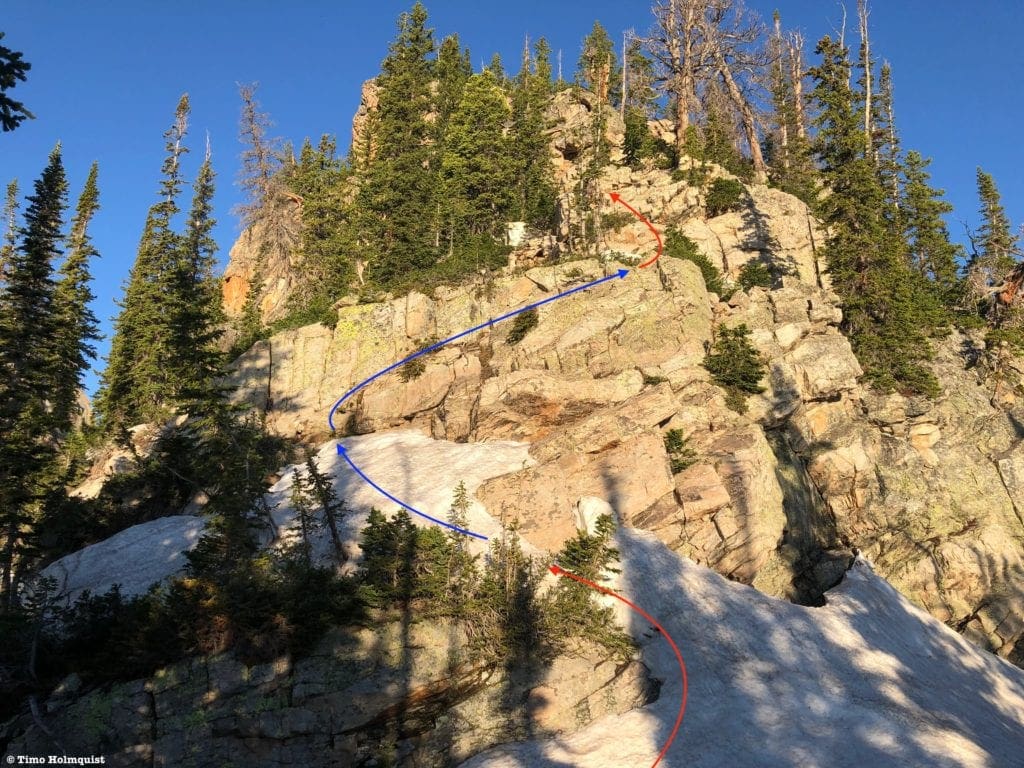
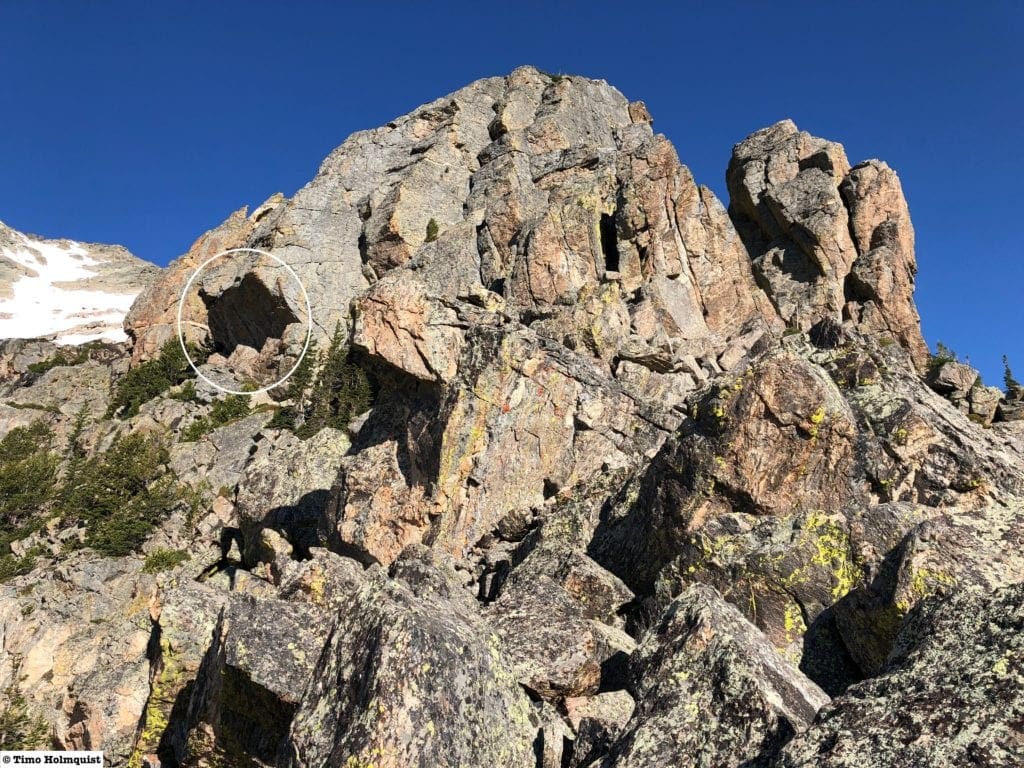
Close up of the second white circle from the previous picture.
Most workarounds exist on the south side of the ridge, facing Otis Peak and Lake Haiyaha. The north side towards Emerald and Dream Lake becomes much more precipitous as you continue to ascend. You will be able to locate Emerald Lake far below you if you manage to stay on the ridge crest.
Emerald Lake from the ridge.
After a series of ups and downs, each one a little more dramatic than the last, you’ll briefly break tree line at a cluster of rocky pinnacles. Stupendous views await, and if you stay on the crest, you’ll be able to peer into the drainages on each side while employing a few light 3rd class moves to scamper around.
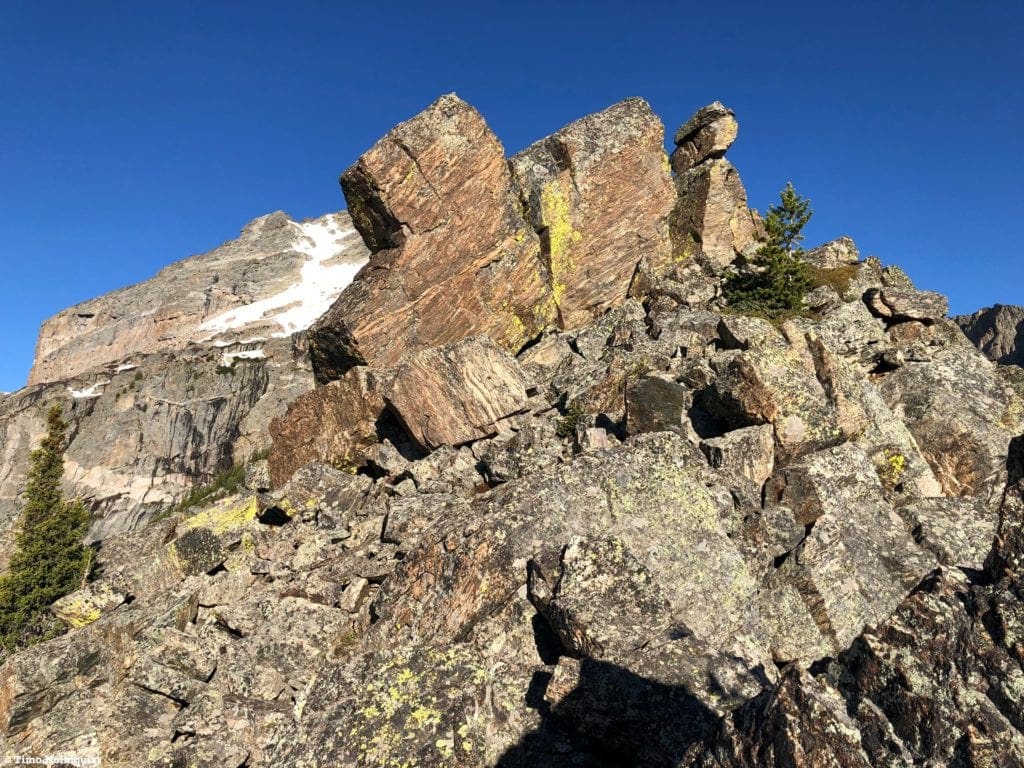
The top of the ridge has some very interesting-looking rocks.
Following this ridge high point, the route drops about a hundred feet. Once you stop losing elevation, you should be able to stare down the East Couloir to your right, which drops down to a bench near Emerald Lake. Up until this point, you will have encountered a few 3rd-Class moves along the spine of the ridge or kept the scrambling at a Class 2 by finding bypasses (again, most commonly found on the south side of the ridge). This ridge is a fun training run for the serious parts of the scramble ahead and gives you some of the best views along the entire route.
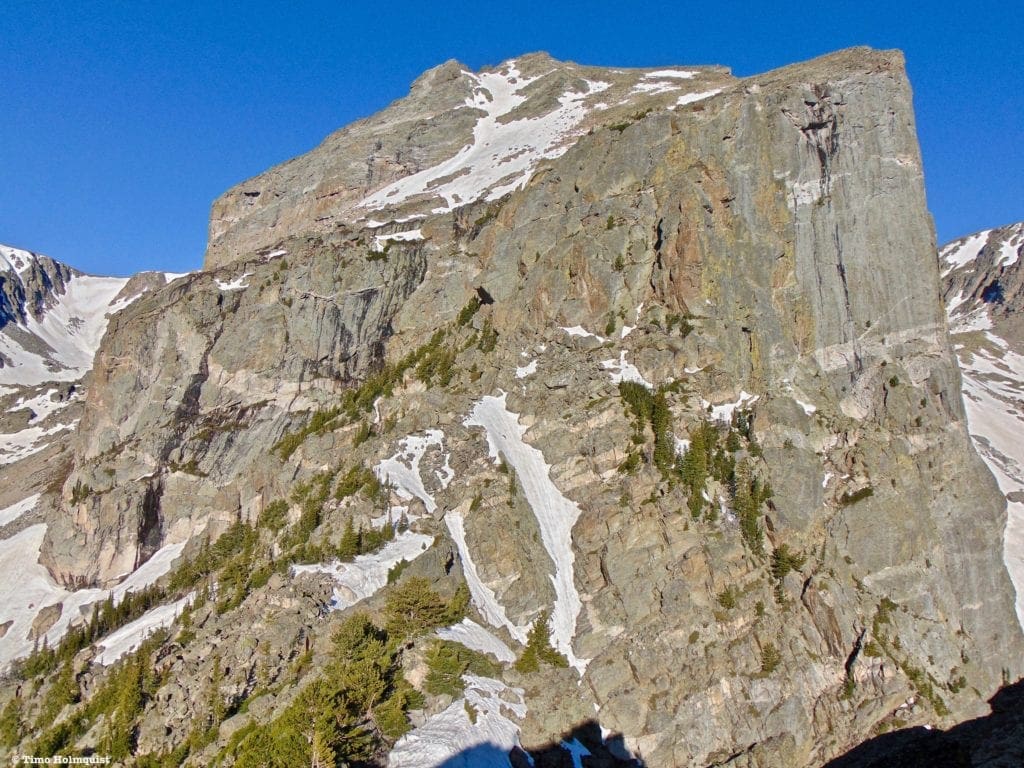
The hardest parts of the route deal with this face of Hallett.
Once you pass the head of the East Couloir, the route becomes much more serious. Work your way around the East Couloir and ascend with the daunting rock walls of Hallett in front of you. Some 3rd Class moves will be encountered here, though, with careful scouting, you can keep the difficulty at 2+. Keep an obvious rock overhang in your focus to your left. The route will traverse left around the base of the vertical walls, and this overhang is central to your navigation.
Heading to the start of the traverse.
Once located, head towards the overhang. This next section is the key to unlocking the rest of the route.
Steepening terrain, find your way to the white circle.
From the overhang, traverse west with vertical cliffs to your right and steep slopes to the left. It is not necessary to take the highest possible route all the time. If you do, however, be prepared for at least two 4th Class sections. The first is a diagonal crack. To skip this part, walk up to the moves, turn left and inch around until finding a broken ledge with a small pine tree growing in it.
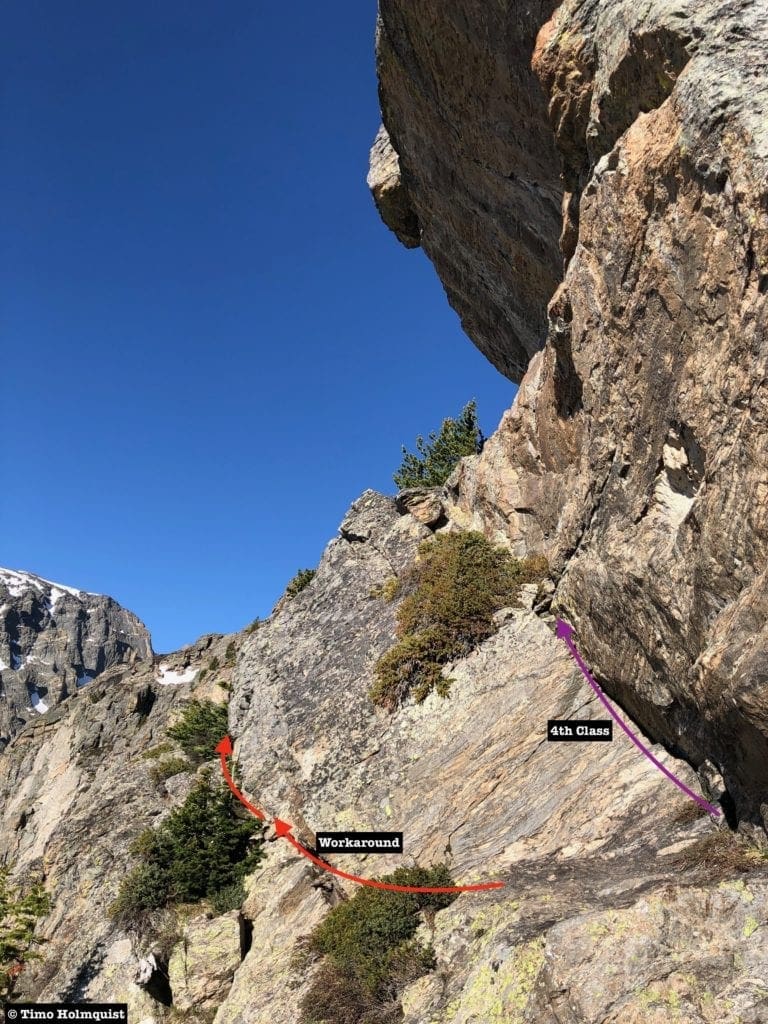
The first 4th Class section and the lower Class 3 workaround.
You’ll likely get scratched passing by the tree, but the path continues at a light Class 3. Once past, you’ll want to regain the higher line. To do this, you can stay low until scouting a path up higher, likely resulting in some brief bushwhacking or Class 3. Optionally, you take a more direct line that requires a couple of short Class 4 moves with good holds and low exposure.
Looking down at a quick Class 4 sections to regain the higher ascent line.
Once you’ve regained the highest path, you’ll notice the walls to your right change direction, leading you into a steep, rock-rimmed gully.
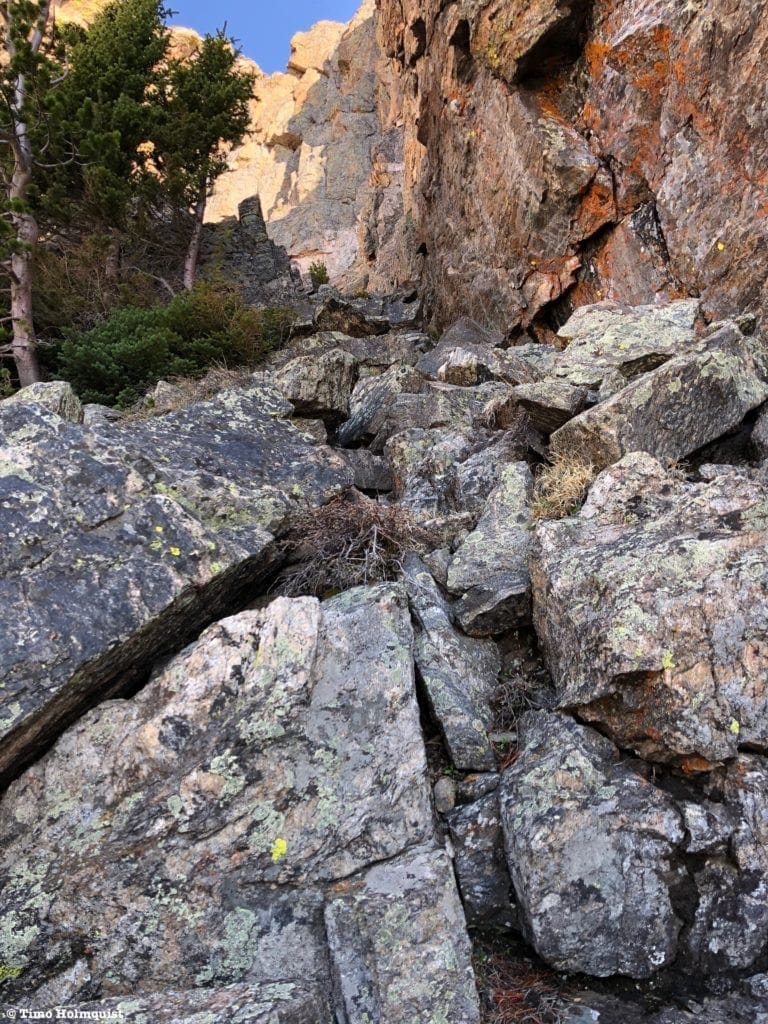
Keep rising along the walls initially, with the gully on your left.
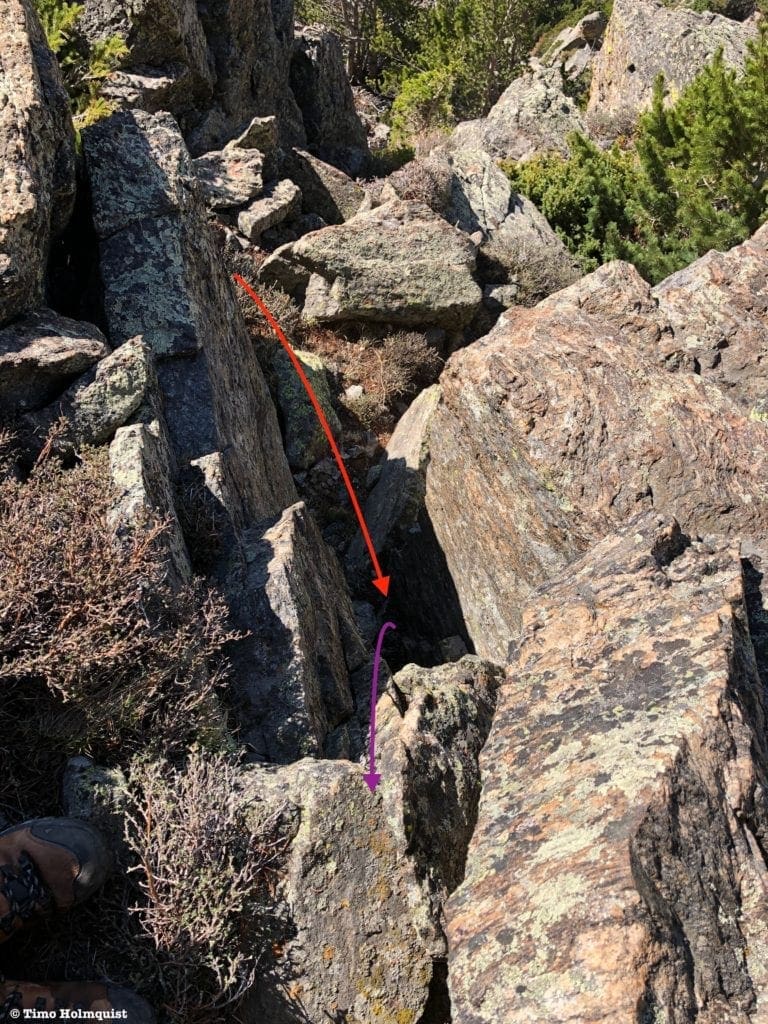
Ultimately, you want to descend to the gully, cross it, and continue traversing on the other side. You can do this by carefully scouting a route on angled rock to the gully floor, or ascending until the gully floor meets your line, cross, descend and wrap around the next set of walls on the other side.
The gully crossing.
The presence of snow and/or wet rocks in this area will dictate which path is safest, even if it means gaining and losing some elevation in the process.
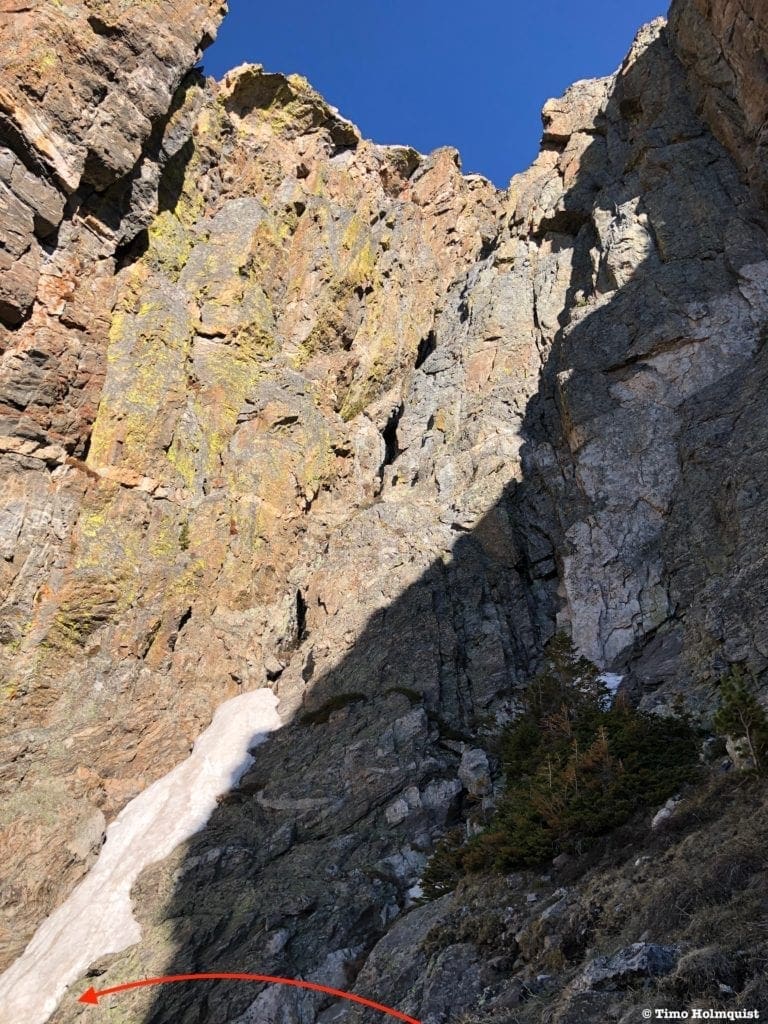
Once you’ve crossed this gully, the traverse continues. The second 4th Class section is here, along the highest possible route. You can bypass on the lower side with careful route selection.
Avoiding another 4th Class section.
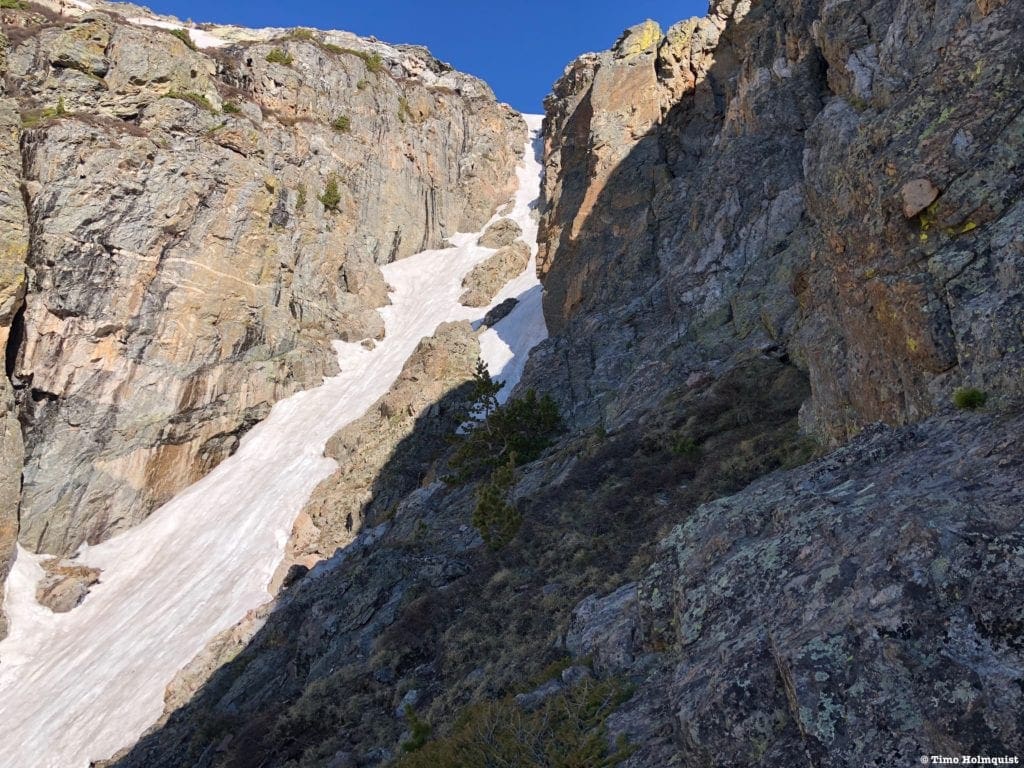
Regain the higher route and stay close to the rock walls on your right as they lead you into the Chaos Couloir.
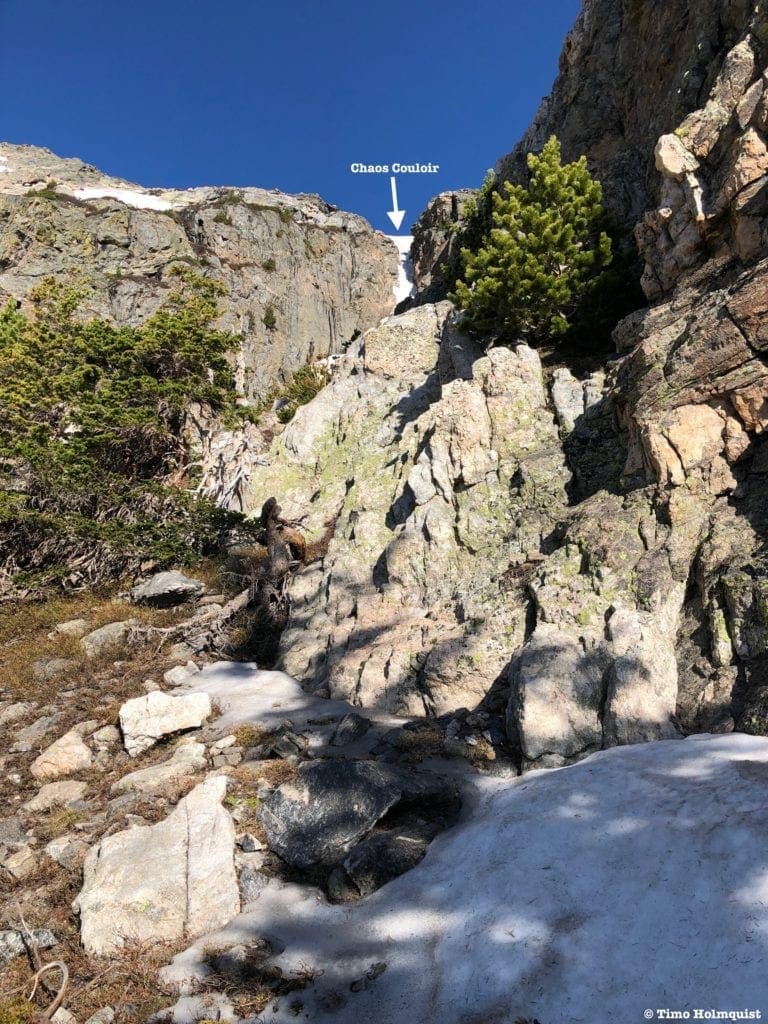
First views up the couloir.
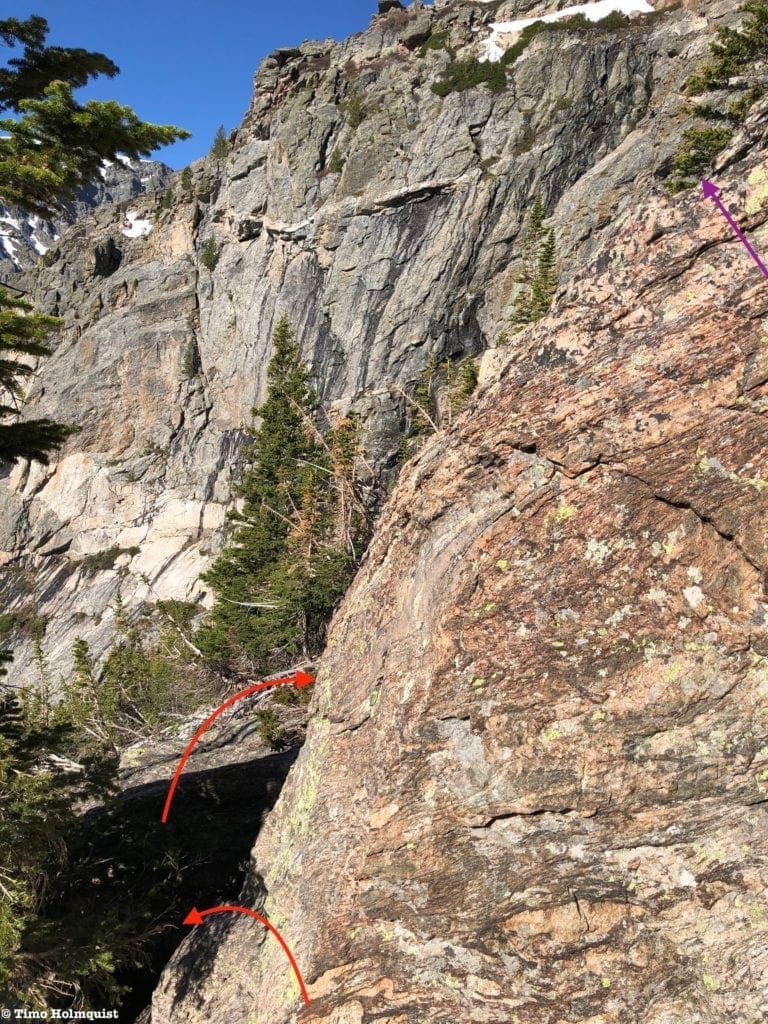
Much of your transition onto the couloir will be dictated by how much snow is in it. I completed my ascent on June 8 after an active and wet spring. Once I sighted the couloir, I was able to use a series of slanted rocks to gain elevation to a “rock island” that had emerged between two braids of the couloir.
Climbing alongside the couloir to the rock island.
If this section is open, another series of 3rd Class moves will be required.
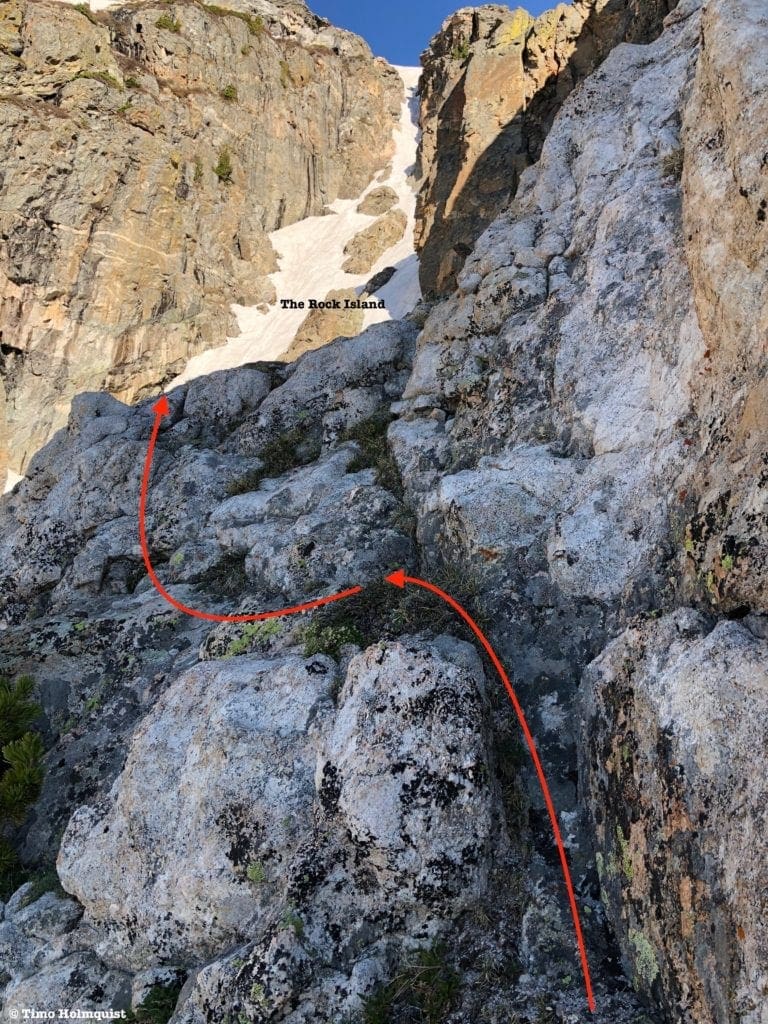
The route toward the rock island.
Once on top of the rock island, take a break and do some mental adjusting. From here to the top of Chaos Couloir is a steep and committing snow climb; make sure you are ready.
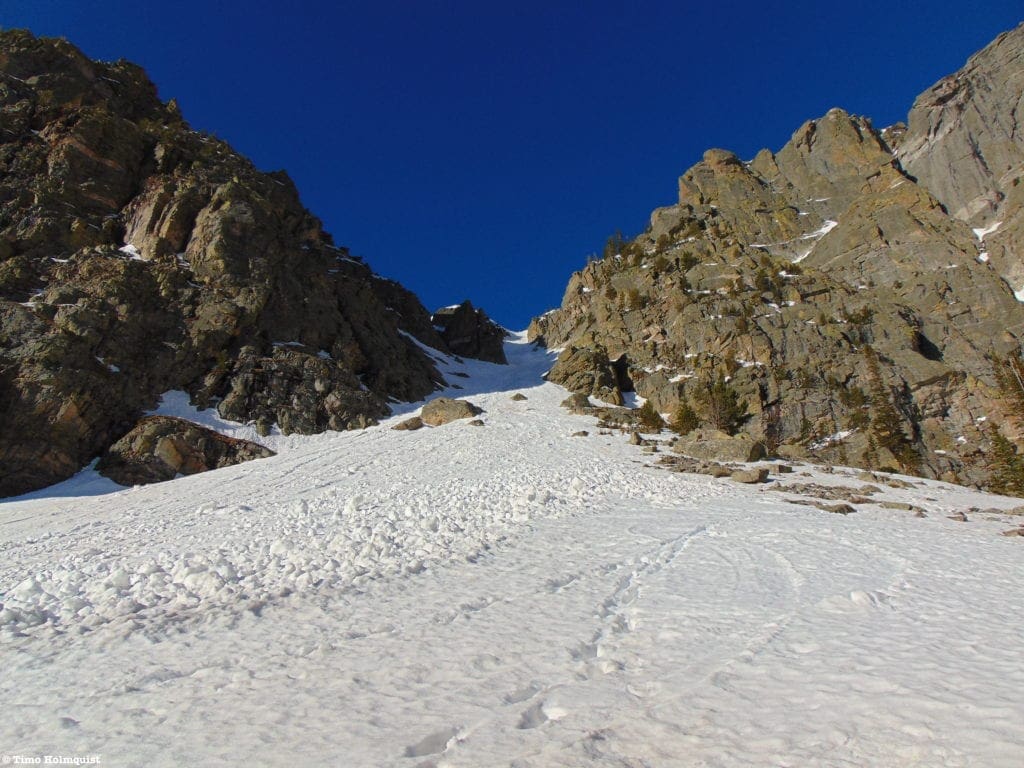
The upper part of Chaos Couloir.
After inhaling some water, I slapped my crampons on, brought out my axe, and began climbing.
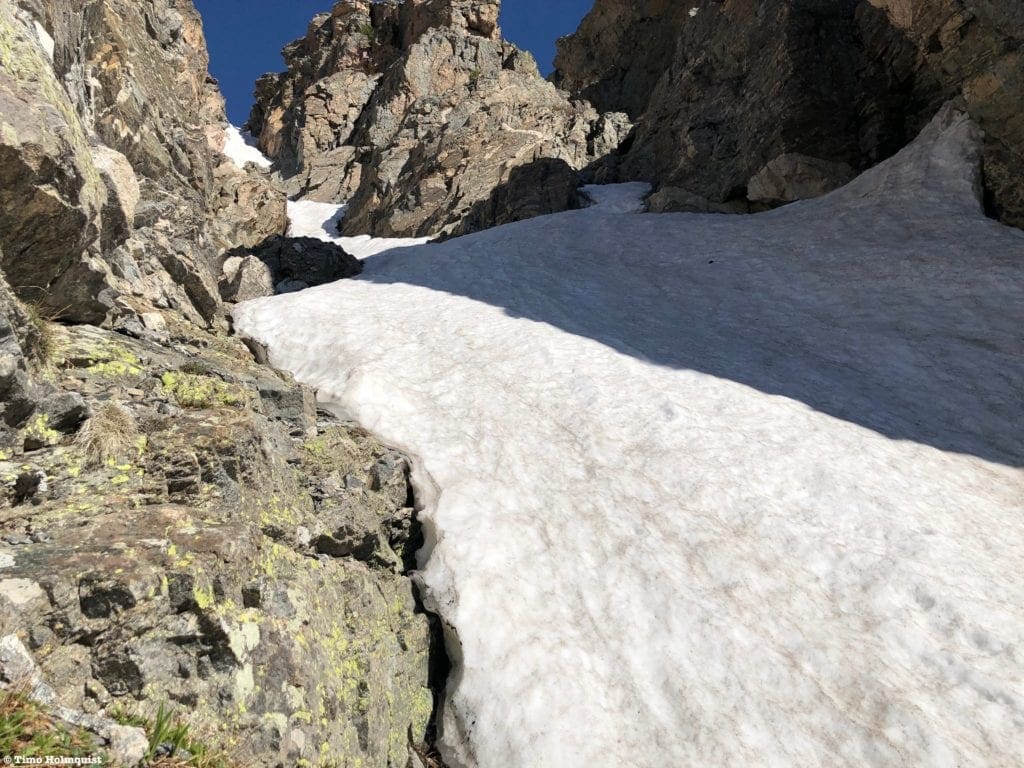
Looking up the couloir. The slope angle here is between 40-45 degrees.
The traverse to get to this point is certainly complicated, but Chaos Couloir is the definitive crux of the route. While annoying, it is possible to retrace your route and find bail options before hitting the couloir. Once you’re in or above the couloir, continuing to climb is the most reasonable option.
At its least steep, the couloir is firmly in the 40-45-degree range.
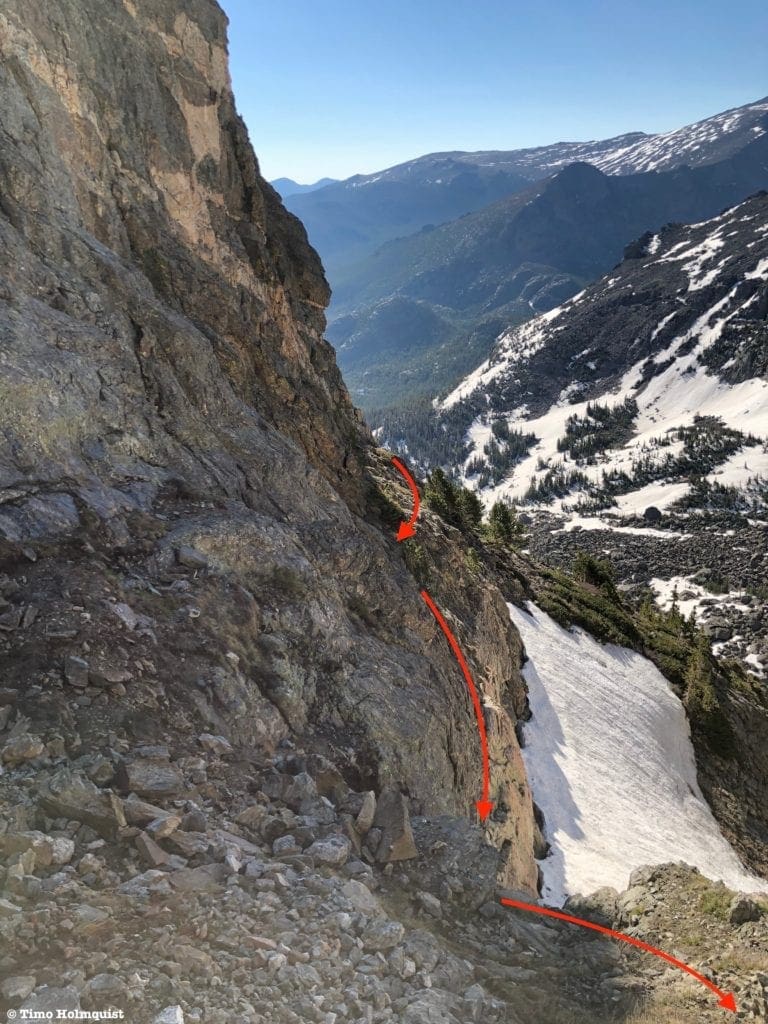
Looking down to where I began climbing from ~300 ft. up.
It is also an added burden trying to continuously ascend the gentlest portions because the couloir does not melt uniformly and traversing in crampons to match the line of least resistance is more tedious than picking a line of best fit and just climbing. Choosing a line center-left, I climbed slope angles between 45-50 degrees until just below the top apron, where it seemed to increase to over 50 degrees briefly before lessening significantly.
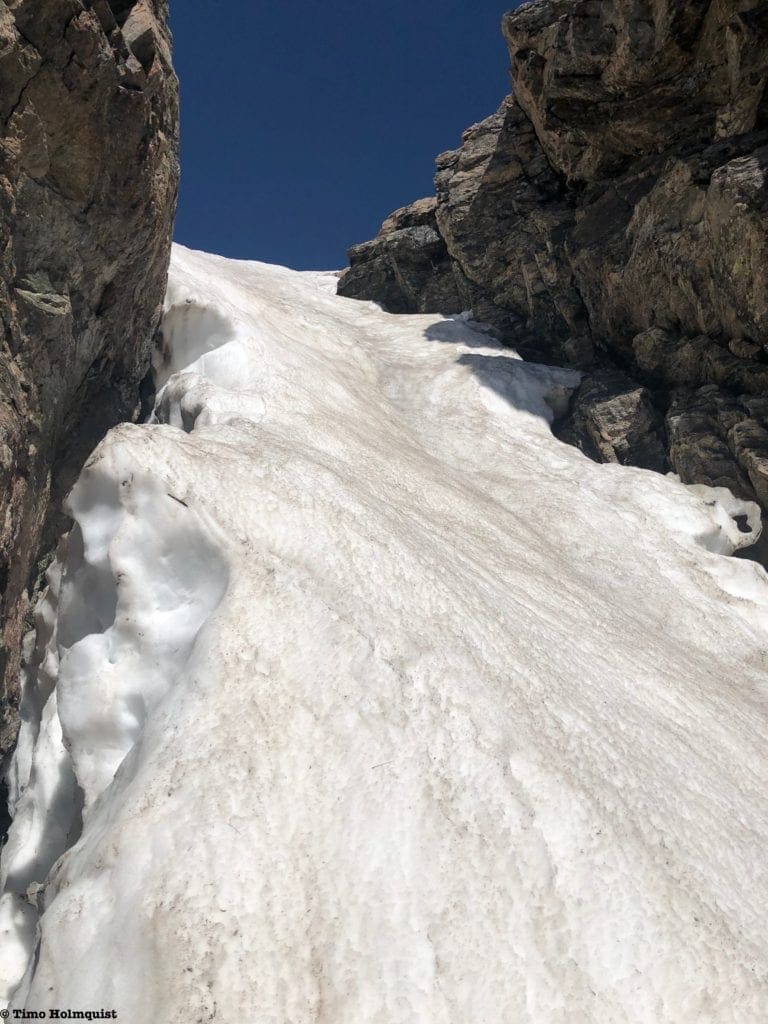
The couloir getting steeper as it reaches skyward.
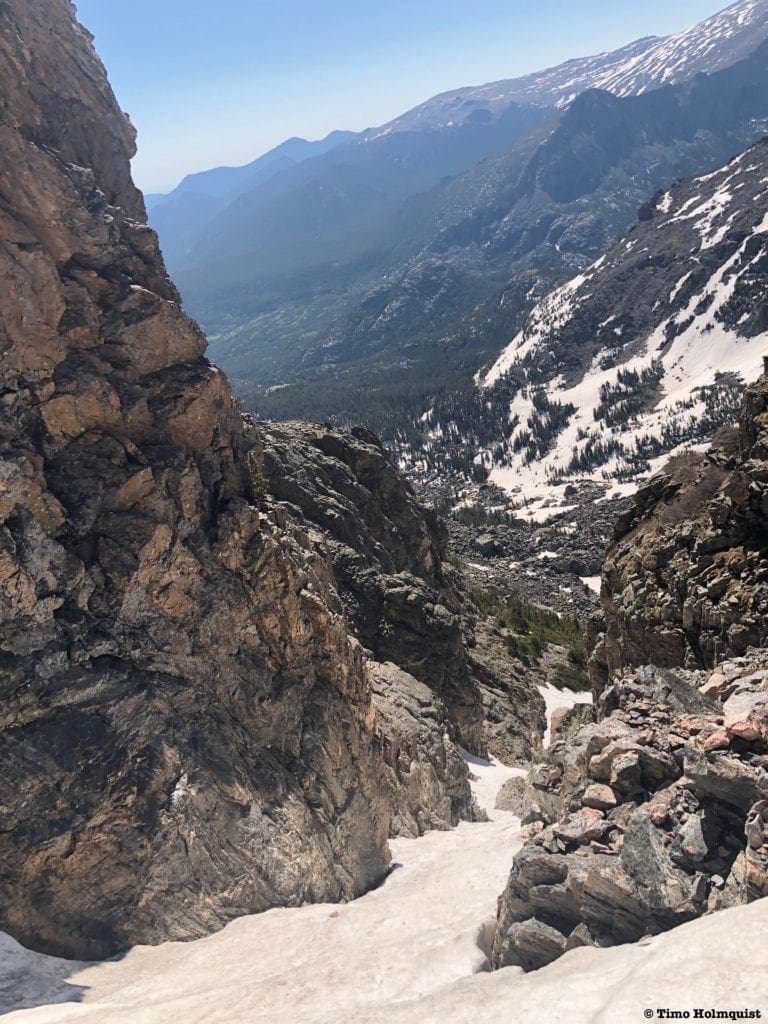
Once I rose above the skinniest part of the couloir, the rock walls faded away, and I was able to exit left onto a talus slope. While not as time-consuming as the earlier ridge walking sections, the couloir climb is VERY labor-intensive.
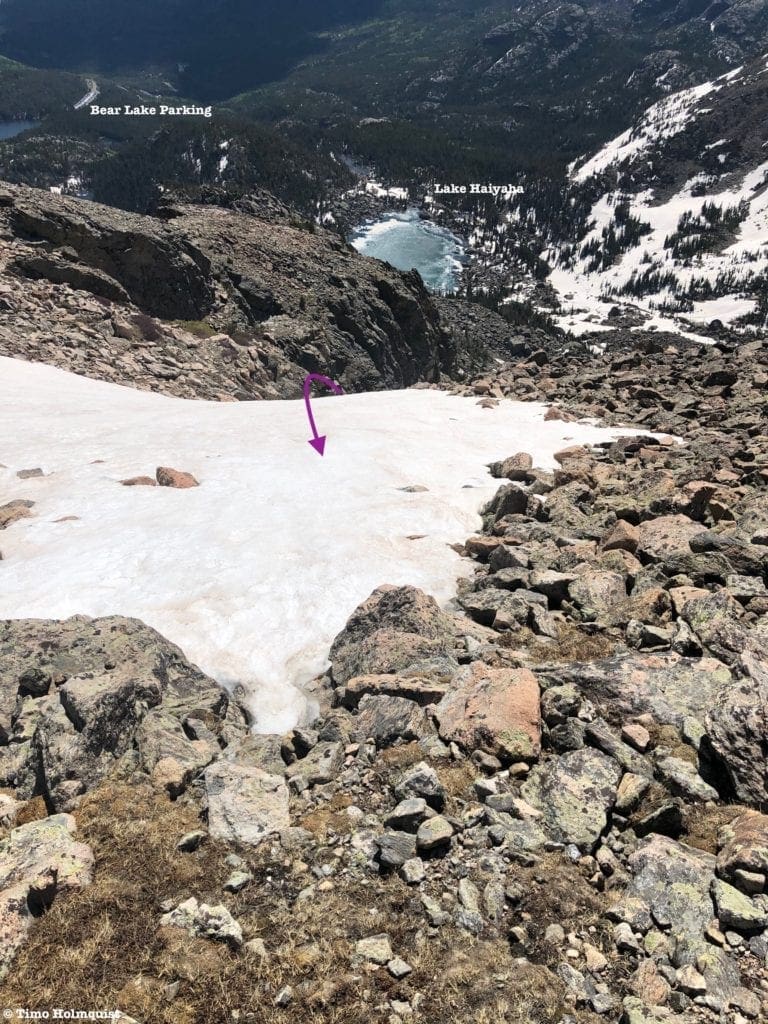
Looking down to where the couloir dives through the rock. Lake Haiyaha is behind it, and you can even see the Bear Lake Parking Area, where your car is.)
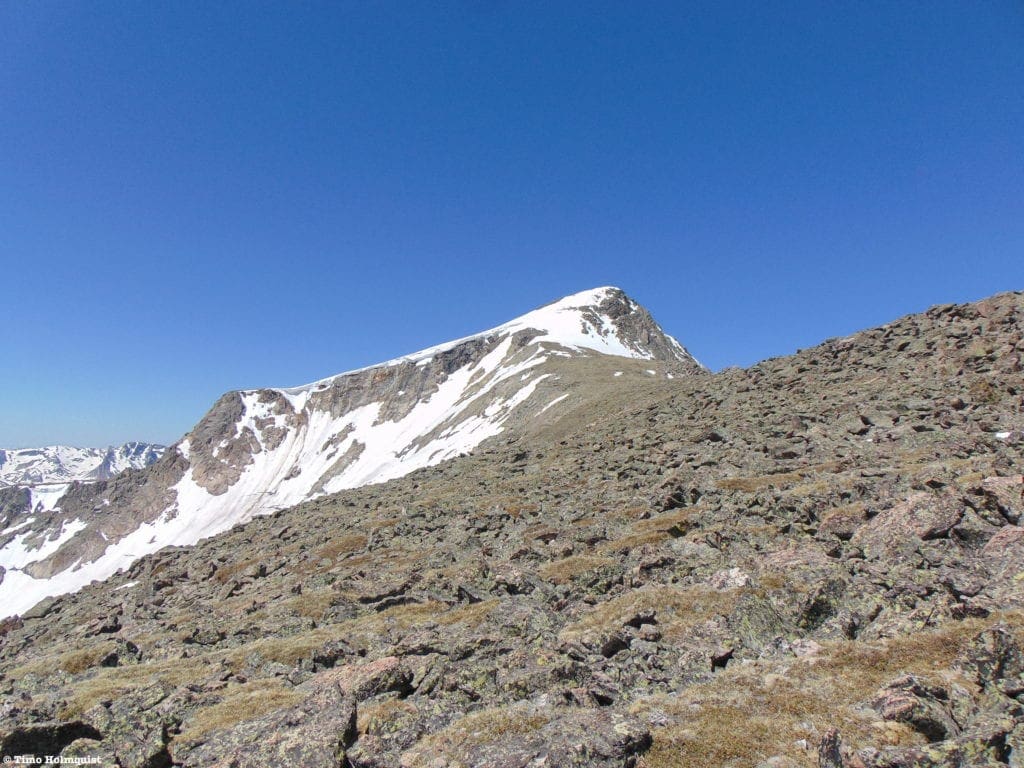
Give yourself a high five for making it this far, but don’t get too excited. Despite all that effort, you still won’t be able to see the true summit. What you will be able to see is a series of rocky buttons lining the ridge to the west. The most direct route is to make for them.
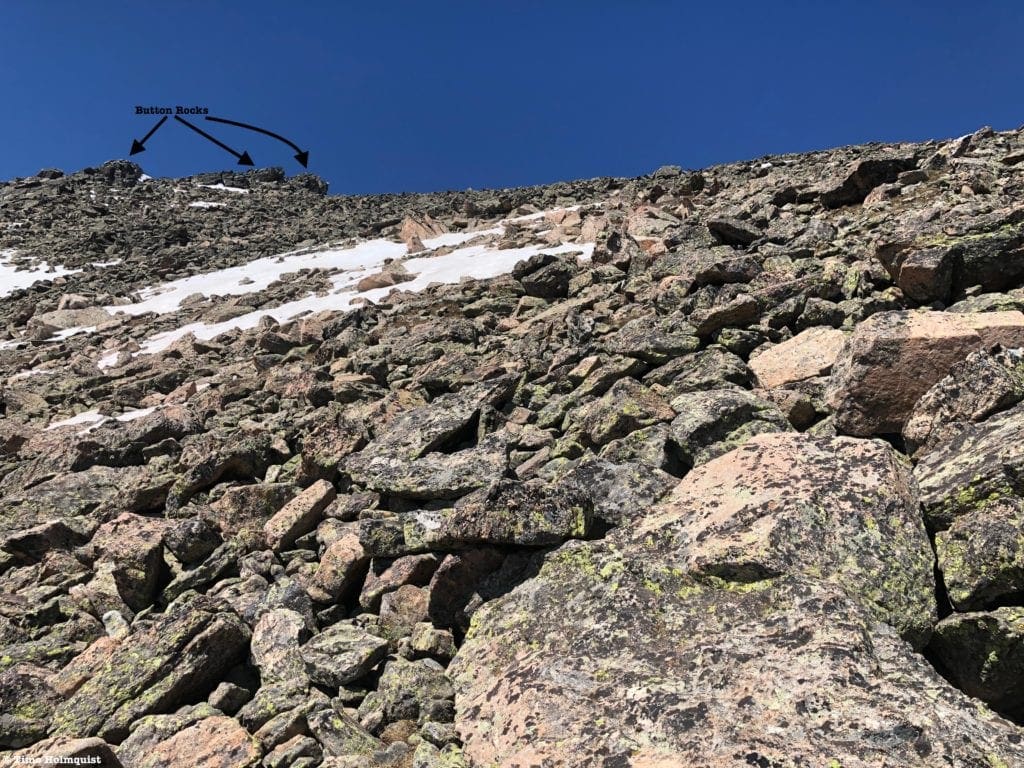
The route above the couloir.
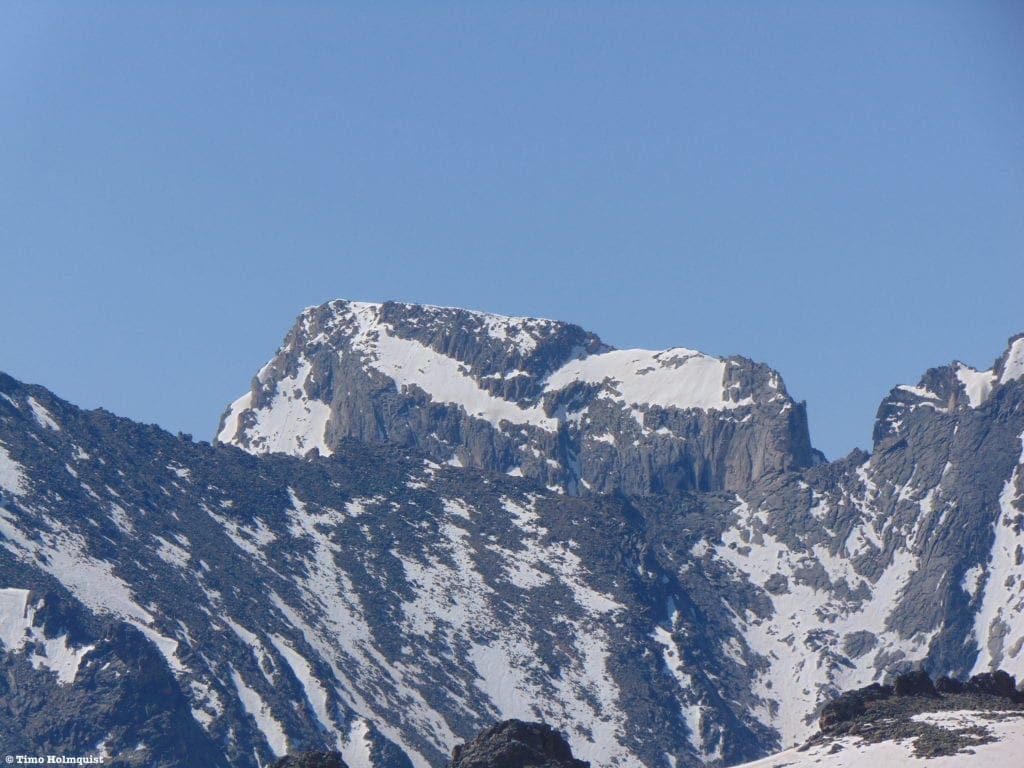
If your curious, you can also ascend to the right after exiting the couloir and CAREFULLY make your way to a small high point.
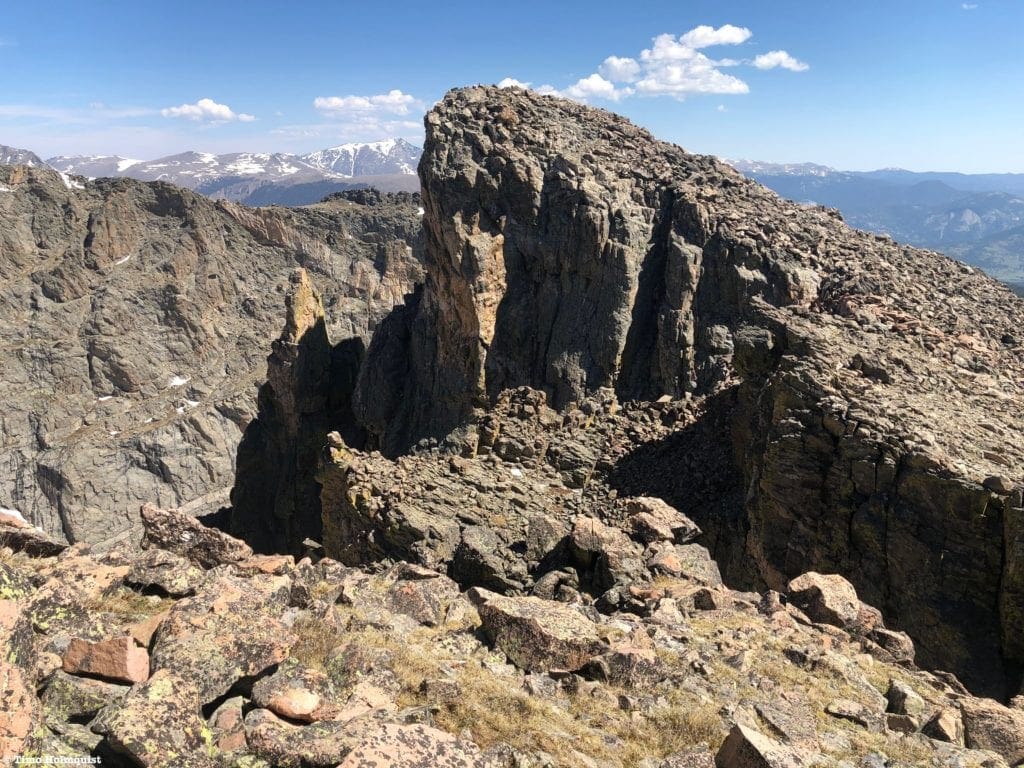
The high point from a little further up the ridge.
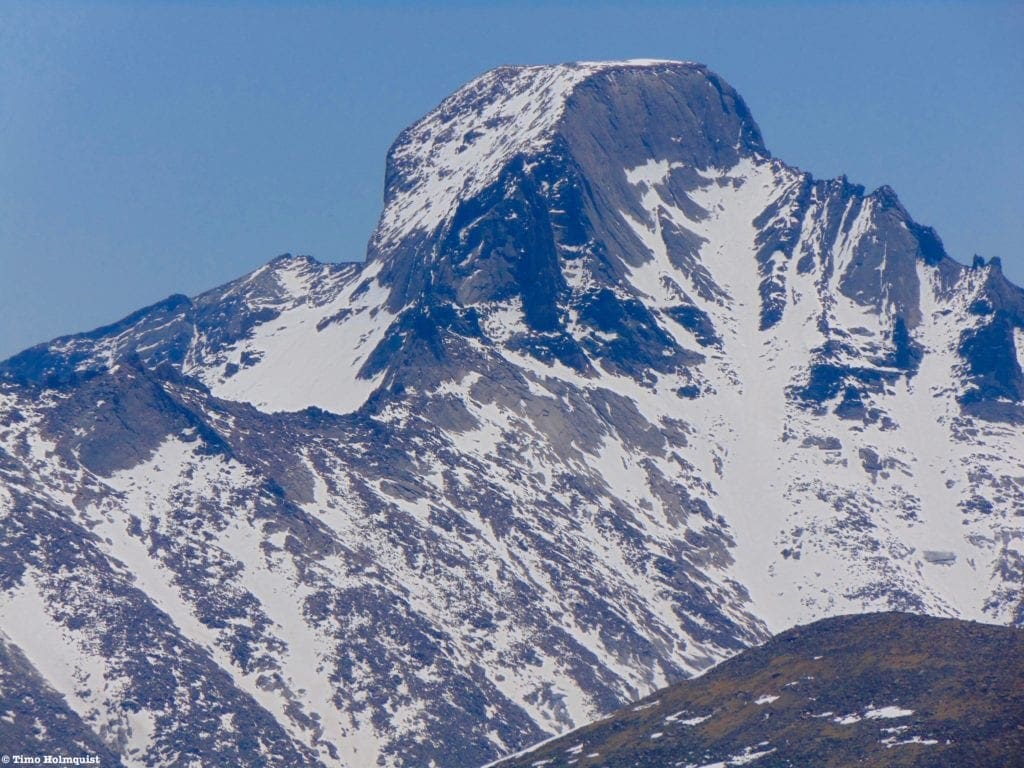
Be warned; you are now on top of the massive wall famously photographed from Dream Lake and sighted earlier in your ridge walking. Falling off the wall would certainly be fatal. Stay at least a few feet back from the edge.
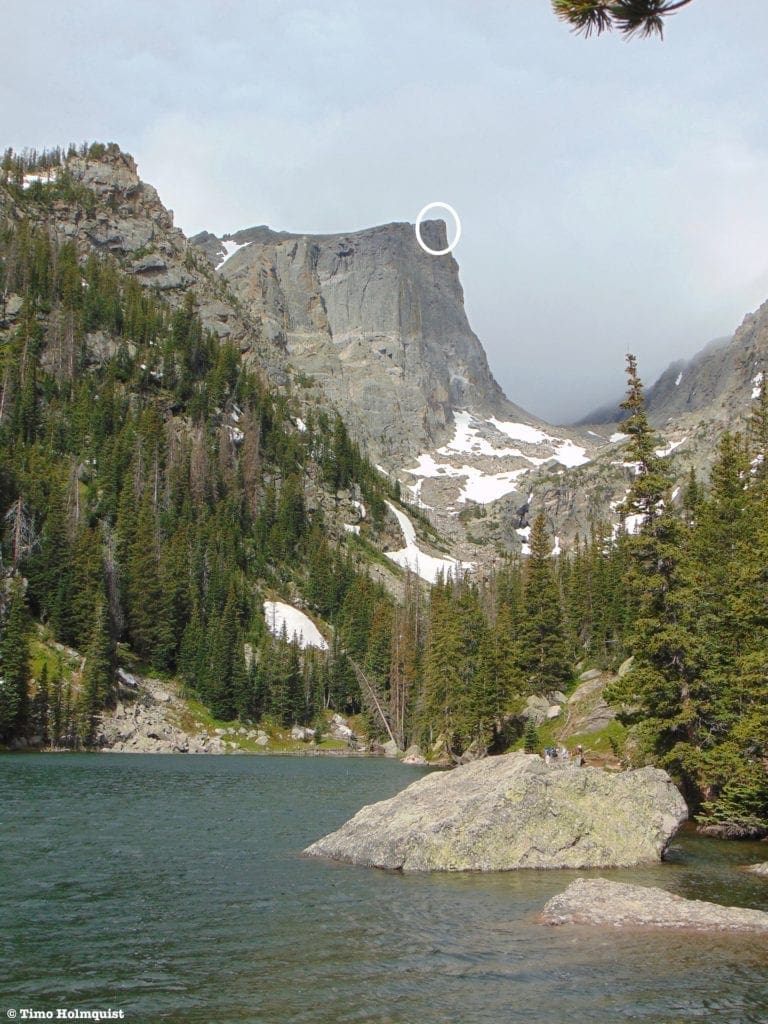
Dream Lake view for perspective.
When you’re ready, continue walking westward along the ridge, ultimately passing between the button rocks. On the other side, you’ll finally be able to see the true summit.
First views of the summit.
It’s still half a mile away, but you can make up some distance here by traversing just shy of the actual ridge crest and making a beeline for the snowfield leading up to the summit.
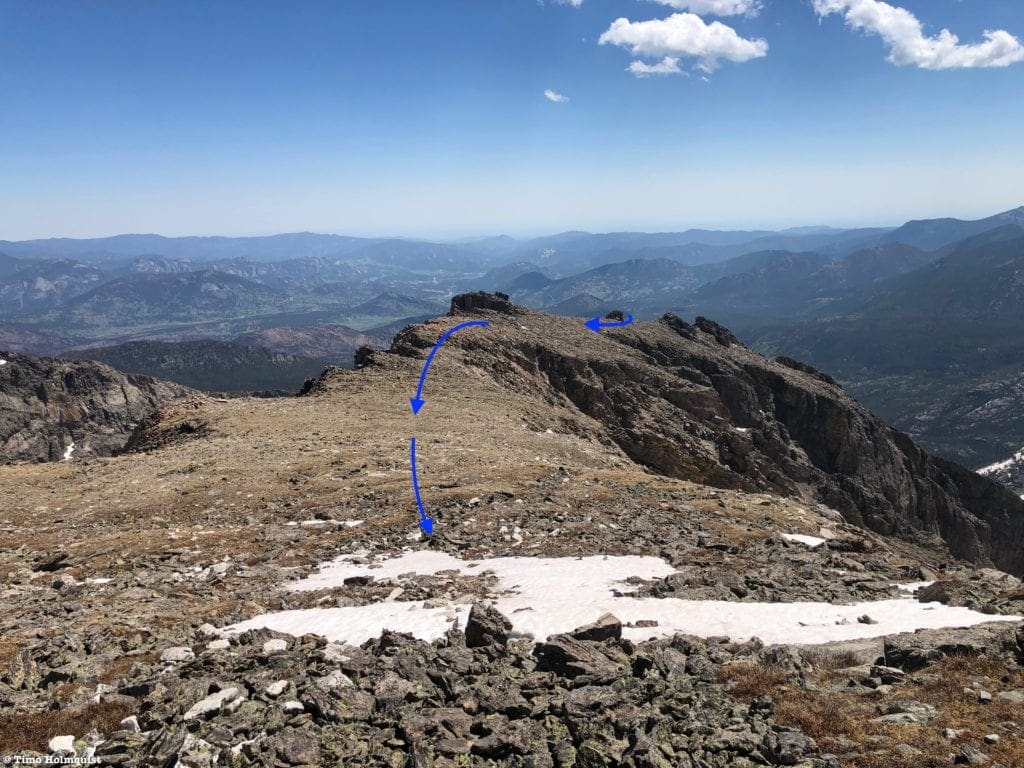
Looking back at where you walked by the button rocks. Chaos Couloir is no longer visible.
This tamer part of the hike is an incredible contrast to the earlier challenges but provides stellar views to Longs Peak and the Glacier Gorge giants to the south.
Zooming in on McHenry’s Peak.
Looking northward, you can see out to the Mummy Range. The remaining challenge (if climbing before mid-July) is a sizable snow slope leading up to the top.
This slope, while large, is not nearly as challenging as Chaos Couloir and can be dispensed with microspikes. Pay attention to the time of day as well; the snow may be slushy. If that’s the case, make sure to kick step your way into the slope with every step to minimize slide risk. While the slope is fairly gentle by the way you’re climbing, a slide sideways into Chaos Canyon will hurl you off a series of cliffs. The story is similar on the other side.

From the top of the snowfield, looking back at your route once you clear the button rocks.
After finally conquering this snow slope, you’ll arrive at the summit, marked by two rock windscreens. Touch the highest rock, and you’ve completed the mountaineering route on Hallett Peak!

One of two windscreens at the top of Hallett.
Incredible views of Longs Peak appear along the entire upper portion of the route.
There are three ways to get back down. The easiest option (but still requiring a large amount of effort) is to descend the west side of Hallett, turn north around Tyndall Gorge and connect with the Flattop Mountain Trail.
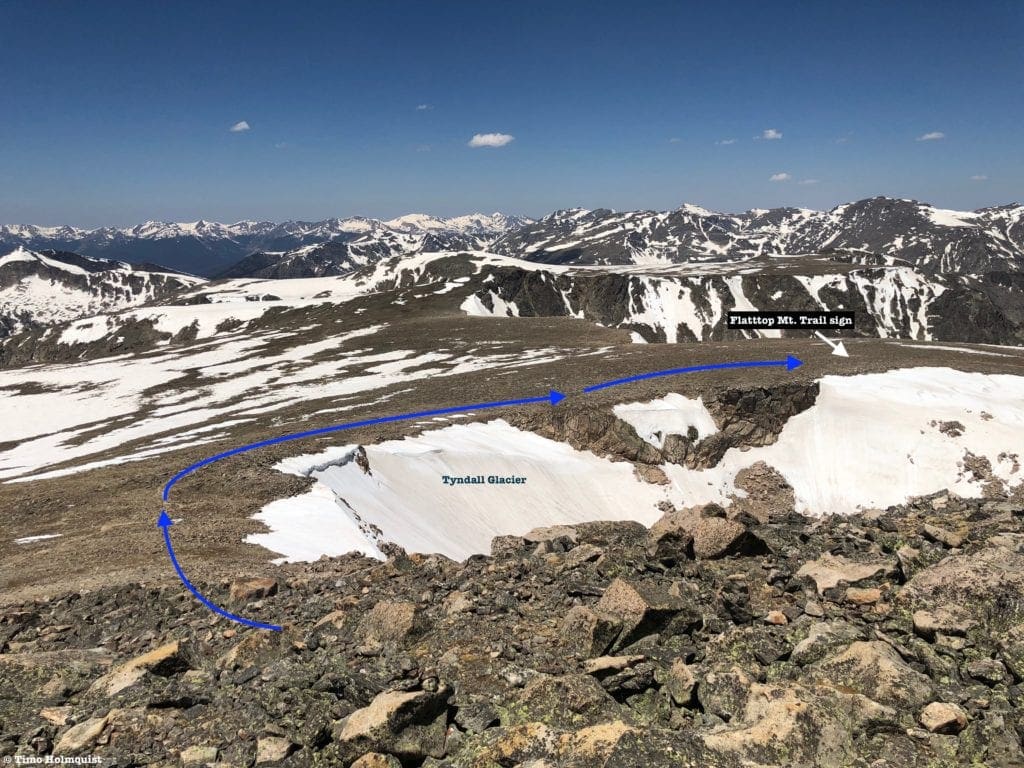
Eyeing the top of the Flattop descent route.
Looking back at Hallett Peak and Longs Peak from the Flattop Mountain Trail.
Take the Flattop Mountain Trail east to below treeline (snowdrifts may exist in the trees, even when the alpine is relatively clear) and descend until you hit the junction with the Odessa Lake Trail.
One of many perspective back to your ascent route from the Flattop Mt. Trail.
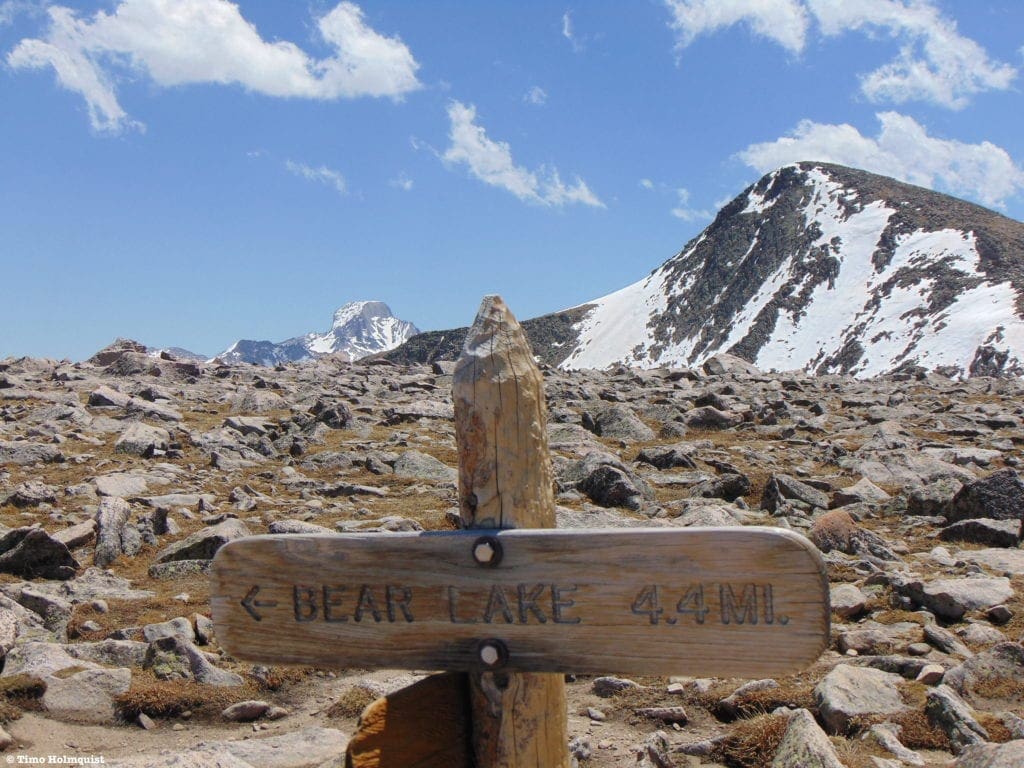
Here, take a right and continue until running into another junction, where you’ll take a second right, following the arrows for Bear Lake. You’ll encounter one last trail junction by the shores of Bear Lake, take a left, and follow the now wide and popular trail back to your car. For a bonus, take in the views of Hallett Peak’s East Ridge from the shores of Bear Lake and smile, knowing you were up there.
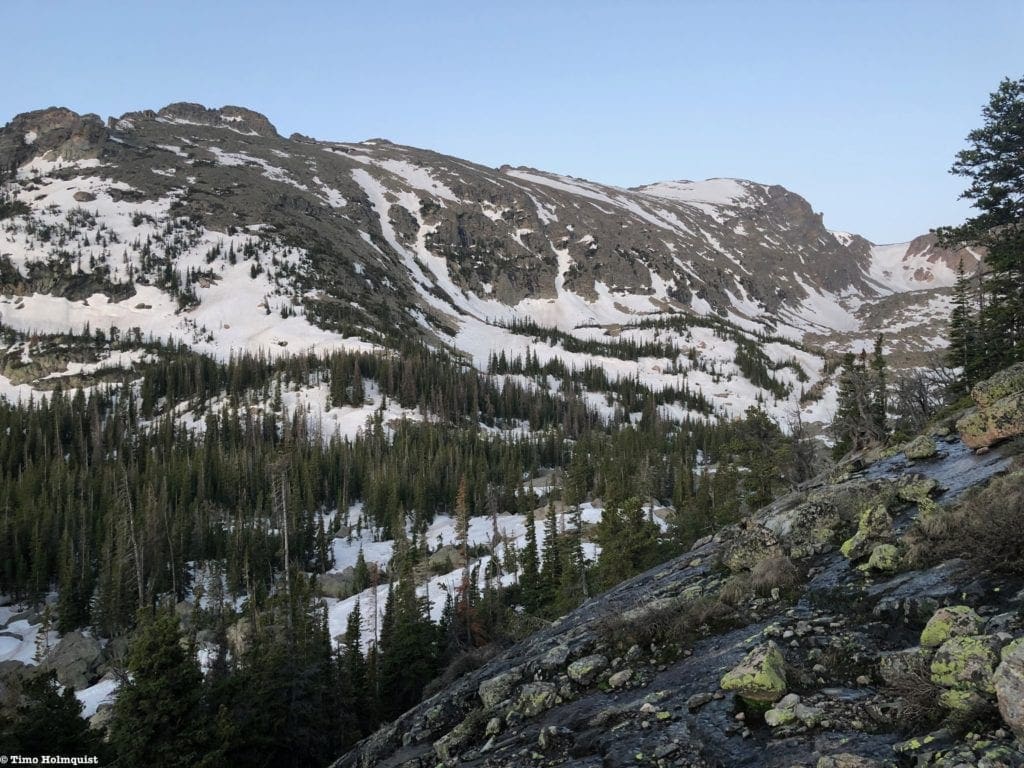
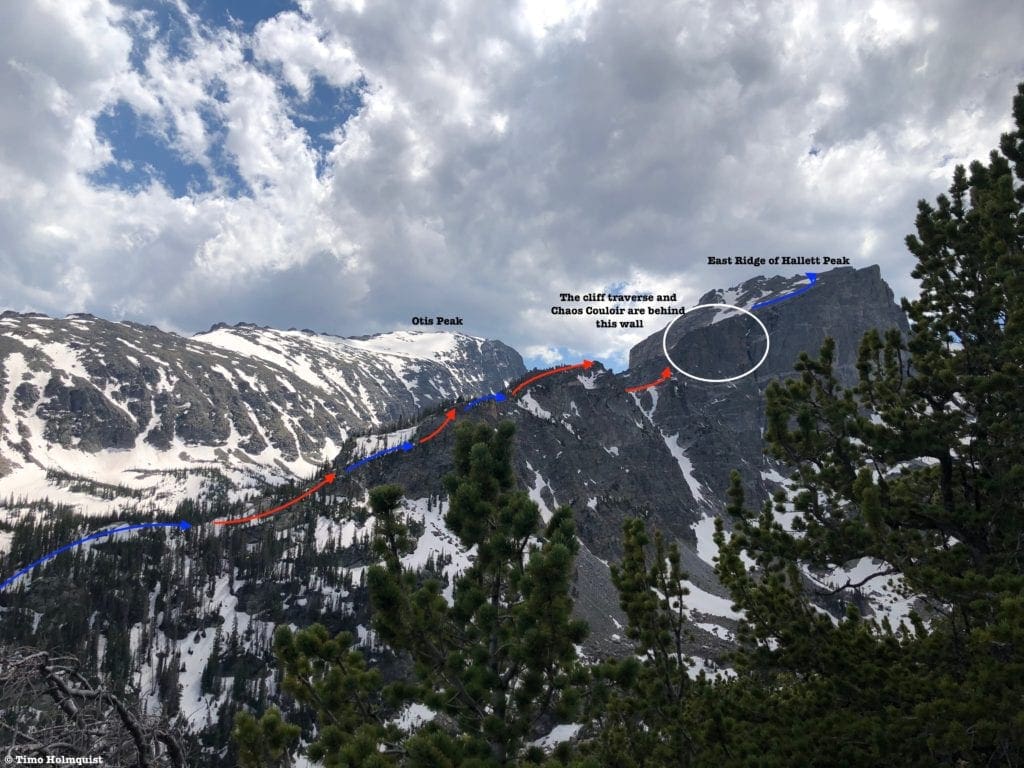
Alternatively, from Hallett, you can head south around Chaos Canyon, touch Otis Peak, and walk its long ridge eastward to a prominent rock fin. From there, you can descend back down to Haiyaha.
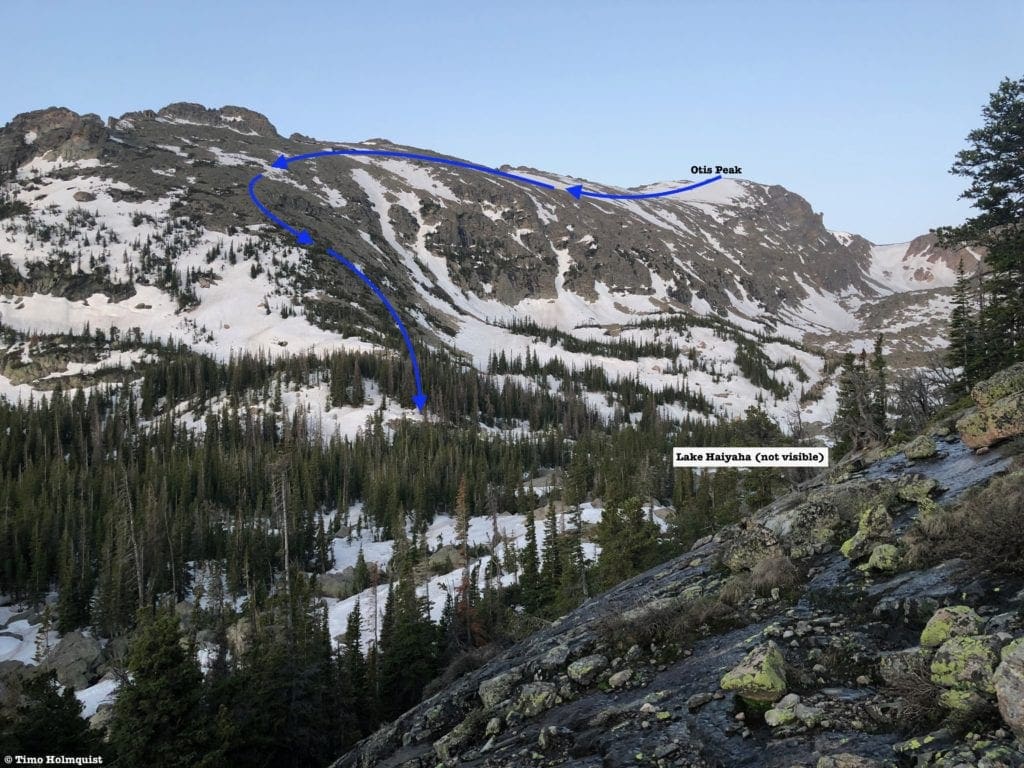
Loop option utilizing Otis Peak instead of Flattop.
Despite its shorter overall length than Flattop, this is all trailless territory and will inevitably eat up more time. However, from Otis’s ridge, you’ll be able to trace your ascent route and get a great perspective of Chaos Couloir. From Haiyaha, follow the trail to Dream Lake, take a right and descend all the way back to Bear Lake.
The third option would be descending Hallett peaks west side and continuing south past Otis Peak until you find Andrews Glacier in the basin beyond it. At a moderate and manageable 25-30 degrees, you can plunge step or glissade down the glacial remnant, pick up the Andrews Creek trail and make it down to the Loch. From there, take a left out of the area, go through Mills Junction, and take a left towards Alberta Falls at the following junction with North Longs Peak Trail. The trail will lead you down to the Glacier Gorge parking lot, where you can take a spur trail left to get back to Bear Lake.
Tyndall Glacier, located between Hallett Peak and Flattop, is not suitable for descending because it is much steeper than Andrews and ends in a rocky terrain trap. Similarly, trying to drop into the head of Chaos Canyon puts you on dangerous snow slopes and forces you to navigate a litany of large boulders before ever making it down to Haiyaha.
Last look at the summit of Hallett from along the Flattop Mt. trail near treeline.
Final Thoughts:
Hallett Peak is an especially dramatic-looking mountain when viewed from Bear Lake, Dream Lake, Emerald Lake, and Lake Haiyaha. If you’ve ever caught yourself staring at the imposing profile of the peak and wondering if there’s a way to climb it from the east, there is. As previously mentioned, however, this is not a hike; it is a mixed climb featuring mandatory 3rd and optional 4th class scrambles and roughly 500 vertical feet of steep couloir climbing. Navigational coherence, experience snow climbing, and experience rock scrambling are necessary to even think about attempting it.
While there are certainly tougher routes out there, Hallett’s East Ridge is challenging. I saw one cairn on the entire route to the summit, so you cannot depend on whoever came before you to do the directional leg work. The route is best climbed from April-June or early July if the area had a snowy spring. After July, you can still climb the route, but it’s a lot of scree and talus hopping over a long distance.
For those looking for a good mixed climb, consider this mountaineering route on Hallett Peak. It’s a fun, challenging, tiring, and well-balanced adventure to a famous peak in a famous national park. Onwards and upwards.
Popular Articles:
- Guide to the Best Hiking Trails in Rocky Mountain National Park, Colorado
- The Dyrt: The 10 Best Campgrounds In Colorado
- Top Adventure Sports Towns 2021: Boulder, Colorado
- Epic Adventures with the Best Guides In Colorado
- Bear Lake Nature Trail, Rocky Mountain National Park, Colorado
- Mills Lake via Glacier Gorge Trail, Rocky Mountain National Park, Colorado
- Black Lake Via Glacier Gorge Trail, Rocky Mountain National Park, Colorado
- Lake Haiyaha Trail, Rocky Mountain National Park, Colorado
- Sky Pond via Glacier Gorge Trail, Rocky Mountain National Park, Colorado

Skyblue Overland Strongly Recommends That You Enroll With Global Rescue Prior To Embarking On Your Next Adventure.
With more people outside now more than ever, Global Rescue expanded services to include field rescue within 100 miles of home. With Local Field Rescue — automatically included in any travel protection services membership — Global Rescue is there whether you’re hiking, kayaking, snowmobiling, fishing or simply enjoying the outdoors and get ill or injured and you’re unable to get to safety on your own. Purchase a Global Rescue membership for your next adventure and travel with peace of mind. Single trip, annual and family options are available.
Memberships start at $119.
Terms of Use:
As with each guide published on SKYBLUEOVERLAND.com, should you choose to this route, do so at your own risk. Prior to setting out check current local weather, conditions, and land/road closures. While taking a trail, obey all public and private land use restrictions and rules, carry proper safety and navigational equipment, and of course, follow the #leavenotrace guidelines. The information found herein is simply a planning resource to be used as a point of inspiration in conjunction with your own due-diligence. In spite of the fact that this route, associated GPS track (GPX and maps), and all route guidelines were prepared under diligent research by the specified contributor and/or contributors, the accuracy of such and judgement of the author is not guaranteed. SKYBLUE OVERLAND LLC, its partners, associates, and contributors are in no way liable for personal injury, damage to personal property, or any other such situation that might happen to individuals following this route.


