


|
Getting your Trinity Audio player ready...
|
Discover the best scrambles in Indian Peaks Wilderness, a small but beautiful area between Rocky Mountain National Park and James Peak Wilderness. Perfect for honing your mountaineering skills with its Class 3-4 routes.
Overview
Uncover the top scrambles in the Indian Peaks Wilderness (IPW), a compact yet scramble-filled region nestled between Rocky Mountain National Park and James Peak Wilderness. Scrambling falls between hiking and rock climbing. It involves off-trail ascents, rocky and exposed terrain, and various low-level rock climbing moves.
This area is divided by the Continental Divide into two large sections, east and west, and is surrounded by other wilderness areas with no roads cutting through it. Despite having well-known and well-kept trailheads on both sides, they are hours away from each other via the nearest reliable roads, such as Trail Ridge and Berthoud Pass.
The eastern side of the wilderness is more frequented due to its convenient accessibility. The trails starting from Brainard Lake Recreation Area are likely the busiest, followed by those near the town of Nederland at Hessie and Fourth of July Trailheads. Some areas surrounding the wilderness require reservations and fees, which can be found in the section labeled Field Notes below.
Even though it may be smaller than the nearby Rocky Mountain National Park, the Indian Peaks still offer plenty of unforgettable climbs and breathtaking views that can rival those found in the park. If you’re hoping to improve your mountaineering abilities with some challenging Class 3-4 routes, the Indian Peaks are an ideal destination.
Fun fact: The original plan for the Rocky Mountain National Park included the Indian Peaks area because of its stunning scenery.
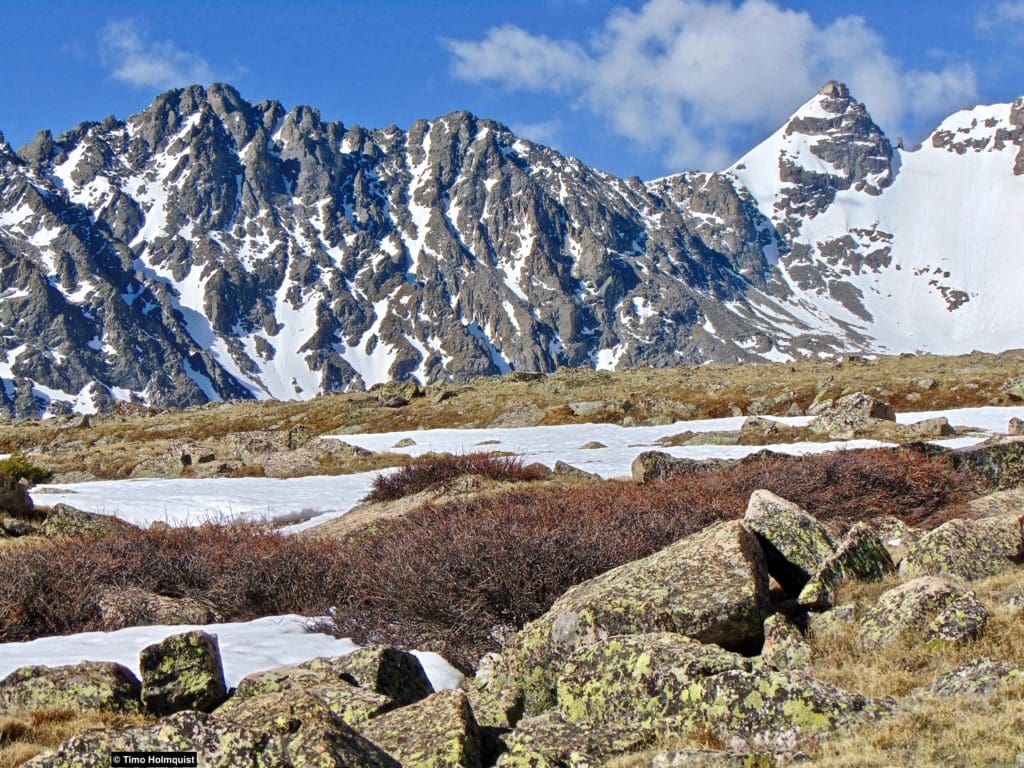
Navajo Peak (left) and Apache Peak (right) from the route to Shoshoni.
Planning The Perfect Adventure Trip to the Gateway to the Indian Peaks, Nederland, Colorado
Table of Contents
Article Navigation: Click on any of the listed items in the table of contents below to jump to that section of the article. Similarly, clicking on any large, white section header will jump you back to the Table of Contents.
- Overview
- What is scrambling? And why would anyone want to do it?
- Scales and Criteria
- Field Notes
- Best Scrambles
- Introductory Scrambles: Easy to mid Class 3
- Intermediate Scrambles: Higher Class 3
- Intense Scrambles: Class 4
Support Skyblue Overland™ on Patreon!
If you’d like to support our efforts for a few dollars a month, please subscribe to our Patreon page. Every donation energizes our team to keep writing detailed trail reviews, gear reviews and adventure guides. Thank you!
What is scrambling? And why would anyone want to do it?
Scrambling is a general term to describe the gray area between hiking and rock climbing. The hallmarks of scrambling involve off-trail ascents, traversing rocky and exposed terrain, and employing a series of low-level rock climbing moves to get through various route sections. The attractive component of scrambling is that it’s an adrenaline shock without the rock-climbing gear. You, of course, can bring ropes with you on any scramble, but many can be done without, so it gives you a “toeing the line” sort of feeling. It’s also a type of recreation that has you hunting for things like exposed ridgelines and rock quality, as opposed to a specific overlook or lake. For the list below, I strove to include scrambles that get the heart pumping but involve stretches of superb and stable rock. That isn’t a guarantee that every move is solid, and any good mountaineer, scrambler, or rock climber knows to double and triple-check every hand and foothold before setting their body weight on it.
North Arapaho Peak’s rugged north ridge.
Now that we’ve covered what scrambling is, the next question is usually, why would anyone want to do it? Well, for starters, it’s a beautiful, challenging, and different way to experience the mountains. Scrambling is also required to complete uber-popular challenges like ascending all of Colorado’s 14,000-foot mountains. As a skill, it blows the door open on experiencing some of the more interesting and hidden peaks in the state. Most people can hike a trail, but far fewer can stomach the idea of exposed scrambling. The physical and mental components are huge attractions to me personally. When your limbs are working in synch to accomplish a complex scramble, there’s an incredible feeling of excitement and bodily freedom. Scrambling also forces your brain to acknowledge complicated route problems and develop unique and often fascinating solutions to them. The combination of physical exertion, freedom and intellectual stimulation elevates the discipline above and beyond what you would get from an average hike.
If you’re interested in scrambles within Rocky Mountain National Park, make sure to visit our companion article by clicking here.
The crux section on Cooper Peak’s South Buttress: Class 4
Global Rescue is there whether you’re hiking, kayaking, snowmobiling, fishing or simply enjoying the outdoors and get ill or injured and you’re unable to get to safety on your own. Global Rescue is the red button you push in an emergency. Their team of medical and security experts come through for you when it matters most.
Scales and Criteria
This article utilizes two separate rating systems: Difficulty (comprised of distance and overall elevation gain) and a Technical Rating indicating the hardest move or set of moves encountered. The technical rating employs the Yosemite Decimal System. The scrambles are divided into three sections which correspond to the scrambling portion, NOT the overall length or elevation gain of the entire adventure. The Difficulty Rating and Technical Rating are the first stats present for every selection, so that information should be easy to find for prospective scramblers.
Difficulty Ratings:
-Easy: less than 5 miles, less than 500 ft. of elevation gain
-Moderate: 5-10 miles, 500-2000 ft of elevation gain
-Difficult: 5-15 miles, more than 2000 ft. of elevation gain
-Very Difficult: 10+ miles, more than 3,500 ft. of elevation gain
Technical Rating:
- Class 1: Established hiking trail the entire length of the adventure. Low chance for injury.
- Class 2: Typically involves cross-country navigation, possibly using hands for balance but not required, steeper than Class 1.
- Class 3: Hands and feet used to scale areas; must use hands to proceed (either for balance or to help pull you up a section), increased exposure, a fall could be fatal. Helmet recommended, along with grippy hikers.
- Class 4: Climbing on very steep terrain just shy of vertical, falls could be fatal, hands employed for grip and balance continuously, ropes advised but scalable without. Helmets are highly recommended, along with grippy hikers.
- Class 5-5.4: Vertical climbing that involves technical rock-climbing moves, exposed, falls likely to be serious or fatal, possible to scale without ropes but only for very experienced veterans. Helmets, grippy hikers, and/or rock-climbing shoes are necessary.
- Class 5.5 and up: Not covered as scrambling, full-on rock climbing with ropes, helmets, etc.
The YDS system is widely used in North America but can be quite subjective, so it is not perfect. The biggest differences I’ve encountered between Class 3 and Class 4 sections have to do with slope angle, exposure, and putting weight and pressure on hand grips (4) instead of using hands and feet interchangeably as supporting points of contact (3). It is not possible to climb a Class 4 section without using your hands to pull up some or all of your body weight. Typically, a Class 4 section will also require some type of rock-climbing move, like stemming, where hands or feet are pressed in opposition as if climbing the inside of a chimney. If downclimbing, a key difference is that most people will descend a Class 4 section facing inward, i.e., your back faces the exposure.
Approaching the hardest sections of the Mt. Neva’s north ridge: Class 3 and 4.
Field Notes
The Indian Peaks Wilderness, like Rocky Mountain National Park, is close to many major urban areas of the Front Range. Because of this, there are various areas where fees and timed entry passes have become a necessity to spread out traffic and protect the delicate resources of the area. While annoying, there are ways to master the reservation system.
If you plan on using the Brainard lake Recreation Area as an access point to your scramble, make sure to log onto recreation.gov to get the details about parking and passes. In short, you need either a Brainard single-day ticket, season ticket, or National parks pass to satisfy one of the two criteria. The other criterion is a timed entry pass, which you can also buy on recreation.gov. Planning is critical here because of the area’s popularity. Hop on early and check often to understand how the system works; weekends always sell out first.
Remember, you need an entrance pass AND a timed entry between Memorial Day and mid-October. Outside of these times, you can get into Brainard easily, but there will be more extreme weather and possibly a ton of snow to deal with. If the area experienced a productive spring with a lot of snowfall, the road to Brainard may not open until closer to July.
If you’re heading to Monarch Lake, the trailhead also requires a fee; this one’s a bit easier to manage as it’s only $5. Again, check all details here before committing; getting a ticket is no fun. Other popular trailheads like Hessie, 4th of July, Roaring Fork, and Moffat Tunnel don’t require fees, but it’s first come, first served. The strategy there is to think of the earliest time you’d be willing to get there and then go an hour earlier.
Aside from the reservations and timed entry permits, which can be a bit of a frustrating experience, it helps to have an accurate weather picture. Now, this is mountainous terrain; there has never been a 100% accurate forecast for mountain weather; they all get some details wrong from time to time. Always prepare for a high degree of variability in the alpine. Here are some useful forecasts to consider for the Indian Peaks Wilderness Area.
Eastern Trailheads
Western Trailheads
Eastern Alpine
Western Alpine
As you can see, the eastern side has more weather forecast stations to take data from. The western section is less traveled, and peaks like North Arapaho and Sawtooth Mountain (both of which lie on the Continental Divide) can work well for both sides. I prioritized free weather reporting with a few links sprinkled in for Opensummit. Opensummit was started by a long-time Colorado meteorologist (who also created Opensnow, dealing with winter weather). If you’re in the area, I highly recommend getting the subscription version. There are still coverage gaps, so prepare for variability, but with more information, you can start to zero in on typical regional weather patterns. A range is still better than flying blind.
Paiute Peak from the west, Mount Audubon rises behind and to its right.
Best Scrambles
As indicated above, all scrambles will have a general difficulty rating based on distance and elevation gain, along with a scramble rating. They are divided into 3 sections based on the cumulative difficulty of attaining these ridges and peaks. These are not the only fantastic scrambles in the Indian Peaks and really only scratch the surface of what’s out there. Stay tuned for more scramble articles in the future.
Introductory Range: Easy to mid-Class 3
These scrambles are designed to tip-toe you into the idea of Class 3 scrambling while providing plenty of options and bailouts if it turns out to be an activity you aren’t very interested in.
- Paiute Peak (Easy Class 3)
- Shoshoni Peak (Easy Class 3)
- Marten Peak (Brief moderate Class 3)
Paiute Peak – Easy Class 3
What: Paiute Peak (13,088 ft.)
Where: Eastern Indian Peaks
When: June-October
How: Most likely through the Mitchell Lake Trailhead in the Brainard Lake Recreation Area. See the Field Notes section for information about passes and fees.
Difficulty: Difficult (+ 3,050 ft.)
TLDR: There are a few Class 3 moves that provide a little fun up the first summit. The second and taller summit has a more exposed but still only a Class 3 traverse to it. These small sections are perfectly distilled looks at what longer and more involved Class 3 and 4 scrambling looks like without upping the danger. The exposure is also relatively low (but certainly not zero, be careful). If you get to the first scrambly section and don’t like what you can see, you can easily escape back to Audubon.
What the scramble looks like from the low point between Audubon and Paiute.
Description: Paiute Peak is the first entry in our list because it’s connected to Mt. Audubon, a Class 2 13er that is nearly trailed to its summit. (Mitchell Lake Trailhead, Beaver Creek Trail, left at the next trail junction up to the shoulder of Mt. Audubon). While the last little elevation rise has some Class 2 maneuvering, Audubon is many people’s first Indian Peaks summit.
From the summit of Audubon, if you look west, you can see an arcing ridge connecting Audubon to Paiute. The ridge is sturdy and wide, only offering up some Class 3 scrambling near the summit of Paiute. There are a few small sections of fun, including a Class 3 traverse to the highest point. The western and northern slopes end in sharp cliffs, which give Paiute a lot of stature from the Monarch Lake area. Retrace your route to reconnect with Audubon, or continue around the entire cirque heading south and then west to knock off the Blue Lake Traverse, which you can read about here.

The traverse marked and seen from the north.
Shoshoni Peak – Easy Class 3
What: Shoshoni Peak
Where: Eastern Indian Peaks
When: later June-October
How: Most likely via Long Lake Trailhead in Brainard Lake Recreation Area. See the Field Notes section for information about passes and fees.
Difficulty: Difficult (+2,600 ft.)
Length: 10.6 miles
TLDR: The scrambling is short and dramatic, and you get killer views of Apache Peak and the basin holding Isabelle Glacier and Navajo Peak. Shoshoni Peak is a fun scramble and a superb summit to be on.
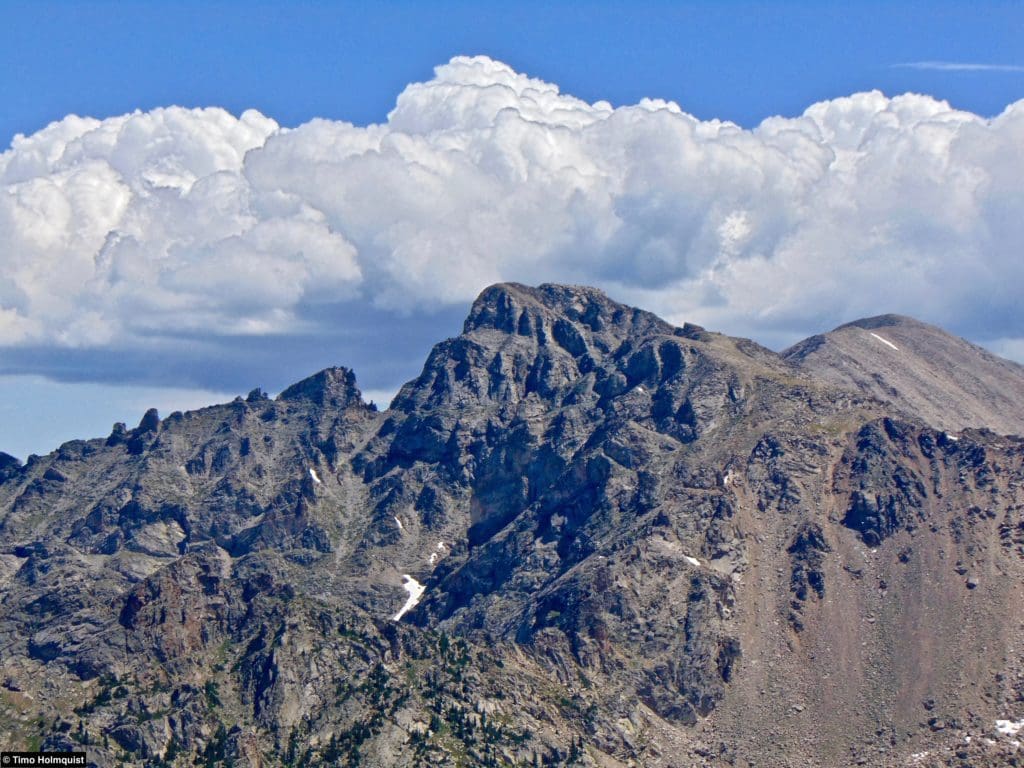
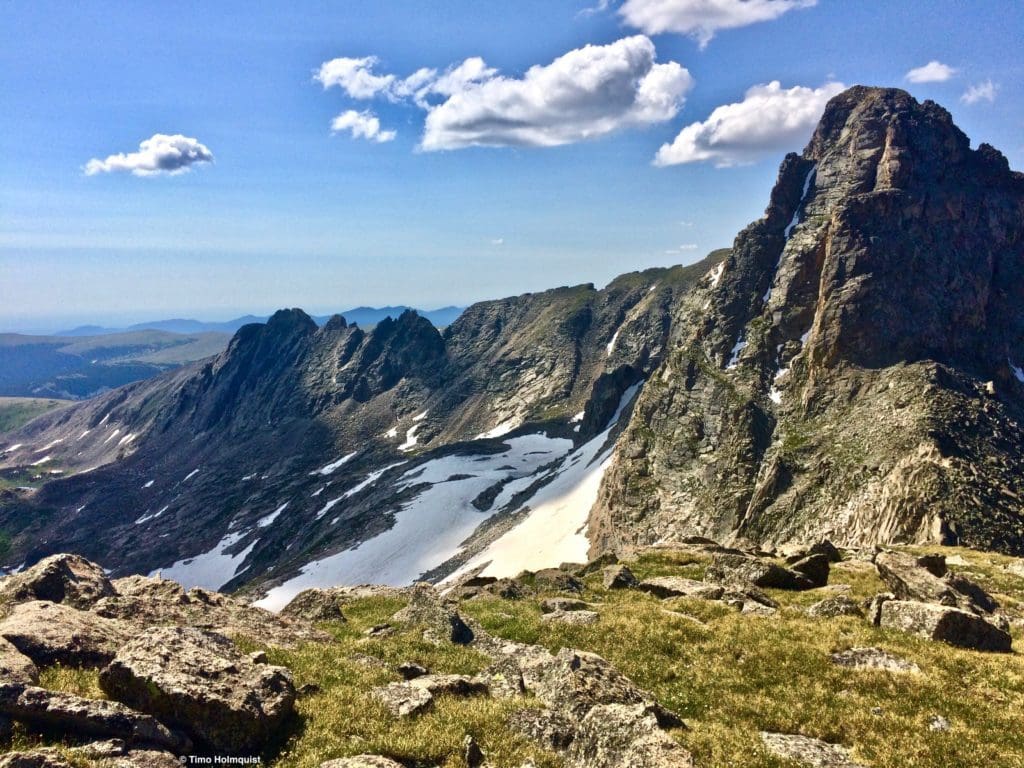
The summit of Shoshoni Peak, seen from Niwot Ridge.
Description: Shoshoni Peak is hidden in plain sight. The mountain is part of the iconic set of peaks that rise around Lake Isabelle and the Isabelle Glacier, which feature Navajo Peak, Apache Peak, Niwot Ridge, and Shoshoni Pk. The area is super popular and accessed from Brainard Lake Recreation Area, which has timed entry requirements in the summer; see the Field Notes for more information.
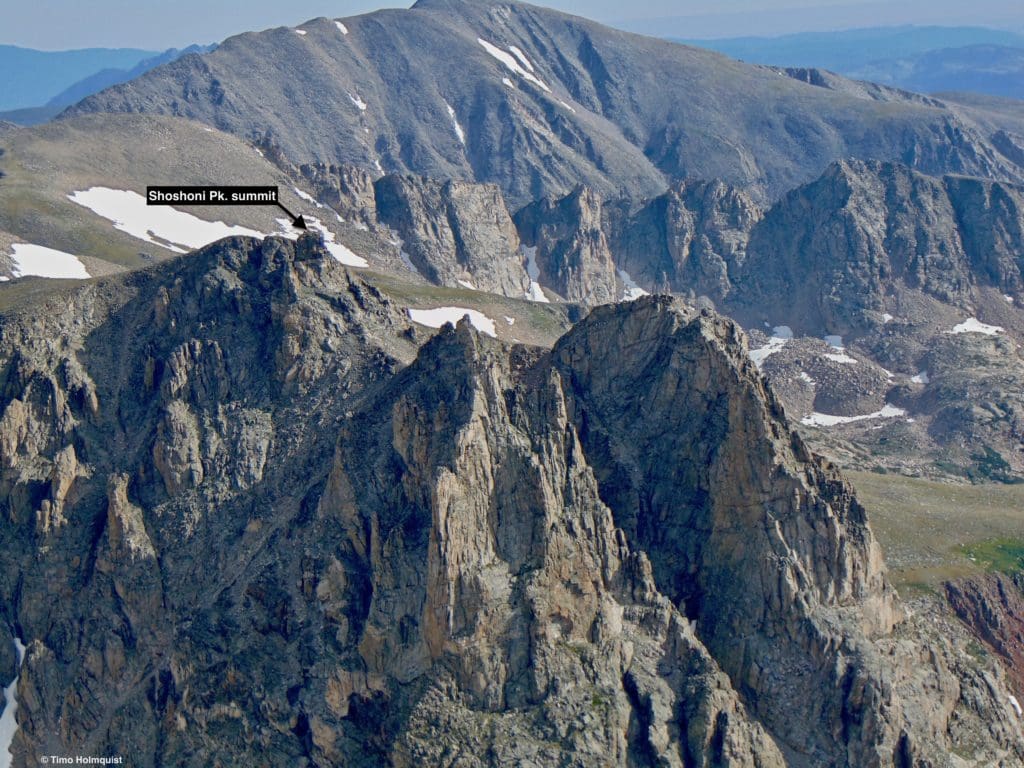
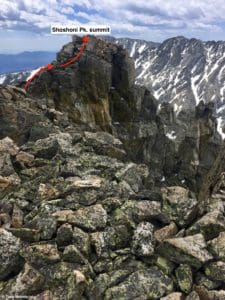
The peak is easily accessed from the top of the Pawnee Pass Trail. Instead of descending into the western side of the wilderness, take a left (south) and hike along the ridgeline towards the big flank of Apache Peak. You’ll cross a few ridge points before the terrain flattens into a high-elevation plateau. Instead of continuing to Apache and the start of the Kasparov Traverse, head south southeast (a bit more left) to hunt for the Shoshoni chimney tower. There are short, exposed bits of Class 3 here, but the quick duration makes it manageable.
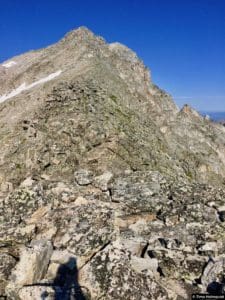
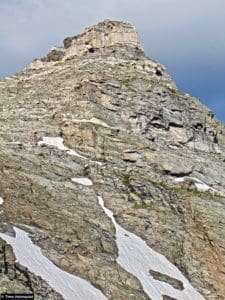
The summit block of Shoshoni Peak.
Marten Peak (Brief moderate Class 3)
What: Marten Peak
Where: Western Indian Peaks
When: July-October
How: Either via Roaring Fork Trailhead or Monarch Lake
Difficulty: Very Difficult (+4,500 ft. from Roaring Fork/Monarch Lake)
Length: 3.72 miles from Gourd Lake, ~15.3 miles from Roaring Fork Trailhead
TLDR: This adventure does two things. Firstly, it provides short, exposed, and fun Class 3 scrambling in a wilderness setting. Secondly, it should remind you that in order to reach some of these peaks, you’ll be pulling a lot of mileage. Train up, or make it a bigger camping adventure to take advantage of the area. Backcountry permits can be found here for the IPW.
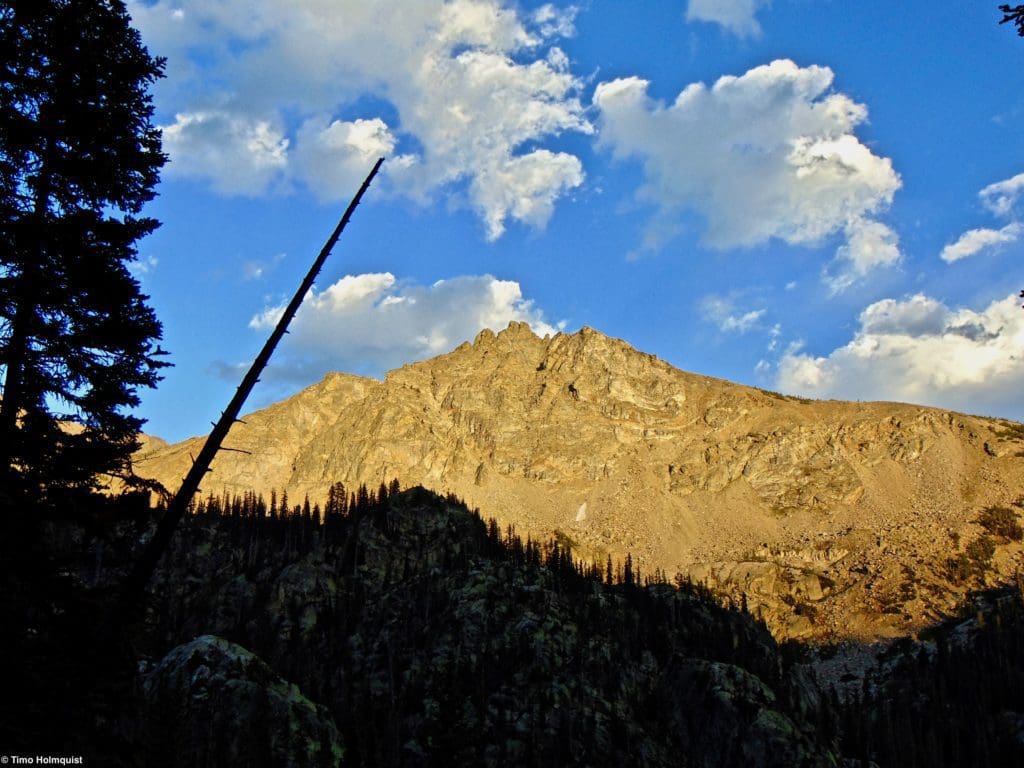
Marten Peak bathed in afternoon light.
Description: Marten Peak is a haul for a day hike, it’s certainly possible, but it’s long. If you camp at Gourd Lake or Stone Lake, you can grab a handful of nearby peaks and routes in the area, including Cooper Peak, whose Class 4 South Buttress Route is discussed in the Harder Range of scrambles below. For a full review of Marten Peak, click here.
From Gourd Lake (8.3 miles from Monarch Lake), you want to make it up to the Island lake Drainage, duck into the basin between Cooper and Marten and climb up to the saddle. From there, you head southwest and deal with summit options. By the standard route, this is a relatively easy and short Class 3 with moderate exposure. The summit area has a lot to offer the discerning scrambler, so take a look at our full coverage here.
From Stone Lake (5.8 miles from Roaring Fork Trailhead), you can see Marten Peak easily. Make for the saddle to the left of the summit towers, then follow the ridge up to the summit area and scope out your options. Return via the way you came.
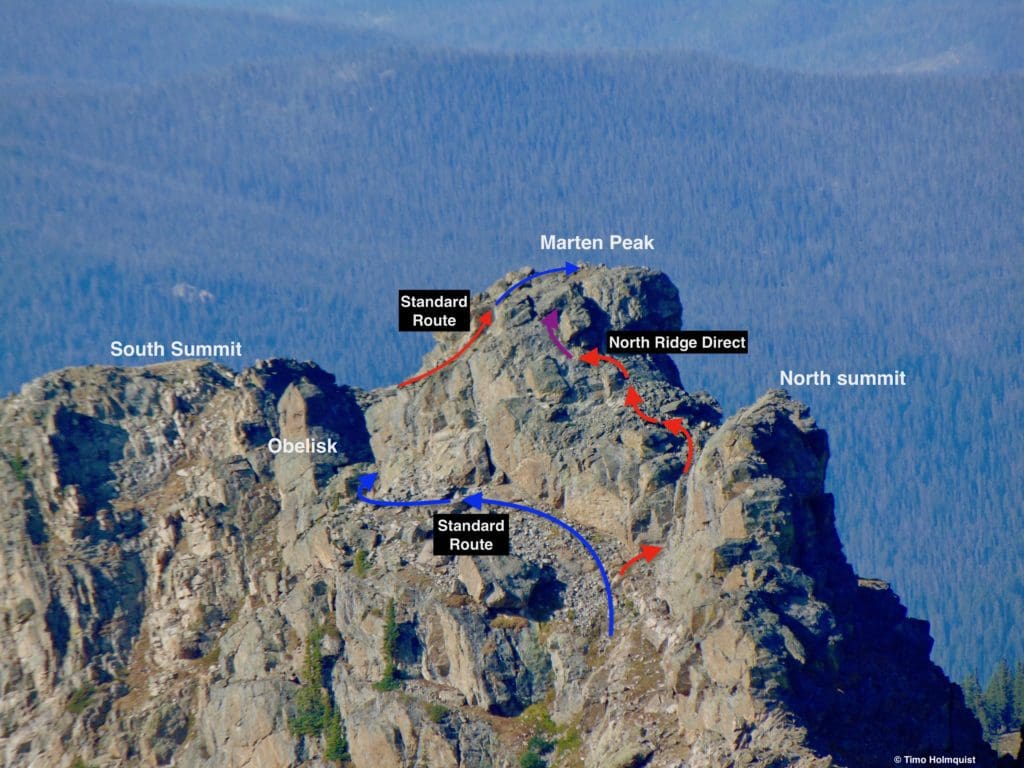
Various summit options exist.
Intermediate Range:
The jump to this category involves a little more of everything. The scrambling durations are a bit longer and more challenging, and the approaches may be as well. There will be substantial off-trail travel, and not all of it is above treeline, so bring your bearings.
- “Cherokee” and Pt. 11,602: Moderate Class 3
- Navajo Peak: Moderate/exposed Class 3
- Blue Lake Traverse: Difficult Class 3
“Cherokee” & Pt. 11,602 (Class 3)
What: “Cherokee” (12,130 ft.)
Where: Western IPW
When: mid-July-early October
How: Via Monarch lake Trailhead
Difficulty: Very Difficult (+ 4,200 ft.)
Length: 15-18 miles depending on route choice
TLDR: “Cherokee” ups the ante in a couple of ways. If you opt for the northern approach, you get to tack on some quality off-trail navigation. If you approach via Crater lake, it’s more demanding, but you stay on official trail for longer. “Cherokee” also offers classic Class 3 scrambling, whether it’s up broken cliffs and through grass benches or alongside mountain scars and relatively stable rock. The route’s got a good mix of terrain.
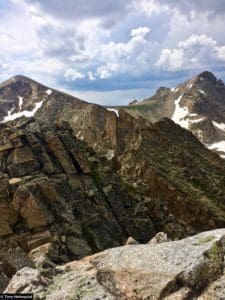
Crater Lake from Pt. 11,602.
Description:
For important route details and full coverage, click here.
“Cherokee” Peak is the western bookend of the Crater Lake Cirque. Due to its position, isolation, and relative prominence, the view from it and neighboring Pt. 11,602 are some of the best in the entire western IPW. In short, it’s a stunning mountain with stunning views.
You’ll start at the Monarch lake Trailhead (see the Field Notes section to find out about fees). Most of the approach follows the same set of trails for Crater lake, which you can read about here. The real fun begins about 5.75 miles in and at an elevation of roughly 9840.
You’ll break from the trail, heading southwest, cross Cascade Creek, and begin climbing mixed terrain up the other side. Follow herd paths higher until you can cross a tributary stream. Then, head up the prominent gully between “Cherokee” and Pt. 11,602. A little Class 3 is required to get into the gully. Pt. 11,602 is a Class 2+ affair from the top of the gully and gives you an awesome view of Crater Lake and the rest of the route options up “Cherokee.”
You can pick a line closer to the ridgeline or traverse across the face to an obvious scar splitting “Cherokee.” Class 3 routes on good rock exist on either side of the scar and travel until the scar ends. From there, it’s a little looser, but only Class 2 to the summit block. A few final and exposed Class 3 moves get you to the highest point. There’s plenty to explore here; bring a camera.
The upper part of “Cherokee.”
Navajo Peak – Class 3
What: Navajo Peak (13,395 ft.) Bonus: Niwot Ridge (13,023 ft.)
Where: Eastern Indian Peaks Wilderness
When: July-October
How: via Long Lake Trailhead, Brainard Recreation Area
Difficulty: Difficult (+ 3,050 ft.)
Length: 8.85 miles (~11 if including Niwot Ridge)
TLDR: Navajo Peak is a serious mountain. There are multiple Class 3, 4, and Class 5 routes up the summit block. The two variations discussed here are both harder Class 3 but relatively short. If you add Niwot Ridge, the scrambling continues and takes on a stout Class 3+ nature with route finding required.
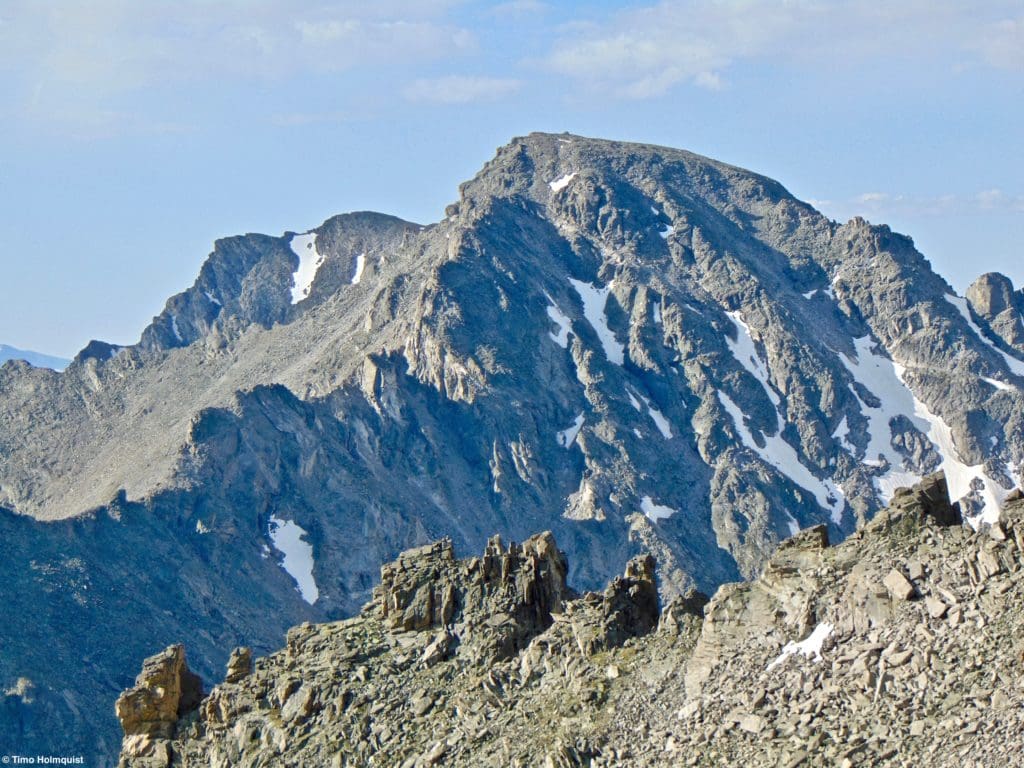
Niwot Ridge (left) and Navajo Pk. from near the Pawnee Pass Trail.
Description: See full route description here.
With an iconic profile immediately visible from many places, Navajo Peak is an eye-catching summit and a very rewarding scramble. The most likely approach is via Brainard Lake, and for a lot of the hike, your summit is visible. Most people will attempt Navajo via airplane gully, which has airplane wreckage in it from 1947.
The route is fairly popular, and so are the various routes around Navajo Peak. As you climb Airplane Gully, watch for loose rocks and never ascend directly above or below someone. Airplane Gully gets you onto the ridge that connects with Navajo’s summit, but the scrambling options are at the very end. You can either go up the SE Chimney (Class 3+) or traverse west and south around the summit block until hitting the ridgeline. From there, turn north and scramble up the ridge line to the summit (Class 3).
Both routes have a bit of exposure but offer up stable rock and fun scrambling as well. The summit view is also lovely. For a combination route that’ll push the Class 3 envelope, consider adding an eastward traverse of Niwot Ridge (Class 3+). Conversely, you could scramble Niwot Ridge on the way to Navajo. In either scenario, remember the following points:
- There are three high points on Niwot Ridge.
- The middle high point is the tallest (Class 3)
- The Eastern High point is the hardest because of the steep col between it and the highest summit. It’s easy to tag from the east, but then you have to navigate difficult terrain to get to the highest summit.
- From the east, you can tag the first summit, descend to the north and wrap around while staying at Class 3. This involves some tough scrambling and route finding.
- Any ridgeline connection between the eastern summit and the actual highpoint will require a minimum of Class 4 scrambling.
Approaching the Navajo summit block.
Blue Lake Basin Traverse (Class 3+)
Where: Eastern Indian Peaks Wilderness
When: June-October
How: via Mitchell Lake Trailhead or Long Lake Trailhead in Brainard lake Recreation Area. See the Field Notes section to learn about fees etc.
Difficulty: Very Difficult (+4,350 ft.)
Length: ~10.5 miles
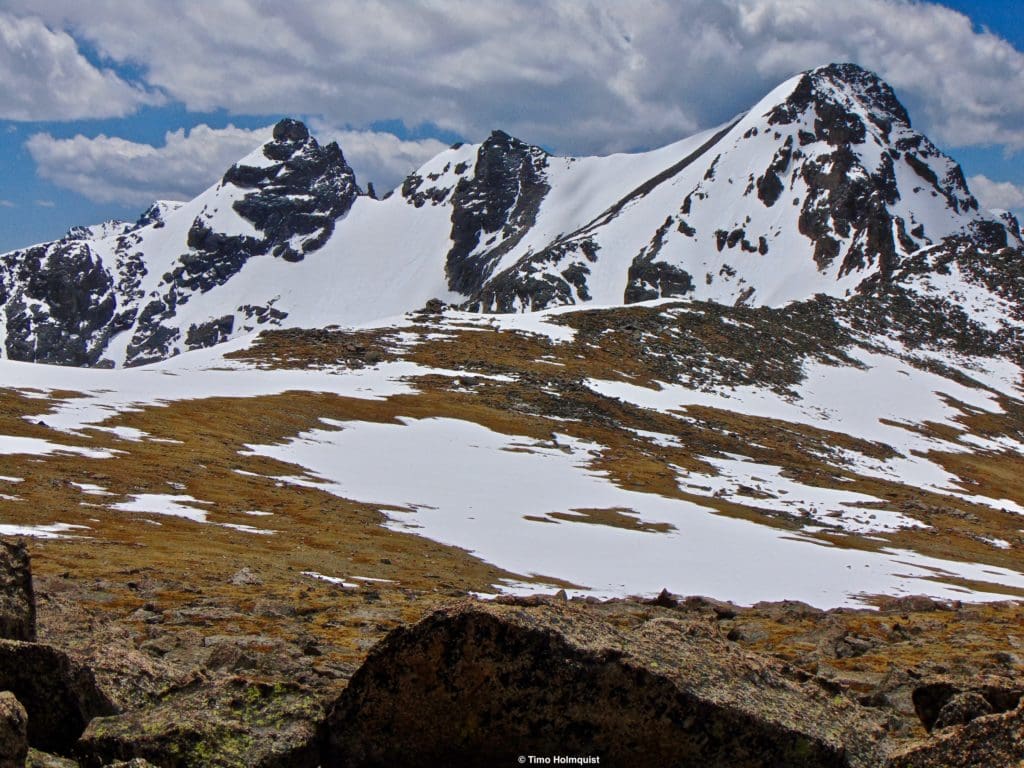
TLDR: This scramble fest navigates the ridgelines around the basin holding Blue Lake and Mitchell Lake. Audubon is an easy enough start, but Paiute and Toll both have serious scrambling (Class 3+ via the bypass). The scrambling relents on Pawnee Peak, but once you head east toward Little Pawnee, it ramps right back up (Class 3+). There’s a lot to love about this adventure, but the mileage is misleading; most of the route is trailless and in the alpine.
Mt. Toll looms over the route, the lower but sharp ridge behind and to the left is Little Pawnee.
Description: You can do this loop in either direction. We describe it in our full review counterclockwise, beginning with Audubon. It’s a brilliant and beautiful traverse with a couple of surprising sections of scrambling, like the Paiute-Toll section and the traverse to Little Pawnee. On a good weather day, navigation is fairly easy, as most mountains on the traverse are pretty identifiable.
Watch the weather on this one; you are above treeline for the majority of the scramble. When afternoon storms are threatening, it’s best to do a shorter hike. In order of difficulty (following the path of least resistance), the sections of the traverse are ranked as follows:
- Little Pawnee – Class 3+
- Paiute to Toll (or vice-versa) – Class 3+
- Paiute Peak (Class 3)
- Audubon (Class 2+ briefly)
- Pawnee Peak (Class 2)
A possible variation if you run out of time is to descend the Pawnee Pass trail and skip Little Pawnee. Only use this option as a practical solution (i.e., inclement weather, low energy level, running out of daylight, etc.) because the scrambling on Little Pawnee is certainly a route highlight.
Typical terrain around Little Pawnee Pk. Pawnee Peak is the large peak to the right and Mt. Toll is the large peak to the left.
Intense Range:
This is the hardest category covered in this article but not the hardest in the IPW. There are some wild variations out there, but Class 4 scrambling is a big step up from Class 3. Therefore, for this first scramble IPW article, I’m listing out good scrambles that are majority Class 3 with a few Class 4 sections. See the Future Scrambles section for even harder routes.
- Arapaho Traverse (Class 4)
- Neva (Class 4)
- Cooper Peak – South Buttress (Class 4)
- North Arapaho – North Ridge (Class 4)
Arapaho Traverse (Class 4)
What: South Arapaho Peak (13,397 ft.) and North Arapaho Peak (13,508 ft.)
Where: Eastern Indian Peaks Wilderness
When: July-October
How: 4th of July Trailhead
Difficulty: Difficult (+3,500 ft.)
Length: 9.6 miles
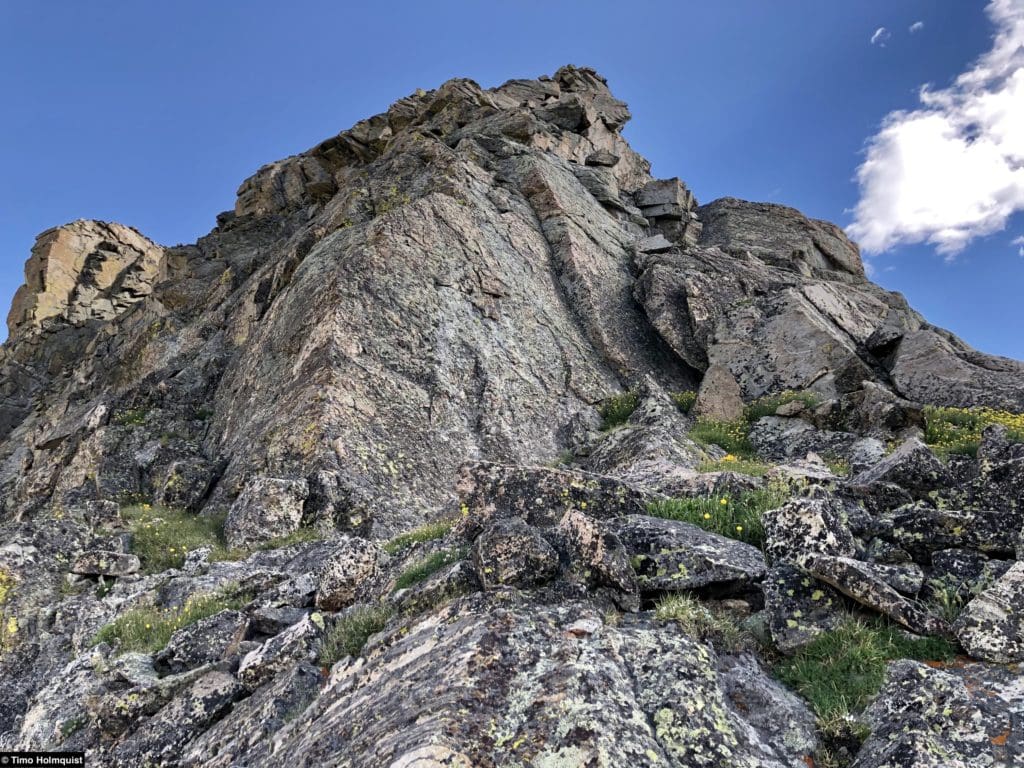
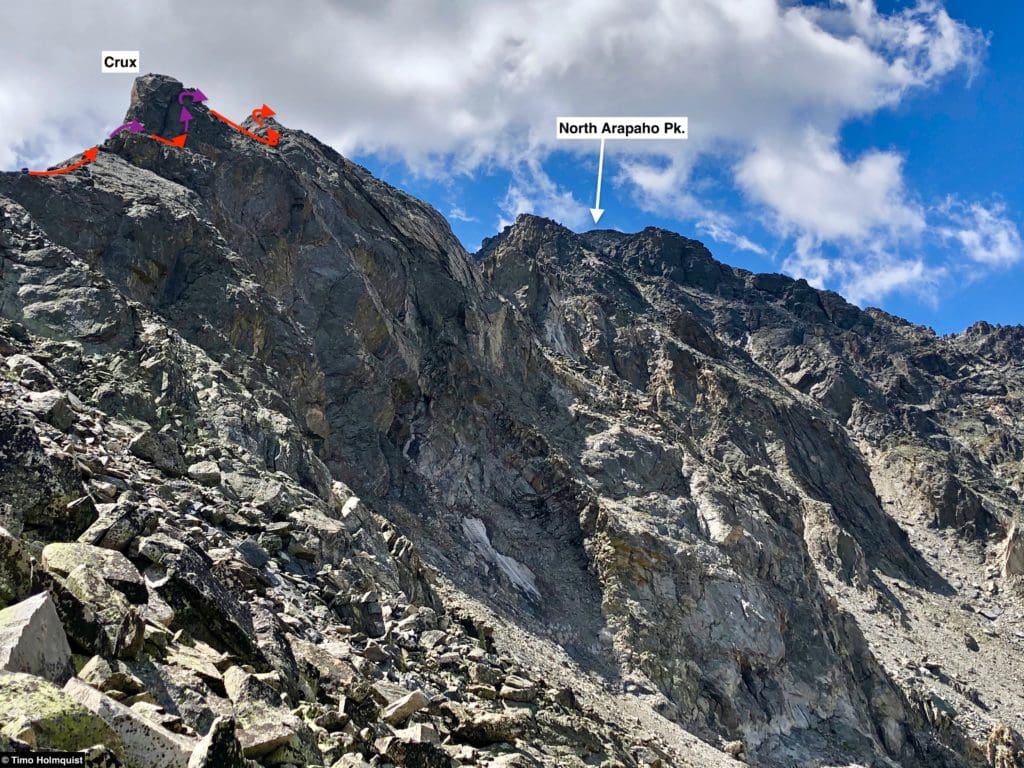
TLDR: Definitely one of the most popular routes in the area, this is the easiest way to get to North Arapaho Peak, the highest summit in the Indian Peaks. It is an out-and-back hike with plenty of Class 3 scrambling and fantastic scenery. There is one Class 4 section, which is a great Class 4 introduction because the section is short (one leaning rock, maybe 10-12 feet in total) and less exposed than other parts of the route.
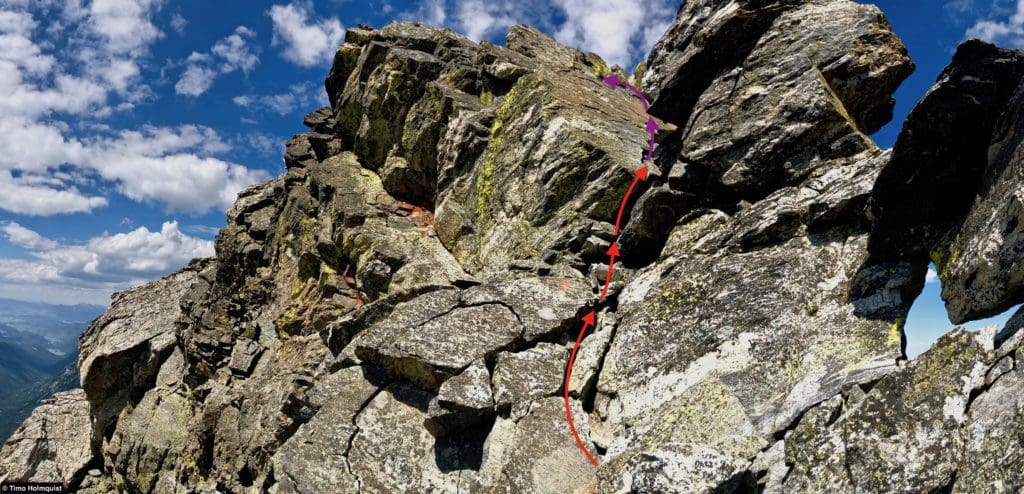
The crux section. There are a few awkward moves, but if you’re looking at the Class 4 block (purple arrows), it’s easiest to stay farther right where the section is shortest.
Description
For our full Arapaho Traverse review, click here.
From the 4th of July Trailhead, you need to ascend South Arapaho Peak. South Arapaho does not have enough prominence to be its own peak, but at Class 2+, the mountain is much easier to attain than North Arapaho. There are also large windscreens up top, along with a nice plaque.
The scrambling is from South Arapaho to North Arapaho. It begins easily enough, where a few ridgeline obstacles are avoided to the south side of the ridge. Soon, you’ll be on the ridgeline proper for some nice Class 3 scrambling. The exposure is very high to the east but less dramatic to the west.
The Class 4 section occurs a little less than halfway across the traverse. Once you clamber up the Class 4 slab, you’ll stay on the ridgeline for a while and continue some quality Class 3 scrambling. As you weave closer to North Arapaho, options abound, but the most stable routes are always closer to the ridgecrest.
Once you find a route up the North Arapaho summit block (there are a few variations to work with), you’ll see the massive summit cairn and know that you have arrived. Repeat the process backward to return to South Arapaho Peak. Watch for other climbers on the weekends; this is a local test piece and fairly popular as far as scrambling routes go.
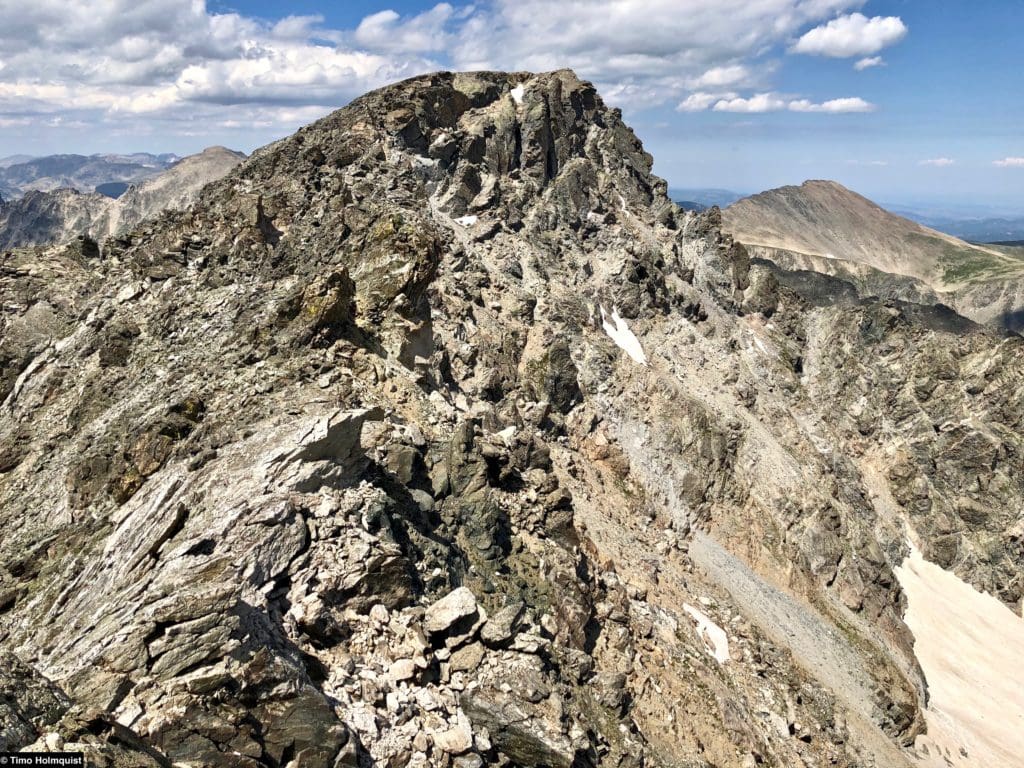
Terrain beyond the Crux, North Arapaho is the large mountain in the center.
Mt. Neva – North Ridge Class 4
What: Mt. Neva (12,820 ft.)
Where: Eastern Indian Peaks Wilderness
When: Late June-October
How: 4th of July Trailhead most likely, also approachable from Junco Trailhead on the western side of the wilderness
Difficulty: Difficult (+ 2,900 ft.)
Length: ~9 miles
TLDR: This is one of my favorite scrambles. From near Lake Dorothy, you’ll climb up to the ridgeline (Class 2). From the ridgeline, there are three bumps (Class 3 to 3+) and the crux area (Class 4). Beyond the crux, there is another highpoint (optional Class 3) and then a Class 2 ascent to the true summit. The crux is a 30 ft. section of Class 4 wall that’s exhilarating and a little nerve-wracking. Thankfully, the rock is solid, provides many holds, and is short. Completing this scramble is a big confidence booster.
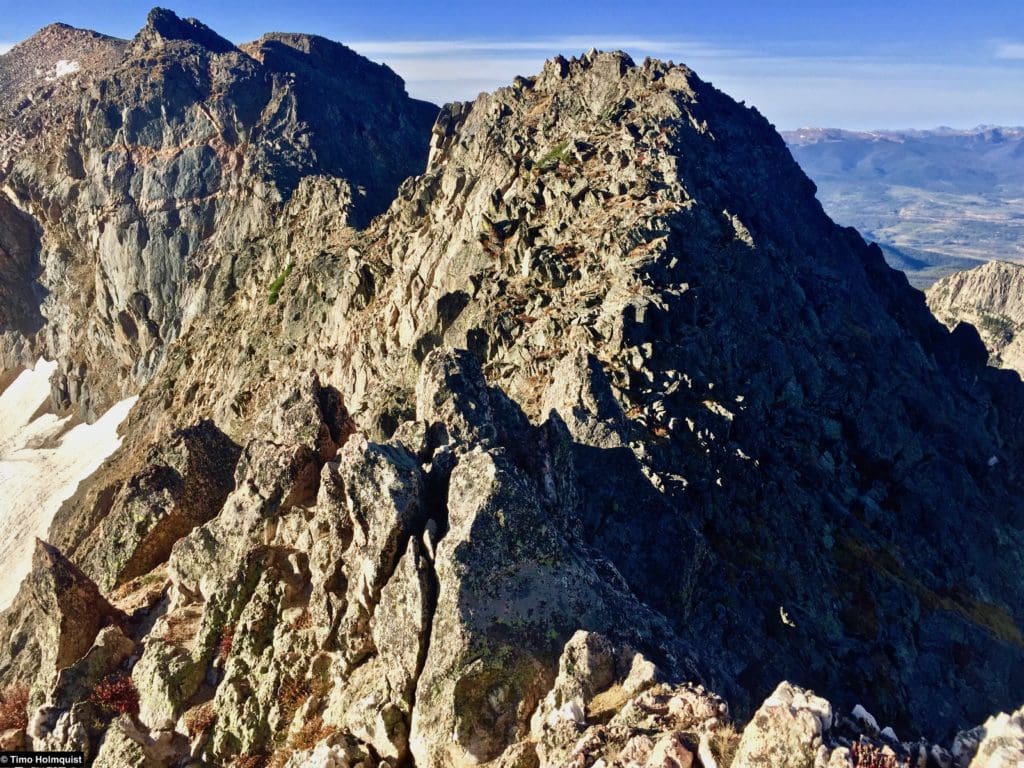
Profile of the ridge as the scrambling intensifies.
Description: See our full review to get all the details by clicking here.
Hidden in the shadow of the larger Arapaho Peaks, at first glance Neva doesn’t look like it offers much, but this mountain is full of surprises. There are a series of steep couloirs that provide ample early-season mountaineering and backcountry skiing opportunities. Also, the snowfields below Neva’s summit are semi-permanent, making an August and September ski possible every year except for ones with record-low snowfall.
Once you get to the ridge above Lake Dorothy, the breakdown of the scramble looks like this:
- Bump 1: Class 2 to the top, Class 3 into the next col
- Bump 2: Class 2+ to the top, stout Class 3-3+ to the next col with some route finding
- Bump 3: Class 3 (optional Class 4) on the way up, Class 3 on the way down
- The Crux Area: Class 3+ approach, unavoidable Class 4 wall, Class 3 beyond
- The Spine: Optional Class 3 for those who want it, otherwise a looser but easier Class 2+ bypass
- A quick section of sandy-colored rock, pretty loose; watch your step (Class 2+)
- Summit push: Class 2 with a bit of talus hopping at the very top
In short, despite its lower profile, Neva delivers. This scramble is fun, challenging, pretty, and fairly exposed. Bring your A-game and a partner to make sure you’re following the path of least resistance. There are plenty of places where you can accidentally make this scramble tougher than low Class 4.
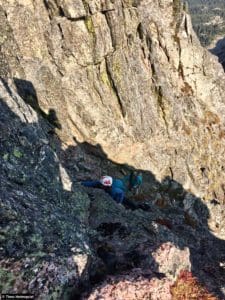
Perspective. Where I took the photo is where the Class 4 crux bleeds back into Class 3. My friend is in the middle of the pitch, and my other friend is at the bottom.
Cooper Peak – South Buttress – Class 4
What: Cooper Peak (12,296 ft.)
Where: Western Indian Peaks Wilderness
When: July-late September
How: via Gourd Lake and Monarch Lake Trailhead
Difficulty: Very Difficult (+4,535 ft. from Monarch lake Trailhead.)
Length: 3-4 miles from Gourd Lake, ~20 miles from Monarch Lake
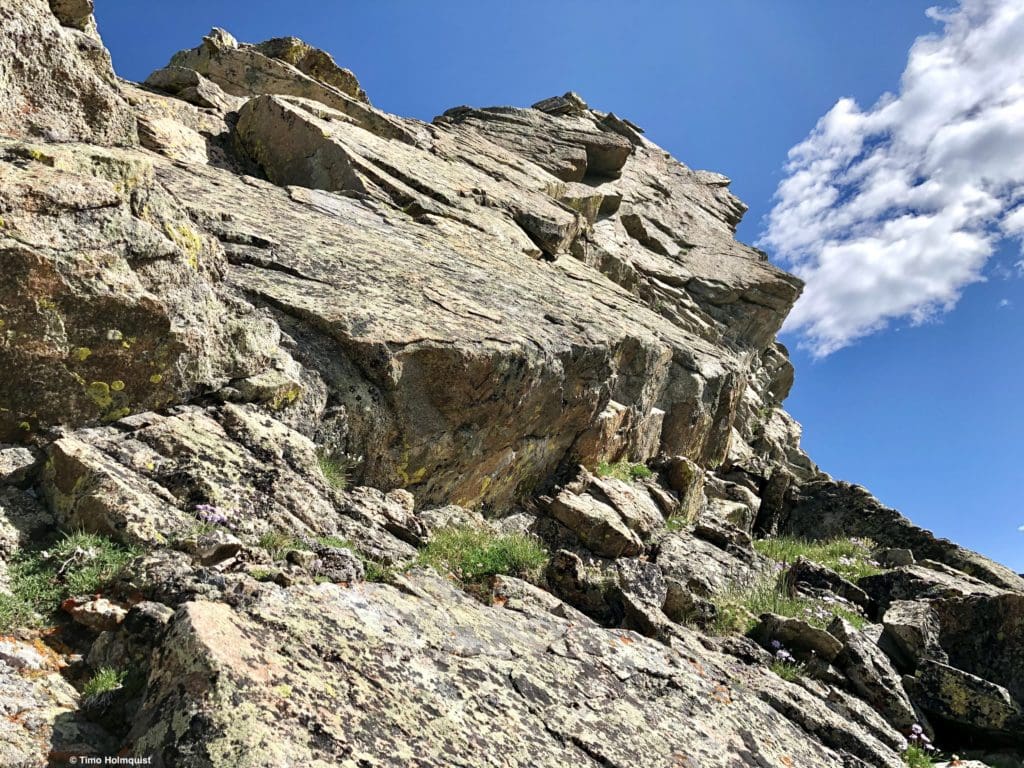
TLDR: Cooper Peaks South Buttress is an exquisite scramble. It’s as exhilarating as Mt. Neva, and the crux, I would argue, is harder. This isn’t a true summit bid, although you can easily connect the top of the route to the top of Cooper. The south buttress rises precipitously over Gourd Lake and demands attention. The scramble has a good variety of Class 3 sections, one unavoidable Class 4 pitch that is quite exposed but on fantastic rock (good holds, grippy surface when dry), and is over in ~45 minutes.

Cooper Peaks South Buttress route.
Description:
Read our full review here, which includes additional routes up Cooper.
Cooper Peak, like marten Peak, is a tough peak to get to. It’s either a 20-mile day or it’s a backpacking adventure. I’d recommend backpacking because there’s an additional North Ridge (Class 3) that’s a lot of fun on Cooper, along with a couloir you can climb. Additionally, Gourd Lake is a beautiful camping location, and Island Lake makes for a great add-on excursion. You can also connect various routes on Cooper with an ascent of Marten Peak.
From Gourd Lake, you need to ascend out of the bowl holding the lake. Head north, piecing together a route to the top of the ridge separating Gourd from the Island Lake Drainage. From the top of this ridge, you should be able to see all of the scramble. Descend to and cross the stream flowing from Island Lake, then ascend to the start of the scramble, which may involve navigating through krummholz.
Once the krummholz ends, the scrambling begins. You are basically on the nose of the ridge the whole time. There is a large overhung section to your right as you approach the crux, but take heart, the rock quality is excellent. The Crux involves clambering up a slab (Class4), shimmying your way up the ridge crest for a few exposed feet (Class 4), and navigating around a boulder that blocks your path (Class 4). Beyond this, there is some more Class 3 scrambling and one surprisingly difficult wall (Class 3+) before the buttress relents.
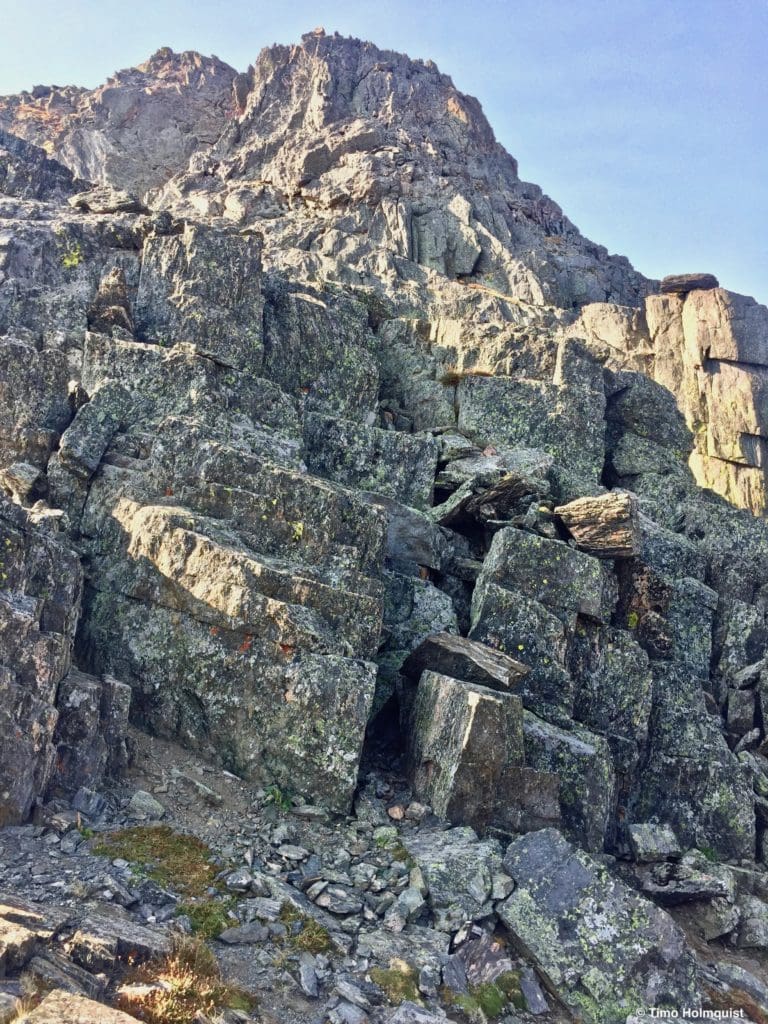
By the time you get to the top, it’s back to Class 2, and there are no signs of the demanding scramble you just did. It’s a bit anticlimactic, but the exposure and exhilaration of the crux section will sear itself into your memory for a while, especially if you camp near Gourd Lake and can stare back at what you accomplished. This is a wonderful, lightly used route with particularly striking views to the south, where the mountainous drama of the Western Indian peaks reveals itself fully.
Getting into the tougher scrambling near the crux.
North Arapaho – North Ridge (Class 4+)
What: North Arapaho Peak – North Ridge
Where: Western Indian Peaks (but best approached from the east)
When: July-September
How: via the 4th of July Trailhead or Monarch Lake
Difficulty: Very Difficult (+ 5,250 ft.)
Length: ~15 miles
TLDR: This is an obscure and difficult scramble that will surely get the heart pumping. It also comes very close to the edge of the Boulder Watershed. According to a few guidebooks, this is a legal route. However, it’s worth noting because no hiking is allowed within the Boulder Watershed. The approach is convoluted, there are large trailless sections through Wheeler Basin, and the crux shows up very quickly once you get onto the ridgeline. This is also a 2-for-1 kind of deal. Once you finally make it up to North Arapaho, the easiest descent route is to take the Arapaho Traverse back to South Arapaho Peak (Class 4).
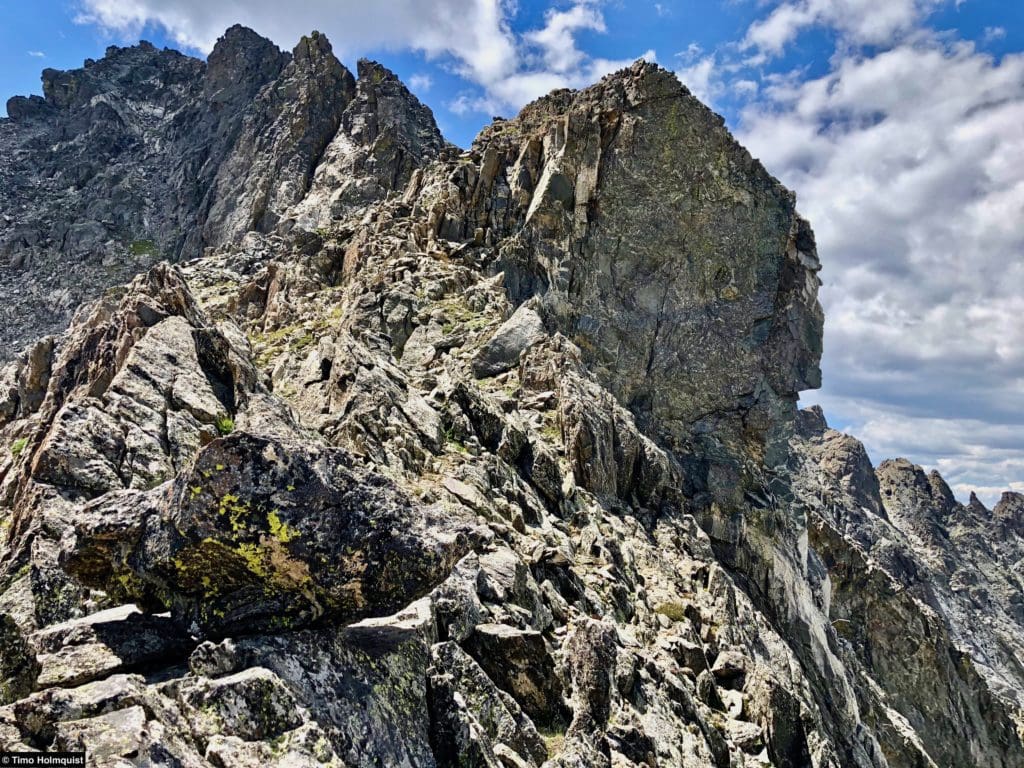
Scenes along the ridgecrest.
Description:
There are some resources online you can use, but a lot of this journey is going to require on-the-spot thinking and off-trail navigation. Do not attempt unless you have ample Class 3 and 4 experience.
The general order of operations is as follows:
- Hike up and over Arapaho Pass.
- Descend to Coyote Park.
- Go off trail, cross the creek, and traverse (maintain your elevation) through difficult terrain until finding the mouth of Wheeler Basin.
- Hike up Wheeler Basin to beyond treeline.
- Find a Class 2+ slope between “Deshawa,” and North Arapaho and use that to access the ridge.
- Once on the ridge, turn south and follow the ridge line as the difficulty increases dramatically.
- The crux is a rock tower; it is a serious mountaineering section and harder than anything on the Arapaho Traverse. The east side provides low 5th Class face climbing with exposure. The west side stays at Class 4 but requires you to traverse in front of the tower (brief Class 4), wrap around the nose of the tower (Class 3) and perform an angled ascent up very steep rocks (Class 4+) until you’ve climbed around and above the tower. It’s a lot.
- The following sections stay in the Class 3 range until you reach the low point of the ridge.
- Then, you follow a prominent gully on the east side of the ridge cliffs (light Class 2+/Class 3).
- At the head of the gully, pop over the other side (light Class 3) to another gully heading west (Class 2). Ascend this gully. You can also take on some optional Class 3+-4 climbing here on great rock.
- At the end of the Class 2 gully, take a left, connect with another gully (Class 2) that avoids a rocky area and take this up to the summit.
Again, due to the funky position of the crux and the trailless approach, this is not a scramble you should attempt unless you’ve done some serious Class 4 climbing before, like Cooper Peaks South Buttress. It’s also super helpful to do the Arapaho Traverse first, so you know how to navigate that portion. From the summit of North Arapaho, the traverse is the easiest way off the mountain. Just to reemphasize, you HAVE TO descend the Class 4 Arapaho Traverse to get off this mountain; you cannot simply backtrack.
A view of the Crux section as you approach the ridgeline. It arrives quickly and punches well above its weight, use extreme caution.
Future Targets
That’s not all, folks! The Indian Peaks is teeming with options. In addition to the scrambles mentioned, you have Hiamovi Tower (Class 3), “Hopi” (Class 3+), “Achonee” Peak (Class 4), the Kasparov Traverse (Class 4) with a NW gully route on Navajo (Class 4), Lone Eagle Peak (Class 4) and the Mohling Traverse (Low Class 5) among others.
Keep an eye out for a follow-up IPW scramble article in 2023. Please stay safe, only operate within your limits, get the proper certifications (a wilderness first responder is always nice to have), and go with a partner. No adventure is worth your life.
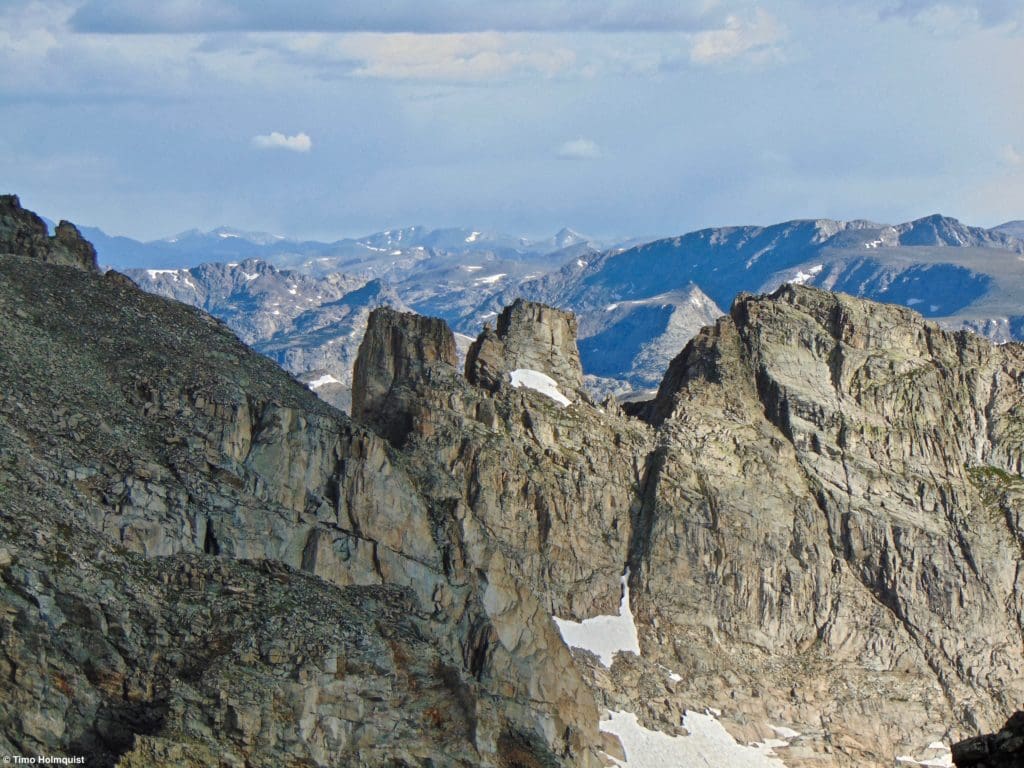
Various rock towers along the Kasparov Traverse.

Enroll With Global Rescue Prior To Embarking On Your Next Adventure.
When a travel emergency arises, traditional travel insurance may not come to your aid, and a medical evacuation can cost up to $300,000.
The cost when you have a Global Rescue membership? $0. That’s why when the unexpected happens, you want the leader in rescue, evacuation and medical advisory behind you. You want Global Rescue.
Popular Articles:
Planning The Perfect Adventure Trip To Grand Lake, Colorado
Best Alpine Scrambles in Rocky Mountain National Park
5 Excellent Backpacking Routes in the Indian Peaks Wilderness, Colorado
Best Hiking Trails in Rocky Mountain National Park, Colorado
Terms of Use:
As with each guide published on SKYBLUEOVERLAND.com, should you choose one of these routes, do so at your own risk. Prior to setting out check current local weather, conditions, and land/road closures. While taking a trail, obey all public and private land use restrictions and rules, carry proper safety and navigational equipment, and of course, follow the #leavenotrace guidelines. The information found herein is simply a planning resource to be used as a point of inspiration in conjunction with your own due-diligence. In spite of the fact that this route, associated GPS track (GPX and maps), and all route guidelines were prepared under diligent research by the specified contributor and/or contributors, the accuracy of such and judgement of the author is not guaranteed. SKYBLUE OVERLAND LLC, its partners, associates, and contributors are in no way liable for personal injury, damage to personal property, or any other such situation that might happen to individuals following this route.


