


High Point:
13,508 feet

Total Ascent:
~3590 feet

Difficulty:
Very Difficult (Class 4 scrambling)

Distance:
9.6 miles (~10 miles if looping in “Old Baldy”)

Waypoints:
39.9950, -105.63476

Route Type:
Out and Back
The Indian Peaks offer great scrambling opportunities, like the Arapaho Traverse connecting South Arapaho Peak to North Arapaho Peak, the monarch of the Indian Peaks.
Overview
The Indian Peaks contain a wealth of scrambling. They are jagged, iconic, and aesthetic mountains (for the most part). One of the most popular and accessible scrambling challenges is the Arapaho Traverse, connecting the unofficially ranked South Arapaho Peak with its neighbor, the monarch of the Indian Peaks, North Arapaho Peak.
Just because it’s popular doesn’t mean there aren’t a number of challenges involved on this route. The most obvious is a slanted, Class 4 rock ramp that can act as a choke-point for hesitant scramblers. Pick your day wisely, or you could be standing in a line, waiting to go up or down.
Typical of the Indian Peaks, the views are absurdly beautiful, but the trailhead fills up quickly. Once you get above the treeline, the opportunities for water are reduced to whatever snow fields remain from the previous winter. Make sure you bring sunscreen, water, and food, and watch for signs of altitude sickness.
The peak’s summit commands a breathtaking view of the entire Front Range. To the north looms the jagged silhouette of Longs Peak, while to the south lies Winter Park Ski Resort with its snow-covered slopes glinting in the sunlight. On a particularly clear day, one might even catch a glimpse of the distant Pikes Peak, standing tall and proud against the horizon. And yet, as impressive as these sights may be, nothing compares to the behemoth that is Arapaho Glacier, reigning supreme on the eastern side of the Continental Divide. This massive frozen giant not only captivates with its sheer size, but also serves as a lifeline for the thirsty city of Boulder, providing much-needed sustenance in the form of pure mountain water.
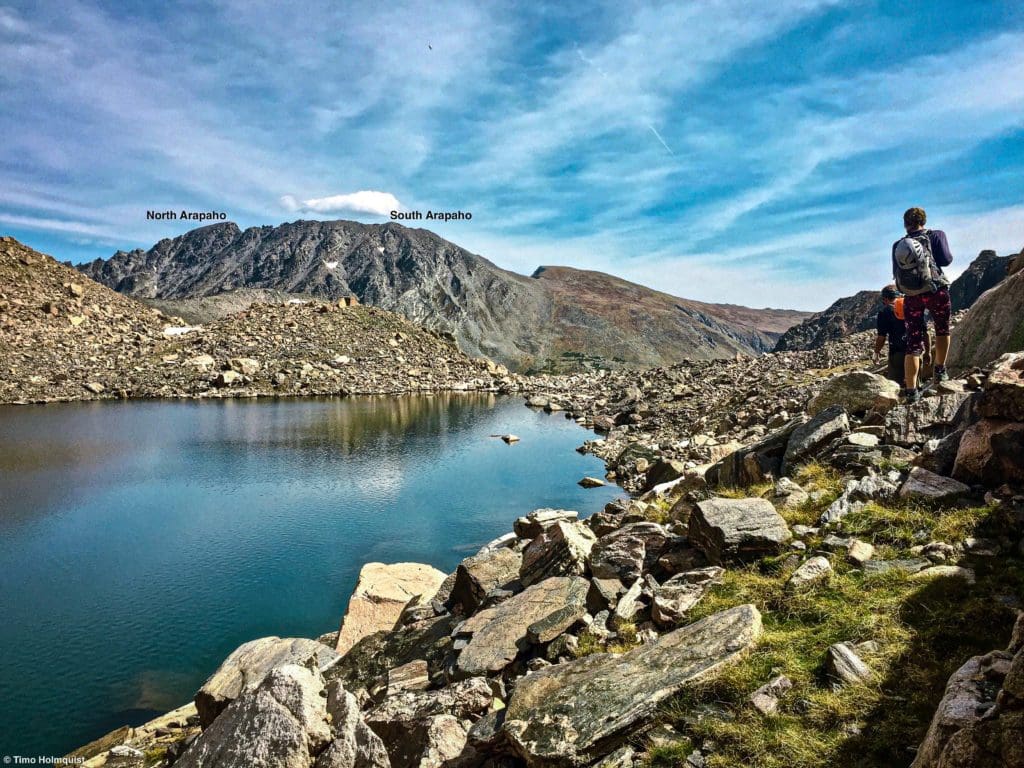
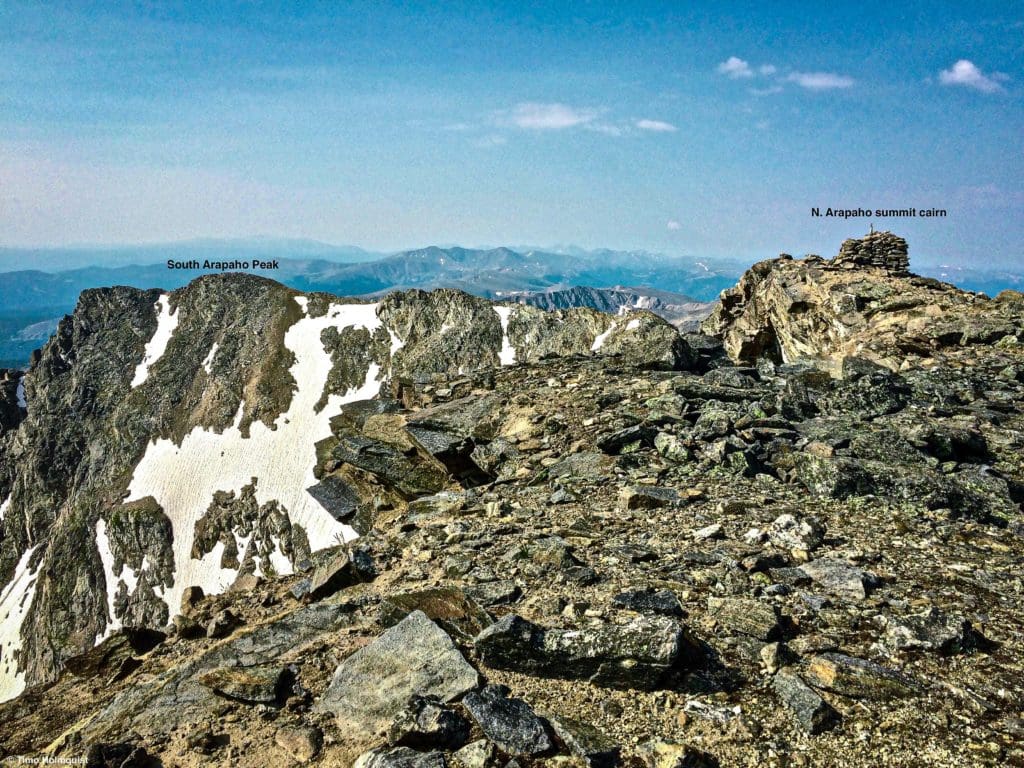
North Arapaho Peak with South Arapaho Peak poking out behind and to the left, seen from the summit of Navajo Pk.
Table of Contents
Article Navigation: Click on any of the listed items in the table of contents below to jump to that section of the article. Similarly, clicking on any large, white section header will jump you back to the Table of Contents.
The beautiful Arapaho Peaks, viewed from near Niwot Mountain.
Global Rescue is there whether you’re hiking, kayaking, snowmobiling, fishing or simply enjoying the outdoors and get ill or injured and you’re unable to get to safety on your own. Global Rescue is the red button you push in an emergency. Their team of medical and security experts come through for you when it matters most.
Scales and Criteria
This article uses two metrics to calculate difficulty: overall distance and elevation gain. For winter ascents, a snow rating may be used, but this review covers the basic traverse during snow-free summer and autumn months, so snow shouldn’t be more of a factor than a few isolated patches up high. Seeing as there are multiple places where scrambling is required, a technical rating is also employed, which uses the Yosemite Decimal System to calculate the difficulty of the moves required.
Difficulty Ratings:
- Easy: less than 5 miles, less than 500 ft. of elevation gain
- Moderate: 5-10 miles, 500-2000 ft. of elevation gain
- Difficult: 5-15 miles, more than 2000 ft. of elevation gain
- Very Difficult: 10+ miles, more than 3,500 ft. of elevation gain
Technical Rating:
- Class 1: Established hiking trail the entire length of the adventure. Low chance for injury.
- Class 2: Typically involves cross-country navigation, possibly using hands for balance but not required, steeper than Class 1.
- Class 3: Hands and feet used to scale areas; must use hands to proceed (either for balance of to help pull you up a section), increased exposure, a fall could be fatal. Helmet recommended, along with grippy hikers.
- Class 4: Climbing on very steep terrain just shy of vertical, falls could be fatal, hands employed for grip and balance continuously, ropes advised but scalable without. Helmets are highly recommended, along with grippy hikers.
- Class 5-5.4: Vertical climbing that involves technical rock-climbing moves, exposed, falls likely to be serious or fatal, possible to scale without ropes but only for very experience veterans. Helmets, grippy hikers, and/or rock-climbing shoes necessary.
- Class 5.5 and up: Not covered as scrambling, full-on rock climbing with ropes, helmets, etc.
North Arapaho (center back) and the Indian Peaks are visible from many places in the foothills around Boulder.
The Ultimate Offline GPS Hiking & Ski Maps
See why onX Backcountry is the ultimate GPS navigation app for your outdoor pursuits. Try Today for Free. No credit card required.

Directions to Trailhead
Your target is the 4th of July Trailhead. This super popular trailhead is generally not accessible until around the 4th of July but can occasionally open as early as mid-June. Find your way to the town of Nederland.
From town, head south on 119 and take a right on Eldora Road, only a minute outside of town. If you’re coming up 119 from the south, look for the left-hand turn on Eldora Road directly after a big S-turn.
Once on Eldora Road, drive west, passing the road to Eldora Ski Resort. Once you get into the town of Eldora, SLOW DOWN; the speed limit is 25 mph through town. People live here, be respectful.
Through town, you’ll pass the über popular Hessie Trailhead. Continue on the now dirt road (bearing right at a small fork) and continue up to the 4th of July Trailhead. This next part of the road is rough but passable for a coherent driver in a 2wd car. At the end of the road, there’s a split. If you have a burlier rig, you can head up to the top parking lot; if not, park in designated spots near the end of the road and never block the road.
The trailhead is located next to the upper lot and leads to a wide and well-maintained trail system.
The traverse, seen one of the Neva Lakes.
The Ten Essentials: How to Equip Yourself for the Backcountry
Packing the “Ten Essentials” whenever you step into the backcountry, even on day hikes, is a good habit. When something goes awry, you’ll truly appreciate the value of carrying these items that could be essential to your survival.
Field Notes
This is a high elevation day; bring lots of water, sunscreen, layers, and nutrition. In the summer, watch for potent afternoon thunderstorms as there really aren’t a lot of places to hide once you’re on the ridgelines. Note signs of altitude sickness (nausea, lack of appetite, persistent headaches) and treat with fluids and NSAIDs (non-steroidal anti-inflammatory drugs) or go back down in elevation if symptoms aren’t going away.
For your weather forecasting needs, start with Nederlands 7-Day Forecast. For more specific forecasts, check out Opensummit’s North and South Arapaho forecast page; they have the best mountain forecasts, but to see more than two days out, you need to pay. For free forecasts, use this mountain-forecast page for North Arapaho Peak.
The season for this traverse is generally July through October, depending on snow. There’s a good chance the 4th of July road won’t open until late June-early July. Even if it is open, snowfields on the traverse add additional challenges to any adventure. Make sure you are up to date on conditions. If worried, scout the route from Lake Dorothy or Mt. Santanta near Arapaho Pass. This perspective allows you to see most of the traverse from South to North Arapaho. From here, you can make more informed decisions about the state of the route.
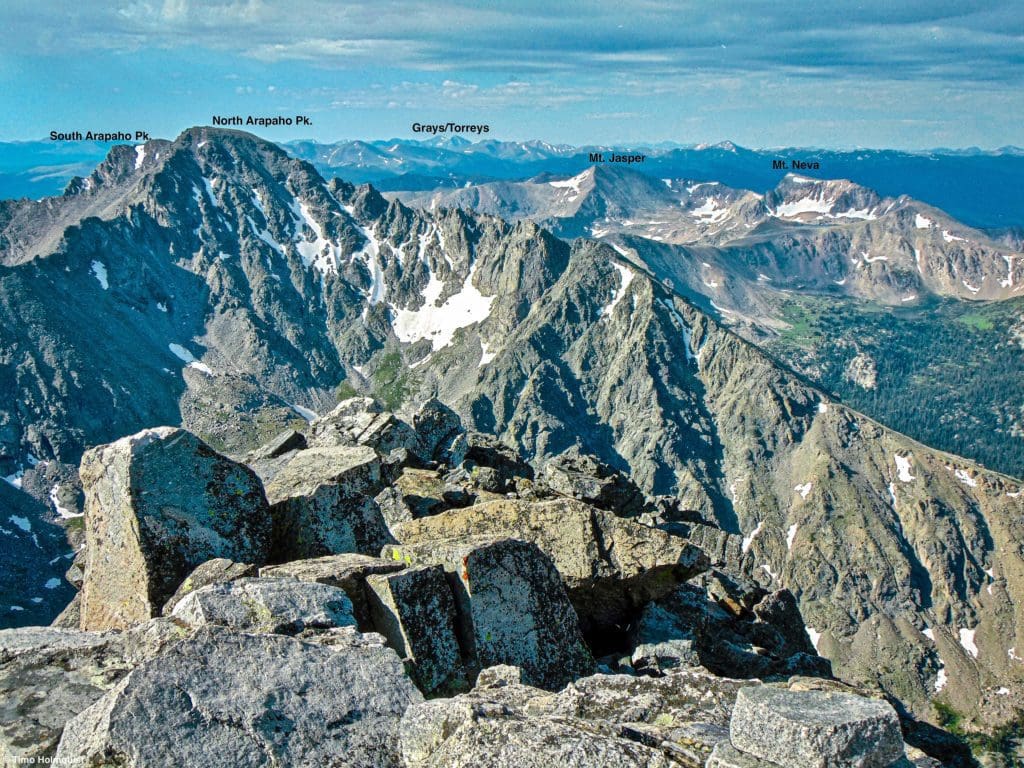
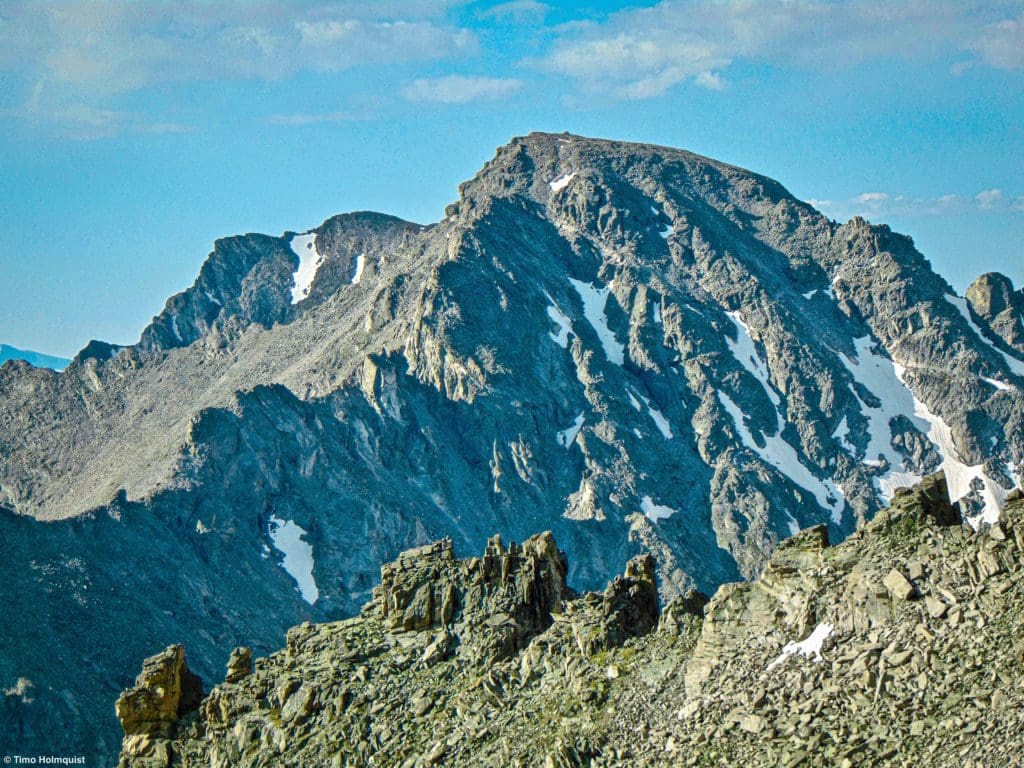
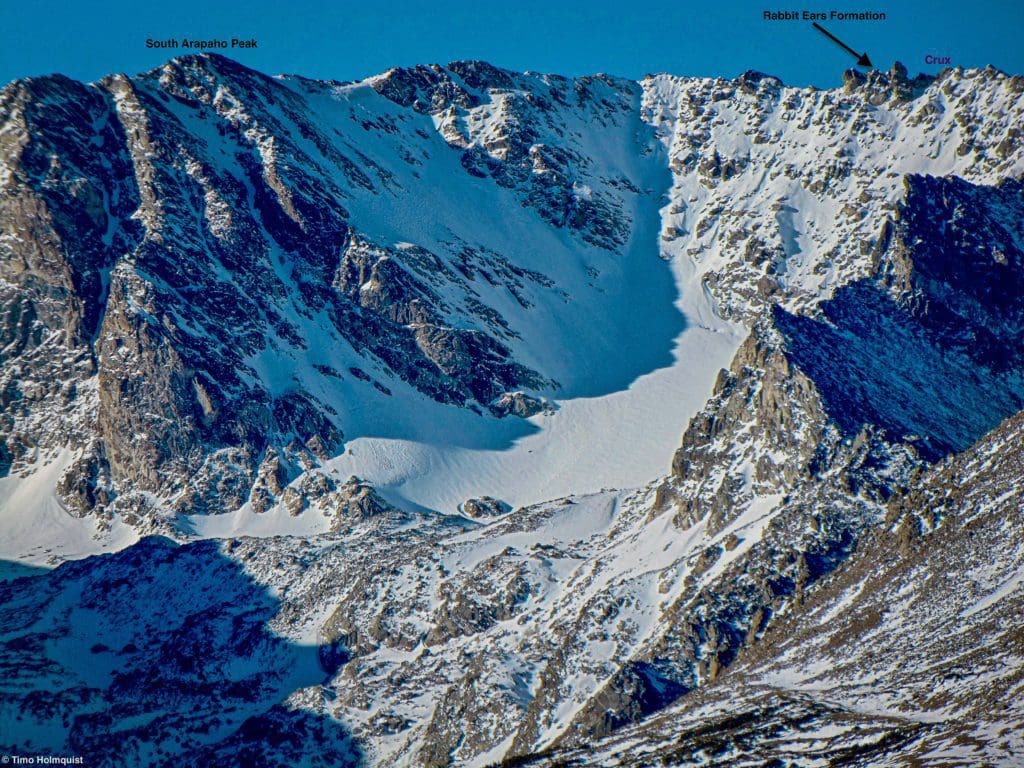
The remote and rugged north side of North Arapaho Pk., with prominent mountains labeled.
Interesting History – Is it Arapahoe or Arapaho?
Irritatingly, both representations are used in Colorado. Arapahoe Ski Basin and Arapahoe County use the extra “e,” while Arapaho National Forest and the two peaks reviewed in this guide drop the extra “e.” So, which one is correct?
Well, interpretation and translation from other languages into English is an inexact science. In this case, Arapaho refers to a Great Plains-oriented Native American tribe, and the origins of the word are debated to this day (it may be derived from the Pawnee word iriiraraapuhu, which means “trader”). As far as grammar is concerned, both variations are used, but Arapaho, without the extra e, seems to be more common on public lands.
The Arapaho Native Americans are represented today by two tribes, one in Wyoming and one in Oklahoma. Their reservations are federally protected, although much of their former territory was taken by the US military in the late 1800s on the back of relentless westward expansion by American settlers and pioneers.
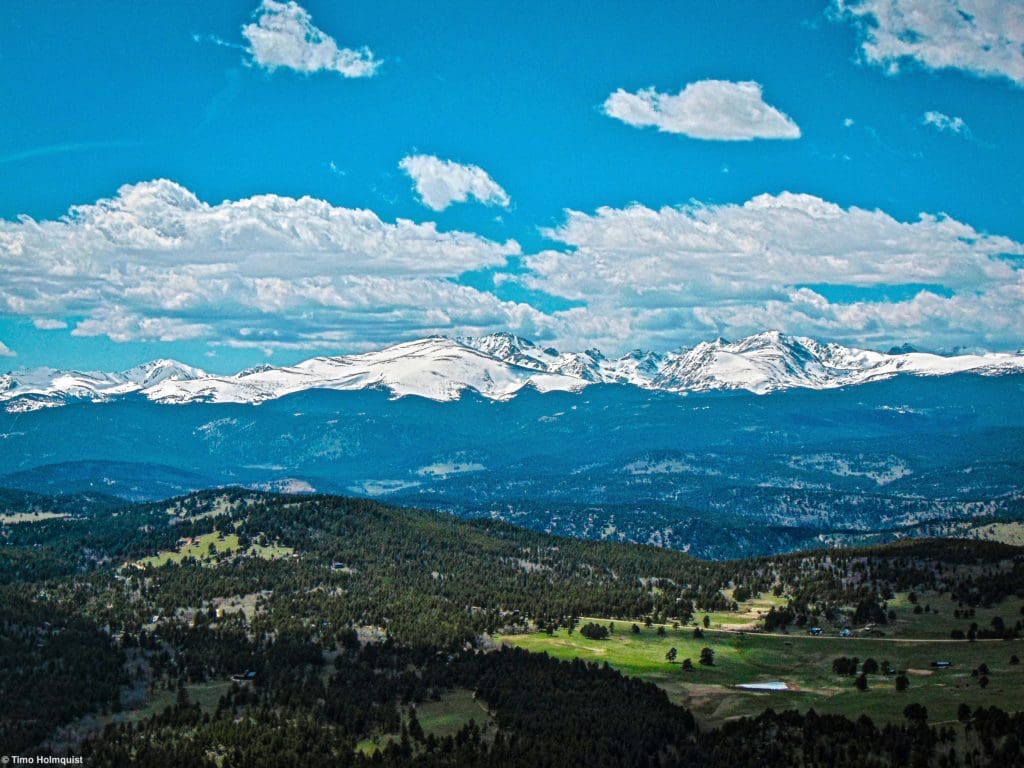
The spine of the Indian Peaks from the foothills west of Boulder.
Good To Know: North and South Arapaho Peak is home to the largest glacier in the Front Range, the Arapaho Glacier. Off-limits to the public, it serves as the main water source for Boulder through its Watershed program. Educating yourself on boundary details before hiking is crucial to avoid hefty fines for trespassing on private property.
Journal
Once you’ve found some parking at the 4th of July Trailhead, take the very obvious Arapaho Pass Trail from the upper lot, heading west. The trail will meander through some treed sections and gain elevation before running into the first trail junction. The junction is a bit awkward as it’s right in the bend of the trail, so if you continue straight, you’ll end up at Diamond Lakes. You want to veer right and continue up the Arapaho Pass Trail.
Once you break treeline, wonderful views of Mt. Jasper and Mt. Neva break out along the south side of the drainage. Continue west until roughly 2 miles into your journey. Once you pass the Arapaho mine, the Arapaho Glacier Trail comes in and meets the trail you’re on. Take a right onto the Glacier Trail at around 11240 ft. in elevation.

Mt. Jasper (left) and Mt. Neva (right) from near the Arapaho Mine.
Once on the Arapaho Glacier Trail, the elevation gain begins to really come into focus. From the westward-oriented Arapaho Pass Trail junction, you’ll head north on the Glacier Trail, then double back east as you switch back your way up a broad shoulder.
The horn-shaped profile of South Arapaho as you gain the saddle between it and “Old Baldy”.
Despite the significant elevation gain and associated huffing and puffing, this route avoids sharp cliffs and couloirs on South Arapaho Peak. The trail will make its way to a forgiving saddle between the arrowhead shape of South Arapaho Peak to the west and the gentler roll of “Old Baldy” to the east.
The view of North Arapaho from the saddle.
At the saddle, the official Arapaho Glacier Trail heads east, traversing around the trailless but easily attainable summit of “Old Baldy” before slowly descending back towards the Rainbow Lakes Trailhead near Nederland. Instead of heading east, pick up a well-trodden social trail as it zigzags up the initially intimidating profile of South Arapaho Peak.
The route to the saddle (black arrows) from Lower Diamond Lake.
Despite the steep profile of this section, the trail finds the easiest path, keeping it all to light Class 2 and under. South Arapaho Peak isn’t actually a peak by the traditional definition of the word, which requires 300 feet of prominence (up/down) between it and the next big high point, which, in this case, is North Arapaho Peak. This isn’t a hard and fast rule because many iconic peaks like North Maroon also don’t have 300 feet of prominence, but if you’re a peak bagger who likes to stick to rules, South Arapaho may not count in your book. Despite the vagaries, the summit of South Arapaho is a fantastic place to be.

The traverse, seen from the summit of South Arapaho Peak.
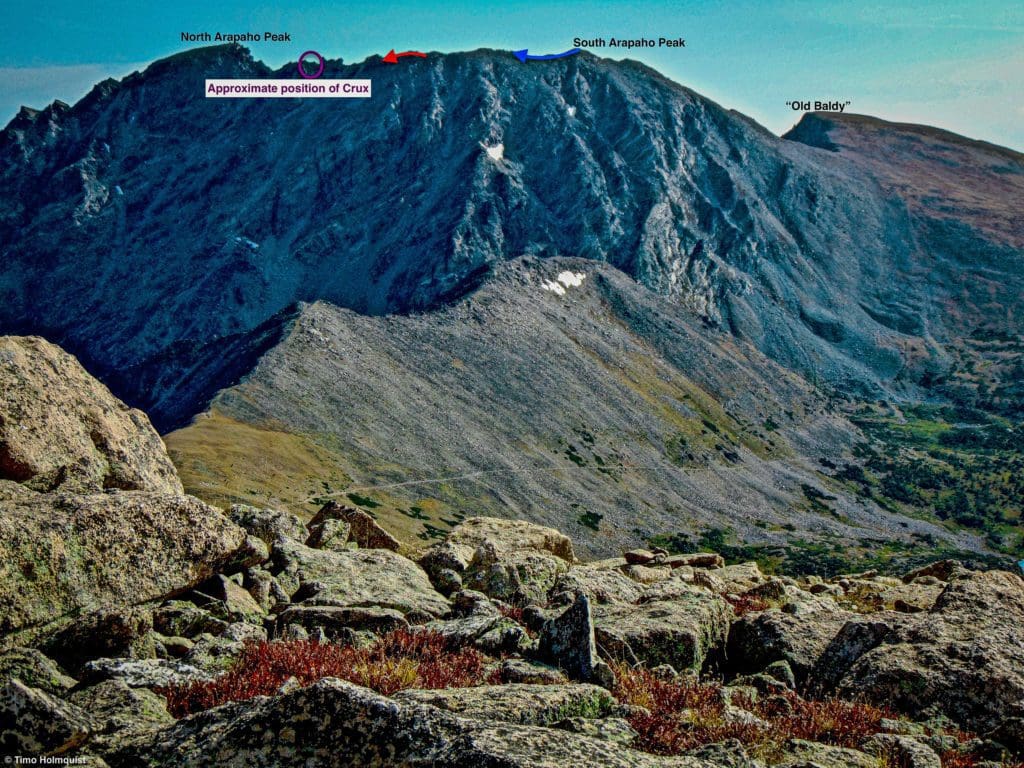
The near-vertical northern edge of South Arapaho is seriously intimidating, the views to the east and west are vast, and you get a great view of the traverse to North Arapaho. The actual distance of the traverse is less than a mile, but it has some surprises along the way, including a few Class 3 sections and one Class 4 slanted crux.
The bulk of the traverse, as seen from the slopes of Mt. Neva.
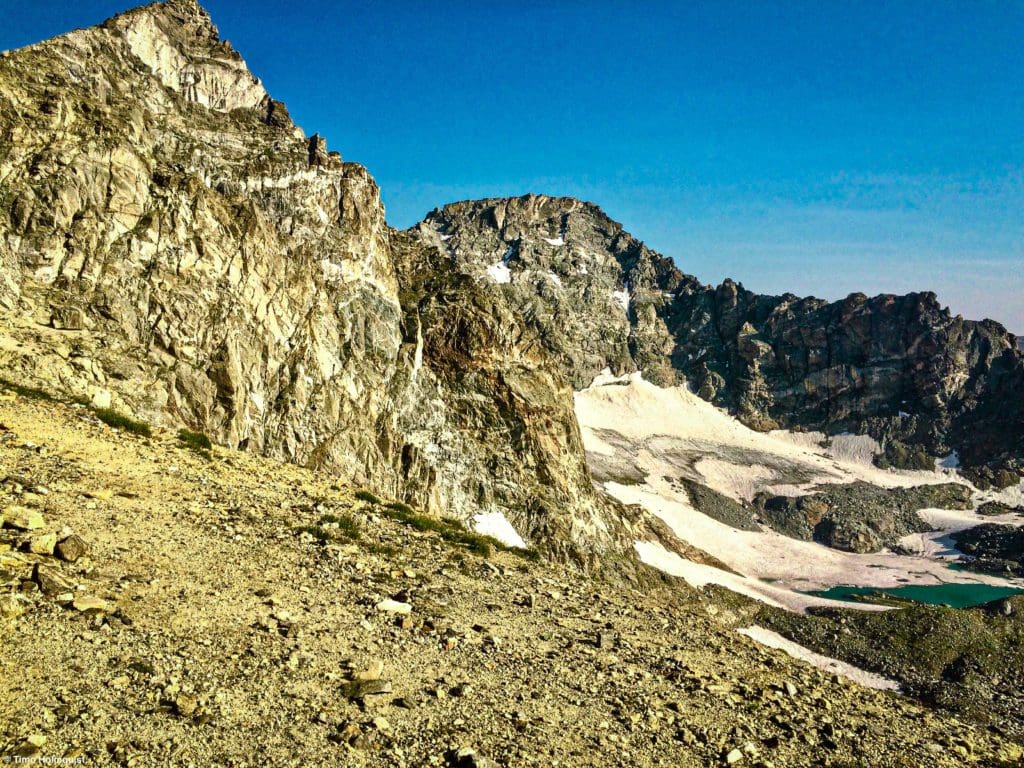
The first part of the traverse is quite straightforward as you meander along the ridge crest, employing a few sparing Class 3 moves to get up various rock obstacles. For this part of the traverse, you are never far from the ridge crest, but plenty of workarounds exist. If you run into a part on the ridge that looks like it won’t go, hunt for alternative routes to the (left) west of the ridge crest. The eastern side has a spine-tingling drop down to the Arapaho Glacier below you.
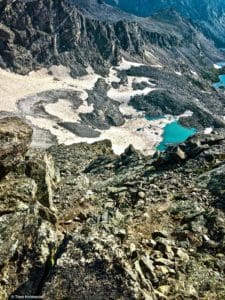
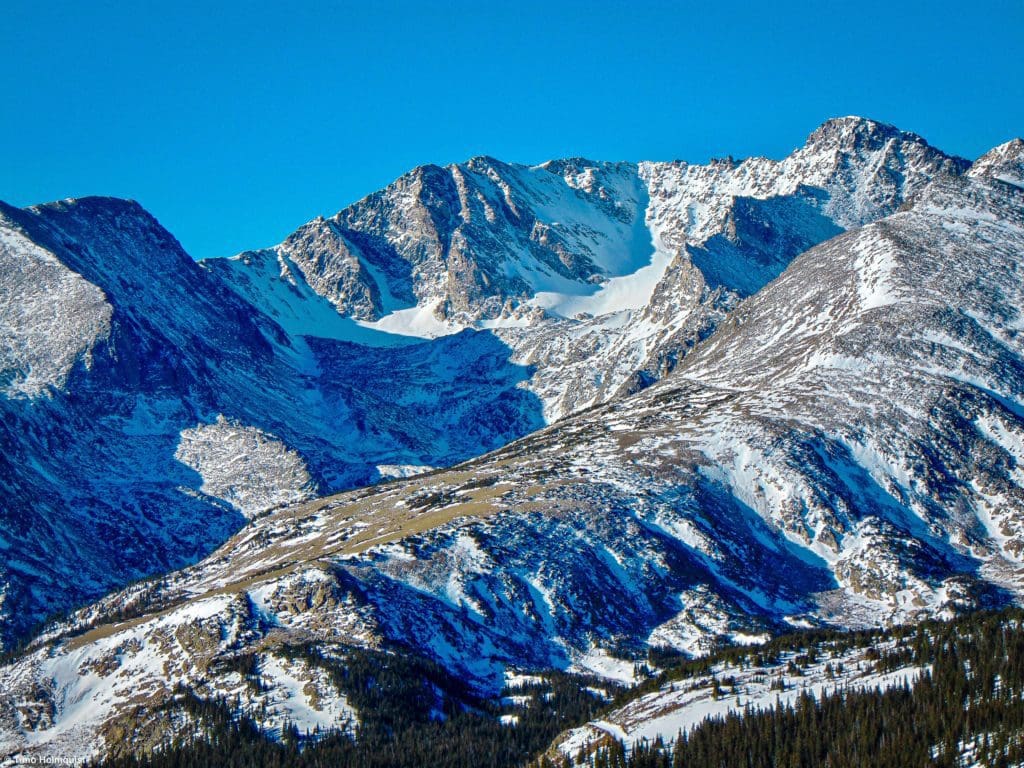
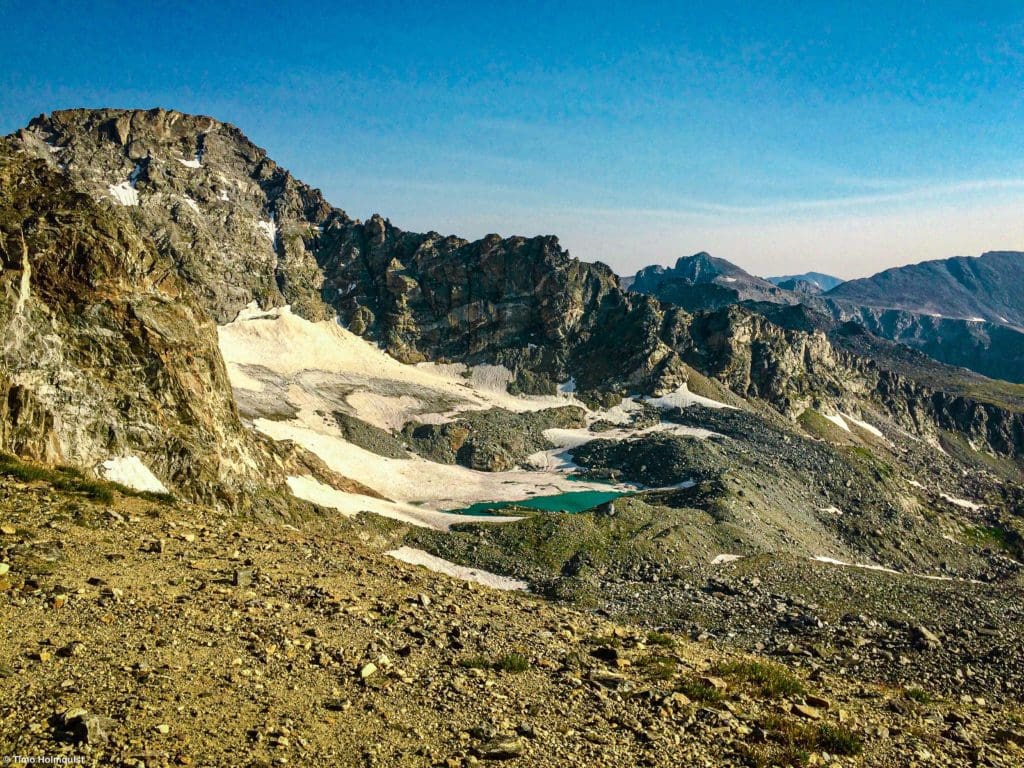
Steep slopes and a retreating alpine glacier.
There are a series of small painted marks to aid in route finding, but they’ve been up there quite some time and are faded at best. They’re similar to the elusive Clark’s arrow on the Loft Route to Longs Peak. The marks are there, but you shouldn’t rely on them.
You’ll continue to scamper along, avoiding tougher gendarmes along the crest until you pass what looks like a set of rabbit ears from both the east and west.
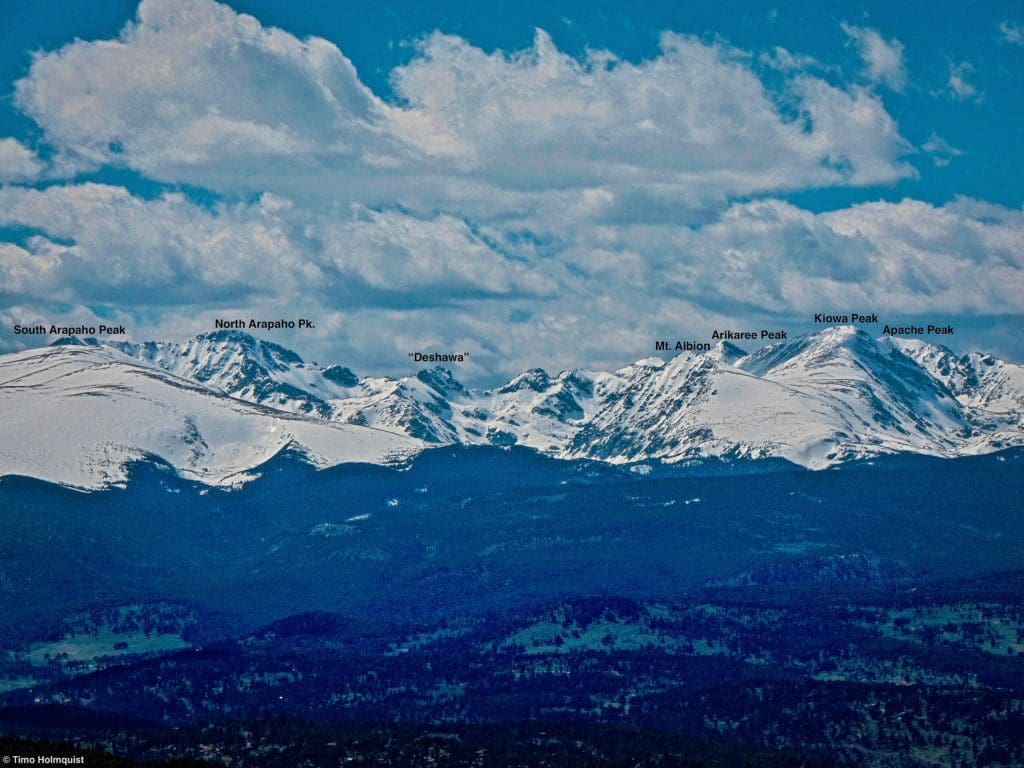
The traverse, seen from near Niwot Mountain.
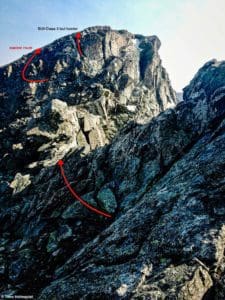
Once you do, the ridge drops briefly before heading toward the crux section. There’s some debate amongst sources over what Class the crux is. A lot of older guidebooks (Gerry Roach’s Indian Peaks guidebook in particular) call it a tougher class 3 move. I agreed on the way up but coming back made me wonder. The issue is that it’s a slanted 10-foot rock that has seen A LOT of use over recent years and the holds are therefore more rounded and less grippy than what a traditional Class 3 would have. As more and more people do this traverse, the rock will get smoother, and the holds will become harder to find. I’m comfortable calling it a low Class 4 section.
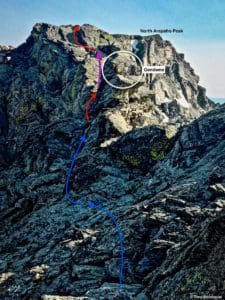
Approaching the crux section. The hardest moves are where the purple arrow is located.
The moves themselves aren’t complicated. You’ll come up to a gendarme, faint slightly left around it, and then climb into a notch between it and the crux slab.
Once you scamper up the crux slab by whatever means are available to you, you’ll pop back up to the ridge crest for a while. The profile of North Arapaho will dominate your view.
Once you draw near the summit block, after employing various additional Class 3 moves along grippy rocks, including a surprising downclimb, you have a few choices. The easiest is to head diagonally left, find a loose gully and climb it. This is a lighter Class 3 option with minimal exposure and spits you out on the flatter summit area.
Summit block options.
Another option is to climb a gully that seems more in line with the rest of the trajectory of the ridge. Again, this is class 3 but a little harder and more direct. A third option is to duck under and over huge slabs of slanted rocks to the east before finding a series of options that pierce the head of the summit block. Many harder Class 3 moves exist here, along with the potential for some Class 4 excitement. The occasional exposure to the east is substantial.
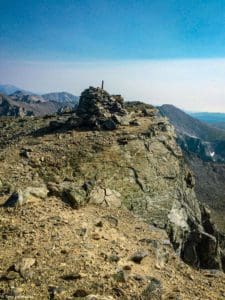
Summit cairn.
Once you break the cliffs and end up on the summit plateau, the huge expanse is reminiscent of the football fields atop Longs Peak and a stark contrast to the spindly ridge you just traversed. The cairn at the top is huge and easy to find. For some added perspective, continue north beyond the cairn and then turn around to stare at it. You’ll see that the massive slab of rock the cairn is built upon is quite overhung.
Along the summit cliffs, looking back to South Arapaho Peak.
Spend some time up there to enjoy your summit and hunt for the USGS marker but be wary of thunderstorms.
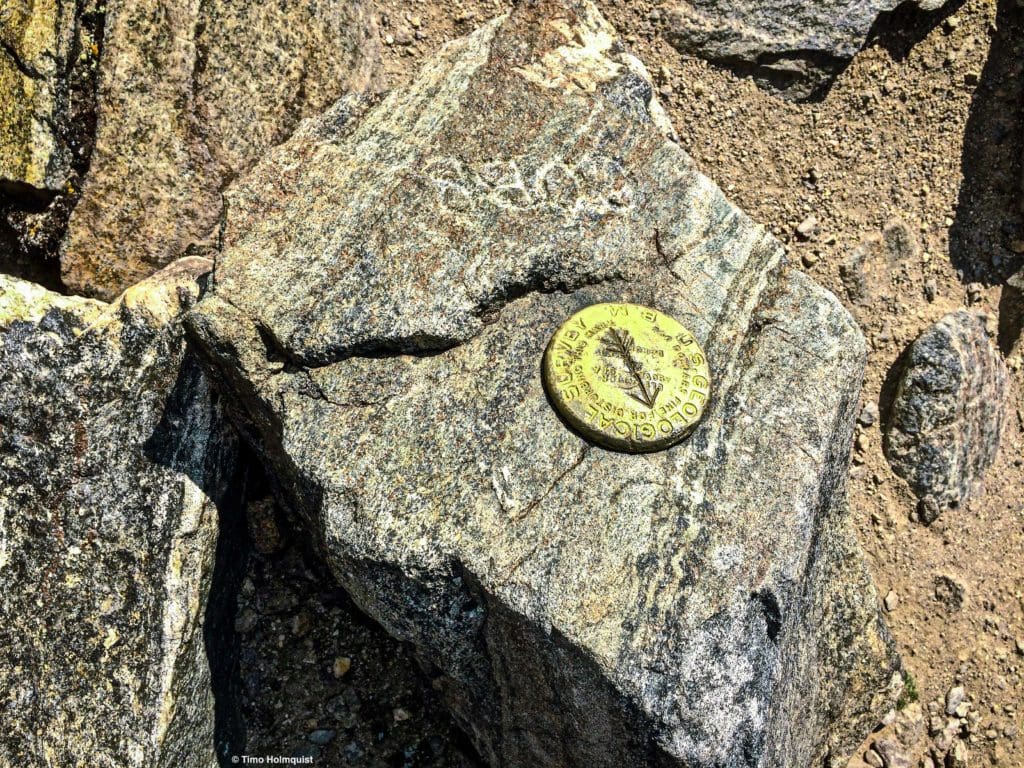
USGS summit marker.
On the way back, retrace your ascent route as best as possible. Descending the crux rock is a bit harder because of the smooth holds. There may also be people waiting to climb up it, so be patient and make sure no one is climbing while others are descending.
Once you make it back to South Arapaho, you’ll pick up the Class 2 route down to the saddle, where the official Arapaho Glacier Trail takes over.
South Arapaho, North Arapaho, and the glacier between them from the saddle.
Meander down the trail as it dips below the broad shoulder near the saddle. The unobstructed views south make this a particularly delightful part of the descent.
Pleasant alpine strolling as you descend off of South Arapaho.
Once you make it down to Arapaho Mine, take a left on the Arapaho Pass trail and make your way back to the trailhead after a classic Indian Peaks Scramble. Well done!

Enroll With Global Rescue Prior To Embarking On Your Next Adventure.
When a travel emergency arises, traditional travel insurance may not come to your aid, and a medical evacuation can cost up to $300,000.
The cost when you have a Global Rescue membership? $0. That’s why when the unexpected happens, you want the leader in rescue, evacuation and medical advisory behind you. You want Global Rescue.
Popular Articles:
Guide to the Best Hiking Trails in Rocky Mountain National Park, Colorado
Sky Pond via Glacier Gorge Trail, Rocky Mountain National Park, Colorado
Scrambling Hallett Peak’s East Ridge, Rocky Mountain National Park, Colorado
Scrambling Mt. Alice via the Hourglass Ridge, Rocky Mountain National Park, Colorado
Terms of Use:
As with each guide published on SKYBLUEOVERLAND.com, should you choose to this route, do so at your own risk. Prior to setting out check current local weather, conditions, and land/road closures. While taking a trail, obey all public and private land use restrictions and rules, carry proper safety and navigational equipment, and of course, follow the #leavenotrace guidelines. The information found herein is simply a planning resource to be used as a point of inspiration in conjunction with your own due-diligence. In spite of the fact that this route, associated GPS track (GPX and maps), and all route guidelines were prepared under diligent research by the specified contributor and/or contributors, the accuracy of such and judgement of the author is not guaranteed. SKYBLUE OVERLAND LLC, its partners, associates, and contributors are in no way liable for personal injury, damage to personal property, or any other such situation that might happen to individuals following this route.


