


|
Getting your Trinity Audio player ready...
|
The 73,391-acre Indian Peaks Wilderness in Colorado provides plenty of adventure. Despite summer popularity, there are still many places to get lost in the mountains. Five great backpacking trips are detailed below.
Overview
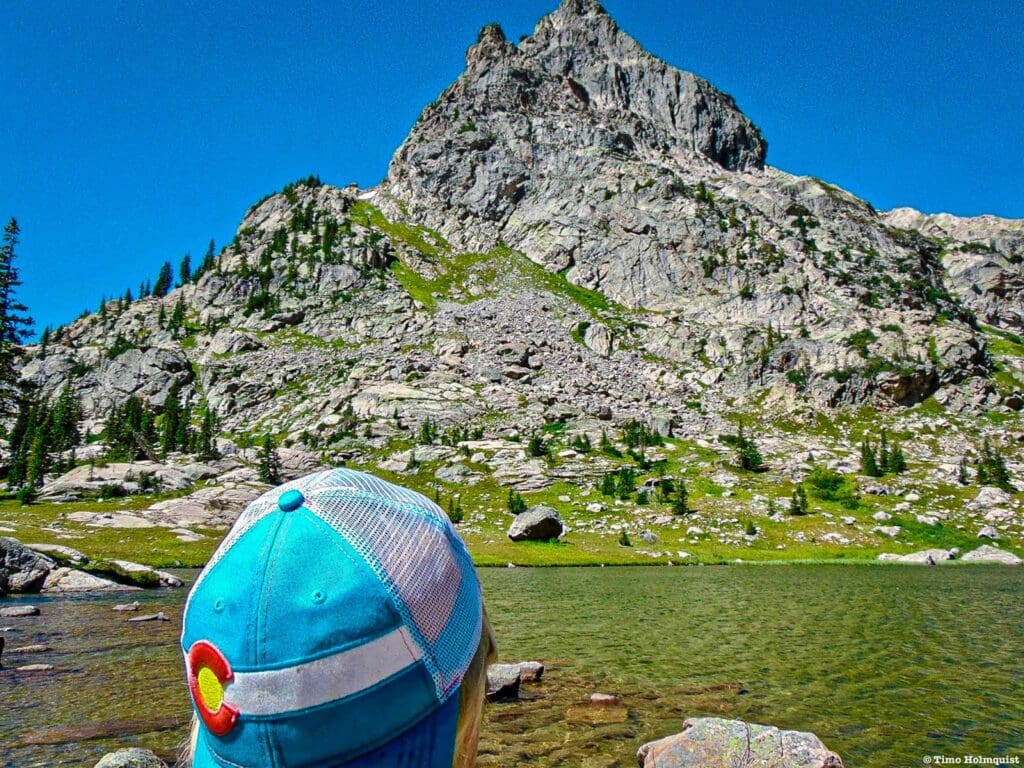
The Indian Peaks Wilderness (IPW) is one of the crown jewels of the Northern Front Range, second only to Rocky Mountain National Park in popularity and beauty. This smattering of 12ers, 13ers, rivers, and lakes is a stunning testament to the visual power of nature. Anyone who’s ever seen Lone Eagle Peak towering over Mirror and Crater Lake will understand why.
Within the relatively small 73,391-acre wilderness lie enough adventure to keep you occupied for quite some time. It’s also not a hidden wilderness, and the summer popularity can be a bit stifling at several trailheads. Nevertheless, there are still plenty of places to get lost in the arms of the mountains. One of the best ways to do that is by tackling any one of the five stellar backpacking trips detailed below.
Table of Contents
Article Navigation: Click on any of the listed items in the table of contents below to jump to that section of the article. Similarly, clicking on any large, white section header will jump you back to the Table of Contents.
Things To Know
Like most mountainous areas near the Front Range, accessing the Indian peaks has become a bit harder over the years. Some trailheads are still scott-free, like Hessie and 4th of July Trailheads near Nederland. However, that’s no longer a secret, and if you don’t claim a limited parking spot before the sun rises, you may need to add miles of road walking or take a shuttle to access trails.
Brainard Lake Recreation Area, which is possibly the easiest way to access the wilderness, has imposed a system similar to RMNP. In order to visit, you need a pass, which you can purchase here. Budget-focused outdoor folk can still park at the winter lot and get in for free. However, you’ll be adding roughly 5 miles roundtrip to any adventure. The total adds up if you continue west into the Indian Peaks Wilderness, which is where the best views are.
The western side of the wilderness is still much wilder than the eastern but takes a long time to get to. When you do, you’ll likely still find crowds at Monarch Lake Trailhead. Roaring Fork is less popular but has more limited parking. Other areas, like Middle St. Vrain, Meadow Creek Reservoir, and Rollins Pass (when the snow melts), are free to access but require more from your car. Middle St. Varin is especially rugged, with lifted 4WD vehicles recommended due to the rough dirt road and several potentially deep water crossings.
Backpacking in the Indian Peaks Wilderness requires an overnight permit. Please carefully read the Camping Rules section below for details.
Good To Know: The Indian Peaks Wilderness was designated as a protected wilderness area in 1978 by an act of Congress. It encompasses 73,391 acres with over 50 lakes, 28 trails covering 133 miles, and six passes across the Continental Divide. Elevations in these wilderness areas vary from 8,400 to over 13,500 feet, from montane to sub-alpine and alpine zones. It is bordered by the James Peak Wilderness to the south and Rocky Mountain National Park (RMNP) to the north.
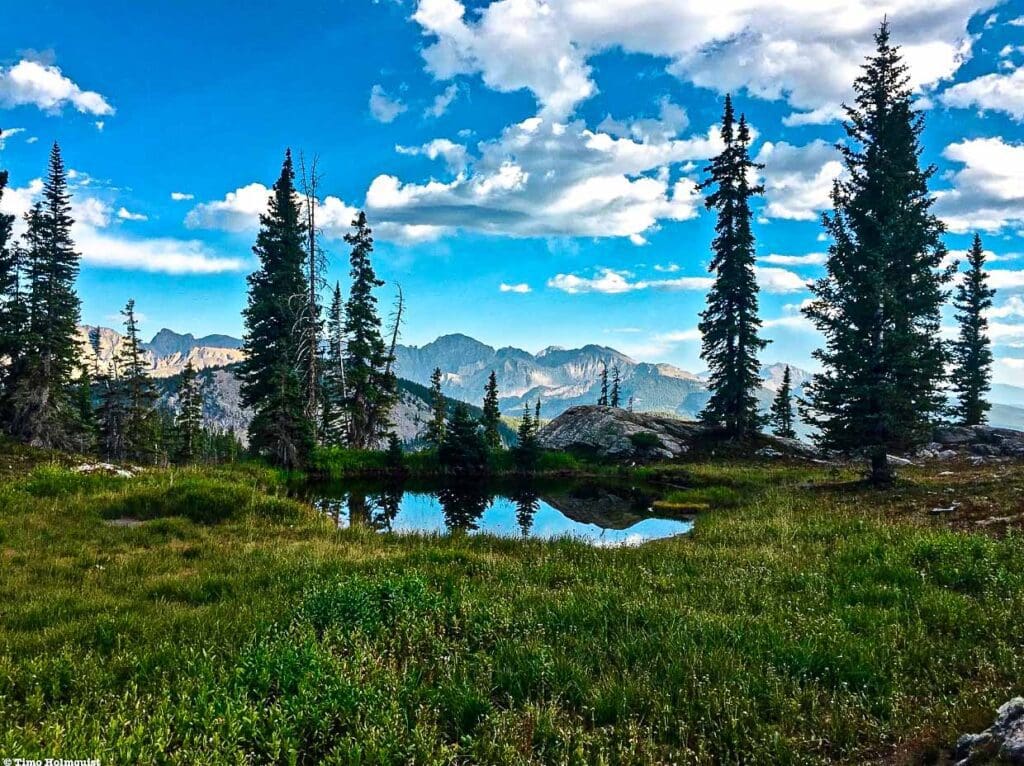
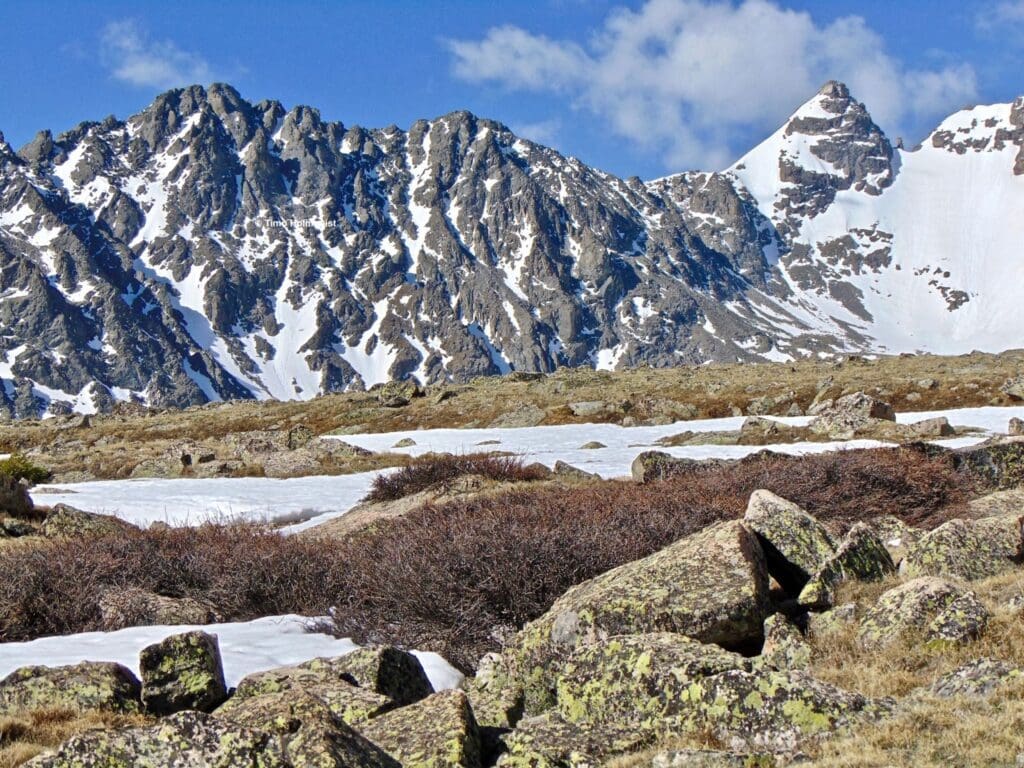
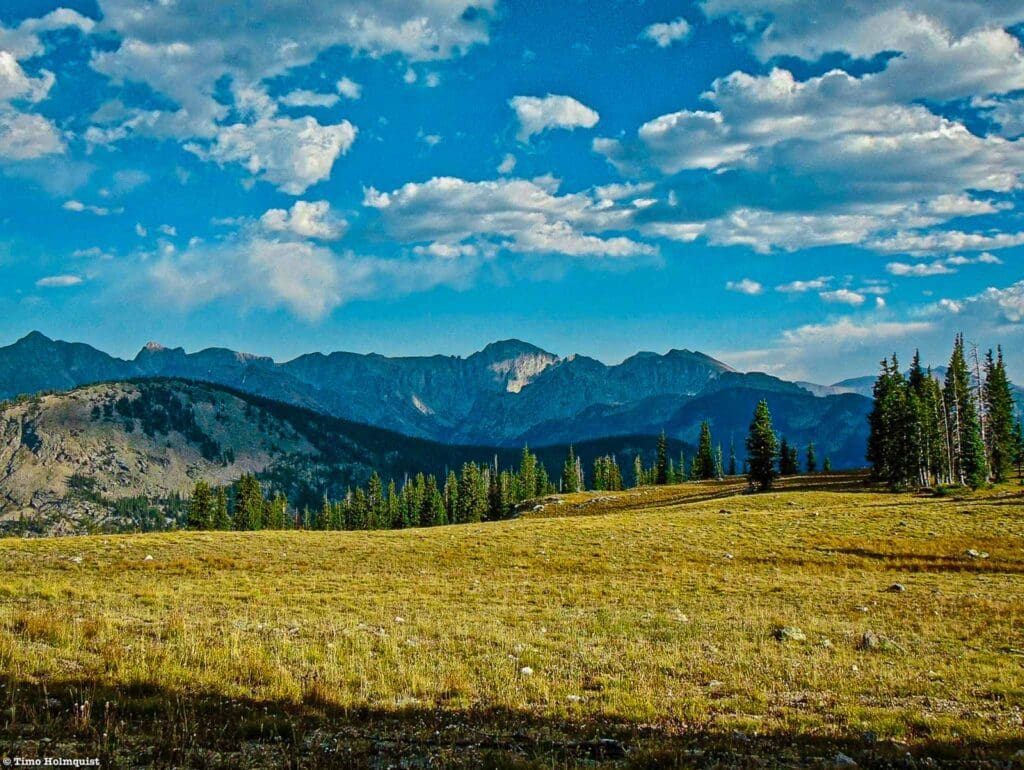
Ponds, meadows, blue skies, and serrated ridges in the western IPW.
Best Times To Visit
The most popular times to visit are from mid-June through September. The main road into Brainard isn’t plowed until after Memorial Day (usually) so that further limits the season. Avoid summer weekends or get there at 5-6 am to guarantee parking.
The same general rule applies to Hessie and 4th of July Trailheads. The best times are July-September, though Hessie is farther down the road, so it tends to open up before the 4th of July. Because there is no fee structure, the rush on these trailheads can be spectacularly bad. A 5-6 AM arrival should at least get you close.
Less popular trailheads on the eastern side, like Coney Creek, St. Vrain, and Rainbow Lakes, don’t have as much of a time crunch. However, they don’t access some of the most iconic areas. Or, if they do, you’ll be spending more time on trails to get there.
Visiting the western side of the wilderness is great from July-September. The snow melts later there than on the eastern side and can have you post-holing through unconsolidated drifts well into June.
My recommendation is to grab an established campsite near Lake Granby, Shadow Mountain Lake, or the town of Grand Lake. Then, access Monarch Lake and Roaring Fork on weekdays. After a hike, you could hire a pontoon boat or hang out in town. The mood is relaxed and less frantic than on the eastern side.
On the Arapaho Pass Trail as it steadily gains elevation to treeline.
Camping Rules
Dispersed camping is allowed from Nov-April; however, snow will likely be on the ground, so a winter camping setup is likely necessary. The wilderness has strict camping rules. You’ll need to secure a backcountry overnight reservation first.
The reservations usually open in March for the upcoming season, and the most popular ones sell out within an hour. If you want Crater Lake or the Pawnee Campground in Brainard, hit that refresh button often.
Remember, if you are camping and accessing the wilderness via Brainard, you need an overnight permit AND a parking pass.
There are NO campfires in the backcountry on the eastern side of the Wilderness. There are also NO campfires around Crater Lake, Gourd Lake, Caribou Lake, and Columbine Lake on the western side.
In fact, there are only a few areas where backcountry campfires are still allowed, and, unsurprisingly, they are the least visited parts of the wilderness. Pour over this map to find out about which zones you want to camp in and whether or not you can have a fire.
If you’re dead set on having one, the best bet is to stay at an established campground with metal grates, fire pits, and bear boxes. Pawnee Campground, Rainbow Lakes Campground, Arapaho Bay Campground, and Sunset Point Campground are good options.
There are dispersed camping options on forest service roads, but in all camping cases, if there is a fire ban, you’re not having one. Anyone found to have caused a forest fire is liable for serious fiscal punishment and possible jail time. Sorry guys, the West is drying out, and after the massive fires of 2020, there’s just not a lot of sympathy left for people who flaunt regulations.
This isn’t meant to dissuade you from camping; just follow the rules. It aint that hard.
If you’re camping in the backcountry away from established sites, make sure your site is at least 100 feet away from trails and sources of water to prevent contamination. When using the restroom, make sure to dig a cat hole at least 6-8 inches deep and farther away from water sources than your campsite. No one wants giardia.

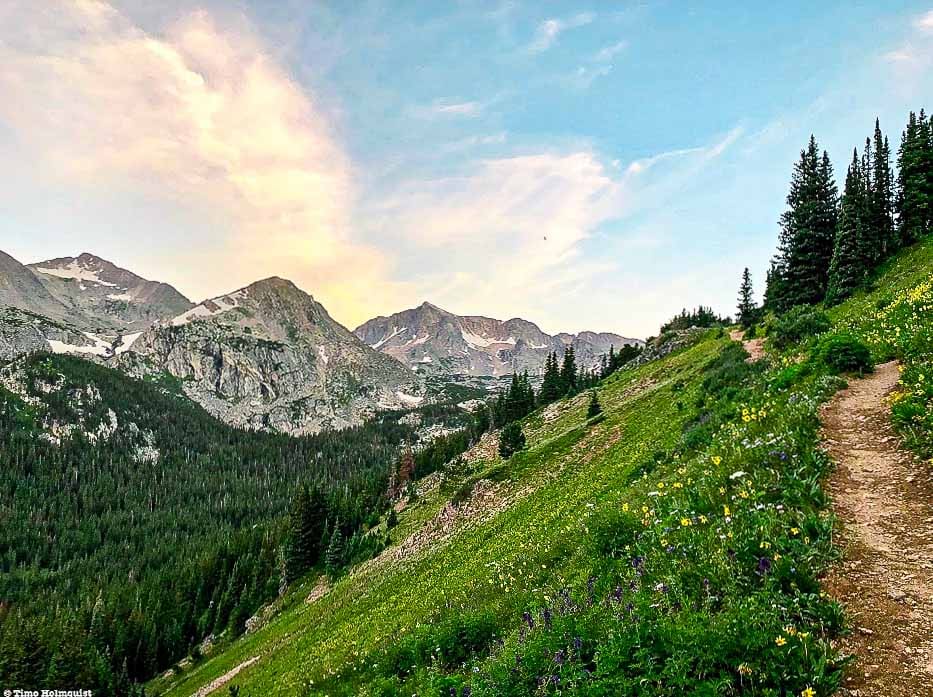
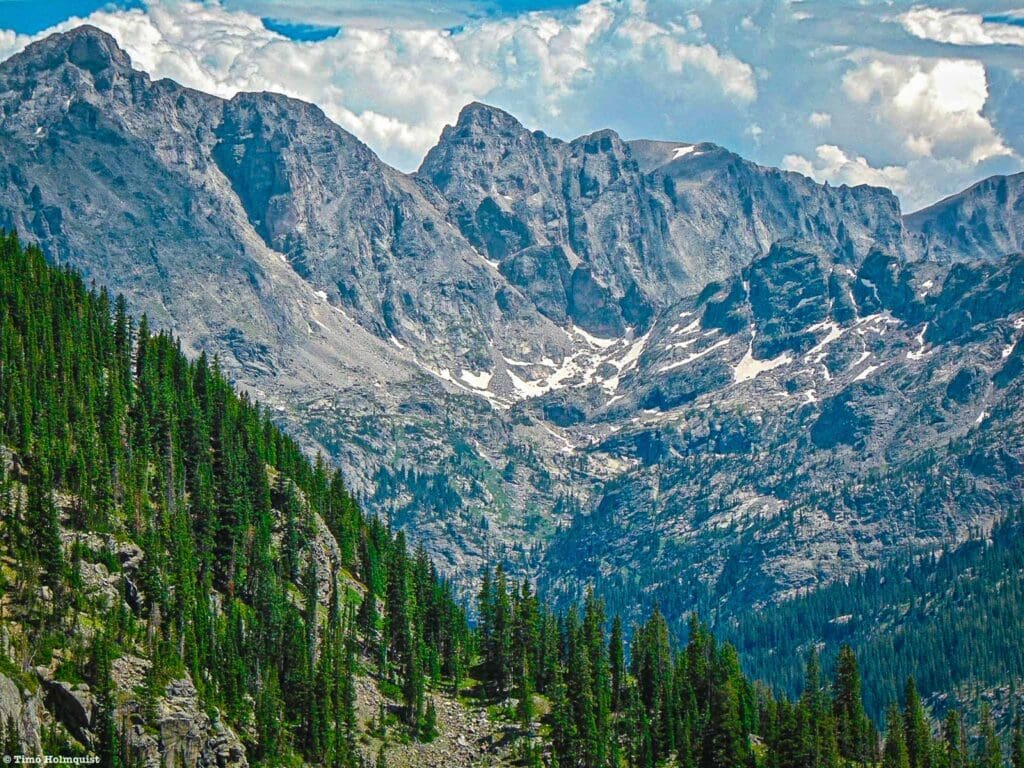
The western side of Buchanan Pass above Fox Park (not quite visible).
Top 5 Backpacking Routes
The options below generally follow two types of adventures.
- Basecamp. These trips utilize a central location or two from which you can spend days exploring the surrounding mountainous terrain.
- Backpacking Loops. These adventures generally follow a camp-hike-camp formula. Campsites will be different every night (or every other night), and you’ll be hiking along a preset backpacking route with options for day trips.
Optional Scrambles
All of the backpacking routes can be completed without any off-trail travel. However, if you want to add some spice and you have relevant experience, the IPW is loaded with adrenaline-pumping scrambles. Many of these routes are accessible from the backpacking loops.
Bonus scrambling content includes Neva’s North Ridge, Arapaho Traverse, Cooper Peak, Marten Peak, and Skyscraper Peak (brief).
Additional scrambles not covered by these routes include Sawtooth & Algonquin, Navajo Peak, Shoshoni Peak, and the Blue Lake Traverse (which covers Paiute, Toll, and Little Pawnee Pk.).
Check out our Best Scrambles in the IPW for more detailed information and links to other routes.
All scramble ratings follow the Yosemite decimal system.
- Class 1: Hiking trail, easy.
- Class 2: Off-trail, twisted ankle danger, but you generally don’t need to use your hands.
- Class 3: Steeper, rockier, and requires the use of your hands for support. A helmet is recommended.
- Class 4: Scrambling on nearly vertical rock and requires the continuous use of hands for support. You will be putting weight on your hands and pulling yourself up. A helmet is highly recommended. Roped travel is optional.
- Class 5: Rock Climbing.
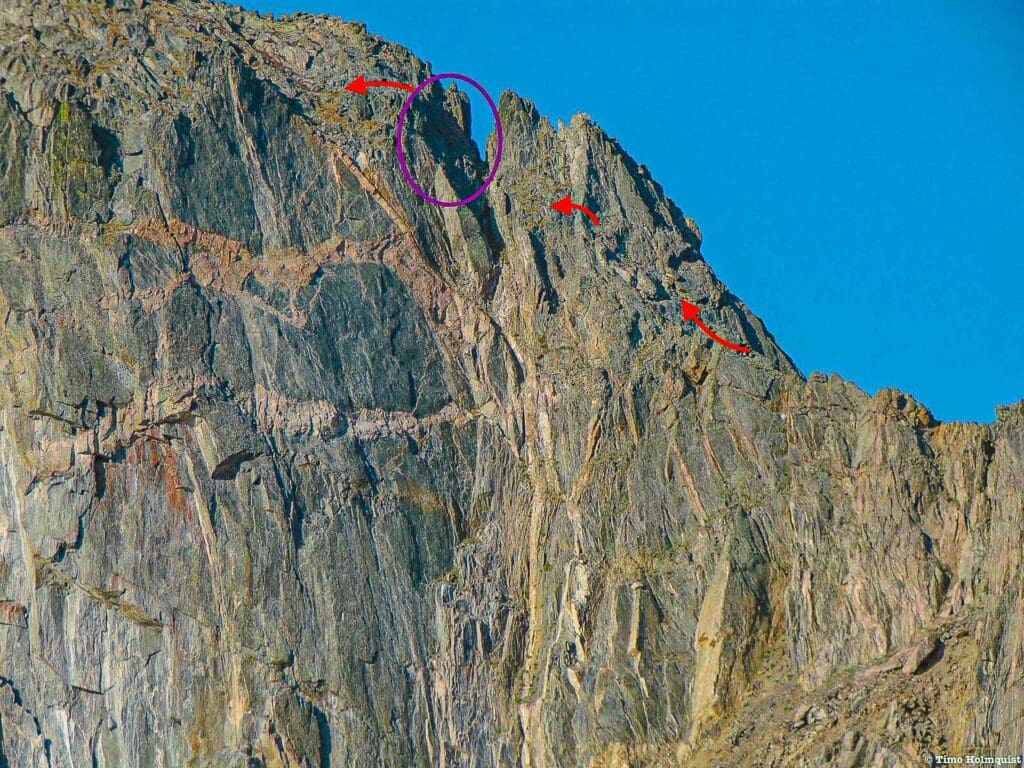
The crux of Mt. Neva’s north ridge scramble. Red=Class 3, Purple=Class 4.
Pawnee-Buchanan Loop
There are several ways to do this loop with different starting and ending locations. However, it is very popular and utilizes popular areas, so no matter where you start, make sure you have the proper camping reservations and overnight parking permits to avoid getting a ticket. Once you have the details sorted, however, this is certainly the premier Indian Peaks backpacking experience.
Most will want to start from Brainard Lake. From there, you can go clockwise or counterclockwise. Each method is appealing, but I’ll describe the counterclockwise option and the 4-day itinerary with notes about the 3, and 5-day versions.
Highlights include Isabelle Lake, Pawnee Pass, Pawnee Lake, Crater Lake (optional day hike but high priority), waterfalls on Cascade Creek, Fox Park, and Buchanan Pass.
You can also rope several optional peaks into the route, including Pawnee Peak, Sawtooth, and Mt. Audubon.
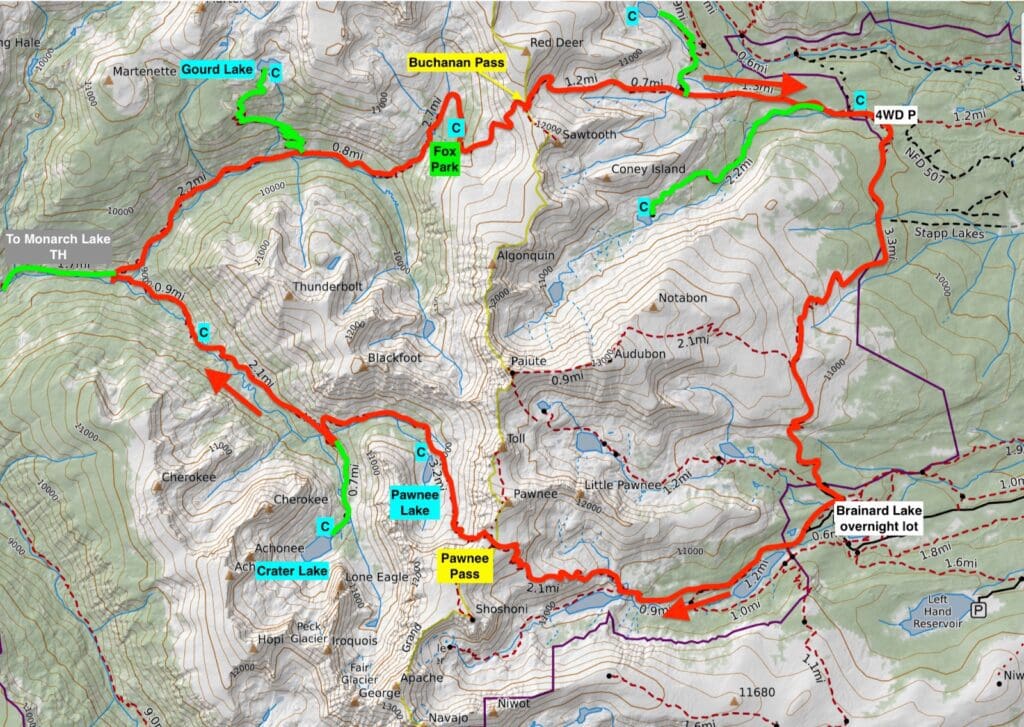
Pawnee-Buchanan Loop
Planning Tips & Critical Information
- Style: Backpacking Loop
- 3-Day Itinerary: Camping permit for Pawnee Lake (1 night, Cascade Creek Zone, no fires), 1 night Fox Park (1 night, fires ok)
- 4-Day Itinerary: Camping permit for Pawnee Lake area (2 nights Cascade Creek zone, no fires), Fox Park (1 night, Buchanan Zone, fires ok)
- 5-Day Itinerary: Camping Permit for Pawnee Lake area or Cascade Creek area (2 nights, Cascade Creek zone), Fox Park (2 nights, Buchanan Zone; or, 1 night Fox Park (fires ok), 1 night Red Deer Lake or Coney Lake (no fires))
- If parking in Brainard: Get an overnight parking permit
- Other parking areas: make sure to display parking fees if applicable, and always lock vehicles. Trailhead theft is not necessarily common here but has happened before
- Total elevation gain (with Crater Lake add-on): ~8,200 ft.
- Mileage (with Crater Lake add-ons): ~32.25 miles
Day 1
- Mileage: ~7.3 miles
- Elevation Gain/Loss: +2240 ft., -1700 ft.
Park at the Brainard overnight lot. Follow the roads or trails to Long Lake Trailhead. From there, enjoy the wide and well-maintained trail as it follows the northern shore of Long Lake. Follow signs for Pawnee Pass or Lake Isabelle. Your first bit of elevation gain occurs once you’re beyond Long Lake. You’ll actually run into the trail junction with Panwee Pass before getting to Lake Isabelle. However, if you continue toward Isabelle, it makes for a great break or snack spot and will only cost a point or two of a mile.
Once done, or if you opt to skip Lake Isabelle, make sure to take the Pawnee Pass Trail. You’ll gain a lot of elevation here, but on the way, you’ll get stunning views of Navajo Peak (with the cone-like summit), Navajo Snowfield, and Niwot Ridge. Pawnee Pass appears as a gentle saddle from your eastern approach, well above treeline.
However, the descent on the western side is steep and dramatic, with craggy ridges spindling down to various mini cirques and basins. Take your time on the descent and use trekking poles if you have them. After the initial steep elevation loss, you’ll pass around the side of Pawnee Lake. There are various dispersed campsites along this stretch. It’s best to camp in this basin as opposed to the Cascade Creek area. Due to the popularity of Crater Lake, options may be limited until you’re well beyond this zone, which will negate any side trips to Crater Lake itself.
Once you’ve found a campsite, set up and settle down.
Niwot Ridge (left) and Navajo Peak from the Pawnee Pass Trail.
Day 2
- Mileage: ~5.2 miles
- Elevation Gain/Loss: +/- 1,200 ft.
This is either a rest day or a day trip to Crater Lake. From camp, head down the trail westward until running into a trail junction. Here, take a left toward Crater Lake on the Cascade Creek Trail. You’ll ascend to the Crater Lake area, where multiple campsites spindle off from the trail. You’ll first pass Mirror Lake, which is where most of the iconic Lone Eagle Peak photos are taken from. However, Crater Lake is the real goal.
The lake is surprisingly large and hemmed in by beautiful mountains and craggy rocks. You can explore the eastern shore, although this will have most day hiker traffic. For more solitude, follow the campsite trail beyond no.12 and piece together unofficial trails to make a loop around the lake. There are multiple places to hang along the shoreline or take a dip in the water if you’re feeling brave. Since these are unofficial trails, it will require astute observation to stay on the path.
Another option is to backtrack from Crater Lake to Mirror Lake and then follow the climber’s trail to Triangle Lake for views of Fair Glacier, which remains white through July. In August and September, the glacier is still visible but has been subjected to yearly summer erosion, so a layer of dirt and rocks is usually smeared across a large portion of it.
For the most adventurous, beyond Triangle Lake is the climber’s trail up Lone Eagle Peak. This is the only non-technical route on the mountain but is a serious and dangerous scramble. Read that again. This is a scramble, NOT a trail; you will navigate cliff faces, thousand-foot drops and use all fours to make your way up. Attempt at your own risk. Solo Flight is a Class 4 scramble, which means just a notch or two below full-on rock climbing. It is also an out-and-back route. What you scramble on the way up, you’ll scramble on the way down.
When you’re finished with the area, backtrack to your campsite around Pawnee Lake.
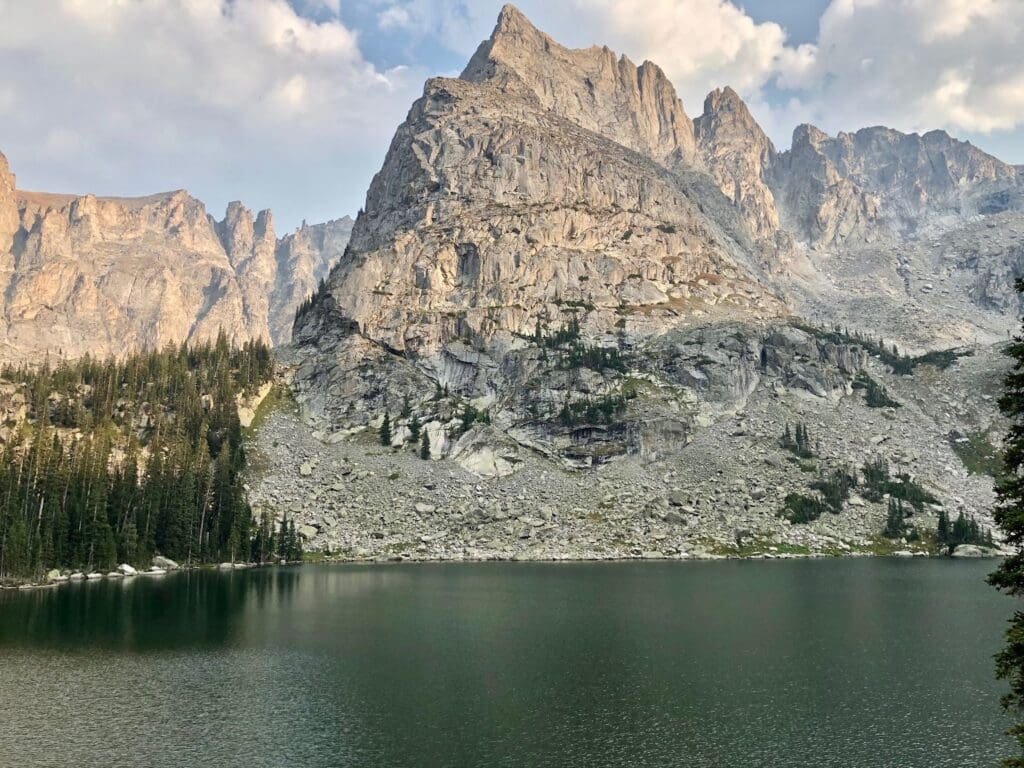
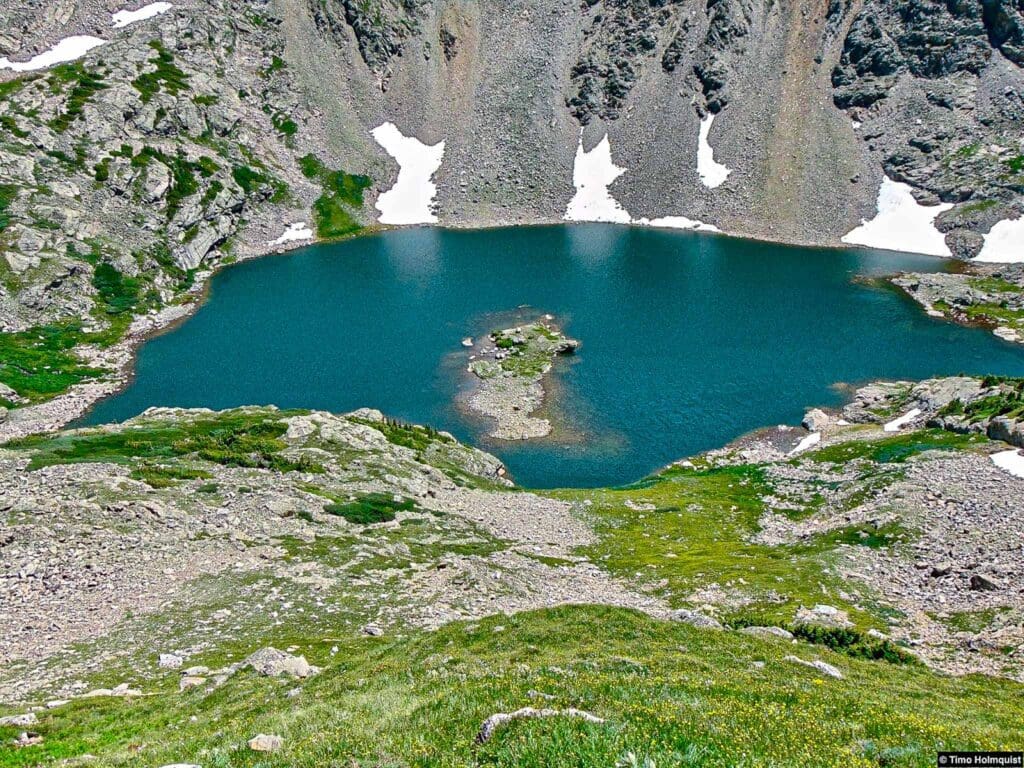
Crater Lake with Lone Eagle Peak on the other side.
Day 3
- Mileage: ~8.5 miles
- Elevation Gain/Loss: +1650 ft., -2,150 ft.
This is a longer distance day but half of it is downhill, and the uphill portions only have one or two notably steep sections.
Break camp and head down to the trail junction you found the day before. Instead of heading to Crater Lake, take a right and follow Cascade Creek as it spills down the valley. You’ll pass verdant meadows, where an occasional moose sighting isn’t out of the question, and a series of waterfalls. The higher falls are very impressive, and the trail gets you close enough to touch the water at its base. Be very careful here as the rocks are all smooth and very wet. If you slip in, it’ll hurt.
The last major waterfall is likely the largest and a good marker. Once you descend beyond it, you’ll cross Buchanan Creek on a well-built bridge and come to your next trail junction. Take a right up the Buchanan Pass trail. Enjoy the gradual rises and oscillating woods and meadows. You’ll pass the Gourd Lake Trail, which could be a side excursion but will add a punishing climb to your loop, so I recommend leaving that one alone.
As the Buchanan Pass Trail winds up the valley, you’ll get views of Paiute Peaks’ sharp and rugged western face, along with multiple avalanche chutes on either side of the trail. When you cross Buchanan Creek, prepare for the most concentrated elevation gain of the day. The trail will ascend in a way that avoids a slot canyon and a series of cascades. You’ll be offered several looks at the jagged scenery through the trees.
The trail will cross the creek once more (you may have to wade across if the water level is high). Once you do, you’ll enter a rolling meadowed area known as Fox Park. Dispersed camping options exist here, most likely in the random clumps of trees off-trail. Set up in this area if spaces are available. If they aren’t, continue through Fox Park.
The trail will rise up a wooded slope, but after a few hundred feet, the ascent relents, and you’ll be at the edge of treeline. Look north and see if you can spot some level ground right at treeline. Within this zone are a few hidden campsites with tree cover and stunning views. If you go any higher, you could still camp but you’ll be fully exposed to alpine weather without much cover.
Find a spot and call it a day.
Once you get into Fox Park, make sure to turn around every once in a while for views like this!
Day 4
- Mileage: ~11.2 miles
- Elevation Gain/Loss: ~3,072 ft., -3,115 ft.
This is your biggest day, but your pack should be light, and depending on how far up Fox Park you camped, the first ascent to Buchanan Pass can be reduced. However, if the stats don’t line up with your energy levels, know that an extra night at Red Deer Lake or Lake Coney is also an option. If you’re unsure, go ahead and book a night there in advance, just in case.
Having said that, after three nights in the woods, your desire to get back might be strong. If so, break camp and climb up Buchanan Pass. The trail is steep but makes use of a very large switchback to get beyond a crumbly cliff. From there, hike up a rolling mountainside to the top of Buchanan Pass. I’d recommend stopping a few dozen yards BEFORE you get to the top. The views southwest to the craggy summits lining Crater Lake and north to the Continental Divide are inspiring. For a detailed review, visit our Buchanan Pass article.
Once you crest Buchanan Pass, you’ll be able to see down to the cities of the Front Range for the first time since Pawnee Pass. You’ll descend on a well-built trail beyond lingering snowfields on Sawtooth Pk. (itself a side quest from the pass). As you get lower, you’ll reenter the trees and pass a junction with a trail to Red Deer Lake. For the 5-day itinerary, I recommend spending a night there. It’s a lovely hidden lake with heaps of solitude, which may be nice before hiking back to the crowded Brainard Lake area.
Either way, descend all the way back down to the large gravel area where the Middle St. Varin Dirt road awaits. This is just beyond another trail junction with an optional side quest to Coney Lake. Once you find the dirt road, look for signs for the Beaver Creek Trail, which will head south over the shoulder of Mt. Audubon. That’s what you want.
Take a break because you’ll have to tackle a long ascent to your last high point, just beyond treeline on Audubon. From there, it’s a nice downhill stretch to Mitchell Lake Trailhead. Then, you can connect various trails or roads back to the overnight lot where your car is parked.

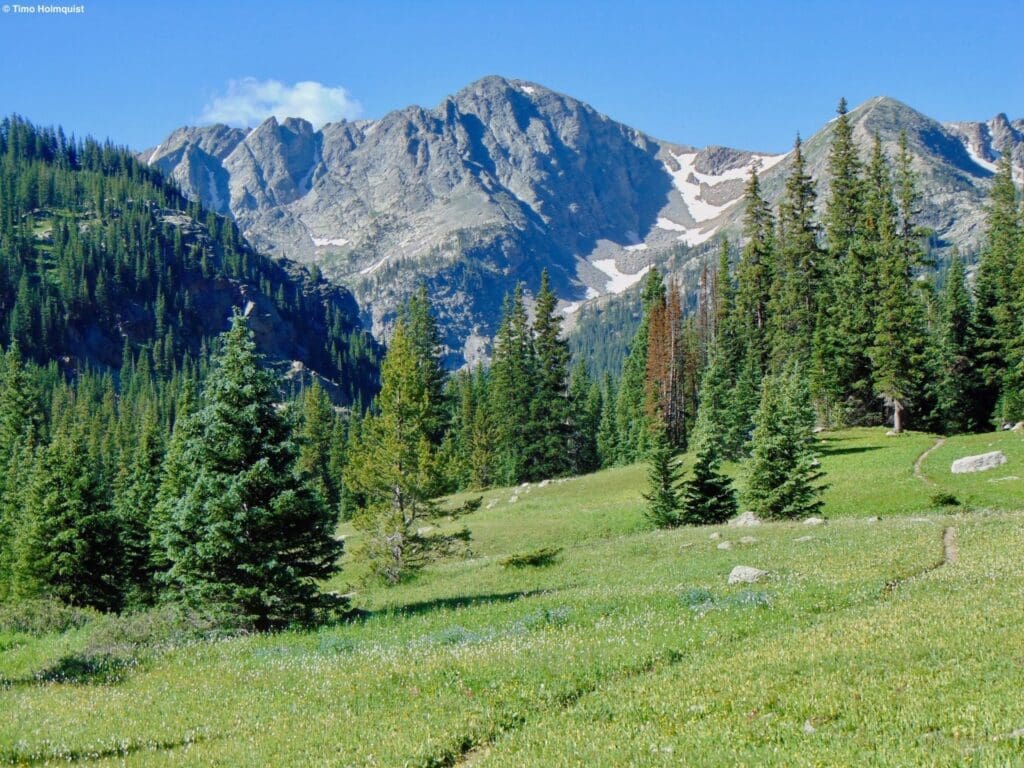
Paiute Peak poking up above the terrain south of Buchanan Pass.
High Lonesome Loop
While the Pawnee-Buhcanan Pass Lopp is arguably the best backpacking trip in the IPW, it’s a grueling effort. The High Lonesome Loop is a popular and much shorter excursion that still packs a punch with lakes, long stretches of beautiful alpine, and well-defined trails. If you can only spare 2-3 days and still want to get a good IPW experience, I recommend trying this loop.
Because it’s largely on the eastern side of the divide, this is a very popular and easy-to-access loop. Weekend crowding at the parking lot is a guarantee. However, there is a shuttle you can take from the nearby Nederland High School, which is highly recommended. Additionally, no backcountry campfires are allowed on this loop once you’re inside the wilderness boundaries.
I’ll describe the loop as a leisurely 3-day adventure, although you can easily do this in 2 or even 1 day if you’re hauling. The total distance is just under 16 miles if you don’t stray from the main loop.
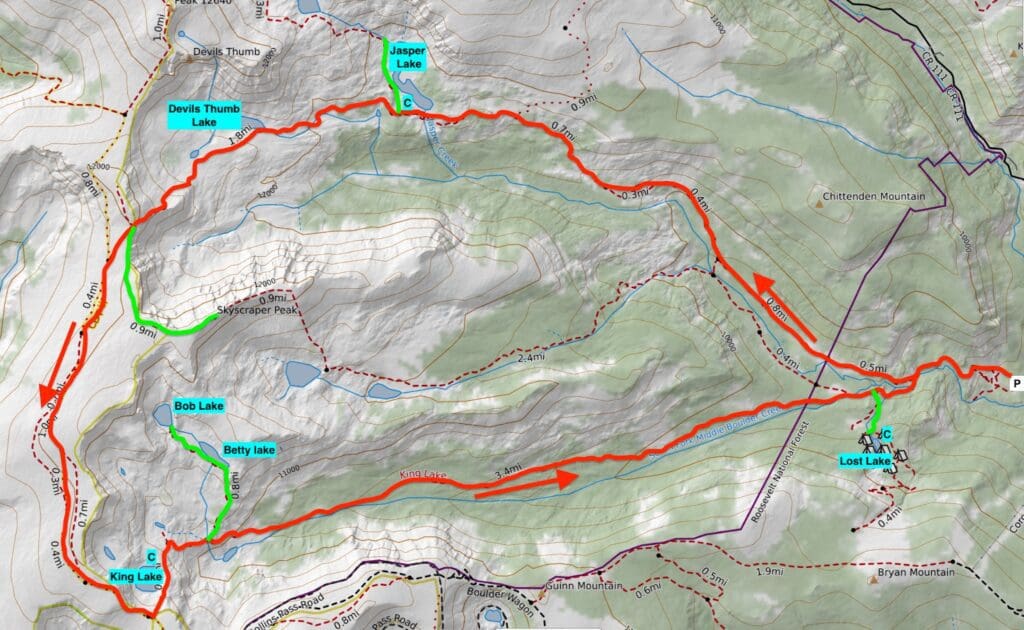
An overview map of the High Lonesome Loop.
Planning Tips and Critical Info.
- Style: Backpacking Loop
- 2-Day Itinerary: Get a campsite reservation for Jasper Lake or Devil’s Thumb Lake
- 3-Day Itinerary: 1-night Jasper Lake/Devils Thumb Lake, and 1 night at either King Lake OR Lost Lake
- No campfires in any of the backcountry zones. Lost Lake is not in the Wilderness, so campfires are allowed when there aren’t any fire bans. When camping by Jasper Lake, you have to use one of the established campsites.
- Total Distance: ~15 miles (w/ no add-ons), +1 mile for Lost Lake, +1.7 for Bob & Betty Lakes, and ~1.65 miles for Skyscraper Pk.
- Elevation Gain/Loss: +/- 3,470 ft. (w/ no add-ons), +/-230 ft. for Lost Lake, +/- 450 ft. for Bob & Betty Lakes, +/-425 ft. for Skyscraper Pk.
Day 1
- Mileage: ~4.6 miles (from Hessie Road to Jasper Lake)
- Elevation Gain/Loss: +~1,900 ft.
From Hessie Trailhead, the most likely starting point, take the steep dirt road west. Before a mile has passed, you’ll run into an intersection with the Devil’s Thumb Bypass Trail, take a right on it, and follow the trail through a large meadow before entering the IPW. The trail follows Jasper Creek and rises slowly toward treeline. You’ll pass two junctions, one to Woodland Reservoir and one to Diamond Lake. Simply continue on the Devil’s Thumb trail, following signs for Jasper Lake.
A little after 4 miles (4.3ish), you’ll start passing spur trails to Jasper Lake and the campsites around it. This is a great place to set up camp and enjoy an afternoon and evening. For the 3-day itinerary, this will be your first camp. However, options also exist at Devil’s Thumb Lake (4.8 miles).
If you’re intent on finishing the loop in 2 days, I’d still consider Jasper Lake to camp. It is possible to camp at King Lake and can make for a lovely experience, but it’s above treeline so a good weather night would be advisable.
Descending the trail to Devil’s Thumb Lake in the Indian Peaks Wilderness, Colorado
Day 2
- Mileage: ~4.75 miles
- Elevation Gain/Loss: +~1550 ft., – ~950 ft.
After breaking camp, continue west on the trail, gaining elevation steadily. If you camped at Jasper, you’ll pass spur trails to Devil’s Thumb Lake, a worthy side quest. If you camped near Devil’s Thumb Lake, continue into the alpine, gaining elevation to the ridgeline south of Devil’s Thumb Pass and topping out just under 12,000 ft.
The terrain opens substantially, and you’re granted long-range views. If you go early in the season, you will likely encounter snow above Devil’s Thumb Lake; come prepared. The rise up to the pass is steeper, but the views keep everything exciting. Once you top out, you’ll come to an intersection with the High Lonesome Trail, which doubles as the Continental Divide trail in this section.
From here, you’ll spend the next 2.5 miles atop the Divide with stunning long-range views and a gentle, rolling trail. Enjoy the sweeping views and watch for the occasional trail runner. If you want to climb to a high point, Skyscraper Peak is available. For less than two additional miles of effort you can tag this 12er while employing a few sparse Claas 3 scrambling moves.
A few points of a mile before Corona Pass (another possible starting point) to this loop, you’ll connect to the King Lake Trail. Take this east as you descend abruptly to King Lake (11,450 ft.).
King Lake, while above treeline, offers a few spots on its eastern side to set up a camp. This area makes for an agreeable night 2 camp. However, if you’re feeling good and want to keep exploring, you can descend all the way down to the Lost Lake cutoff and look for a spot there.

Looking into King Lake Basin from Corona Pass.
Day 3
- Mileage: ~5.63 miles
- Elevation Gain/Loss: +20 ft., -2,460 ft.
This is your exit day and consists of a long downhill trail to your car. You can add a little sidequest to it by exploring Lost Lake. This area is outside the IPW but has several good campsites and is frequented by moose.
Early morning light scatters across snow-covered peaks above Lost Lake.
Arapaho Pass Combination
This is a tough and helter-skelter combination but it utilizes free trailheads and provides relatively easy access to stellar scrambling routes, lakes, and the Continental Divide. If you’re new to the region and the Pawnee-Buchanan or High Lonesome Loops aren’t available, I’d try this one.
Highlights include multiple scrambling routes, 13ers, views of the largest glacier left in Colorado, lakes, and well-maintained trails. There is a bit of back and forth associated with the trip, but I’d strongly advocate spending the two nights at Caribou Lake. The lake is tucked down far enough from the popular Arapaho Pass to give you that excellent backpacking experience.
With the optional scrambles attached to this trip, the difficulty is very high (Class 4 with big fall potential). If you’re just bopping between the lakes (Caribou, Dorothy, and Columbine), the whole journey won’t be more than an occasional Class 2 move.
With both scrambles, this is best done as a 3-4 day adventure. If you’d rather stay on trails and avoid the big scrambles, you’ll only need 3 days to get it done.
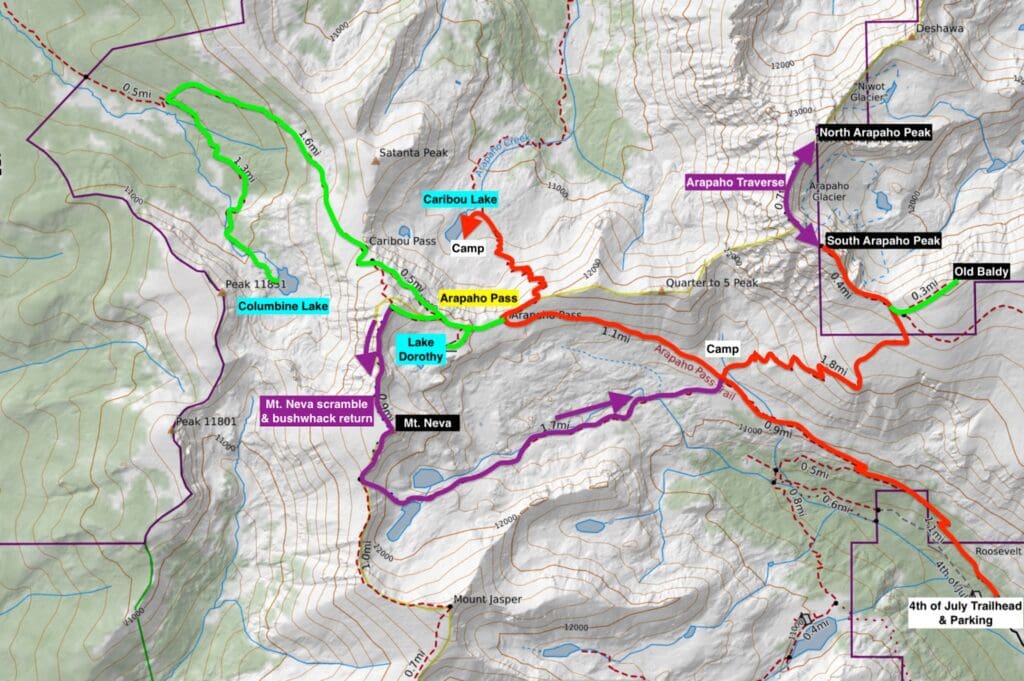
Overview map of the Arapaho Pass Combination route.
Planning Tips & Critical Info:
- Style: Out and Back
- 3-Day Itinerary: 1 night at Caribou Lake, 1 night at Arapaho Mine (Neva BZ), OR just 2 nights at Caribou Lake
- 4-Day Itinerary: 2 nights Caribou Lake, 1 night Arapaho Mine
- No Campfires in these backcountry zones; please respect wilderness rules
- Total distance: ~25 miles (without Columbine Lake add-on but with both scrambles included)
- Elevation Gain/Loss: +/- ~9900 ft.
- Total distance and elevation without any scrambling and with Columbine Lake add-on: ~20 miles (+/- ~5,800 ft.)
- Notes: It’ll be repeated a few times, but with the scrambling options, this is a very very difficult adventure with high exposure and several large no-fall zones. YOU MUST have prior scrambling experience to successfully attempt both Neva and the Arapaho Traverse. If you don’t, just stick to the lakes and trails, they are equally gorgeous and don’t require scrambling.
Day 1
- Mileage: ~4.6 miles
- Elevation Gain/Loss: +1,850 ft., -795 ft.
Start from the 4th of July Trailhead and make your way up the Arapaho Pass Trail. You’ll ascend gradually at first, crossing a lovely cascade and the trail junction to Diamond Lakes. A longer rise awaits as the trail begins to break out of the trees. Before it does so completely, you’ll find the Arapaho Mine. Here is a trail junction with the path up to the Arapaho peaks. Remember this area for later.
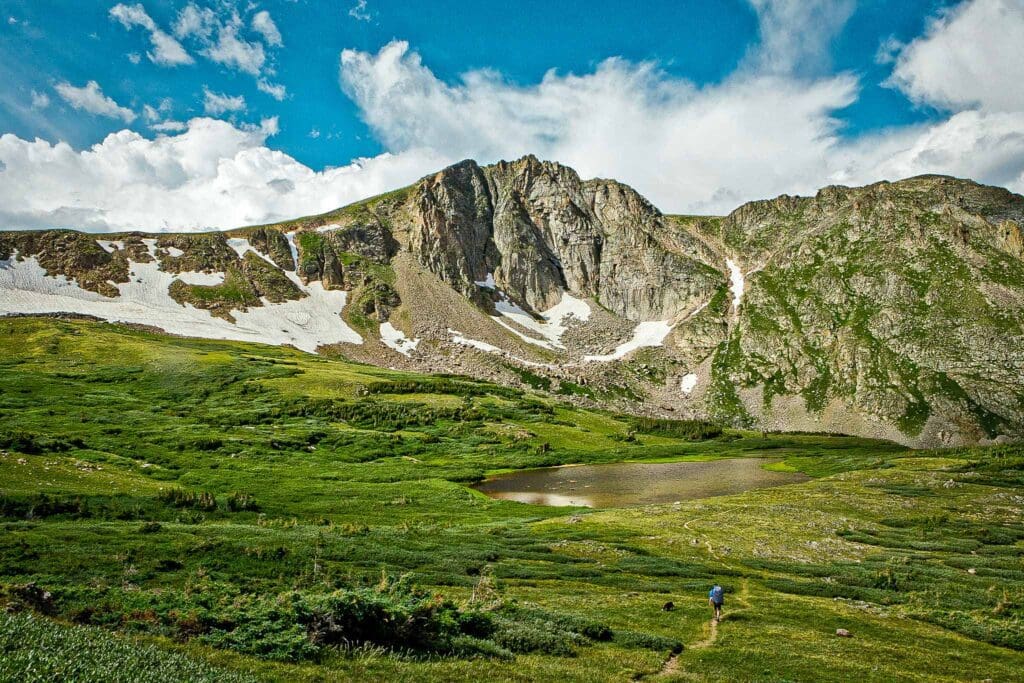
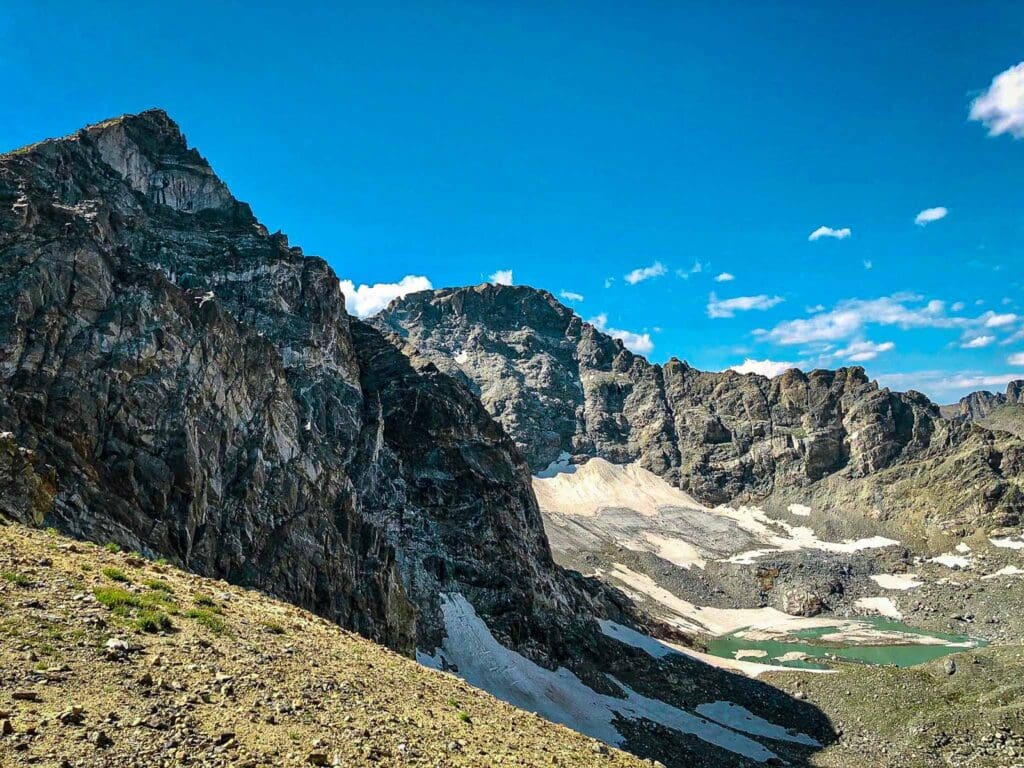
Continue up into the alpine. The pass is a great place to relax and soak up the 100-mile views. From the trail sign at the pass, take a right and follow the path along the divide momentarily before descending steeply down the other side. You should be able to see your camp area around Caribou Lake as you descend.
Find a spot and settle in. Caribou Lake is lovely and much less crowded than the other side of the Divide, but in June and July, the vegetation-heavy shoreline does attract mosquitoes. Enjoy the quieter area and explore to your heart’s content before calling it a day. You’ll be spending two nights here.

Looking down at Caribou Lake from between Arapaho Pass and Caribou Pass.
Day 2
- Mileage w/ Neva scramble: ~7.25-7.5 miles
- Elevation Gain/Loss w/ Neva scramble: +/- ~ 2,595 ft. (Significant Class 3 and 4 scrambling required)
- Mileage w/ Columbine Lake: ~10.3 miles
- Elevation Gain/Loss w/ Columbine Lake: +/- 3,160 ft. (no scrambling required)
Break from camp and reascend the pass. From the pass, take a right and continue up to Lake Dorothy. Here, you have a few options. For the hardy, find the start to the IPW classic Neva Scramble. This Class 4 route is awesome and features very sturdy rock.
From the top of Neva, circle down to the two unnamed lakes between it and Jasper. Then piece together a trail that avoids most of the marshy areas (although I’d prepare for some wet shoes regardless). In here, it’s fairly common to see moose, so be on the lookout and give them plenty of space. You’ll reconnect with the Arapaho Pass Trail. Turn left, ascend to the pass once more, and then descend back to your campsite.
The non-scrambling option is to hang out at Lake Dorothy for a while, then continue beyond it to Caribou Pass. Keep in mind that snow can linger here through June. At Caribou Pass, you have two options. You can take a right off-trail and walk along the ridge to the top of Satanta Peak. The views of the Arapaho Peaks, Apache, Navajo, and the Continental Divide are fantastic. You can also opt to stay on trails by descending north from Caribou Pass. At the first trail junction, take a left and make your way to Columbine Lake. Then, retrace your steps back to camp.
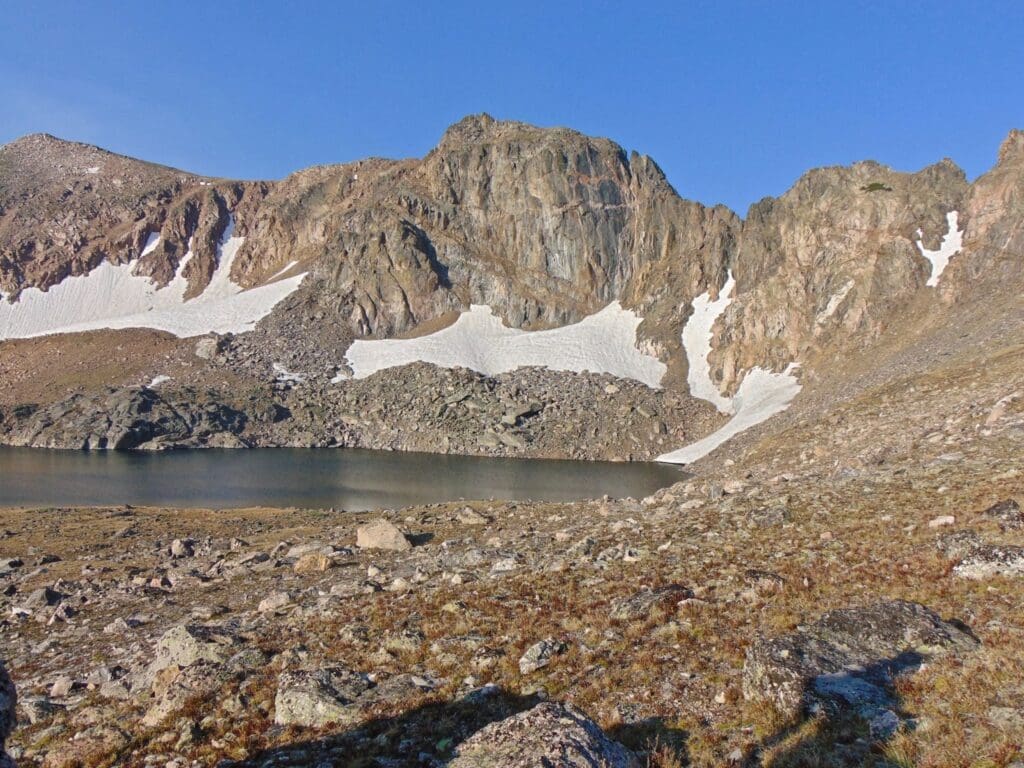
Mt. Neva from Lake Dorothy. The true summit is the point farthest left, while the serrated ridge to the right makes up a lot of the scrambling challenge.
Day 3
- Mileage: 2.5 miles (+4.4 miles for S. Arapaho add-on)
- Elevation Gain/Loss: +800 ft. -715 ft. (+ 2,932 ft., – 2,850 ft. w/ S. Arapaho add-on)
- Mileage and gain/loss from Caribou Lake back to trailhead: ~4.5 miles ( +800 ft., – 1850 ft.)
If scrambling isn’t your deal and you opted for the lakes the previous day, rest assured, you can simply pack up camp and head back today. However, if Neva got your heart pumping, the Arapaho Traverse is next. Today you’ll pack camp at a leisurely pace and re-ascend the pass. If the day is nice, hang out at Lake Dorothy (a 0.4-mile side quest), where you can admire the route up Neva you did the day prior.
After that, descend east to the Arapaho Mine, which is near treeline. Amongst the old mining equipment, you should find enough space to pitch a tent or two. Make sure it’s off-trail enough so as not to block anyone. There are two trails in this area, the main Arapaho Pass Trail and the Glacier Trail up to South Arapaho.
Once you’re set up, you can hang out at camp or do some scouting. For the adventurous, go up the Glacier Trail to either Old Baldy for views of the Arapaho Glacier or all the way up to South Arapaho (weather dependent), where you can get eyes on the Arapaho Traverse. If it looks good, bottle that excitement; you’ll be doing it tomorrow.
The slopes leading up to the junction with the Glacier Trail while S. Arapaho looks on.
Day 4
- Mileage: ~7.75 miles
- Elevation Gain/Loss: +2,530 ft., -3,675 ft.
From camp, retrace your ascent to south Arapaho Peak and do the traverse to North Arapaho. Here’s a detailed breakdown of the route; it’s a dangerous scrambling adventure.
From the summit of North Arapaho, take in the massive views of the surrounding peaks and bask in your accomplishments. Both Neva and the Arapaho Traverse are in the top 5 Class 4 scrambles in the IPW. I’d lump them together with Cooper Peak’s South Buttress, Mt. Achonee from Crater Lake, and the Solo Flight on Lone Eagle Peak.
Navajo Peak’s West Chimney is also a worthy Class 4 route, alongside the long and very intense Wheeler Basin-North Arapaho Scramble but they both require much more than scrambling. Navajo’s West Chimney is either an arduous combo with Apache Pk. or a mixed climb up Navajo’s permanent snowfield followed by the scramble. North Arapaho from Wheeler Basin involves long stretches of complex off-trail navigation and requires a descent of the Arapaho Traverse, meaning it’s essentially 2 separate Class 4 traverses rolled into one.
If you really enjoy scrambling, know there are several low Class 5 traverses and several other higher Class 5 rock climbs in the area.
Once you’re safely back to the saddle between South Arapaho and Old Baldy, retreat to your camp and break it down. The last portion of the trail to your car is all downhill and easy to follow. Be aware that some areas are quite loose and sandy, so trekking poles and shoes with lots of tread tend to be helpful.
South Arapaho Peak (left) and North Arapaho Peak (center). You can reach the top of South Arapaho Peak without any serious scrambling.
Gourd Lake and Island Lake
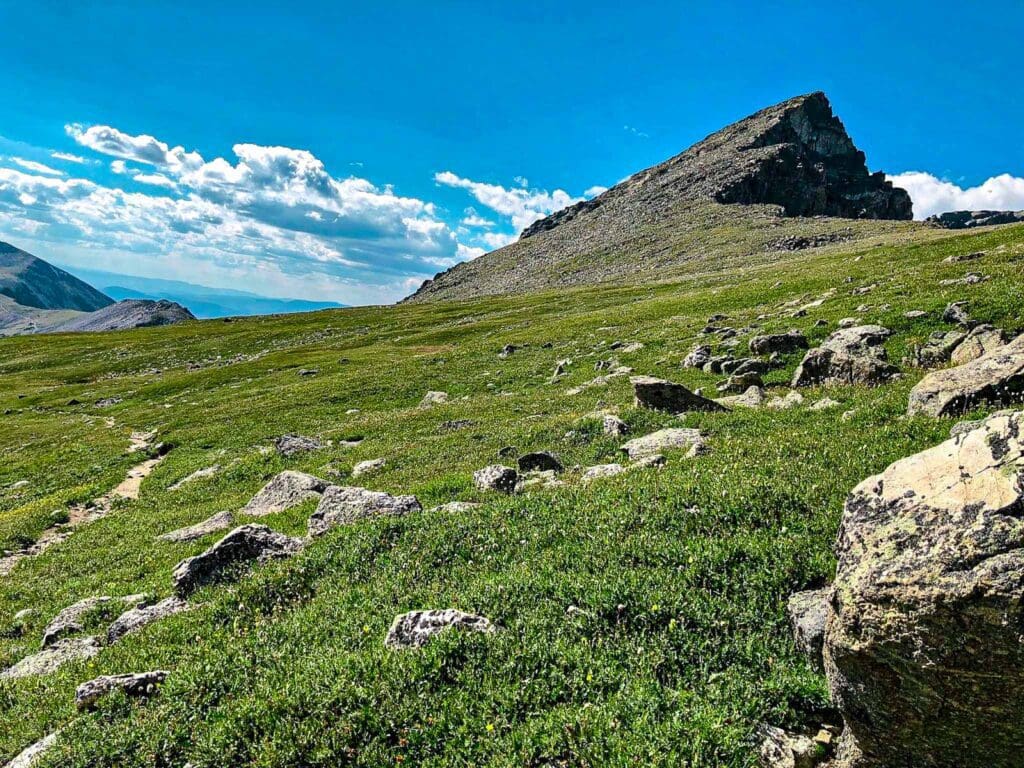
Gourd Lake is a deep subalpine lake with plenty of places to cliff jump. It also serves as a perfect base camp to check out some of the beautiful and overlooked 12ers in the region. Both Marten Peak and Cooper Peak have stellar scrambling routes on them that are well worth checking out. Also, Island Lake is a stunning alpine body of water well within reach of Gourd.
I’d recommend 4 days for this area and will describe the adventure that way. However, you can make Gourd Lake as short as a day hike; it’ll just cost you 18 miles.
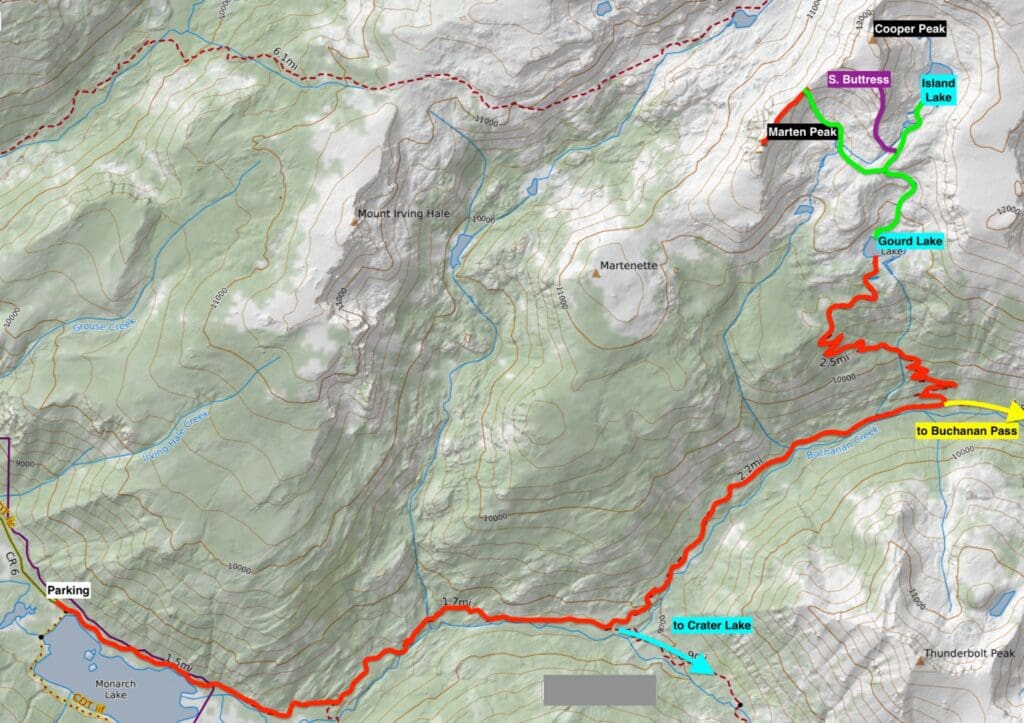
Overview map of the Gourd Lake Route.
Planning Tips & Critical Info.
- Style: Basecamp/out and back
- 3-Day Itinerary: 2 nights in Gourd Lake BZ
- 4-Day Itinerary: 3 nights in Gourd Lake BZ
- NO campfires in the Gourd Lake zone
- Total Distance (w/ Island Lake add-on): ~19 miles
- Elevation Gain/Loss (w/ Island Lake add-on): +3,710 ft., -3,715 ft.
Day 1
- Mileage: ~8.4 miles
- Elevation Gain/Loss: + 2650 ft., -170 ft.
Park at Monarch Lake and follow signs for Cascade Creek. This section of trail is pleasant but features a few hidden rises tucked between flatter sections. At the intersection between Cascade Creek and Buchanan Pass, continue up Buchanan Pass. You’ll eventually come upon the trail junction with Gourd Lake. Prepare yourself, the main ascent is coming.
Getting up to Gourd Lake is tough with a pack; take your time and take breaks often. The lake itself is situated on a shelf at the edge of the rise. Its peculiar shape is why it’s called Gourd Lake. There are campsites in several places, though the best one look across the lake to the towering buttress coming off of Cooper Peak.
Once you’ve settled in, call it a night, jump into the lake, or try walking on social trails around the lake. The lake is below treeline, so if you’re going in June or July, understand that the mosquitos can be pretty fierce. Plan accordingly.
On the shores of Gourd Lake.
Day 2
- Mileage: ~3 miles
- Elevation Gain/Loss: ~ +/- 830 ft.
While beautiful on its own and featuring tons of cliff-jumping options, Gourd Lake is not the star of this area. Several superb adventures exist close by. The easiest to get to, although not without effort, is Island Lake.
From Gourd Lake, make your way to the northern shoreline and pick one of several ascent gullies. Choose wisely; there are some scrambles required in the steeper options. For a longer but gentler approach, simply follow the stream that dumps into Gourd Lake uphill. It’ll lead you to an unnamed pond above Gourd Lake. From there, cross left and sight a break in the rocky walls that you can ascend. Atop this rise, you’ll see the beautiful and super intimidating South Buttress of Cooper Peak. You can scramble this, but it is a serious and exposed Class 4 jaunt.
For details on the South Buttress and other routes on the mountain, check out our Cooper Peak article.
If the south buttress looks above your pay grade, then follow the rocky height of land to the right, sighting a way to descend to another thundering stream. This one flows out of Island Lake. There are a few ways down to the stream, but many paths end in small cliffs, so take your time and sight an agreeable path. Once you’re by the stream, continue alongside it until arriving at the bigger Island Lake.
Snow lingers on the eastern shore through June, so if you want to circle around the lake, keep that in mind. The western shore has A TON of wildflowers on it but is more complex to follow, with multiple cliff bands spoiling easy passage. Be careful, pick your route, and enjoy! For the brave, you can swim to the namesake island. Retrace your steps back to Gourd Lake.
Paiute Peak and Mt. Toll’s rugged western faces from a few hundred feet above Gourd Lake.
Day 3
- Mileage (Marten Peak): ~3 miles
- Elevation Gain/Loss: +/- 1600 ft.
For your second full day, either relax by Gourd Lake or Island Lake. Or, if you want to keep the scrambling momentum up, you can approach Marten Peak from Gourd Lake as well. Follow the streams up to the rocky ridge between Gourd Lake and the stream flowing out of ISalnd Lake. Instead of heading right and upstream, stay on the ridge and head left (downstream). You’ll pass above a mini canyon, and when the terrain relents, find a way to descend towards the stream.
You should meet it in another beautiful area with a couple of shallow lakes, Cooper Peak to your right and Marten Peak across the way. Marten Peak is identifiable due to its rocky and blocky summit. Find your way to the saddle between marten peak and Cooper, then take the ridge left to the summit block options. Several routes exist; take a look at our Marten Peak article for more details. Retrace your route back to Gourd Lake.
Island Lake from the slopes of Cooper Peak.
Day 4
- Mileage: 8.4 miles
- Elevation Gain/Loss: +170 ft., -2650 ft.
From your camp near Gourd Lake, retrace your steps to Monarch Lake. The nice thing is that the trails are easy to manage, and the trail signs are obvious. The downside is that it’s a long exit. But with reduced weight in your pack and the vast majority of it being downhill, it won’t be nearly as difficult as the approach on Day 1.
Stone Lake & Upper Lake
This is an often overlooked area and can give you a bigger chance of solitude over the more popular locations in the wilderness. Having said that, with Arapaho Bay Campground near the trailhead, there could be several weekends where parking is an issue. True to the mantra of the area, get there early.
One of the nice things about this part of the wilderness is that you still get the alpine lakes, the craggy summits, and wildlife viewing with the benefit of campfires. However, if there is a fire ban for the area (either the wilderness or Grand County), fires are not allowed. Keep in mind that the journey here requires much more effort than the mileage indicates, especially with a full pack.
The reward, however, is well worth it. Catching the last glimmer of daylight on the rock spires of Marten Peak from Stone Lake or staring at the impressive Hiamovi Tower from Upper Lake are wonderful sights.
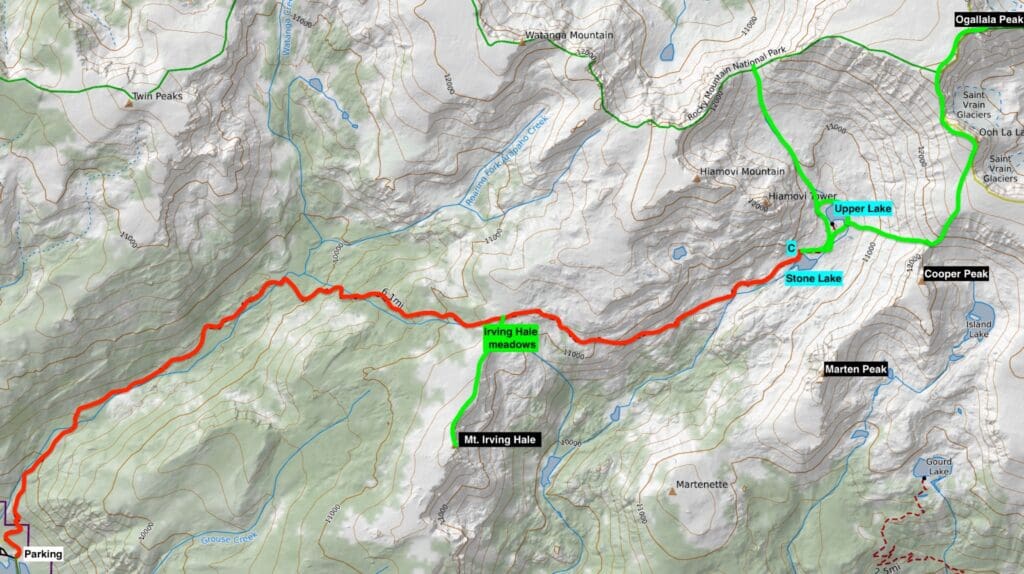
Overview of the Stone Lake route and additional adventures.
Planning Tips & Critical Info.
- Style: Basecamp/out and back
- 3-Day Itinerary: 2 nights in Hell Canyon BZ
- 4-Day Itinerary: 3 nights in Hell Canyon BZ
- Campfires are allowed, practice safe etiquette and make sure it’s dead out before leaving the area
- Mt. Irving Hale (Class 2), Hiamovi Tower (Class 3-4), Cooper Peak (Class 3-4), Marten Peak (Class 3)
Day 1
- Mileage: 6 miles
- Elevation Gain/Loss: + 3,105 ft., – 750 ft.
- Mileage & Elevation w/ Irving Hale add-on: 7.5 miles (+3,665 ft., – 1,309 ft.)
Start from the Roaring Fork Trailhead. It’s best to start early because the first part of the rise has little shade. It’s only after you climb a couple of hundred feet and cross the creek on a wooden bridge that shade increases meaningfully.
Once you do, follow the meandering creek higher into the arms of the mountains. After roughly 2.6 miles, you’ll reach a trail junction. Make sure to head right instead of toward Watange Lake. This ascent with a full pack can slow your pace down a lot. Take your time. It’s hard to measure progress in the trees, but once you start seeing meadows crop up next to the trail, know that you’re in the final third.
At the apex of the climb, you’ll break out into a wide meadow on the shoulder of Mt. Irving Hale. For a more detailed report up to this point, including a jaunt up to the top of Irving Hale, read our companion piece here. This is a perfect place for a break, with sweeping views of the western IPW.
When ready, continue into Hell Canyon, descending along the steep slopes until you reach the canyon bottom. Pay attention to the trail as it meanders downhill; there are several less-defined sections that require you to pay a bit more attention.
Once you bottom out, the approach isn’t quite done. You’ll travel along some additional meadows and climb a handful of small elevation steps before reaching the lake. The best campsites are across the outflow stream in a flat area along the lake’s southern shore, along the lake’s western shore, or a bit farther, between Stone Lake and Upper Lake.
Stone Lake is tree-lined and relatively shallow, although there is one area along the western shore where a large rock pokes up from the waters. The main stream channel undercuts the rock, making for relatively safe jumping without touching the bottom.
If motivation grips you, you can add another 0.5 and follow the now unofficial trail as it meanders up to Upper Lake.
The Irving Hale Meadows.
Day 2
- Mileage (to Upper Lake and the saddle north of it): ~2.54 miles
- Elevation Gain/Loss: +/- 890 ft.
You can either use this as a rest day and relax by the lakes or an adventure day. There are multiple possibilities, although the easiest is to travel between the two lakes and circumvent Upper Lake while taking in the views of Hiamovi Tower. There is a pass north of Upper Lake that’s fairly easy to reach. From there, you can stare at the walls of Hiamovi Mountain to your southwest or northward into Paradise Park.
Paradise Park is one of several wilderness areas in Rocky Mountain National Park that has no trails and is as wild as you can get. It’s a deep and undisturbed slice of nature. You can venture into it, but there’s no camping allowed, and you have to retrace your steps to get back.
Our Stone Lake and Upper Lake article has all the adventure details.
Upper Lake and the imposing Hiamovi Tower.
Day 3
- Mileage (Cooper Pass-Cooper Peak-Marten Peak and back): ~2.8 miles
- Elevation Gain/Loss: +/- 2,085 ft. (several Class 3 sections with exposure)
If you have the energy, there are several summits you can reach from this area. The most direct from Stone Lake is to get on the eastern side and piece together a route to the obvious saddle to the left (southeast) of Marten Peaks summit block. Marten Peak is the collection of obvious rock spires across the lake.
From the saddle, you can head along the ridgeline and choose one of several scrambling routes to Marten Peaks summit. For a detailed description, check out our Marten Peak article.
You can also tackle Cooper Peak via Cooper Pass and the fun North Ridge. There are several routes on the mountain, although the South Buttress, Southwest Slopes, and the North Couloir are best approached from Gourd Lake.
Also, from Cooper Pass, you can venture north (light Class 3) to tag Ooh La La and Ogallala, the resident 13ers in the area. If you do this, take mental notes of where you clambered up. The top of the ridge is wide and gentle. Once you get high enough, you won’t be able to pick out your ascent route without some visual clues or photos. This could be an issue as veering off course on the descent may put you in more consequential terrain than you realize.
Whatever adventure you choose, or if you’d rather hang out at camp and relax, this area is perfect for some wilderness therapy.
Stone Lake, from the eastern shore, looking northwest.
Day 4
- Mileage: 6 miles
- Elevation Gain/Loss: +750 ft., -3,105 ft.
This is a repeat of day one, except backward. Pack up camp, descend slightly along the creek, then climb your big rise of the day back to the meadows near Irving Hale. From there, it’s all downhill. Markers to note are the trail junction with Watanga Lake, the wooden bridge across the Roaring Fork about 2 miles later, and finally, the last descent through sun-soaked terrain with fleeting views of Lake Granby in the distance.
Bonus: Hell Canyon Loop
If you wanted to combine trips to Hell Canyon and Gourd Lake, this would be the way to do it. There isn’t much here that isn’t already covered by the two other routes, but I’ll list important points below.
- If advancing from Gourd Lake to Island Lake, make sure to stay on Island Lake’s eastern side (right-hand side). If you stay on the western side, there’s a good chance you’ll be scrambling with a pack on and could get cliffed out.
- Cooper Pass between Island Lake and Upper Lake is fairly short on the Island Lake side. However, the Upper Lake side is long and notoriously loose, especially if you have a large pack. Go slowly and test each foothold before committing to another step. A fall this far into the wilderness would be very bad.
- Remember, if going from Gourd Lake to Stone Lake, there is a significant uphill portion between Stone Lake and the meadows beneath Irving Hale. This will come as a nasty shock if you aren’t ready for it.
- Additionally, if you go the other way (Stone Lake to Gourd Lake), once you get to Gourd Lake, you still have ~9 miles to go before getting back to Monarch Lake Trailhead.
- In order to complete the loop, you need to walk the road between Monarch Lake and Roaring Fork Trailhead (or car position). If you walk the distance, add another 1.66 miles of dirt road walking to your journey.
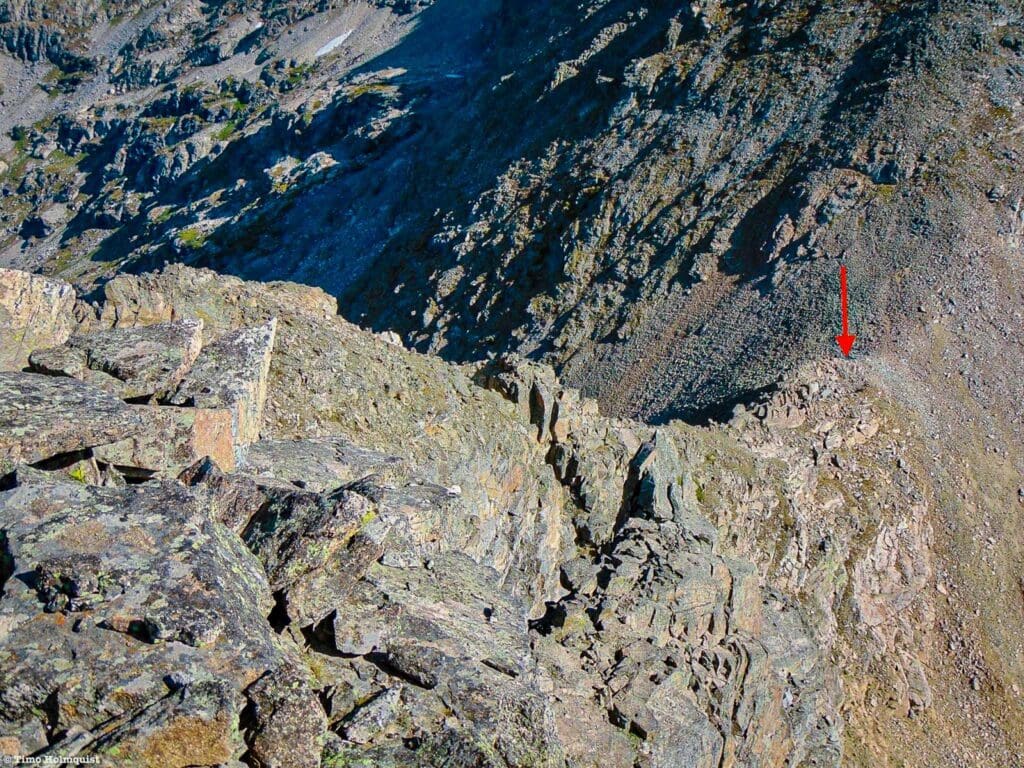
The red arrow points to Cooper Pass. Photo taken from the summit of Cooper Peak.
Honorable Mentions
Crater Lake
Crater Lake is one of the prettiest places in all of Colorado. Unfortunately, that means it gets absolutely inundated in the summer. The high snowfall numbers in the area truncate the best times to visit, which also squeezes the summer months. If you don’t get a camping reservation, this suddenly becomes a long day hike.
As far as backpacking routes are concerned, Crater Lake is included as an optional (but highly recommended) add-on to the Pawnee-Buchanan Loop. You can make it a separate backpacking trip, but due to the crunch on available camping spaces, I opted to include it as part of a larger journey where you can shift camp away from the busiest sites while still enjoying the lake.
Watanga Lake
A shallow subalpine lake accessible from the Roaring Fork Trailhead, Watanga Lake is a haven of solitude. While not as immediately beautiful as neighboring areas, from Watanga, you can get above treeline and enjoy long-range views into the IPW and RMNP. Campfires are allowed in the area, provided there aren’t any fire bans in the area.
Diamond Lake
Perennially popular, this easy-to-reach lake has big views, deep enough water to wade into, and a series of campsites around it. If you’re new to camping or want to spend an easy night or two outside, the 5.4-mile roundtrip distance should be easy to navigate.
Popular Articles:
Best Scrambles in the Indian Peaks Wilderness, Colorado
Best Alpine Scrambles in Rocky Mountain National Park
5 Excellent Backpacking Routes in Rocky Mountain National Park
Grand Lake Is An Off-The-Beaten-Path Mountain Adventure Town
Best Hikes Within An Hour Of Boulder, Colorado
Terms of Use:
As with each guide published on SKYBLUEOVERLAND.com, should you choose to this route, do so at your own risk. Prior to setting out check current local weather, conditions, and land/road closures. While taking a trail, obey all public and private land use restrictions and rules, carry proper safety and navigational equipment, and of course, follow the #leavenotrace guidelines. The information found herein is simply a planning resource to be used as a point of inspiration in conjunction with your own due-diligence. In spite of the fact that this route, associated GPS track (GPX and maps), and all route guidelines were prepared under diligent research by the specified contributor and/or contributors, the accuracy of such and judgement of the author is not guaranteed. SKYBLUE OVERLAND LLC, its partners, associates, and contributors are in no way liable for personal injury, damage to personal property, or any other such situation that might happen to individuals following this route.


