


High Point:
12,579 feet on top of “Algonquin”

Total Ascent:
Both mountains: ~4620 ft., Just Sawtooth: ~3,300 ft.

Difficulty:
Very Hard

Distance:
13.4 to 16.7 miles

Waypoints:
40.13908, -105.58598

Route Type:
Lollipop loop, out and back available via Buchannan Pass
- Sawtooth Mountain has a number of possible paths, from the class 1 hike up Buchanan Pass to the class 3 east ridge climb that spans a full mile.
- Technical rock climbing can be done on its south face, but the 600 vertical feet of loose rock might be too hazardous to traverse. We detail the standard route up Buchanan Pass in another article;
- We review the excellent East Ridge Route plus adding the traverse to “Algonquin” Peak provides an easy extra credit target south of Sawtooth with absolutely stellar views.

Overview:
Sawtooth is an instantly recognizable mountain from certain perspectives and completely hidden from others. Neither it nor the unofficially named “Algonquin” break the 13,000-foot line, meaning they see generally less traffic. The best trailhead to access these mountains is also off the beaten path, contributing to its wilder feel. For the budget-conscious, there is no parking fee at the closest trailhead, but you may be doing some road walking unless you brought a lifted 4WD truck. As far as the eastern IPW goes, this area is possibly the only “hidden” gem left, and it really isn’t all that hidden if you’ve studied a map hard enough. While Sawtooth can be hiked with little difficulty from Buchannan Pass, this review covers the optional East Ridge (Class 3). “Algonquin” is an easy extra credit target south of Sawtooth with absolutely stellar views. There are two summits of “Algonquin,” and traversing between the two gives you some more fun Class 3 scrambling and an arguably better summit view.
- Sawtooth via Buchanan Pass: Class 2
- Sawtooth via East Ridge: Class 3 (Optional Class 4)
- “Algonquin” main summit: Class 2
- “Algonquin” south-summit: Class 3+ (Optional Class 4)
Distance breakdown:
- East Ridge Sawtooth to “South Algonquin” and back via Coney Lake: 15.5 miles
- East Ridge Sawtooth to “Algonquin” and back via Buchannan Pass: 16.7 miles
- East Ridge Sawtooth/Buchannan Pass return: ~13.4 miles
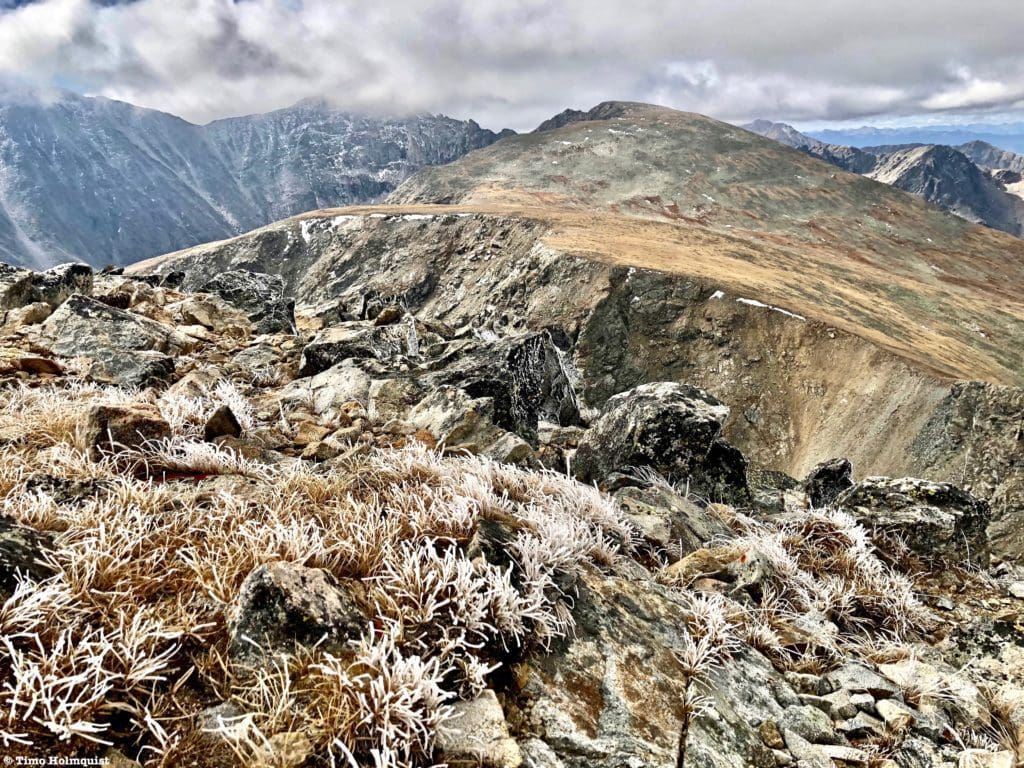
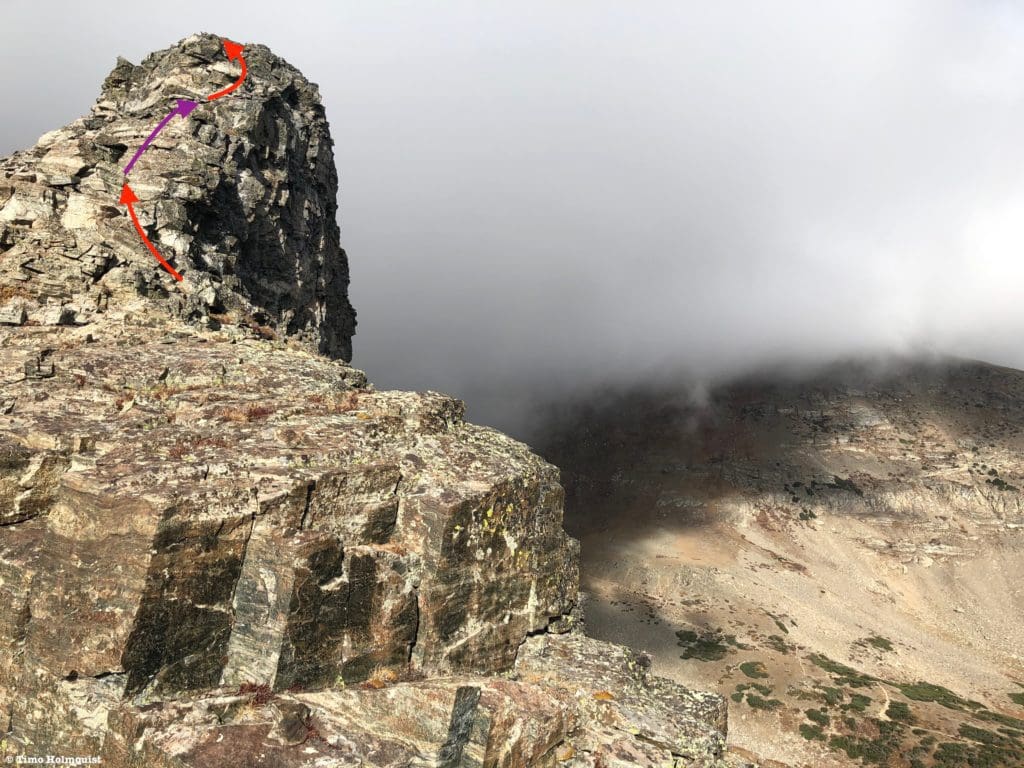
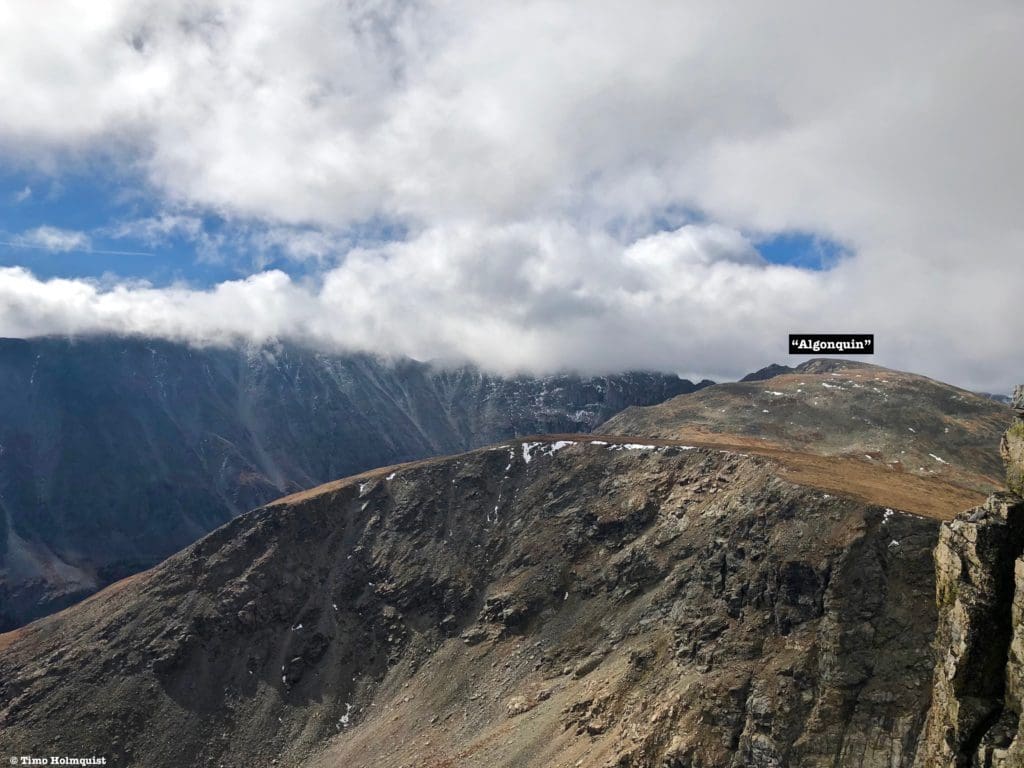
Rime ice on the summit of Sawtooth. “Algonquin” is visible as the mountain to the right of the peak in the clouds.
Table of Contents:
Article Navigation: Click on any of the listed items in the table of contents below to jump to that section of the article. Similarly, clicking on any large, white section header will jump you back to the Table of Contents.
- Overview
- Scales and Criteria
- Directions to Trailhead
- Places to Stay
- Field Notes
- Journal
- Final Thoughts
Global Rescue Travel Membership
When a travel emergency arises, traditional travel insurance may not come to your aid, and a medical evacuation can cost up to $300,000.
The cost when you have a Global Rescue membership? $0. That’s why when the unexpected happens, you want the leader in rescue, evacuation and medical advisory behind you. You want Global Rescue.
Scales and Criteria:
This article utilizes three separate rating systems: Difficulty, Popularity, and a Scramble Rating indicating the hardest move or set of moves encountered. The scramble rating employs the Yosemite Decimal System. By the easiest technical route, Mt. Neva is a Class 2+ hike with plenty of frustrating off-trail navigation. The off-trail approach is most often used when combing Neva with its southern neighbor Pt. 12,923 (commonly referred to as Jasper Peak). For scintillating scrambling and superb alpine views, the Class 4 North Ridge is the standard way to tag Neva.
Difficulty Ratings:
- Easy: less than 5 miles, less than 500 ft. of elevation gain
- Moderate: 5-10 miles, 500-2000 ft of elevation gain
- Hard: 5-15 miles, more than 2000 ft. of elevation gain
- Very Hard: 10+ miles, more than 3,500 ft. of elevation gain
Popularity Ratings:
- Low: Large sections of trail all to yourself
- Moderate: Sizeable trail sections to yourself, crowding possible on busy summer weekends
- High: You’ll be seeing people, still a chance for solitude in spring/fall/winter.
- Very High: Almost always busy.
Scramble Rating:
- Class 1: Established hiking trail the entire length of the adventure. Low chance for injury.
- Class 2: Typically involves cross-country navigation, possibly using hands for balance but not required, steeper than Class 1.
- Class 3: Hands and feet used to scale areas, must use hands to proceed (either for balance or to help pull you up a section), increased exposure, a fall could be fatal. Helmet recommended, along with grippy hikers.
- Class 4: Climbing on very steep terrain just shy of vertical, falls could be fatal, hands employed for grip and balance continuously, ropes advisable but scalable without. Helmets are highly recommended, along with grippy hikers.
- Class 5-5.4: Near vertical and vertical climbing that involves technical rock-climbing moves, exposed, falls likely to be serious or fatal, possible to scale without ropes but only for very experienced veterans. Helmets, grippy hikers, and/or rock-climbing shoes necessary.
- Class 5.5 and up: Not covered as scrambling, full-on rock climbing with ropes, helmets, etc.
The YDS system is widely used in North America but can be quite subjective, so it is not perfect. The biggest differences I’ve encountered between Class 3 and Class 4 sections have to do with slope angle, exposure, and putting weight and pressure on hand grips (4) instead of using hands and feet interchangeably as supporting points of contact (3). It is not possible to climb a Class 4 section without using your hands to pull up some or all of your body weight. Typically, a Class 4 section will also require some type of rock-climbing move, like stemming, where hands or feet are pressed in opposition as if climbing the inside of a chimney. If downclimbing, a key difference is that most people will descend a Class 4 section facing inward, i.e., your back faces the exposure.

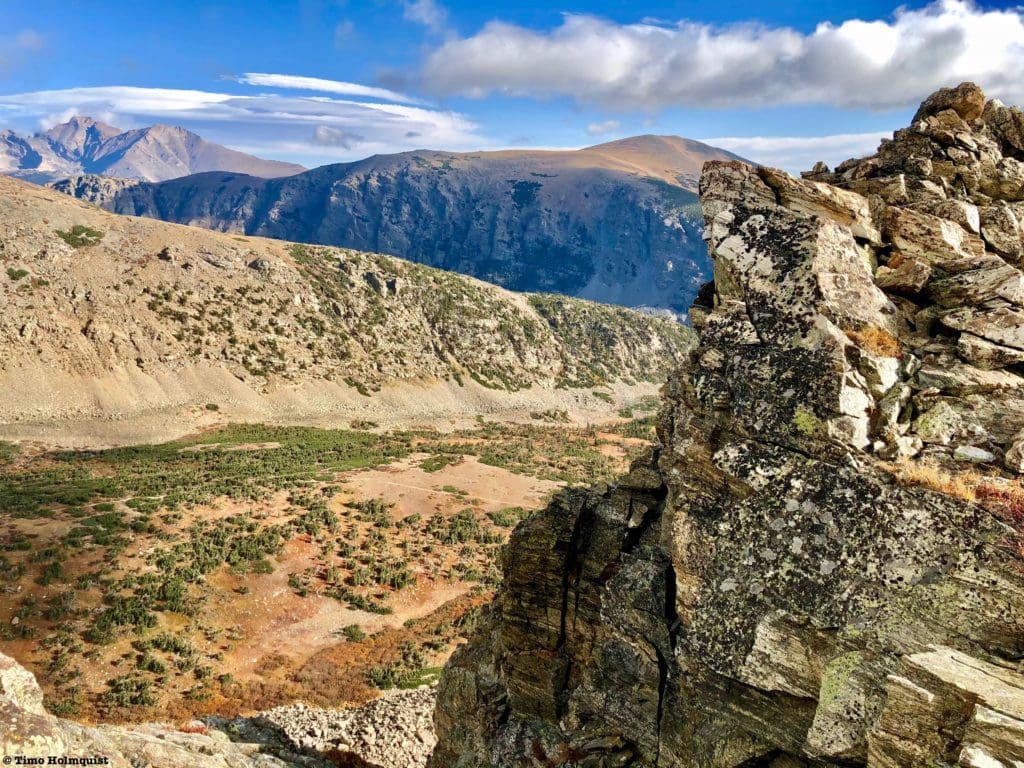
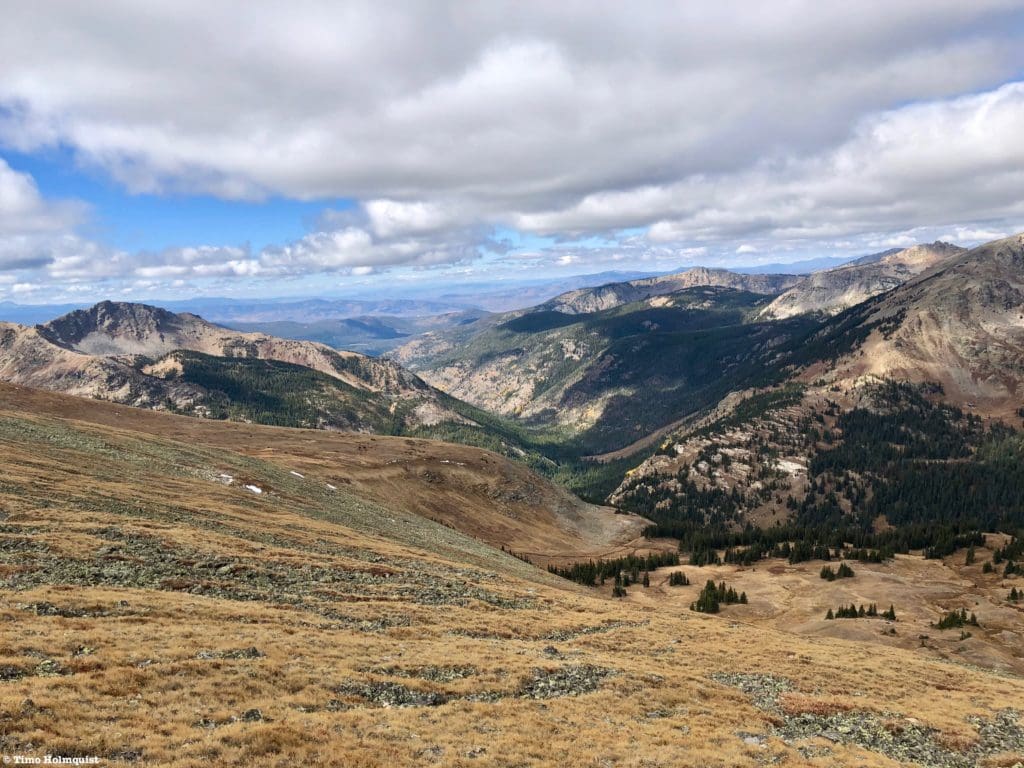
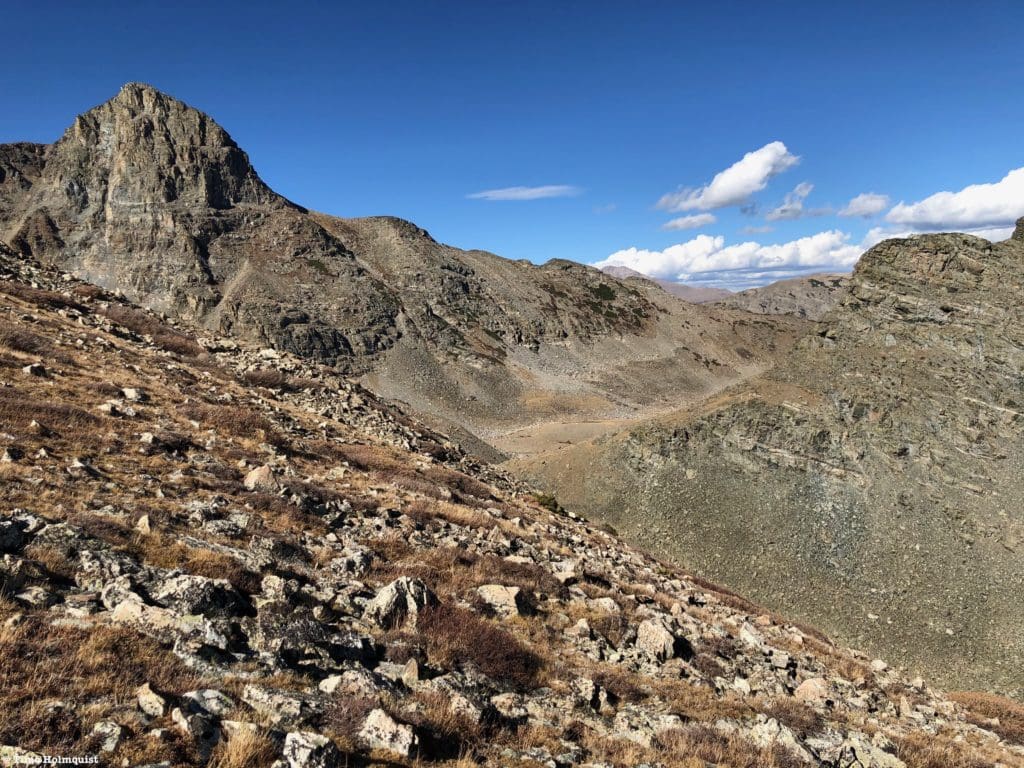
Looking south from a portion of the East Ridge, Coney Island is the small visible summit, and Mt. Audubon is in the clouds behind it.
The Ultimate Offline GPS Hiking & Ski Maps
See why onX Backcountry is the ultimate GPS navigation app for your outdoor pursuits. Try Today for Free. No credit card required.
Directions to Trailhead:
The hardest part about getting into this area of the IPW is just finding the access road. Most of the journey is easy. Find the best way to get to the peak-to-peak highway west of Boulder (CO 72). You can use three main options: Boulder Canyon up to Ned, left-hand canyon through Ward, or up CO 7 from Lyons. Once you hit the peak to peak, you want to head north (unless you came up from CO7, in which case, take a left on peak-to-peak and head south).
Your goal is to get to Beaver Reservoir, a private body of water near a large boy scout camp. If you’re coming from the south, the entrance is BEFORE you get to Peaceful Valley. If you’re coming from the north, go through Peaceful Valley, up the other side, and start watching for County Road 96.
Once you find county road 96, take it west; there should be a sign indicating Tahosa Boy Scout Camp. You’ll pass the camp on your left as you continue up the dirt road. There are a few dispersed camping sites in the area. Eventually, the road turns private, but not before you cross the spillway of the reservoir. Immediately on the other side, you’ll see a larger road shoulder where a handful of cars can park and a rough dirt road leading into the woods. For anyone with regular stock 2WD and AWD vehicles, this is your trailhead. There should be a kiosk and trail signs.
For anyone with a lifted rig, you can take the rough dirt road (507.1) west for a few miles until reaching Cony Flats. Be aware; there are many rock obstacles and a significant water crossing that is likely impassible during spring snowmelt (April-early July). The other option for 4WD vehicles is to head toward Peaceful Valley and look for signs for Camp Dick on the west side of the peak-to-peak. The middle St. Vrain road also gets to Coney Flats but has the same hazards as 507.1. ATVs are effective for the rough road portion.
Time calculated from each location’s downtown and without traffic:
- From Boulder: ~57 minutes
- From Denver: ~1 hour 23 minutes
- From Fort Collins: ~1 hr. 37 minutes
- From Colorado Springs: ~2 hrs. 26 min.
Halfway up the East Ridge of Sawtooth with Longs Peak in the background.
Places to Stay:
Because of its ease of access to most areas in the Front Range, your best bet is to wake up early and make this a day trip. If that’s not an option, there are a few places between Boulder and the trailhead that will support camping endeavors.
- Rainbow Lakes Campground (click here for information). The overall gist here is that the campsite is beautiful, but it’s first come-first served, so no reservations and no fee. The road to get to it is rough (AWD/4WD likely required), and there is zero cell service; plan accordingly. Check out the reviews on the Dyrt to see what recent visitors are saying.
- West Magnolia Campground (click here for information). There are shooting enclosures nearby, so don’t be alarmed if you hear shots fired. The campground is free, secluded and cell service may be spotty. To see recent reviews, visit the Dyrt by clicking here.
- Camping in the Indian Peaks Wilderness: This option gets you closest to Sawtooth but requires a permit, with a finite number issued every year. If you want to secure one in advance, keep checking gov in March of the year in question, they usually open up the permit system then. When filling out the permit, you need to indicate your backcountry zone (map) and details from your party. The rules and regulations regarding the Indian Peaks Wilderness can be found on the USFS website here. If you can snag an opening, the cost is $11.
- If you’d rather stay close but stay inside, check out lodging options in Nederland and Rollinsville.
- Further afield, Boulder, Estes Park, Blackhawk, Lyons, and even Golden can provide some good lodging options. Make sure to adjust your driving expectations, depending on where you end up staying.
- Bonus option: County road 96 has some dispersed camping along its initial stretch. Once you get to the actual lake, all land except the trailhead area is private property. Check out this website for more information on primitive camping in this location. If you find a spot, this is the closest option to the trailhead.
Another thing to keep in mind if you are visiting multiple places in the region is that while Beaver Reservoir is free, Rocky Mountain National Park and Brainard Recreation Area are not. It is incumbent upon each visitor to find out what fees are needed and when.
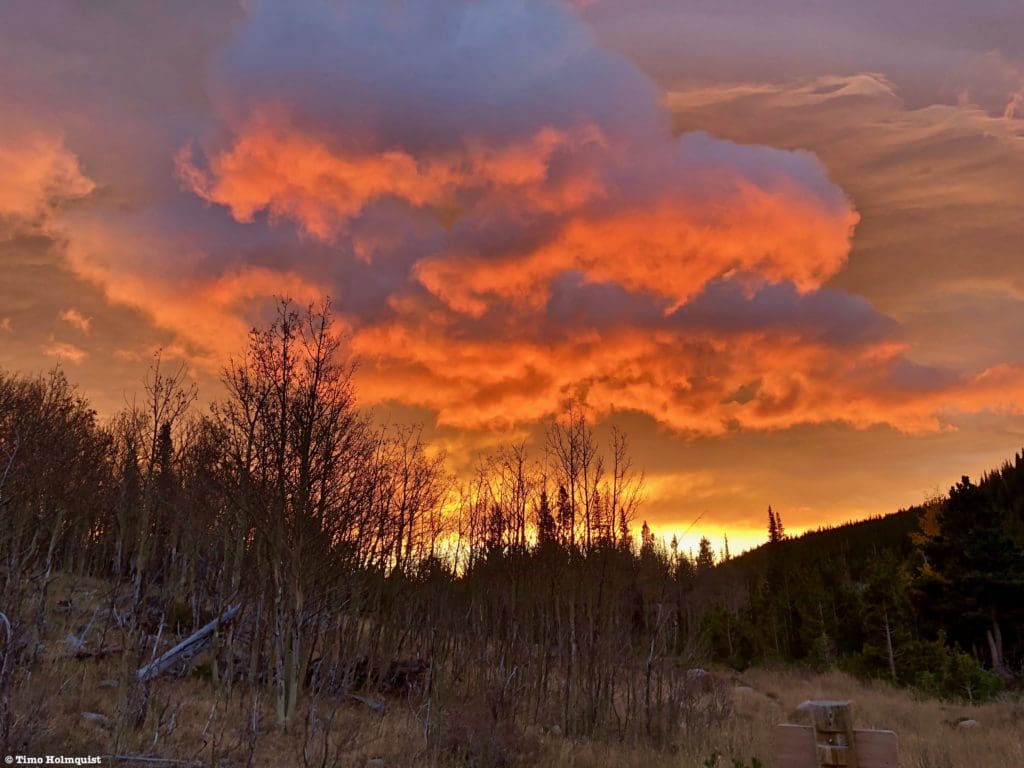
Painted clouds at sunrise from Coney Flats.
Field Notes:
This section will walk you through some additional pointers while reiterating what’s been included in previous sections.
- For camping options, see Places to Stay.
- For directions, see Directions to Trailhead.
- The Beaver Reservoir Trailhead is free to access, but not all regional trailheads are; research your destinations and what fees are required BEFORE showing up.
- The trailhead is tucked away from popular areas but can still fill up quickly in the summer, especially between July-Labor Day; plan accordingly. Additionally, off-road vehicles and ATVs frequent the first part of your route.
- The East Ridge of Sawtooth and traversing both summits of “Algonquin,” is NOT the easiest way to hike them. Sawtooth and “Red Deer” Peak can be easily attained by following an established trail to Buchannan Pass and then walking the ridgelines north and south (Class 2). If you’re here for the scrambling AND the beautiful alpine, consider using this route.
- Practice leave no trace, do not antagonize wildlife, and if you are camping in the wilderness, put all smelly items in a bear canister. CAMPFIRES ARE NOT PERMITTED AT ANY TIME IN THE EASTERN INDIAN PEAKS WILDERNESS. Campgrounds (like West Magnolia and Rainbow) have established fire rings and can support fires as long as there aren’t local fire restrictions in place. Colorado is dry and windy; it’s not the tinder box that California has been, but the wildfire threat is real almost every year. Be proactive and know what you’re doing; causing a wildfire has serious implications (both legal and financial).
- Mountain weather is notoriously fickle; check multiple forecasts multiple times before committing. The national weather service has 7-day forecasts for a number of local towns (Allenspark, Ned, and Peaceful Valley). If those are the only forecasts you’re using, subtract anywhere from 5-10 degrees for summit temps and increase the wind forecast predictions by the same amount in mph. Mountain weather is harder to come by, but you can use forecasts for nearby mountains or use services like opensummit, which requires a subscription to get all the weather details.
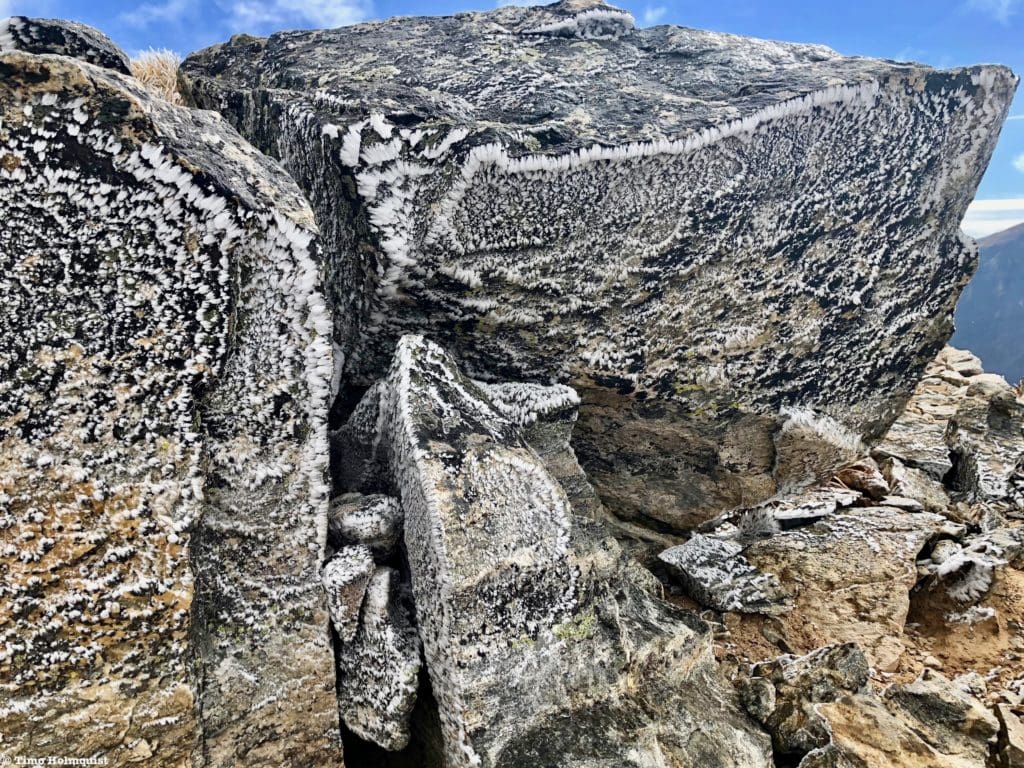
Rime ice on Sawtooth’s summit rocks.
Journal:
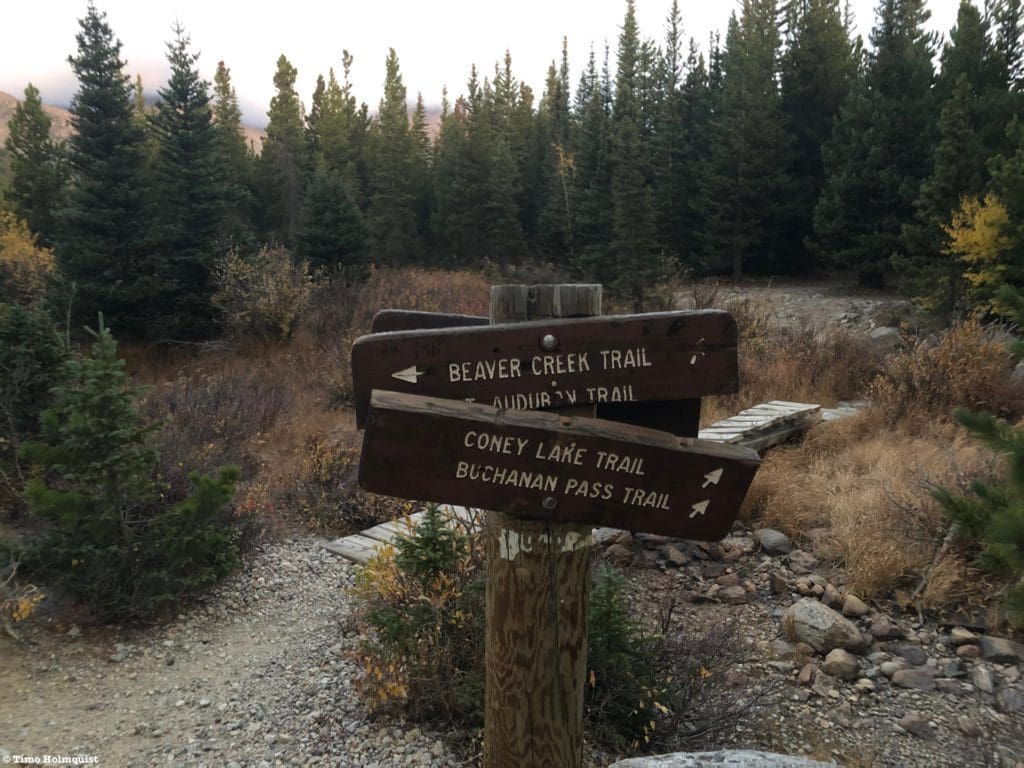
From the Beaver Reservoir trailhead, find forest service road 507.1 and start following it. The road leads to Coney Flats, and you can stay on the main strip the whole way or take a hiker shortcut not far into the journey. The sign for the shortcut is obvious and shaves more than half a mile off the overall journey, so it is worth it.
As long as snow isn’t a huger factor up high, consider starting this hike early and dispensing with the road section before the sun comes up. With the road portion out of the way, you can focus on summitting what you want and descend before any chance of afternoon thundershowers pops up.
After passing the Beaver Creek trail sign and the Indian Peaks Wilderness sign, follow identifiable single-track west through a series of fields and aspen.
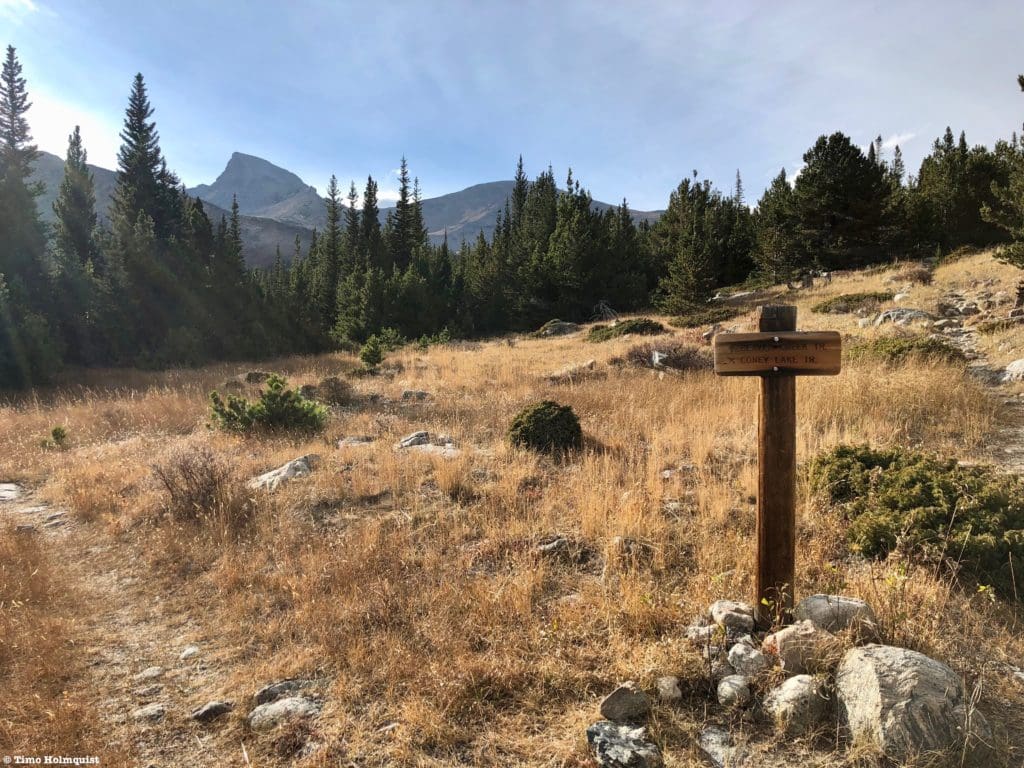
Trail sign at Coney Flats.
You’ll soon pass the junction for Coney Lake Trail, continue straight on the Beaver Creek trail. There is a loop option that will have you coming back on the Cony Lake trail if you choose.
Coney Lake Trail sign, Sawtooth is the mountain in the middle of the picture, its summit covered by low clouds.
If you started at Beaver Reservoir, the Coney Lake trail junction is roughly 3.3 miles into your journey. Elevation gain so far has been trivial and will remain so until you start ascending into the alpine. If your goal is to ascend Sawtooth by the easiest route, simply stay on the trail to Buchannan Pass.
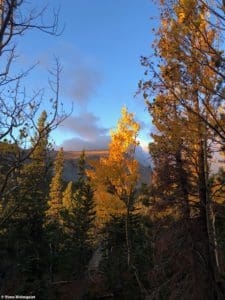
Bright aspen on a cold October morning.
If you’re trying to make the Sawtooth summit a little spicier, start looking for a way to break left of the main trail after passing the trail junction for Red Deere Lake.
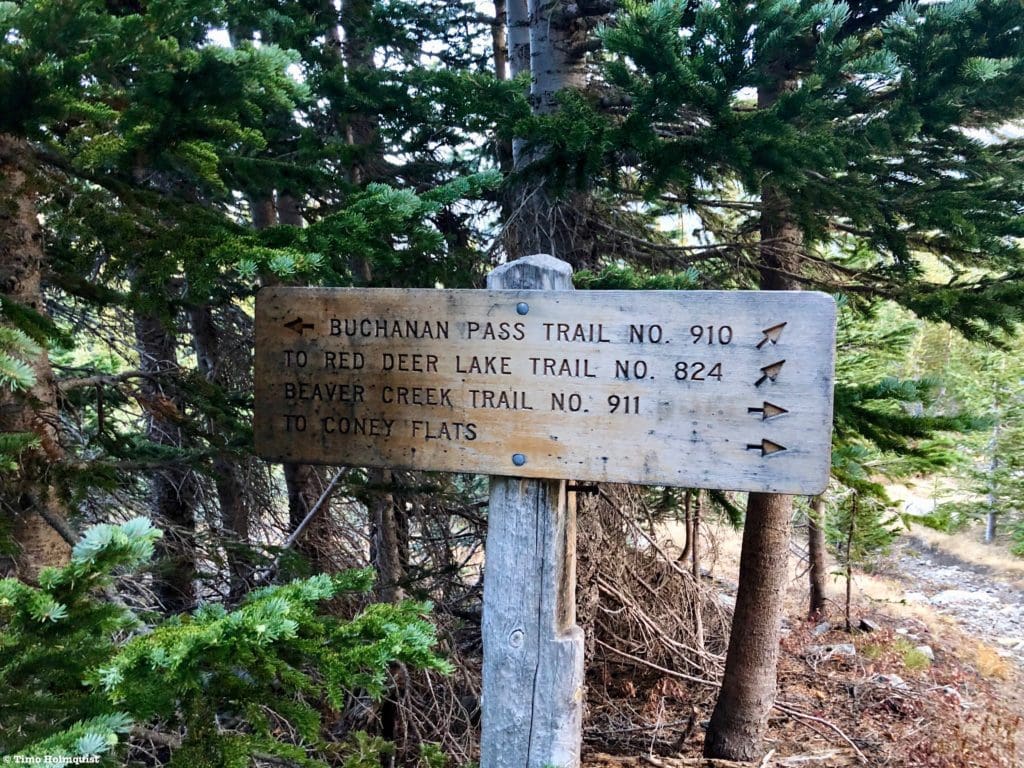
Red Deer Lake Trail Junction.
The East Ridge isn’t discreet; it forms the only obvious alternative way to climb Sawtooth from the east. Between thinning lines of trees, you’ll see Sawtooth’s summit and a recessed bowl to its right, which leads to Buchannan Pass. The East Ridge is simply the southern edge of the bowl, and it leads right up to the summit.
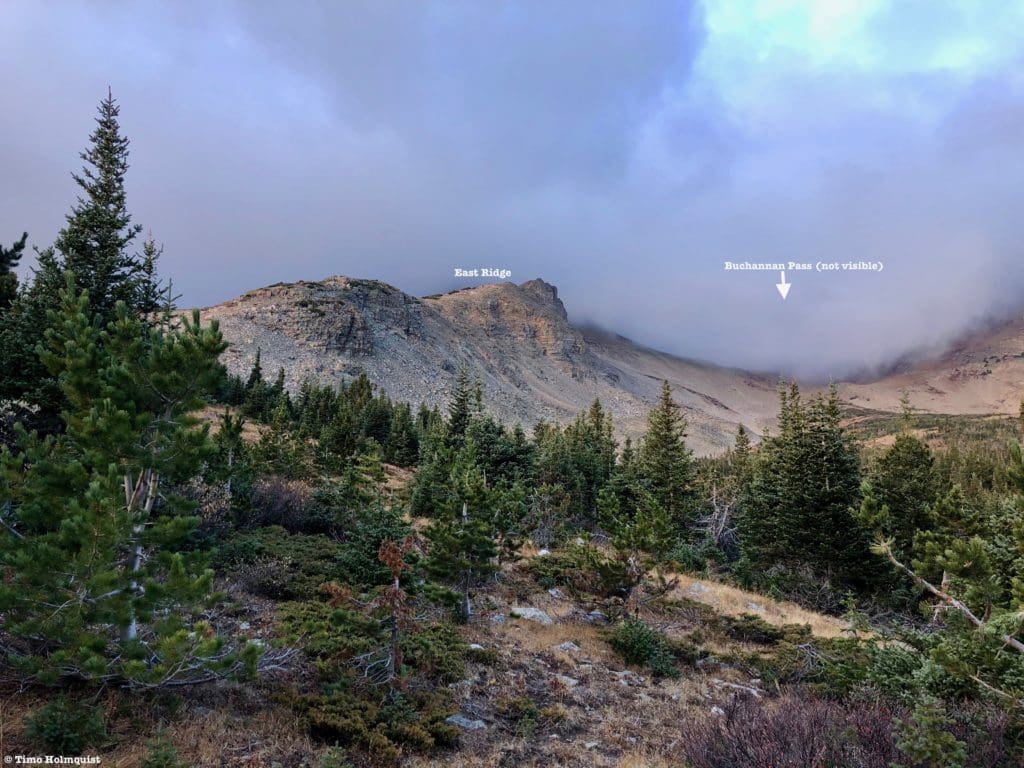
Photo of East Ridge
Once you break away from the trail, you’re in the backcountry, but unless you’re in a whiteout or dense fog, orientation is not particularly difficult. Break left and rise up a gentle roll of land until you break treeline. Then, sight the start of the east ridge and make your way to it. Once you’re on the spine of the ridge, there’s really only one way to go.
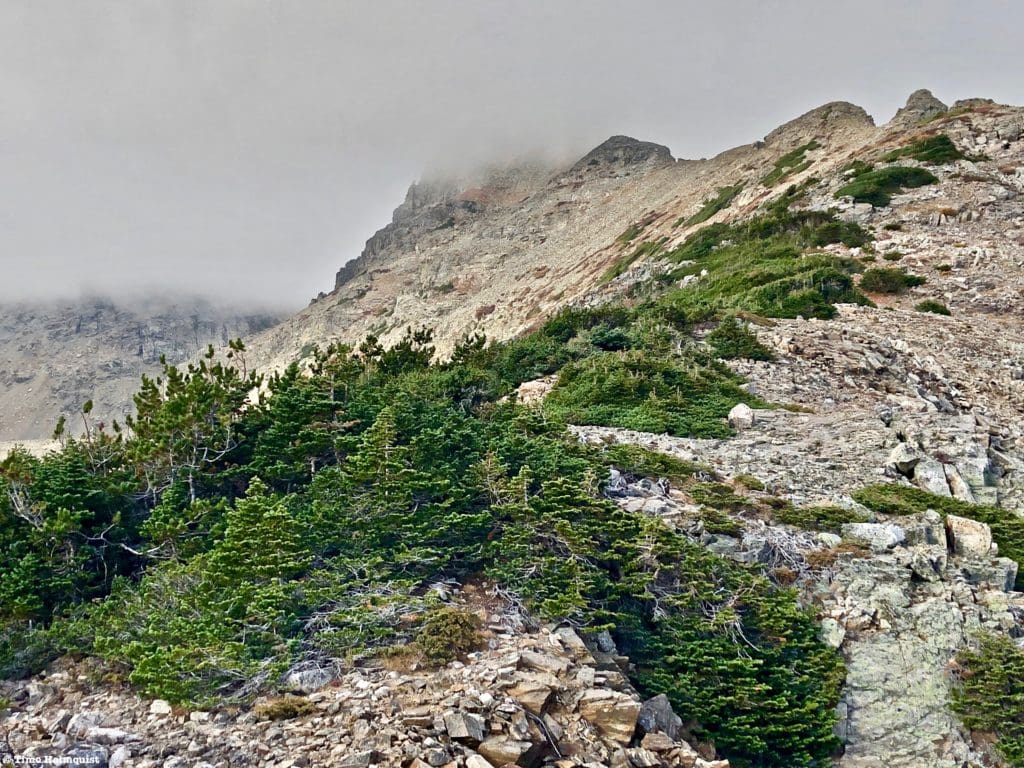
Starting up the ridge
Once you’re on the ridge, continue ascending for a while amongst broken talus and a few Class 2-2+ sections. The ridge itself has a few high points along its route that make for fun optional scrambling. The best and most difficult scramble is on the first of a series of knobs you can see from lower down.
The closest knob to the right has fun scrambling.
Take a second to look north when you can; if the weather is good, you’ll be able to see the Buchannan Pass trail winding up the terrain below you and St. Vrain Mountain. To read a review of the St. Vrain hike, click here.
The view northeast from the East Ridge.
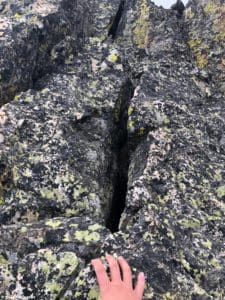
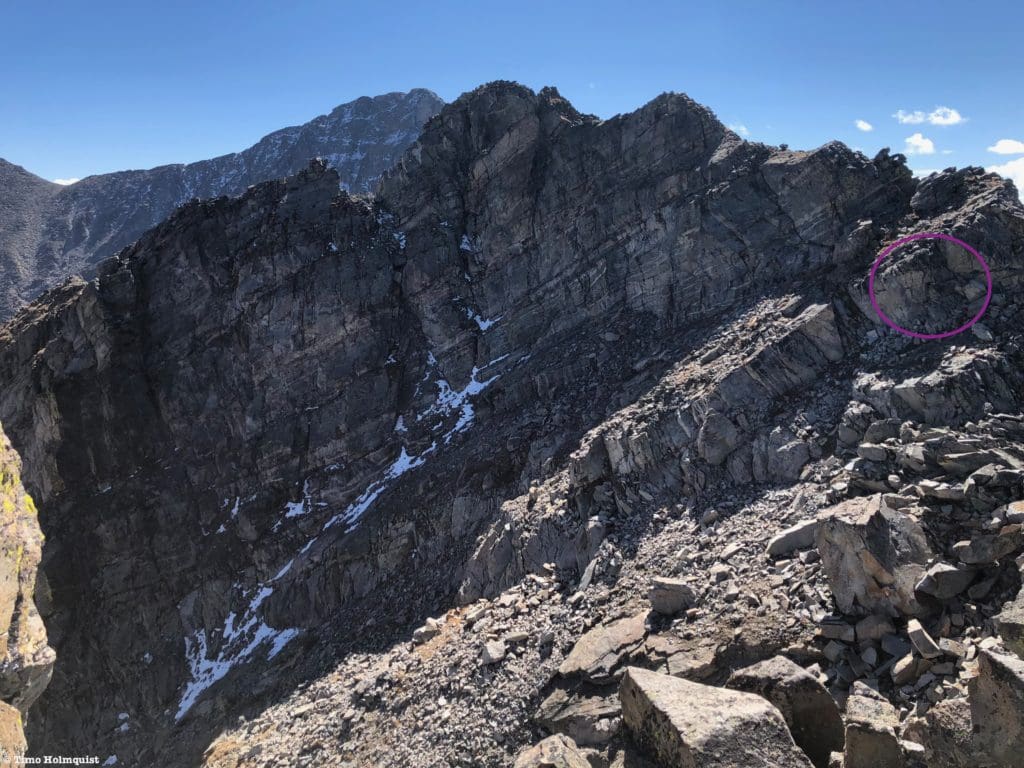
As you approach the first knob, you’ll notice that there are quite a few ways around it to the south side. You can use any way you find. The north side is steep and cliffy, so not a lot there. If you’re pining to get some scrambling in, there’s a ridge direct Class 4 section with minimal downclimbing (brief Class 3).
The first knob as you approach.
Similar to the crux wall on Neva (you can read about that report here), the Class 4 section is short and features plenty of grippy rock and handholds. The path is fairly straightforward and follows the ridge crest with a few small variations. There are other optional lines to make it harder or easier. The simplest method is to find a diagonal dihedral, climb it, and then follow a Class 3 vein up to the top.
Looking up at the brief, circled Class 4 section.
Looking down from above the Class 4 section.
The last bit of Class 3 scrambling before the top.
Even though this scramble is optional, it doesn’t have a demanding downclimb, so if you’ve already committed to the East Ridge, give this bit a try. With an easy way off the backside and grippy rock, this is one of those perfect activities within an activity that will generate more confidence in the Class 3-4 realm.

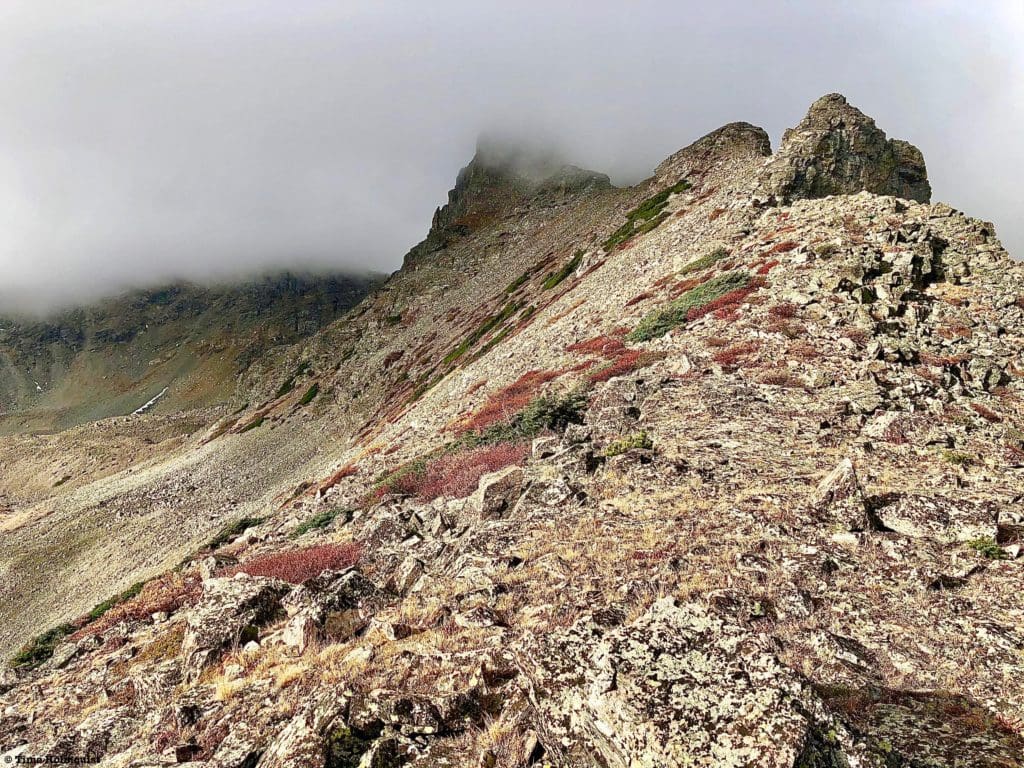
The rest of the ridge from the first knob.
When you’re ready, continue by descending to a shallow col between you and the next knob. As with the first knob, you can traverse around, but if you stick to the ridge crest, there are a few small Class 3 moves available. Continuing on, you’ll eventually ascend a total of four knobs before the ridge rises into the summit block.
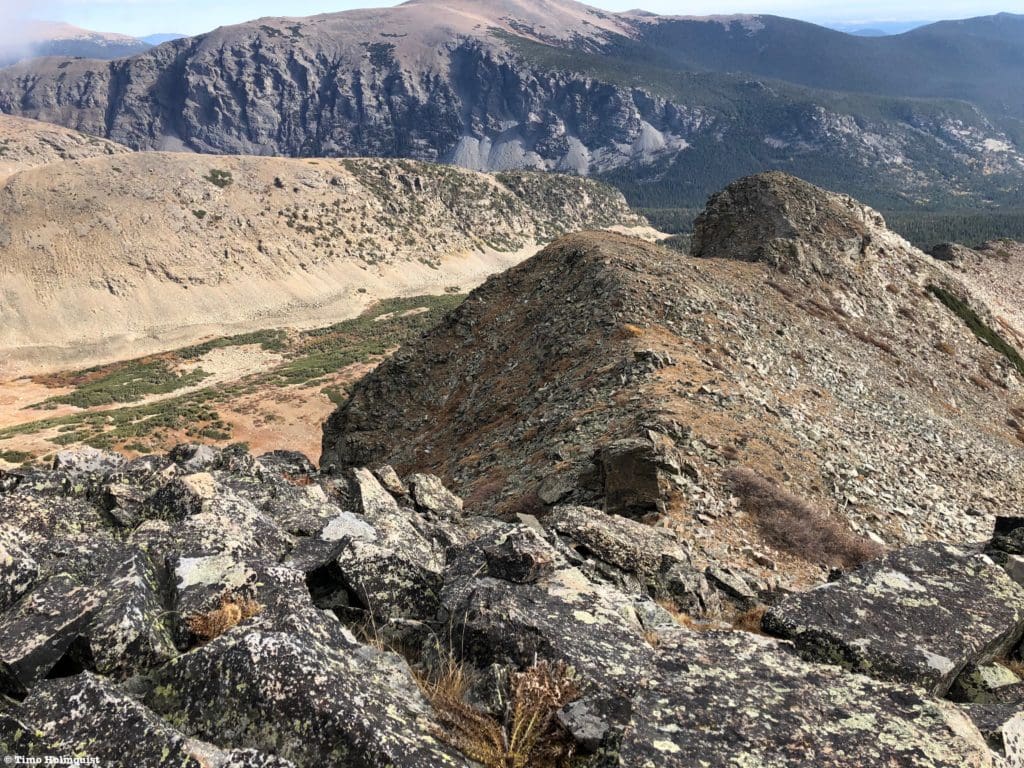
Looking back at the ridge from Knob 4, Knob 1 is barely visible.
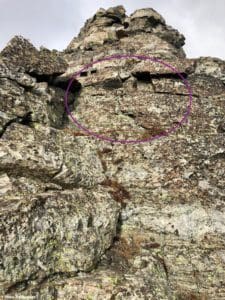
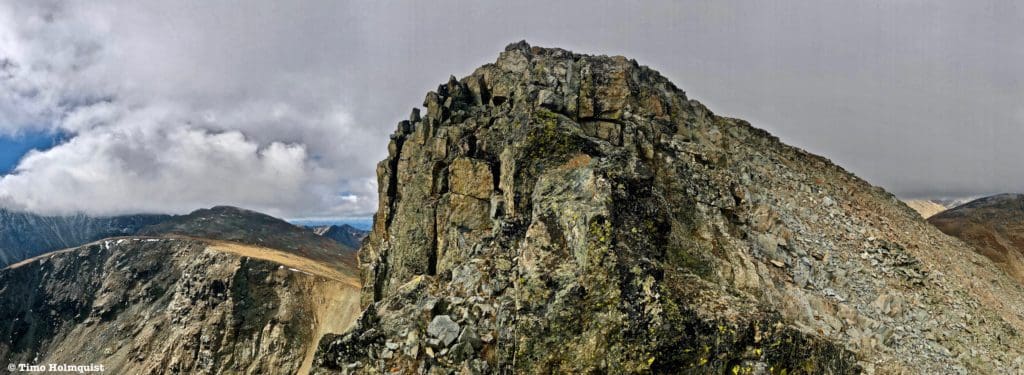
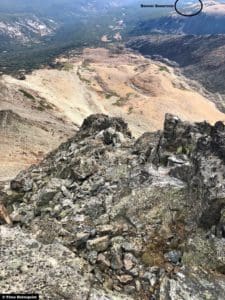
The standard ascent now finds a broad gully just west of the summit block and snakes its way up it (the blue arrows in the following picture). If you want to get your scrambling money’s worth, head to the left of the highest summit block and look for darker rock on the ridgeline (multicolor route).
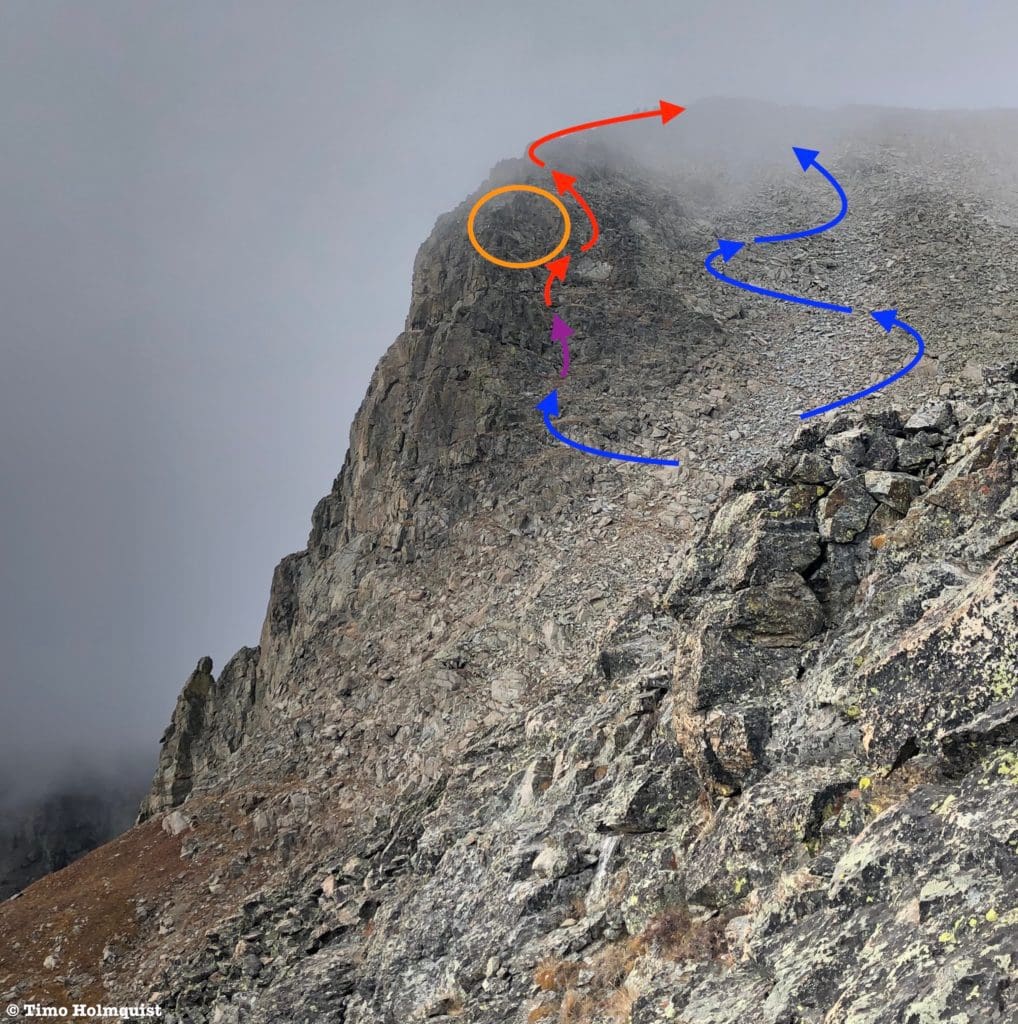
Options as you approach the summit block. The orange circle represents a class 5 section. The line featuring only blue arrows is an easier option and will keep all additional scrambling in the Class2+/3 range.
Run the ridge until it dead-ends into the summit block. From there, you should be able to see how to take the easier route to the top. You should also be able to see the scrambling options in front of you. To get to them, maintain your rough elevation and cross the gully with the lighter colored rock.
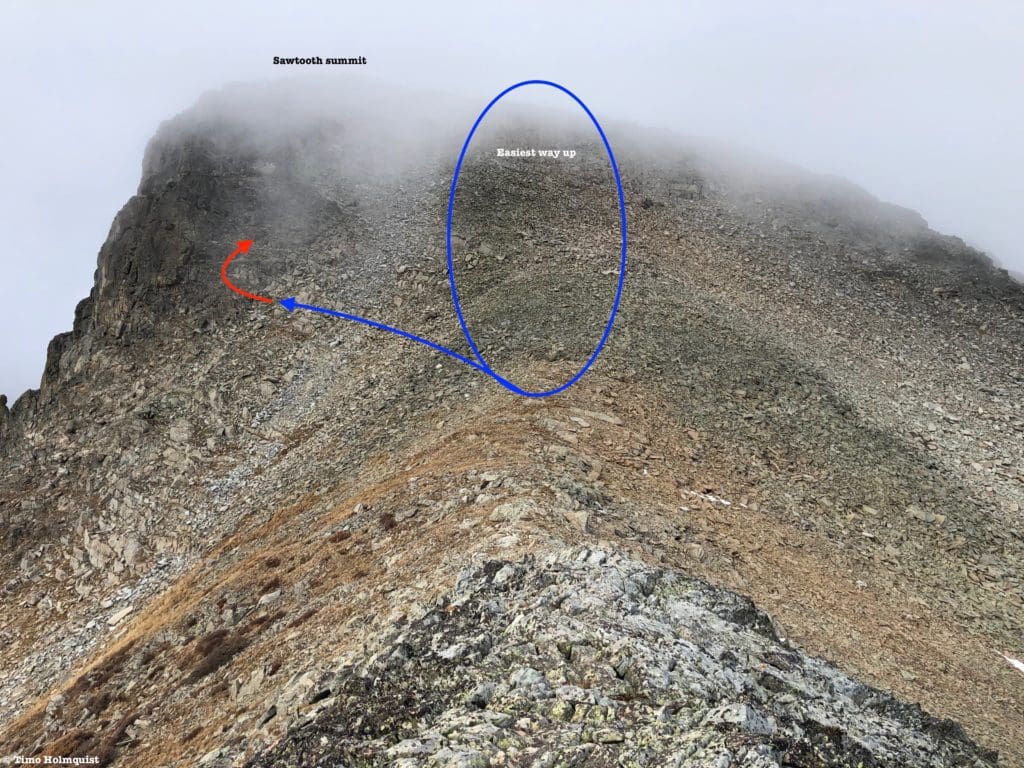
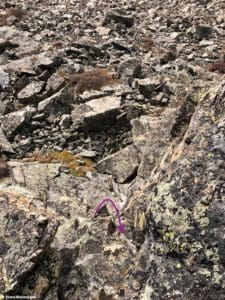
Where to cross the gully.
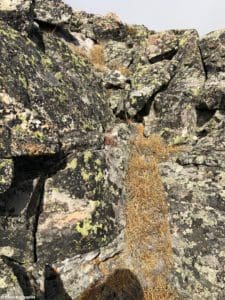
On the other side, you’ll be in a section dominated by darker rock, and a few alpine grass benches tucked in between them. From here, make a call. Staying harder left means harder scrambling; the scrambling goes down in difficulty the further right you stray.
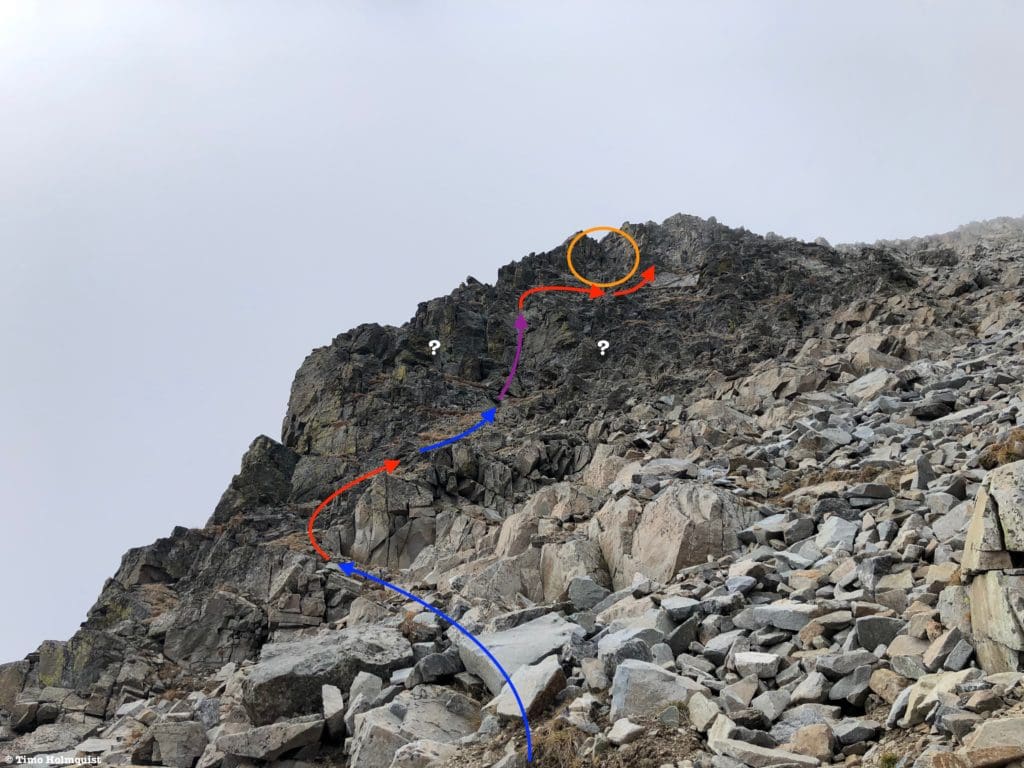
Crossing the gully and looking at the line I ultimately chose. The orange circle is a Class 5 section; the purple is Class 4, Red is Class 3, and Blue is Class 2. The question marks are sections that I did not personally try.
Unless you have a particularly foggy and wet day like I did, the rock will have great hand and footholds. There are grassy benches between some of the rocks and if they’re wet, go slow to avoid slipping. What’s nice about this part is that there are tons of other options available for exploration. If you get frustrated by a certain part, take a breath and hunt for alternatives, they are there.
Perspective of a grippy Class 4 section I found.
The goal is to scramble up to and then around the Class 5 section before scrambling up to the crest of the ridge. The view to the top should look something like this from the ridge crest.
On the ridgeline with the summit in sight.
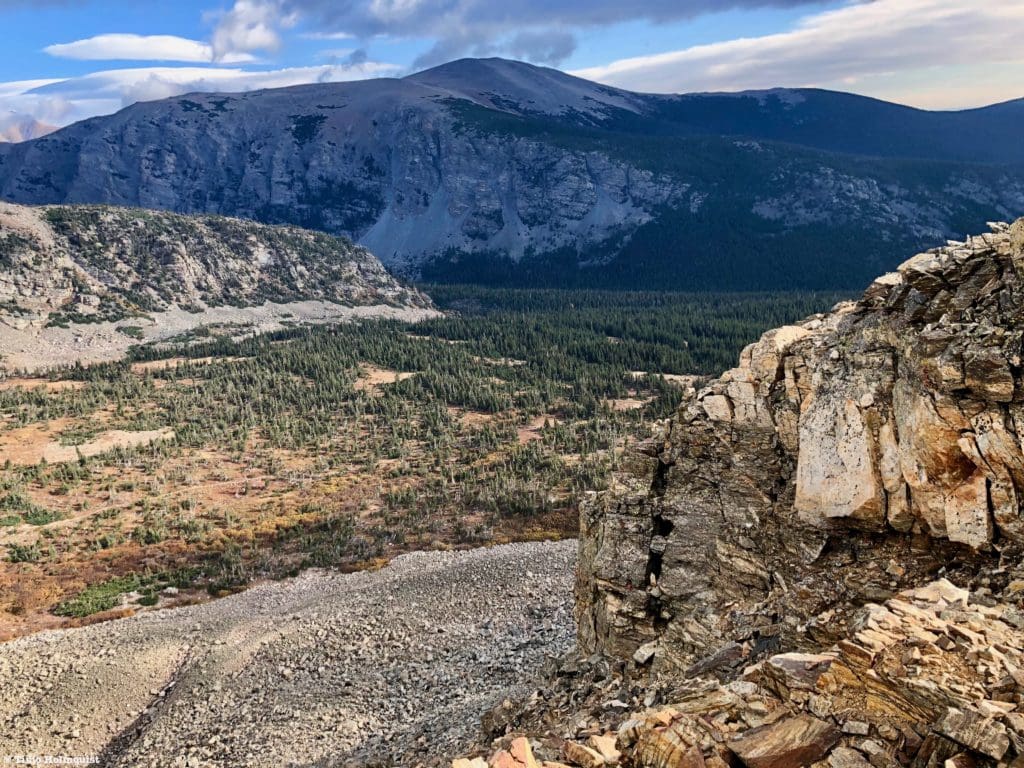
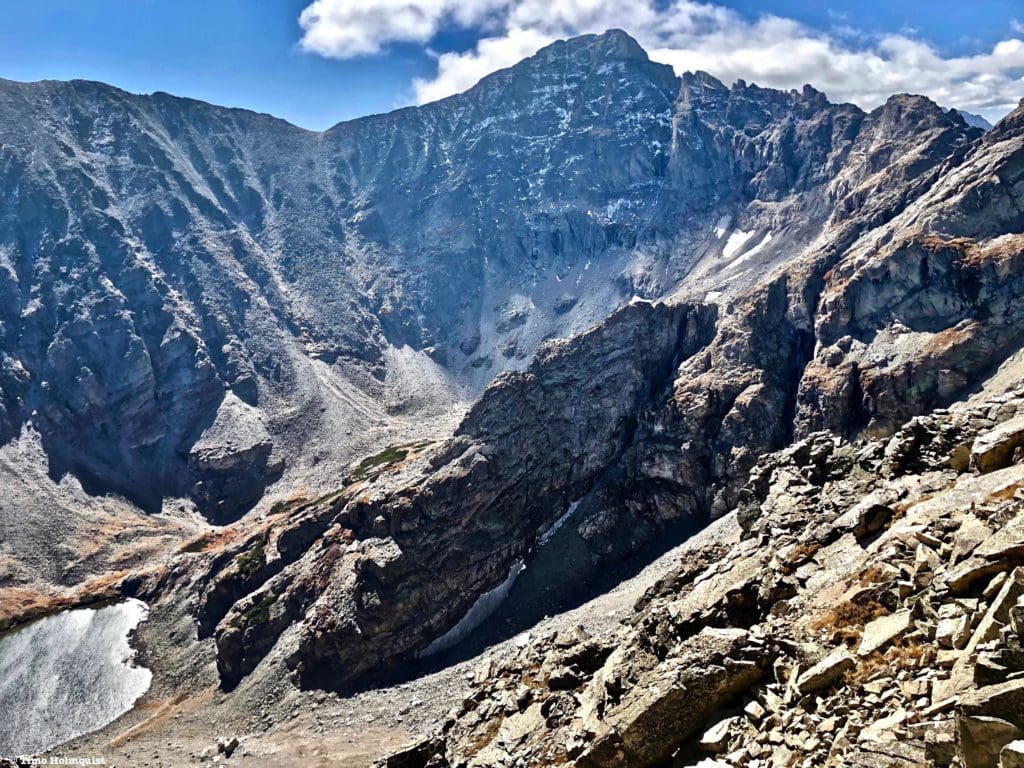
Once you make the ridge crest, enjoy the spindly ridge for a few scramble-filled moments. The cliffs that give Sawtooth its dramatic shape are to your left and quite precipitous. You can also glimpse Beaver Reservoir down and away to the east.
Where you started.
Before you know it, you’ll be on top of Sawtooth Mt.
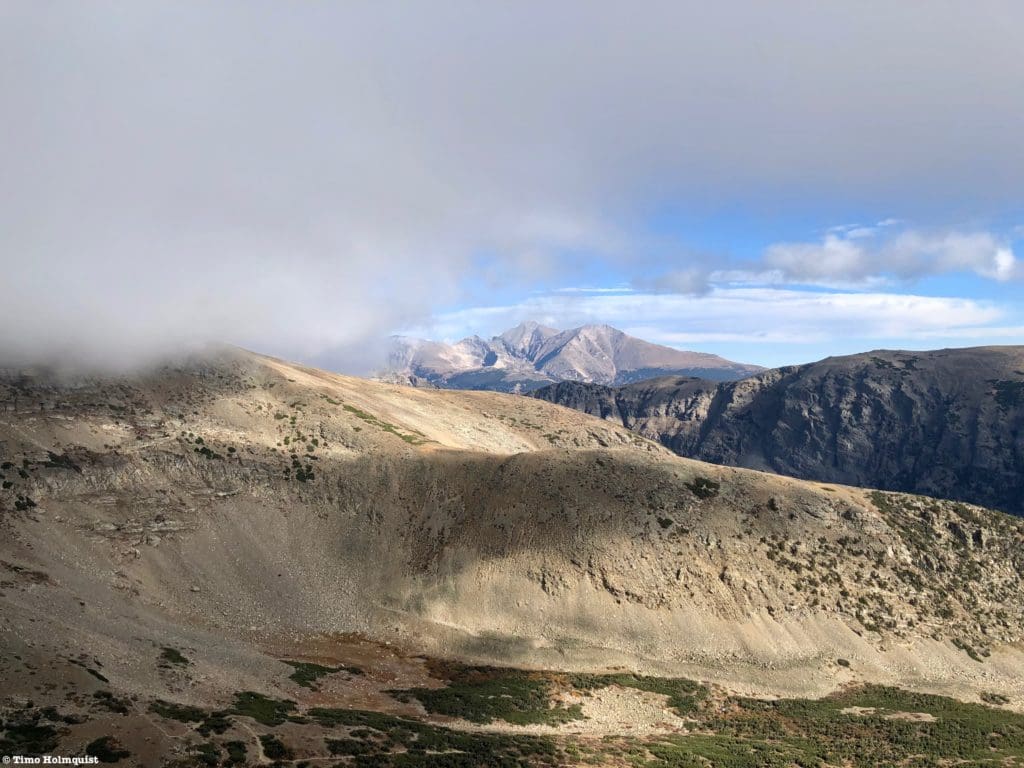
View of Longs Peak to the NE from the summit.
There is a large summit register and a USGS survey marker to find if you’re interested in either; otherwise, enjoy the views!
Summit views west into deeper parts of the IPW.
If Sawtooth was your objective, make your way west from the summit block, follow the divide north, and run into the Buchannan Pass trail. Once you take a right onto the trail, just follow it back to Coney Flats.
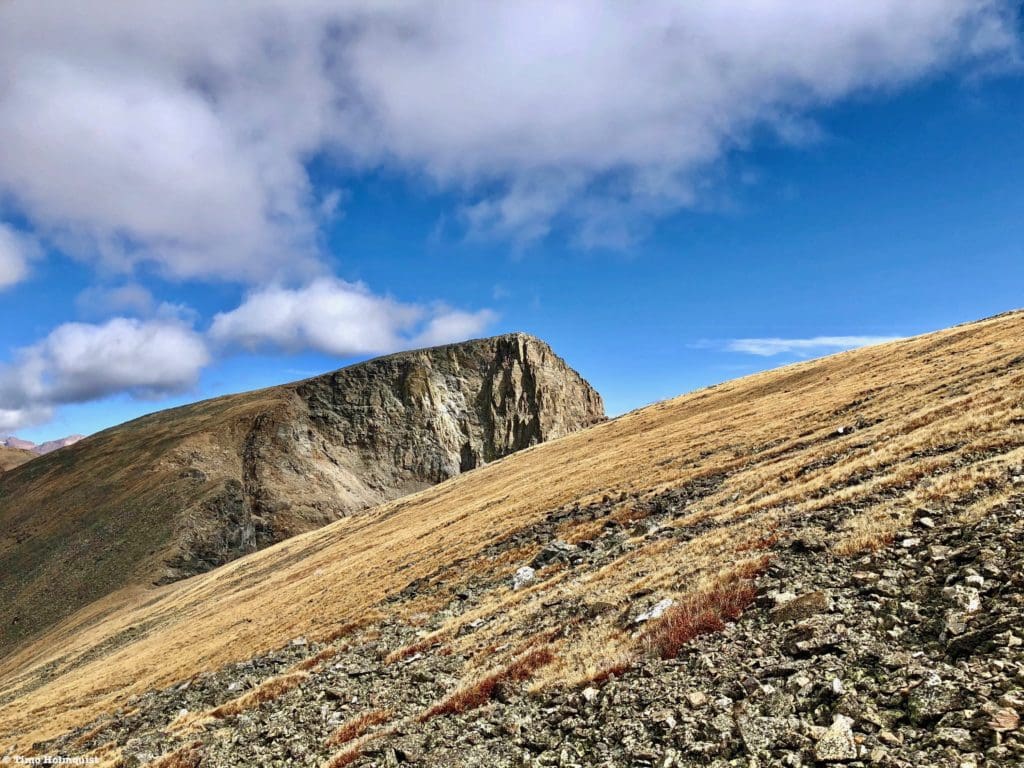
If you’re interested in some more alpine exploration, turn south and spot a gentle, undulating alpine slope that eventually rises up to a larger peak. That’s “Algonquin,” it is not the sharp pinnacle beyond it, which is Paiute Peak.
Looking south to your next optional objective.
The journey to “Algonquin” is not difficult and features some stunning alpine walking. The winds can be vicious up here, so if it’s gusting 30+ mph, considering coming back another day, there isn’t a lot to hide behind.
Looking back to the southern cliffs of Sawtooth as you make your way to “Algonquin.”
There is a small high point between sawtooth and “Algonquin,” keep it in mind because it can provide an alternate descent path to Coney Lake. You can always backtrack to Buchannan pass and take the trail down as well. If the weather is good, enjoy this long, but not particularly difficult, stretch of healthy alpine.
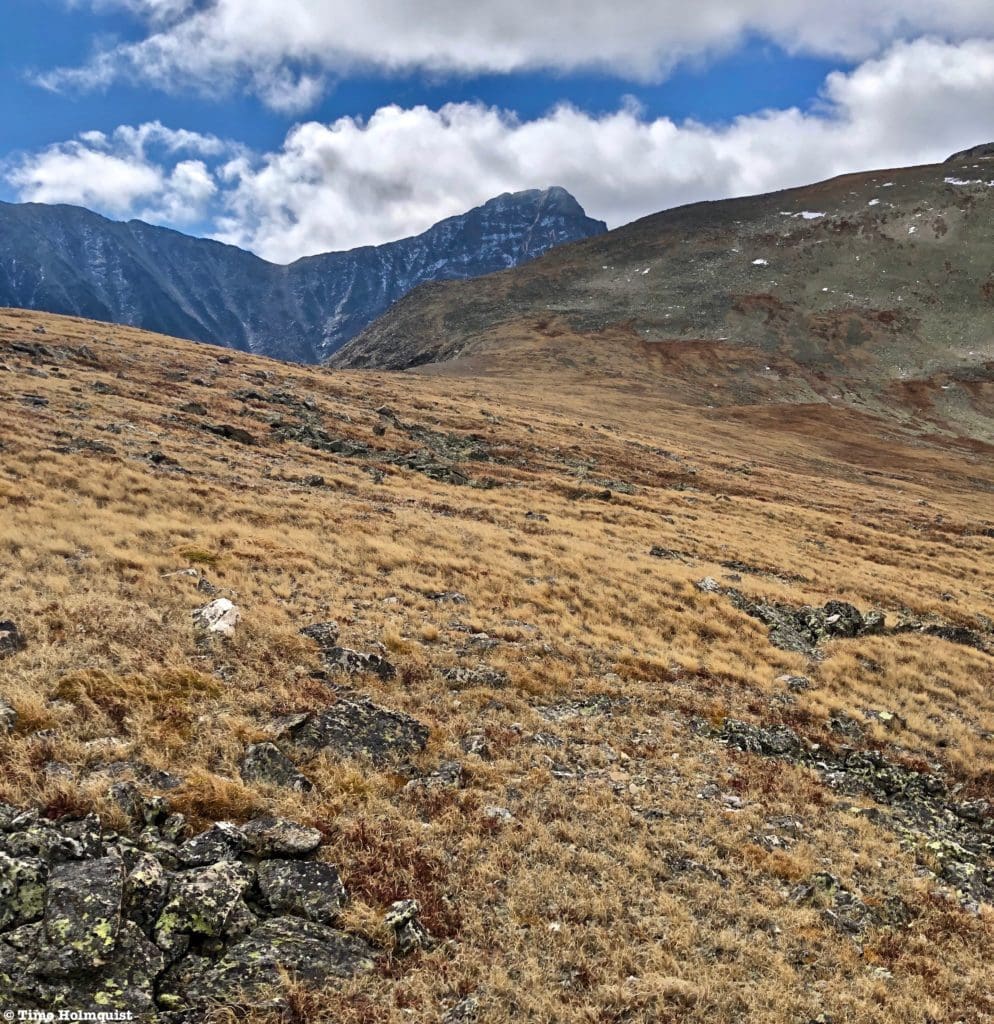
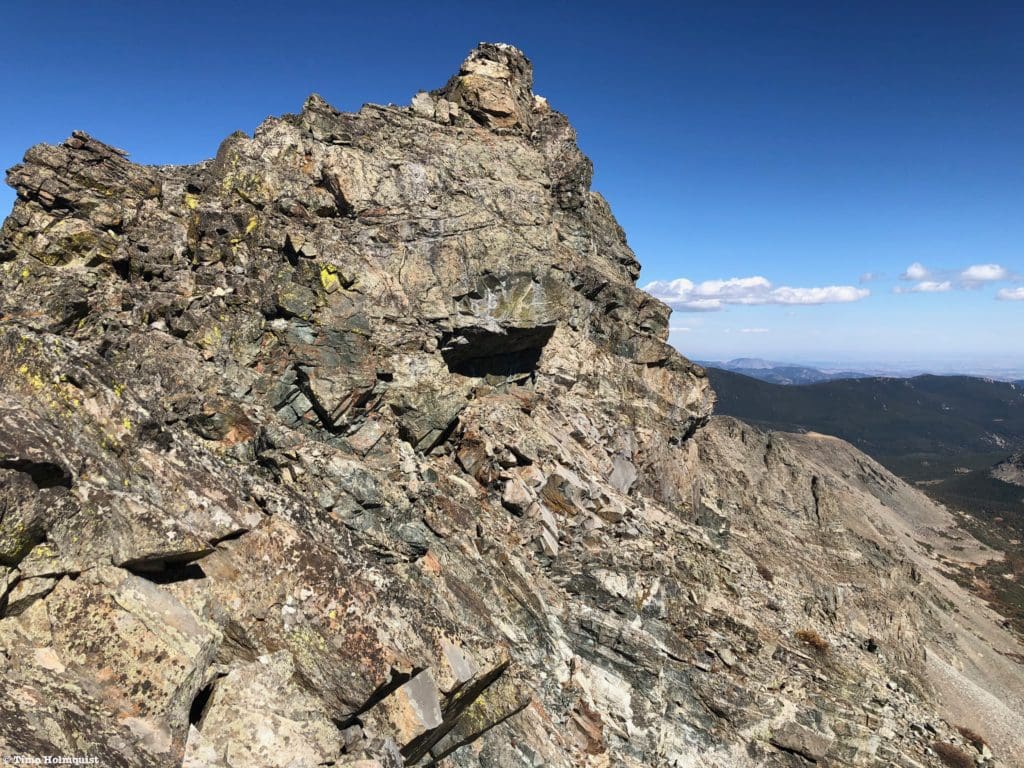
Paiute Pk. on the horizon as you approach the final uphill to “Algonquin.”
The final stretch up to Algonquin isn’t difficult but provides fantastic views of the craggy north face of Paiute. Make your way to the ridgeline left of the summit.
The view of Paiute from the ridgeline; Upper Coney Lake is visible in the lower left-hand corner.
The gentle roll of “Algonquin” isn’t dramatic, but the summit view to the south sure is. Make sure to take a moment and enjoy this beautiful and unique perspective of the western IPW.
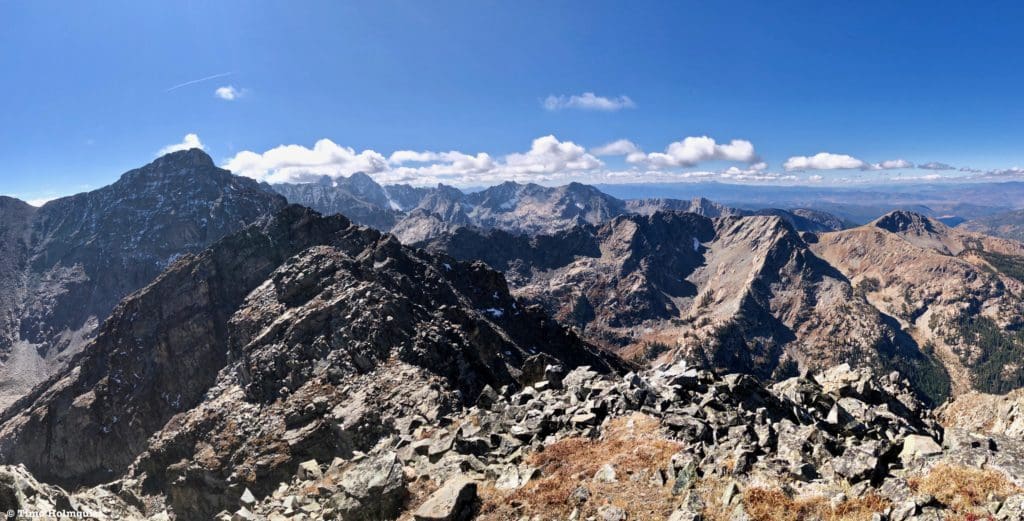
The wilder parts of the IPW.
Not many make it to this summit because the more immediate beauty of Brainard Recreation Area and Rocky Mountain National Park usually take all the attention. Even less attempt to scramble over to “South Algonquin” because it’s a Class 3-4 scramble on top of everything you just did, and it’s also shorter than the actual summit. However, since this is a scramble review, let’s dive in anyway.
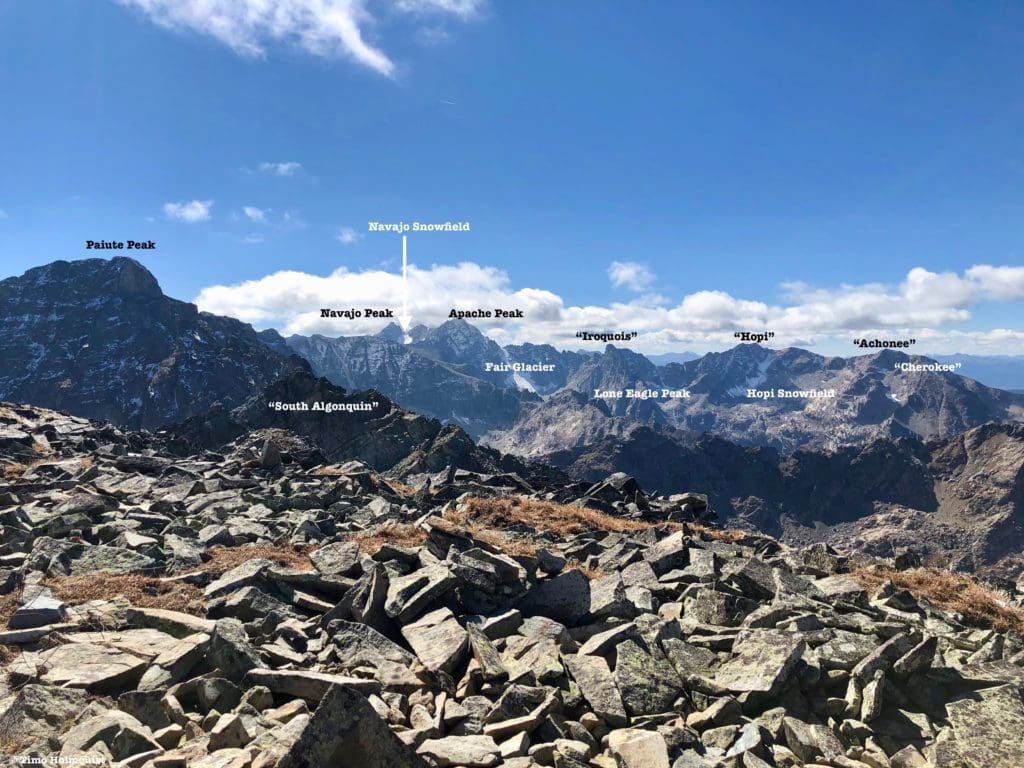
Labeled view south from “Algonquin.”
Right after the summit, the grassy, pleasant roll of land will break into a craggy ridge. Make your way down from the summit to a shallow col, employing some Class 2+ moves along the way. On the other side, you’ll have a short section of Class 3 as you regain the ridge to a false summit.
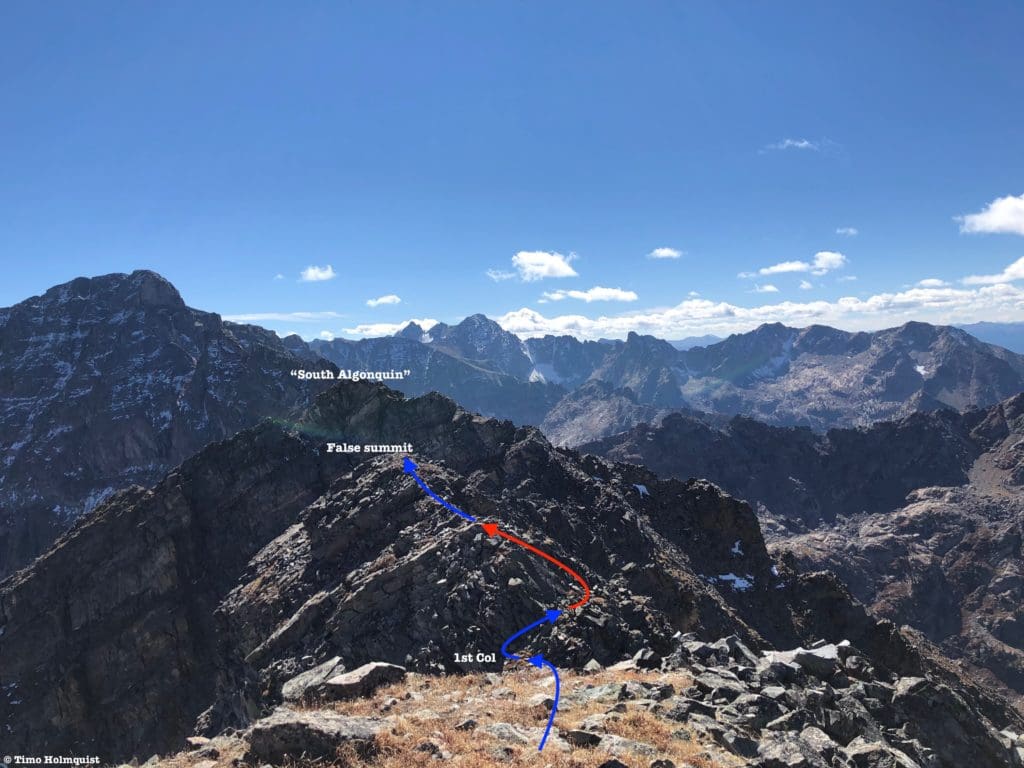
First part of the scramble.
The hardest part of the scramble is sticking to the ridgeline as you descend from the false summit to the final col before “South Algonquin’s” summit. Moving along the nose of the ridge will give you a nice Class 4 crux near the next col. You can keep the difficulty at Class 3 by skirting to the right (or west) side of the ridge.

Looking at the ridgeline descent from just below the summit of “South Algonquin.”
Once you make it down to the following col, the serrated ridge of your target comes into full view. The easiest way to ascend is to stay right of the ridgeline, employing a few class 3 moves along the way. You can also start left, find a crack in the first diagonal wall, ascend, and then follow the rest of the ridge. The most fun route, however, is to stick close to the ridge crest where Class 3+ sections and a small Class 4 section await.
Almost there! Optional Class 4 circled.
Once you start clambering up, only a few minutes separate you from the summit. While “South Algonquin” doesn’t have enough prominence to be its own summit and is smaller than the regular summit, I’d argue the view is as good, if not better than the regular summit.
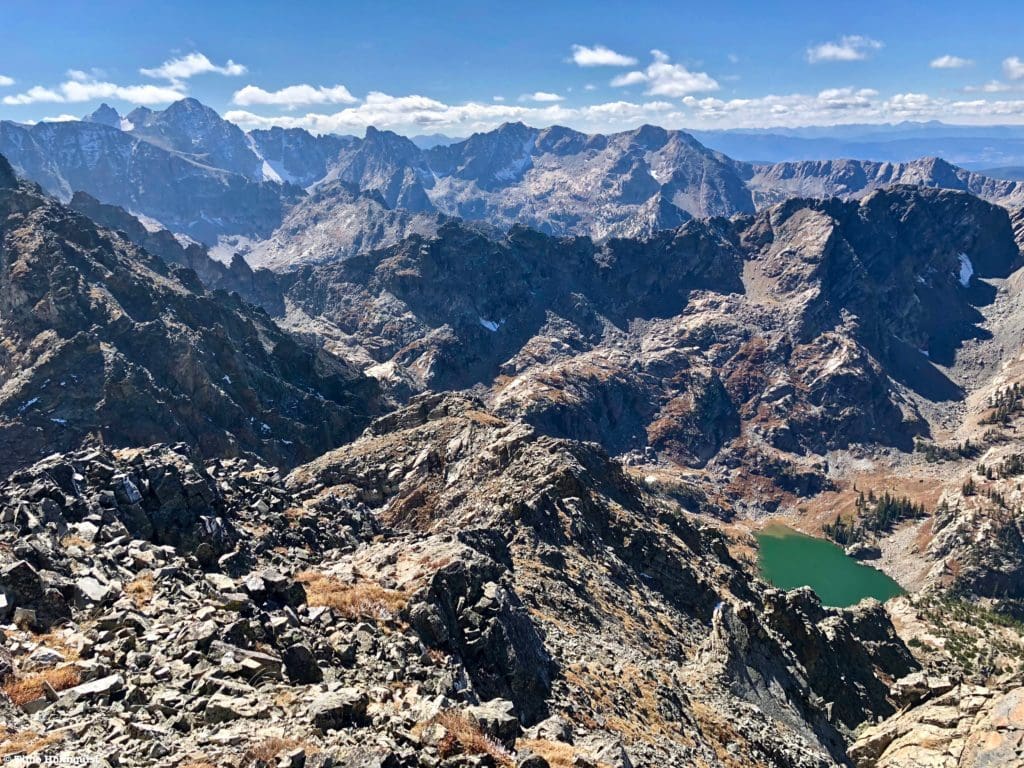
A deeper view into the craggy beauty of the Western IPW, the body of water shown is Paiute Lake.
When you’re ready, head briefly west along the spine of the ridge until you get back down to the col.
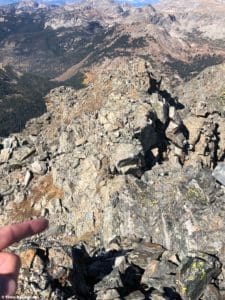
General path from the summit block, enjoy the grippy rock!
At the col, reclimb the sharp ridge above you, either scrambling up the Class 4 section or skirting to the left side of the ridge when able.
Profile of the ridge climb back to the false summit.
Once above this section, you should be standing on the false summit between the two “Algonquins.” A smattering of further Class 3 moves await, but you can reduce the difficulty by finding clever paths through the rocks until re-ascending to the true summit of “Algonquin”.
From here, you have two options, with both requiring you to backtrack towards Sawtooth. Between “Algonquin” and Sawtooth is an unnamed roll of ridge. You can perform an off-trail descent of this roll to the east. Depending on how you descend, you’ll either end up right in-front of the smaller Coney Island, or, if you take a more eastern line, in the basin near Coney Lake. There are some Class 3 portions here but many options exist; take your time and scout the easiest path before committing.
Looking back at Sawtooth from the off-trail descent.
I ended up descending to Coney Lake, which went fairly well with some additional Class 3 sections (take your time and scout solutions before committing) and a THICK bit of vegetation near the lake’s shoreline. After bashing through willows, I managed to find the Coney Lake trail and followed it all the way back to Coney Flats.

Looking back at some features of your hike from the shores of Coney Lake.
Even though it is longer, the easier method by far is to retrace the ridgeline from “Algonquin” all the way to Sawtooth, continue north beyond the summit and hook up with the Buchannan Pass trail.
Sawtooth from the junction of Buchannan Pass Trail and Coney Flats Trail.
In either scenario, once you arrive at Coney Flats, walk the dirt road back to your car and call it a day!
Final Thoughts:
If you’re checking off best-of-lists for the northern Front Range, this area probably won’t crop up on your radar. There are hundreds more famous routes to explore between the IPW, Rocky Mountain National Park, James Peak Wilderness, and everything in between. However, if you’ve been to all the regional highlights and are looking to explore a little deeper, the terrain around Sawtooth provides great scrambling, alpine exploration, summits a-plenty, and notable backcountry ski lines. Happy trails!
Terms of Use: As with each guide published on SKYBLUEOVERLAND.com, should you choose to this route, do so at your own risk. Prior to setting out check current local weather, conditions, and land/road closures. While taking a trail, obey all public and private land use restrictions and rules, carry proper safety and navigational equipment, and of course, follow the #leavenotrace guidelines. The information found herein is simply a planning resource to be used as a point of inspiration in conjunction with your own due-diligence. In spite of the fact that this route, associated GPS track (GPX and maps), and all route guidelines were prepared under diligent research by the specified contributor and/or contributors, the accuracy of such and judgement of the author is not guaranteed. SKYBLUE OVERLAND LLC, its partners, associates, and contributors are in no way liable for personal injury, damage to personal property, or any other such situation that might happen to individuals following this route.


