


High Point:
12,820 feet

Total Ascent:
~3,250 feet

Difficulty:
Difficult

Distance:
~9 miles roundtrip

Waypoints:
40.08262, -105.53981

Route Type:
Lollipop Loop
Mount Neva is a classic Class 4 scramble in Colorado’s Indian Peaks Wilderness. It doesn’t draw the 13er & 14er crowds because its elevation is under 13,000 feet. An undulating scramble and a 30 ft Class 4 wall are required to reach the summit. The descent is off-trail though a long, heavily vegetated alpine marshy area.
Overview:
The iconic and classic Mount Neva scramble is a tried and true Class 4 test piece for the Indian Peaks Wilderness. Sharing the trailhead with other popular destinations like North and South Arapaho Peaks, Diamond Lakes, and Lake Dorothy, Neva is generally overlooked by the hiking generalist. There are a few reasons for this: its elevation is under 13,000 feet, so it doesn’t draw the 13er & 14er crowds, the most expedient way up it requires an undulating scramble and a 30 ft. Class 4 wall, and unless you reverse your ascent route, the descent is off-trail through a long and heavily vegetated alpine marshy area. However, if you have experience scrambling on similar terrain like Navajo Peak, McHenrys Peak, or Lead Mountains East Ridge, Neva provides the same experience without a parking lot fee to access. Naturally, this makes the trailhead insanely popular, but with careful planning, a quick half-day ascent of Neva can rapidly increase your outlook on life.
- Neva North Ridge: Class 4
- Neva South Ridge (descent): Class 2+ w/ significant off-trail navigation
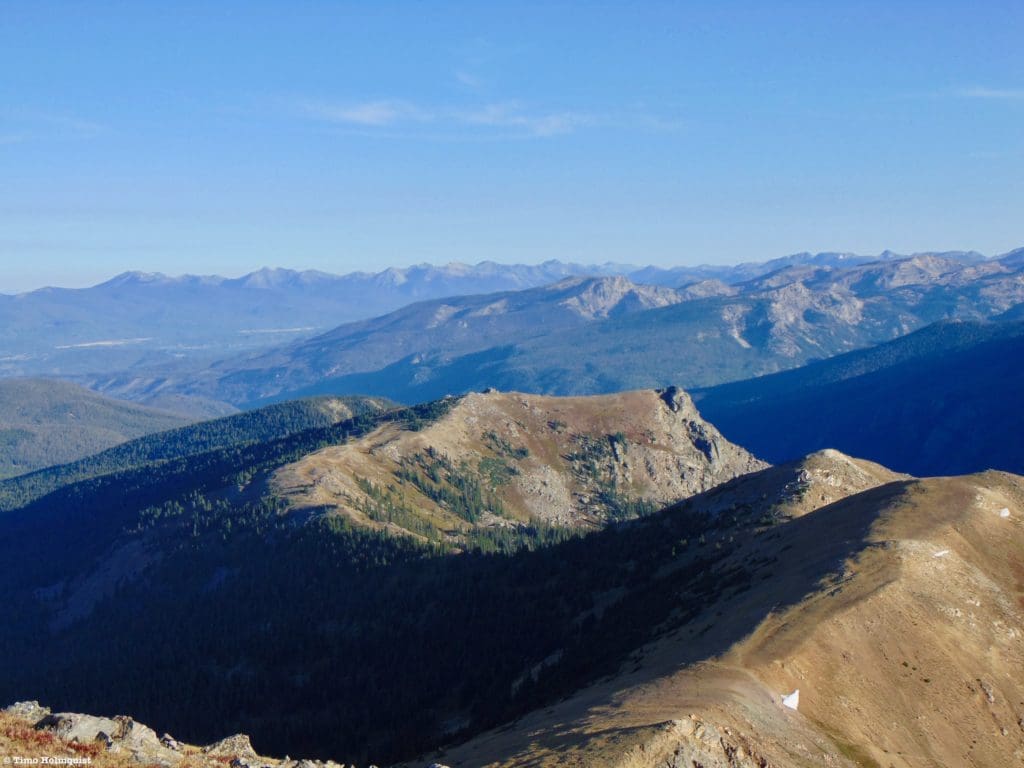
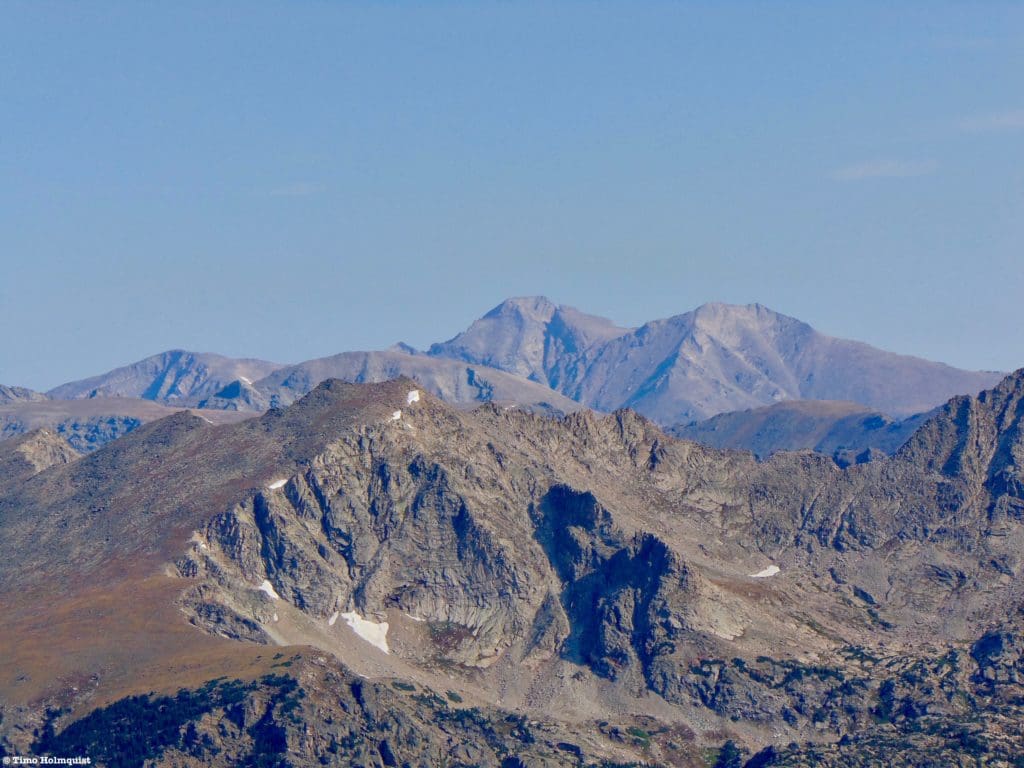
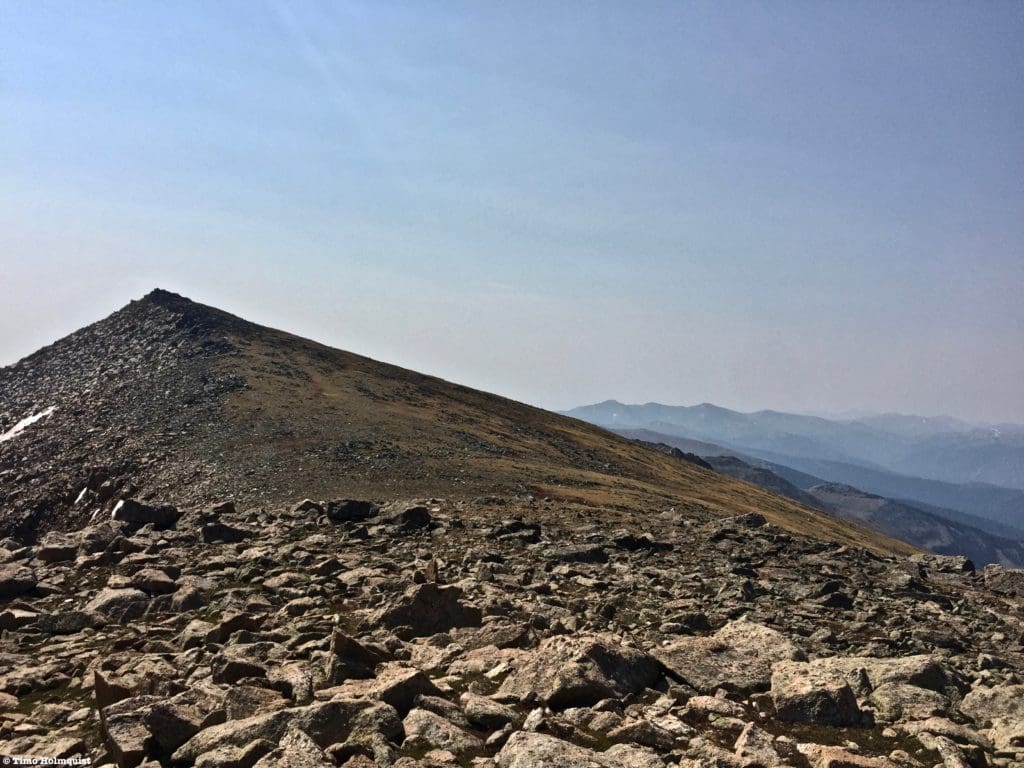
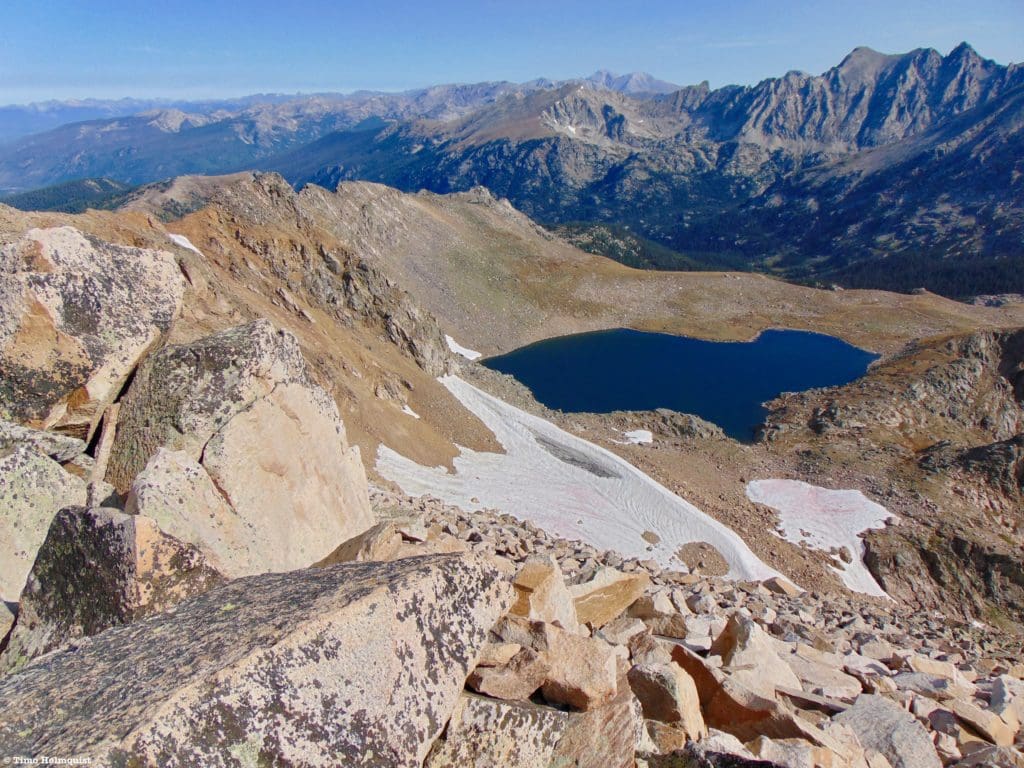
Looking northwest from the ridgeline. The Never Summer mountains make up the horizon running left from photo center. Keen eyes should also be able to discern the shapes of Mt. Ida and Mt. Julian on the horizon to the right of center.
Table of Contents:
Article Navigation: Click on any of the listed items in the table of contents below to jump to that section of the article. Similarly, clicking on any large, white section header will jump you back to the Table of Contents.
- Overview
- Scales and Criteria
- Directions to Trailhead
- Field Notes
- Places to Stay
- Journal
- Final Thoughts
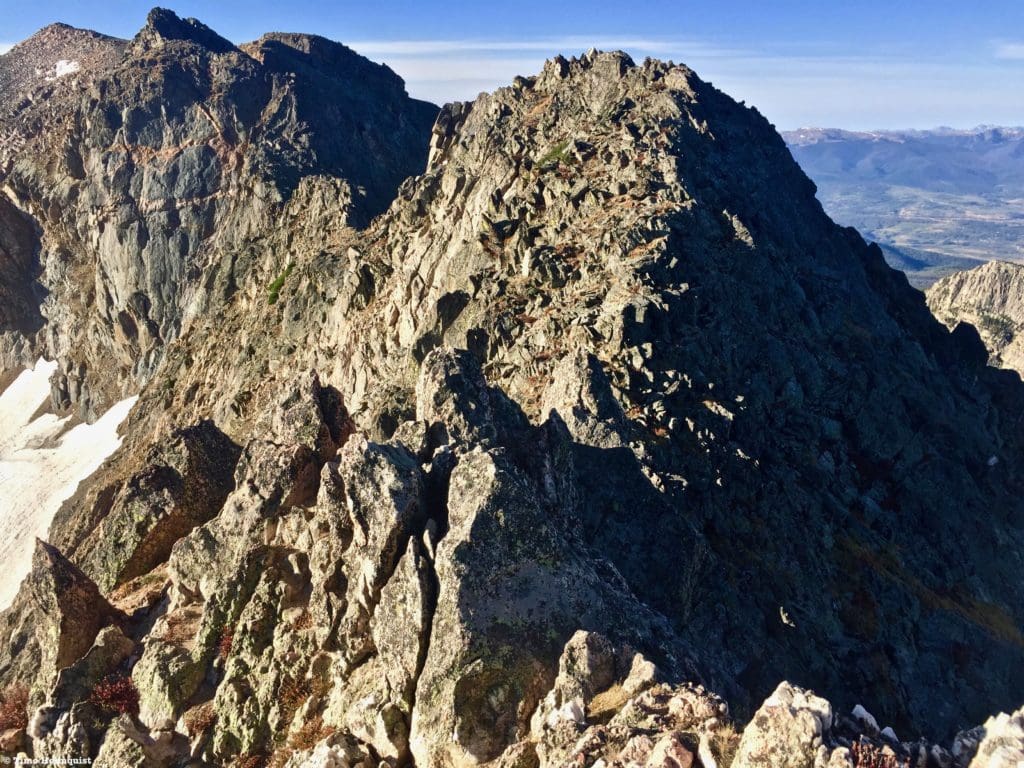
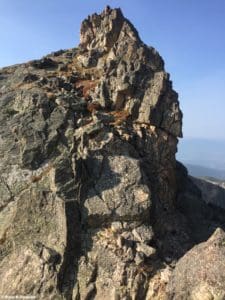
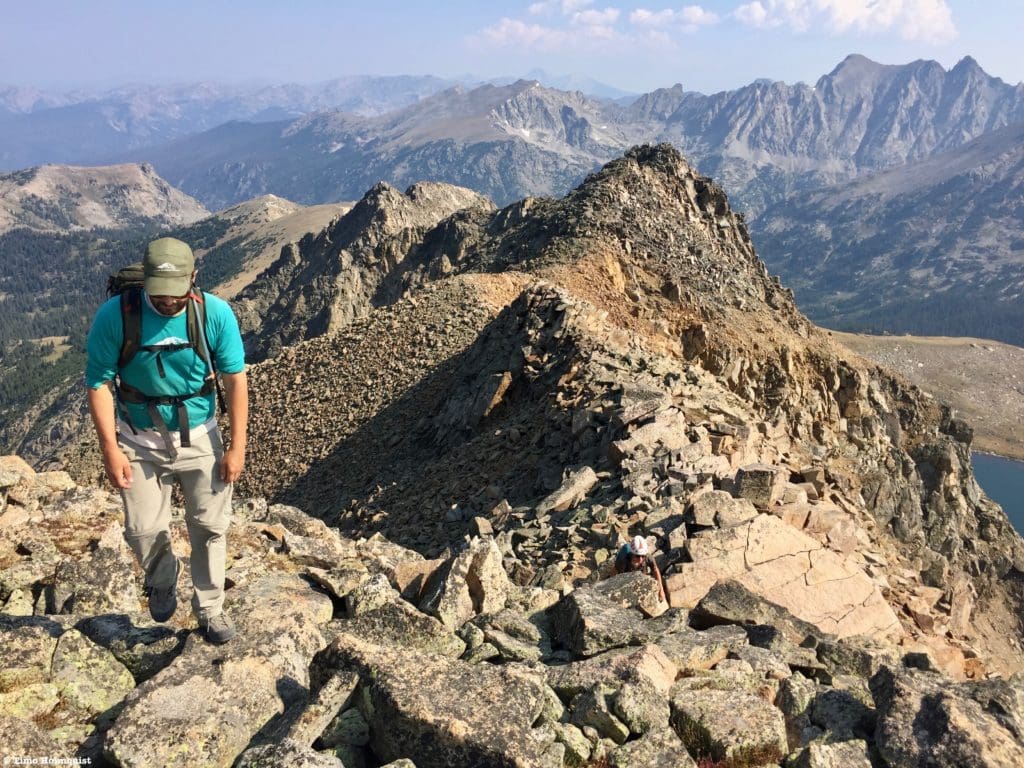
Mt. Neva (far left) and the gnarled ridge leading to the sub-summit before it.
Scales and Criteria:
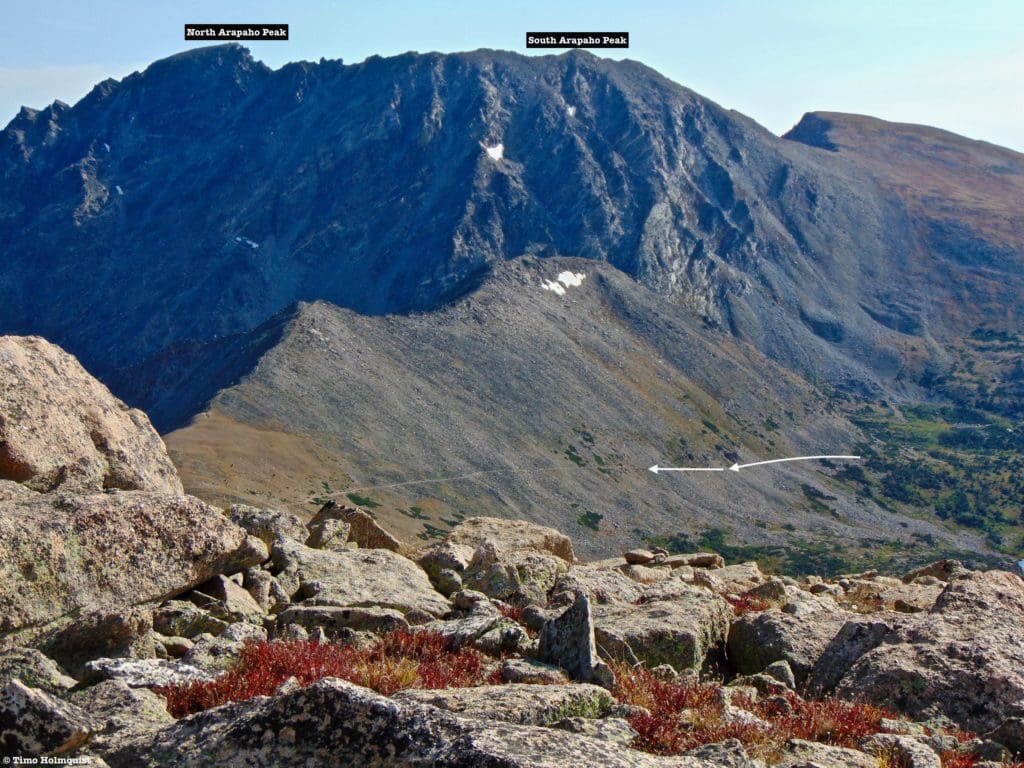
This article utilizes three separate rating systems: Difficulty, Popularity, and a Scramble Rating indicating the hardest move or set of moves encountered. The scramble rating employs the Yosemite Decimal System. By the easiest technical route, Mt. Neva is a Class 2+ hike with plenty of frustrating off-trail navigation. The off-trail approach is most often used when combing Neva with its southern neighbor Pt. 12,923 (commonly referred to as Jasper Peak). For scintillating scrambling and superb alpine views, the Class 4 North Ridge is the standard way to tag Neva.
Difficulty Ratings:
- Easy: less than 5 miles, less than 500 ft. of elevation gain
- Moderate: 5-10 miles, 500-2000 ft of elevation gain
- Hard: 5-15 miles, more than 2000 ft. of elevation gain
- Very Hard: 10+ miles, more than 3,500 ft. of elevation gain
Popularity Ratings:
- Low: Large sections of trail all to yourself
- Moderate: Sizeable trail sections to yourself, crowding possible on busy summer weekends
- High: You’ll be seeing people, still a chance for solitude in spring/fall/winter.
- Very High: Almost always busy.
Scramble Rating:
- Class 1: Established hiking trail the entire length of the adventure. Low chance for injury.
- Class 2: Typically involves cross-country navigation, possibly using hands for balance but not required, steeper than Class 1.
- Class 3: Hands and feet used to scale areas, must use hands to proceed (either for balance or to help pull you up a section), increased exposure, a fall could be fatal. Helmet recommended, along with grippy hikers.
- Class 4: Climbing on very steep terrain just shy of vertical, falls could be fatal, hands employed for grip and balance continuously, ropes advisable but scalable without. Helmets are highly recommended, along with grippy hikers.
- Class 5-5.4: Near vertical and vertical climbing that involves technical rock-climbing moves, exposed, falls likely to be serious or fatal, possible to scale without ropes but only for very experienced veterans. Helmets, grippy hikers, and/or rock-climbing shoes necessary.
- Class 5.5 and up: Not covered as scrambling, full-on rock climbing with ropes, helmets, etc.
The YDS system is widely used in North America but can be quite subjective, so it is not perfect. The biggest differences I’ve encountered between Class 3 and Class 4 sections have to do with slope angle, exposure, and putting weight and pressure on hand grips (4) instead of using hands and feet interchangeably as supporting points of contact (3). It is not possible to climb a Class 4 section without using your hands to pull up some or all of your body weight. Typically, a Class 4 section will also require some type of rock-climbing move, like stemming, where hands or feet are pressed in opposition as if climbing the inside of a chimney. If downclimbing, a key difference is that most people will descend a Class 4 section facing inward, i.e., your back faces the exposure.
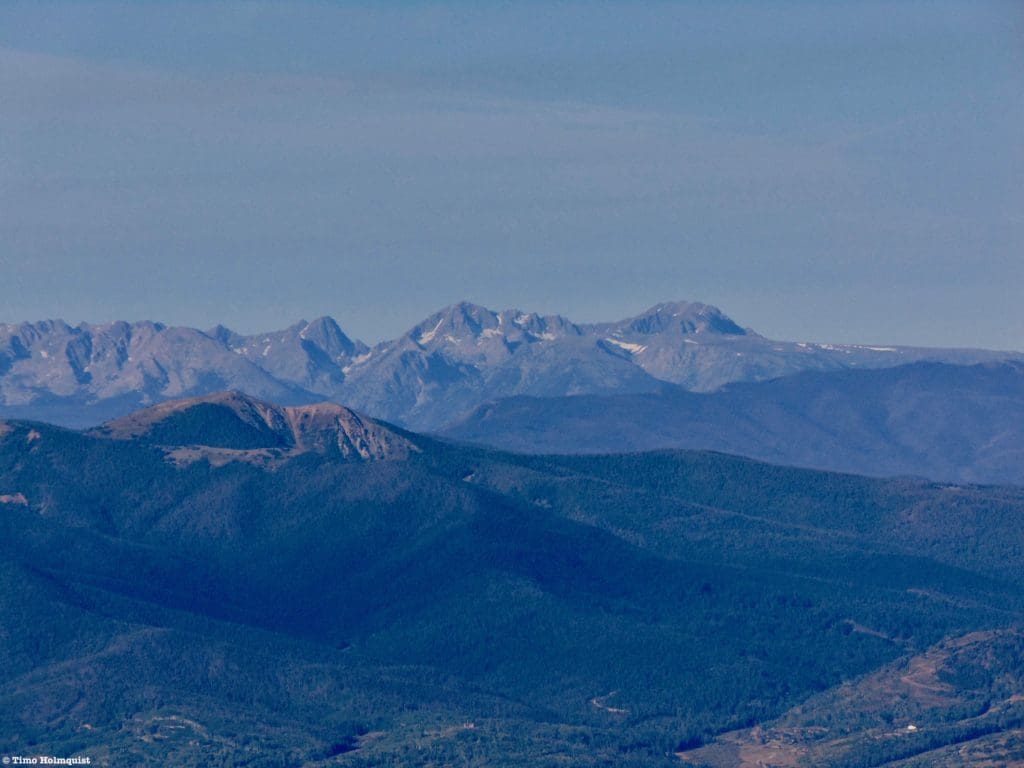
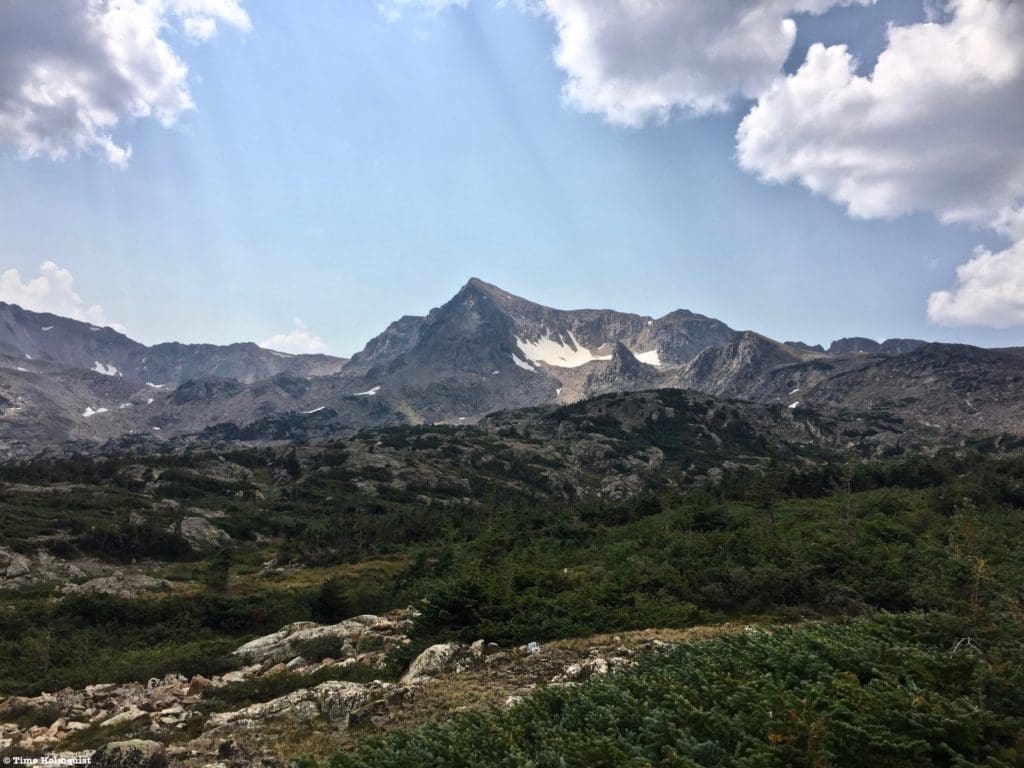
The Gore Range, seen across North Park from the slopes of Neva.
The Ultimate Offline GPS Hiking & Ski Maps
See why onX Backcountry is the ultimate GPS navigation app for your outdoor pursuits. Try Today for Free. No credit card required.
Directions to Trailhead:
As far as directions go, google maps is your best bet. Getting to the 4th of July Trailhead is not difficult, likely contributing to its popularity. From Boulder, make your way up canyon boulevard into Boulder Canyon. From Denver, take US36 to Boulder; after the McCaslin Boulevard exit, you’ll crest a roll of land and have a great view of the Boulder Valley and the iconic flatirons. Descend past the next exit and stay on 36. The second exit (Baseline Road) is the one you want; exit and take a left on Baseline. Only a minute or two later, Baseline will intersect with Broadway, take a right onto Broadway and pass the bulk of the CU campus. The road will cross Boulder Creek and run into Canyon boulevard on the edge of downtown. Take a left on Canyon and drive up to Nederland.
Once you arrive in Nederland, take the roundabout and head south on the peak-to-peak highway (CO 119). Just south of town, and just before a large hairpin turn, you should see signs on the right-hand side for Eldora ski resort. Take a right on Eldora avenue.
The road stays paved for the first few miles, passing the entrance to the ski resort on the left. Continue into the small town of Eldora and SLOW DOWN. The speed limit is 25 mph here, and there are MANY signs asking you to slow your roll. Once you thread through town, the road will turn to dirt, and you’ll pass the uber-popular Hessie Trailhead on your left. Just beyond that, the road splits, take the right fork to the 4th of July Trailhead (there will be signs). These last few miles are on a much rougher road, but a coherent driver can navigate up to near the trailhead with a 2WD vehicle. If you do have some lift, at the very end, you can head up a right spur that leads to an upper parking lot. Once you’ve parked, make your way to the upper lot and find the large trailhead sign.
- Total time from most areas of Boulder: ~55 min.
- Total time from Denver (downtown): 1 hour 35 min.
- Total time from Fort Collins (downtown): ~2 hours
- Total time from Colorado Springs (downtown): ~2 hours and 30 minutes.
*All times are calculated without traffic, which can significantly impact travel from Fort Collins, Colorado Springs, and the southern or eastern Denver suburbs.
*Please keep in mind, 4th of July Trailhead and Hessie Trailhead are free lots, which significantly increases their popularity. It is not uncommon on weekends in July to see cars parked miles down the dirt road because all parking lots are full. Once the road opens (usually by July 4), prepare to get there before 6 am to have a chance to park near the trailhead. Autumn (September through mid-October) is your best bet to secure an easier parking situation; but, it has been known to snow up high starting in September, so preparing for wildly variable conditions is a prerequisite.
Good luck.
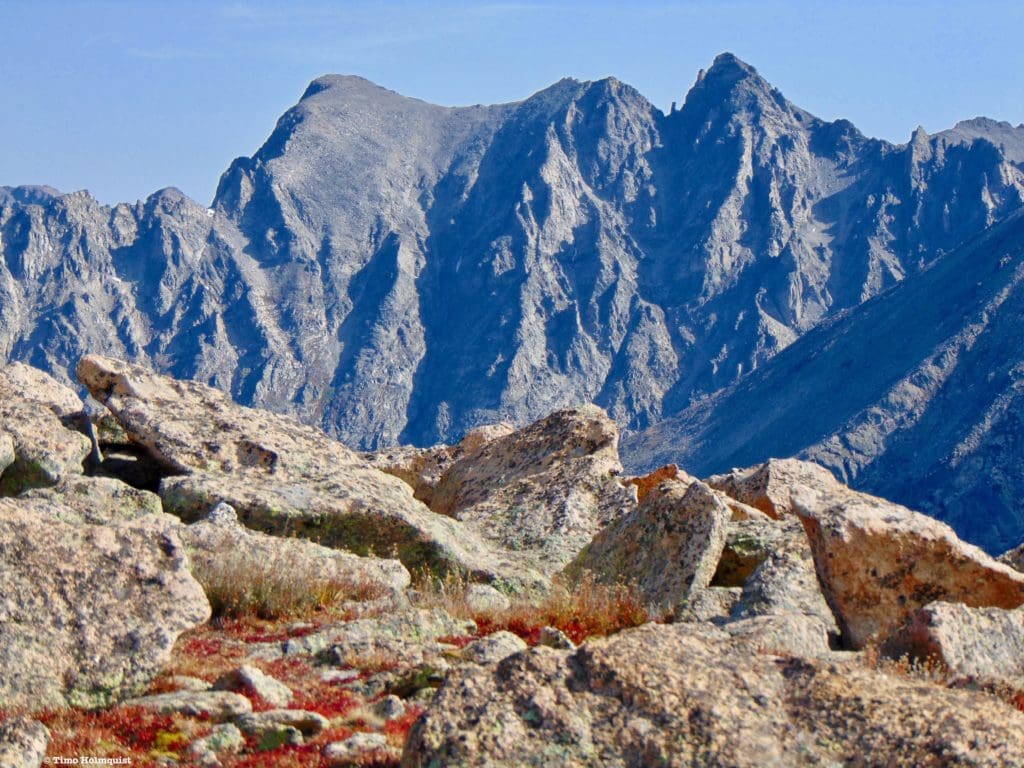
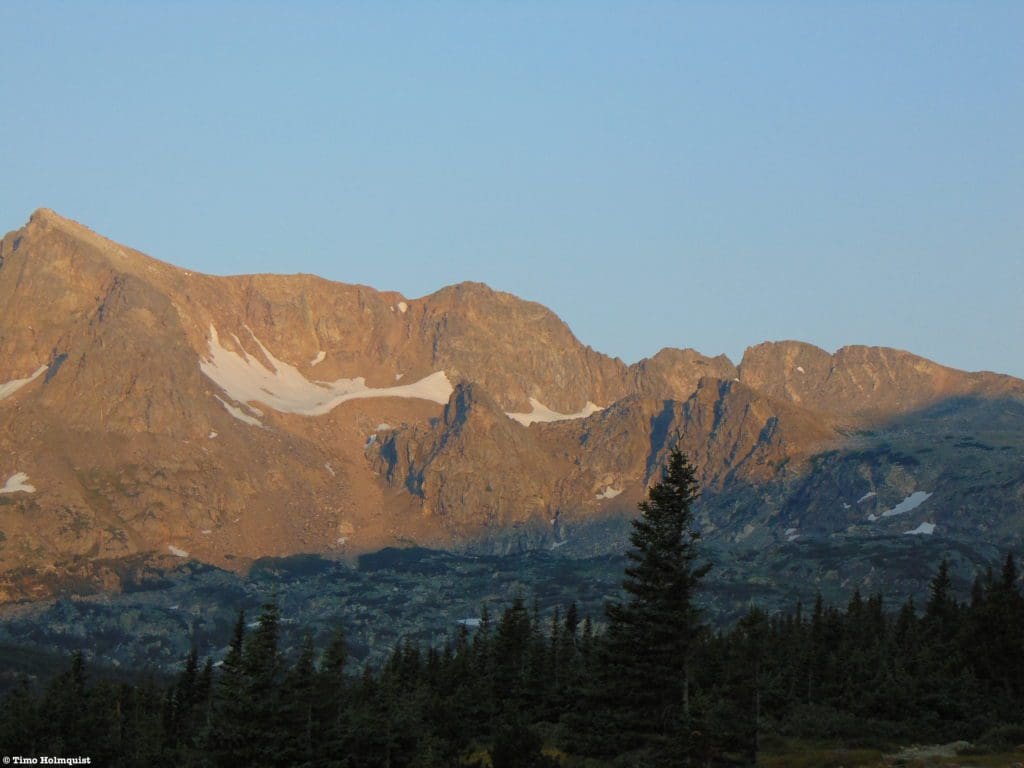
The western sides of Apache and Navajo Peaks.
Places to Stay:
Because of its ease of access to most areas in the Front Range, your best bet is to wake up early and make this a day trip. If that’s not an option, there are a few places between Boulder and the trailhead that will support camping endeavors.
- Rainbow Lakes Campground (click here for information). The overall gist here is that the campsite is beautiful, but it’s first come-first served, so no reservations and no fee. The road to get to it is rough (AWD/4WD likely required), and there is zero cell service; plan accordingly. Check out the reviews on the Dyrt to see what recent visitors are saying.
- West Magnolia Campground (click here for information). There are shooting enclosures nearby, so don’t be alarmed if you hear shots fired. The campground is free, secluded and cell service may be spotty. To view recent reviews, visit the Dyrt by clicking here.
- Camping in the Indian Peaks Wilderness: This option gets you closest to Neva but requires a permit, with a finite number issued every year. If you want to secure one in advance, keep checking recreation.gov in March of the year in question, they usually open up the permit system then. When filling out the permit, you need to indicate your backcountry zone (map) and details from your party. The rules and regulations regarding the Indian Peaks Wilderness can be found on the USFS website here. If you can snag an opening, the cost is $11.
- If you’d rather stay close but stay inside, check out lodging options in Nederland and Rollinsville.
- Further afield, Boulder, Estes Park, Blackhawk, Lyons, and even Golden can provide some good lodging options. Make sure to adjust your driving expectations, depending on where you end up staying.
- Bonus option: Gross Reservoir also has first come-first served camping (click here for reviews). You cannot swim in the lake (though people have kayaked and used SUP’s before), and the location is much closer to Boulder, meaning you may share the campground with loud guests and some college kids. Noise and trash have been reported before.
Another thing to keep in mind if you are visiting multiple places in the region is that while Hessie and the 4th of July trailhead are free, Rocky Mountain National Park and Brainard Recreation Area are not. It is incumbent upon each visitor to find out what fees are needed and when.
The summits of Longs Peak and Mt. Meeker are quite visible on clear days.
Field Notes:
This section will walk you through some additional pointers while reiterating what’s been included in previous sections.
- For camping options, see Places to Stay.
- For directions, see Directions to Trailhead.
- 4th of July Trailhead is free to access, but not all regional trailheads are; research your destinations and what fees are required BEFORE showing up.
- The trailhead is exceptionally popular from July-Labor Day; plan accordingly.
- Neva is NOT the easiest mountain accessed from this trailhead. If you don’t have significant scrambling experience (see the Overview section for a few comparable scrambles), do not climb this route. Instead, enjoy South Arapaho Peak, Diamond Lakes, Lake Dorothy, or Arapahoe Pass, all of which are well-marked destinations with obvious paths to follow.
- Practice leave no trace, do not antagonize wildlife, and if you are camping in the wilderness, put all smelly items in a bear canister. CAMPFIRES ARE NOT PERMITTED AT ANY TIME IN THE EASTERN INDIAN PEAKS WILDERNESS. Campgrounds (like West Magnolia and Rainbow) have established fire rings and can support fires as long as there aren’t local fire restrictions in place. Colorado is dry and windy; it’s not the tinder box that California has been, but the wildfire threat is real almost every year. Be proactive and know what you’re doing; causing a wildfire has serious implications (both legal and financial).
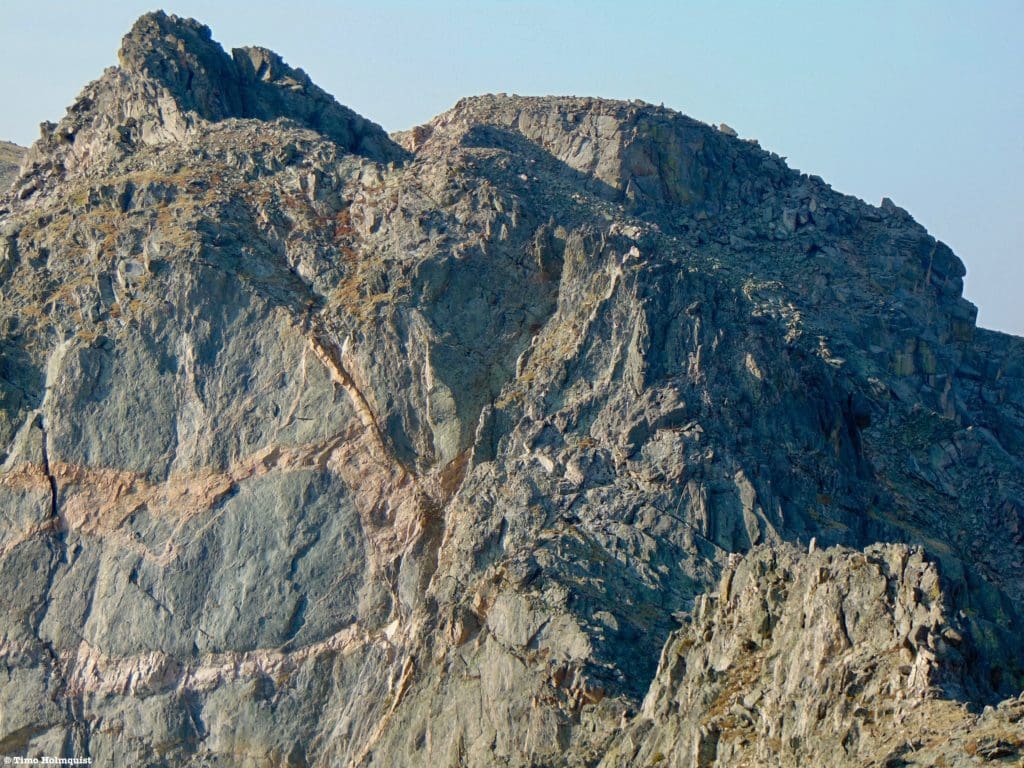
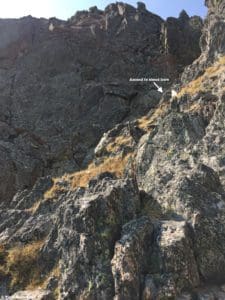
Looking at the hardest sections of the scramble, the summit of Neva is not visible.
Journal:
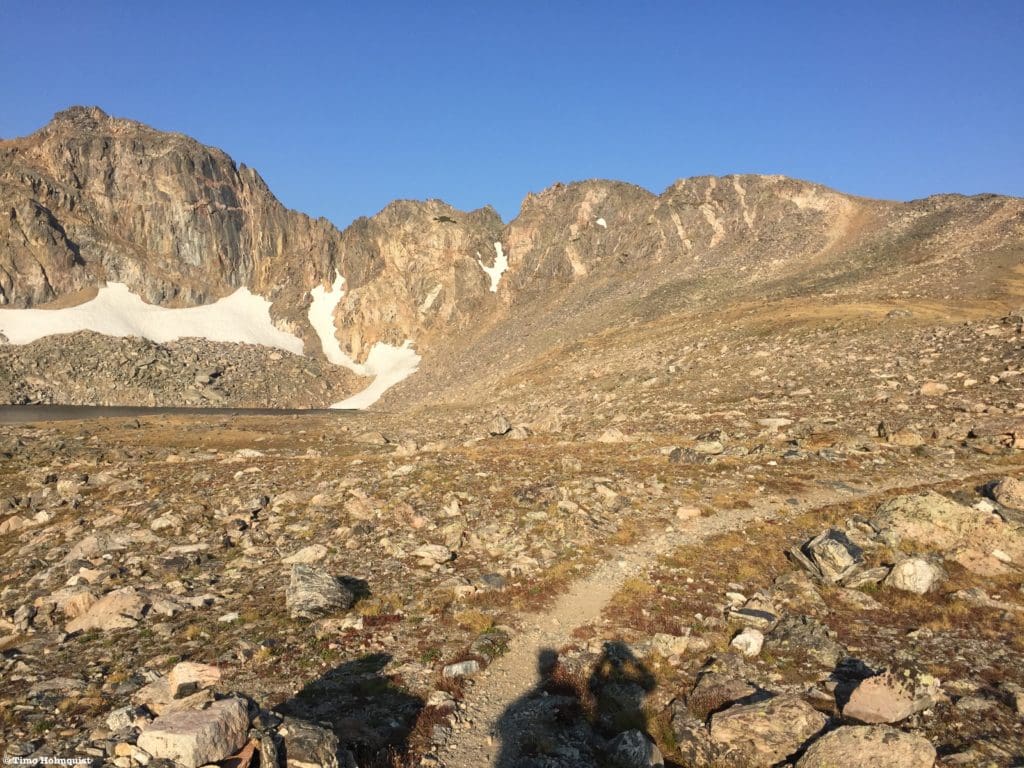
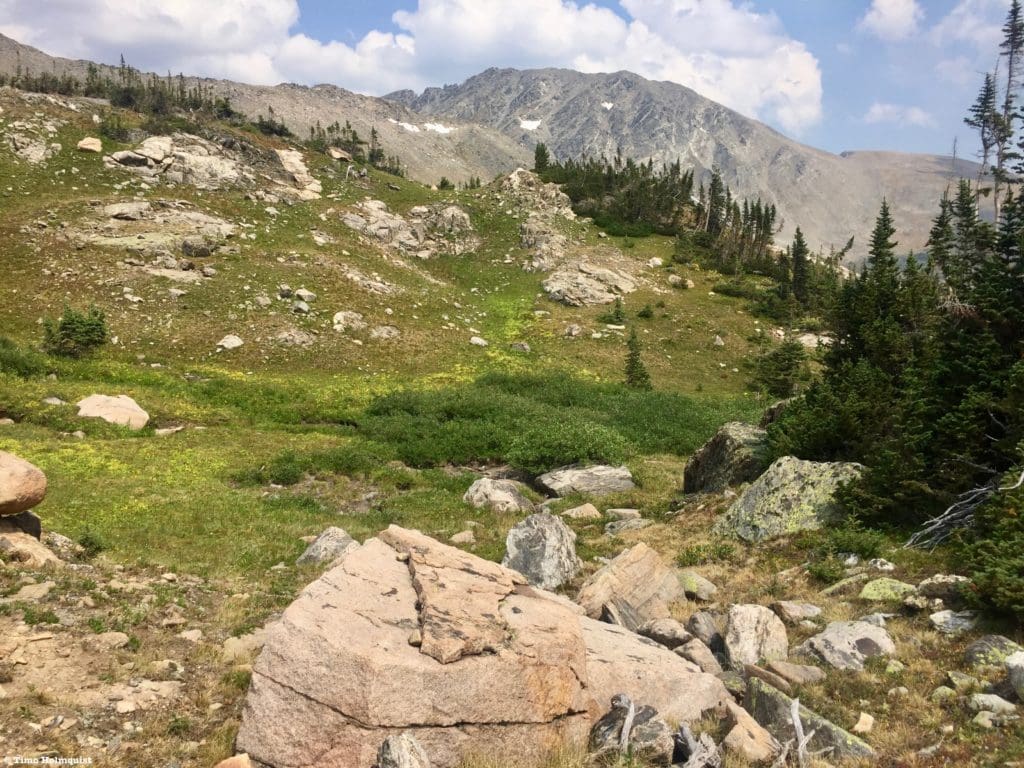
From the edge of the upper lot at the fourth of July trailhead, take the Arapaho Pass Trail (really the only option at first) west into the woods. The first part of the trail gains some moderate elevation and is a pleasant stroll through oscillating woods. Be aware of trail braids near the bottom and try your best to stay on ground that has been traveled on before to minimize crushing plants and vegetation.
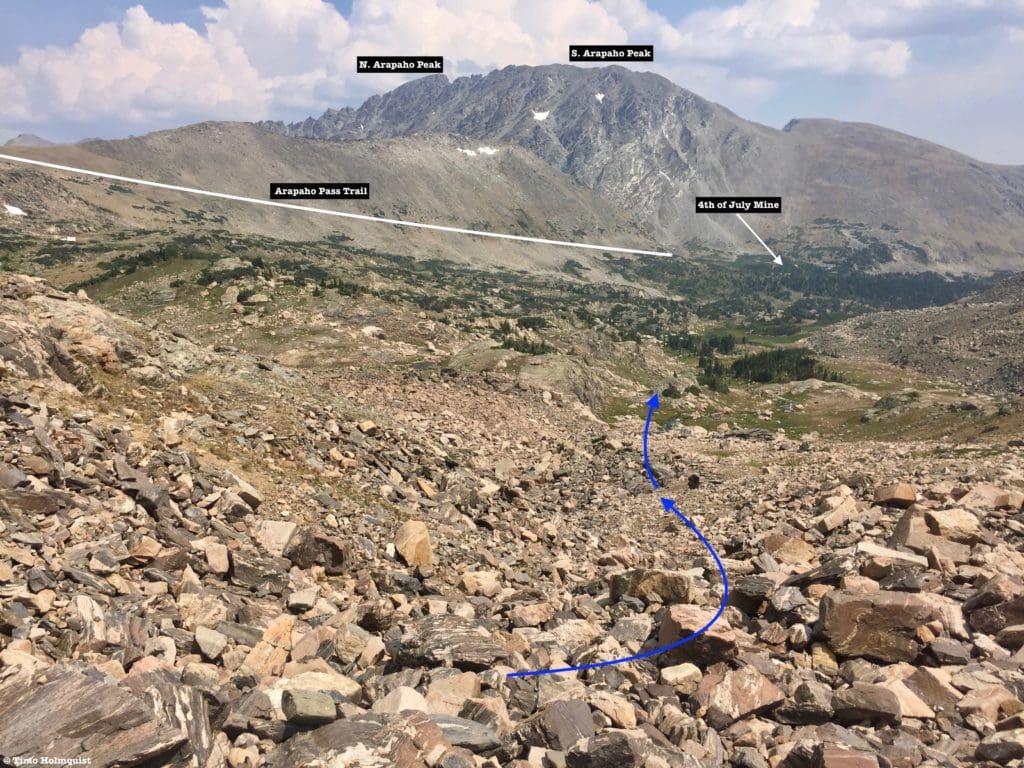
Roughly a mile into your journey, you’ll pass the first major intersection. A left will lead you across the drainage and up to Diamond Lakes; for this scramble, you want to stay straight. Following the intersection, the trail will take a more dramatic step uphill as it approaches the treeline. If a break is in order, there are a few small outcroppings on trailside left that provide good views up the basin, including of Mt. Neva.
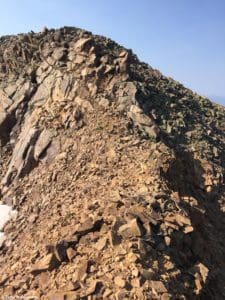
The entire scramble, which starts at the right edge of the picture and traverses left across the horizon, ending on Neva’s summit.
Once you get to the two-mile marker, you should start seeing some old mining equipment to your right. The Arapaho Glacier trail breaks off here, ascending north to a saddle between Old Baldy and South Arapaho Peak with views of the largest glacier left in Colorado. Continue on the main vein and ascend the wide trail above the trees as it heads for Arapaho Pass.
Arapaho Pass Trail from near Neva’s summit.
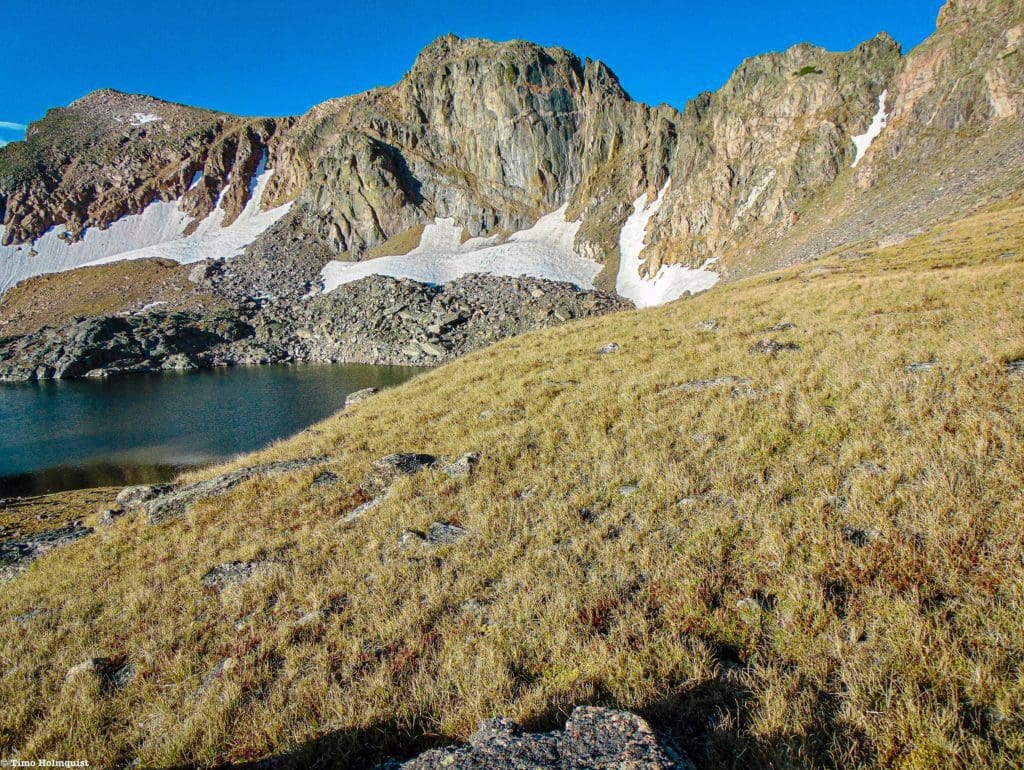
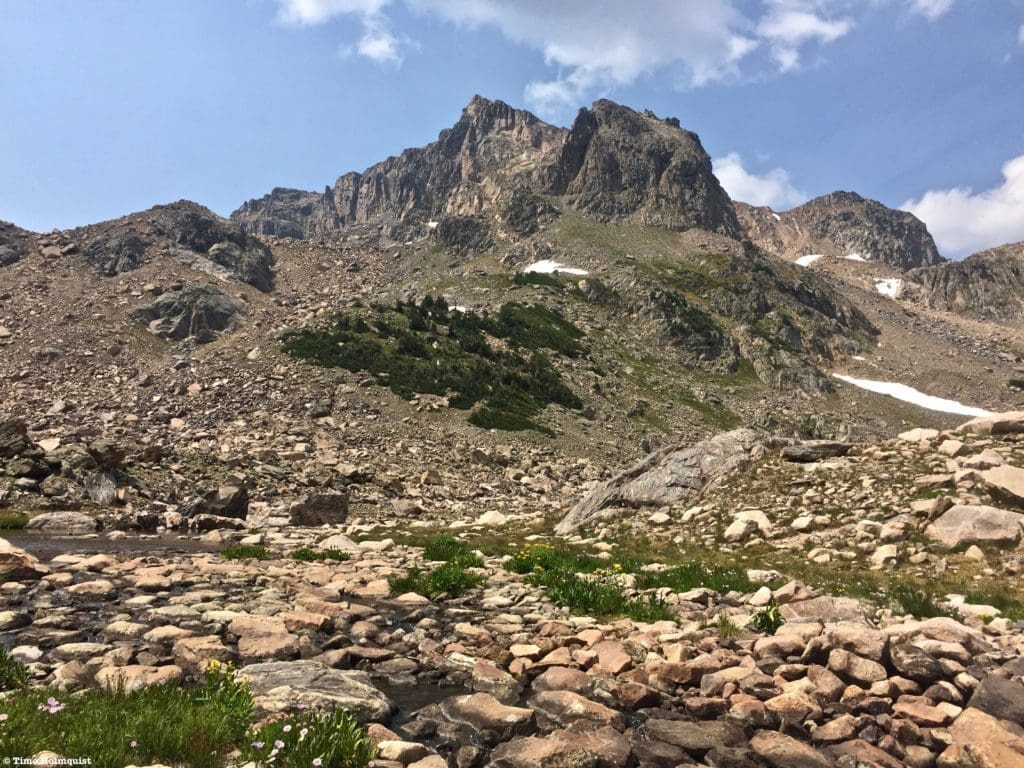
Once you arrive at the pass, follow the trail left as it continues ascending for a few more minutes. Ultimately, this trail will get you to Caribou Pass, but you want to keep an eye out for Lake Dorothy on your left. Not only is Lake Dorothy the highest lake in the Indian Peaks Wilderness (~12,060 ft. above sea level), it’s also your best visual indicator of when to start scouting for the beginning of the route.
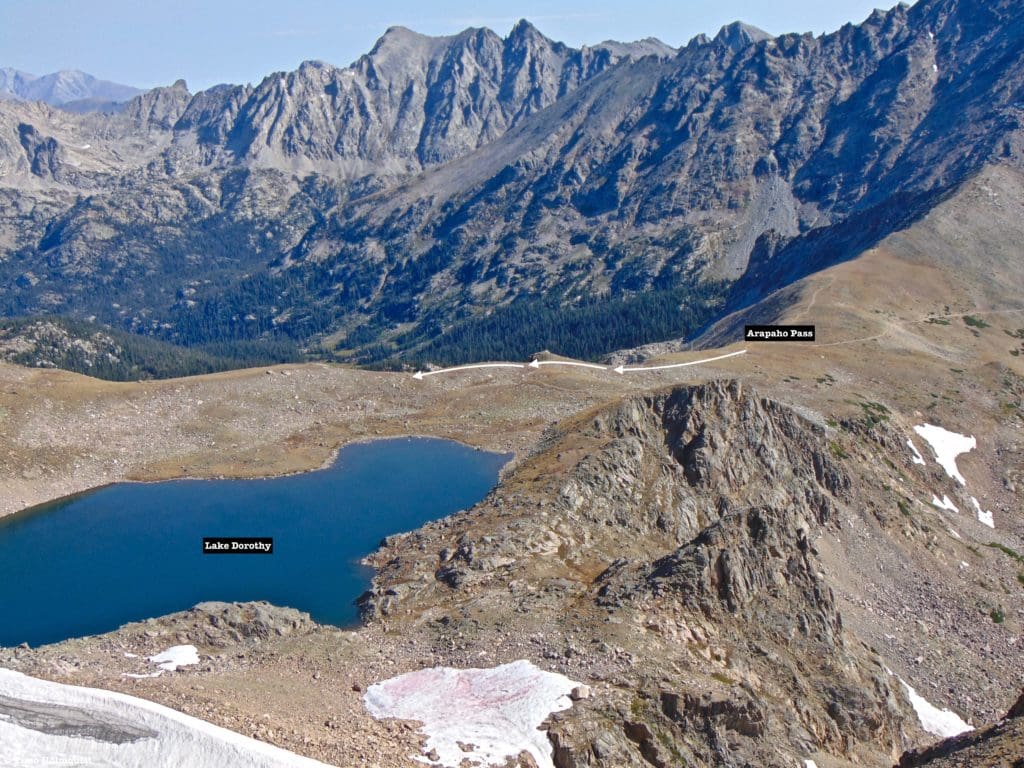
Lake Dorothy and Arapaho Pass from above.
There are a couple of different ways to begin the scramble; you can continue on the main trail until finding a small set of cairns to your left, or you can break early and follow the roll of land between the lake and the trail as it gets higher. Once you locate the initially gentle alpine slope, find a nice place to grab a break and prepare for the scramble ahead.
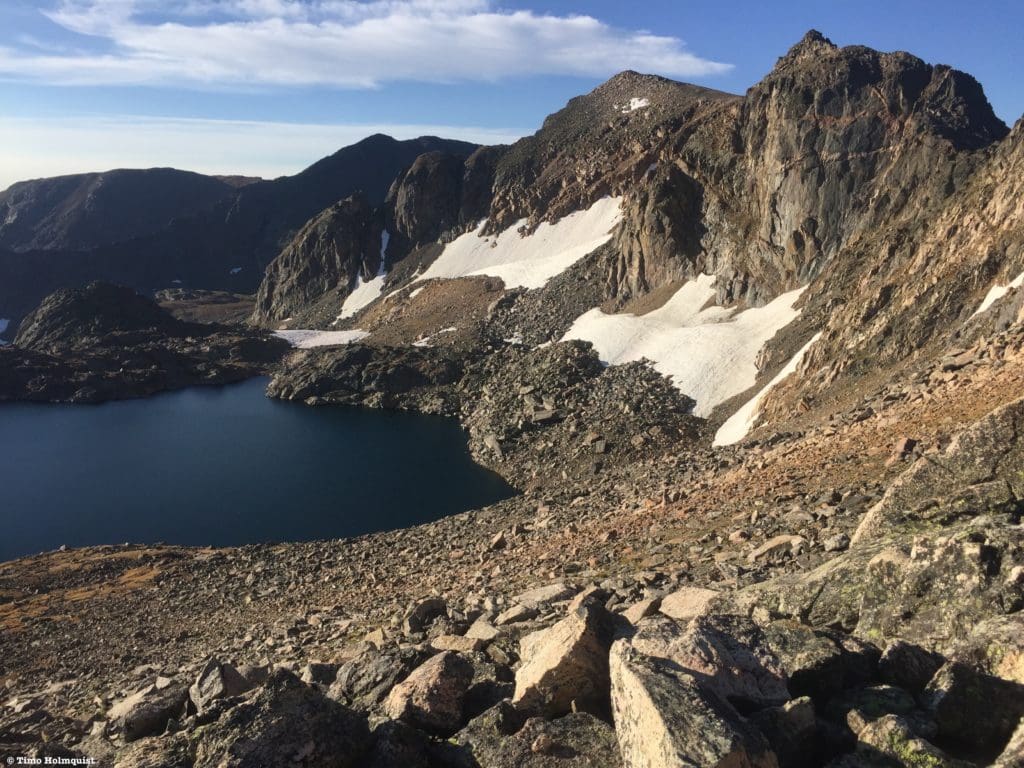
Lake Dorothy and the majority of Neva’s north ridge route.
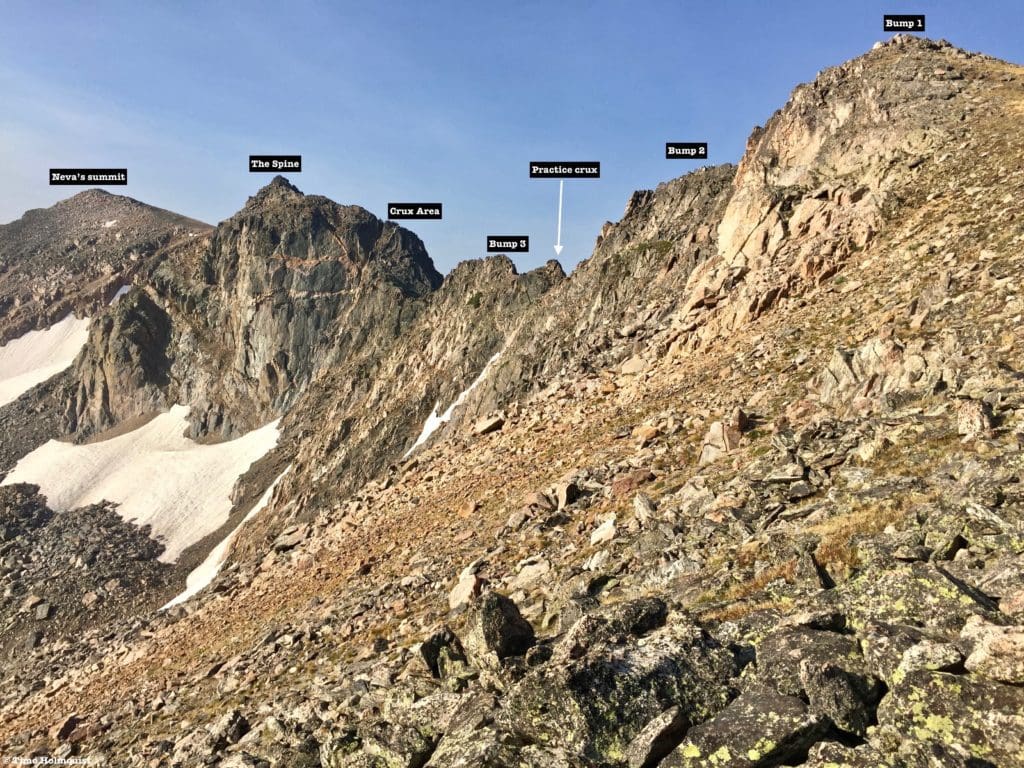
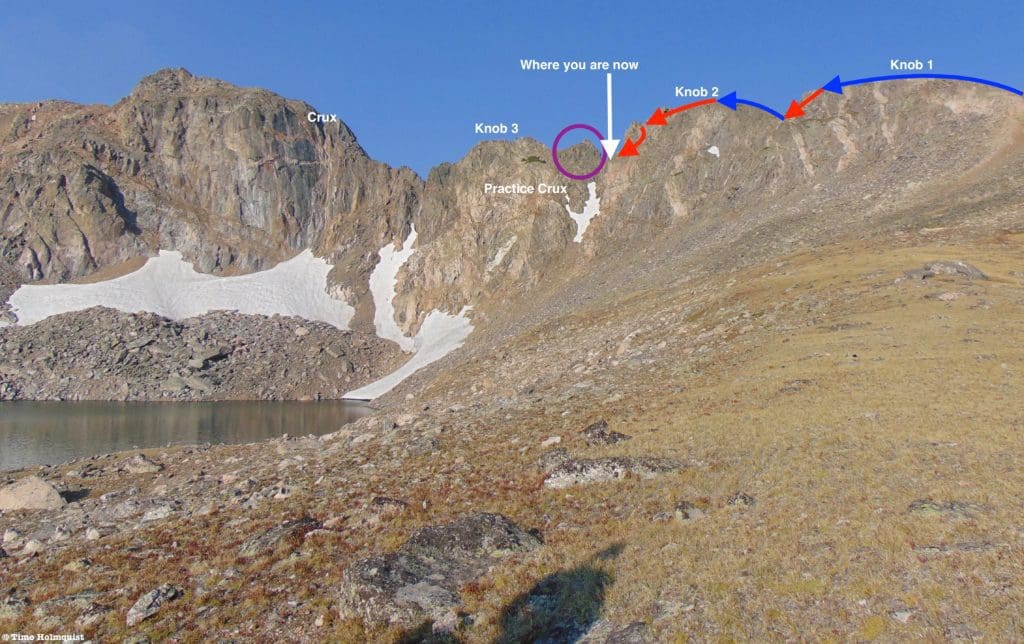
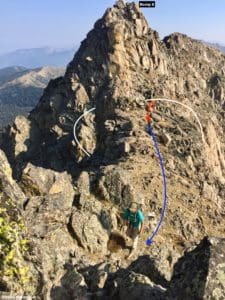
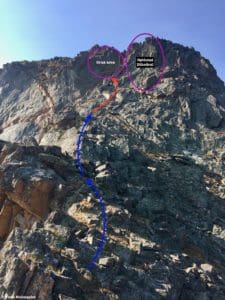
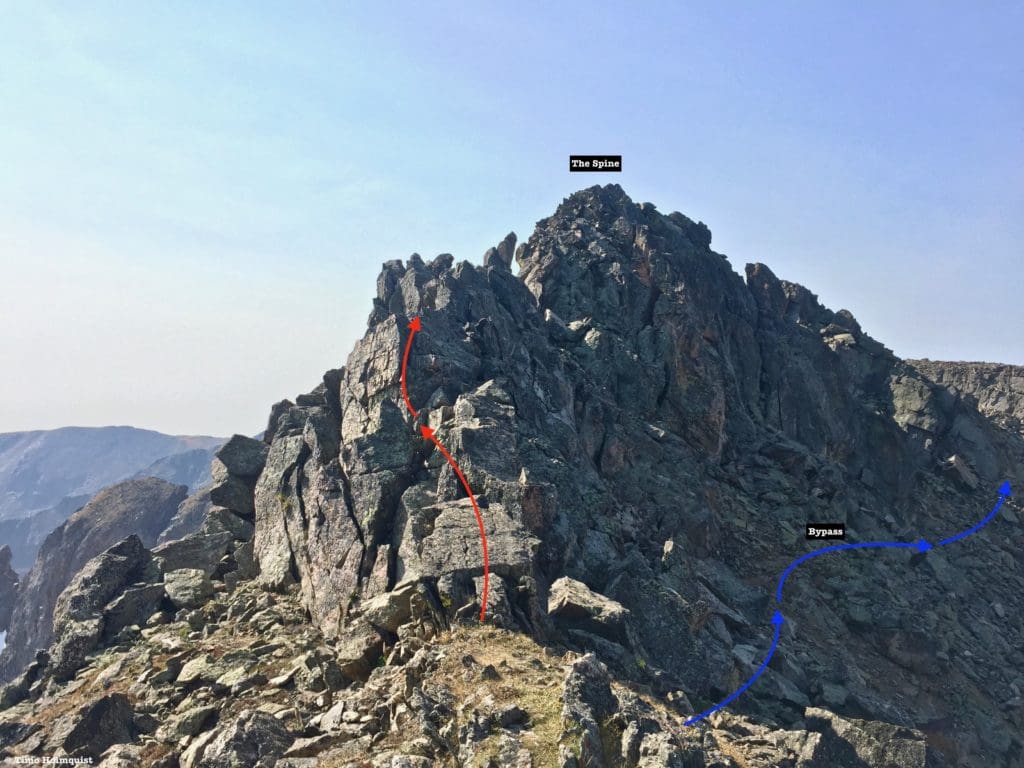
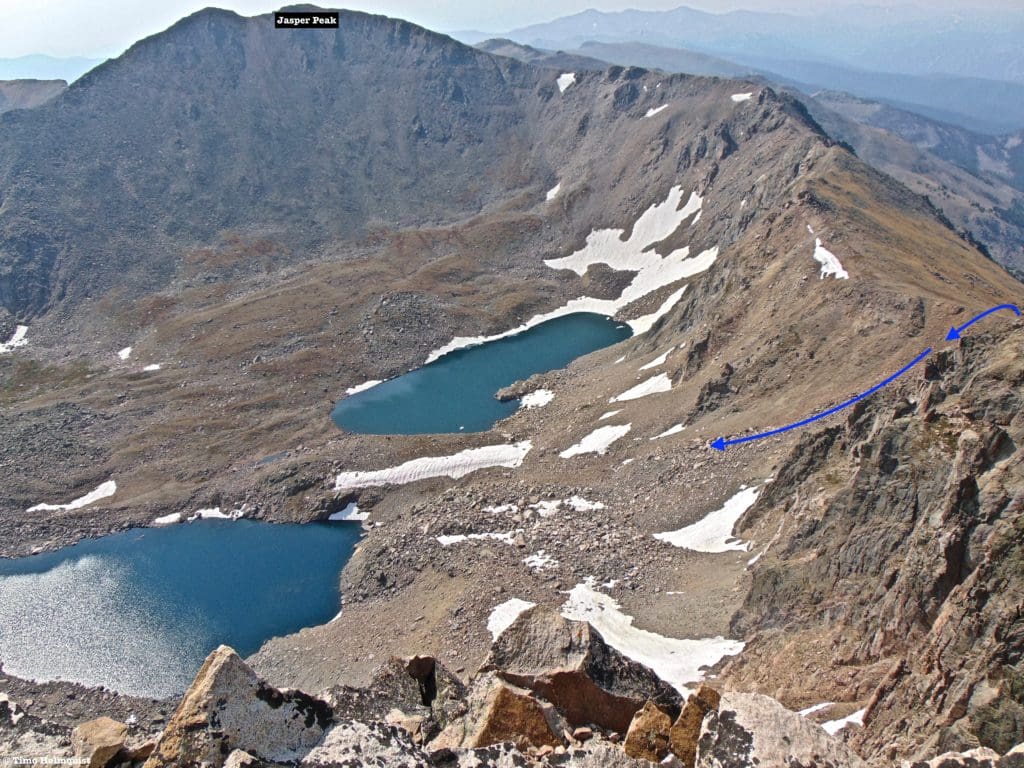
There are six main components to the scramble, with a few smaller features you can use for navigation or extra scrambling. In order, the components are: Bump 1, Bump 2, Bump 3 (which has a practice crux area), the Crux Area, The Spine (last optional scrambling), and the final summit walk. Below is a marked-up image of the components as you see them from near Lake Dorothy.
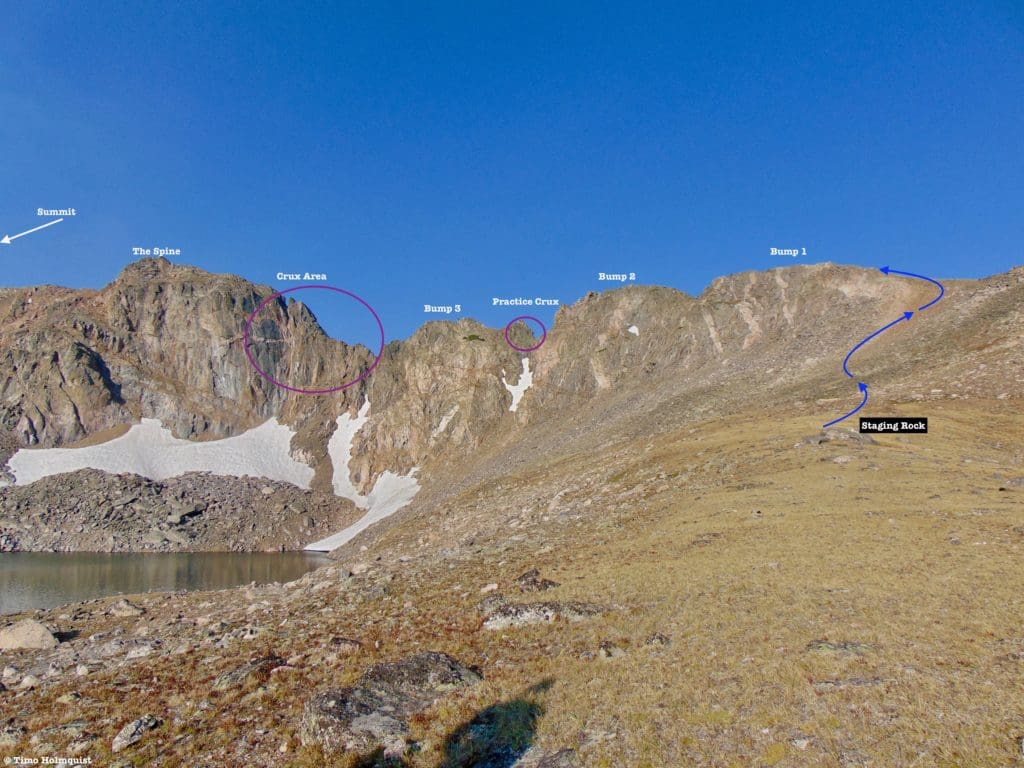
Marked up picture of the challenges ahead.
For identification purposes, you can differentiate the Bumps fairly easily. Bump 1 has a total of three thin lighter rock striations that run vertically, starting just to the left of the highest point. Bump 2 has one light rock striation that descends from the summit until taking a sharp turn north and dissipating. Bump 3 has a thick green patch of vegetation below the crest, and leads into the Crux Area, which is just to the right of the darker wall of rock. There is a wide, permanent snowfield below the crux area.
Changing scenery as you ascend Bump 1.
Getting to the top of Bump 1 is off-trail but not difficult and can be done by most fit hikers in good conditions. It’s a great place to analyze coming obstacles or pause and take great photos. The slope starts with mostly alpine grasses before changing over to scree.
Farther up the ridge, only a few minutes from the crest.
When you hit the ridge crest, the terrain pops back to grass until you ascend the final dozen feet through larger talus to the top of Bump 1. For the hesitant, this is probably your best bail-out point. It is possible to retrace steps later on, but the effort required will double.
Ridge overview from the top of Bump 1
The descent off of Bump 1 gives you your first small Class 3 section. Descending along the ridge crest dramatically increases the difficulty. You want to stay on the crest until sighting a gully to your left. Descend on some grippy broken rocks (Class 3) until you can veer right to the saddle between the first two bumps.
Looking back at the first small Class 3 section.
The ascent up to the top of Bump 2 is relatively tame, never really getting harder than an occasional Class 2+ move by the easiest path.
Bump 2 general ascent path from Bump 1.
Once you top out on Bump 2, the scrambling increases once again. Multiple route options exist, with varying challenges. Opting to scramble along the ridge crest provides the most fun, with chunks of Class 3 scrambling thrown in.
An example of the terrain beyond the high point on Bump 2.
There’s even a mini-knife edge you can awkwardly scoot along or just take a step to the right and follow a slightly easier traverse (still Class 3) with a hand on the knife-edge for stability. Even though your pace will undoubtedly slow, this is a great section to force the scrambling mindset to take over.
Me, at the end of the short knife edge.
After the knife-edge, staying ridge direct pulls you into a sizeable Class 5 descent. This can be avoided. The path of least resistance will have you hunting for a shallow gully to the left (east) with Lake Dorothy below. Descend (Class 2-3) with steeper rocks to your right. Once able, veer right once more and traverse to the next saddle.
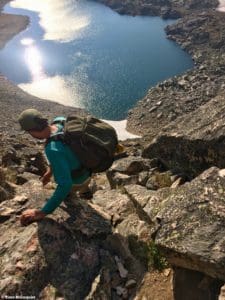
Down the gully.
Once you hit the saddle, you’re halfway to the crux. For reference, here’s a progress picture.
So far, so good.
An intriguing optional feature confronts you on the other side of the saddle. It is possible to get through with a few Class 3+ moves or stay closer to the ridge crest and climb a grippy slab with less obvious holds (light Class 4).
Practice crux area.
Before committing to the easiest path, see if you can flirt with tougher variations; this is a good way to steel yourself for the unavoidable Class 4 crux.
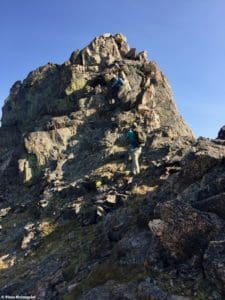
Beyond the practice Crux, the ridge mellows briefly before ascending up to the top of Bump 3. Scramble up a Class 3 section with a few variations and arrive at the top.
Looking back to Bump 2 from near the top of Bump 3.
Drop off of Bump 3 with some brief Class 3 downclimbing and continue. It will seem like, once again, ridge direct leads into Class 5 terrain, but stick with it, and you’ll reach the following saddle with few issues.
Looking back at the descent off of Bump 3.
This is the last low area before the crux climb. The leadup has some interesting elements to consider as well, including some Class 3 scrambling up a series of slanted blocks.
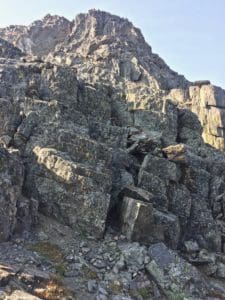
Interesting blocks to climb.
Beyond the blocks, you can stay on the ridgeline until connecting with the larger sub-summit that holds the crux.
Getting to the steepest areas.
Below, I’ve broken down some elements to keep in mind.
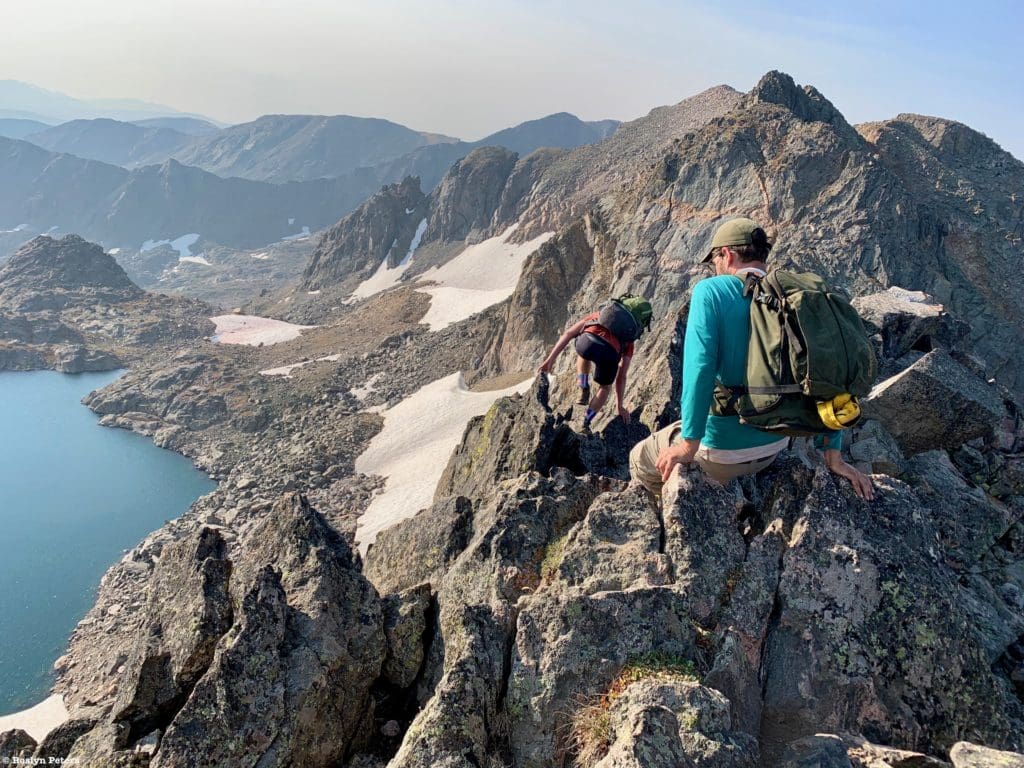
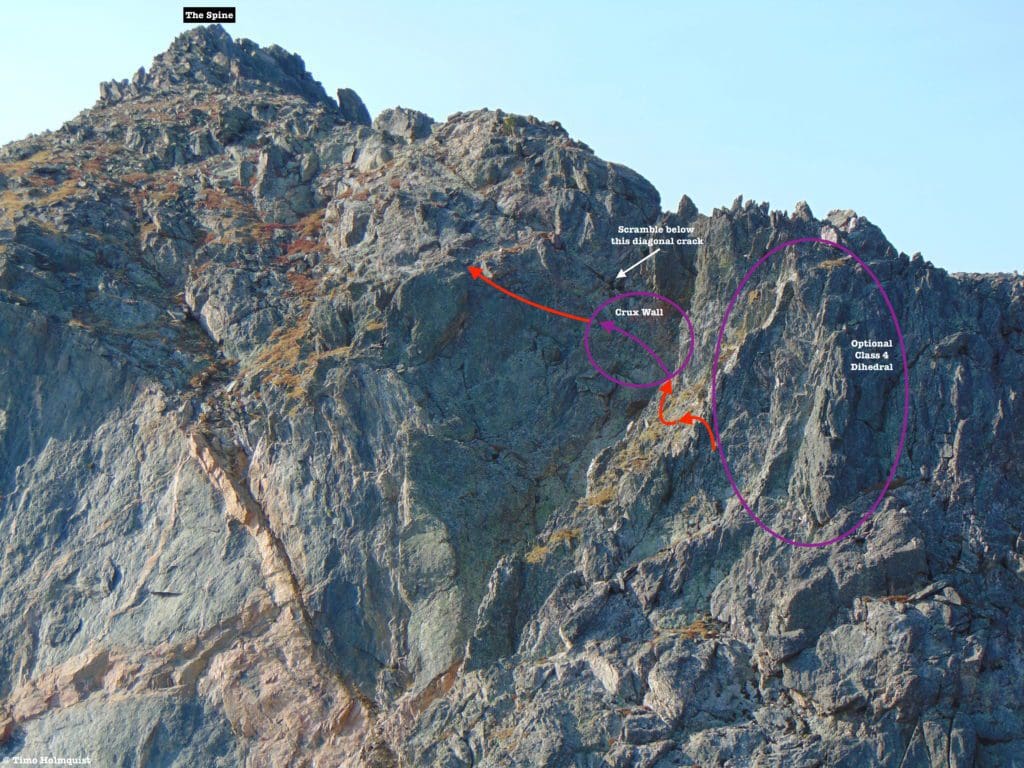
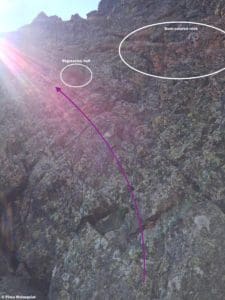
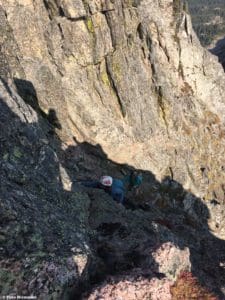
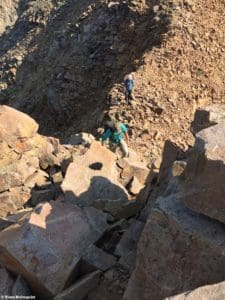
There are roughly 15-30 feet of unavoidable Class 4 scrambling on the crux wall, but the factors are stacked on your side, grippy rock, identifiable features, and no awkward downclimbing.
Good overview of the crux area from earlier in the scramble.
The path of least resistance is an angling traverse below the start of the optional dihedral. If inclined, climb up the dihedral, reengage the ridge crest and walk a spindly, exposed line to the notch next to the crux.
Eyeing the dihedral.
If you’re focused on the crux, instead of climbing the dihedral, traverse to an obvious rock fin that cuts diagonally across your path.
Approaching the Rock Fin.
Employ some Class 3 moves to scramble up and over the rib. The slope angle here is quite steep. On the other side, you’ll enter a pocket of grassy alpine vegetation, buffered by the crux wall.

Looking back after crossing the rock fin.
Ascend into the pocket, keeping an eye on the wall and formulating a route. It should be fairly obvious where the scramble begins because everything to the left of it is much harder.
Steep but manageable terrain to the start of the wall.
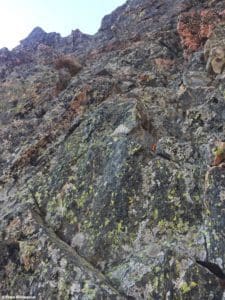
As you stand below the wall, locate a vegetation tuft below a large diagonal crack. The sun washed out some colors from the picture below, but I’ve marked the vegetation tuft and some rust-colored rock that you generally want to stay below. From a distance, the diagonal crack is obvious and can be used as a marker, but it’s virtually invisible when you’re standing at the foot of the wall.
The Class 4 wall.
Things to remember at the crux.
- It is shorter than you think it is.
- The rock is very grippy when dry.
- This will be the last mandatory Class 4 moment if you take the loop option back.
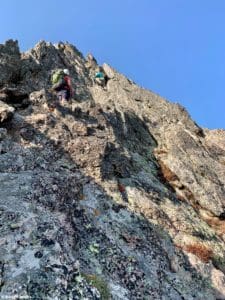
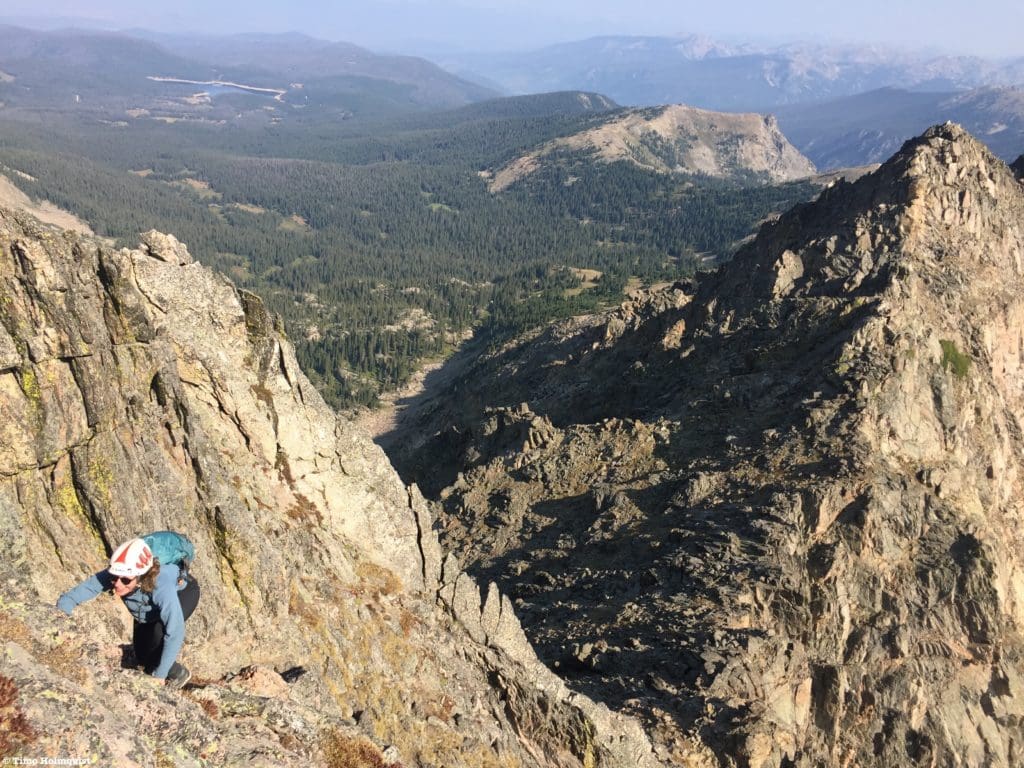
Rather than go through the minutiae of how you ascend the wall, I’m going to provide some pictures of the wall and one of my hiking partners scrambling up it. The variation shown is NOT the only way; find a line that suits you and have at it.
Clearer view of the start, with the vegetation tuft a little easier to see.
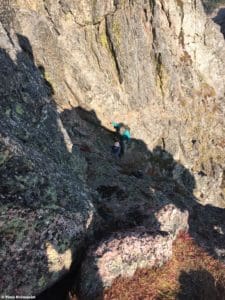
Getting ready to scramble.
At the end of the steepest part.
Topping out.
After the crux, ascend easier slopes (Class 2) while admiring the progress you’ve made. On clear days you’ll be able to see Longs Peak to the North, the high plains to the east, the Gore Range to the west, and Winter Park Ski Resort to the southwest.

Winter Park from above the crux.
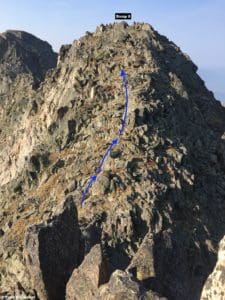
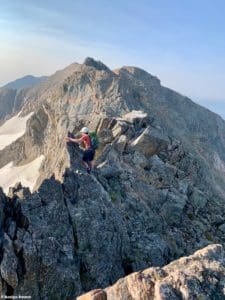
You can maintain the ridgeline until arriving at the base of The Spine. Here, you can either traverse completely by on the right-hand side or take The Spine up for some extra scrambling.
Scramble up or pass around.
This section is loaded with some fun Class 3 on good rock and consists of two parts with a notch between them.
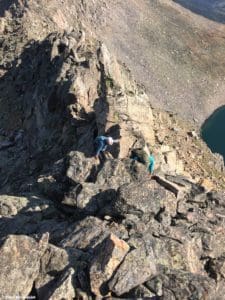
Scrambling out of the notch between the two parts of the Spine.
Enjoy it while you can because, on the other side, the rock quality changes for the worse.
Although brief, the rocks are not very stable here, watch your steps.
If you traversed around, or as you descend off the spine, you’ll notice a sand-colored rock taking over. This rock is fairly brittle and moves a lot, so take some extra time and make sure you’re stepping on something that won’t shift dramatically beneath you.
Looking down from the top of the sandy rocks.
A quick minute or two of careful Class 2+ scrambling will deposit you above the sand-colored rock. Stay true to the ridge crest and enjoy some more easy talus hopping until the rocks end and more pleasant alpine takes over.
Good perspective of all you’ve climbed so far. Lake Dorothy is visible to the lower right-hand side of the picture.
From here, the rest of the journey is a simple alpine stroll to the summit, with some brief talus near the top (Class 2).
Up to the highest point.
Because the hardest is now behind you, you may be tempted to pick up the pace. Do yourself a favor, and don’t let summit fever take over just yet. After all you’ve done, twisting an ankle this far into your adventure would be a shame; watch your footfalls and arrive safely at the top.
Summit view north.
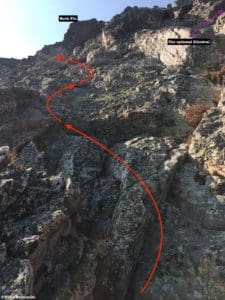
Once you’ve properly basked in your achievement, descend south along the crest of the now very pleasant ridge. At the low point between you and the next summit south (the unofficially named Jasper Pk.), veer left into a loose gully leading down.
The first part of the descent from the summit.
There is a relatively well-defined social trail leading down, but because it’s a climber’s trail, erosion has stripped a lot of the grippy rock away, and the path leads through some loose scree. You can avoid this (for the most part) by hunting sturdier rocks to the left side of the path. At the bottom of the gully, you are clear of the major alpine challenges. There’s also a set of vibrant alpine lakes up here.
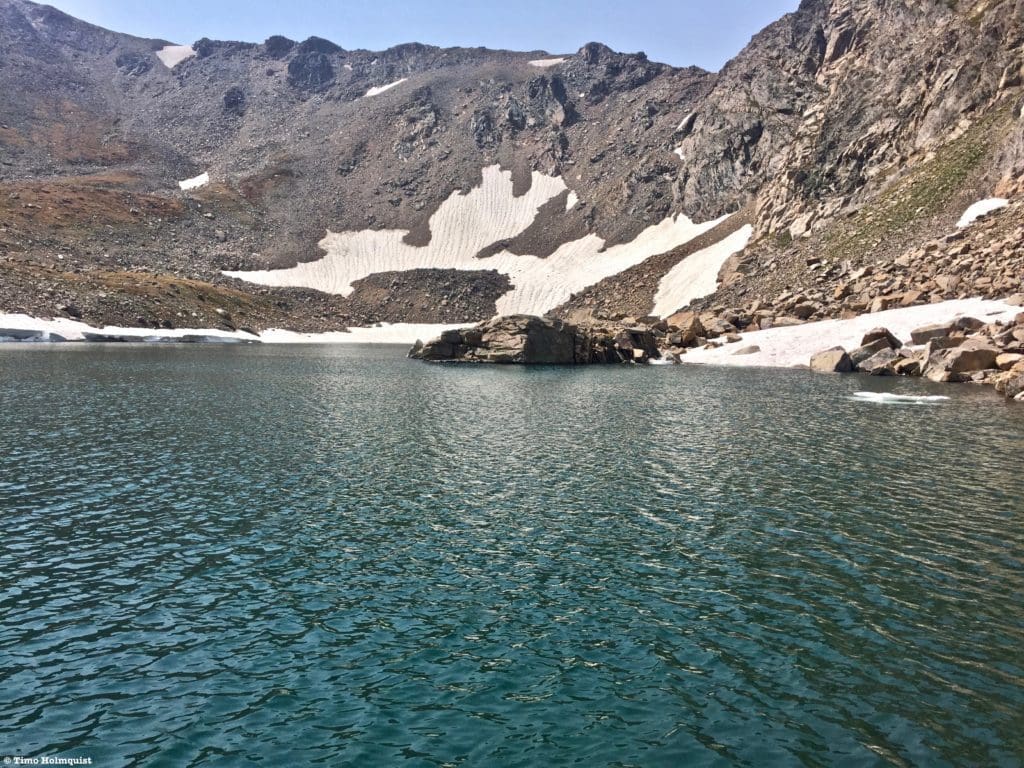
The unnamed lake closer to Jasper Peak.
Both lakes sport some nice, deeper spots, but as always, make sure you can see below before jumping into anything. Being above treeline and in a recessed basin, these lakes are always cold.
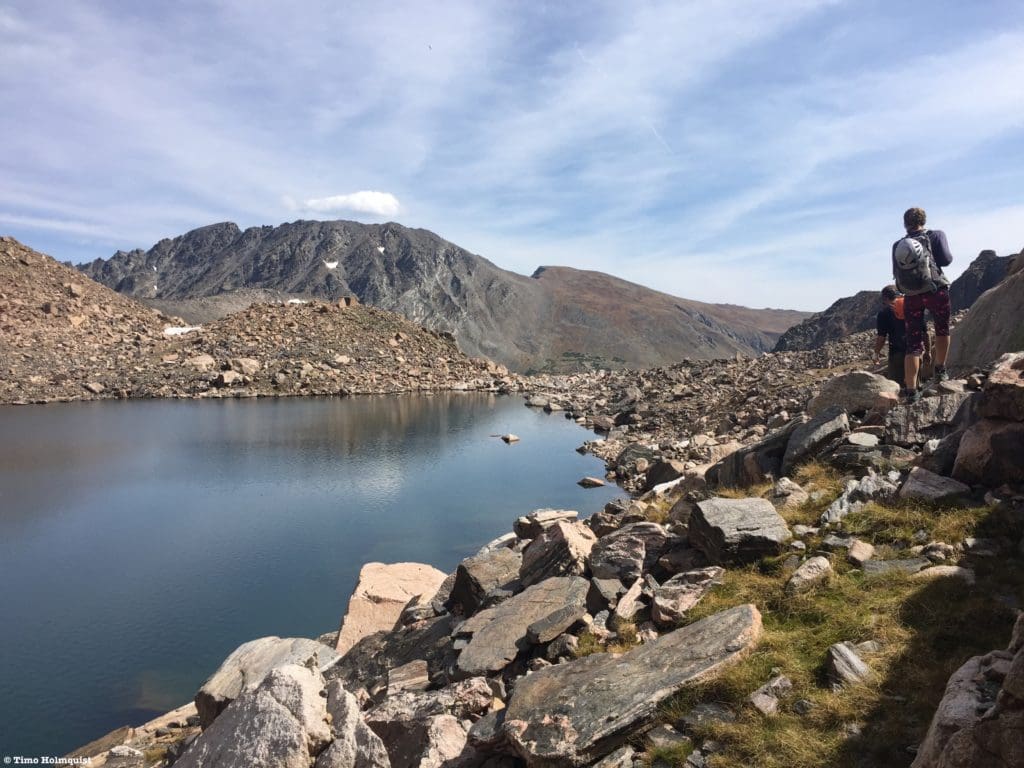
Passing along the shoreline of the northern lake, nearest to Neva’s summit.
Pass between the two lakes on your way out before hugging left. You’re going to want to follow the drainage down but veering too far to the right creates additional navigational challenges later. The goal is to cross the lake’s outlet stream before the talus gives way to a flatter, marshy area. It is not uncommon to see moose in the marshy areas, so pay attention and give them a wide berth.
General descent route with Arapaho Pass Trail marked in the distance.
The trailless portion of the loop takes over here, and you will be crossing multiple small hogbacks, marshy areas, and eventually a massive willow field. It is tempting to think that this section will go quickly since you can see the Arapaho Pass Trail across the drainage but go ahead and throw that thought out.
Crossing the outlet stream from the unnamed lakes. The summit of Neva is the highest visible pinnacle.
The goal is to reconnect with the Arapaho Pass Trail above treeline to limit visibility issues. Trying to find the driest path is difficult but not insurmountable, ultimately leading to the willow field.
Typical off-trail terrain as you head back to Arapaho Pass Trail.
When you reach the willow field, you don’t really have a choice except to hunt for the thinnest section of willows before bashing through them. The plants reach up to hip level, so it’s difficult to see where you are planting your feet; GO SLOW. This section is very reminiscent of the willows in Upper Glacier Gorge. There’s also another stream you need to cross in this part; make sure you’re watching those footfalls. It will be tempting to veer right to avoid the marshy area, but there are multiple additional challenges there, like crossing the stream before it hits a series of steep cascades or making sure you don’t descend back into the trees where orientation becomes more difficult.
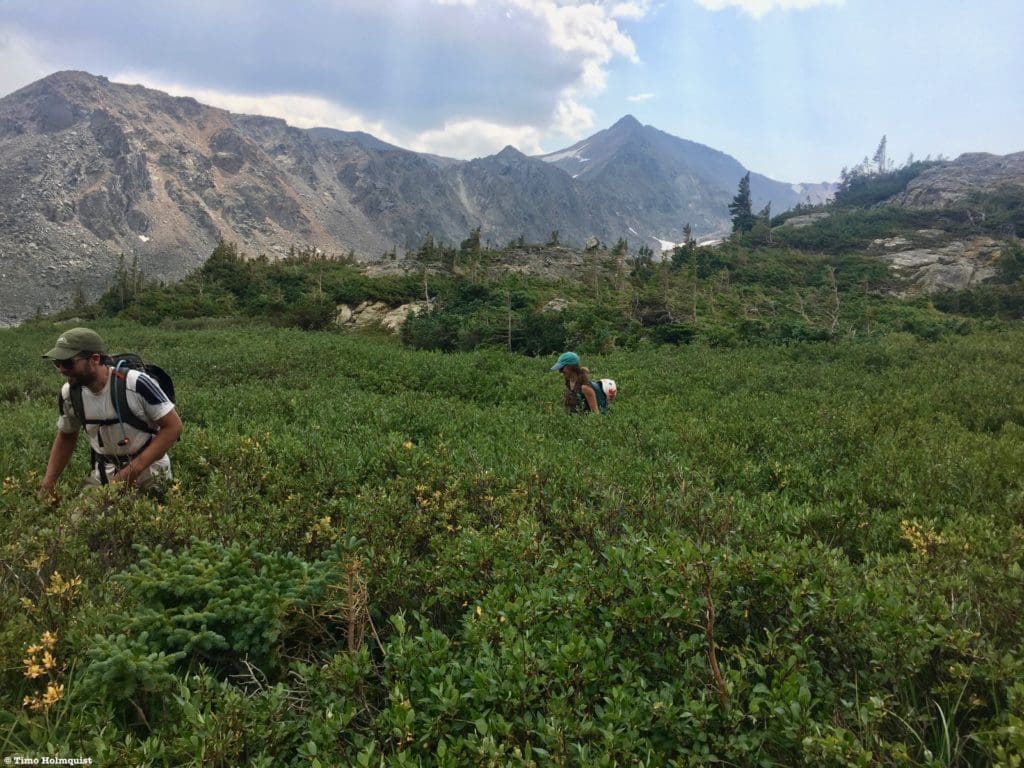
The thick Willows. Mt. “Jasper” is visible in the background.
After the willows, continue north, following whatever line appears best, and reconnect with the Arapaho Pass Trail. Now that you’ve tied the loop: descend east on the trail for ~2.5 miles until you reach your car; nicely done!
Mt. Neva just before reconnecting to the Arapaho Pass Trail.
Final Thoughts:
Mt. Neva is an excellent scramble. However, like all alpine scrambling adventures, risks exist. On my first of multiple scrambles up the mountain, I sliced my knee down to the patella. While I was able to drag myself over the crux and down the other side, the three months of recovery effectively ended my hiking season. Enjoy the playground of stable, grippy rocks but do not forget to watch your step on any of the alpine portions. Despite the relatively tame overall mileage, you are still far from help.

Enroll With Global Rescue Prior To Embarking On Your Next Adventure.
When a travel emergency arises, traditional travel insurance may not come to your aid, and a medical evacuation can cost up to $300,000.
The cost when you have a Global Rescue membership? $0. That’s why when the unexpected happens, you want the leader in rescue, evacuation and medical advisory behind you. You want Global Rescue.
Terms of Use: As with each guide published on SKYBLUEOVERLAND.com, should you choose to this route, do so at your own risk. Prior to setting out check current local weather, conditions, and land/road closures. While taking a trail, obey all public and private land use restrictions and rules, carry proper safety and navigational equipment, and of course, follow the #leavenotrace guidelines. The information found herein is simply a planning resource to be used as a point of inspiration in conjunction with your own due-diligence. In spite of the fact that this route, associated GPS track (GPX and maps), and all route guidelines were prepared under diligent research by the specified contributor and/or contributors, the accuracy of such and judgement of the author is not guaranteed. SKYBLUE OVERLAND LLC, its partners, associates, and contributors are in no way liable for personal injury, damage to personal property, or any other such situation that might happen to individuals following this route.


