


High Point:
13,327 feet

Total Ascent:
~4,450 feet

Difficulty:
Very Hard

Distance:
~14 miles via Glacier Gorge Trailhead

Waypoints:
40.310517, -105.640278

Route Type:
Out and Back
McHenrys Peak in Colorado offers a dramatic scramble with stunning views, from Black Lake to the summit. You’ll feel like you’re in the Alps, Sierra, or Canadian Rockies: rock, snow, ice, and lakes abound. It’s all here!
Overview:
This is one of the best scrambles in Colorado. Yes, it’s in a National Park, and summer crowding near the trailhead can be extreme, but if you manage to slip into the park early and start hiking before dawn, you will not be disappointed. They make them dramatic in Glacier Gorge, and the views from Black Lake all the way up to the summit of McHenrys Peak are mind-blowing. At times you’ll feel like you’re in the Alps; at others, you’ll cross large rock slabs more reminiscent of the Sierra, and still, at others, you’ll feel like you’re in the Canadian Rockies. Rock, snow, ice, lakes, and a ton of scrambling, it’s all here.
- Stoneman Pass (without any snow): Class 2+
- Standard route up McHenrys: Class 3 (sustained scrambling)
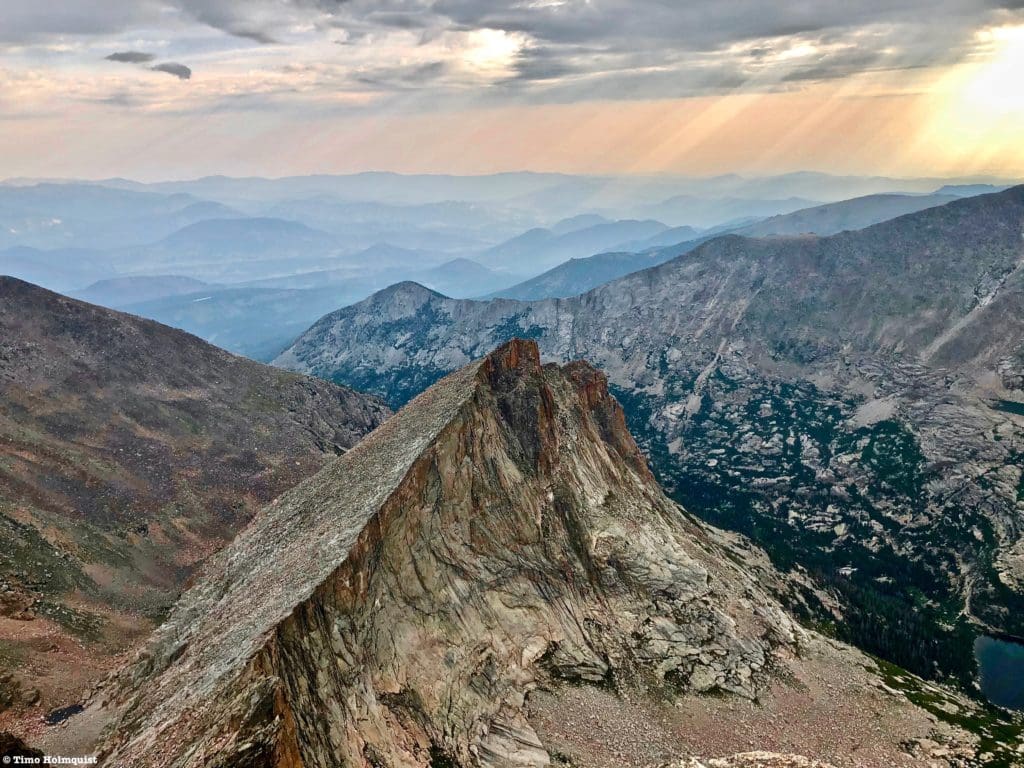
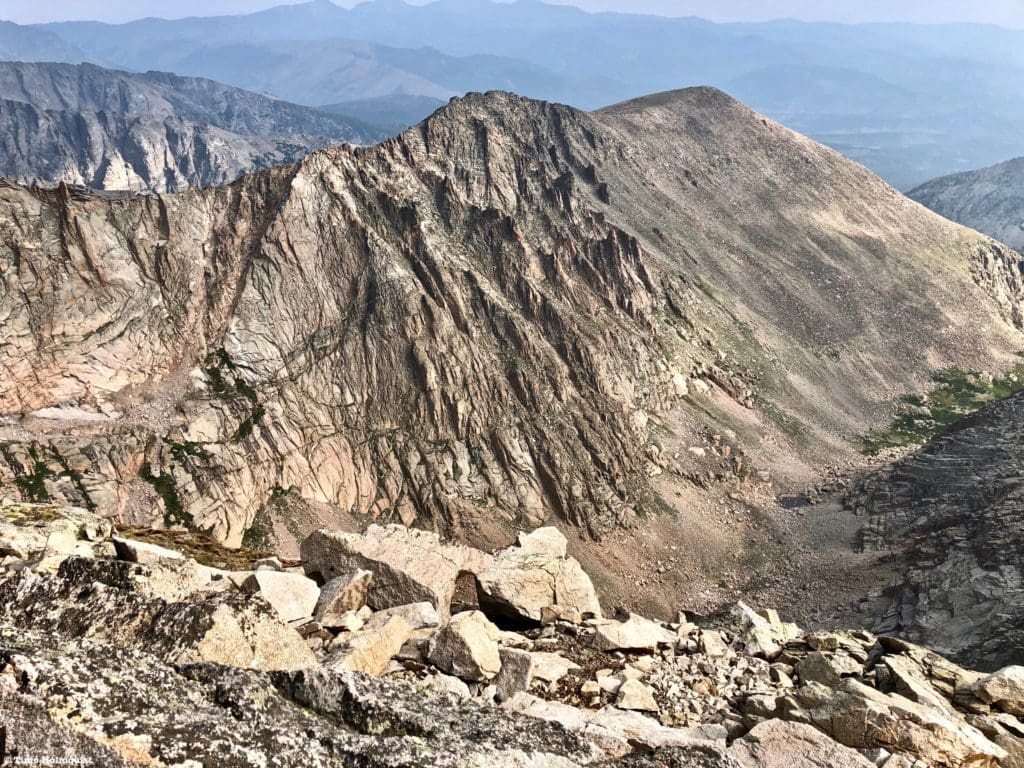
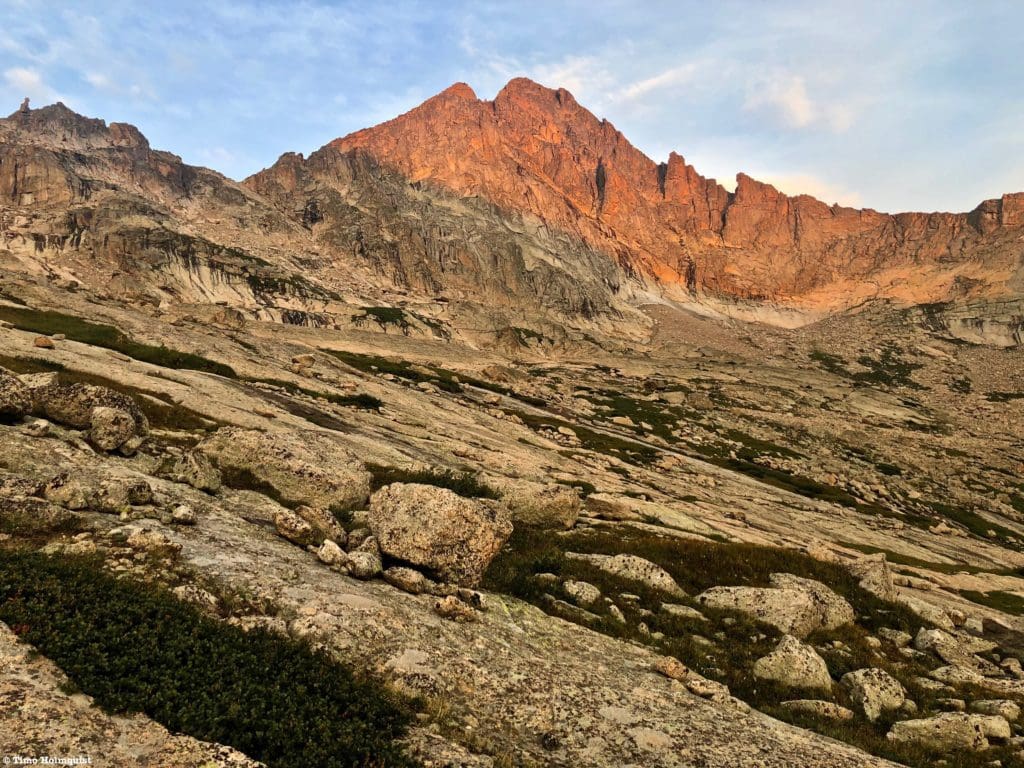
View of the Arrowhead and the Estes Park area from atop McHenrys Peak.
Table of Contents:
Article Navigation: Click on any of the listed items in the table of contents below to jump to that section of the article. Similarly, clicking on any large, white section header will jump you back to the Table of Contents.
- Overview
- Scales and Criteria
- Directions to Trailhead
- Places to Stay
- Field Notes
- Journal
- Final Thoughts
Looking For An Amazing Adventure? Book A Hiking Tour in Rocky Mountain National Park
Scales and Criteria:
This article utilizes three separate rating systems: Difficulty, Popularity, and a Scramble Rating indicating the hardest move or set of moves encountered. The scramble rating employs the Yosemite Decimal System. By the easiest route McHenrys Peak is a Class 3 scramble, and many options exist to make it even harder.
Difficulty Ratings:
- Easy: less than 5 miles, less than 500 ft. of elevation gain
- Moderate: 5-10 miles, 500-2000 ft of elevation gain
- Hard: 5-15 miles, more than 2000 ft. of elevation gain
- Very Hard: 10+ miles, more than 3,500 ft. of elevation gain
Popularity Ratings:
- Low: Large sections of trail all to yourself
- Moderate: Sizeable trail sections to yourself, crowding possible on busy summer weekends
- High: You’ll be seeing people, still a chance for solitude in spring/fall/winter.
- Very High: Almost always busy.
Scramble Rating:
- Class 1: Established hiking trail the entire length of the adventure. Low chance for injury.
- Class 2: Typically involves cross-country navigation, possibly using hands for balance but not required, steeper than Class 1.
- Class 3: Hands and feet used to scale areas, must use hands to proceed (either for balance or to help pull you up a section), increased exposure, a fall could be fatal. Helmet recommended, along with grippy hikers.
- Class 4: Climbing on very steep terrain just shy of vertical, falls could be fatal, hands employed for grip and balance continuously, ropes advisable but scalable without. Helmets are highly recommended, along with grippy hikers.
- Class 5-5.4: Near vertical and vertical climbing that involves technical rock-climbing moves, exposed, falls likely to be serious or fatal, possible to scale without ropes but only for very experienced veterans. Helmets, grippy hikers, and/or rock-climbing shoes necessary.
- Class 5.5 and up: Not covered as scrambling, full-on rock climbing with ropes, helmets, etc.
The YDS system is widely used in North America but can be quite subjective, so it is not perfect. The biggest differences I’ve encountered between Class 3 and Class 4 sections have to do with slope angle, exposure, and putting weight and pressure on hand grips (4) instead of using hands and feet interchangeably as supporting points of contact (3). It is not possible to climb a Class 4 section without using your hands to pull up some or all of your body weight. Typically, a Class 4 section will also require some type of rock-climbing move, like stemming, where hands or feet are pressed in opposition as if climbing the inside of a chimney. If downclimbing, a key difference is that most people will descend a Class 4 section facing inward, i.e., your back faces the exposure.
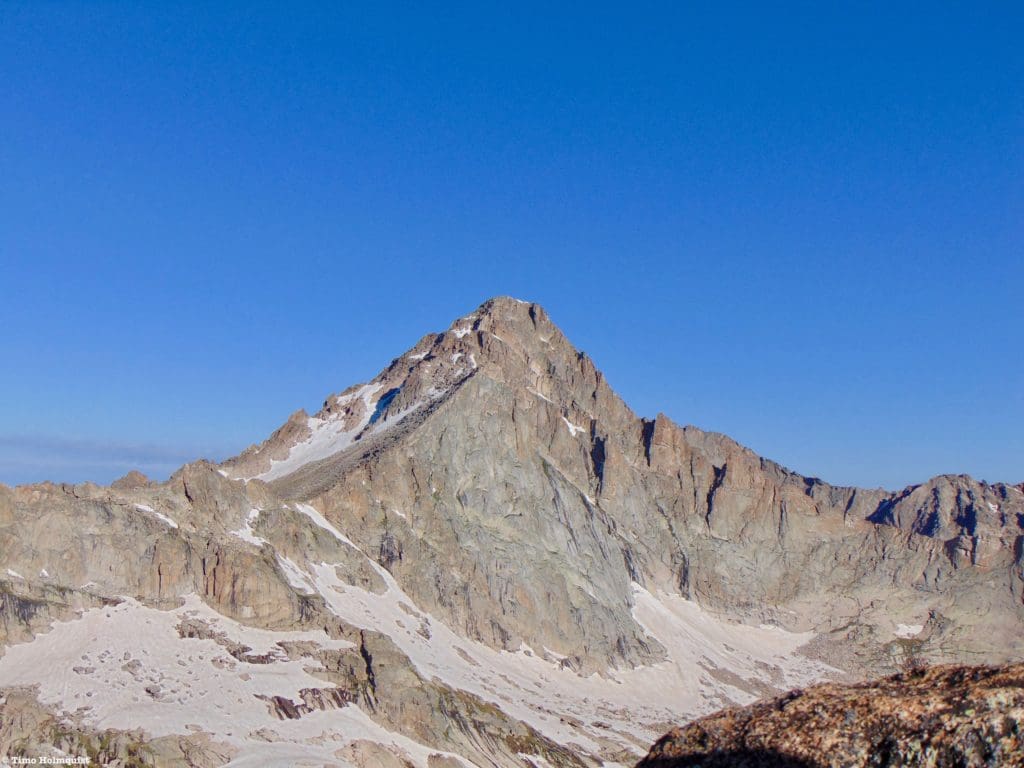
McHenrys Peak, seen from the top of the Spearhead.
The Ultimate Offline GPS Hiking & Ski Maps
See why onX Backcountry is the ultimate GPS navigation app for your outdoor pursuits. Try Today for Free. No credit card required.
Directions to Trailhead:
The best way to start this hike is from the Glacier Gorge Parking area along Bear Lake Road. The parking area is not very large and will usually fill up in the summer months before 6 or 7 AM. Considering the length of the trail, you’re going to want to get there early anyway. What’s nice about pre-dawn starts is that the National Park signage is clear, so you can make it to Black Lake without any navigational issues as long as you have a map and are paying attention to trail signs at each junction. Generally, follow signs for Alberta Falls, Mills Lake, and then Black Lake.
A backup option is to park at Bear Lake, which will cost you an extra few points of a mile but is still a good option with a much larger parking lot. Again, this lot does fill entirely up, so early is the way to go. If you can swing a weekday, do that.
The National Park has instituted a time slot system in addition to the entrance passes for the summer of 2021, which complicates the process of getting in. Do yourself a favor and take the time to understand these components by visiting the Park website. If you do not have an entrance pass or time slot, you will be turned back. The short version is that ALL visitors must have an entrance pass. If you arrive on Bear Lake Road anywhere between 5 AM and 6 PM, you will also be required to produce a timed entry pass. You will be turned around if you do not have a timed entry pass. IF you have an entrance pass, AND you arrive before 5 AM, you are free to park and enjoy your day (make sure your pass is visible on your windshield), hence the “arrive early” mantra.
To get to Bear Lake Road, approach the park via the Beaver Meadows Entrance gate on US 36 and take a left onto Bear Lake Road within a minute of passing the entrance. There is a large repaving construction project going on, so go slow and follow the signs. If you’re coming from the west, enter the park, traverse Trail Ridge, and if US 36 is closed (it may be during the pre-dawn hours so crews can work on the repaving), you’ll have to exit the Park on US34, reenter on US36 and make sure you’re beyond the Bear Lake Road entrance booth by 5 AM. Good luck. I’ll update this section once the construction stops.
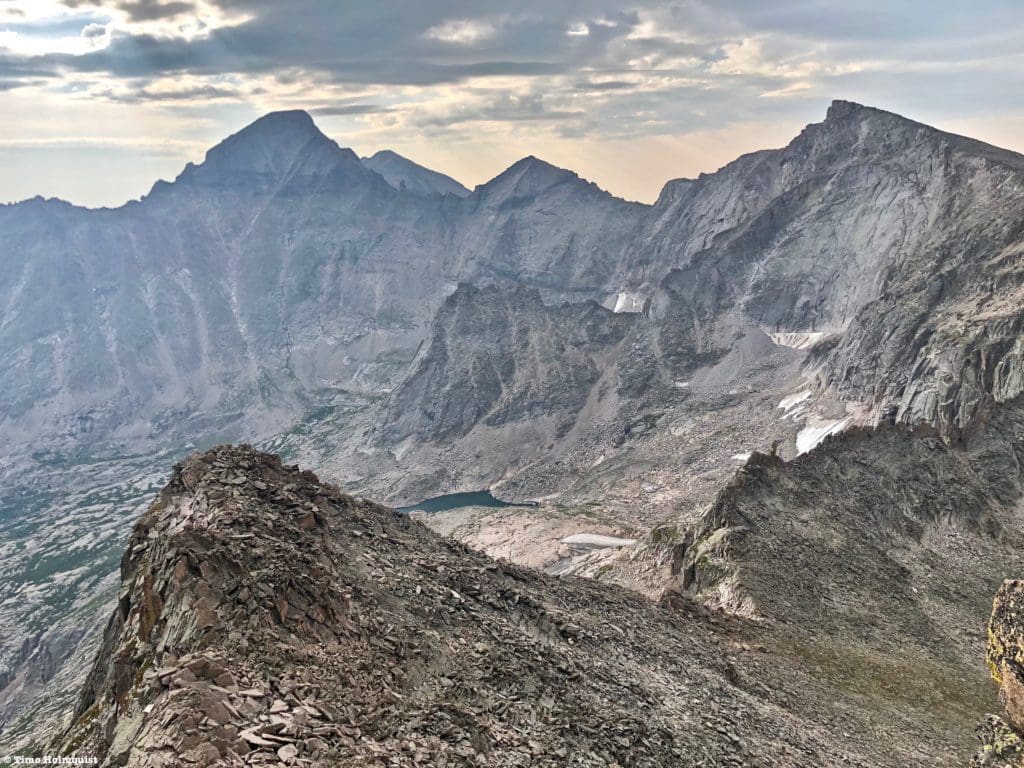
Upper Glacier Gorge and Frozen Lake from high on the slopes of McHenrys Peak.
Places to Stay:
Find a Hotel in Estes Park, Colorado
Support Skyblue Overland by booking your hotel or cabin through one of our links.
Camping
Camping near Rocky Mountain National Park will cost you. The options for free area camping are limited. On a positive note, there are plenty of options, and the National Park is within driving distance of Fort Collins, Boulder, and Denver.
- Estes Park: Known as the gateway to Rocky Mountain National Park, Estes sees nearly 80% of park traffic as opposed to the much quieter western entrance near Grand Lake. The town has a ton of lodging options.
- Allenspark: A small town near Wild Basin that has a few lodging options, including the Wild Basin Lodgeand the Sunshine Mountain Lodge and Cabins.
- Rocky Mountain National Park Camping
- Moraine Park Campground: $30 per site. $20 in winter. Established campground with perks, facilities, campfire grate, wood for sale in summer, and bear boxes to store food. Only loop B is open in the winter, and it’s first-come, first-serve.
- For summer, a reservation is needed quite a ways in advance to secure a spot.
- Glacier Basin Campground: $30 per site. Established campground with the same perks as Moraine Park. Reservation required.
- Backcountry Campsites: Rocky Mountain National Park has backcountry sites that you could book in advance. There is no open camping in the backcountry; it must be at designated backcountry sites. Please check the park website for more details. Backcountry sites require an overnight permit of $30.
- Camping near Estes Park
- Estes Park Campground at Mary’s Lake: Established campground, pricey $45-55. Good backup if other campgrounds are full.
- Hermit Park Open Space: $30 for a tent site, price increases if towing a trailer or for group spots.
- Estes Park Koa: Rates dependent on what you’re bringing with you but will run more than $50 a night in the busy season.
- Free or close to free: but a little farther (if you’re willing to drive)
- Ceran St. Vrain Trail Dispersed Camping ($1)
- County Road 47. Users have reported trash and ATV noise at this location, but it is free.
The steep western edge of McHenrys Peak with Lake Powell below.
Field Notes:
McHenrys Peak is often described as the toughest non-technical summit in Rocky Mountain National Park by its standard route. Read that sentence again.
McHenrys is at the center of a few elite scrambling routes in the region including, Stoneman Pass (Class 3), Arrowhead traverse (Class 4), McHenrys Notch (Class 5.3), and the SW ridge from Lake Powell (Class 4). It’s a mountain that leaves an impression. The route from Stoneman Pass is certainly a classic and provides one of the best summit views for a hundred miles. You also get to pass through Upper Glacier Gorge, which is the most beautiful alpine area in the park.
While not a member of the hundred highest club, McHenrys still reaches 13,327 ft. above sea level. You’ll be spending at least a few hours above treeline. It is imperative that you understand what altitude sickness is and how to combat it. Patchy snow also lasts deep into the summer up here. You need to be prepared to deal with it through July.
For your forecasting needs, start with Estes Park weather. You can also check the forecast for Trail Ridge, which covers a large alpine area north of McHenrys Peak. Many websites will claim they have the best forecasts, but mountain weather changes so often you can’t depend on the accuracy of one forecast. Additionally, many forecast sites use data provided by NOAA, so you might as well use what they provide.
Two additional websites I’ve had good luck with are mountain-forecast.com and Opensummit. Mountain-forecast.com has data for Longs Peak, which forms part of the Eastern wall of Glacier Gorge. There is also a reliable forecast for Taylor Peak, just north of McHenrys. Of particular interest should be wind speed and precipitation. The winds can be nasty in the Front Range and are often stronger than predicted for alpine areas. Another thing I like is that they have estimated freeze levels. If you get high enough, it can freeze/snow any time of the year; crossing snow patches is MUCH easier if they froze overnight, and you can use spikes. Slushy snow will break under your weight, and you could sink up to your hips. Opensummit forecasts are free for the first two days; anything beyond that you have to pay for. They have a forecast for Longs Peak, Spearhead, and McHenrys Peak. In addition to forecasts, Opensummit takes the time to lay out crucial information about alpine weather, including macro forecast discussions and how to read clouds above treeline. It’s a good idea to check forecasts right before you leave for the trail because the most accurate forecast will be the last one you check.
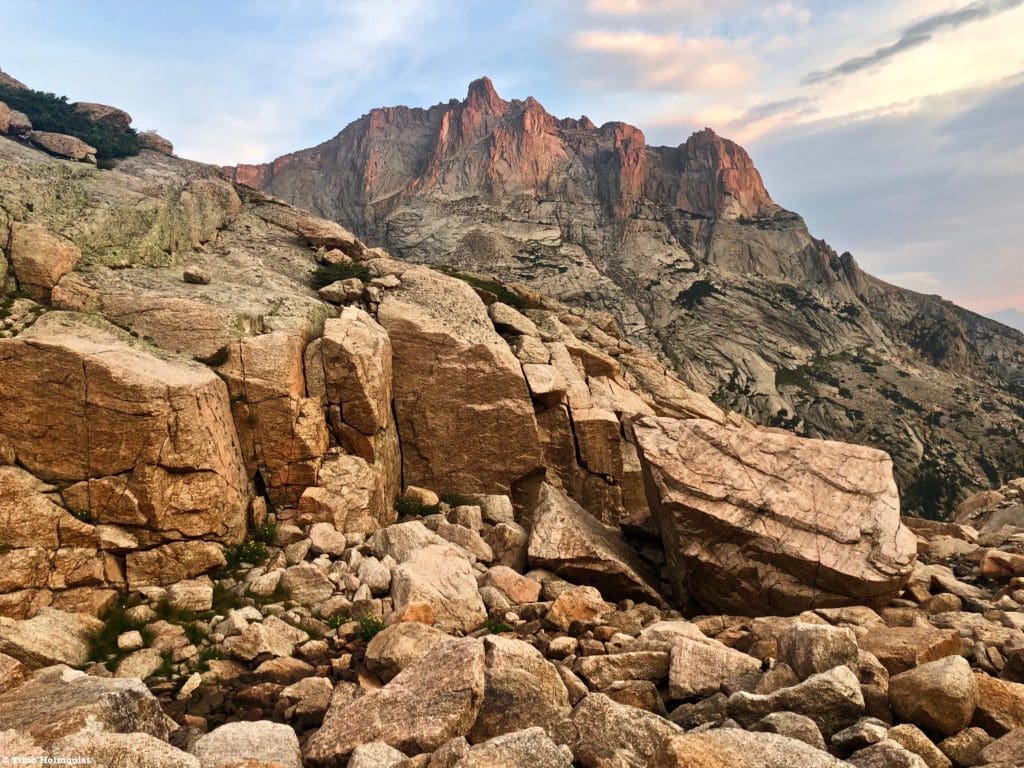
Showy cliffs off the southern side of Thatchop, seen from McHenrys summit.
Journal:
If you don’t come out of this hike thinking, “ok, I get why this area is a national park,” you’re probably hiking a different mountain. To see the serrated cathedrals of rock in Glacier Gorge is to truly understand how dramatic nature can get. High praise? Yes. Deserving? Also, yes.
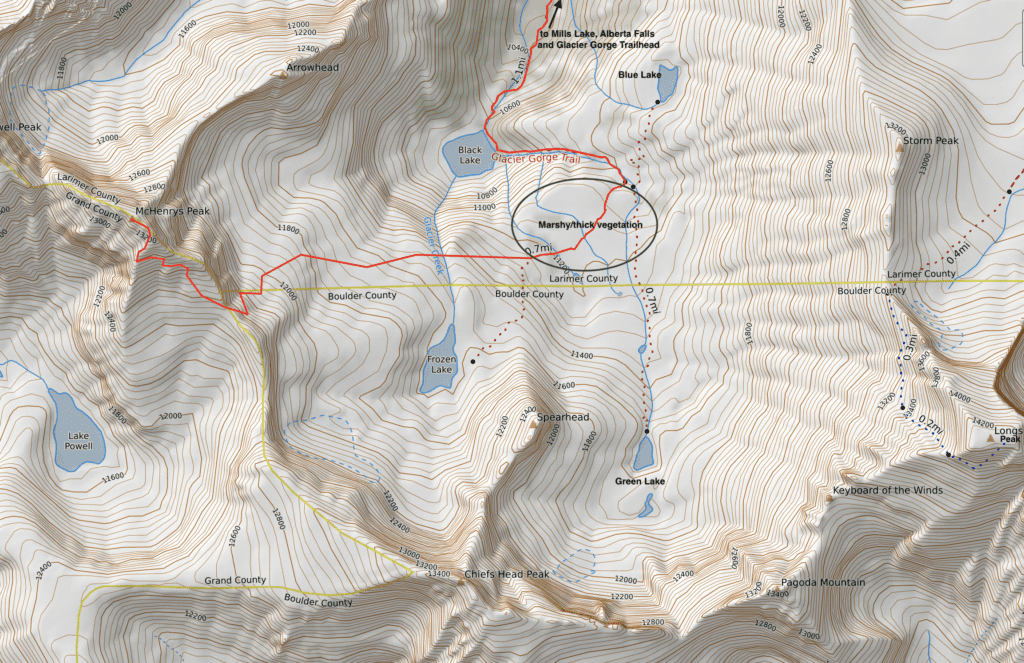
Route to McHenrys Peak.
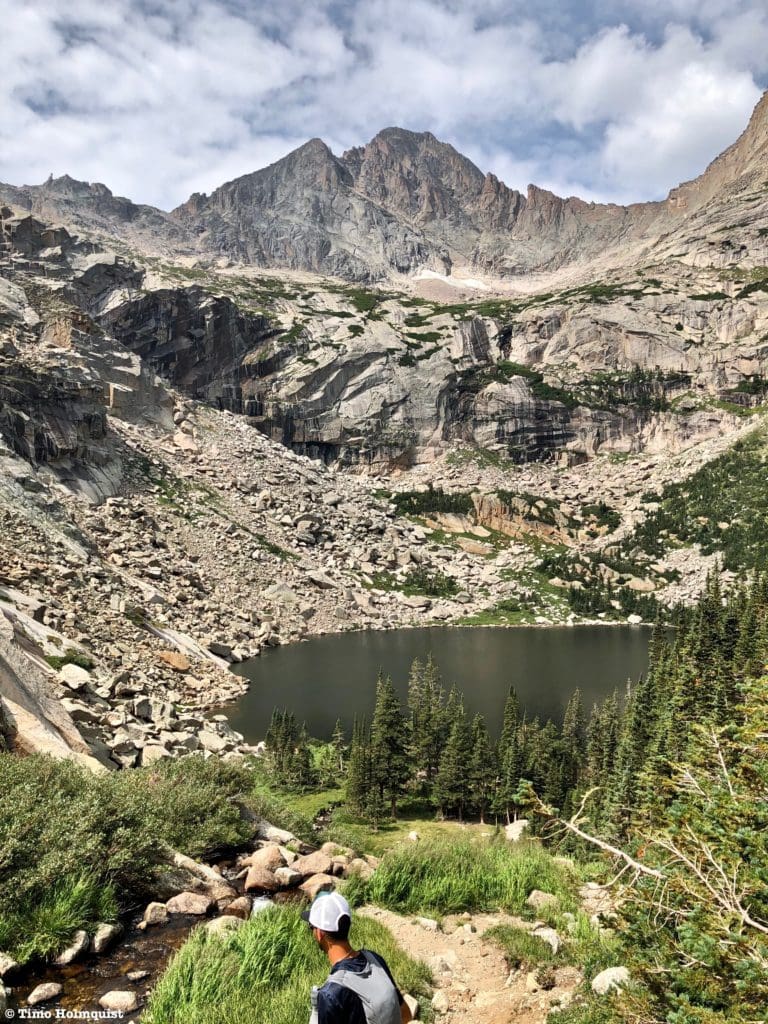
This review will begin from Upper Glacier Gorge. In order to get there, you want to start from the Glacier Gorge or Bear Lake Parking area and proceed to Black Lake. To read about the trail to Black Lake, visit our review by clicking here.
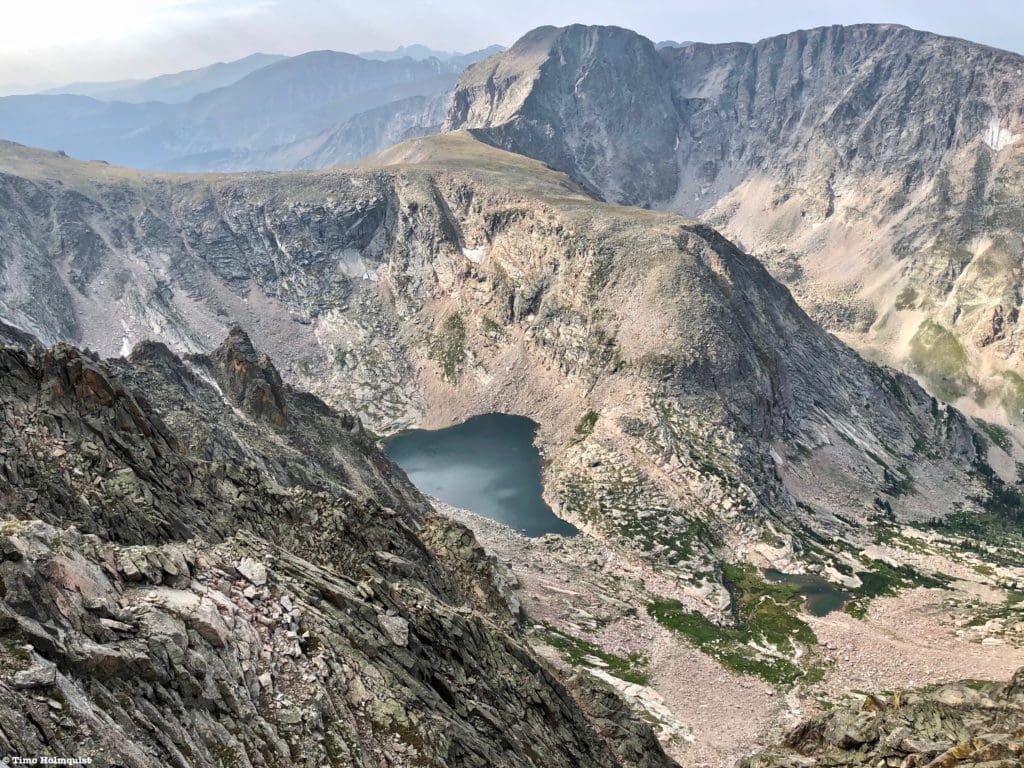
Black Lake is a gorgeous destination by itself and warrants some exploration, but beyond the lake is where the real peak baggers paradise awaits. From the edge of the lake, follow a rough trail along the eastern shore. You’ll pass through a treed section before arriving at a stream running down to meet the lake. Turn east (left) and ascend the gully with the stream on your right-hand side. This steep uphill section will have you gain roughly 400 feet in only a few points of a mile.
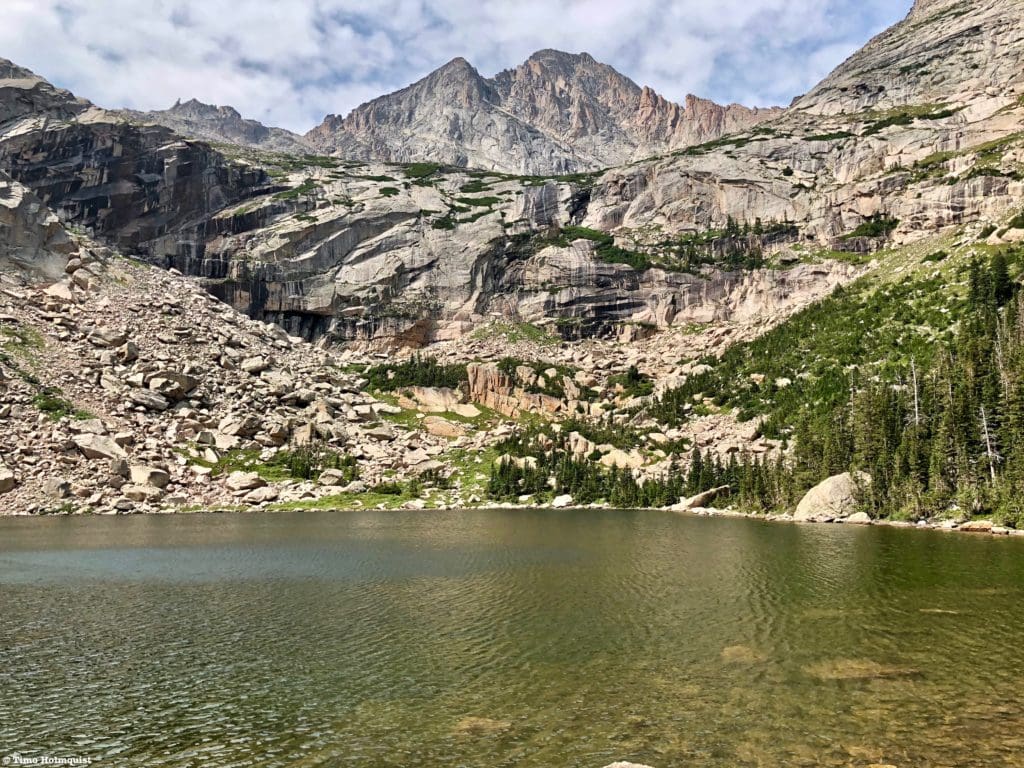
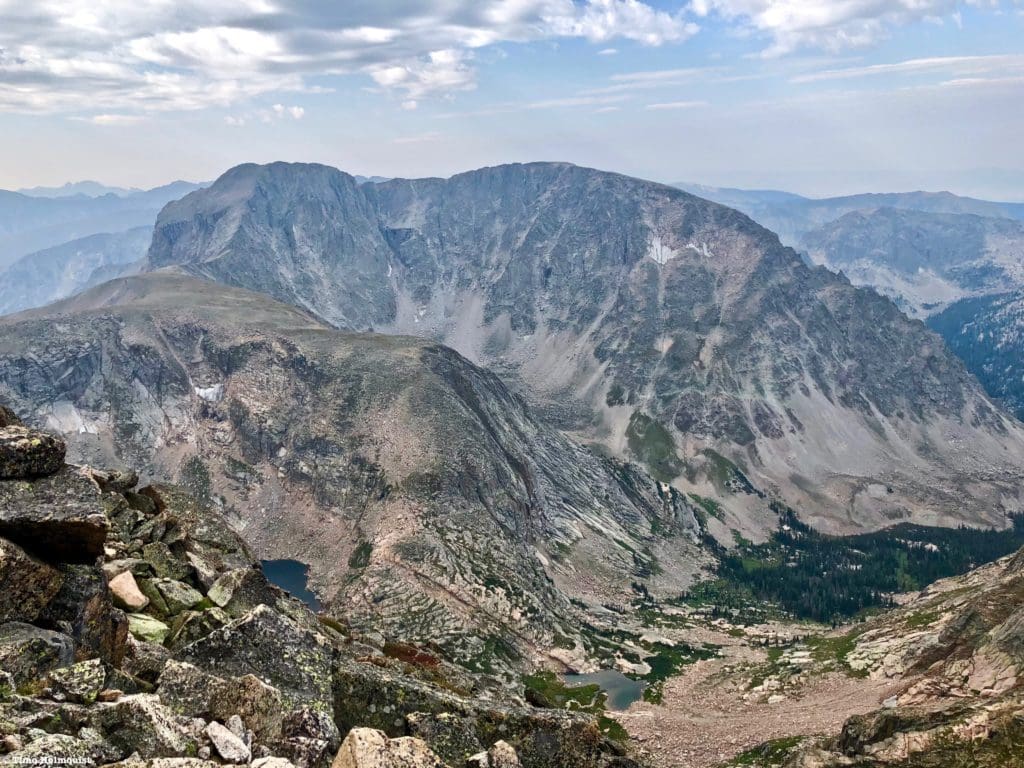
McHenry’s Peak from Black Lake.
Once the elevation levels off, you’ll arrive in Upper Glacier Gorge. This fascinating area is the highest part of Glacier Gorge and is ripe with outdoor opportunities. You can ski backcountry couloirs here, attempt a handful of dramatic summits, rock-climb or scramble up the Spearhead, and visit three beautiful alpine lakes. For a full breakdown of what the area can offer, visit our Upper Glacier Gorge review: click here.
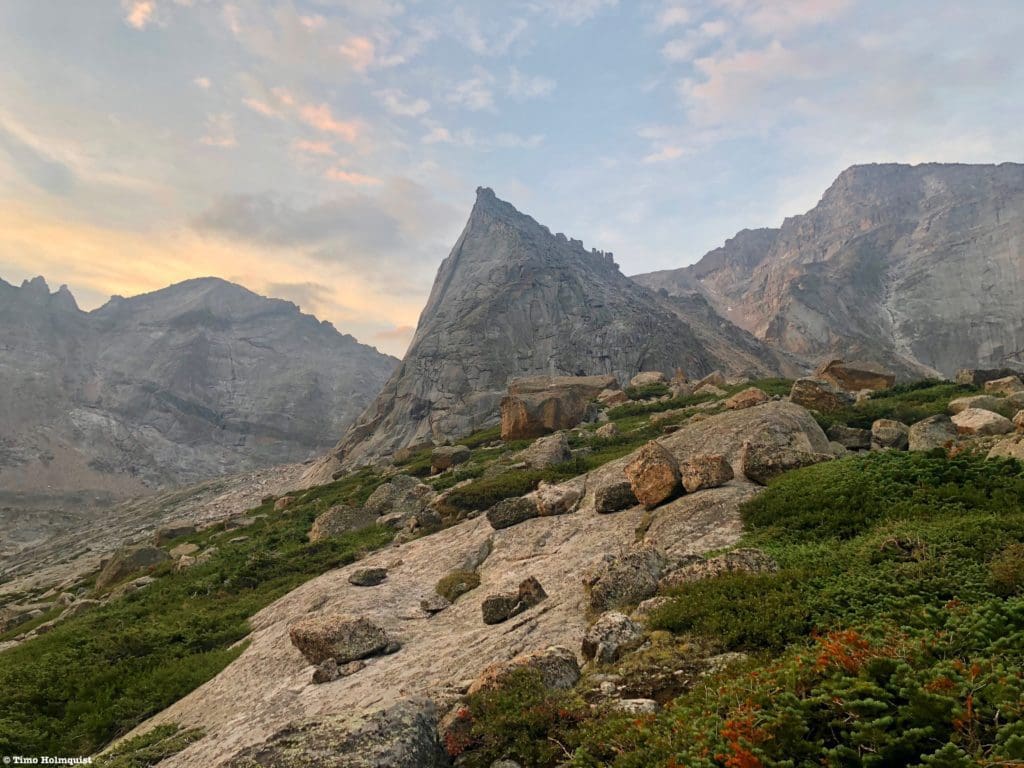
The Spearhead in Upper Glacier Gorge.
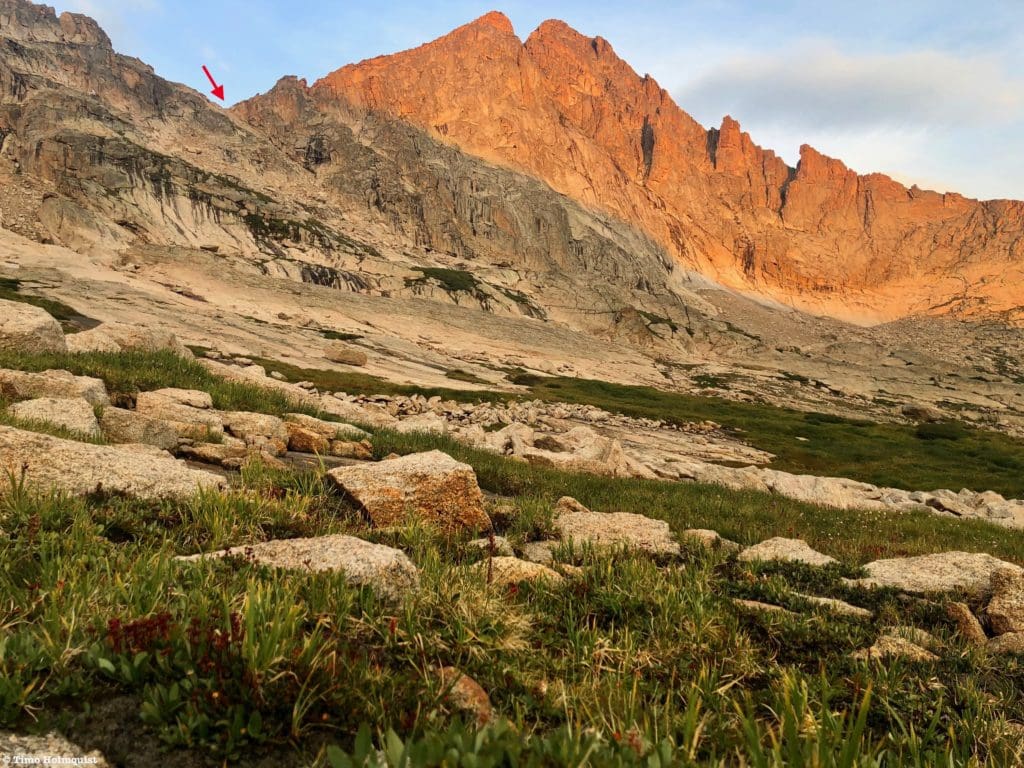
Despite the searing beauty of the area, some fairly committing route choices stand before you. Having seen McHenry’s from Black Lake, you should be able to identify the mountain to the west of where you are. Directionally, it’s not difficult to trace a line to it. However, this area is festooned with cairns that do not lead to anything you want them to, and paths disappear in a sea of willows and thick vegetation. Your best bet is to cross the stream you’ve been following whenever you can, point your toes towards McHenrys, and thread together a path utilizing a combination of cairns and drier rocky surfaces to minimize time spent fighting through tough plants. The keyword is minimize; you will have to bust through some vegetation regardless of what path you ultimately pick.
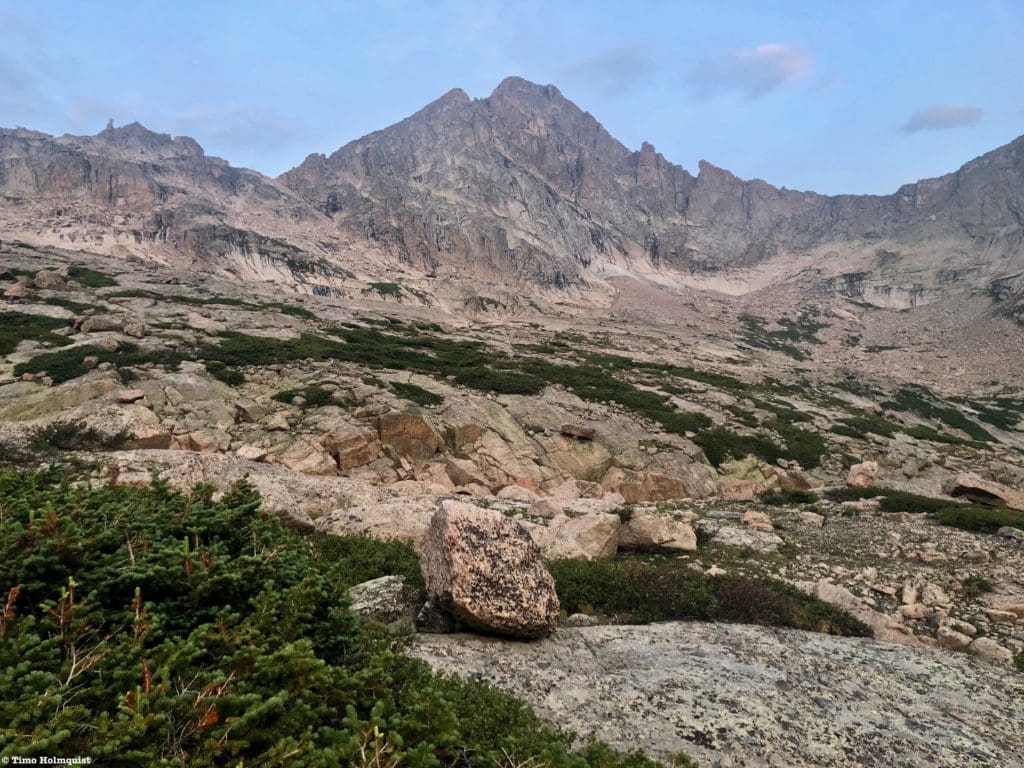
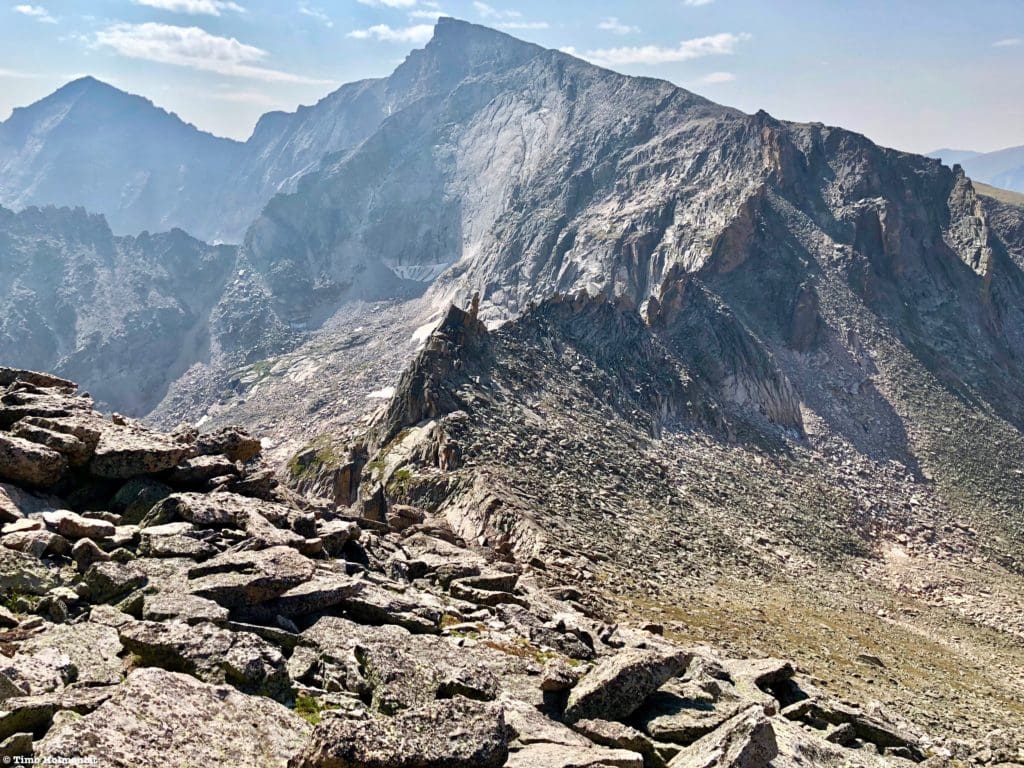
The profile of McHenrys Peak is hard to miss, aiding your general orientation.
If you ascend too high, you’ll end up by Frozen Lake, next to the Spearhead, and have to readjust. Similarly, if you try to use the shelf around Black Lake as a marker, you’ll spend too much time fighting through cliffy terrain and tedious vegetation. Pick a line of best fit and work your way to the peak.
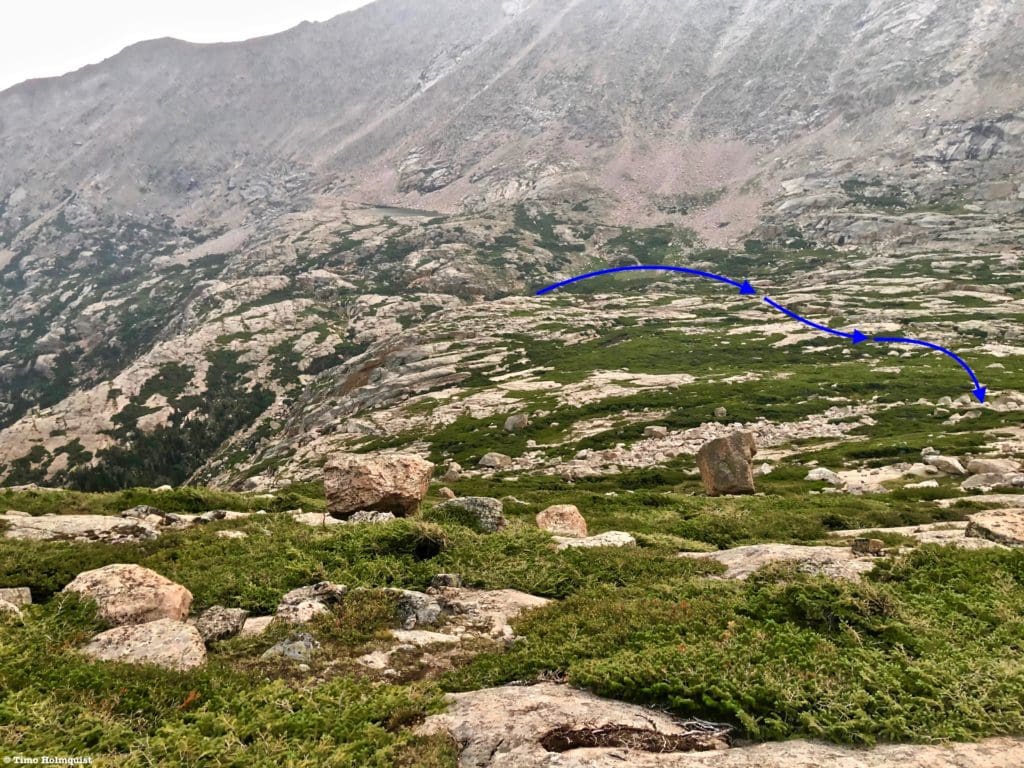
Approximate path from where you emerge in Upper Glacier Gorge.
Eventually, you’ll reach a small rocky canyon where the outflow stream from Frozen Lake passes through. This is the last reliable place to filter water. If you’re hiking in August or September to avoid the snow, make sure to top up here.
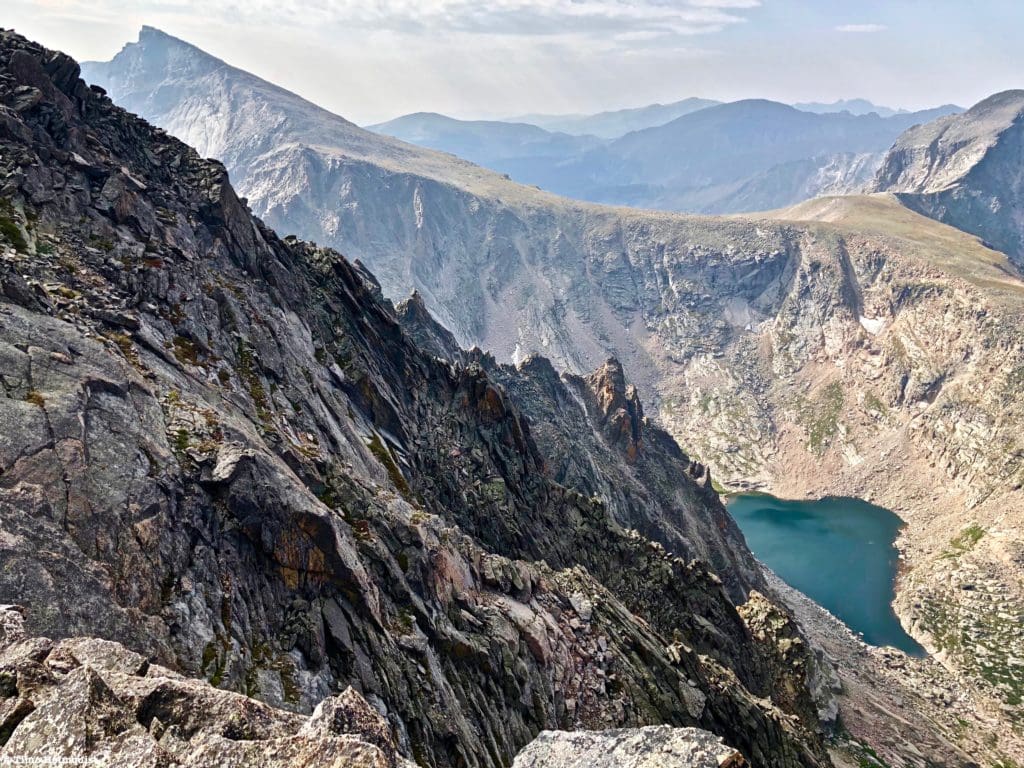
The small rocky canyon with Arrowhead behind. It’s hard to see from this angle but there is a reliable stream here.
There are multiple breaks in the canyon walls you can clamber up to continue on your way. After you pass the stream, the views towards McHenrys become more and more dramatic. In fact, the entire basin is loaded with so much beauty it may be hard to stay focused.
An iconic summit in an iconic place.
While you eventually want to be standing on top of McHenrys, the cliffs below the peak are all technical. The easiest way to scramble up is actually to make for the pass just to the left of the main mountain. This dip in the ridge is called Stoneman Pass.
Stoneman Pass marked as you approach.
The actual Stoneman is a rock formation south of the pass, which will become more obvious as you near it. It is not necessary to climb to the Stoneman and will, in fact, require harder scrambling to reach.
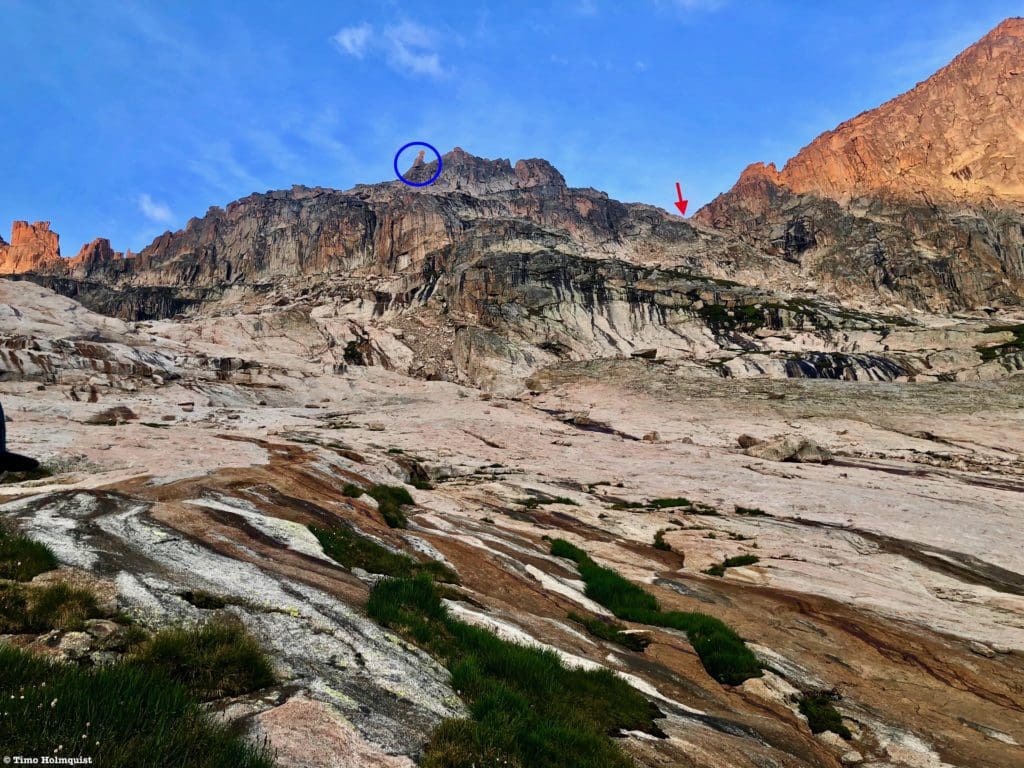
The Stone Man (blue circle), in relation to the pass (red arrow).
As you approach the pass, the ground will shift to an area where enormous sheets of unbroken rock slabs dominate the landscape. Crossing them feels more like the Sierra backcountry than the Rockies and adds another level of unique beauty to the hike itself. The rock is grippy and beautiful.
Once you cross over the rock slabs, the terrain will change again, with broken rocks and scree taking over.
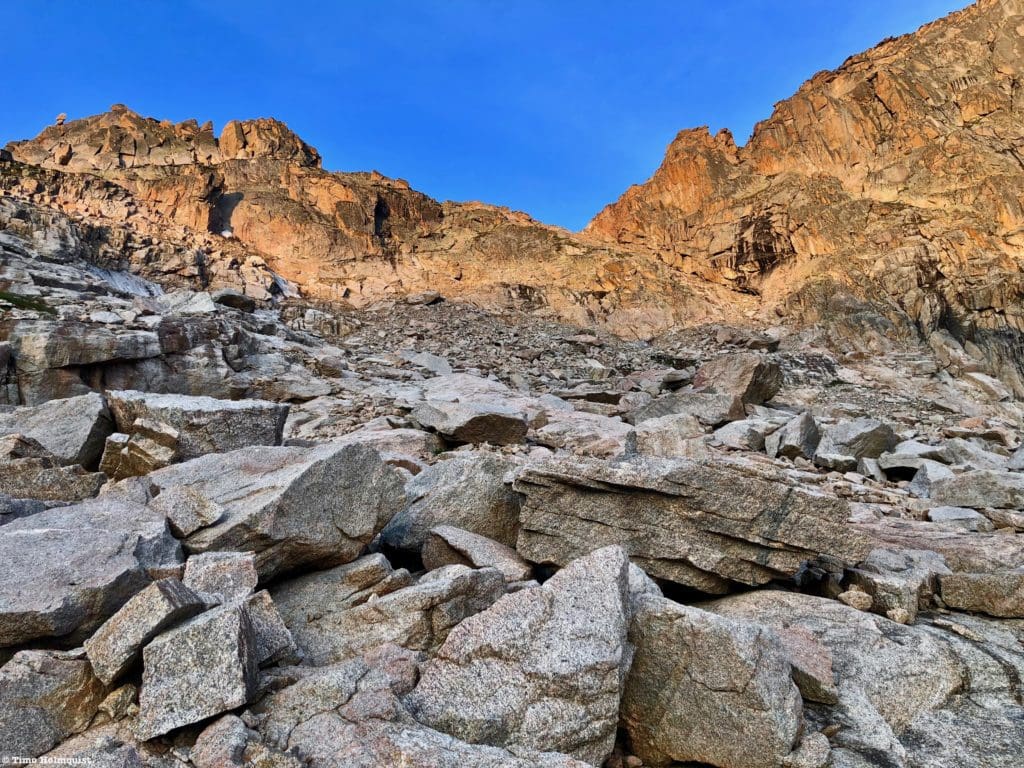
Big broken rocks beneath Stoneman Pass.
With eyes set on the pass, pick and choose a line of best fit. There are occasional cairns through here, but as long as your heading for the pass, they aren’t necessary.
A patch of snow hiding near Stoneman Pass. Longs Peak looks on from afar.
Ultimately, how you ascend the pass is up to you. The most traveled path finds the bottom and ascends up a mixed slope with loose and sandy rock. It’s not technically all that difficult, but the slip and slide risk is high.
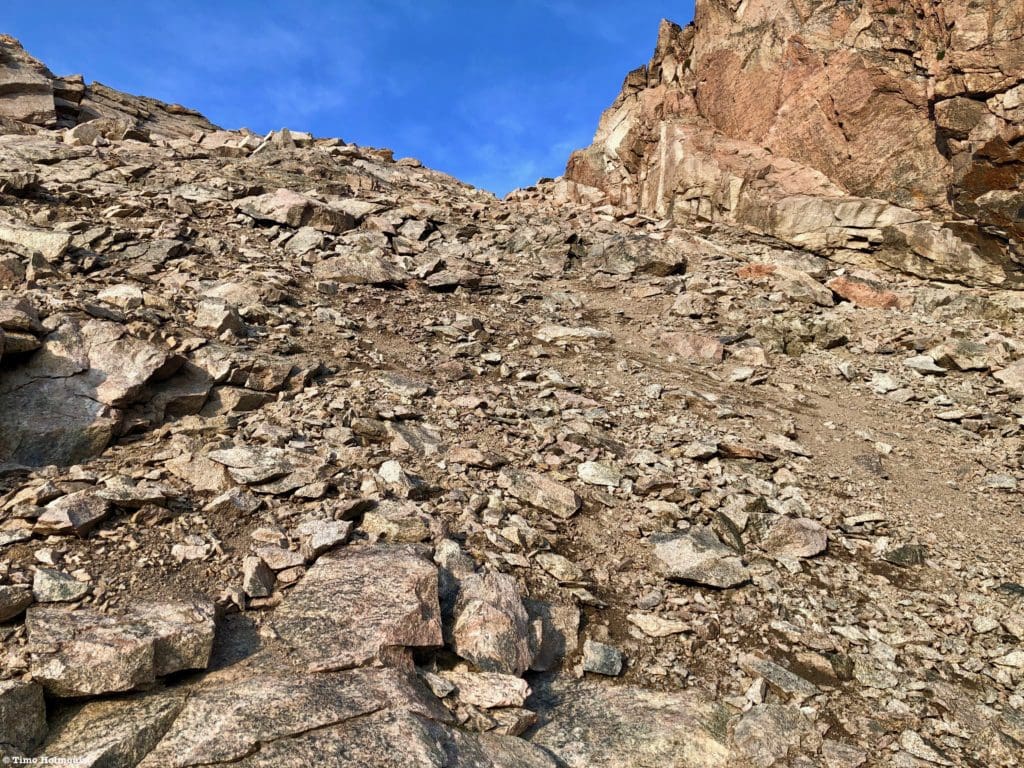
The terrain composition on the way up Stoneman Pass.
Alternatively, you can stick to the left (southern) side of the pass and try a line through much sturdier rock.
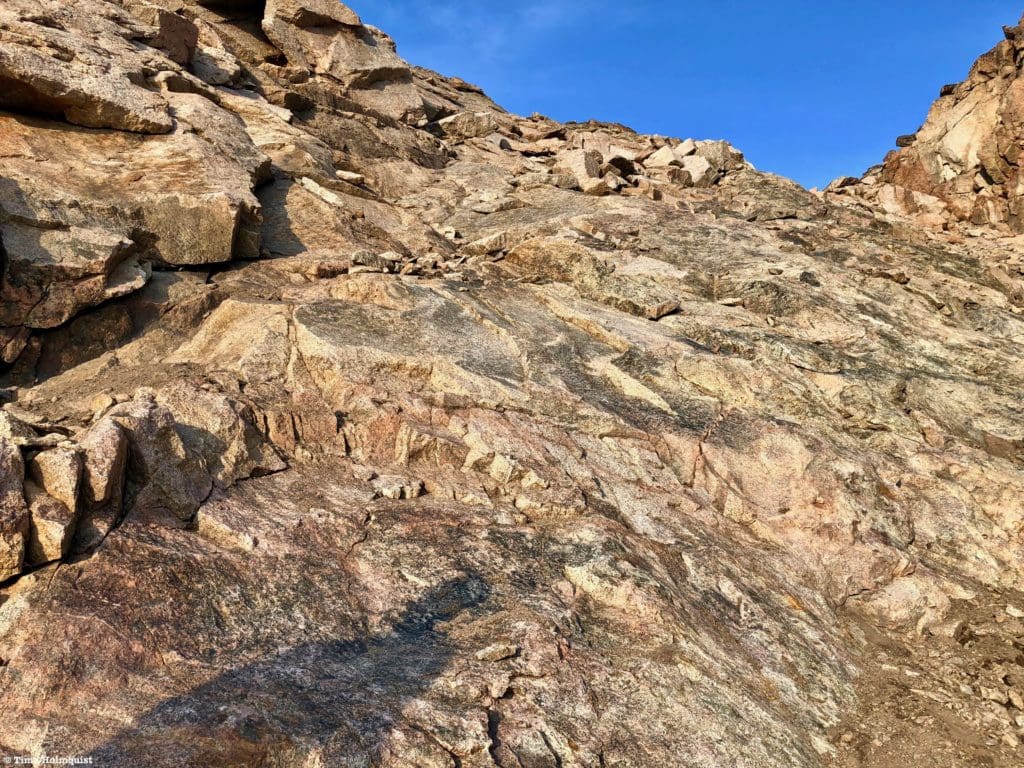
Where I ascended. This area has a few isolated Class 3 moves but is much more stable underfoot.
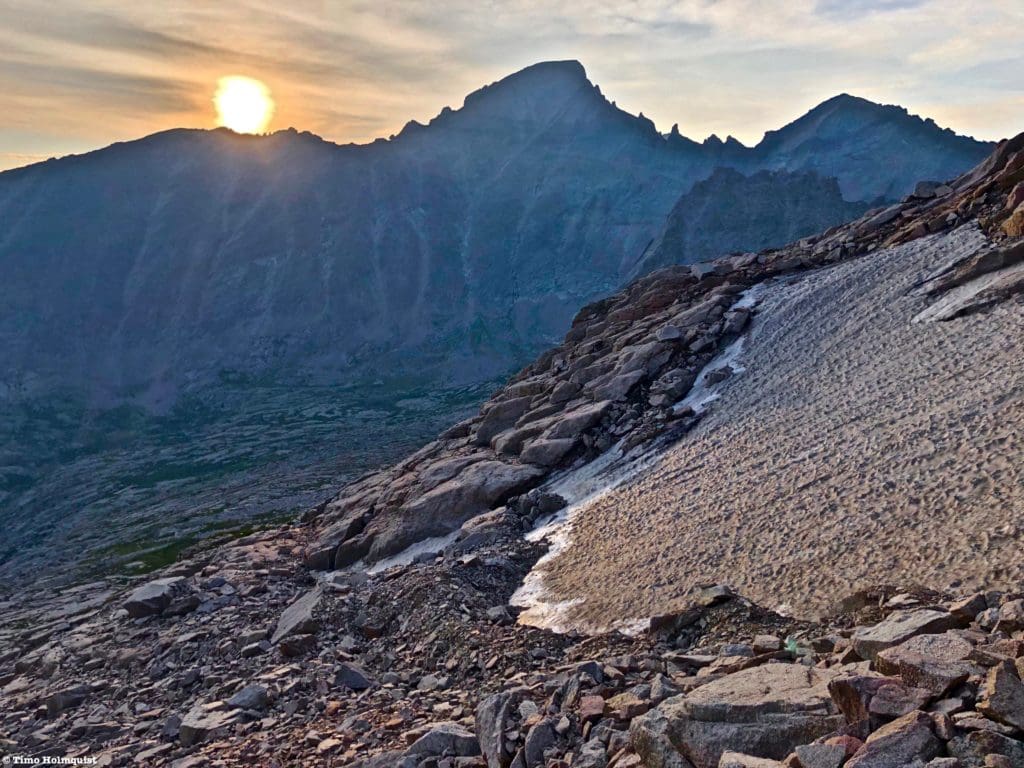
Keep in mind that Stoneman Pass retains snow through July, and large parts of the upper route on McHenry’s do as well. If you’re worried about what shape the upper route is in, you can get a good preview from Mt. Alice’s summit. A mid-August through late September ascent is the best way to avoid any lingering snow.
McHenry’s from Alice in early July. The upper route is marked.
Once on Stoneman Pass, you’ll be given absolutely stellar views of the surround with no shortage of things to stare at.
Following the ridgeline south, you can see the Stoneman rock formation and the hulking northern face of Chiefs Head Peak. The ridge featured is part of the Continental Divide.
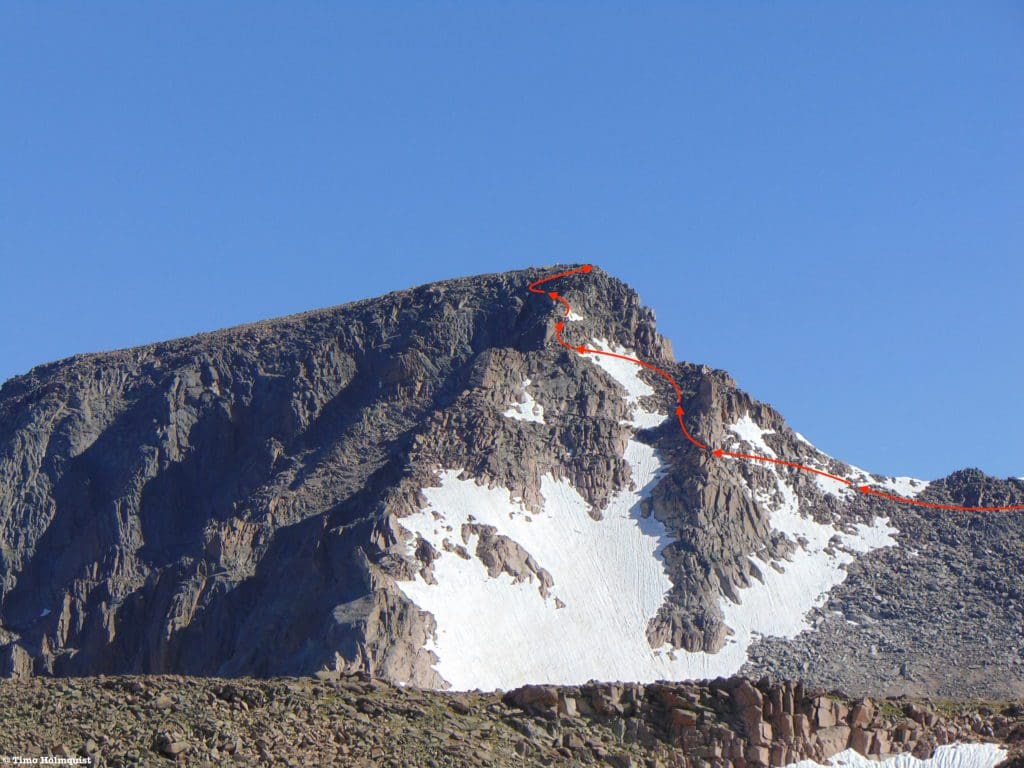
Turning north, you’ll be able to get a better idea of the seriousness of the upper route.
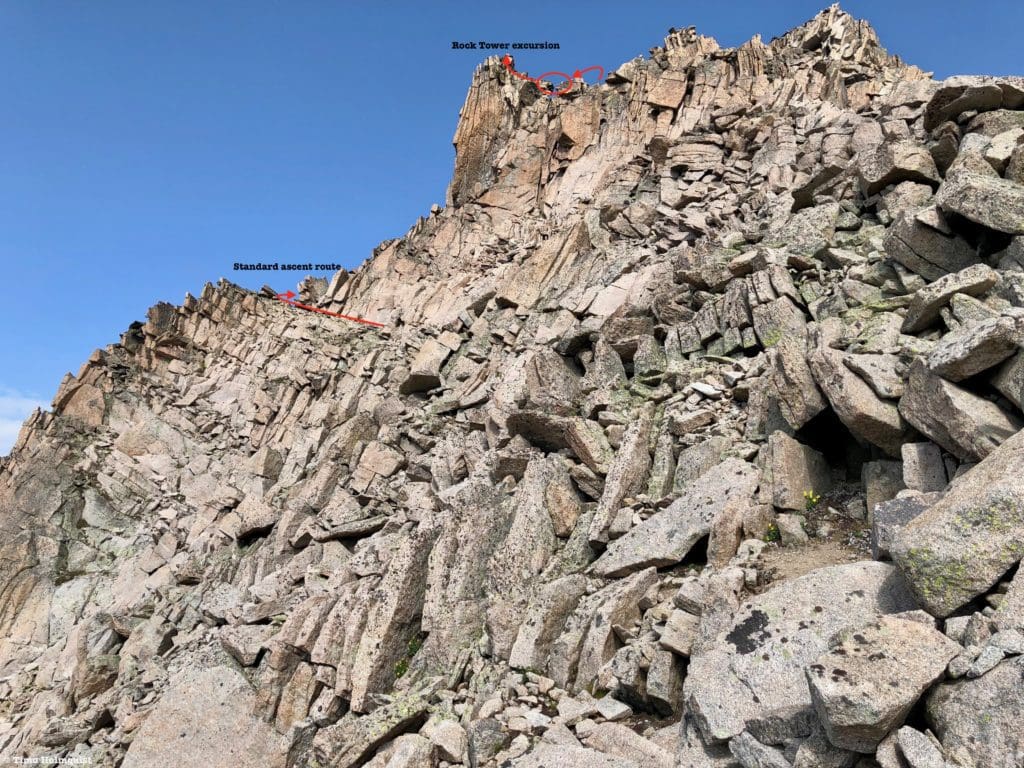
The rest of the peak. You’ll stay left of the first pinnacle, ascend towards the rock pillar just left of the summit and then hook back towards the summit. It’s a fun and complicated route.
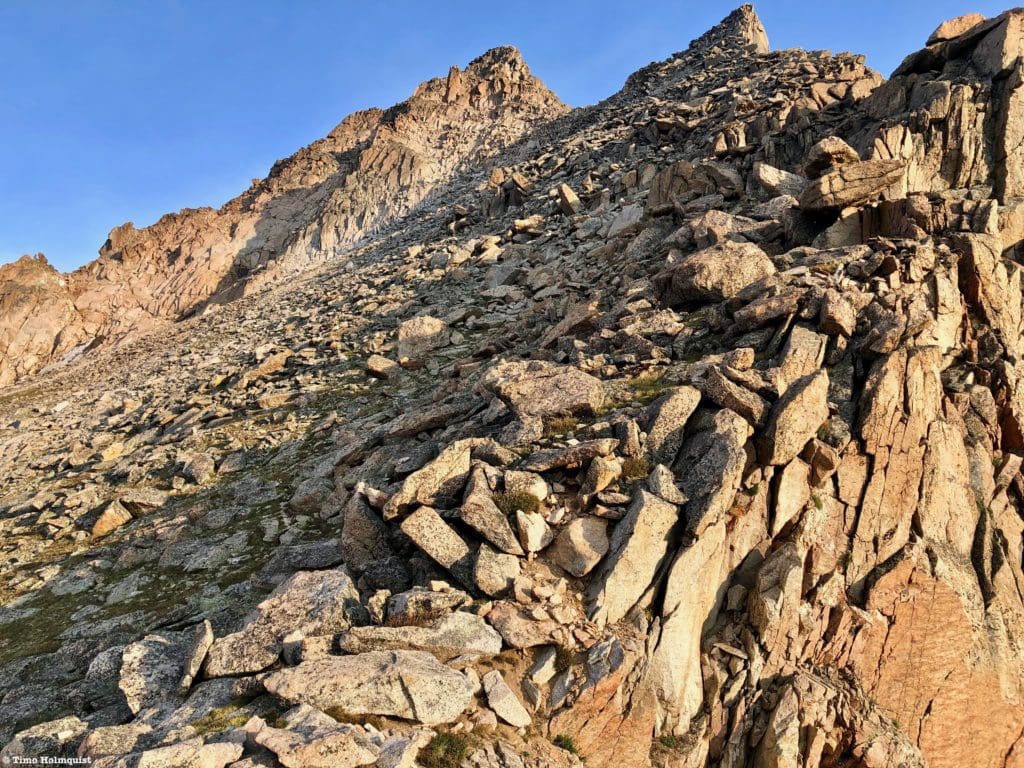
Once you’re ready, begin ascending below the ridgeline north. This section is long and involves Class 2+ scrambling over large talus boulders. Depending on your route choice, you may be forced to perform a few Class 3 moves. Generally speaking, you can dodge more intense sections by either sticking closer to the ridge crest early or by staying lower and performing a long-angled ascent towards the upper difficulties of the peak. My hiking partner and I decided to stay lower initially, and that served us well.
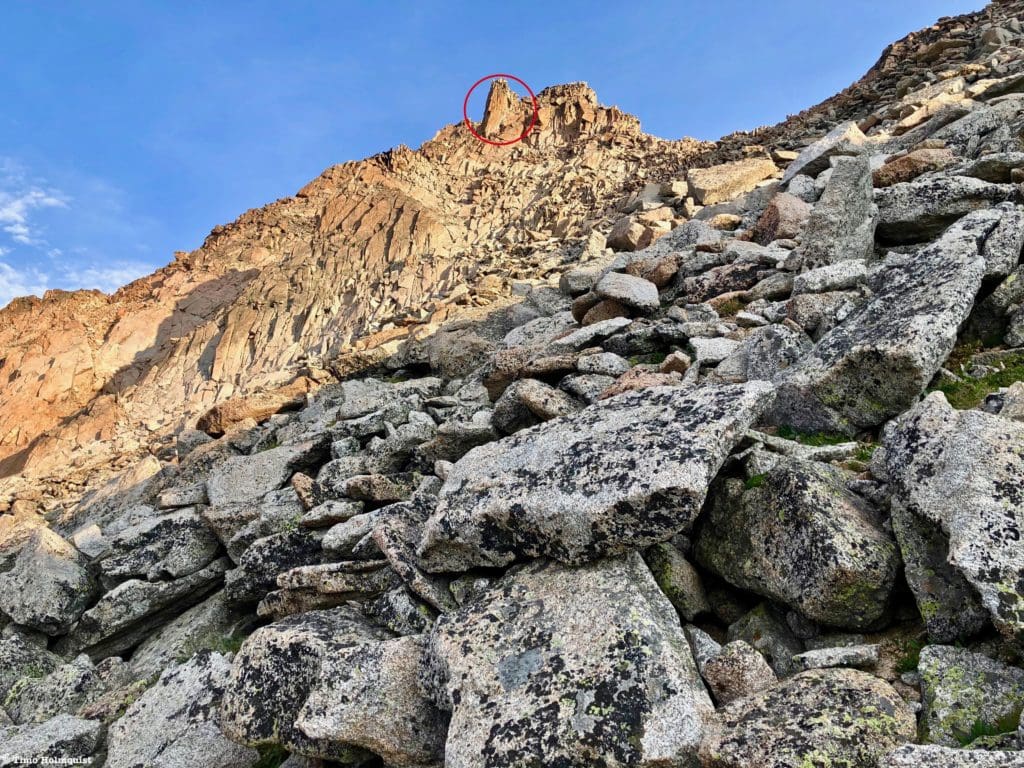
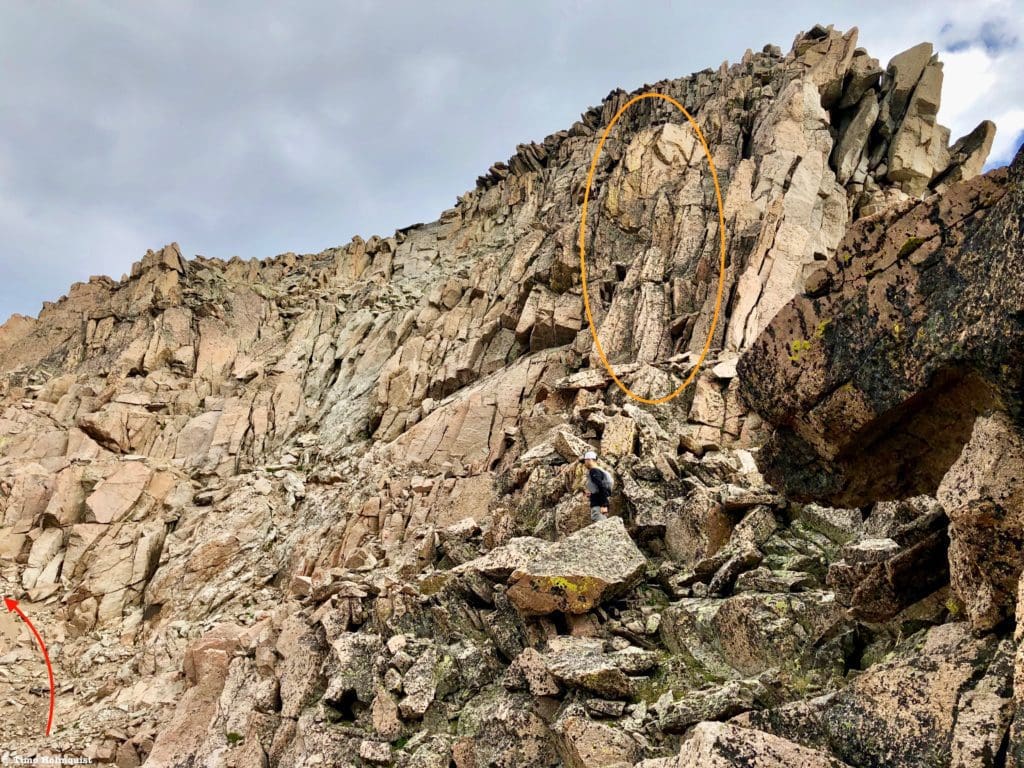
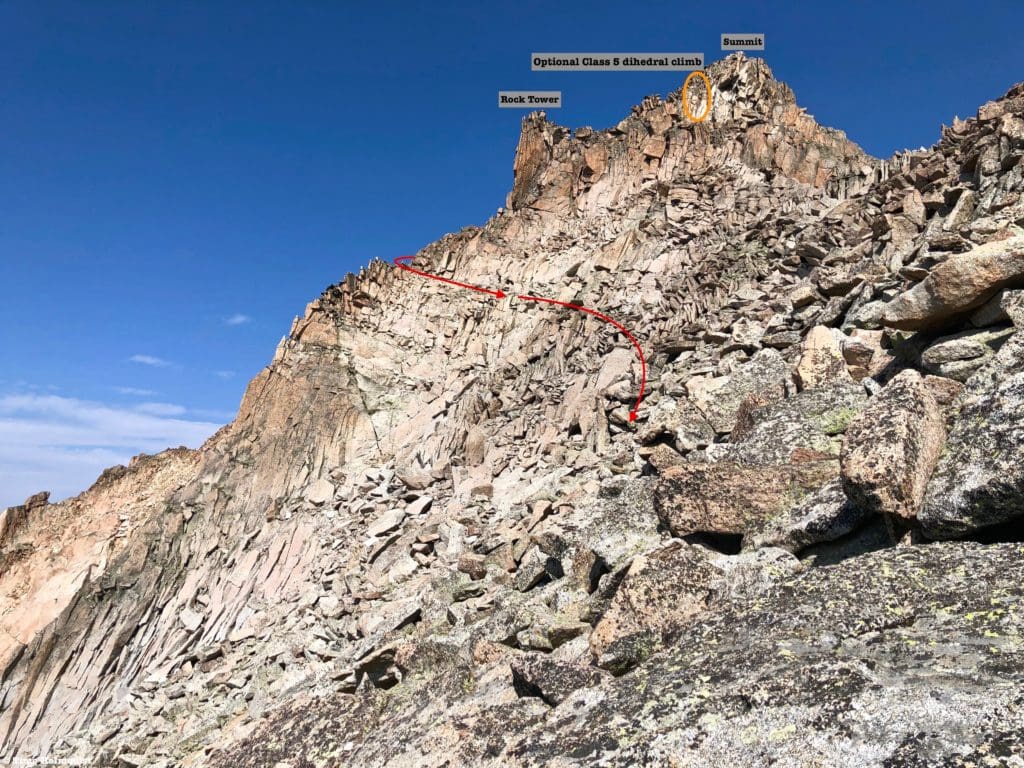
Our goal was to make it underneath the rock tower circled in red.
There are a lot of cairns in this area, and some lead to interesting route choices, while others lead to nothing. The best bet is to use them when they appear useful, and when they don’t, find the summit block or the tower in front of you and work your way up towards it. As you near the rock tower, a more definable set of cairns takes shape and ascends a series of broken ledges to the left of the rock tower.
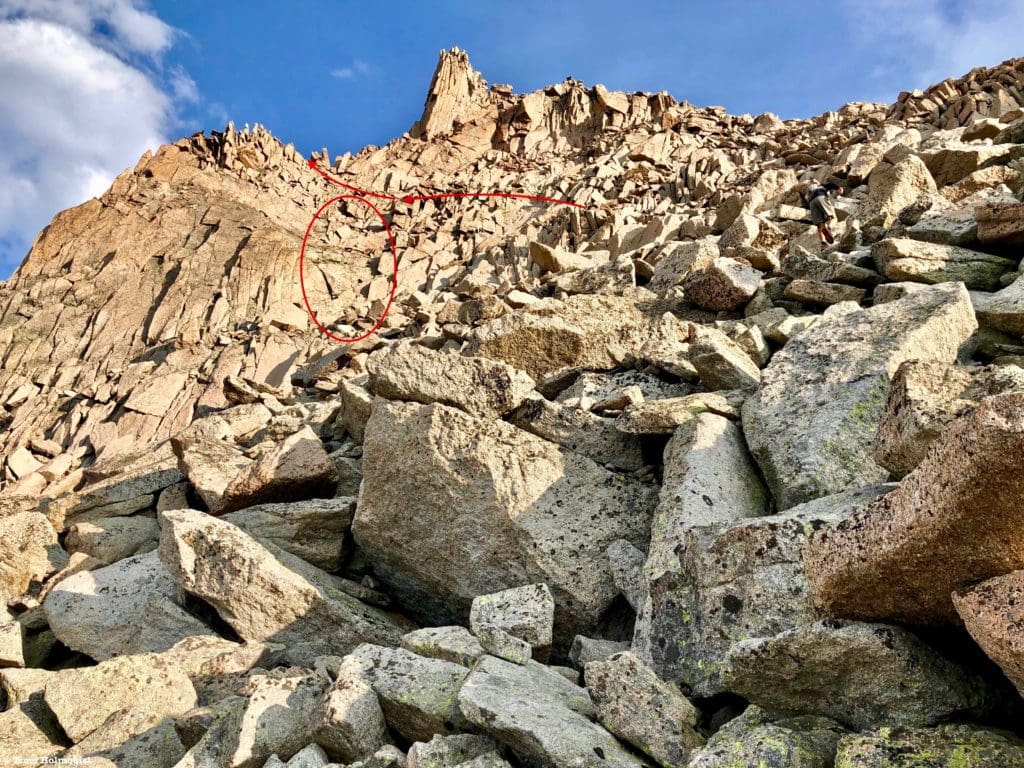
The red arrows approximate the easiest route, marked with cairns. The red circle represents an area of supremely fun blocks to scramble up that go at a Class 3+/4.
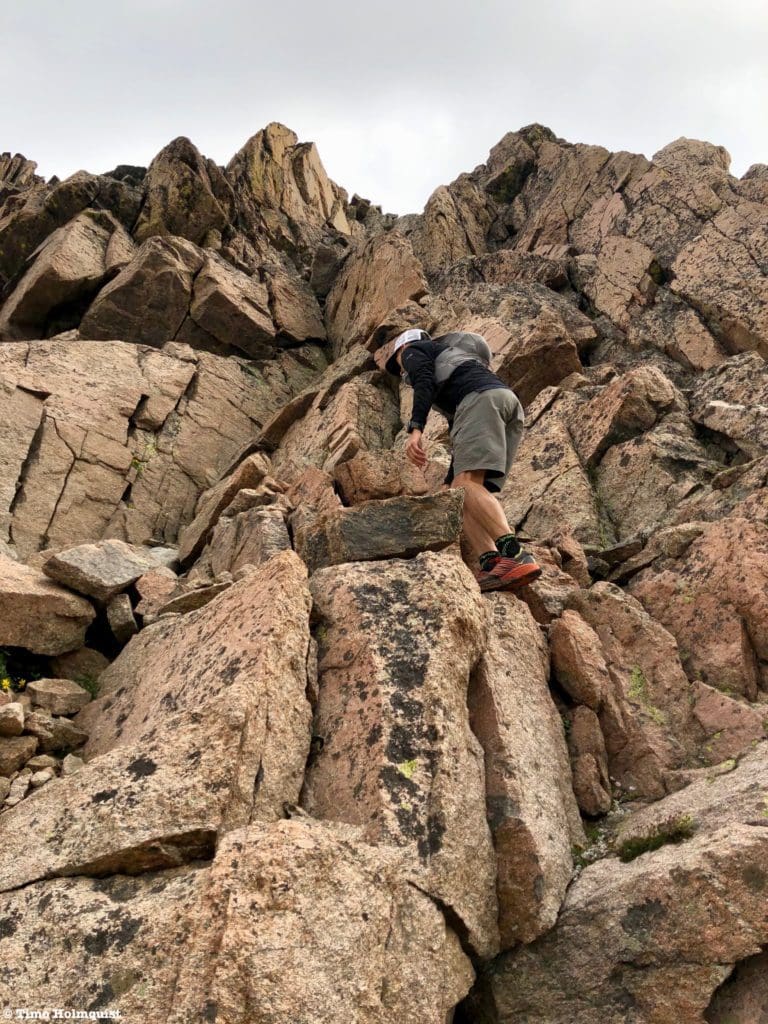
While the easiest route follows a fairly established path once you get close to the tower, there are dozens of other variations that will bring the intrepid scrambler joy. Since you’re in a sea of cliffs, talus, and cool rock formations, pick and choose what you will.
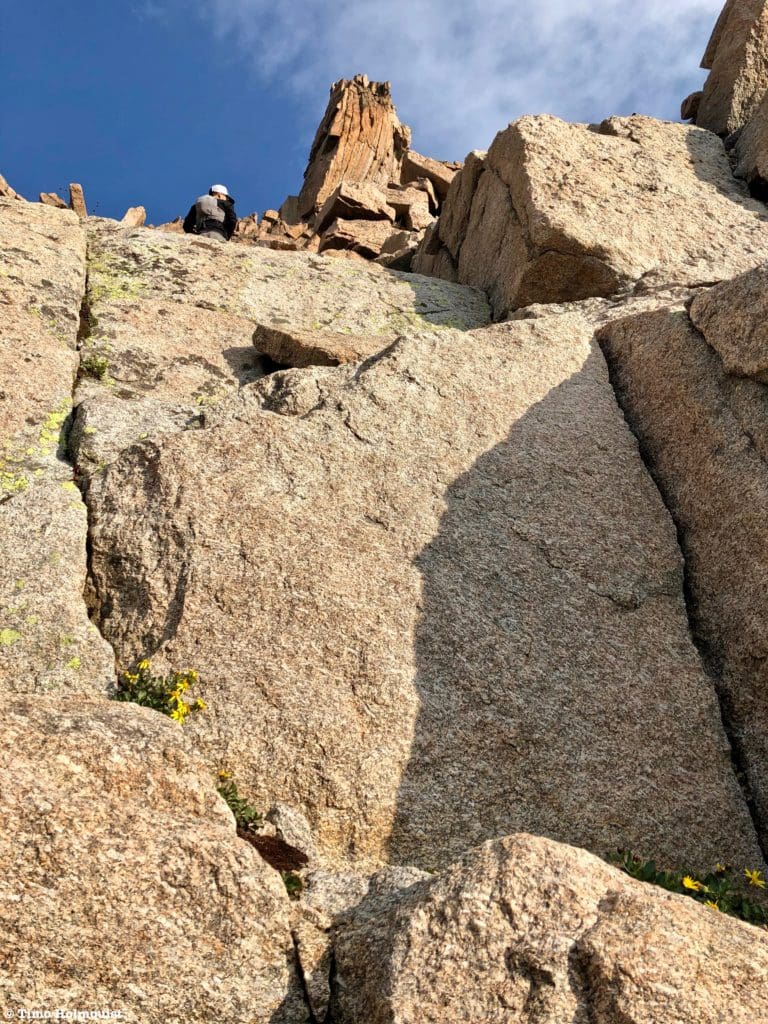
The fun optional blocks beneath the rock tower.
The other side of the rock tower does not cliff out so any path you choose won’t suffer from excessive downclimbing on the other side.
It’s hard not to have fun on this type of rock.
As you pick and choose the easiest way to attain the ridge, continue checking your hand and footholds. In general, things didn’t move, but there are always exceptions, and on the backside of McHenrys, you are pretty far from help.
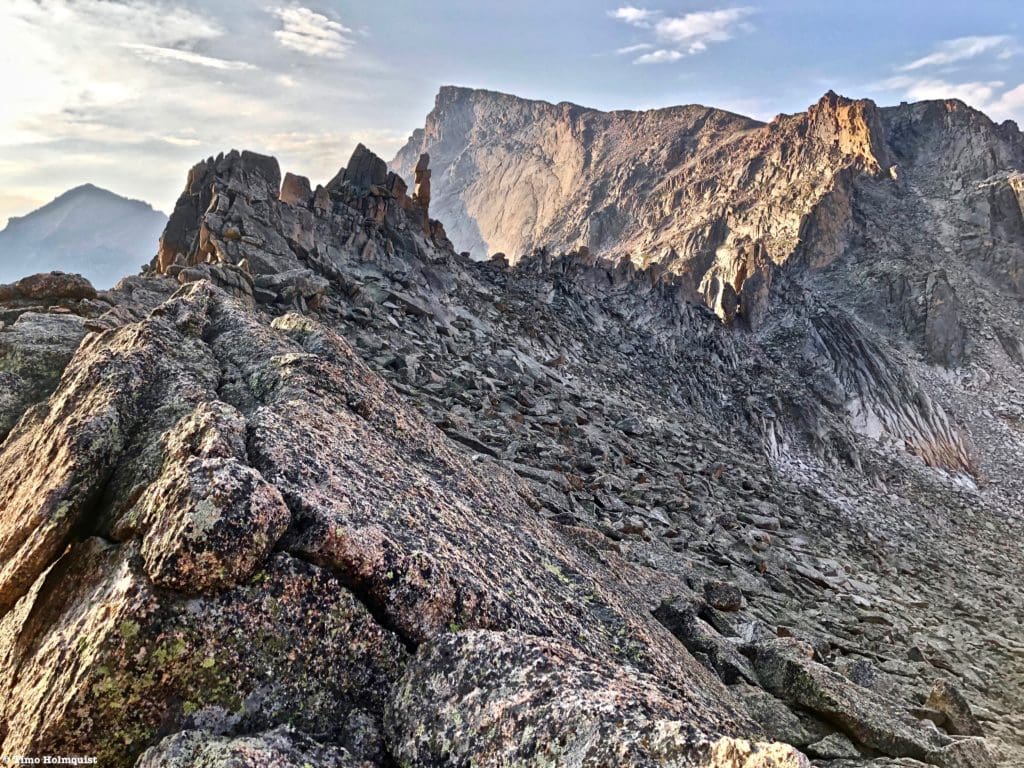
Don’t forget to take a look back at the beautiful natural architecture of Glacier Gorge, where Chiefs Head, Spearhead, Pagoda, Keyboard of the Winds, and Longs Peak are obvious. As you reach the rock tower, you’ll finally be high enough to see Frozen Lake creeping into the scene.
Cairns will become more obvious as you hit the ridge near the rock tower, and the views southwest take on a fantastically remote profile.
The drainages between where this photo was taken and Mt. Alice are some of the most remote in the Northern Front Range.
From the ridge crest, you’ll be able to see a large gully separating you from the final scramble up to the summit. Make sure you get off the ridge and cross the gully well left of the summit to find the easiest route.
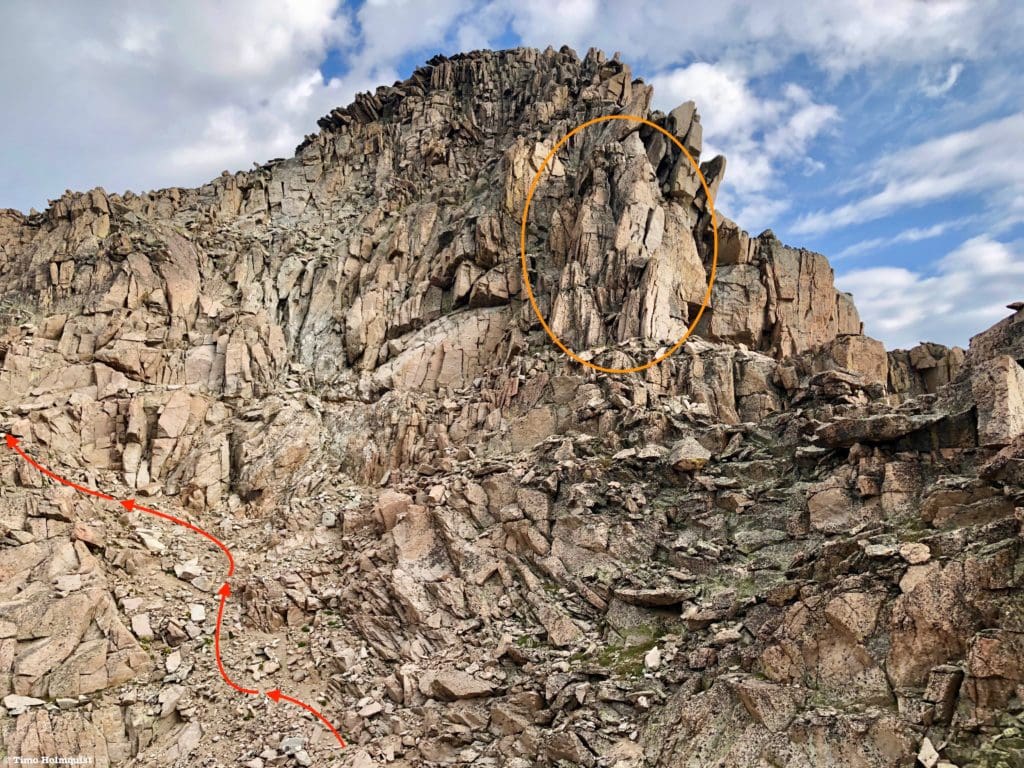
The easiest route is in red, hits the following ridge, and threads its way back to the eventual summit. The orange circle is where some bomber Class 4-5 routes exist.
You can also, if you want, climb to the rock tower from behind it. There’s a quick leap of faith section with serious consequences if you miss the jump, but it is only about 3 feet across. It makes for an exciting little excursion.
The standard route and rock tower excursion seen from below.
Back on the standard route, once you pass the rock tower, cross the big gully in front of you on a sandy path and look for a cairn on the ridgeline to the left of the summit block.
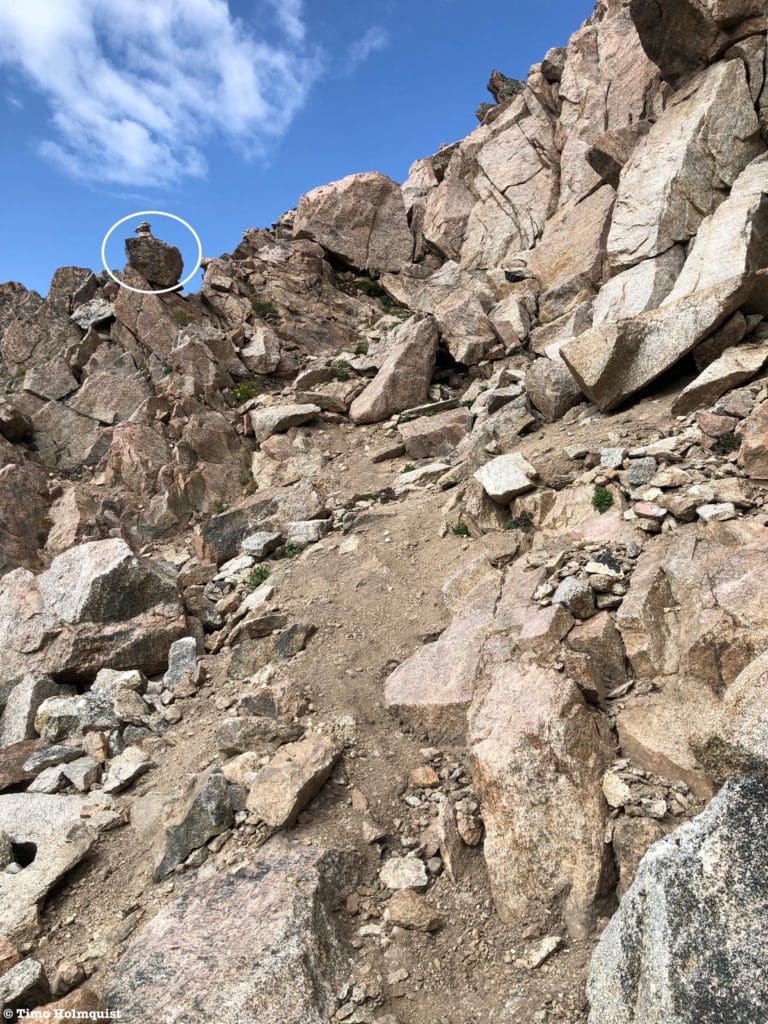
Standard route with cairn.
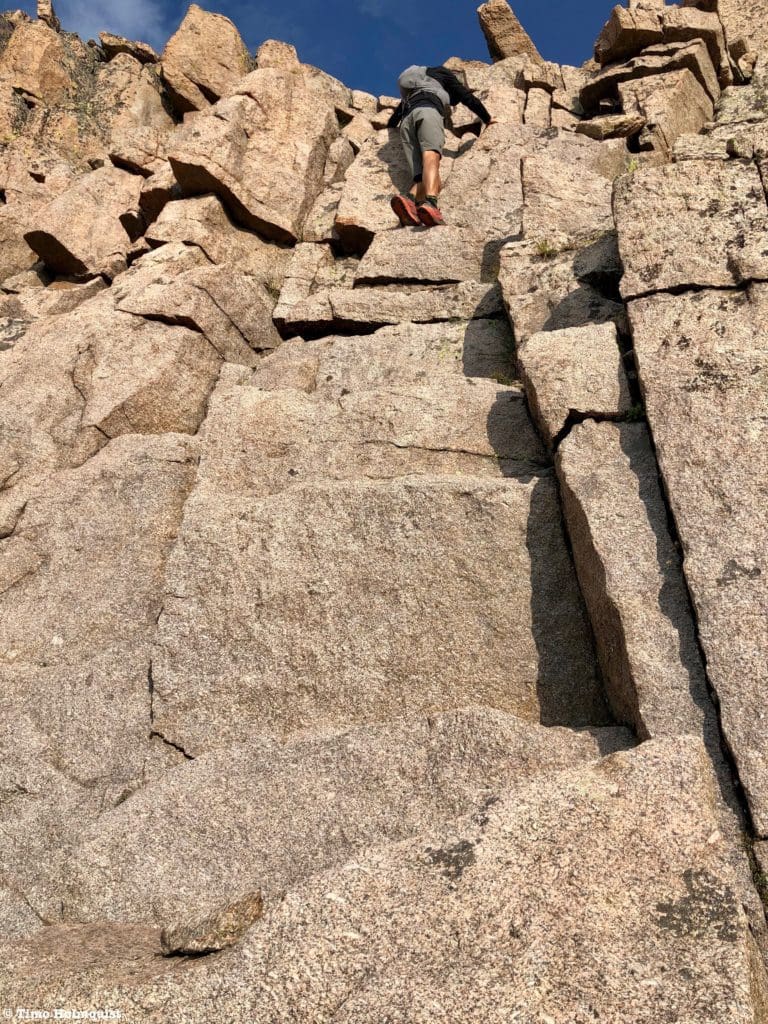
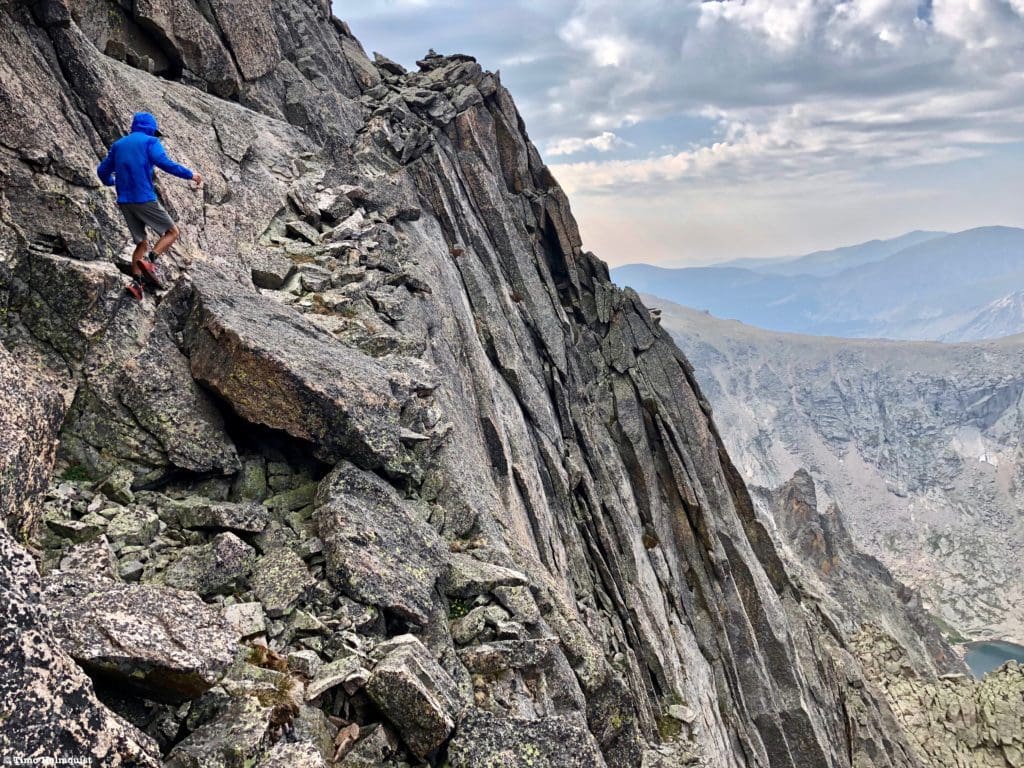
Once you reach this second ridge, wrap around the back of it and follow the cairns as they switchback up the summit block on grippier rocks.
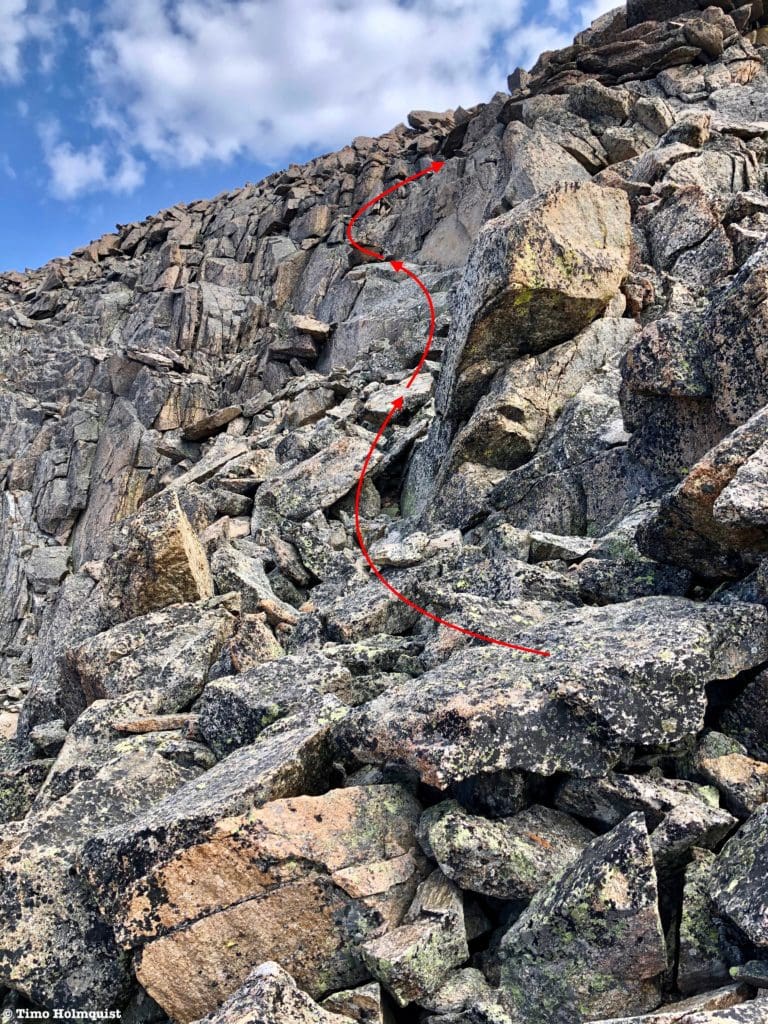
The next section of the route, now on the western side of McHenrys.
There are some mid-class 3 moves here on stable rock that certainly rival sections of the Keyhole Route on Longs, and with way fewer people. After a few minutes of concentrated scrambling, the slope angle relents, and you’ll reach the abrupt summit. The views are stupendous.
Longs Peak from the summit of McHenrys, you can see Black Lake far below.
Unless you ascend in complete whiteout conditions, it’s hard not to be in awe of the views.
Mt. Alice to the south.
Now, if you ascend McHenrys earlier in the season and snow limits your options, or if you’re looking for an extra kick, there are a few ways to make the ascent spicier.
From just beyond the rock tower, instead of crossing the large gully and following the cairns, aim directly for the summit and advance to the summit block.
Orange circle=scrambling route, Red=standard.
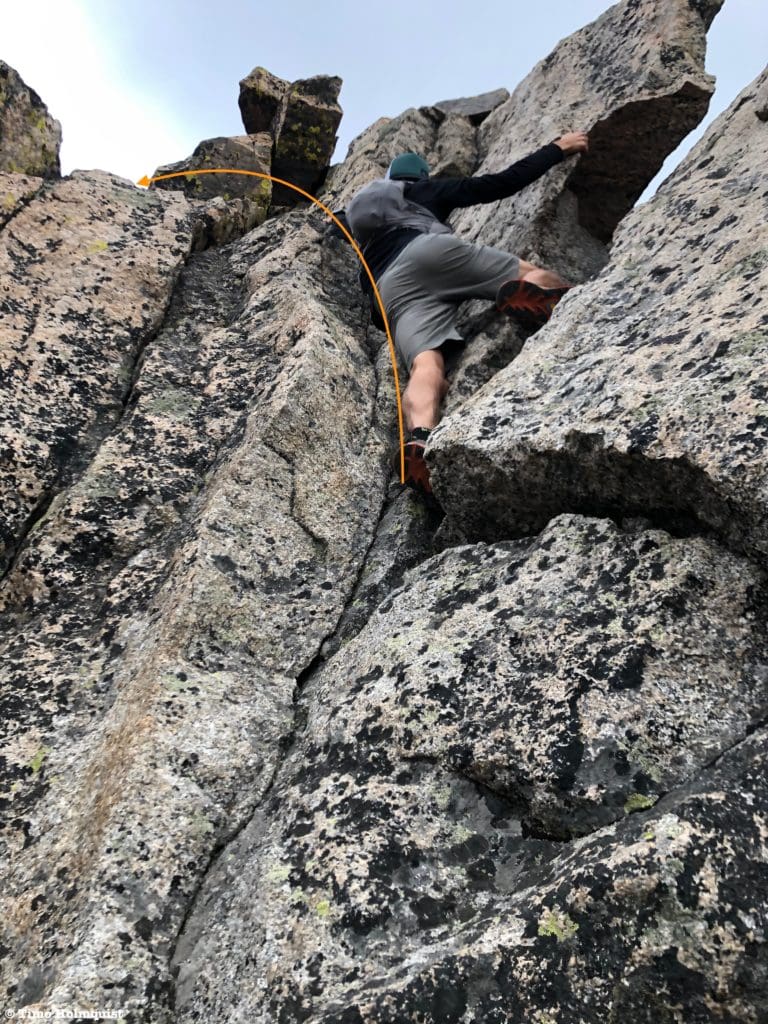
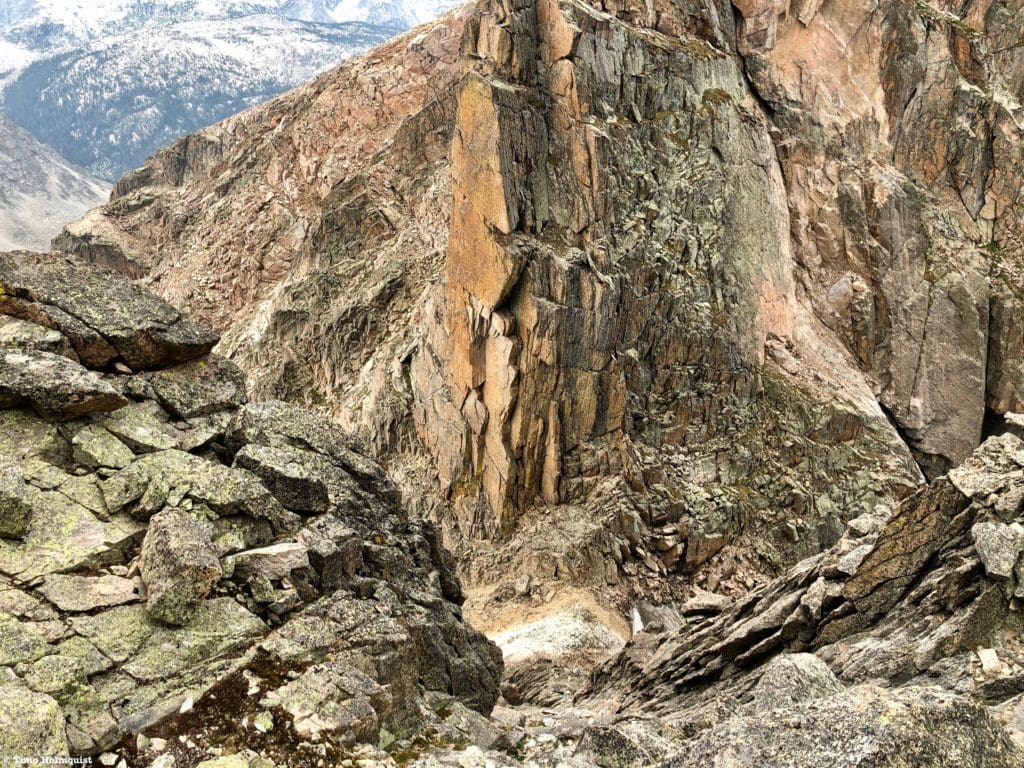
Approach the summit rocks and hunt for an enticing-looking set of broken rocks that lead into a dihedral. The scrambling begins at a mid-Class 3.
The route from the bottom.
The variation remains at Class 3 for the majority of the ascent, but you have to perform a low Class 5 traverse to get out of the dihedral at the top, and it’s all kinds of exciting.
The final moves out of the slot you’ve climbed up.
From the other side, a few low Class 3 moves separate you from the flat summit plateau.
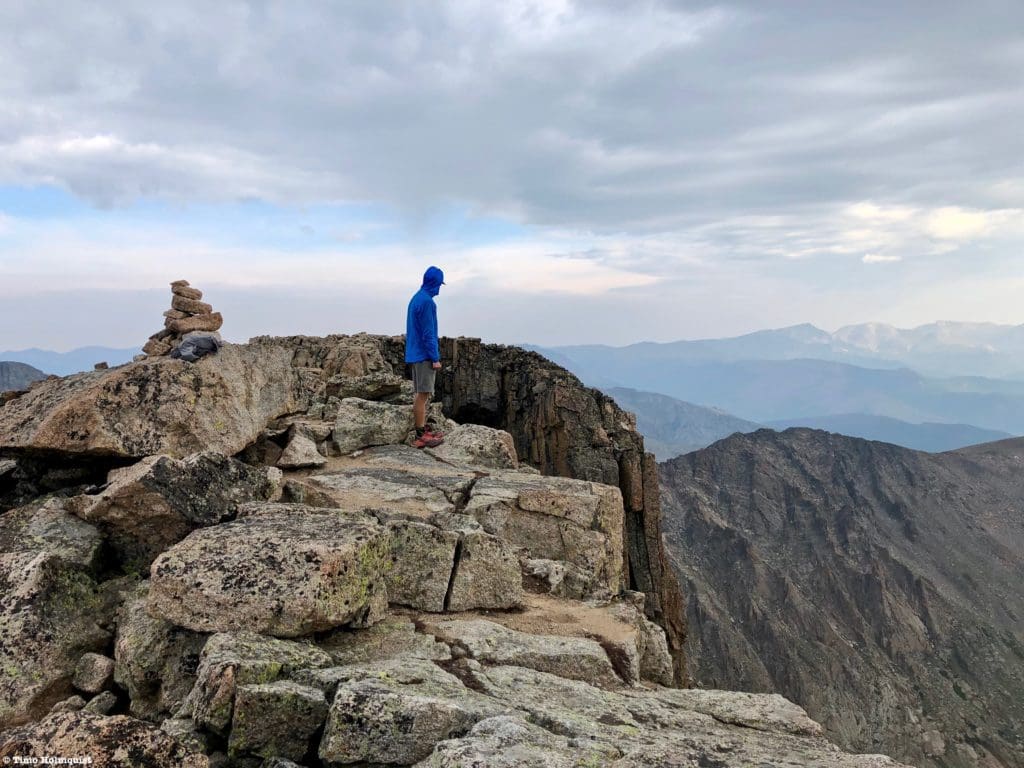
The summit on a cold August morning.
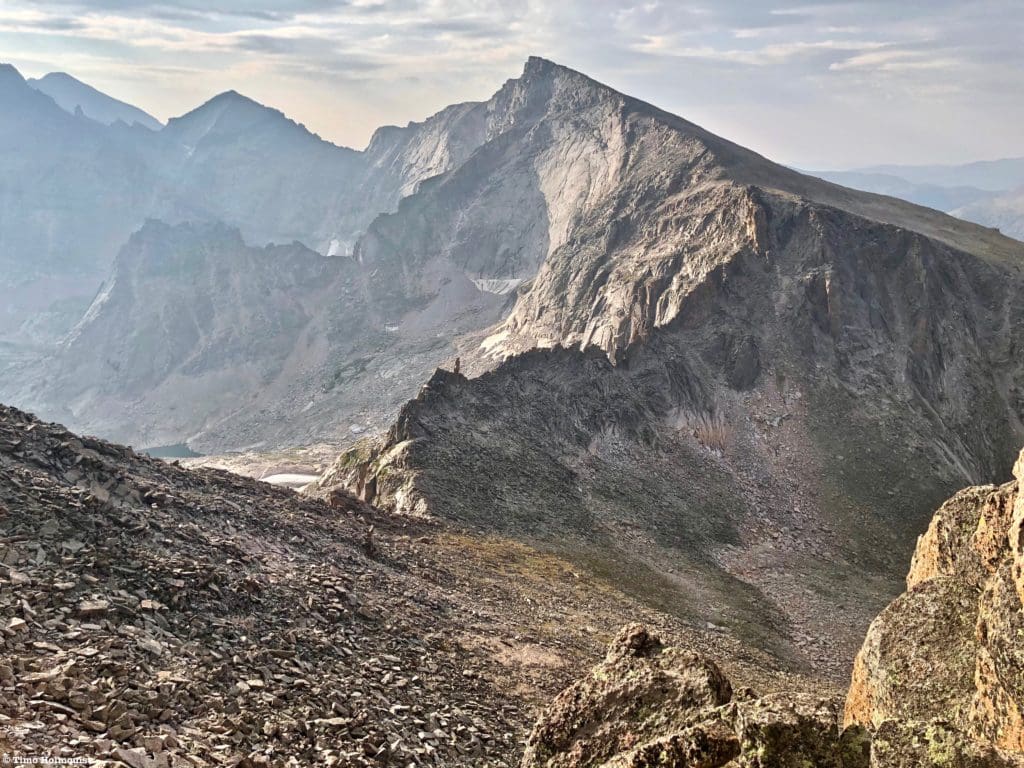
If you have the weather, hang out on top and marvel at the glorious views all around. There are a few ways to explore the summit plateau as well. We decided to go find the top of McHenrys Notch, a dramatic and unnatural appearing cleft separating McHenrys Peak from Powell Peak.
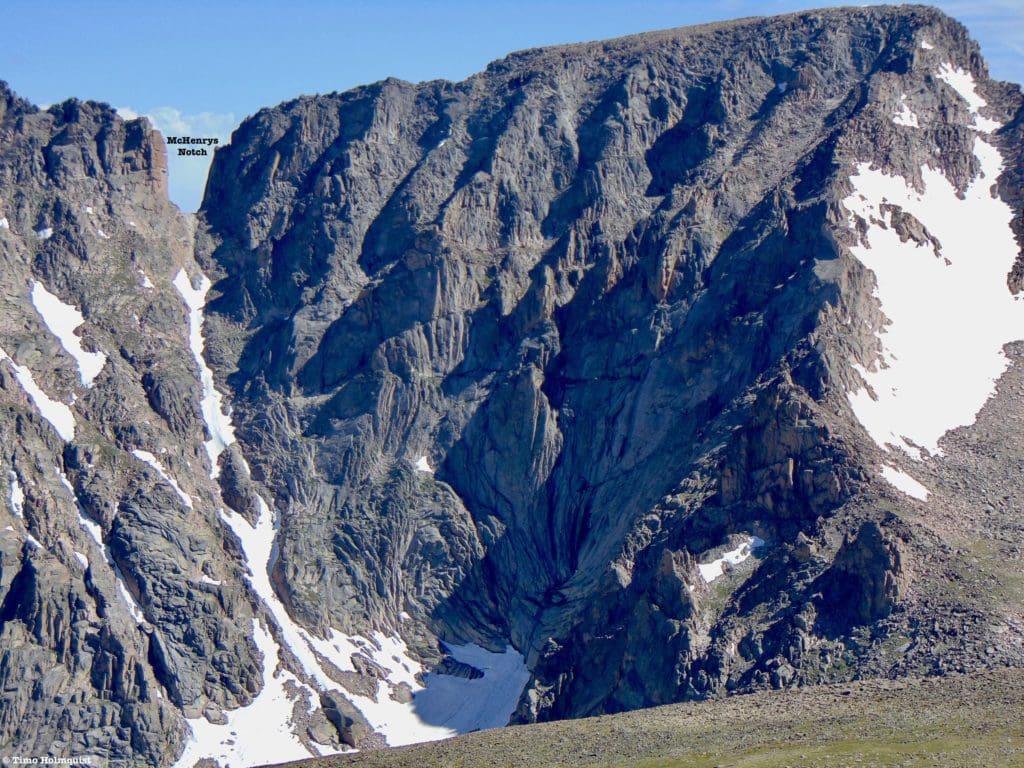
The notch from Mt. Alice.
It does take a minute to reach the notch from the summit, but you’ll gain great perspectives to the north.
The notch from above.
You can advance along the ridge crest by employing a decent amount of Class 3 moves on stable rock, or you can take the walkway that traverses just below the ridgeline. The walkway is easier, but the exposure is more dramatic.
The walkway as we made our way back to McHenrys summit.
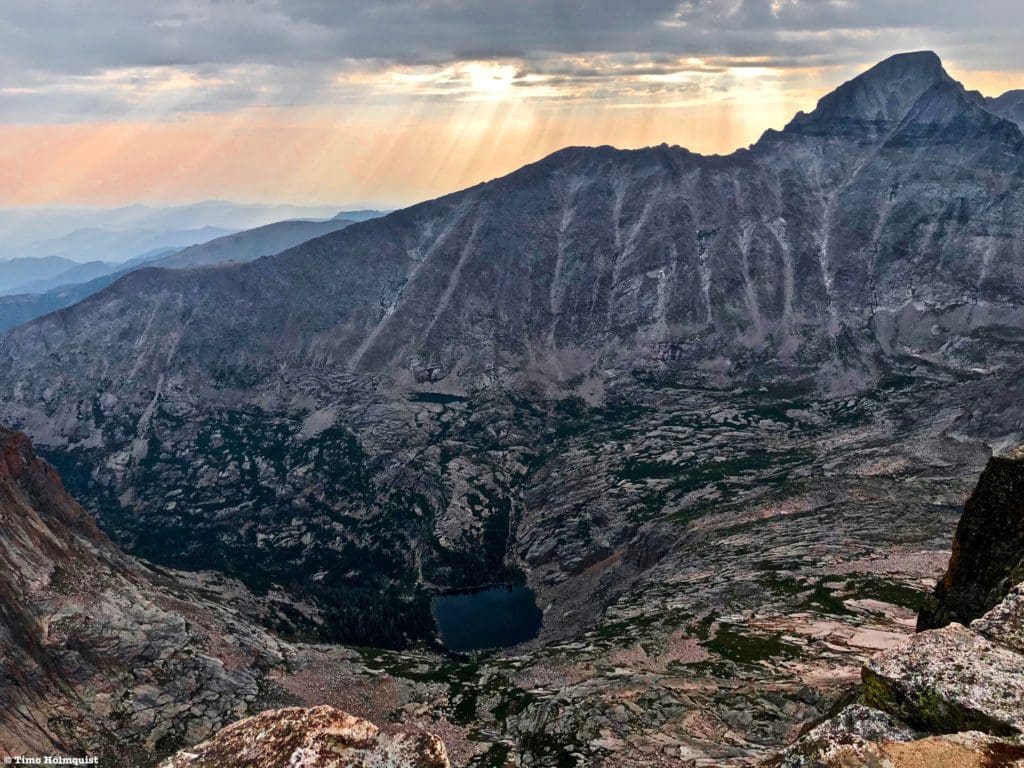
Along this stretch, especially as you return from the notch, you’ll be able to glimpse Lake Powell. This little alpine tarn is one of the most remote points in the park and is arguably one of the highest sources of water for the Colorado River. No trails lead into the basin housing the lake, and the simplest routes to it will cost you roughly 20 miles.
Lake Powell with Mt. Alice behind.
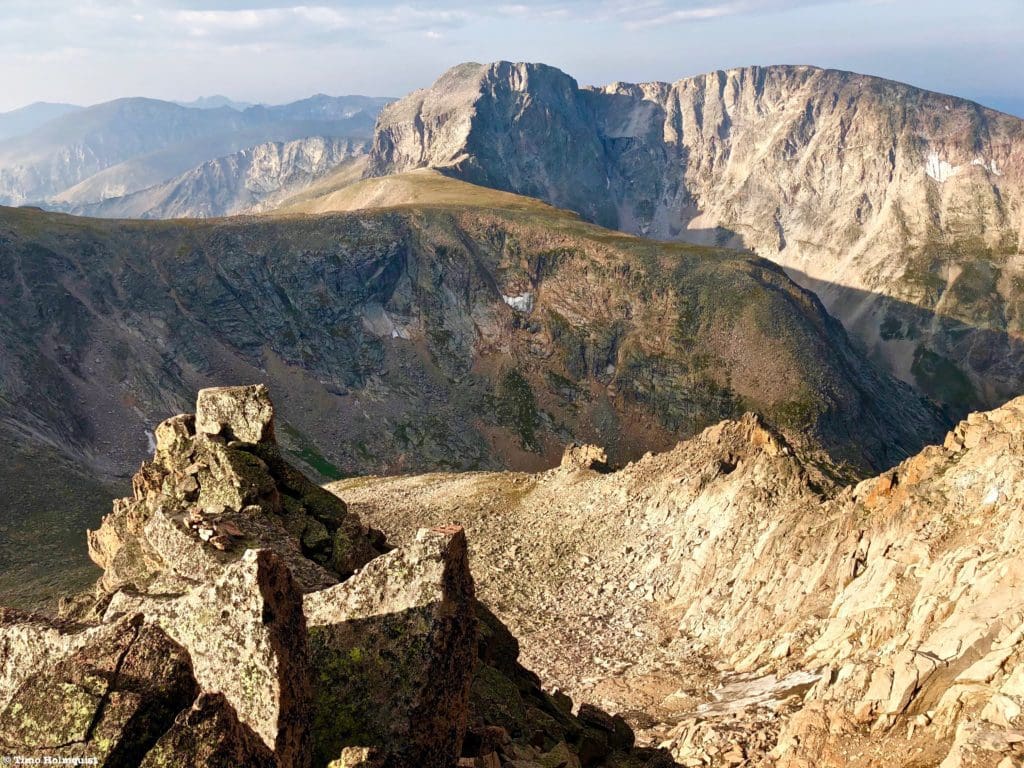
While not as stunning as other views, to the north, you can pick out the Mummy Range, the spine of the divide as it nears Bear Lake, and even the Never Summer Mountains.
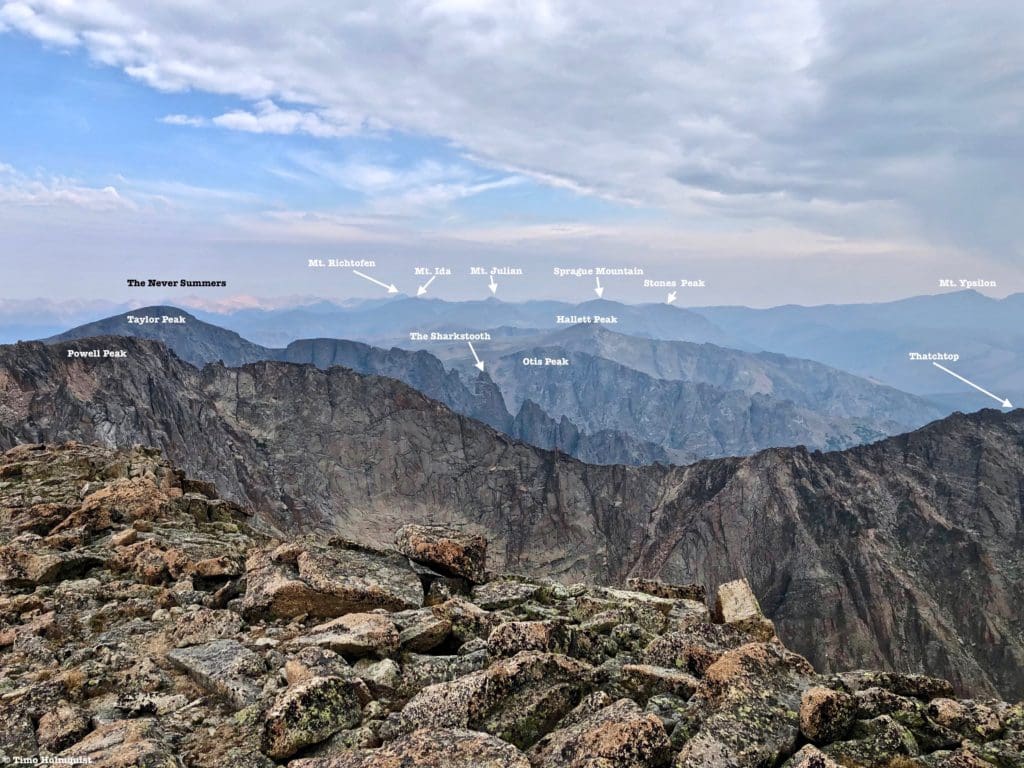
The view north from McHenrys summit plateau with many mountains labeled.
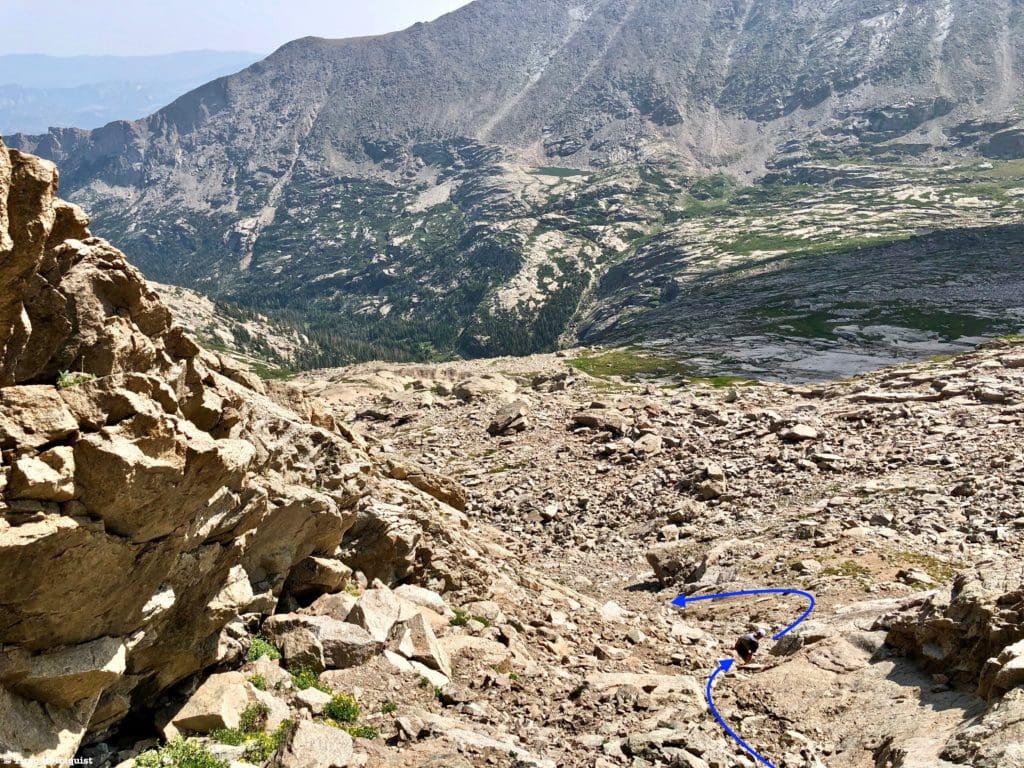
When you’re finally ready to depart, which can be hard to do in such a beautiful place, find a strong set of cairns descending initially west, then south along the ridge until popping back into the higher gully you crossed on your ascent.
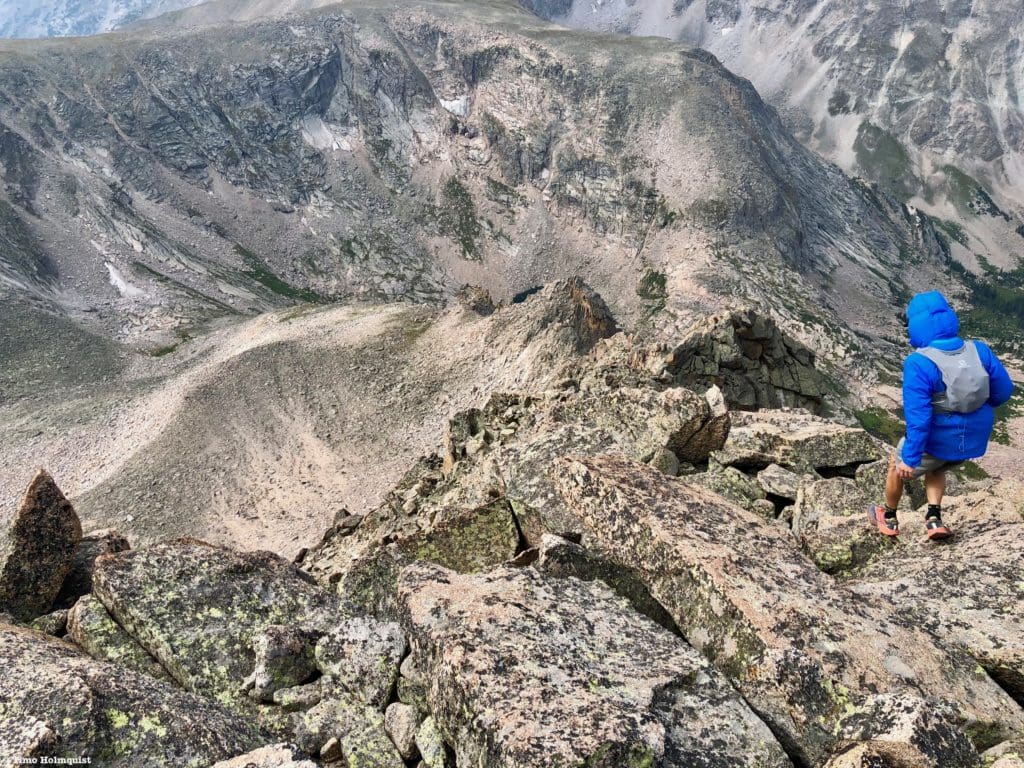
The start of the descent.
Making your way across this higher gully is not a difficult affair but be mindful of cairns; the route does perform a few quick switchbacks. If you miss one, it’s not tragic, but you may end up descending harder terrain, so keep your head on a swivel.

Back in the higher gully.
The rock tower should be easy to see now; make your way to the center of the gully and descend below the tower. You don’t need to descend this gully all the way down to the talus below, but it is much easier to traverse below the rock tower.
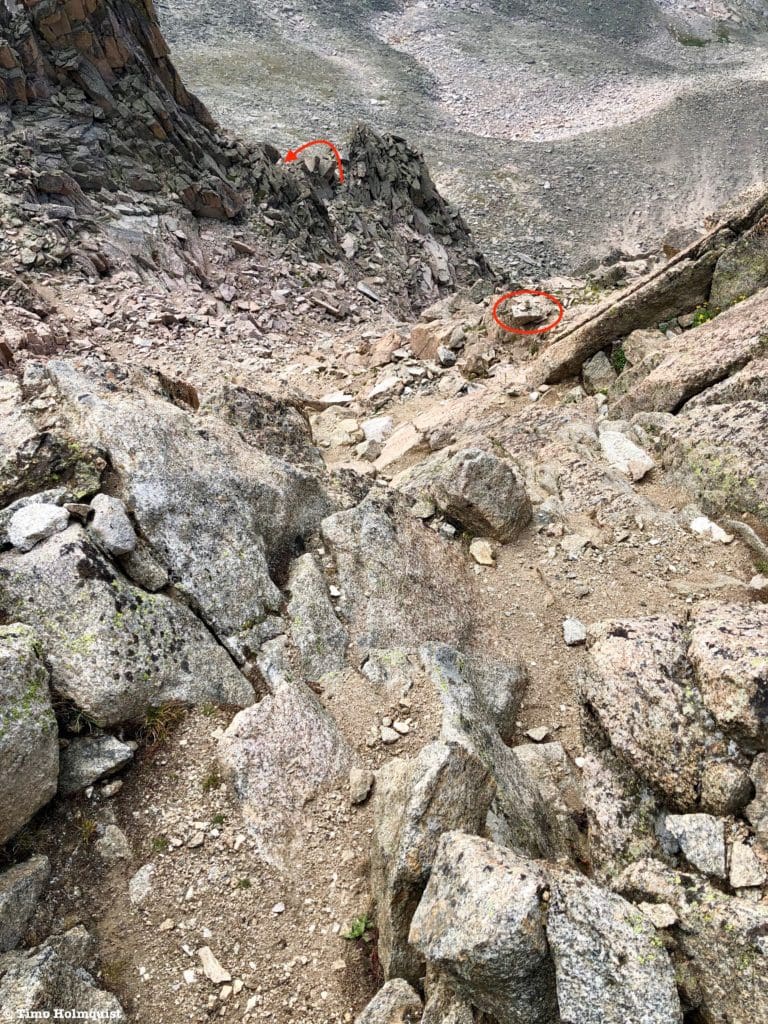
Where to traverse with a cairn circled.
Once you navigate off the east (left side) of the ridge housing the Rock Tower, you should be able to see your talus hopping route all the way down to Stoneman Pass.
Looking back to Stoneman Pass, Chiefs Head, and Pagoda Mountain.
The difficulties relent after the Rock Tower area, but it’s still a long way to descend on rough talus. Take your time and watch where you’re planting your feet.
Looking back at some of the upper difficulties on McHenrys.
When you get to the pass, the difficulty will spike for a moment until you can successfully navigate off the pass.
On the way back to upper Glacier Gorge. Watch out for loose rocks and make sure no one is directly beneath you in case you start a rockslide.
Anticipate some delays and detours on the way back to Black Lake. There are just so many patches of willows to thread through that you likely won’t make it back via the easiest path. Take a deep breath and stop to look around you at the beautiful views if frustration is creeping.
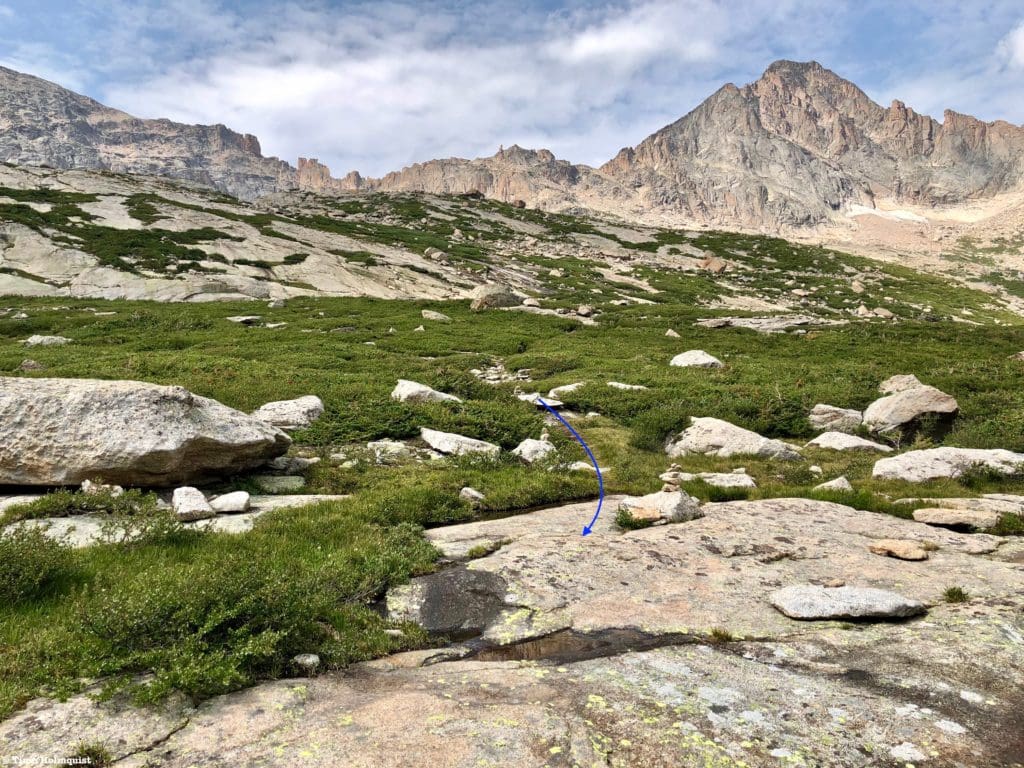
Large sections of willows complicate movement out of the upper gorge.
Once you make it to Black Lake, another five miles separates you from your car, but it’s all on easily identifiable trails.
Almost to the shores of Black Lake.
One quick PSA before you read on. Pick up trash when you see it; this is what we found on McHenrys, with the bulk of it being left above treeline.
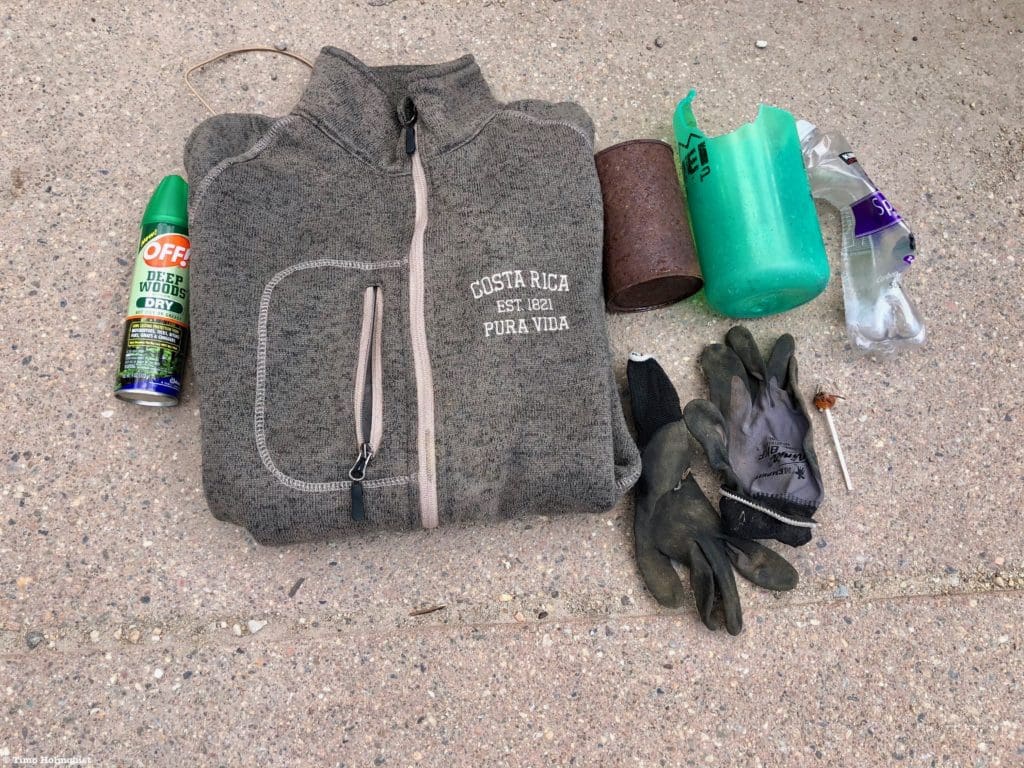
Trash sampling.
I know it likely wasn’t on purpose that these items were left, but if it doesn’t grow out there, it shouldn’t be out there. You can make exceptions for any biological waste, tissues, and wet items but plastic, clothes, water bottles, hats, etc., is all fair game. Leave the mountains a better place than you found them.
Final Thoughts:
It’s becoming dangerous for me to say any hike is my new favorite because I keep finding more enjoyable routes, but as of this second, I can say that McHenrys is my favorite individual summit in Rocky Mountain National Park. We’ll see how long that distinction lasts, but even if another route upends it, ascending this mountain via Stoneman pass is just a fun alpine scramble. The options for individual lines are nearly limitless, and roping in a quick side trip to the top of the Rock Tower or tackling the ridge directly to the summit are perfect ways to increase the scrambling. For those who love ridgelines, rock hopping, route finding, and unreal views of Glacier Gorge, consider scrambling up McHenrys.
Gazing up at the summit from Upper Glacier Gorge.
Popular Articles:
- Guide to the Best Hiking Trails in Rocky Mountain National Park, Colorado
- Sky Pond via Glacier Gorge Trail, Rocky Mountain National Park, Colorado
- Scrambling Hallett Peak’s East Ridge, Rocky Mountain National Park, Colorado
- Scrambling Mt. Alice via the Hourglass Ridge, Rocky Mountain National Park, Colorado
- Gorge Lakes Rim Scramble, Rocky Mountain National Park, Colorado
- Black Lake Via Glacier Gorge Trail, Rocky Mountain National Park, Colorado
- Scrambling To The Lake Of The Clouds, Rocky Mountain National Park, Colorado

Enroll With Global Rescue Prior To Embarking On Your Next Adventure.
When a travel emergency arises, traditional travel insurance may not come to your aid, and a medical evacuation can cost up to $300,000.
The cost when you have a Global Rescue membership? $0. That’s why when the unexpected happens, you want the leader in rescue, evacuation and medical advisory behind you. You want Global Rescue.
Terms of Use:
As with each guide published on SKYBLUEOVERLAND.com, should you choose to this route, do so at your own risk. Prior to setting out check current local weather, conditions, and land/road closures. While taking a trail, obey all public and private land use restrictions and rules, carry proper safety and navigational equipment, and of course, follow the #leavenotrace guidelines. The information found herein is simply a planning resource to be used as a point of inspiration in conjunction with your own due-diligence. In spite of the fact that this route, associated GPS track (GPX and maps), and all route guidelines were prepared under diligent research by the specified contributor and/or contributors, the accuracy of such and judgement of the author is not guaranteed. SKYBLUE OVERLAND LLC, its partners, associates, and contributors are in no way liable for personal injury, damage to personal property, or any other such situation that might happen to individuals following this route.


