


High Point:
~11,080 to 12,642 feet

Total Ascent:
~1,840 to 3,600 feet

Difficulty:
Hard (Very Hard if tackling Stone Man Pass, Spearhead or Arrowhead)

Waypoints:
40.310517, -105.640278

Route Type:
Out and back (Lollipop loop options available)
Upper Glacier Gorge is a stunning alpine basin in Rocky Mountain National Park with rugged mountains and beautiful lakes. It also offers thrilling opportunities for climbs and scrambles, with varying degrees of difficulty and exposure.

Overview
Upper Glacier Gorge is the premier alpine basin in Rocky Mountain National Park. It is deserving of all the praise that has been heaped upon it for the last hundred years. Formed by the retreat of glaciers, the Upper Gorge is rimmed with giant, serrated mountains, intimidating rock prows more reminiscent of the Canadian Rockies than Colorado, and a string of exquisite high-elevation lakes.
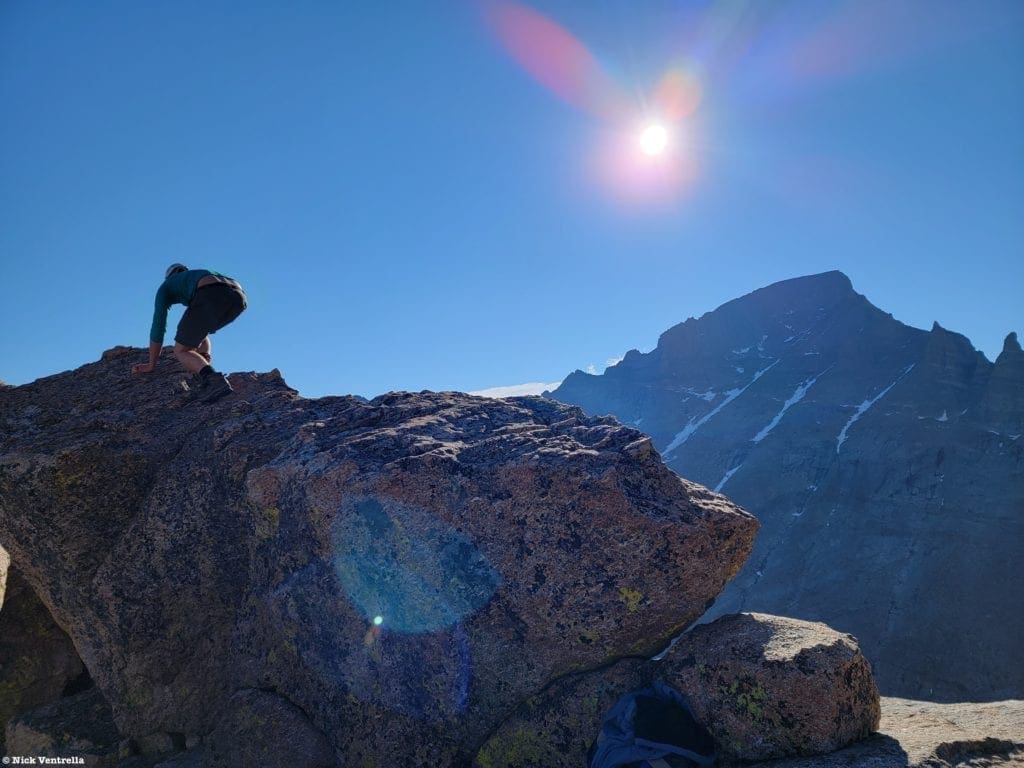
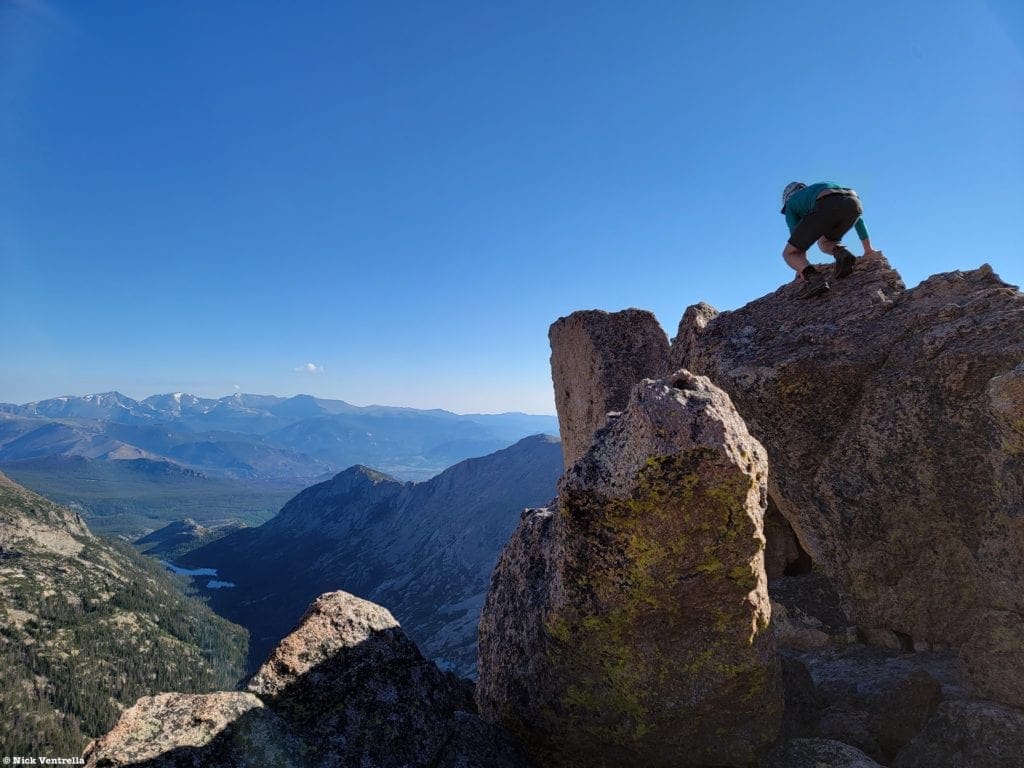
For the adventure-oriented, Upper Glacier Gorge also provides access to some fantastic scrambles, snow ascents, and rock-climbing routes. There are routes up Longs Peak, Pagoda Mountain, Chiefs Head, McHenrys Peak, Arrowhead, and Spearhead that all originate from the Upper Gorge. Due to the area’s complex geography, all of these routes require a MINIMUM of Class 3 scrambling with anywhere from decent to wild exposure depending on your route choice. There are also premier backcountry ski lines tucked into the far corners of the Upper Gorge like the Trough on Longs Peak and the Pagoda/Chiefs Head Couloir.
Due to the sheer number of routes in the area, a more comprehensive set of criteria is needed to properly assess difficulty. Please see the Scales and Criteria section below for an explanation of these criteria. Keep in mind, though; if your goal is to ascend into the Upper Gorge and float between some of the stunning lakes while taking gorgeous photographs, it is entirely doable without exceeding Class 2.
Here are some scramble ratings for several routes in Upper Gorge.
- Popularity: Moderate
- Scramble Rating:
- Blue, Green and Frozen Lakes: Class 2 w/ route finding (Easy snow)
- Stone Man Pass: Class 3 (Moderate snow through early/mid-July)
- The Spearhead: Class 3 and Class 4 options available (Steep snow early/mid June)
- Arrowhead: Class 4 (Class 3 option from Solitude Lake basin)
- Backcountry Lines:
- The Trough: Steep (Long approach, possible rock step to avoid, slope angle 45-50 degrees)
- Pagoda/Chiefs Head Couloir: Very Steep (Long approach, possible wind loading and cornices up top, slope angle 45-55 degrees)
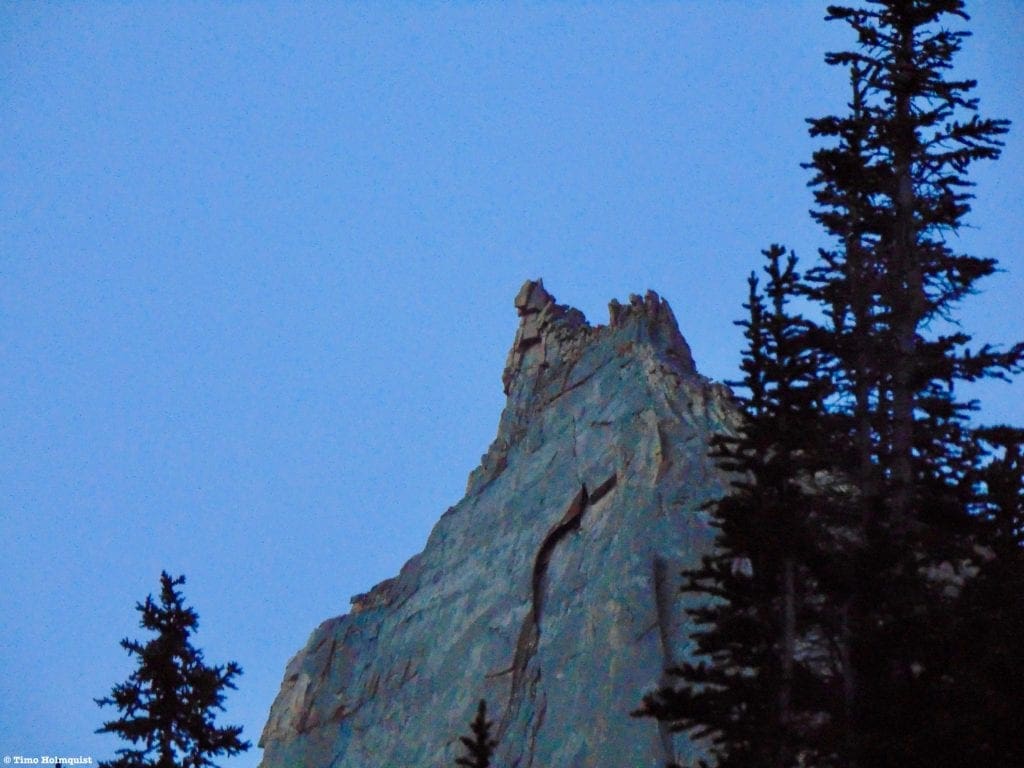
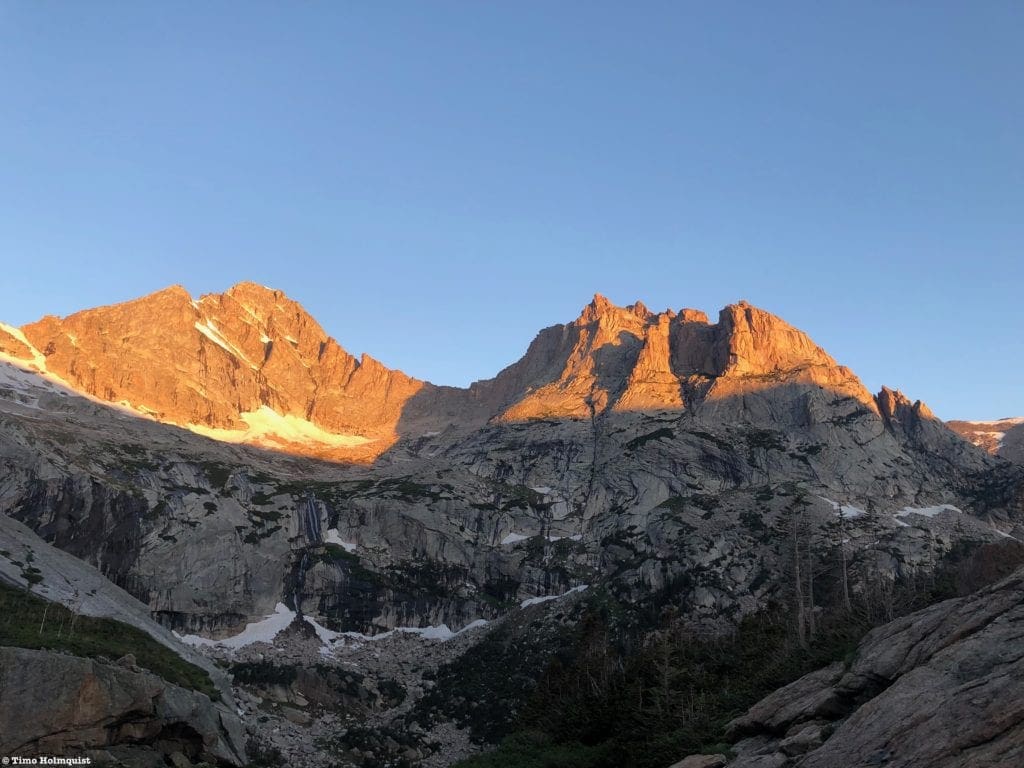
The always intimidating northern walls of Chiefs Head.
Table of Contents:
Article Navigation: Click on any of the listed items in the table of contents below to jump to that section of the article. Similarly, clicking on any large, white section header will jump you back to the Table of Contents.
- Overview
- Scales and Criteria
- Directions to Trailhead
- Field Notes
- Places to Stay
- Journal
- Final Thoughts
- Sources and Acknowledgment
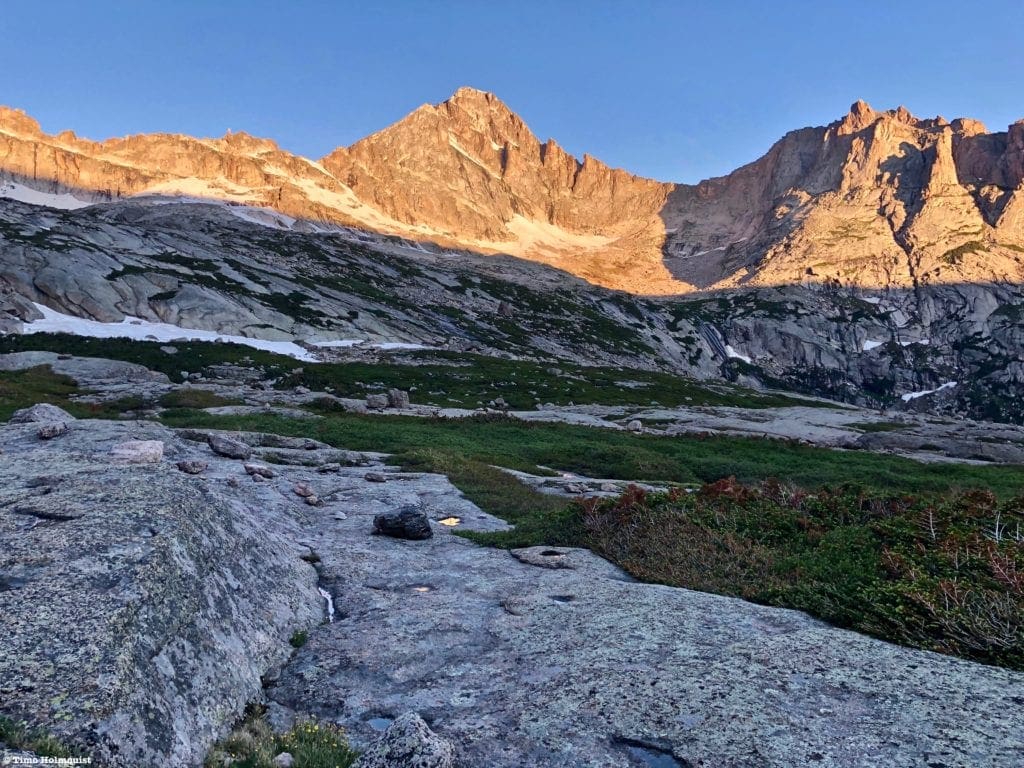
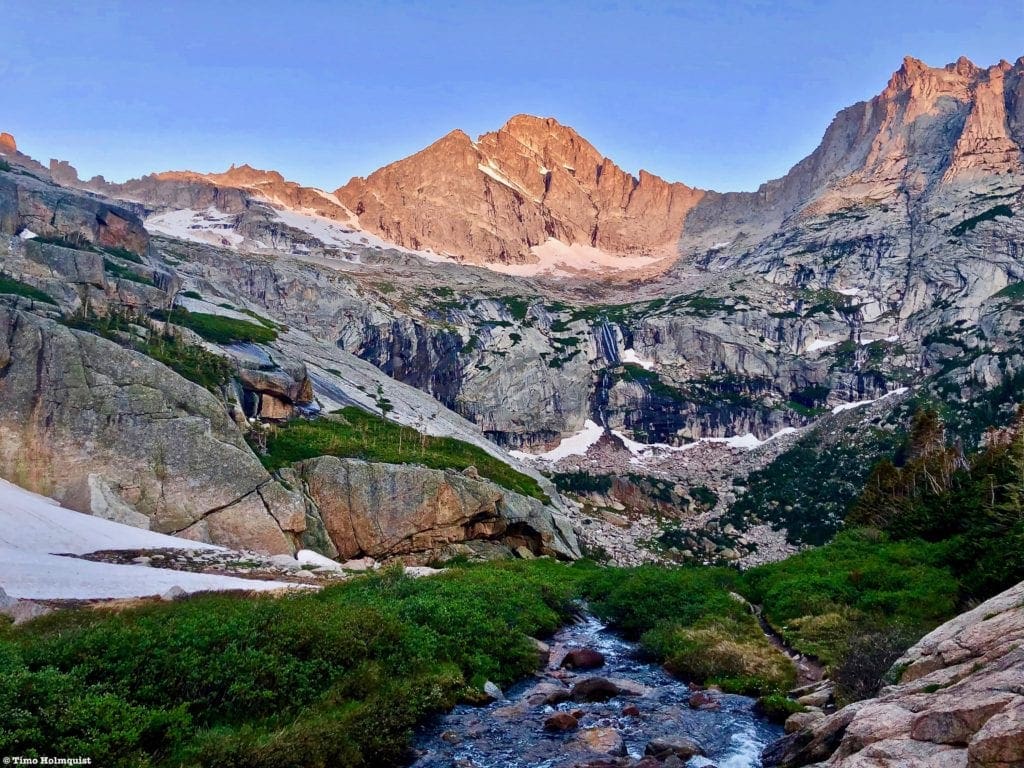
Beautiful morning light on the high peaks surrounding Upper Glacier Gorge.
Scales and Criteria
This article utilizes four separate rating systems: Difficulty, Popularity, a Snow Rating, and a Scramble Rating indicating the hardest move or set of moves encountered. The scramble rating employs the Yosemite Decimal System. This review focuses on a snow-free ascent of the Upper Gorge; however, snow is patchy through at least early July, and any ascent of the area between October and June will require micro-spikes or snowshoes at a minimum.
Difficulty Ratings:
- Easy: less than 5 miles, less than 500 ft. of elevation gain
- Moderate: 5-10 miles, 500-2000 ft of elevation gain
- Hard: 5-15 miles, more than 2000 ft. of elevation gain
- Very Hard: 10+ miles, more than 3,500 ft. of elevation gain
Popularity Ratings:
- Low: Large sections of trail all to yourself
- Moderate: Sizeable trail sections to yourself, crowding possible on busy summer weekends
- High: You’ll be seeing people, still a chance for solitude in spring/fall/winter.
- Very High: Almost always busy.
Snow Rating:
- Easy: Less than 30 degrees
- Moderate: 30-40 degrees
- Steep: 40-50 degrees
- Very Steep: 50+ degrees
Scramble Rating:
- Class 1: Established hiking trail the entire length of the adventure. Low chance for injury.
- Class 2: Typically involves cross-country navigation, possibly using hands for balance but not required, steeper than Class 1.
- Class 3: Hands and feet used to scale areas, must use hands to proceed (either for balance or to help pull you up a section), increased exposure, a fall could be fatal. Helmet recommended, along with grippy hikers.
- Class 4: Climbing on very steep terrain just shy of vertical, falls could be fatal, hands employed for grip and balance continuously, ropes advisable but scalable without. Helmets are highly recommended, along with grippy hikers.
- Class 5-5.4: Vertical climbing that involves technical rock-climbing moves, exposed, falls likely to be serious or fatal, possible to scale without ropes but only for very experienced veterans. Helmets, grippy hikers, and/or rock-climbing shoes necessary.
- Class 5.5 and up: Not covered as scrambling, full-on rock climbing with ropes, helmets, etc.
The YDS system is widely used in North America but can be quite subjective, so it is not perfect. The biggest differences I’ve encountered between Class 3 and Class 4 sections have to do with slope angle, exposure, and putting weight and pressure on hand grips (4) instead of using hands and feet interchangeably as supporting points of contact (3). It is not possible to climb a Class 4 section without using your hands to pull up some or all of your body weight. Typically, a class 4 section will also require some type of rock-climbing move, like stemming, where hands or feet are pressed in opposition as if climbing the inside of a chimney. If downclimbing, a key difference is that most people will descend a Class 4 section facing inward, i.e., your back faces the exposure.
Longs Peak stands watch over multiple routes inside the Upper Gorge.
The Ultimate Offline GPS Hiking & Ski Maps
See why onX Backcountry is the ultimate GPS navigation app for your outdoor pursuits. Try Today for Free. No credit card required.
Directions to Trailhead:
The best way to start this hike is from the Glacier Gorge Parking area along Bear Lake Road. The parking area is not very large and will usually fill up in the summer months before 6 or 7 AM. Considering the length of the trail, you’re going to want to get there early anyway. What’s nice about pre-dawn starts is that the National Park signage is clear, so you can make it to Black Lake without any navigational issues as long as you have a map and are paying attention to trail signs at each junction. Generally, go to Alberta Falls, Mills Lake, and then Black Lake.
A backup option is to park at Bear Lake, which will cost you an extra few points of a mile but is still a good option with a much larger parking lot. Again, this lot does fill entirely up, so early is the way to go. If you can swing a weekday, do that.
The National Park has instituted a time slot system in addition to the entrance passes for the summer of 2021, which complicates the process of getting in. Do yourself a favor and take the time to understand these components by visiting the Park website. If you do not have an entrance pass or time slot, you will be turned back. The short version is that ALL visitors must have an entrance pass. If you arrive on Bear Lake Road anywhere between 5 AM and 6 PM, you will also be required to produce a timed entry pass. You will be turned around if you do not have a timed entry pass. IF you have an entrance pass, AND you arrive before 5 AM, you are free to park and enjoy your day (make sure your pass is visible on your windshield), hence the “arrive early” mantra.
To get to Bear Lake Road, approach the park via the Beaver Meadows Entrance gate on US 36 and take a left onto Bear Lake Road within a minute of passing the entrance. There is a large repaving construction project going on, so go slow and follow the signs. If you’re coming from the west, enter the park, traverse Trail Ridge, and if US 36 is closed (it may be during the pre-dawn hours so crews can work on the repaving), you’ll have to exit the Park on US34, reenter on US36 and make sure you’re beyond the Bear Lake Road entrance booth by 5 AM. Good luck. I’ll update this section once the construction stops.
Places to Stay:
Camping near Rocky Mountain National Park will cost you. The options for free area camping are limited. On a positive note, there are plenty of options, and the National Park is within driving distance of Fort Collins, Boulder, and Denver.
- Estes Park: Known as the gateway to Rocky Mountain National Park, Estes sees nearly 80% of park traffic as opposed to the much quieter western entrance near Grand Lake. The town has a ton of lodging options.
- Allenspark: A small town near Wild Basin that has a few lodging options, including the Wild Basin Lodgeand the Sunshine Mountain Lodge and Cabins.
- Rocky Mountain National Park Camping
- Moraine Park Campground: $30 per site. $20 in winter. Established campground with perks, facilities, campfire grate, wood for sale in summer, and bear boxes to store food. Only loop B is open in the winter, and it’s first-come, first-serve.
- For summer, a reservation is needed quite a ways in advance to secure a spot.
- Glacier Basin Campground: $30 per site. Established campground with the same perks as Moraine Park. Reservation required.
- Backcountry Campsites: Rocky Mountain National Park has backcountry sites that you could book in advance. There is no open camping in the backcountry; it must be at designated backcountry sites. Please check the park website for more details. Backcountry sites require an overnight permit of $30.
- Camping near Estes Park
- Estes Park Campground at Mary’s Lake: Established campground, pricey $45-55. Good backup if other campgrounds are full.
- Hermit Park Open Space: $30 for a tent site, price increases if towing a trailer or for group spots.
- Estes Park Koa: Rates dependent on what you’re bringing with you but will run more than $50 a night in the busy season.
- Free or close to free: but a little farther (if you’re willing to drive)
- Ceran St. Vrain Trail Dispersed Camping ($1)
- County Road 47. Users have reported trash and ATV noise at this location, but it is free.
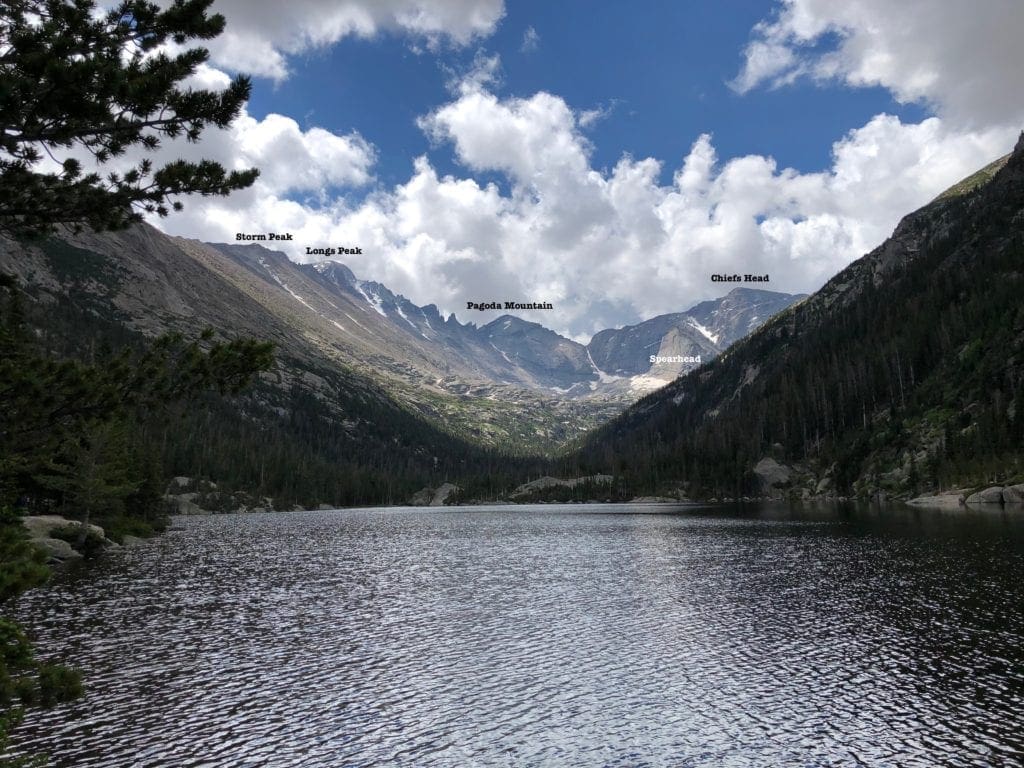
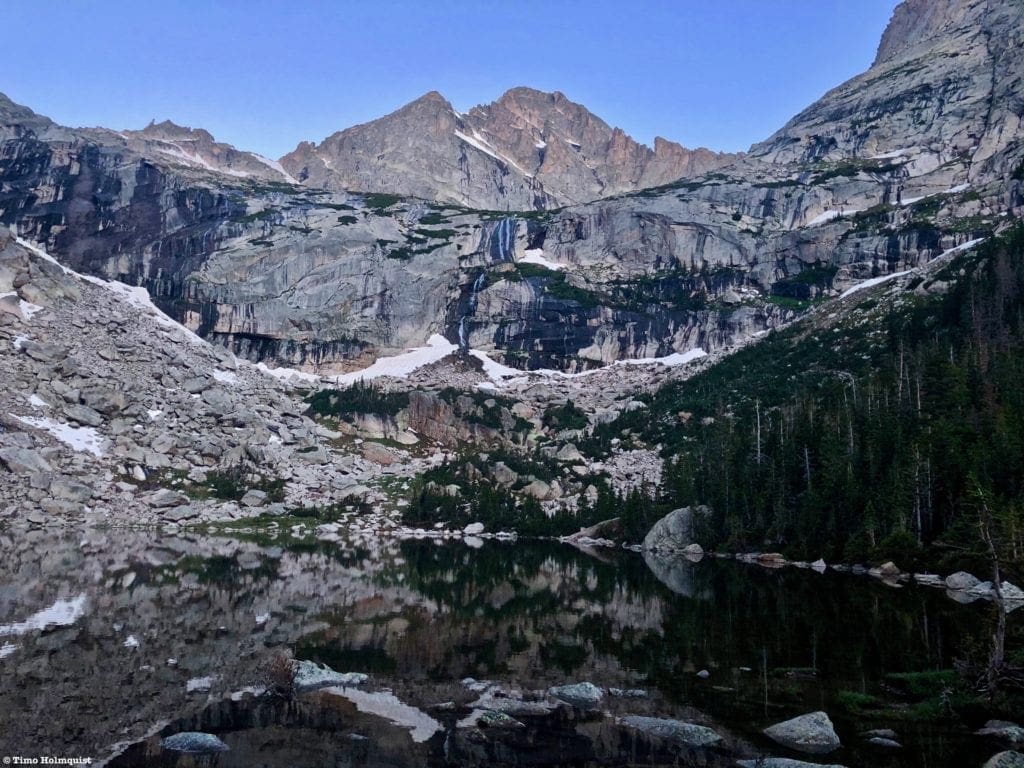
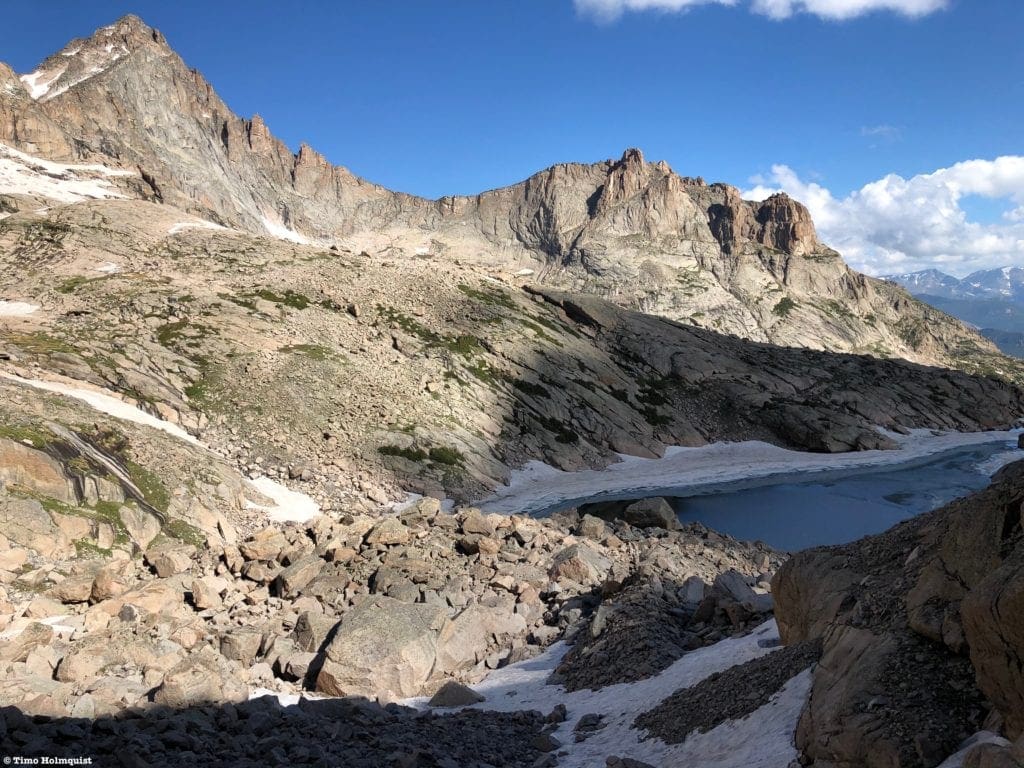
A preview of Upper Glacier Gorge from the shores of Mills Lake.
Field Notes:
Along with Chicago Basin, South Colony, Horn Fork, and Crater Lake Basin, Glacier Gorge is in the top tier of elite mountain destinations in Colorado. It’s one of those places that single-handedly justifies the creation of Rocky Mountain National Park. However, like all the other candidates mentioned above, you are going to have to work to get there. Traditionally, I’d consider Black Lake to be the gateway to Upper Glacier Gorge, and it alone will take five miles to reach, with just under 2,000 feet of elevation gain.
Beyond Black Lake, the official trail disappears, and navigation could be an issue in inclement weather. Complicating the matter are hundreds of rock cairns that no longer serve any directional purpose and are just there because of the compulsive human nature to stack rocks. It’s often best to bring a map, aim for the direction you’re headed and thread together a trail that follows the assumed path of least resistance.
From Black Lake to the base of the Upper Glacier Gorge area requires an additional 600 feet of elevation gain and spits you out above 11,000 feet. Due to the variety of destinations you could visit in this area, chances are you’ll be spending hours above treeline. It is imperative that you understand what altitude sickness is and how to combat it. Patchy snow also lasts deep into the summer up here, and you need to be prepared to deal with it through July.
Glacier Gorge is also not a place you want to be in a thunderstorm. Not only is it above treeline, but the shelf above Black Lake is also loaded with willows. These tough plants retain water better than any other plant I’ve encountered in the alpine, and they are more than happy to transfer any residual moisture directly onto you. If it has rained previously, passing through dense Willow patches will leave you utterly soaked.
Complicating the weather factor are the steep rimmed sides of Glacier Gorge. If any storms come over Longs Peak, Pagoda, or Chiefs Head, you are not going to be able to see it until it’s right on top of you. If flexibility is on your side, go for the best weather day you can. If time constraints are an issue and t-storms are forecast, get up super early and try to make it to Black Lake around sunrise.
For your forecasting needs, start with Estes Park weather because the town lives just to the east of the park entrance. You can also check the forecast for Trail Ridge, which covers a large alpine area north of the Gorge. Many websites will claim they have the best forecasts, but mountain weather changes so often you can’t depend on the accuracy of one forecast. Additionally, many forecast sites use data provided by NOAA, so you might as well use what they provide.
Two additional websites I’ve had good luck with are mountain-forecast.com and Opensummit. Mountain-forecast.com has data for Longs Peak and Storm Peak, which form part of the Eastern wall of Glacier Gorge. Of particular interest should be wind speed and precipitation; the winds can be nasty in the Front Range and are often stronger than predicted for alpine areas. Another thing I like is that they have estimated freeze levels. If you get high enough, it can freeze/snow any time of the year; crossing snow patches is MUCH easier if they froze overnight, and you can use spikes. Slushy snow will break under your weight, and you could sink up to your hips. Opensummit forecasts are free for the first two days; anything beyond that you have to pay for. They have a forecast for Longs Peak, Spearhead, and McHenrys Peak. In addition to forecasts, Opensummit takes the time to lay out crucial information about alpine weather, including macro forecast discussions and how to read clouds above treeline. It’s a good idea to check forecasts right before you leave for the trail because the most accurate forecast will be the last one you check.

Map of the Upper Glacier Gorge.
Journal:
Because there are quite a few destinations to explore in Upper Glacier Gorge, I’ll write up this review beginning with Black Lake and discuss points of interest from southeast to northwest (left to right) as they appear once you commit to ascending into the Upper Gorge. As previously mentioned, there are numerous access points to summits along the rim of the basin. I’ve elected to omit the final scrambles to Longs, Pagoda, Chiefs Head, and McHenrys as there are multiple ways to ascend these mountains, and each peak deserves a full review for their various routes. Stunning ridge extensions like Spearhead are fair game, along with Stone Man Pass and the Class 4 scramble up Arrowhead from inside the basin. The easier Class 3 route up Arrowhead from Solitude Lake is not included because the approach to get there does not involve Black Lake or the Upper Basin. The focus here is Upper Glacier Gorge. I will also briefly mention the two backcountry ski lines because they can arguably start and end inside the rim of the basin.
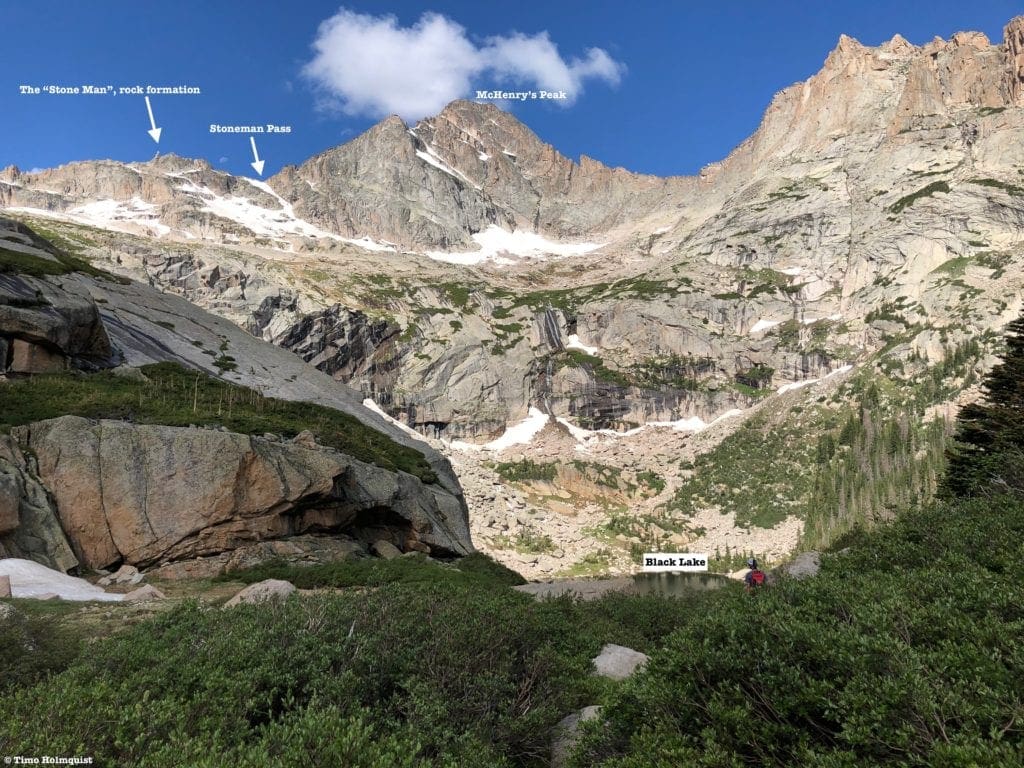
Five miles and ~1800 feet into your hike from Glacier Gorge Parking Area, you’ll arrive at Black Lake. For details up to this point, read our Black Lake trail review. This stunning subalpine lake is rimmed on three sides by an intimidating rock shelf, behind which lie McHenrys Peak and Arrowhead. The otherworldly scenery is heightened in June when multiple snowmelt waterfalls cascade off the shelf and make their way down to the lake.
A glassy looking Black Lake before sunrise, with McHenrys Peak in the background.
Black lake is a fantastic destination all on its own, and seeing a sunrise here is a worthy goal. If you plan on taking your adventure higher, Black Lake is a good place to break and assess the future of your hike. From the shores, you can see at least four prominent Upper Gorge destinations: McHenrys Peak, Arrowhead, the Stone Man, and the improbable, overhung summit of the Spearhead.
Arrowhead rising southwest of Black Lake.
Blue Lake and Trough Couloir Access
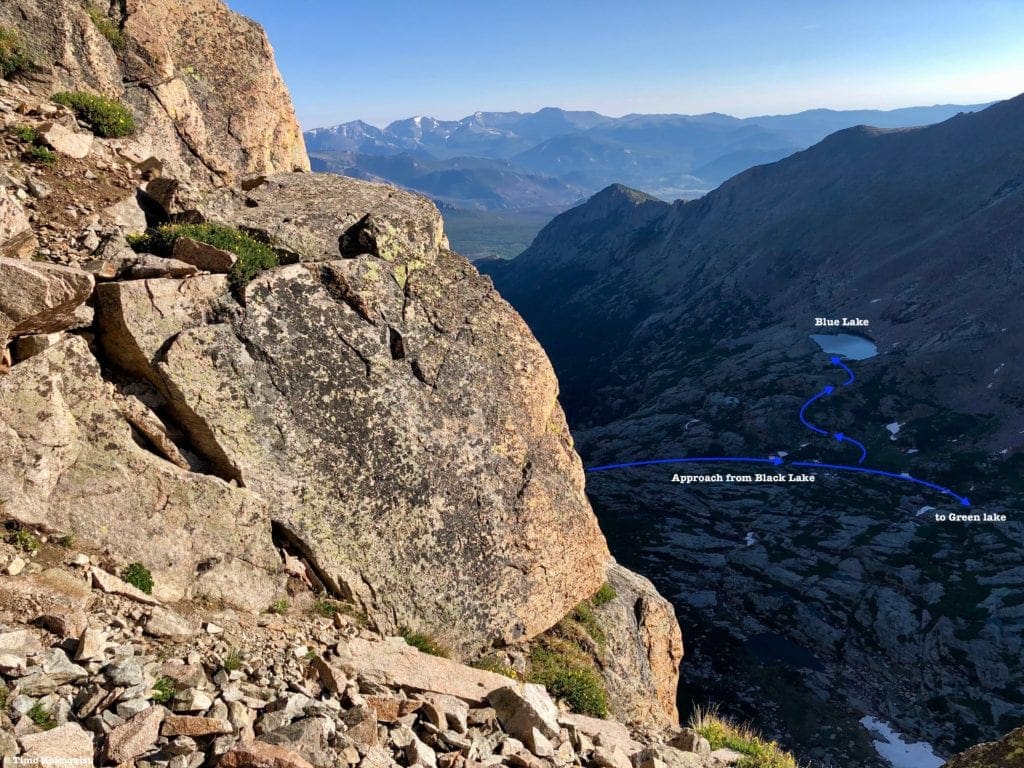
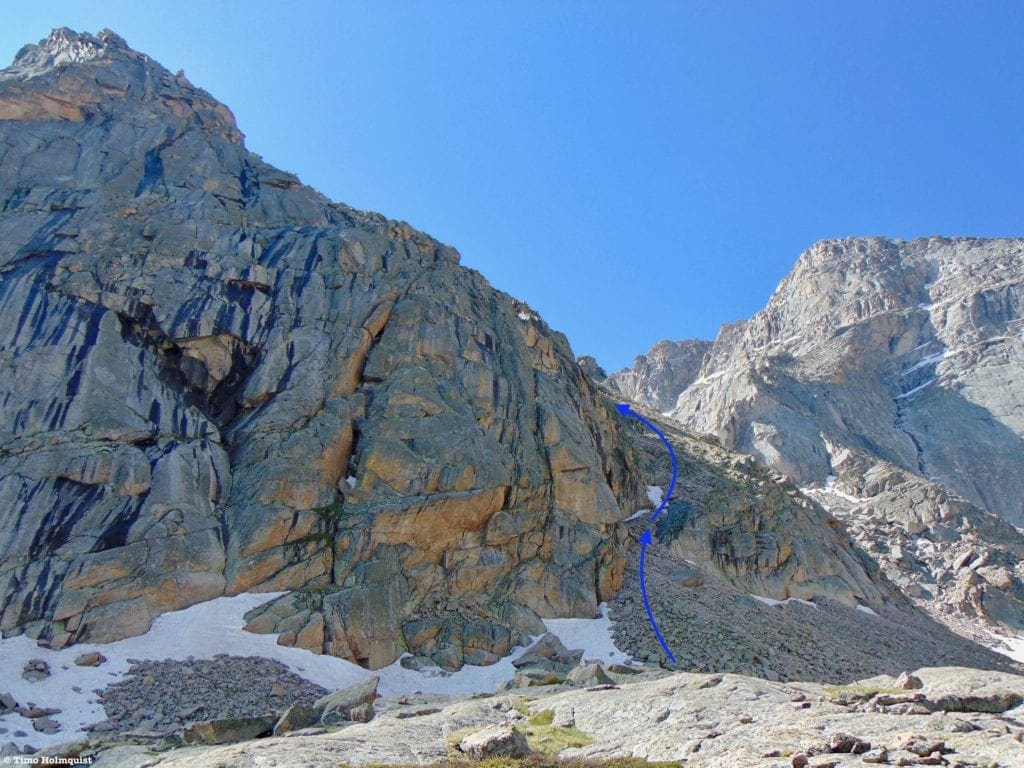
When you’ve had your fill of Black Lake, continue around the lake’s eastern side until locating a stream-filled gully heading southeast. The gully is not hard to find, contains a discernable social trail, and is one of the only places to get beyond the rock shelf guarding Black Lake. You will gain roughly 600 feet over the next .38 miles. Remember to take breaks and look behind you at the National Geographic worthy profiles of McHenrys and Arrowhead.
Stunning views begin to open up as you ascend into the Upper Gorge.
The gully will eventually peter out as you approach the top of the shelf. Views will explode out in every direction, and it may be worth taking a break to simply stare at the environment you’re now in.
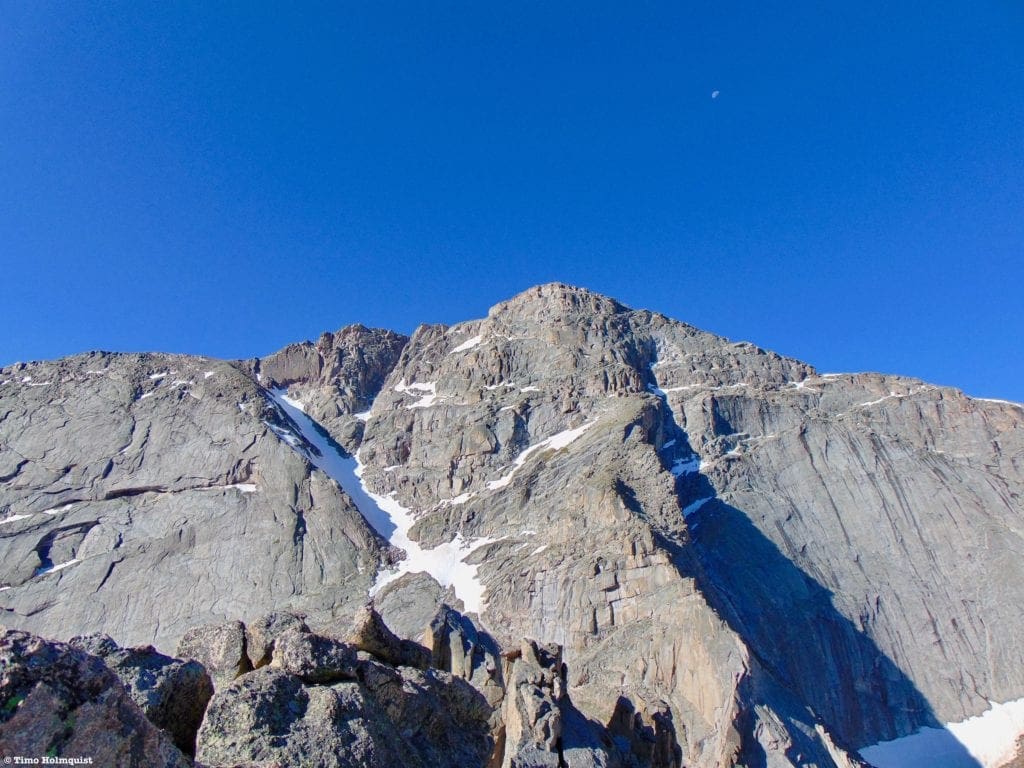
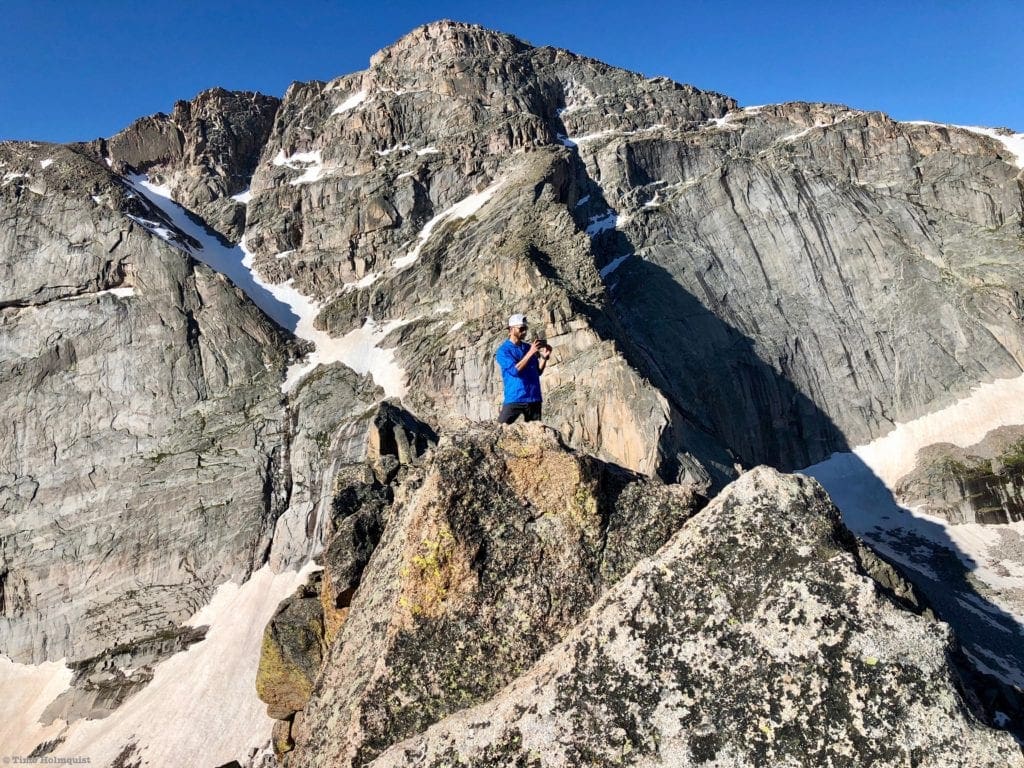
One of the most obvious features in the center of the Upper Gorge is the Spearhead. It is a fantastic rock-climbing destination with world-renowned routes and absolutely dizzying exposure on its Northeast side. Spearhead seems like an appropriate name; I also think it looks like one of those old-school cow-catchers they used to put on locomotives. Either way, looking at something like the Spearhead is like making shapes out of clouds; you really can’t go wrong, and if you think about something long enough, your brain will take you there.
The Spearhead with the moon behind a cloudless morning.
The inlet you’ve been following from Black Lake will begin to veer south on its way to Green Lake. Before heading that direction, as the gully peters out, turn sharply to your left (now facing north) and ascend a grassy hillside interspersed with rock bands and willows. There are a few cairns up here to help with navigation but once you gain the ridge, keep the wall between Storm Peak and Longs on your right as you locate and drop down to Blue Lake. There are lovely picnic rocks around the shallow lake and stupendous views of the Upper Gorge. While fairly easy to get to, there is no official trail, and you do have to traverse around some rocky sections, which necessitate a Class 2 rating. Blue Lake is probably the easiest of the three lakes in Upper Glacier Gorge to reach.
Blue Lake from the rocky slopes of Spearhead.
If you stay on the main social trail out of Black Lake and pass the Blue Lake access, the stream you’ve been following will head south. As you move alongside it, options to cross the stream will present themselves. Crossing the stream and heading southwest will provide you access to Frozen Lake, Green Lake, and Stone Man Pass. It will also provide a more direct line to the base of the intimidating walls of Spearhead but may require some snow crossing.
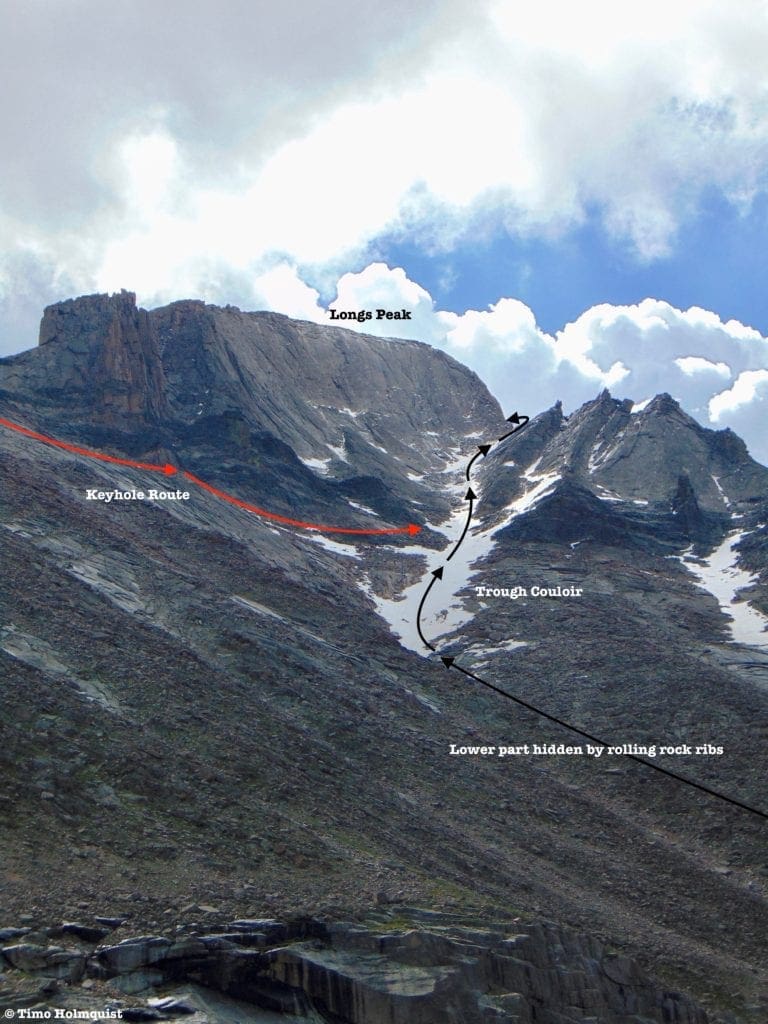
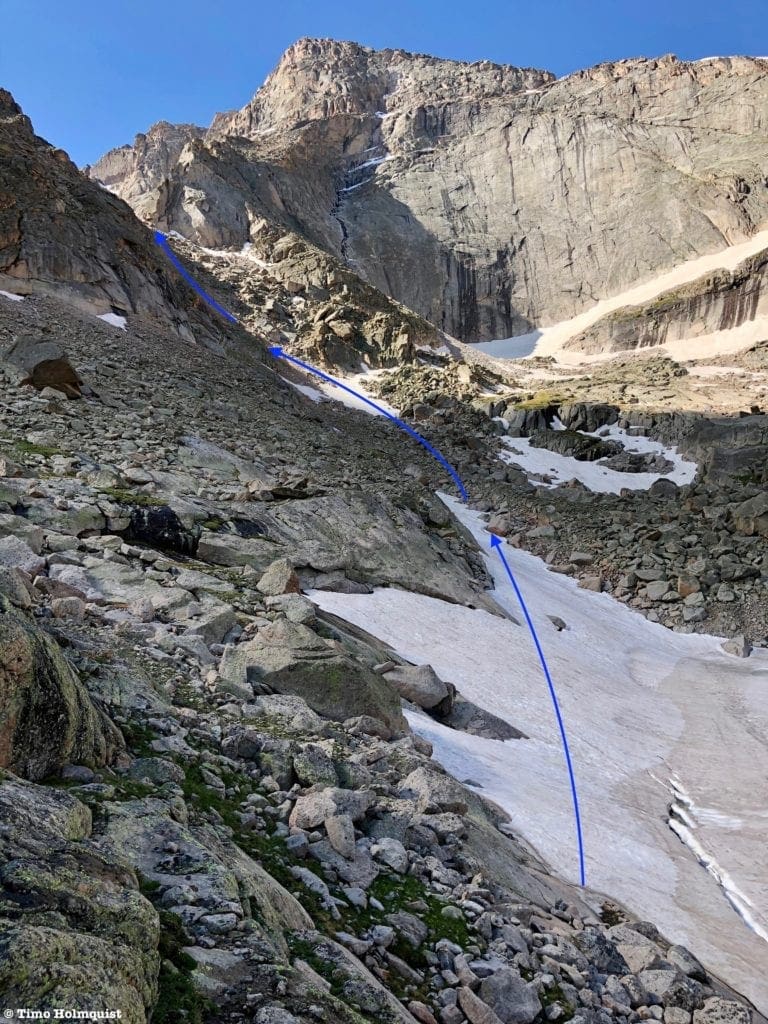
The only reason to stay on the left-hand (eastern) side of the creek is if you plan to access the Trough Couloir on Longs Peak. There are a series of three diagonal couloirs that spill down to Glacier Gorge. The Trough Couloir starts furthest to the north and ascends the highest, ending at ~13,800 feet.
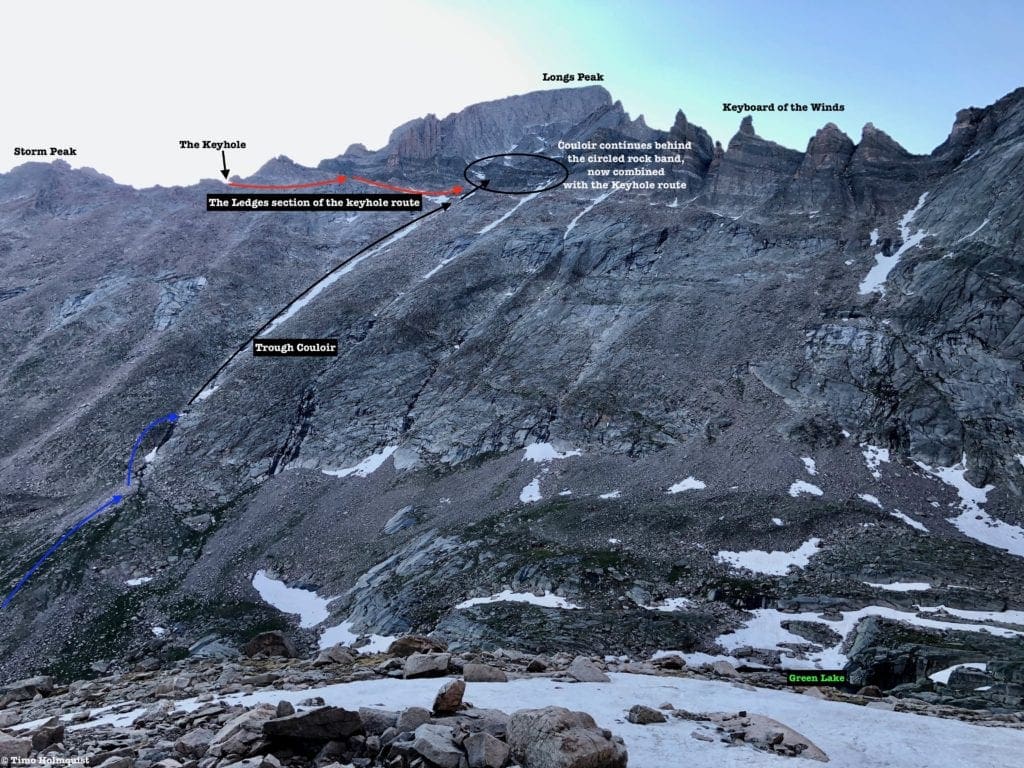
The Trough Couloir, with the Keyhole route marked up for reference.
Once you locate the bottom of the couloir, which will require a couple hundred feet of scree climbing to reach, you can continue along its winding expanse for another 2,600 vertical feet. As the couloir dries out, a series of rock steps will appear, which you can avoid to the left. This is not only the safest winter ascent option for Longs; it provides one of the most aesthetically pleasing ski descents in the Park. Due to its intersection with the Keyhole route, it’s best not to climb this route in the summer when rockfall danger from peak baggers above you on the Keyhole Route is high.
The upper section of the Trough Couloir from the shelf above Black Lake.
Green Lake Area
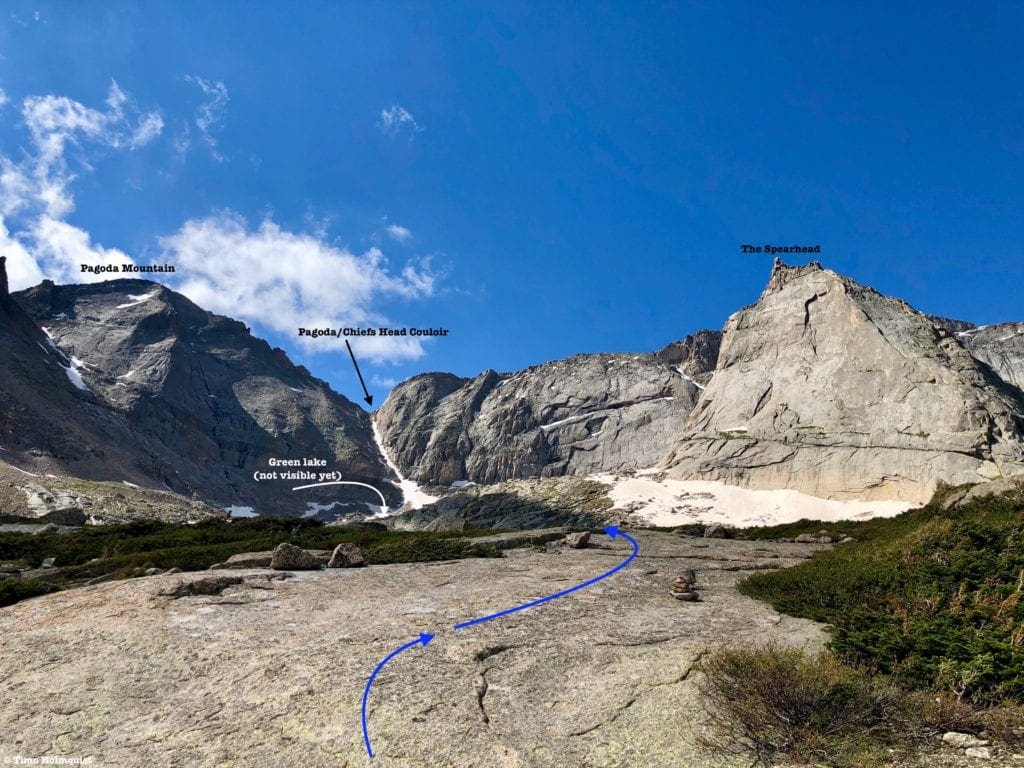
Assuming that Green Lake is your destination, cross the creek, find a way to parallel its meandering course south, and gain elevation steadily as you approach the lake. This part of the Upper Gorge is festooned with useless cairns. For your sanity, pick and choose paths based on how dry they seem, not because a cairn convinced you to go somewhere. Between the multiple rock bands are willow thickets and braided, swampy expanses that you really want to avoid. For simple orientation, you want to head between Pagoda Mountain on the left and the Spearhead on the right; aiming for the Pagoda/Chiefs Head Couloir is a good move. Before you reach the lake, you may need to cross or divert around a permanent snowfield, but the slope angle is not difficult.
What the upper part of the Green Lake route looks like.
Green Lake can, perhaps unsurprisingly, look green when the sun hits it. Due to its sheltered location, Green Lake holds snow for a long time and can be much colder than the ridges around it until the sun finally greets the area.
Green Lake from above as the sun finds it.
From Green Lake, the easiest way to scamper over to Frozen Lake is to proceed towards the walls of Spearhead, backtrack to its northern edge and find the path of least resistance around the nose of it. While there is some backtracking involved, the distances are not terribly long, and with an environment as beautiful as Upper Glacier Gorge, it’s hard to be upset. Another upside is the ability to stare in awe at the commanding rock faces and features on the Spearhead like Sykes Sickle, the Eye of Mordor, and the Barb Flake. This variation to Frozen Lake keeps the scrambling at Class 2 (with maybe an easy snowfield to cross).
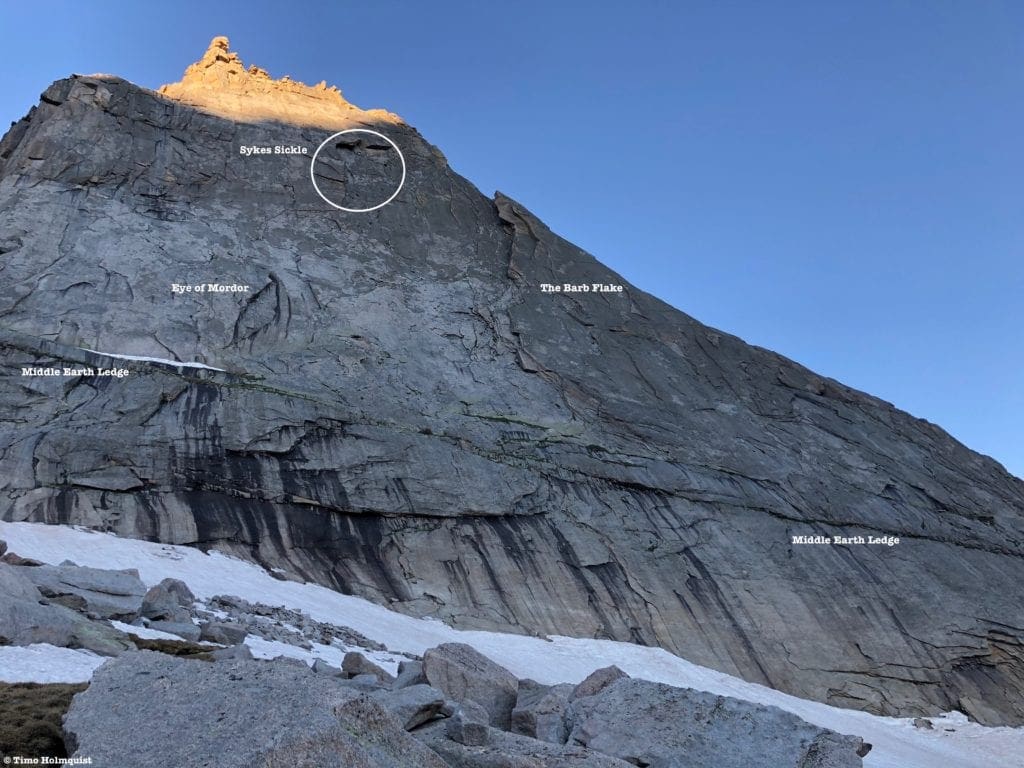
The Spearhead with labeled features.
Green Lake is also a great access point for the Pagoda-Chiefs Head Couloir (Very Difficult), a summit bid of Pagoda (light Class 3), and the NE Ramps route up the Spearhead (Class 4). To reach the Pagoda-Chiefs Head Couloir, climb south from the lake to a small, unnamed tarn. Wrap around the tarn on its east (left) side or skin across if it’s frozen. Find the path of least resistance through some broken cliffs and then climb towards the main couloir, still heading south. In the winter and spring, this should be an all snow affair above Black Lake. Eventually, you’ll turn left up the main couloir and climb it to the saddle between Pagoda and Chiefs Head. The top of the couloir can be wind blasted through winter, and there are likely cornices to deal with at the headwall. Ascend and descend with extreme caution. In the summer, you can use this method to attack Chiefs Head as a Class 2+/3 climb. This is not the easiest way up Pagoda, although the summit route is available via a Green Lake approach as well.
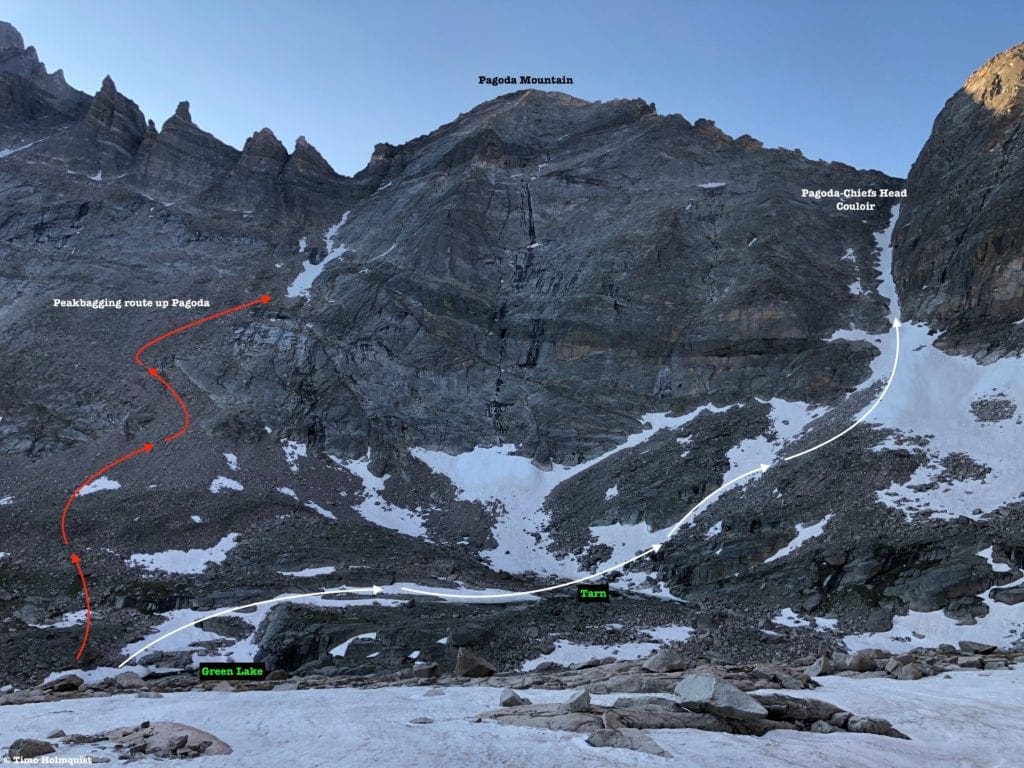
Route access from near Green Lake.
If you’ve been looking at Spearhead this whole time and wondering how anyone actually tops out on it without ropes, the short answer is either the NE Ramps or the NW Gully. From Green Lake, you can quickly access the NE Ramps. This is a Class 4 route with massive exposure. However, when comparing both non-roped routes up the peak, I prefer this one.
As the name suggests, the route consists of two main ramps, connected by a short Class 4 section. The 4th Class section can be bypassed as a Class 3 section with a little creative route finding, but I would make the argument that the middle section of the Lower Ramp is Class 4 as well, especially with any type of moisture or snowmelt involved.
The beginning of the NE ramps route.
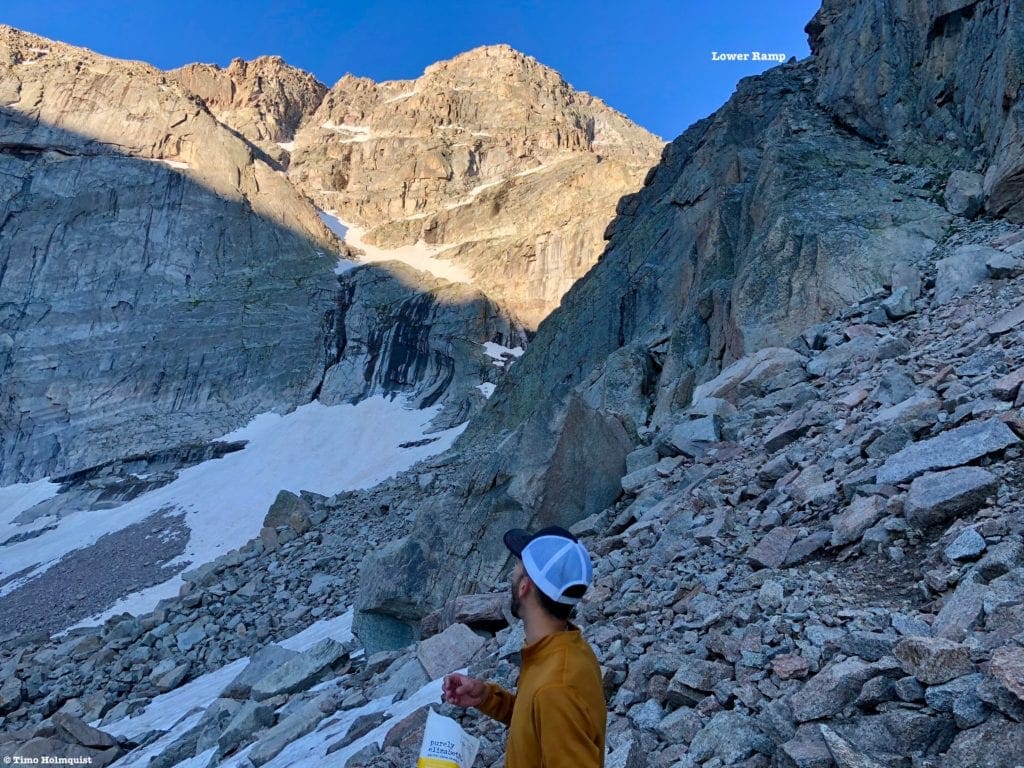
From Green Lake, proceed west up a talus fan just to the south of the daunting Spearhead wall. As you ascend, you will be able to see an improbable ramp breaking up the rock face and ascending steeply. That’s it, get ready. The first fifty feet or so are comfortably Class 3, but there are tons of loose rocks here. Eventually, the ramp width narrows and an overhung ledge pushes you away from the rock walls to your right. You can either veer left towards your first bout with exposure or squeeze under the overhang where loose dirt and tufts of grass prevent a good connection between your tread and the rocks. It’s an awkward and uncomfortable set of moves, complicated by the overhang. In bone-dry conditions, it may pass as Class 3+, but that was not my experience.
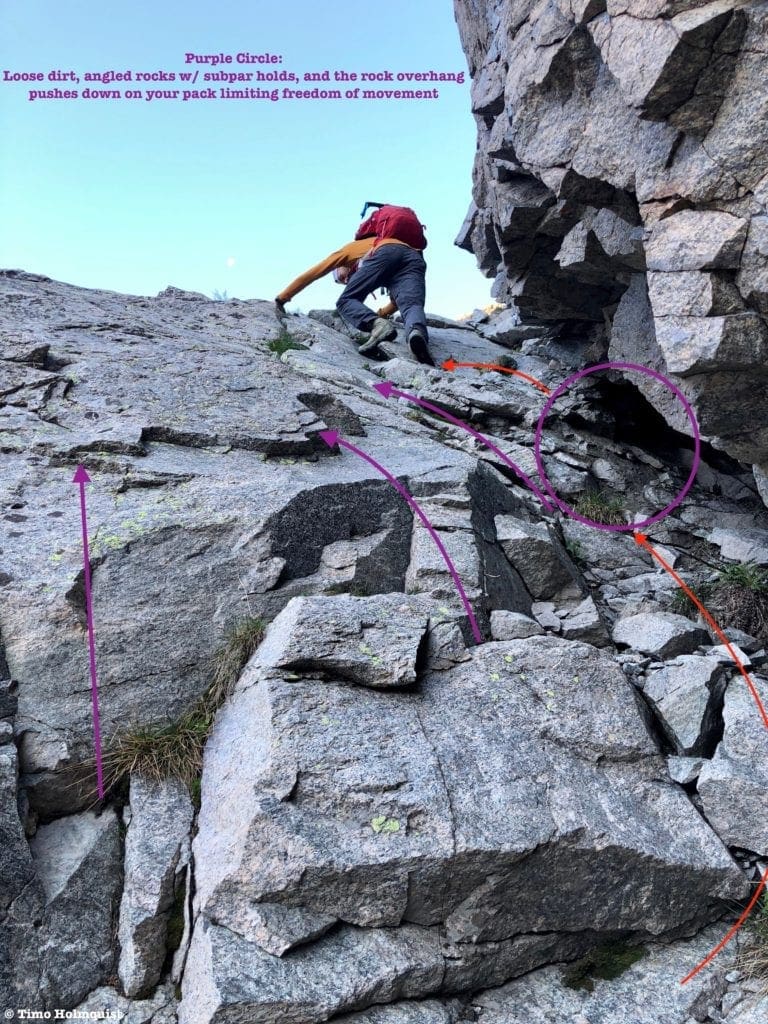
Class 4 section on the Lower Ramp.
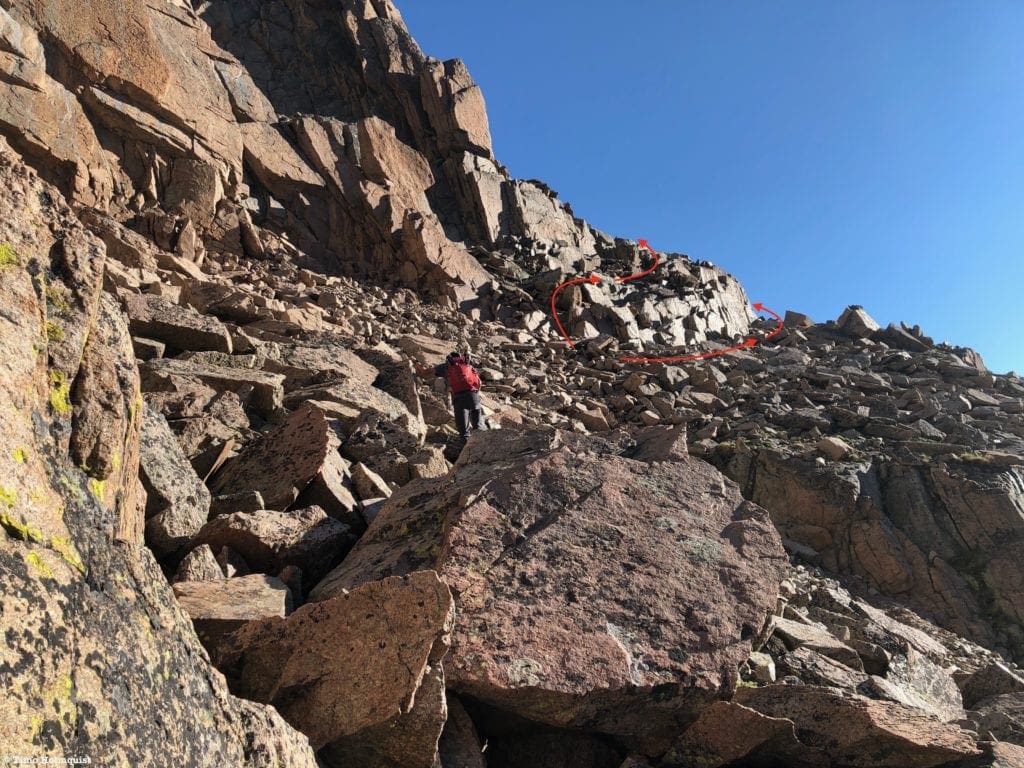
Once you pass the overhang, it’s a relatively easy scramble until the vertical wall to your right begins to fade into a series of blocks. A direct ascent up these blocks is also firmly in the Class 4 range, but there are great holds, and the rocks are generally solid, unlike the lower portion. You can, however, continue on your ramp, ascending and keeping an eye on the blockier bits to your right until a quick Class 3 workaround presents itself.

Class 3 alternate route.
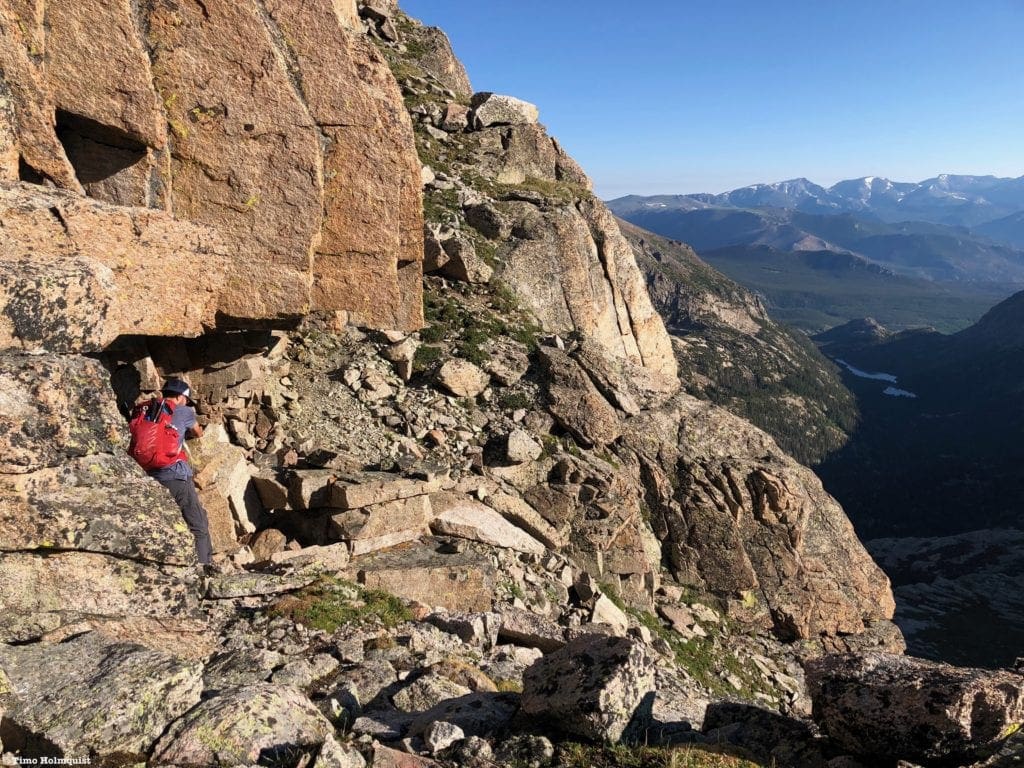
Once you complete the workaround (or clamber up the Class 4 blocks), double back until the rock walls are now on your left. Proceed, occasionally performing a few Class 3 moves up and over some rocks until the wall to your left ends, and you can round the corner, thus beginning the Upper Ramp. Move for move, the whole Upper Ramp is no more than light Class 3, but it’s where you are that really sets the route apart.

Marked up version of the Upper Ramp from below.
Until you are actually on the Upper Ramp, it seems improbable that any ramp could split this face, but it does. Perhaps more improbable is how wide the ramp is, more so than the Lower Ramp, to where you could arguably conduct the ascent pressed against the walls to your left and never be in a position overlooking the void. There are multiple places where you can peek over the edge if you choose to and it is severe.
The start of the Upper Ramp. Both variations go; the one to the left stays further from the edge but requires a short downclimb on the other side.
Once you start the Upper Ramp, ascend a blocky talus slope, staying as far or as close to the edge as you find comfortable. Eventually, the ramp narrows (but still with plenty of width) and forges across the top of the Northeast Face.
Where two variations meet and the route narrows.
The last portion to the ridgeline goes by quickly, and before you know it, you’ll be within sight of the summit.
The final section of the climb past the ramp.
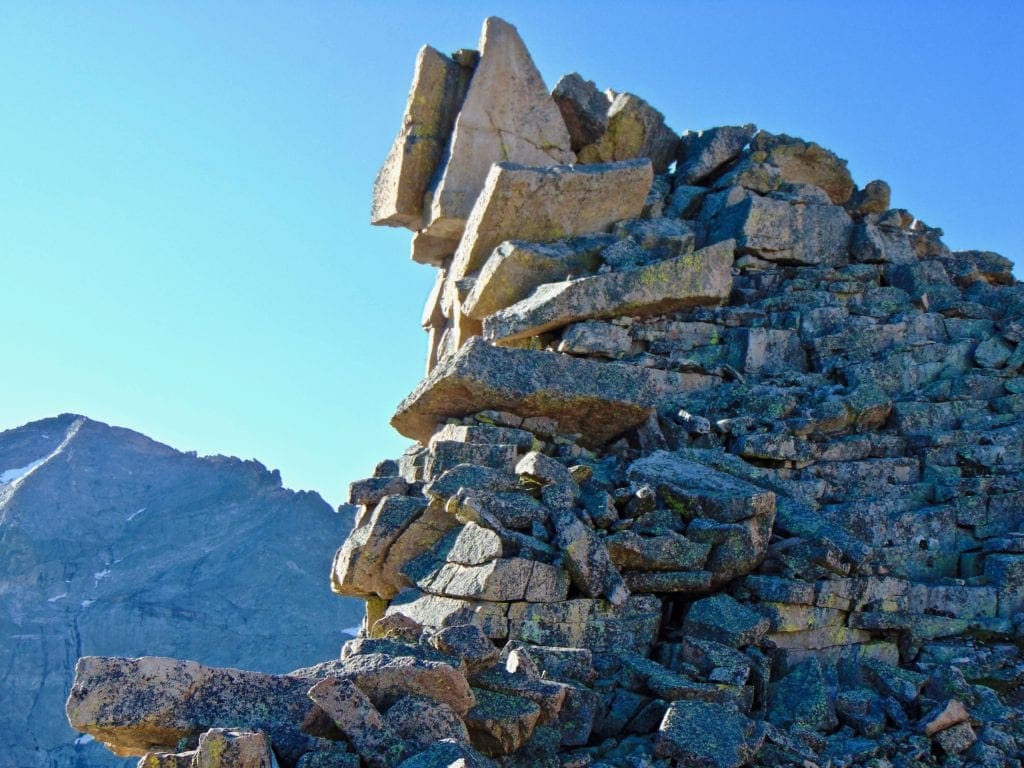
What’s left is a series of blocky steps to get to the summit ridge. The summit itself is a massive overhung rock that’s realistically only accessible via an exposed catwalk. It is not a place to be when it’s windy. If you know where to look, you can see the summit block from way down by the shores of Black Lake.
The very tallest block is overhung at least twice.
From the end of the Upper Ramp, climb south along the path of least resistance until arriving at the summit rib. Five large boulders separate you from the very highest piece of rock. It is a short but hair-raising experience going out to the end. For the fearless, you can peer through the overhung connection between the two summit rocks and stare directly into the void. This is dizzying exposure.
Starting along the summit scramble, with Longs Peak standing guard.
Thankfully, the summit rocks are grippy and sturdy. Additionally, between the third and fourth is a large pocket where the exposure dims, and you can take a few breaths.
One of the craziest summits in the Park.
From there, it’s easy to scramble up a few feet and reach a hand out to touch the summit rock. If you’re up to it, you can stand on the very top.
On the summit rock.
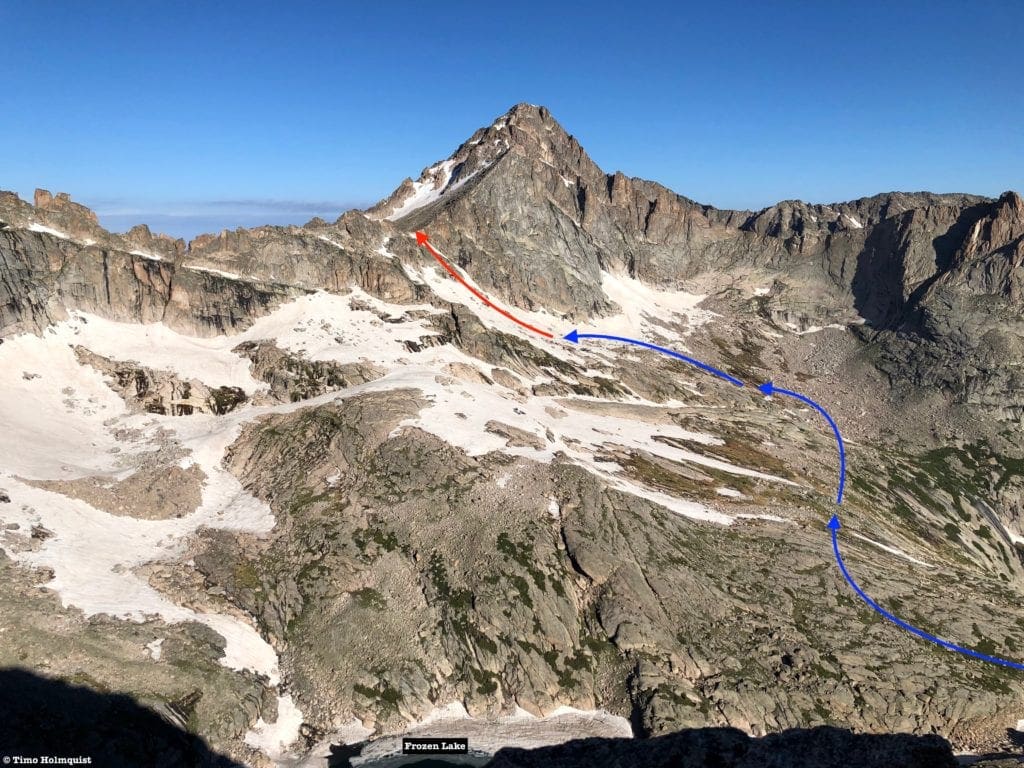
Once you’ve had your fill of the spectacular summit, you have to decide which way to go down. Opting for the NW Gully makes the most sense, but it’s still Class 3. I’ll describe that route later as it is best approached from Frozen lake. The short version is: make it down to the saddle with Chiefs Head peak, staying to the right of the ridge crest when necessary, and take the broad gully down to the shores of Frozen Lake.
Looking back down the summit ridge with Chiefs Heads imposing frame filling up the skyline.
Frozen Lake Area
The saddle between Chiefs Head and Spearhead is impossible to traverse without serious Class 3-4 scrambling. The easiest way to connect Green Lake and Frozen Lake is to backtrack around Spearhead. From Green Lake, you want to cross the stream if you’re on the east side, get close to the Spearhead and follow its awesome-looking Northeast Wall to the prow of the rock and then scurry around it. The navigation with the Spearhead for reference is easy; you just want to make sure you stay high enough to avoid any marshy areas.
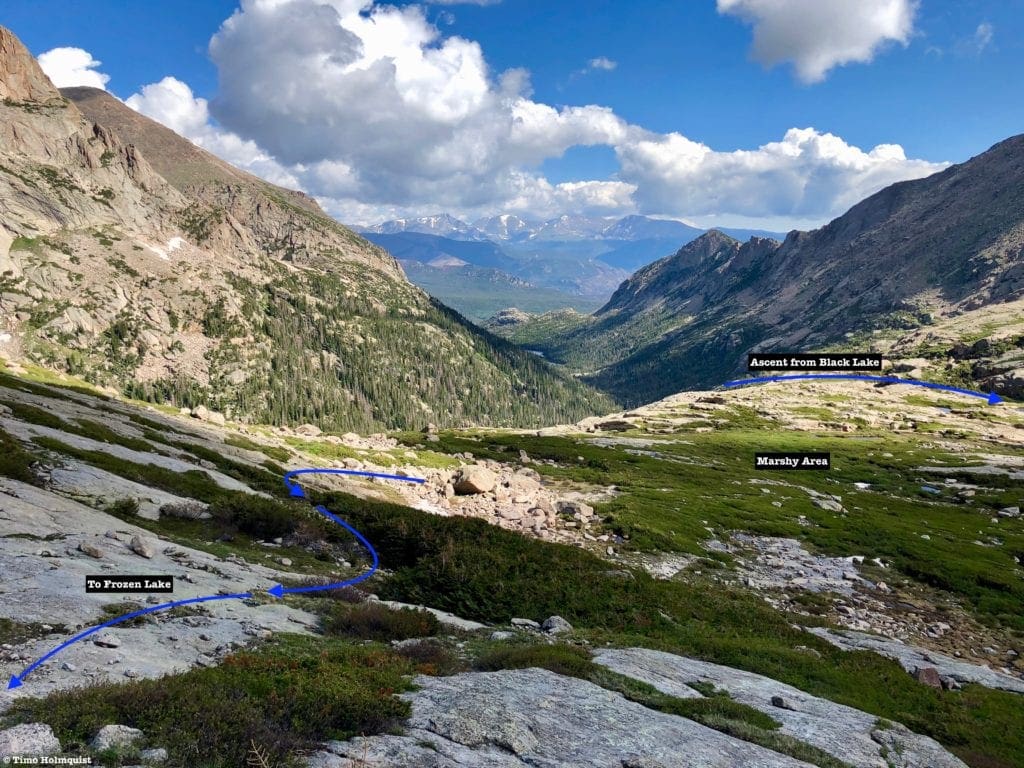
If Frozen Lake is the first destination you’re going for after passing Black Lake, ascend the gully (southeast) of Black Lake until you’ve entered Upper Glacier Gorge. Once you can see the Spearhead, survey the terrain around you. Like the start to Green Lake, you’re going to want to cross the stream you’ve been following since Black Lake. There are multiple ways to do this. By August, the water level is lower, but the stream will be freezing no matter what time of year it is. Thankfully, there are points where the stream is not wide, and step rocks can be used to get across. Some cairns will lead you to a more direct crossing near a mini gorge. There are usually good places to plant your feet and hop across the stream here, but if there are any lingering snowbanks, it could complicate the crossing. Additional options exist both above and below the mini gorge. A quicker crossing is preferable to limit time spent fighting the willows.
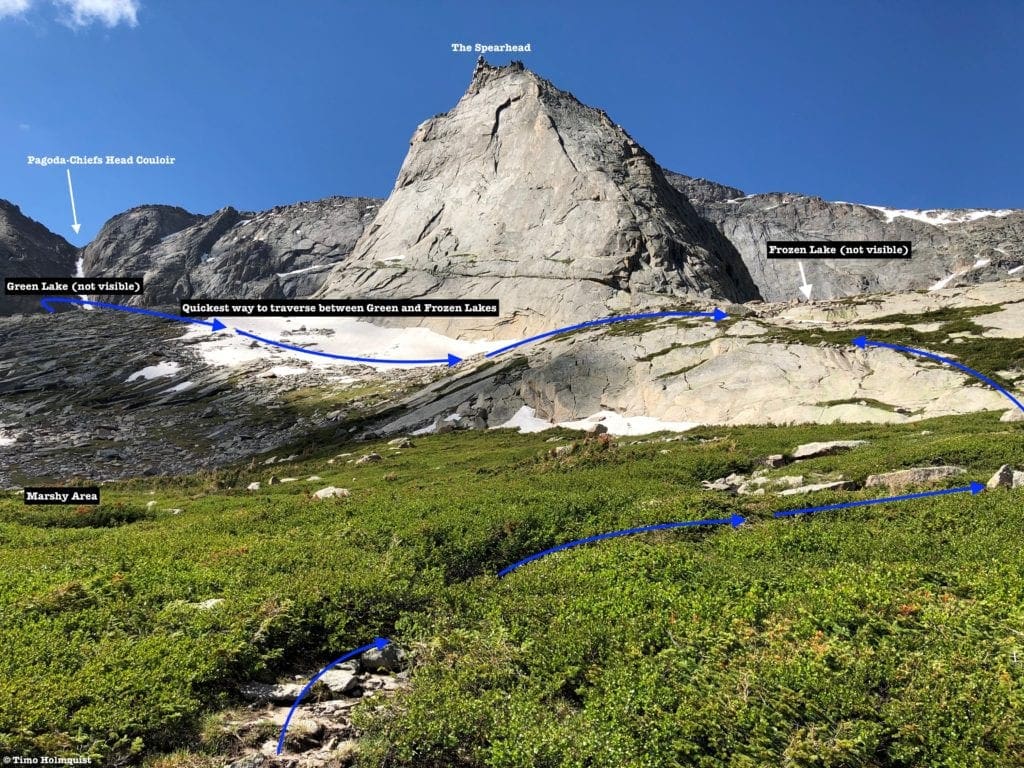
Spearhead, the paths forward, and the marshy area you want to try to avoid.
Apart from dry and cool autumns, chances are you won’t be able to avoid all the marshy areas. The key is to cross quickly by heading west until finding a series of slanted rock ribs. The terrain will dry out, and the added bit of elevation will reveal stunning views back down the valley.
One possible ascent route to Frozen Lake once you’re through the willows. The view north to the Mummy Range is classic Rocky Mountains.
As you cross in front of the Spearhead, you’ll be given a great view of the North Ridge route, which is one of the premier moderate rock-climbing routes in Colorado (8 pitches, 5.6).
The approximate North Ridge climbing route on the Spearhead.
Soon, you’ll be able to crest the rock rib you’re on and stare forward to Frozen Lake. Before descending to it, take note of a sneaky gully on the Spearhead. Like the NE Ramps from Green Lake, this is a rock-climber descent route and can arguably provide the most direct route to the summit. From July to September, the Spearhead will be loaded with aspiring rock climbers, so this gully and the NE Ramps are going to be busy. Unlike the solid structure of the North and Northeastern Walls, the western side of the Spearhead is broken and crumbly. It may be more direct, but it is not a fun ascent, and the risk for rockfall is much greater.
The North Gully will work, but it’s not recommended.
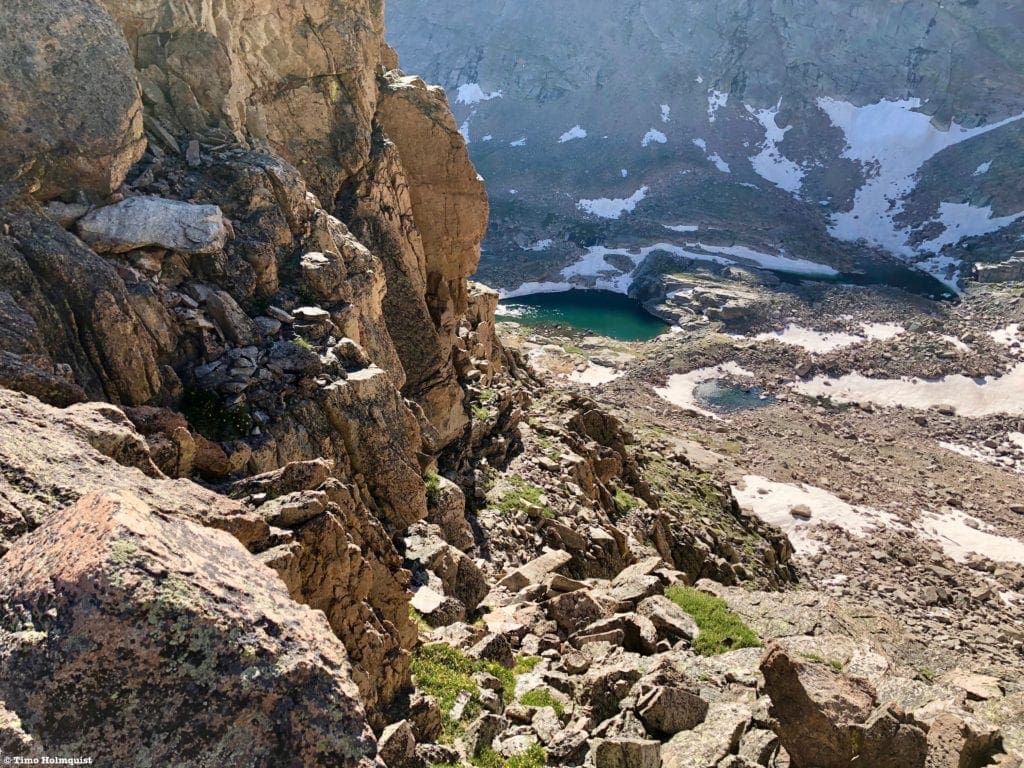
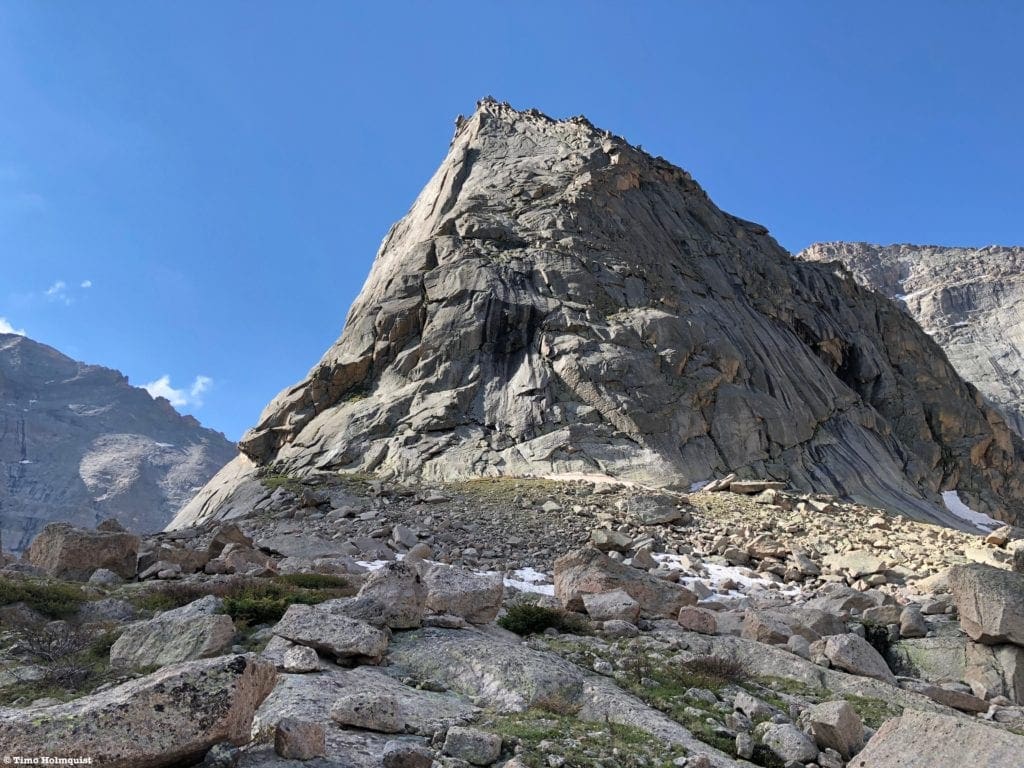
Frozen Lake is a beautiful lake that retains ice through a decent amount of the summer. It is also the largest of the three lakes in Upper Glacier Gorge. The shoreline is quite rocky and offers good opportunities to scramble around and find the best views. Because of the rugged nature of the shoreline, use extra caution when exploring.
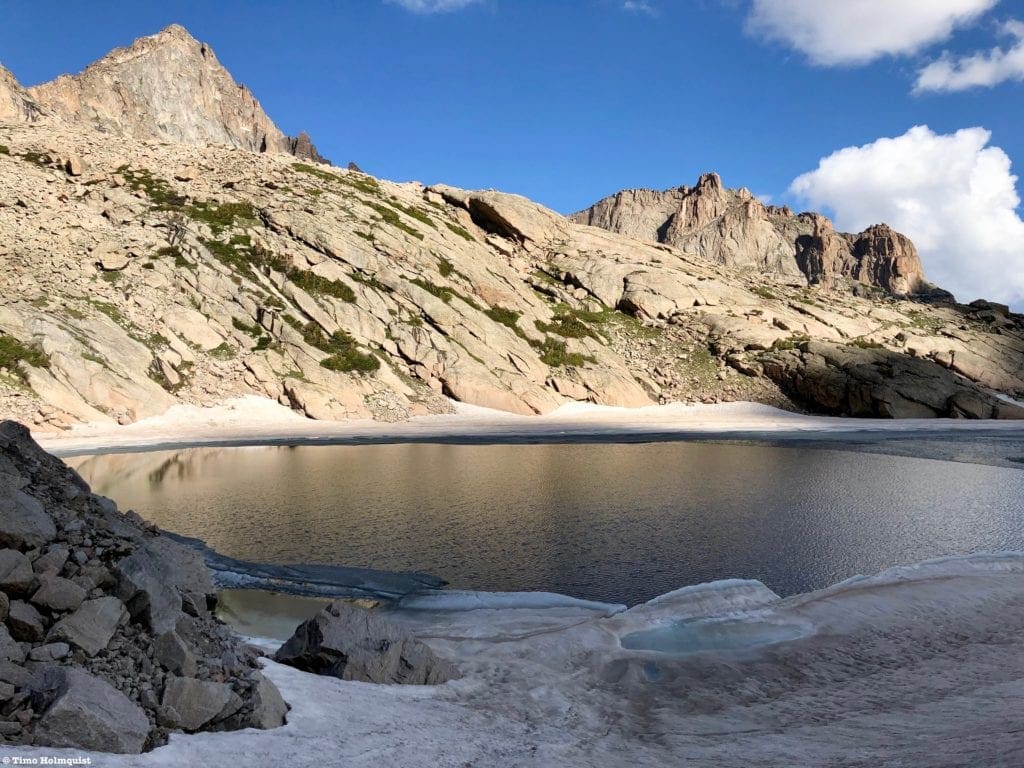
Receding ice on the periphery of Frozen Lake in late June.
Frozen Lake is also the jumping-off point to what is commonly referred to as the standard (or NW Gully) route up the Spearhead. To take advantage of this option, proceed south from the end of Frozen Lake. You’ll be able to spot a large gully ascending to the low point between the Spearhead and Chiefs Head Peak. Large boulders line the middle and right sides of the gully. This is a steep and loose ascent to the saddle. It is easier than the NE Ramps, but the slip and trip risk is substantial.
What the gully looks like as you approach.
After making it to the saddle, the crest of the Spearhead will appear much more intimidating, with a few sharp towers you’ll need to avoid on the west side. You can stay relatively close to the crest; or, instead of reaching the saddle between Spearhead and Chiefs Head, cut up to the left once you pass an area of sloping rocks.
In either scenario, once you pass the first tower, angle towards the ridge crest, staying on the west side, and ascend as you can until reaching the summit rocks. Most of this route is light Class 3, you can probably keep it Closer to 2+ by staying a bit lower, but the area just underneath the crest has the best and sturdiest rock. Once you get to the series of boulders that make up the summit ridge, it’s back to firm Class 3 with outrageous exposure to the east.
Gaining the ridge crest before the summit area.
If you ascend the Spearhead by the NW Gully, it is best to retrace your route when descending. It may be tempting to shortcut the gully on the way down, but sneaky cliffs near Frozen Lake block easy passage. This standard approach to Spearhead, while loose, allows you to access the summit area without crowding any of the rock-climbing areas to the North and East. If you do not have experience with loose Class 3 scrambling and spectacular exposure, there are other, much better introductory scramble routes to consider, such as the Hourglass Ridge on Mt. Alice.
Frozen Lake from the above.
Frozen Lake is a great destination on its own anyway, with McHenrys peak looking particularly dramatic to the southwest.
Stone Man Pass
The last area of the Upper Gorge is Stone Man Pass, which is a relatively low crack in the wall connecting McHenrys to Chiefs Head.
Stone Man Pass from near Black Lake.
The climbing up to the pass is Class 3 and involves snow up until late in the summer. The easiest way to reach the pass is to start as if heading to Frozen Lake. Once you are past the marshes, ascend rock benches to the west and continue traversing below Frozen Lake. You are essentially paralleling the top of the cliffs wrapping above Black Lake. Ascend southwest up the mixed snow/rock slope to the pass.
The approximate route from the Spearhead.
The actual Stone Man rock formation is south of the pass, so you do not have to aim for it. Once on the pass, you have the standard summit option for McHenrys available to the north. You can also head south for access to Chiefs Head and even down to Mt. Alice: depending on time and conditions. The pass itself offers a great perspective of the upper challenges on McHenrys and the rest of Glacier Gorge. When Stone Man Pass is free of snow, it can act as a good Class 3 practice route; conversely, when there is snow, many opportunities exist to sharpen snow climbing and self-arresting skills, both crucial components of mountaineering.
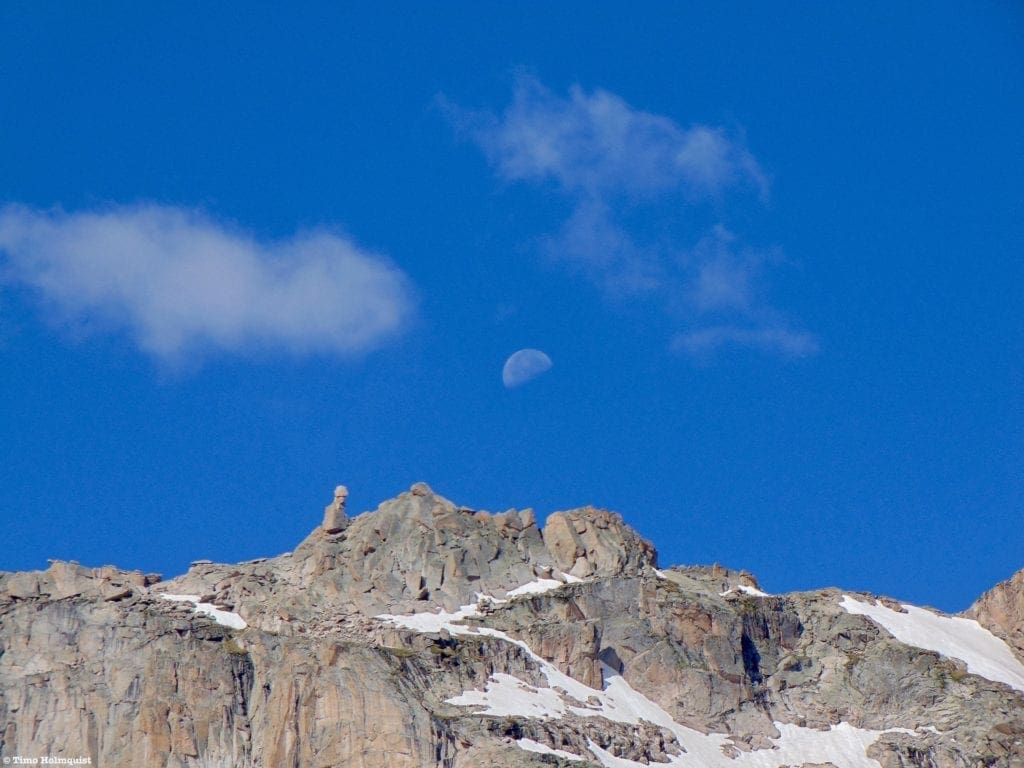
The interesting Stone Man formation with the moon behind and to the right of it.
There is a more direct approach to get to the Stone Man Pass area from Black Lake. When the cliffs around Black Lake are dry, there is a break you can use to the west, which allows quicker access to the Stone Man area and a Class 4 route up Arrowhead. This is an exposed and improbable route, much like the NE Ramps on Spearhead, though the route-finding component is even more critical here.
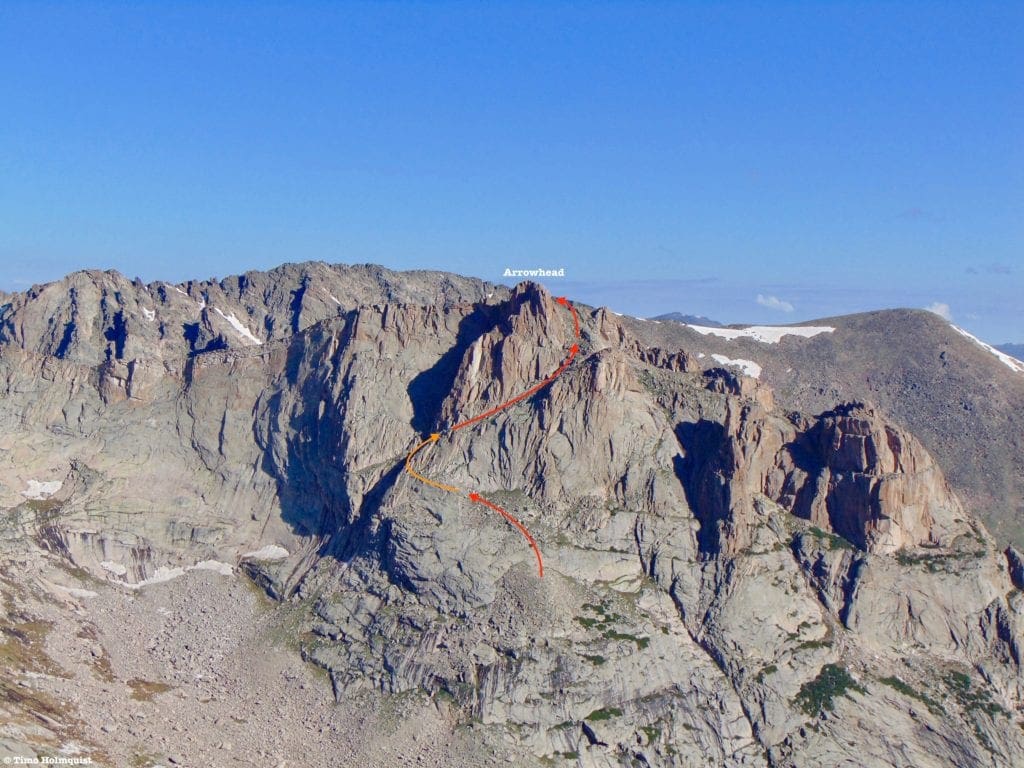
Arrowhead scramble route from Glacier Gorge.
As stated previously, the easiest way to get to Arrowhead is from Solitude Lake. Due to its position north of Upper Glacier Gorge, the Solitude Lake route is not included in this review.
Final Thoughts:
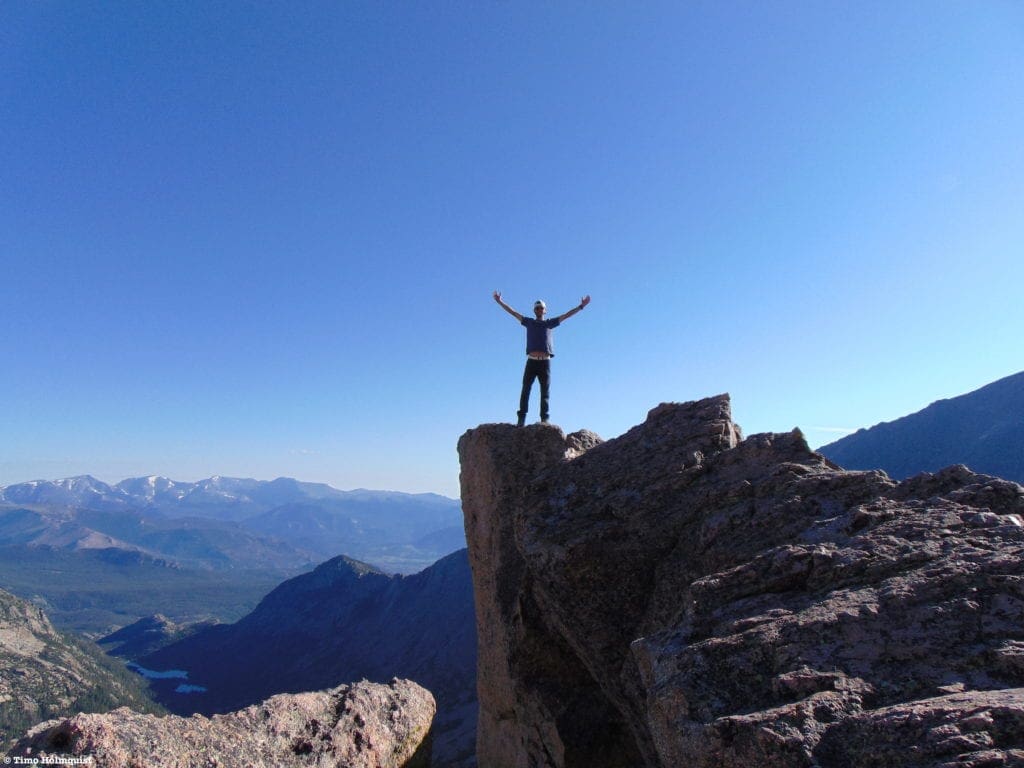
Upper Glacier Gorge is a brilliant example of nature’s artistry, sure to inspire and impress anyone motivated enough to seek it out. Whether your goal is any of the three lakes, a summit bid, climbing route, or backcountry ski, the Upper Gorge provides. While difficult routes exist here in abundance, the best introduction to the area is a day spent hunting the three exquisite lakes and marveling at the scenic beauty of this elite alpine basin.
Sources and Acknowledgments:
As with any area review, there are bound to be routes that are not mentioned. The goal of this review was to highlight the wonders of Upper Glacier Gorge in a way that touched upon each geographic component of the Upper Gorge. The observations were all conducted from first-hand experience climbing and exploring this wonderful area. Having said that, acknowledgment needs to be given to the multiple sources I used to supplement my own observations. They are, in alphabetical order:
- Foster, L. Rocky Mountain National Park: The Complete Hiking Guide. (2005). Westcliffe Publishers, Inc.
- hikingrmnp.org (Excellent blog from someone who, like Lisa Foster, has touched every named feature in Rocky Mountain National Park).
- Kelly, M. Backcountry Skiing and Ski Mountaineering in Rocky Mountain National Park. (2013). Giterdun Publishing.
- mountainproject.com (User rated site covering rock climbing routes all over the world).
- Rossiter, R. Rocky Mountain National Park: A comprehensive Guide to Scrambles, Rock Routes, and Ice/Mixed Climbs on the High Peaks. (2015). Fixed Pin Publishing.
- Spearhead NE Ramps, Summitpost. (2012). Retrieved from https://www.summitpost.org/spearhead-ne-ramps/780031
There are many sources out there that detail Rocky Mountain National Park, and the one thing binding them together is the subjective nature of each individual rating scale. For example, Lisa Foster, whose book is probably the de-facto resource for every feature in the park, claims a Class 4 route for the summit rib on Spearhead via the NW Gully. Rampant exposure or adverse ground conditions may have led to this rating. If you focus on the move-for-move component, the NW Gully route and summit rib do not exceed 3rd Class. Rossiter also claims some interesting ratings, calling the Keyhole Route on Longs Peak a Class 2, which is the only source I’ve found that makes that claim.
In short, every source is going to have pros and cons; it’s really the combination of descriptions and reports that should guide your research. Take a good look at the date of when sources were written as well. Focusing again on Rossiter: in his book, he talks about a Class 3 route up Hayden Spire. The catch is that he did it in 1994, and based on numerous reports since then, this route no longer exists. (Click here, here, and here for sources disputing the Class 3 route). Does this mean you can’t trust well-loved works like Rossiters? No, there are HUNDREDS of brilliantly described routes in there. However, as someone seeking information on routes in dangerous environments, you always need to cross-check your sources. Hayden Spire is at least 10 miles from the nearest trailhead, and if you arrive anticipating a moderate Class 3 scramble only to face difficult Class 5 moves above what you can do, you’ve just wasted all that effort for nothing. Similarly, the Spearhead NE Ramps description from Summitpost is well-written and certainly contains a Class 4 section as described; it can, however, be skipped in favor of a Class 3 workaround.
Armor up with the best combination of information you can find, but expect surprises along the way. As a basic rule, if multiple sources claim multiple ratings, prepare for the most difficult rating given and then judge the accuracy once you’re up there. Over preparing for any adventure in the alpine is always better than under preparing.
McHenrys Peak and Arrowhead bathed in morning light.
Popular Articles:
- Guide to the Best Hiking Trails in Rocky Mountain National Park, Colorado
- The Dyrt: The 10 Best Campgrounds In Colorado
- Top Adventure Sports Towns 2021: Boulder, Colorado
- Epic Adventures with the Best Guides In Colorado
- Sky Pond via Glacier Gorge Trail, Rocky Mountain National Park, Colorado
- Scrambling Hallett Peak’s East Ridge, Rocky Mountain National Park, Colorado
- Scrambling Mt. Alice via the Hourglass Ridge, Rocky Mountain National Park, Colorado
- Gorge Lakes Rim Scramble, Rocky Mountain National Park, Colorado
- Black Lake Via Glacier Gorge Trail, Rocky Mountain National Park, Colorado

Skyblue Overland Strongly Recommends That You Enroll With Global Rescue Prior To Embarking On Your Next Adventure.
With more people outside now more than ever, Global Rescue expanded services to include field rescue within 100 miles of home. With Local Field Rescue — automatically included in any travel protection services membership — Global Rescue is there whether you’re hiking, kayaking, snowmobiling, fishing or simply enjoying the outdoors and get ill or injured and you’re unable to get to safety on your own. Purchase a Global Rescue membership for your next adventure and travel with peace of mind. Single trip, annual and family options are available.
Memberships start at $119.
Terms of Use:
As with each guide published on SKYBLUEOVERLAND.com, should you choose to this route, do so at your own risk. Prior to setting out check current local weather, conditions, and land/road closures. While taking a trail, obey all public and private land use restrictions and rules, carry proper safety and navigational equipment, and of course, follow the #leavenotrace guidelines. The information found herein is simply a planning resource to be used as a point of inspiration in conjunction with your own due-diligence. In spite of the fact that this route, associated GPS track (GPX and maps), and all route guidelines were prepared under diligent research by the specified contributor and/or contributors, the accuracy of such and judgement of the author is not guaranteed. SKYBLUE OVERLAND LLC, its partners, associates, and contributors are in no way liable for personal injury, damage to personal property, or any other such situation that might happen to individuals following this route.


