


High Point:
~11,450 feet (12,810 ft. on top of Howard Mt.)

Total Ascent:
2,850 feet (over 4,300 ft. if including Howard Mt. and/or Cirrus)

Difficulty:
Hard (Very Hard if adding Howard or Cirrus)

Distance:
~13.5 miles to edge of Lake (~15 if climbing Mt. Cirrus or Howard Mt.)

Waypoints:
40.4016, -105.84889

Route Type:
Out and Back
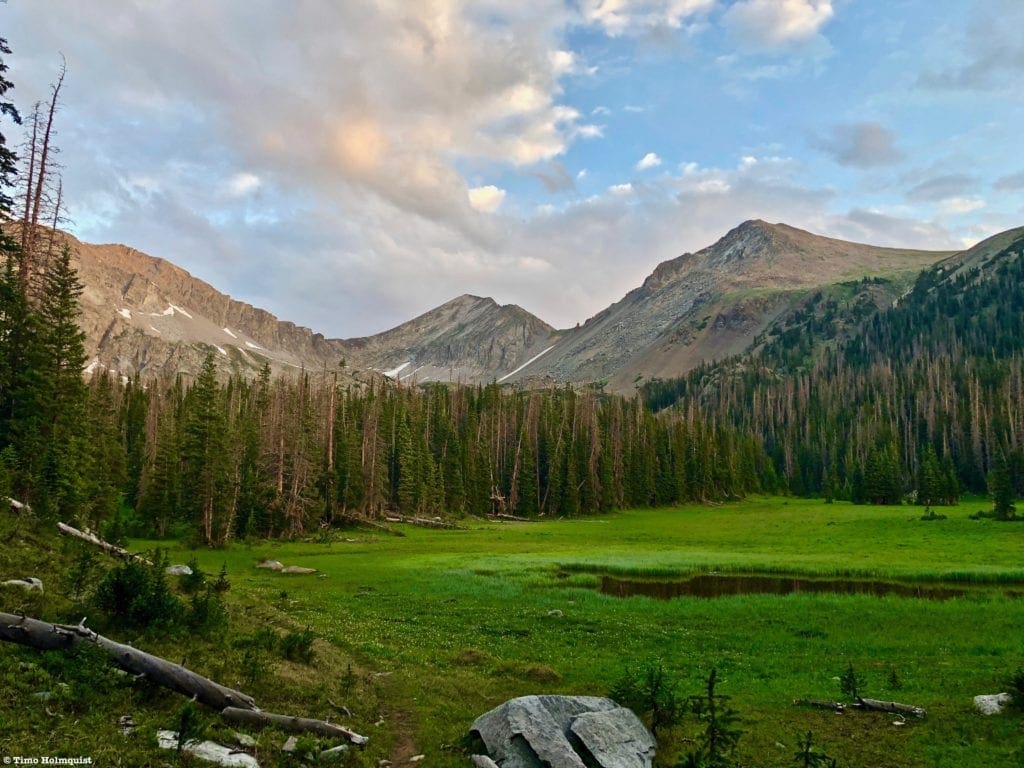
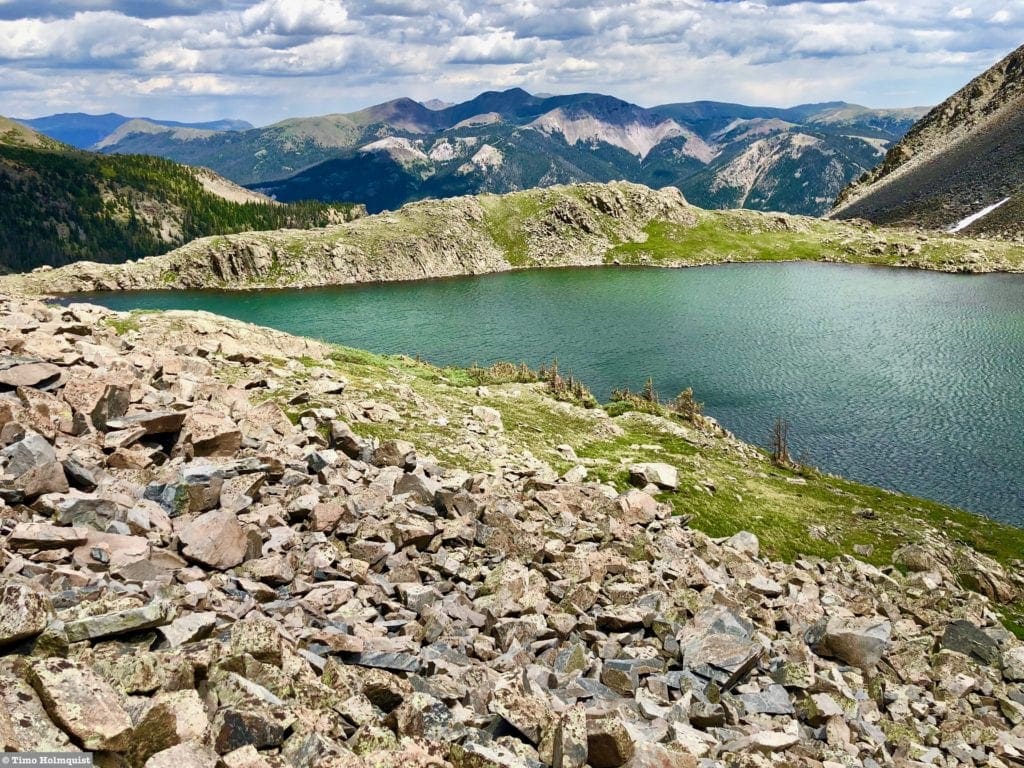
Situated on the border of the Rocky Mountain National Park and the Never Summer Wilderness is the breathtaking Lake of the Clouds. Between Howard Mountain and Mount Cirrus, this alpine lake showcases incredible views of the towering Never Summer Mountains and lush forests of the Rocky Mountain National Park.
Overview
If you want top-notch National Park photos for minimum effort, Lake of the Clouds, and the larger Never Summer Mountains in general, are not for you. Far from the popular areas of alpine Trail Ridge Road, Bear Lake Road, and Wild Basin, the northwest border of Rocky Mountain National Park may seem like an afterthought. The appeal is certainly more subdued than the view-ridden and comparably easy ascents of Black Lake, Sky Pond, or Ouzel Falls. However, if you savor the grind, love getting lost in remote corners of mountains, and have a penchant for finding (or jumping into) alpine lakes, Lake of the Clouds is a great addition to any hiking portfolio.
While the lead-up is all along trails and dirt roads, the last push from the Dutch Town backcountry site to the lake itself is decidedly off-trail. There are a few errant cairns to aid in navigation but prepare for some moderate route finding and some steep talus slopes to negotiate. You can usually make it to the lake without dealing with serious snow by early July but if you want to get to the ridgelines behind it, prepare for patchy snow until late July/early August.
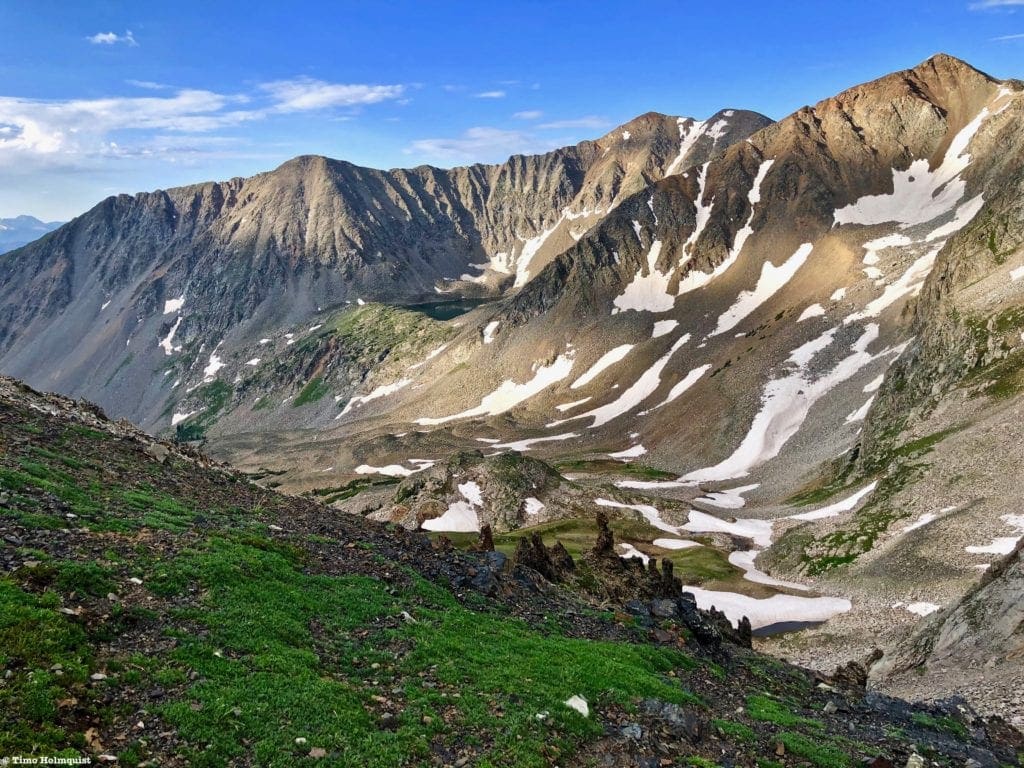
Lake of the Clouds from the north. Mt. Cirrus is the reddish tinted pyramid to the right, and Howard Mt. is the double humped summit.
Table of Contents:
Article Navigation: Click on any of the listed items in the table of contents below to jump to that section of the article. Similarly, clicking on any large, white section header will jump you back to the Table of Contents.
- Overview
- Scales and Criteria
- Directions to Trailhead
- Field Notes
- Places to Stay
- Journal
- Final Thoughts
Scales and Criteria:
Difficulty Ratings:
- Easy: less than 5 miles, less than 500 ft. of elevation gain
- Moderate: 5-10 miles, 500-2000 ft of elevation gain
- Hard: 5-15 miles, more than 2000 ft. of elevation gain
- Very Hard: 10+ miles, more than 3,500 ft. of elevation gain
Popularity Ratings:
- Low: Large sections of trail all to yourself
- Moderate: Sizeable trail sections to yourself, crowding possible on busy summer weekends
- High: You’ll be seeing people, still a chance for solitude in spring/fall/winter.
- Very High: Almost always busy.
Snow Rating:
- Easy: Less than 30 degrees
- Moderate: 30-40 degrees
- Steep: 40-50 degrees
- Very Steep: 50+ degrees
Scramble Rating:
- Class 1: Established hiking trail the entire length of the adventure. Low chance for injury.
- Class 2: Typically involves cross-country navigation, possibly using hands for balance but not required, steeper than Class 1.
- Class 3: Hands and feet used to scale areas, must use hands to proceed (either for balance or to help pull you up a section), increased exposure, a fall could be fatal. Helmet recommended, along with grippy hikers.
- Class 4: Climbing on very steep terrain just shy of vertical, falls could be fatal, hands employed for grip and balance continuously, ropes advisable but scalable without. Helmets are highly recommended, along with grippy hikers.
- Class 5-5.4: Vertical climbing that involves technical rock-climbing moves, exposed, falls likely to be serious or fatal, possible to scale without ropes but only for very experienced veterans. Helmets, grippy hikers, and/or rock-climbing shoes necessary.
- Class 5.5 and up: Not covered as scrambling, full-on rock climbing with ropes, helmets, etc.
The YDS system is widely used in North America but can be quite subjective, so it is not perfect. The biggest differences I’ve encountered between Class 3 and Class 4 sections have to do with slope angle, exposure, and putting weight and pressure on hand grips (4) instead of using hands and feet interchangeably as supporting points of contact (3). It is not possible to climb a Class 4 section without using your hands to pull up some or all of your body weight. Typically, a Class 4 section will also require some type of rock-climbing move, like stemming, where hands or feet are pressed in opposition as if climbing the inside of a chimney. If downclimbing, a key difference is that most people will descend a Class 4 section facing inward, i.e., your back faces the exposure.
- Lake of the Clouds: YDS Class 2
- Howard/Cirrus: YDS Class 2+
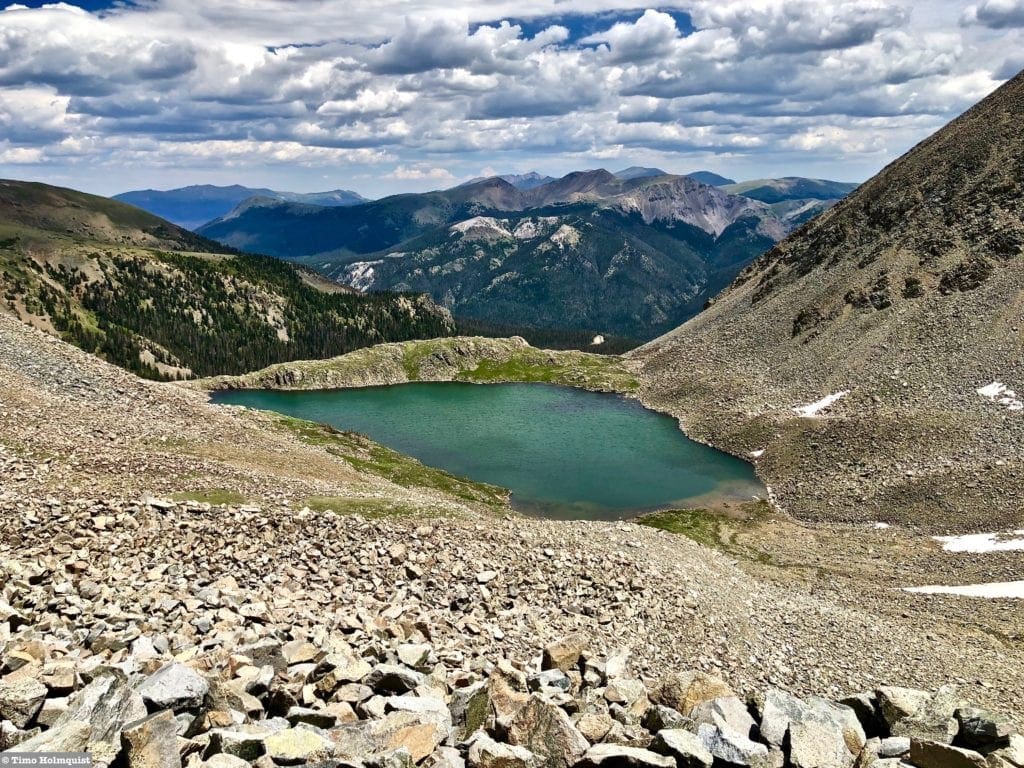
Lake of the Clouds from above.
The Ultimate Offline GPS Hiking & Ski Maps
See why onX Backcountry is the ultimate GPS navigation app for your outdoor pursuits. Try Today for Free. No credit card required.
Directions to Trailhead:
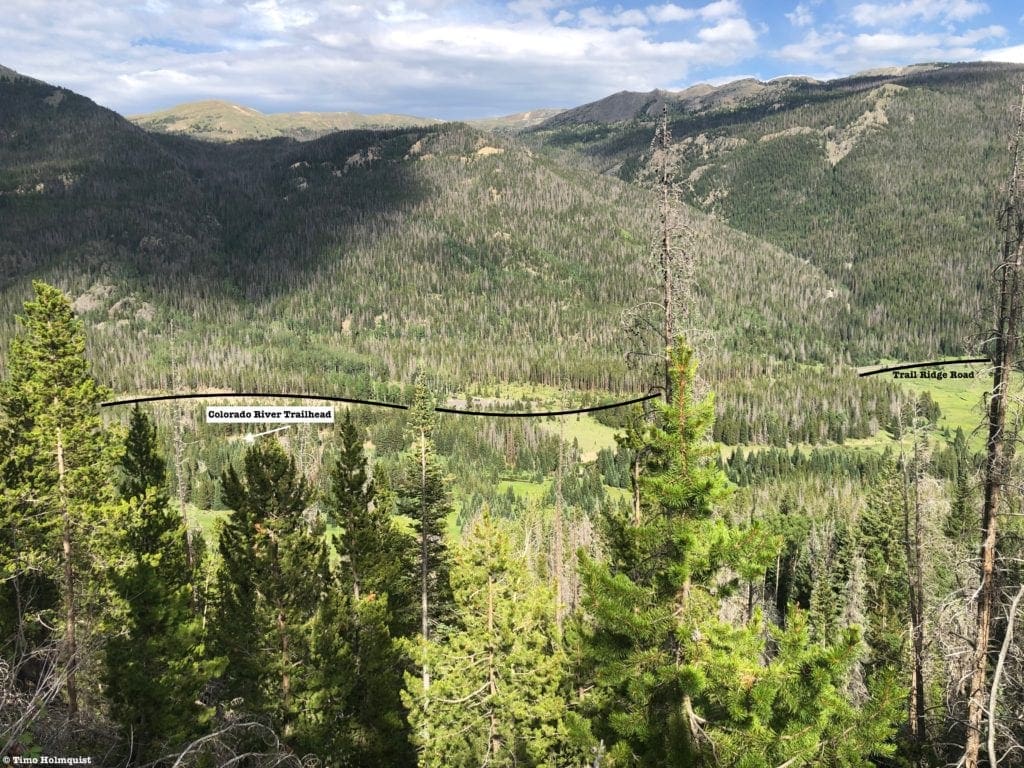
From the east, enter Rocky Mountain National Park. The most popular entrance is US36 at the Beaver Meadows Entrance; however, a large repaving project is in full swing near this entrance, with delays and closures common. US34, entering at Fall River, can often provide a faster entrance experience and (as of summer 2021) avoids the construction on 36. When US34 intersects with US36 at a three-way junction, take a right to continue up Trail Ridge Road. You’ll travel through the exceptionally popular alpine section of the road before dipping down to the divide at Milner Pass. Continue driving, dropping elevation consistently until the road runs parallel to the Colorado River. Pay attention after Fairview Curve, the road will continue to switchback down to the valley floor, but right as the elevation drop ends, a quick sign for Colorado River Trailhead will become visible on the righthand side. If you miss it, you can pull a U-turn at any number of subsequent lots, but it’ll burn some time. Without traffic, this is at least a two-hour drive from large parts of Denver, Boulder, and Fort Collins.
From the west, enter Rocky Mountain National Park on US34 outside of Grand Lake. Drive alongside the Kawuneeche Valley until seeing signs for the Colorado River Trailhead on your left. If you miss the parking entrance, you can turn around at the Fairview Curve, but it’s another few minutes up the road. The trailhead is a little less than 10 miles from the entrance booths at Kawuneeche and should take you around 15-20 minutes to reach.
The National Park has instituted a time slot system in addition to their normal entrance pass system for the summer of 2021. Do yourself a favor and take the time to understand these components by visiting the Park website. If you do not have an entrance pass or time slot, you will be turned back. The short version is that ALL visitors must have an entrance pass. If you arrive at the park (excluding Bear Lake Road) anywhere between 9 AM and 3 PM, you will also be required to produce a timed entry pass. You will be turned around if you do not have a timed entry pass. IF you have an entrance pass, AND you arrive before 9 AM, you are free to park and enjoy your day (make sure your pass is visible on your windshield), hence the “arrive early” mantra. If you exit the park between 9 AM and 3 PM, you will be required to produce a timed entry slot to reenter, or you’ll have to wait until after 3 PM to reenter.
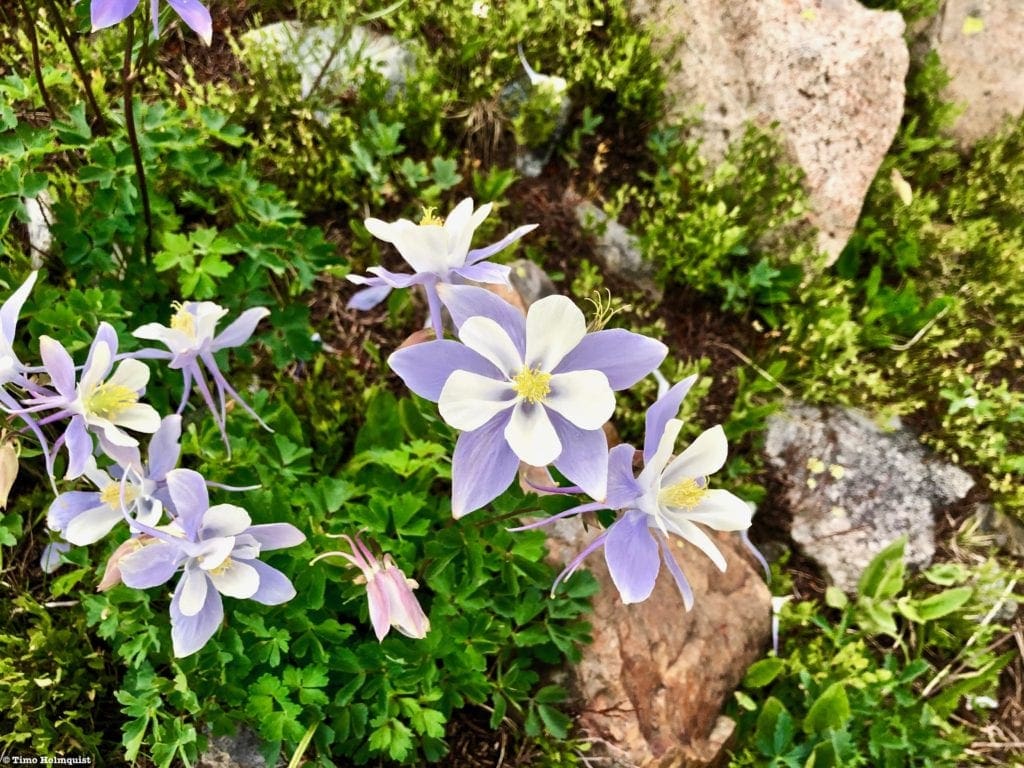
A Columbine, the state flower of Colorado, growing out of cracks in the rocks near Lake of the Clouds.
Places to Stay:
The Never Summers are pretty far from anything, but a few lodging options exist in the town of Grand Lake; click here to peruse. As far as camping is concerned, Valley View and Dutch Town are great sites in the vicinity that will significantly reduce the effort it takes to get to Lake of the Clouds. The Kawuneeche Valley also has a few established campgrounds like Timber Creek. Backcountry camping in the National Park comes with its own set of rules and regulations, most of which can be found by clicking here.
If you’re coming up over Trail Ridge or north from Berthoud, it may be best to get a few hours of sleep at the trailhead and then begin your hike. You have to have a Rocky Mountain National Park entrance pass to make this option possible. Alternately, if you don’t mind waking up in the middle of the night, you could make the two-to-three-hour journey from the Front Range over Trail Ridge or Berthoud Pass to start the hike.
South of Grand Lake, camping options exist as well, use this link to check some out. Be aware, since you need to enter the park to get to the trailhead, you must purchase an entrance pass, even if you are camping outside of the park. Check with the Arapaho National Forest or the Park service for the most up to date information on campgrounds.
Tucked into an alpine pocket between Howard Mt. and Mt. Cirrus, Lake of the Clouds is a great, lesser known destination within Rocky Mountain National Park.
Field Notes:
Despite relatively easy directions, the western side of the National Park is significantly more remote than trails near Estes Park. Cell reception might be hard to come by. Make sure you have a proper first aid kit with you to deal with any issues.
Snow is a consistent problem up high until the middle of July. Come prepared with crampons or microspikes (along with trekking poles or an ice axe for support) if hiking before then. If you have no interest in dealing with snow, wait on this one until later in July, August, or September.
Unlike the large, intact rock walls of Upper Glacier Gorge, the Never Summers are pretty crumbly. Even though Lake of the Clouds has a relatively simple Class 2 rating, you will be required to traverse talus slopes where large rocks may not be as stable as you’d like. Always double-check your footfalls and make sure things aren’t sliding beneath you. A helmet is not required but may be a good idea, especially if you are unsure about talus-hopping. It is always a good idea to slow the pace down when dealing with talus, especially on the return journey when thoughts are more bent towards the end of the hike instead of the challenges between you and your car or campsite.
This hike won’t appeal to everyone. The mileage is significant (14-15 miles depending on how much you explore), and the effort to get there is not trivial. Traversing loose talus is also not a super fun experience. However, veterans of the Park, mountaineers, and ridge-runners are often intrigued by the Never Summers. The range exudes classic big mountain energy and does not give up its secrets easily. If you want to put in the work, the Never Summers will reward.
Weather forecasting is pretty tricky for the Never Summers. You can always start with the Trail Ridge Forecast (collected at the Alpine Visitor Center), which lays a good foundation. However, as far as local mountains are concerned, there aren’t many supplemental forecasts to use. Mt. Richtofen, the monarch of the Never Summers, has a half-decent forecast but is two basins to the north. While the distance is small on the map, it is significant in regard to weather. Depending on which direction the storms move in, Richtofen could be experiencing sunshine while Lake of the Clouds is in a dangerous thunderstorm or vice versa.
Journal:
With most of the hiking focus in Rocky Mountain National Park geared toward the eastern half of the park, journeying into the lesser-known areas on the west can feel like an entirely different experience. There is a distinct, lost world vibe when you finally reach Lake of the Clouds. That feeling doubles if you’re able to get onto the main Never Summer Ridge behind it. With just under 3,000 feet required to make it to the lake, this is the hike for those looking to experience the quieter (but no less dramatic) side of the Colorado wilds.
From the Colorado River Trailhead, begin by hiking north on the wide and easy-to-follow Colorado River Trail. Less than half a mile into your trek, you’ll see a large sign with Red Mountain Trail on it. Take a left onto Red Mountain and settle into a good pace.
Looking down to the trailhead from higher on the Red Mountain Trail.
The trail takes a hugely circuitous route on its way to the Grand Ditch and will cost you 2.8 miles of effort. The upside? The trail is not difficult, with a few steeper uphill sections augmented by flatter bits. Once you make it up to the Grand Ditch Road, navigation is even easier.
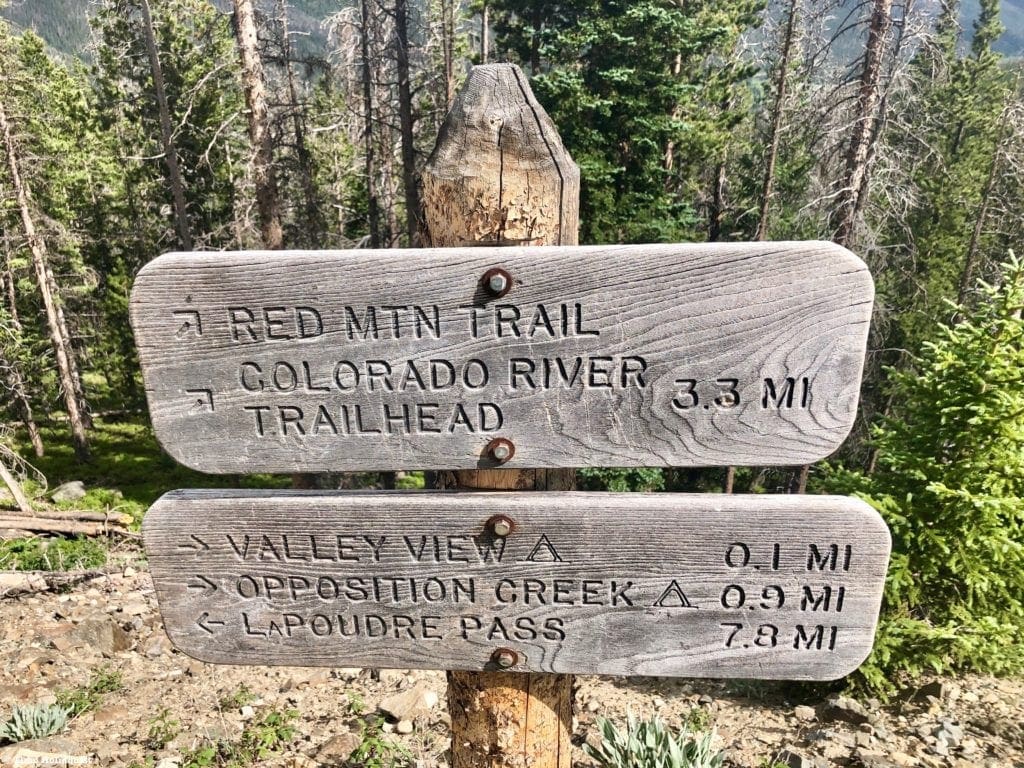
The sign at the end of Red Mountain Trail.
The Grand Ditch is one of those ridiculous feats of engineering. Essentially, there wasn’t enough water in the Cache La Poudre watershed to hydrate Fort Collins and the farmland near Greeley. The ditch collects snowmelt from the Never Summers and transports it over the Continental Divide, dumping it into the Fort Collins area. So, even though you are on the western side of the Divide, every east-facing basin between Parika Peak and Mt. Richtofen feeds water into the ditch instead of the Colorado River. There are water mitigation features to allow for some runoff into the Colorado River but the National Park Service estimates the Ditch transfers roughly 29% of the Never Summers snowmelt away from its natural flow.
From a hiking perspective, this is actually a blessing; the dirt road alongside the ditch is well maintained, and as long as it’s snow-free, you can cruise alongside it quickly. The presence of the road may take some feeling of remoteness out of the experience, but the chances are very low you’ll see any trucks on it. It’s also nice to stride out and take care of another 1.75 miles of distance in short order.
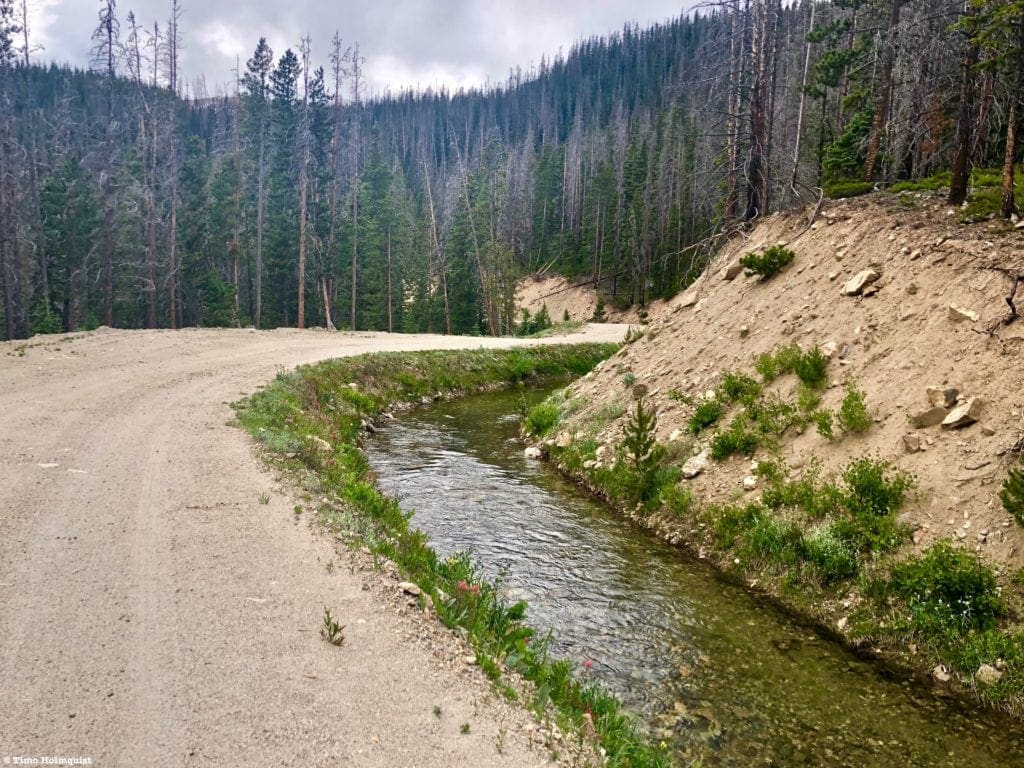
The Grand Ditch and its dirt road.
After strolling north along the ditch for nearly two miles, you’ll notice two large snow measuring sticks on the left side of the road and a small wooden bridge across the ditch. There is a trail sign on the other side that indicates the beginning of Hitchens Gulch. This is your access trail. The two campsites up this gulch could arguably be used as a launching pad for more ambitious Never Summer adventures, though only Dutch Town is currently open.
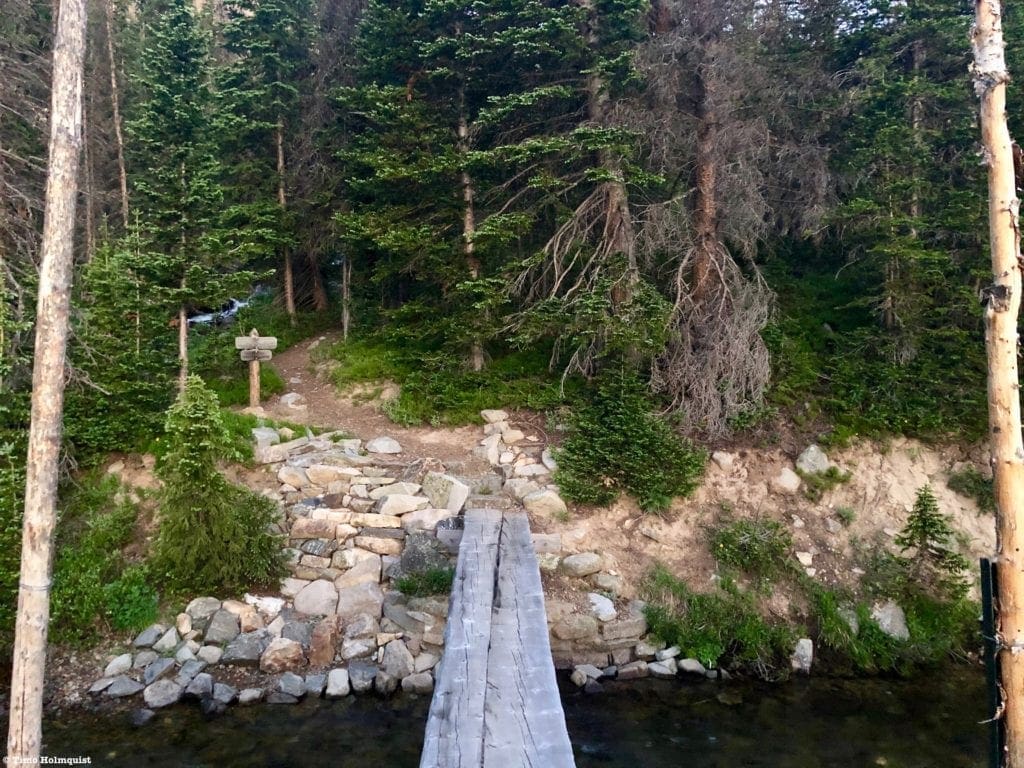
Bridge across the Grand Ditch, i.e. the beginning of the Hitchens Gulch Trail.
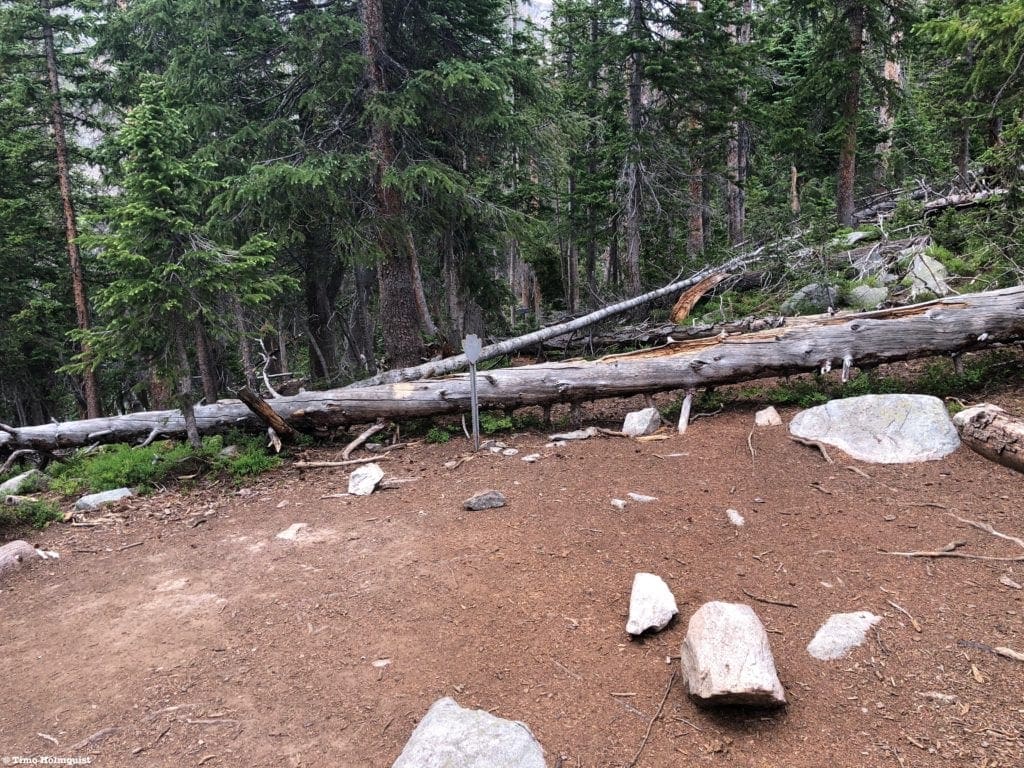
Once you find the Hitchens Gulch trail, you’ll already be 5 miles into your journey. Dutch Town is another 1.3 miles up the gulch on an established trail. You’ll begin a more concentrated elevation gain along this stretch, but every uphill section leads to flatter sections, so it shouldn’t feel too taxing. Pay attention to the signs indicating where Dutch Town is. Shortly after passing the cutoff for the campsite, the trail will gradually fade. It disappears after a meadowed area with good views of Never Summer Peak and Lead Mountain.
The meadow before the trail begins to fade.
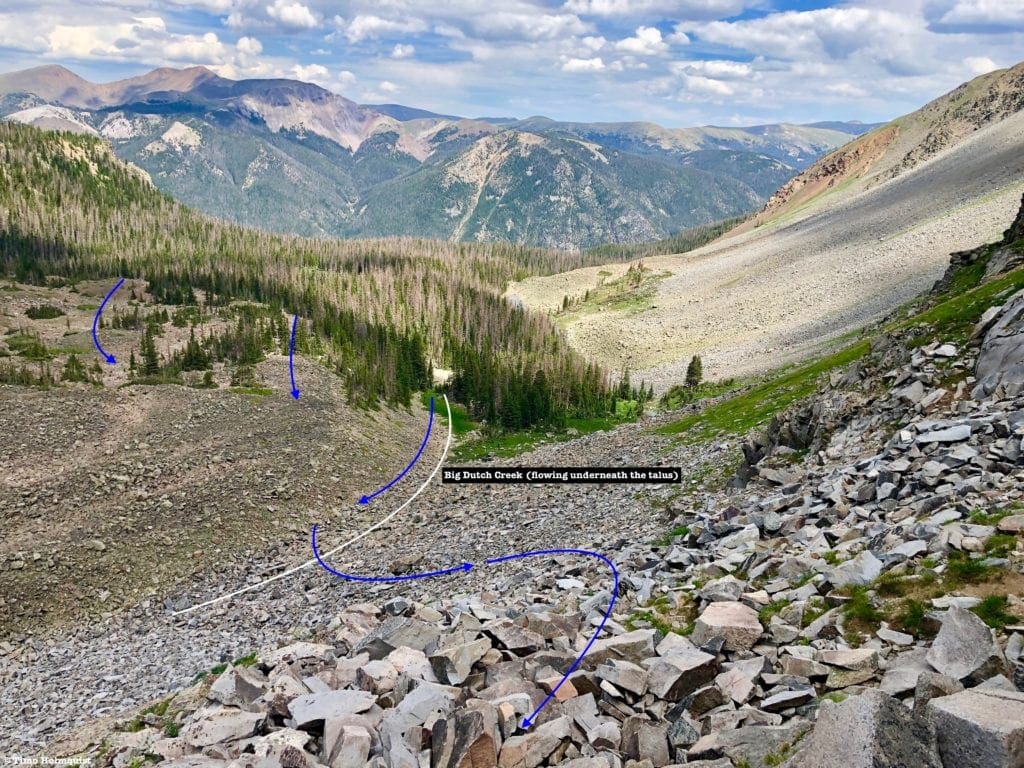
Once the trail fades, some route-finding will become necessary. There are a few ways to do this. The easiest option is to continue west into the basin. The cover here consists mostly of Pine Trees with sparse underbrush, so even though it will be off-trail, it won’t be hard to continue on your trajectory. Alternatively, you can take a more direct line to the left (south) by taking the cut off to Dutch Town and angling toward Big Dutch Creek, following the water until it vanishes beneath some talus, and then follow the talus into the upper basin.
The Dutch Town campsite.
It honestly doesn’t matter which way you choose to go because a huge talus field prevents trees from growing more than a few hundred feet uphill from Dutch Town. As long as you’re going uphill, you will break treeline and have a better understanding of where you are.
(11. Looking at multiple ascent options through the edge of the trees from above.
Once you reach the talus, climb west until you can see the rest of the upper basin. Lake of the Clouds is in a high alpine pocket to the left, cradled between Howard Mountain and Mt. Cirrus. The outflow from Lake of the Clouds (Big Dutch Creek) runs over a series of cascades that should be visible. Head for them.
If the cascades are not visible, ascend into the upper basin, keeping talus slopes and cliffs to your left. There are a series of ledges and ramps west of you that will grant relatively easy access to the lake.
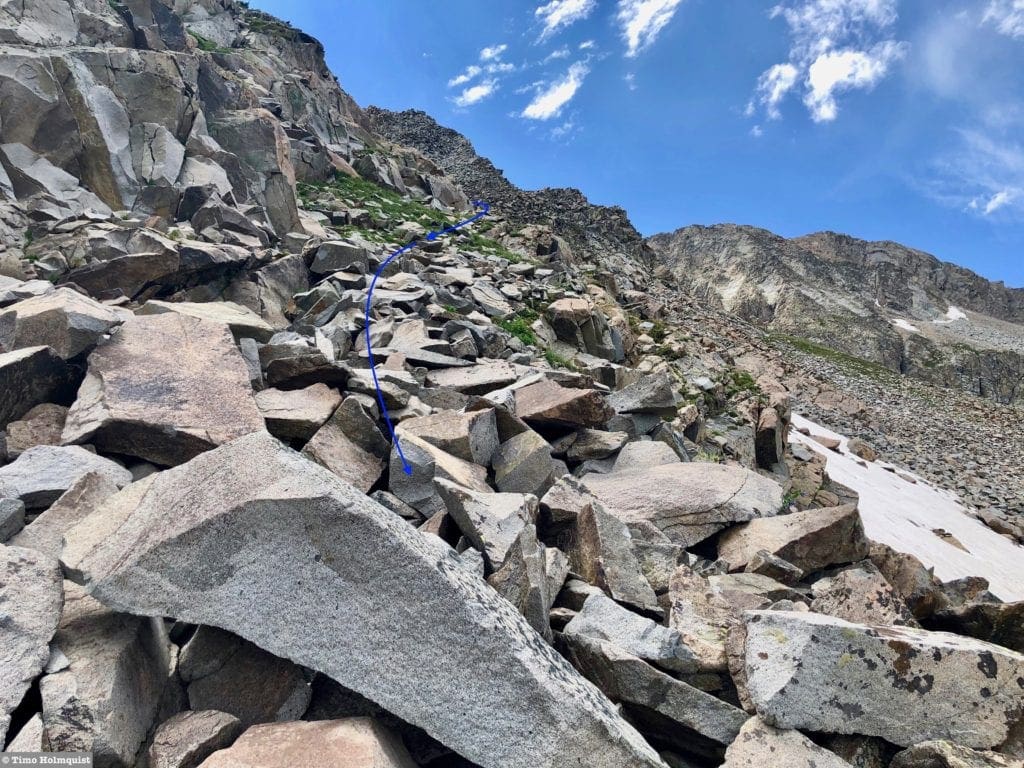
The first part of the ramp to Lake of the Clouds from just beyond treeline.
Once you find the initial ramp, ascend carefully on loose talus and cross over Big Dutch Creek.
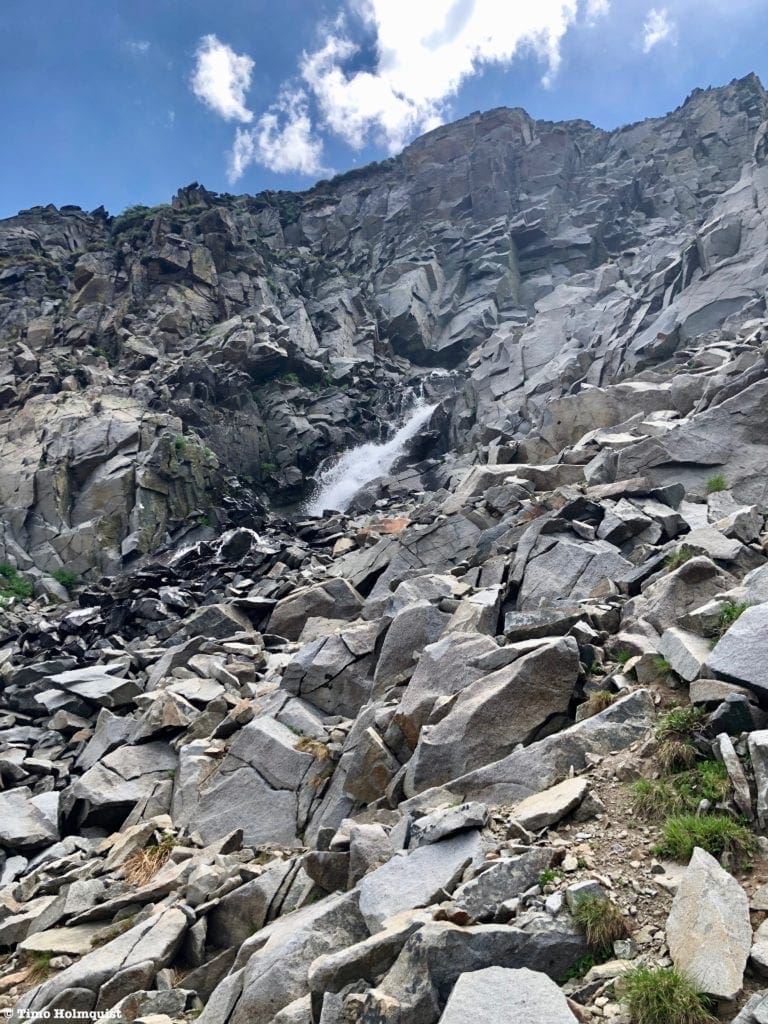
The lower part of the cascade as you cross beneath it.
You’ll be able to see the cascade above you and cross on dry rocks because the stream disappears beneath the talus. You’ll also be able to hear the water flowing beneath the rocks you’re stepping on, which is a cool sensation.
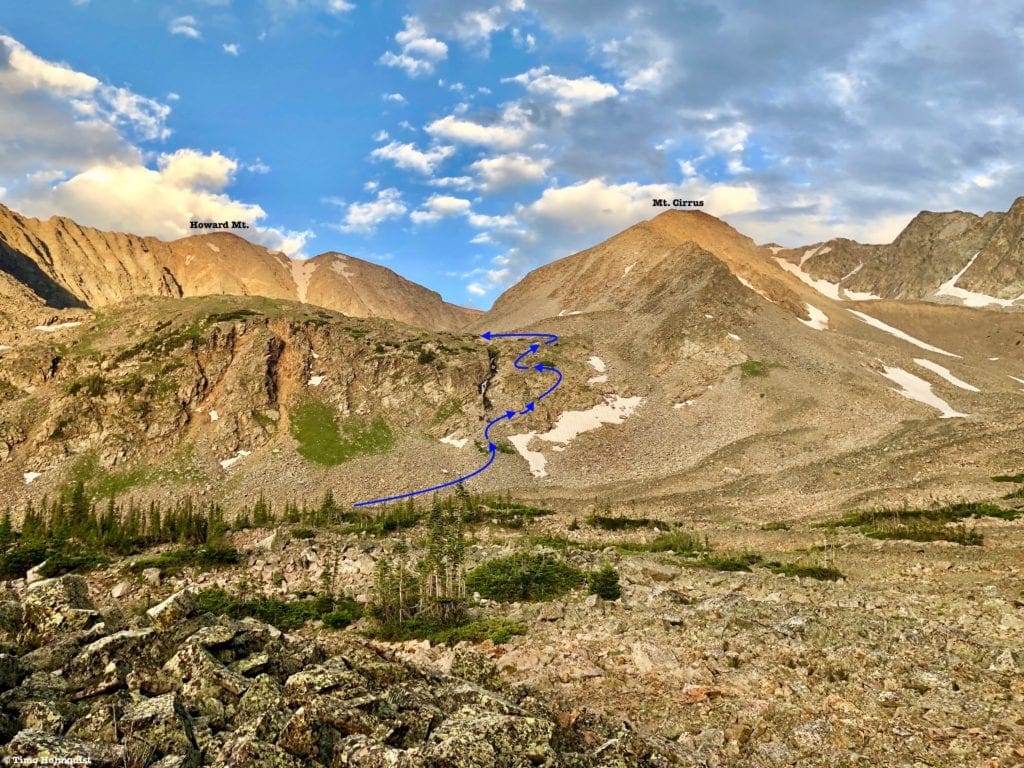
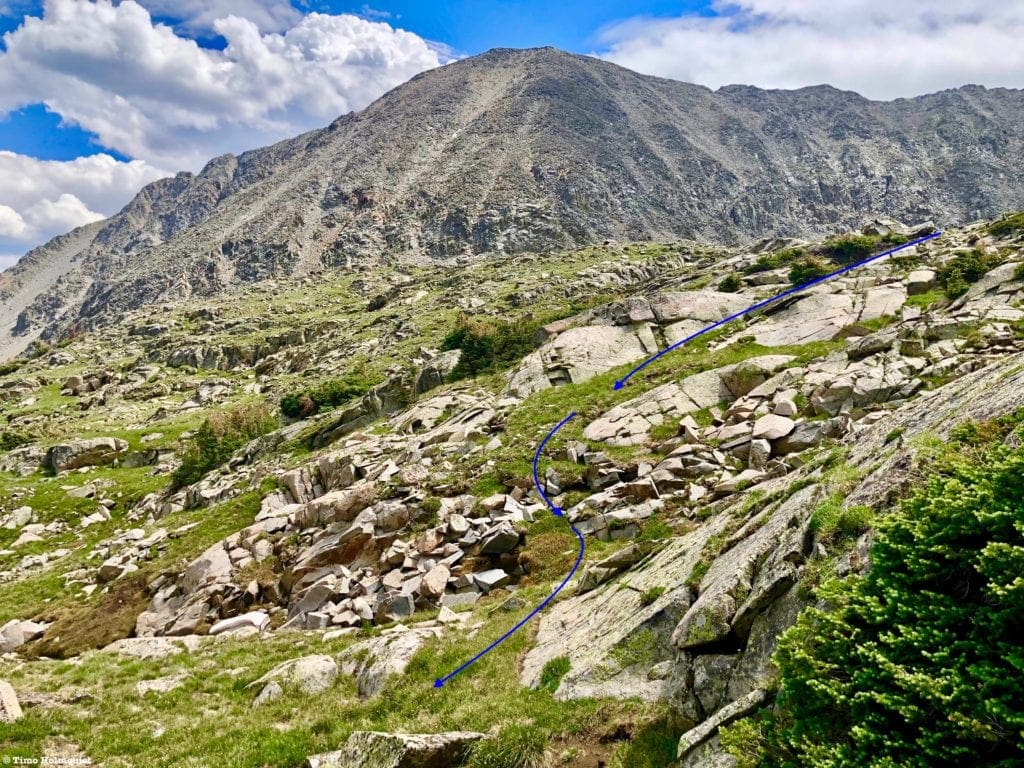
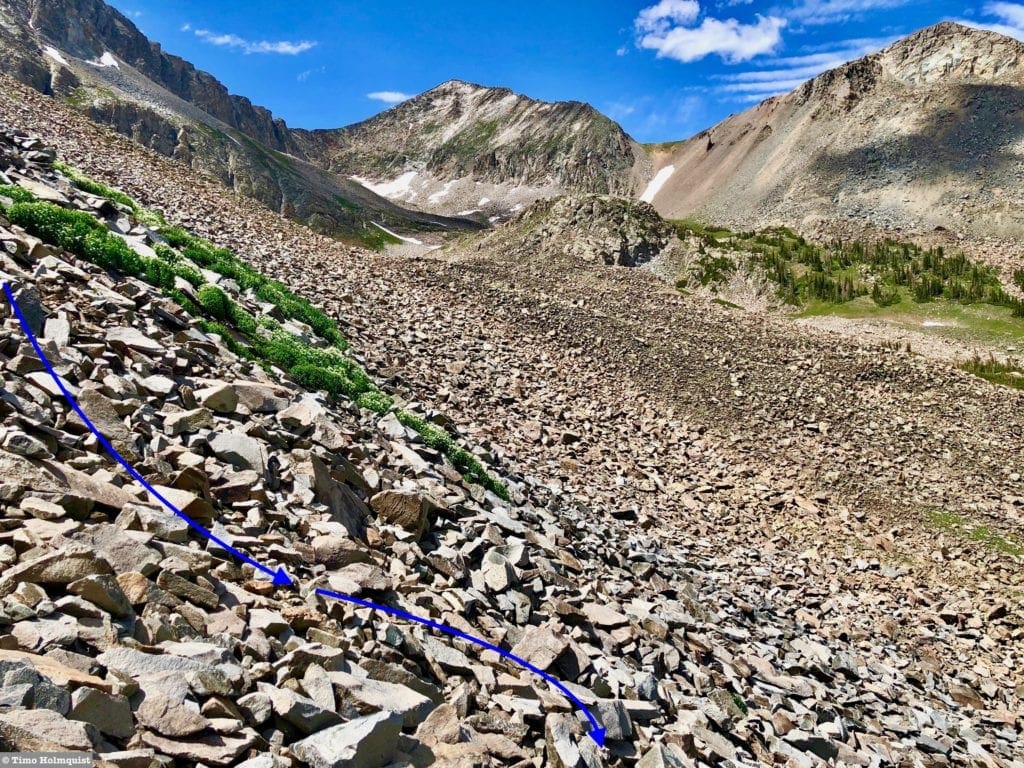
The approximated route from the north.
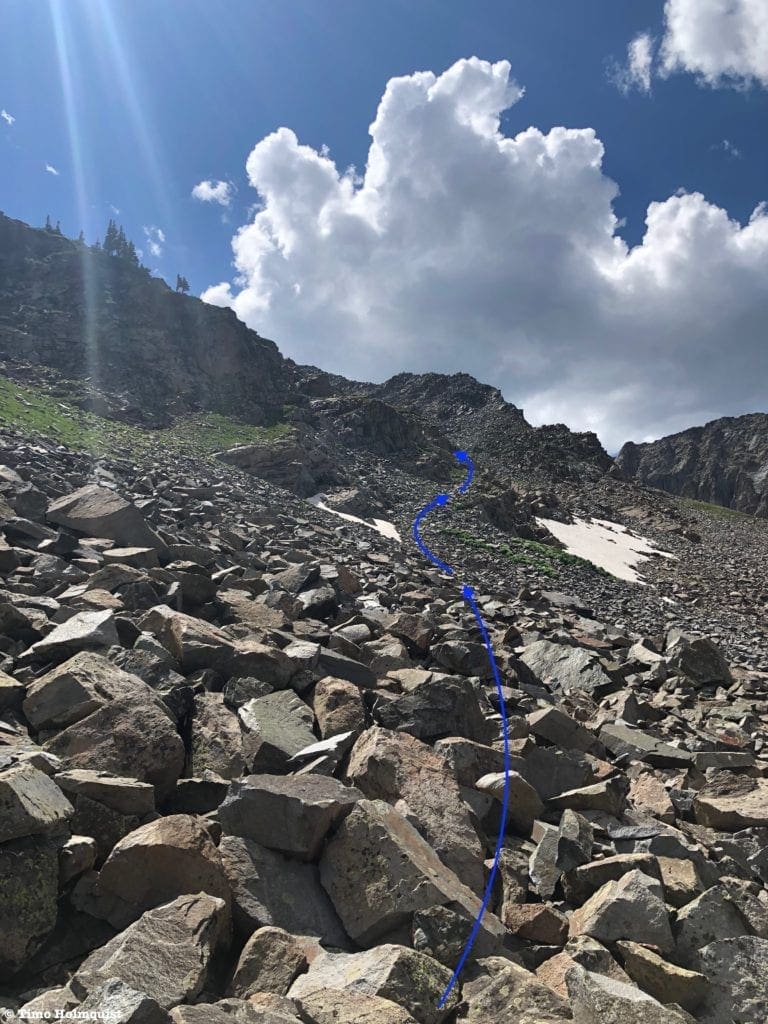
On the other side, continue on your west leading ramp as it gains elevation. When the ramp runs out, turn south (to your left), and complete a few Class 2+ moves to ascend to a higher set of grassy ramps. As you ascend, the slope angle will begin decreasing.
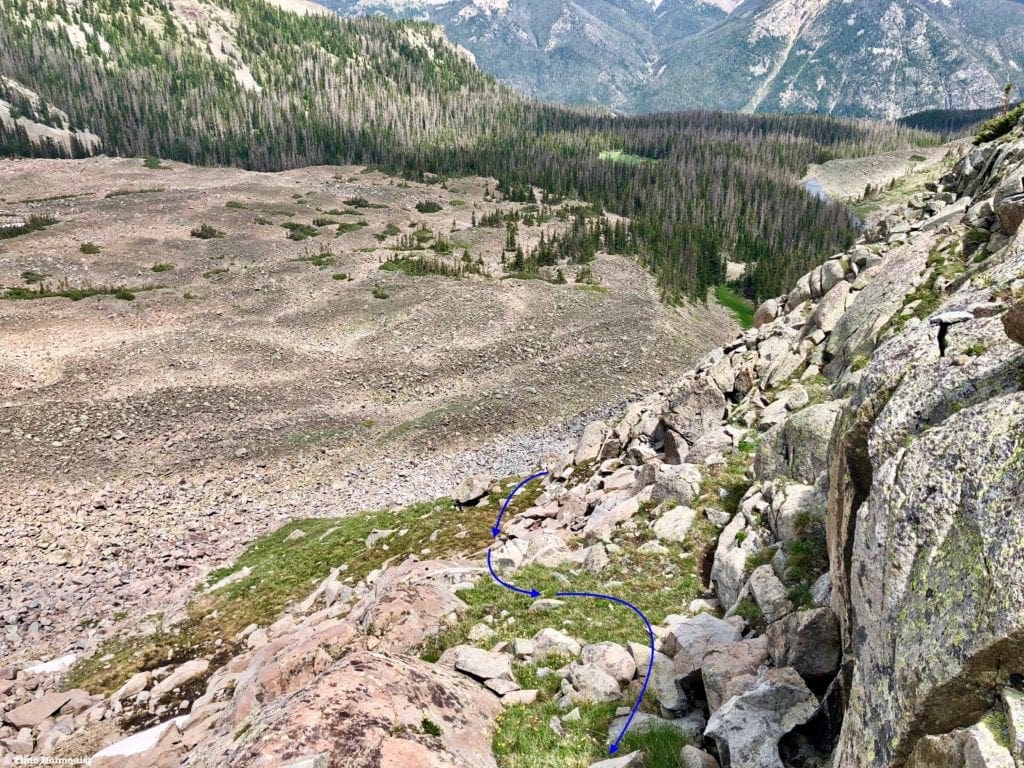
Beyond the first ramp. If your path trends into scrambling territory, stop and reevaluate.
Make your way back to Big Dutch Creek for easy navigation. The creek will vanish beneath some rocks again, but simply continue ascending by the path of least resistance until arriving at the lake.
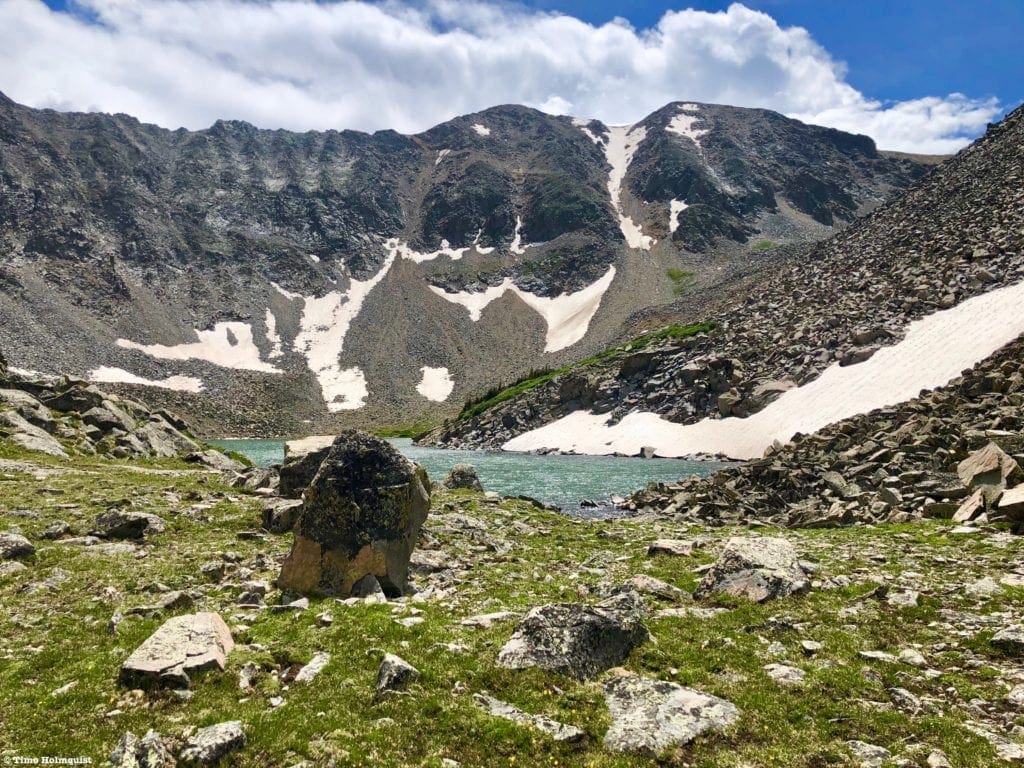
First views of the Lake.
The easiest way to walk the shoreline is along its left side, where a series of grass slopes and rock ribs allow for easy passage. The western shoreline is much more rugged, containing seemingly endless talus slopes. You can absolutely traverse across them, but it will take time, and rocks may shift underfoot.
Looking at the picnic friendly eastern side of the lake from the talus on the western side.
On hot summer days, this lake would be perfect for polar plunges or lake floaties.
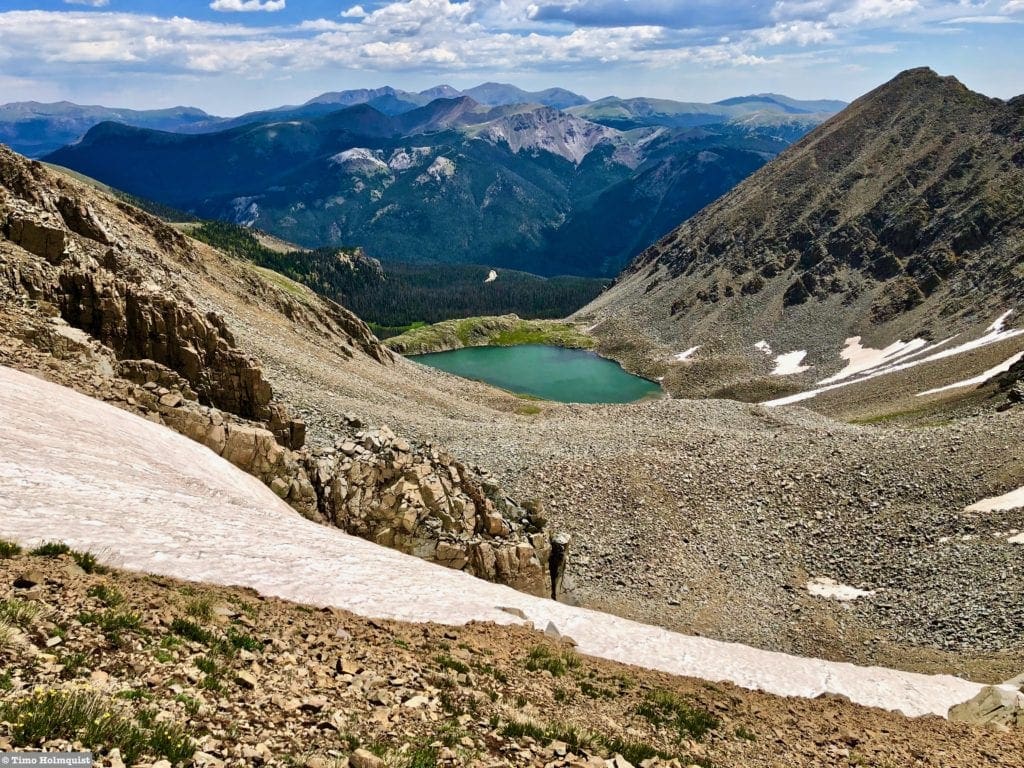
Lake of the Clouds with Howard Mountain behind it.
The lake is usually enough of a destination for people interested in the area, but if you’re one of the select few wanting to push the adventure further, you can continue up the basin. There is a pass to the west of Lake of the Clouds that allows straightforward access to Mount Cirrus and Howard Mountain. Be careful; the pass is Class 2+ territory with plenty of loose rock. From the top of the pass, head north for Cirrus and southeast for Howard. Cirrus is a little closer, but Howard is a little taller.
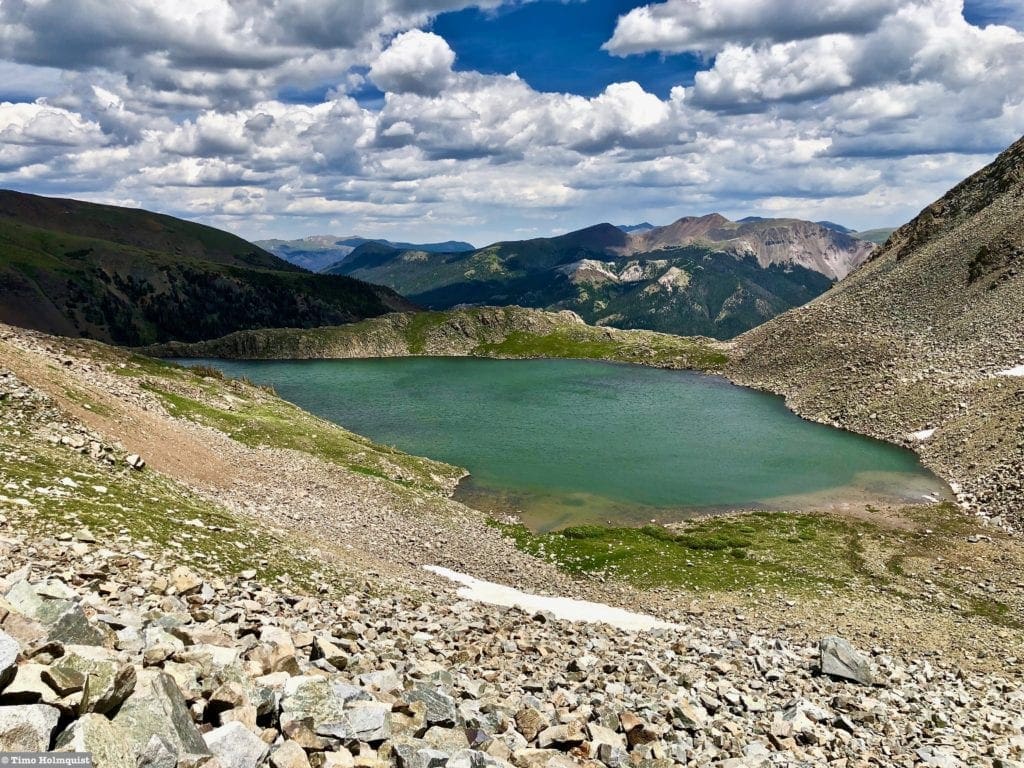
Lake of the Clouds from higher in the basin.
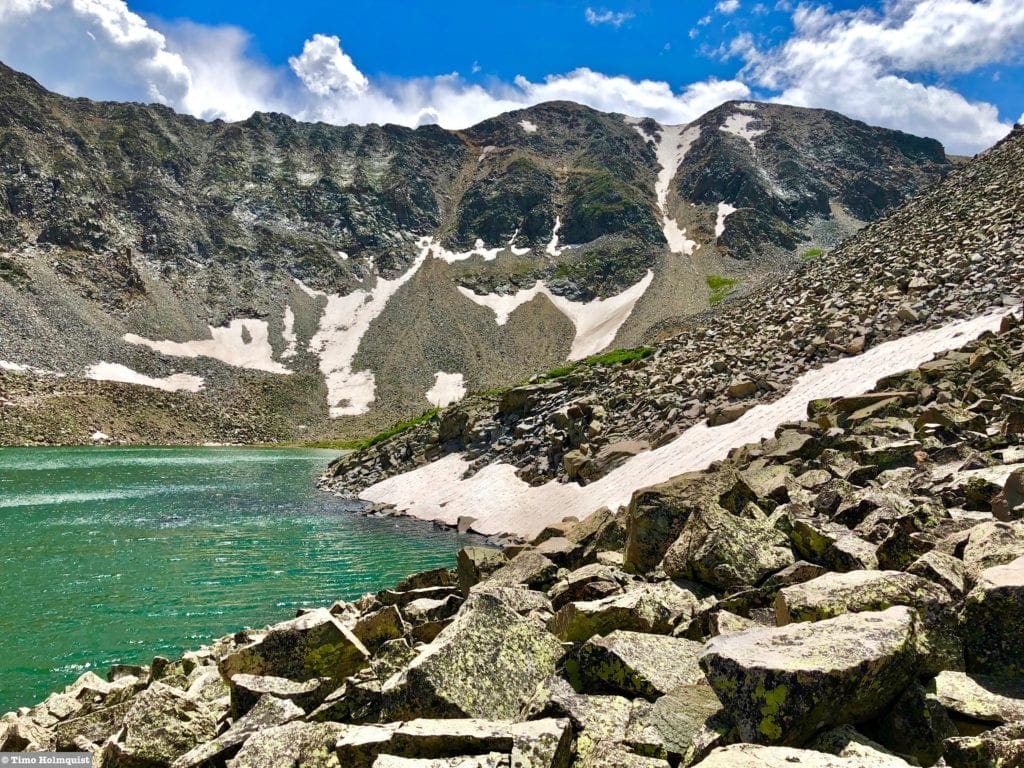
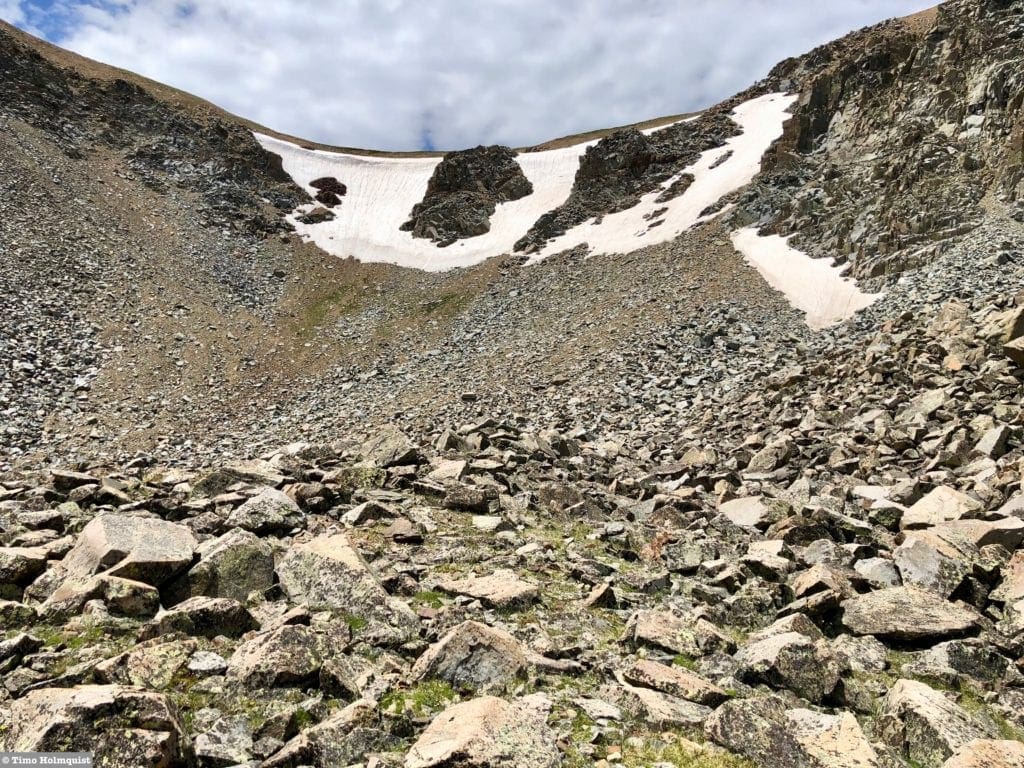
As mentioned previously, you can access Lake of The Clouds by early July, but if you want to get to Cirrus or Howard, wait until August. A stubborn (and very steep) patch of snow clings to the eastern side of the pass until late July. If you don’t have traction devices or snow climbing experience, ascending and descending here is unnecessarily dangerous.
The snowy pass in early July.
From the pass, it’s easiest to hike north (right) along a welcoming stretch of tundra. Eventually, the grass fades into loose scree, but it isn’t far to the top of Mt. Cirrus.
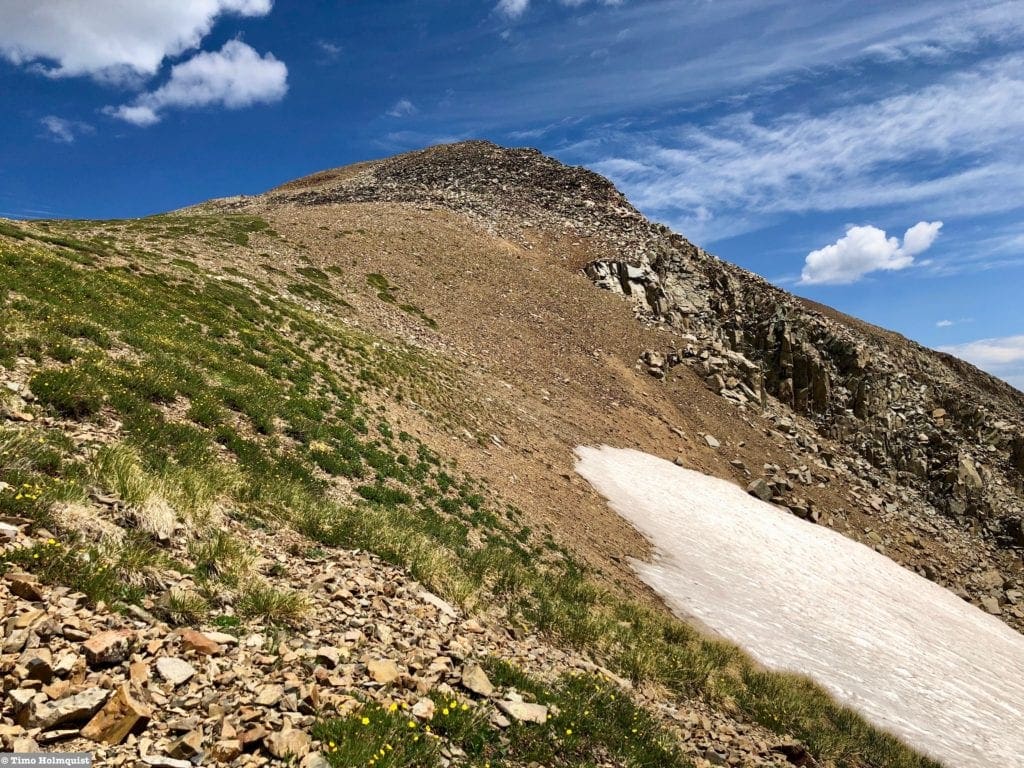
The top stretch of Cirrus from near the pass.
The views from Cirrus are spectacular, and if you do make the journey up here, make sure you have enough time to soak it all in. There’s also a summit register at the top that you can sign.
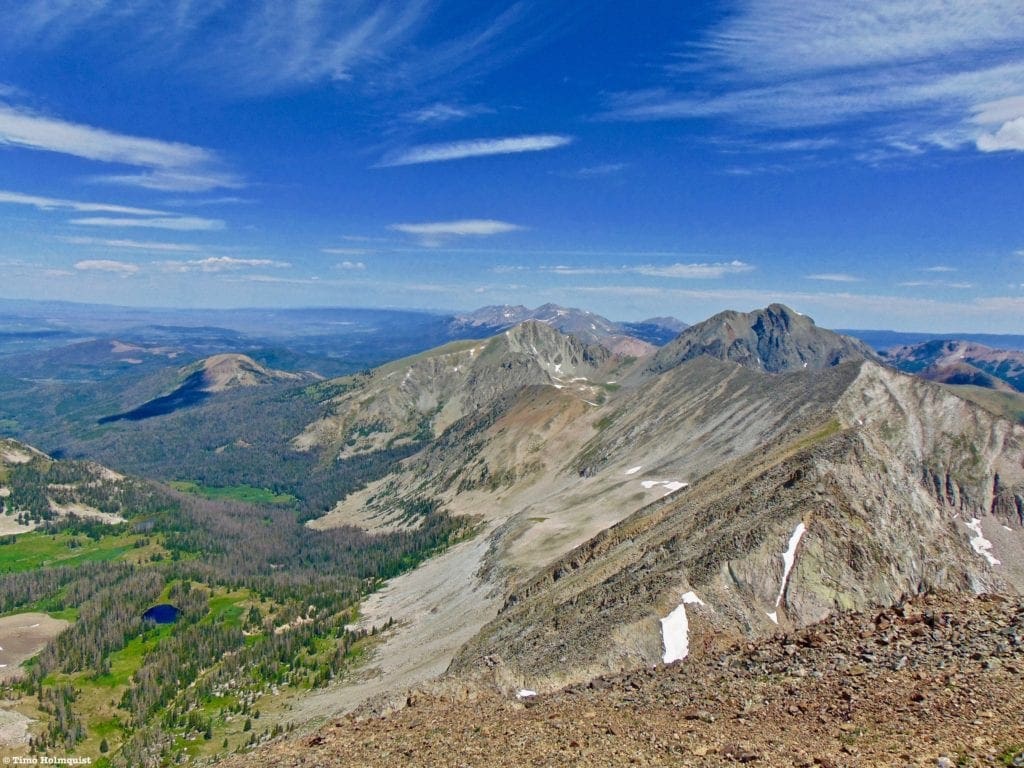
Looking north from the summit of Cirrus.
As is typical for this part of Colorado, once you get high enough, Longs Peak becomes identifiable.
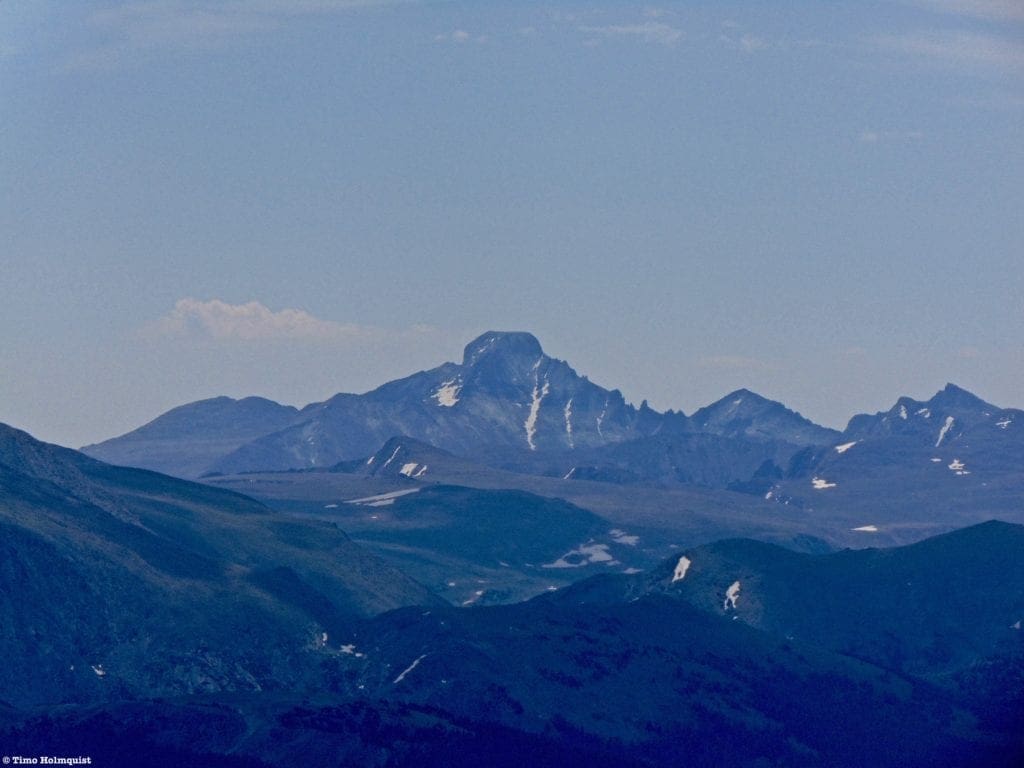
Longs Peak from Cirrus.
To tag Howard, make your way back to the pass, ascend over a false summit, and then continue SE to the highest point.

Howard Mountain from Cirrus.
Be careful descending back to the lake, and test all rocks before stepping on or grabbing hold of them. When you’ve finally had your fill of the area, proceed to the north end of the lake. From there, descend grassy benches to the left of Big Dutch Creek.
General path down from the edge of the lake.
Eventually, a series of cliffs below you will push the easiest path to the right, where you’ll descend back to the creek and cross underneath the cascade.
About half way down the glacial bench.
Take your time as your traversing the talus slopes, and be deliberate about where you’re planting your feet. It’ll be tempting to speed this section along since you have quite a way to go to the trailhead, but that makes this part the most dangerous. Rocks hurt no matter how you fall on them.
The last part of the talus slope.
Only when you have successfully descended out of the alpine, and rejoined the trail near Dutch Town, is it safe to pick up the pace. Getting down to the Grand Ditch is straightforward, and heading south along it is easy. Remember to take a left on the Red Mountain Trail after 1.75 miles; missing this connection would be unfortunate.
Once you see this view, crank your eyes left to find the Red Mountain Trail sign.
Even though you still have 3.3 miles left, the Red Mountain Trail goes by fairly quickly, and soon you’ll bottom out on the valley floor, cross the Colorado River and take a right on the River Trail. Only 0.4 miles now separate you from your car. Remember to take a moment and stretch before driving back to wherever your final destination is; this hike will likely leave you sore.
Final Thoughts:
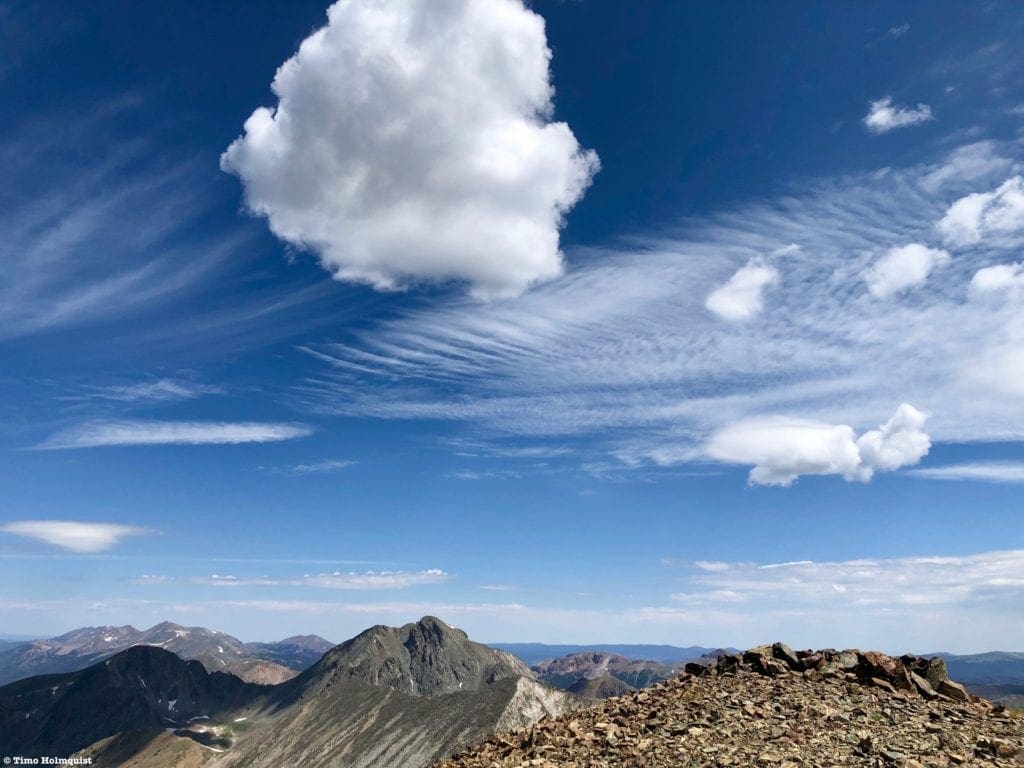
Puffball clouds racing across the sky from the summit of Mt. Cirrus.
Popular Articles:
- Guide to the Best Hiking Trails in Rocky Mountain National Park, Colorado
- The Dyrt: The 10 Best Campgrounds In Colorado
- Top Adventure Sports Towns 2021: Boulder, Colorado
- Epic Adventures with the Best Guides In Colorado
- Sky Pond via Glacier Gorge Trail, Rocky Mountain National Park, Colorado
- Scrambling Hallett Peak’s East Ridge, Rocky Mountain National Park, Colorado
- Scrambling Mt. Alice via the Hourglass Ridge, Rocky Mountain National Park, Colorado
- Gorge Lakes Rim Scramble, Rocky Mountain National Park, Colorado
- Black Lake Via Glacier Gorge Trail, Rocky Mountain National Park, Colorado

Skyblue Overland Strongly Recommends That You Enroll With Global Rescue Prior To Embarking On Your Next Adventure.
With more people outside now more than ever, Global Rescue expanded services to include field rescue within 100 miles of home. With Local Field Rescue — automatically included in any travel protection services membership — Global Rescue is there whether you’re hiking, kayaking, snowmobiling, fishing or simply enjoying the outdoors and get ill or injured and you’re unable to get to safety on your own. Purchase a Global Rescue membership for your next adventure and travel with peace of mind. Single trip, annual and family options are available.
Memberships start at $119.
Terms of Use:
As with each guide published on SKYBLUEOVERLAND.com, should you choose to this route, do so at your own risk. Prior to setting out check current local weather, conditions, and land/road closures. While taking a trail, obey all public and private land use restrictions and rules, carry proper safety and navigational equipment, and of course, follow the #leavenotrace guidelines. The information found herein is simply a planning resource to be used as a point of inspiration in conjunction with your own due-diligence. In spite of the fact that this route, associated GPS track (GPX and maps), and all route guidelines were prepared under diligent research by the specified contributor and/or contributors, the accuracy of such and judgement of the author is not guaranteed. SKYBLUE OVERLAND LLC, its partners, associates, and contributors are in no way liable for personal injury, damage to personal property, or any other such situation that might happen to individuals following this route.


