


High Point:
12,797 ft. atop Mt. Cirrus (12,810 ft. on Howard)

Total Ascent:
5,250 ft. (~5,745 ft. if including Howard)

Difficulty:
Very Hard

Distance:
17 miles (18.2 if tagging Howard Mountain)

Waypoints:
40.4016, -105.84889

Route Type:
Lollipop Loop
The Lead Mountain and Hart Ridge Loop is a challenging path in the Never Summer Mountains, Colorado. Our guide has tips for navigating alpine segments and rocky scrambling sections on this awe-inspiring route.
Overview:
Similar to my review for Lake of the Clouds, this is not an adventure for everyone. There are tons of comparably rated scrambles closer to well-traveled areas, but it’s precisely the remote nature of the route that adds to its allure. The other component is rock quality. The Never Summers are generally known as tedious slag heaps with unstable rock (akin to San Juan scree). This pattern is broken in only a few places: Static Peaks East Ridge (which is north of the National Park boundary if you’re going by the ridge crest), and Lead Mountain via either the demanding North Ridge (Class 4) or the slightly less committing but no less spectacular East Ridge (Class 3+). For scramblers, mountaineers, and wayward adventurers alike, combining Lead Mountains East Ridge, and Mt. Cirrus via Hart Ridge makes for a long but very satisfying day in the high country.
Please note that I am focusing this review on scrambling possibilities, which extend to Hart Ridge, south of Lead Mountain. Generally speaking, however, if your goal is to hit as many Never Summer summits as one day allows, it’s much faster to aim for the path of least resistance on Hart Ridge and circumvent any challenges. If you’re interested in what Hart Ridge can provide, there are at least seven rocky ridge points with anywhere from a Class 2 to a Class 4 experience. In any case, expect a long day with substantial alpine portions, scrambling, and moderate route finding.
- Lead Mountain East Ridge: YDS Class 3+ (Class 4 dihedral option at the crux).
- “Never Summer Mountain”: Class 2
- Hart Ridge: Class 2+
- Hart Ridge via ridge crest direct: Class 3 (Class 4 options available)
- Cirrus and Howard Mt.: Class 2
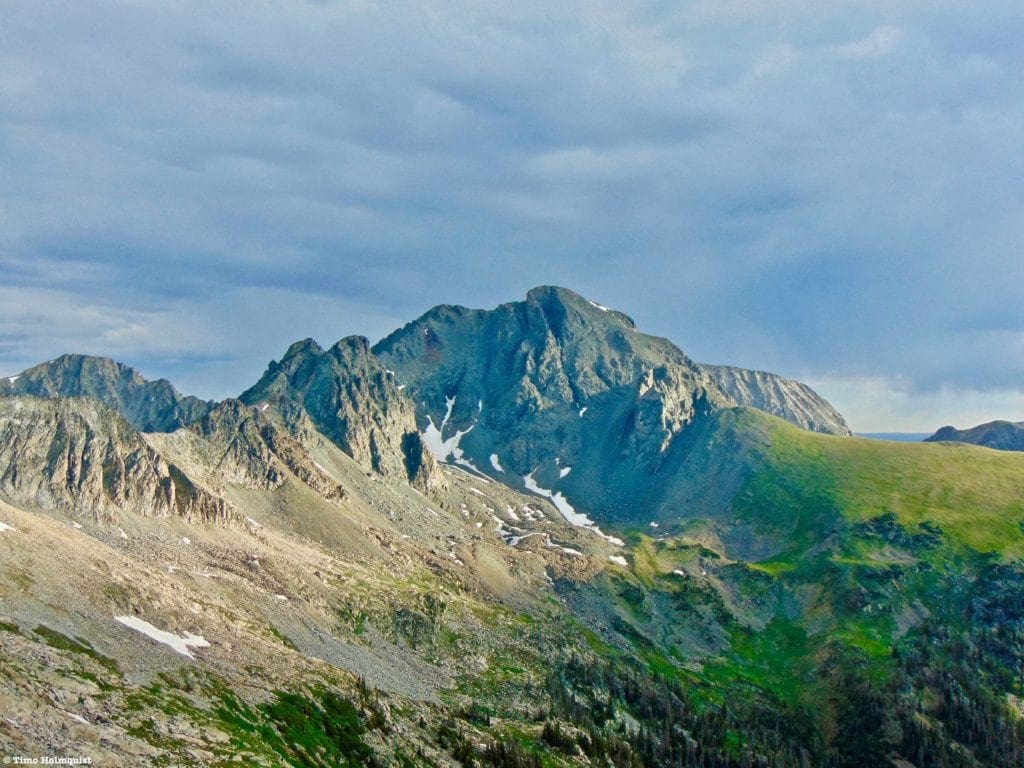
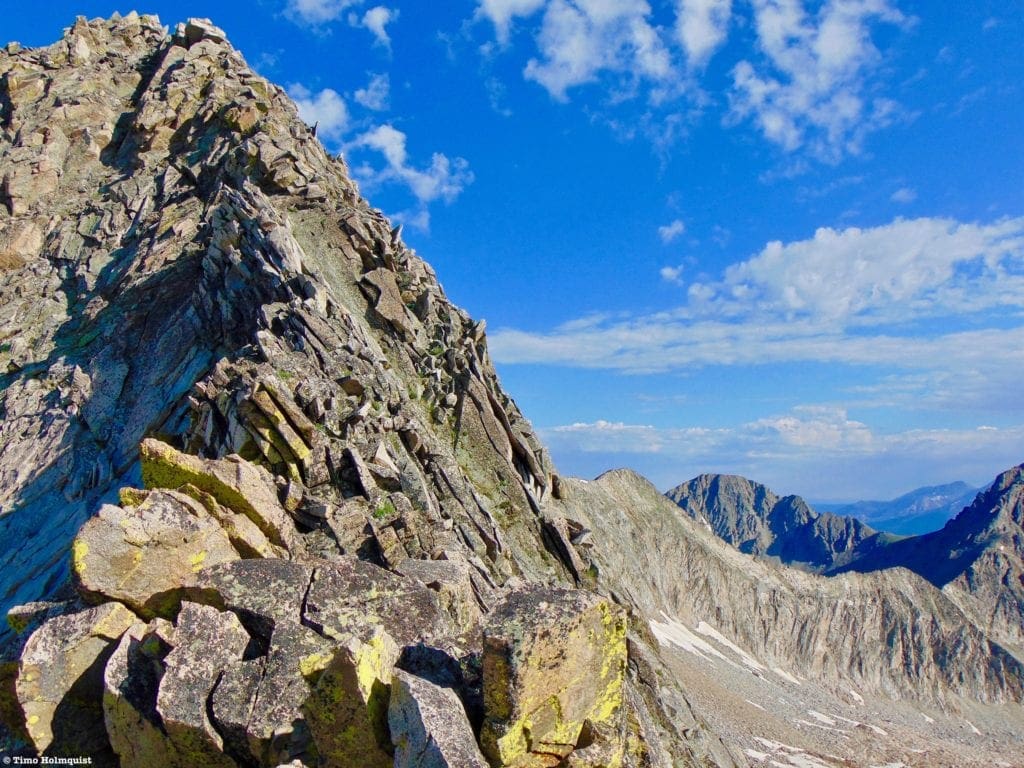
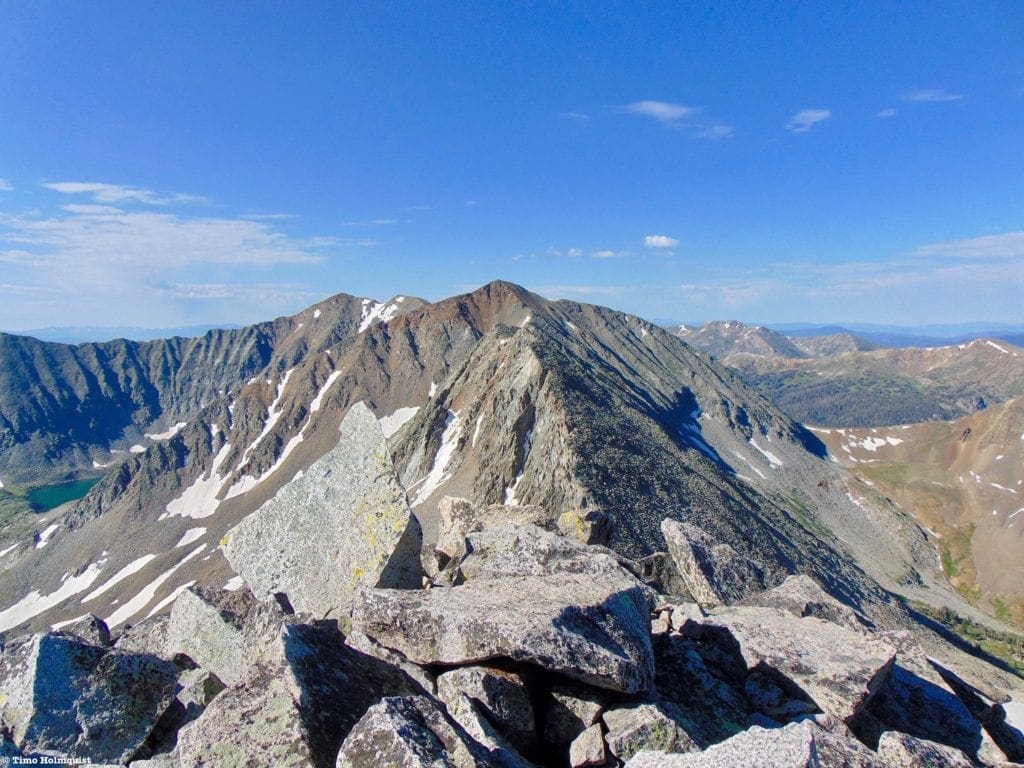
Lake of the Clouds, Howard Mountain and Mount Cirrus from Lead Mountains East Ridge.
Table of Contents:
Article Navigation: Click on any of the listed items in the table of contents below to jump to that section of the article. Similarly, clicking on any large, white section header will jump you back to the Table of Contents.
- Overview
- Scales and Criteria
- Directions to Trailhead
- Places to Stay
- Field Notes
- Journal
- Final Thoughts
- Sources and Acknowledgment
Scales and Criteria:This article utilizes three separate rating systems: Difficulty, Popularity, and a Scramble Rating indicating the hardest move or set of moves encountered. The scramble rating employs the Yosemite Decimal System. This review focuses on a snow-free ascent; however, snow is patchy through at least early July on the pass above Lake of the Clouds and along the eastern side of the main ridgelines. Any ascent of the area between October and June will likely require micro-spikes, crampons, or snowshoes at a minimum.
Difficulty Ratings:
- Easy: less than 5 miles, less than 500 ft. of elevation gain
- Moderate: 5-10 miles, 500-2000 ft of elevation gain
- Hard: 5-15 miles, more than 2000 ft. of elevation gain
- Very Hard: 10+ miles, more than 3,500 ft. of elevation gain
Popularity Ratings:
- Low: Large sections of trail all to yourself
- Moderate: Sizeable trail sections to yourself, crowding possible on busy summer weekends
- High: You’ll be seeing people, still a chance for solitude in spring/fall/winter.
- Very High: Almost always busy.
Snow Rating:
- Easy: Less than 30 degrees
- Moderate: 30-40 degrees
- Steep: 40-50 degrees
- Very Steep: 50+ degrees
Scramble Rating:
- Class 1: Established hiking trail the entire length of the adventure. Low chance for injury.
- Class 2: Typically involves cross-country navigation, possibly using hands for balance but not required, steeper than Class 1.
- Class 3: Hands and feet used to scale areas, must use hands to proceed (either for balance or to help pull you up a section), increased exposure, a fall could be fatal. Helmet recommended, along with grippy hikers.
- Class 4: Climbing on very steep terrain just shy of vertical, falls could be fatal, hands employed for grip and balance continuously, ropes advisable but scalable without. Helmets are highly recommended, along with grippy hikers.
- Class 5-5.4: Vertical climbing that involves technical rock-climbing moves, exposed, falls likely to be serious or fatal, possible to scale without ropes but only for very experienced veterans. Helmets, grippy hikers, and/or rock-climbing shoes necessary.
- Class 5.5 and up: Not covered as scrambling, full-on rock climbing with ropes, helmets, etc.
The YDS system is widely used in North America but can be quite subjective, so it is not perfect. The biggest differences I’ve encountered between Class 3 and Class 4 sections have to do with slope angle, exposure, and putting weight and pressure on hand grips (4) instead of using hands and feet interchangeably as supporting points of contact (3). It is not possible to climb a Class 4 section without using your hands to pull up some or all of your body weight. Typically, a Class 4 section will also require some type of rock-climbing move, like stemming, where hands or feet are pressed in opposition as if climbing the inside of a chimney. If downclimbing, a key difference is that most people will descend a Class 4 section facing inward, i.e., your back faces the exposure.
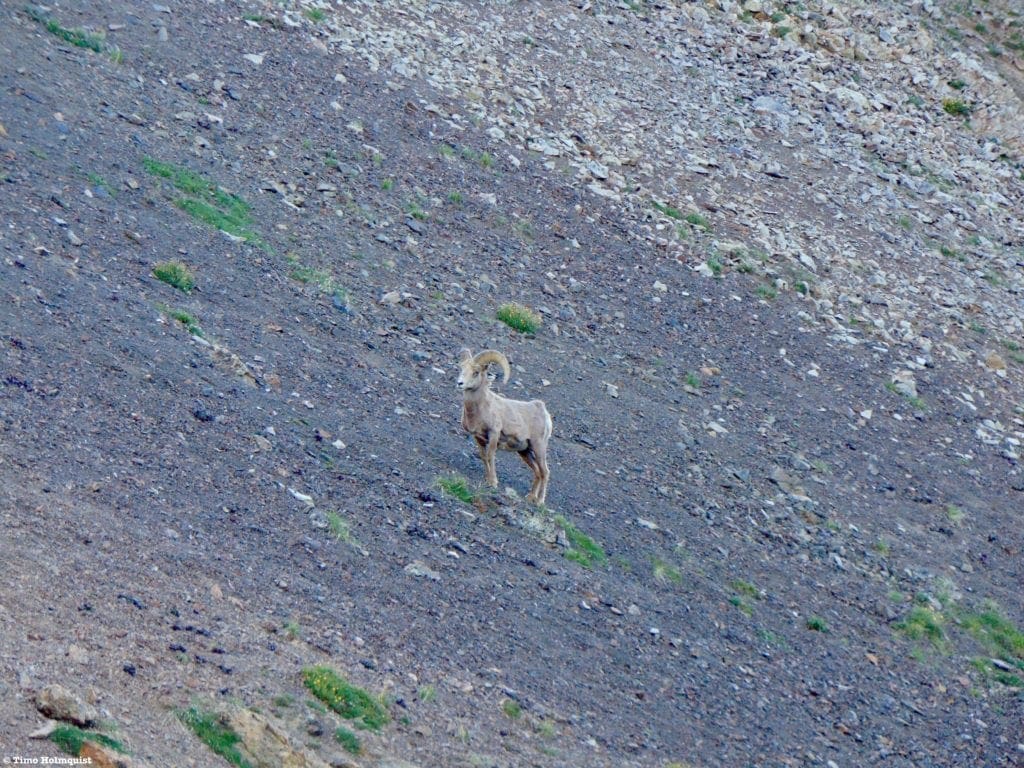
Bighorn Sheep on the slopes of “Never Summer” Mountain
The Ultimate Offline GPS Hiking & Ski Maps
See why onX Backcountry is the ultimate GPS navigation app for your outdoor pursuits. Try Today for Free. No credit card required.
Directions to Trailhead:
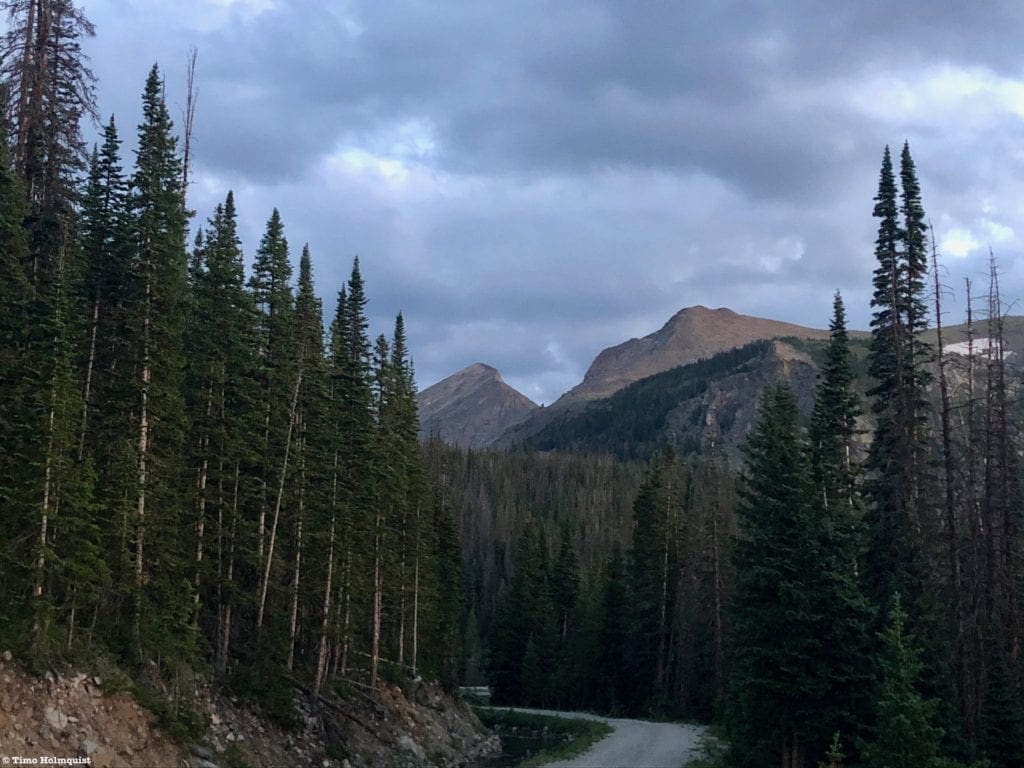
From the east, enter Rocky Mountain National Park. The most popular entrance is US36 at the Beaver Meadows Entrance; however, a large repaving project is in full swing near this entrance, with delays and closures common. US34, entering at Fall River, can often provide a faster entrance experience and (as of summer 2021) avoids the construction on 36. When US34 intersects with US36 at a three-way junction, take a right to continue up Trail Ridge Road. You’ll travel through the exceptionally popular alpine section of the road before dipping down to the divide at Milner Pass. Continue driving, dropping elevation consistently until the road runs parallel to the Colorado River. Pay attention after Fairview Curve, the road will continue to switchback down to the valley floor, but right as the elevation drop ends, a quick sign for Colorado River Trailhead will become visible on the righthand side. If you miss it, you can pull a U-turn at any number of subsequent lots, but it’ll burn some time. Without traffic, this is at least a two-hour drive from large parts of Denver, Boulder, and Fort Collins.
From the west, enter Rocky Mountain National Park on US34 outside of Grand Lake. Drive alongside the Kawuneeche Valley until seeing signs for the Colorado River Trailhead on your left. If you miss the parking entrance, you can turn around at the Fairview Curve, but it’s another few minutes up the road. The trailhead is a little less than 10 miles from the entrance booths at Kawuneeche and should take you around 15-20 minutes to reach.
The National Park has instituted a time slot system in addition to their normal entrance pass system for the summer of 2021. Do yourself a favor and take the time to understand these components by visiting the Park website. If you do not have an entrance pass or time slot, you will be turned back. The short version is that ALL visitors must have an entrance pass. If you arrive at the park (excluding Bear Lake Road) anywhere between 9 AM and 3 PM, you will also be required to produce a timed entry pass. You will be turned around if you do not have a timed entry pass. IF you have an entrance pass, AND you arrive before 9 AM, you are free to park and enjoy your day (make sure your pass is visible on your windshield), hence the “arrive early” mantra. If you exit the park between 9 AM and 3 PM, you will be required to produce a timed entry slot to reenter, or you’ll have to wait until after 3 PM to reenter.
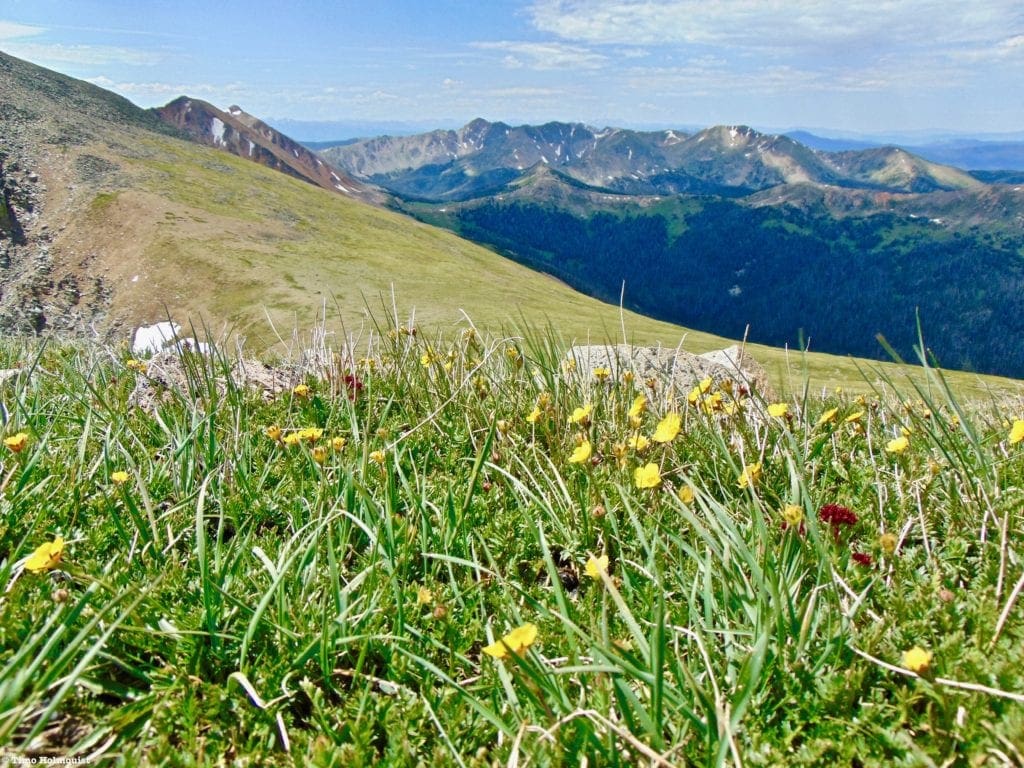
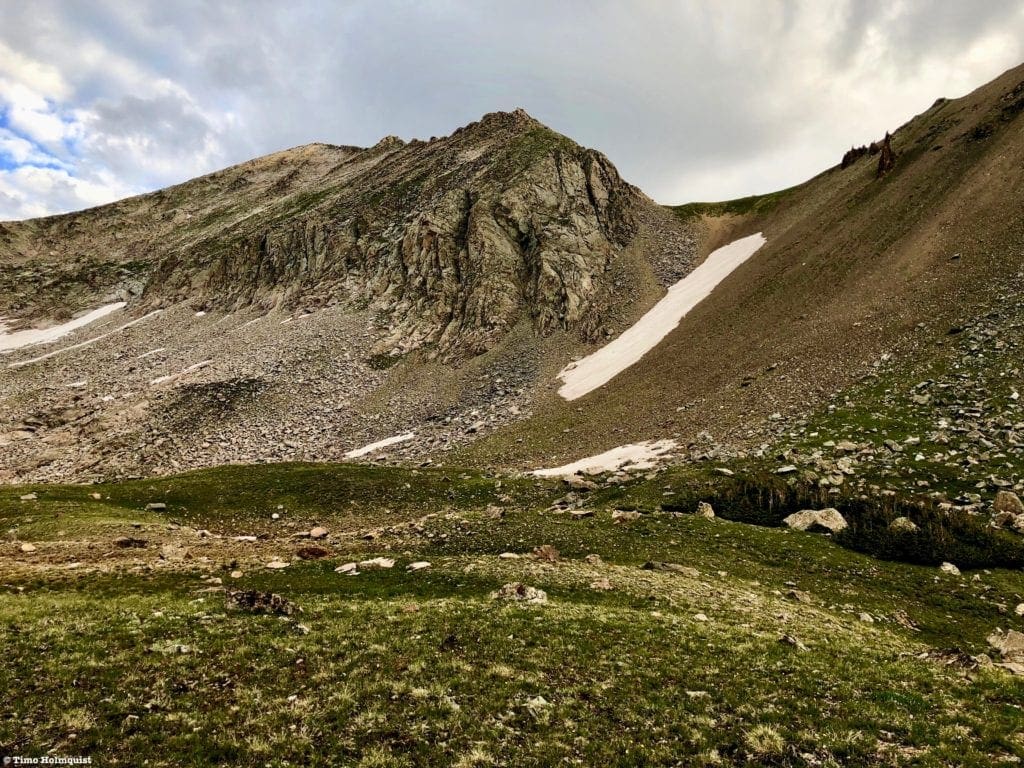
Healthy alpine between Mt. Cirrus and Howard Mt.
Places to Stay:
The Never Summers are pretty far from anything, but a few lodging options exist in the town of Grand Lake; click here to peruse. As far as camping is concerned, Valley View and Dutch Town are great sites in the vicinity that will significantly reduce the effort it takes to get to Lead Mountains East Ridge. The Kawuneeche Valley also has a few established campgrounds like Timber Creek. Backcountry camping in the National Park comes with its own set of rules and regulations, most of which can be found by clicking here.
If you’re coming up over Trail Ridge or north from Berthoud Pass, it may be best to get a few hours of sleep at the trailhead and then begin your hike. You have to have a Rocky Mountain National Park entrance pass to make this option possible. Alternately, if you don’t mind waking up in the middle of the night, you could make the two-to-three-hour journey from the Front Range over Trail Ridge or Berthoud Pass to start the hike.
South of Grand Lake, camping options exist as well; use this link to check some out. Be aware; since you need to enter the park to get to the trailhead, you must purchase an entrance pass, even if you are camping outside of the park. Check with the Arapaho National Forest or the Park Service for the most up-to-date information on campgrounds.
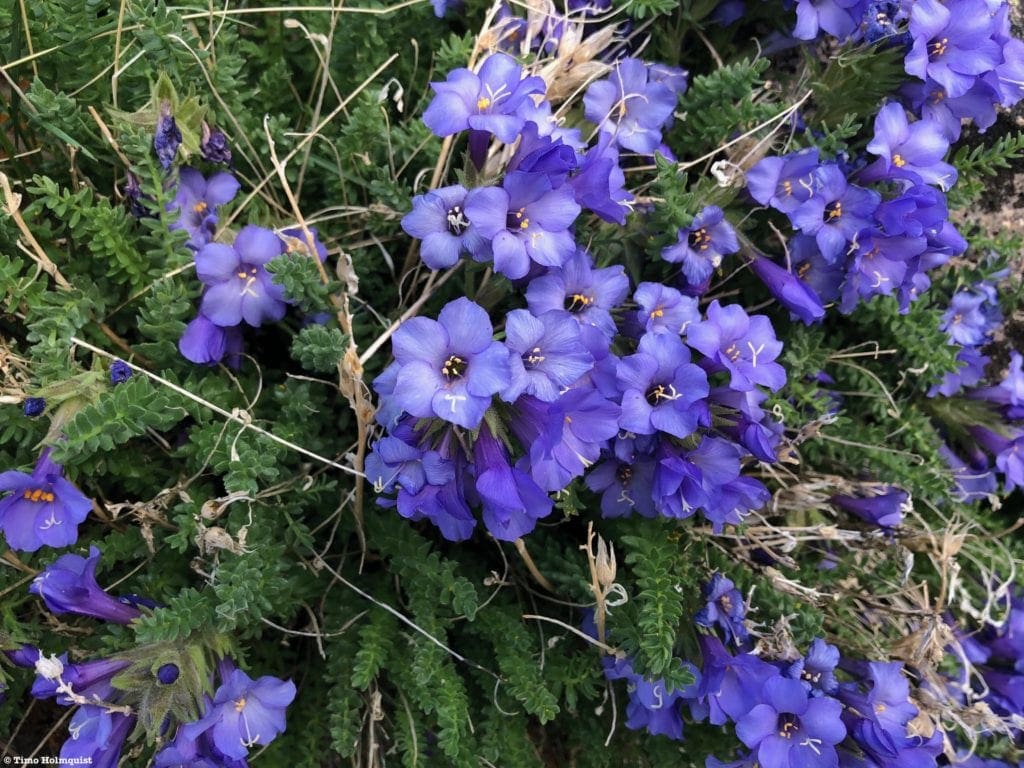
Jacobs Ladder Flower growing along Lead Mountains East Ridge.
Field Notes:
Please note: The route description below makes sure to ascend the most stable rock; HOWEVER, the descent option to Lake of the Clouds is not simple. You’re either going to encounter a steep snowfield blocking passage or a rotten, rocky mess. The alpine challenges of this loop are not over until you are off all talus and back to Hitchens Gulch Trail. Do not underestimate the demanding downclimb to Lake of the Clouds!
The Never Summers are a long way from anything. You really have to commit to a long single-day or multi-day adventure to get into the prettier parts of the range. The tradeoff for miles walked and feet climbed is a sense of timelessness encapsulated by unspoiled alpine basins, glorious mountain solitude, and unique visual perspectives devoid of Front Range city lights. It’s hard to imagine stargazing out here is a bad move.
In Arapaho, the Never Summer Range was called Ni-chebe-chii, which translates to “never no summer.” Typically, the snow in the range lasts well into the summer, and the spring backcountry skiing on the peaks is second to none. The Never Summer Range was also the naming inspiration for Never Summer Snowboards. Despite the presence of permanent and semi-permanent snowfields, there are no recorded glacial remnants in the range.
The rock in the Never Summers is notoriously loose and dangerous, with the southern part of the range being singled out as particularly nerve-wracking to traverse across. There are a few places in the northern part of the range where the rock is surprisingly stable, which should appeal to anyone interested in scrambling. The rock quality is best on Static Peaks Eastern Ridge, Lead Mountains North Ridge, Lead Mountains East Ridge, and isolated points along Hart Ridge.
Weather forecasting is pretty tricky for the Never Summers. You can always start with the Trail Ridge Forecast (collected at the Alpine Visitor Center), which lays a good foundation. However, as far as local mountains are concerned, there aren’t many supplemental forecasts to use. Mt. Richtofen has a half-decent forecast but is only helpful for Lead Mountains East and North Ridges. Once you start heading south on Hart Ridge, the forecast becomes less accurate. Depending on which direction the storms move in, Richtofen could be experiencing sunshine while Mt. Cirrus is in a dangerous thunderstorm or vice versa. The wind can also be STRONG on the main north-south ridgeline because the high elevation plains of North Park do little to stop incoming wind, especially if it’s ripping into the state from the NW.
If you have a large window of flexibility, the best strategy is always to shoot for the day with the least chance of storms and/or high winds. If you are limited by time, and either Richtofen or Trail Ridge forecasting shows afternoon storm potential, get to the trailhead before sunrise (think between 3-5 AM). Remember, it’s a 17-mile roundtrip day, and the first 5-6 miles is on easily visible trails and a dirt road. If you can take care of a good portion of the approach before sunrise, you have that much more time to hang out in the alpine.
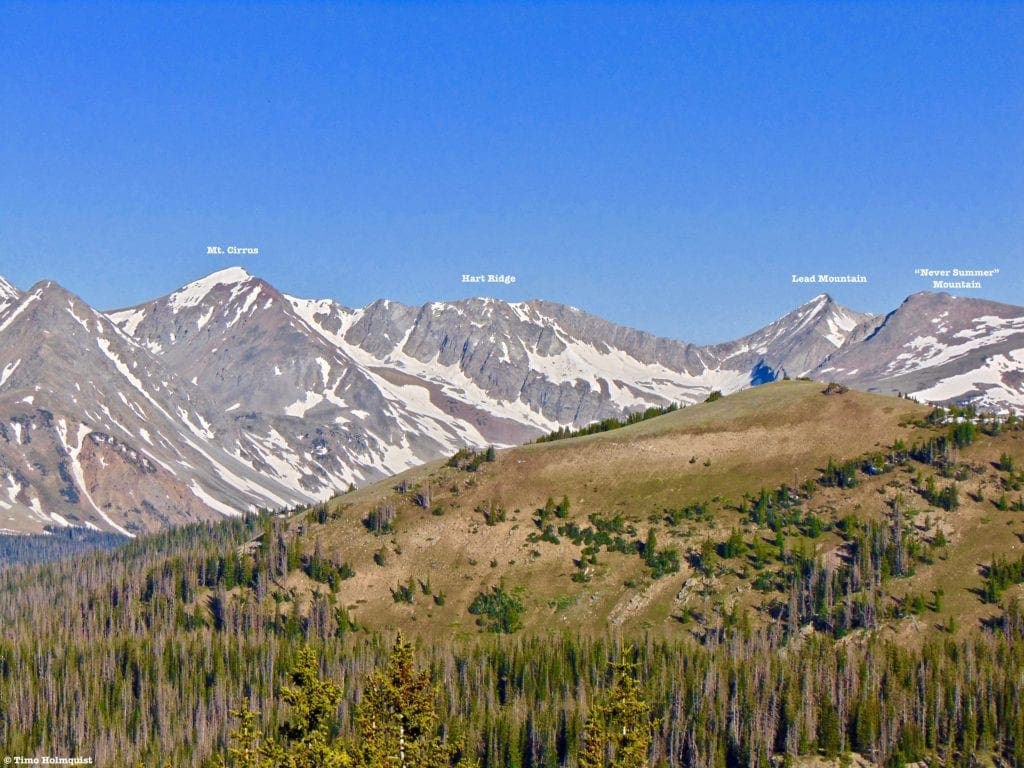
Lead Mountain is hard to identify from Trail Ridge Road because the unofficially named “Never Summer” Mountain to its east blocks most vantage points. This view is from a ridge top near the Mt. Ida trail.
Journal:
From the Colorado River Trailhead, begin by hiking north on the wide and easy-to-follow Colorado River Trail. Less than half a mile into your trek, you’ll see a large sign with Red Mountain Trail on it. Take a left onto Red Mountain and settle into a good pace.
The trail takes a hugely circuitous route on its way to the Grand Ditch and will cost you 2.8 miles of effort, but the trail is not very difficult. Once you make it up to the Grand Ditch Road, navigation becomes even easier.
The Grand Ditch is one of those ridiculous feats of engineering. Essentially, there wasn’t enough water in the Cache La Poudre watershed to hydrate Fort Collins and the farmland near Greeley. The ditch collects snowmelt from the Never Summers and transports it over the Continental Divide, dumping it into the Fort Collins area. So, even though you are on the western side of the Divide, every east-facing basin between Parika Peak and Mt. Richtofen feeds water into the ditch instead of the Colorado River. There are water mitigation features to allow for some runoff into the Colorado, but the National Park Service estimates the ditch transfers roughly 29% of the Never Summers snowmelt away from its natural flow.
From a hiking perspective, this is actually a blessing; the dirt road alongside the ditch is well maintained, and as long as it’s snow-free, you can cruise alongside it. The presence of the road may take some feeling of remoteness out of the experience, but chances are very low you’ll see any trucks on it. It’s also nice to stride out and take care of another 1.75 miles of distance in short order.
The Grand Ditch and your first glimpse of Lead Mountain (left) and the unofficially named “Never Summer” Mountain. I’ve also seen the mountain called “Jiffy Pop” Peak in various trail reports.
After strolling north along the ditch for nearly two miles, you’ll notice two large snow measuring sticks on the left side of the road and a small wooden bridge crossing the ditch. This is Hitchens Gulch trail. The two campsites up this gulch could arguably be used as a launching pad for more ambitious Never Summer adventures, but only Dutch Town is currently open.
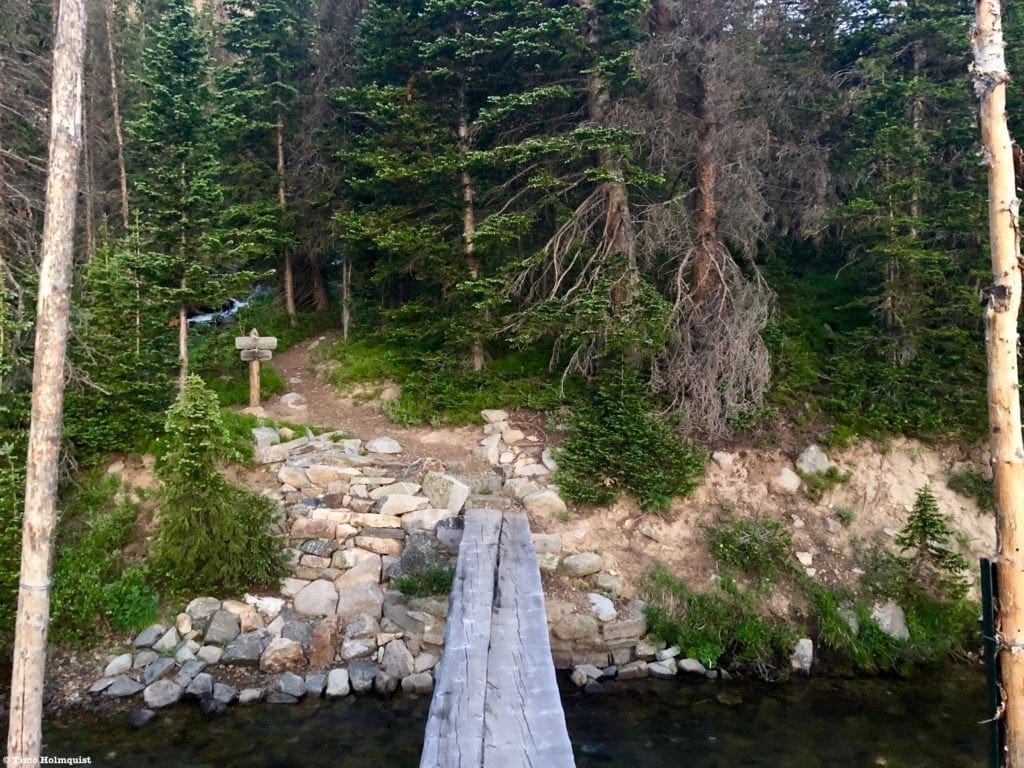
Bridge across the Grand Ditch, i.e. the beginning of the Hitchens Gulch Trail.
Once you find Hitchens Gulch Trail, you’ll already be 5 miles into your journey. Dutch Town is another 1.3 miles up the gulch on an established trail. You’ll begin a more concentrated elevation gain along this stretch, but every uphill section leads to flatter sections, so it shouldn’t feel too taxing. Pay attention to the signs indicating where Dutch Town is. Shortly after passing the cutoff for the campsite, the trail will gradually fade. It disappears after a meadowed area with good views of the unofficially named “Never Summer” Peak and Lead Mountain.
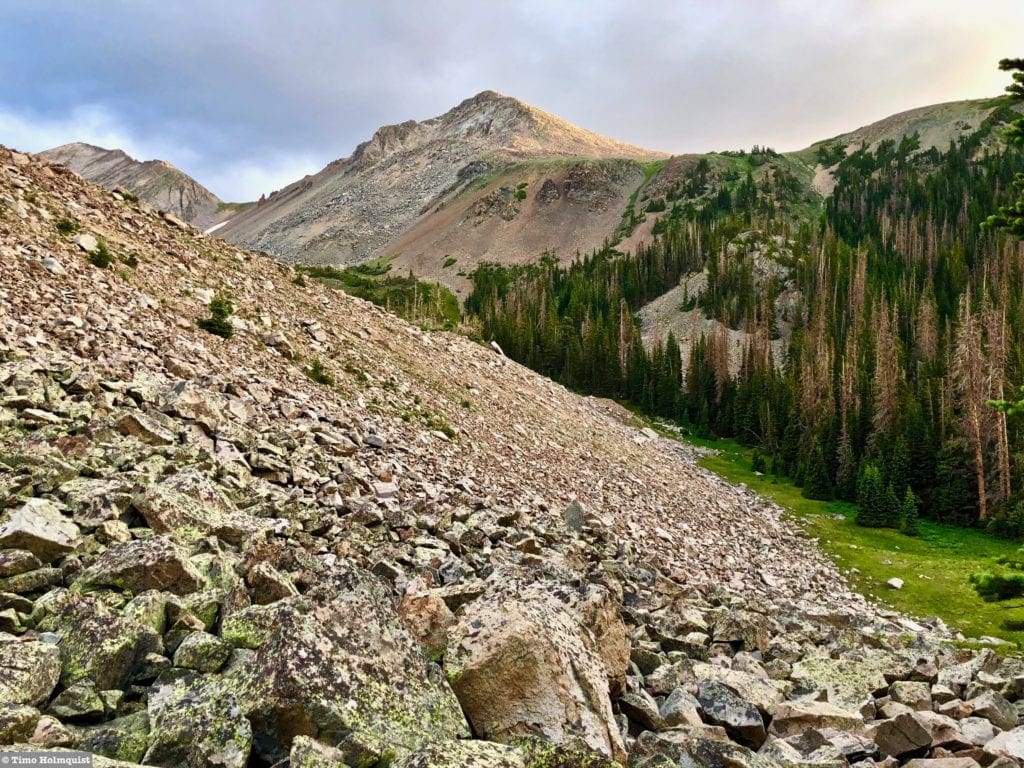
The meadow before the trail begins to fade; Lead Mountain is in the middle of the photo.
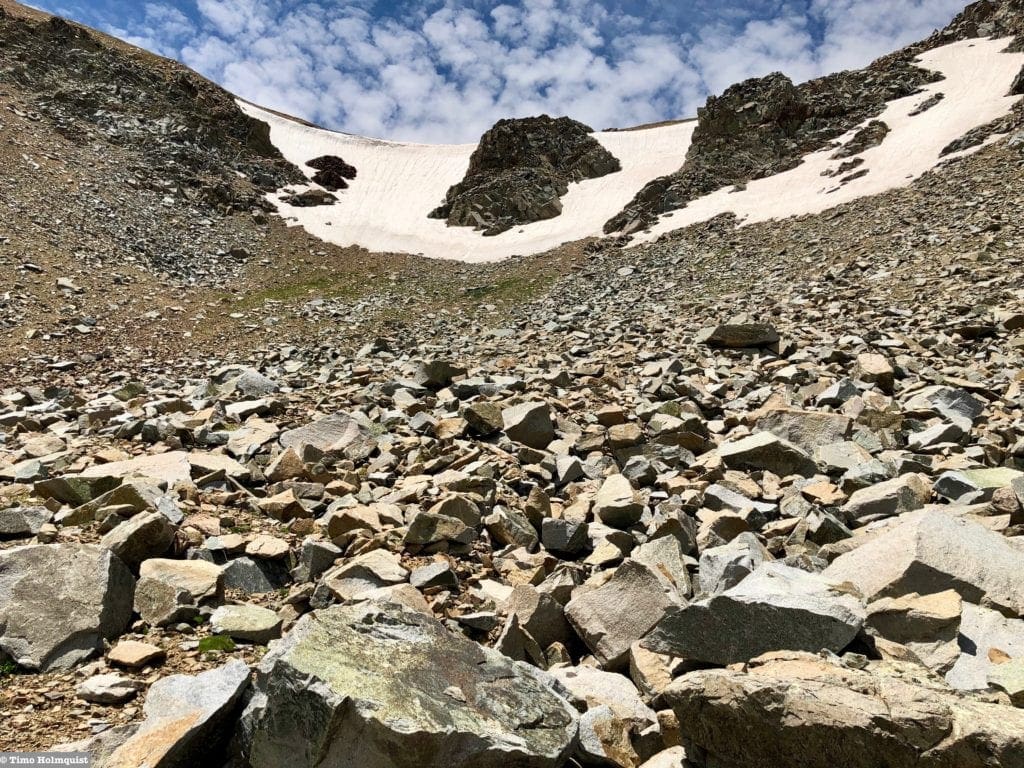
Once the trail fades, some route-finding will become necessary. There are a few ways to do this. The easiest option is to aim for the saddle between Lead Mountain and “Never Summer” Mountain. The cover here consists mostly of Pine Trees with sparse underbrush, so even though it’s off-trail, it won’t be hard to continue your trajectory. Helping out the orientation component is a giant talus field stretching across the entire upper basin. The presence of this field limits tree growth to only a few hundred feet uphill from the Dutch Town campsite. Once you break treeline, it won’t take long to figure out where you need to go.
The edge of the talus field, either scale the ridge or walk along its base until you can continue in a westward trajectory.
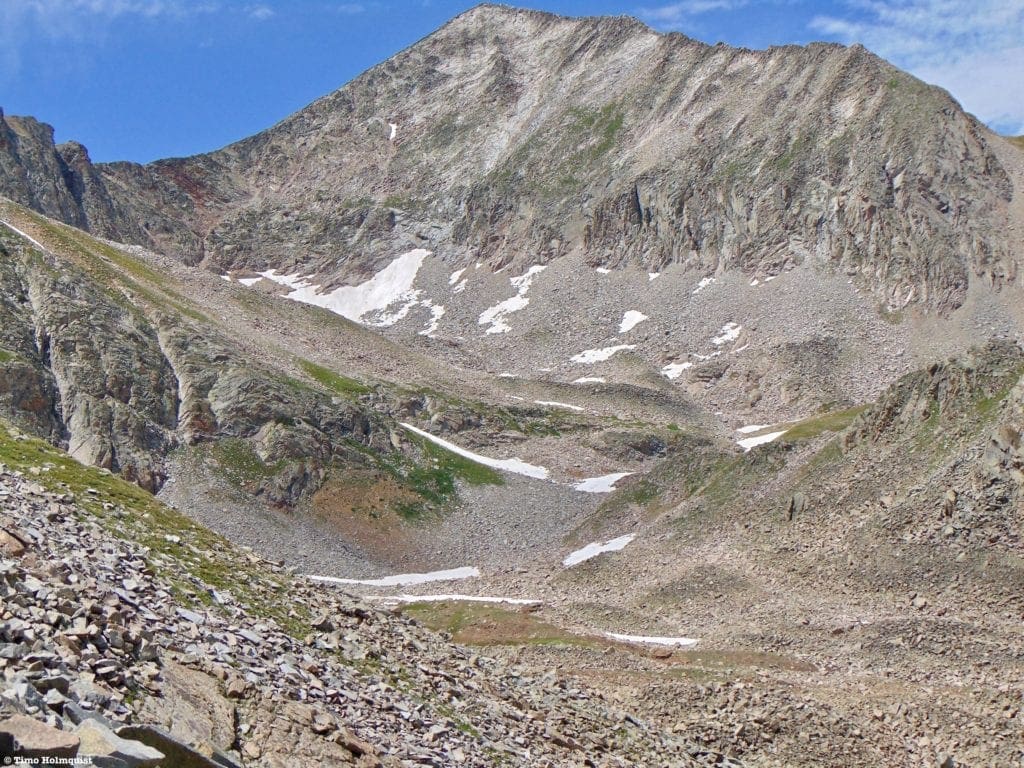
If you want a great perspective of the upper basin and don’t mind longer periods of talus hopping, make your way to the top of the leading edge and enjoy the panoramic views.
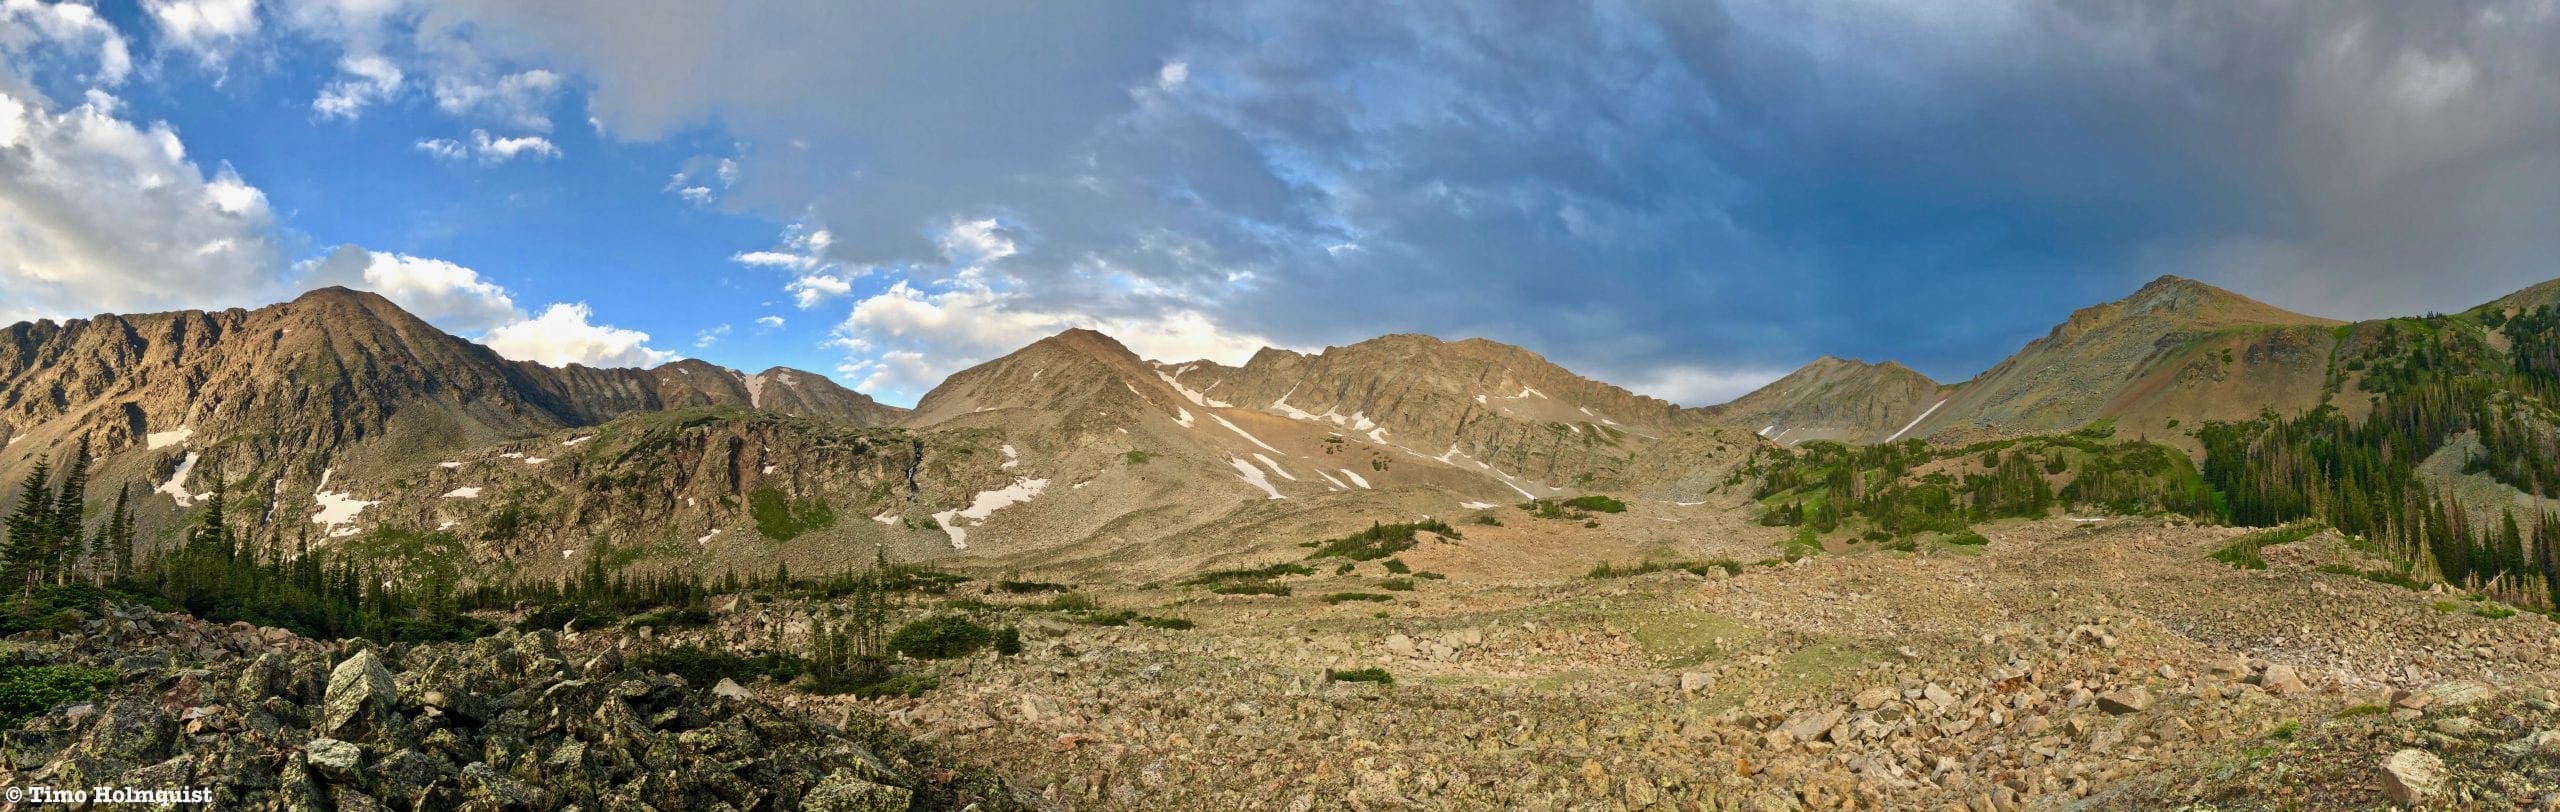
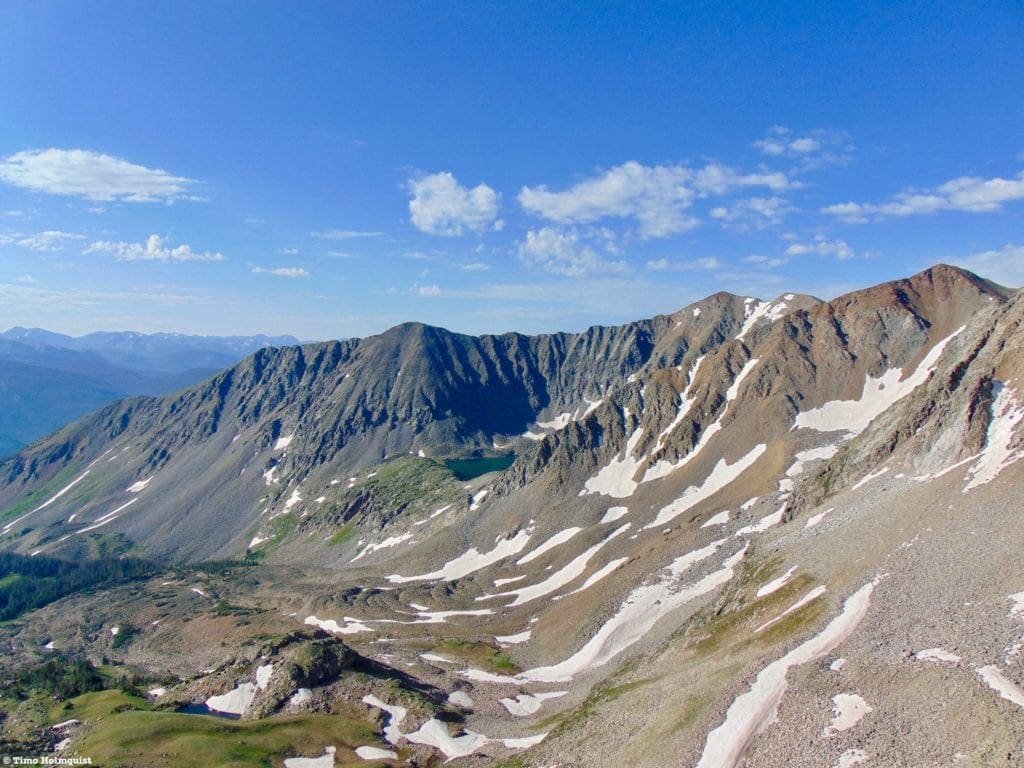
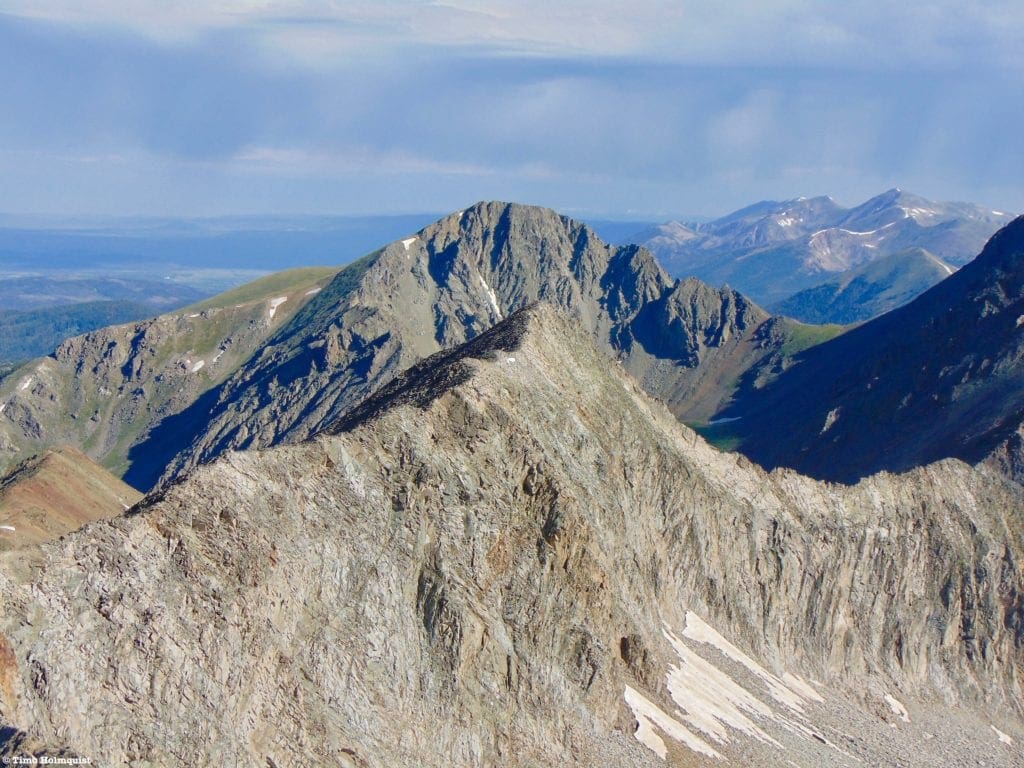
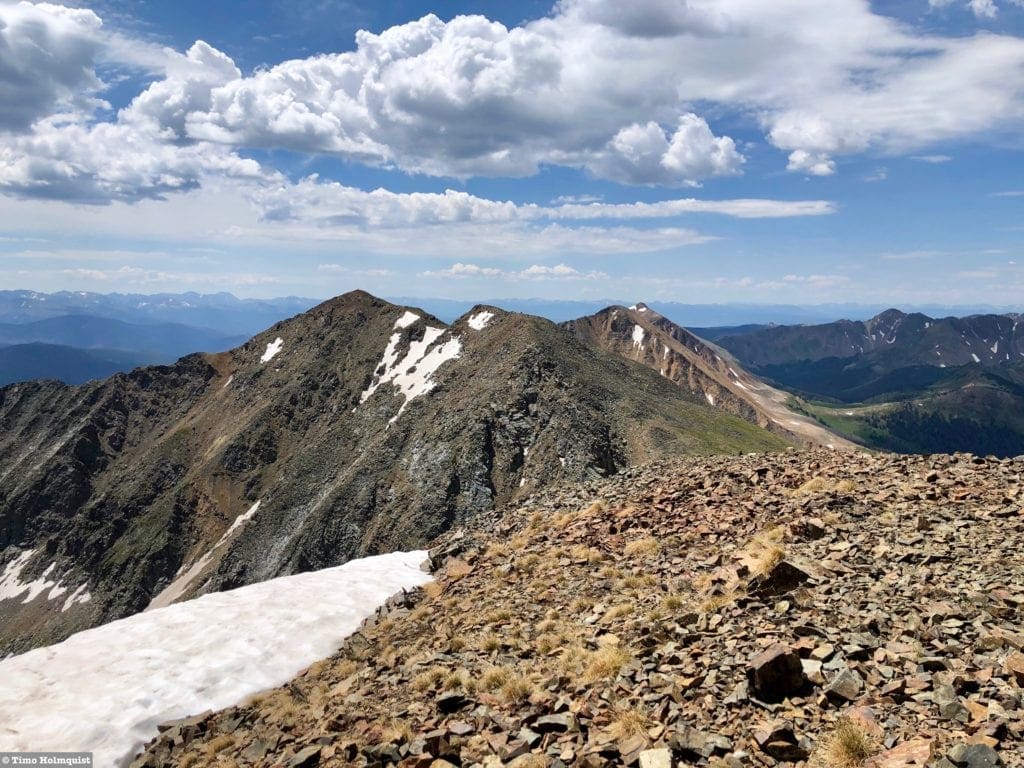
The Upper Basin. From left to right, unnamed ridge highpoint east of Howard, Howard Mt. (lake of the Clouds is below its double-humped summit), Mt. Cirrus, Hart Ridge, Lead Mountain, and “Never Summer” Mountain.
The deeply inset basin makes the journey to the saddle between Lead and “Never Summer” Mountain take a bit of time. Infrequent cairns offer a little directional help, but they aren’t necessary. While it’s certainly dealers-choice as to which ascent path works best, the simplest options stay to the right of a glacial nub.

My approximated route.
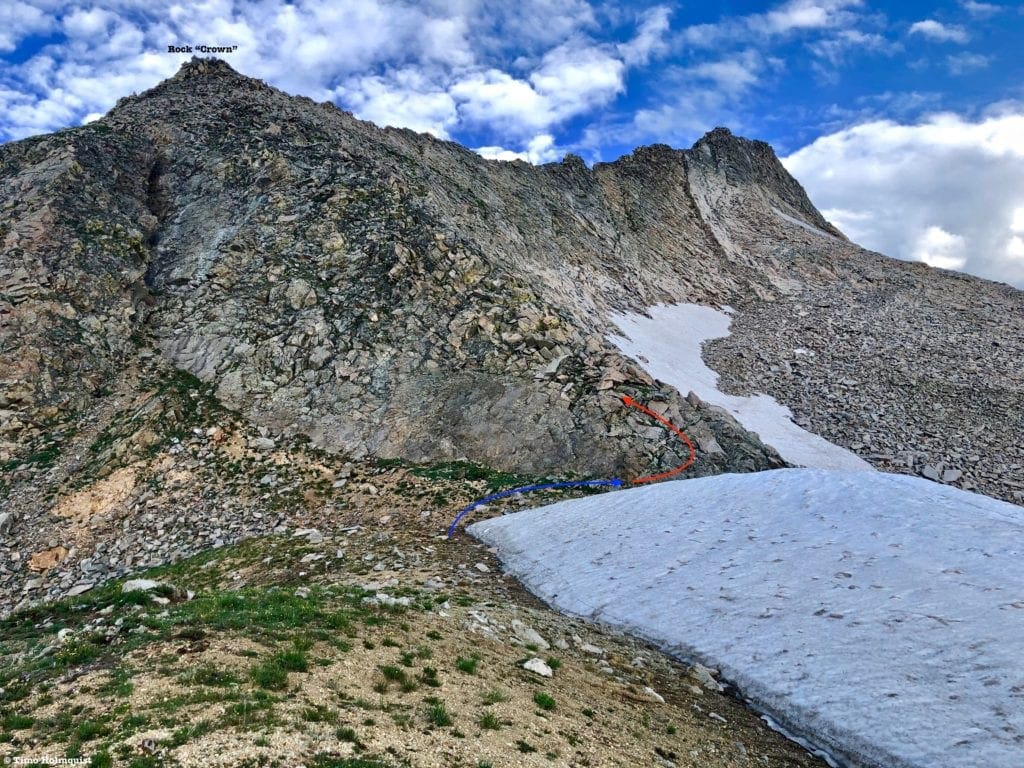
Once you’ve either ascended beyond the glacial nub or taken a line further north along the slopes of “Never Summer,” the pass should become relatively clear. Despite the presence of a strip of snow through mid-July, the pass is not overly challenging; the rock quality is garbage though, you’ll be doing a lot of “two steps forward, one step back.”
The pass between Lead Mountain and “Never Summer.
Alternatively, and if you have a helmet, you can veer left and hug the base of the cliffs. The rocks can shift here underfoot, so watch your step, but the solid walls to your left can add a ton of handholds to your journey, which I ended up preferring.
My approximated route was up the central gully in the photo. The easiest slope angle is through the remaining snow strip.
While not very long, the pass between Lead and “Never Summer” is steep and will demand your full concentration.
Once you’re on the pass, take a few moments to enjoy the views. The entire upper basin is visible behind you, along with Lake of the Clouds, Howard Mt., and Mt. Cirrus. You may notice some peculiar-looking rocks on the eastern side of the pass as well. Even just reaching this vantage point, to me anyway, seems worth the effort to get here.

Looking south from the pass. Rocky Mountain scenery at its finest.
Looking north, you’ll see the hulking profile of Mt. Richtofen guarding the NW corner of Rocky Mountain National Park. You’ll also be able to spot Mt. Mahler to the left, Tepee Mt. with its double summit just in front of Richtofen’s left flank, and the East Ridge of Static Peak, poking out to the right of Richtofen. The basin you’re staring across is called Skeleton Gulch and may be one of the most remote areas in this part of the National Park.
Looking north from the pass.
The option for a straightforward Class 2 ascent of “Never Summer Mountain” is available from the pass. It isn’t difficult, but it is an extra 400+ feet of gain/loss.
Looking East to the summit of “Never Summer,” after beginning the scramble up Lead Mountain.
If your goal is to get some scrambling in, turn your focus to the ridge leading up to Lead Mountain. I decided to break up the scramble into thirds to help identify certain sections and features. From this point on, you’ll be consistently above 12,000 feet until dropping off the ridgelines near Lake of the Clouds; make sure you’re aware of the signs of altitude sickness and how to respond to them.
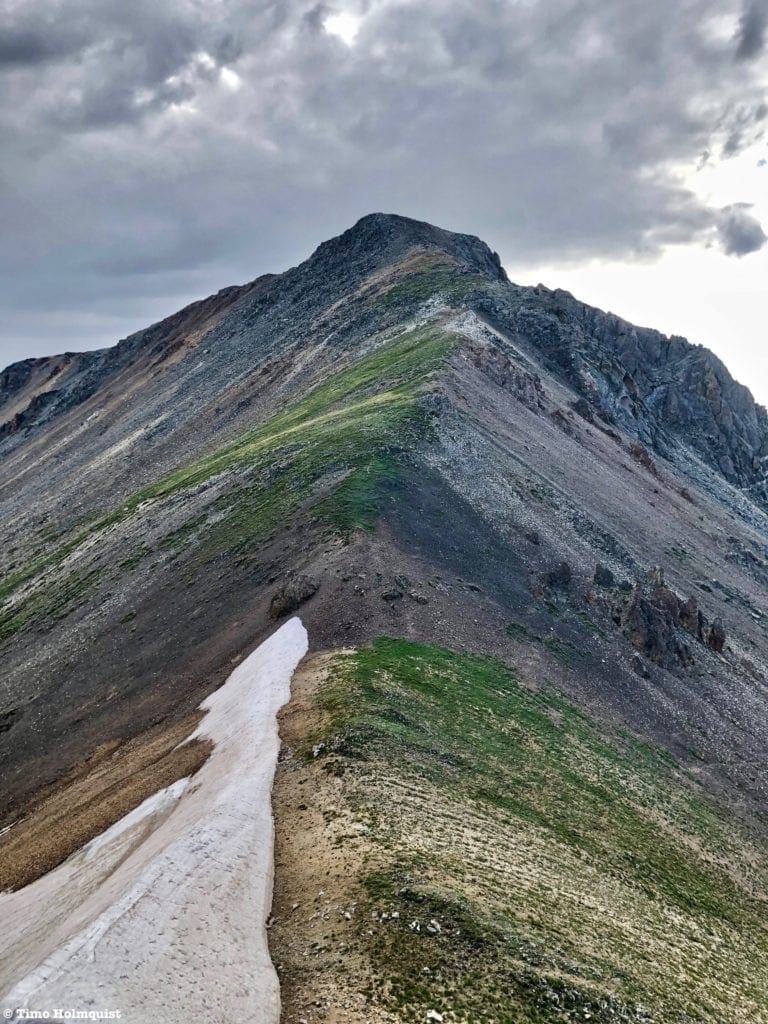
The next part of your route, looking east.
There are a few ways to handle the first third of the ridge, including ascending Class 3-5 slabs from below the pass if you’re really hungry. The easiest directional method is to find the nose of the ridge and work your way higher. The first part of this scramble out of the pass can remain a relatively easy Class 2+ or Class 3 if you stay as true to the ridge crest as you can. There are pieces of lush alpine grasses and flowers here, so do your best to stay off the vegetation. Once you get to a rock crown, the first portion ends, and the ridge takes on a much more serious profile. A break here is useful if you want to analyze the coming obstacles.
The second section of the ridge scramble begins just beyond the highest red arrow.
If you are on a mission and absolutely crushing distances, it’s possible to get to the top of Lead Mountain from the pass in 45 minutes. If you are like me and enjoy savoring each challenge, it will take longer.
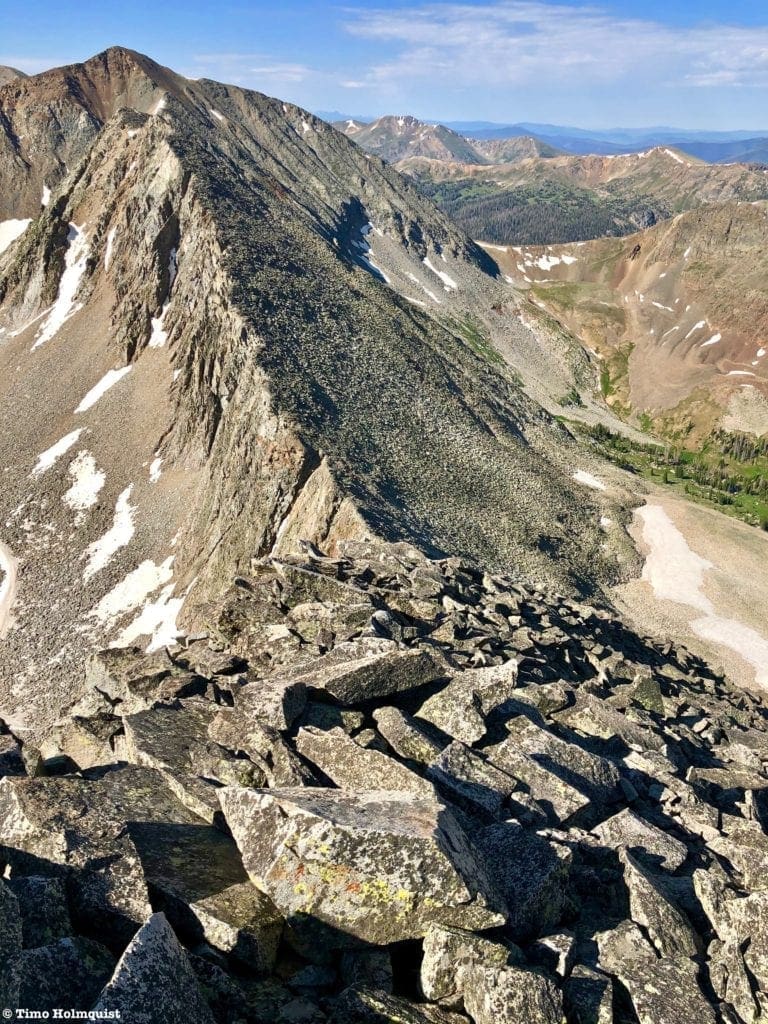
The second portion of the scramble runs from where this picture was taken to “Little Lead,” the ridge high-point slightly to the right and in front of the true summit.
The ridge crest is the most traveled route and contains the best rock. It is possible to traverse beneath the ridge crest on its southern side, but it doesn’t seem much easier. In either scenario, multiple 3rd Class moves and increasing exposure will be common.
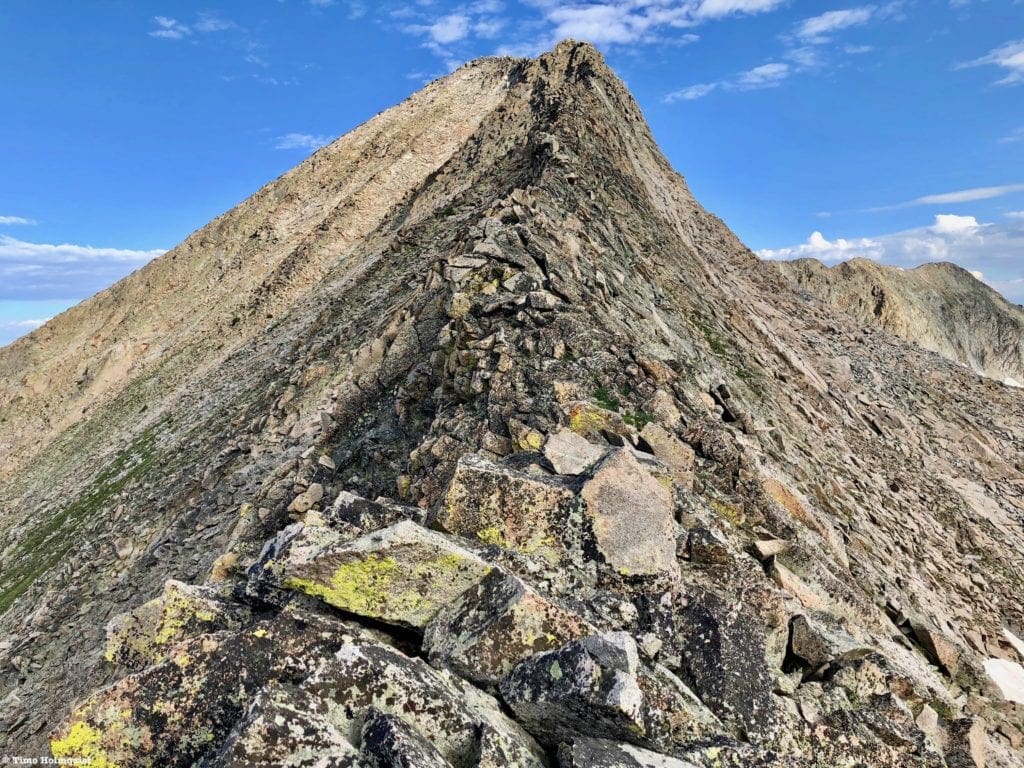
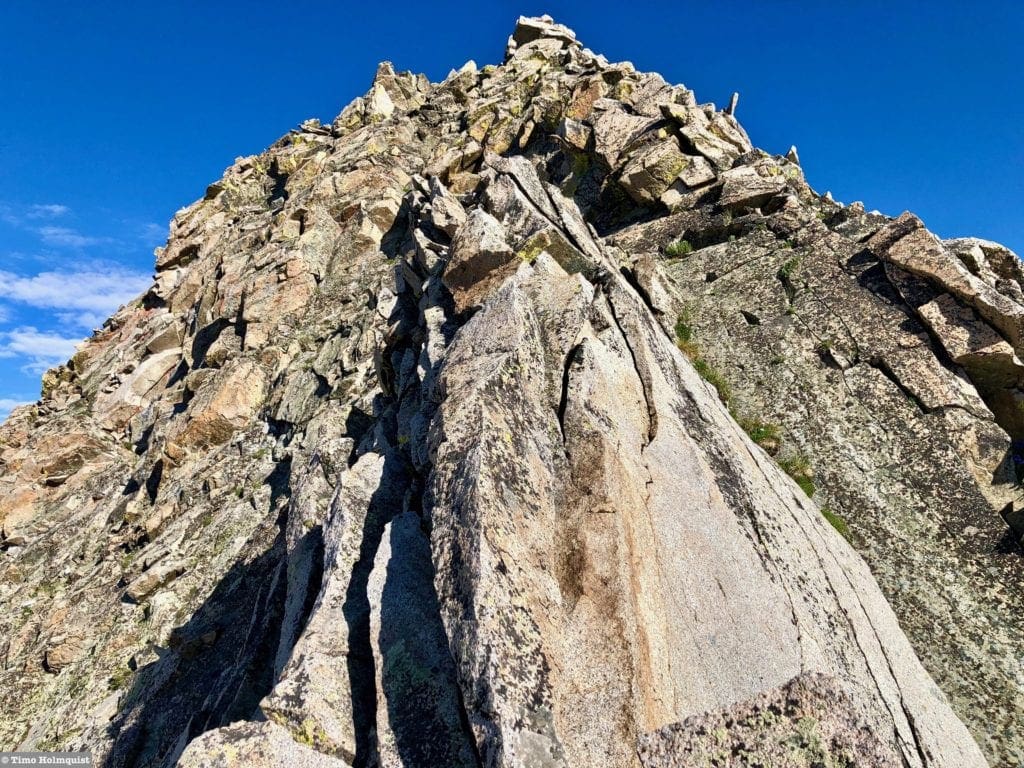
Stay true to the crest and enjoy this exceptionally scenic scramble. In my research for this route, several trip reports claimed different areas were the Crux section, so I was interested in figuring out what I would eventually call the hardest moves on the ridge. In general, you can stay pretty much on top of the ridge crest for the whole thing. In some areas, it will seem like you’re going to cliff out but the ridge provides. It reminded me a lot of taking a ridge direct approach to the top of Mt. Eolus once you finish the catwalk: very gratifying, good rock, and solidly Class 3. If you’re having trouble staying on the crest, take a moment and hunt for the best path, there’s likely a variation you can use. After a series of rocky ups and downs, you’ll begin a significant ascent to a high point.
Increasing exposure as you climb.
The serpentine ridge will continue to rise, with the views becoming more dramatic by the minute. There will be a set of rocks blocking access up the crest itself. Take a moment to find the workaround.
A quick northward feint beyond more intimidating ridge rocks.
Despite the increasing exposure, most ridge workarounds (unless you want to perform a major detour) are on the north side.
Another ridge obstacle, where traversing to the left seems impractical. If you can stay near the crest, a moderate Class 3 solution will present itself.
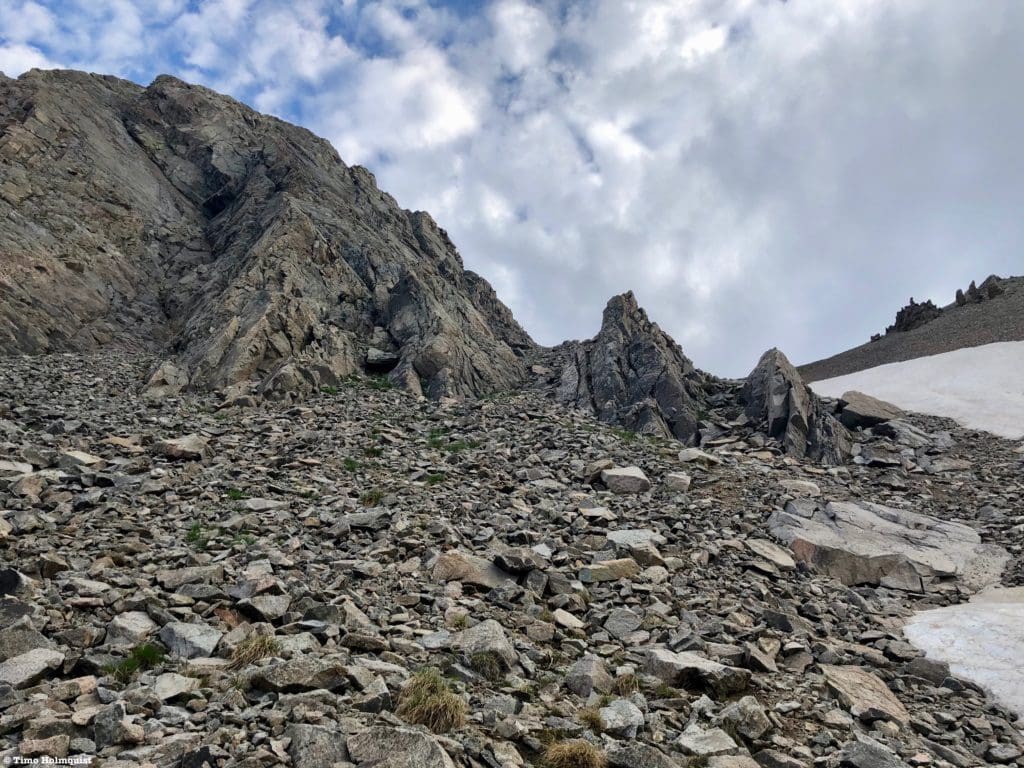
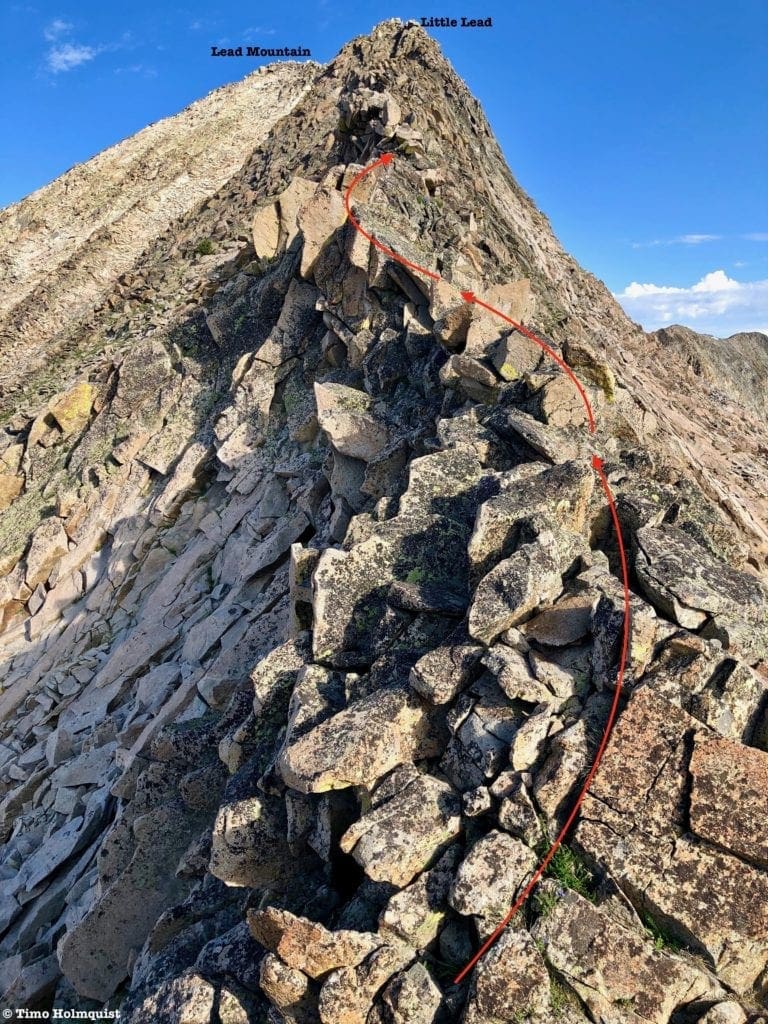
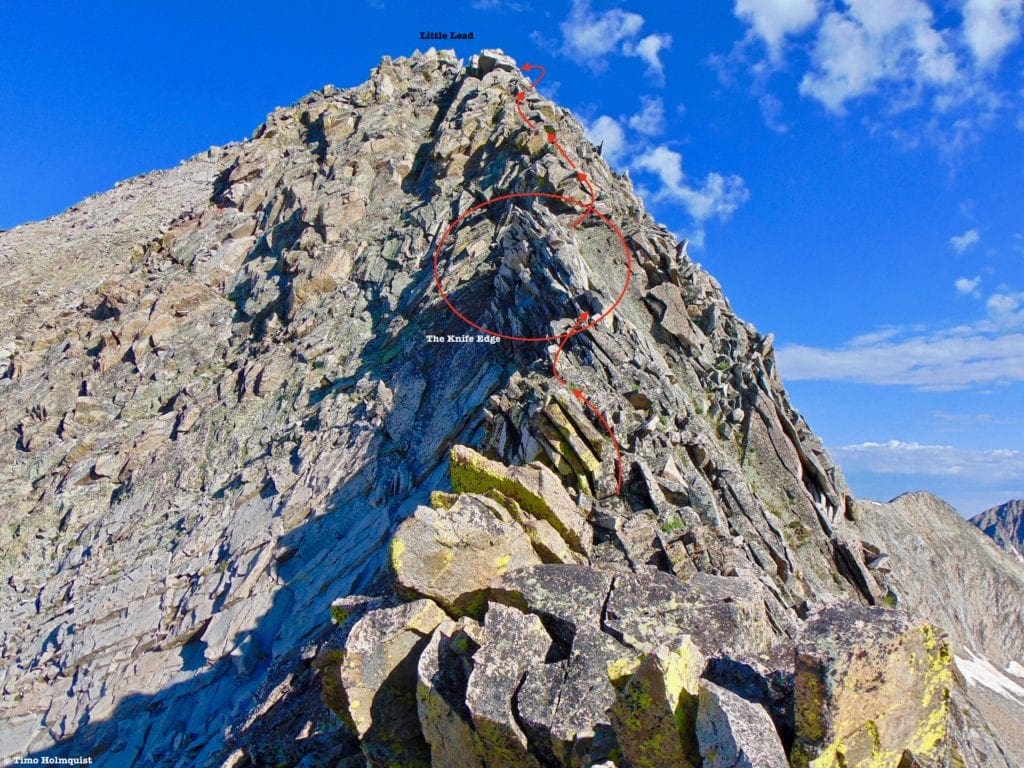
Before reaching “Little Lead,” you’ll encounter a mini-knife edge. There is a seam on the south side you can use if you are uncomfortable on the crest. It is not a long section by any means but requires a few awkward Class 3 movements to dispense with.
The profile of the ridge right before the knife edge. If you’re into scrambling, this should be an exciting photo.
The Knife Edge can probably be skipped, either by using the seam on the left (south) side or by climbing the slanted dihedral to the right with tufts of grass sticking out. Like most potential detours on this stretch, if you can stomach some exposure and are confident in your abilities, taking the Knife Edge up is not only the most practical choice; it’s the most fun.
On the Knife Edge, gazing up at “Little Lead”.
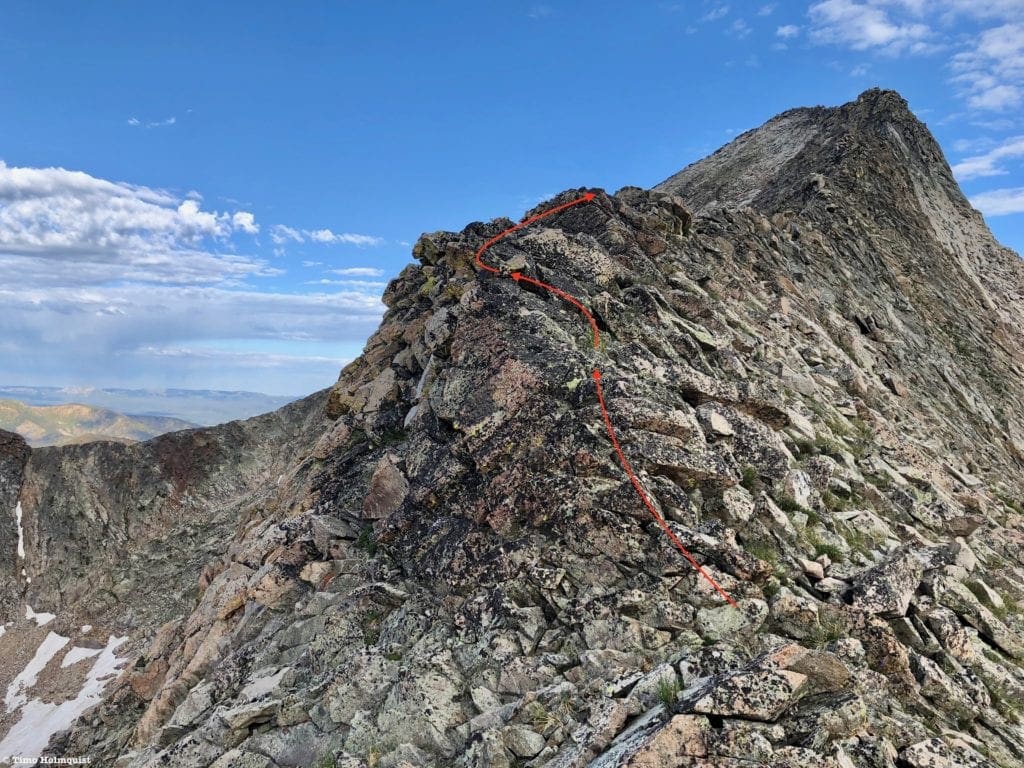
Beyond the Knife Edge, what looked like a Class 4 or 5 section from below, begins to mellow back into the Class 3 category. Ascend by any means necessary (again, staying ridge crest or slightly right) until you’re standing on top of the high point. This is where I’d say section 2 ends and section 3 begins.
The final portion of the second section, up to the high point.
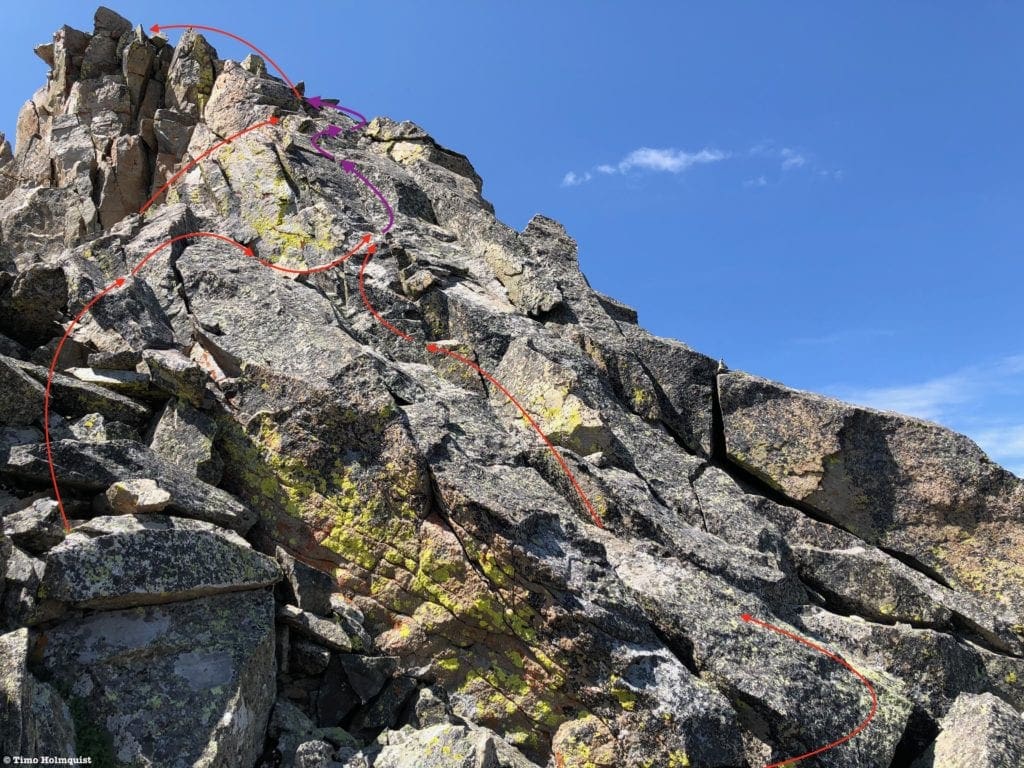
The final third of the scramble has what I would argue is the crux but is shorter in overall distance than section 2. Before continuing, take a second to look down at the “Knife-Edge” from above. In truth, it’s more of a butter knife than anything sharp, but it’s decidedly Class 3 and enough to pump some adrenaline. More importantly, it forces you to focus on each move you’re making.
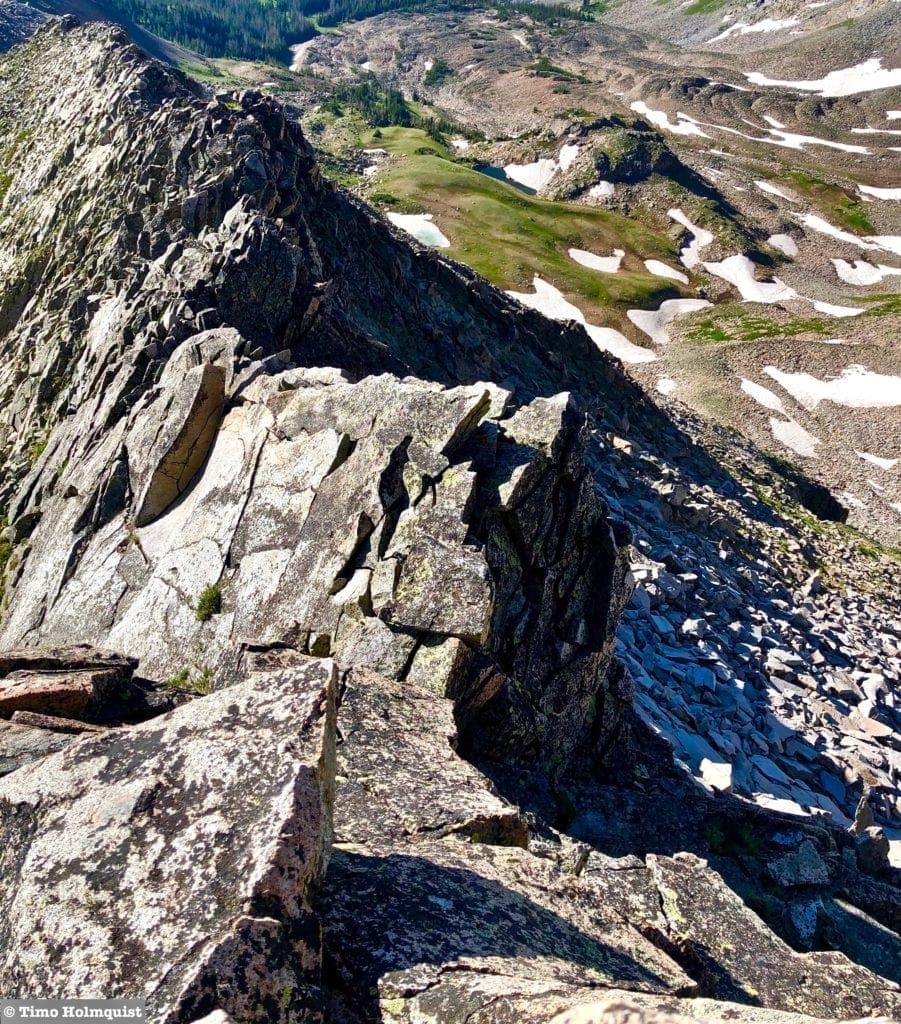
Looking at the Knife-edge from above.
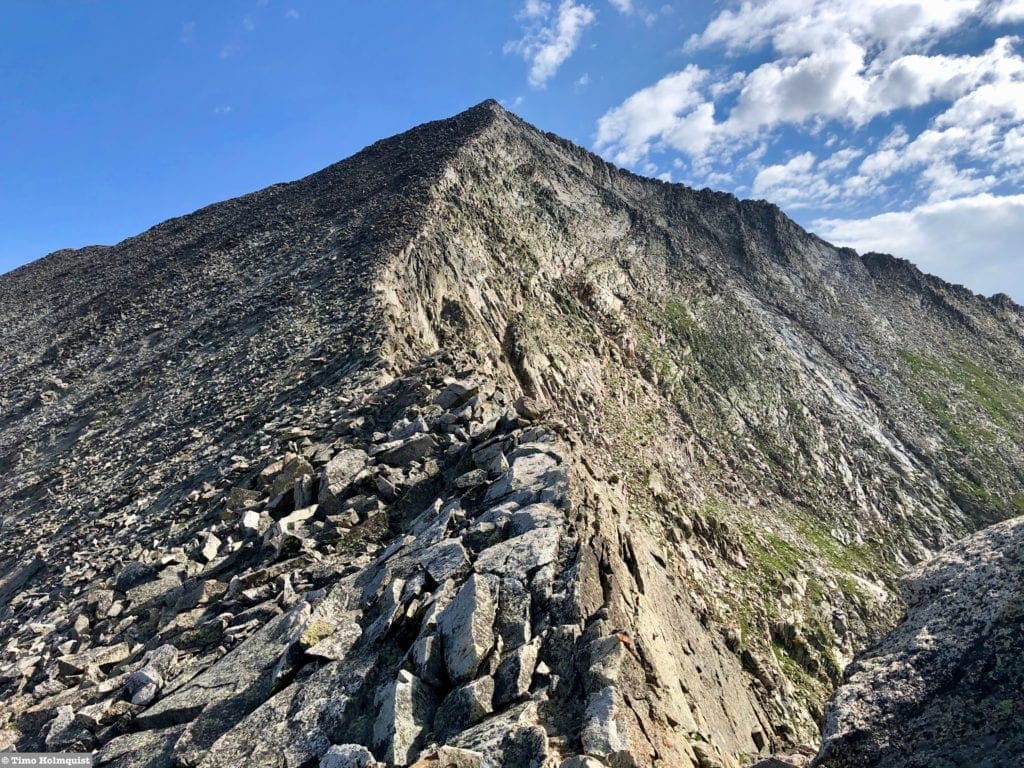
Turning back to the remainder of the route, you’ll be able to pick out the section that has my vote as the crux.
The Crux section from Little Lead.
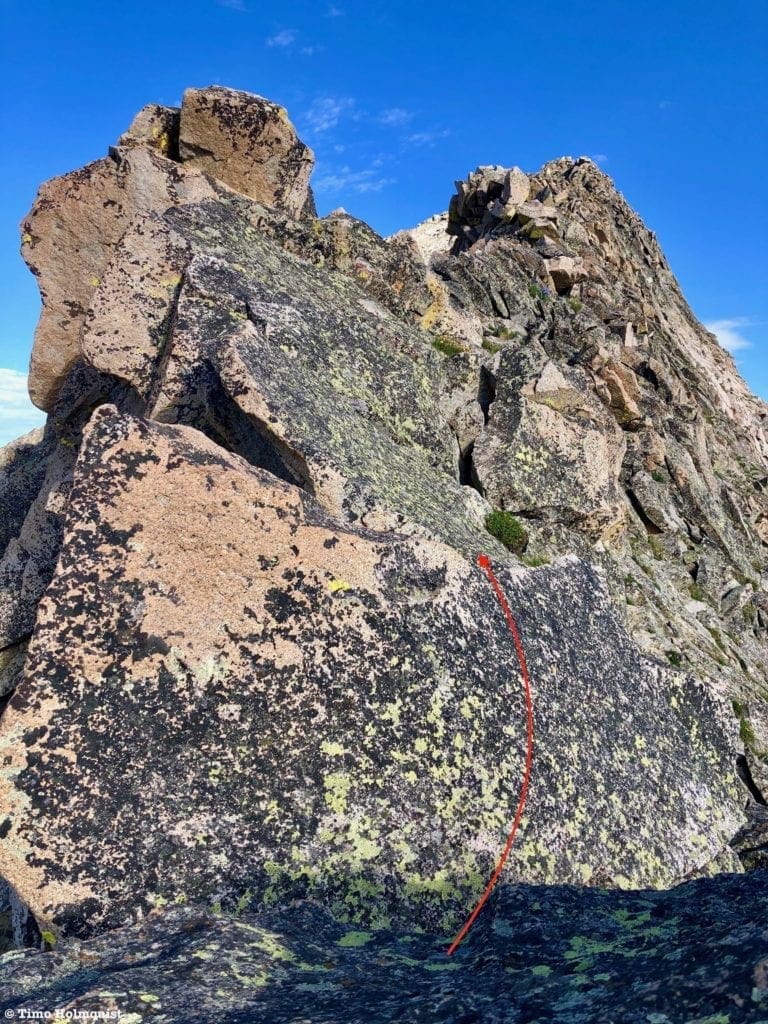
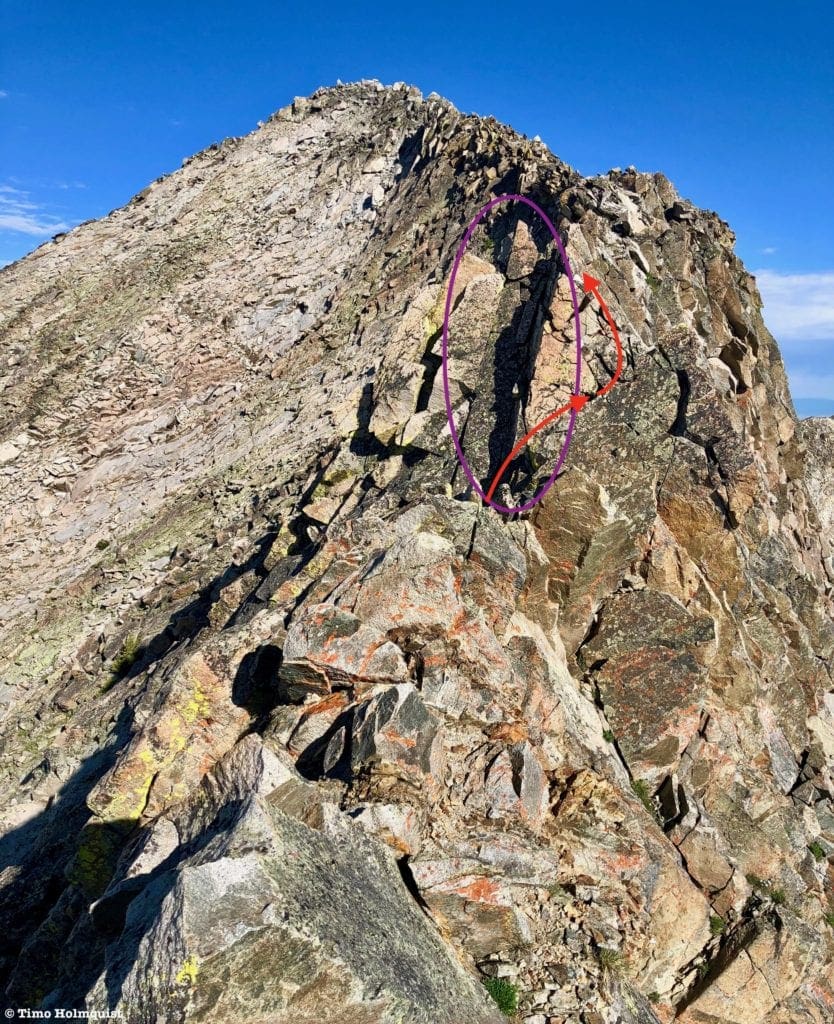
Before you scamper to the easiest route (Red in the pictures above and below), consider that the “easiest” way consists of a handful of consecutive Class 3+ moves with wild exposure to the north. There is a steeper but less exposed alternative.
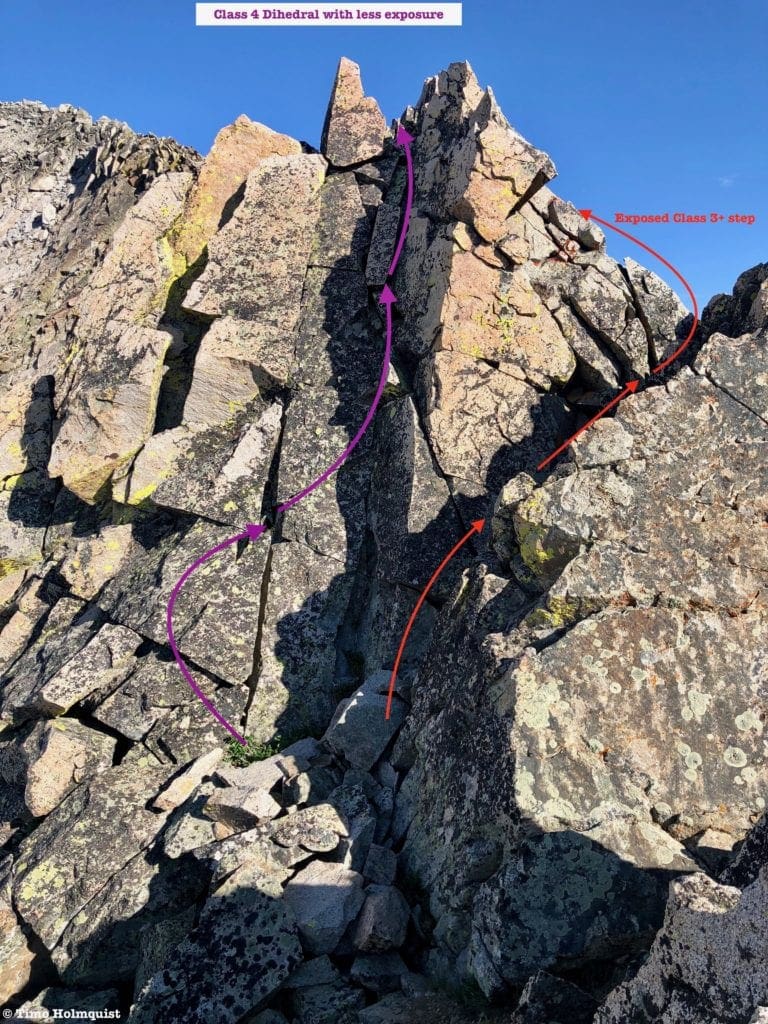
Move for move, the Class 3+ route is probably the easiest method, but the exposure is pronounced.
Once you arrive on the ridge crest, you’ll need to perform an exposed step onto slanted rocks.
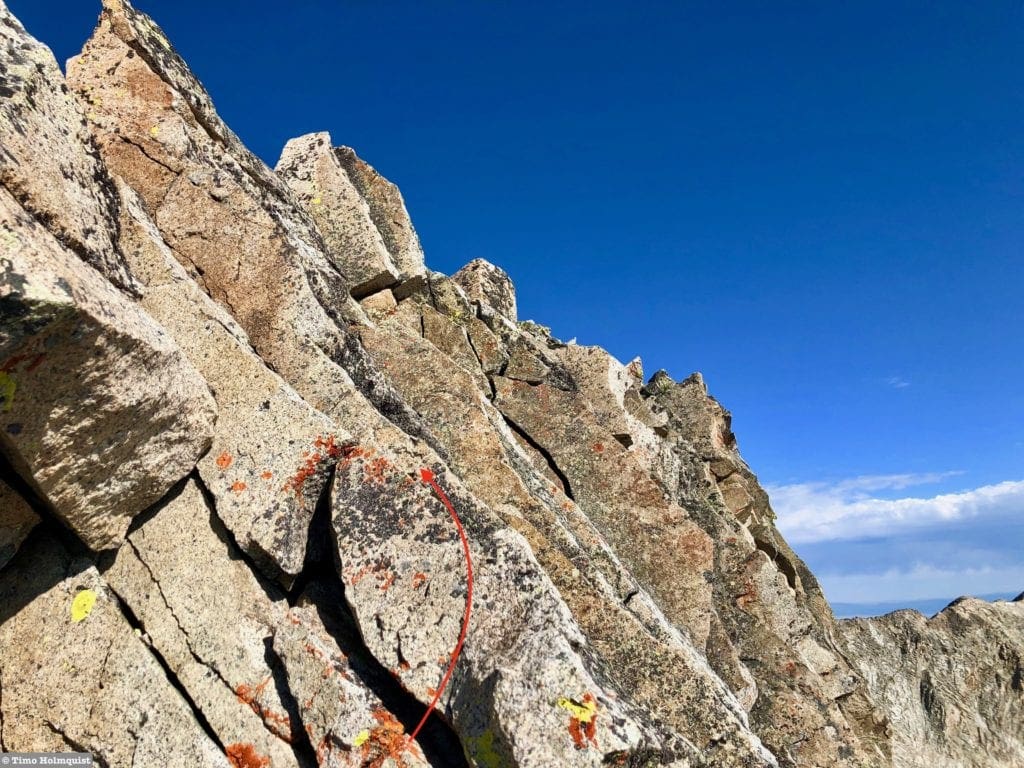
The exposed step and the terrain after it.
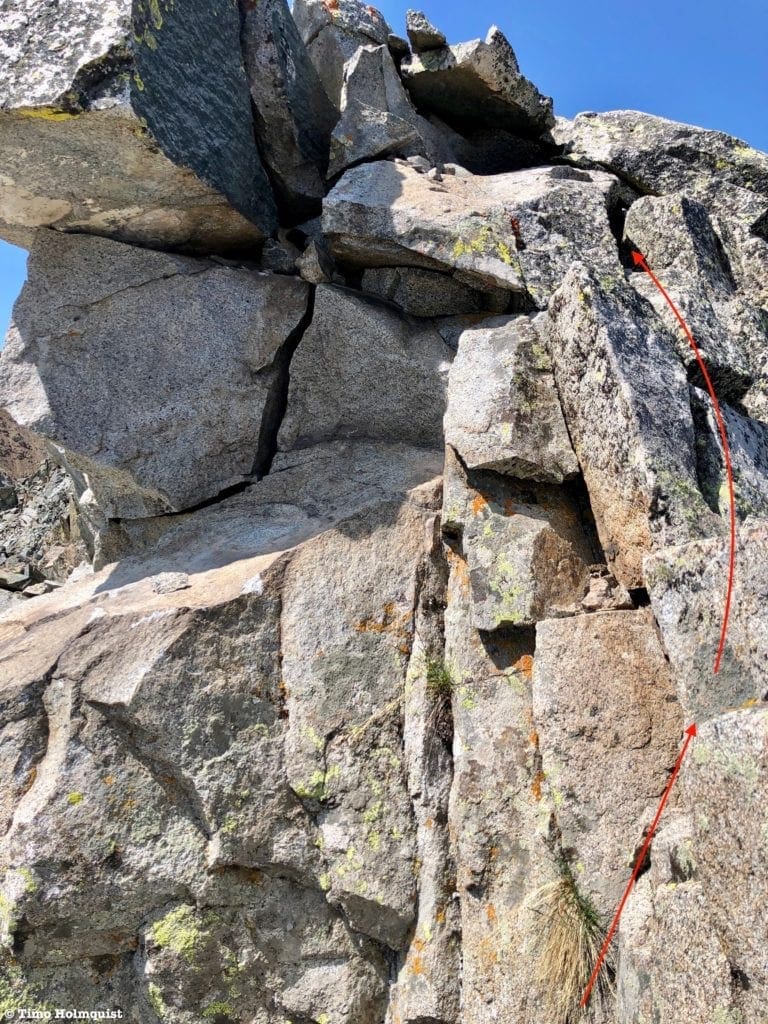
Since I had the weather and felt like trying variations, after completing the Class 3+ method, I scampered back down the ridge and tried the Class 4 dihedral variation.
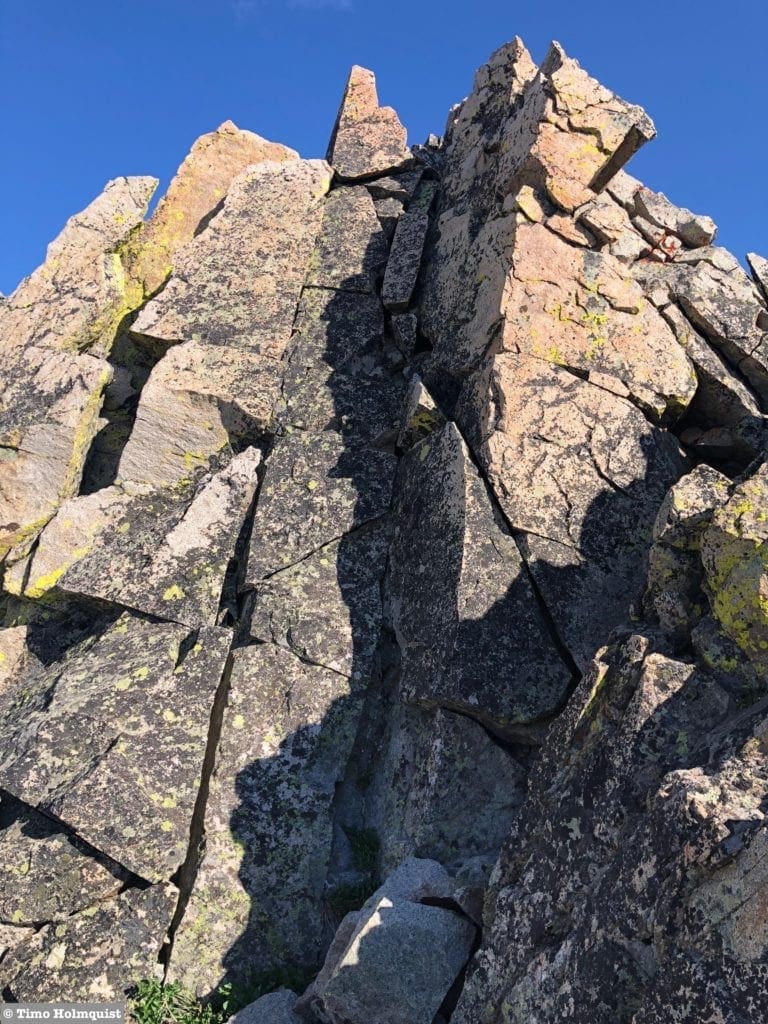
The Class 4 dihedral. Use the rocks on the left side for a good initial boost, then work your way back to center.
In all honesty, I preferred the Class 4 version. The holds are super solid (but always check each one anyway), and despite its steep profile, the dihedral is only ~15 feet tall and puts you on the much less exposed south side of the ridge.
Looking down from the top, where multiple cracks and steps are visible.
It’s such a contained little area that climbing the dihedral (as long as you’re comfortable on this type of terrain and/or have a partner with you) is great Class 4 practice. If exposure doesn’t bother you, the Class 3+ way is easier.
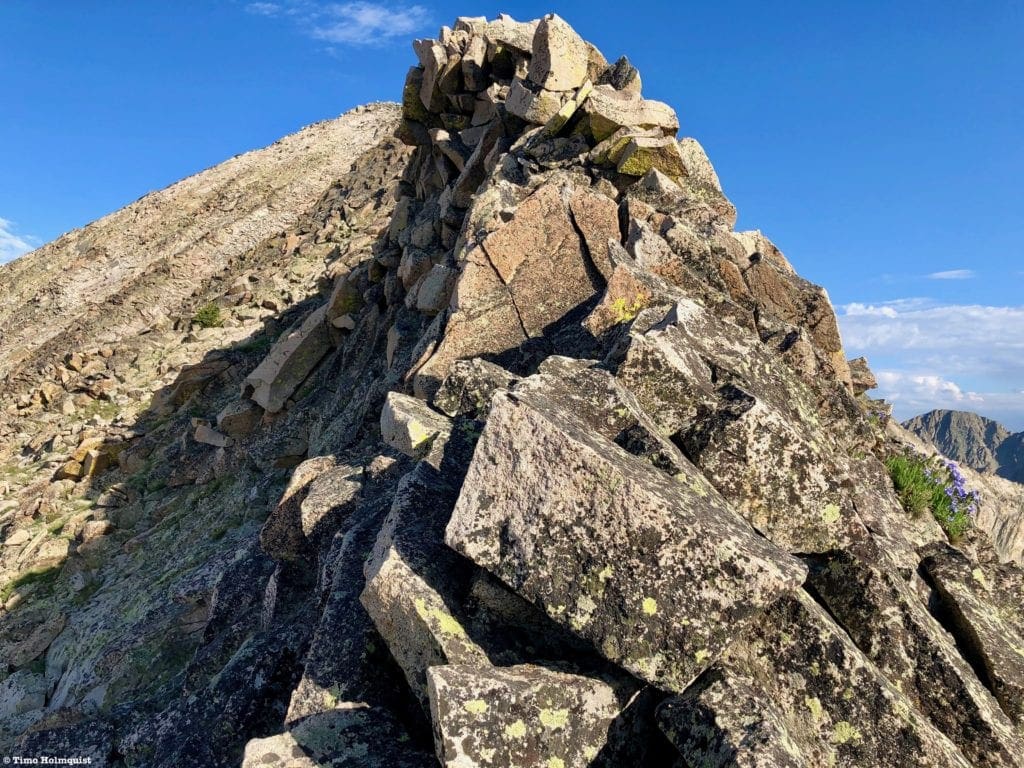
The rest of the ridge after the Crux.
The slope angle relents somewhat after the crux, although the ridge still flirts with substantial north side exposure. The last bit to the top still deals with numerous Class 3 moves if you stay on the crest but is generally easier than the middle portion of the ridge. If you find yourself in a position where the moves and exposure are more than you’ve dealt with previously, pause, breathe and scout your area. A little bit of creative route-finding keeps the challenges down.
Enjoy the last little bit of scrambling to the top!
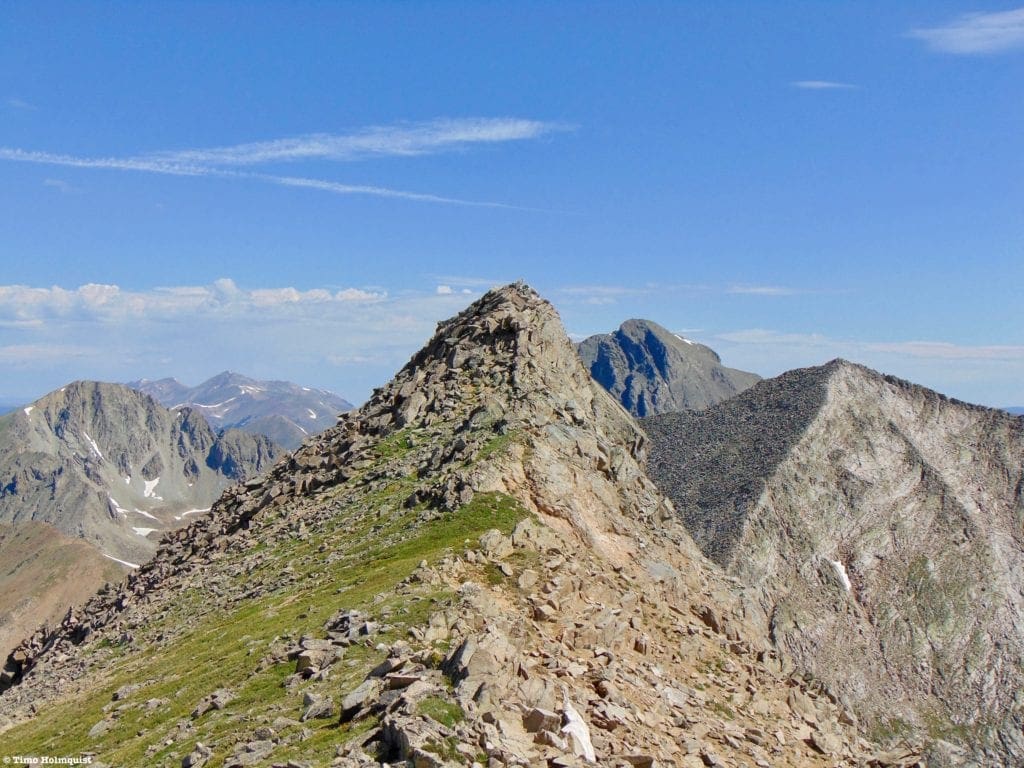
Before you know it, you’ll be standing on top of Lead Mountain. The summit is wider and flatter than the ridge you just climbed, so there’s plenty of space to lounge. Views break out in every direction, with North Park and its surrounding ridges being the geographic standouts to the west. To the north, the Never Summers continue to Cameron Pass, where the Medicine Bow Range takes over and eventually arcs into Wyoming.
North Lead Mountain, Mt. Mahler, and the Medicine Bow Range from Lead Mountain’s summit.
The view south shows the substantial distance between you and Mt. Cirrus. The ridgeline in front of the red-tinted summit of Cirrus is called Hart Ridge. Most people who tackle Hart Ridge do so because it’s between them and the other Never Summer Peaks, not necessarily for fun.
Looking south to Mt. Cirrus with Lake of the Clouds poking out to the left.
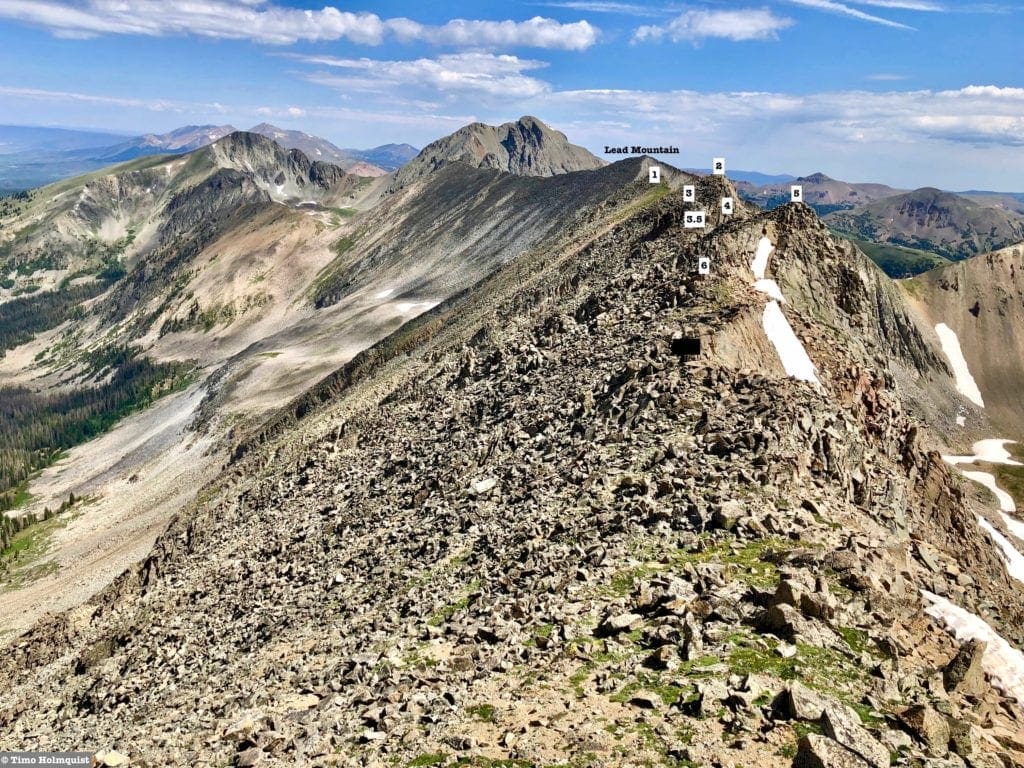
My estimation is that most of the few visitors to Hart Ridge choose the path of least resistance, often slightly below the ridge crest on its western side, and bust over to Cirrus. If I was doing something bananas like a giant Never Summer Traverse, I would too. Since I did not plan to go farther than Howard, had the weather on my side, and came to scramble, I decided to explore Hart Ridge for the best rock. From what I found, there are at least 7 bumps along Hart Ridge that have something to offer the discerning scrambler.
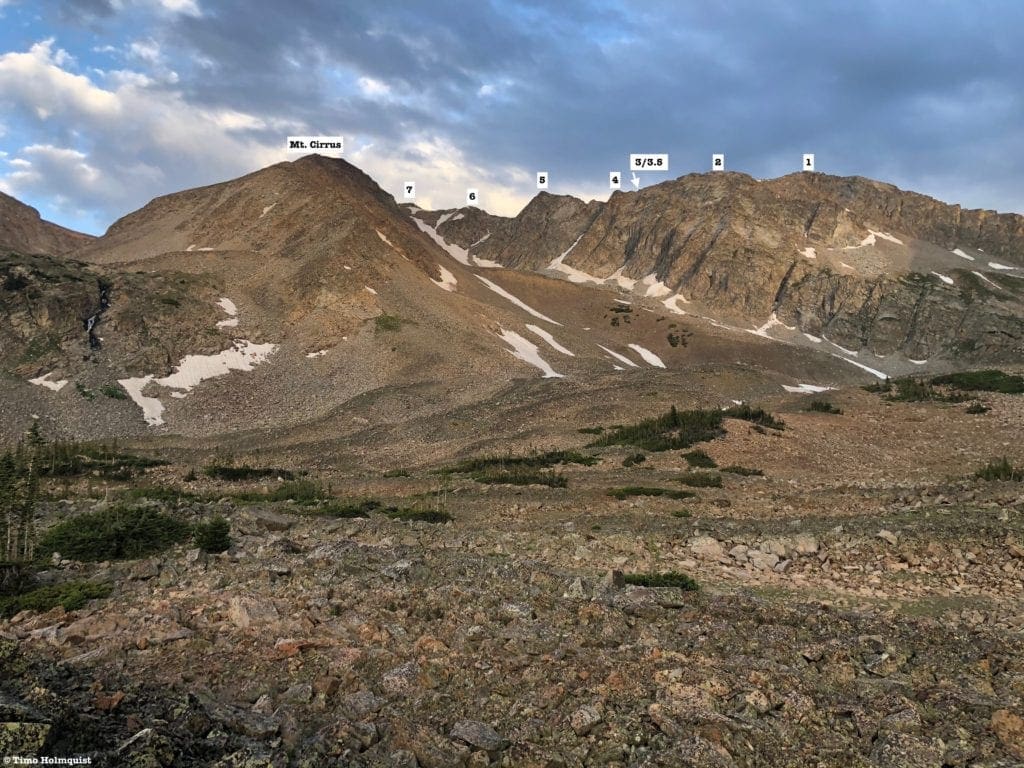
The high points on Hart Ridge from below. 3 & 3.5 are hard to pick out from this view, but they are there.
It should be noted that none of the ridge bumps are “must summits,” there are plenty of ways around all of them. However, considering how much effort I’d already put into getting back here, I felt a strong, deviant compulsion to find some nice scrambling.
Before that could happen, I needed to drop off Lead Mountain and work my way up the first Hart Ridge bump.
Dropping down Lead Mountains south side.
The descent off Lead is a simple Class 2 affair with as much or as little exposure as you want. I found long instances of stable rock on the ridgeline itself, so that ended up becoming my line. I made the saddle quickly and began a much slower and deliberate climb up the other side. The rock quality was more of the same here, less stable than Lead Mountains East Ridge, but nothing too challenging if you stay close to the crest.
Looking back to Lead Mountain from the low point of the ridge.
Conserving as much energy as I could, I took my time reaching the first Hart Ridge bump. During this ascent, I looked back to Lead Mountain to see if I could scope out some features on the East Ridge. This is what I came up with.

Sectioned out Lead Mountain East Ridge.
The climb to Bump 1 was fairly anticlimactic. There is a brief section of slabby rock on the ridge crest that supplies a few low 3rd Class moves, but you really have to hunt for them. Any challenge can be bypassed and will leave you with a simple Class 2 ascent to the top.
The ridgeline offers some easy Class 3 but can just as easily be skipped.
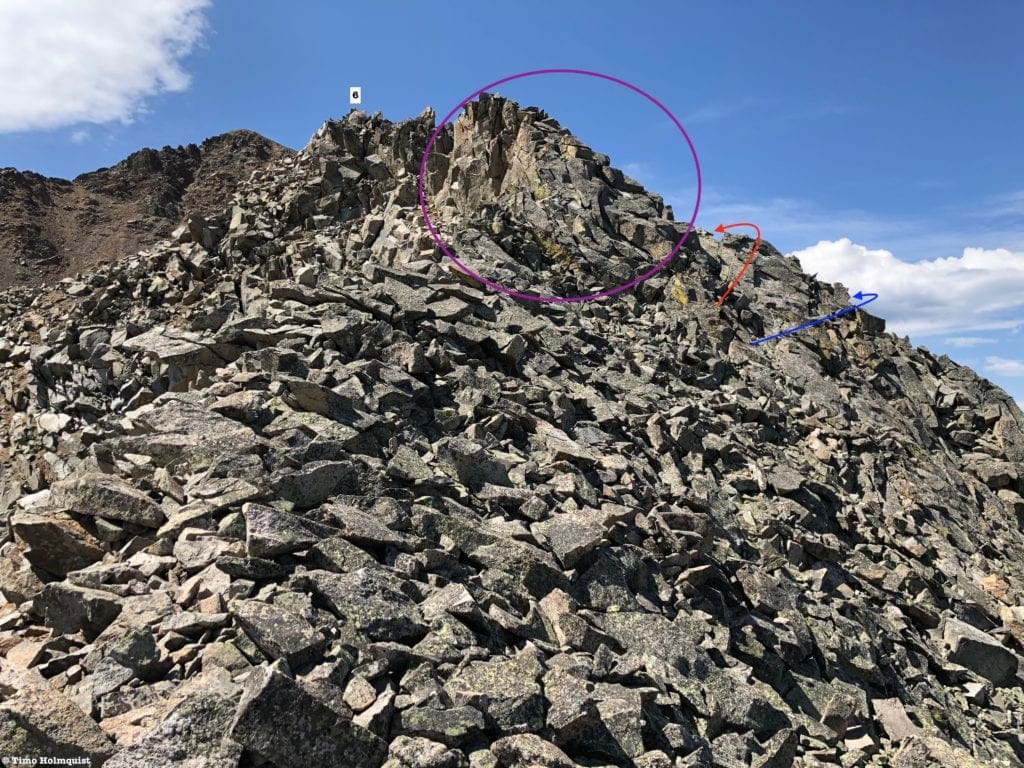
What’s not apparent from any of the points below the ridge is which highpoint is the definitive…uhm, highpoint, of Hart Ridge. I’d make an argument that it’s the second one, and Bumps 6-7 are really a part of Cirrus. Geologically though, 6 and 7 are closer to the rock quality on Hart Ridge, and the crumbly red rock on Cirrus takes over after.
Looking back to the first bump from the slopes of the second one.
Between the first and second bump is a nice stretch of healthy alpine; take care to avoid stepping on vegetation. After bounding up some rocks, I made the highest bump on Hart Ridge. This bump can also be completed easily without straying into Class 3 territory. Once you gain the highest point, you’ll be able to “appreciate” how much more there is to go.
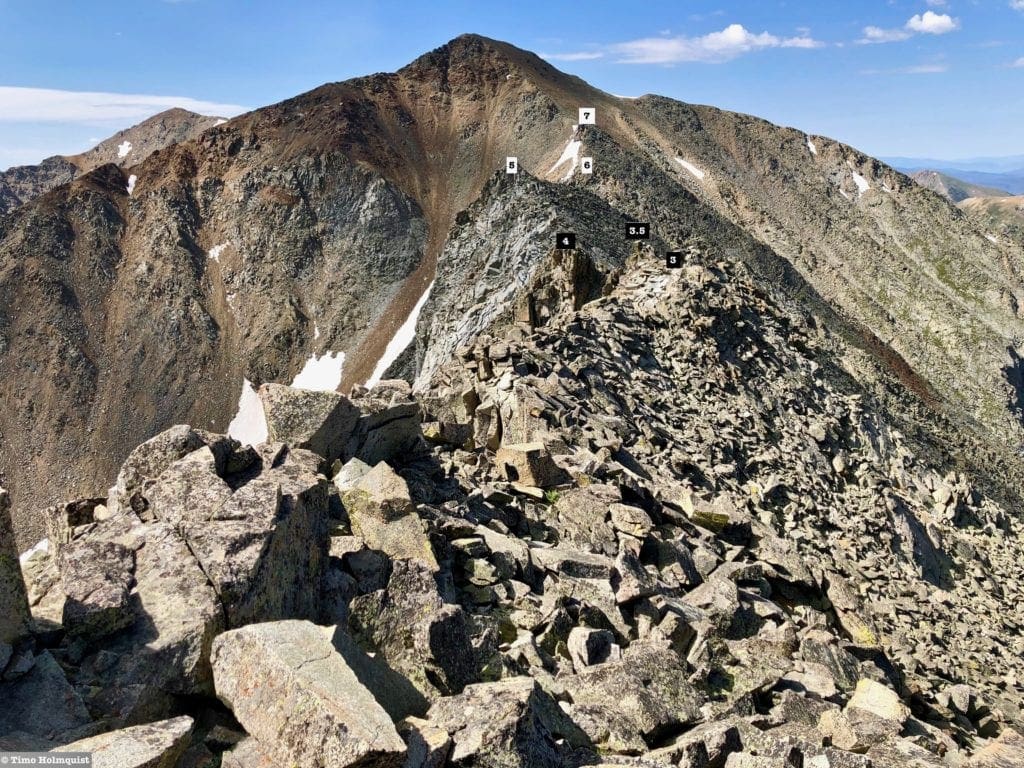
Labeled bumps on the way to Cirrus.
Stay close to the ridgeline to find the best rock and meander over to Bumps 3 and 3.5. Just below the summit of Bump 3 is a massive cairn with a rock sticking out of the top of it. I don’t know how much rock was there naturally before people began adding to it, but it’s starting to look like a Beacon of Gondor, which is impressive, considering how remote Hart Ridge is.
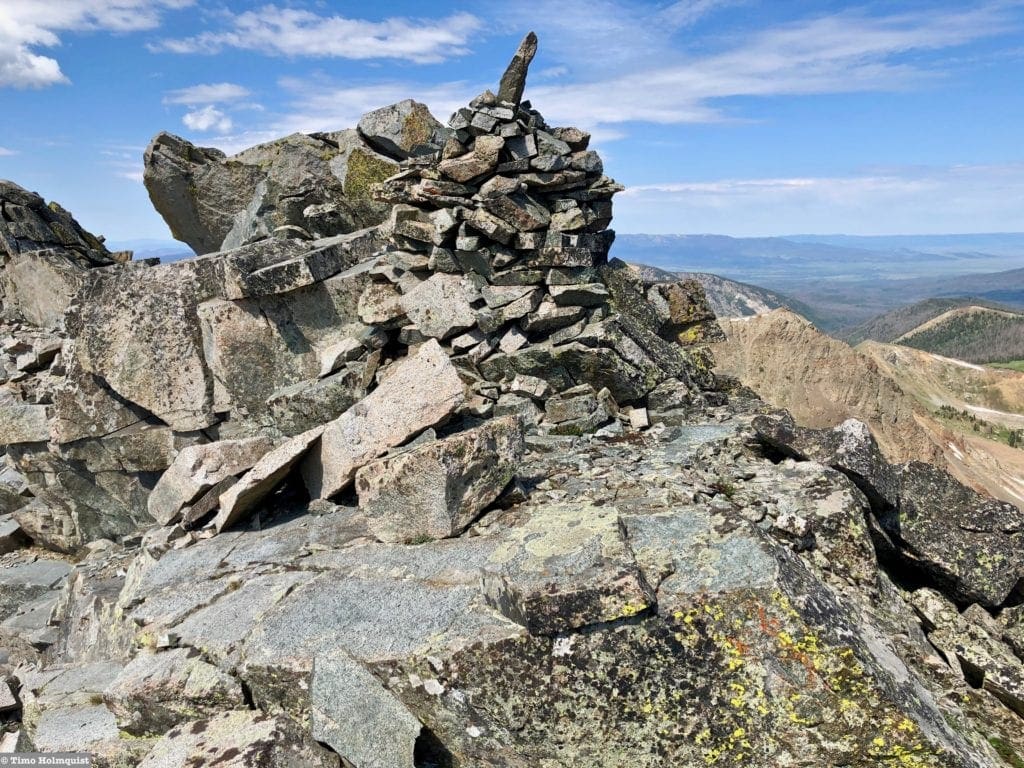
Big cairn on the way to Bump 3
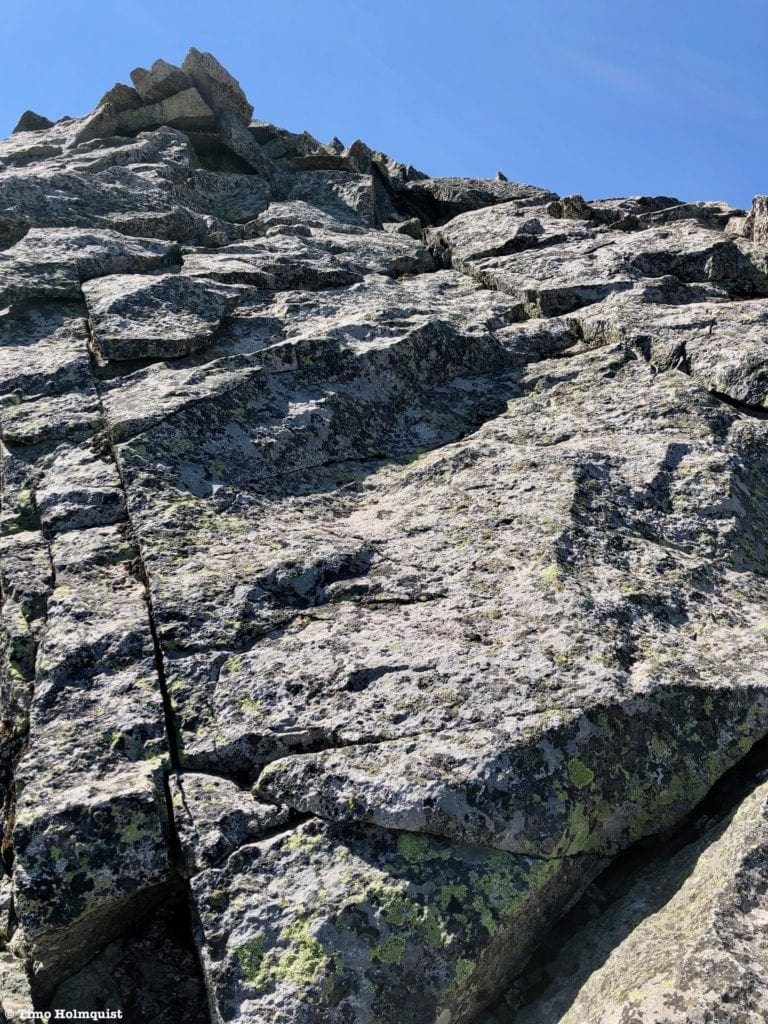
The first bit of enjoyable Class 3 tackles the third bump via a set of blocks going ridge direct. You can also bypass the bump on the east side as long as enough snow has melted.
Short, sweet Class 3 scramble to the top.
From the top of Bump 3, you can see 3.5 and 4, only a short stroll away. You can thread the gap between them by keeping Bump 3.5 to your right and Bump 4 to your left, which I suspect is the easiest path. However, since the distance between them is negligible, you might as well tag both with a few Class 3 moves. The rock through here is generally quite sturdy.
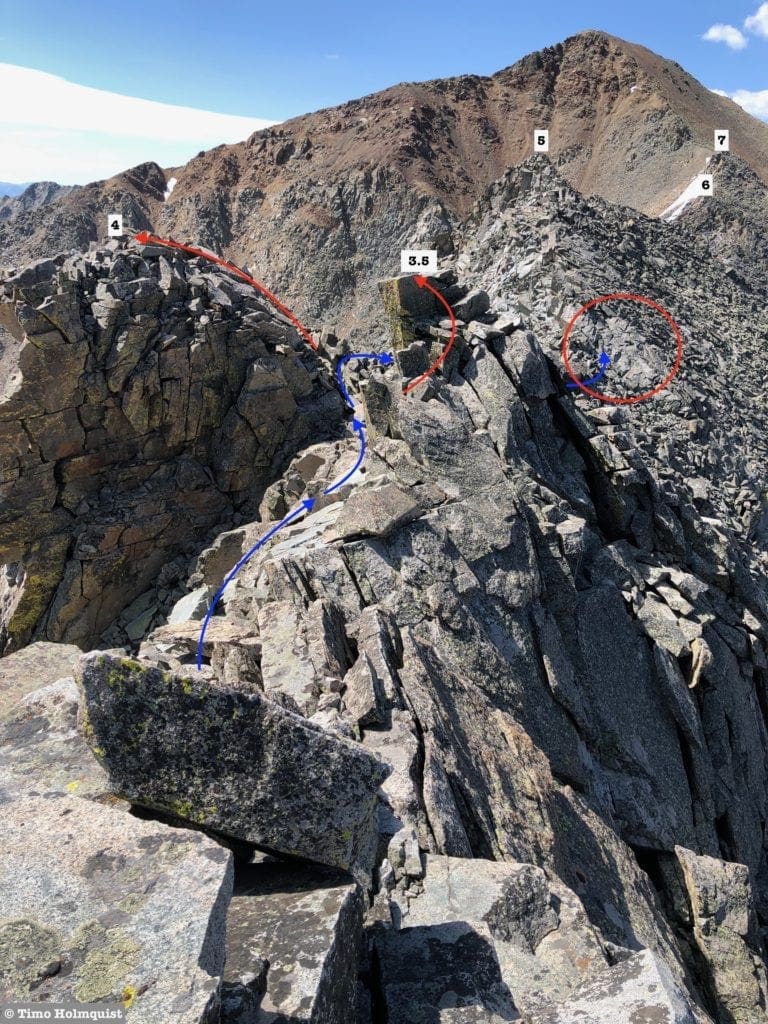
From the top of Bump 3. The red circle indicates a fun, optional slabby scramble.
Between Bump 4 and Bump 5, I found a set of slabby rocks with a central crack system. While never exceeding Class 3 (unless you want it to), it was a lot of fun to scramble up.
Class 3 slabs with multiple options and cracks to use.
Bump 5 had a few Class 3 moves to its abrupt summit but really had more scrambling options down the backside, which was a nice change of pace. Both of the rock faces straddling the little bit of leftover snow looked quite solid and could contain some airy Class 3-4 routes, with the trench in-between them acting as a bailout (see pic below).
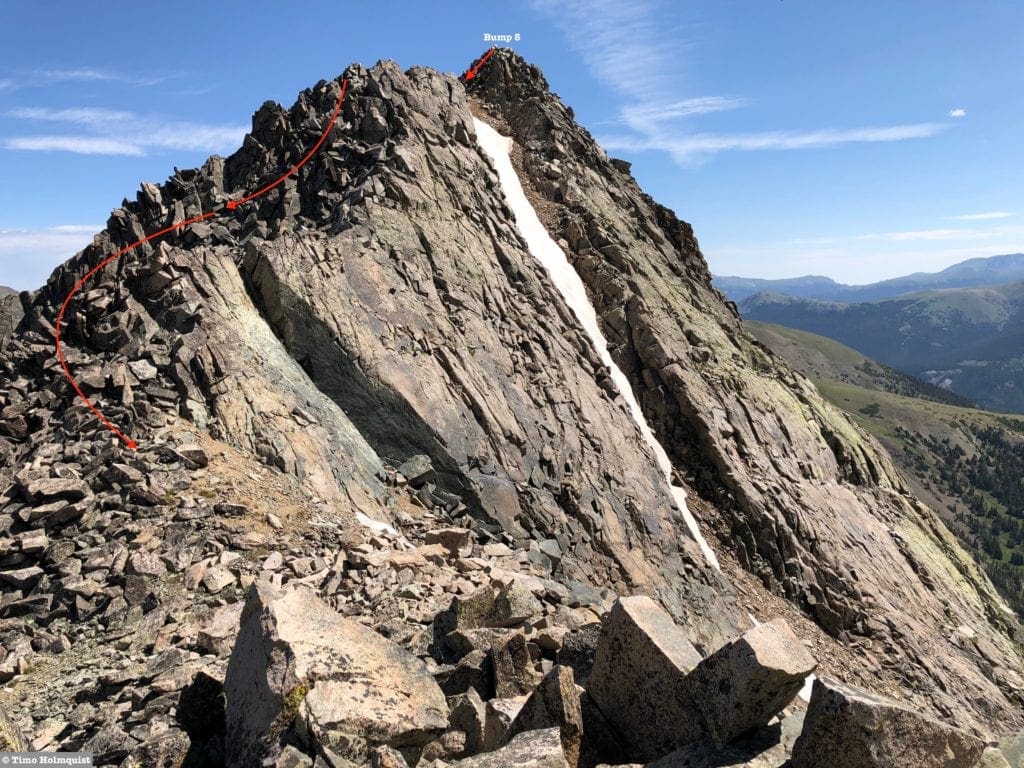
Looking back at Bump 5 after tagging it.
Bump 6 is an outlier on an otherwise upward trending part of the ridge culminating in Bump 7. It does have some brief vertical prominence but is very hard to pick out from the north until you are either standing on Bump 5 or already moving beyond it. If you’re traveling north from Cirrus, it’s invisible until you are essentially descending off of it. Despite its reclusive nature, Bump 6 contained my favorite scramble of Hart Ridge. Like all the previous bump scrambles, it wasn’t a long route, but it did contain the sturdiest rock available and made the long journey between Lead and Cirrus more interesting.
Advancing on Bump 6.
Bump 6 can be bypassed on the west, and you can have as little or as much of the sloped rocks as you want. If you choose to commit, there are many starting points that all funnel towards a series of sloping rocks with relatively few handholds but a nice, grippy surface when dry. There are maybe 3-5 Class 4 moves before the angle relents. Once it does, there is one additional feature I thought was particularly striking: a rock crevasse (a trench between two large sheets of rocks that falls away into darkness below you). A quick step over takes care of the problem, but it’s big enough to be something you don’t want to fall into.
The main face I scrambled up.
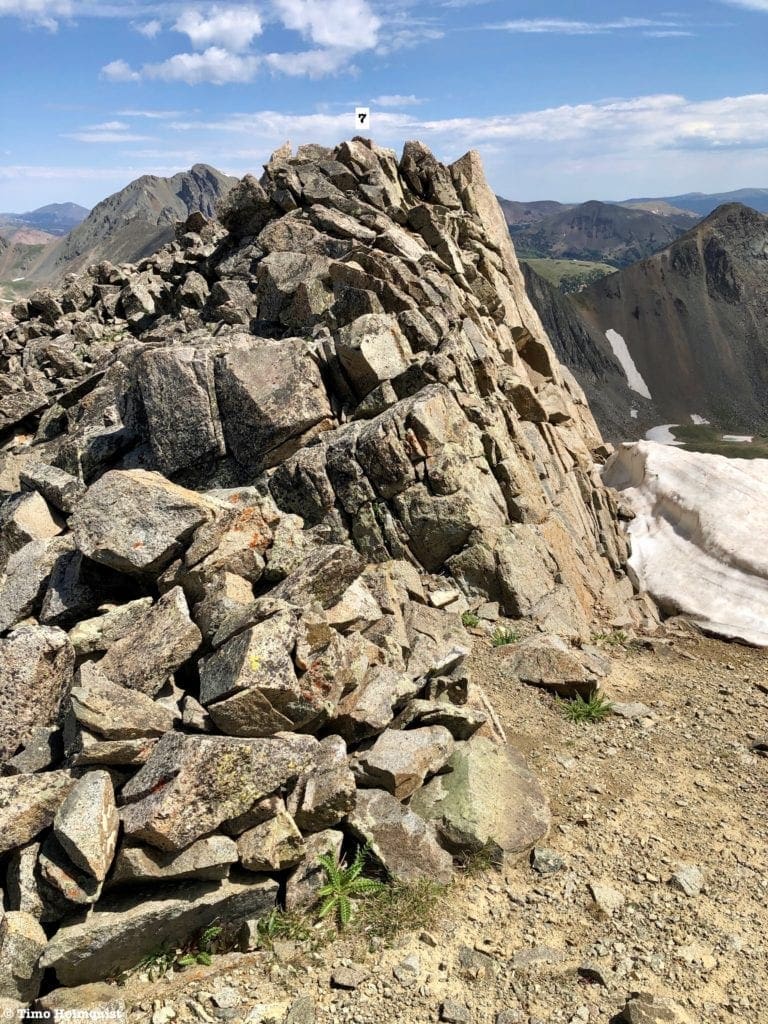
Since so many of the bumps can be bypassed, I doubt there will be many people interested in a bunch of random points along a mile-long ridge, but hey, they’re there if you want them. Beyond Bump 6 is another brief stretch of healthy alpine where I spotted some nice flowers. Bump 7 is not very prominent, and the few Class 2+ sections are more like skippable individual moves, but it is significant in that it marks the end of anything resembling stable rocks.
Looking back at all Hart Ridge bumps and Lead Mountain from Bump 7.
The end of the rock is fairly anticlimactic but obvious. Once you step off the backside of Bump 7, it’s back to sandy and loose. Based on rock quality, this felt like the end of Hart Ridge, but I can see arguments being made that it ends after Bump 5 since that was the last time you had to lose any noticeable elevation.
The end of ridgeline fun, RIP.
Luckily, the summit of Cirrus is not far, and you can take at least two different lines to reach it. Since I was close and could see an odd clump of stable(ish) looking rock near the ridge crest, I took as direct of a line as I could. By this route, it only took me a handful of minutes to reach the top of Cirrus. Alternatively, you can perform an ascending traverse west to a broad shoulder and then turn left up to the top. This option looked longer but less steep.
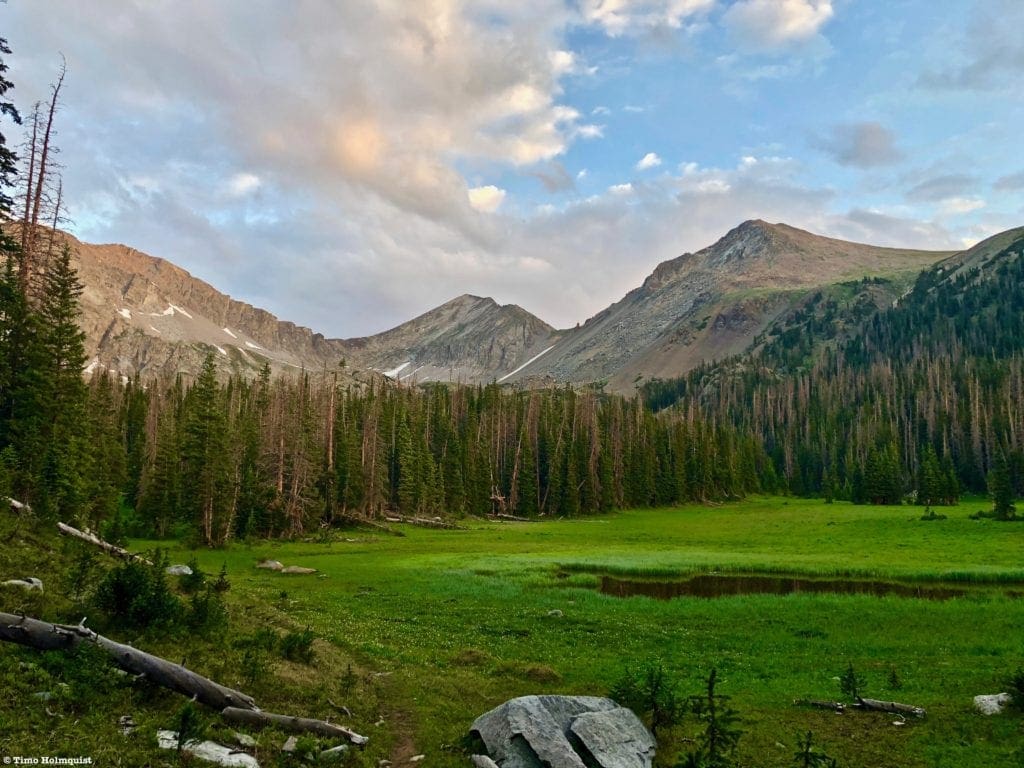
The view south toward Howard Mountain, which is the tallest peak to the left.
Take a well-deserved break and revel in the beautiful scenery all around you on your second (or possibly 3rd) summit of the day! If you want to make it a quartet, Howard Mountain is only 0.6 miles away and accessible via forgiving tundra instead of miserably loose rock. South of Howard, however, there’s no way to get to Cumulus, Nimbus, or Stratus without dealing with steep, loose, and dangerous rock. To quote nearly every single trail review of these mountains that I’ve read, “everything moves.”
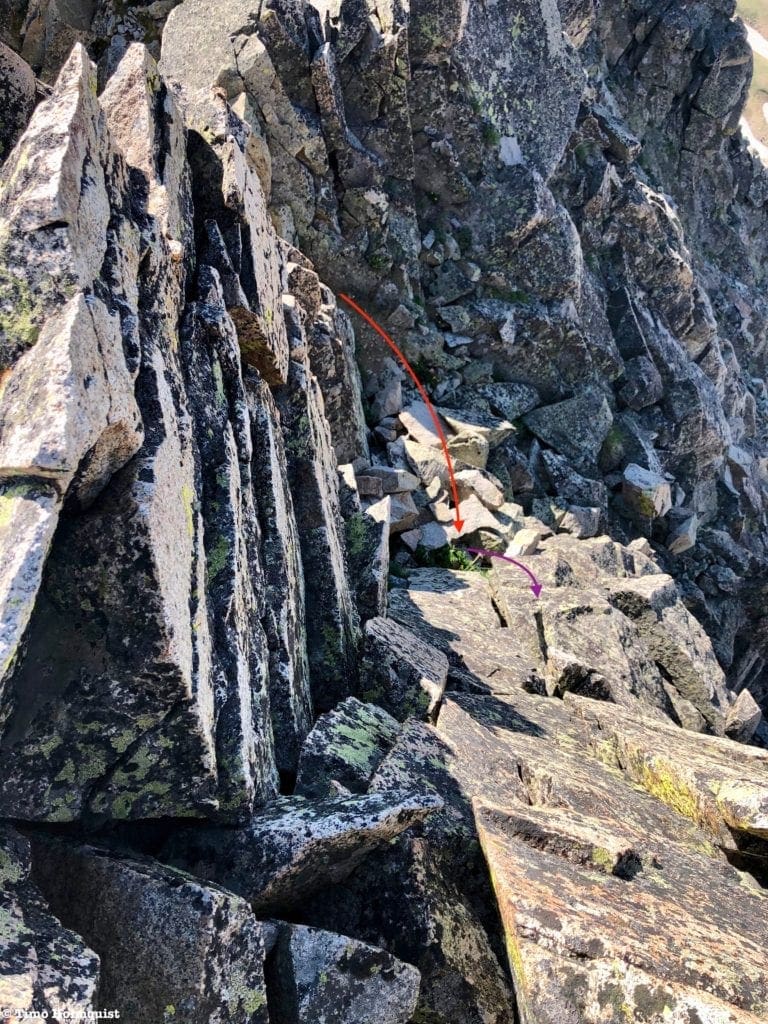
Whether or not you decide to tag Howard, the best way down is via the saddle between Cirrus and Howard. Conceptually it should be a simple descent into the pocket holding Lake of the Clouds, but, naturally, there are complications. A stubborn and impressively steep snowfield clings to the eastern side of the pass, blocking easier passage until late July or early August, depending on what kind of a winter the area had. Descending this pass in the snow is very dangerous and should only be attempted by those with crampons, mountaineering axes, and a helmet.
Stubborn snow blocks easy descent options.
Two rock ribs are the first part of the pass to dry out, and of the two, the north rib has the most agreeable descent options. The rock is generally loose and unstable but can provide good support when you need it to. I ventured down the middle rock rib, made it all the way to where the rocks hit unavoidable snow, and then awkwardly glissaded down the rest, which was difficult because the snowfield dumped me into another endless talus area. A mountaineering axe as a rudder (and knowing how to self-arrest in the snow) is very helpful if you plan to glissade; also, the top of the snowfield is nearly vertical, so you should descend past this lip before even thinking about glissading.
Lake of the Clouds, so close, so far…
By far, the easiest option is to give the pass more time to melt. A mid-August adventure date seems relatively safe. Having said that, without snow, the rocks on the pass are loose and equally as dangerous as the melting snow would be. Stagger your descent if you’re going with a group, and make sure to alternate descent patterns; no one should be descending directly above anyone else. This descent and the East Ridge of Lead Mountain are more than enough reasons to bring a helmet with you.
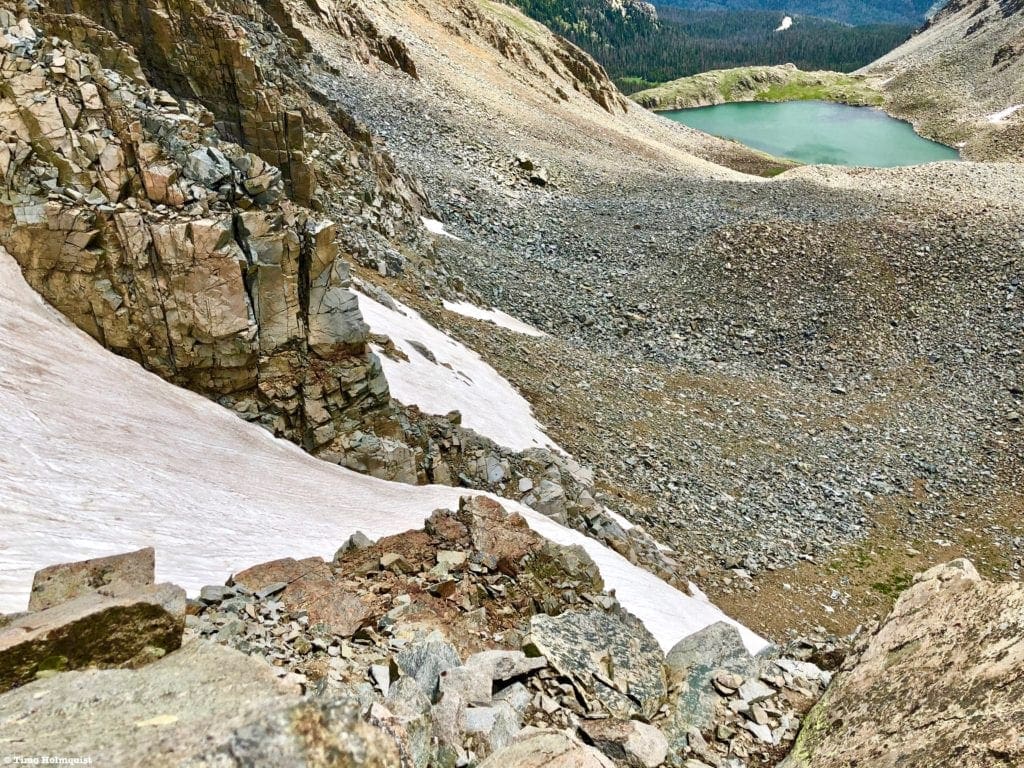
You might be wondering if there is an easier way off the pass when snow is present. The answer is…maybe? If you are incredibly proactive, you can take an eastern descent line from the summit of Cirrus, stay on a sub-ridge, and when you draw even with Lake of the Clouds, descend SE to its shores, making use of one of many rotten rock gullies. I did not try these variations, so I don’t know how much better they are, but one of the possibilities is visible from below the pass. It would NOT be obvious from above, so slow going and religious route finding would be mandatory to prevent unintentional cliff-outs. There are more possible gullies to the east and lower on the ridge.

Lots to consider when descending to Lake of the Clouds.
I’m of the impression that even bone-dry, this pass is simply not a fun descent. If you made it this far, chances are you can make it down ok, but it won’t be pleasant. A great way to scout this route is to bag a campsite at Dutch Town, scope the pass out one day, and then commit to the climb the following day. Could you do this loop hike backward? Yes, but if you’re here to scramble, the best way to scratch that itch is to ascend the East Ridge of Lead and descend to Lake of the Clouds.
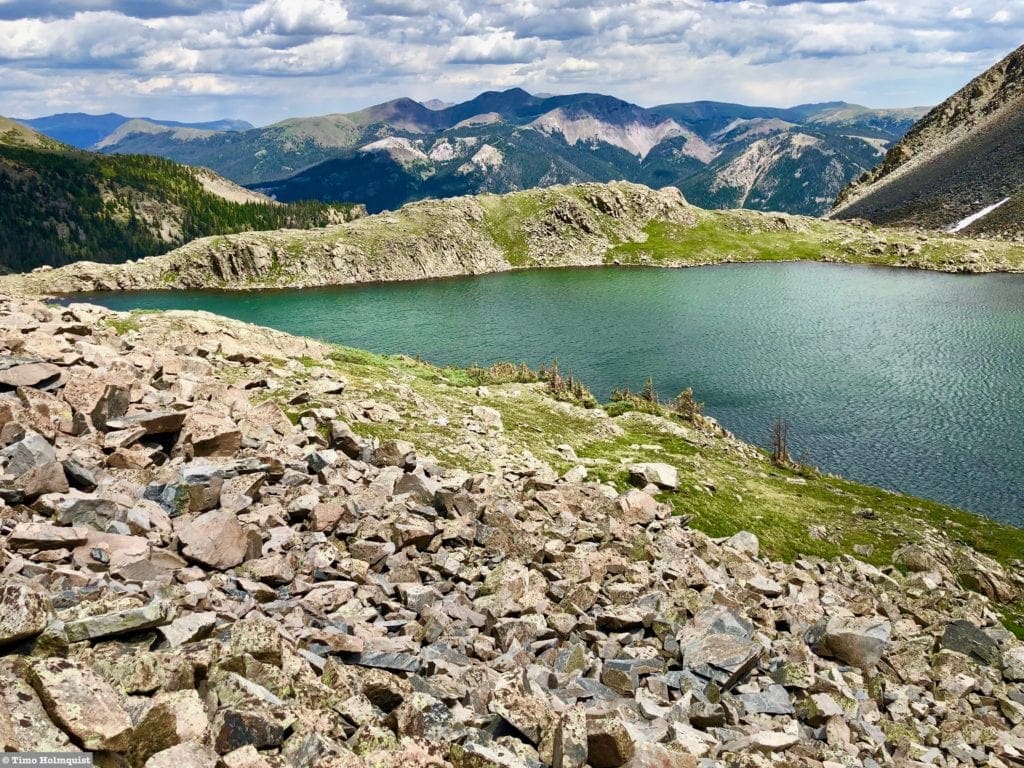
Ready for an alpine lake jump?
Lake of the Clouds is a perfect August lake jump when you finally make it down there. It is also a great destination on its own; check out our Lake of the Clouds review to see what goes into that.
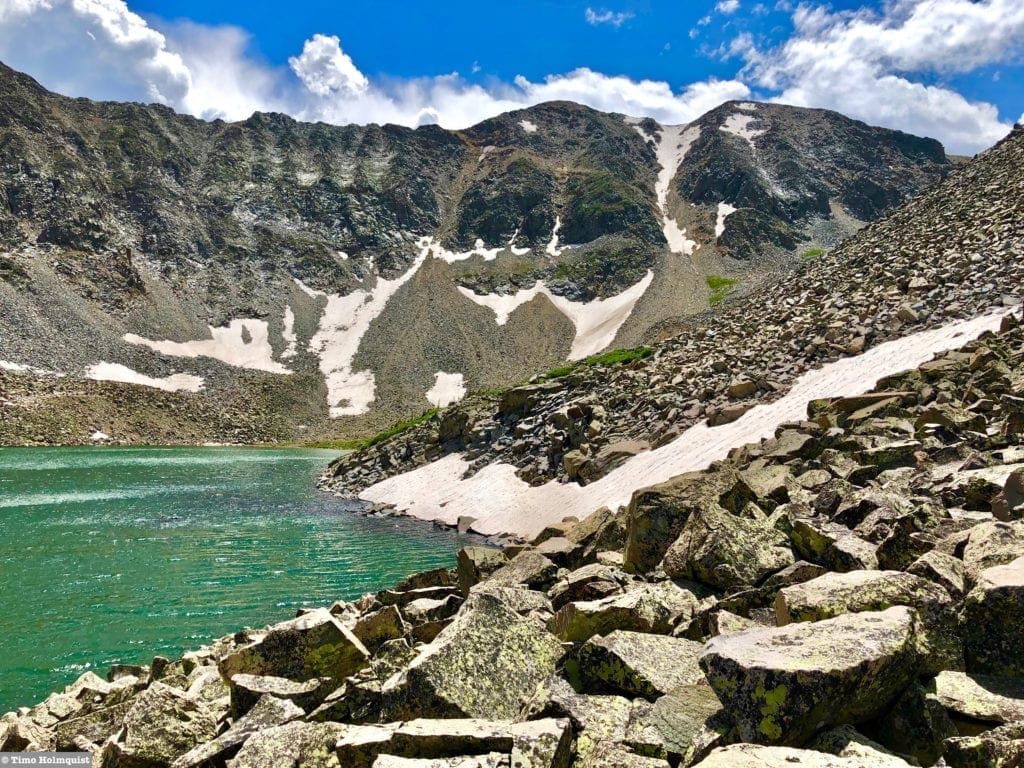
Howard Mt. behind the lake.
Once you’ve had your fill of the area, find the northernmost end of the lake. The outflow forms Big Dutch Creek, but the first part is underground. Descend on grass-filled ledges, bearing north until you can locate the creek as it pops above ground below some talus.
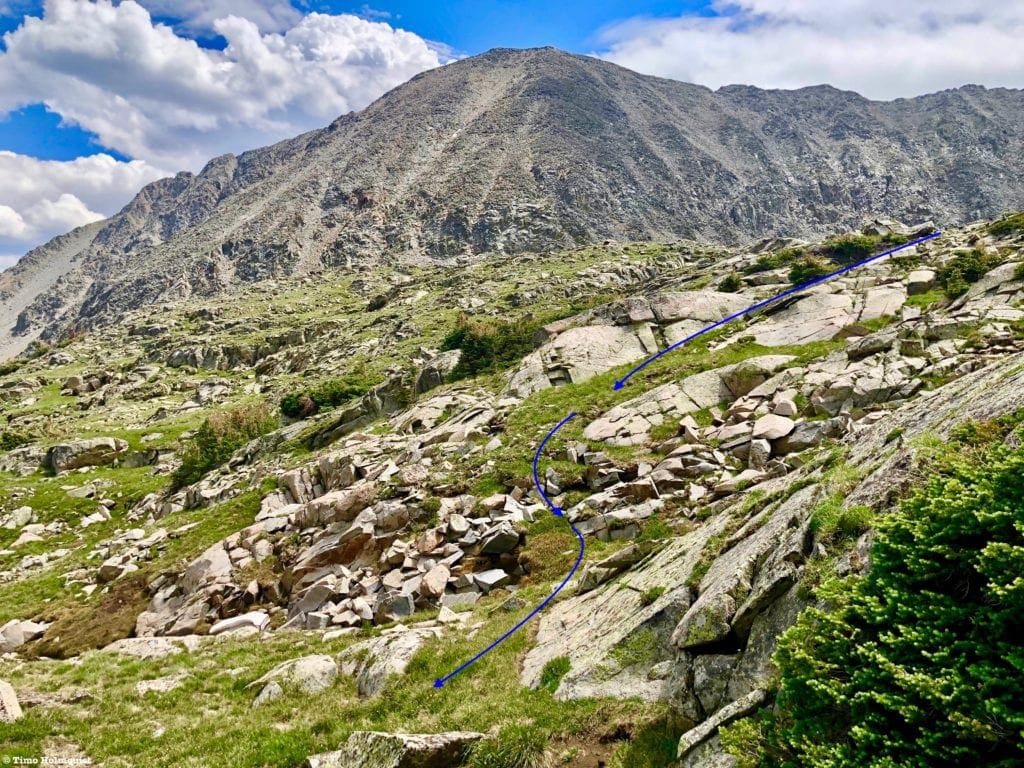
Beginning the descent from Lake of the Clouds.
Once you’ve located the creek, stay on its left-hand side, descending until a significant cliff blocks further passage. At that point, head right, finding a slanting ramp with a few Class 2+ moves. The ramp will take you eastward until you cross below a series of cascades on Big Dutch Creek. The creek will once again disappear beneath the talus so you can cross on dry rocks.
Descending to the ramp.
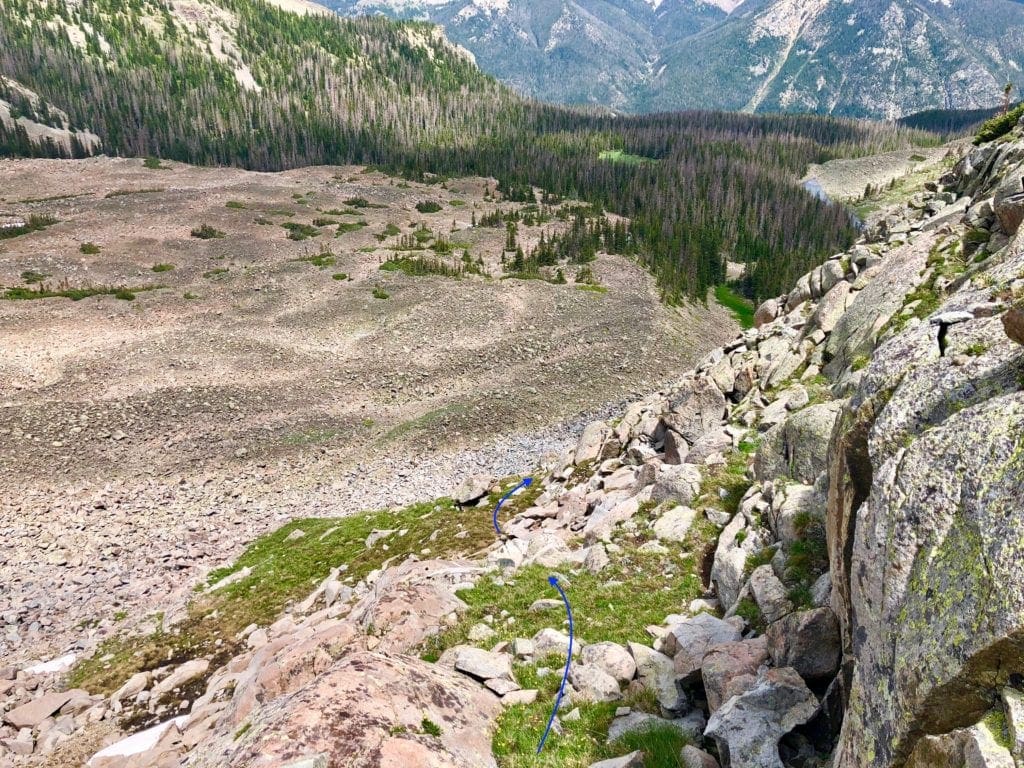
You’re now back on the giant talus field uphill from Dutch Town. There are three ways to get back to Hitchens Gulch Trail.
- You can hug the mountainside to the right, staying on slopes of oscillating talus until finding where Big Dutch Creek resurfaces. When it does, cross to the north and follow it, gently veering left (north) until intersecting the trail.
- Another method is to aim for a verdant stretch of grass growing overtop the buried creek. You’ll use a series of easily navigable open areas until Big Dutch Creek resurfaces and you are on its left (north) side. From there, parallel the creek downhill (east) and beyond a small lake. After the lake, head left (north) until either emerging at Dutch Town or back onto the trail.
- The last option is to retrace your ascent route as closely as possible. This option would have you traverse the talus field until finding its lowest leading edge. Once you do, drop back into the trees and head almost directly due east until running into a large meadow enclosed by Pine Trees. The trail picks up on the meadows right-hand side, where you can follow it back to the Grand Ditch.
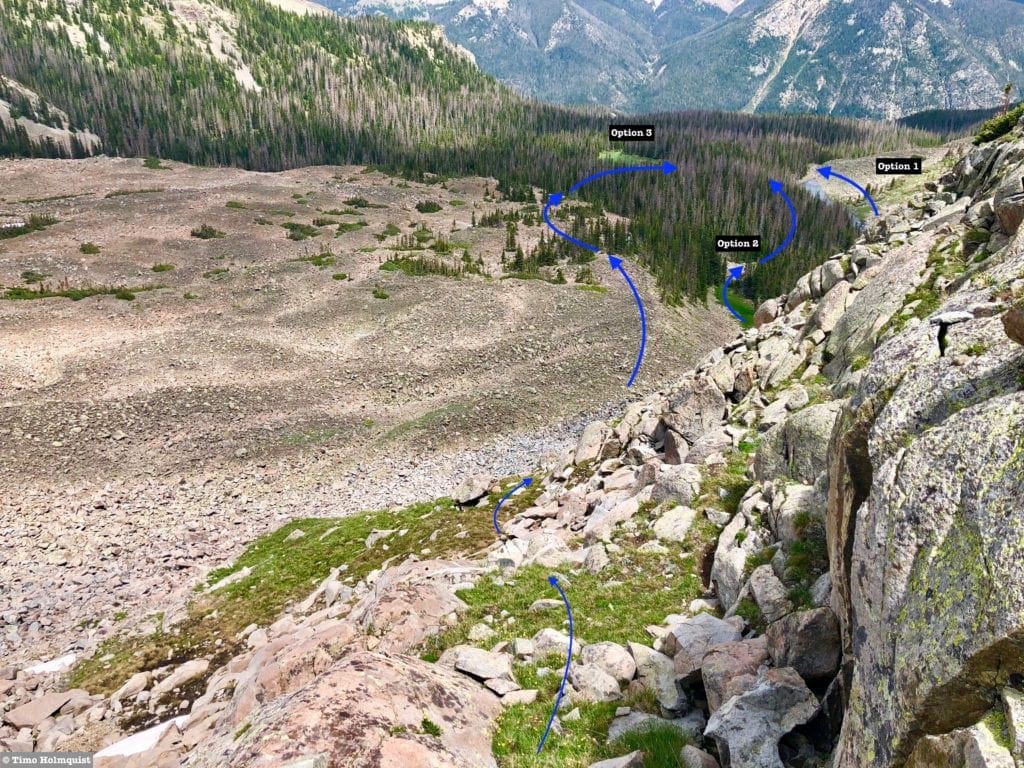
Illustrated descent options.
Once you’re back on the Grand Ditch, it’s a quick 1.75 miles south to the Red Mountain Trail, another 2.8 miles to the Colorado River Trail, and then a right turn and 0.4 miles back to your car.
Final Thoughts:
The Never Summers are usually reserved for those trying to traverse the cloud named peaks (Cirrus, Cumulus, Nimbus, and Stratus), tag every named feature in the Park, or scamper up to Lake of the Clouds. Generally speaking, when you start listing off the greatest trails and mountains in Rocky Mountain National Park, the Never Summers are often left out of the conversation. In relation to about 80 percent of the range, I agree that they fall short of some of the more iconic destinations nearby. However, the East Ridge of Lead Mountain is a stellar and repeatable scramble that lifts any Never Summer adventure. I had a delirious amount of fun ascending this way, to echo many trip reports, only wish that it was longer.
In all likelihood, despite my glowing impression of the East Ridge, this loop will remain most appealing to a select number of mountain masochists due to its overall length, loose rock, remote setting, and time-limited scrambling season (~August-mid October).
One last look back at Lead Mountain from the slopes below Lake of the Clouds.
Sources and Acknowledgments:
I am far from the first person to accomplish this ridge scramble, and I used a few stellar trip reports and additional resources to get stoked on the adventure. They are listed below in alphabetical order.
A Climber’s Glossary (quoted from The High Sierra; Peaks, Passes and Trails by R.J. Secor). (n.d.) Retrieved from https://climber.org/data/glossary.html
Foster, L. Rocky Mountain National Park: The Complete Hiking Guide. (2005). Westcliffe Publishers, Inc.
Hikingrmnp.org (Excellent blog from someone who, like Lisa Foster, has touched every named feature in Rocky Mountain National Park).
Knapp, S. (Sept. 5, 2011). Never Summer Traverse-Rocky Mountain National Park. Retrieved from https://www.14ers.com/php14ers/tripreport.php?trip=10934
Smudge. (n.d.) East Ridge (Lead Mountain). Retrieved from https://www.summitpost.org/east-ridge/166788
Sarnelli, D. (Sept 1, 2014). Traversing the Clouds in the Never Summer Mountains. Retrieved from https://basecampcolorado.com/2014/09/01/traversing-the-clouds-in-the-never-summer-mountains/
Popular Articles:
- Guide to the Best Hiking Trails in Rocky Mountain National Park, Colorado
- The Dyrt: The 10 Best Campgrounds In Colorado
- Top Adventure Sports Towns 2021: Boulder, Colorado
- Epic Adventures with the Best Guides In Colorado
- Sky Pond via Glacier Gorge Trail, Rocky Mountain National Park, Colorado
- Scrambling Hallett Peak’s East Ridge, Rocky Mountain National Park, Colorado
- Scrambling Mt. Alice via the Hourglass Ridge, Rocky Mountain National Park, Colorado
- Gorge Lakes Rim Scramble, Rocky Mountain National Park, Colorado
- Black Lake Via Glacier Gorge Trail, Rocky Mountain National Park, Colorado
- Scrambling To The Lake Of The Clouds, Rocky Mountain National Park, Colorado

Skyblue Overland Strongly Recommends That You Enroll With Global Rescue Prior To Embarking On Your Next Adventure.
With more people outside now more than ever, Global Rescue expanded services to include field rescue within 100 miles of home. With Local Field Rescue — automatically included in any travel protection services membership — Global Rescue is there whether you’re hiking, kayaking, snowmobiling, fishing or simply enjoying the outdoors and get ill or injured and you’re unable to get to safety on your own. Purchase a Global Rescue membership for your next adventure and travel with peace of mind. Single trip, annual and family options are available.
Terms of Use:
As with each guide published on SKYBLUEOVERLAND.com, should you choose to this route, do so at your own risk. Prior to setting out check current local weather, conditions, and land/road closures. While taking a trail, obey all public and private land use restrictions and rules, carry proper safety and navigational equipment, and of course, follow the #leavenotrace guidelines. The information found herein is simply a planning resource to be used as a point of inspiration in conjunction with your own due-diligence. In spite of the fact that this route, associated GPS track (GPX and maps), and all route guidelines were prepared under diligent research by the specified contributor and/or contributors, the accuracy of such and judgement of the author is not guaranteed. SKYBLUE OVERLAND LLC, its partners, associates, and contributors are in no way liable for personal injury, damage to personal property, or any other such situation that might happen to individuals following this route.


