


High Point:
13,395 feet

Total Ascent:
~3181 feet (~3,800 if including Niwot Ridge)

Difficulty:
Hard

Distance:
8.82 miles for out and back (~11 miles for Niwot Ridge Loop)

Waypoints:
40.08262, -105.53981

Route Type:
Loop or out and back
The Indian Peaks offer amazing scrambling. Navajo Peak, with its airplane wreck and incredible views, is one of my top five for the eastern Indian Peaks. Explore the eastern side of the wilderness for ridge scrambles and peaks before heading west for more remote and spectacular mountain opportunities.
Overview:
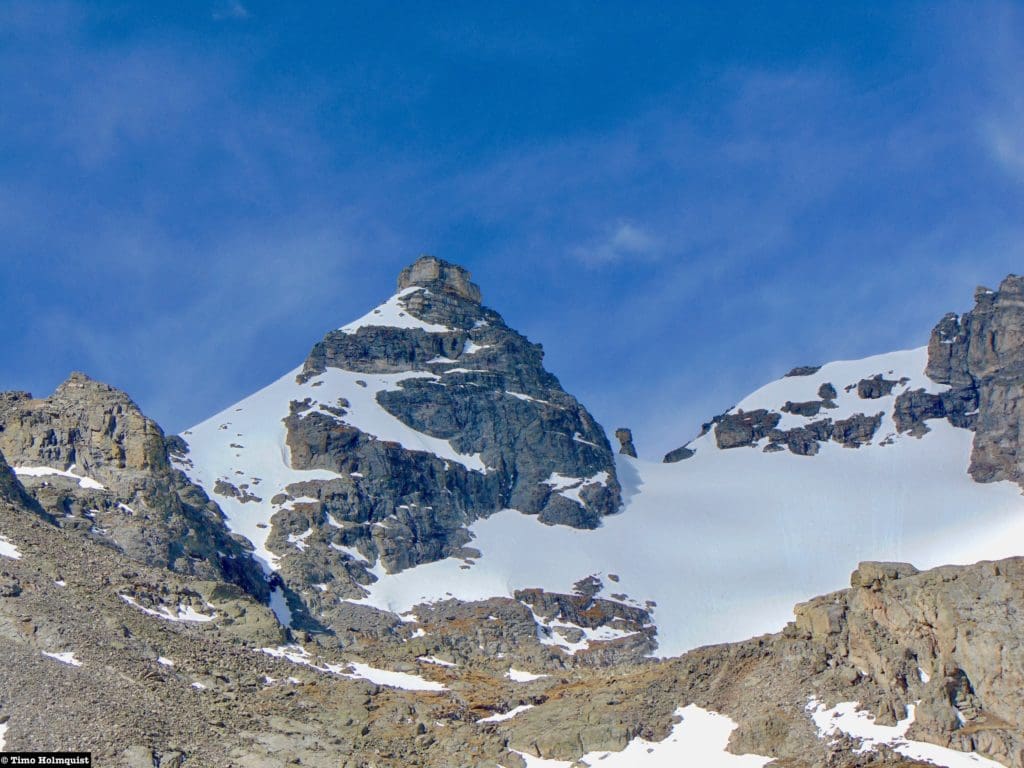
Navajo Peak is a beautiful and instantly recognizable mountain. If you’ve ever used Brainard Recreation Area to get into the Indian Peaks, chances are you’ve already seen it. The mountain is also visible from many places in Wild Basin, including from the summit of Mt. Alice, which you can read about here. The top has a very conical profile; it’s almost impossible to miss from Lake Isabelle and Isabelle Glacier and only gets more dramatic the closer you get to it. There are numerous routes up it, each worth a report on its own. Ascending the steep and loose Class 2+ Airplane Gully is the easiest, though great Class 3 scrambling exists on Niwot Ridge to the east; going up one and down the other is a great way to experience the mountain. It can also be combined with Apache, but that will bump the route options up to Class 4.
- Airplane Gully (not the summit block): Class 2+
- SE Chimney: Class 3+
- Niwot Ridge: Class 3
Navajo Peak from below with Navajo “glacier” to its right.
Table of Contents:
Article Navigation: Click on any of the listed items in the table of contents below to jump to that section of the article. Similarly, clicking on any large, white section header will jump you back to the Table of Contents.
- Overview
- Scales and Criteria
- Directions to Trailhead
- Places to Stay
- Field Notes
- Journal
- Final Thoughts
Scales and Criteria:
This article utilizes three separate rating systems: Difficulty, Popularity, and a Scramble Rating indicating the hardest move or set of moves encountered. The scramble rating employs the Yosemite Decimal System. By the easiest routes, Tanima Peak is a Class 2+ hike, while the Cleaver retains a solid Class 3 rating regardless of how you scale it.
Difficulty Ratings:
- Easy: less than 5 miles, less than 500 ft. of elevation gain
- Moderate: 5-10 miles, 500-2000 ft of elevation gain
- Hard: 5-15 miles, more than 2000 ft. of elevation gain
- Very Hard: 10+ miles, more than 3,500 ft. of elevation gain
Popularity Ratings:
- Low: Large sections of trail all to yourself
- Moderate: Sizeable trail sections to yourself, crowding possible on busy summer weekends
- High: You’ll be seeing people, still a chance for solitude in spring/fall/winter.
- Very High: Almost always busy.
Scramble Rating:
- Class 1: Established hiking trail the entire length of the adventure. Low chance for injury.
- Class 2: Typically involves cross-country navigation, possibly using hands for balance but not required, steeper than Class 1.
- Class 3: Hands and feet used to scale areas, must use hands to proceed (either for balance or to help pull you up a section), increased exposure, a fall could be fatal. Helmet recommended, along with grippy hikers.
- Class 4: Climbing on very steep terrain just shy of vertical, falls could be fatal, hands employed for grip and balance continuously, ropes advisable but scalable without. Helmets are highly recommended, along with grippy hikers.
- Class 5-5.4: Near vertical and vertical climbing that involves technical rock-climbing moves, exposed, falls likely to be serious or fatal, possible to scale without ropes but only for very experienced veterans. Helmets, grippy hikers, and/or rock-climbing shoes necessary.
- Class 5.5 and up: Not covered as scrambling, full-on rock climbing with ropes, helmets, etc.
The YDS system is widely used in North America but can be quite subjective, so it is not perfect. The biggest differences I’ve encountered between Class 3 and Class 4 sections have to do with slope angle, exposure, and putting weight and pressure on hand grips (4) instead of using hands and feet interchangeably as supporting points of contact (3). It is not possible to climb a Class 4 section without using your hands to pull up some or all of your body weight. Typically, a Class 4 section will also require some type of rock-climbing move, like stemming, where hands or feet are pressed in opposition as if climbing the inside of a chimney. If downclimbing, a key difference is that most people will descend a Class 4 section facing inward, i.e., your back faces the exposure.
Looking north from the slopes of Navajo Peak with North Arapaho Peak (the tallest in the Indian Peaks) front and center.
The Ultimate Offline GPS Hiking & Ski Maps
See why onX Backcountry is the ultimate GPS navigation app for your outdoor pursuits. Try Today for Free. No credit card required.
Directions to Trailhead:
Brainard Recreation Area is the most popular access point for the eastern Indian Peaks. The road to the trailhead is paved, and the area is stunningly beautiful. It can, however, get very crowded. Arriving early is key.
The area is pay-to-play, and the current cost for day parking a personal vehicle is $12.00. Brainard Gateway Trailhead is free but will add a total of five miles to any mountain objective. Interagency passes like the America the Beautiful recreation pass will work. However, if you arrive after 5 AM, an additional timeslot reservation (similar to the National Park) will be required for entrance. You can find out about all this information by visiting the national forest website here. IF you have a pass AND arrive before 5 AM, you still have to print a timeslot for 5-8 AM ($2) and display it on your windshield, along with the entrance pass.
To get to Brainard Lake Recreation area from downtown Boulder, head north on Broadway and take a left onto Lee Hill Drive. From Denver, take US36 to Boulder, which will eventually turn into 28th street. Follow 28th north (be careful, lots of red-light cameras, the yellow lights in Boulder only last for three seconds), and then take a left on Lee Hill Drive.
Continue west into the foothills until coming to an intersection between Lee Hill Drive and Olde Stage Road. Either road works, Lee Hill is faster but windier as it traverses many hilltops, Olde Stage is a couple minutes longer but much easier to drive. In both cases, you’ll eventually take a left on Lefthand Canyon Road when you come to it. Lefthand Canyon Road will continue west. If you took Olde Stage Road to Left-hand, make sure to take an additional left once you’re in Lefthand Canyon to stay on course (there are obvious signs near the intersection). Continuing straight will take you up James Canyon. Lee Hill Drive avoids this intersection; you’ll just take a left on Lefthand Canyon at the end of the road and motor up to Ward.
Once you make it to the tiny town of Ward, slow down, and pass through the couple dozen buildings, being cognizant of the 25-mph speed limit. Beyond Ward, the road loops up a steep slope and dead ends into CO119. Take a quick right, followed by an almost immediate left to access Brainard Lake. Drive this road up to the entrance station, and continue to the Long Lake parking area to begin your hike.
From the Estes Park area, take 119 south beyond Allenspark, then take a right to stay on 119 instead of taking US7 down to Lyons. You’ll be following signs for Nederland, and Peaceful Valley. As you wind south towards Nederland pay attention to signs for Brainard Lake; the turn will be on your right.
The directions from Boulder and Denver may sound complicated, but google maps will do the heavy lifting for you, and it really is the fastest way to get there. Unless you live right at the entrance to Boulder Canyon, taking that up to Ned and going north to Brainard takes longer.
Navajo Peak from the alpine near Shoshoni Peak, Apache Peak is the taller summit to the right.
Places to Stay:
Camping at Brainard is limited to Pawnee Campground and backcountry sites. You can find out more about backcountry sites here. Here is another link to the backcountry zones map.
There are a number of other nearby camping options including:
- Olive Ridge Campground in Roosevelt National Forest is north of Brainard. ~$20 for a standard nonelectric site.
- Ceran St. Vrain Trail Dispersed Camping ($1)
- County Road 47. Users have reported trash and ATV noise at this location, but it is free.
- Meeker Park Overflow Campground
Estes Park, Allenspark, Lyons, Nederland, Boulder, Fort Collins, Longmont and even parts of Denver are less than an hour away and have multiple lodging options available.
Niwot Ridge and Navajo Peak from the Pawnee Pass Trail.
Field Notes:
Navajo Peak represents the best in Indian Peaks scrambling. There are a handful of fantastic Class 3 and 4 routes, the peak is absolutely eye-catching, and depending on your route, you can rope in additional scrambling on Niwot Ridge. Perhaps the most intriguing historical component to the Peak is the airplane wreckage sitting on Navajo’s slopes at 12,900 ft.
This is not an introductory scramble. People have died on this mountain before. Is it the toughest mountain out there? No, but the exposure is substantial, snow lingers until mid-late July, and the rocky terrain is time-consuming to traverse across. Come prepared for a full day of alpine adventuring and scrambling.
With over 3,000 peaks in Colorado breaching 11,000 feet, it can be hard to pick and choose ones to climb. There are, however, mountains whose profiles never fail to capture the imaginations of any hiker lucky enough to see them. If you were wanting to scale the most iconic Front Range mountains north of Denver: Navajo, James, Apache, North Arapaho, Lone Eagle, Longs, McHenry’s Peak, and Mt. Alice via the Hourglass Ridge would almost always make the list.
Weather is, of course, a huge deciding factor when thinking about hiking. If Navajo Peak is your target, start with the Brainard Lake forecast. Mt. Toll also has a forecast and provides a nice comparison piece with Brainard. To complete your weather triangulation, use the Opensummit Navajo Peak forecast. It’s important to use different sources, so you have a better understanding of what is most likely to happen. Don’t rely on one forecast because the rain chances are less than another. Use multiple forecasts and average them out. Always check the weather forecast up until the minute you leave, mountain weather changes and alpine thunderstorms are very dangerous.
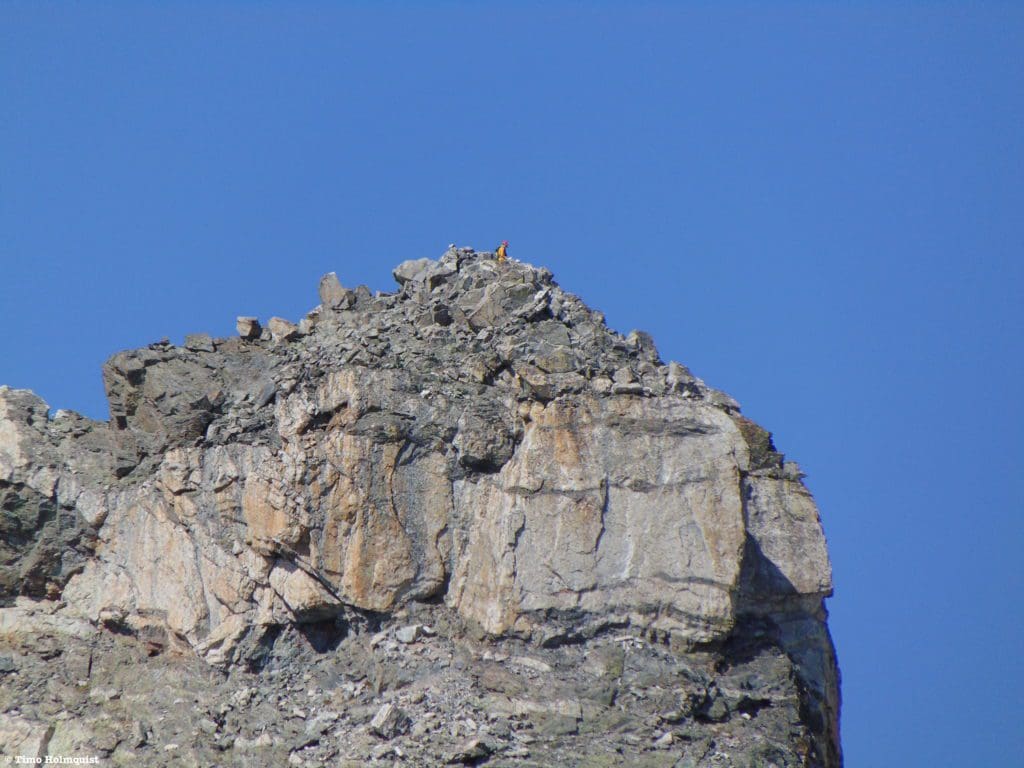
Climbers on the dramatic and picturesque summit of Navajo Peak.
Journal:
This review will describe a route to Navajo via the Airplane Gully with a descent of Niwot Ridge. The loop can be reversed and combined with other variations as well. The Airplane Gully, while not the most aesthetically pleasing ascent route, does contain substantial airplane wreckage, which is both unique and eerie.
Once you park at Long Lake Trailhead (see Directions to Trailhead section above for parking information at Brainard), find the trailhead and proceed west. The first part of the trail will advance briefly to the banks of South St. Vrain Creek, pass the Indian Peaks Wilderness sign, and traverse the north side of Long Lake. At 1.1 miles, you’ll run into a trail junction, take a right to continue to Lake Isabelle. The trail will climb much more aggressively as it makes its way up to Lake Isabelle, but it’s not a long section.
Once you reach the Pawnee Pass trail junction, take a left to Lake Isabelle. The trail will head to the right or north side of the lake.
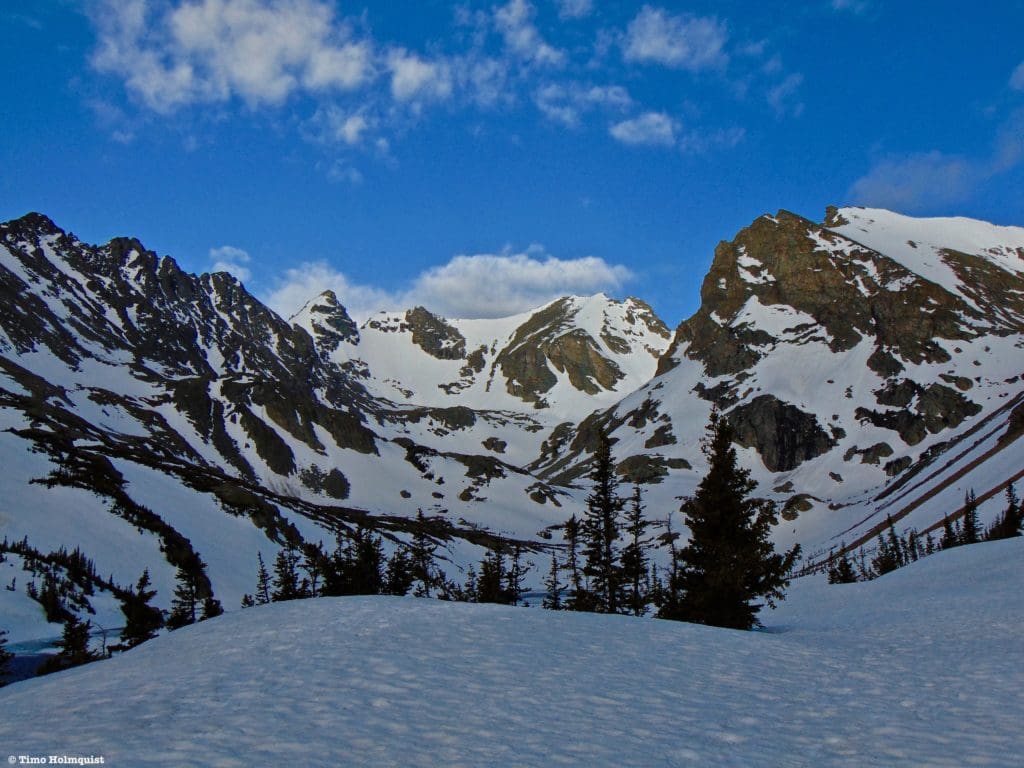
Impressively, this is what the Indian Peaks looks like in early June from just above Lake Isabelle. Navajo Peak already commands the skyline with its unique summit profile.
Continue around the lake until the alpine takes over. Once the trees break, the trail will thread its way into a higher basin with the cliffs of Mt. Shoshoni on your right and the ever-visible Navajo Peak drawing closer. You’ll pass an unnamed tarn where the route to Isabelle Glacier takes off to the right.
This tarn is in what I would consider to be the start of the higher basin. It is surrounded on all sides by steeper slopes, many of which lead to an upper shelf, from which you can access the rest of the Airplane Gully route. The first challenge is getting to the upper shelf while maintaining a West-Southwest trajectory.
One option is to climb up to the glacier (which follows an easily identifiable trail with switchbacks), traverse west, and then cut south across the higher shelf to get to the base of Airplane Gully. This is a longer option, but orientation is simpler than picking your own path from the unnamed tarn up to the higher bench. If you’re choosing your own path, climb a talus slope to your southwest with Navajo Peaks summit poking out behind it. Both are workable, and once you get high enough, it’s impossible to ignore Navajo’s summit anyway. In all scenarios, there are multiple options to ascend to the higher shelf.

From the summit of Navajo, looking down at your route options from the Unnamed Tarn.
By whatever method you choose, reach the higher shelf underneath Navajo Peak and stare at your objective. Airplane Gully is actually east of the iconic summit cone but still provides the easiest way to ascend.
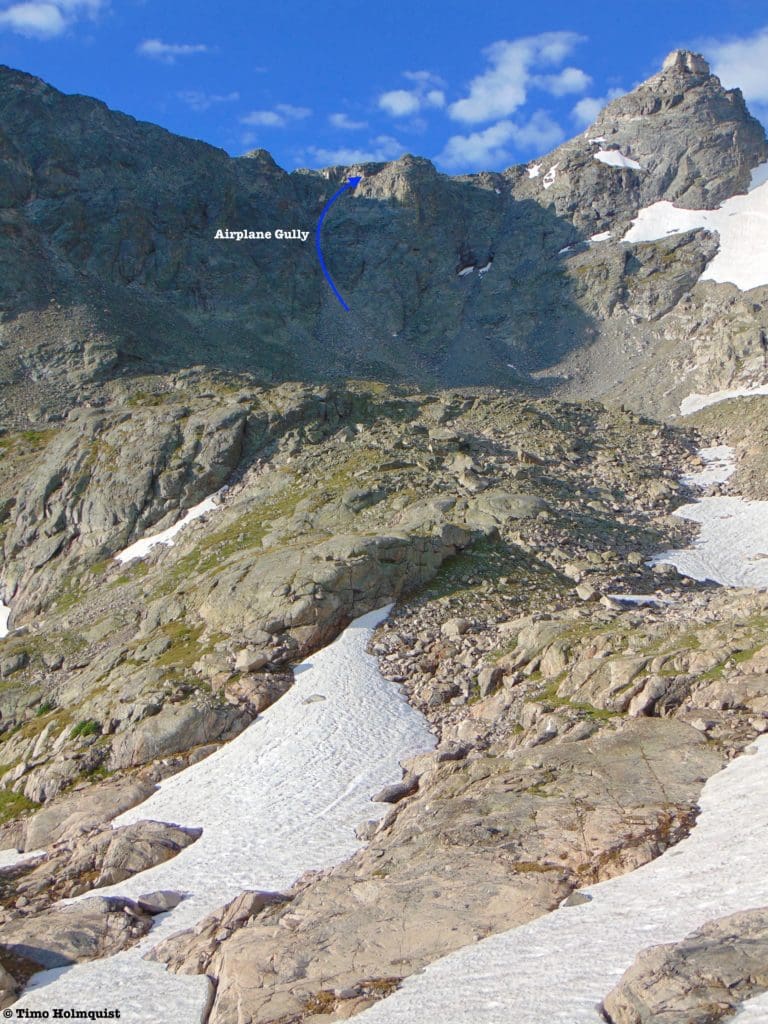
Airplane Gully in relation to the summit.
Make your way to the bottom of the gully, where the rock quality takes a nosedive. As you advance, you may be tempted to find any other way of ascending, but, despite the loose rock, the gully is by far the simplest way up. When the solid rock slabs of the higher bench begin shifting over to talus, slow your pace and prepare for rock hopping.
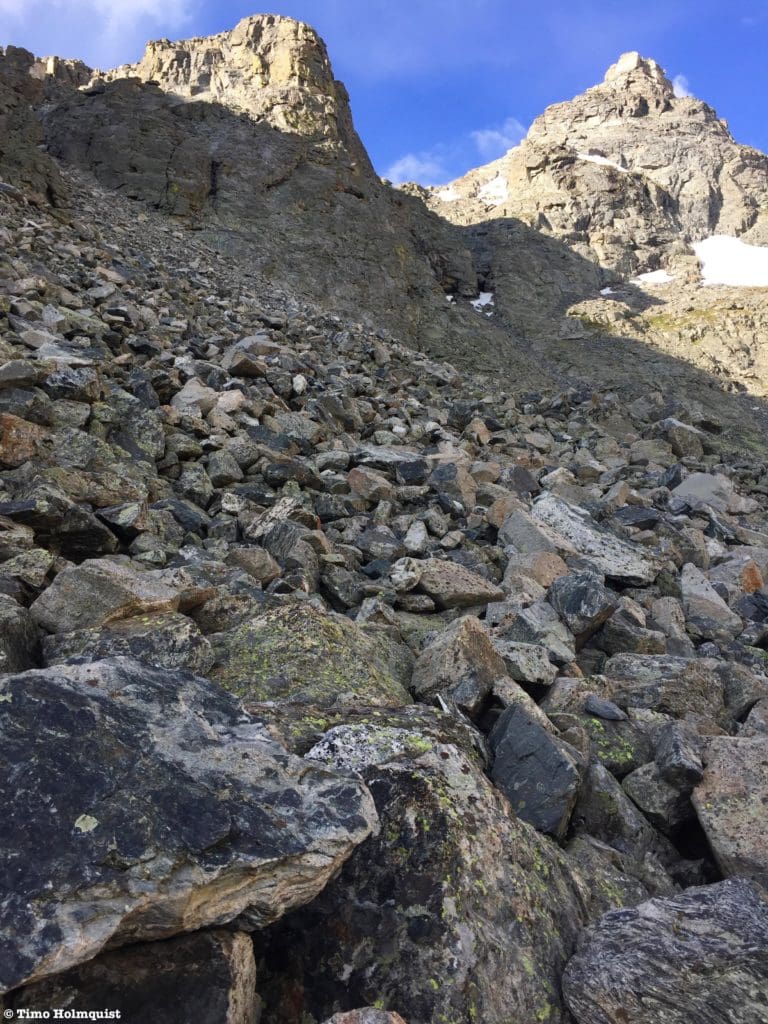
Loose talus as you approach the gully.
It isn’t until you get close to the gully that you’ll begin spying pieces of the plane. I actually passed right by a piece and didn’t notice it until pausing to look behind me at the shifting mountainscape.
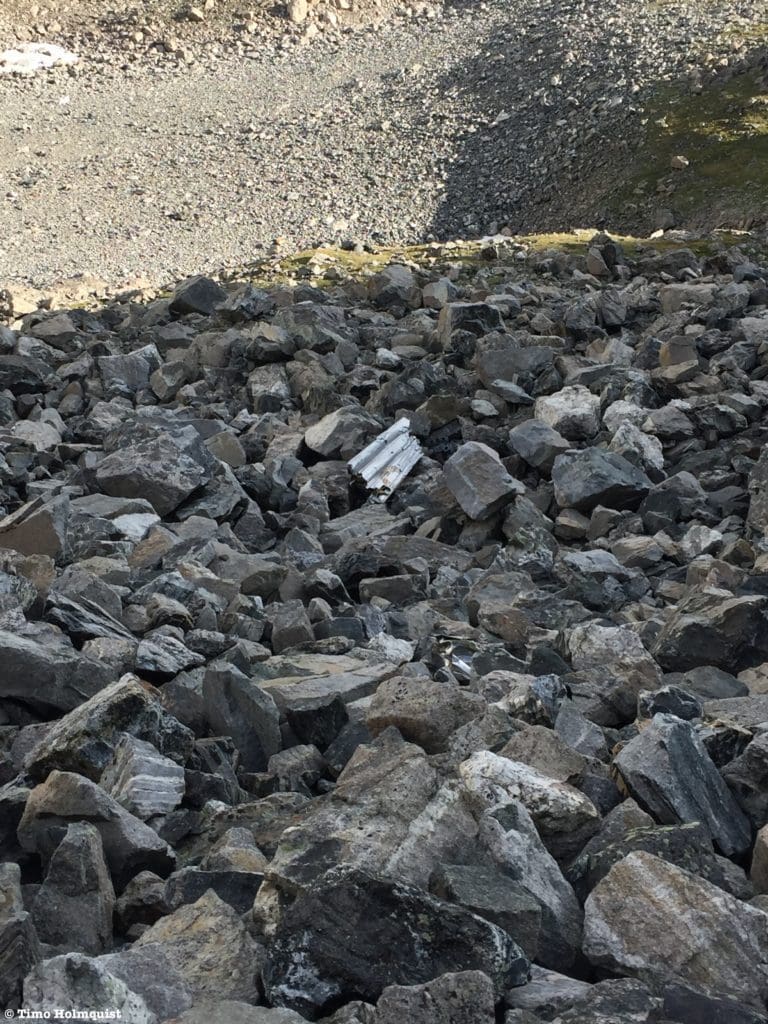
The first piece of the wreck that I saw.
There are a few other pieces scattered about, but they pale in comparison to the main fuselage. Keep in mind that there is a significant amount of loose terrain between you and the wreck. Scout out a path of least resistance, remembering that off-kilter traversing is less stable than picking an ascent line and weaving your way higher. The wreck is in a right angling chute of the main gully, but since it curves towards the summit, it makes sense to go past it. You will absolutely know when you reach the main “airplane.”
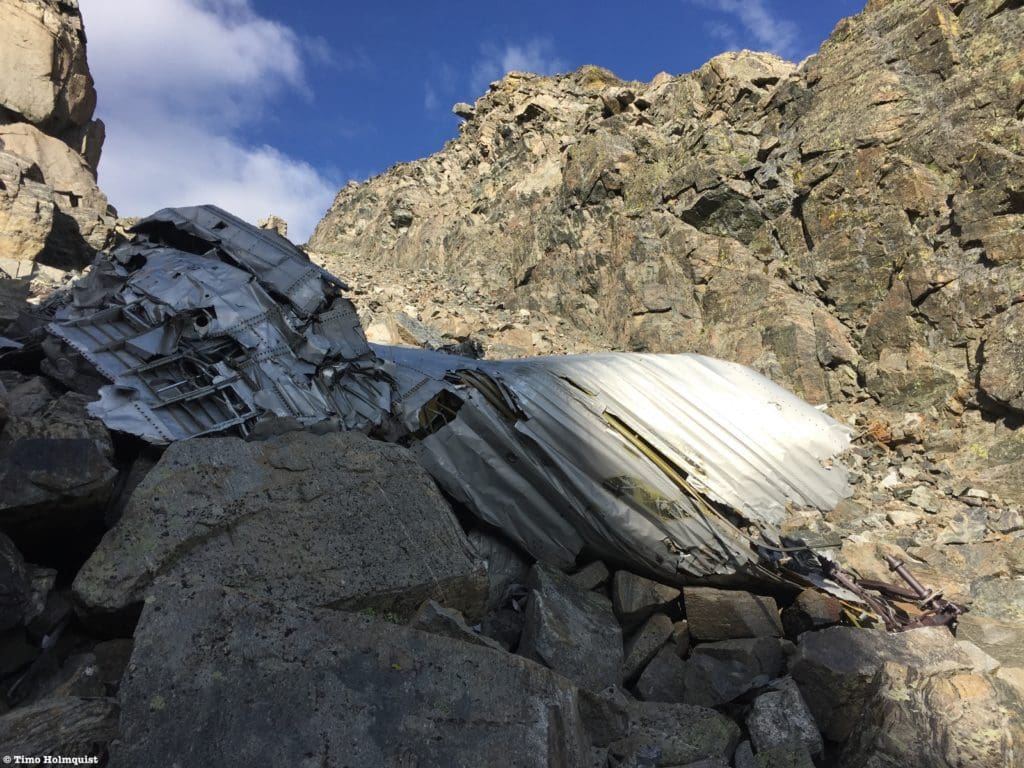
The fuselage from below.
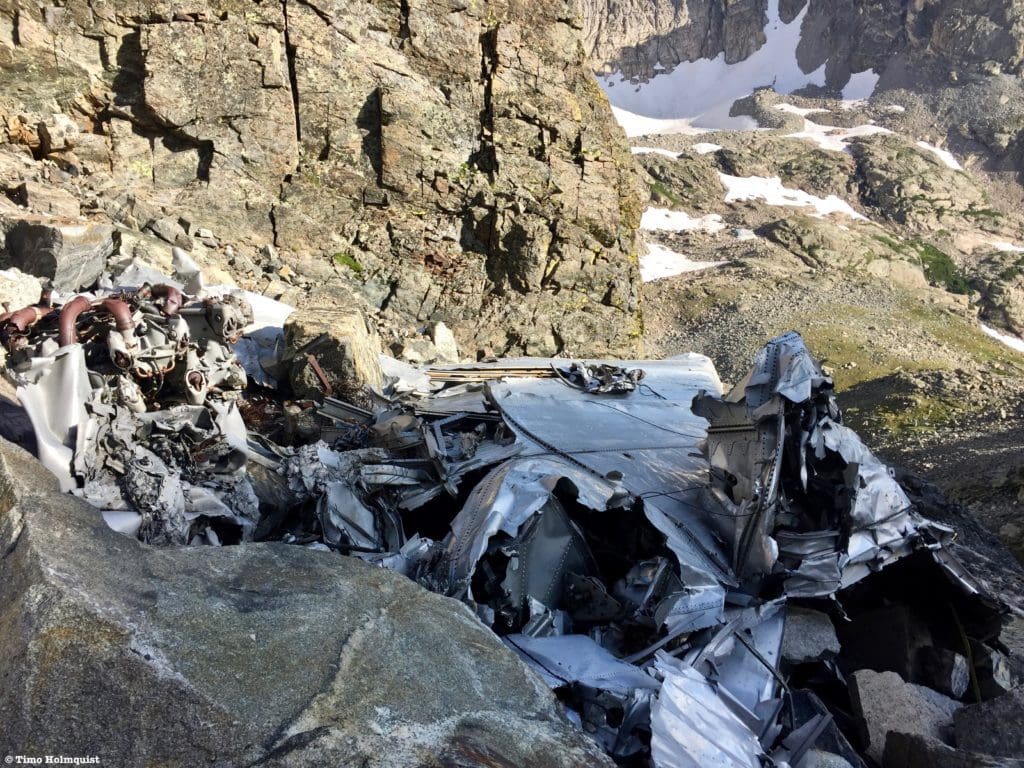
The fuselage from above.
I was curious about the crash and did some research. According to the Aviation Safety Networks database, the airplane was a Douglas C-47-DL (DC-3). If that sounds like a bunch of nothing, then check the Wikipedia page out for it. While this specific plane wasn’t involved with the military (the operator is listed as Civil Aeronautics Administration), it’s in the same family of troop carriers used extensively in World War 2, perhaps most famously before and during Operation Overlord (D-Day). Planes like it were featured heavily in series like Band of Brothers as well.
So, why did it crash? Well, according to the database (click here to access), the plane reported an altitude of 14,500 ft. which is high enough to carry it over the Continental Divide because the Indian Peaks hover at 13,500 ft. The wreckage was found at 12,900 ft. The statement reads, “The Board determines that the probable cause of this accident was an excessive loss of altitude resulting from a downdraft in an area of severe turbulence.” That means these guys were humming along, a thousand feet above trouble, ran into severe weather, and nature connected a slap that threw the airplane 1,600 feet down and into the side of a mountain. In all likelihood, there was nothing the pilots could do to avoid trouble once the wind took hold. Clearly, aviation has improved since 1948, when this crash occurred, but it’s a stark reminder of the crazy microclimates and weather anomalies that frequent extensive mountain ranges like the Rockies.
After spending a little time exploring the wreck, I continued up the gully. It begins to curl to the west and pops you out on the end of Niwot Ridge. Looking to the south, you can see the Boulder Watershed, which does not allow hiking access, and the Arikaree Glacier.
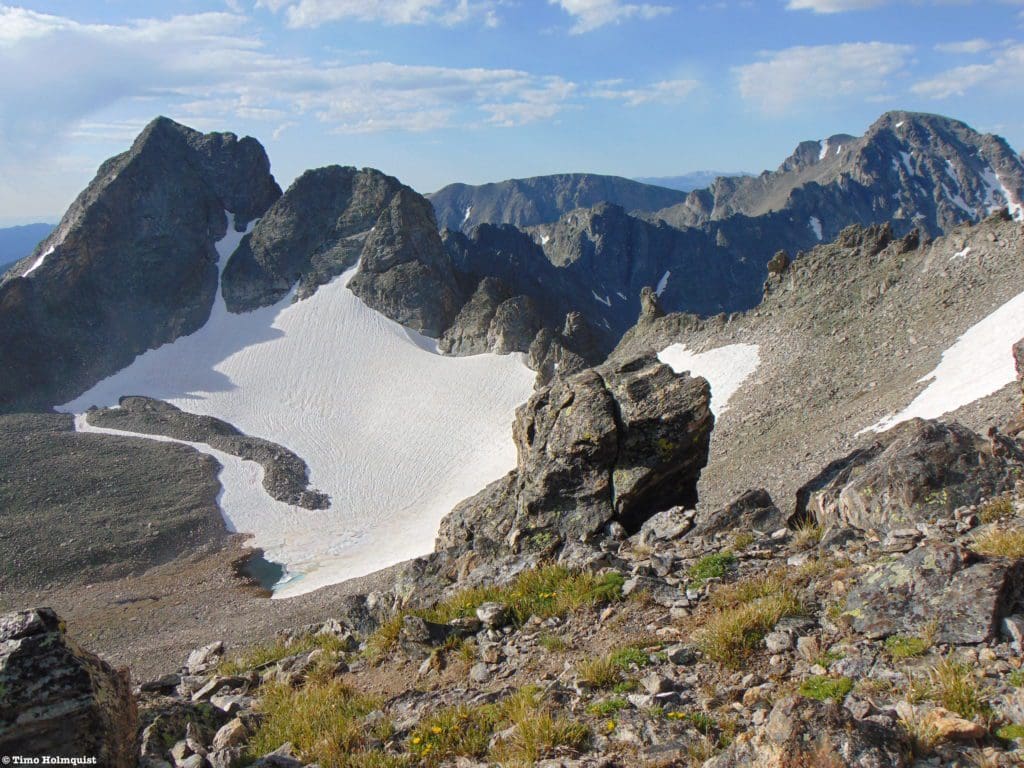
Arikaree Glacier.
Turn to the west and stare at the rest of your route up the undeniably striking profile of Navajo Peak.
Navajo Peak from Niwot Ridge.
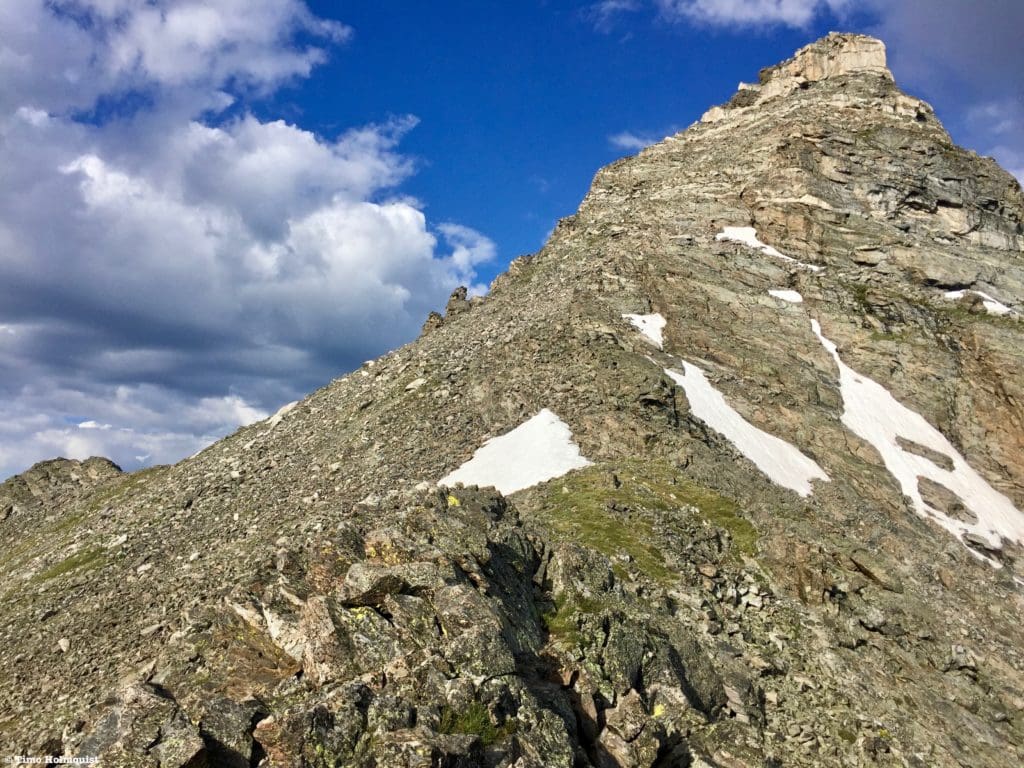
The rest of the route follows the ridgeline, at first, a simple Class 2 affair. As you ascend to a series of broken steps below the summit block, the difficulty increases. Unfortunately, more loose stuff is found here, and several sandy trail braids will ascend around you. Use your best judgment and make sure you’re not ascending anything you won’t feel comfortable going back down.
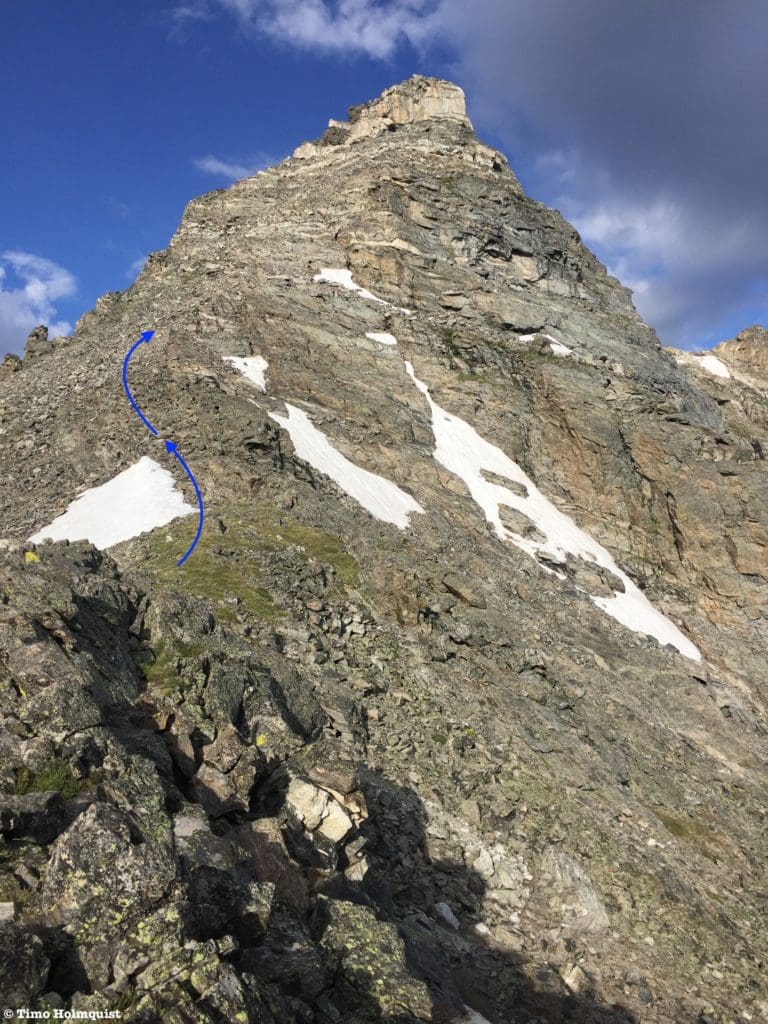
The general route up.
As you scramble, keeping an eye on the intimidating summit block above you, the terrain will continue to steepen with plenty of isolated Class 3 moves. You can avoid the harder scrambling, but this is still loose, Class 2+ territory with increasing slip potential.
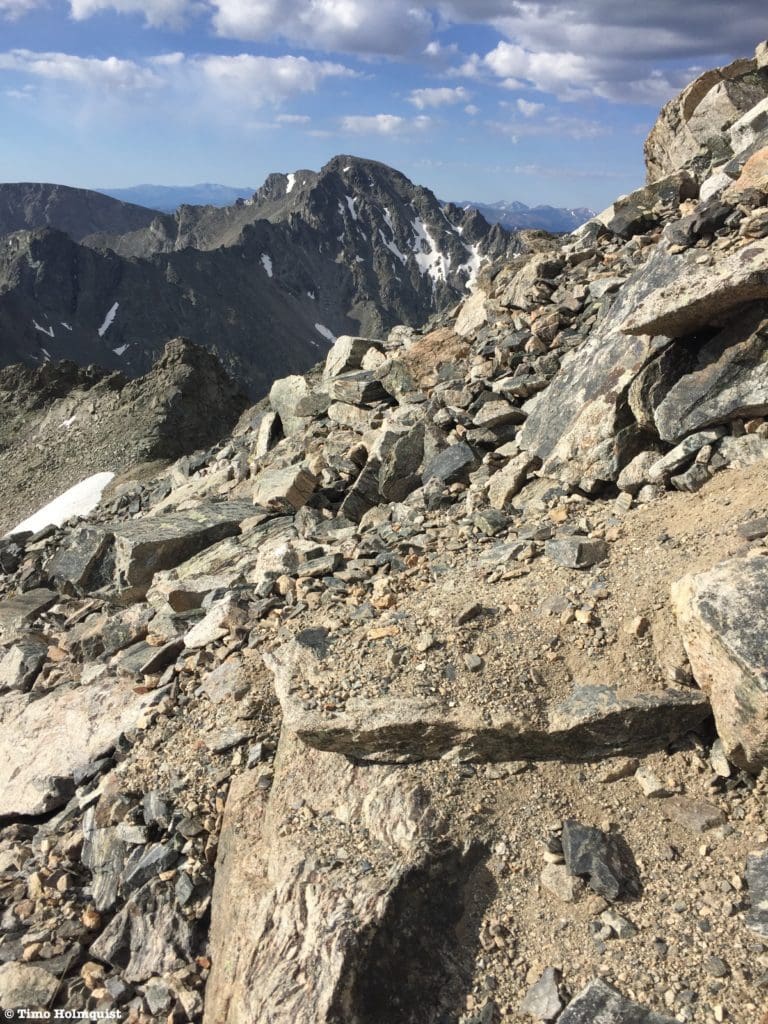
An example of what the terrain looks like below the summit block.
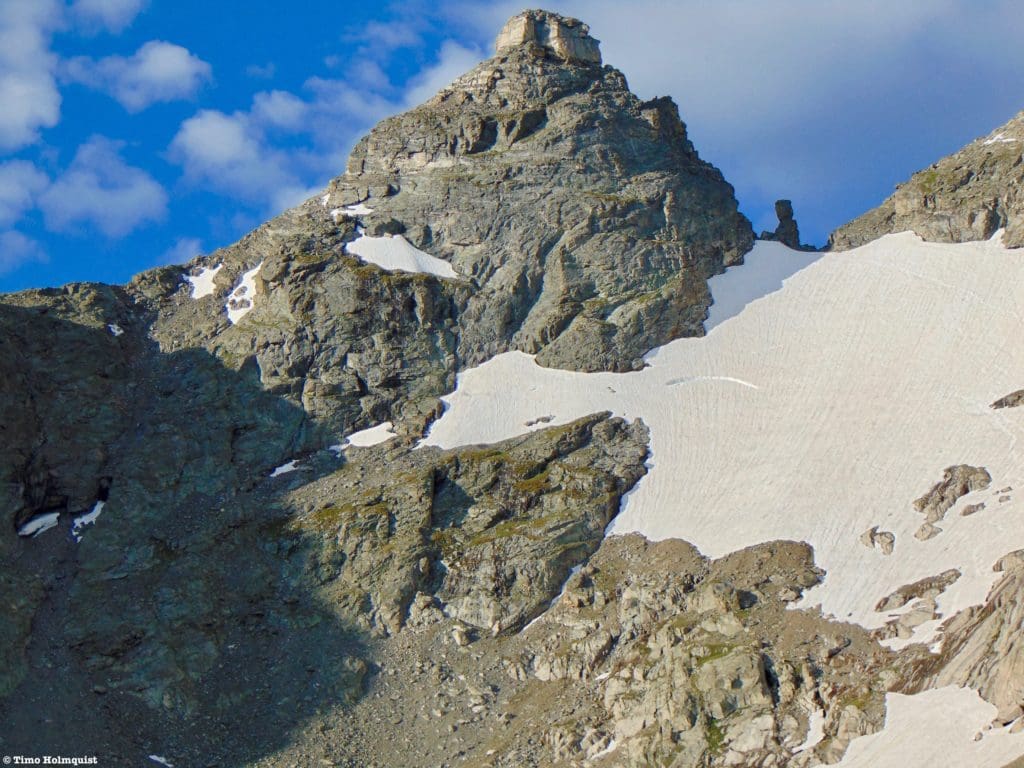
There are a few ways to get above the walls guarding the very top of Navajo. I chose a chimney on the eastern side of the block that broke through with fun and airy Class 3+ scrambling.

The crack I chose.
Gerry Roach (famed Colorado mountain climber and author) reports an easier way to the summit by getting close to the pink-colored summit block and shifting left (west) until finding easier terrain up the block. While I was aware of this route, I couldn’t help but wonder about routes that climbed up the showy summit cliffs. If you can handle a bit of tough Class 3 scrambling, a few airy moves, and an exposed summit, climbing through the bold summit block is an exciting and excellent way to finish scaling Navajo.
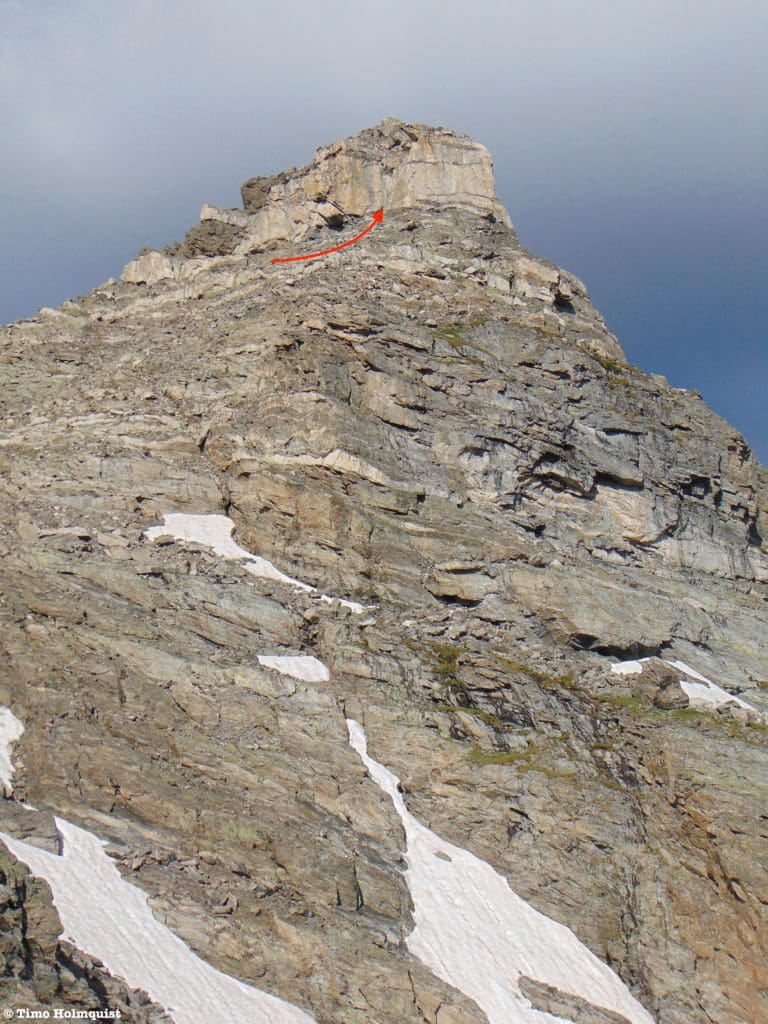
The location of the chimney from further down the ridge.
After reaching the entrance to the chimney, take a good look at what’s required of you.
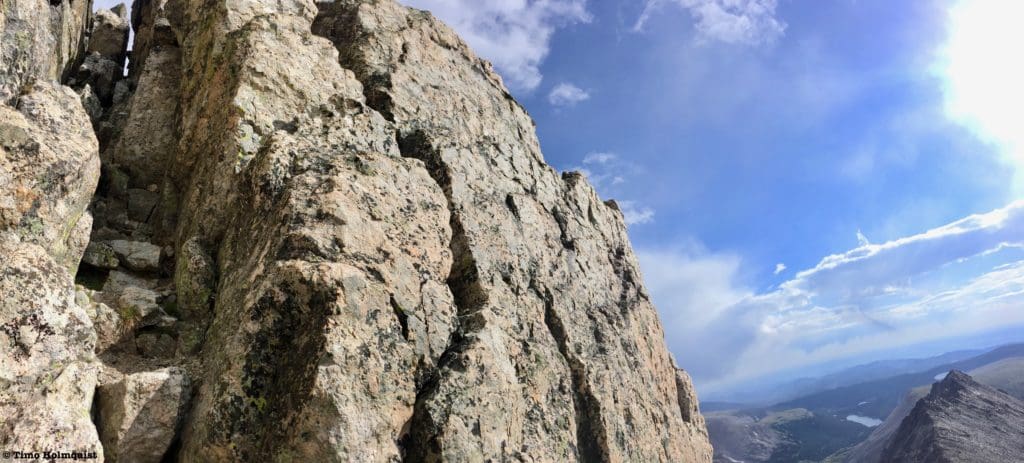
Half panorama of the chimney and the edge of the summit block to the right.
While the initial climbing inside the chimney is low exposure, you are on the leading edge of the summit block.
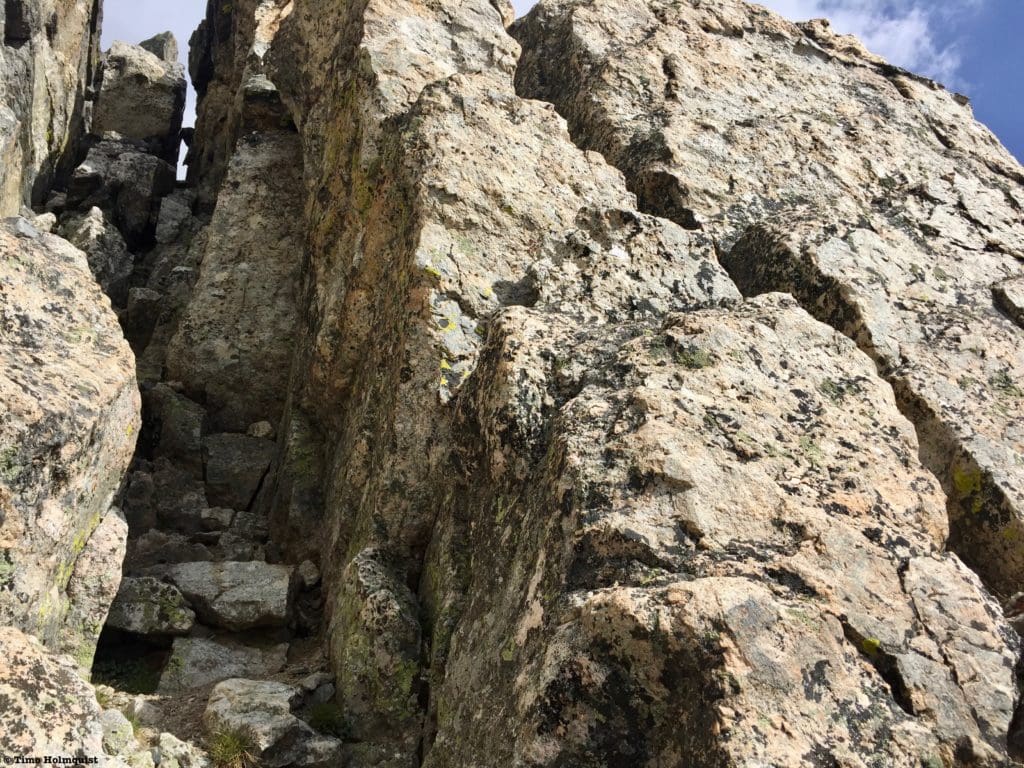
Another look at the chimney from the bottom.
The most complicated moves are entering or exiting the top of the chimney. Using a couple of Class 3+ moves, you want to boost yourself up and climb left out of the chimney to reach the small summit plateau. A few seconds of uphill movement will get you to the highest rock. As you’re leaving the chimney, make sure to turn around and see what the exit looks like from above. If you want to descend the same way, it helps to have a visual (or take a photo), so you can find the chimney quickly on the return journey.
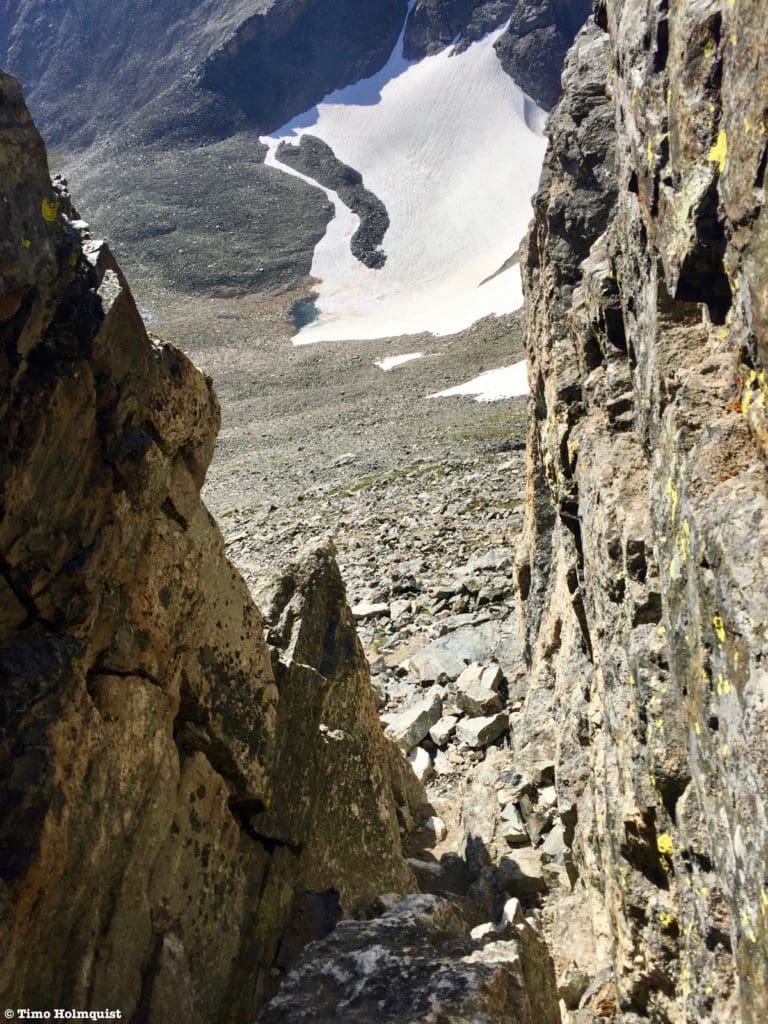
Half way up the chimney.
Although the scrambling is relatively short, the chimney is solid and allows you to climb through the intimidating summit cliffs you’ve undoubtedly been staring at since first glimpsing Navajo Peak way down at Lake Isabelle. The summit is only a few dozen feet from the top of the chimney, so from Airplane Gully, it is the most direct way to the top.
The view north from the exciting summit of Navajo Pk.
Take a second to appreciate where you are, the views are phenomenal, and with the exciting chimney finish, you’ll be on Cloud 9. This is a special peak and a big reason the Indian Peaks Wilderness is a go-to location for so many people.
Zooming in on the three pinnacles of Shoshoni, the farthest left pinnacle is the highest.
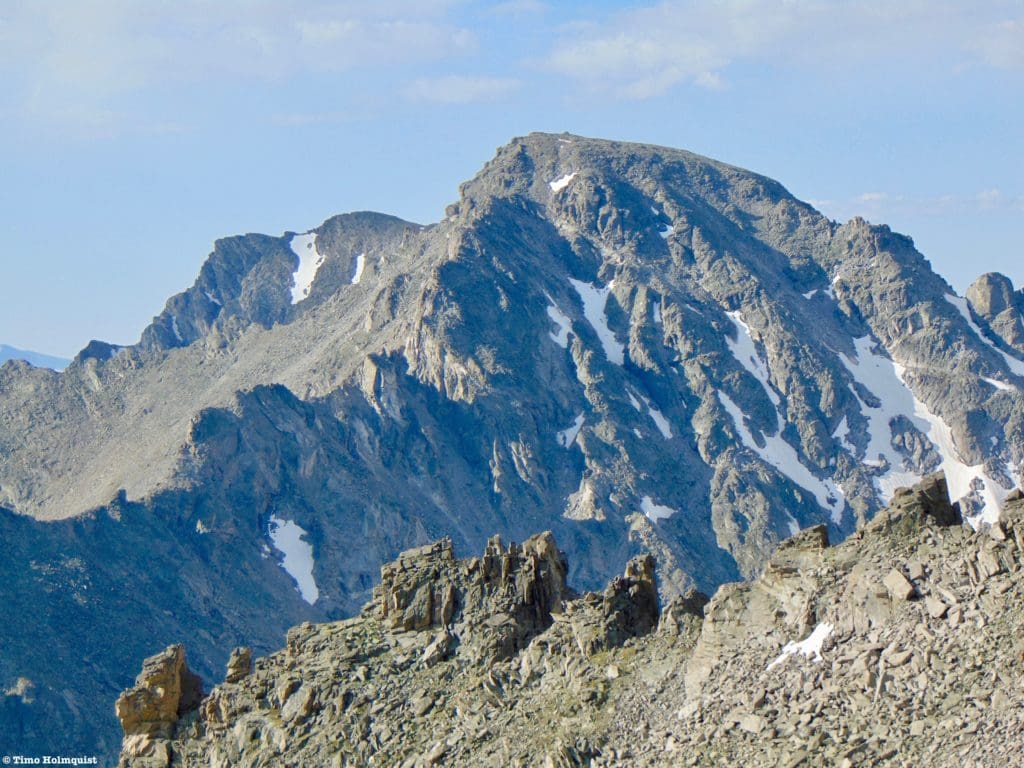
The views south are also fantastic, starting with the remote and exposed northern side of North Arapaho. There are at least two routes that attack this side of the highest mountain in the Indian Peaks, and they are high on my list of things to scramble.

North Arapaho Peak from Navajo.
On good visibility days, you can see farther south to the area around Lake Dorothy and the Class 4 route up Neva.
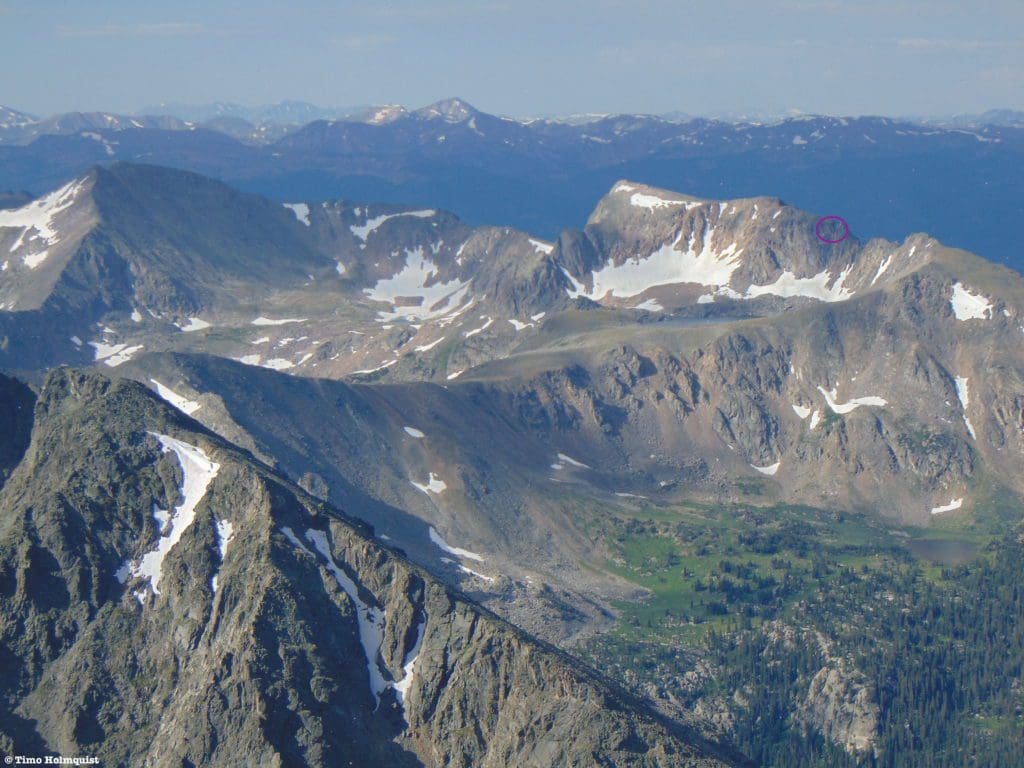
The Class 4 portion up Mt. Neva is in the purple circle.
On great visibility days, you can continue your skyline exploration by sighting Grays and Torreys, two incredibly popular 14ers less than an hour from Denver.
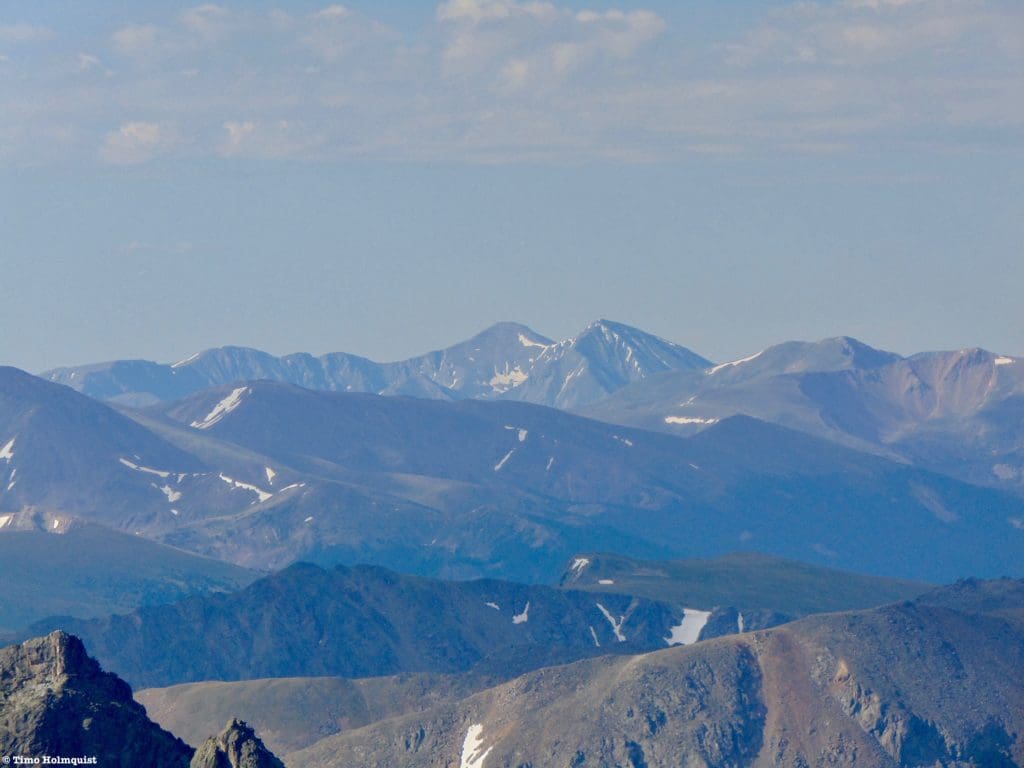
Grays (L.) and Torreys (R.).
When you’ve had your fill, carefully descend east until finding the chimney route. Alternatively, explore the southern side of the summit plateau until sighting a Class 3 variation down broken terrain to the slopes below the top cliff band. Regardless of which path you choose, you want to make it back down to the top of Airplane Gully.

The terrain just below the chimney.
You can always opt to return the same way you climbed, but Niwot Ridge to the east has some exciting Class 3 scrambling and allows you to create a big loop out of the whole hike. I had the weather on my side and only a 20% chance of afternoon T-storm action, so I began scrambling up and over Niwot Ridge.
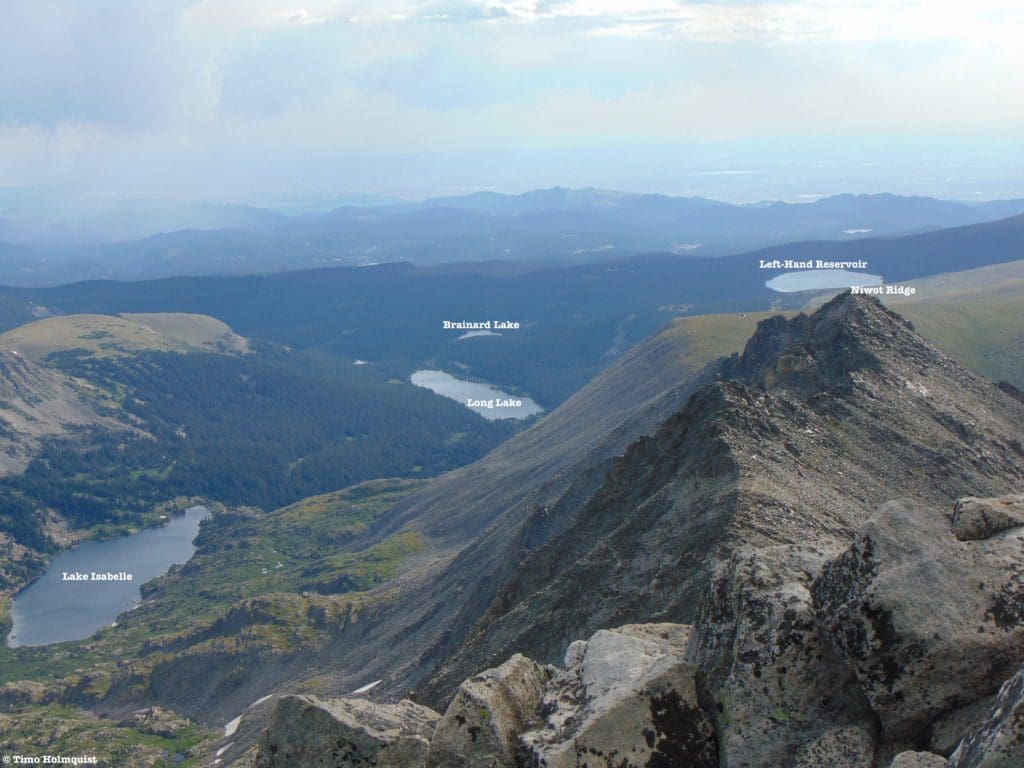
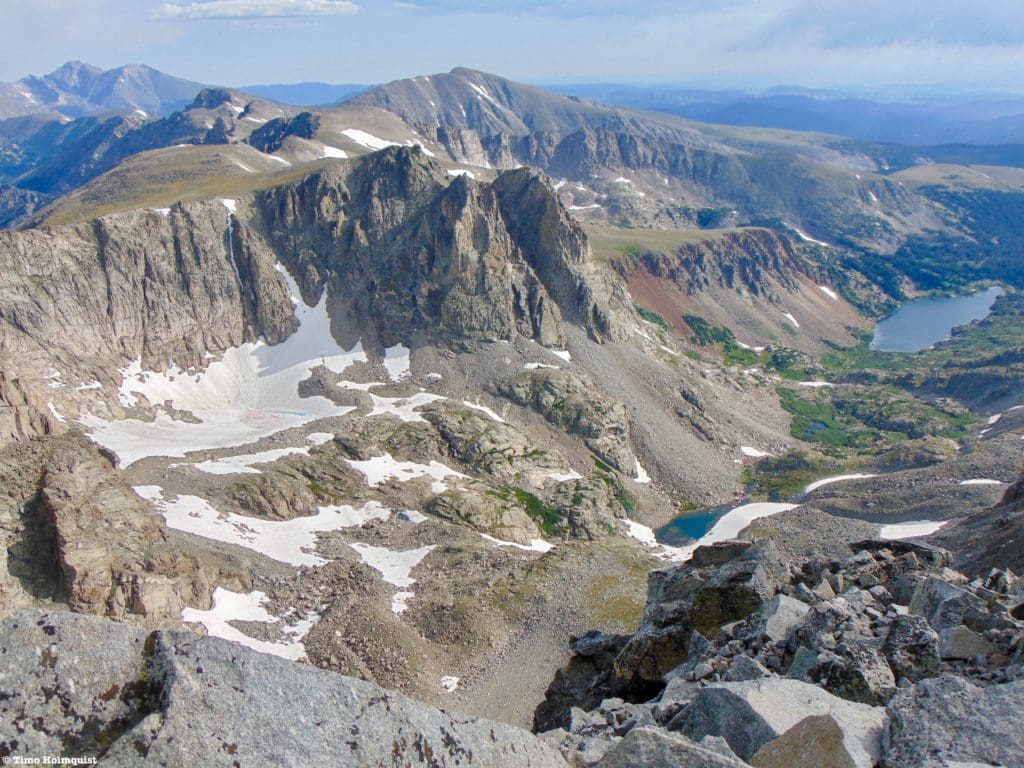
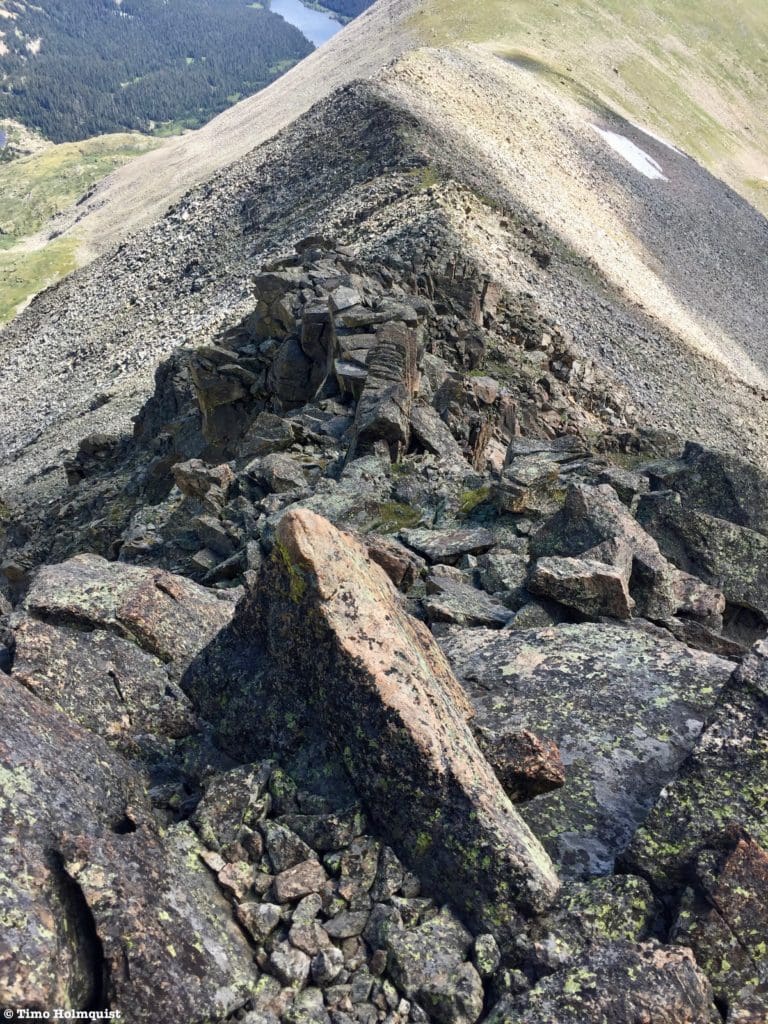
Niwot Ridge from the summit of Navajo. You can skip a few of the high points, but the best scrambling is up and over the tops. Many options exist here, with safer routes generally on the southern side of the ridge.
For the most fun, stick close to the main ridgeline and enjoy the Class 3 scramble fest. Make sure to touch the highest point of the ridge, which should be obvious if you stick closer to the ridgeline.
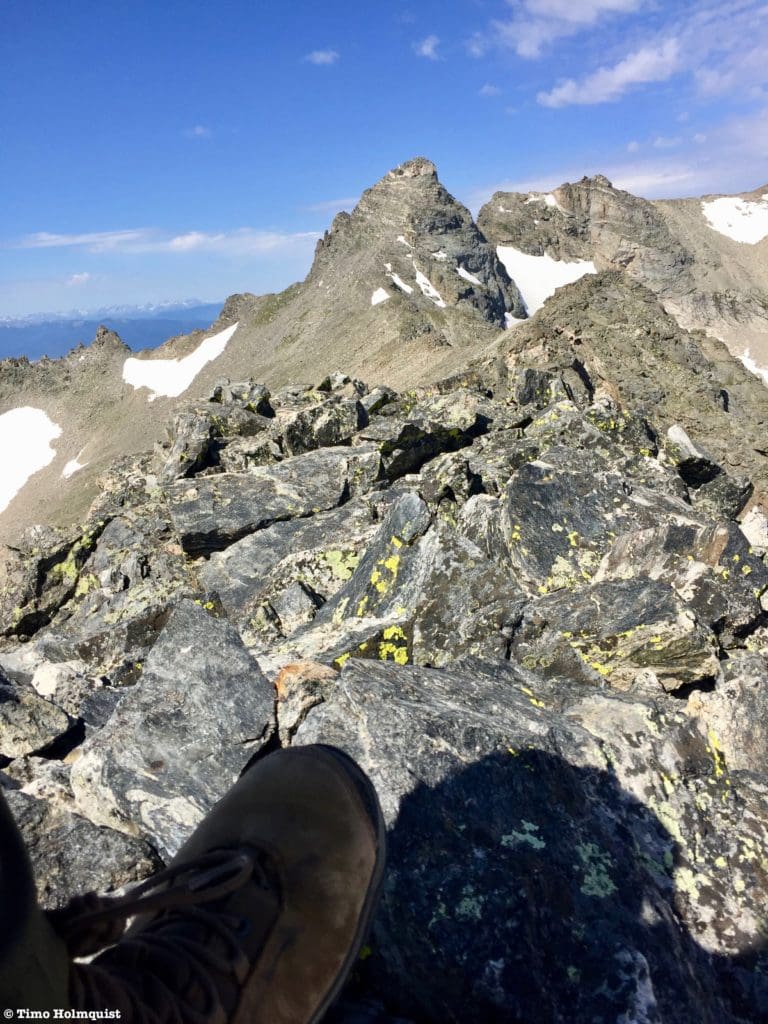
The highest point of Niwot Ridge.
The scrambling along this ridge is fairly continuous, and the rock is generally solid. As always, check your holds but I was surprised by how fun and long the scrambling ended up being.
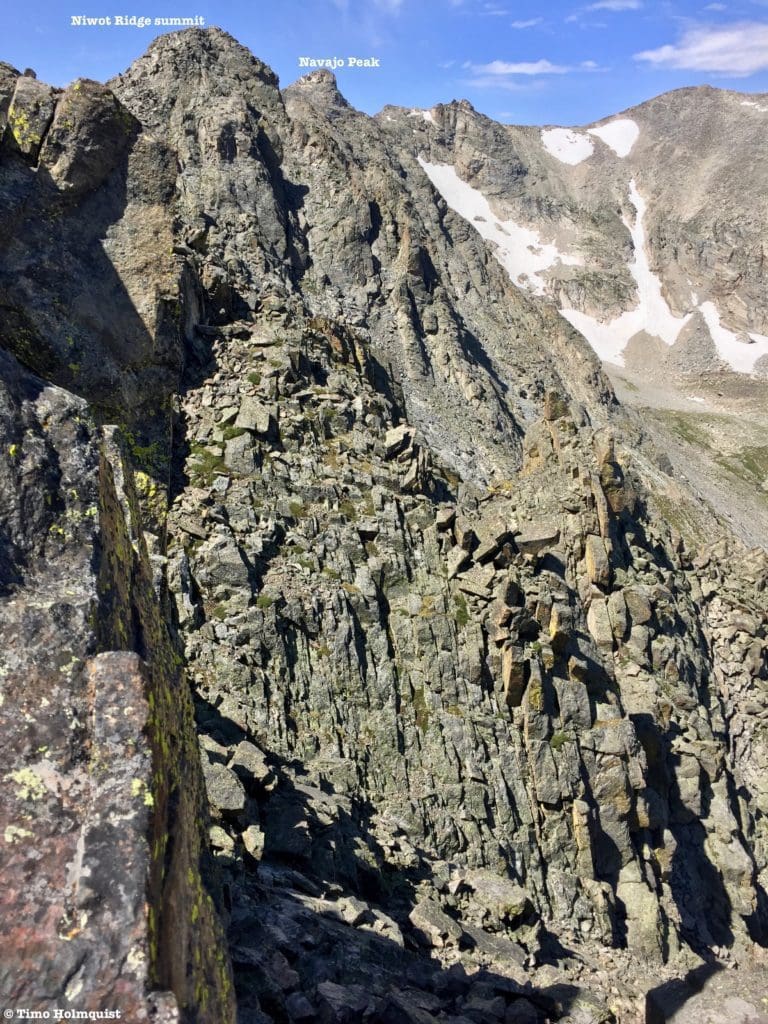
Typical terrain off the northern side of Niwot Ridge with the summit marked.
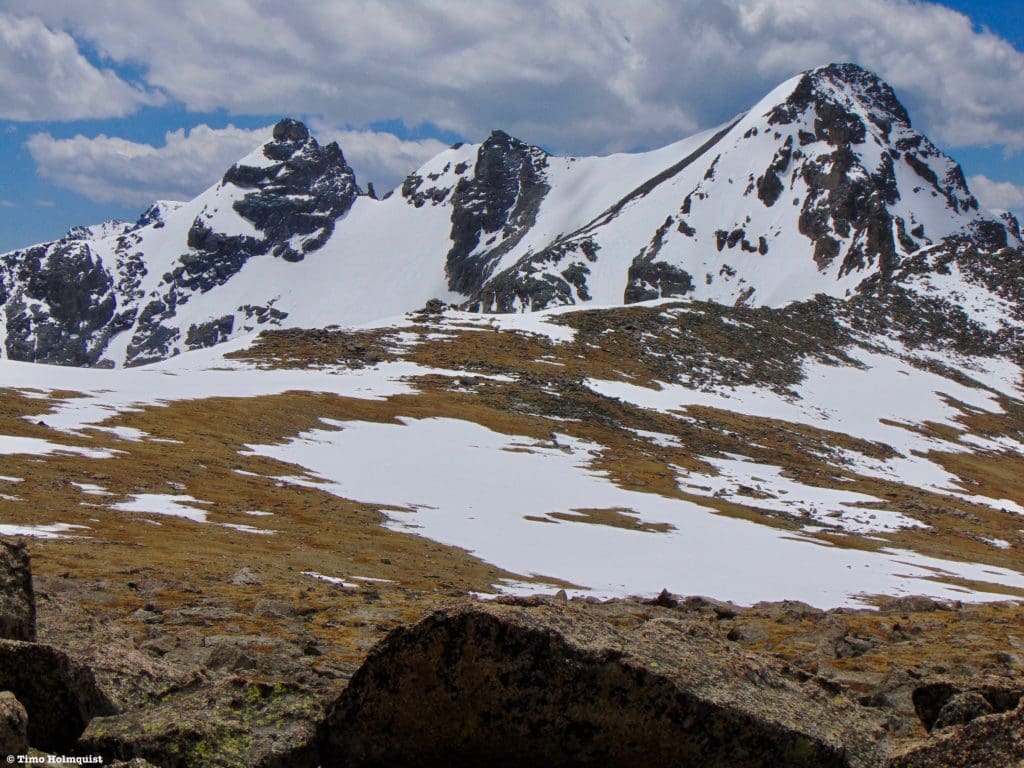
Niwot Ridge is only very visible from certain perspectives. From portions of the Pawnee Pass Trail, you can really appreciate how complex the ridge is.
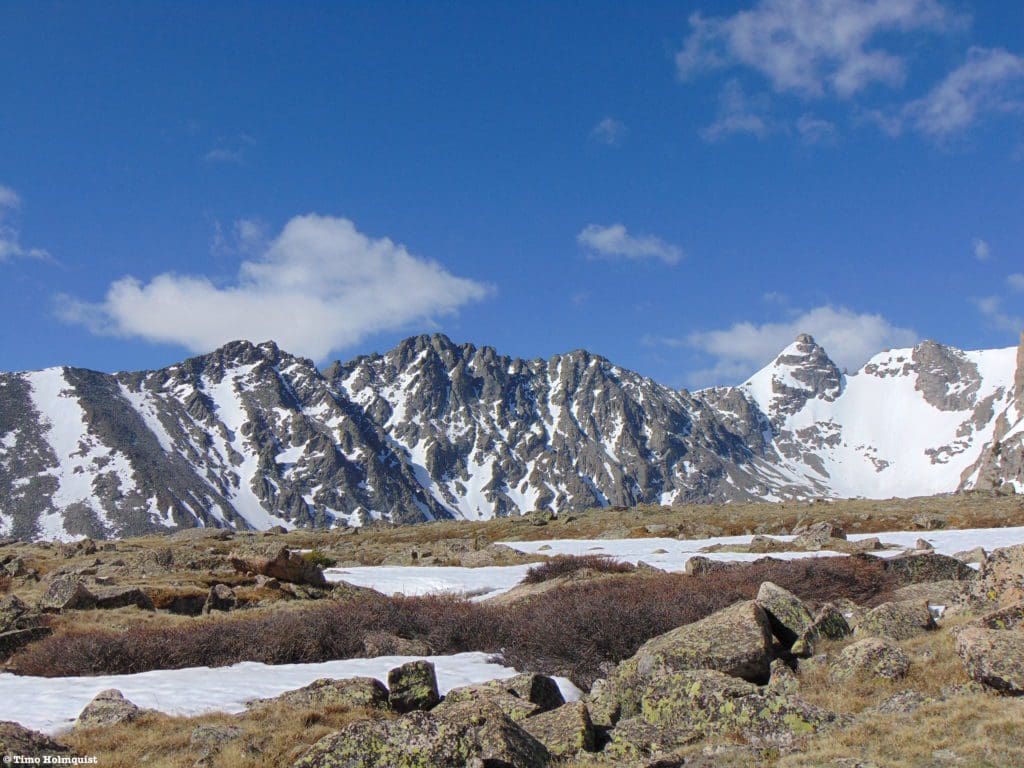
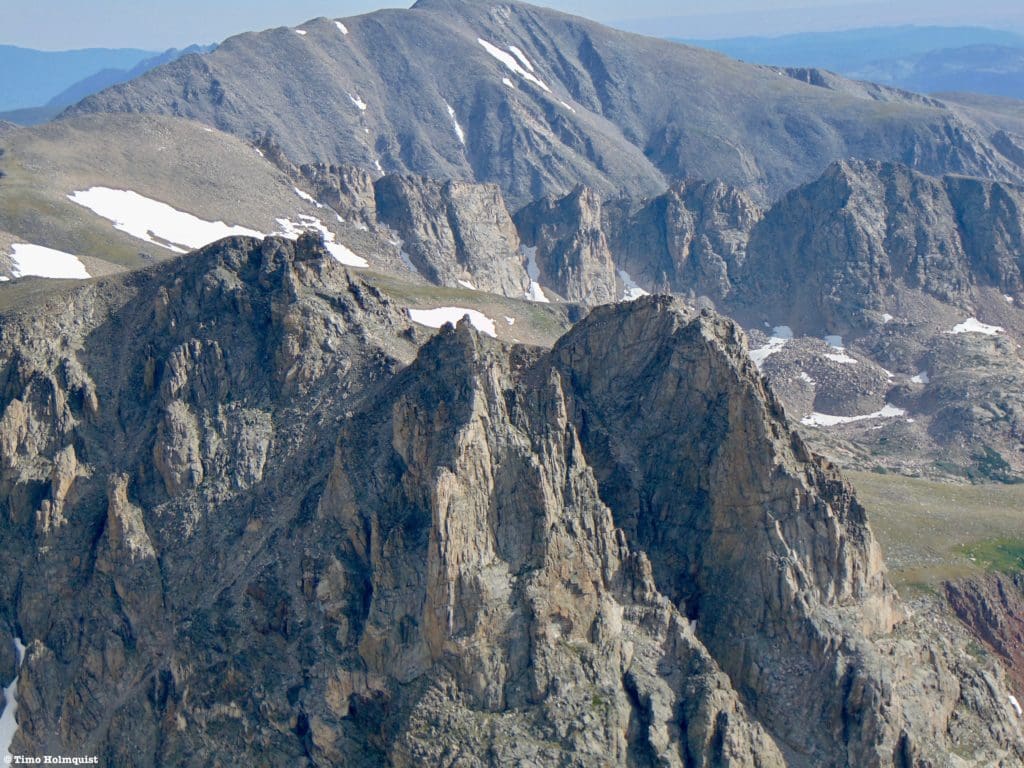
Niwot Ridge from the north.
There are at least three major “peaks” along Niwot Ridge, with numerous smaller highpoints along the way. Take your time and have fun; while also keeping an eye on the weather. When you crest the last major highpoint, you’ll see the next bit of your route as it switches from scrambling to alpine strolling.
The end of the scrambling.
Pay attention as you reach the bottom; there are some funky-looking pancake rocks that you’ll end up passing.
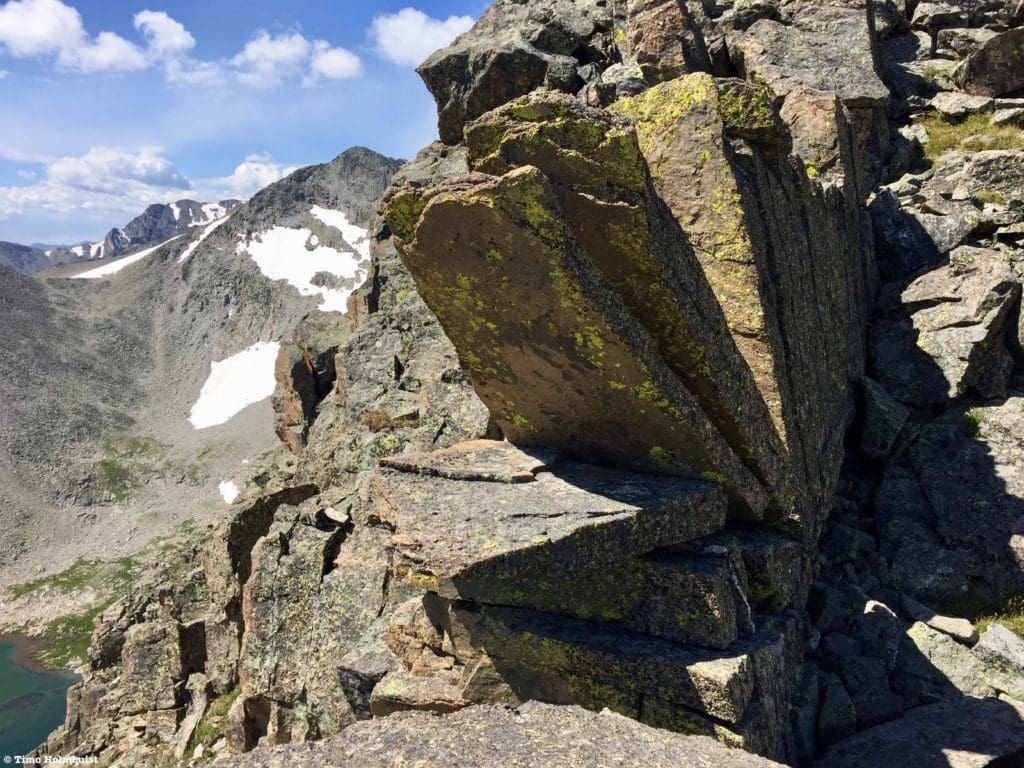
Pancake Rocks.
Don’t forget to look south as well, where uninterrupted views will showcase a series of pristine alpine lakes. They are in the Boulder Watershed, where it is illegal to hike. Hikers have long complained about access issues (understandably), but the silver lining is the pristine environment created from a lack of human presence. Colorado has thousands of mountains; if you get hung up on ones you can’t access, you can always climb different ones.

Forbidden fruit.
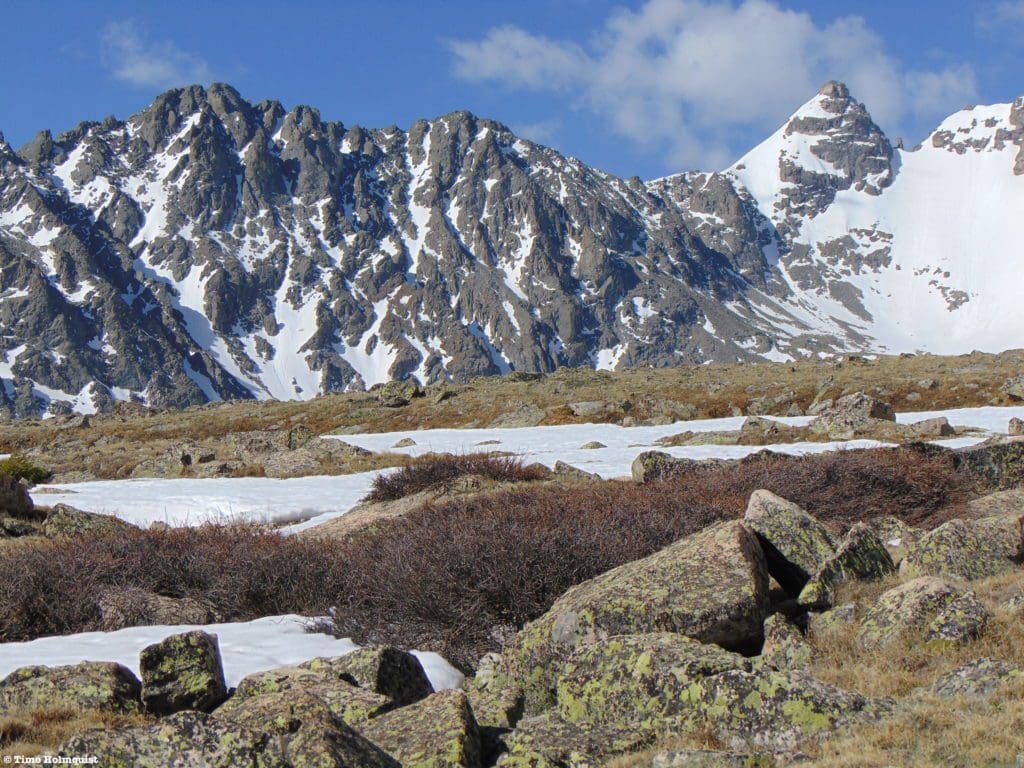
Once the ridge makes the transition to a series of grassy slopes, the scrambling portion is complete. This is also a place where you may see other recreationists, and if you turn around, you’ll see why.
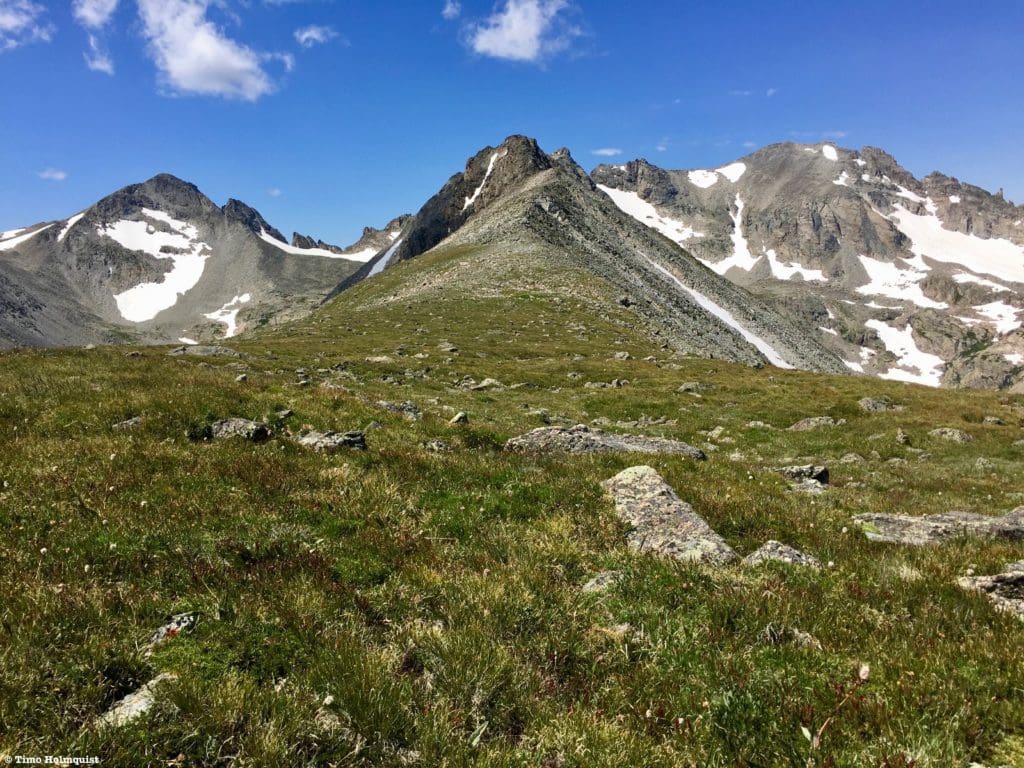
Niwot Ridge from the East.
This grassy area is a fantastic place to be and will give you a sense of what kind of mountains you just traversed across. Despite being close to many population centers, the ridgelines near the Divide in the Indian Peaks are rugged and committing.
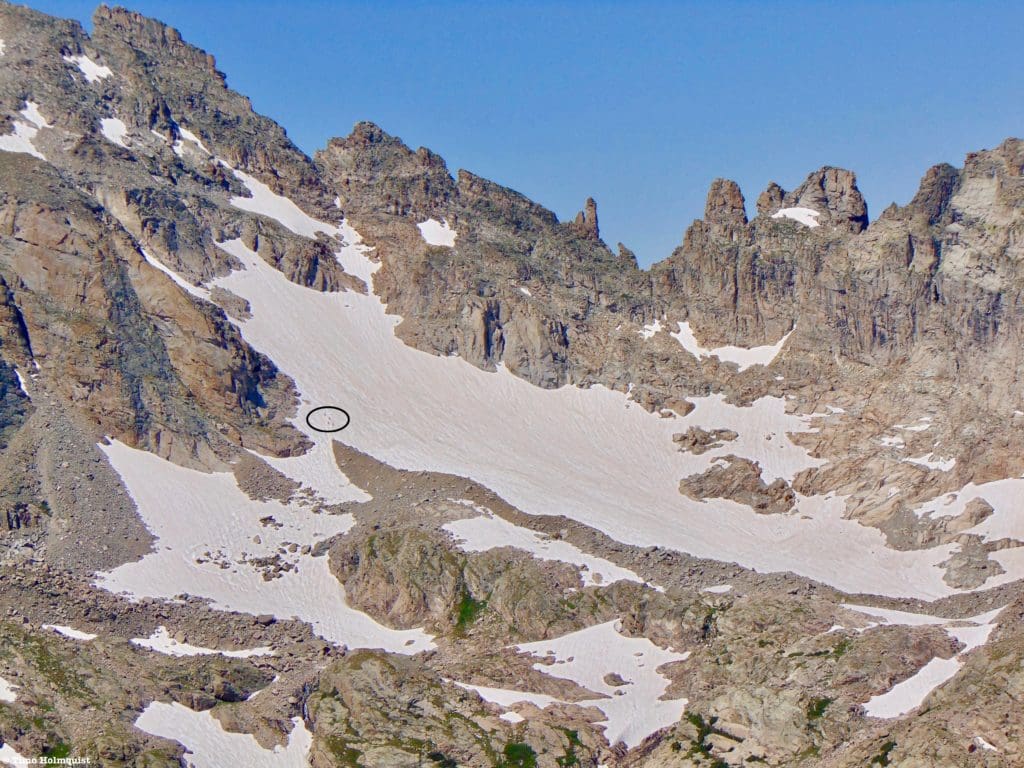
Isabelle Glacier from Niwot Ridge, a group of mountaineers headed for Queensway Couloir, is circled.
From where you are, the rest of the hike involves a nice descent on an old road bed where you’ll pass a couple of weather stations and the INSTAAR tundra station set up by CU (Colorado University). The tundra station has been in operation for decades and releases valuable scientific observations about the changing environment of both alpine and subalpine areas. Recently they released the findings from a long-term study of forest regeneration; you can find the analysis here. The conclusions are that trees are having a harder time growing and spreading in subalpine areas because the climate is getting progressively drier. Please be respectful of the study area and stay on designated trails.
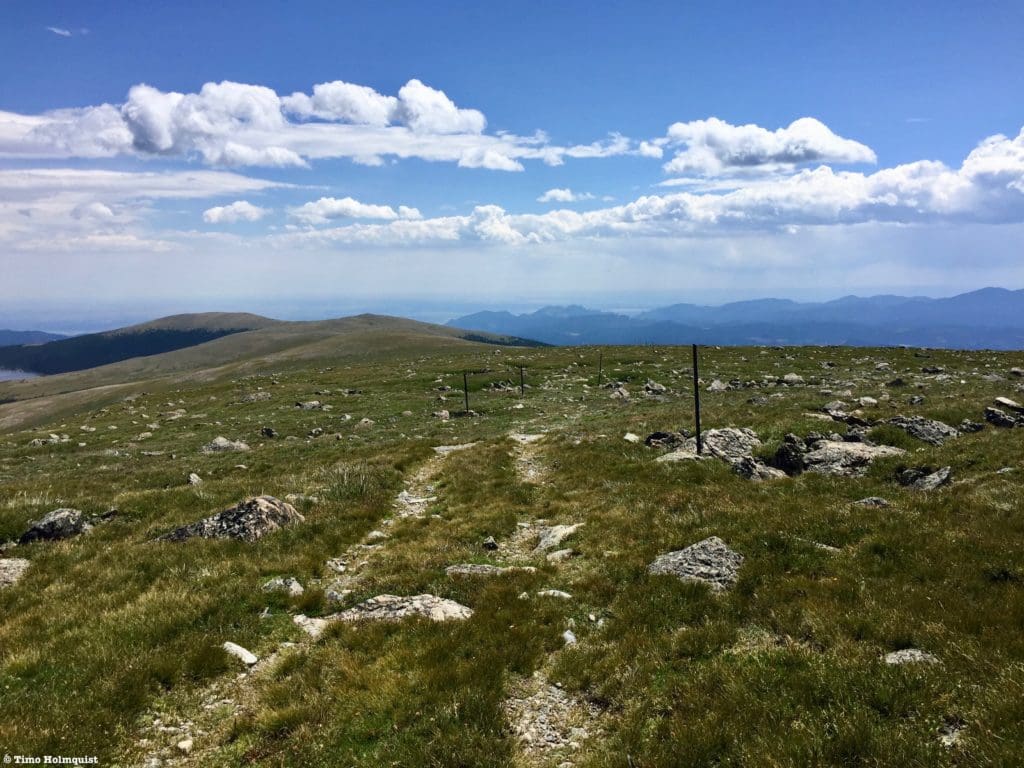
Pleasant alpine strolling.
You’ll spend more than three miles strolling along Niwot Ridge, eventually taking a left once you pass the INSTAAR tundra lab and descending back to Long Lake. While long, this beautiful stretch of alpine is sure to brighten the mood of even the most pessimistic mountaineer.
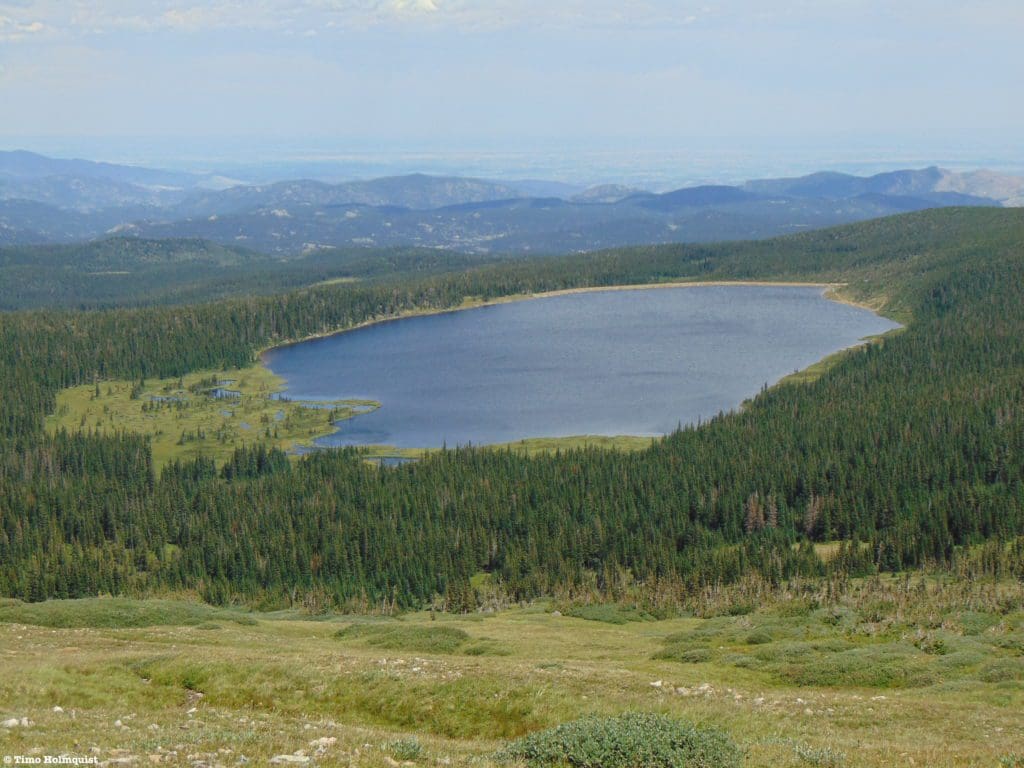
Left Hand Reservoir from above.
Once you drop down to the Jean Cummings Trail take a quick right and then a left across the creek to reconnect with the Long Lake Trail. A few points of a mile to the east is the parking lot and your car.
Final Thoughts:
The Indian Peaks has a TON of awesome scrambling. I’ve been playing in these mountains for years and have still only scratched the surface. If you’re looking for an iconic mountain with substantial scrambling, an airplane wreck on its slopes, and incredible views, Navajo Peak is what you want. It is firmly in my top five for the eastern Indian Peaks (along with the Arapaho Traverse, Mt. Neva, Kasparov Traverse, Shoshoni, and Little Pawnee). Completing the various ridge scrambles and peaks accessible from the eastern side of the wilderness will only prime you for the more remote and spectacular western side of the IPW, where countless additional mountain opportunities exist.

Niwot Ridge with Navajo Peak poking out behind and to the right. The large patch of snow to the right is Navajo “glacier.”
Popular Articles:
Adventurer’s Guide To Arches National Park, Utah
Adventurer’s Guide To Capitol Reef National Park, Utah
The New River Gorge National Park and Preserve, West Virginia
Adventurer’s Guide To Arches National Park, Utah
Top Adventure Sports Towns: Bozeman, Montana

When a travel emergency arises, traditional travel insurance may not come to your aid, and a medical evacuation can cost up to $300,000.
The cost when you have a Global Rescue membership? $0. That’s why when the unexpected happens, you want the leader in rescue, evacuation and medical advisory behind you. You want Global Rescue.


