


High Point:
12,296 feet

Total Ascent:
~1500 ft. from Gourd Lake (~3,900 ft. from Monarch Lake)

Difficulty:
Very Difficult (Class 2-4 scrambling, and a Steep Snow Climbing route)

Distance:
From Gourd Lake: 3-4 miles depending on route

Waypoints:
40.11080, -105.74639

Route Type:
Various Loop options available
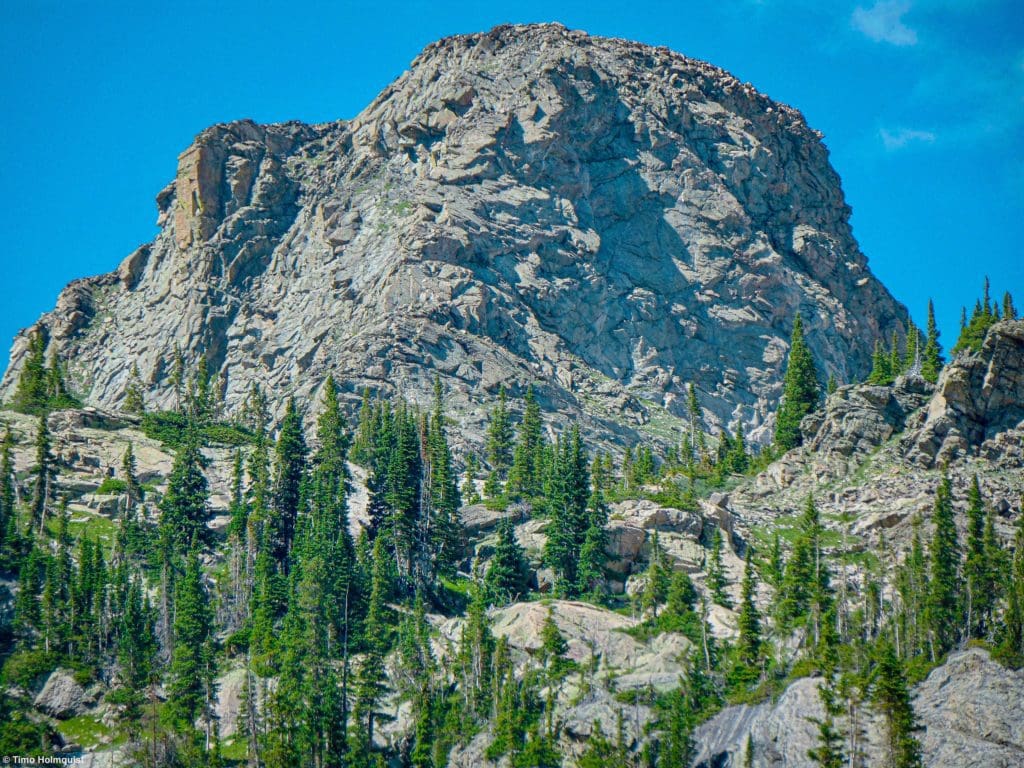
Cooper Peak boasts some incredible scrambling and snow climbing routes. It doesn’t have the height or fame of other peaks, but it showcases the joys of lesser-known summits.
Overview
Cooper Peak contains some superb scrambling and snow climbing routes. From a distance, the mountain is almost indecipherable amongst a sea of western Indian Peaks Wilderness (IPW) summits. It’s a high point on a slanted plateau with a deep col between it and the divide near “Ooh-La-La” and Ogallala Peak, both of which dwarf Cooper in size.
The magic of Cooper lies within its diverse route options. I’ll cover the four most interesting ones, from a manageable Class 2+ jaunt to serious Class 4 scrambles and even a steep snow couloir climb. Strap in; this little mountain has a big attitude. As famed Colorado mountain author Gerry Roach wrote in his book Colorado’s Indian Peaks, Classic Hikes and Climbs, “Cooper is neither high nor well known, but it epitomizes the joys of the lesser summits. Cooper provides lots of little adventures in a beautiful and remote setting.”

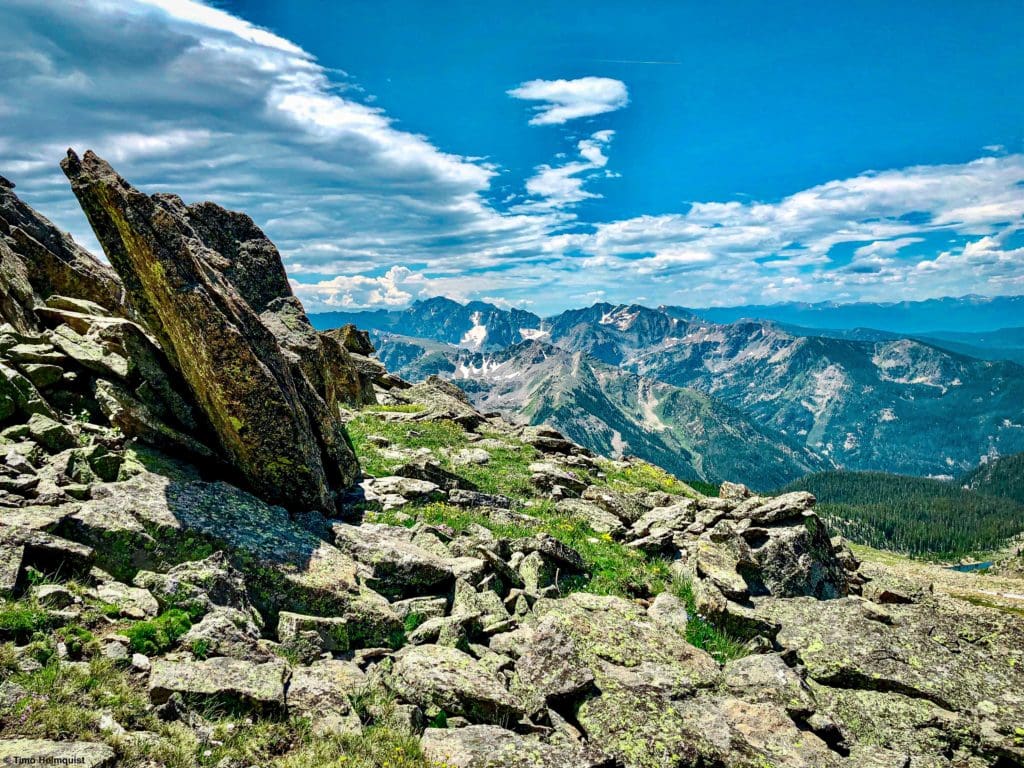
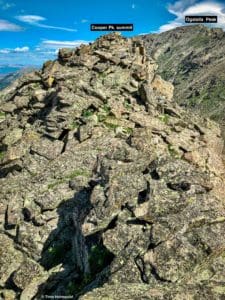
Looking south to the heart of the Indian Peaks from near Cooper Peak.

Table of Contents
Article Navigation: Click on any of the listed items in the table of contents below to jump to that section of the article. Similarly, clicking on any large, white section header will jump you back to the Table of Contents.
- Overview
- Scales and Criteria
- Directions to Trailhead
- Field Notes
- Journal: The Approach (all routes)
- Journal: The Southwestern Slopes (Class 2+)
- Journal: The North Ridge (Class 3)
- Journal: The North Couloir (Steep snow ~55 degrees)
- Journal: The South Buttress (Class 4)
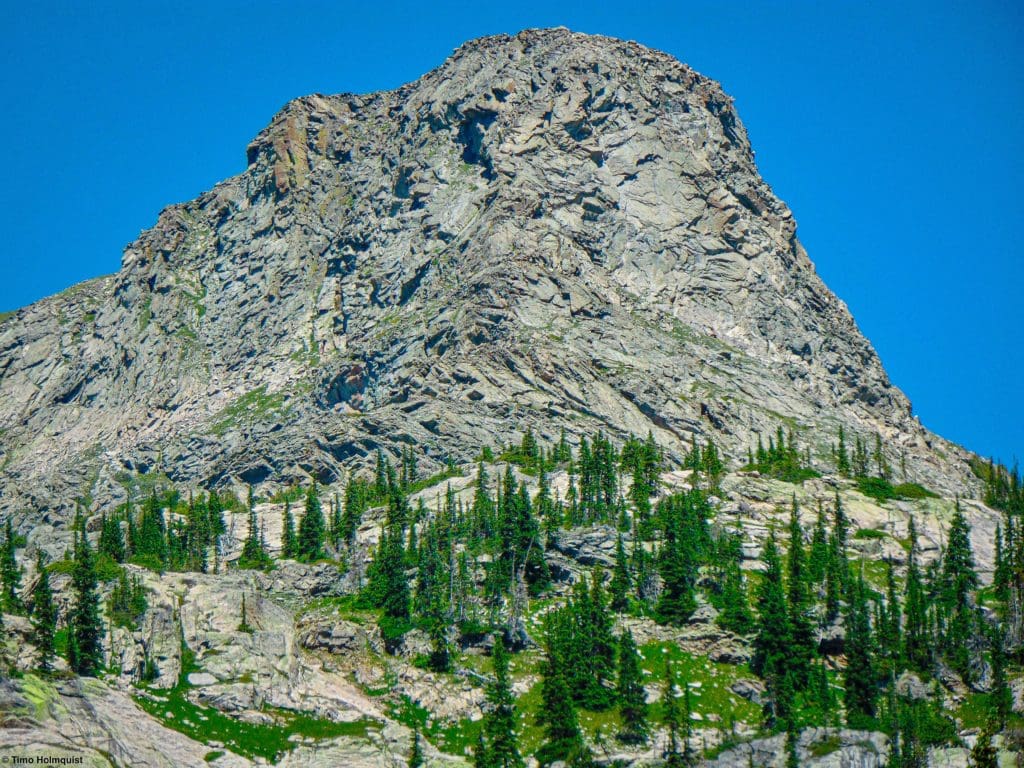
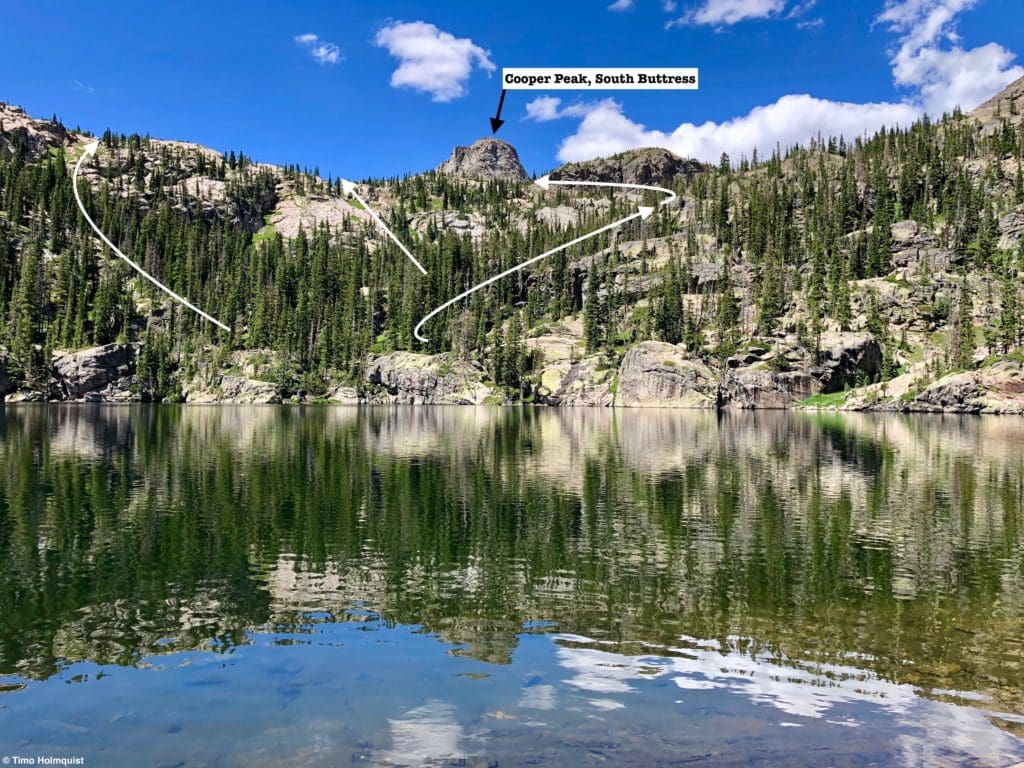
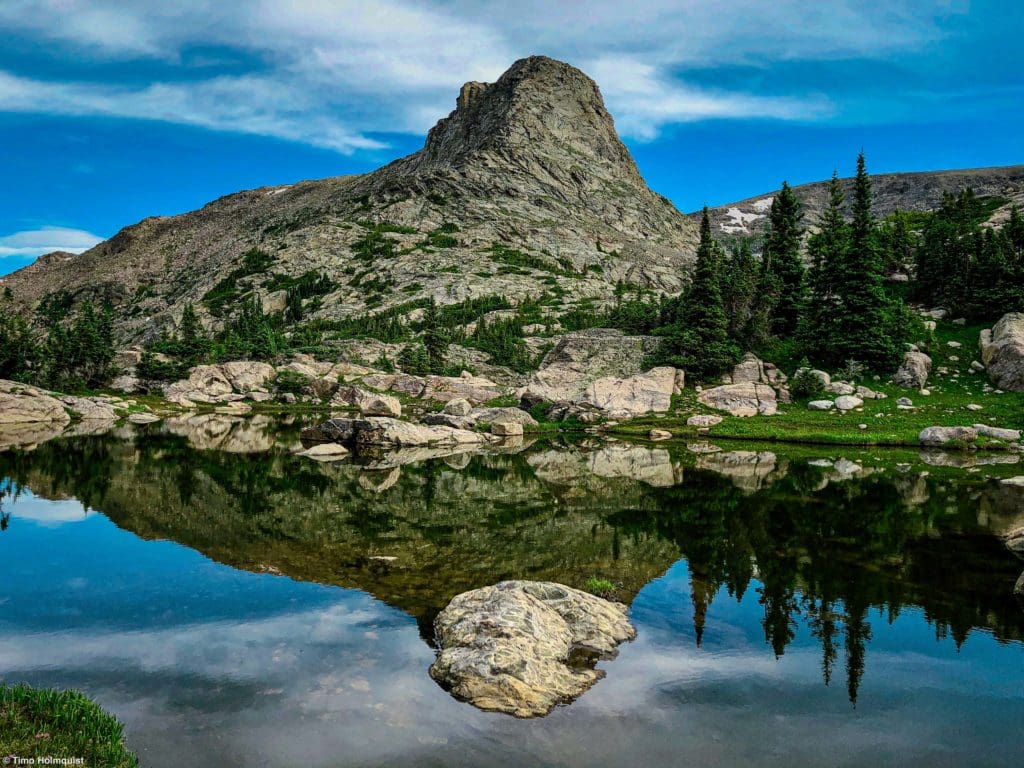
The commanding South Buttress of Cooper Peak, seen from Gourd Lake.
Global Rescue is there whether you’re hiking, kayaking, snowmobiling, fishing or simply enjoying the outdoors and get ill or injured and you’re unable to get to safety on your own. Global Rescue is the red button you push in an emergency. Their team of medical and security experts come through for you when it matters most.
Scales and Criteria
This article uses two metrics to calculate difficulty: overall distance and elevation gain. Although most of this review covers snow free scrambles, there is a spicy snow route up the North Couloir. The couloir, per guidance from previous mountaineers, is in best shape in early July. Snow stays in the couloir through August, but it splits into a few pieces with damp, loose and steep terrain between them, making any ascent much harder. Seeing as there are multiple places where scrambling is required, a technical rating is also employed, using the Yosemite Decimal System to calculate difficulty.
Snow Rating (North Couloir):
- Steep Snow: ~500 vertical feet, max slope angle ~55 degrees (A typical black diamond at a ski resort has a slope angle between 30-35 degrees)
Difficulty Ratings:
- Easy: less than 5 miles, less than 500 ft. of elevation gain
- Moderate: 5-10 miles, 500-2000 ft. of elevation gain
- Difficult: 5-15 miles, more than 2000 ft. of elevation gain
- Very Difficult: 10+ miles, more than 3,500 ft. of elevation gain
Technical Rating:
- Class 1: Established hiking trail the entire length of the adventure. Low chance for injury.
- Class 2: Typically involves cross-country navigation, possibly using hands for balance but not required, steeper than Class 1.
- Class 3: Hands and feet used to scale areas; must use hands to proceed (either for balance or to help pull you up a section), increased exposure, a fall could be fatal. Helmet recommended, along with grippy hikers.
- Class 4: Climbing on very steep terrain just shy of vertical, falls could be fatal, hands employed for grip and balance continuously, ropes advised but scalable without. Helmets are highly recommended, along with grippy hikers.
- Class 5-5.4: Vertical climbing that involves technical rock-climbing moves, exposed, falls likely to be serious or fatal, possible to scale without ropes but only for very experienced veterans. Helmets, grippy hikers, and/or rock-climbing shoes are necessary.
- Class 5.5 and up: Not covered as scrambling, full-on rock climbing with ropes, helmets, etc.
- In the pictures below, these ratings are depicted by colored arrows. White/Black=Class 1, Blue=Class 2, Red=Class 3, Purple=Class 4 and Class 5 is orange.
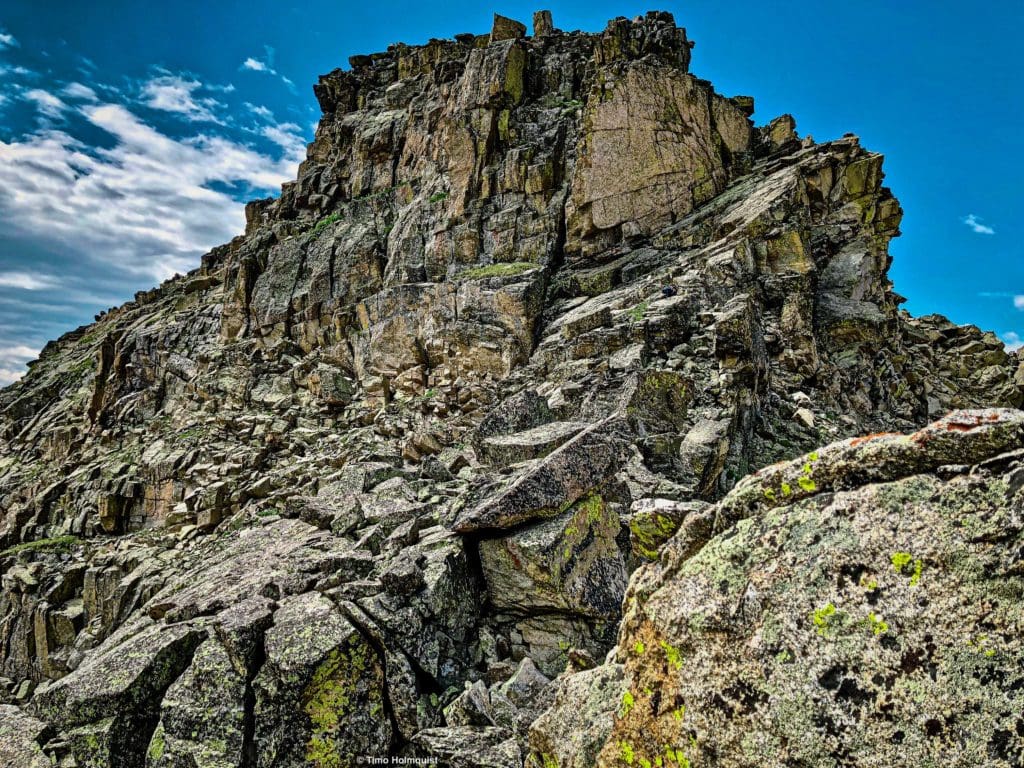
Views from just below the summit of Cooper Peak.
The Ultimate Offline GPS Hiking & Ski Maps
See why onX Backcountry is the ultimate GPS navigation app for your outdoor pursuits. Try Today for Free. No credit card required.

Directions to Trailhead
If you’re doing any of these routes as a single-day adventure, you’ll be going nearly 20-miles. It ispossible, especially for mountain veterans and trail runners, but it’s much more manageable from a camping spot at Gourd Lake. It’s also possible from Stone Lake in Hell Canyon, although the pass you need to climb (Cooper Pass) to get to the routes is loose and tedious with a ton of scree. The most comfortable approach to Cooper’s various routes is from Gourd Lake.
Monarch Lake is the most reasonable one-day approach and the logical approach for a backpacking adventure. Parking at Monarch Lake requires a small fee, as it’s in the Arapaho National Recreation Area. You can use an interagency pass to circumvent the fee.
Camping in the Indian Peaks Wilderness is done by reservation. You can find reservation details at recreation.gov. Please read about reservation type, when reservations open up and wilderness regulations. The reservation process is fairly simple, but if you camp without one, you risk incurring a fine.
Monarch lake is relatively far from the Front Range, but once Trail Ridge opens up, you have two reliable options to get there.
- Option 1: take I-70 to exit 232 toward Winter Park on US 40. Pass through the small town of Empire before winding up and over Berthoud Pass. Drive down the other side and pass through Winter Park, Frasier, and Tabernash. When you get to the town of Granby, take a right on US 34 toward Lake Granby. The turn-off for Monarch Lake is at the end of a quick rise and right before you get to your first views of the lake. If you start to pass the shoreline of Lake Granby, you’ve gone too far. The road you want is Colorado 6; it passes along the southern shoreline of Lake Granby and eventually dead ends into your trailhead after 9.5 miles. The road starts out paved but quickly turns to dirt. The approximate time from Denver is anywhere from 2 hours and 15 minutes to nearly 3 hours, depending on traffic.
- If Trail Ridge is open (also US 34) and you have a Rocky Mountain Pass, you can take that over the divide and pop down to the Monarch Lake Trailhead. Once you get into the park, take US 34 over the divide, get into Grand County and continue south until sighting Colorado 6 on your left. If you go over Trail Ridge, you’ll continue through Rocky Mountain National Park, beyond Grand Lake, Shadow Mountain Lake, and all of Lake Granby before finding the turnoff. Fort Collins to Monarch Lake over Trail Ridge takes about three to three and a half hours.
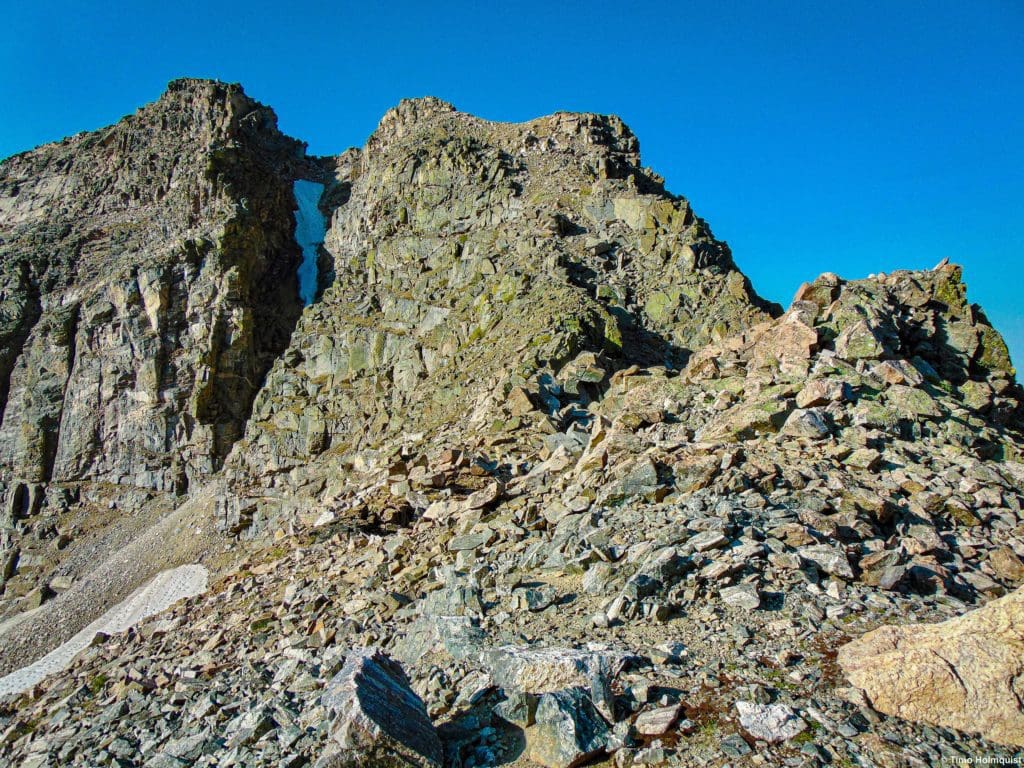
The deeply inset and mostly melted North Couloir in early September.
The Ten Essentials: How to Equip Yourself for the Backcountry
Packing the “Ten Essentials” whenever you step into the backcountry, even on day hikes, is a good habit. When something goes awry, you’ll truly appreciate the value of carrying these items that could be essential to your survival.
Field Notes
This mountain is far from just about everything. While it is possible to do a route in a day, if you’re trying to get after multiple routes, you’re going to need multiple days. Backcountry camping can be exhilarating but bring a stocked first aid kit, plenty of food, appropriate shelter, water purification and a bathing suit (you can jump off the rocks on the northern side of Gourd Lake, it’s deep). Also, please note that if the North American Monsoon is firing off daily thunderstorms, the mosquitoes will be really active.
Your best forecasting angle is probably via Opensummit, although you need a subscription to get all the goods. If you spring for one, check out Sawtooth Mountain’s weather page, it’s the closest to Cooper. The closest town with a reliable forecast is either Granby or Grand Lake. If you’d rather not pay for another subscription to something (understandable), the free forecasts on mountain-forecast.com are pretty good. The closes forecast station is on Mt. Toll, which is visible from multiple angles on the approach to Cooper and from its summit plateau; however, it lies two basins to the south, so it’s good but not pinpoint accurate.
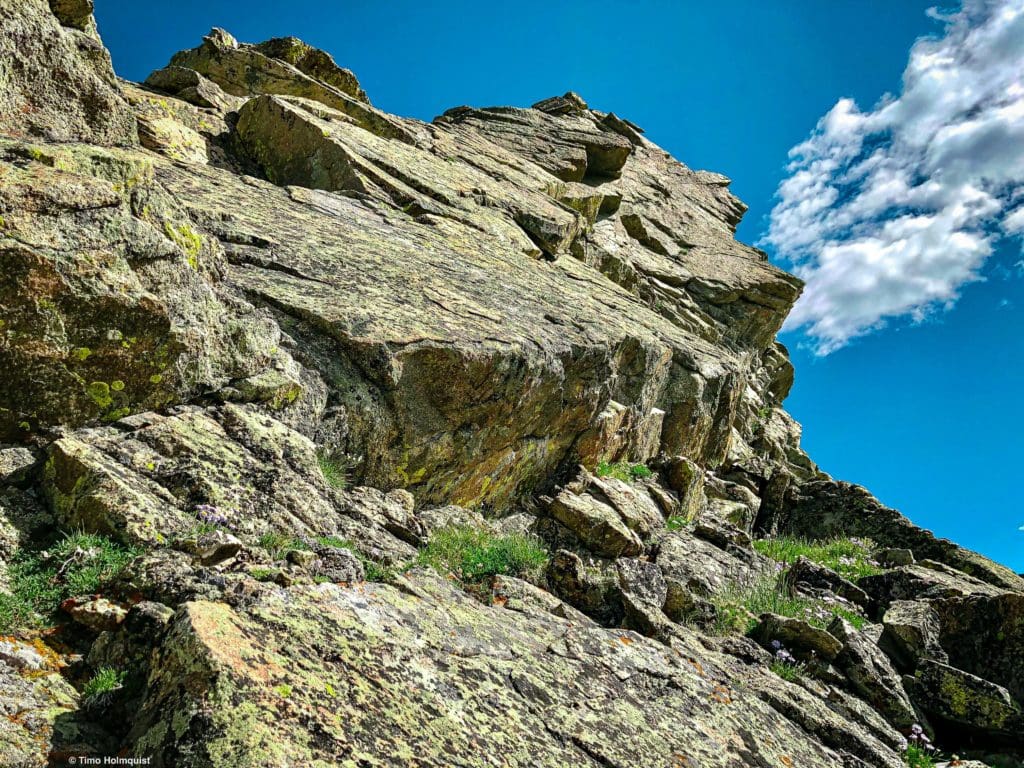
A seldom seen look at Cooper Peak’s craggier northern profile.
Journal: The Approach from Gourd Lake (all routes)
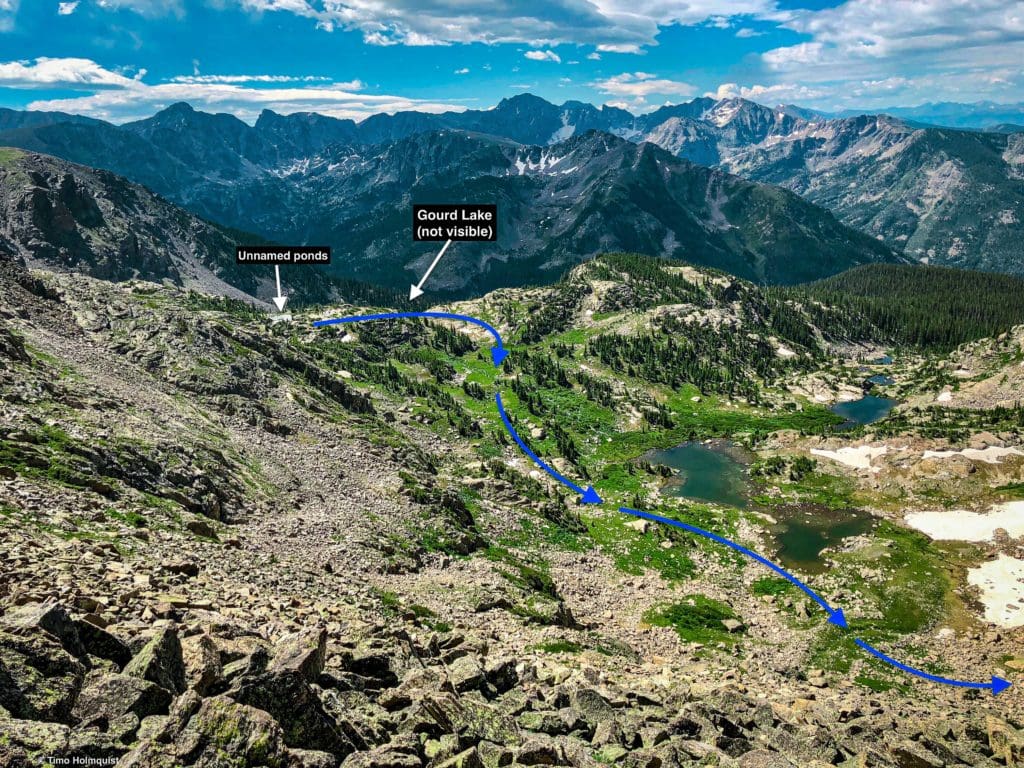
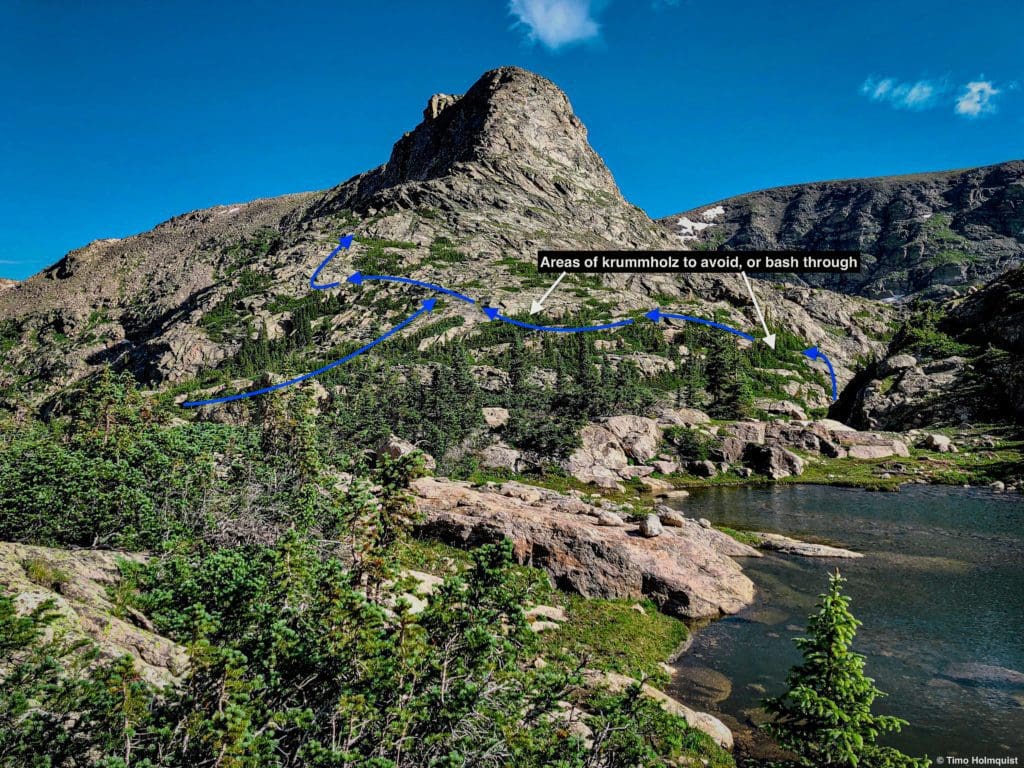
The first objective is to get to Gourd Lake, which you can read about here. From Gourd Lake, you need to pop up above the cirque that holds the lake. There are two ways to go about doing this. You can head up a grassy chute between two knobs or circle around to the feeder stream that dumps into Gourd. The first option is shorter but steeper; the second takes a few extra points of a mile but seemed easier to navigate.
Some options for getting out of the Gourd Lake area.
If you go for the outlet stream, walk around the lake (there’s a pretty easy path to follow that goes right) until you run into the stream that flows into Gourd Lake. Follow a herd path up the right side of this stream that veers in and out of meadows. It is not an official trail, there will be times when you lose it. Keep following the stream higher, making sure to stay on its right-hand side. Eventually, you’ll find a smaller, unnamed lake above Gourd.
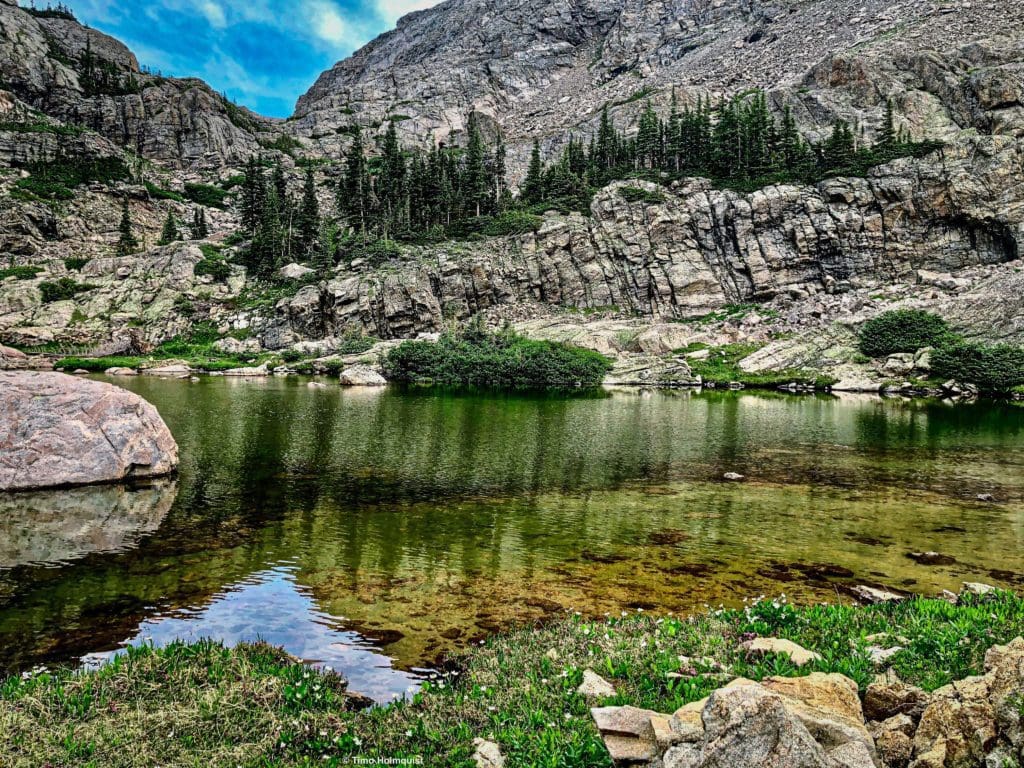
Unnamed lake above Gourd Lake.
Cross the stream where it leaves this small lake and connect rock slabs up to a shoulder to the left of some cliffs.
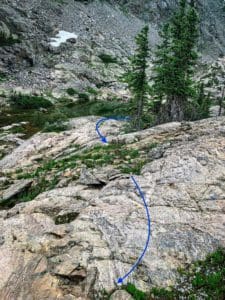
Looking down at your path.
If you follow the slabs and then take the easiest route up to the shoulder, then navigation should be simple.
The shoulder you’re aiming for.
On top of this shoulder lie two small unnamed ponds with killer views of the South Buttress.
The South Buttress of Cooper Peak
These double ponds are where various route approaches take off.
Journal: Southwestern Slopes (Class 2+ easiest)
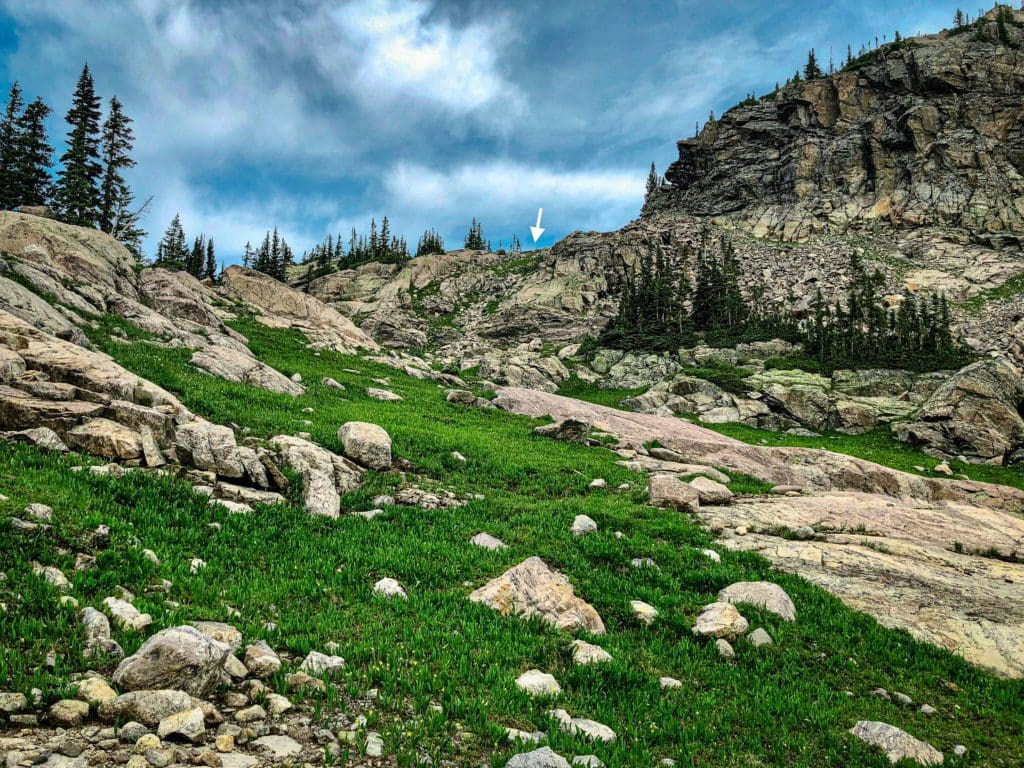
Your goal is to make it into the basin to the left (west) of the South Buttress. From the double ponds, you can descend north to the mountain stream below you that comes from Island Lake. This is made more difficult by the presence of a small canyon. Avoid this by circling to the left of the double ponds and descend to a saddle in the ridge.
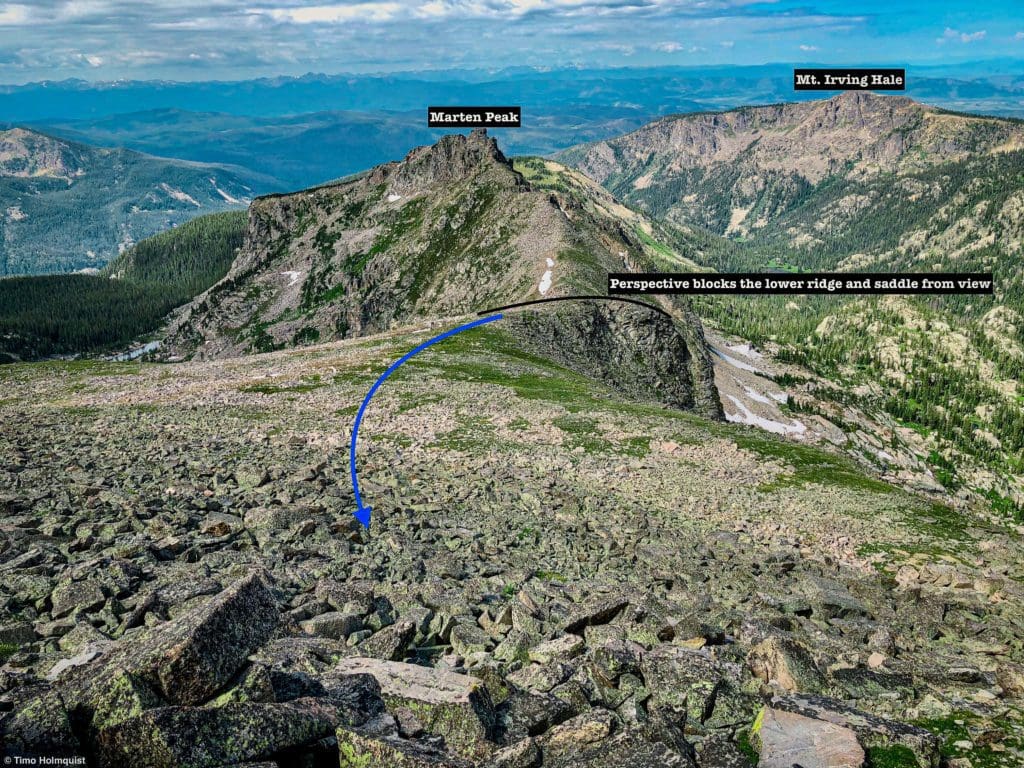
From the saddle, angle a descent down to the stream side. Once you cross the stream, head northwest into the large bowl between Marten Peak (left) and Cooper Peak (right).
The basin you want, seen from high up on Cooper.
This bowl is trailless, but there aren’t enough trees to block perspectives. You want to head to the right of another series of ponds and make for the low point in the ridge between Marten and Cooper Peak.

Typical terrain in the basin, with your objective marked
Once you get onto the ridge, you can turn left to tackle Marten or turn right and tackle Cooper. We’ll cover the Cooper option.
The easiest way is to traverse underneath the ridgeline and avoid the Class 3 sections, but it is a loose and tedious route. If you’re ok with a little scrambling, stick closer to the ridge crest, avoiding tougher sections as they come up to keep the route at a comfortable lower Class 3 on better rock.
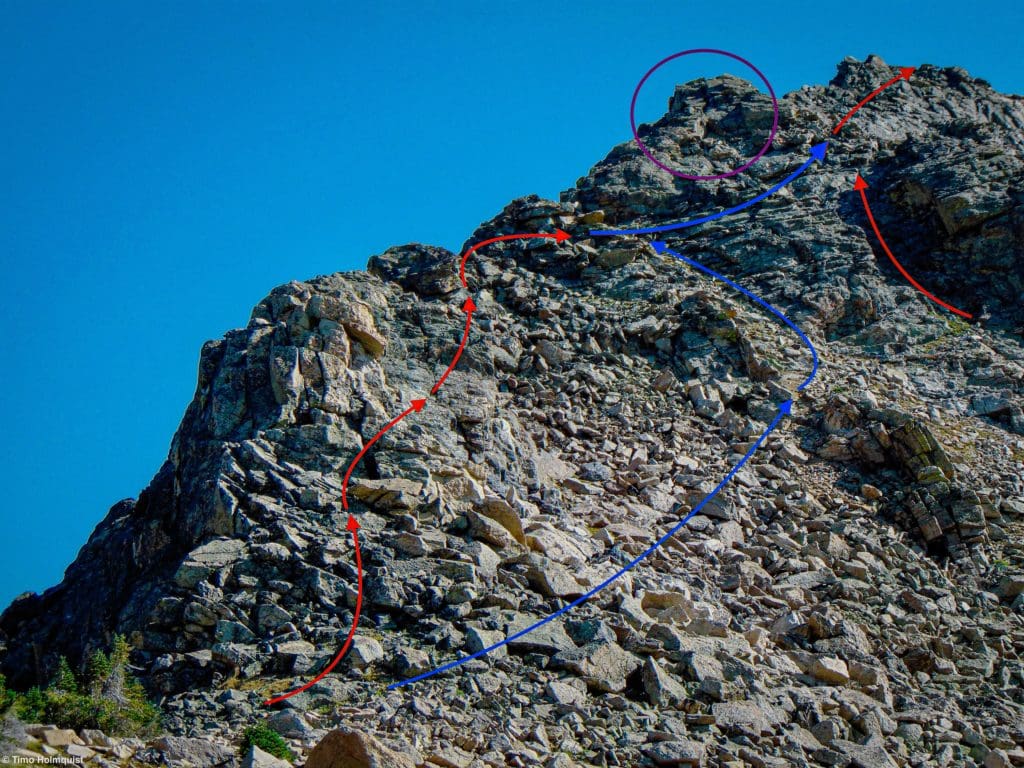
A nice variety of options form the saddle up Cooper’s SW ridge. Purple is Class 4, Red is Class 3 and Blue is Class 2.
The ridge scrambling portion lasts around 450 vertical feet, and there are many bail-out options you can pursue to your right. Just be aware of the looser rock away from the ridge crest. After the ridge bleeds into the slanted summit plateau, the hike drops back to easy Class 2.
Above the mellow section of Class 2 and right below the final rock ribs.
Work your way higher and find a number of ways to attack the final rock rib where the highest rocks are. Everything to the right is Class 2+, with some Class 3 options off to the left.
The summit rocks.
The easiest way to get off Cooper is to return via the same way you came, but make sure to take in the views from the summit. They may not be the most dramatic in the IPW, but you can see the Crater Lake cirque, Sawtooth, Toll, Paiute, Marten Peak, Irving Hale, and the Hiamovi Group, Ogalalla and even up to the Never Summers.
Journal: North Ridge (Class 3)
This is an unexpected and interesting route that can be approached from Stone lake but is best utilized from Gourd lake because you get to pass the stellar-looking Island lake en route.
Make your way to the double ponds described in the shared approach.
Once you circle the ponds and climb a small slope, you’ll be able to hear and see the stream flowing out from Island lake. The Island Lake and Gourd Lake drainages are separate, so you have to cross back over this slope to get back into the Gourd drainage.
Once you’re out of the Gourd Lake Drainage, find the larger stream that flows from Island lake and hike uphill alongside it. Directionally this is to the right or the east. You can descend to the stream and follow it, or stay parallel to it and clamber along some rock slabs punctuated by krummholz. As you follow the stream, look for places to cross, there are several, including a last-minute crossing right on the shores of the surprisingly big lake.
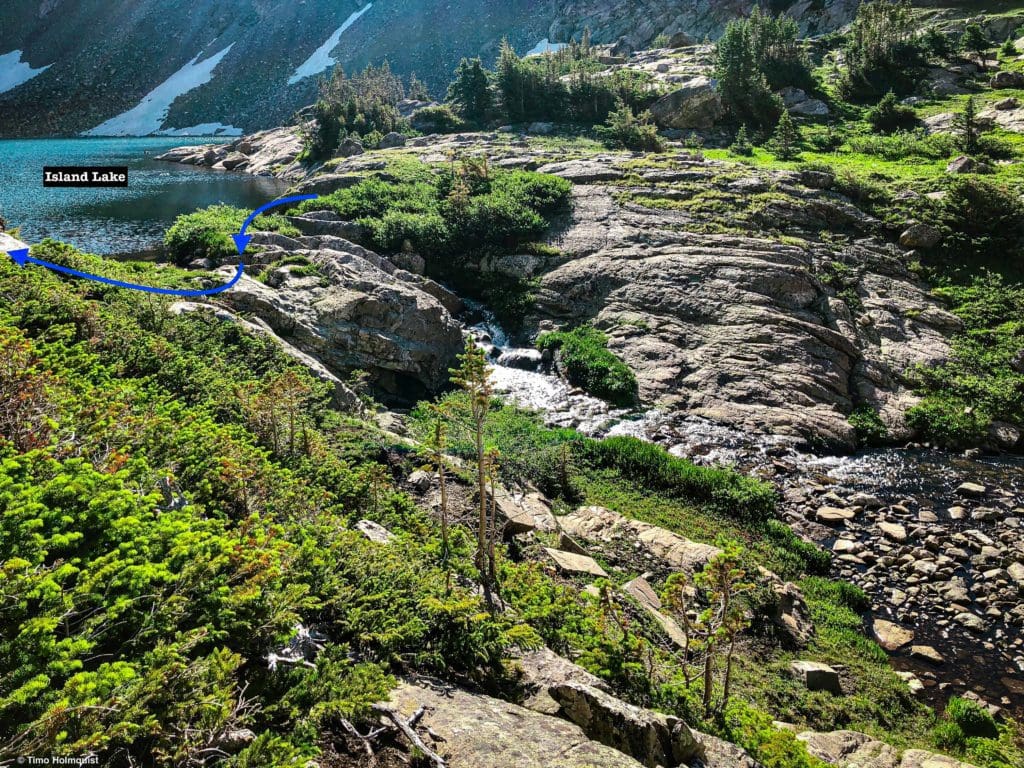
One of many potential stream crossings.
You can cross around Island lake without hopping the stream, but a lot of that crossing is in shade and harbors snow patches through mid-late July that you have to cross. If you hop to the Cooper Peak side, you can traverse around in the sun.
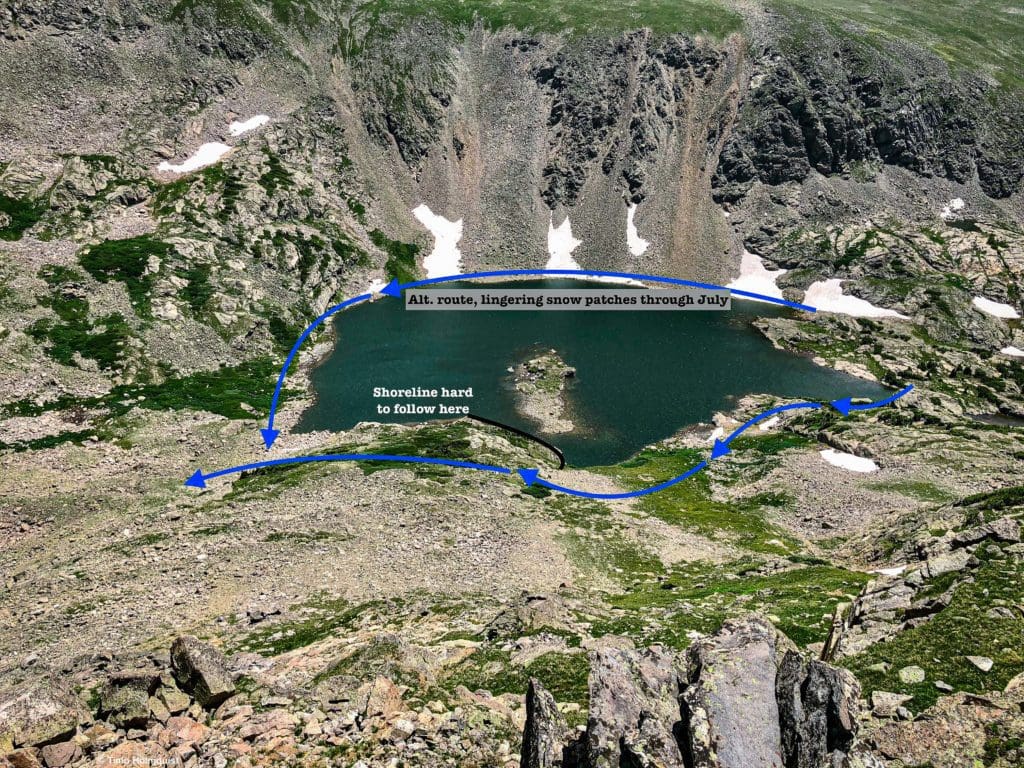
General trajectory around Island lake from the summit of Cooper.
On the Cooper side, you can stick relatively close to the shoreline except for one area near the Island. There, rocks make the shoreline route a little tough, so instead of following the shore, climb around the rocky area and maintain that elevation. Make sure not to climb too high, or you’ll end up cliffing out. There’s another unnamed pond above Island Lake; shoot for that.
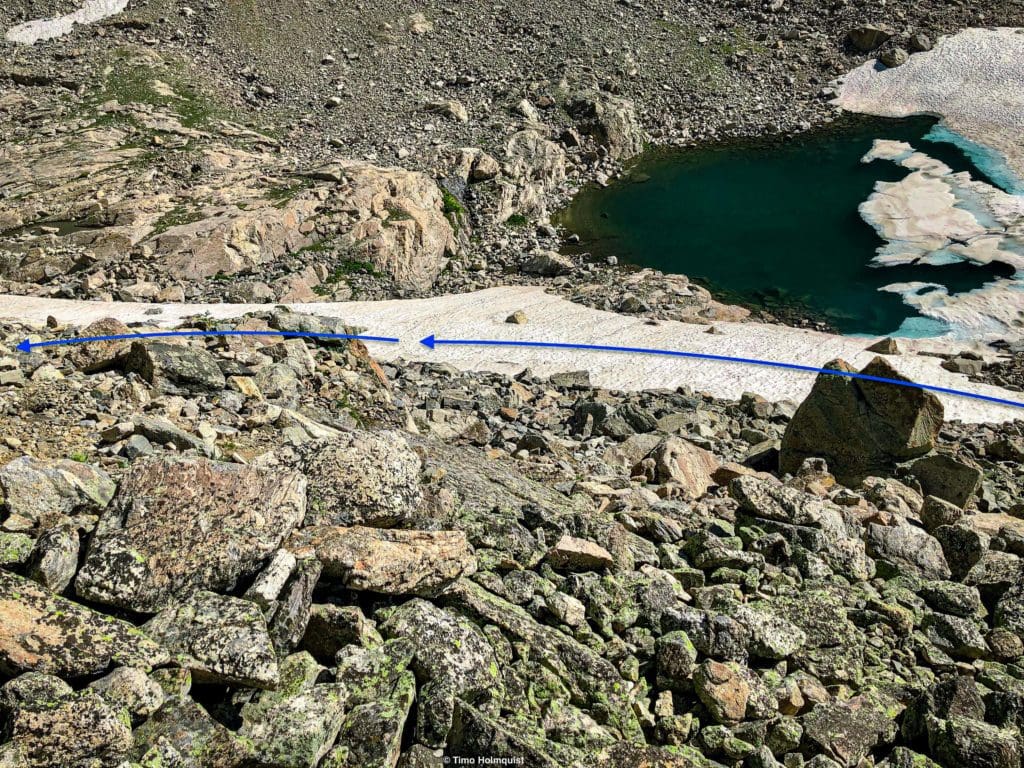
One of several lines around the unnamed glacial pond.
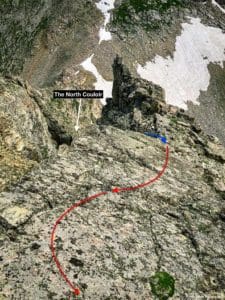
On the other side of this pond, you should start to see Cooper Pass, the saddle between Cooper (left) and the bulk of the Divide (to the right). The scrambling route begins on the pass.
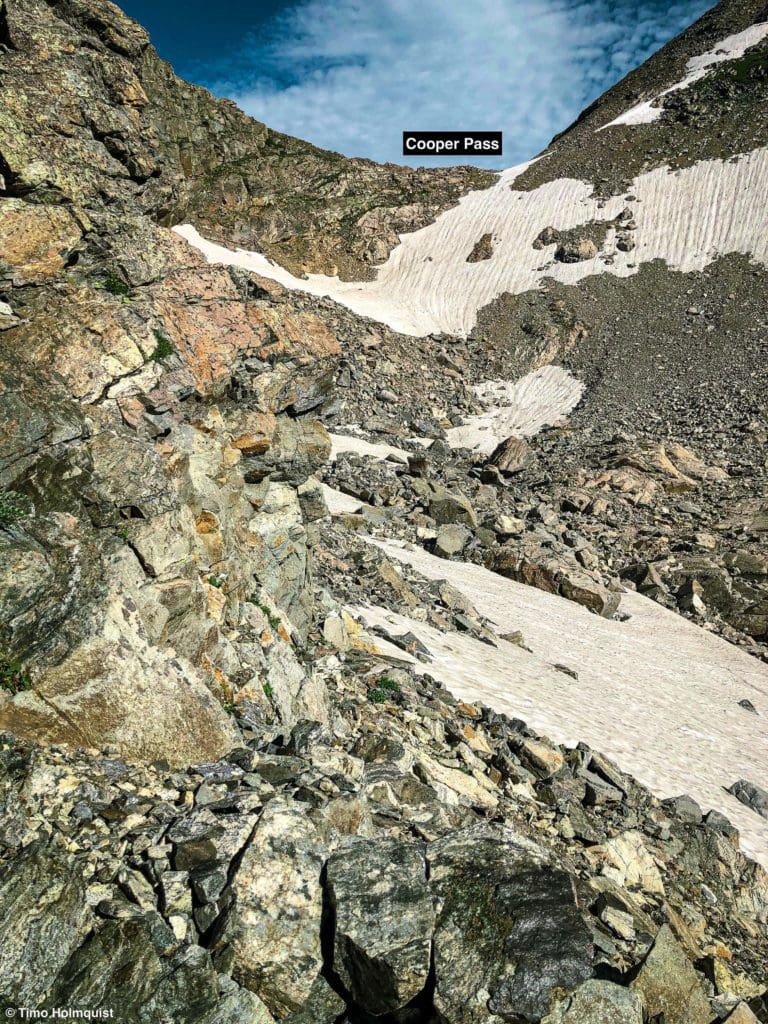
Cooper Pass.
From June-early July, you may be threading through snowfields; bring spikes. August and September usually provide ample ways to avoid what snow is left over. The climb up to the saddle is straightforward and gives you a preview of what you’ll be scrambling, along with a great look at the North Couloir.
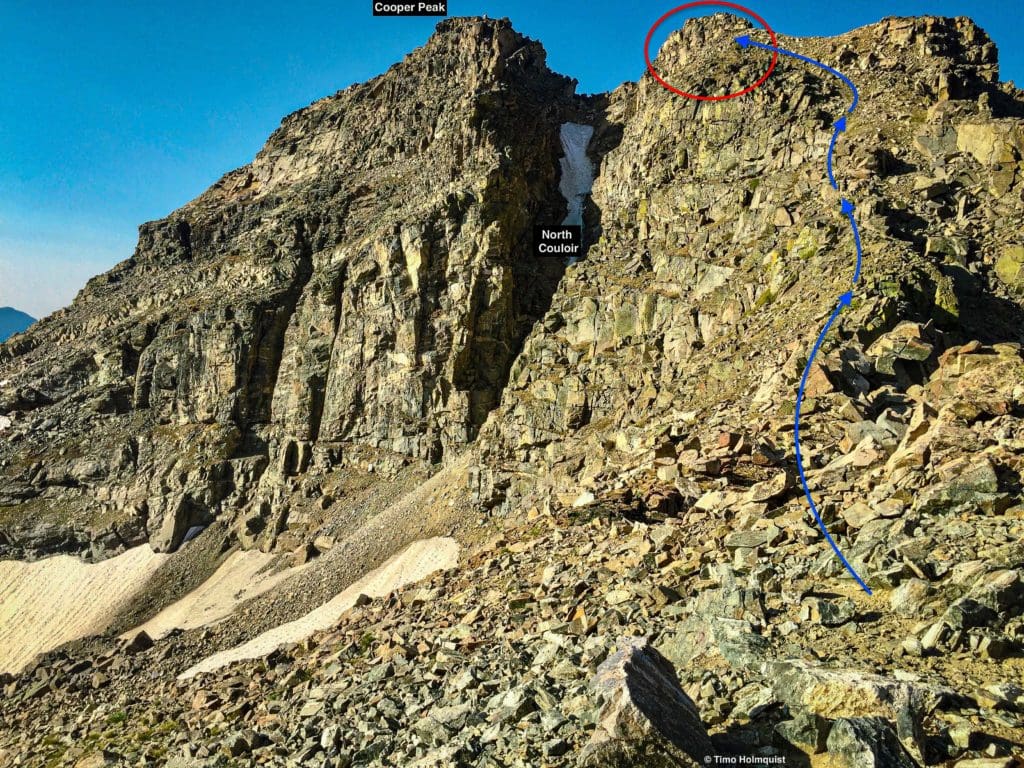
The North Ridge runs to the right of the deeply inset North Couloir.
At first glance, the route doesn’t look like much, and indeed, the first section is largely Class 2 over loose ground. However, a surprising scramble awaits as the ridge route veers closer and closer to the North Couloir. You’ll know you’re getting close to the goods when you start to get this view of Cooper’s summit.
The beginning of the scrambling.
Your first task is to climb up a broken set of blocks to gain the true ridgeline.
First section of Class 3.
Once above this, you’ll start to see the 3 Guardians, which are rock towers that you have to snake between. At first, they don’t look like much, but as you approach them, you’ll see what you need to do isn’t without some Class 3 and decent exposure.
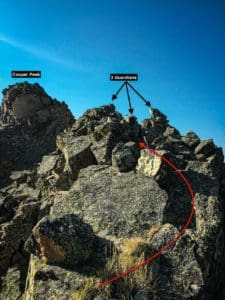
First view of the 3 Guardians.
Approach the Guardians by keeping the closest one on your left. As you get closer, the scrambling will get more interesting.
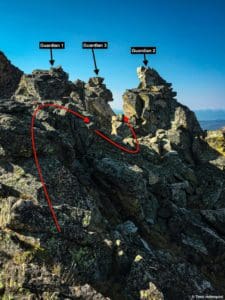
You can reach a hand out and touch the Guardians but the route threads between them.
Once you get up to the guardians, there aren’t many bailout options. You can turn around and downclimb the first class 3 section and then perform a long traverse underneath the difficulties, but if you’re up here and itching to scramble, keep on keeping on.
After staying to the right of Guardian 1, pass to the left of Guardian 2 on a stable ledge with substantial exposure down to the North Couloir.
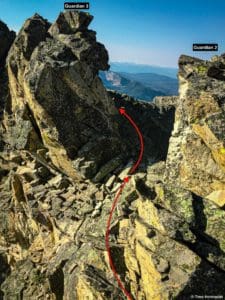
After passing between the first two Guardians, which involves the most exposed moves on the route, you’ll swing around the right side of Guardian 3 and traverse around it on another small ledge. The exposure is less on this side, but it would still be a painful fall on sharp rocks if you lost your balance, use the rocks on Guardian 3 to find good hand holds.
Passing by Guardian 3.
After sliding by the Guardians, you have one more scramble step before circling the head of the North Couloir and attacking the summit. At this point, you could slide to the right of this step, but if the Guardian traverse got you stoked, there’s a simple Class 3 route right up the middle.
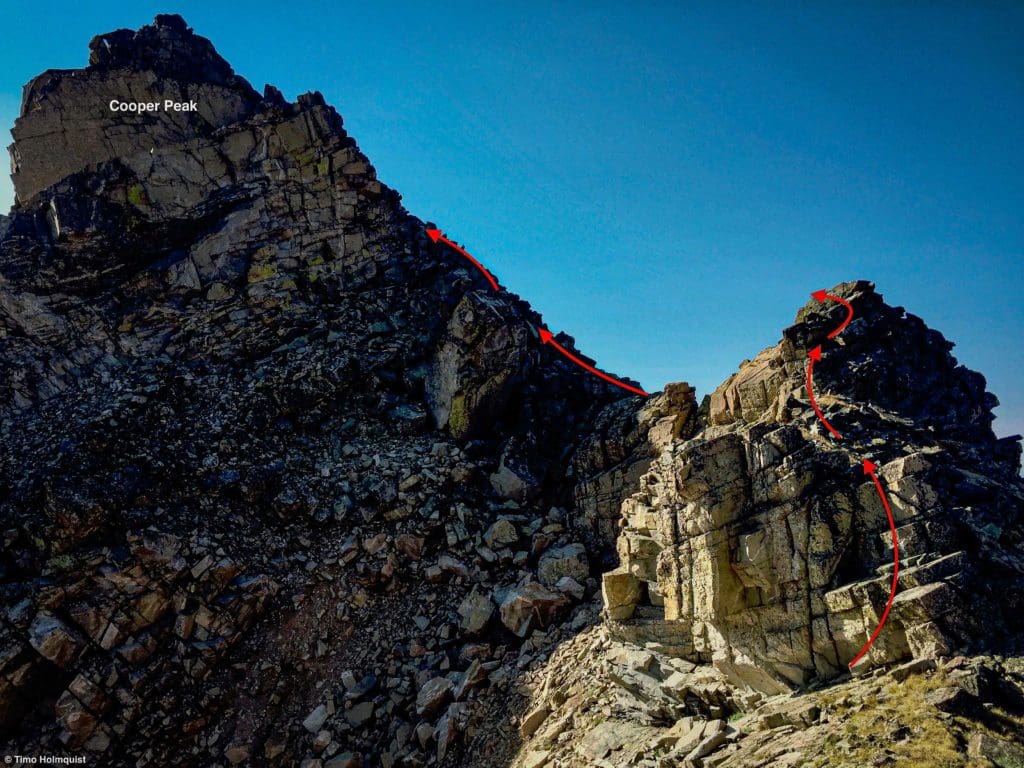
Another short but sweet scrambling section.
Once you’re on top of the ridge once more, run it to the head of the North Couloir and scout some options up to Cooper’s summit. The easiest method is to head behind the ridgeline and thread together a Class 2 route up to the summit rock. But honestly, if you’re here, climbing a 12,000-foot mountain in a state with 1,000 higher peaks, stay closer to the ridgeline to keep it fun.

Stay closer to the ridgeline to maintain fun Class 3 routes on good rock. Check your holds.
The summit isn’t visible right away from the area around the Guardians. You can scramble up two distinct pitches of Class 3 scrambling and arrive on a grassy bench about 10 feet below the summit rib.
Once on the bench, take a quick look to the north to see your route from the Guardians to where you’re standing.
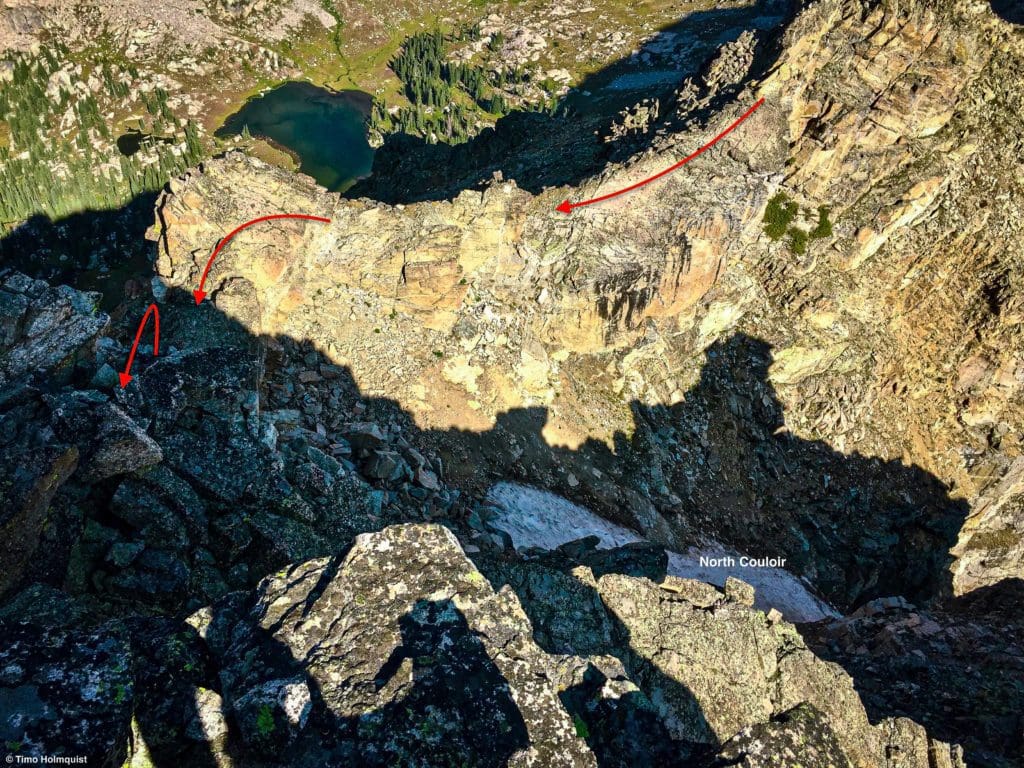
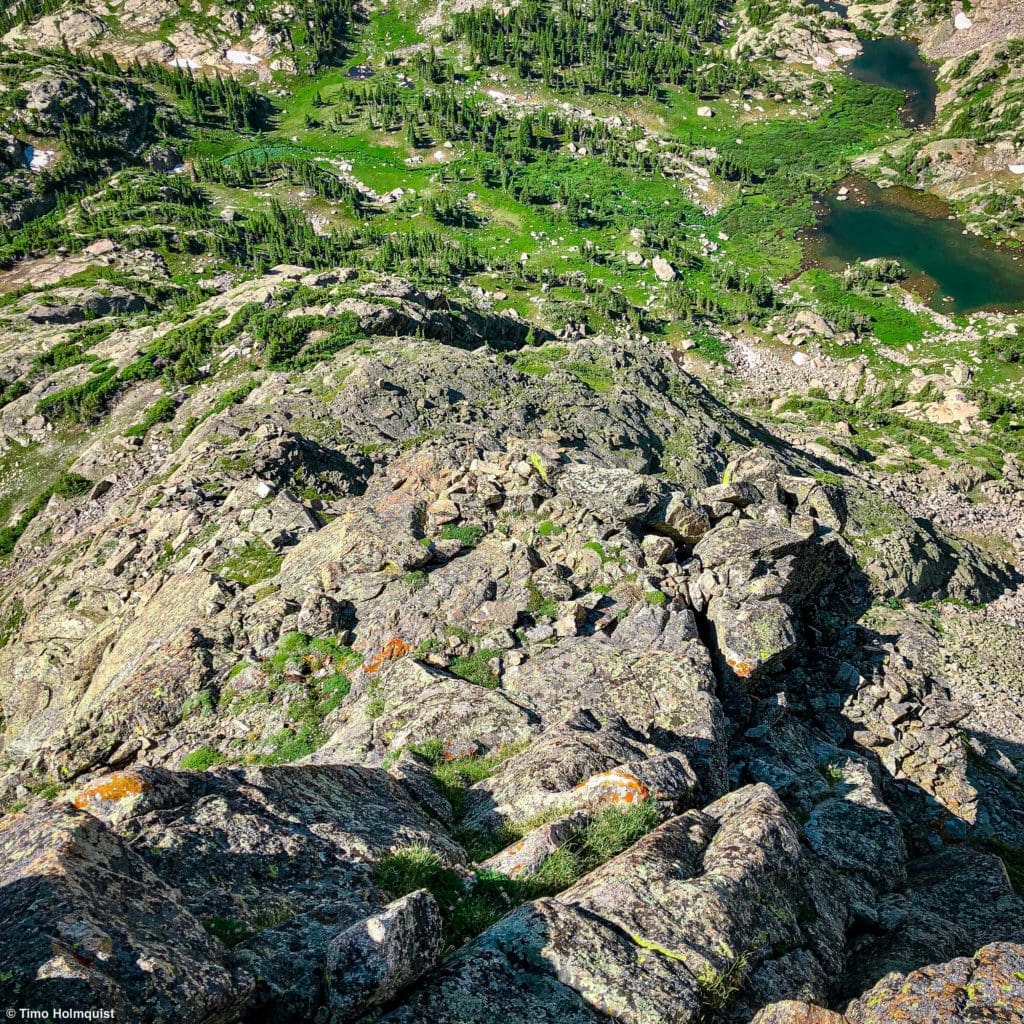
Looking down.
From here, find the best way to pop up onto the final rock ribs (light Class 3 or 2+) and claim Cooper Peak’s summit!
Descend by either retracing your steps (veering left to avoid some areas of scrambling amongst the Guardians), or descending the ridge towards the saddle between Cooper and Marten Peak. From there, use the description of the Southwestern Slopes to make it back to the Gourd Lake area.
Journal: North Couloir (Steep snow)
The North Couloir is a 55-degree snow chute that runs parallel to the North Ridge in a deeply inset couloir. There’s snow in at least two definable chunks through August, but late June through mid-July is the prime window for an uninterrupted 500-foot steep snow climbing experience in a wilderness setting. This is a technical route; you need to have crampons, an axe (or two) a helmet, prior experience and/or an experienced climbing partner.
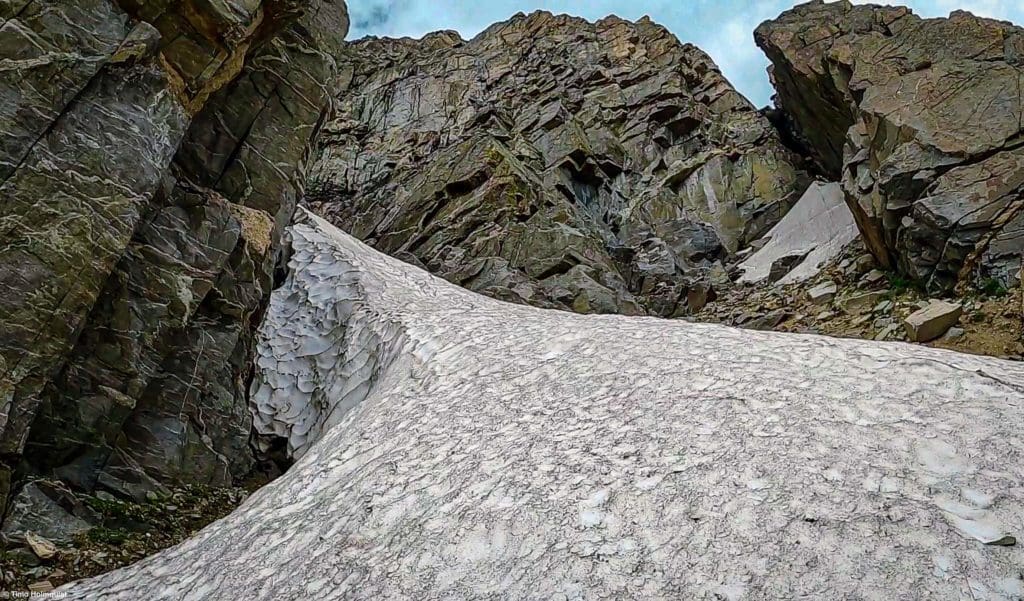
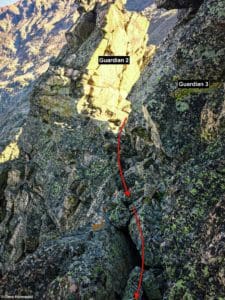
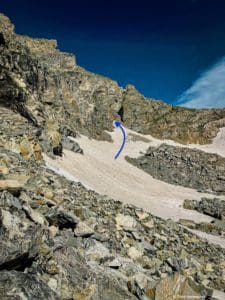
What the entrance to the North Couloir looks like
The approach is similar to the North Ridge scrambling route.
- Climb out of the Gourd Lake area heading north.
- Pop into the Island Lake Drainage and ascend along the outflow stream to the shores of Island lake (generally bearing right after you crest the ridge separating Gourd Lake with the Island lake drainage).
- Pick a side and circle Island Lake. Both sides go. The eastern side is probably easier but has lingering snow patches so bring spikes.
- Ascend past the lake and beyond another glacial pond, heading toward Cooper Pass.
- Before you get to Cooper Pass, turn left and sight the intimidating couloir.
- Climb up.
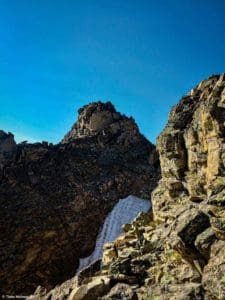
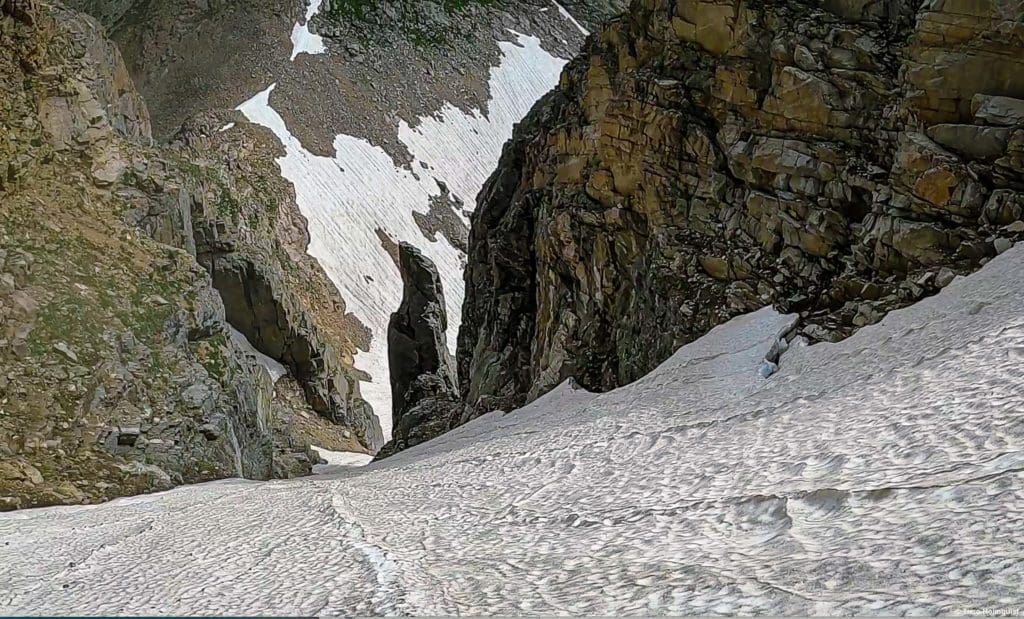
The couloir is actually hard to see until you get close to Cooper Pass.
North Couloir from Cooper Pass.
The climb is pretty relentless. Because it’s sheltered, you don’t have to start extremely early but around 10 am (July-August), parts of the couloir start seeing flashes of sun and will slush up a lot faster. Generally, starting the climb between 7-8 am seems wise unless the area had a solid freeze the night before.
The North Couloir stays hidden until you’re right below it.
It’s a tough but consistent climb and looks especially intimidating as you look up into the entrance.
The left side of the couloir is quite vertical and doesn’t harbor many places to step off the snow if you want. While it’s possible on the northern side, options are somewhat limited.

Looking up from inside the couloir.
The best moves are to have a camelback or something with a hose attachment so you can take standing breaks and keep drinking water to power you up the couloir.
Looking down from near the top.
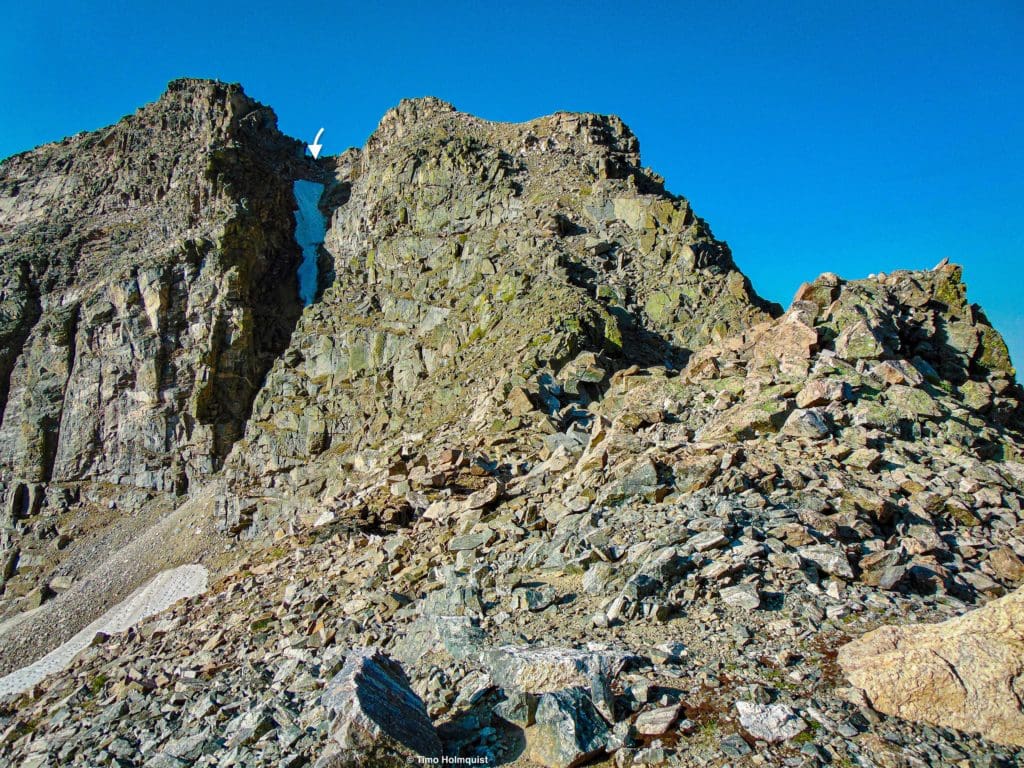
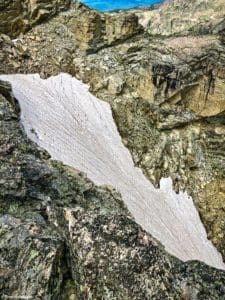
The general shape of the couloir is like a warped hourglass, with a shorter and slightly wider bottom, a thin middle section that likely melts out first in August, and a slowly broadening upper section that ends below the final summit block of Cooper.
Looking at the top of the couloir from a side ridge on Cooper.
When you get to the top, you have a few options to finish the climb. You can scramble up the headwall (Class3, brief) and merge with the top of the North Ridge Route. You can also swing left and in front of Cooper’s summit block. There’s a fun, slanted scramble across the ridge that rejoins the summit push.
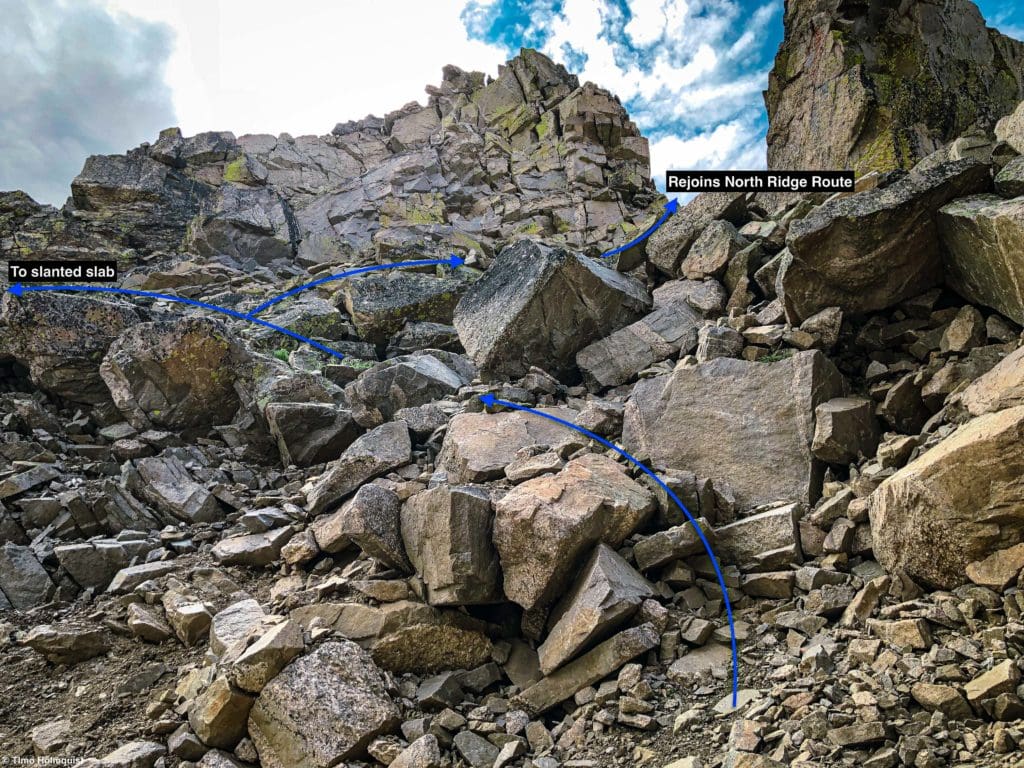
Options from the top of the couloir.
If you opt for the slab, you’ll exit the couloir and circle to the left, joining a stunted ridge that makes up the southern wall of the couloir.

The slab route is tucked under Coopers north face.
Taking this route will have you rejoining the North Ridge Route for its final push up the summit rib. When dry, it’s a fun way to explore more of the craggier side of Cooper.
On the slab looking northeast
Journal: South Buttress (Class 4)
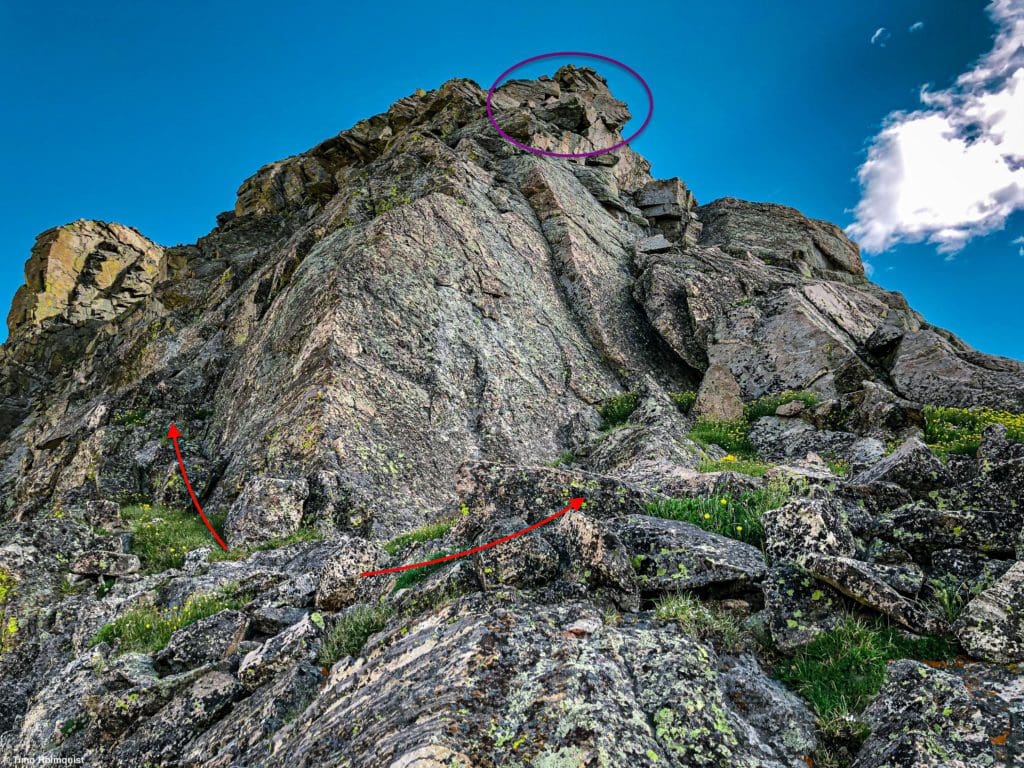
This is probably the most spectacular route on this peak, and it doesn’t even lead directly to the summit. The South Buttress towers over the north end of Gourd Lake. It’s a spicy but short route, and you can take the Southwest slopes back to Gourd Lake, so there isn’t any downclimbing. It reminded me a bit of Lead Mts. East Ridge in the Never Summers. There are multiple no-fall zones on this scramble and it goes through serious terrain, make sure you’re comfortable with the occasional rock climbing move and Class 4 scrambling.
If you camp at Gourd Lake and have a camera with a decent zoom, you can actually study the route.
The South Buttress looming over the area.
- Exit the Gourd Lake area
- Reach the divide between Gourd lake and Island Lake Drainage
- Descend to the stream coming out of Island Lake and find a way to cross it (easier the closer you get to the bowl between Marten Pk. and Cooper.)
The bottom part of the route once you cross the stream.
- Begin rising amongst and around thick krummholz
Once you cross the stream and start rising, the terrain is a mix between rock slabs and thicker vegetation. There are likely many variations through them, some good, some bad, but you have to get through or around the vegetation to begin the scramble.
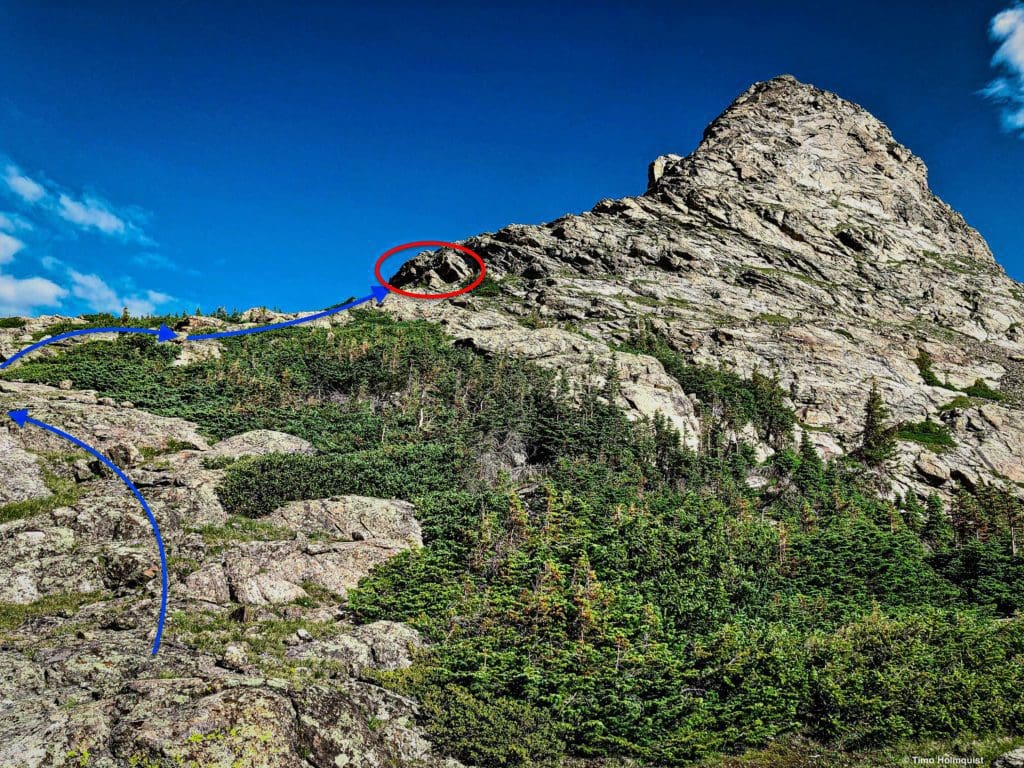
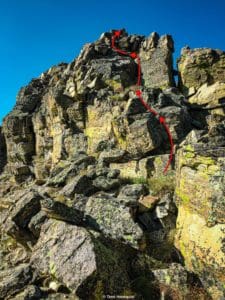
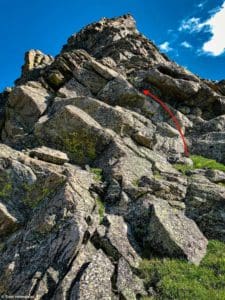
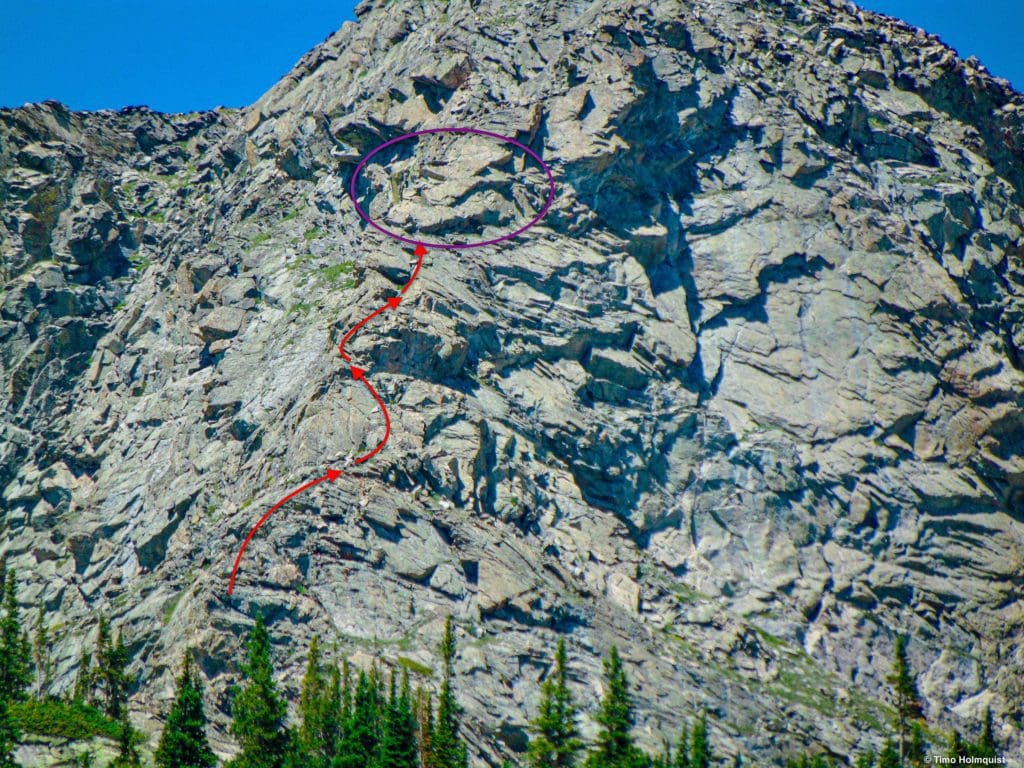
Make your way to the red circle, the first section of scrambling on the ridge.
There is a rocky endcap to the scrambling that picks up after the krummholz finally ends. There’s some good Class 3 scrambling on this piece. Once you get over or around it, the rest of the scramble begins to take shape.
Up, up and away.
There are quite a few sections of class three from here on out. The first couple of sections are separated by grassy shoulders. As you climb, the exposure begins to sharpen.

The sections leading up to the crux begin to get clearer as you ascend.
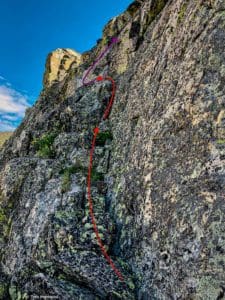
You mostly follow the nose of the ridge, sometimes bearing slightly right but there is at least one alternative to the left that leads to a great Class 4 slab.
Paths diverge but come together before the Class 4 Crux section in the purple arrow.
The alternative slab is reached by following an ascending bench and meeting it from the side.
The approach.
This slab was a fun surprise. The rock was grippy, dry and supplied numerous holds via multiple crack systems. If you’re trying this in the fall or early season, it is on the colder side of the ridge and doesn’t see the sun until the afternoon. It will also be harder if the rock is wet.
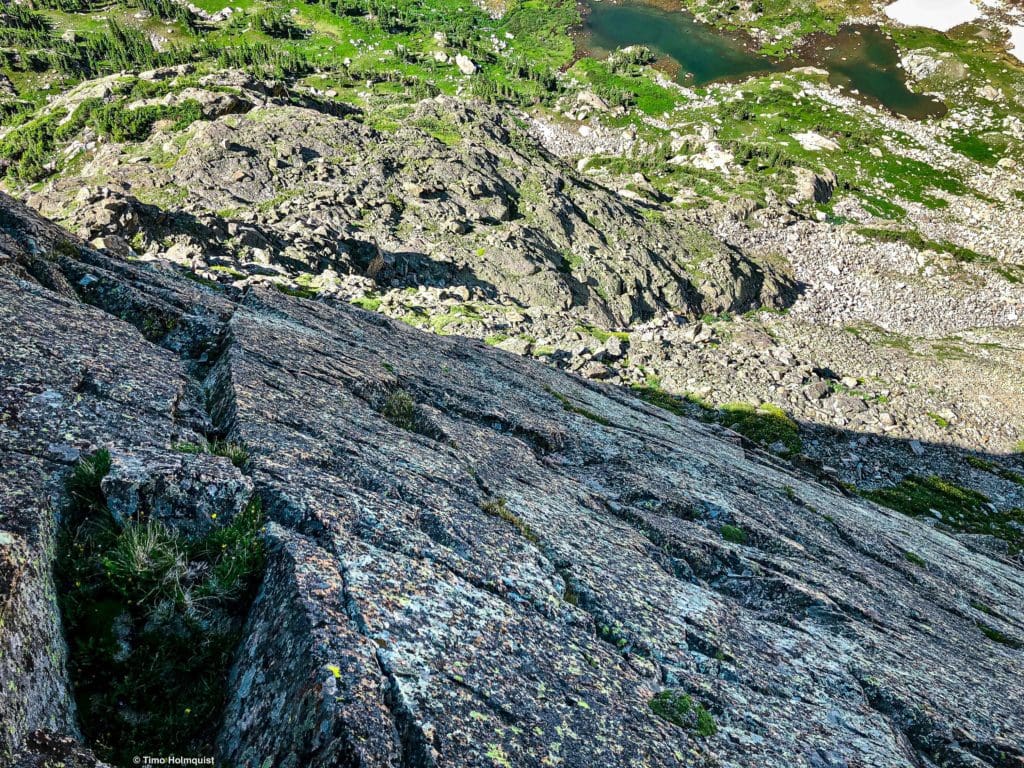
Looking down at the slab.
Once you scramble up the slab, there’s a brief Class 3+/4 window you have to climb through to get back on the eastern side of the ridge, but it also has good holds.
Back on the ridgeline proper, or if you skipped the slab and stayed on the nose, you’ll be approaching the hardest part.
The crux slabs, zoomed in.
The crux is made of a series of slabs you can to clamber over. There are steep drop-offs to the left and a slanted series of slopes to your right that are all a bit overhung at the bottom. This is serious terrain.
Here is what the crux area looks like as you approach.
A few things to keep in mind as you get to the crux.
- This is good rock, there are plenty of holds.
- The farther right your veer, the more the exposure.
- There are multiple sections.
- You do not have to downclimb this route.
After you get over the first slab, there is a bit of climbing along the crest directly. Following this, you have to traverse to the right towards more exposure in order to get under and around a piece of rock that juts into your path. That’s probably the most exposed set of moves. Search for holds, continue up, and the scrambling relents for a few feet.
Looking down from above the crux, which is now nearly indistinguishable.
While the most dramatic and exposed portion is now behind you, the scrambling is not done. You still have a slanted wall to climb to get from the nose of the ridge up to the crown.

The last concentrated area of Class 3+ and 4 scrambling.
The individual moves in this section are as hard as the crux but with a little less exposure. As before, the holds are good, and if you keep a good rhythm and try to maintain 3-points of contact against the rock at all times, you should find this an enjoyable way to end the serious scrambling.
Once you top out on this section, there’s some brief light Class 3 as you get up to the crown of the buttress, and then the terrain opens up. It’s wide and flat on top, which doesn’t do justice to how exposed the scrambling was up to that point. It took me 45 minutes but you could scramble this whole thing in half an hour if you really moving.
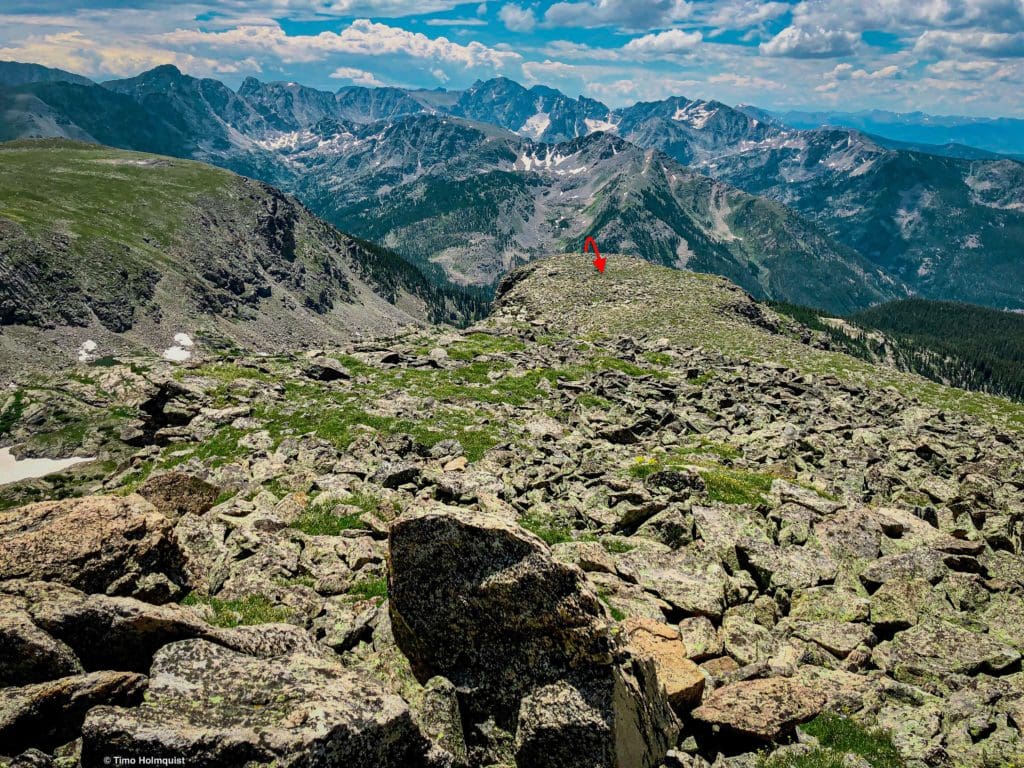
The red arrow shows where you emerge from the South Buttress. This perspective is from a few dozen feet below the summit rib of Cooper.
From here, you can tag Cooper if you haven’t already or begin making your way to the saddle between Marten and Cooper, which is the easiest way down. As you descend into the bowl between Cooper and Marten, make sure to find a place to cross the stream and use grassy benches on the other side to re-attain the ridge between the Island lake and Gourd Lake drainages. From there, consider your options and find the easiest way back into the Gourd lake area.
Skyblue Overland Strongly Recommends That You Enroll With Global Rescue Prior To Embarking On Your Next Adventure.
With more people outside now more than ever, Global Rescue expanded services to include field rescue within 100 miles of home. With Local Field Rescue — automatically included in any travel protection services membership — Global Rescue is there whether you’re hiking, kayaking, snowmobiling, fishing or simply enjoying the outdoors and get ill or injured and you’re unable to get to safety on your own. Purchase a Global Rescue membership for your next adventure and travel with peace of mind. Single trip, annual and family options are available.


