


High Point:
12,047 ft

Total Ascent:
~4450 ft. from Roaring Fork Trailhead (~1330 ft. from Stone Lake)

Difficulty:
Very Difficult (Class 3 scrambling, harder options available)

Distance:
~15.3 miles from Roaring Fork Trailhead (3.72 miles from Stone Lake)

Waypoints:
40.12952, -105.76442

Route Type:
Out and Back
Overview
Marten Peak is a fun scramble in a remote setting and provides some quality Indian Peaks Wilderness (IPW) level scenery. The peak is surprising, rocky and has a few different routes on it. You can approach it in a couple of different ways, namely Hell Canyon or Gourd Lake. If you decide to get up Marten in a day, it’s a long outing. Instead, consider camping at Stone Lake, where you can eye the peak from the northern shores of the lake. Marten Peak is one of the last places to catch sunlight in Hell Canyon, and it looks particularly striking with the last light of day on it.
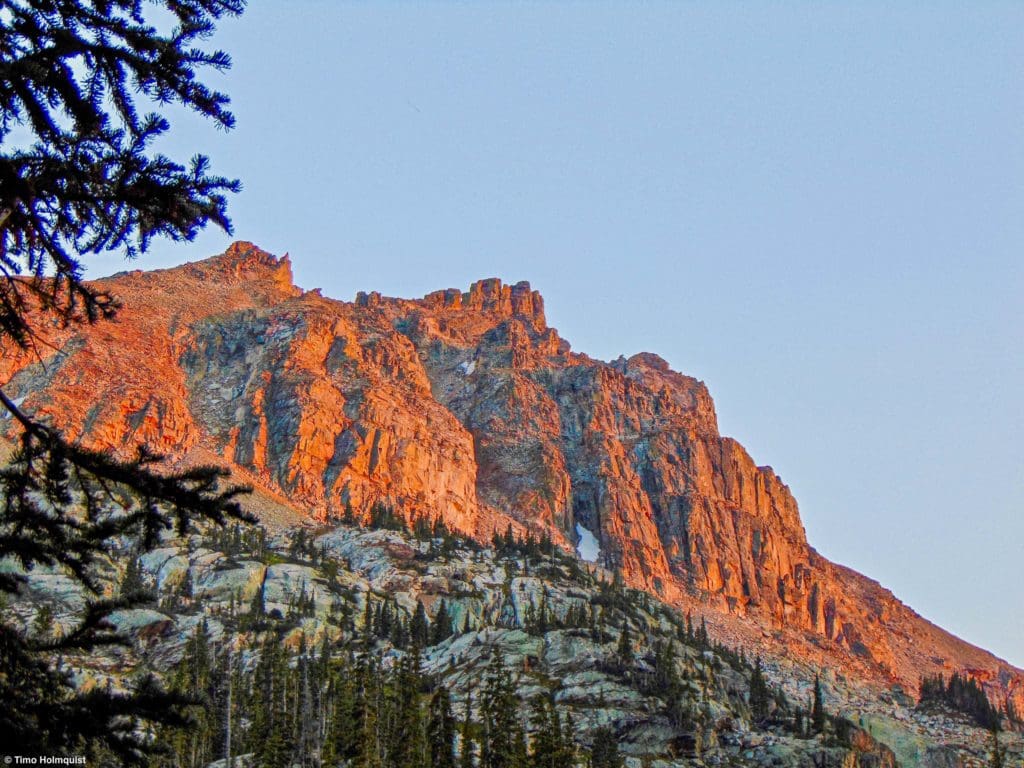
Marten Peak at sunset from Stone Lake.

Table of Contents
Article Navigation: Click on any of the listed items in the table of contents below to jump to that section of the article. Similarly, clicking on any large, white section header will jump you back to the Table of Contents.
- Overview
- Scales and Criteria
- Directions to Trailhead
- Field Notes
- Journal: Standard Route (light Class 3)
- Journal: North Ridge Direct (brief Class 4)
- Bonus: North Tower (Class 4)
- Journal: F&T Route (Class 4)
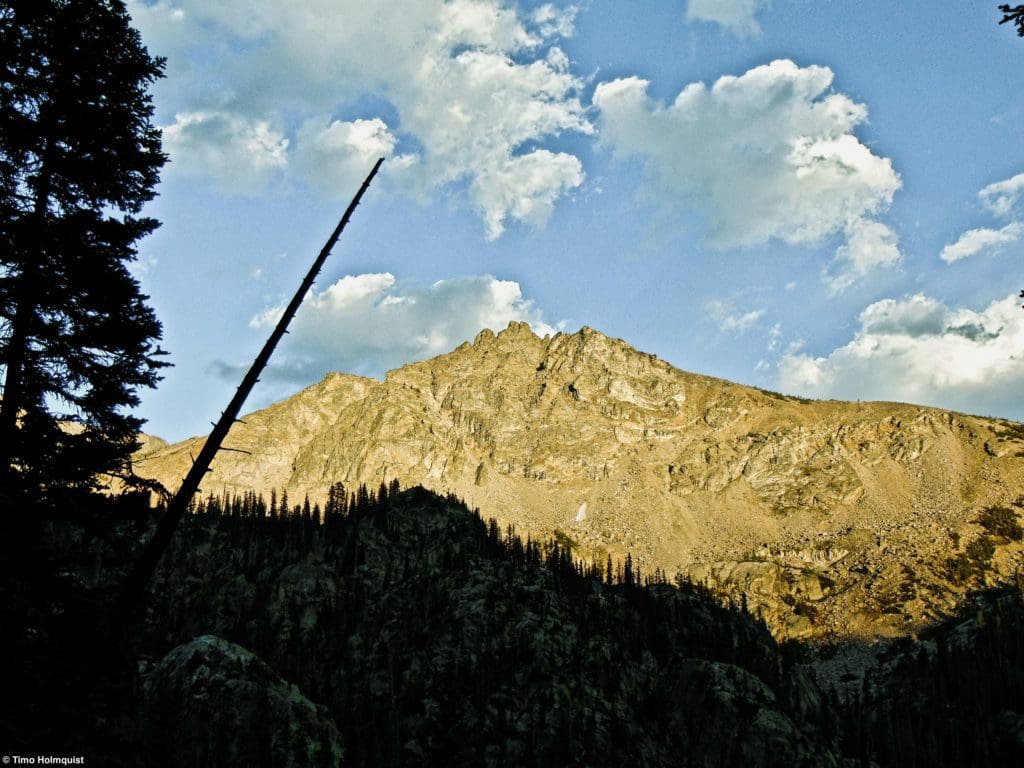
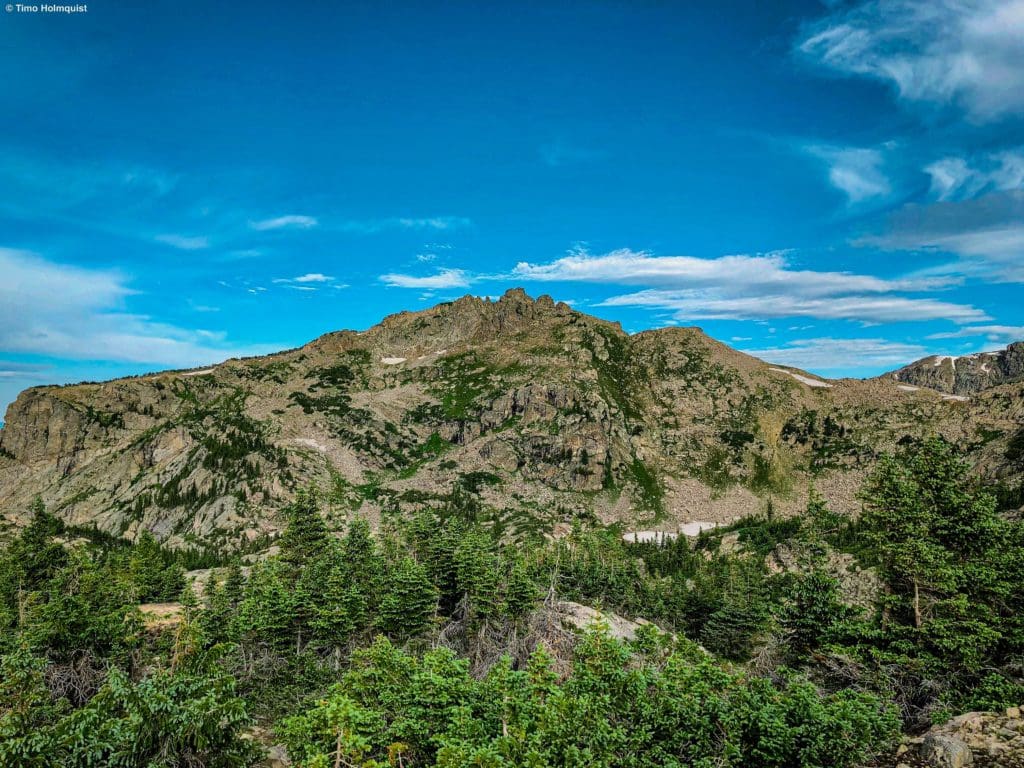
Marten Peak from the Roaring Fork Trail as it descends into Hell Canyon.
Scales and Criteria
This article uses two metrics to calculate difficulty: overall distance and elevation gain. Seeing as there are multiple places where scrambling is required, a technical rating is also employed, using the Yosemite Decimal System to calculate difficulty.
Difficulty Ratings:
- Easy: less than 5 miles, less than 500 ft. of elevation gain
- Moderate: 5-10 miles, 500-2000 ft. of elevation gain
- Difficult: 5-15 miles, more than 2000 ft. of elevation gain
- Very Difficult: 10+ miles, more than 3,500 ft. of elevation gain
Technical Rating:
- Class 1: Established hiking trail the entire length of the adventure. Low chance for injury.
- Class 2: Typically involves cross-country navigation, possibly using hands for balance but not required, steeper than Class 1.
- Class 3: Hands and feet used to scale areas; must use hands to proceed (either for balance or to help pull you up a section), increased exposure, a fall could be fatal. Helmet recommended, along with grippy hikers.
- Class 4: Climbing on very steep terrain just shy of vertical, falls could be fatal, hands employed for grip and balance continuously, ropes advised but scalable without. Helmets are highly recommended, along with grippy hikers.
- Class 5-5.4: Vertical climbing that involves technical rock-climbing moves, exposed, falls likely to be serious or fatal, possible to scale without ropes but only for very experienced veterans. Helmets, grippy hikers, and/or rock-climbing shoes are necessary.
- Class 5.5 and up: Not covered as scrambling, full-on rock climbing with ropes, helmets, etc.
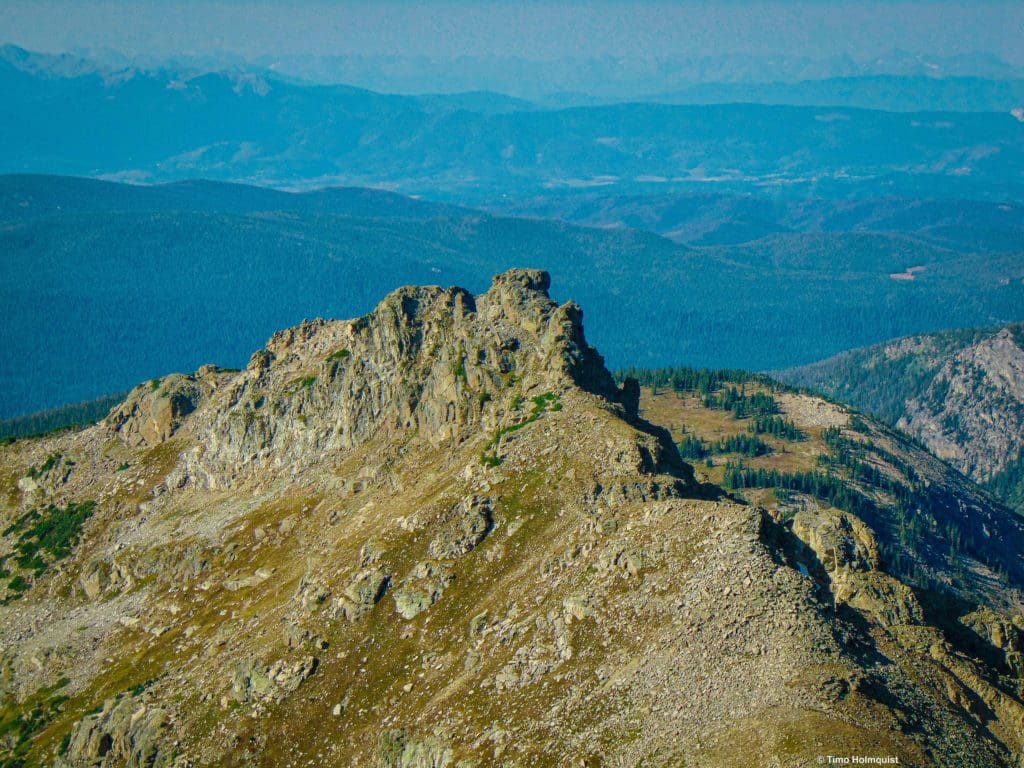
Marten Peak as it looks from Cooper Peak.
Directions to Trailhead
Roaring Fork Trailhead is the most reasonable one-day approach and the logical approach for a backpacking adventure. Roaring Fork Trailhead is relatively far from the Front Range, but once Trail Ridge opens up, you have two reliable options to get there.
- Option 1: take I-70 to exit 232 toward Winter Park on US 40. Pass through the small town of Empire before winding up and over Berthoud Pass. Drive down the other side and pass through Winter Park, Frasier, and Tabernash. When you get to the town of Granby, take a right on US 34 toward Lake Granby. The turn-off for Roaring Fork is at the end of a quick rise and right before you get to your first views of the lake. If you start to pass the shoreline of Lake Granby, you’ve gone too far. The road you want is Colorado 6; it passes along the southern shoreline of Lake Granby and starts out paved but quickly turns to dirt. The approximate time from Denver is anywhere from 2 hours and 15 minutes to nearly 3 hours, depending on traffic.
- If Trail Ridge is open (also US 34) and you have a Rocky Mountain Pass, you can take that over the divide and pop down to the Roaring Fork Trailhead. Once you get into the park, take US 34 over the divide, get into Grand County and continue south until sighting Colorado 6 on your left. If you go over Trail Ridge, continue through Rocky Mountain National Park, beyond Grand Lake, Shadow Mountain Lake, and all of Lake Granby before finding the turnoff. Fort Collins to Monarch Lake over Trail Ridge takes about three to three and a half hours.
Once around the lake, you’ll come up to a three-way intersection, take a left and continue past some campsites. Beyond the campsites, the road will pass by an arm of the lake on your left and a pond that empties Grouse Creek on your right. Just beyond this section, the trailhead appears on your right. This is nearly 9.7 miles from the turn-off with US34. If you enter the campsites at the end of the road, you’ve gone too far.
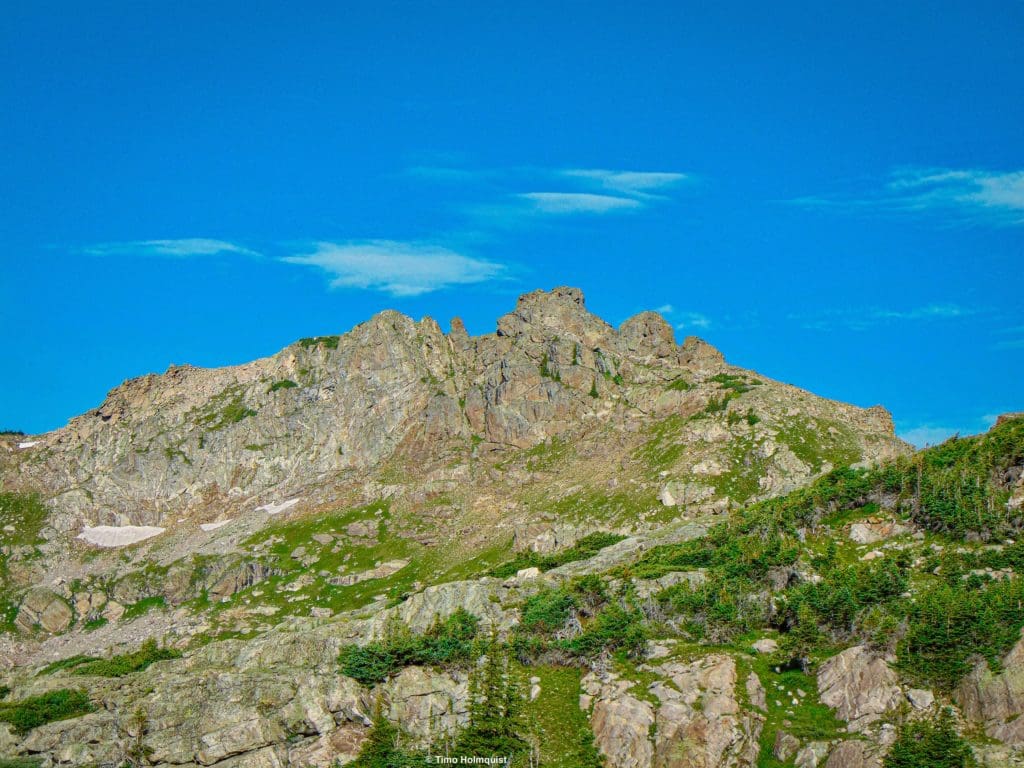
Marten peak from between Gourd Lake and Island Lake.
Field Notes
This mountain is far from just about everything. While it is possible to do it in a day, Marten Peak also makes a nice combination with Cooper Peak or a campsite at Stone Lake. Backcountry camping can be exhilarating but bring a stocked first aid kit, plenty of food, appropriate shelter, water purification and a bathing suit (you can jump off the rocks on the northern side of Gourd Lake, it’s deep). Also, please note that if the North American Monsoon is firing off daily thunderstorms, the mosquitoes will be really active.
Your best forecasting angle is probably via Opensummit, although you need a subscription to get all the goods. If you spring for one, check out Sawtooth Mountain’s weather page, it’s the closest to Cooper. The closest town with a reliable forecast is either Granby or Grand Lake. If you’d rather not pay for another subscription to something (understandable), the free forecasts on mountain-forecast.com are pretty good. The closes forecast station is on Mt. Toll, which is visible from multiple angles on the approach to Cooper and from its summit plateau; however, it lies two basins to the south, so it’s good but not pinpoint accurate.
2 route possibilities, there’s another Class 4 route on the other side of the summit block, a Class 3 approach via the south summit, and a way to climb the smaller north summit.
Journal: Standard Route
You can get to Marten from either Gourd Lake or Stone lake. If you’re doing it in a day, it’s probably best to combine it with Cooper Peak to get two summits in one day. Although, I would make the argument that camping at Gourd Lake and spending time on Cooper Peaks’ various routes is worthwhile. Similarly, if you camp at Upper Lake or Stone Lake, consider tagging Marten Peak since it’s right there and visible from most of the area around the lake.
Your trailhead is either Monarch Lake or Roaring Fork, depending on how you want to climb the mountain. You’ll either approach via Stone Lake or Gourd Lake. Check our articles on both to get an idea of what the approaches are like. Distilled, it’s ~6 miles and 3,120 of vertical gain, with one significant downhill for Stone Lake. Gourd Lake is ~9 miles and 2,725 ft. of gain, but a lot of that comes at the very end.
If you approach from Gourd Lake, make your way out of the bowl heading north until you crest a low ridge. Cooper Peaks’ stunning South Buttress should be right in front of you. To the left, you’ll be able to see Marten Peak.
Marten Peak from the ridge between Gourd lake and the stream that flows out of Island lake.
Make for the basin between Cooper and Marten, attain the ridge and approach from there. While a Gourd Lake approach is possible, I recommend getting to Marten from Stone Lake.
If you approach from Stone Lake, the approach is easier, although not without some concentrated vertical gain. You can see the mountain from the northern shore of Stone Lake. Follow the ridge left to the low point; that’s your target.
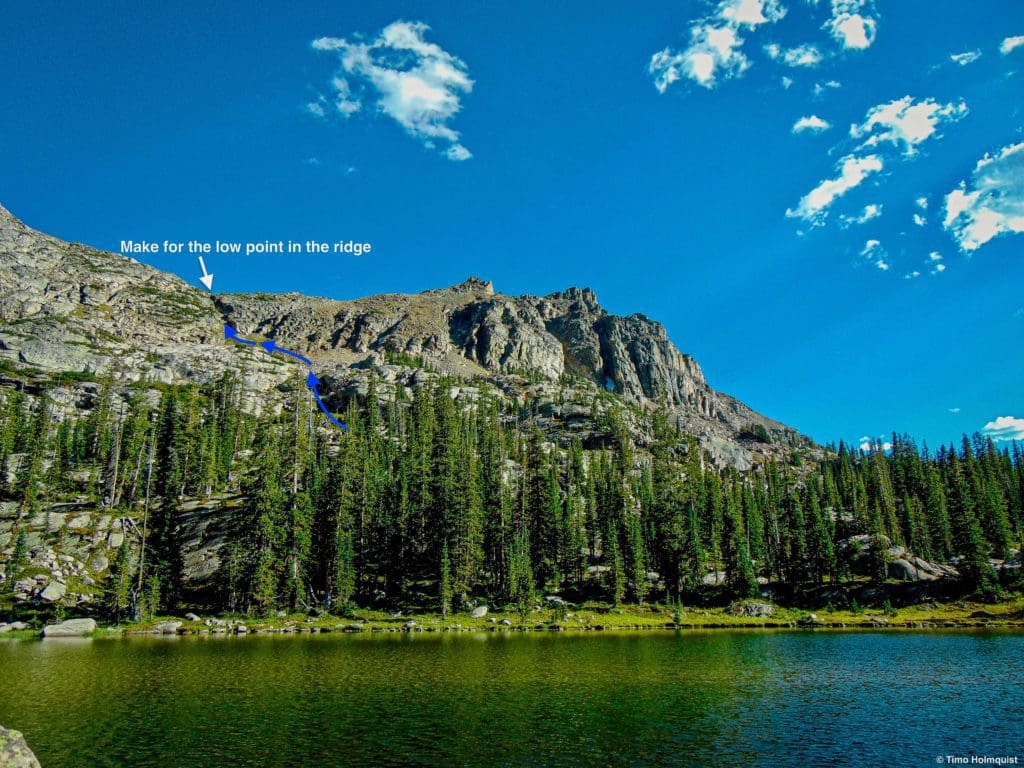
The general route to the ridge from Stone Lake.
Cross the lake at its outflow, or take the trail, breaking at the head of the lake (eastern side), heading first east, then south to the ridge. Follow the path of least resistance, which follows a very defined gully to the ridge. Watch for loose rock if you’re traveling with a partner.
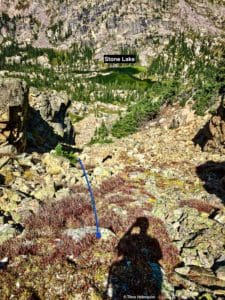
Looking down to Stone Lake once you’ve attained the ridge.
Once you’re on the ridge, head southwest.
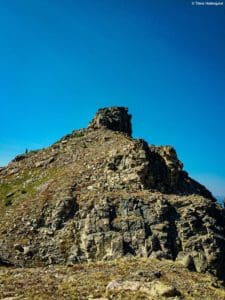
From the ridge, the route is obvious; up you go.
The first part of the climb isn’t all that complicated; you just follow the ridge. There is some exposure to the Hell Canyon side, but for the most part, the ridge is wide and runs at a manageable Class 2.
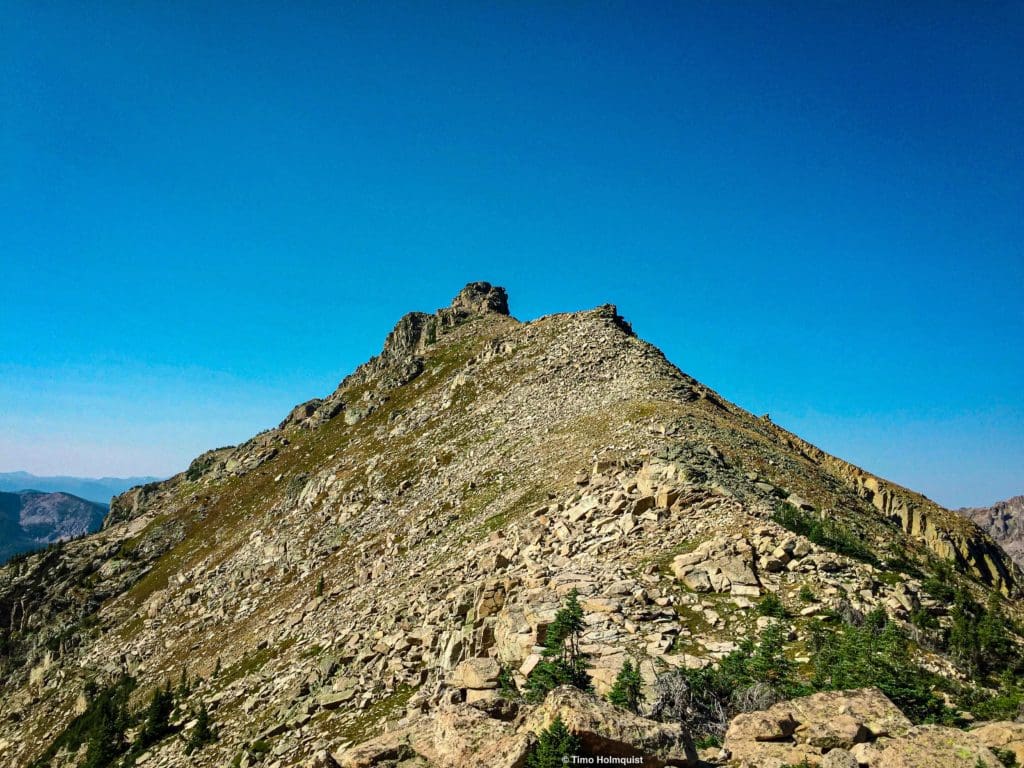
The view of the summit block from the first large shoulder you crest.
Once you draw nearer to the summit block, the route gets a little more interesting. The summit area isn’t big by any stretch of the imagination, so none of these routes are too terribly committing. However, since there are a few, you can easily do some exploration and scramble up more than just the standard route.
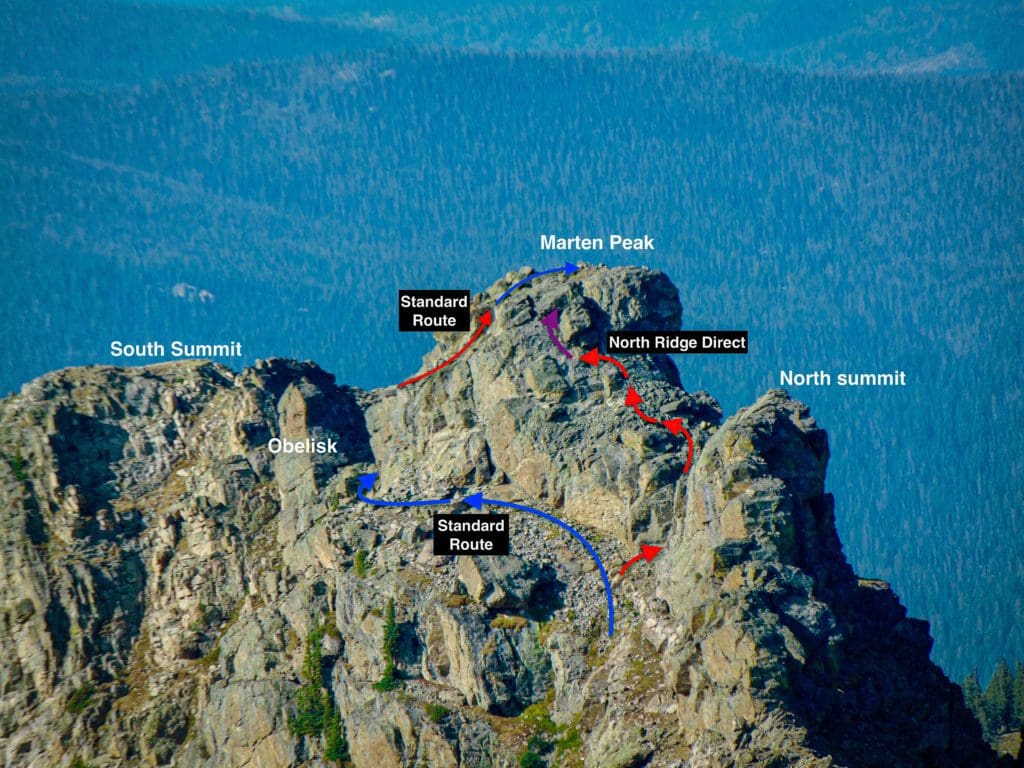
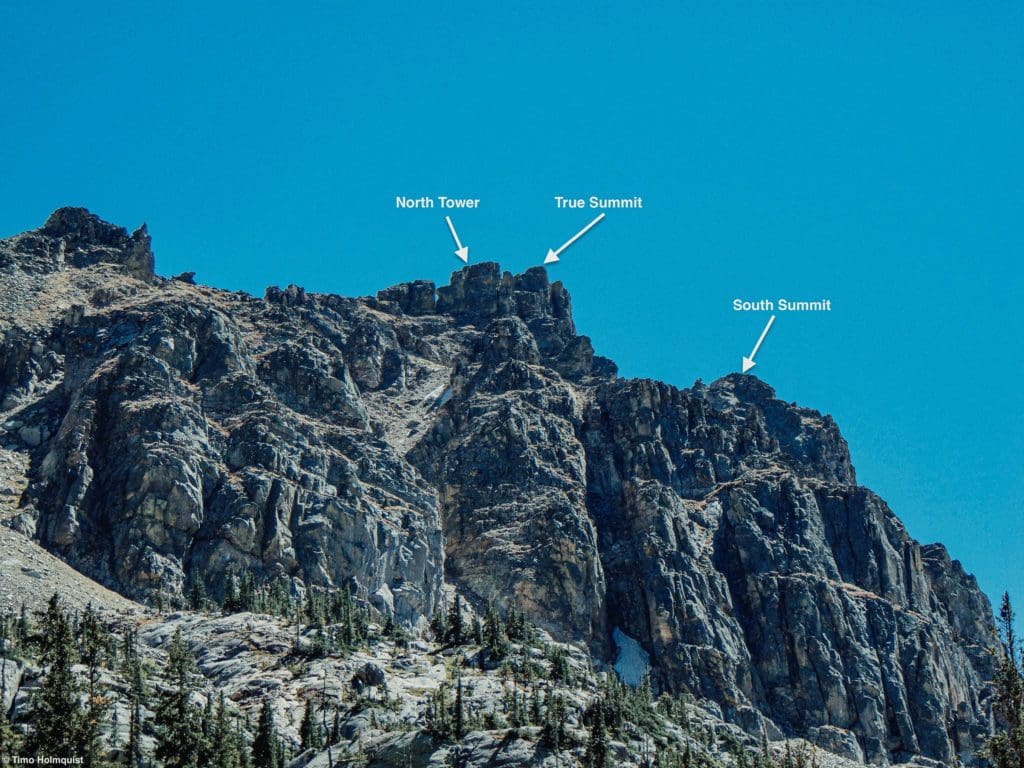
As you near the summit block, take a second to note some things. First, the summit block is one of three component pieces. There’s a smaller North Tower, the True Summit and a large South Summit, along with various other lesser features.
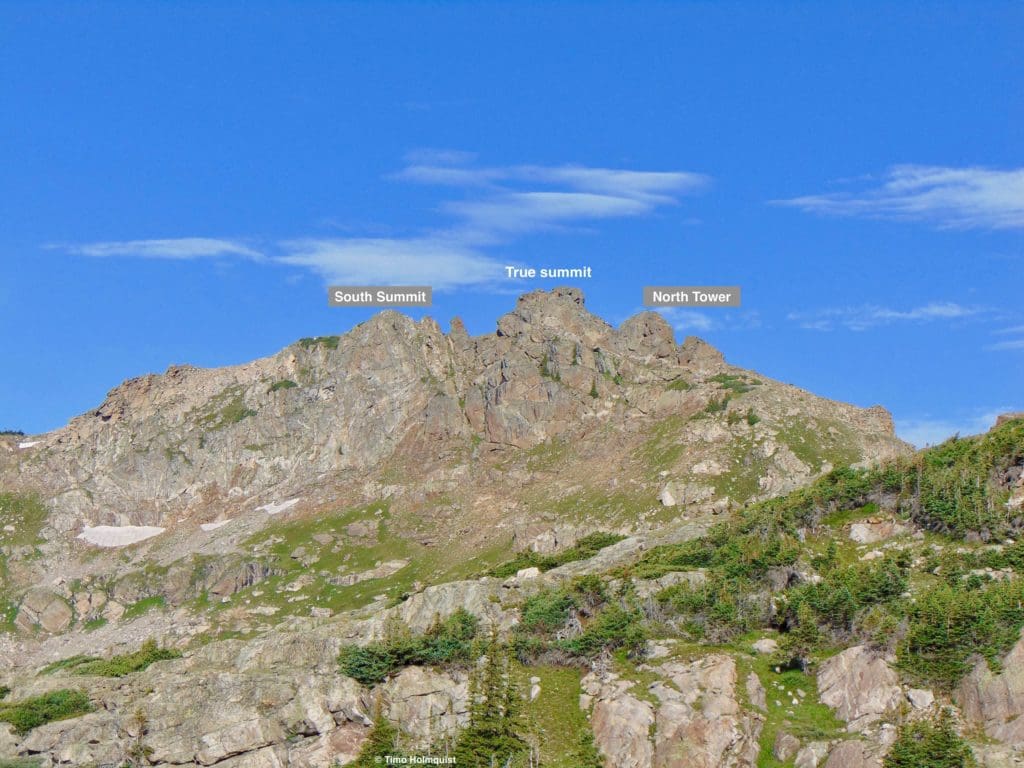
All three summits, seen from the east.
You’ll pass by a dwarf summit first, then the North Tower.
There’s a nice bench that skirts the summit blocks.
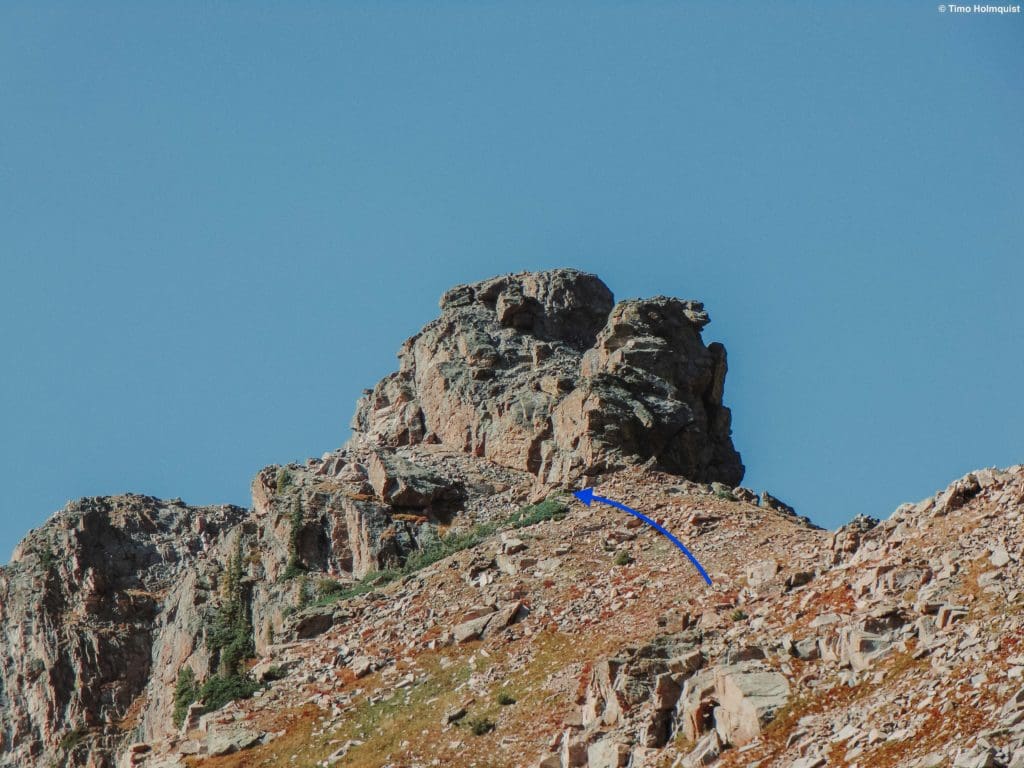
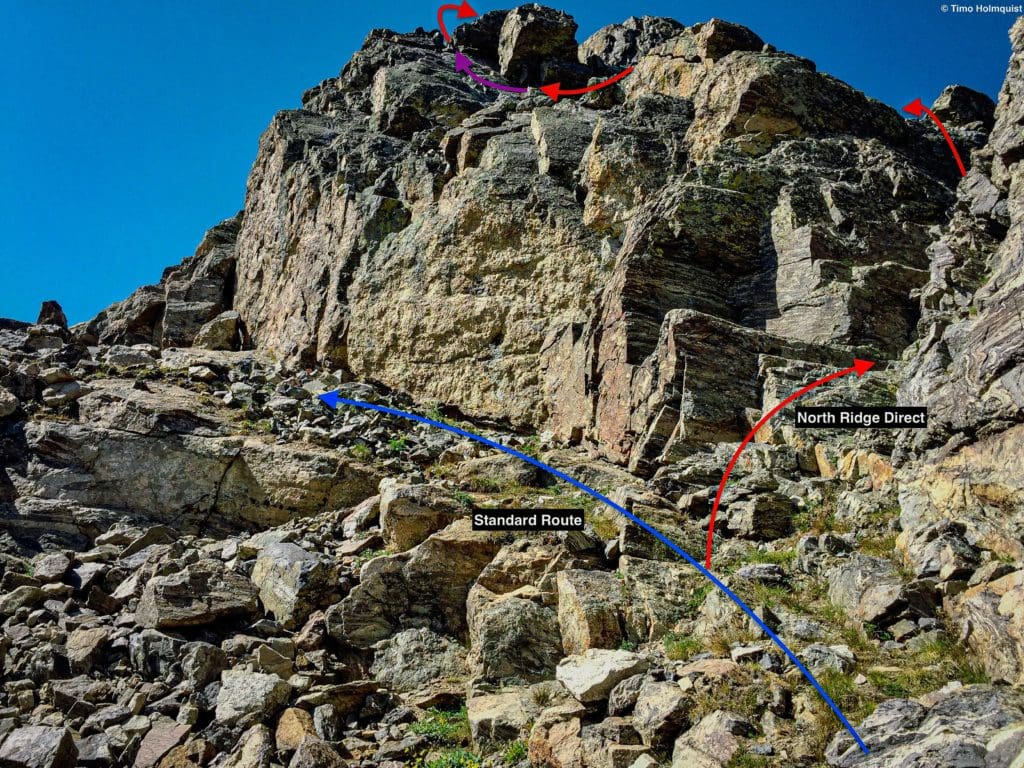
The goal is to find a bench on the left (southeastern) side of the summit blocks and skirt by the northern summit. There’s a cleft between the main summit and the North Tower. From that cleft, you can continue on the standard route or dabble in some brief Class 4 scrambling.
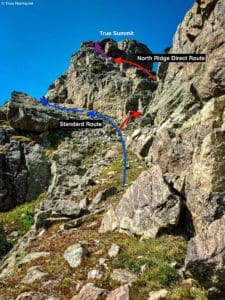
Continue following the bench to stay on the standard route. The red arrow shows access to a Class 4 direct route to the main summit and a way up to the North Tower, which will be discussed as an alternative route below.
The standard route actually wraps around the True Summit block and attacks it from the other side. So, follow the bench beyond the summit block until you’re in the large gap between the True Summit and the south summit (you’ll see an obelisk of rock in between the two.)
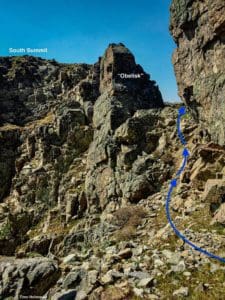
Follow the path of least resistance around the summit block before doubling back.
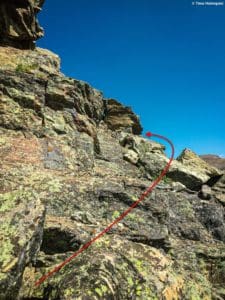
After you round the summit block, turn back east and scout a short class 3 set of moves that will pop you up in elevation.
A little Class 3.
Now you’re facing north and staring at the other side of the summit block. There is a way through this side at Class 4, or you can round the block to the right and circle up to the top (light Class 3).
The path moving forward.
Following the standard route, you circle around the rock ridge until finding yourself on another bench.
Continue on this trajectory with some summit cliffs to your left and a significant drop to your right.
Take this angled bench around the rocks to your left.
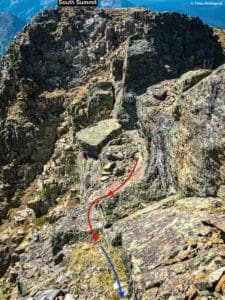
On the higher bench looking back to the South Summit.
As you round back to the summit, you’ll come upon a shallow gully that leads up. Take this (light Class 3) until you pop up onto the summit block.
After another small section of Class 3 scrambling, you reach the summit.
The standard route has a grand total of 3 small class 3 sections and is a great introductory scrambling route. If you’re already into scrambling, the variations available should pique your interest.
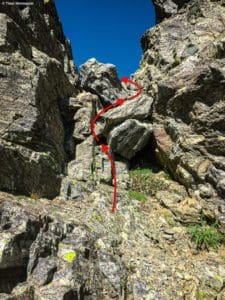
Journal: North Ridge Direct (brief Class 4)
This is a majority Class 3 route with a move or two that could be considered lighter Class 4. It’s short, sweet, and fun.
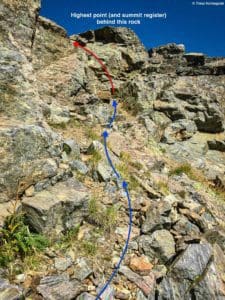
To find it, rewind to the standard route before you get to the summit area. As you draw up to the summit area, the blocky North Tower (and an even smaller rock tower in front of it) will appear first, separated from the True Summit by a notch. Your first goal is to get into that notch. In fact, before you do, you can see nearly the entire route.
General trajectory of the route as you approach it.
Getting into the notch requires the first bit of Class 3 scrambling.
The first moves.
After you crest the small rise in the notch, look to your left and sight a Class 3 route up onto the summit block.
Most of the route.
It’s a short little route, but the rock is good, and the crux is a spicy little section that leads right to the summit. With the standard route, you have an easy and convenient descent option.

The crux section from below.
Marten Peak’s summit area is ripe with these small routes. There’s at least one more on the south side of the main summit block, a bonus route up the North Tower, and additional approaches from the south.
Looking down from above the crux.
Bonus: North Tower (Class 4)
Instead of taking a left and climbing out of the notch to tag the summit, look for a small bench on the right that angles up towards the North Tower. This is a Class 4 route with substantial exposure along the top.
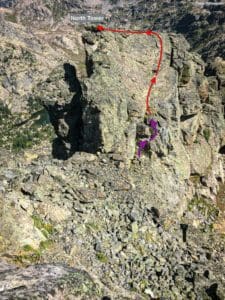
General route overview from just below the true summit of Marten Peak.
From the true summit, you can tell that the North Tower is lower, but from Stone Lake, it’s debatable, and the North Tower is certainly eye-catching.
Marten Peak and its various summits seen from Stone Lake.
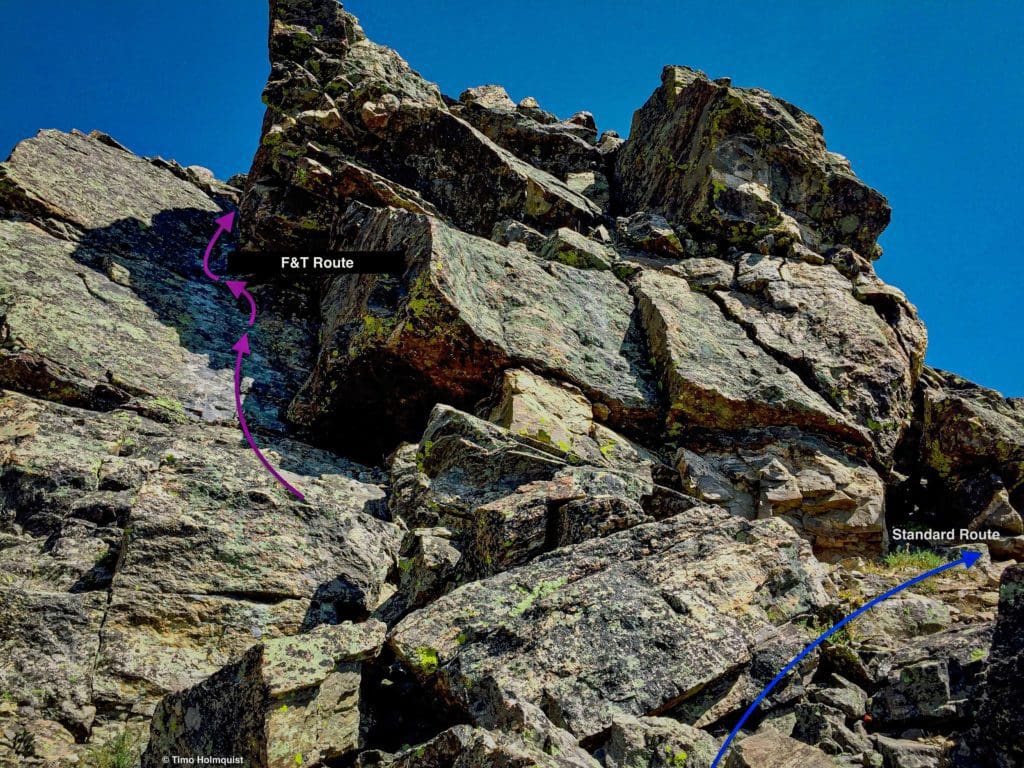
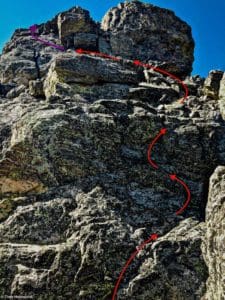
Journal: F&T Route (Class 4)
This obscure route is a Class 4 scramble where you’ll be relying on small finger and toe holds, so I’ll just refer to it as the F&T (finger and toes) Route.
Also approached via the standard route, you’ll ascend from the saddle between Marten and Cooper. You’ll want to approach the summit block and pass beyond the access to both the North Tower and North Ridge Direct Routes. Once the standard route makes its 180-degree turn (so you’re now facing northeast), you’ll be able to see the route.
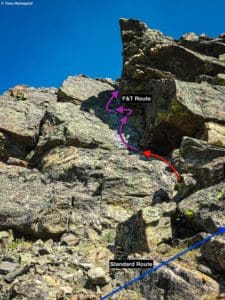
General trajectory of the Class 4 route.
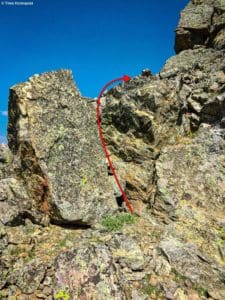
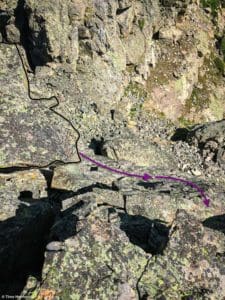
In Gerry Roach’s guidebook “Colorado’s Indian Peaks: Classic Hikes and Climbs,” he describes part of the standard route up Marten Peak as follows: “Avoid the next steep 30 feet by executing an exposed Class 3 traverse around a corner to the east…”. The F&T route is the 30 steep feet he mentions and runs at a consistent Class 4 for the majority of its gain.
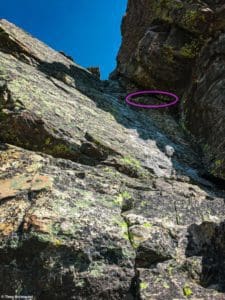
The purple circle highlights the key hold to the route.
As you start, use the seam to your right and a series of small toe holds to inch up to a crack hold (see pic above.) This hold is the key to the route. With a strong hold, reposition your body and shift left. Use the hold to push off against with your right hand and reach for a set of more accommodating holds above you. Once you’ve got a good set of Finger and Toe holds, proceed up, where the Class 4 scrambling continues for another 10-15 feet before relenting back into 3rd Class.

The route from above.
No matter how you ultimately scramble Marten peak, it’s a great secluded peak with good views and almost guaranteed solitude.
Skyblue Overland Strongly Recommends That You Enroll With Global Rescue Prior To Embarking On Your Next Adventure.
With more people outside now more than ever, Global Rescue expanded services to include field rescue within 100 miles of home. With Local Field Rescue — automatically included in any travel protection services membership — Global Rescue is there whether you’re hiking, kayaking, snowmobiling, fishing or simply enjoying the outdoors and get ill or injured and you’re unable to get to safety on your own. Purchase a Global Rescue membership for your next adventure and travel with peace of mind. Single trip, annual and family options are available.


