


High Point:
High Point: 12,130 ft.

Total Ascent:
~1,835 feet (from Crater Lake)

Difficulty:
Moderate

Distance:
~4 miles (from Crater Lake)

Route Type:
Out and Back
Lone Eagle Cirque, one of Colorado’s most beautiful places, beckons the adventurous hiker. At the lonely western rim of the cirque stands “Cherokee” (12,130-ft). This mountain offers the first stunning view of the area’s splendor. Logistically speaking, “Cherokee” is important because it is the final piece of the west rim and connects to Mount Achonee by a sharp ridge that makes up the rocky wall northwest of Crater Lake.
Overview
The western side of the Indian Peaks Wilderness is the crown jewel of the wilderness. That doesn’t mean the eastern side isn’t beautiful, and there are many stellar places to tromp around over there, but the western side holds all the last vestiges of deep wilderness. Here, you’ll find glacial remnants, serrated peaks that seem to defy gravity, beautiful alpine lakes, and terrain with few (if any) people around.
This part of the wilderness holds a number of long, demanding, and ultimately spectacular scrambling routes. Many of them are best approached from a regional basecamp, although they can be done as demanding day hikes. If you manage to snag a campsite at Crater Lake (click here to read our trail guide for that adventure) or don’t mind starting very early, an ascent of “Cherokee” is an absolutely worthy addition to any scrambling resume.
The route is not unreasonably hard, but does require Class 3 scrambling and some off-trail navigation no matter which route you take. For your effort, though, the summit views are some of the best in northern Colorado. If you want a challenge where you can utilize navigational skills, scrambling and behold the majesty of the southern Rockies, this is a top-tier candidate.

Crater Lake Basin from Pt. 11,602.

Table of Contents
Article Navigation: Click on any of the listed items in the table of contents below to jump to that section of the article. Similarly, clicking on any large, white section header will jump you back to the Table of Contents.
- Overview
- Scales and Criteria
- Directions to Trailhead
- Field Notes
- Journal from Monarch Lake:
- Journal from Crater Lake:
The first view of “Cherokee” from the Cascade Creek Trail.
Scales and Criteria
This article uses two metrics to calculate difficulty: overall distance and elevation gain. For winter ascents, a snow rating may be used, but this review covers the out and back hike during snow-free summer and autumn months, so snow shouldn’t be more of a factor than a few isolated patches up high. Seeing as there are multiple places where scrambling is required, a technical rating is also employed, using the Yosemite Decimal System to calculate difficulty.
Difficulty Ratings:
- Easy: less than 5 miles, less than 500 ft. of elevation gain
- Moderate: 5-10 miles, 500-2000 ft. of elevation gain
- Difficult: 5-15 miles, more than 2000 ft. of elevation gain
- Very Difficult: 10+ miles, more than 3,500 ft. of elevation gain
Technical Rating:
- Class 1: Established hiking trail the entire length of the adventure. Low chance for injury.
- Class 2: Typically involves cross-country navigation, possibly using hands for balance but not required, steeper than Class 1.
- Class 3: Hands and feet used to scale areas; must use hands to proceed (either for balance or to help pull you up a section), increased exposure, a fall could be fatal. Helmet recommended, along with grippy hikers.
- Class 4: Climbing on very steep terrain just shy of vertical, falls could be fatal, hands employed for grip and balance continuously, ropes advised but scalable without. Helmets are highly recommended, along with grippy hikers.
- Class 5-5.4: Vertical climbing that involves technical rock-climbing moves, exposed, falls likely to be serious or fatal, possible to scale without ropes but only for very experienced veterans. Helmets, grippy hikers, and/or rock-climbing shoes are necessary.
- Class 5.5 and up: Not covered as scrambling, full-on rock climbing with ropes, helmets, etc.
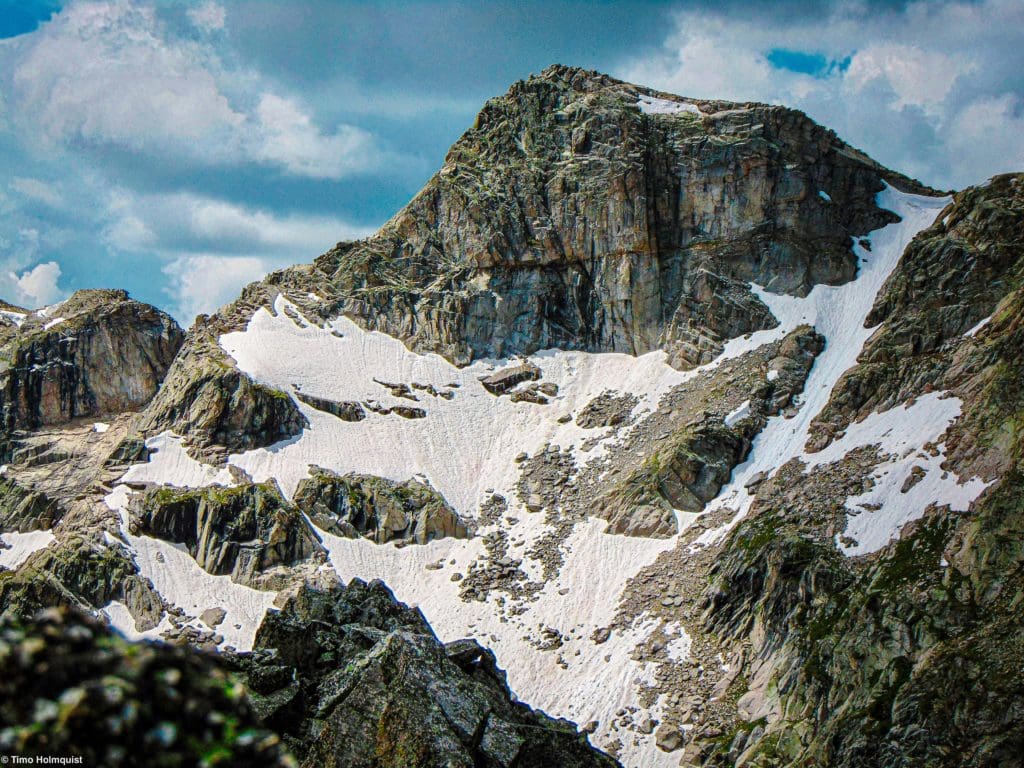
A dark and moody Mt. Achonee from the summit of “Cherokee.”
Directions to Trailhead
There are a few ways to get to “Cherokee,” although for the day hike and camping options, a start from Monarch lake is by far the easiest. For supremely dedicated athletes, you can start on the other side of the divide at Brainard Recreation Area, climb up Pawnee Pass, and hook up with the Crater Lake Trail on the other side. Keep in mind that you’ll need to procure parking passes and a time slot for Brainard Lake on recreation.gov way ahead of time.
Parking at Monarch Lake requires a small fee, as it’s in the Arapaho National Recreation Area. You can use an interagency pass to circumvent the fee.
Monarch Lake is a fair distance from the Front Range, but once Trail Ridge opens up, you have two reliable options to get there. The first is to take I-70 to exit 232 toward Winter Park on US 40. The road will pass through the small town of Empire before winding its way up and over Berthoud Pass. Drive down the other side and pass through the towns of Winter Park, Frasier, and Tabernash. When you get to the town of Granby, take a right on US 34 to continue north toward Lake Granby. The turn-off for Monarch lake is at the end of a quick rise and right before you get your first views of the lake. If you start to pass the shoreline of Lake Granby, you’ve gone too far.
The road you want is Colorado 6; it passes along the southern shoreline of Lake Granby and turns to dirt after a minute. You’ll pass over a few dams and the picturesque shore of Lake Granby until crossing the lake at its eastern mouth. There will be a three-way intersection, where a left will lead to more trails and Arapaho Bay Campground. Keep going straight until the road dead-ends into the Monarch Lake Parking Area. The approximate time from Denver is anywhere from 2 hours and 15 minutes to nearly 3 hours, depending on traffic.
If Trail Ridge is open (US 34) and you have a Rocky Mountain Pass, you can take that over the divide and pop down to the Monarch Lake Trailhead. Once you get into the park, take US 34 over the divide, get into Grand County and continue south until sighting Colorado 6 on your left. If you go over Trail Ridge, you’ll continue through Rocky Mountain National Park, Grand Lake, Shadow Mountain Lake, and all of Lake Granby before finding the turnoff. Fort Collins to Monarch lake over Trail Ridge takes approximately three to three and a half hours.
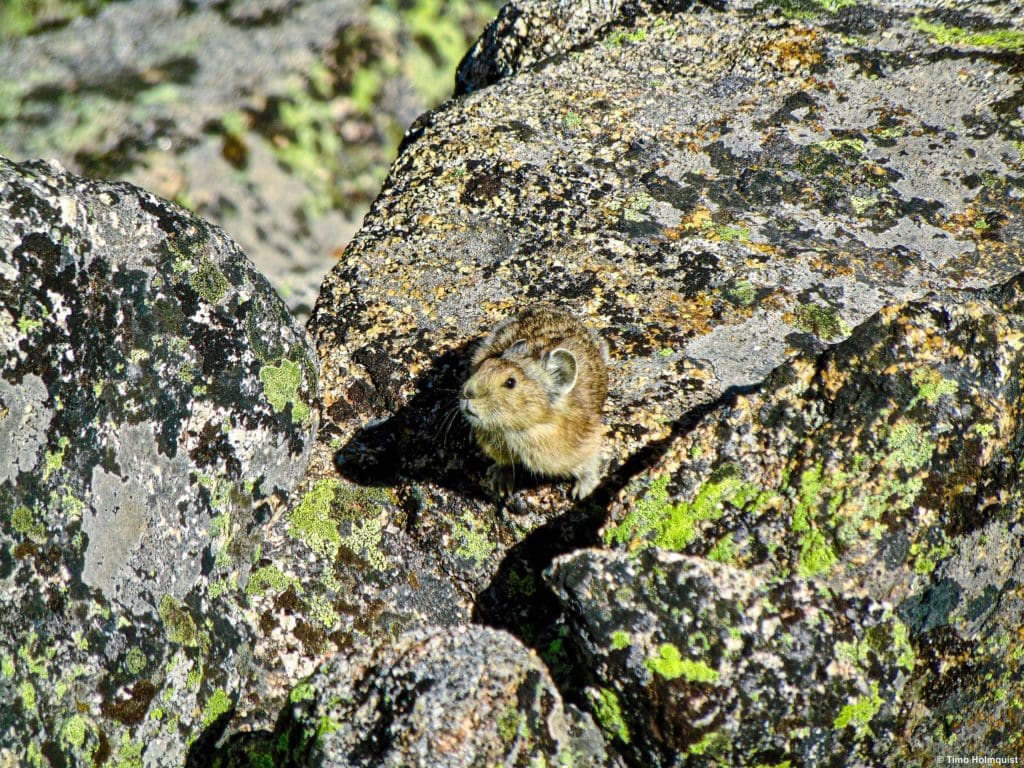
A Pika along the scramble to “Cherokee.”
Field Notes
This is a tough day if you decide to do it as an out-and-back hike. For those camping at Crater Lake, additional backpacking details need to come into your thinking, like day packs, food, supplies, etc. In all cases, checking the weather and making sure you have a stocked first aid kit are critical. Despite the relative popularity of Crater Lake, you are still at least 7 miles from the nearest trailhead, and help will be hard to come by.
For your forecasting needs, start with Granby and Grand Lake. If you’re able, subscribe to Opensummit, they have the best weather discussions and weather metrics to check like wind speed, precipitation chances, lightning chances, and air quality (important with the summer threat of wildfires). The most relevant weather page on Opensummit to check is Lone Eagle Peak.
If you prefer to stay with the free weather sites, use mountain-forecast.com. They have forecasts for Lone Eagle Peak and Mt. Toll, both of which are close enough to provide relevant weather information.
The name “Cherokee” was given to this peak to continue the Native American motif of the Indian peaks Wilderness. Officially, this mountain does not have a name. For clarity, I’ll refer to it as “Cherokee” since it’s been used extensively by fellow hikers and scramblers for decades. I’ll also use quotes around it to signify that it isn’t officially named, similar to how Colorado mountain author Gerry Roach depicted the mountain and its routes in his book “Colorado’s Indian Peaks: Classic Hikes and Climbs.” Because it is unnamed, if you’re using mapping software, Nat Geo illustrated maps, or something similar, the mountain may appear as an unnamed elevation point along the northern edge of the Crater Lake Basin.
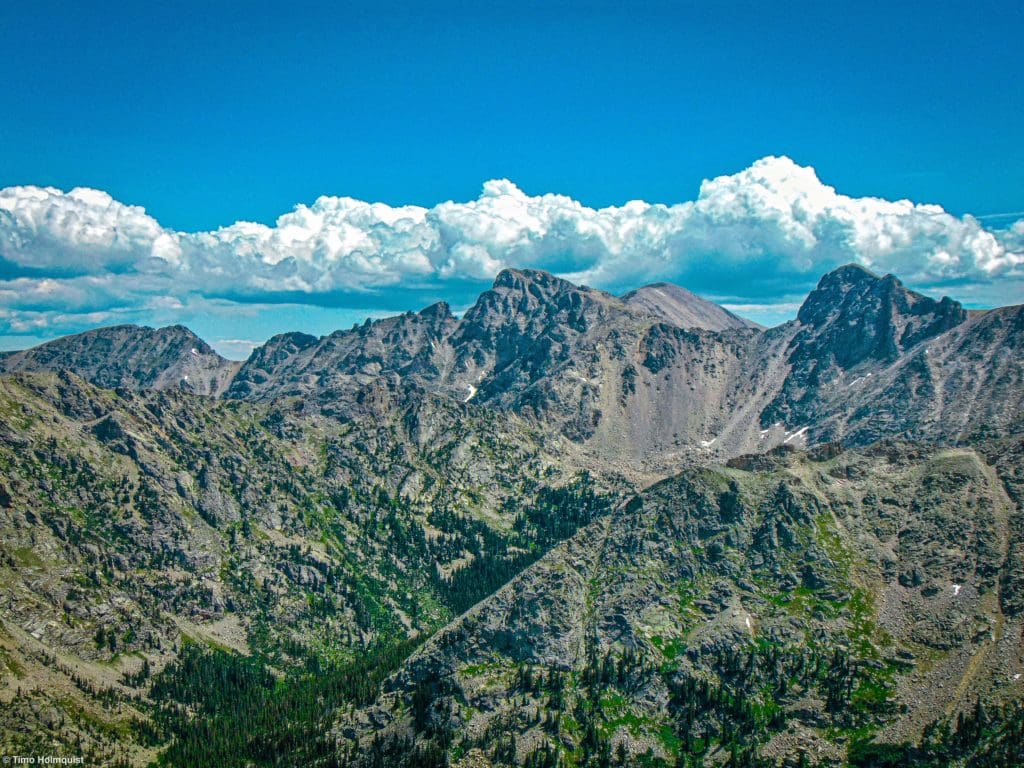
Looking at the peaks along the Continental Divide.
Journal: From Monarch Lake
The first part of this journey follows the route to Crater Lake. You’ll start by going around Monarch lake and following signs for Crater Lake and Gourd Lake. About 3.3 miles into your journey, you’ll come across another trail junction. Take a right to continue to Crater Lake by following Cascade Creek. A left (more like continuing straight) will get you toward Gourd lake and eventually Buchannan Pass.
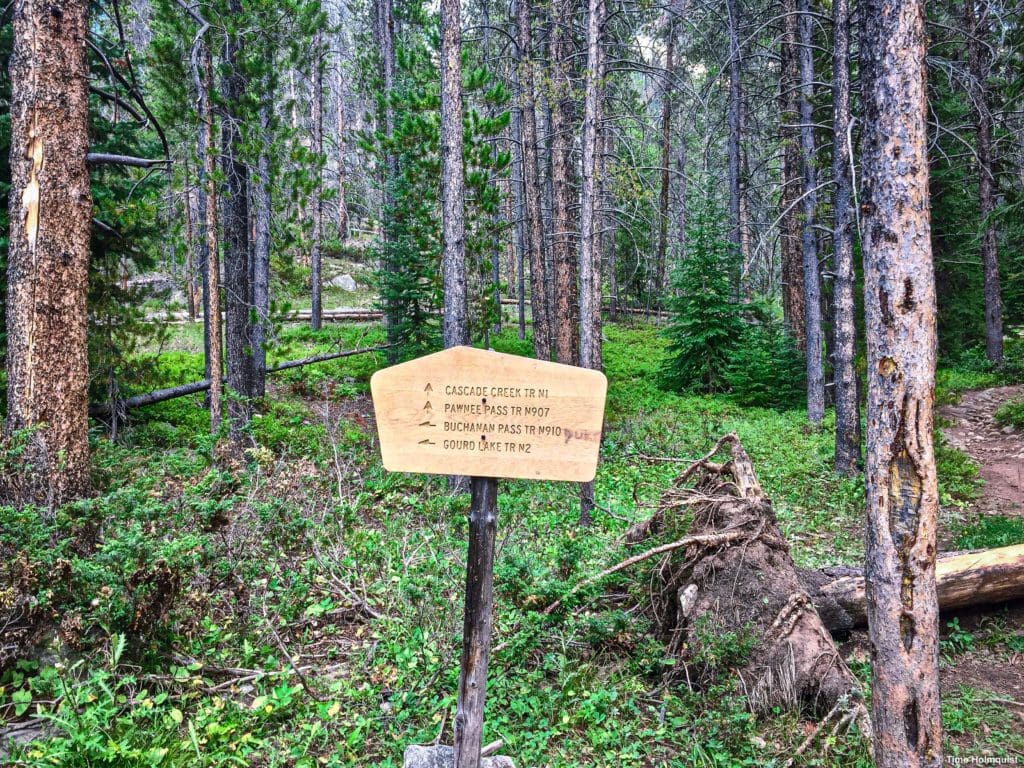
Trail sign, make sure to take the Cascade Creek Trail.
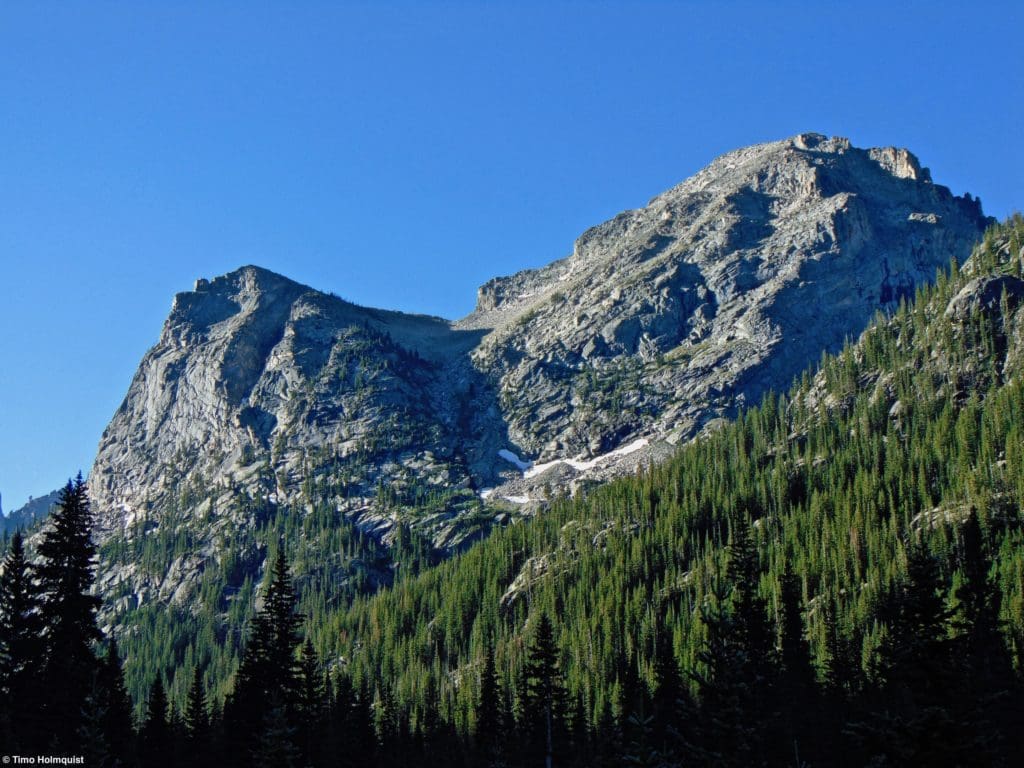
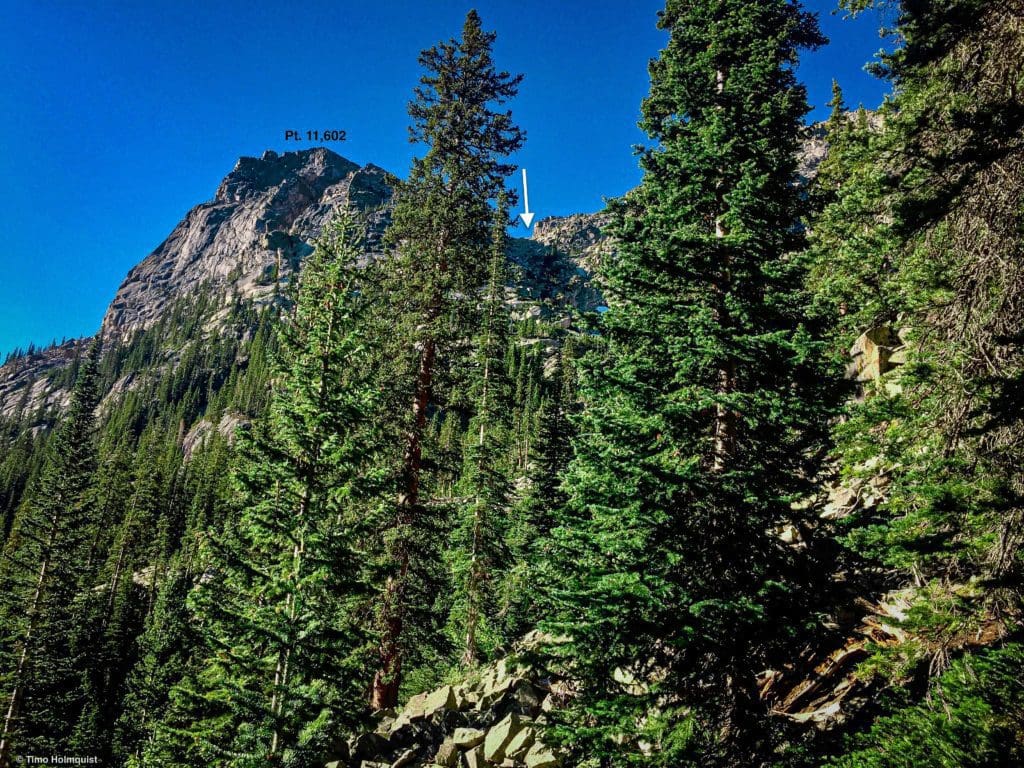
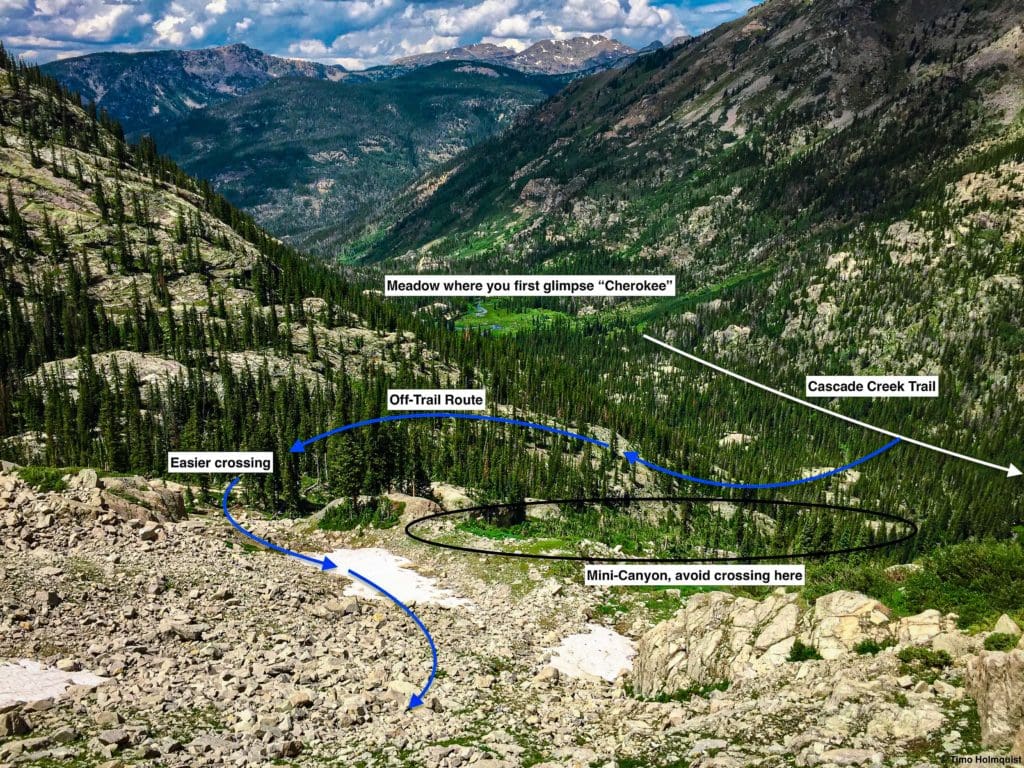
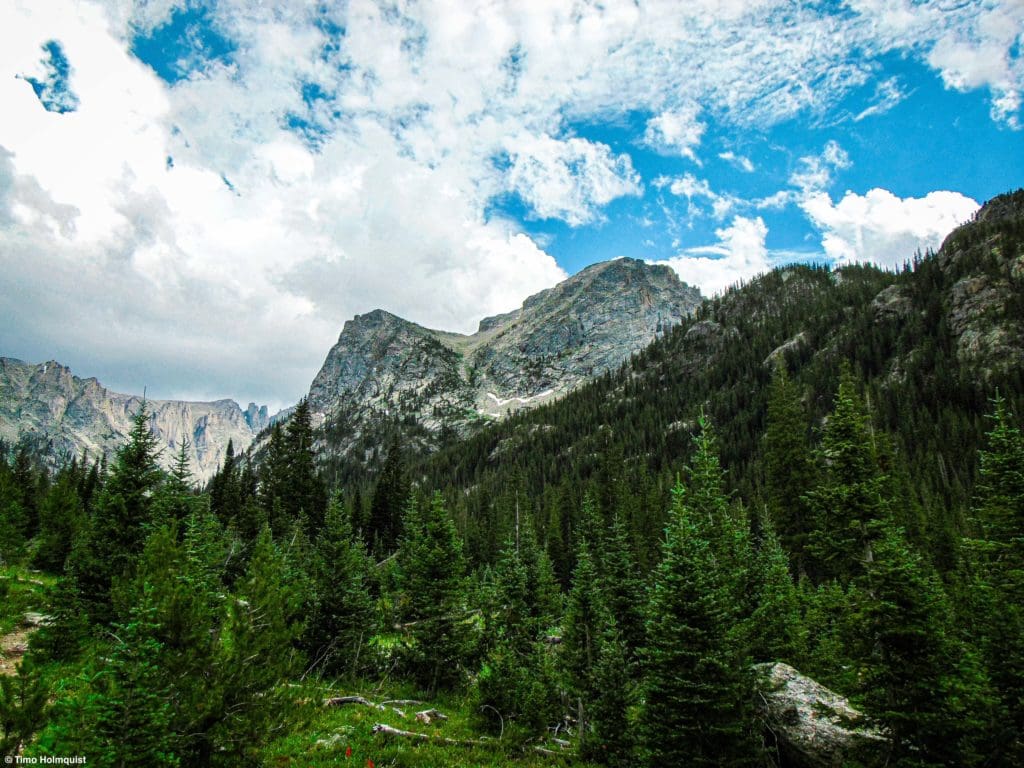
Once on the Cascade Creek Trail, travel through forests and a series of meadows. After the second and third waterfalls (which are close to one another), you’ll enter a flatter stretch of trail that rims a large and peaceful meadow. This will be the second large meadow you pass on the Cascade Creek Trail. It’s here that you get your first views of “Cherokee,” roughly 5.2 miles into your journey and around 9720 ft. above sea level.
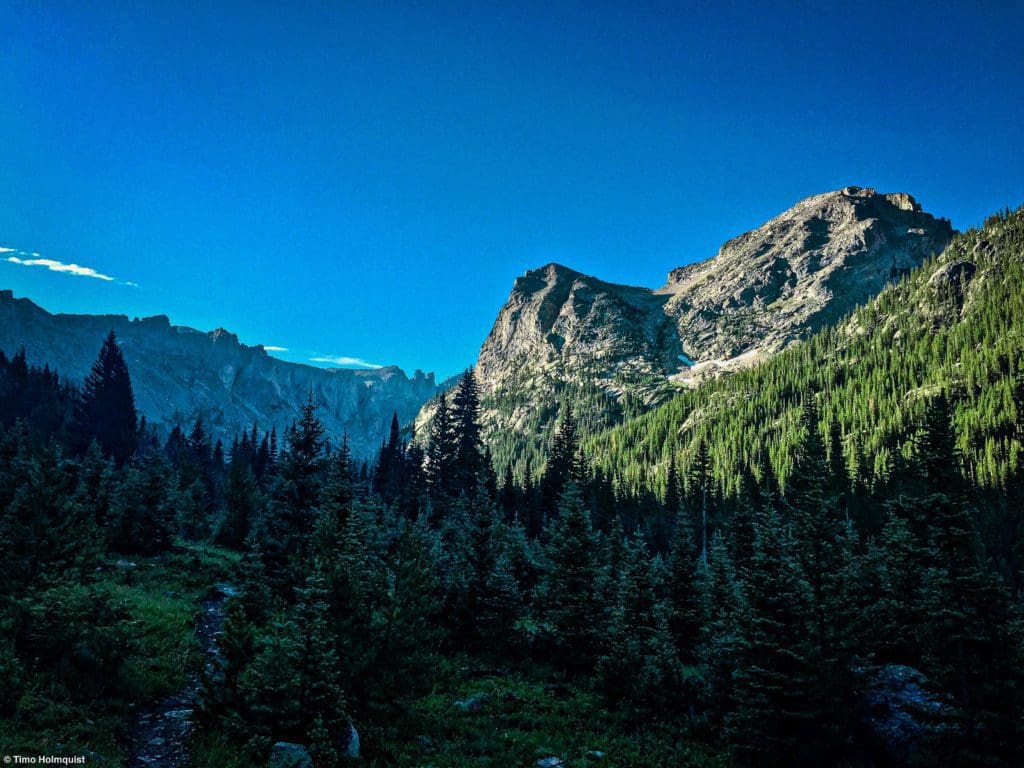
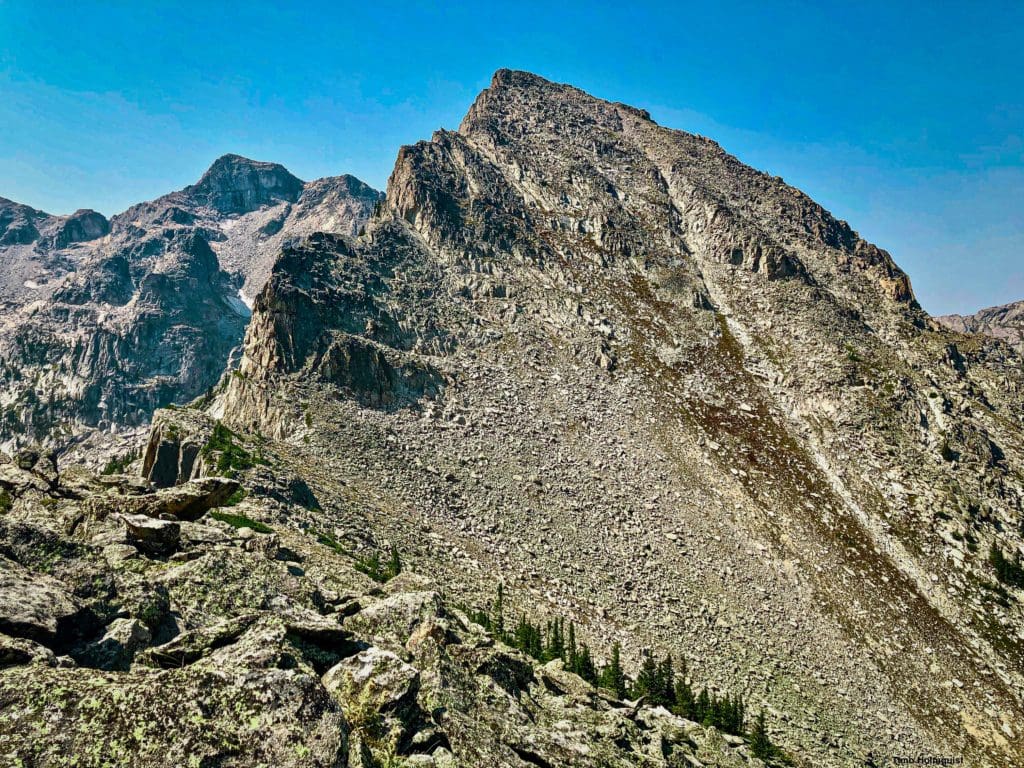
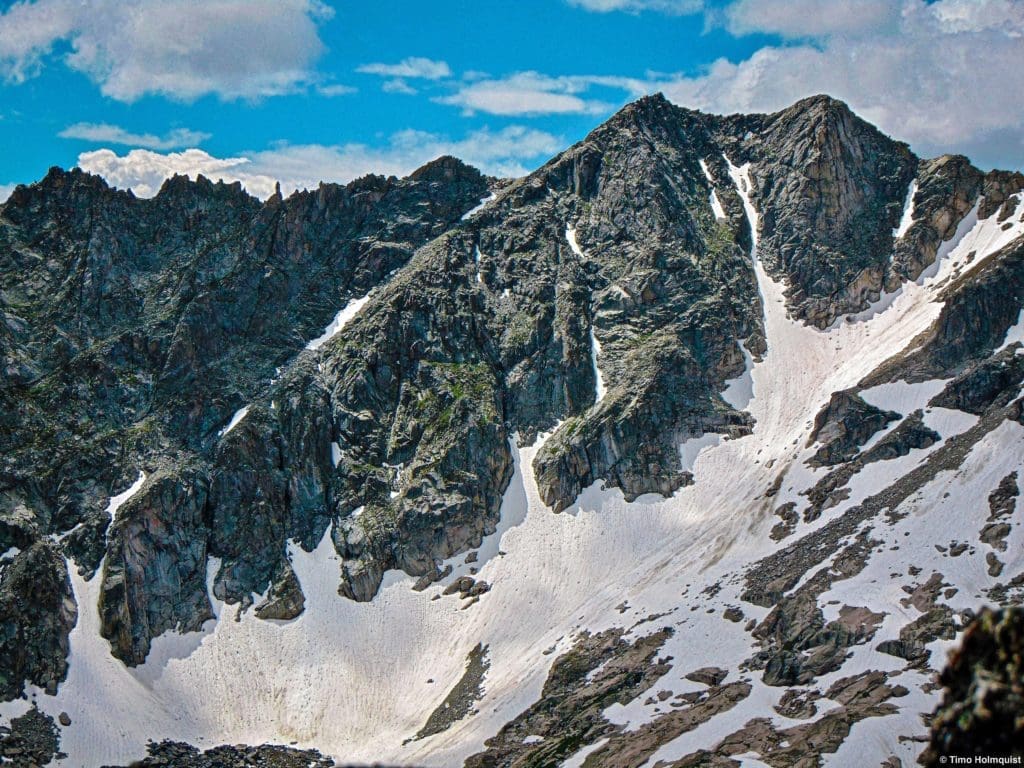
The imposing figure of “Cherokee.”
What’s nice about this view is that you can see the upper part of your route.
Before you can get there, however, you need to continue along the Cascade Creek Trail until finding a point where you can cross the creek and begin a trailless approach to the route. There aren’t too many visual markers to latch onto, but I found a large boulder to the right side of the trail around 9840 feet above sea level. Roughly 30 seconds beyond it, I picked a line and began an off-trail descent to the right, down to Cascade Creek.
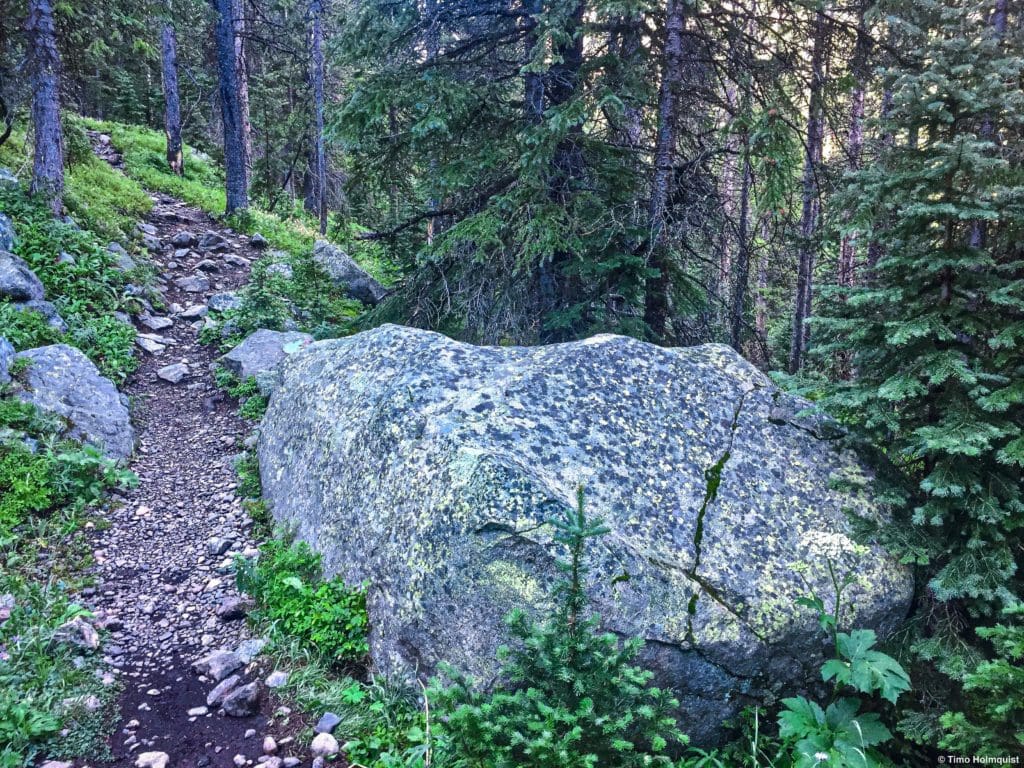
Boulder Marker
If you miss this marker but continue rising until you’re on a rocky section a hundred feet above the creek, you’ve gone too far. You want the trail and creek to be relatively close in elevation, or there’s more up and down you have to do to get across it.
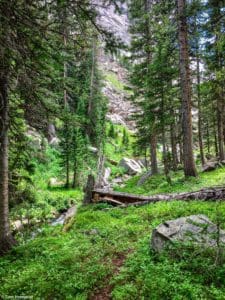
Once you find a good place to begin your adventure, head toward the sound of the creek. Eventually, you’ll come upon it, and it may be a lot bigger than you think. There are a few strategies for the crossing. You can opt to take your shoes off and ford the creek, or you can find a downed log or thinner portion to try and cross. Both have benefits and drawbacks but falling in fully clothed is not particularly ideal.
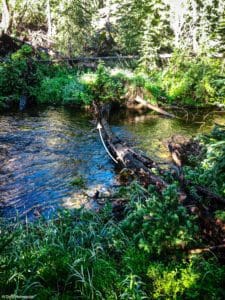
How I ended up crossing. On the way back, I took my hikers off and forded the creek.
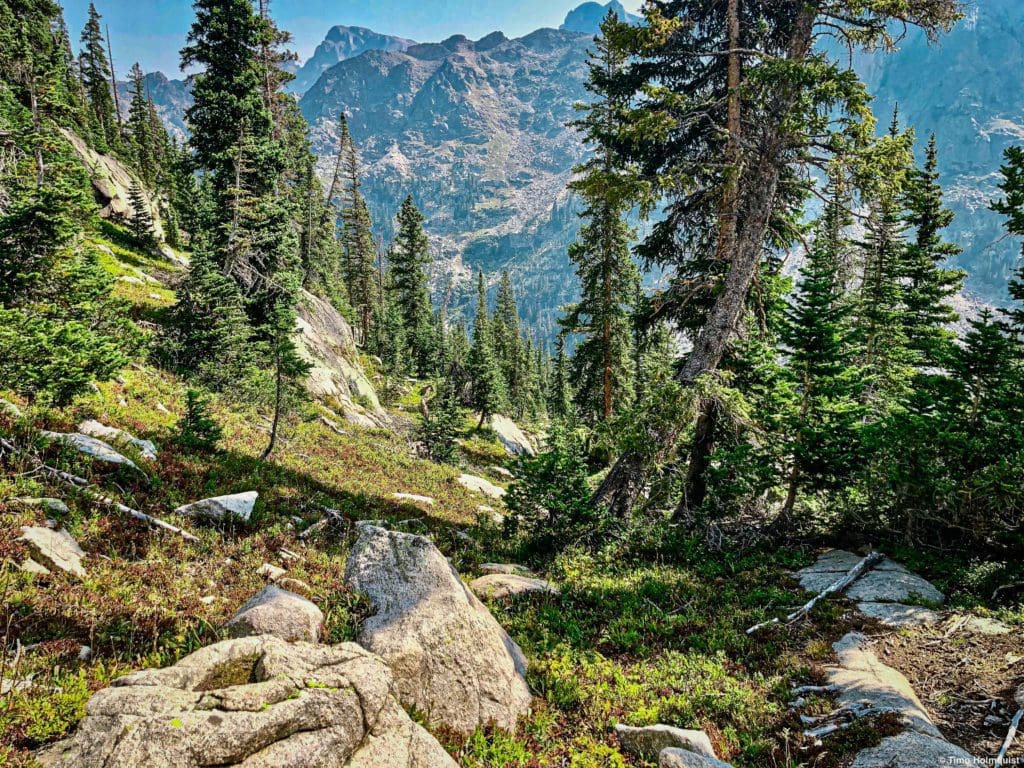
Once you’re safely across, the next step is getting oriented. Luckily, there are strips of rock a few hundred feet above you and a series of thinning trees that provide crucial vantage points. Make your way higher. As you climb, you should see Pt. 11,602 to your left and the gully between it and “Cherokee.” Eventually, you want to aim for that.
Your ultimate goal between the trees.
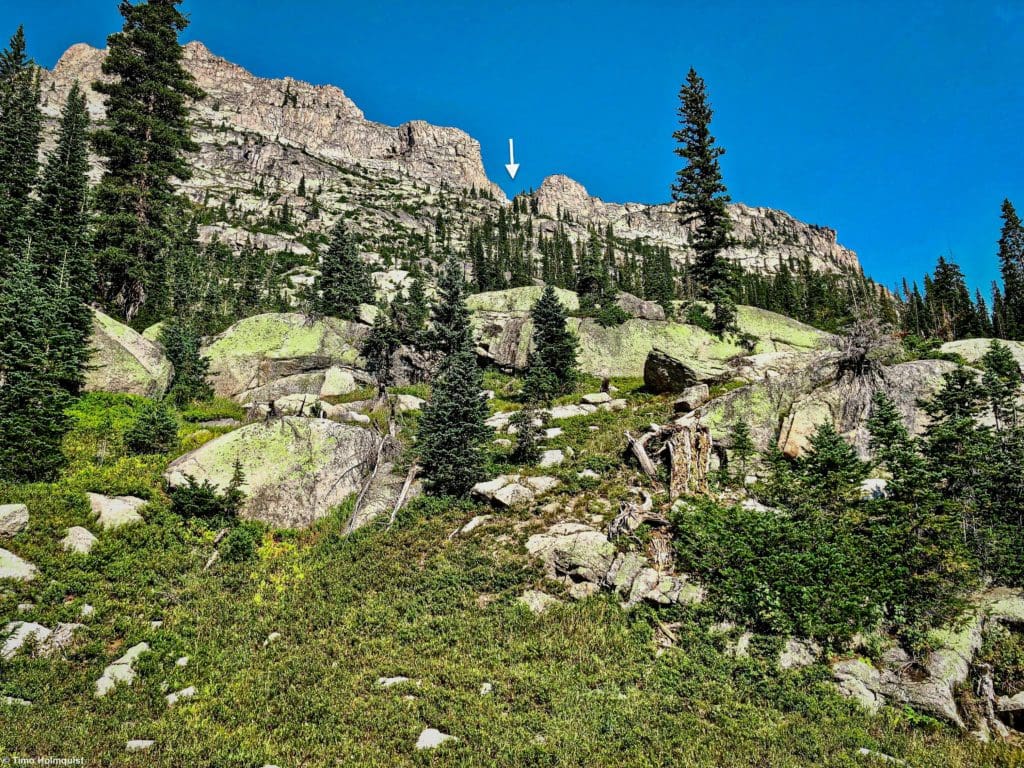
However, a straight shot from where you are to your target will force you through dense vegetation and a surprisingly difficult mini-canyon. Instead, continue to rise parallel to Pt. 11,602, making use of various goat and animal herd paths that weave through the thinning trees and exposed rocks.
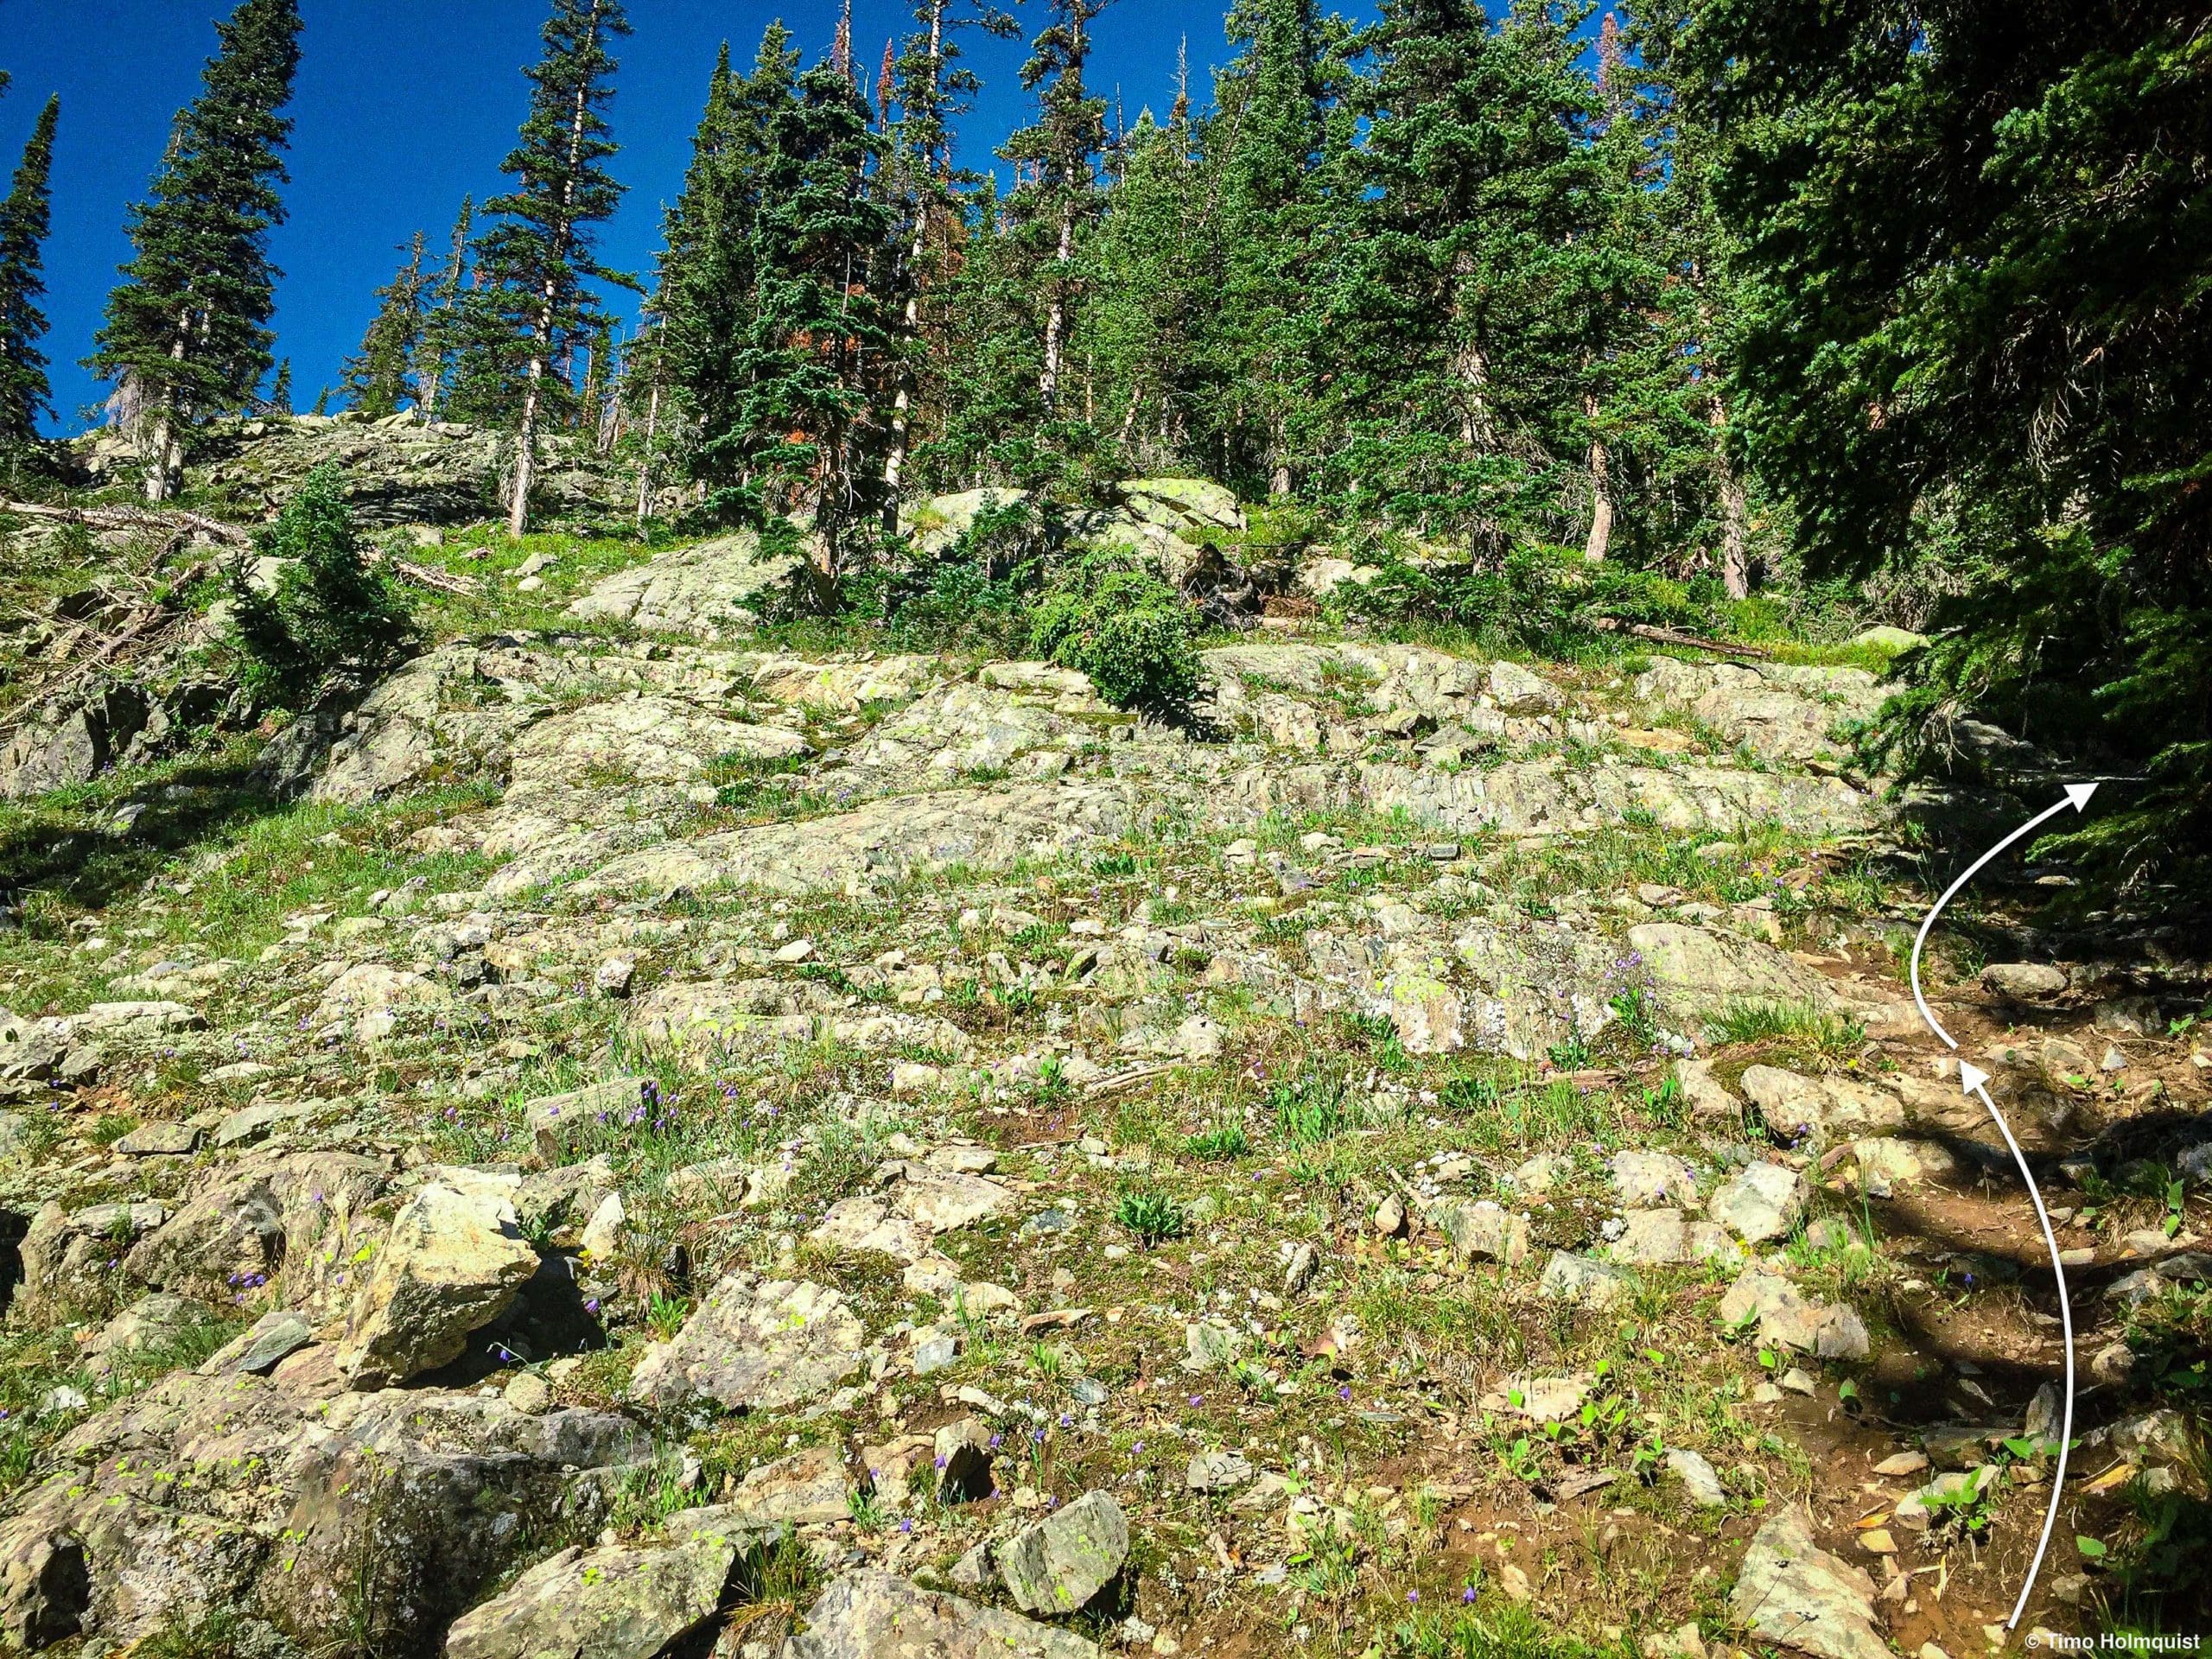
Make sure to stay on a southwest trajectory and rise along the rocks.
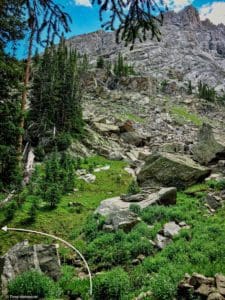
Eventually, the herd paths coalesce above the mini-canyon and provide an easy and safe path to cross a tributary that flows back down to Cascade Creek.
The gentler terrain near the crossing, with “Cherokee” in the background.
After this brief crossing, you’re on the lower slopes of “Cherokee.”
The tributary crossing with the cliffs of “Cherokee” behind it.
The off-trail portion may seem difficult, but it can be broken down pretty easily. Once you cross the larger Cascade Creek, find rock ribs and ascend. There will be a small tributary between you and “Cherokee,” that’s ok, don’t cross the tributary down low, or you’ll make everything harder. Follow the rock ribs and herd paths until you gain between 6-700 feet. When the terrain angle lessens, cross the tributary and aim for the gully between the rock cliffs on “Cherokee” and the cliffs on Pt. 11,602. There’s really only one way to go once you break treeline.
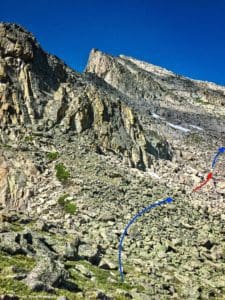
The whole off-trail lower part from the North Gully.

A map of the off-trail portion once you get off of the Cascade Creek Trail.
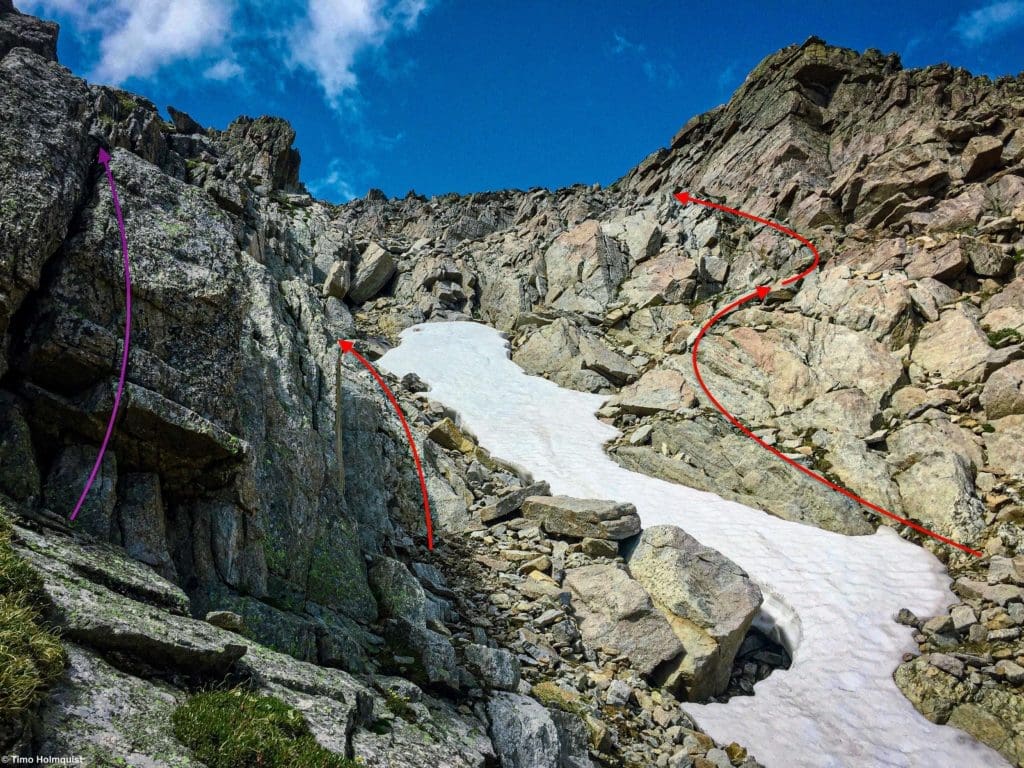
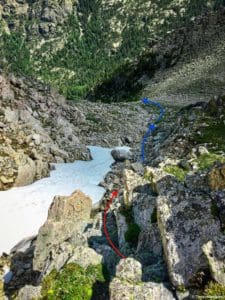
The North Gully is a mostly Class 2 affair with a short Class 3 intro scramble up some broken rock. Once you snake up to the bottom of the gully, you’ll see the Class 3 section above. You’ll also notice a 10-15-foot waterfall to the left. Eventually, your route will connect with this stream.
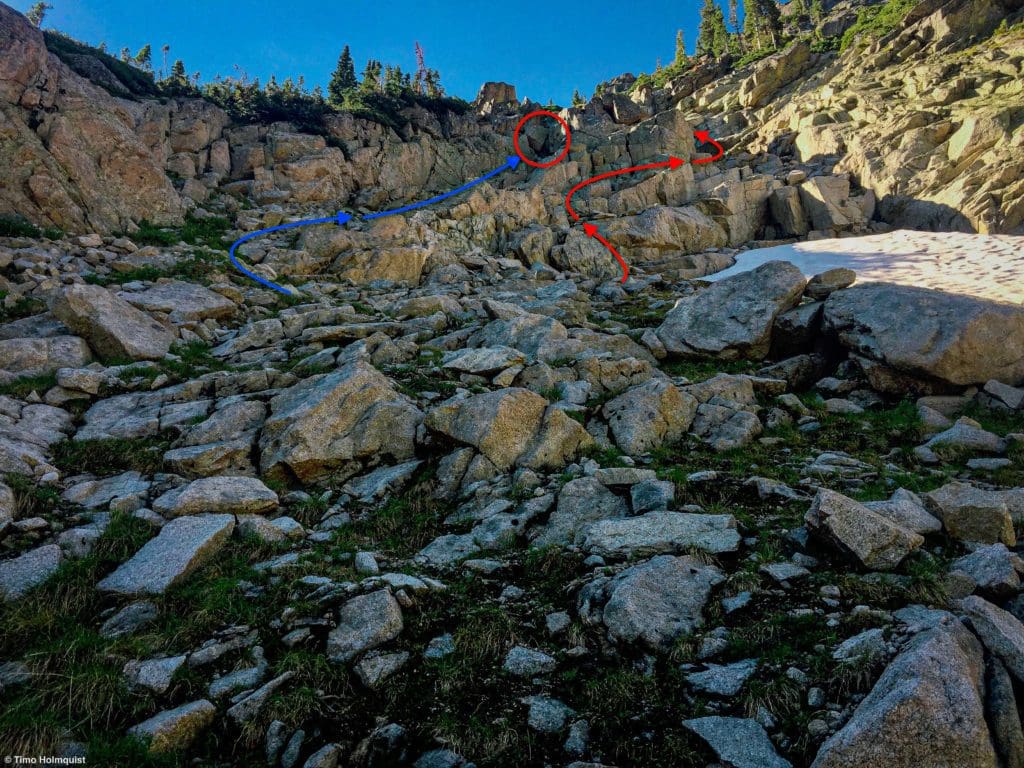
Two Class 3 options.
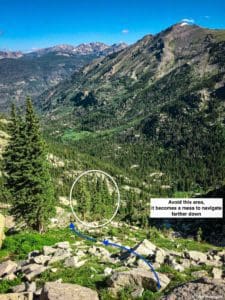
There looked to be a possibility to avoid the scrambling to the left, but it ends in nasty Krummholz and may actually be harder. The simplest and fastest way to get up is to scramble.
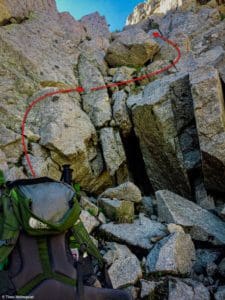
A zoomed-in image of the red circle from the previous photo.
Once you’re above the brief difficulties, the gully tail you’re in and the gully tail with the waterfall merge. You’ll slog up the combined gully, with every bit of elevation gain offering more complete views north to some of the more remote areas of the IPW.
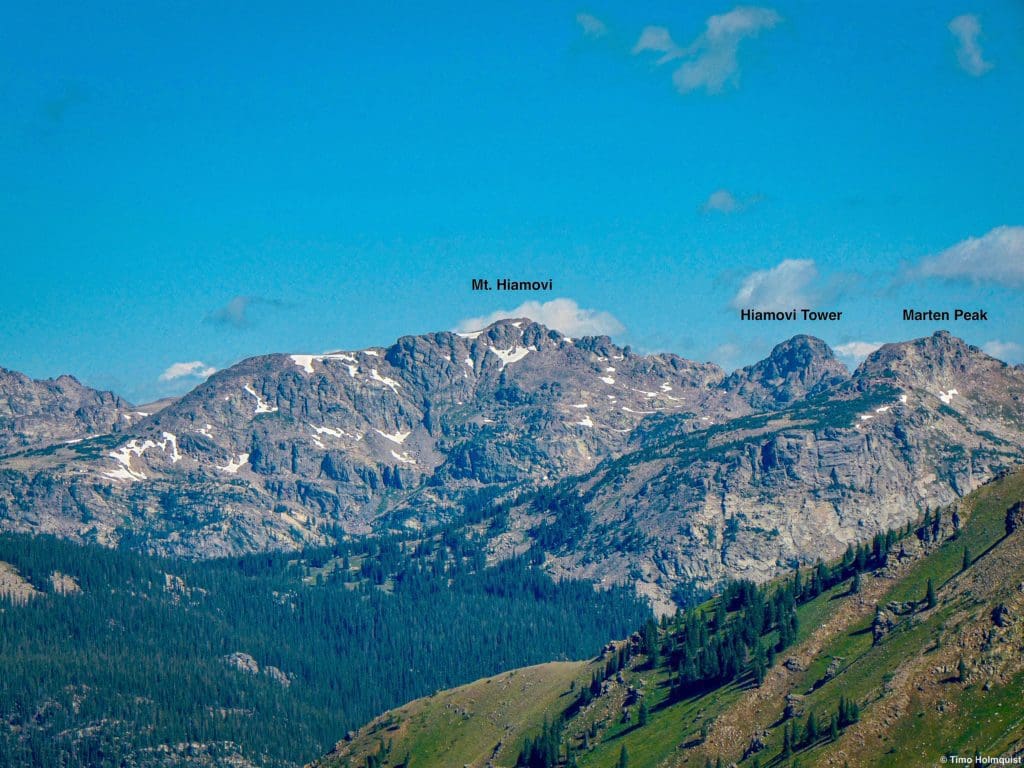
Remote mountains in the northwest corner of the Indian Peaks Wilderness.
After a lot of effort, you’ll end up at the saddle between Pt. 11,602 and “Cherokee.” Here, you have a choice, either make a beeline for the summit or tag Pt. 11,602. If you have the energy, it’s a quick jaunt and provides truly stunning views of the Crater Lake Basin. Orientation is simple, just follow the ridgeline, avoiding difficulties to the north until you’re at the highest point.
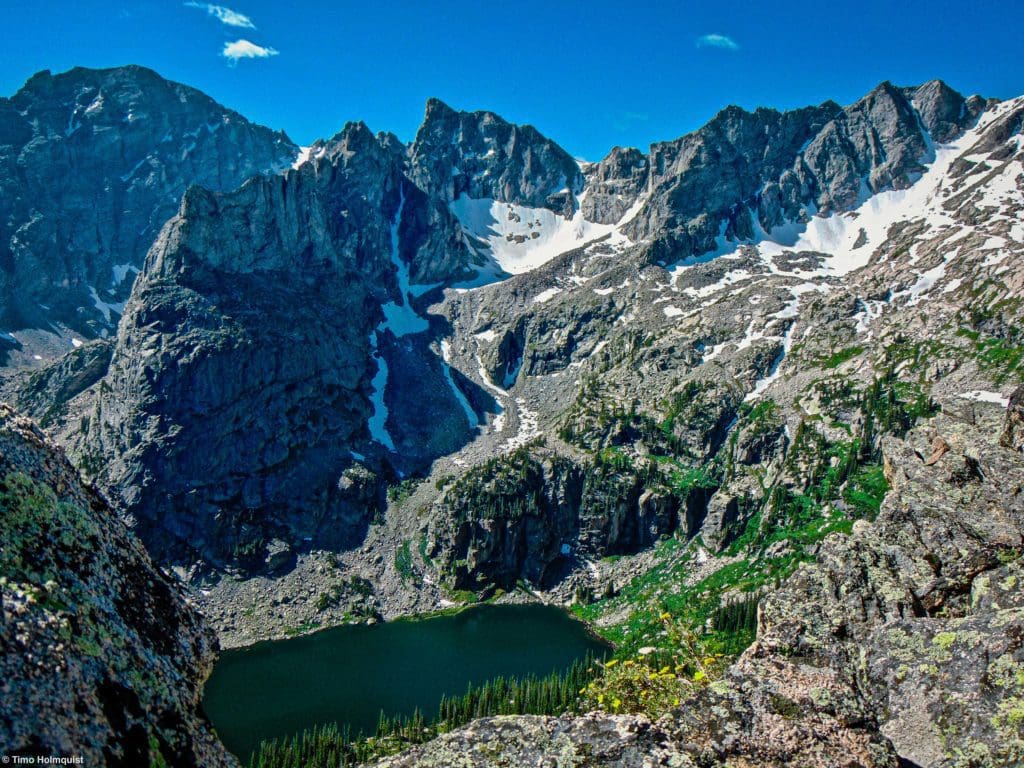
Peering into the Crater Lake Basin from atop Pt. 11,602.
The view here is one of the best in northern Colorado, and in June and July has a distinctly Alps feel with verdant green slopes, snowfields, and the deep blue water of Crater Lake. Looking southwest, you can see what remains of your climb up “Cherokee.”
What remains of the climb.
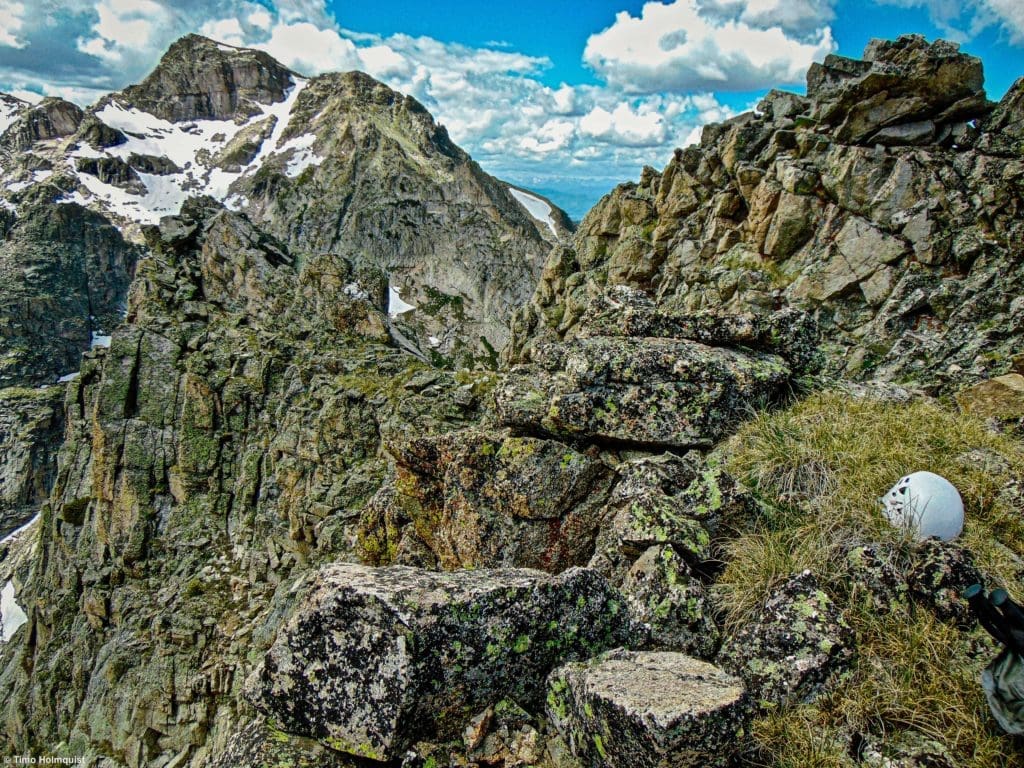
There are a few ways to tackle the rest of the scramble, and they are all pretty straightforward. Directionally, from the saddle, you want to traverse underneath the first series of rock towers along the ridge. You’re aiming for a vegetation strip that breaks up the talus slope. Once you locate it, piece together a fairly straightforward Class 3 scramble up to the ridgeline and then run the ridge to the summit plateau.
An assortment of scrambling variations awaits!
The view as you approach the first scrambling option is a bit different when you’re underneath it, so just make sure to traverse around the first obstacles, or you’ll end up either cliffing out or on much harder terrain than Class 3.
The first portion from the saddle.
Once you get toward the grassy benches, you’re first scrambling option becomes more apparent, although it is not the quickest option directionally.

Roughly where the ridgeline scramble breaks off from the traverse.
An easier route visually is to find the long scar that splits the north face of Cherokee. It’s fairly easy to spot from Pt. 11,602.
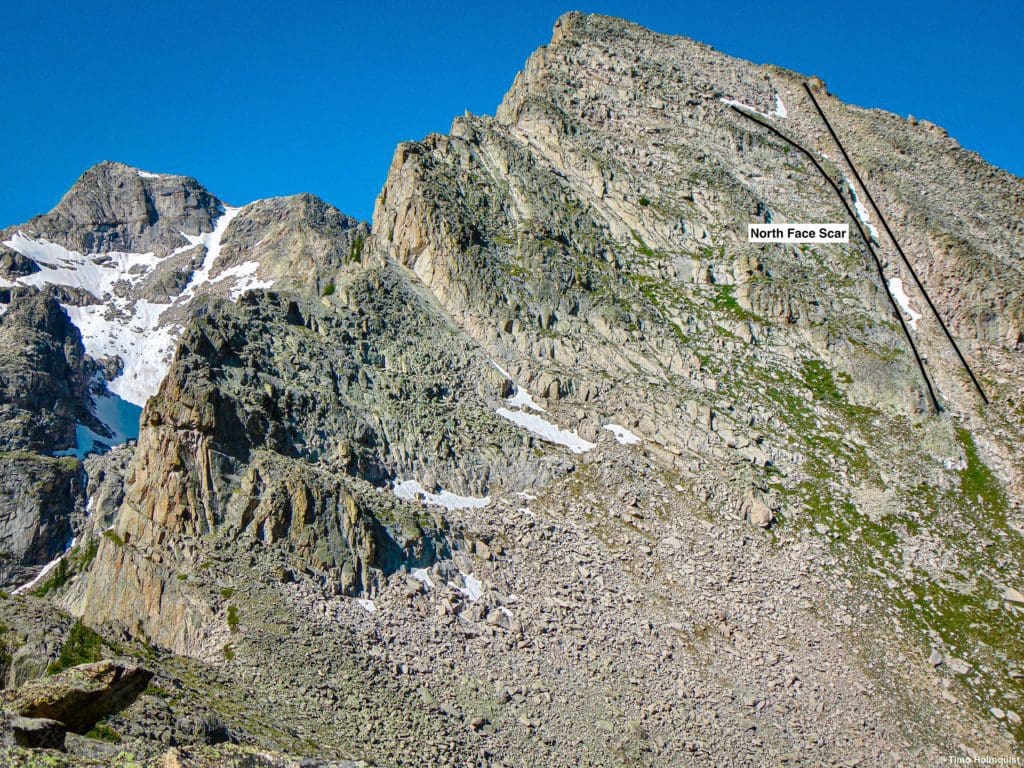
The north face scar on “Cherokee.”
While obvious from Pt. 11,602, the orientation of the North Face Scar makes it pretty much invisible from the off-trail portion lower down. Scrambling options exist on either side of the Scar. You can also climb up the Scar if you want, but it stays partially filled in with snow until July and afterward is dominated by loose and annoying scree.
The North Face Scar and options on either side.
While it does take a little longer to traverse over to the North Face Scar, once you find it, orientation is easy. Pick a side, start scrambling and continue on this trajectory up until the Scar ends.

What the Scar looks like from above.
When the Scar ends, continue ascending on Class 2 talus until you find the ridge line a few dozen meters from the summit block. You’ll need to bump the scrambling back up to some brief Class 3 in order to get up to the summit rock.
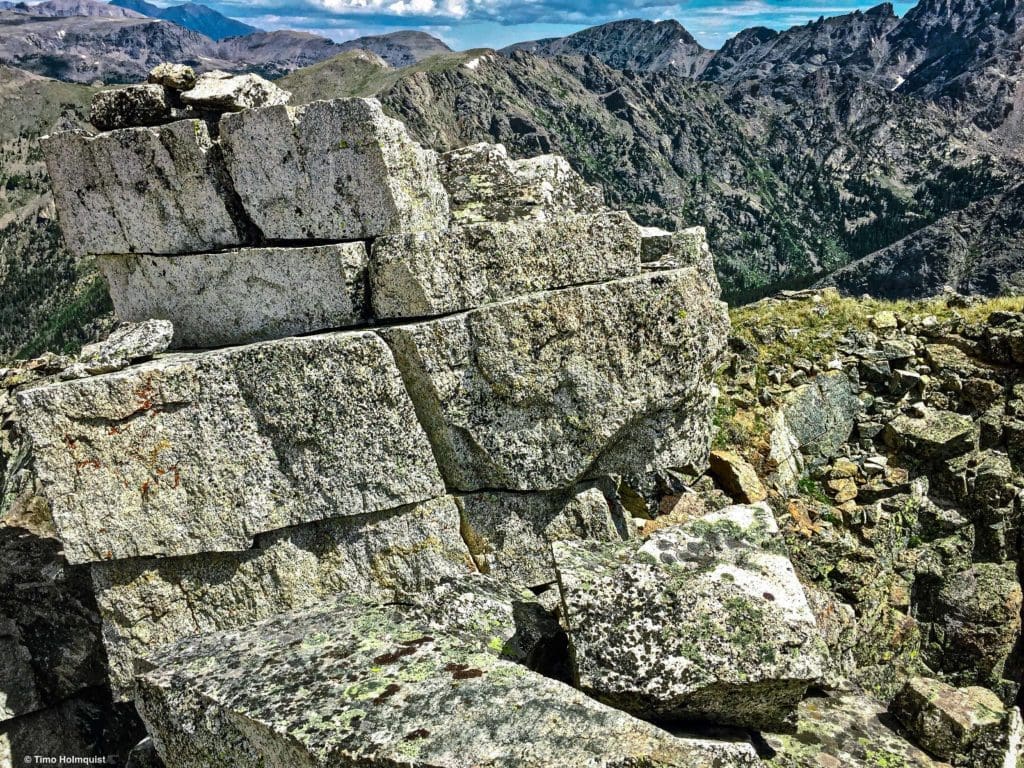
The summit rocks.
The summit block of “Cherokee” is an exciting place to be. The top rock doesn’t have too much room, but you can find plenty of places to sit on either side of it. The views are also stunning in pretty much every direction.
The summit to the right with Mt. Achonee in the background.
“Cherokee” also has a shorter summit that sticks farther into the basin, which is fun to explore, although the exposure toward Crater Lake is vertigo-inducing.
The double summits of “Hopi” and its permanent snowfield from the summit of “Cherokee”.
If you switch your gaze to the northeast, you’ll be able to see popular summits from the Brainard Lake area but from their seldom seen and seldom climbed western sides.
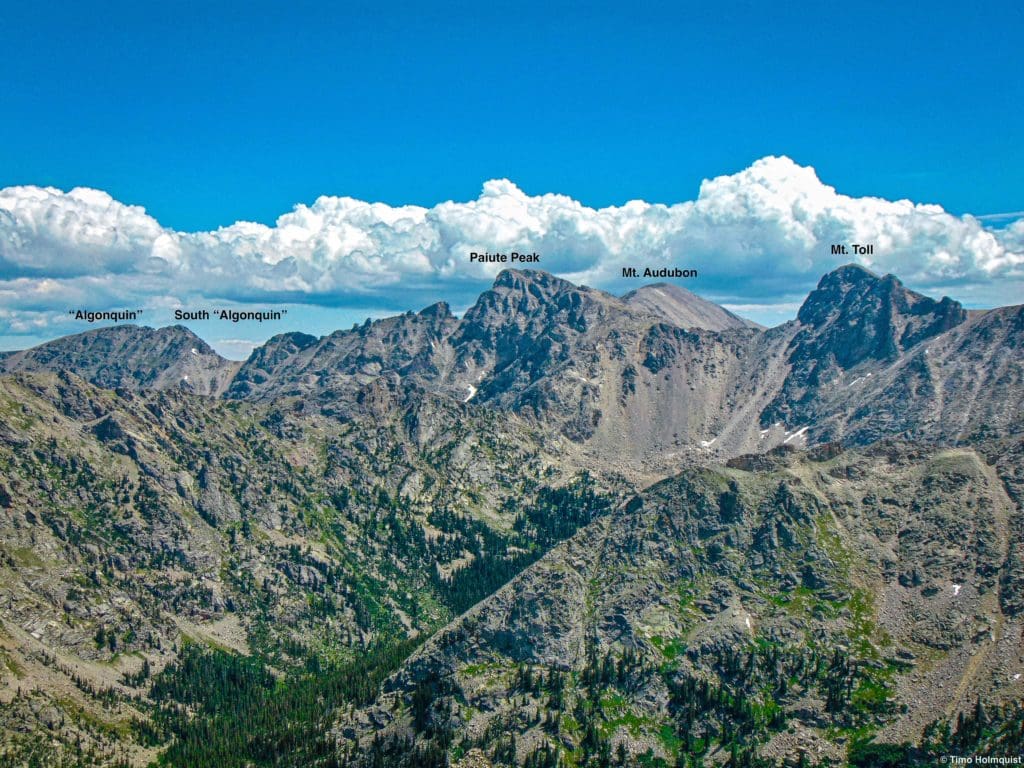
Icons of the Continental Divide.
Once you’re ready to descend, it’s best to retrace your ascent route to avoid getting confused. While not likely, there are ways to find yourself on much harder terrain than you are prepared to handle. Either make for the Scar or retrace the ridge route, taking care to descend down the vegetation strips to avoid tougher ridge obstacles close to the saddle.
Orientation is fairly simple once you’re in the Scar.
As you did on the ascent, proceed down the North Gully. Most of this is fairly straightforward until you get toward the bottom. At some point (more obvious if there are still snow piles feeding it), a stream will appear in the gully. Do not follow this stream into the krummholz, the bushwhacking becomes very difficult, and you have to negotiate 10-15-foot cliffs to get out of the area.
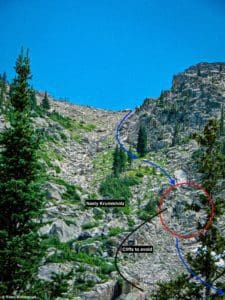
Bottom up look at descending the North Gully.
Instead, about 2/3 of the way down the gully start veering left of center. Continue to stay in the gully but begin looking for options around the waterfall. There is a small clump of trees that acts as a consistent marker for when it’s time to begin veering left.
Where you want to begin veering away from the stream on the way down the North Gully.
Remember, when you get out of the gully, you want to head left (west) initially to find the easiest place to cross back over the tributary. If you head down to the right, you’ll have to re-cross the mini-canyon, and it’s filled with surprise rock scrambles, willows, and thick vegetation.
Follow the herd paths down to the main Cascade Creek. Once you’re back at the big creek, find a place to cross by either hopping over, using a downed log, or wading through to the other side. On the other side, you’ll likely have to walk a few hundred yards back up the slope to meet the Cascade Creek Trail. After finding the trail, the navigational difficulties are over, but you still have a long way to go.
If you’re attempting this hike in one day, budget a lot of time, start early, and watch for the threat of afternoon thunderstorms.
Back on the Cascade Creek Trail, with one last look at “Cherokee.”
Journal: From Crater Lake
If you manage to snag a campsite near Create lake, a) nicely done, it’s an incredibly popular place, and you have to book months ahead of time, and b) a day trip up “Cherokee” becomes a much more leisurely experience. Don’t misread; you’re still gaining nearly 2000 feet in four miles, so you will be working, but it won’t take all day, and you can jump into Crater Lake afterward.
From whatever campsite you stay at, head toward the shore of Crater Lake and continue around the northern shore. After passing the last campsite (#12), you’ll find an obvious herd trail continuing around the lake. Walk this trail for a few minutes until you see an opening to begin climbing north (to the right).
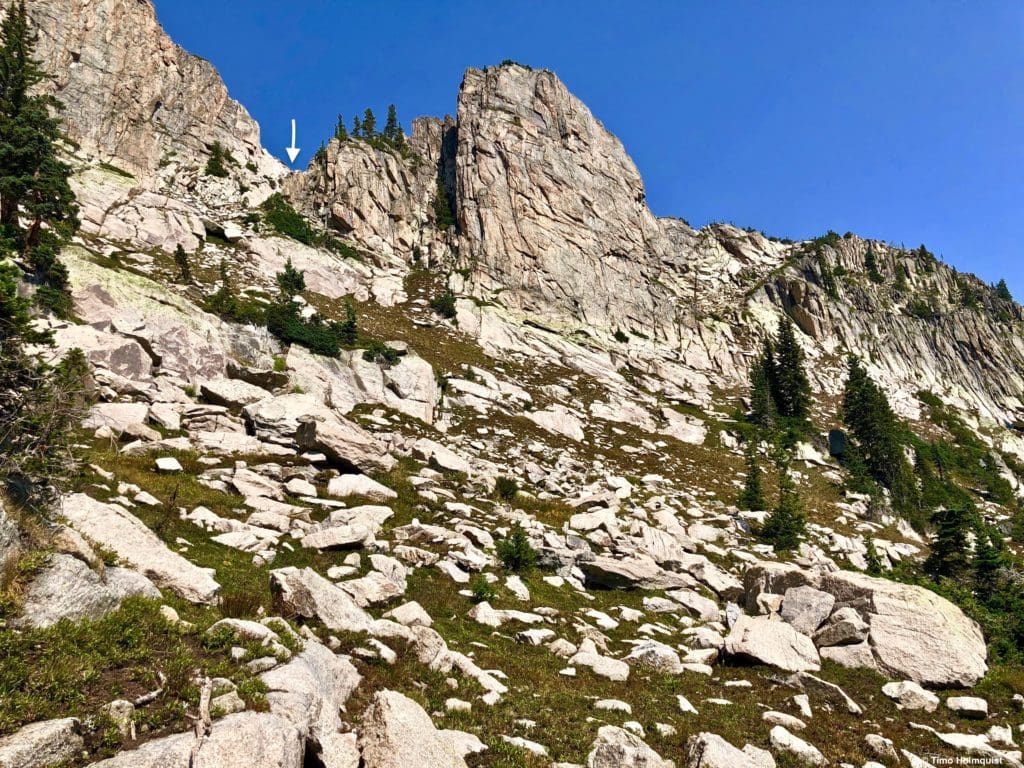
The first part of this ascent involves stringing together a path between a few bands of broken rock. There are a few places that don’t connect, so you’ll have to kind of figure it out as you go.
Typical terrain you’ll encounter.
As you climb, you’ll start to see the prominent cliffs on both “Cherokee” and Pt. 11,602. Your goal is to make it to the cleft between the two.
Where you need to go.
Take your time on this section, the terrain is tougher than it looks, and there are a lot of places where you can twist an ankle. Eventually, the trees will break, and you’ll be able to make more of a beeline to the cleft.
More serious terrain as you approach the cleft.
There will be a bit of scrambling as you gain the ridgeline, but it is light and brief Class 3. The total elevation and distance from Crater lake to the ridgeline is ~1180 feet in around half a mile.
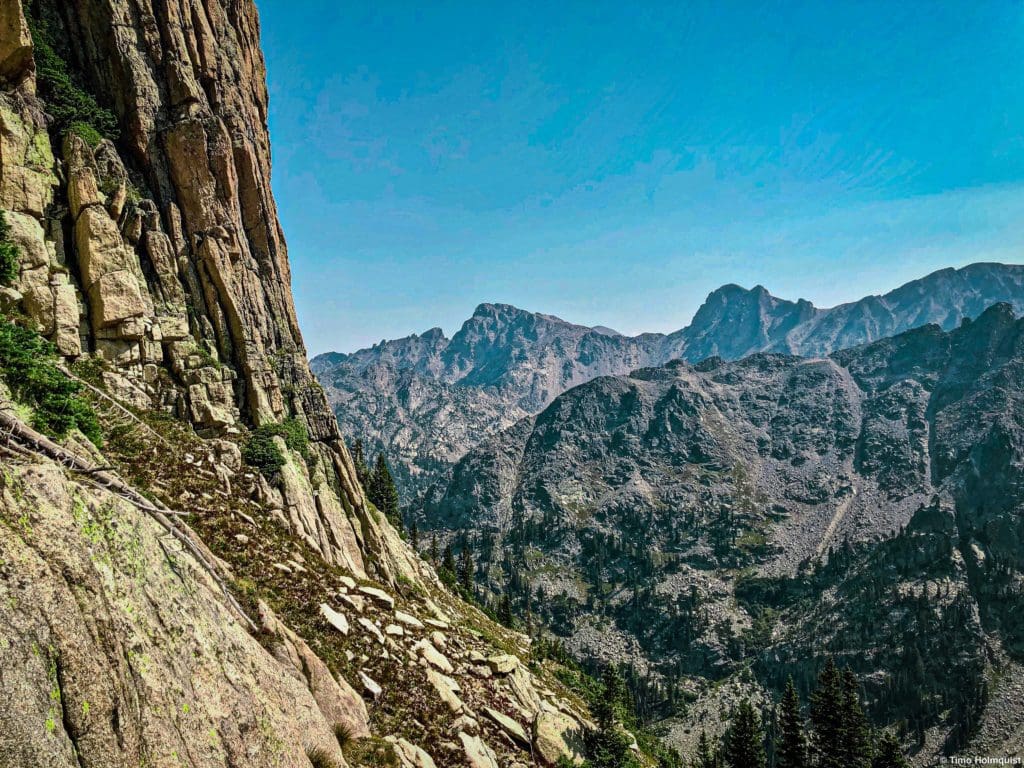
Some of the cliffs below Pt. 11,602.
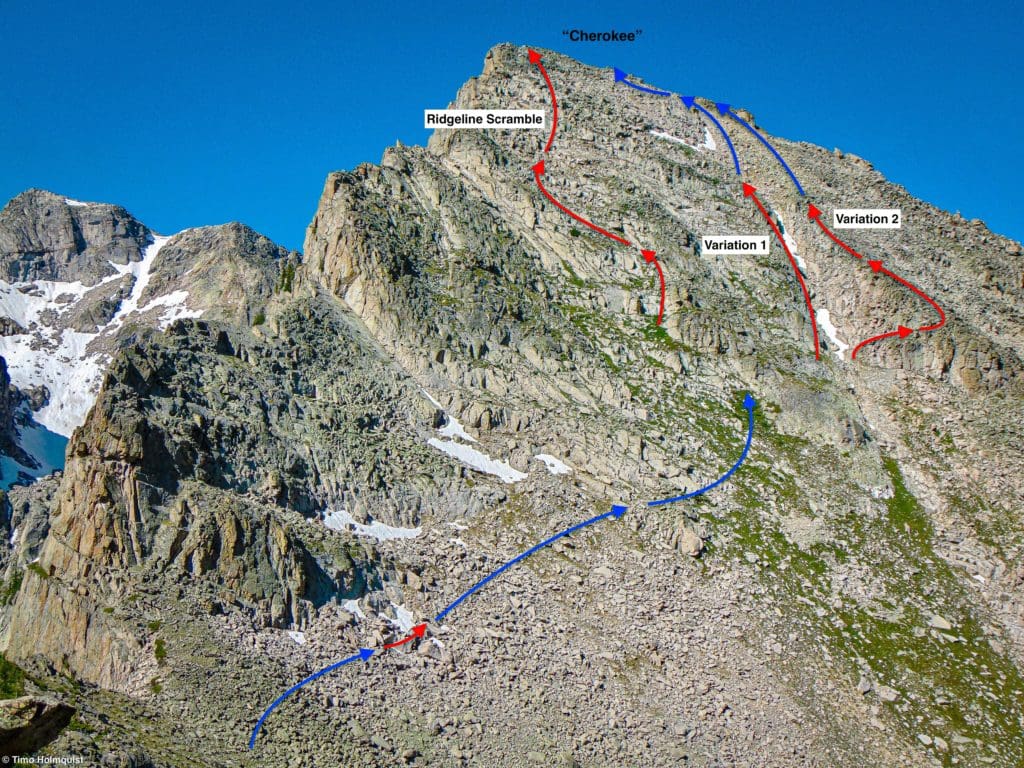
Once you get to the saddle, you can head right to tag Pt. 11,602. This will allow you to get a great view of the basin and see the rest of your potential routes up “Cherokee.” Then, traverse below the first few obstacles on “Cherokee” and either ascend up the vegetation benches to the ridgeline or continue traversing until you run into the obvious scar that runs from near “Cherokees” summit. There are multiple scrambling variations on either side of the Scar.

Routes and variations up “Cherokee” from Pt. 11,602.
Once you’ve picked a route, scramble up to the ridgeline, tag the summit block and enjoy the stellar views of the surround. On the way down, make sure to follow the same route you took up to minimize confusion. You don’t want to veer too far to the north if you’re heading back to Crater lake. Once you arrive at the saddle, pop over to the south side and piece together a trail to the lakeside. Generally speaking, southwest is an easier direction that avoids larger cliffs.
After you pick up the social trail around the lake, take it back to your campsite and enjoy the fruits of your labor. Nicely done!
Skyblue Overland Strongly Recommends That You Enroll With Global Rescue Prior To Embarking On Your Next Adventure.
With more people outside now more than ever, Global Rescue expanded services to include field rescue within 100 miles of home. With Local Field Rescue — automatically included in any travel protection services membership — Global Rescue is there whether you’re hiking, kayaking, snowmobiling, fishing or simply enjoying the outdoors and get ill or injured and you’re unable to get to safety on your own. Purchase a Global Rescue membership for your next adventure and travel with peace of mind. Single trip, annual and family options are available.


