


|
Getting your Trinity Audio player ready...
|
Searching for the best backcountry ski spots in Colorado? Look no further than Rocky Mountain National Park. We’ll take a look at two remote regions–Mummy Range and the Never Summer Mountains –promising long days in the backcountry and mountain solitude.
Overview
Looking for the best places to backcountry ski in Colorado? This is the last of four articles dedicated to skiing the more famous backcountry lines in Rocky Mountain National Park. We’ll take a look at the Park in general before zeroing in on three regions, Mummy Range North, Mummy Range South, and the Never Summers. For those who’ve skied the Bear Lake, Longs Peak, and Hidden Valley areas, these involved lines will be sure to keep the adrenaline pumping. The options presented below guarantee long days in the backcountry and glorious mountain solitude.
Backcountry Skiing comes chock full of benefits and risks, almost in equal measure. It is a discipline that rewards methodical and purposeful learning with a deeper connection to nature. It can also be very dangerous for the uninitiated and seasoned veterans alike; avalanches don’t pick favorites. However, by arming yourself with the right gear and planning knowledge, backcountry skiing can satisfy the outdoor itch for multiple lifetimes.
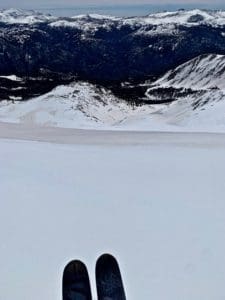
While not as well-known as Longs or Bear Lake, the Mummy Range and Never Summer Mountains have plenty to offer for those who love backcountry skiing and riding. Escape from the crowded slopes and experience peaceful solitude surrounded by stunning mountain views in the Never Summers. For a more challenging adventure, try tackling the steep and technically demanding Y-Couloirs on Ypsilon Peak. With a skilled and adventurous companion, proper backcountry skills, and favorable weather conditions, exploring these hidden gems in Rocky Mountain National Park will be a thrilling and rewarding experience. Just be prepared for long days and savor every moment of your time out there.
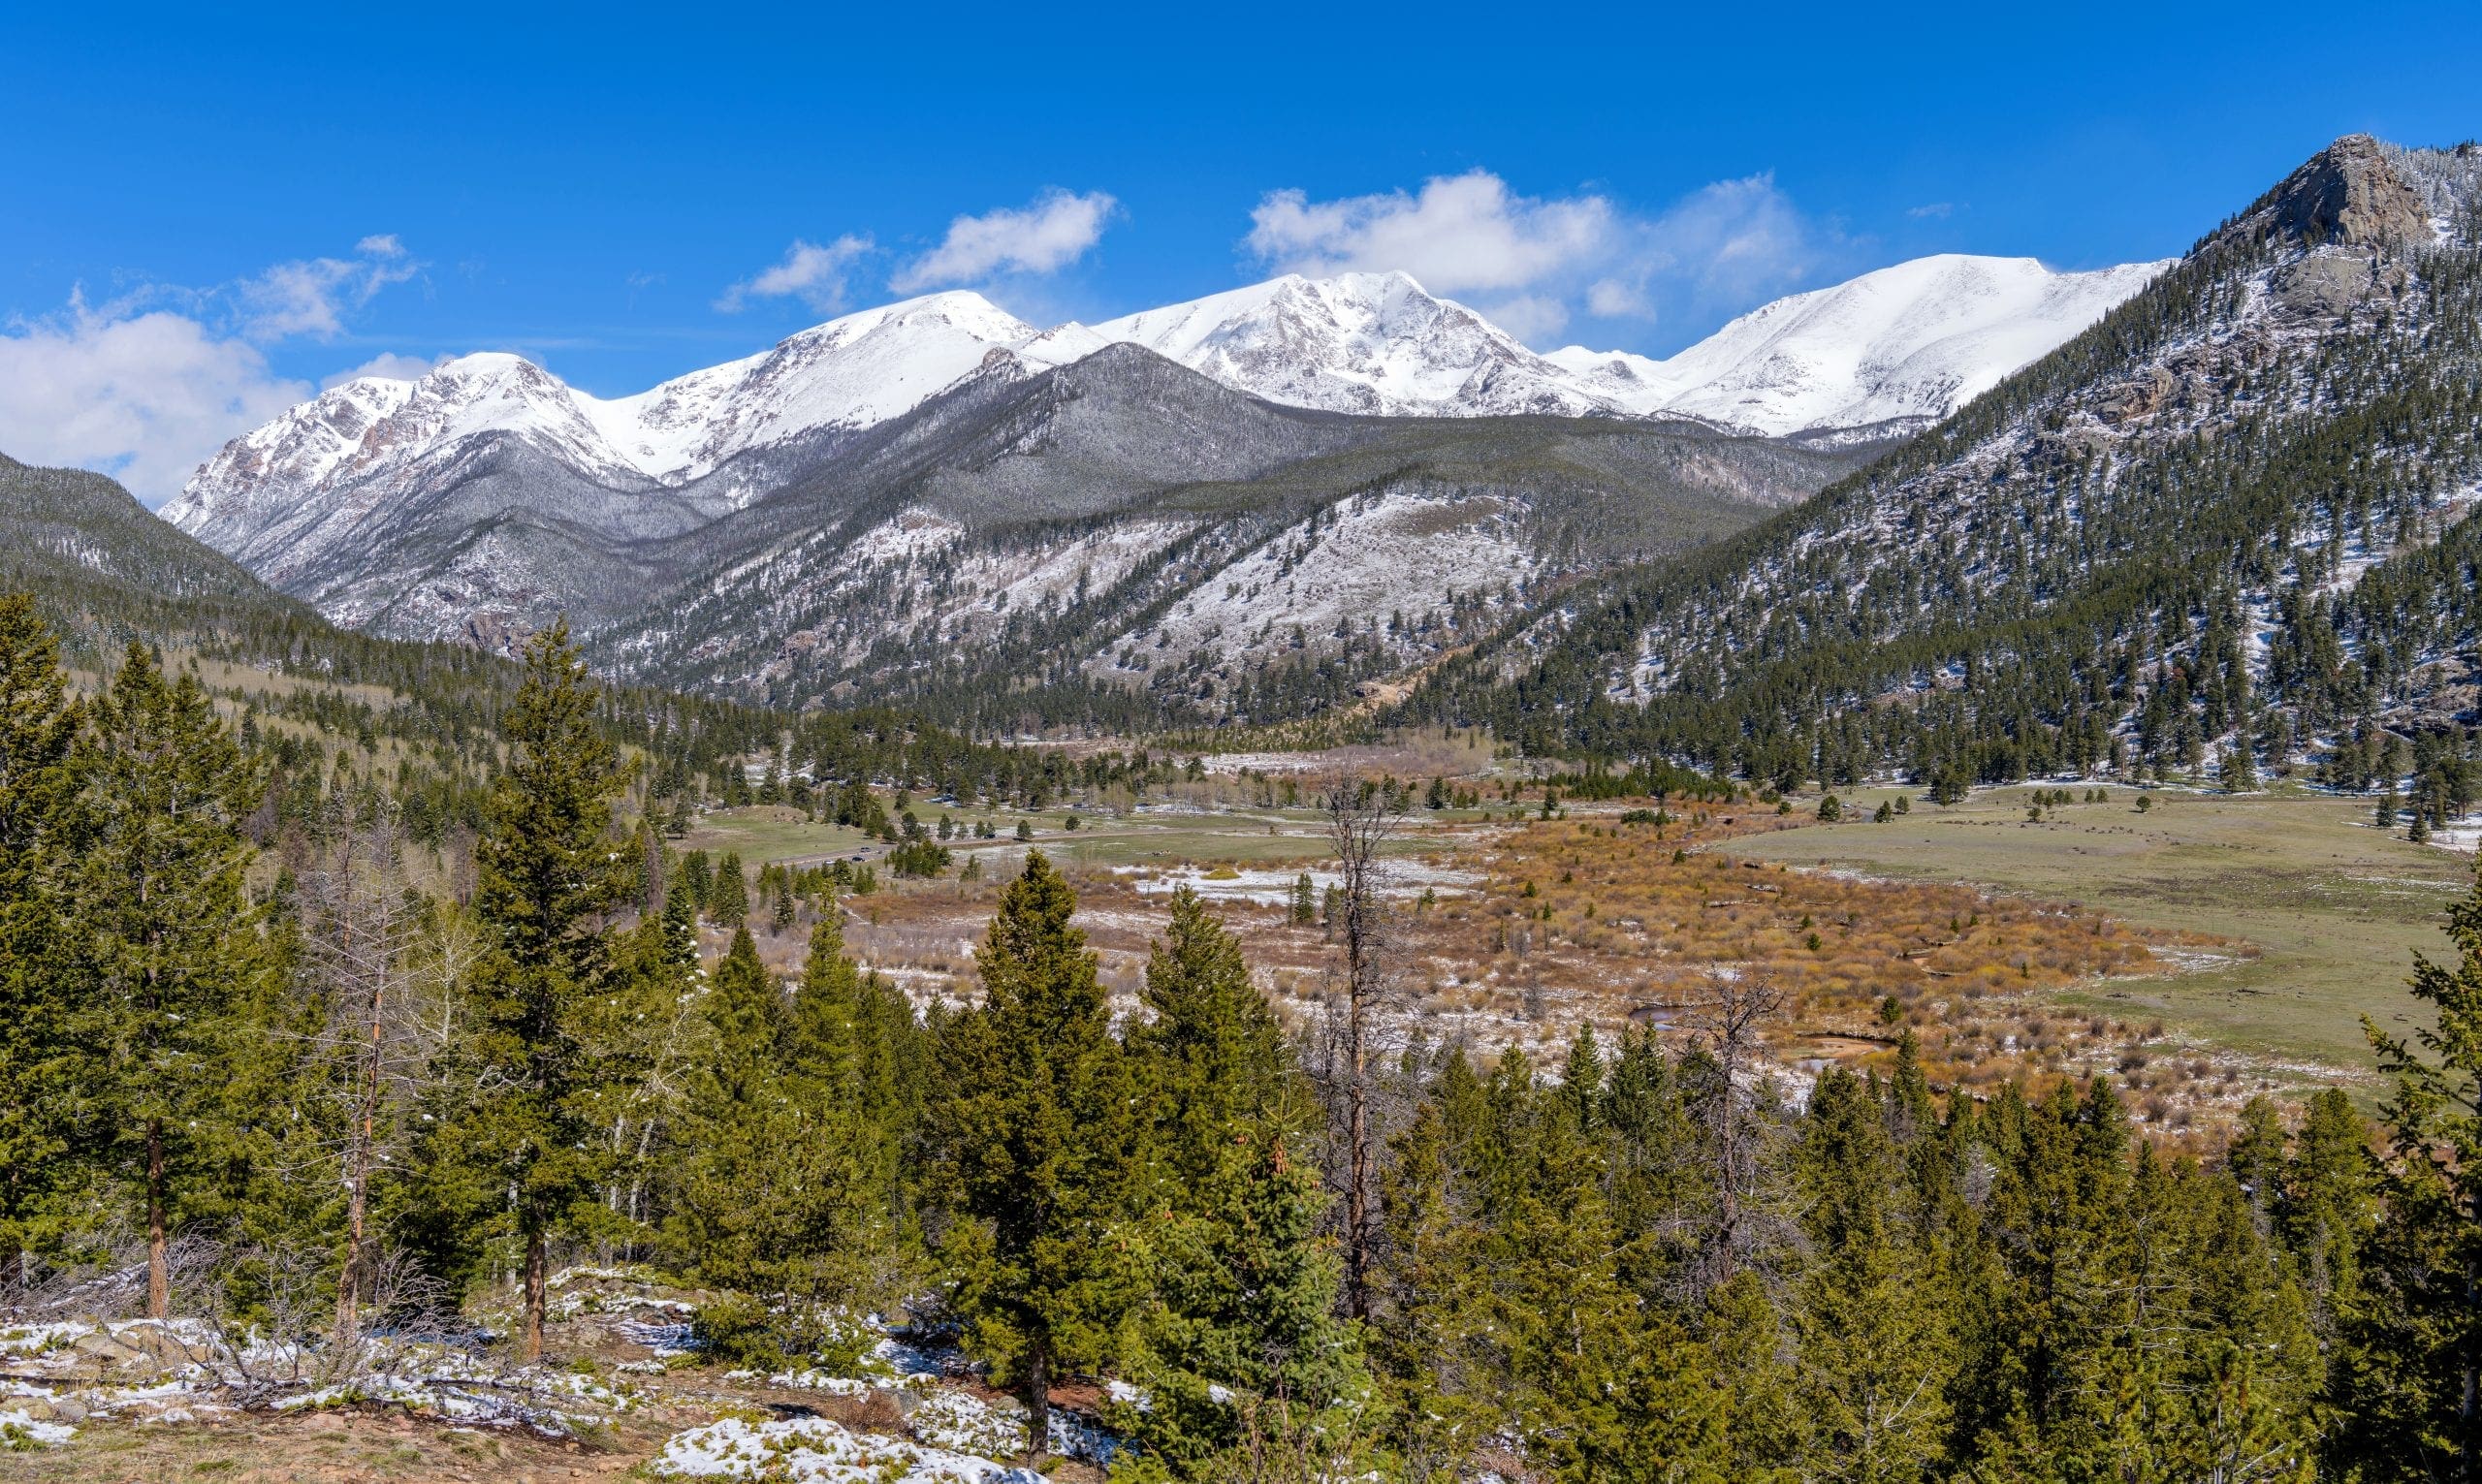
A view of Rocky Mountain National Park on a sunny morning after a Spring snowstorm, with snow-capped Mummy Range towering in background.
Table of Contents
- Backcountry Gear
- Backcountry Planning
- Rocky Mountain National Park Overview
- Places to Stay
- Our Rating System
- Mummy Range Overview
- Mummy Range North
- South Face (Fairchild Mountain)
- North Face (Fairchild Mountain)
- Y Couloir-Left Arm (Ypsilon Mountain)
- Y Couloir-Right Arm (Ypsilon Mountain)
- Mummy Range South
- Never Summer Range Overview
- South Face Howard Mountain
- Mount Cumulus: East Bowl 1
- Mount Cumulus: East Bowl 2
- Mount Cumulus: East Bowl 3
- Mount Nimbus Northeast Face
- Red Mountain Descent
- Mummy Range North
(Please Note: Some of the parent lines listed above have add-ons and variations, which are also discussed)
Backcountry Gear
Before we begin, let’s lay out some quick backcountry gear knowledge (for a more comprehensive guide, check out our article, Backcountry Gear: Essentials for Human Powered Skiing). The list below is crucial, don’t skimp on gear when avalanches are in play.
- Skis/Helmet/Gloves/Goggles
- Winter Clothing: waterproof shells, thick ski socks, layers, puffy, beanie, hand warmers, etc.
- Skins
- AT Bindings (Frame or Tech)
- Avalanche Gear: Beacon, Shovel, Probe, and Radio
- Backcountry ski pack
- Food/Water/First-Aid Kit
- For multi-day adventures: 4-season tent, winter rated sleeping bag, avalanche airbag, orienteering equipment, batteries/rechargeable batteries
- Mountaineering Axe and Crampons. While there are hundreds of lines that do not require these tools, some of the most epic lines in Rocky Mountain National Park do. Research which crampons fit over your alpine or tech boots before buying! Generally speaking, you do not need an “Ice” axe unless you are climbing an ice wall, a mountaineering axe should work fine for most couloirs. However, some of the hardest ski mountaineering routes in the area demand more. Analyze your skill level and the route of choice BEFORE settling on gear choices.
Remember, it isn’t enough to simply own gear; take the time to figure out how to use it before heading out. Speed is key, especially in a backcountry avalanche rescue. Visit Backcountry Gear: Essential for Human Powered Skiing to get comfortable with the necessary gear and how to use it.
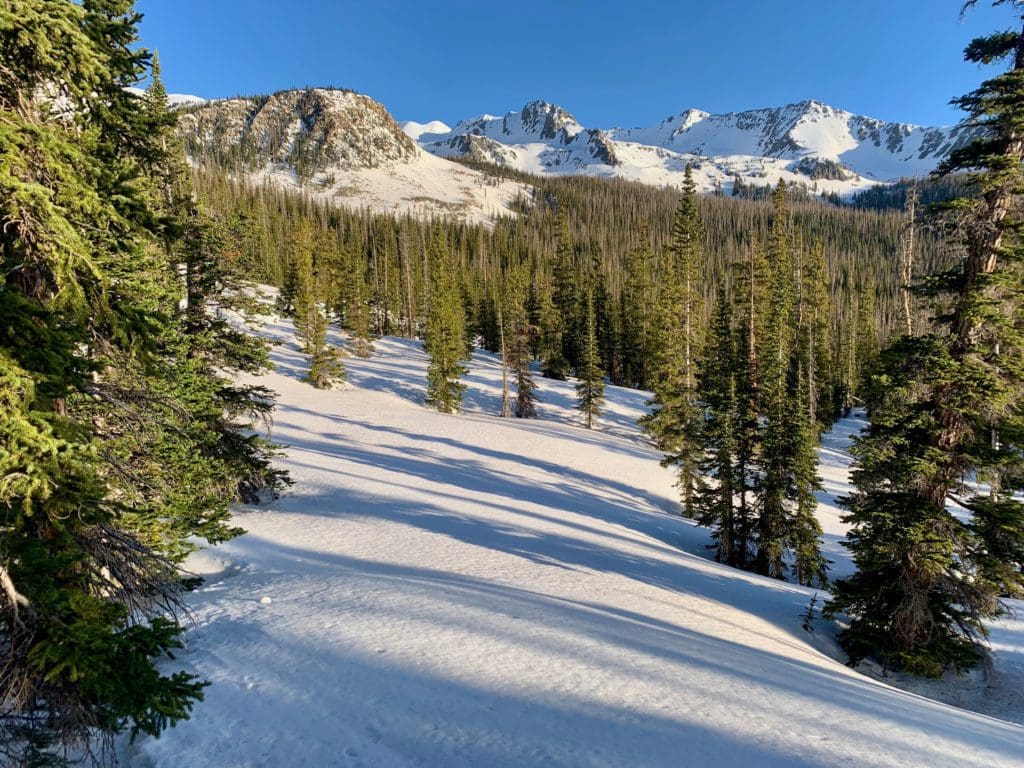
The sharp and dramatic ridges of the Never Summer Mountains
The Ultimate Offline GPS Hiking & Ski Maps
See why onX Backcountry is the ultimate GPS navigation app for your outdoor pursuits. Try Today for Free. No credit card required.

Backcountry Planning
Once you have the gear and know how to use it, it’s time to start planning. We’ll briefly break down the central components below, but check out our Guide to Planning a Backcountry Ski Adventure for an in-depth analysis of the planning process. A good plan can separate success from disaster. No outdoor activity is worth your life.
- 1) Pre-Planning
-
-
- Learn how to Ski at an EXPERT level before heading outside ski resort boundaries. Find a squad. Start backcountry gear research. Hone your craft. Get in shape.
-
- 2) Long-Term Planning
-
- Geographic reduction: where are you skiing? Start big, get small.
- Weather and snowpack research.
- Research ski lines using books, online resources, and forums. Key data:
- Total distance, total climb, total descent, slope angle
- Local Emergency contacts
- Unique factors: trees, cornices, couloirs, avalanche history
- Get into the maps and apps, know the area like the back of your hand.
- 3) Short-Term Planning
- Managing Expectations
- Constantly check weather updates until the morning you leave. Remember, snow reflects light, if it’s a sunny day, bring sunscreen!
- Popularity of your backcountry line.
- Tell people where you’re going and who to call if things go wrong.
- Have a back-up plan.
- Who’s got the medical training?
- Go over the plan in detail with your squad. CHECK FOR UNDERSTANDING.
- Packing
- Make sure everything fits, and you can access your avalanche gear quickly. Time is critical in a burial situation.
- Managing Expectations
- 4) On-site Planning
- What do you see when you get there?
- Watch out for tree-wells, wind-loaded slopes, cornices, bergschrunds, and other topographical considerations.
- Timing and snow surface i.e. environmental factors. Not all snow skis the same.
- What do you see when you get there?
- 5) Post-Planning
- Analyze
- What worked well? What didn’t?
- Ease into the harder stuff.
- Analyze
The steps listed above are only a skeleton outline; see our Guide to Planning a Backcountry Ski Adventure to iron out the critical details. Remember, you can always take an avalanche safety course through AIARE; it can absolutely save lives.
Rocky Mountain National Park Overview
Rocky Mountain National Park is the third most popular National Park in terms of visitation, right behind The Great Smokey Mountains and the Grand Canyon (nps.gov, 2020). A lot of its popularity has to do with the relative ease of access (Denver and its major international airport are less than two hours away) and dramatic glaciated terrain, which creates stunning vistas along the Continental Divide. The other winning ingredient is backcountry skiing.
While winter is a down season in terms of Park visitation, Rocky Mountain supplies some of the best winter and spring skiing in northern Colorado. Most of it is easily accessible from the more trafficked eastern side of the park. Please see our Hidden Valley/Sundance Mountain article for detailed information on a great backcountry introductory area. If variety is your game, check out our Bear Lake Area article, containing some of the highest concentrations of ski lines in the park. Additionally, see our Longs Peak Area article for additional intermediate and extreme lines. If, however, your sights are set on less popular areas, have no fear; with Rocky Mountain National Park clocking in at over 415 square miles, it’s easy to find new and exciting places to recreate.
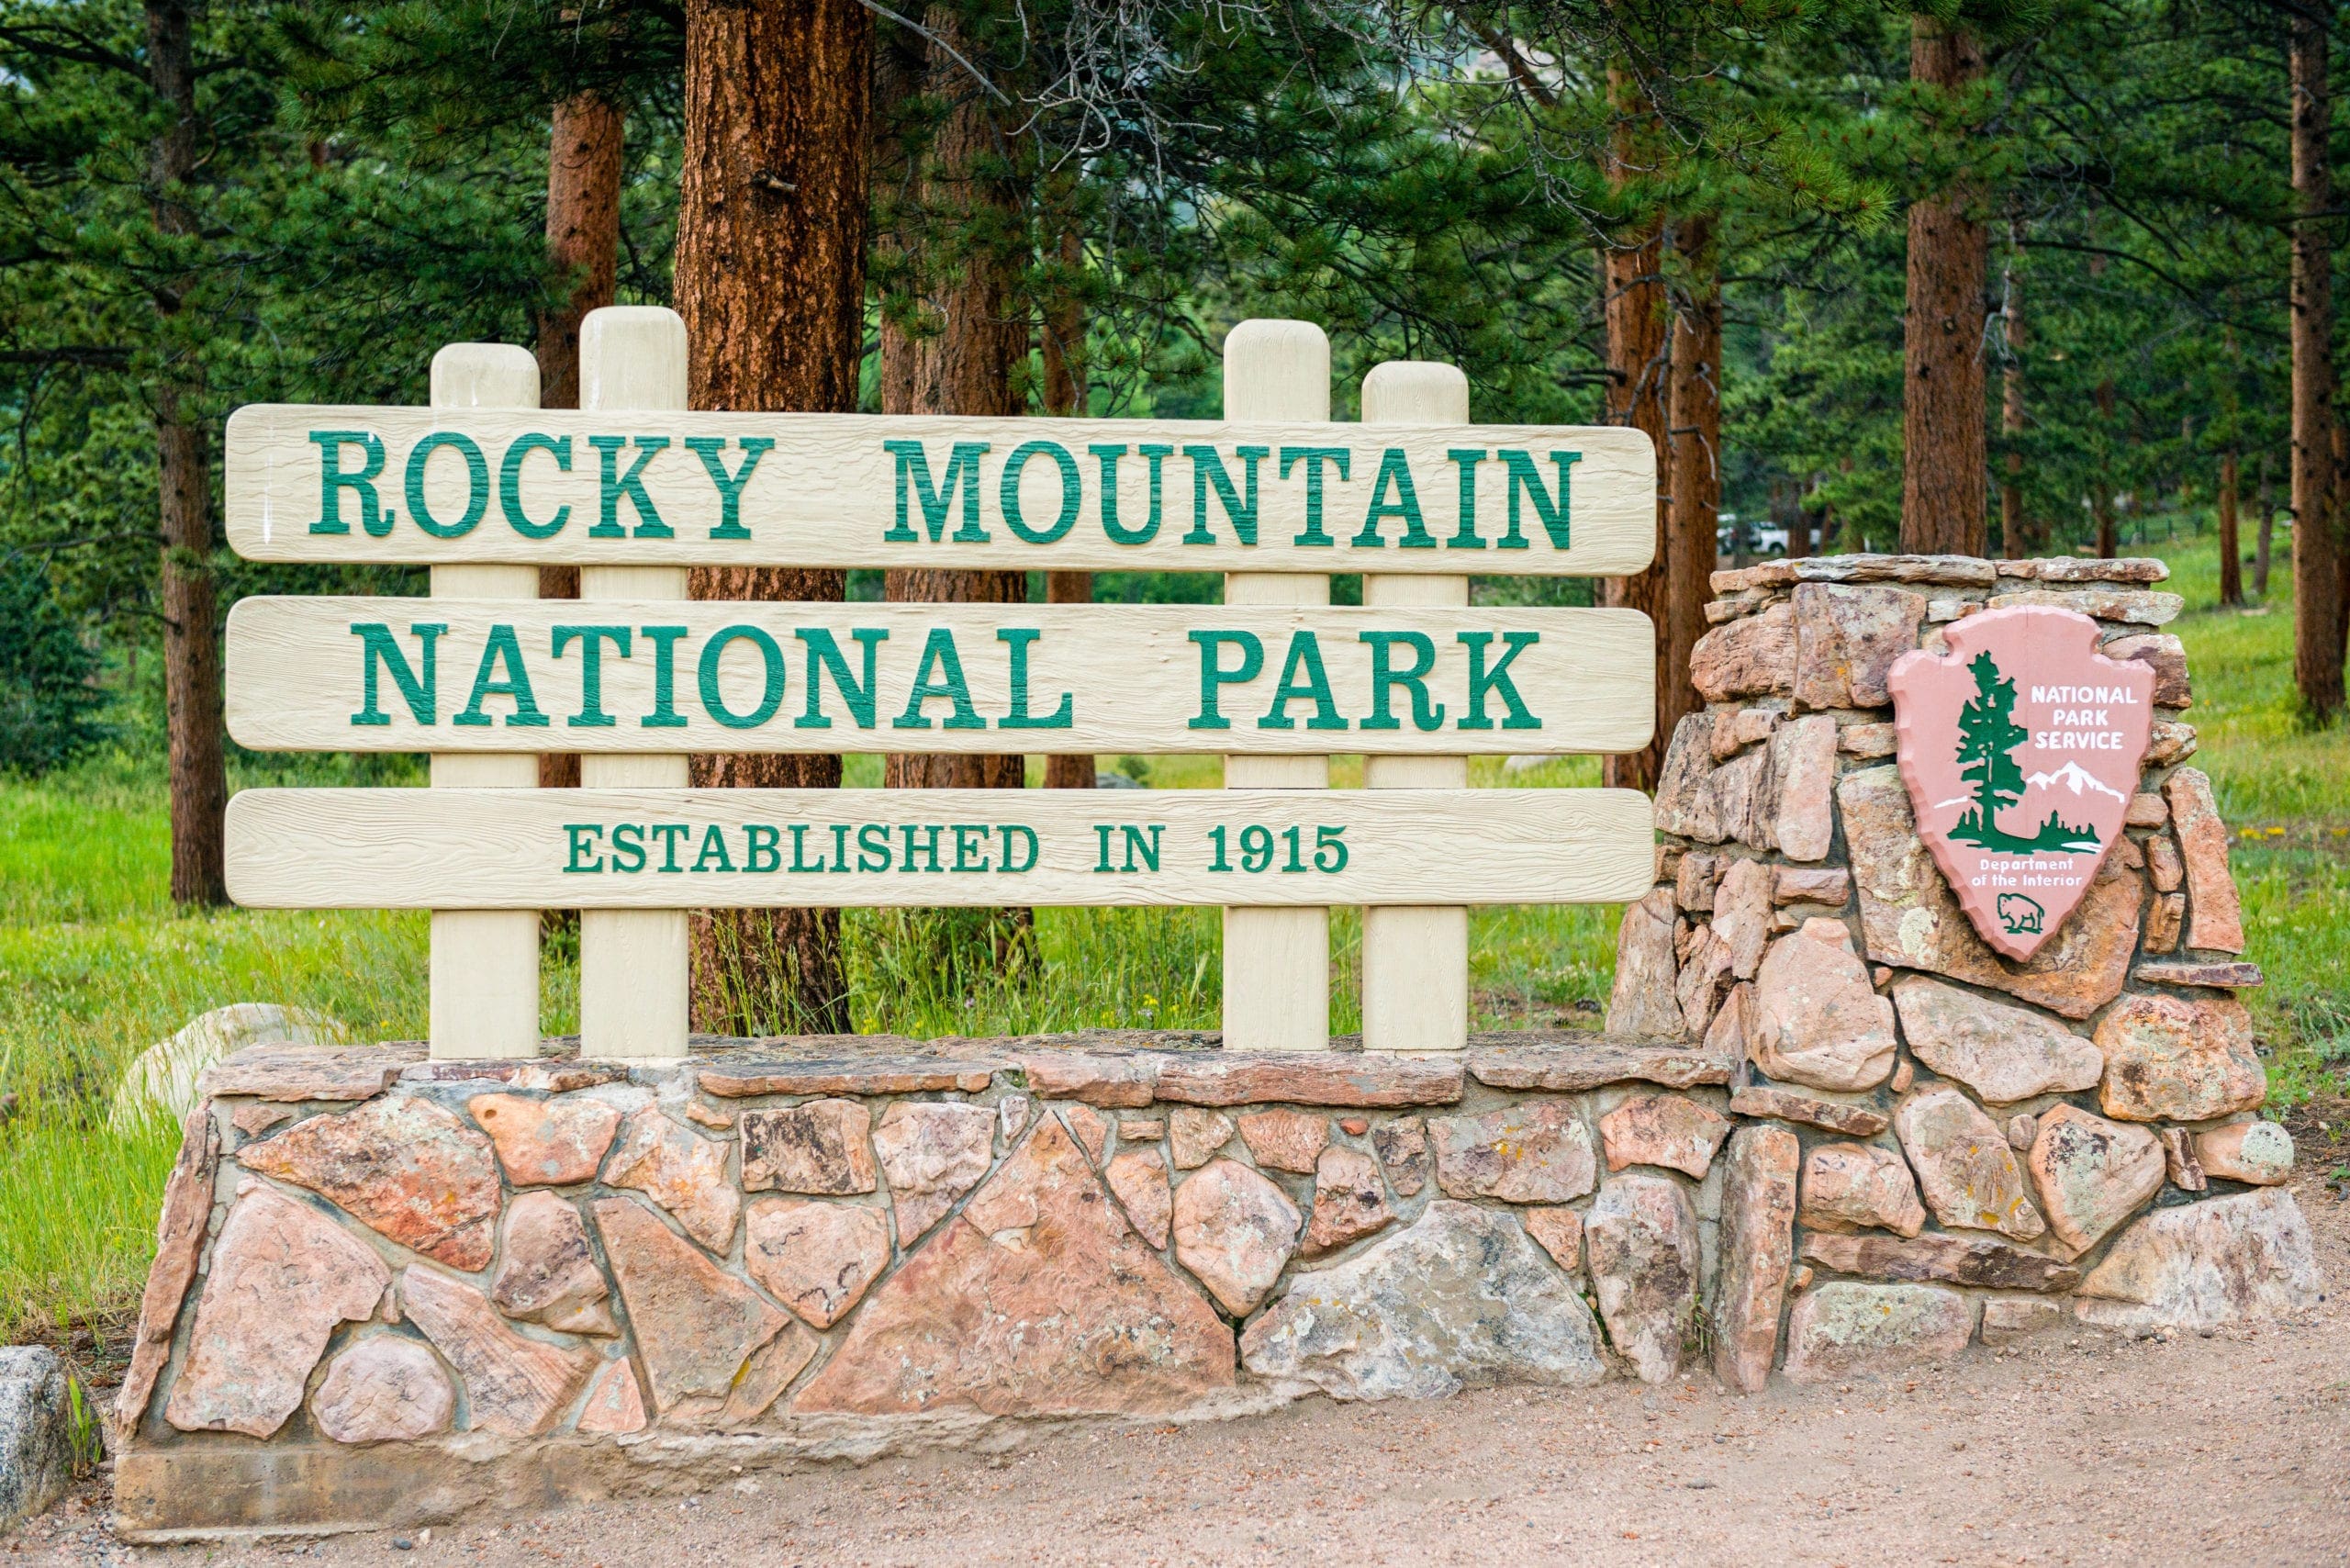
Entrance sign to Rocky Mountain National Park, Colorado
Because it is a National Park, there are many options for weather forecasting. During the planning phase of any backcountry ski trip, it’s important to check the weather using multiple sources. The forecast for Estes Park is a good starting point. Estes sits right outside the eastern park boundary, only thirty minutes from the Mummy Range Lines. There is also a forecasting station at the Alpine Center off Trail Ridge, which will provide a good overview of the Never Summers. Between the forecasts for Estes and the Alpine center, you can usually lock in a good spectrum of possible weather factors.
In addition, individual mountain weather forecasts are very handy and come chock full of weather details reported from multiple elevation gradients. For Mummy Range North forecasts, check out Hagues Peak and Mt. Ypsilon. For Mummy Range South forecasts, use Mt. Chiquita. Heading out to the Never Summers? Use the Alpine Center forecast and Grand Lake on the western fringe of the park.
Keep in mind there are multiple components to the weather; it’s not just about precipitation. The temperature will dictate what layers to bring, and local weather patterns will help you figure out what’s important. For example, in Rocky Mountain and the larger Front Range in general, make sure to check the wind forecast. The Front Range is notorious for strong, blustery winds, and fighting your way up to a ski line in 50mph gusts is not fun.
There are also Snotel weather station sites scattered throughout the backcountry offering snowpack data. It can be a bit confusing to sort through the site, but here is the interactive map option. Use the menu on the right-hand side to create specific condition queries. The linked map will open with a window to the specific station in the Never Summers. The closest station to the Mummy Range is Willow Park. Snowpack data is really important for backcountry skiing; not only will it tell you if there is even enough snow to ski on, but it will also show you whether or not the area is experiencing an average winter. Any significant deviation away from average is noteworthy. Deep winters create more pronounced avalanche conditions, but wimpy winters can as well, especially if a storm overloads weak and unstable snow. Snowpack science should be a critical component of planning.
As crucial as snowpack data is, the numbers would be incomplete without an avalanche forecast. This forecast is MANDATORY before heading out. In Colorado, we are lucky to have the CAIC (Colorado Avalanche Information Center). The information is easy to read, the maps are color-coded, and a flurry of explanations gives depth to the forecast. More specifically, Rocky Mountain is in the Front Range Zone; make sure you are checking the right area for the most accurate information. Do not go into the Colorado backcountry without checking CAIC.
Remember, an entrance pass is required to visit Rocky Mountain National Park. These passes can be purchased online. Please visit the official National Park website to ascertain what passes and entrance fees are required. Fines will be administered to those without proper passes.
Global Rescue has expanded services to include local field rescue within 100 miles of home. Global Rescue is there whether you’re hiking, kayaking, snowmobiling, fishing or simply enjoying the outdoors and get ill or injured and you’re unable to get to safety on your own. Global Rescue is the red button you push in an emergency. Their team of medical and security experts come through for you when it matters most.
Places to Stay
The best option for accommodations near the Mummy Range is Estes Park. The town is a four-season playground offering myriad lodging opportunities. It is impractical to stay in Grand Lake if you’re set on skiing the Mummy’s because of seasonal closures along Trail Ridge.
If you’re based in the Front Range, Estes Park is only an hour and a half from Boulder and metro Denver. Loveland, the closest major town to Estes, is only 45 minutes away with no traffic. Due to the relative proximity of the Mummy Range to major population centers, it may be easier to day-trip up to the ski area.
If you want to stay in Estes, please visit the tourism bureau website here. The search filters on the site will help you narrow down options. Additionally, Airbnb frequently offers great options. Because winter is less busy, many lodging establishments will offer discounts and perks to attract clients.
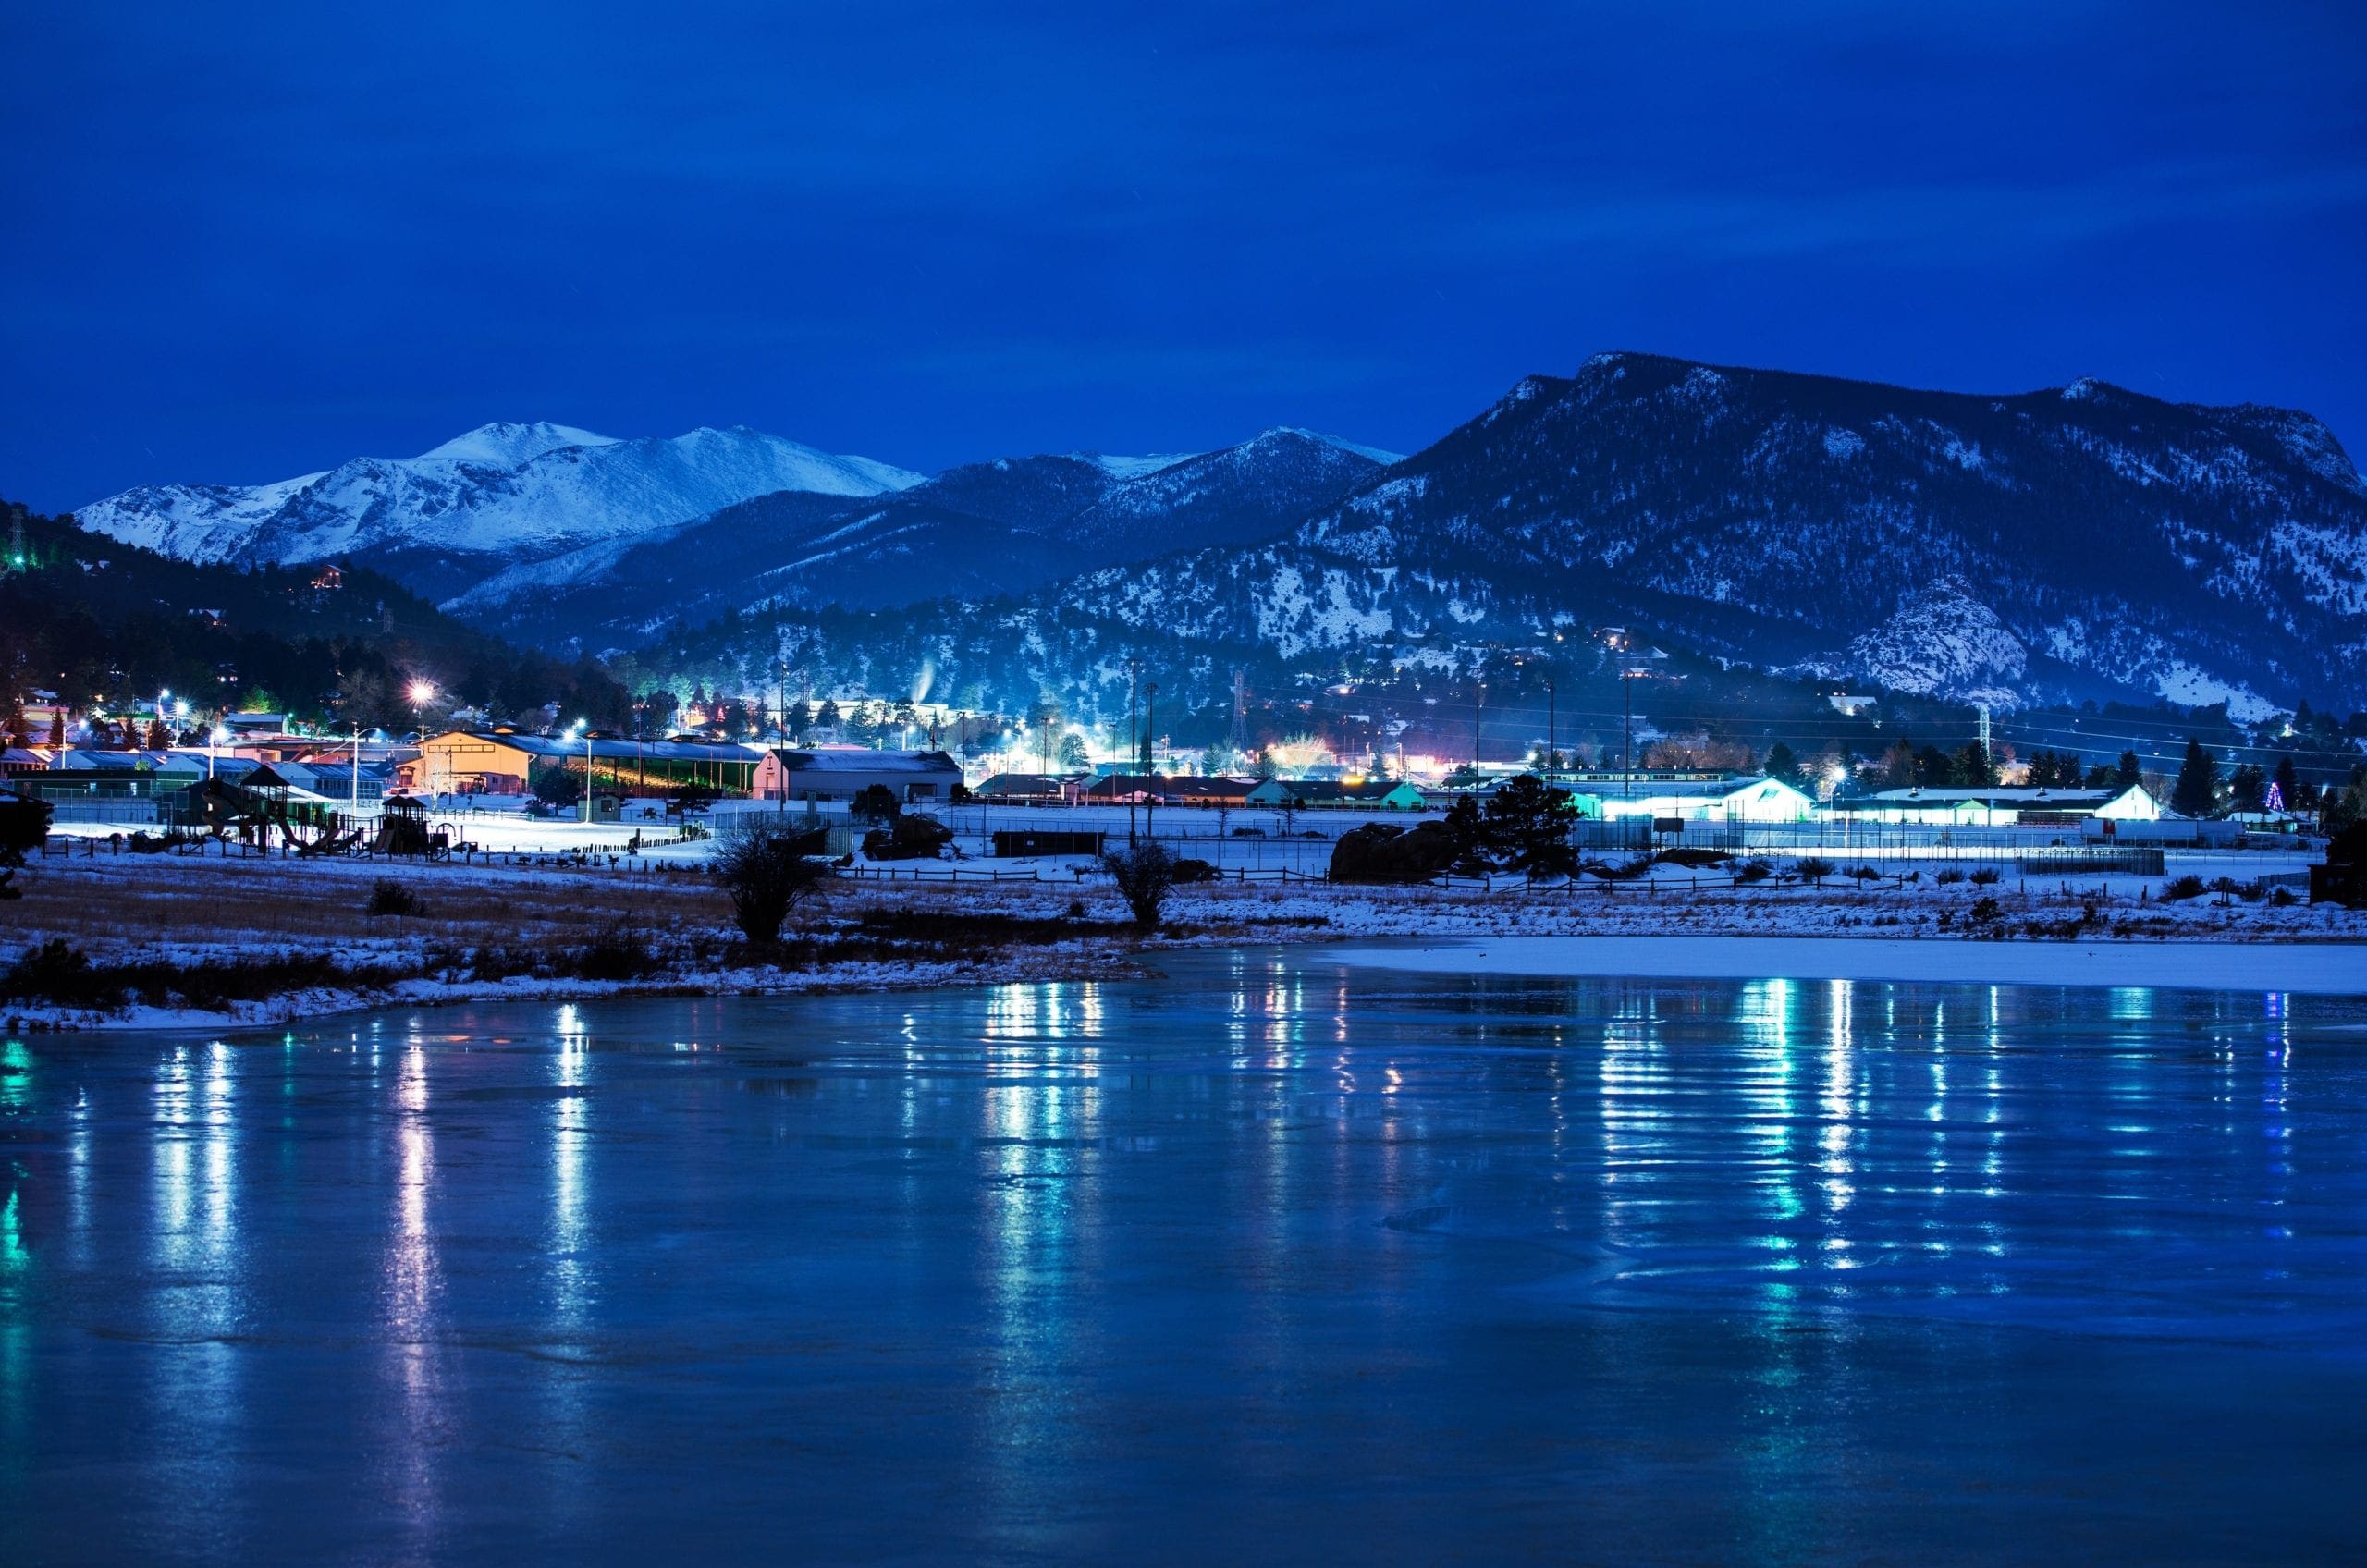
Estes Park, Colorado on a cold winter night.
The Never Summers are a bit harder to get to. Lying on the western border of the park, when Trail Ridge closes, this range can take up to five hours to get to from the Front Range. If long, mountainous drives are your thing, you can make a day trip of the Never Summers. For the rest of us, staying in Grand Lake is the best and most practical launch pad for exploration. Once Trail Ridge opens, you can shave an hour or two off the drive, but it’s still quite a haul. Consider staying in Grand Lake, Granby, or Fraser.
Our Rating System
Below you’ll find route descriptions, maps, and ratings as they pertain to the lines we cover. These articles cover the most reported and referenced lines, not all possible lines you could ski. We utilize a four-tier rating system illustrated as follows:
- Beginner (Green)
- Intermediate (Blue)
- Difficult (Maroon)
- Very Difficult (Black)
Some areas covered only exhibit a few tiers; others exhibit all of them. Regardless, it is important to understand that each rating does not ONLY correspond to the steepest slope angle skied. Some lower-angle Difficult terrain is simply difficult to access and requires an immense amount of effort to attain, hence the harder rating. Take the ratings seriously as the separation between Difficult and Very Difficult often involves many of the hallmarks of true ski mountaineering, ropes, legitimate ice axes, mountaineering crampons, etc. It is incumbent upon each reader to understand their limits. Always start small.
3D Map Navigation Instructions
On desktop: Hold the ctrl key while you drag to rotate the map. Use your mouse scroll to zoom in and out.
On mobile: Rotate and zoom on mobile by pinching and moving two fingers.
Best of the Rest
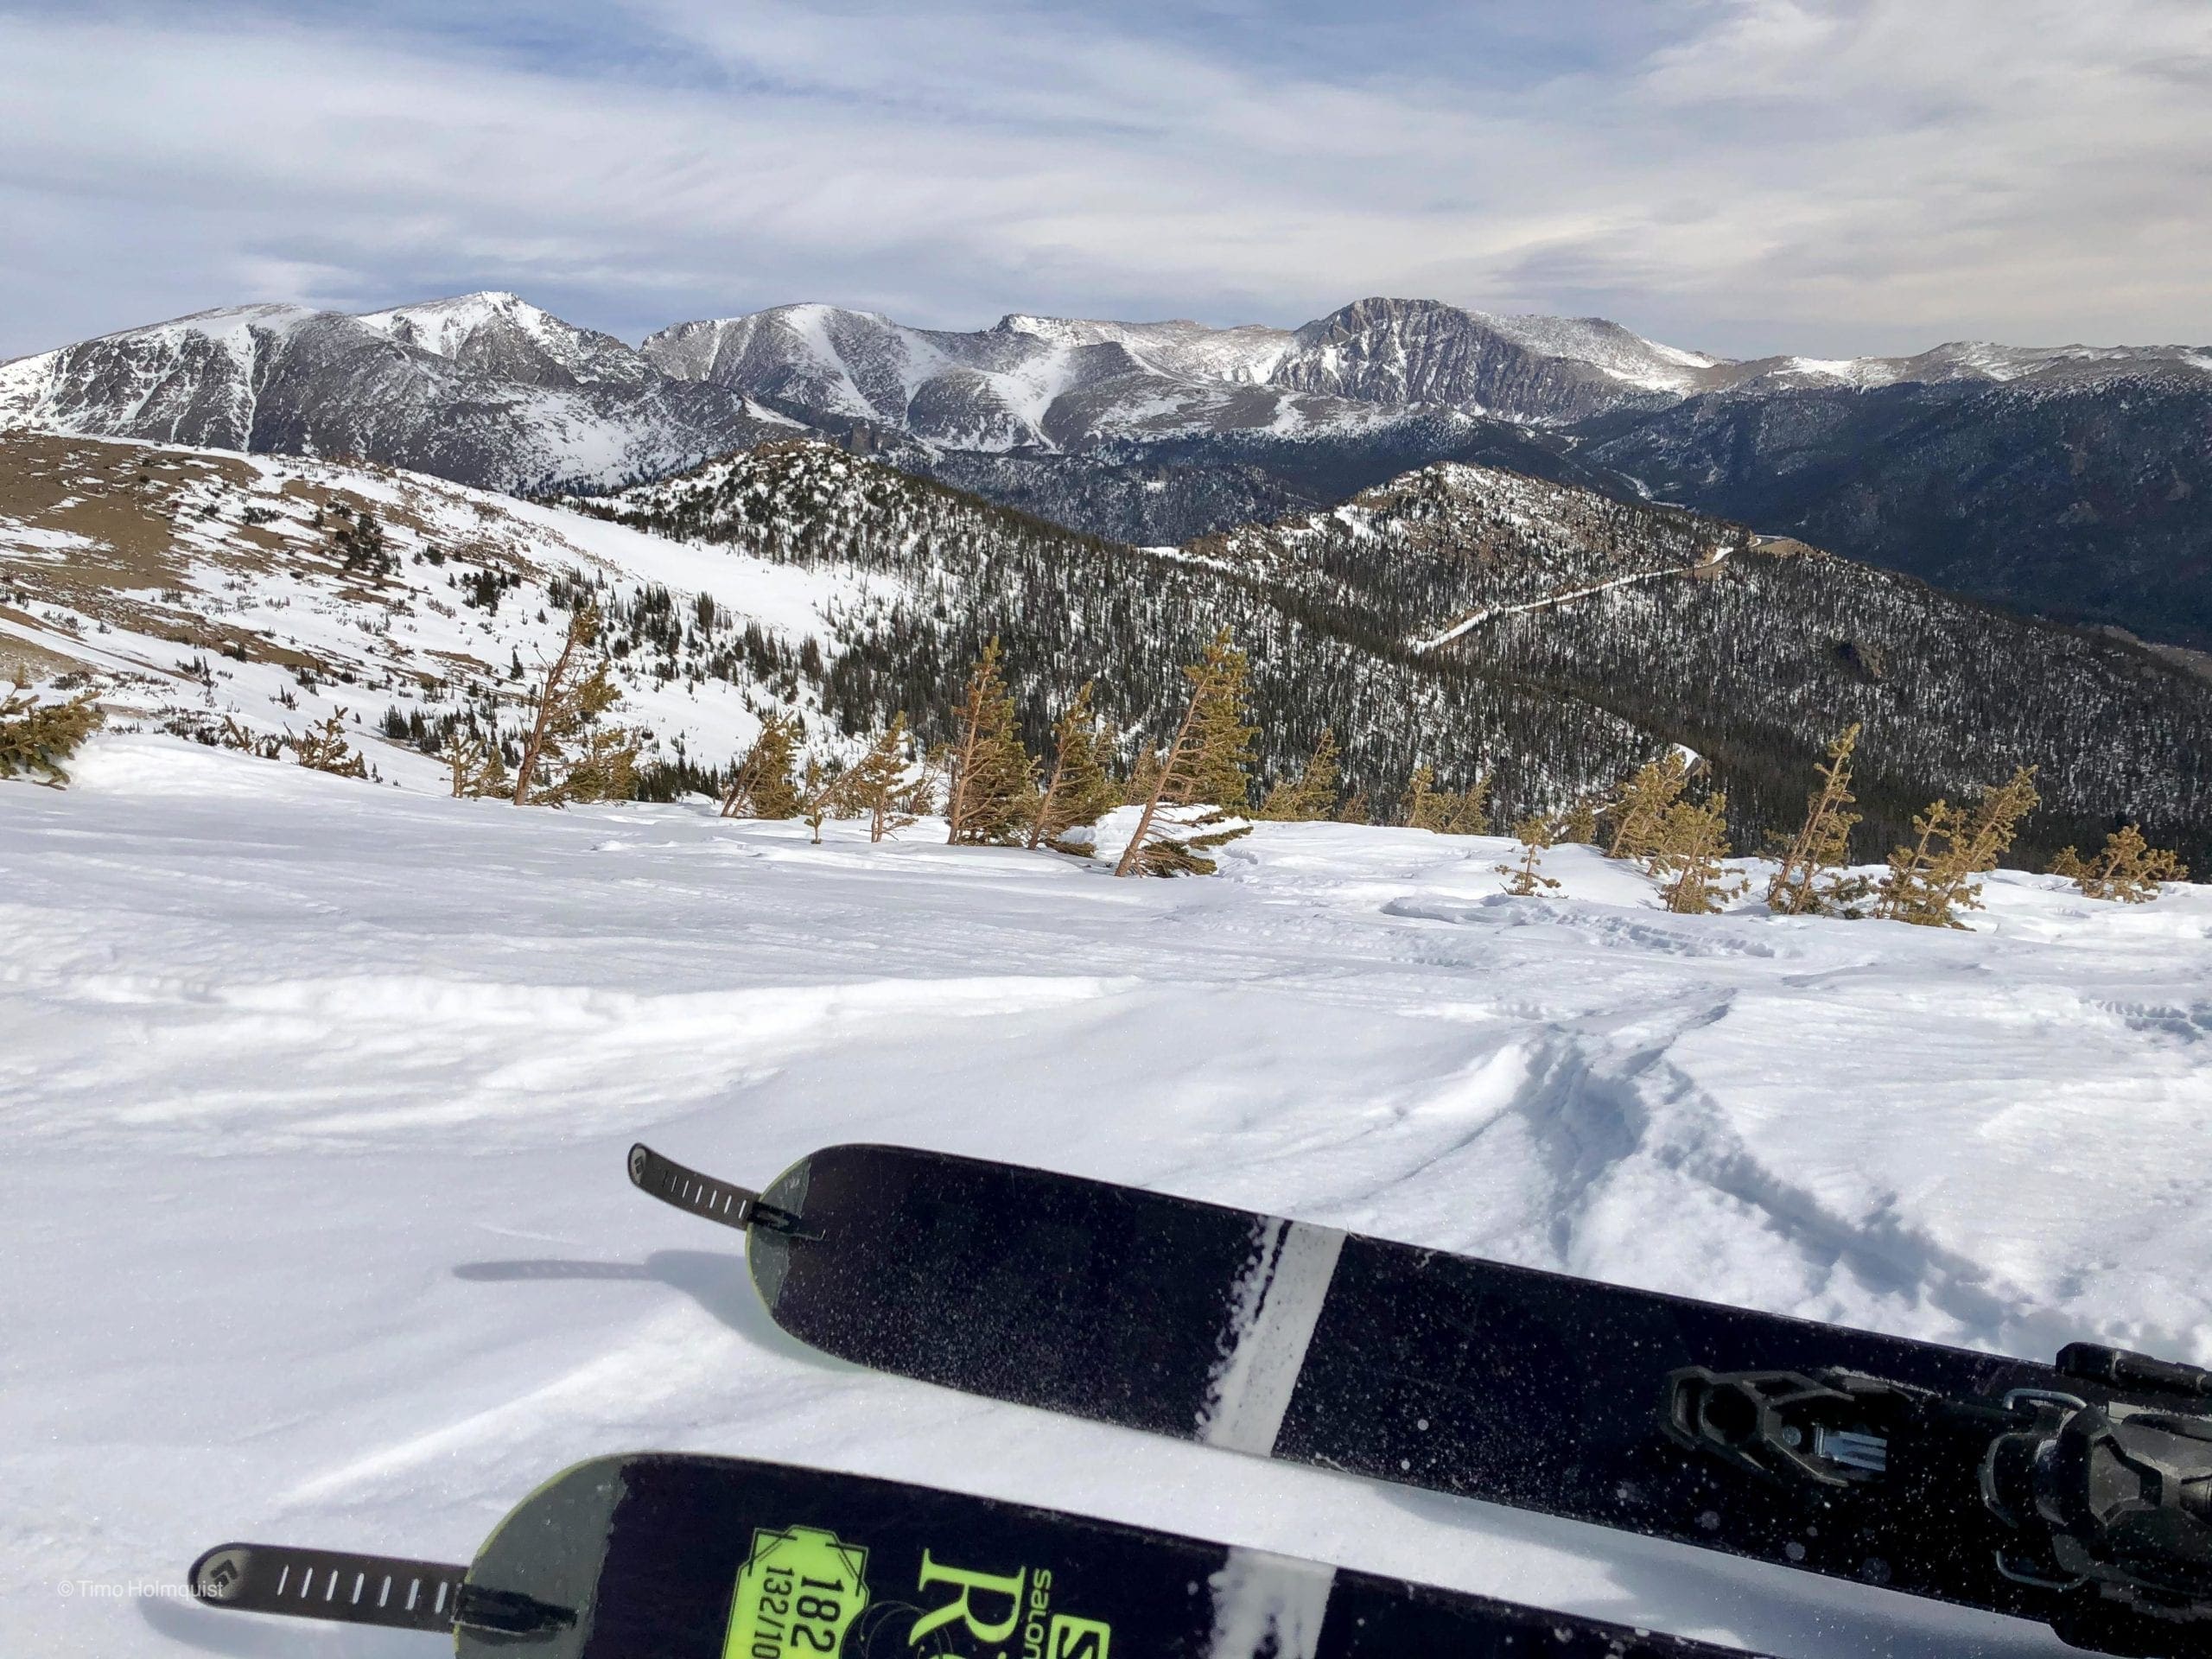
Photo of the Mummy Range from Hidden Valley. Photo by Timo Holmquist.
Mummy Range Overview
The Mummy Range is a unique component of Rocky Mountain National Park. They are very visible from the Eastern Plains, especially from the Loveland, Berthoud, and the Fort Collins area. They are a compact range that does not directly connect with the Continental Divide, an uncommon occurrence considering the linear structure of the ranges in this part of the state. The range tops out at over 13,500 feet and dominates the view north from places like Hidden Valley and Sundance Mountain. In terms of skiing, there are two general components: a north, and south area, most easily accessed via the East, although the Alpine Center can be used when Trail Ridge is clear.
27-29 degrees 29-31 degrees 31-34 degrees 34-45 degrees 45+ degrees
3D Map Navigation Instructions
On desktop: Hold the ctrl key while you drag to rotate the map. Use your mouse scroll to zoom in and out.
On mobile: Rotate and zoom on mobile by pinching and moving two fingers.
Northern Mummy Range
The lines off of Fairchild and Ypsilon are best approached by parking at the Endovalley parking area near the start of Old Fall River Road. It is plowed to Endovalley, but the rest of the road does not open up until the summer. From Estes Park, enter Rocky Mountain on US 34 (not US 36) and proceed past the Fall River Visitor Center. When the road begins to make a long curve back on itself at the head of Horseshoe Park, look for Old Fall River Road signs and Endovalley on your right. At the intersection, take a right and drive to the Endovalley picnic area. Note: Endovalley is a day use area, not a campground.
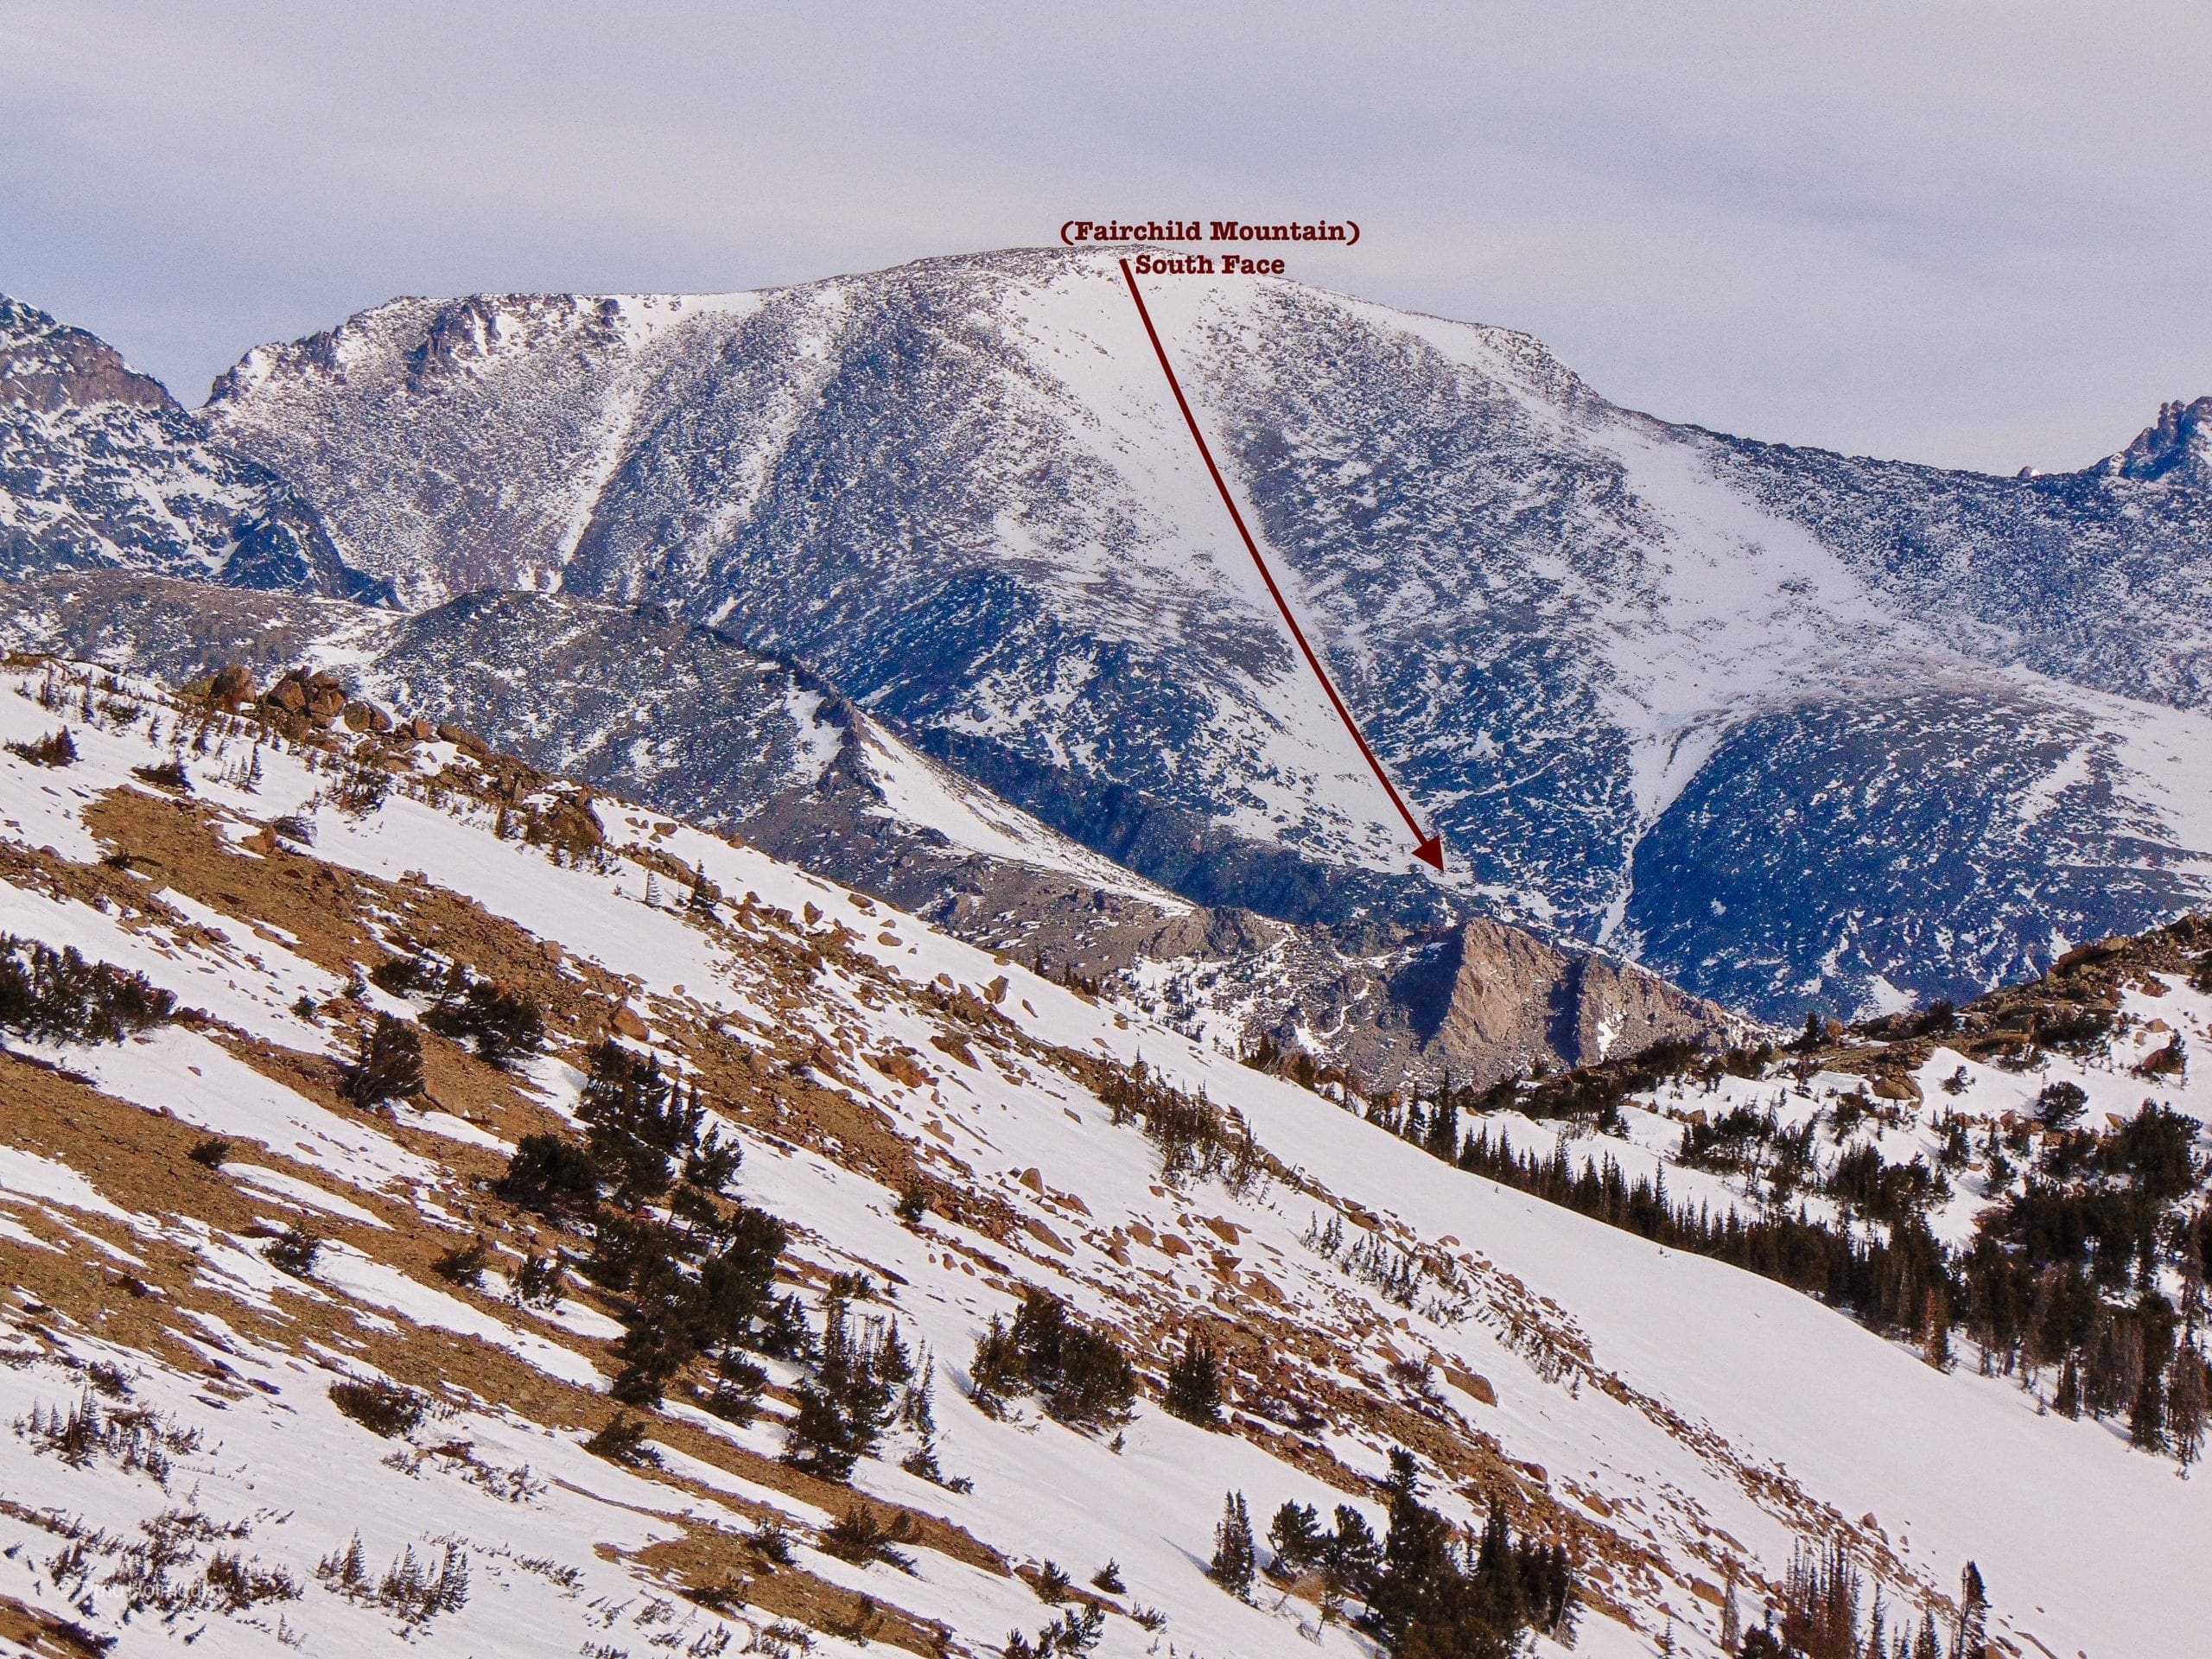
Photo of the South Face descent line on Fairchild Mountain. Photo by Timo Holmquist.
South Face (Fairchild Mountain)
- Essentials: 1.04 miles, 2447-foot vertical
- Status: Difficult
- Steepest Slope Angle: 35-40 degrees
- Good for: Long days in the backcountry with good company and all the right equipment. Good for skilled backcountry recreationists with a lot of stamina. Avalanche danger through spring.
- Accessed via: Endovalley picnic area. Proceed west to the Lawn Lake Trail. After 1.5 miles, cross the Roaring River (left) and proceed up the Ypsilon Lake. Circumvent the lake on its southern shore and bushwhack NE for ~0.6 miles until reaching the lowest Fay Lake. From there, continue up the outlet stream to Middle Fay Lake. From here, Mt. Fairchild comes into view in a big way. The line descends directly from the rounded summit and is wide enough at the top for GS turns in good conditions. This is a mountaineering route: crampons and ice axe are mandatory. Warning: there are obstacles to deal with, notably cliffs 2/3 of the way up. If you ski it, trending skiers right once the face narrows will help avoid those areas (PowderProject). Approach stats: ~2480-foot climb over 5.3 miles. Alternatively, at the first trail junction, keep heading to Lawn Lake. At Lawn Lake turns SW and ascend to the saddle. From the saddle, turn south and climb up the backside of Fairchild. While longer (almost 9 miles), this ascent is much more casual and seldom requires mountaineering gear.
North Face (Fairchild Mountain)
- Essentials: ~1.8 miles, 2400-2500 foot vertical (if able to ski back to Lawn Lake)
- Status: Difficult
- Steepest Slope Angle: 30-35 degrees (brief and avoidable)
- Good for: If the South Face is in bad shape (possible, considering its orientation), this is a great alternative. It’s a long descent without too many obstacles to worry about. Like the South Face, this ski line is way out there; make sure you have a coherent set of backcountry skills in order to attempt this. Plan on an all-day affair to reach the top and ski it down.
- Accessed via: Lawn Lake, which can be reached via Endovalley after ~6.25 miles. From Lawn Lake, continue around the eastern side of the lake and up the valley, passing a side trail to the Crystal Lakes on your left. At the saddle between Fairchild and Hagues, turn south and clamber up to the summit. Use the ascent from the pass as your scouting opportunity to sight the best lines from the summit. The slopes of Fairchild are generally mellow, but the eastern edge is steep and cliffed out. Pay attention as you ascend to avoid challenges on the descent. Total ascent distance ~8.9 miles.
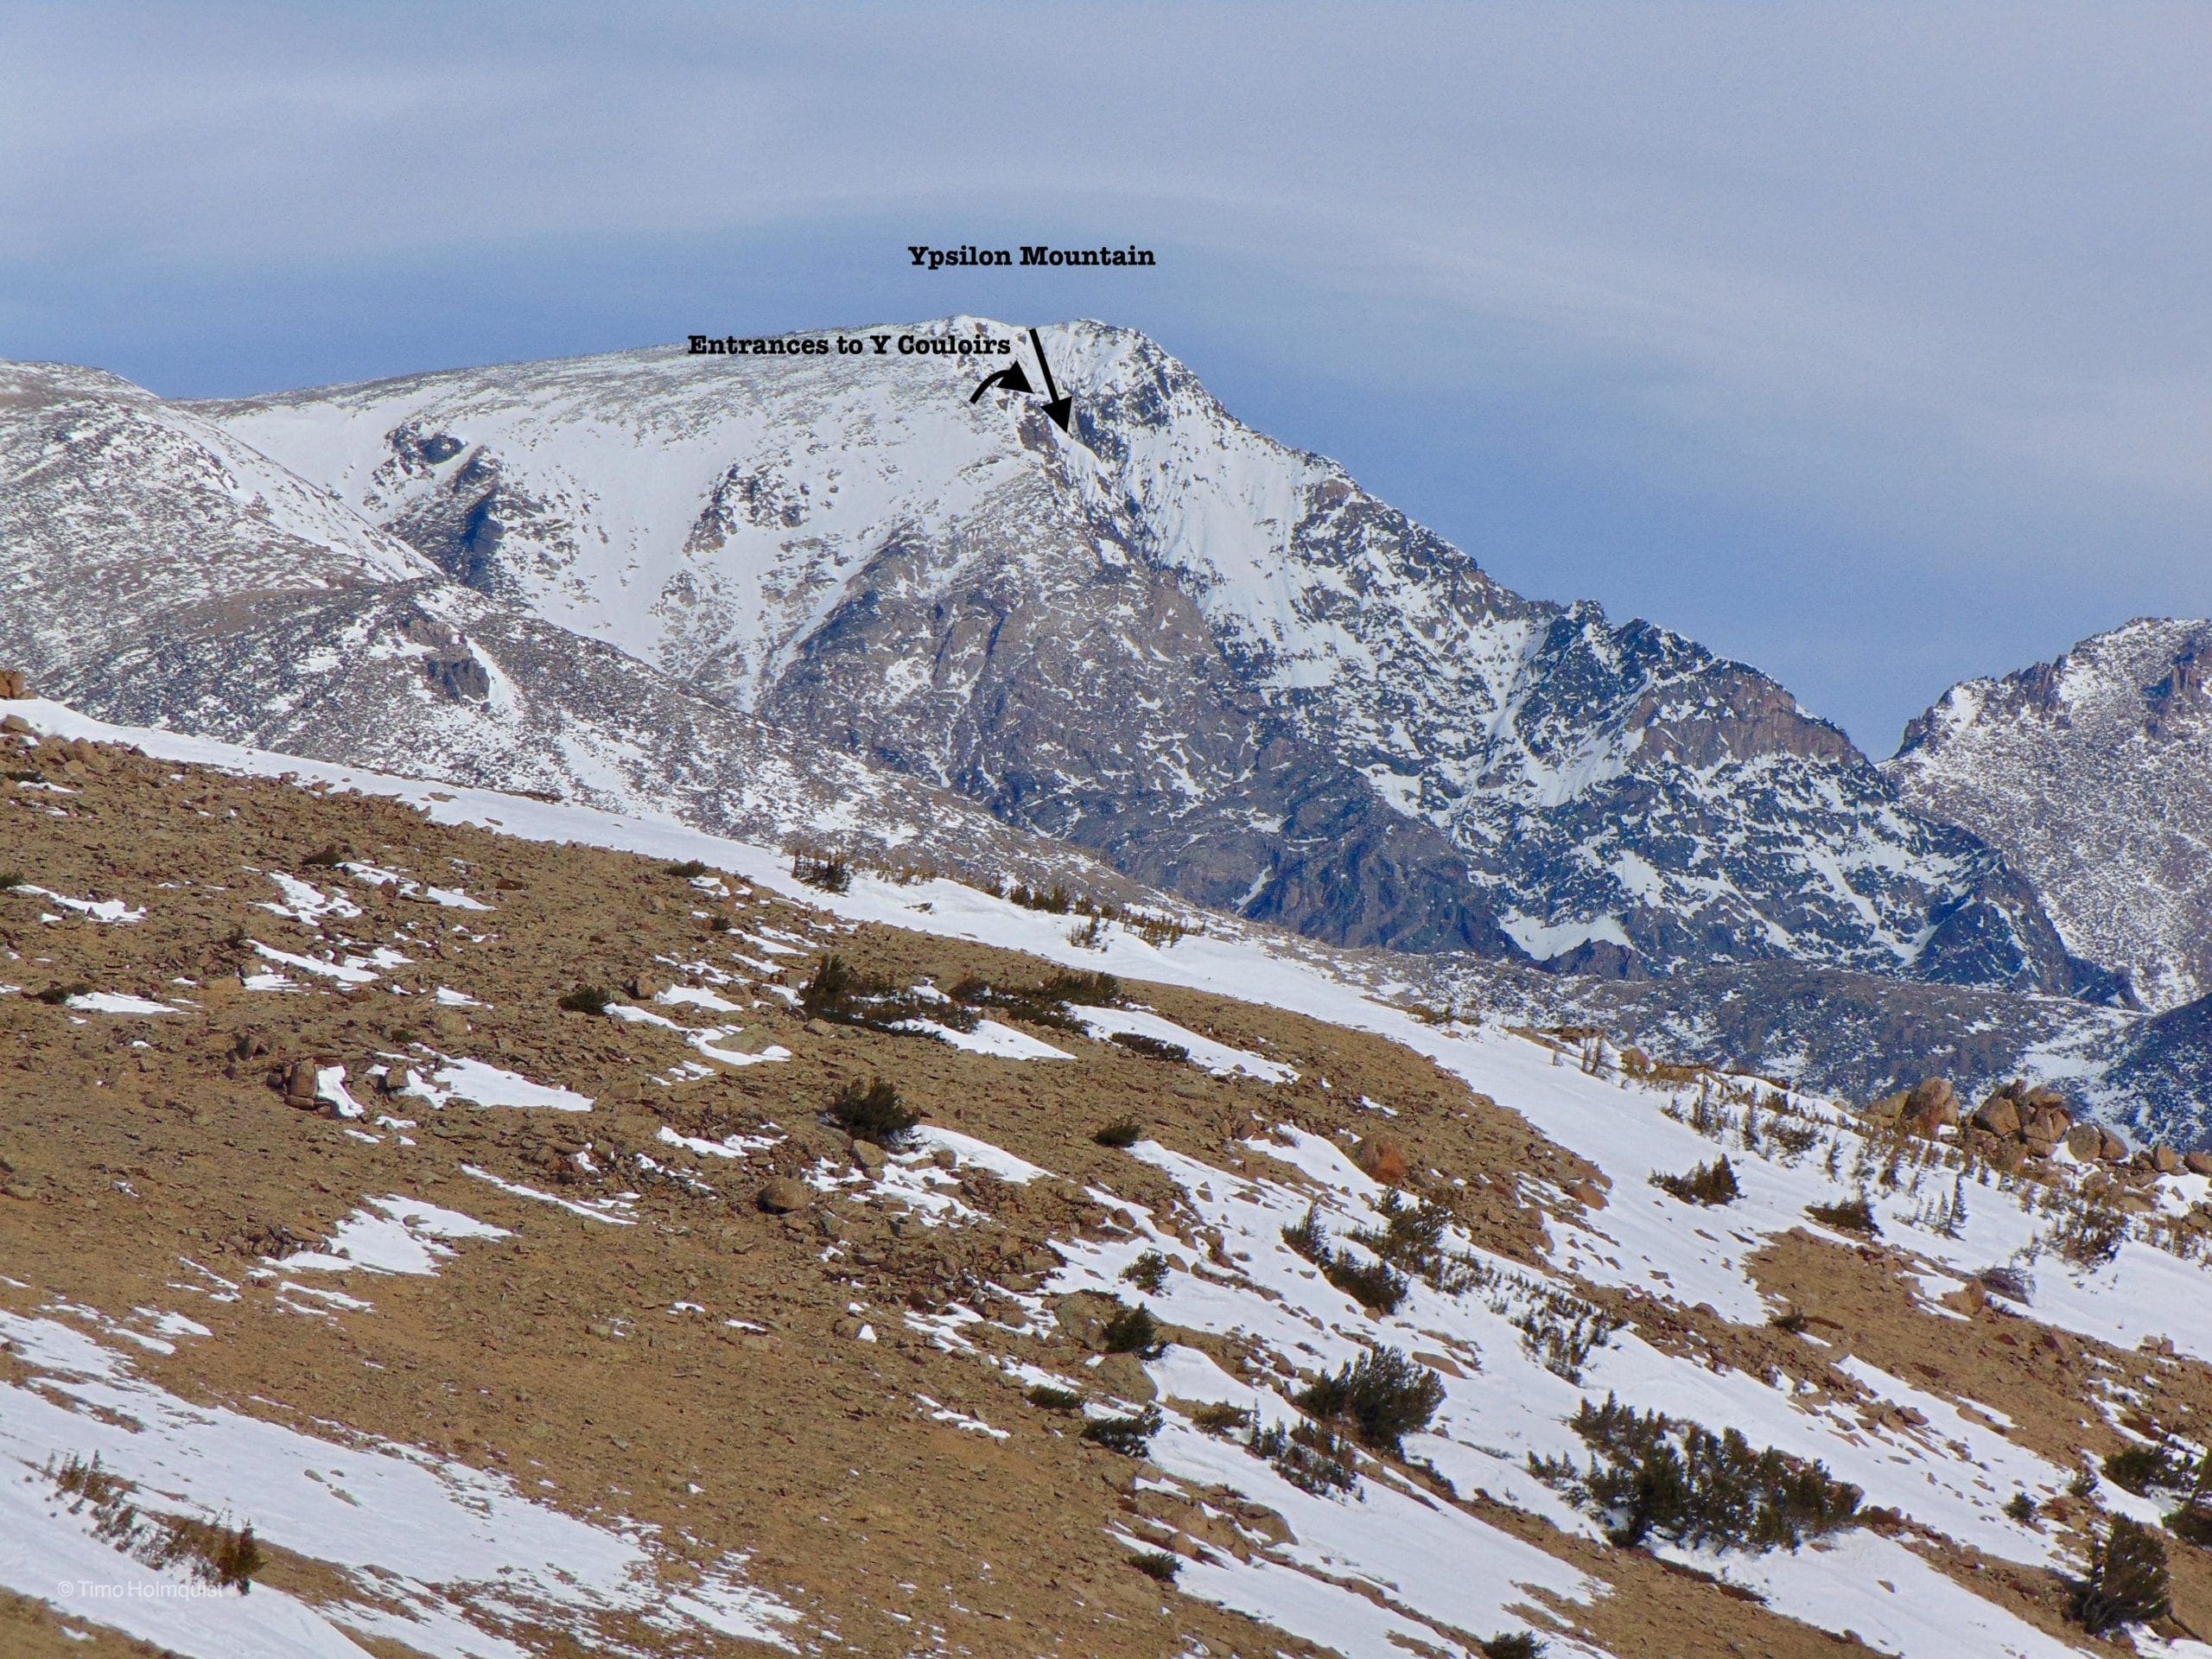
Side angle view of Ypsilon and the entrance to the technical and dangerous Y-Couloir. Photo by Timo Holmquist.
Y Couloir-Left Arm (Ypsilon Mountain)
- Essentials: 0.47 miles, 2023-foot vertical
- Status: Very Difficult
- Steepest Slope Angle: 40-47 degrees
- Good for: Technical couloir skiing in a remote setting, for experts and professionals only. NOT for beginners or intermediate skiers. ICE AXE required.
- Accessed via: Endovalley ~6 miles to Ypsilon Lake. From Ypsilon Lake, veer NW away from the lake, paralleling a steep slope to your right. When the slope breaks, revealing a steep gulley (some rock scrambling required) ascend up it (general N-NE orientation). At the top of the gulley, veer left to find the first of the Spectacle Lakes. If frozen, skin across it and the second lake. The Y Couloir should be very obvious: spilling down to the far shore of the upper Spectacle Lake. Ascend carefully, and with a full complement of mountaineering gear, this is a steep ascent. At the split between arms, take the left variation to the top. Avalanche danger is pronounced from a corniced top and multiple sneaky cliff sections; pay attention as you climb! This is the best place to gather beta about the route down. Ascent stats to bottom of couloir: 7.1 miles and ~2854 feet.
Y Couloir-Right Arm (Ypsilon Mountain)
- Essentials: 0.2 miles, 1068-foot vertical
- Status: Very Difficult
- Steepest Slope Angle: 50+ degrees
- Good for: EXPERTS ONLY. Mountaineering gear needed (including ICE axe). Ice walls, cornices, and heightened rockfall are perennial dangers when the couloir is filled.
- Accessed via: Same approach as Y Couloir. Lawn Lake Trailhead to Ypsilon Lake, to Spectacle Lakes. 7.1 miles and ~2854 feet to the bottom of the couloir. About 2/3 of the way up the couloir, take the right fork, which presents with icy walls and a steepening 50+ degree slope angle at the top and comes complete with a big ole cornice. Proceed with EXTREME caution. Buckle up and drop in from the top.
Southern Mummy Range:
The Southern Mummy Range has a lot of potential for fun skiing routes. Because of the Mummy’s location, snow tends to hold out a little later into the spring. A great backcountry point to point is from the Alpine Center (when Trail Ridge opens) to the top of Chiquita, down the Banana Peel Couloir, and out to the bottom of Old Fall Road. The Southern part of the range is separated from the northern routes by its access points.
Note: Due to the devastating Cameron Peak and East Troublesome Fires, parts of the park are closed, including all hiking from Chapin Pass and the Alpine Center, please check here to see what areas are currently closed to access.
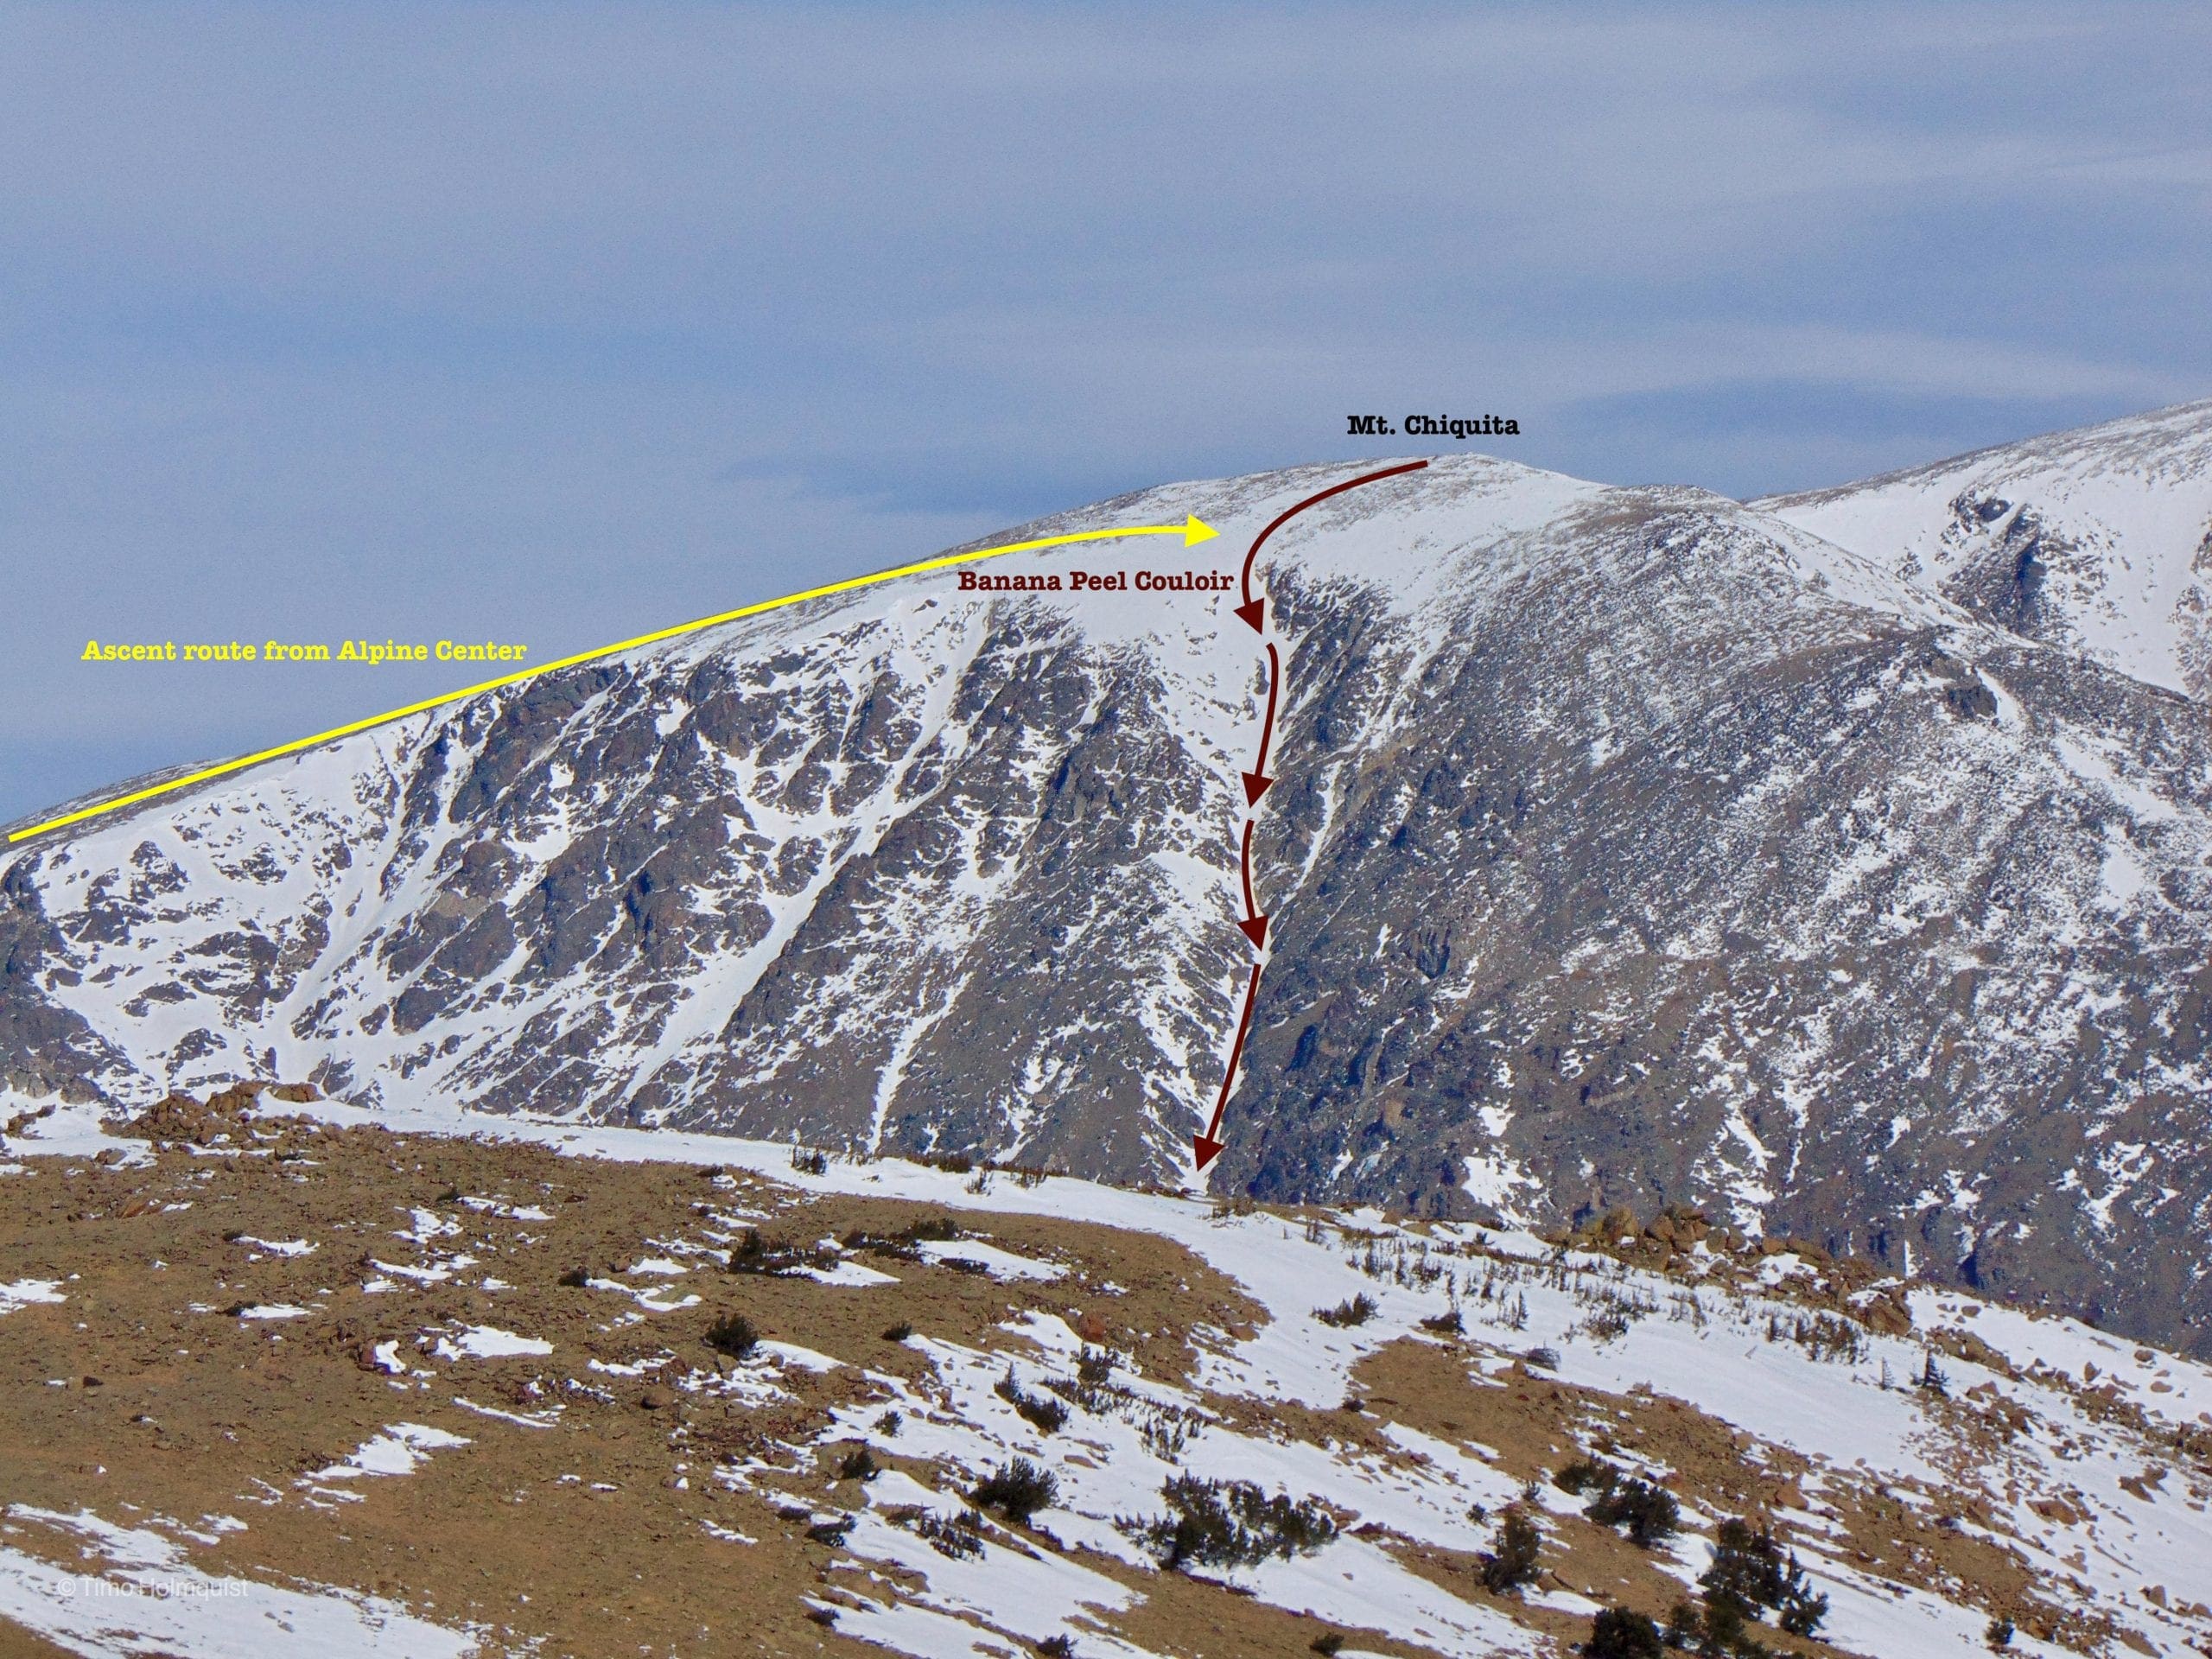
View of the Banana Peel Couloir from the southeast. Photo by Timo Holmquist.
Banana Peel Couloir (Mt. Chiquita)
- Essentials: 0.67 miles, 2103-foot vertical
- Status: Difficult
- Steepest Slope Angle: 40+ degrees
- Good for: An optional point-to-point ski adventure or steep couloir skiing and a long, skinny descent with snow holding into early summer. NOT for beginners or intermediate skiers.
- Accessed via: Endovalley Picnic area OR Alpine Center on Trail Ridge. From Endovalley, walk up the closed portion of Old Fall River Road. Just past the picnic loop to your left, the road will perform an S-curve. It’ll turn left and swing back right, when it swings right, begin skinning to the right and up a drainage. Later in the season, you should see and hear the sounds of Chiquita Creek. You’ll be following the creek north and west for the duration of the ascent. It’s a 2.42-mile ascent up 2226 feet, with only the last little bit being above treeline. Once you exit the trees and see the head of the steepening cirque, turn right (north) to scout the couloir. By late spring, the bottom bit melts out, but in good conditions, it’ll lead you up to the summit plateau just west of the actual highest point. Turn around and descend. It is possible to drop into the couloir from a ski tour originating at the Alpine Center; however, dropping into the couloir without scouting it comes with plenty of risks as well.
Never Summer Range Overview:
This is a cool mountain range. Part of the Never Summers appeal is that they don’t crop up on the casual recreationist’s radar: the highest peaks are under 13,000 feet, and the range isn’t close to any major thoroughfare. From Denver, it takes at least three hours over Berthoud Pass (or Trail Ridge if it’s open), to access them. The range is pushed back against the western periphery of the park and escapes a lot of crowds because there aren’t many ways to get in there without logging some serious miles and vertical feet. If Trail Ridge is open, you’ll be able to see them from a distance and realize why they’re called the Never Summers; snow lingers in their alpine bowls long after most of the park sheds its winter coat. For those willing to work to get there, the Never Summers offer a sublime alpine backcountry experience.
27-29 degrees 29-31 degrees 31-34 degrees 34-45 degrees 45+ degrees
3D Map Navigation Instructions
On desktop: Hold the ctrl key while you drag to rotate the map. Use your mouse scroll to zoom in and out.
On mobile: Rotate and zoom on mobile by pinching and moving two fingers.
Access South: The reclusive Never Summers are only practically accessible from the western side of Rocky Mountain National Park. You approach from the south, through Grand Lake on US 34. When the road passes into the park, drive along some great meadows and flats where wildlife sightings are plentiful. At the Colorado River Trailhead, pull off and gear up. If the road starts climbing steeply up to the Alpine Center, you’ve gone too far.
Access East: From the east, make your way to Estes Park, enter Rocky Mountain, and drive Trail Ridge across the alpine portions and the Continental Divide. After the Fairview Curve Overlook (now below treeline again), start paying attention. The road will wind its way down to the valley floor and the first chance you get, pull off to the right following signs for the Colorado River Trailhead.
Organization: The Lines below are discussed from north to south. In each of the following scenarios, you’re looking at a 10-12-mile day with complicated approach routes in a remote area. Your party will most likely be the only ones back here. Make sure you have the stamina, gear, and skill to make a trip to the Never Summers work. Remember: While the upper bowls are skiable through June and sometimes July, the best time to ski the Never Summers is April and May. This window dramatically increases the possibility of a continuous ski descent down to the trailhead. If you hit it right, you’re looking at ~3,600 feet of vertical over 4.2-4.5 miles of skiing. Timing matters.
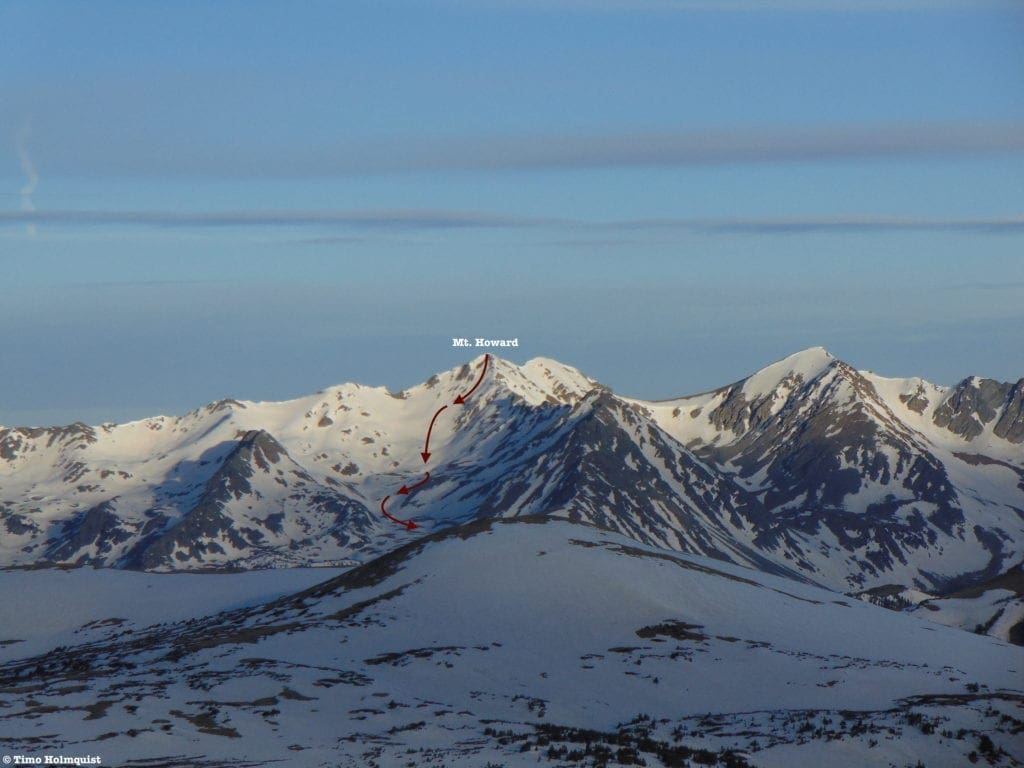
Mt. Howard descent route in late spring.
Mount Howard
- Essentials: 0.62 miles, 1215-foot vertical
- Status: Difficult
- Steepest Slope Angle: ~37 degrees
- Good for: Long, spring skiing in a remote setting. Avalanche gear and a partner are required; these mountains are out there. NOT for beginners or skiers without proper orientation skills or GPS experience and tools.
- Accessed via: Colorado River Trail, proceed north 0.4 miles until coming to a trail junction. Turn left towards Red Mountain and continue ascending. There is a slide path on Red Mountain you will want to aim for later in your ascent that should be visible from the area just past the junction (assuming there is enough light). The trail will cross Opposition Creek, traverse 0.25 miles south of the creek. If there’s no snow, continue on the trail until Grand Ditch; if there’s snow, there’s a shortcut straight up the ridge between aspens and sparse rocks that will take you up to the steeper slopes of Red Mountain. Continue ascending northwest around the bulk of Red Mountain until intersecting the Grand Ditch. Once you arrive there, proceed north along the Grand Ditch for a little less than half a mile. Two large poles should be visible along the road, marking the entrance to the trail less Mosquito Creek Drainage. Turn left and begin following the creek (on the righthand side). It’ll be a right turn if you ascend via the Grand Ditch North approach (see the map). After clambering up a small gorge, a clearing will appear on the right side of the creek. Head into it, crossing the clearing and veering away from the creek. Enter the forest on the other side and maintain your northwest trajectory. A rock buttress will present itself in front of you, circumvent to the north (right side) until finding a slope around it to clamber up (left/northwest again). Beyond the buttress, you’ll break treeline and enter a large alpine valley. When able, turn your path westward and skin up the valley. This entire area is ripe with skiing potential. If set on Howard, continue climbing until sighting the true summit (not the more prominent peak to the left, which is a false summit) and ascend up to the summit. While snow keeps the upper valley skiable through the early summer, an April or early May attempt may allow you to ski all the way back to the trailhead.
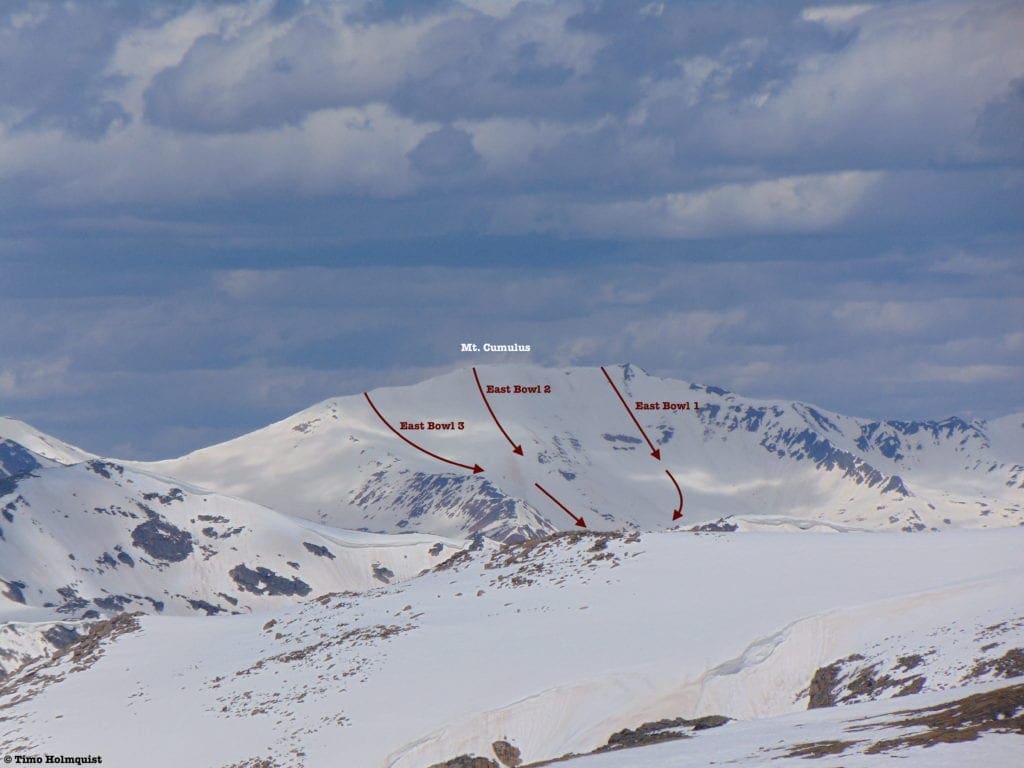
Mt. Cumulus (East Bowl 1,2, and 3)
Mount Cumulus (East Bowl 1,2 and 3)
- Essentials:
- Bowl 1: 0.6 miles, 1262-foot vertical
- Bowl 2: 0.42 miles, 1069-foot vertical
- Bowl 3: 0.53 miles, 1098-foot vertical
- Status: Difficult
- Steepest Slope Angle: ~34-40 degrees
- Good for: Long days in the wilderness with good company and a coherent set of backcountry skills. Avalanche gear and orientation skills are mandatory. Not for beginners.
- Accessed via: Colorado River Trail, proceed north 0.4 miles until coming to a trail junction. Turn left towards Red Mountain and continue ascending. There is a slide path on Red Mountain you will want to aim for later in your ascent that should be visible from the area just past the junction (assuming there is enough light). The trail will cross Opposition Creek, traverse 0.25 miles south of the creek. If there’s no snow, continue on the trail until Grand Ditch; if there’s snow there’s a shortcut straight up the ridge between aspens and sparse rocks that will take you up to the steeper slopes of Red Mountain. Continue ascending northwest around the bulk of Red Mountain until intersecting the Grand Ditch. Once you arrive there, continue following Opposition Creek to the west for 0.4 miles until reaching a clearing. You can climb into the East Bowls directly or climb from Nimbus and descend the opposite side. To reach the bowls directly, cross Opposition Creek so you’re on the north side of it, then cut across the clearing almost directly west. At the base of the next steep slope, climb up through the trees (now angling north) and finding the weaker slope angle to ascend. After breaking treeline, you’ll be in the basin leading up to Cumulus. Continue west-northwest into the basin, eyeing the broad summit of Cumulus. The options for lines here are numerous. To reach East Bowl 1, climb up the right (north) side of the Cumulus summit area. You’ll cross a high elevation plateau to the north before turning west and scouting your line. If trying to reach Bowls 2 and 3, angle southwest, continuing within the basin you came in on. Once above the basin, you have two options. Finding a line to the summit highpoint will give you access to Bowl 2; staying left will let you reach the south side of the summit plateau for Bowl 3. These runs are the best introduction to Never Summer skiing and can be lapped. Generally speaking the lines are most difficult to the north (Bowl 1 has cornice potential), easing as you head south (Bowl 2 & 3).
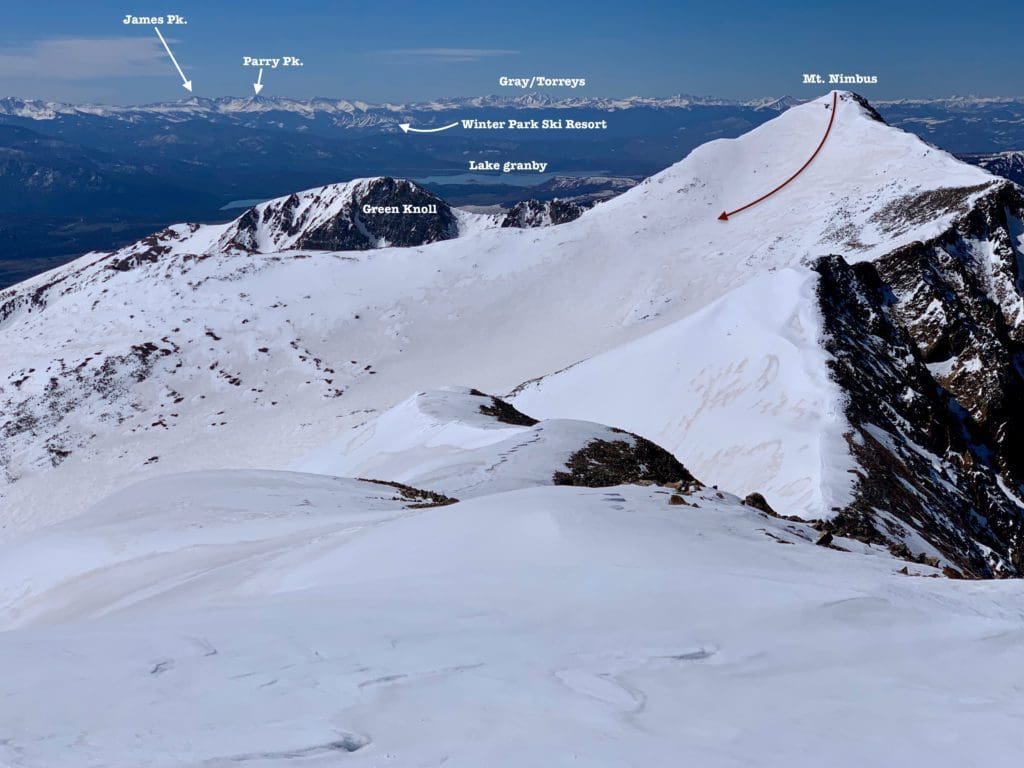
Mt. Nimbus and its summit descent from Mt. Cumulus.
Mount Nimbus (Northeast Slopes)
- Essentials: 0.62 miles, 1215-foot vertical
- Status: Difficult
- Steepest Slope Angle: ~37 degrees
- Good for: Combination with Cumulus. Long days in a remote mountain range with the potential for long vertical runouts. Avalanche gear and orientation skills are a must. NOT for beginners.
- Accessed via: Colorado River Trail, proceed north 0.4 miles until coming to a trail junction. Turn left towards Red Mountain and continue ascending. There is a slide path on Red Mountain you will want to aim for later in your ascent that should be visible from the area just past the junction (assuming there is enough light). The trail will cross Opposition Creek (over a small bridge), traverse 0.25 miles south of the creek. If there’s no snow, continue on the trail until Grand Ditch, if there’s snow, there’s a shortcut straight up the ridge between aspens and sparse rocks that will take you up to the steeper slopes of Red Mountain. Continue ascending northwest around the bulk of Red Mountain until intersecting the Grand Ditch. Once you arrive there, continue following Opposition Creek to the west. When you reach a clearing with clear views of Red Mountain to the south, begin a southwest ascent. Aim for behind the summit of Red Mountain. Make sure you are on the south side of Opposition Creek and angle your ascent in a south, then west, then northwest feint to avoid a gorge the creek tumbles down. Once you pass the gorge, continue ascending along the mellow valley. The final approach can usually be done in skins but may require some boot packing. Turn southwest, sight the true summit of Nimbus (the high point on the same ridge as Red Mountain) and climb up the broad slopes to the summit. Turn around and ski down. Best skied in April and early May as the run is thin in the middle of the basin, and spring offers the best chance to ski all the way back to the trailhead.
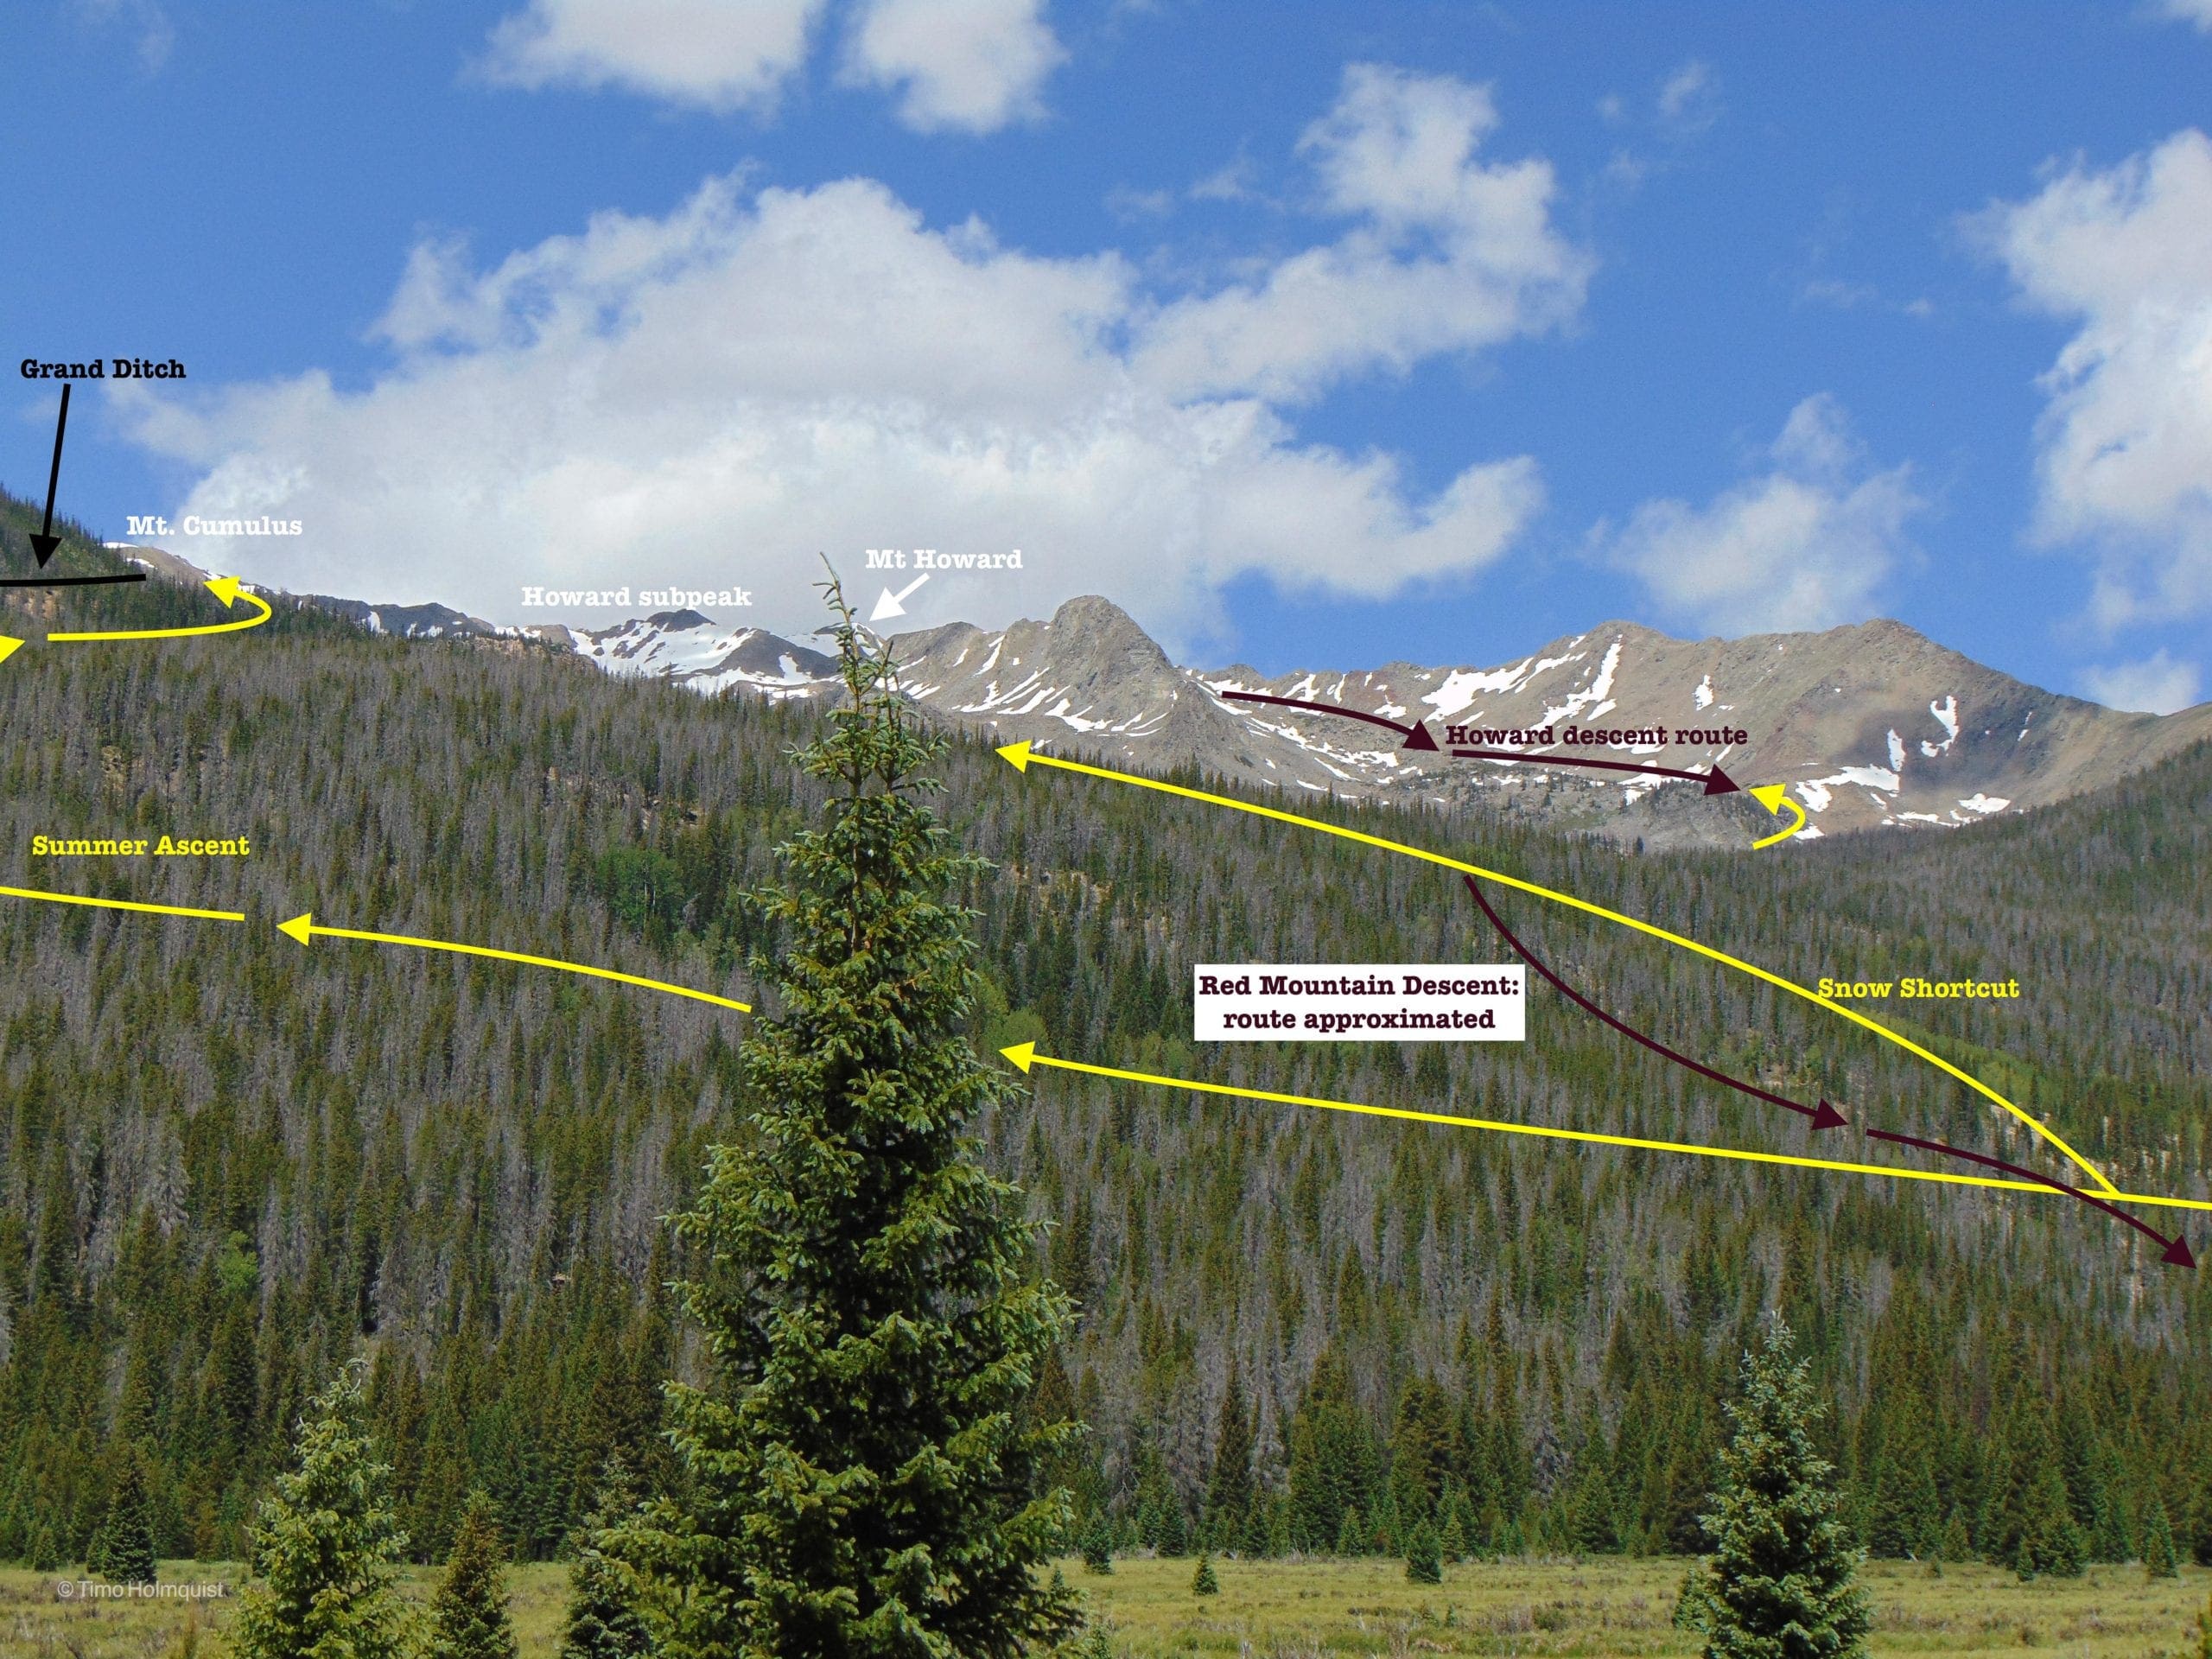
View of the Red Mountain descent route (approximated) from Kawuneeche Valley. Photo by Timo Holmquist.
Red Mountain Descent
- Essentials: 0.68 miles, 508-foot vertical
- Status: Difficult
- Steepest Slope Angle: ~30 degrees
- Good for: Laps, tree skiing and less effort than the higher Never Summer lines.
- Accessed via: Colorado River Trail 0.4 miles north to a junction, take a left, cross the valley bottom and begin a southern ascending traverse up the slope of Red Mountain. After crossing Opposition Creek, look for a less hemmed in area of aspens and rock, skin west and uphill. The beginning of the line is up to you, though ascending higher offers more turns. Strap in and descend, playing in the glades down to the flat Colorado River valley and your car.
Quick Terminology Reference Guide
- Apron: An open section of a ski line, shaped roughly like an apron. It is generally shallower at the top, wider at the bottom.
- Bootpack: A way to gain elevation utilizing the tough exterior of ski boots, literally creating steps in the slope with your ski boots. Only effective in mid-winter conditions with softer snow. Once ice forms, crampons, and an axe are best.
- Buttress: A support structure in architecture. In mountain talk, it is a large, often steep set of rock walls that juts out from a mountain massif and acts as an impediment (or rock-climbing opportunity) on an ascent. A buttress does not have to be immediately connected to a summit.
- Bergschrund: Unlike a crevasse, which tends to form in the middle of a glacier, a bergschrund, or “schrund” for short is a crack or separation that forms between the top of a glacier and the mountain slope or stagnant snow behind it.
- Chute: An inset area along a ridge that can hold great snow and presents like a natural ski run.
- Cirque: an amphitheater shaped abrupt head of a glacial valley.
- Cornice: An overhung area of snow that typically forms at the crest of a ridge or cirque. While the corniced ice and snow looks compact, there is usually nothing holding it up underneath; your weight alone can collapse a cornice. A collapsed cornice may also lead to avalanches. Do not stand on the edge of a cornice or climb up directly beneath one.
- Couloir: Originally a French alpinist term, a couloir is a thin skiable chute. They are typically a no fall zone and challenging to ski effectively.
- Crevasse: A large crack that usually forms on glaciers during warmer times of year as the compact ice shifts. Very dangerous if fallen into.
- Crown: The vertical fracture line that appears after a slab avalanche, indicative of unstable terrain.
- Crux: Typically, the most dangerous section of an ascent or descent. Difficult routes can have multiple cruxes. A NO FALL ZONE.
- Glade: A treed area of a particular slope or line.
- Headwall: A topographical term used to mark where a basin, gorge, or alpine valley ends. Headwalls are usually steep and can sport multiple couloir options.
- Line: The chosen path of skiers and snowboarders.
- Pillows: Created when deep snow buries boulders, super fun to bounce between.
- Runout: The bottom of a ski line, especially after a thin section or couloir, where the slope opens up. Similar to an apron.
- Skin track: The rote you use to ascend a slope, very important for backcountry navigation.
- Terrain Trap: An area where snow from an avalanche can collect and bury a victim. More broadly an area where it is difficult to ski out of once entered.
- Wind-Slab: An area of compacted snow: formed by gusty winds. If near a steep slope, they can collapse and cause avalanches. Wind-slabs are often called wind-loaded slopes as well.
With dozens of line options and more than 2000 vertical feet of descent, the Never Summers are a blast to ski.
Final Thoughts:
While smaller in stature than Longs or Bear Lake; the Mummy Range and the Never Summers have lots to offer the dedicated backcountry skier/rider. Trade the crowds for mountain solitude and long runouts in the Never Summers. Or, if ski mountaineering is more your speed, tackle the intimidating and very difficult Y-Couloirs on Ypsilon. Armed with good company, good backcountry skills, and good weather, venturing deeper into these corners of Rocky Mountain National Park will reward the dedicated adventurer in all of us. Prepare for long days and enjoy every second you’re out there.
Resources:
AIARE, Avalanche Research Education. (n.d.) Retrieved from https://avtraining.org/
Colorado Avalanche Information Center. (n.d.) Retrieved from https://www.avalanche.state.co.us/
Front Range Ski Mountaineering. (n.d.) https://www.frontrangeskimo.com/#home-section
Howard Mountain. Retrieved from https://www.frontrangeskimo.com/howard-mountain
Mount Cumulus. Retrieved from https://www.frontrangeskimo.com/mount-cumulus
Mount Nimbus. Retrieved from https://www.frontrangeskimo.com/mount-nimbus
Grand Lake Colorado. (n.d.) Lodging. Retrieved fromhttps://www.grandlakecolorado.com/lodging
Kelly, Mark. (2013). Backcountry Skiing and Ski Mountaineering in Rocky Mountain National Park. Giturdun Publishing Ltd.
Mountain Forecast (n.d.)
Hagues Peak. Retrieved from https://www.mountain-forecast.com/peaks/Hagues-Peak/forecasts/4136
Mount Ypsilon. Retrieved from https://www.mountain-forecast.com/peaks/Mount-Ypsilon/forecasts/4119
Mount Chiquita. Retrieved from https://www.mountain-forecast.com/peaks/Mount-Chiquita/forecasts/3983
National Park Service. (2020). Visitation Numbers. Retrieved from https://www.nps.gov/aboutus/visitation-numbers.htm
- Rocky Mountain National Park. (n.d.) Fees and Passes. Retrieved from https://www.nps.gov/romo/planyourvisit/fees.htm
- Rocky Mountain National Park. (n.d.) Park Roads. Retrieved from https://www.nps.gov/romo/planyourvisit/road_status.htm
- Rocky Mountain National Park. (n.d.) Shuttle Bus Routes. Retrieved from https://www.nps.gov/romo/planyourvisit/shuttle_bus_route.htm
- Rocky Mountain National Park. (n.d.) Area Closures. Retrieved from https://www.nps.gov/romo/learn/fire-information-and-regulations.htm
National Weather Service
- Estes Park Extended Forecast. (n.d.) Retrieved from https://forecast.weather.gov/MapClick.php?lat=40.3772059&lon=-105.5216651&site=all&smap=1&searchresult=Estes%20Park%2C%20CO%2C%20USA#.YCbnzxNKjOS
- Alpine Center/Trail Ridge Extended Forecast. (n.d.) Retrieved from https://forecast.weather.gov/MapClick.php?lon=-105.76022675170898&lat=40.42810400402635#.YCboWRNKjOS
- Grand Lake Extended Forecast. (n.d.) Retrieved from https://forecast.weather.gov/MapClick.php?lat=40.25220729999999&lon=-105.8230671&site=all&smap=1&searchresult=Grand%20Lake%2C%20CO%2C%20USA#.YEl6n7RKjOR
Outside Online. (Nov. 3, 2017). The Backcountry Skiers Dictionary. Retrieved fromhttps://www.outsideonline.com/2257716/adventure-backcountry-skiers-dictionary
Powder Project. (n.d.)
Nevius, Ryan. Fairchild Mountain South Face. Retrieved from https://www.powderproject.com/trail/7000849/fairchild-mountain-south-face
Nevius, Ryan. Fairchild Mountain North East Slope. Retrieved from
https://www.powderproject.com/trail/7000846/fairchild-mountain-northeast-slope
Göpfert, Zander. Red Mountain Ascent. Retrieved from
https://www.powderproject.com/trail/7000711/red-mountain-ascent
https://www.nps.gov/romo/planyourvisit/maps.htm
USDA: Natural Resources Conservation Service, National Water and Climate Center. (n.d.) Snotel Interactive Map.
VisitEstesPark.com. (2021). Lodging. Retrieved from https://www.visitestespark.com/lodging/
(Information on Y-Couloirs)
14ers.com. Trip Reports: 3 Blocks Down, Left on Yippy. Retrieved from https://www.14ers.com/php14ers/tripreport.php?trip=11725

Skyblue Overland Strongly Recommends That You Enroll With Global Rescue Prior To Embarking On Your Next Adventure.
Purchase a Global Rescue membership for your next adventure and travel with peace of mind. Single trip, annual and family options are available.
Learn More!
Terms of Use:
As with each guide published on SKYBLUEOVERLAND.com, should you choose to this route, do so at your own risk. Prior to setting out check current local weather, conditions, and land/road closures. While taking a trail, obey all public and private land use restrictions and rules, carry proper safety and navigational equipment, and of course, follow the #leavenotrace guidelines. The information found herein is simply a planning resource to be used as a point of inspiration in conjunction with your own due-diligence. In spite of the fact that this route, associated GPS track (GPX and maps), and all route guidelines were prepared under diligent research by the specified contributor and/or contributors, the accuracy of such and judgement of the author is not guaranteed. SKYBLUE OVERLAND LLC, its partners, associates, and contributors are in no way liable for personal injury, damage to personal property, or any other such situation that might happen to individuals following this route.
Backcountry Ski Gear: Essentials for Human Powered Skiing
Guide To Planning A Backcountry Ski Adventure
Backcountry Skiing in Rocky Mountain National Park: Hidden Valley and Sundance Mountain Ski Lines
Backcountry Skiing in Rocky Mountain National Park: Bear Lake Area Ski Lines
Backcountry Skiing in Rocky Mountain National Park: Longs Peak Area Ski Lines


