


High Point:
~12010 feet

Total Ascent:
~4,570 feet

Difficulty:
Very Hard

Distance:
~17 miles

Waypoints:
40.08262, -105.53981

Route Type:
Out and Back
The Eagles Beak summit offers a challenging, yet rewarding journey through Wild Basin. Class 3 scrambling, stunning lake views, and the Moomaw Glacier await. Best tackled in August for optimal adventure.
Overview:
Get ready for an epic adventure at Eagles Beak. This demanding and highly rewarding summit may be just a subpeak of Isolation Peak, but it sure packs a punch. The approach through Wild Basin is long, with the first six miles on an established trail and the rest requiring off-trail travel. But don’t let that deter you – keep pushing and you’ll be rewarded with exhilarating Class 3 scrambling, breathtaking views of four stunning lakes, and the awe-inspiring Moomaw Glacier. This route is not for the faint of heart, but if you’re up for the challenge, you’ll likely have large portions of it all to yourself. For the best experience, wait until August when lingering snowfields won’t be a factor. Eagles Beak via E. & W. Gullies is classified as a Class 3+ scramble – are you ready?
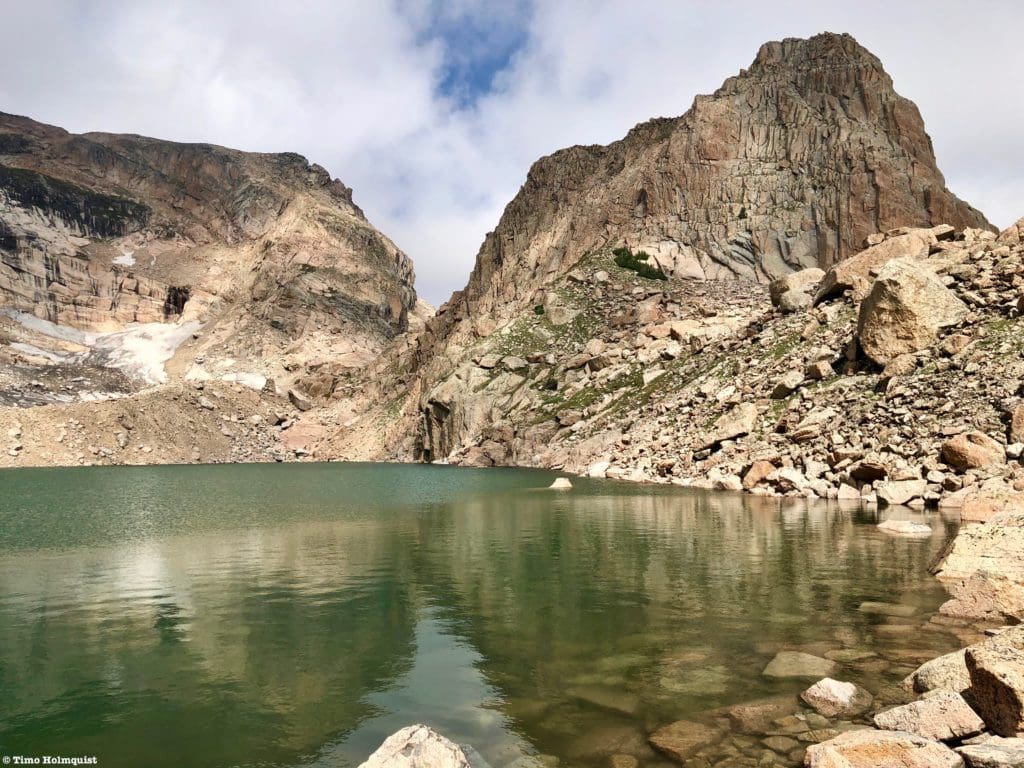
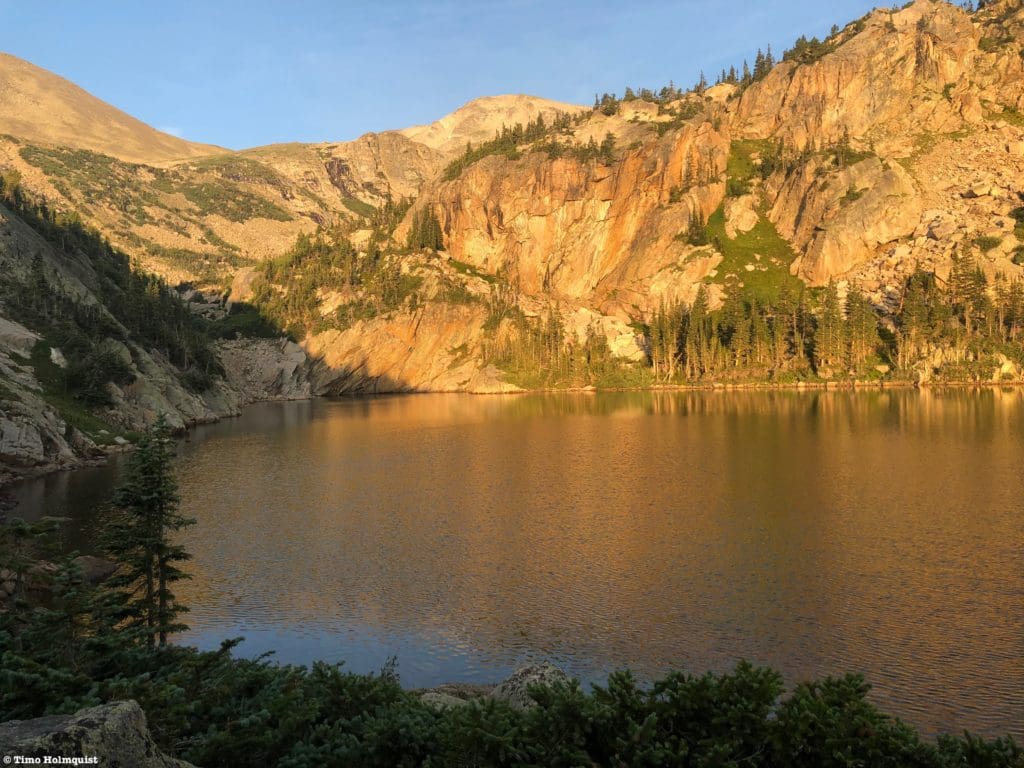
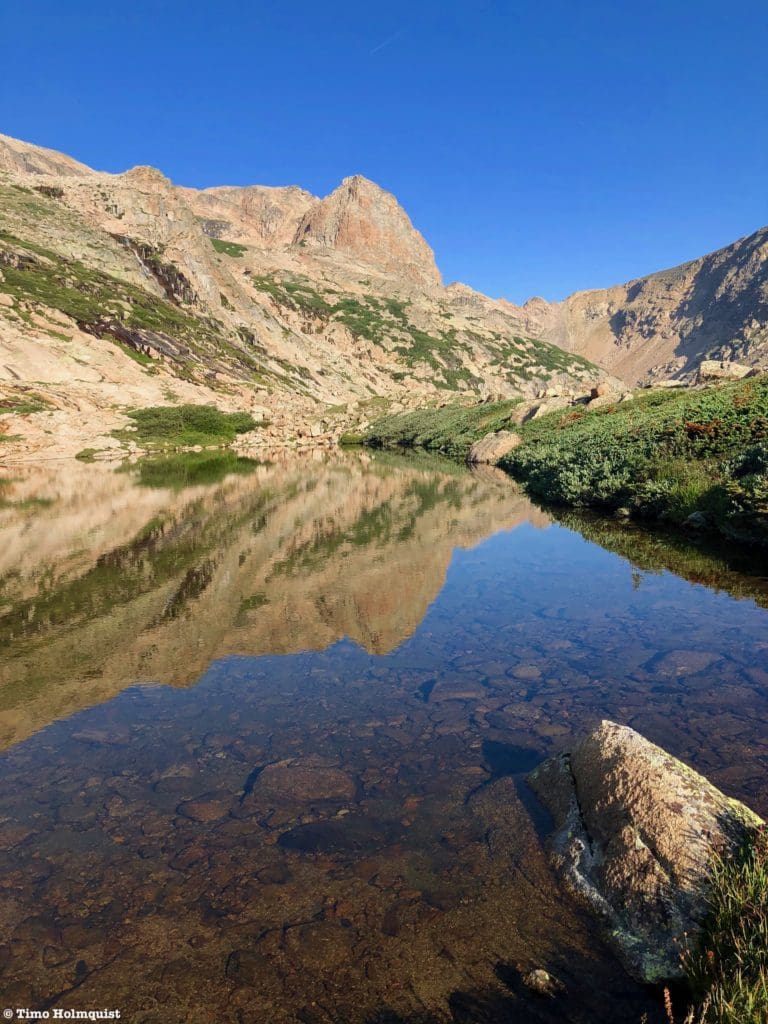
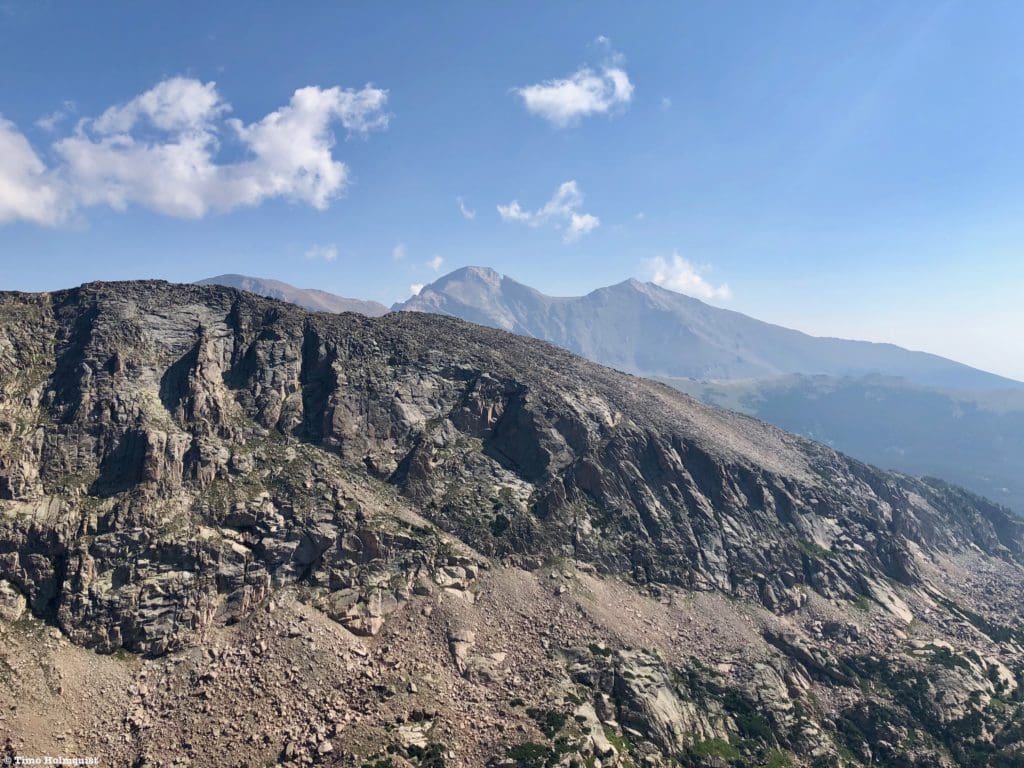
Eagles Beak from Frigid Lake.
Table of Contents:
Article Navigation: Click on any of the listed items in the table of contents below to jump to that section of the article. Similarly, clicking on any large, white section header will jump you back to the Table of Contents.
- Overview
- Scales and Criteria
- Directions to Trailhead
- Places to Stay
- Field Notes
- Journal
- Final Thoughts
Looking For An Amazing Adventure? Book A Hiking Tour in Rocky Mountain National Park
Scales and Criteria:
This article utilizes three separate rating systems: Difficulty, Popularity, and a Scramble Rating indicating the hardest move or set of moves encountered. The scramble rating employs the Yosemite Decimal System. By the easiest route, Eagles Beak is a class 3+ scramble, and many options exist to make it even harder. Before August and after October, there will be significant areas of snow to deal with; this review focuses on a snow-free ascent and should therefore only be used for late summer ascents.
Difficulty Ratings:
- Easy: less than 5 miles, less than 500 ft. of elevation gain
- Moderate: 5-10 miles, 500-2000 ft of elevation gain
- Hard: 5-15 miles, more than 2000 ft. of elevation gain
- Very Hard: 10+ miles, more than 3,500 ft. of elevation gain
Popularity Ratings:
- Low: Large sections of trail all to yourself
- Moderate: Sizeable trail sections to yourself, crowding possible on busy summer weekends
- High: You’ll be seeing people, still a chance for solitude in spring/fall/winter.
- Very High: Almost always busy.
Scramble Rating:
- Class 1: Established hiking trail the entire length of the adventure. Low chance for injury.
- Class 2: Typically involves cross-country navigation, possibly using hands for balance but not required, steeper than Class 1.
- Class 3: Hands and feet used to scale areas, must use hands to proceed (either for balance or to help pull you up a section), increased exposure, a fall could be fatal. Helmet recommended, along with grippy hikers.
- Class 4: Climbing on very steep terrain just shy of vertical, falls could be fatal, hands employed for grip and balance continuously, ropes advisable but scalable without. Helmets are highly recommended, along with grippy hikers.
- Class 5-5.4: Near vertical and vertical climbing that involves technical rock-climbing moves, exposed, falls likely to be serious or fatal, possible to scale without ropes but only for very experienced veterans. Helmets, grippy hikers, and/or rock-climbing shoes necessary.
- Class 5.5 and up: Not covered as scrambling, full-on rock climbing with ropes, helmets, etc.
The YDS system is widely used in North America but can be quite subjective, so it is not perfect. The biggest differences I’ve encountered between Class 3 and Class 4 sections have to do with slope angle, exposure, and putting weight and pressure on hand grips (4) instead of using hands and feet interchangeably as supporting points of contact (3). It is not possible to climb a Class 4 section without using your hands to pull up some or all of your body weight. Typically, a Class 4 section will also require some type of rock-climbing move, like stemming, where hands or feet are pressed in opposition as if climbing the inside of a chimney. If downclimbing, a key difference is that most people will descend a Class 4 section facing inward, i.e., your back faces the exposure.

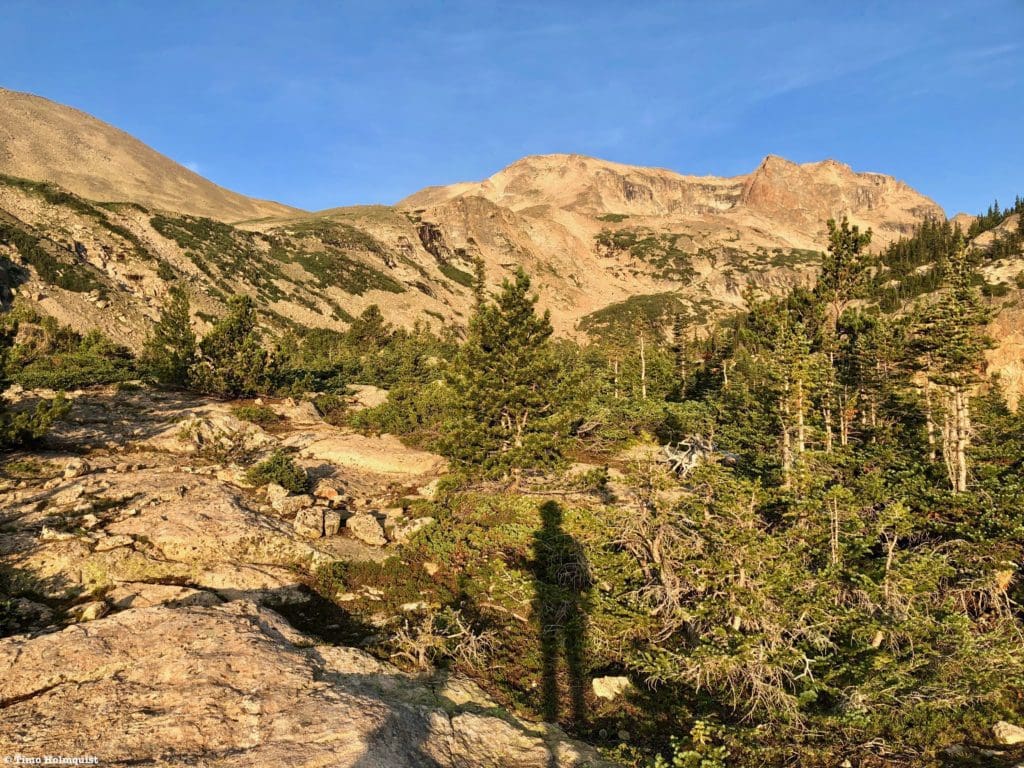
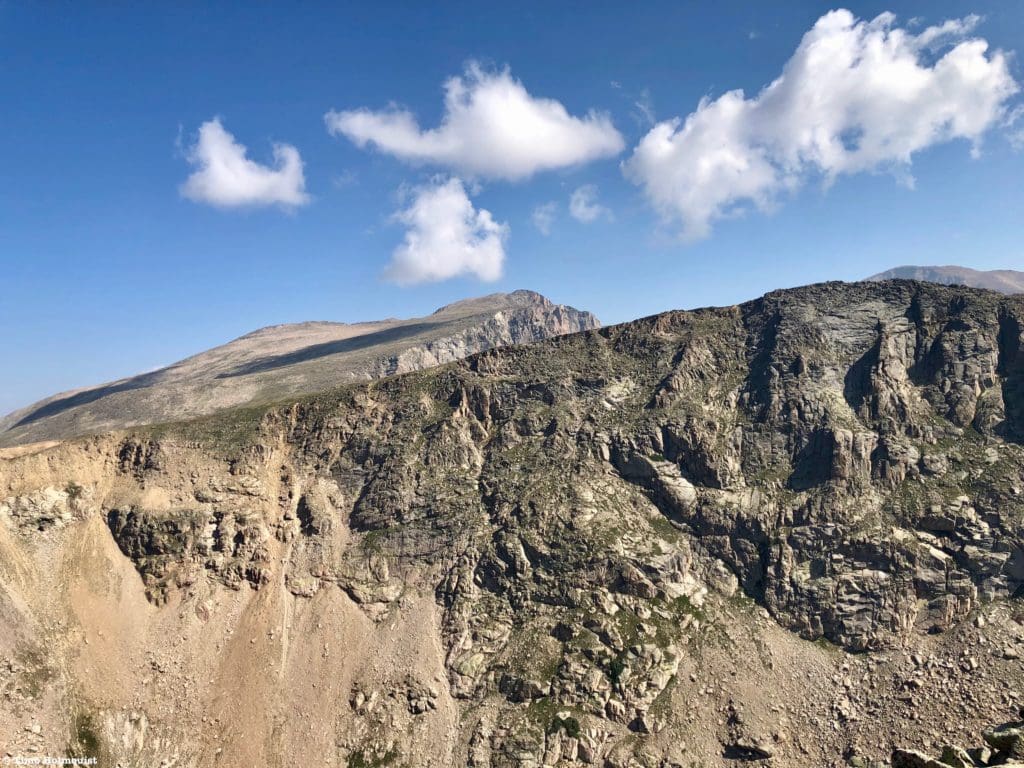
Eagles Beak from an unnamed pond within Wild Basin.
The Ultimate Offline GPS Hiking & Ski Maps
See why onX Backcountry is the ultimate GPS navigation app for your outdoor pursuits. Try Today for Free. No credit card required.
Directions to Trailhead:
This hike takes off from the main Wild Basin trailhead. It is located off of US 7, just north of Allenspark. Find US 7 and approach from either the north (Estes area) or the south (Allenspark, Lyons, Boulder, Nederland, etc.). If approaching from the south, make your way through Allenspark and look for a large brown sign for Wild Basin; there is a small left turn lane in the middle of the road. Once you see the sign, slow down, the turn is abrupt. You’ll make a hard left onto a small road and proceed past some houses and the Wild Basin Lodge. The National Park gate is located on the right side of the road and is visible when you approach.
From the north, there will be a large Wild Basin sign on your right after you pass the Meeker Park Overflow Campground. While the sign is large, there is only one, so when you see it, slow down. It’ll be a right-hand turn onto a small road. Proceed until seeing the National Park gate on your right. Approach the gate and drive through to enter into Wild Basin.
Regardless of how you get to the Park gate, you’ll want to drive the dirt road into Wild Basin for its entire length until coming to a parking lot. Make sure to follow the one-way road signs and park where able. The trail takes off from the lower loop portion.
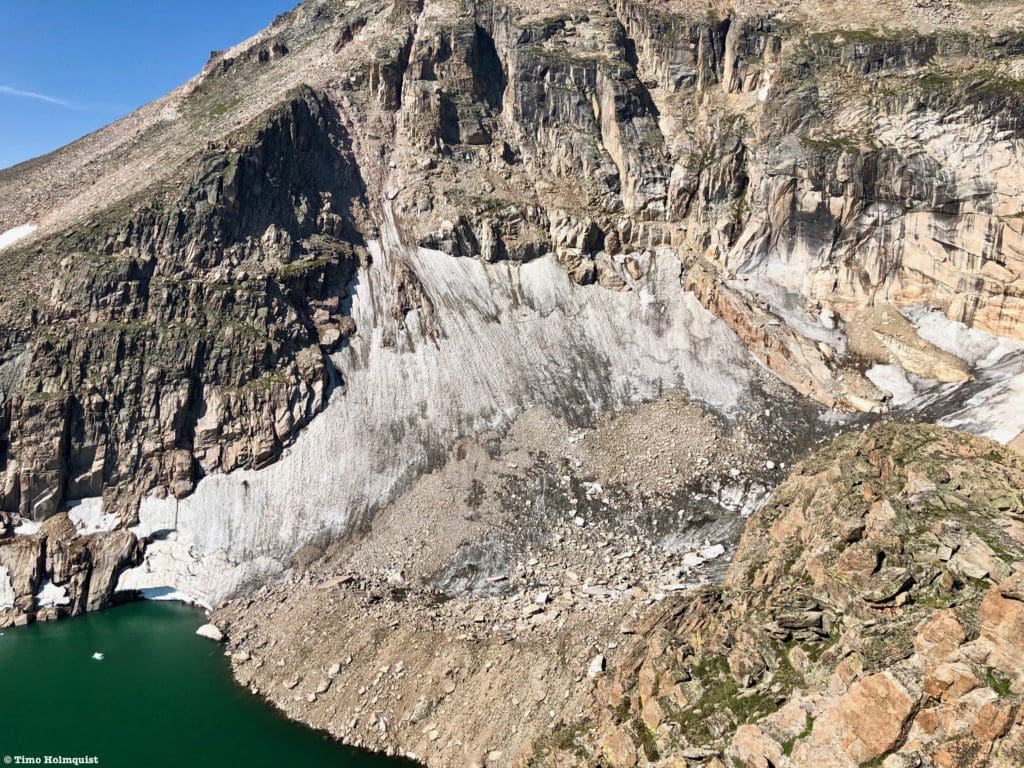
Moomaw Glacier sits on the north side of Frigid Lake, directly opposite Eagles Beak.
Places to Stay:
Camping
Camping near Rocky Mountain National Park will cost you. The options for free area camping are limited. On a positive note, there are plenty of options, and the National Park is within driving distance of Fort Collins, Boulder, and Denver.
- Estes Park: Known as the gateway to Rocky Mountain National Park, Estes sees nearly 80% of park traffic as opposed to the much quieter western entrance near Grand Lake. The town has a ton of lodging options.
- Allenspark: A small town near Wild Basin that has a few lodging options, including the Wild Basin Lodgeand the Sunshine Mountain Lodge and Cabins.
- Rocky Mountain National Park Camping
- Moraine Park Campground: $30 per site. $20 in winter. Established campground with perks, facilities, campfire grate, wood for sale in summer, and bear boxes to store food. Only loop B is open in the winter, and it’s first-come, first-serve.
- For summer, a reservation is needed quite a ways in advance to secure a spot.
- Glacier Basin Campground: $30 per site. Established campground with the same perks as Moraine Park. Reservation required.
- Backcountry Campsites: Rocky Mountain National Park has backcountry sites that you could book in advance. There is no open camping in the backcountry; it must be at designated backcountry sites. Please check the park website for more details. Backcountry sites require an overnight permit of $30.
- Camping near Estes Park
- Estes Park Campground at Mary’s Lake: Established campground, pricey $45-55. Good backup if other campgrounds are full.
- Hermit Park Open Space: $30 for a tent site, price increases if towing a trailer or for group spots.
- Estes Park Koa: Rates dependent on what you’re bringing with you but will run more than $50 a night in the busy season.
- Olive Ridge Campground in Roosevelt National Forest. ~$20 for a standard non-electric site.
- Free or close to free: but a little farther (if you’re willing to drive)
- Ceran St. Vrain Trail Dispersed Camping ($1)
- County Road 47. Users have reported trash and ATV noise at this location, but it is free.
- Meeker Park Overflow Campground
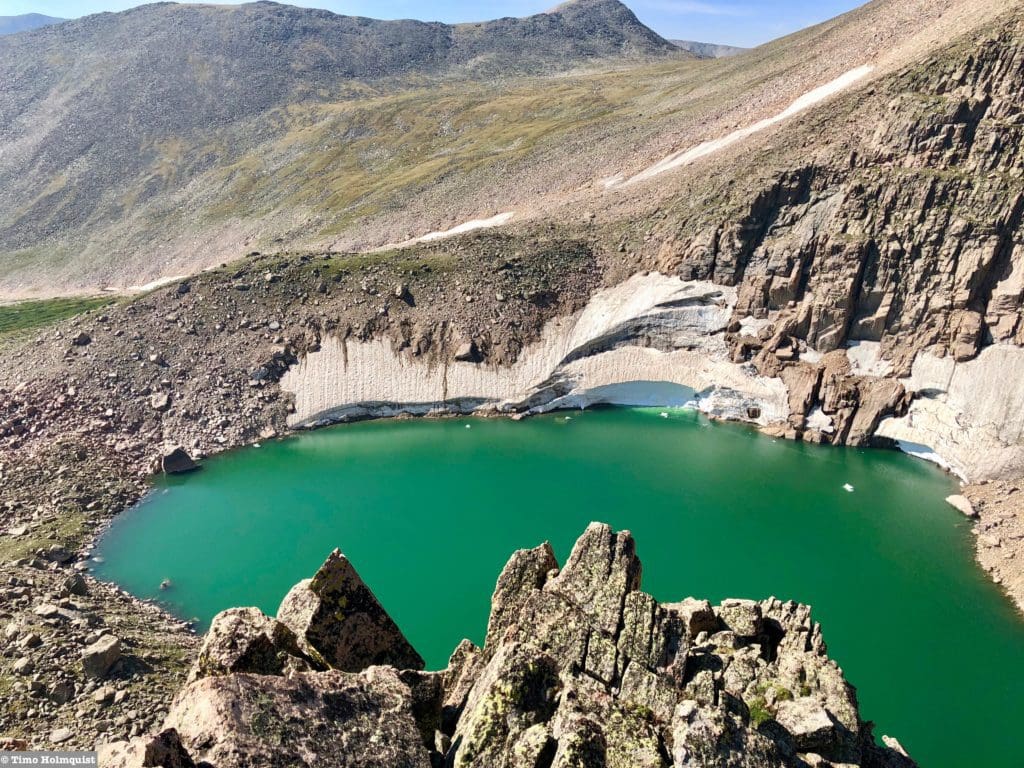
Eagles Beak from the shores of Eagle Lake.
Field Notes:
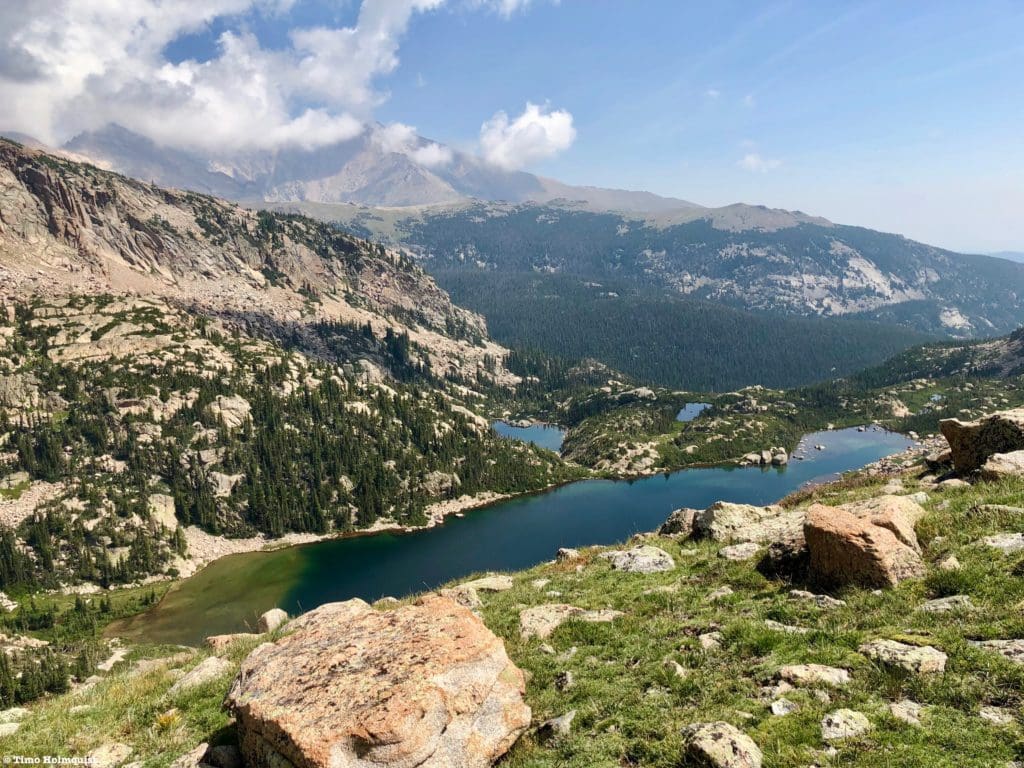
While it is certainly possible to summit Eagles Beak in a day, it is a substantial day. The easiest way to include the Beak in an adventure is to book and set up a basecamp near Thunder Lake. From there, you can visit Eagle, Box and Frigid Lakes, and Eagles Beak. A basecamp will also allow you to rope in any of the following Wild Basin destinations: Lake of Many Winds, Lion Lakes, Tanima Peak/The Cleaver, Mt. Alice, Chiefs Head Peak, Mahana Pk. and Isolation Peak.
If you are doing this hike in a day, come ready for rocky mountain weather. For your weather needs, start with Allenspark’s extended forecast. The mountain forecast for Mt. Alice is a good option for the higher portions of Wild Basin. Saint Vrain Mountain also has a good forecast. Using the three forecasts above, you should be able to hone in on what the conditions will be like near Eagles Beak. Remember to check the forecast religiously until the minute you leave for the trailhead, mountain weather changes.
With the elevation of Eagle Lake at more than 10,800 feet, and any of the mountains or ridges around it crossing 12,000 feet, it’s important to be aware of and know how to respond to signs of altitude sickness. If you are coming from a low-lying area and haven’t had a chance to acclimatize, a splitting headache, lethargy, and nausea will almost certainly dampen the mountain spirit.
The National Park has instituted a time slot system in addition to their normal entrance pass system for the summer of 2021. Do yourself a favor and take the time to understand these components by visiting the Park website. If you do not have an entrance pass or time slot, you will be turned back. The short version is that ALL visitors must have an entrance pass. If you arrive in Wild Basin anywhere between 9 AM and 3 PM, you will also be required to produce a timed entry pass. You will be turned around if you do not have a timed entry pass. IF you have an entrance pass, AND you arrive before 9 AM, you are free to park and enjoy your day (make sure your pass is visible on your windshield), hence the “arrive early” mantra. If you exit the park between 9 AM and 3 PM, you will be required to produce a timed entry slot to reenter, or you’ll have to wait until after 3 PM to reenter.
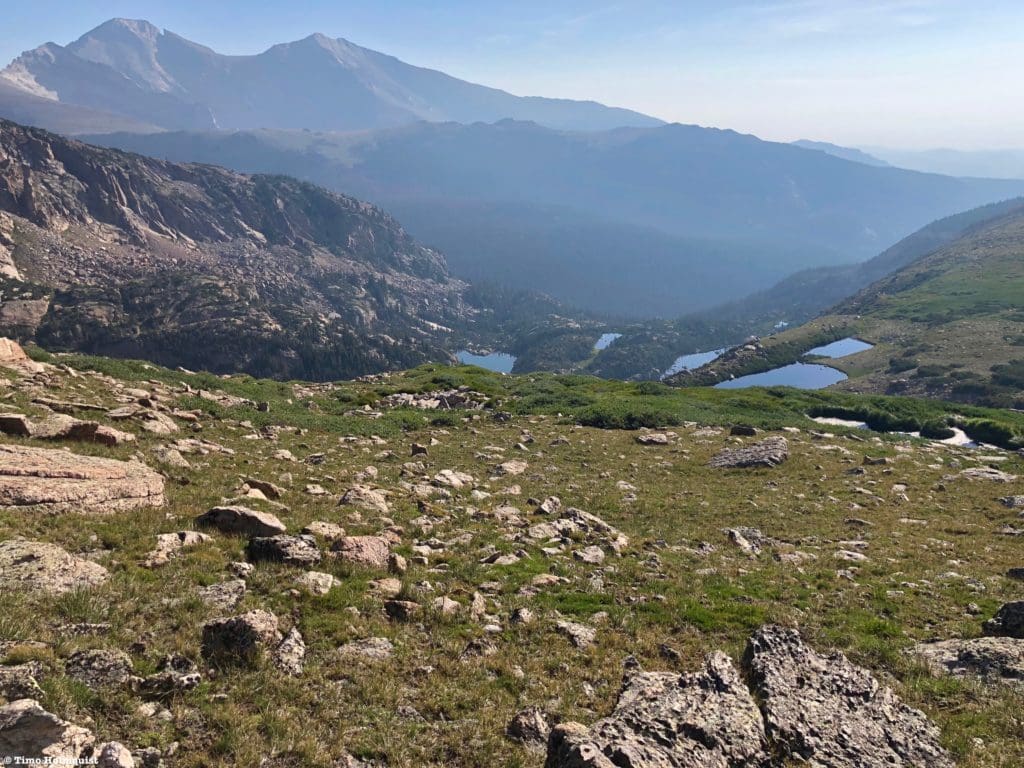
Crystal clear lakes on the way to Eagles Beak.
Journal:
This review will begin in earnest after Box Lake, but that is not the beginning of the journey if you are trying to tag Eagles Beak in one day. To do this as a day hike, begin at the main Wild Basin Trailhead and hike 5.8 miles west (using the Campsites cutoff option) until reaching Thunder Lake. See the Field Notes section for details about parking fees.
From the USFS cabin at the eastern edge of Thunder Lake, break south and reach the shoreline. Follow the shore and cross a log jam over the start of North St. Vrain Creek. After crossing, the trail becomes more of an intermittent herd path; follow it around the eastern edge of Tanima Peak before reaching Box Lake. For details on the unofficial trail to Box and Eagle Lake, click here.
Box Lake in the early morning light.
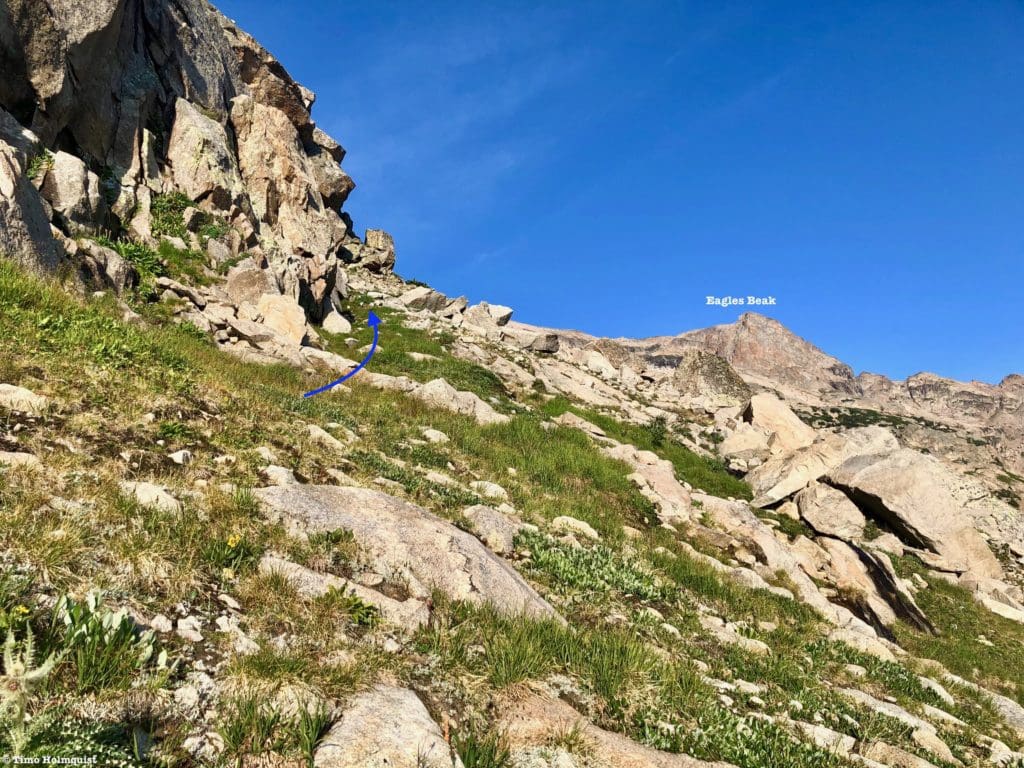
It’s from the edge of Box Lake that you need to start paying attention. Follow the trail as it heads around a small part of the lake before climbing up a gully to the south. Once you exit the gully, you’ll be on a ridge of rock surrounded by scratchy, low-lying pine trees (krummholz). The identifiable path will disappear, but rock cairns spring up to guide your path.
Your first looks at Isolation Peak and Eagles Beak to the right of it.
If you follow the cairns, you’ll reach the shores of Eagle Lake within 15 minutes. This route, however, is not the best for reaching Eagles Beak. If you follow the cairns to the shoreline, you have two options. You can either traverse west or east around the lake. Both options come with substantial sections of full-on bushwhacking. Not only is this a bad move for the vegetation and sensitive plants between the krummholz, but it also risks leaving you beat up, scratched, and bruised. Instead, sight an unnamed tarn to the left once you get out of the Box Lake Area. You’ll ultimately want to traverse around the western side of this pond.
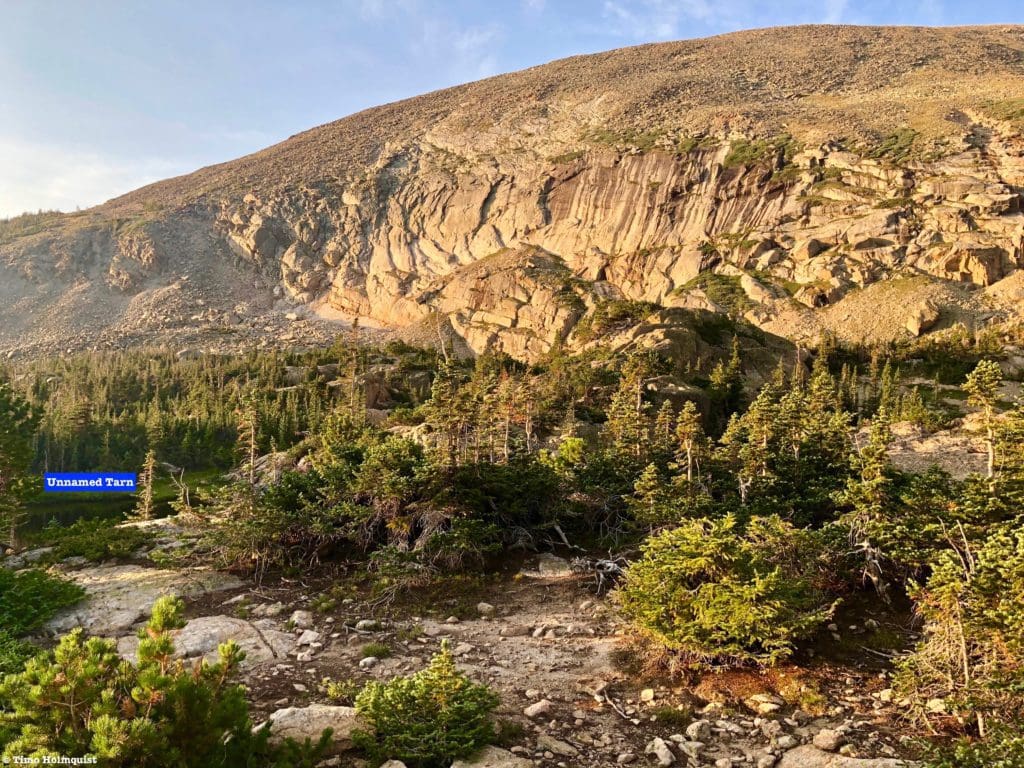
The unnamed tarn and the obvious cliffs on the side of Mahana Peak are good markers.
Follow the cairns for a few minutes until seeing the view below.
Where you want to break from the cairns.
Follow the path of least resistance down to an area between rock ribs and turn left alongside a prominent rib with the unnamed tarn now ahead of you.
The approximate route with Mt. Orton in the background.
Once you round the corner, you’ll have to weave around the shoreline until sighting another large rock rib. Find a way to climb to the top of this one.

General path and where you want to end up.
From the top of this rock rib, head along its crest (still east), using Mt. Orton as a temporary marker.
On the rock rib with the unnamed tarn now below you.
When the rib ends in another grassy gully, descend to it and veer south once more. The cliffs on the side of Mahana Peak are hard to ignore as you walk towards them.
Continuing along the path of least resistance.
Once the gully ends into thick vegetation, you’ll have to employ some brief route-finding skills to secure the easiest route, but after a minute or so of effort, you should hear the outflow stream from Eagle Lake. Rather abruptly, you’ll end up along the banks of the creek.
Making your way across the neck of the outflow to the south shore of Eagle Lake.
In normal and low tide conditions, you should be able to find an easy path along surface rocks to reach the other side. If the water level is swollen from snowmelt or recent rain, it may help to proceed a little farther east until you find the thinnest part of the creek and cross there. In any case, once you make it to the southern shore of Eagle Lake, the worst of the vegetation is behind you, and the alpine begins to take over.
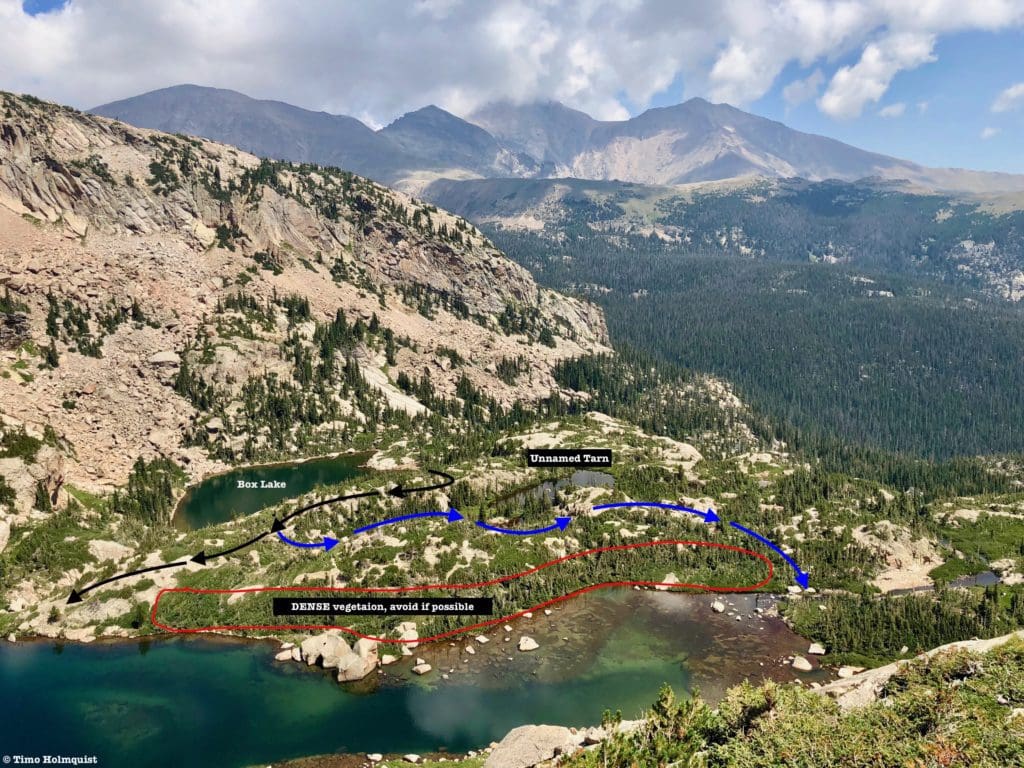
The route options from above. Black lines=cairned route to Eagle Lake shore. Blue arrows=the path of least resistance to cross over to the southern shore of Eagle Lake. Red=what you want to avoid. All arrows are approximated.
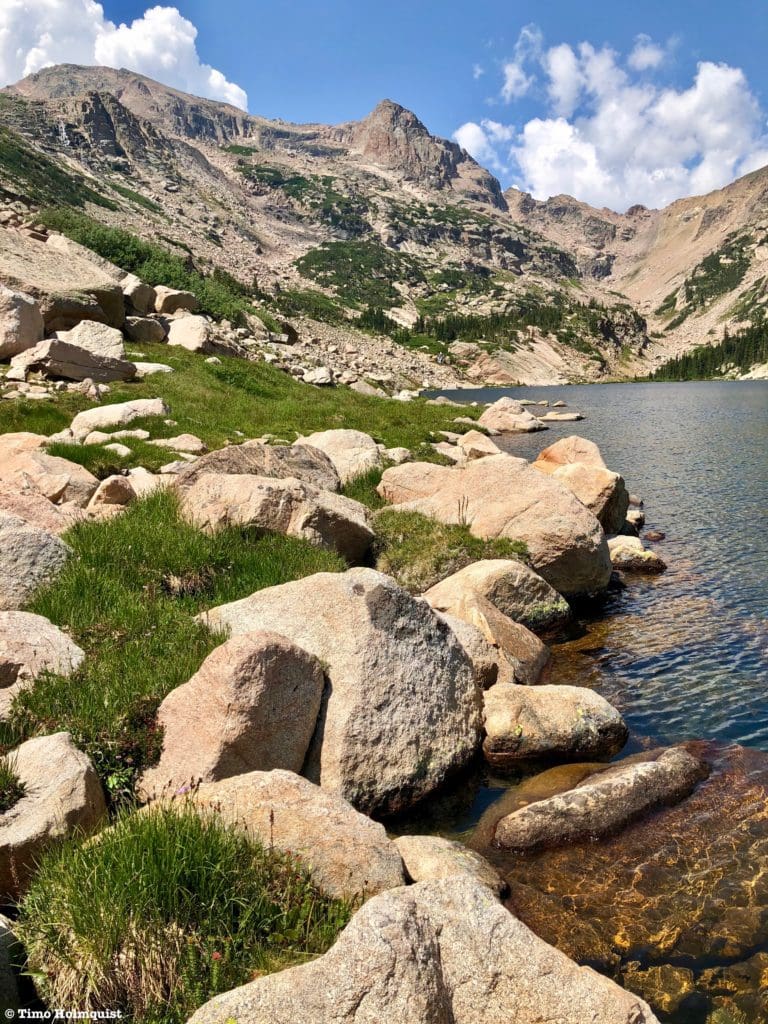
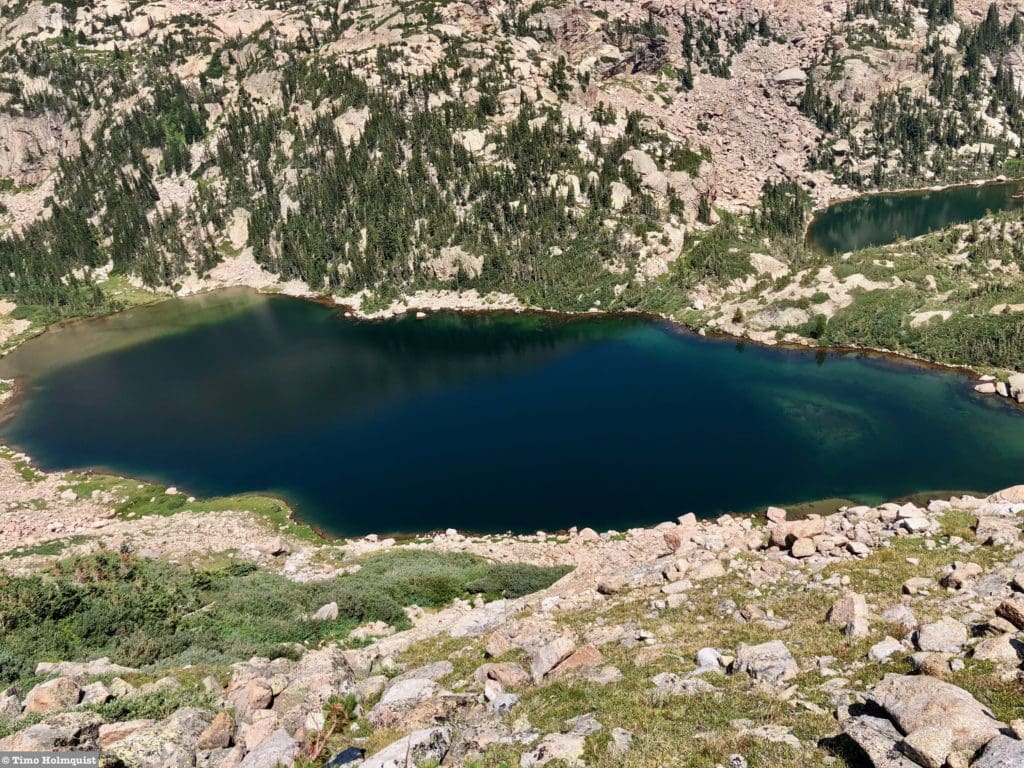
Once you make it to the southern shore, admire the tranquil and picture-perfect lake at your feet. The views back to Longs Peak are particularly striking.
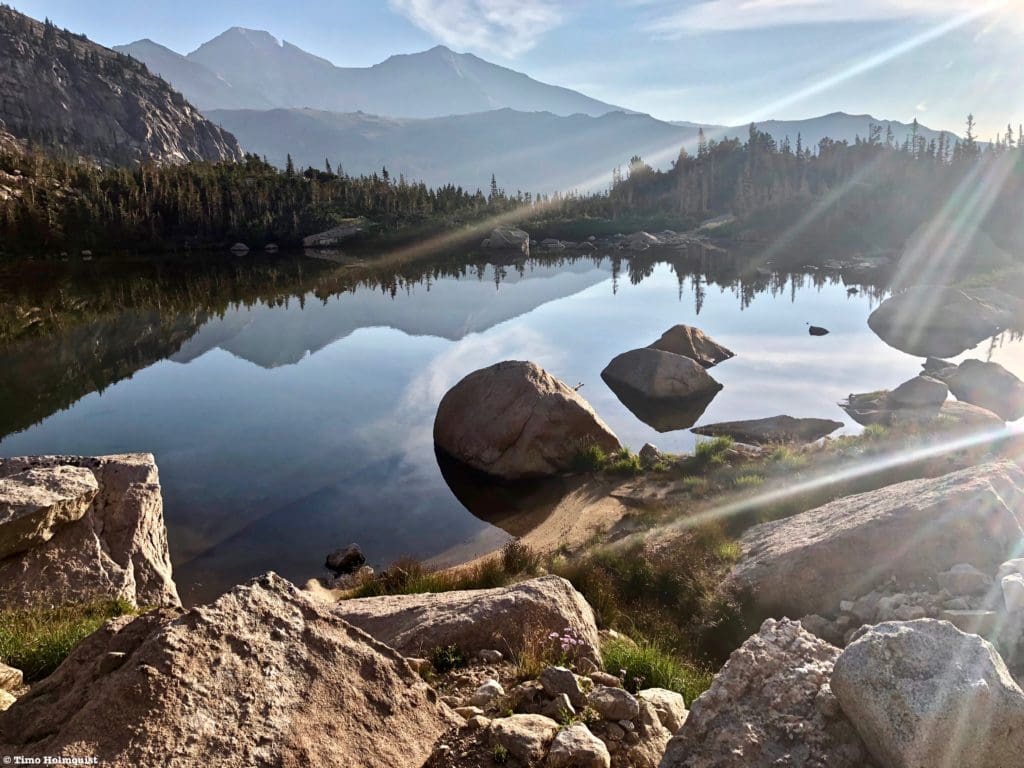
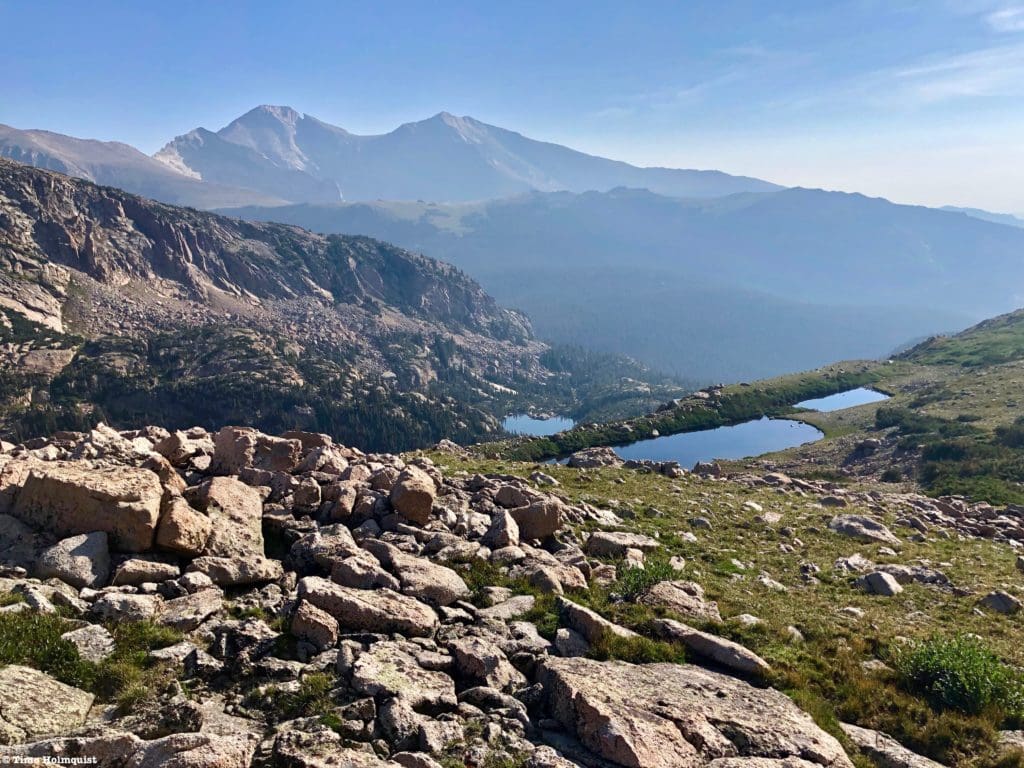
Longs Peak and Meeker from Eagle Lake.
Hop across talus, taking in the wonderful views of the whole basin.
Looking west with Eagles Beak on the top Left.
From here, the real uphill portion begins. After you’ve admired the lake and maybe refilled some water (always filter or use iodine tabs), try to spy the easiest way up the shelf between you and Eagles Beak.

The blue arrow is where you want to end up.
Using a series of large talus boulders, ascend from the shoreline until running into a large, diagonal wall. Follow this wall up the side of Mahana.
The diagonal wall above Eagle Lake.
The ground at the bottom of the wall is a mix of loose scree and grassy patches, so watch your step and take your time.
Ascending alongside the largely intact walls above Eagle Lake.
As you ascend, the wall will curve south, and your route will follow it closely. Any shortcut to the west will suffer from excessive traversing and clumps of thick and unfriendly krummholz. The best strategy is to use the wall as your guidepost.
Looking down to the lake after following the curving wall south.
There are a few cairns along this stretch of the path, especially as the wall you’ve been following begins to break. Once you curve south, ascend a scree slope that looks like a path but could just be erosion in action. This part is the steepest of your ascent, and traction is hard to come by, but there are a half-decent amount of sturdier rocks to use as grips and platforms. Once you top out on the wall, the next part of your journey comes into view.
Make your way to the green saddle in front of Isolation Peak.
A little more elevation will get you to a shelf below Mahana Peak that contains some vibrant alpine. It is hard to find rocks here to dance between, so do your absolute best to stay off alpine flowers, smaller plants and anything mossy. There are thick lines of willows and krummholz to avoid, and in some cases, you will be forced to traverse through them. Their stunted growth does help limit difficulties, but crossing through them is never easy.
This route, while circuitous, avoids fields of willows, krummholz and tough vegetation. It may not be the shortest path, but it is absolutely the least difficult.
If you turn west and follow the edge of the shelf towards Eagles Beak, you’ll come across a set of unnamed ponds with great views of your eventual target.
Eagles Beak from one of the unnamed ponds.
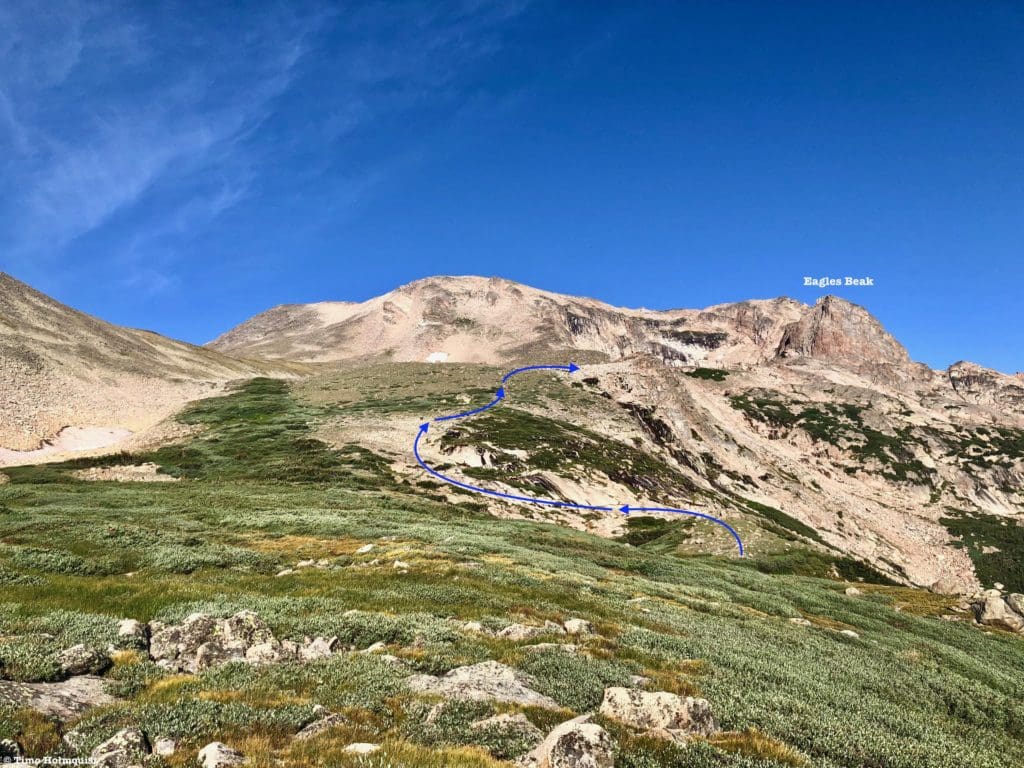
On the other side of the ponds, begin zig-zagging your way up the following slopes. The most direct route has you traversing over slick rocks and wetter vegetation, increasing the likelihood of falling. Breaking left and sticking with drier terrain will have you avoid additional obstacles. In either scenario, this next rise is not very difficult, and you should make it to the following area relatively quickly.
The unnamed ponds from above, Box Lake is visible far below.
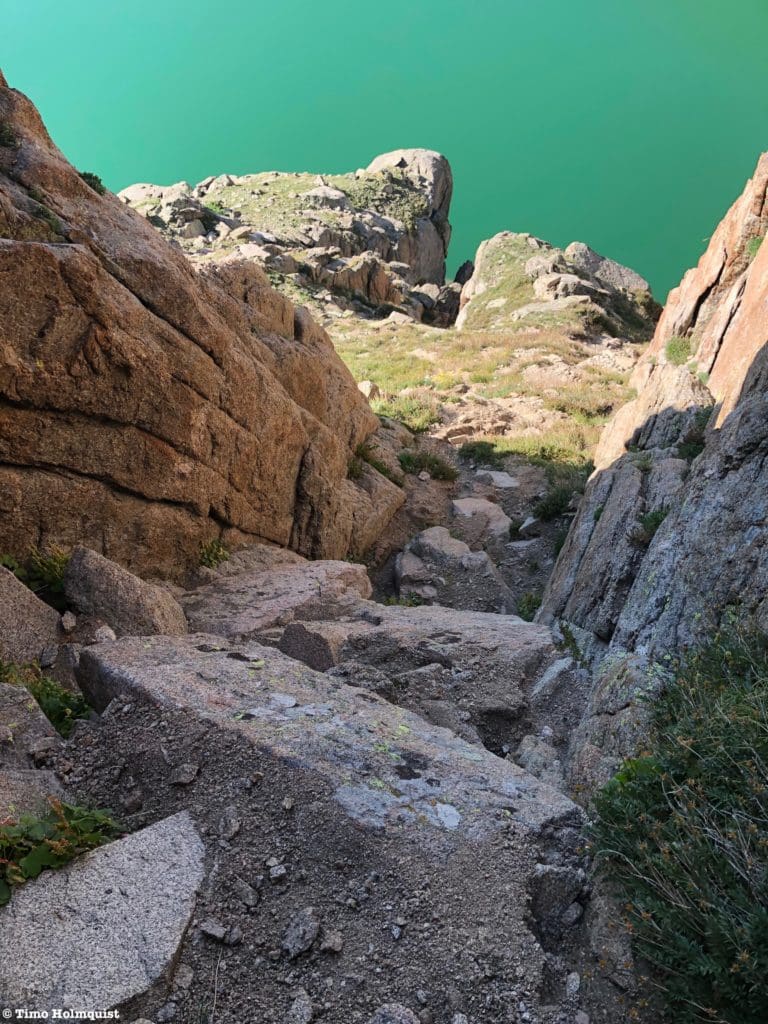
The mixed grass and talus slope becomes almost all talus as you close in on Eagles Beak.
The best path crosses a talus field and ascends partway up a grass slope before traversing to the right and cresting a roll of land separating the Frigid Lake area from the rest of the basin.
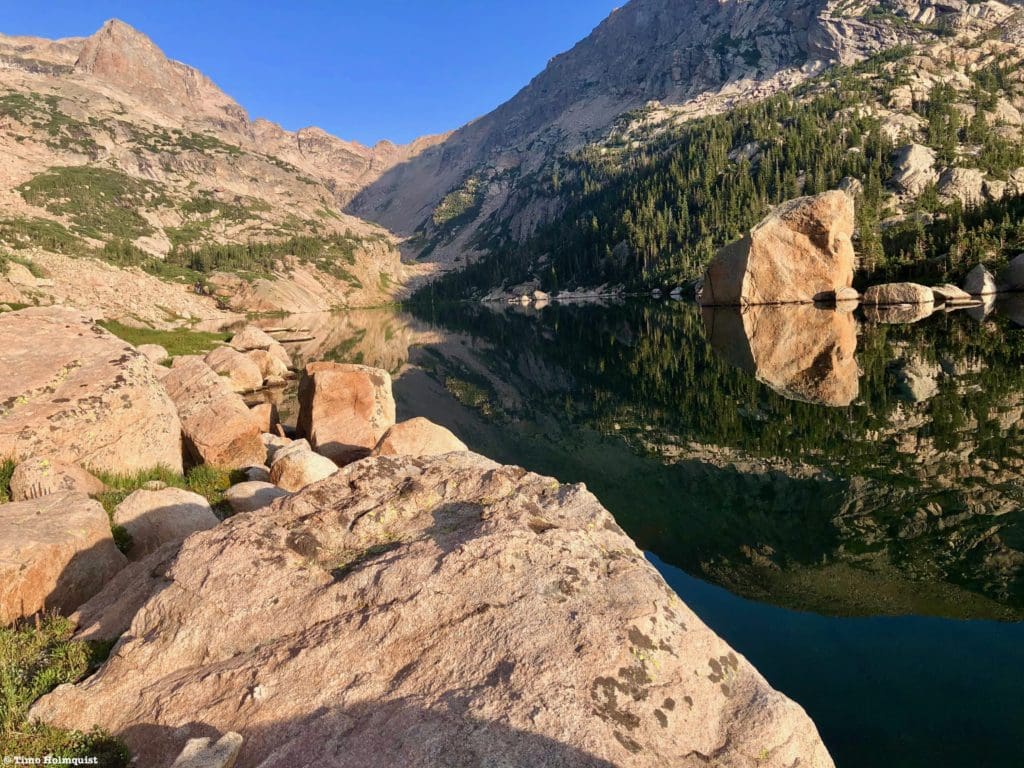
Cross the talus field and ascend either partway up or all the way up a grass slope. Once you crest the next roll of land, you’ll be able to see Frigid Lake, Moomaw Glacier, and the target you’ve been gunning for, Eagles Beak.
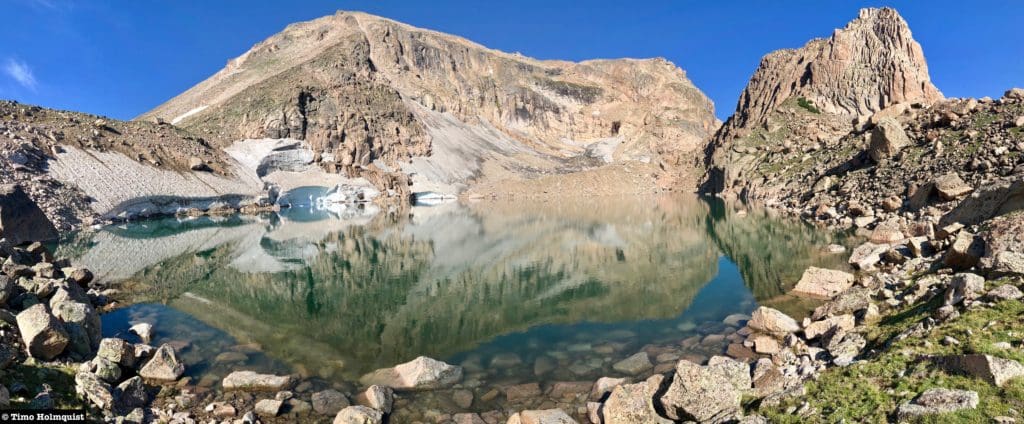
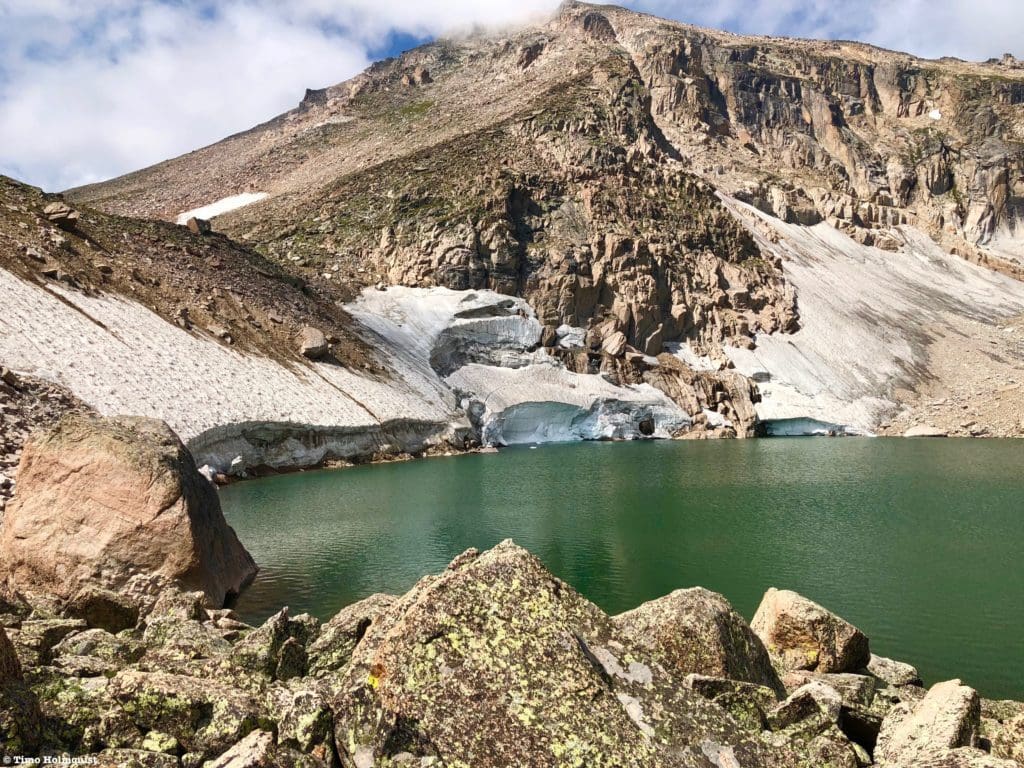
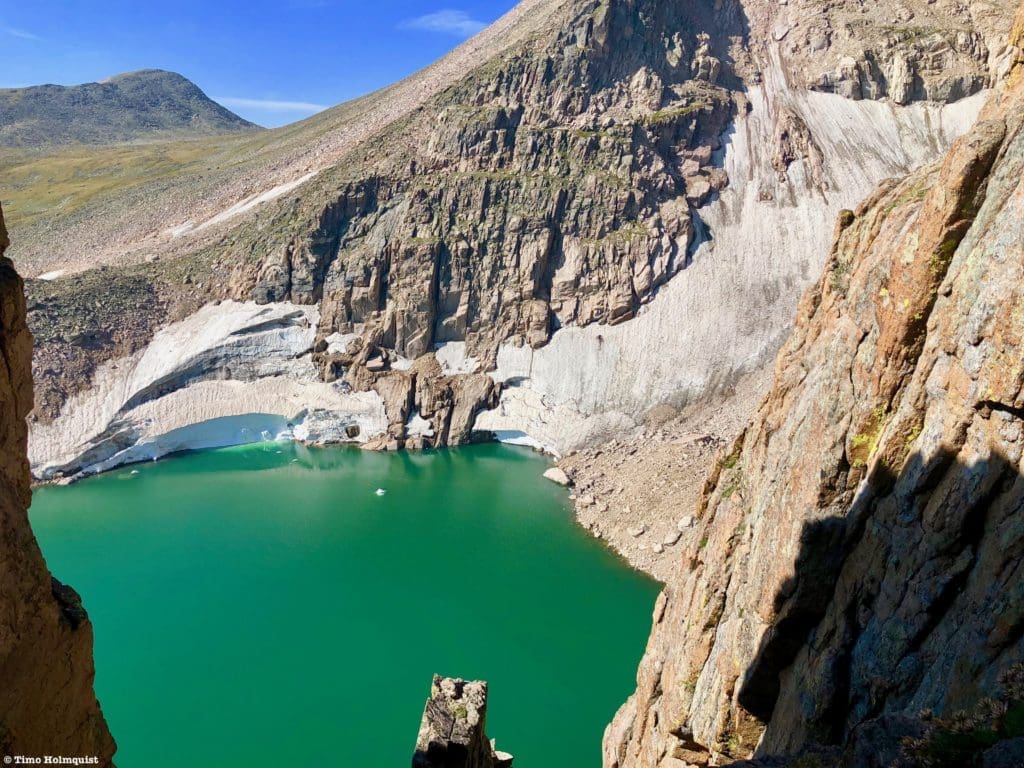
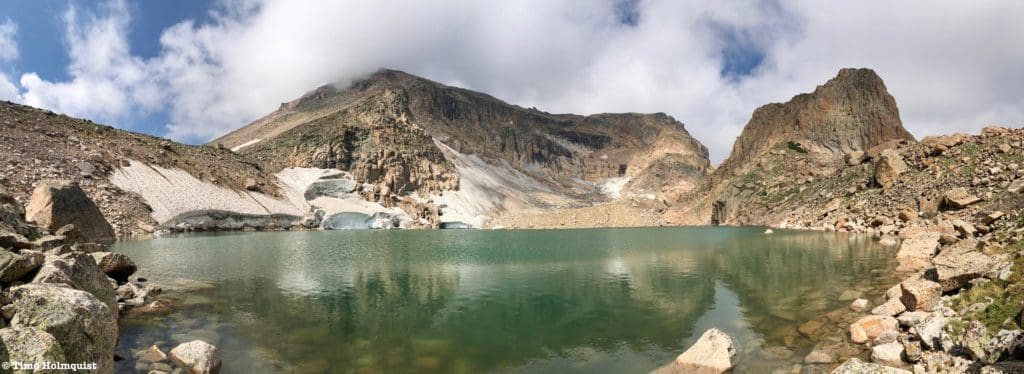
Frigid Lake, Moomaw Glacier, and Eagles Beak with Isolation Peak looming behind.
This is a high and wild area, far removed from all things human. While your focus will eventually narrow down to the Class 3+ ascent up Eagles Beak, it’s worth checking out Moomaw Glacier as well.
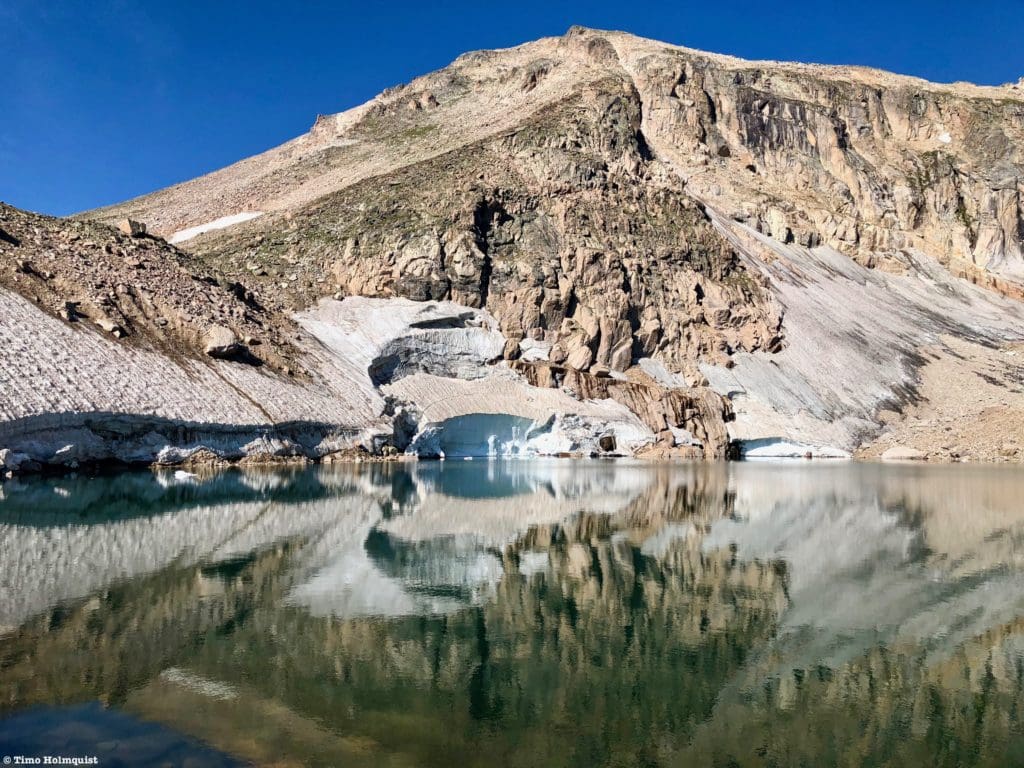
Moomaw Glacier.
The Glacier consists of two main pieces. They are connected through July but by August have split. The eastern side is smaller but more dramatic, with calving pieces of glacial ice slowly spilling into Frigid Lake. This ice stays around all year. There is also a larger snow/ice field that stretches below Isolation Peak. It also calves into the lake and extends back to some cliffs along Isolations ridge. It’s tempting to say that snowfield is at risk of melting out, but there’s more to the story.
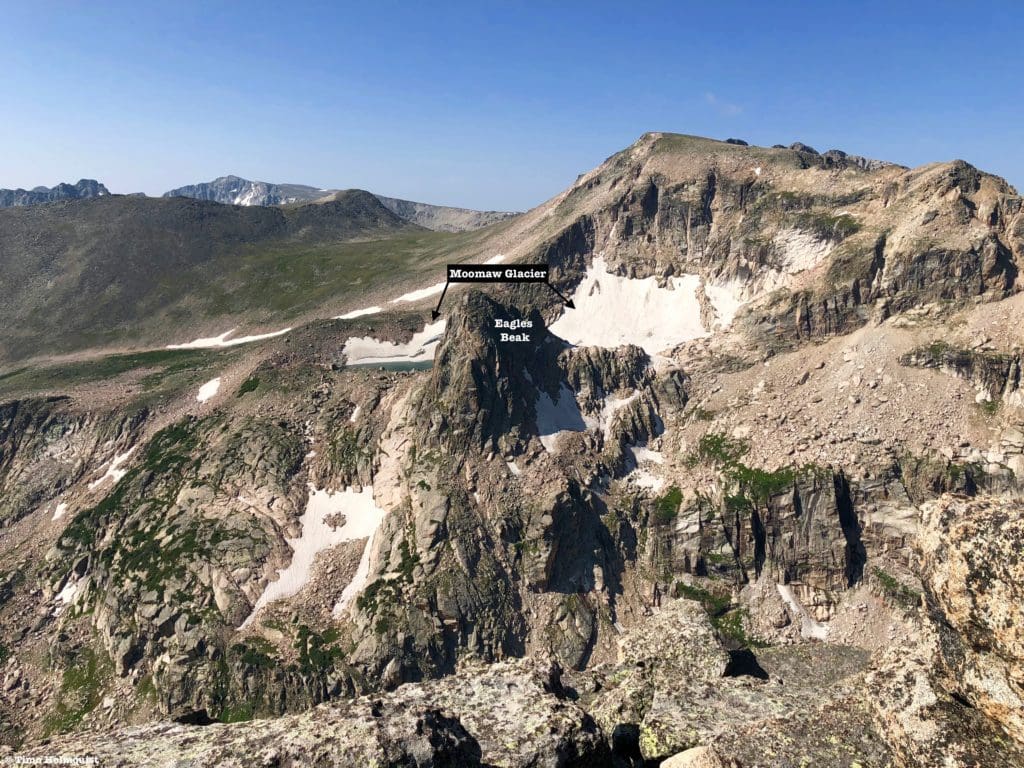
Moomaw Glacier from Tanima Peak, mid-July.
Looking at the picture above, you can see that the snowfield portion of Moomaw was much more obvious only a few weeks prior. Did all that snow melt since then? Not likely. When I was sitting by the edge of Frigid Lake for maybe ten minutes, I heard and saw at least seven different rockfall events. The cliffs above the snowfield are not stable at all and constantly sluff off rocks and scree onto the ice below. This pattern continued for the next few hours, leading me to theorize that even though it looks melted, a large portion of the snowfield is intact but buried beneath the debris of a constantly shifting and eroding landscape.
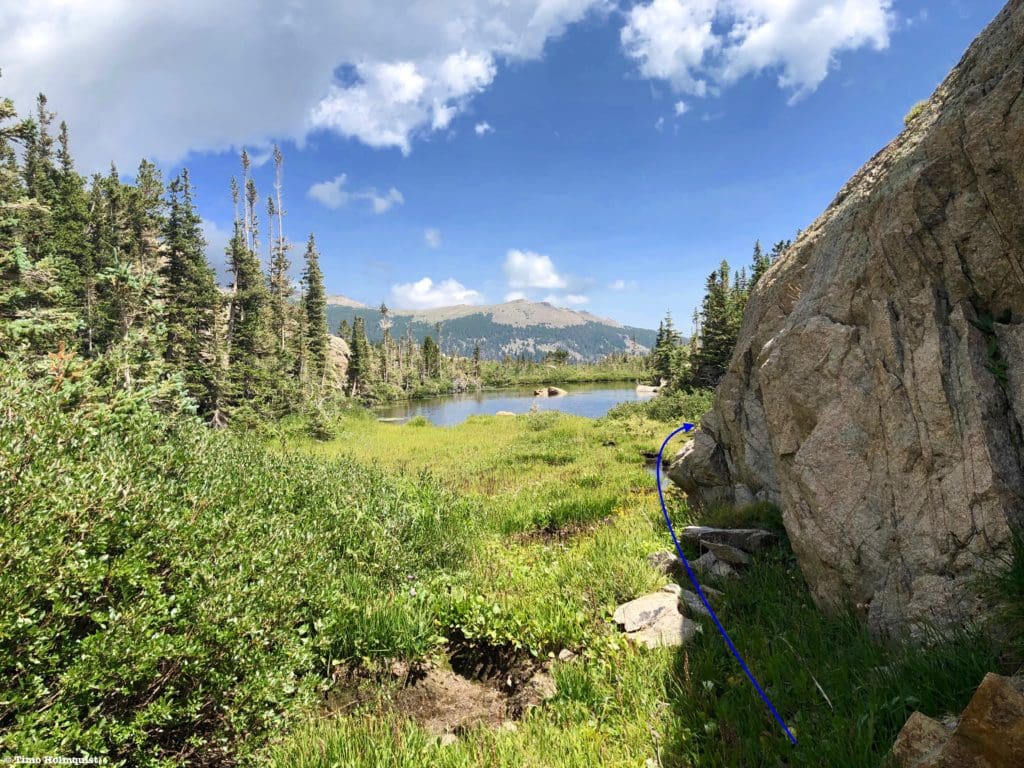
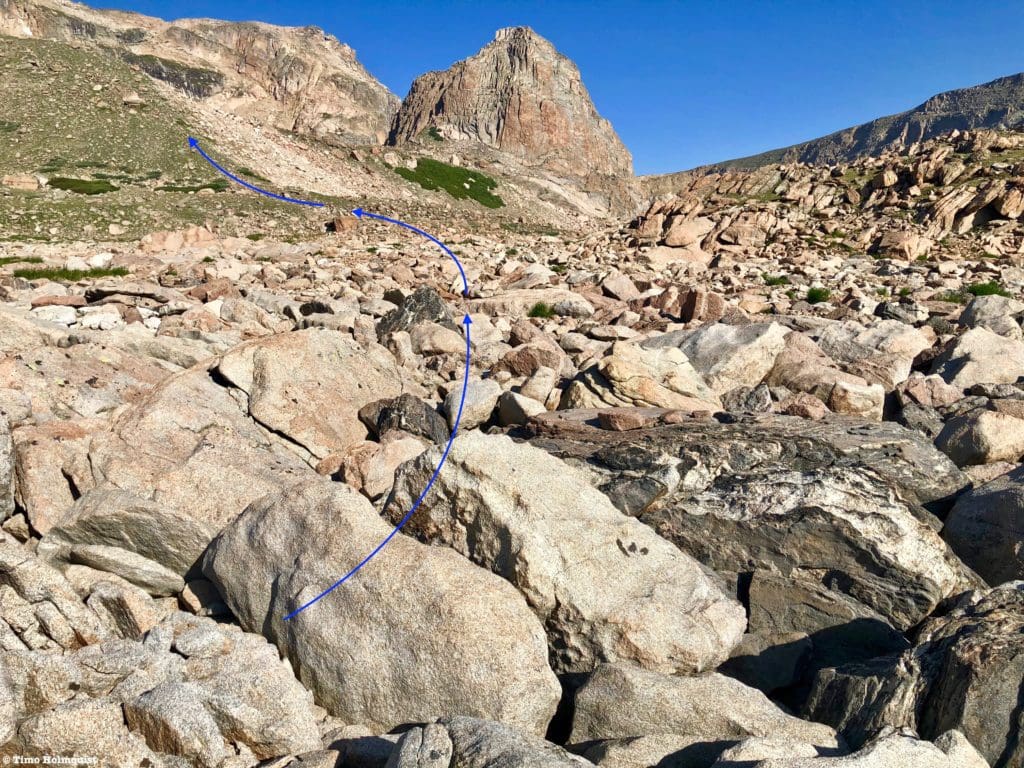
If you’re brave, take a dip in the water; if not, set your sights on Eagles Beak because the scrambling is about to begin.
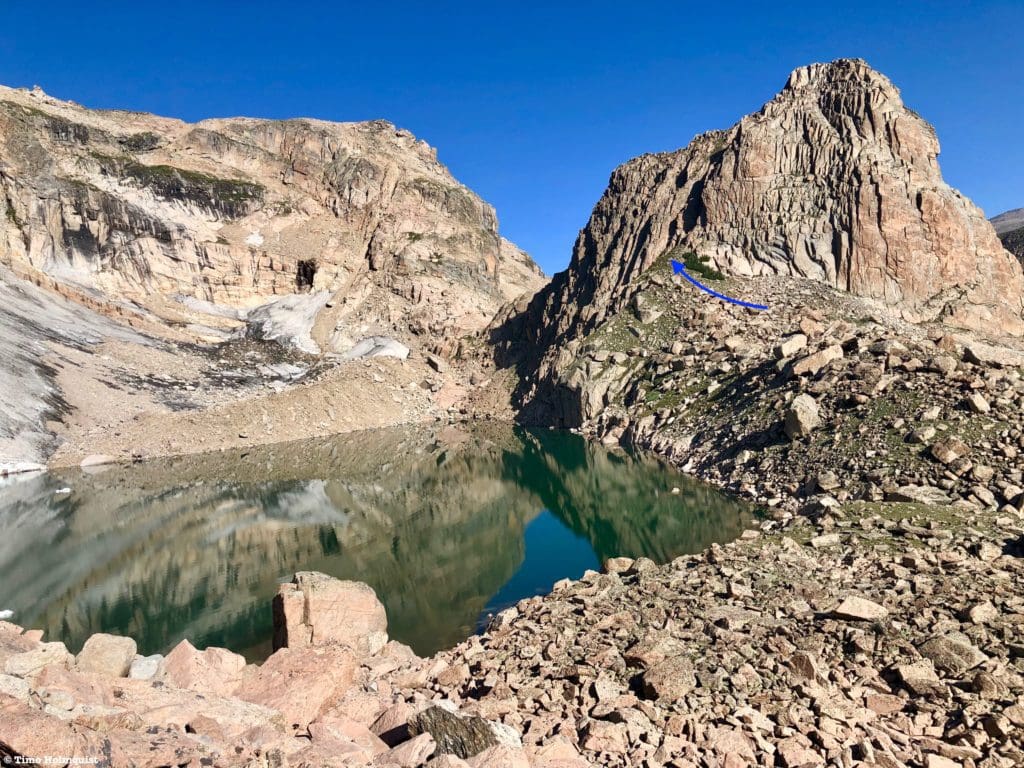
The end of the blue arrow is where the scrambling begins.
Traverse around the lake, employing some Class 2 and Class 2+ moves through a sea of talus.
Approaching Eagles Beak.
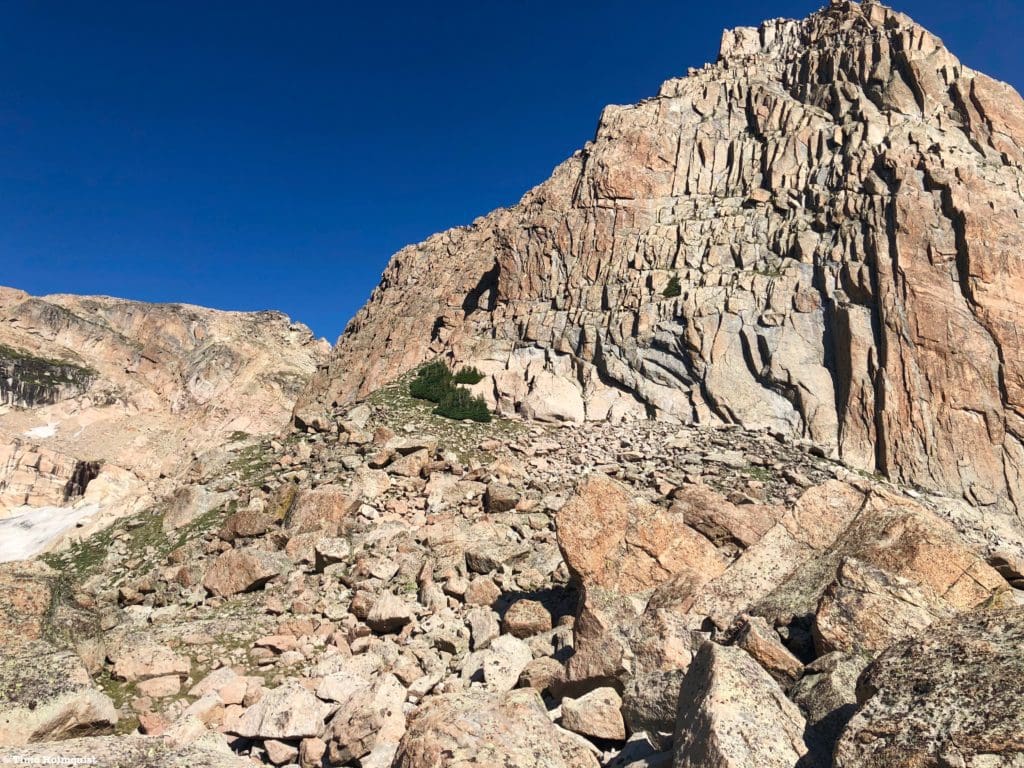
Ascend a grassy and sandy ramp with a small patch of vegetation on its right side.
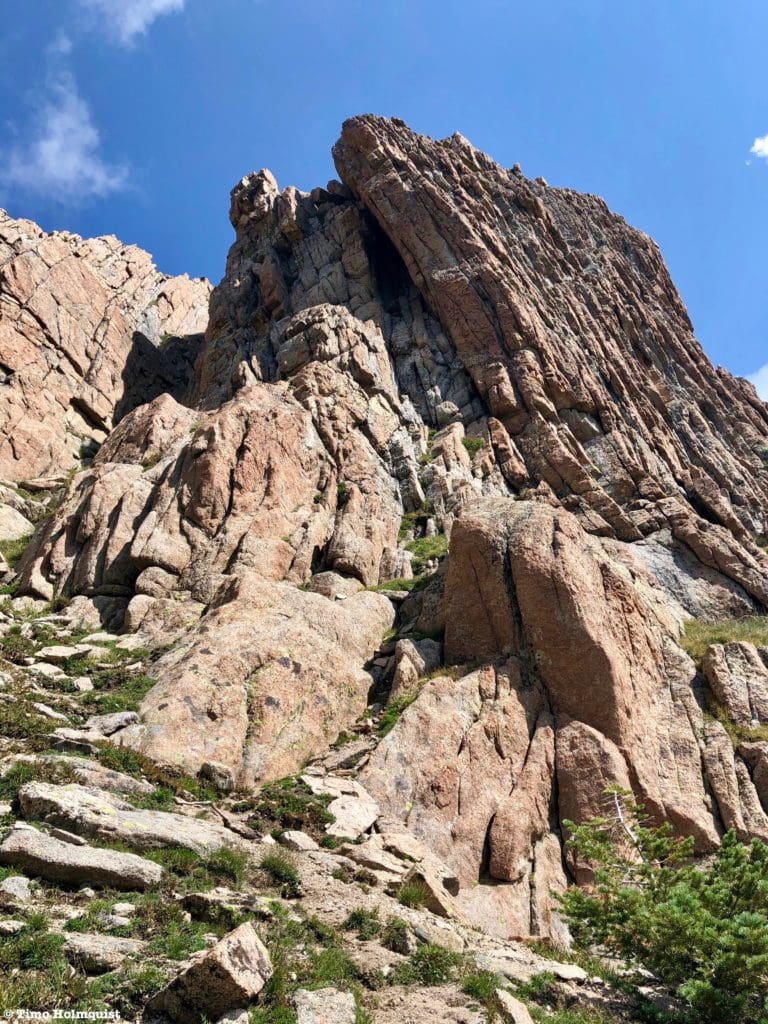
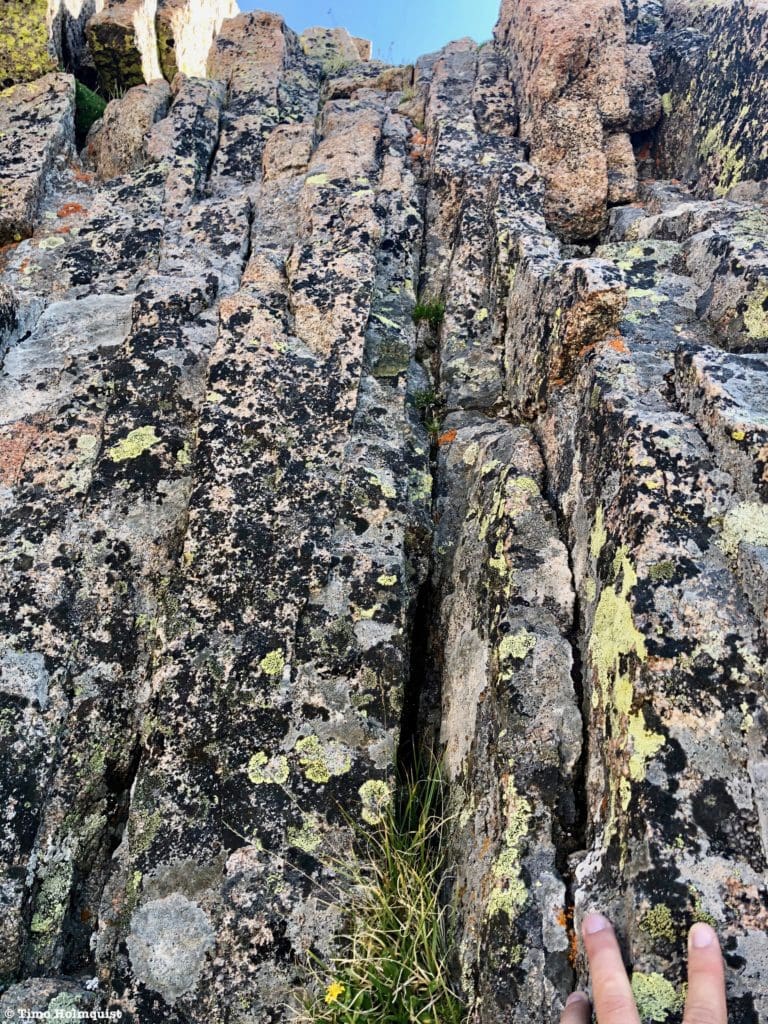
The different shapes and angles of the rock above you are mesmerizing.
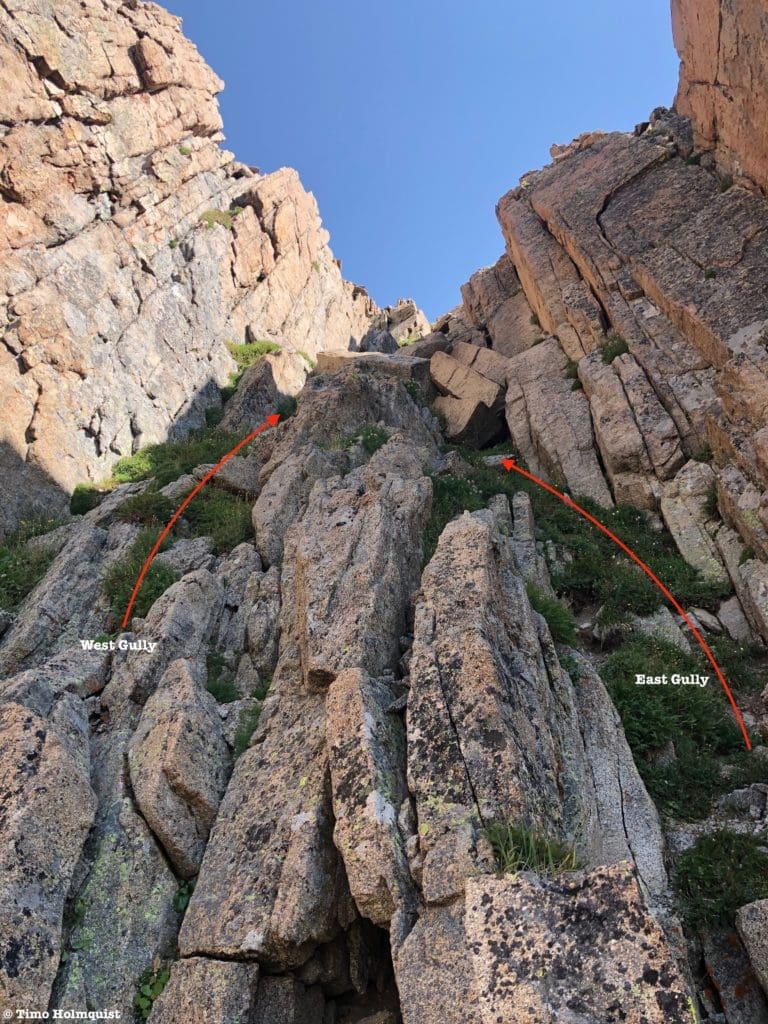
You’ll notice a steep gully spilling down to you from the right. Pay attention, there are two gullies, and the first gully you see is NOT the one you want. The two gullies will eventually merge higher up, but the entrance to the first gully is Class 4-5 terrain. The gully you’re initially avoiding is the East Gully; the one you want is the West Gully.
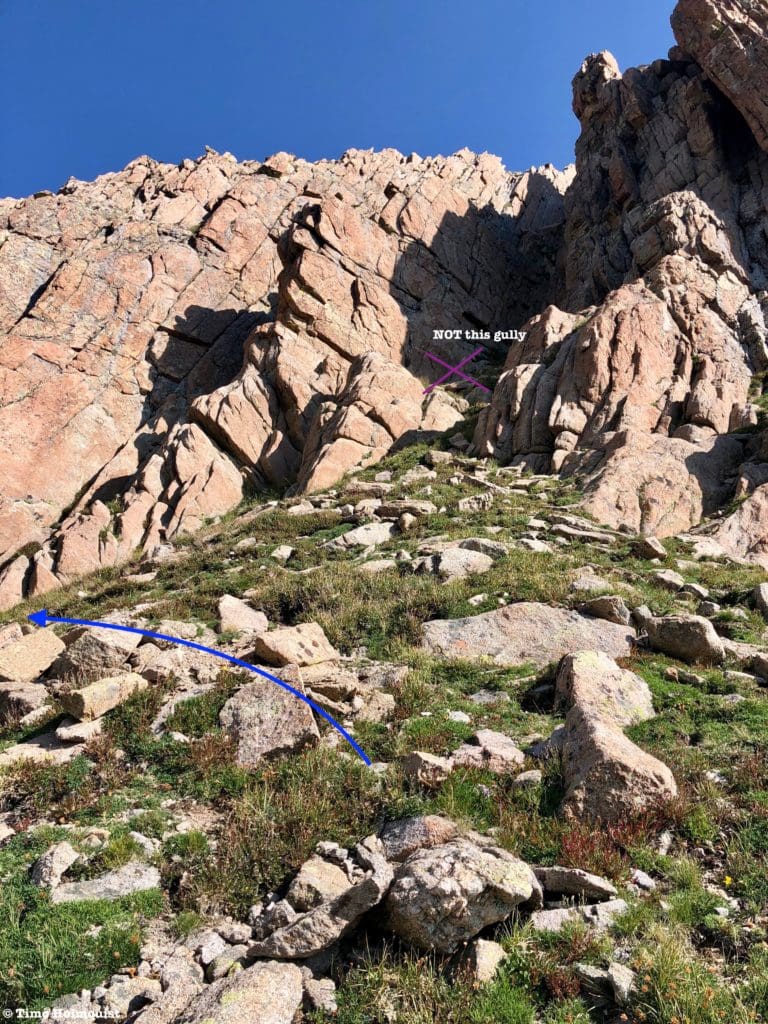
The East Gully looks appealing at first but a complicated wall blocks easy progress, continue traversing.
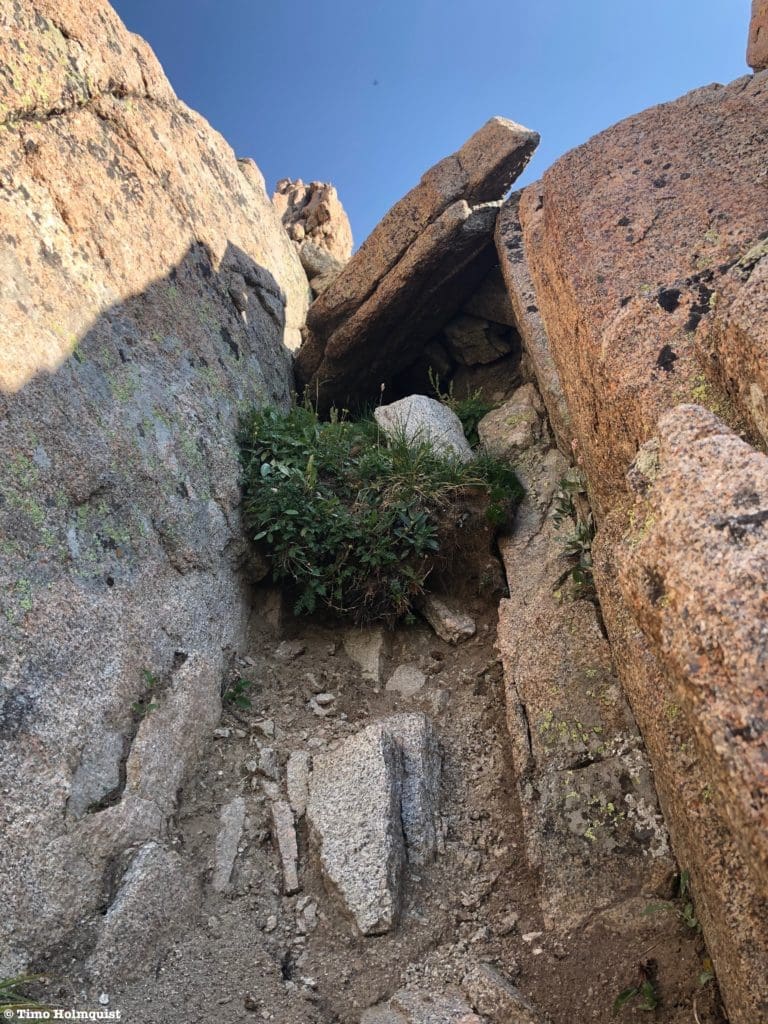
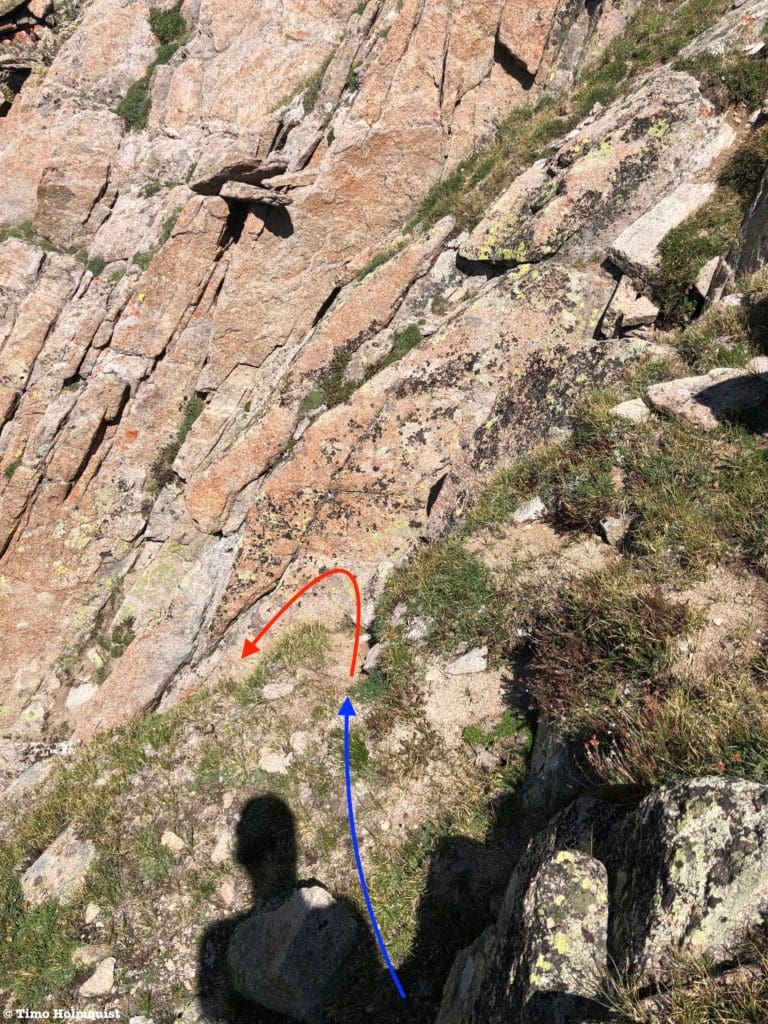
On the other side of a thin and showy rock rib lies the West Gully. It is the last option to ascend before the terrain steepens and forces you into complex traversing near the edge of the lake. When you locate the gully, stop, get a helmet on, drop any excess weight you don’t want to carry, and get ready for the scramble.
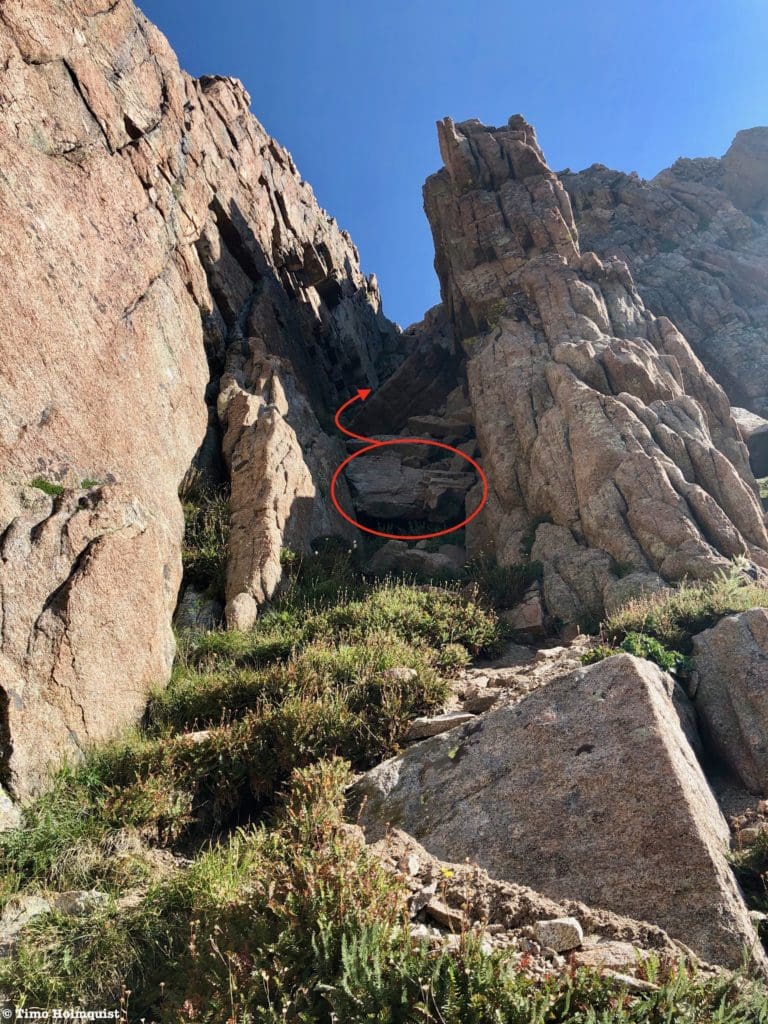
The gully you want. The lower crux is circled.
Now, many people will have many opinions on what constitutes the hardest set of moves on Eagles Beak; I think it’s the first section. You have to climb up a slanted chockstone with weak holds to get into the gully proper. It’s not too bad on the way up but a bit hairy on the return journey.
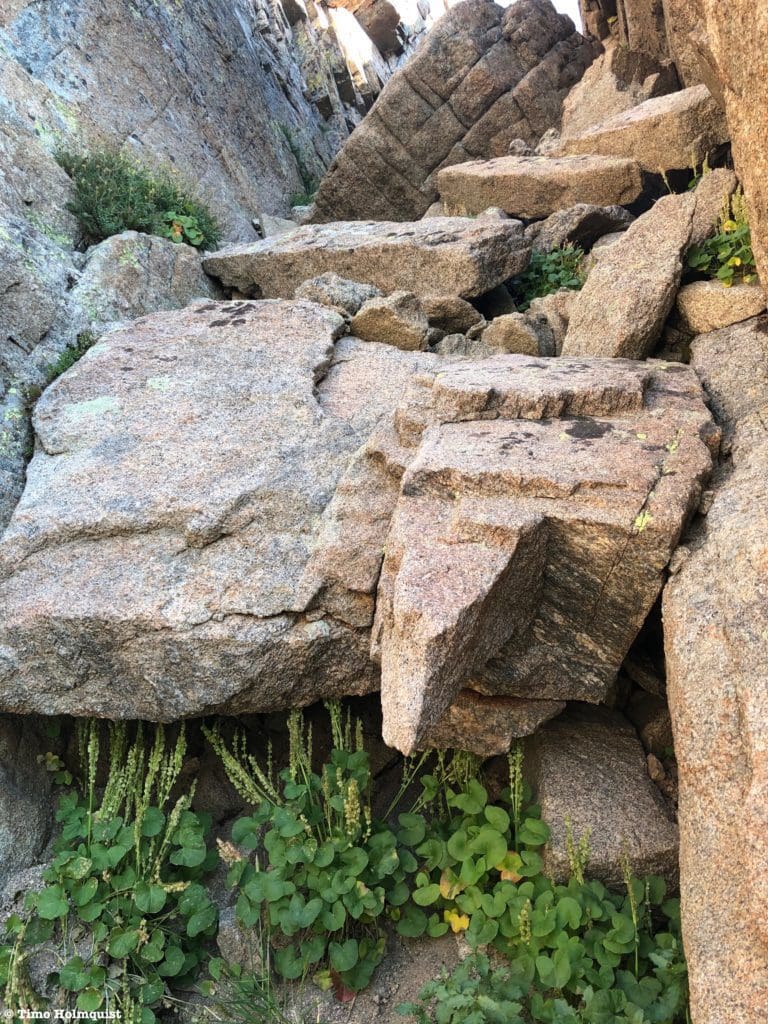
Close up of the Crux, the camera is tilted about 45 degrees up from horizontal.
I ascended and descended using a large crack and body friction. I’d rate the section a solid Class 3+.
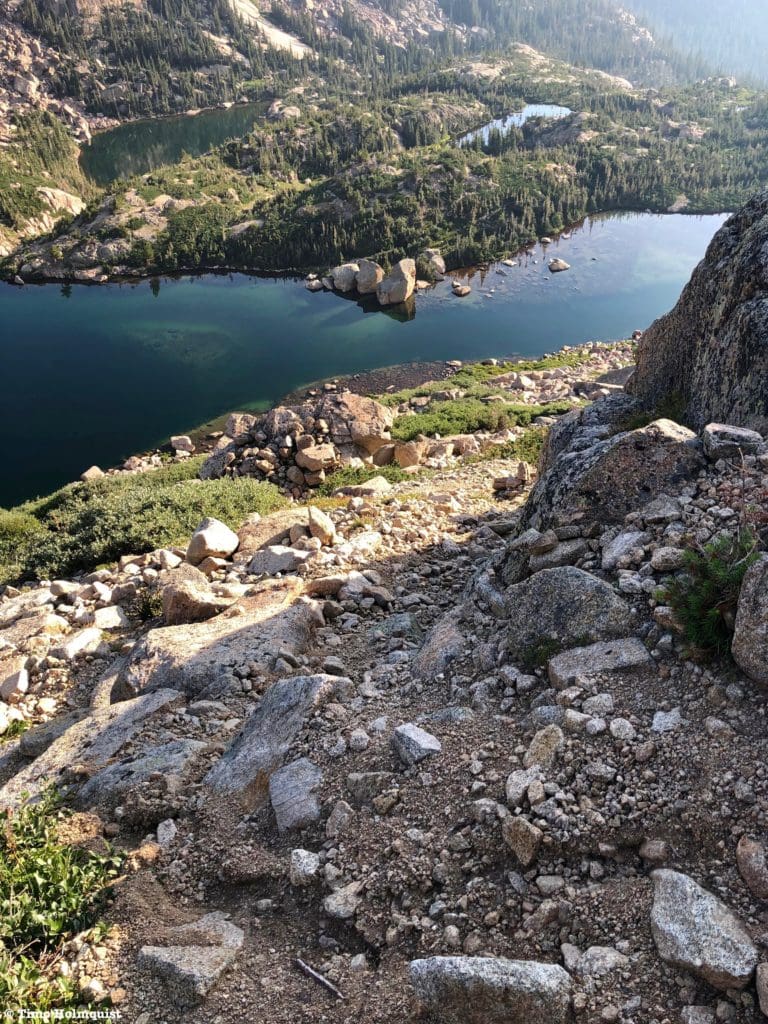
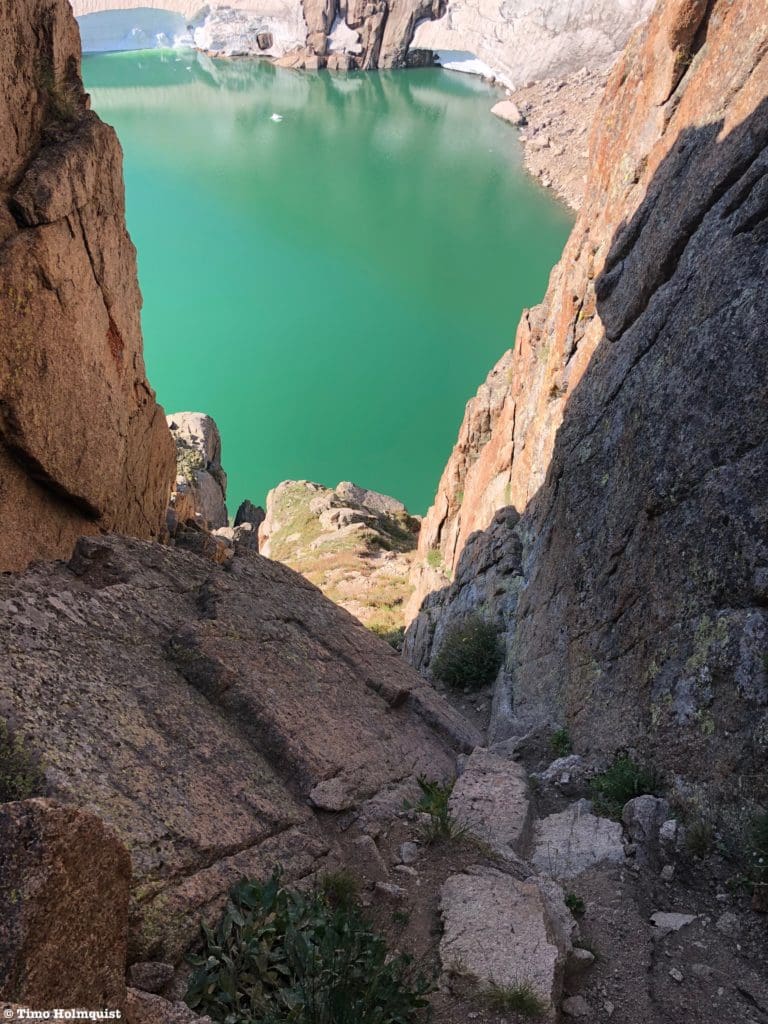
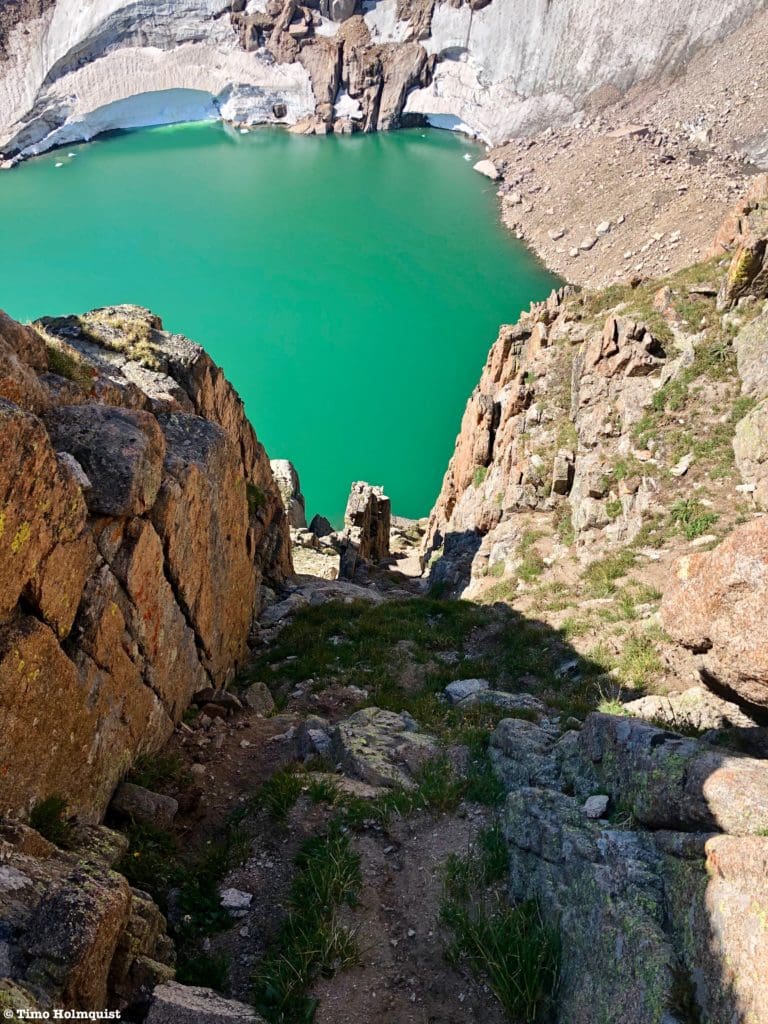
Looking down from above the crux, with Frigid Lake taking on a stunning green color.
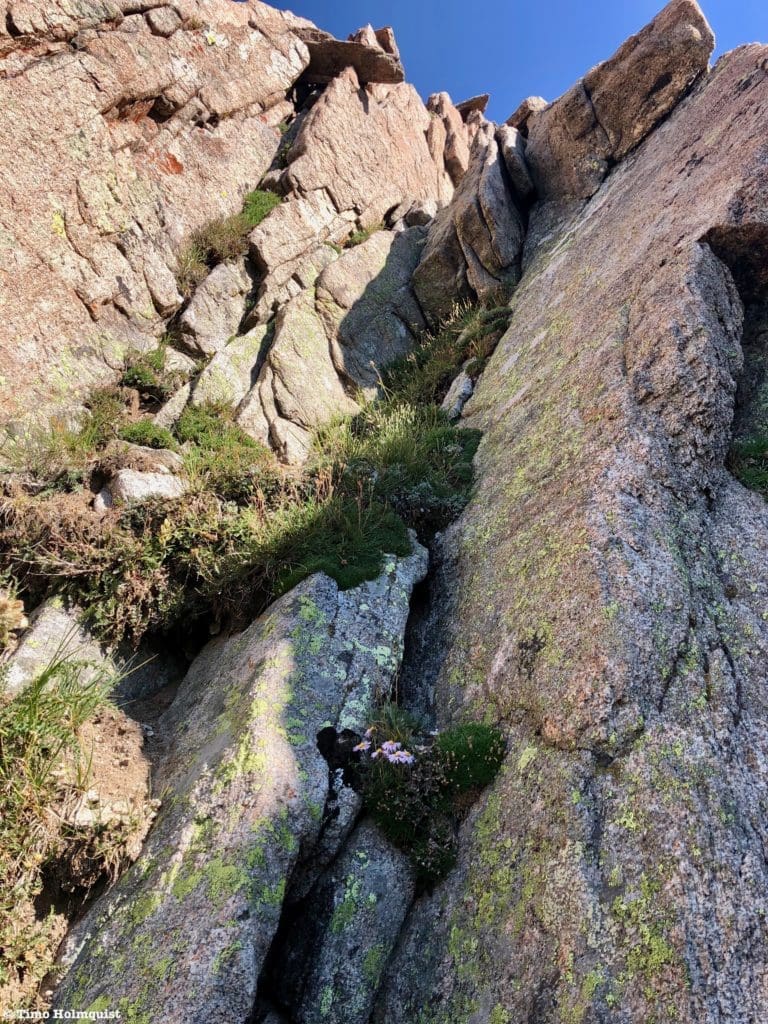
The majority of the big rocks and rock walls in this gully are solid and provide ample holds; however, since it is a gully, yearly erosion occurs, and the bottom is covered in sandy scree. As always, double or triple-check holds before putting weight on them.
After the first crux, you want to stay left around a slanted rock and ascend.
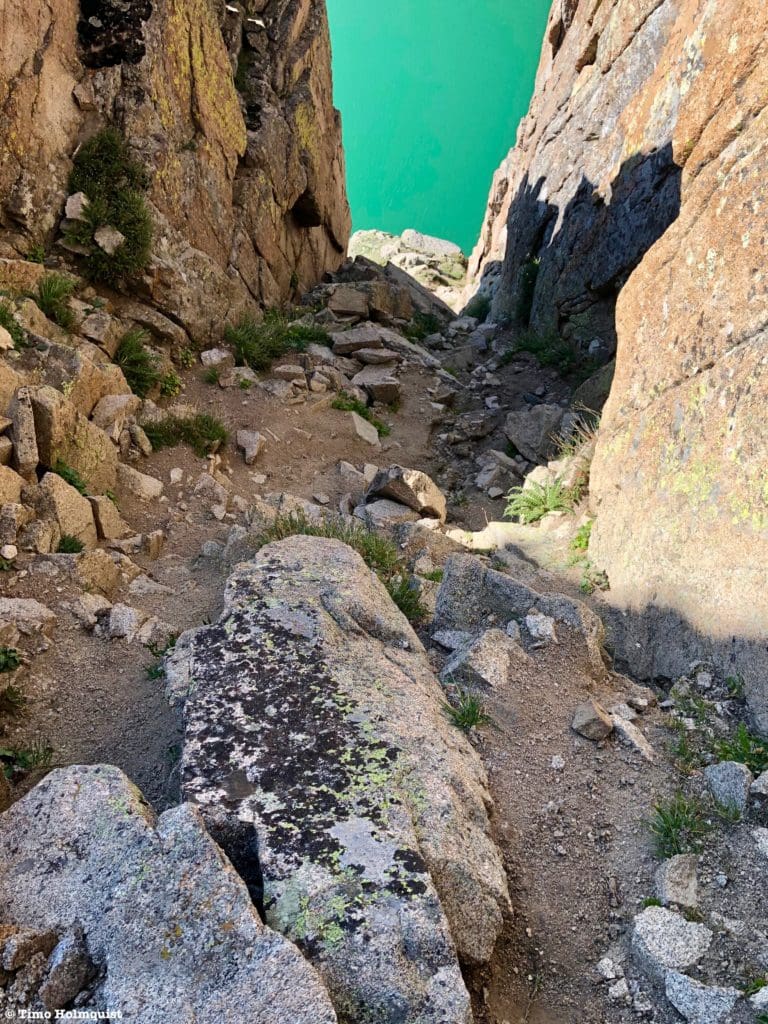
Gaining elevation inside the gully.
Once you pass the slanted rock, a better view of additional challenges opens up above you.
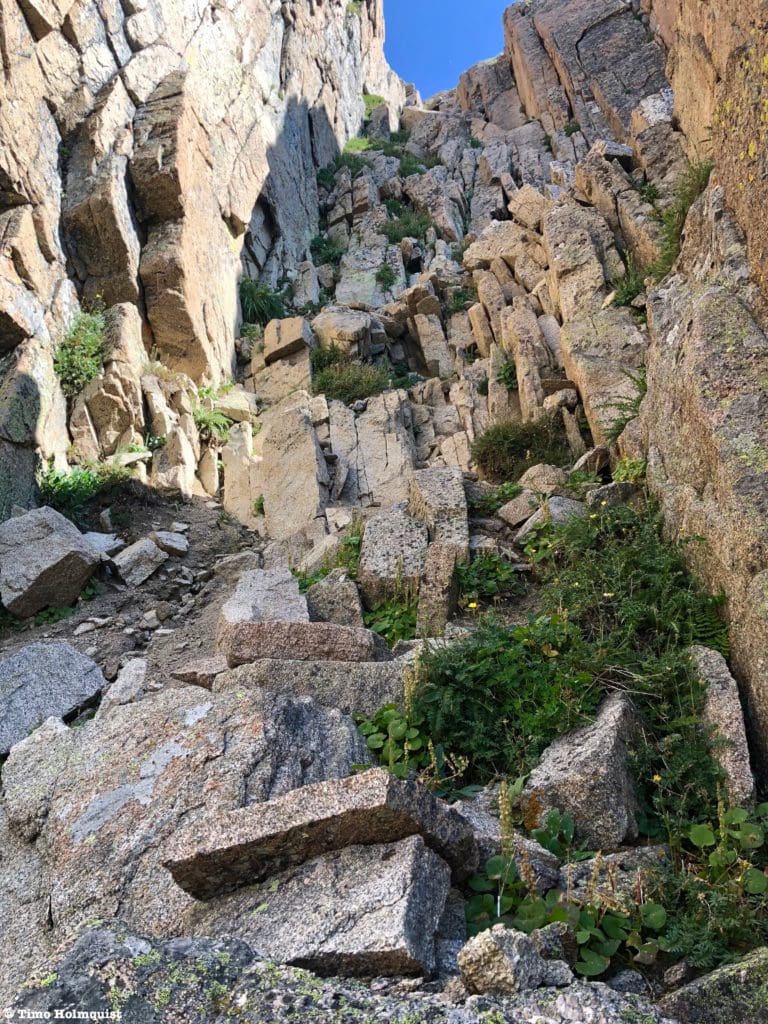
Another longer section of Class 3 scrambling on broken rocks above you.
After threading your way up the broken blocks, employing Class 3 moves along the way, you’ll reach a section where it’s possible to traverse over to the East Gully next to you.
Looking down after the brief gully merger. You climbed up the gully on the right. If you’re feeling brave, you can get on top of the divider rock, which is generally very solid but has substantial exposure.
Once you merge gullies, you have the option of continuing up the variation you’ve been following or hopping over to the other one. There is no right or wrong answer, but staying in the West Gully will lead to steeper terrain. If you’re looking to ease the scrambling, oscillating between the two variations is probably the easiest method. After some consideration, I popped over to the East Gully and ascended another series of broken ledges.
At this point, the two gullies are less distinguishable but still offer an East and West option, separated by a line of angled rocks.
The less dramatic but still different gully ascent options.
I stayed in the East Gully for a few minutes, rising until popping back over to the West Gully when it seemed convenient to do so.
The views back to Frigid lake and Moomaw keep getting better the higher you climb.
Ultimately the two gullies merge again, and you can more easily hop between sections as you please.
Another brief merger.
However, the union doesn’t last, and soon the Western Gully gets much steeper than the Eastern one.
The Western Gully approaching Class 3+/Class 4 territory.
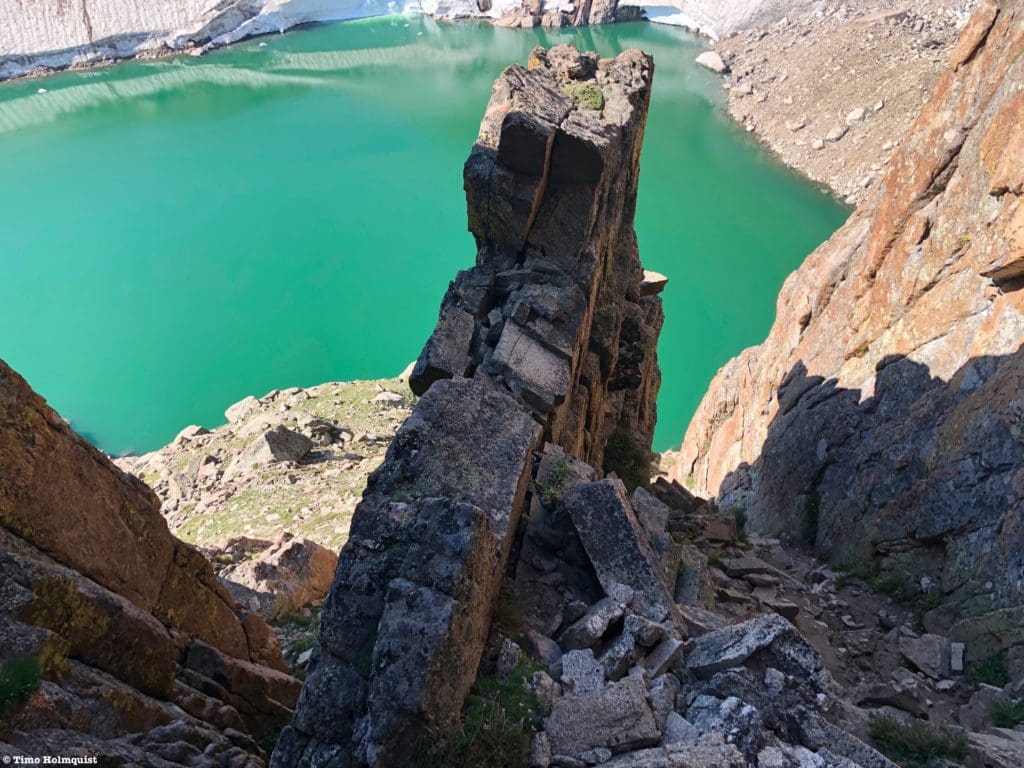
While the rock in the Western Gully looked sturdier, the rock angle didn’t provide the best grip, and I switched back to the East Gully. The going was fairly consistent low-mid Class 3 until I ran into the second crux. This one consisted of another chockstone blocking passage. The best strategy is to advance up to it, turn right and scramble up a lip that pops you out of the gully. This also felt like a brief Class 3+ section but had much better holds than the lower crux.
The chockstone in the upper East Gully from below.
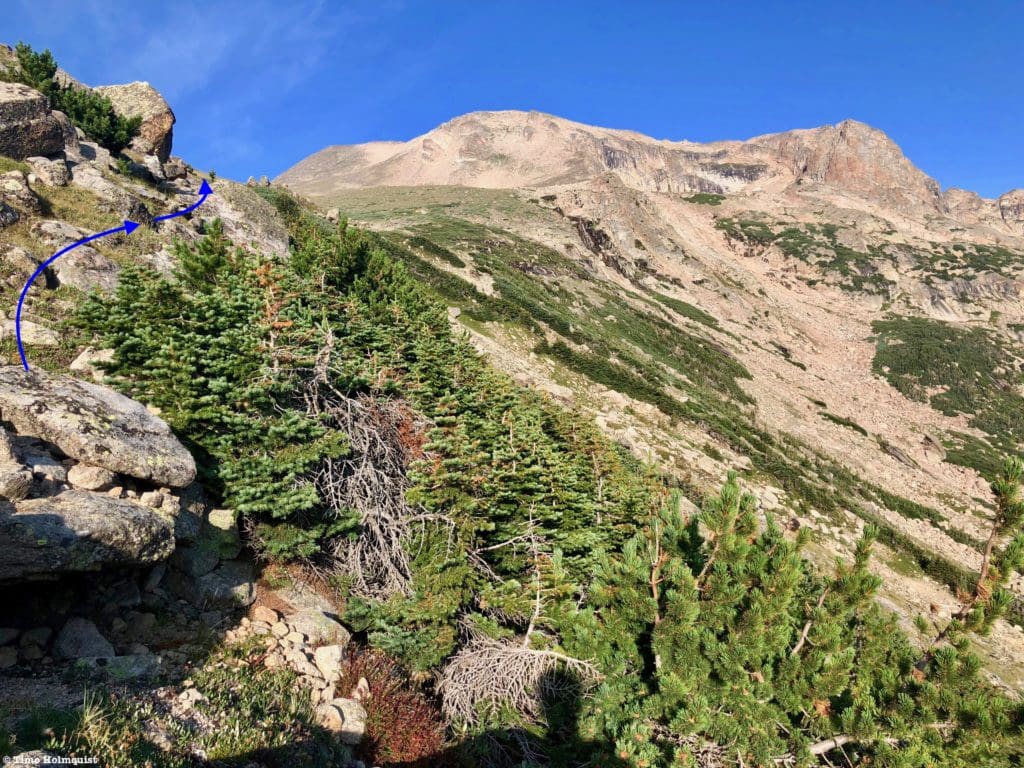
Once you exit the East Gully, you’ll arrive on a set of grassy ledges beneath the final summit scramble. By far, the easiest method is to slowly ascend left to the ridgeline and pop over to the other side, where a few Class 3 moves will get you up the summit rib. However, if you want an awesome Class 4 finish to this exciting peak, move directly up to the summit wall.
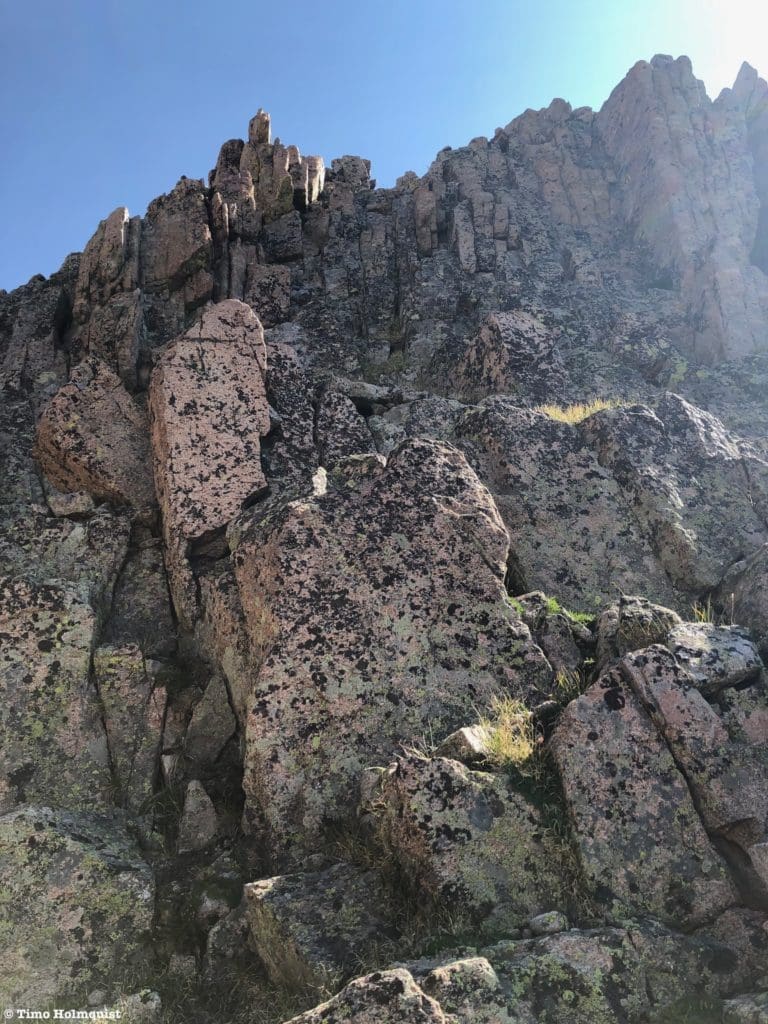
The summit wall.
The rock is stable, and grip options are many. These 15 feet of blissful Class 4 scrambling do enough to elevate the ascent into the “would totally repeat” category.
The Class 4 section.
From the top of the Class 4 section, walk the ridge a dozen feet or so to the highest point, which is marked with a cairn.
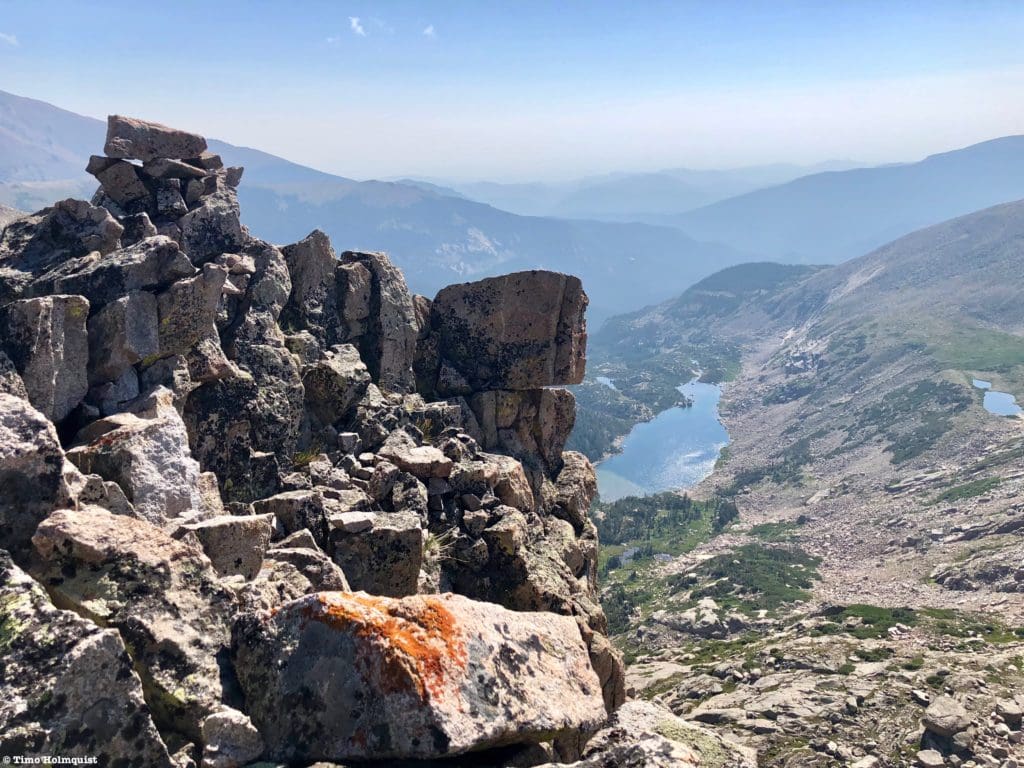
The summit, with Eagle lake below and the two unnamed ponds you pass enroute to the right.
It’s worth spending a little time on top and marveling at the unique position you’re in. To the northeast, Longs Peak and Meeker dominate.
Summit view Northeast.
To the north, Tanima Peak and Mt. Alice grace the skyline.
Summit view north.
To the southwest, Isolation Peak shows off its impressive cliffs and the larger part of Momaw.
I suspect some of the bigger snow patches are connected underneath the rubble.
To the south, Mahana Peak’s gentle profile contrasts sharply with the dramatic Eastern half of Moomaw and the stunningly green Frigid Lake.
The view south.
Not many people venture out here, which makes sense; it’s a damn long day. From a camp at Thunder Lake, an ascent is more reasonable, but because of the stout scrambling and lower elevation than most mountains around it, Eagles Beak will likely remain a hidden gem for many years to come.
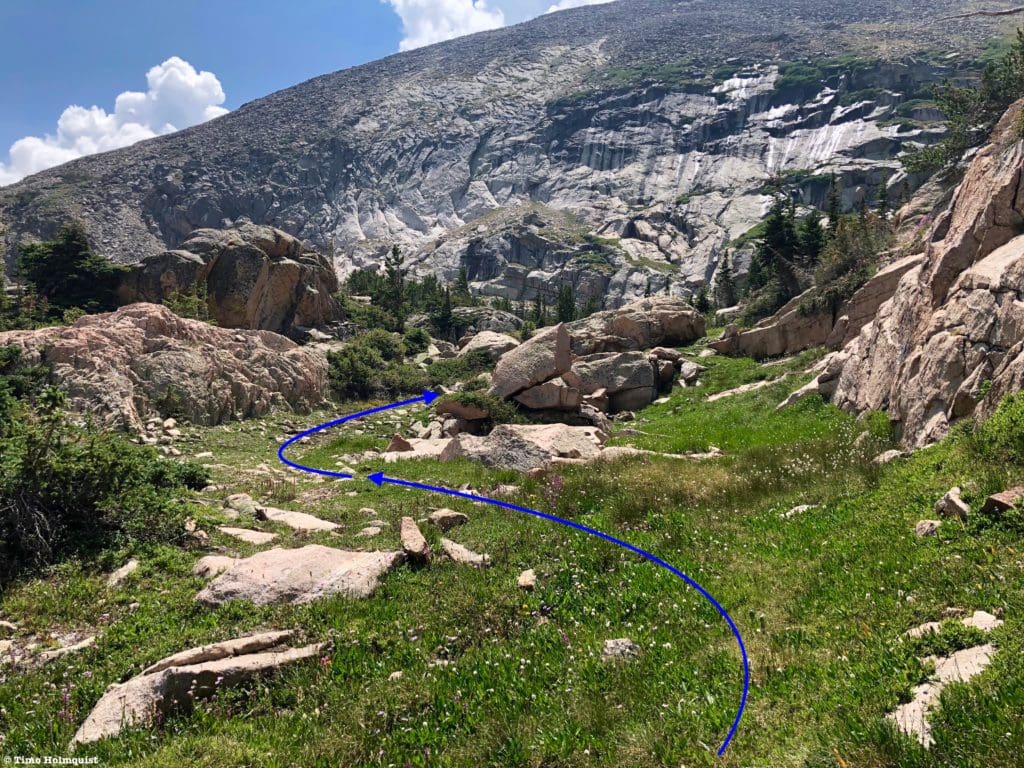
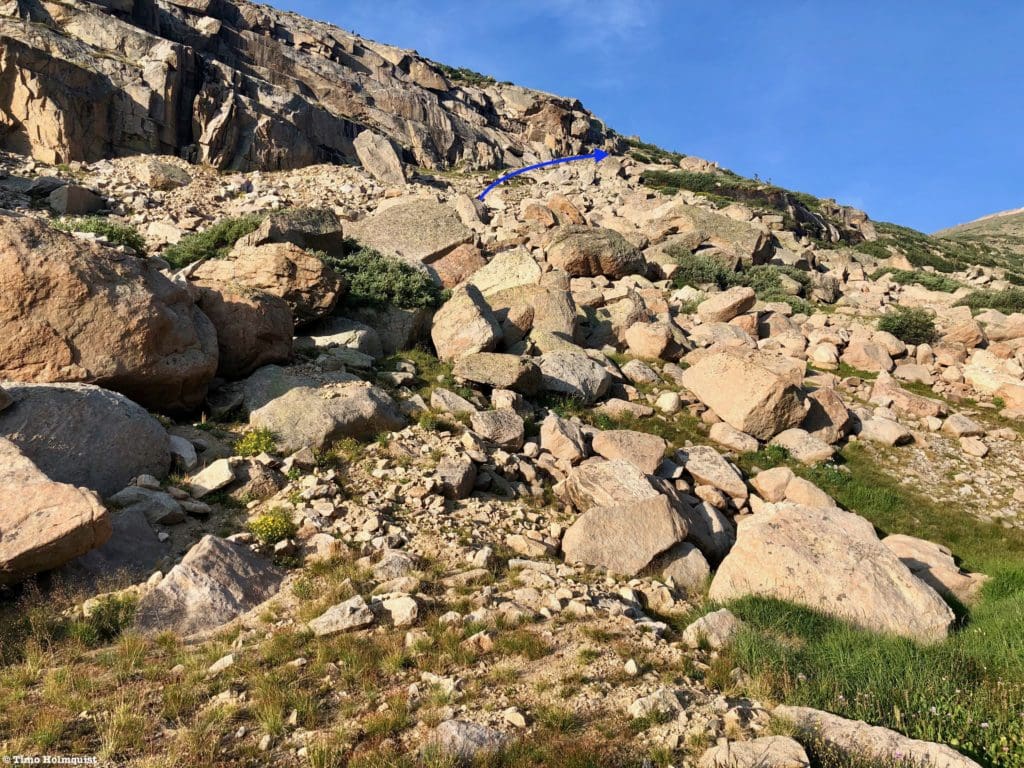
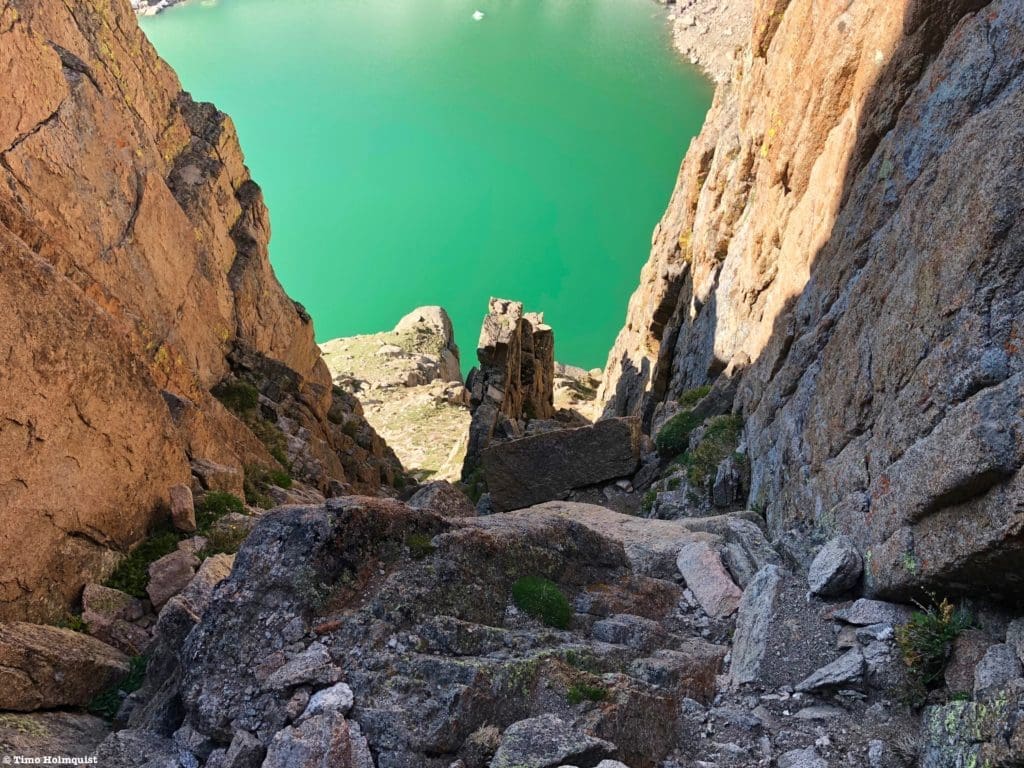
When it’s time to descend, follow the summit ridge west until hitting a saddle between the highest point and a smaller sub-summit to the west. Turn left and follow the saddle towards Frigid lake; this will eventually split into the two gullies.

Best route for descending.
While initially difficult to see from above, you want to find that upper crux chockstone on the East Gully. It’s the easiest way to get back into the gullies.
Getting back into the gullies.
Once in, you’ll be able to see your route below you.
Descend using the path of least resistance, keeping an eye out for sandier sections that could potentially cause you to slip. As you pick and choose the best path down, make sure you are eventually heading to the right side of the divider rock. While the East Gully is easier up high, it ends in a wall.
Back in the West Gully below the Divider Rock.
Remember that the lower crux is still to come. Using any number of strategies like: downclimbing while facing into the rock, butt sliding, stemming, or a combination of all three, descend the slanted rocks back down to the gully entrance. This is not a graceful descent; the only requirement is to get down as safely as possible.

The West Gully and the crux from below.
Once you make it to the gully entrance, you are done with the intense scrambling. There is still a fair amount of talus hopping left, and you are hours away from treeline, so don’t hang out too long by Frigid Lake if puffy clouds are building.
Low clouds hitting Isolation Peak.
I’m always partial to loop hikes, but Eagles Beak poses an interesting predicament. If you can’t secure a backcountry campsite at either Thunder Lake or Ouzel Creek, any loop option will push your total mileage to over 20. That’s a substantial amount of time spent in thunderstorm-prone areas, and while the mileage above treeline is less than five, most of the tough scrambling, elevation gain, route finding, and talus hopping occurs in the alpine. It takes a clear day, strong hiker, and pre-dawn start to help guarantee a successful outing. The most practical way to do this hike in one day is as an out and back.
Descending back to the unnamed ponds from the area around Eagles Beak.
The only navigational hang-up to be aware of is deciding when to descend back down to Eagle Lake. If you traverse too long, there will be cliffs below you. If you descend too early, you’ll encounter steep and difficult terrain. The best practice is to stick to the edge of the shelf above Eagle Lake and stop every few minutes to scout ahead. When you are even with roughly the middle of Eagle Lake, begin a more concentrated descent line towards the lake, adjusting course as you need to.
Roughly where you need to descend, keep an eye out for cliffs to your right. If the slope steepens to the point where you cannot see what’s beneath you, it may cliff out, be careful and retrace your steps if you need to get out of a difficult area.
Once you make it back down to Eagle Lake, and depending on the weather, it may be tempting to find a rock and jump in. The lake is always cold, but a mid-august timeframe is perfect for an alpine lake jump. Barring that, continue along the shoreline until you reach the outflow stream and cross where able. Instead of tracing the opposite shoreline, pick a line north between rock ribs until you can see the unnamed tarn you used on your ascent. Pick a route that circles the left (western) shoreline of the tarn and use a system of grassy gullies to ascend another rock rib. From the top of this rib, you should be able to find the cairns leading from Box to Eagle lake. Follow them down to Box Lake and continue back to Thunder Lake. From there, find the official trail and hightail back to the parking lot.

Descending back to Eagle and Box Lakes while Longs Peak looks on from afar.
Final Thoughts:
Eagles Beak is a formidable challenge. It’s often overlooked, appearing as just a small part of Isolation Peak on the map. But for those who are willing to push themselves, this 17-mile excursion through untamed wilderness will lead you to an untouched paradise within the national park. The short scramble is thrilling, the vibrant green Frigid Lake beckons you onward, and the sight of permanent ice and snow adds a touch of rugged beauty to the landscape. This journey is not for the faint of heart, but for experienced hikers with strong navigation skills, it offers the ultimate mountaineering adventure in Colorado.

One last look at Eagles Beak from Frigid Lake.
Popular Articles:
Guide to the Best Hiking Trails in Rocky Mountain National Park, Colorado
Sky Pond via Glacier Gorge Trail, Rocky Mountain National Park, Colorado
Scrambling Hallett Peak’s East Ridge, Rocky Mountain National Park, Colorado
Scrambling Mt. Alice via the Hourglass Ridge, Rocky Mountain National Park, Colorado
Gorge Lakes Rim Scramble, Rocky Mountain National Park, Colorado
Black Lake Via Glacier Gorge Trail, Rocky Mountain National Park, Colorado
Scrambling To The Lake Of The Clouds, Rocky Mountain National Park, Colorado

Enroll With Global Rescue Prior To Embarking On Your Next Adventure.
When a travel emergency arises, traditional travel insurance may not come to your aid, and a medical evacuation can cost up to $300,000.
The cost when you have a Global Rescue membership? $0. That’s why when the unexpected happens, you want the leader in rescue, evacuation and medical advisory behind you. You want Global Rescue.
Terms of Use:
As with each guide published on SKYBLUEOVERLAND.com, should you choose to this route, do so at your own risk. Prior to setting out check current local weather, conditions, and land/road closures. While taking a trail, obey all public and private land use restrictions and rules, carry proper safety and navigational equipment, and of course, follow the #leavenotrace guidelines. The information found herein is simply a planning resource to be used as a point of inspiration in conjunction with your own due-diligence. In spite of the fact that this route, associated GPS track (GPX and maps), and all route guidelines were prepared under diligent research by the specified contributor and/or contributors, the accuracy of such and judgement of the author is not guaranteed. SKYBLUE OVERLAND LLC, its partners, associates, and contributors are in no way liable for personal injury, damage to personal property, or any other such situation that might happen to individuals following this route.


