


|
Getting your Trinity Audio player ready...
|
This list is perfect for intermediate hikers wanting to challenge themselves with our favorite 25 trails in Colorado. It’s the ideal resource for elevating your hiking game!
Greetings, I’m Timo and I’m well familiar with Colorado’s hiking trails and scrambles. I was a ski instructor at Beaver Creek Ski Resort for seven years, spent three years building high alpine trails with Southwest Conservation Corp and Colorado Fourteeners Initiative, summited all the state’s 14ers, completed 3 of 4 grand traverses, and hiked in every mountain range across the state.
I love alpine scrambling, backcountry skiing, and finding remote locations where the splendor of nature takes center stage. I have no shortage of love and respect for the more than 3,000 mountains dotting the state. There are some unforgettable experiences out there, but looking at a map can be overwhelming.
I decided to compile all of my favorite Colorado hiking trails I’ve visited throughout my journey. So here it is: the definitive list of all the wonderful places in this beautiful state. This is an ultimate guide to the best trails in Colorado for those with intermediate hiking experience who want to take their outdoor adventures to the next level.

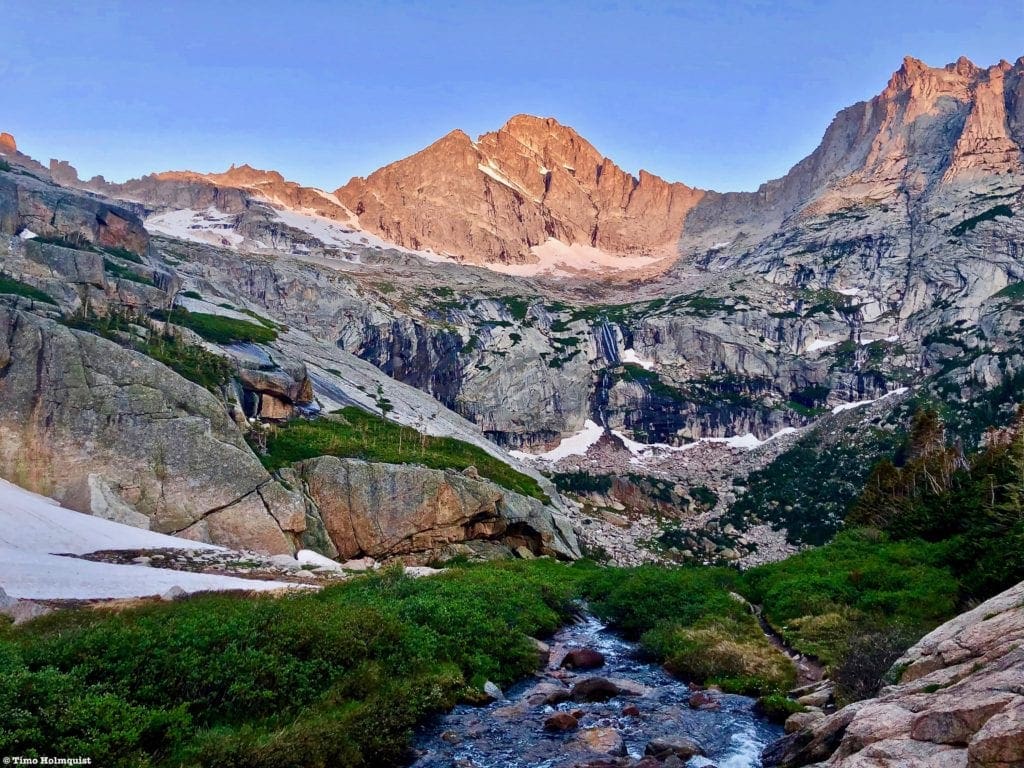
McHenrys Peak (left) and Arrowhead (right) from Upper Glacier Gorge in Rocky Mountain National Park. Photo: Timo Holmquist
Table of Contents
Article Navigation: Click on any of the listed items in the table of contents below to jump to that section of the article. Similarly, clicking on any large, white section header will jump you back to the Table of Contents.
- Who’s This List For Anyway?
- Are There Areas in Colorado You Gloss Over?
- The YDS Scale
- Altitude Risks
- Critical Skills (Research, Weather & Planning)
- San Juan Mountains
- Sangre De Cristo Mountains
- Elk Mountains
- Sawatch Range
- 10 Mile/Mosquito Range
- Flattops
- Gore Range
- Park Range
- Front Range
- Rocky Mountain National Park
- Wrap Up
Support Skyblue Overland™ on Patreon!
If you’d like to support our efforts for a few dollars a month, please subscribe to our Patreon page. Every donation energizes our team to keep writing detailed trail reviews, gear reviews and adventure guides. Thank you!
Who’s this list for anyway?
This list is intended for intermediate hikers looking to elevate their game. And by that, I mean hikers that are comfortable (or want to be comfortable) hiking up to 20 miles in a day and with up to 5,000 feet of elevation gain. It’s also for people who want to dabble in scrambling or off-trail objectives, so some Class2+ and Class 3 routes are discussed. I’ll discuss the scale most commonly used (the Yosemite Decimal System) below.
In constructing this, I am offering up just some of my favorite hikes in the Colorado mountains. They may not be yours, and that’s ok, but what I’ve tried to do is illustrate the mind-boggling diversity of terrain that the state harbors.
When recreating, I tend to lean more heavily toward rocky terrain, mountain solitude, and long-range perspectives, so there will be several scrambles and remote peaks on the list. However, some of my absolute favorite routes are omitted due to demanding route finding, wild exposure, and difficult alpine scrambling.
Great Sand Dunes National Park. Photo: Timo Holmquist
Are there areas in Colorado you gloss over?
Yup, there are just too many. Here’s a brief list of places missing from this list that are worth checking out as well:
- Dinosaur National Monument
- Grand Junction/Roan Cliffs
- Fruita
- Grand Mesa & Battlement Mesa
- The Uncompahgre Plateau (great offroading back here)
- Elkhead Mountains
- Spanish Peaks
- Wet Mountains
- South San Juans
- West Elks/the area around Crested Butte/Gunnison
- Taylor Park
- Monarch Pass
- Kenosha Pass
- Penitente Canyon
- The La Plata Mountains (not La Plata Peak)
- Buffalo Peaks
- A lot of the I-70 corridor outside of Summit County
- James Peak
- Pawnee and Comanche National Grasslands and a ton of terrain in the eastern part of the state.
- Cache La Poudre watershed/Comanche Peak
- Rawahs & Never Summers
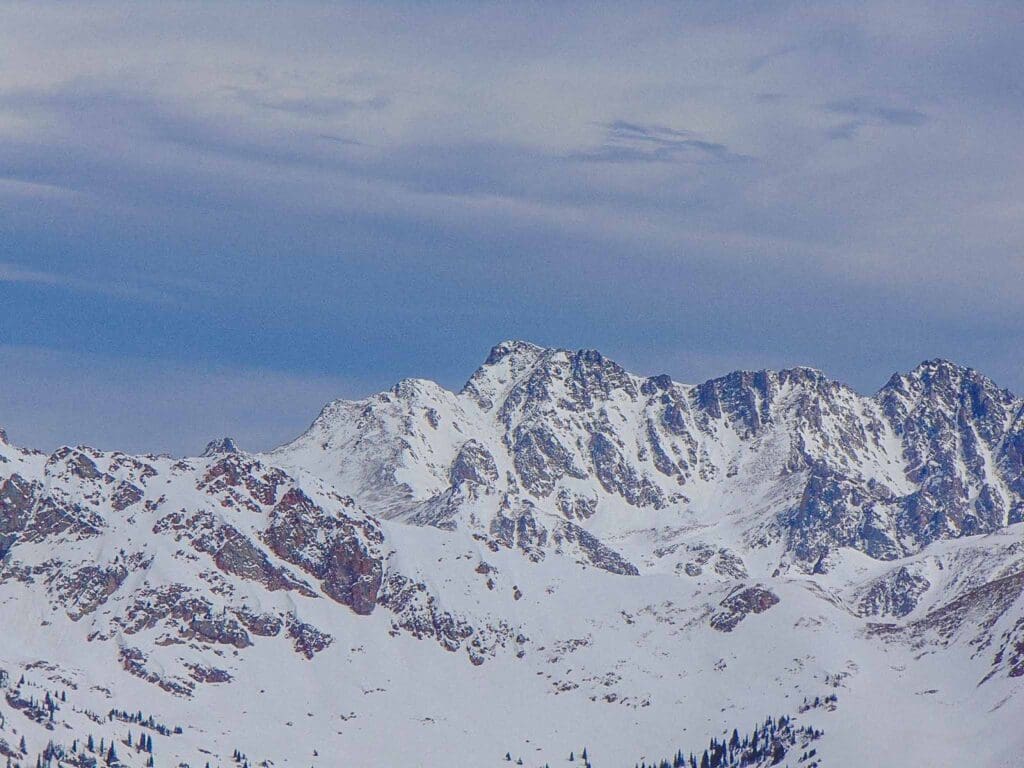
The Gore Range. Photo: Timo Holmquist
The YDS Scale
While it is wildly subjective, the standard difficulty rating scale follows the Yosemite Decimal System (abbreviated to YDS).
The scale is often used in association with rock climbing and broadly runs from Class 1 to 5. Most rock climbing routes live in the 5th Class range, which is then broken down into minutiae from there. Class 1-4 can be done without the aid of rock climbing equipment, although that will depend entirely on previous experience and level of comfort on complicated terrain. It is common to wear helmets any time there’s a rockfall risk.
- Class 1 routes are trailed adventures.
- Class 2 involves a bit of off-trail navigation with some rock hopping or bushwhacking. The ground is uneven, and ankle-twisting becomes a concern.
- Class 3 is officially scrambling and is itself a large scale. Class 3 involves using your arms as anchors or to steady yourself as you climb up broken terrain. A helmet is recommended, especially for long-duration Class 3 routes with exposure.
- Class 4 routes are harder scrambles, where you’ll be calling upon all four appendages to aid in movement. It’s not full-on rock climbing, but it’s close. There will be moments when your arms are taking weight and helping to pull you up something. There will also be several no-fall zones and some level of intimidating exposure.
- Class 5 is straight up rock climbing. Some superb scrambling routes dabble with a few moves above Class 5 but never more than a handful or a pitch or two. No Class 4 or 5 routes will be discussed in this article.
If you’re unfamiliar with this scale or scrambling in general, stick to the Class 1 and 2 routes. I offer plenty of options in this article that don’t require Class 3 scrambling. However, there are some options that do, so understanding what the YDS represents is pretty critical.
On that note, it’s important to remember what the YDS scale does and doesn’t do.
The YDS Class rating refers to the hardest physical moves required on a route. The YDS Class rating DOES NOT:
- Factor in exposure. If anything, a route description may say something like “this route has exposure”. You’re going to have to find out what that means, and how scary it is when you get there.
- Factor in route-finding. Not all scrambles have one dedicated path and you WILL be required to scope around. This is a skill that has to be built and perfected over time. No one starts route finding with a perfect score. The key here is back down when things get too tough and look for alternative options.
- Factor in snow. A snow climbing rating is separate from the YDS scale. If something says steep snow, assume it’s a slope over 40 degrees that you need to get up and/or down. (All of the routes in this article feature snow-less ascent options by mid-August.)
- Factor in your height. Tall people will have an easier time making big steps than shorter folks. There is a noticeable difference here, but the YDS wasn’t created to see it. Interestingly, the opposite is also true. Tight spaces and cave workarounds (which do exist) are going to be a lot easier to get through for fun-sized folks.
- Factor in your fatigue and bias. Tired and irritated hikers can easily inflate a rating to justify something they thought was hard or complex. We’re all guilty of this but it doesn’t make the physical moves any tougher.
- Factor in the duration. It makes sense to rate a scramble based on the most difficult move. A Class 3 route, therefore, has at least one Class 3 move. The problem is you may not know how many Class 3 moves are required. There is a HUGE difference between an easy Class 3 and a tough Class 3 route with hundreds of consecutive moves, a huge no-fall zone, and massive exposure. Some people have taken to saying things like “light Class 3” or “Class 3+” and I think that’s starting to get at the problem, but it’s still highly subjective. Just remember, continuous Class 3, which is objectively harder than a one-move Class 3 route, doesn’t make it a full Class higher. It’s still a 3; it’s just a lot of it.
- Factor in your preparedness. This one’s on you. The amount of time you spend preparing for a hike or scramble has a direct impact on how you perceive the adventure. If you follow someone blindly into the backcountry, prepare to be surprised. I always advocate that everyone in a group needs to be in on the planning session. Knowledge is power, and why wouldn’t you want to know if something is difficult and possibly exposed? That doesn’t sound like a fun surprise to find out halfway through a route with limited bail-out options.
So, with all these problems, why do we still use the YDS scale? Well, it’s the best-simplified scale we have in North America and is so widely used that it doesn’t make sense to stop. It was also created through a rock climber’s lens, so while Class 5 is broken down into nice specifics, Class 2-4 are left open to the whims of interpretation. Maybe one day, we’ll find a way to combine duration, class, exposure, fatigue, height, snow, and route-finding into one streamlined scale, but until then, we’ll be sticking with the YDS.
The bottom line is to be thorough with your planning and always prepare for surprises.
The Ten Essentials: How to Equip Yourself for the Backcountry
Packing the “Ten Essentials” whenever you step into the backcountry, even on day hikes, is a good habit. When something goes awry, you’ll truly appreciate the value of carrying these items that could be essential to your survival.
Altitude Risks
Colorado is high, known colloquially as the roof of the lower 48. The average elevation of Colorado is higher than any other state, including Alaska and runner-up Wyoming. There are a slew of medical situations that can occur as a direct or indirect result of exposure to high altitude.
It is incumbent upon each outdoor recreationist to understand and respond to the signs of altitude sickness. It’s one of those things that may be managed with extra oxygen or NSAIDs and water. However, if symptoms do not go away (and they often don’t), there is only one permanent solution, and that is dropping in elevation until symptoms reduce.

Crater Lake from a shoulder of Cherokee Peak. Photo: Timo Holmquist
Critical Skills (Research, Weather, and Planning)
Do your research before you go. Compare multiple reports and ratings, and remember, if it says “trip report,” it is NOT a peer-reviewed guidebook. A trip report is a synopsis of someone’s personal journey. Trip reports have incredible information within them, but it doesn’t mean the author found (or even wanted to find) the easiest way to tackle whatever objective they were going after. Sometimes, people write trip reports to highlight a challenging route variation they found. Pick and choose the info that matters for your goals.
A good way to know which pieces of information are useful is by actively planning your route. Get into the maps and apps; Alltrails, Caltopo, Avenza, FatMap, or onX backcountry are several options you can get into. If you want old school, the USFS still makes topo maps, and National Geographic has a great, colorful map series that covers most major ranges in the state. Once you’re on your adventure, you may have to perform on-the-spot route finding, especially if weather and visibility take a downturn. Route finding is much easier if you can bust out a map and find yourself on it quickly. Always be aware of your surroundings.
This is a great video on how to read a topo map. Please take the time to watch it if you’d ike to become more proficient.
Once you’ve got the mapping part down, start checking the weather. Mountain weather is notoriously fickle, and you do not want to be stuck in the alpine in a thunderstorm. Here are my favorite weather sites.
- Opensnow/Opensummit. Requires a subscription to unlock all benefits.
- NOAA. Yes, it’s a government site, and yes, most other weather sites pull data from it unless they specifically say they have proprietary satellite access. You might as well use it.
- Snotel Sites. This is great for checking snowpack levels in the spring or for cold weather hikes. The data is pretty stale, but if you mess around on the site, you can find nuggets of info that aren’t available on other platforms.
- Mountain-forecast. They don’t have sites everywhere, but they generally feature one station per large range and can help you triangulate conditions for free.
The last big point I want to mention is that, in this article, I won’t always include directions to trailheads. Many of the routes are easy enough to find with existing apps and maps (you can use the hyperlinks throughout the article to great effect here). There is an immense benefit to looking at topo maps or mapping apps to get comfortable with an area. I give the mountain range, the trails, and the description; finding directions to the trailhead won’t be much harder and should be a part of your preparation.
Alright, I think that covers most of what I wanted to say, aside from the omnipresent warning that the outdoors are dangerous. Don’t force yourself to go on adventures you’re not ready for; take it slow and build up your skills. No outdoor objective is worth your life.
The Ultimate Offline GPS Hiking & Ski Maps
See why onX Backcountry is the ultimate GPS navigation app for your outdoor pursuits. Try Today for Free. No credit card required.

San Juan Mountains
Coloradans often wax poetic about the San Juans, and it’s easy to see why. Having spent multiple years trail building down there, I’m often among them!
This is the largest mountain range in the state and contains some truly remarkable places. It’s also 6-8 hours from spots in the Front Range, so not regularly done as a day hike from there. It’s actually much easier to reach the gateway towns of the San Juans from Santa Fe or Farmington, NM.
The San Juans are steep, difficult mountains. The range is volcanic in origin, so they often have brittle rock that shifts underfoot (sometimes referred to as San Juan scree). There are exceptions, like the Needles and Grenadier Range, but part of the range’s allure is that it doesn’t release its prizes easily.
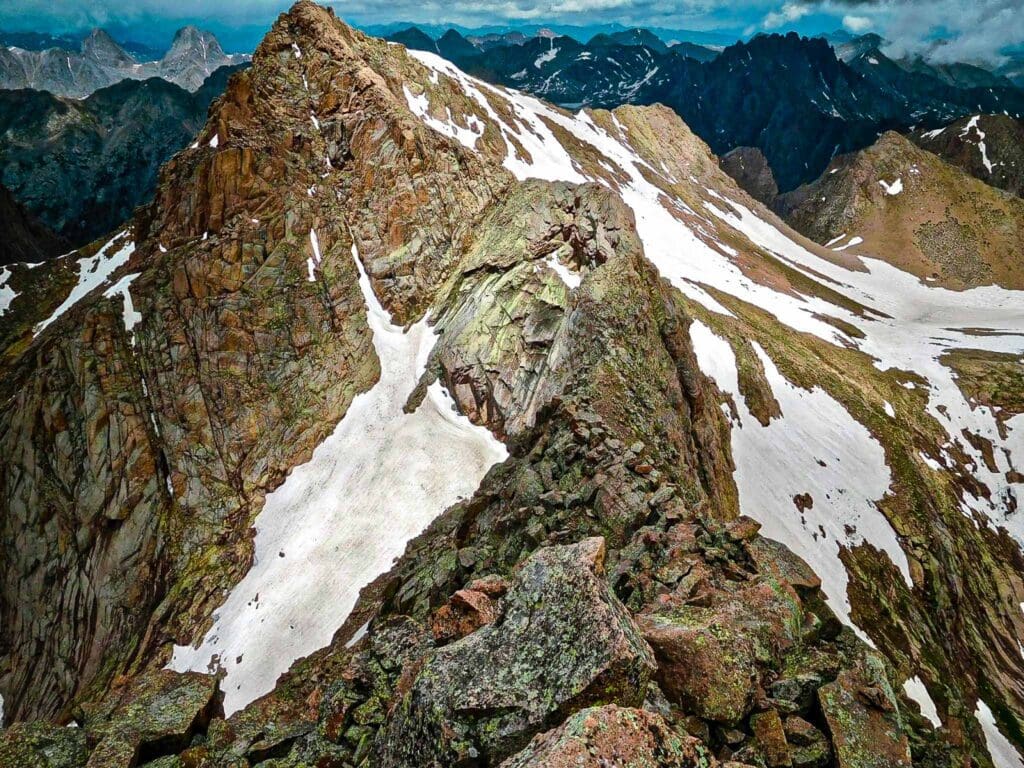
North Eolous from the Catwalk on Mt. Eolus, San Juan Mountains. Photo: Timo Holmquist
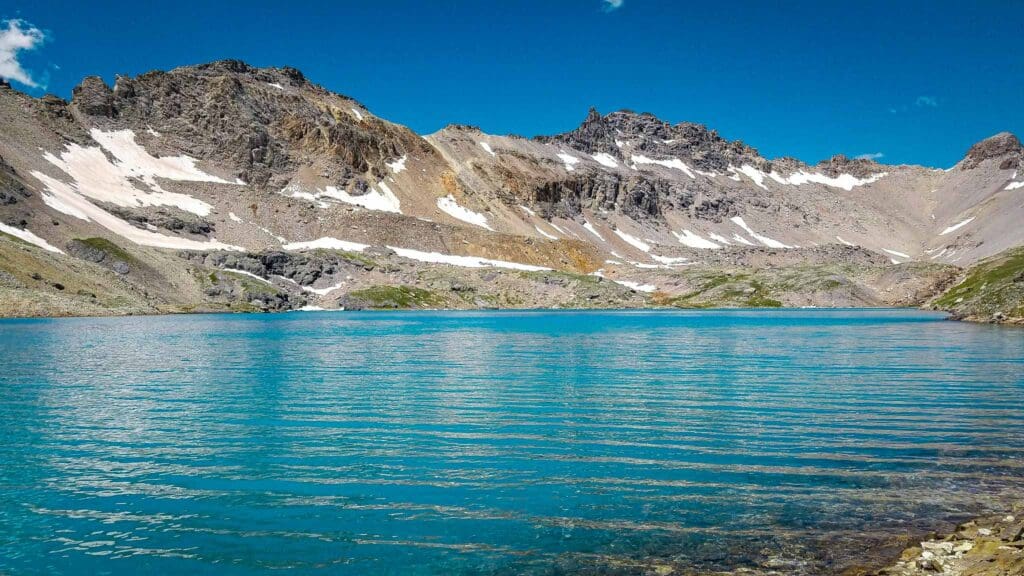
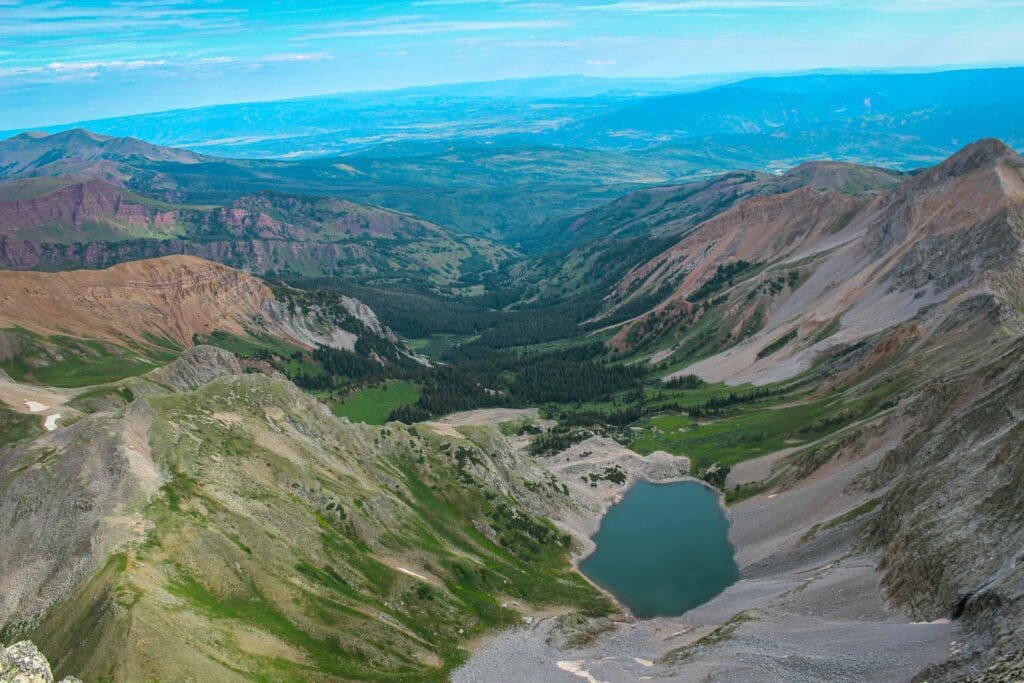
Ice Lakes Basin
Type: Trailed Out and Back Hike
Stats & Difficulty:
- 7-10 miles. (7 to include both Ice and Island Lake, 10 to include Fuller Lake as well)
- +/-2650 ft. for Ice & Island. +/- 2950 ft. for all three.
- Difficulty: Hard but easy-to-follow trails.
- YDS: Class 1
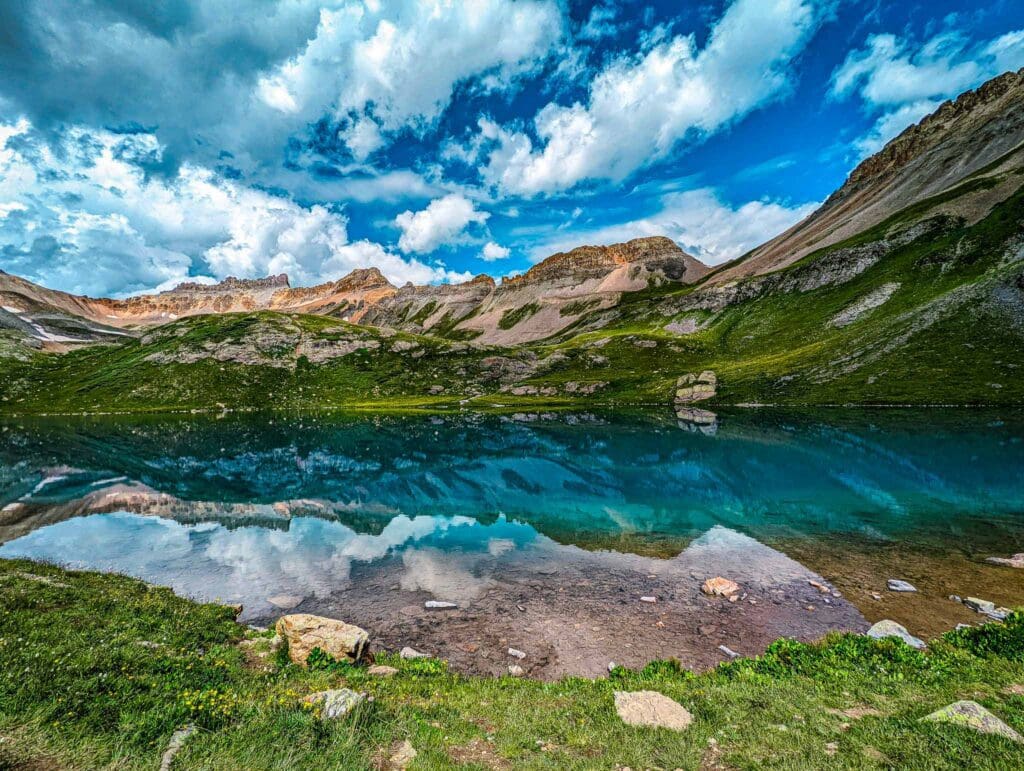
Ice lake in the San Juan Mountains, Colorado.
Attraction: Stunning alpine mountain views and a series of gorgeous lakes, including one with an otherworldly light blue hue.
Popularity: Very popular in the summer; get to the trailhead early. Do research on the snowpack the year before. Sometimes snow can linger up high well into July. If there’s snow, bring traction devices.
Important notes
- The elevation gain is significant.
- There isn’t much shade above treeline.
- Practice leave no trace principles. Leave the place better than you found it so the magic can continue to inspire people for years.
- Afternoon thunderstorms can be severed. The San Juans are heavily affected by the NAM (Noth American Monsoon), and thunderstorms that usually form by 1-2 pm in other parts of the state can form as early as 9 or 10 am. Always check the weather before you go out, especially since the destination is above treeline.
Columbine Lake
Route Type: Trailed Out and Back
Stats & Difficulty:
- ~8 miles
- +/- 2850 ft.
- Difficulty: Hard
- YDS: Class 1 (optional Class 2 if you decide to circle the lake, which involves talus hopping)
Columbine Lake in the San Juan Mountains, Colorado.
Attraction: This is a great alternative hike to Ice Lakes and is relatively close by. The lake is manmade, but the result of the hike is similar to ice lakes. You arrive in a gorgeous basin high above treeline with wildflowers in bloom early-mid July and a big blue gorgeous lake at the end of the trail. For a detailed trip report, visit our article on Columbine Lake.
Popularity: Less than Ice Lakes but can be full during the summer. Due to its proximity to US 550, it can certainly attract people, especially if the parking areas for Ice Lakes are full.
Important Notes:
- The elevation gain is significant. Bring lots of water.
- There isn’t much shade above treeline. Hats and sunscreen are great ideas.
- Practice leave no trace principles. Leave the place better than you found it so the magic can continue to inspire people for years.
- Afternoon thunderstorms can be severe. The San Juans are heavily affected by the NAM (North American Monsoon), and thunderstorms can form early. Always check the weather before you go out, especially since the destination is above treeline.
Engineer Mountain
Route Type: Out and Back
Stats & Difficulty:
- ~7 miles
- +/- 2,300 ft.
- Difficulty: Hard. There’s an easy-to-follow trail to the meadows just east of the peak. You then have to climb up the ridge, which is not a trail but a scrambling route. Take care; this is not a beginner route. For additional resources, click here
- YDS: Class 3 scrambling.
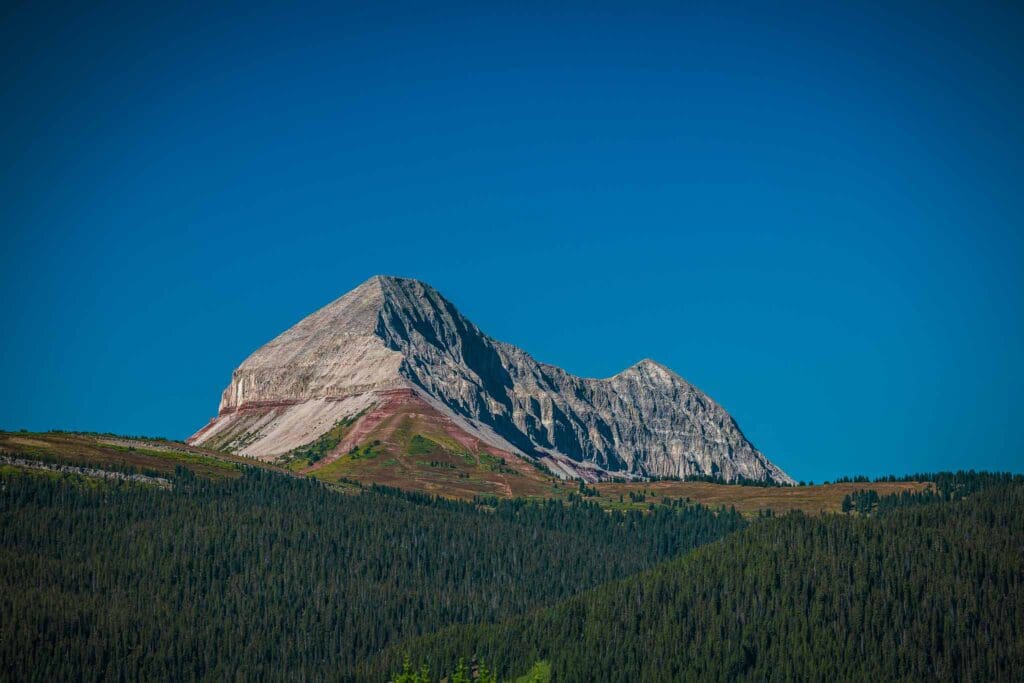
Engineer Mountain
Attraction: A gorgeous volcanic-looking mountain set back from the main ranges of the San Juans and offering superlative views of the surround. Be aware that there are several Class 3 moves required, along with some exposure on the summit ridge. If you’re driving north from Durango on US550, it’s almost impossible to ignore Engineer when it comes into sight around Haviland State Park. There is another Engineer Mt. in the San Juans; this one is slightly shorter at 12,970 ft.
Popularity: Medium. It’s a fine mountaineering objective but won’t appeal much to casual hikers and riders. Horse riders frequent the trails around the peak.
Important Notes:
- The elevation gain is significant, and most of it comes from the off-trail portion.
- There isn’t much shade above treeline.
- If the San Juans had an above-average snow year, expect snow through early-mid June at least. When snow is present, this is a mountaineering route, and you should be prepared with helmet, axe, and traction devices.
- Practice leave no trace principles. Leave the place better than you found it so the magic can continue to inspire people for years.
- Summer thunderstorms can be severed. The San Juans are heavily affected by the NAM (Noth American Monsoon), and thunderstorms can form as early as 9 or 10 am. Always check the weather before you go out, especially since the destination is above treeline.
Courthouse Mt.
Route Type: Out and Back
Stats & Difficulty:
- ~3.7 miles
- +/- 1900 ft.
- Difficulty: Medium to Hard, depending on prior experience.
- YDS Rating: Class 2+ (Class 1 on the trail to the summit plateau, the final rock rib will require some brief scrambling.)
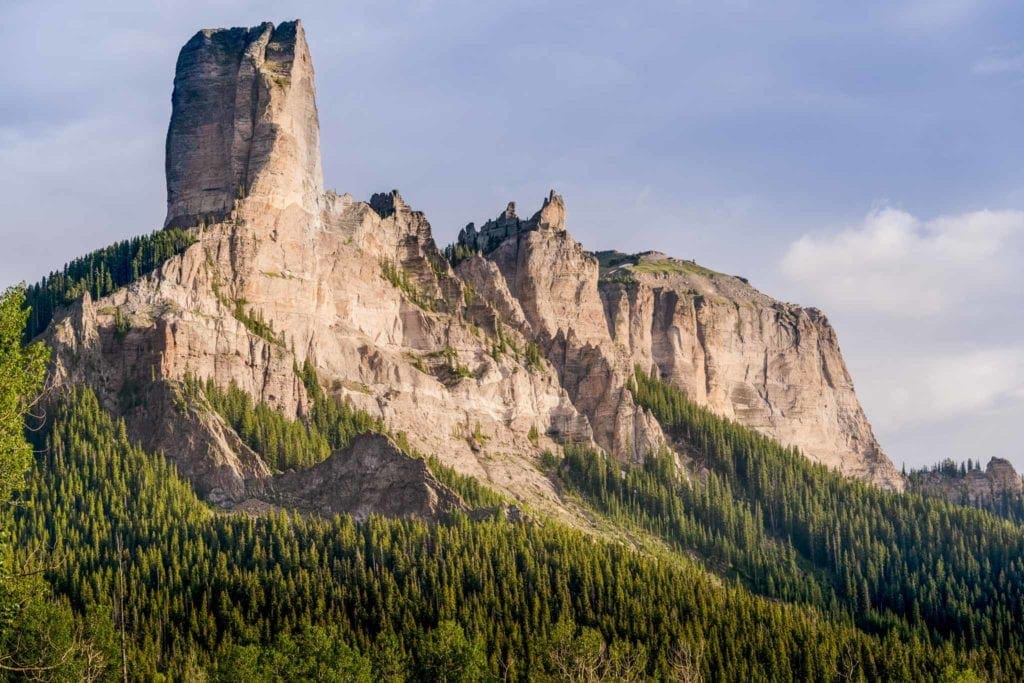
Courthouse Mountain from the north, with Chimney Rock the obvious hoodoo on the left. Photo by Danita Delimont
Attraction: Like Engineer Mountain but on the northern side of the range, Courthouse is not the tallest around but benefits from a superb position in the Cimarrons. To the south, you’ll be able to see the iconic Cimarron mountains and the sharp 14er Wetterhorn Peak. To the southwest, you’ll be able to spot the iconic Dallas Divide, a wall of mountains extending from Ouray to Telluride, with another 14,000 mountain (Mt. Sneffels) at its crown. Read our article on Courthouse Mountain for more information.
Popularity: Medium but growing. Courthouse is not perhaps the most popular San Juan destination, but it is becoming more well-known. In order to secure an ascent, make sure you arrive at the trailhead early. If you’re down in the San Juans for a few days, some great camping spots exist along the West Fork of the Cimarron River, but you need to practice leave no trace principles to keep the area beautiful.
Important Notes:
- The elevation gain is significant for such a short trail. Take breaks as needed.
- There isn’t much shade above treeline. Bring sunscreen and water.
- Practice leave no trace principles. Leave the place better than you found it so the magic can continue to inspire people for years.
- Afternoon thunderstorms can be severed. The San Juans are heavily affected by the NAM (Noth American Monsoon), and thunderstorms can form early. Always check the weather before you go out, especially since the destination is above treeline.
Uncompahgre Peak
Route Type: Out and Back
Stats & Difficulty:
- ~8 miles
- +/- 3,000 ft.
- Difficulty: Hard
- YDS Rating: Class 2

Uncompahgre Peak.
Attraction: The highest peak in the San Juans and a gorgeous journey. You’ll ascend up to a stunning high-elevation plateau where a species of endemic butterfly exists (and only exists in Colorado). The summit block is gorgeous, blocky, and attained via a moderate Class 2 route. Since it is a high mountain, make sure to watch for those signs of altitude sickness! If you’re hungry for more, Wettehorn and Matterhorn are nearby for a nice three-peat with good low to medium Class 3 scrambling.
Popularity: Medium to High. This area is stunning, and the appeal of the 14ers isn’t going away any time soon, so expect to see people unless you are going up during the snowy months (where MANY additional safety issues come into play) or later in the season like late September or early October before the first big accumulating snow.
Important Notes:
- You need an AWD or 4WD capable car to reach the upper trailhead; the dirt road is rough. Basically, a Subaru Outback and up can make it with careful driving.
- The elevation gain is significant.
- There isn’t much shade above treeline.
- Practice leave no trace principles. Leave the place better than you found it so the magic can continue to inspire people for years.
- Afternoon thunderstorms can be severed. The San Juans are heavily affected by the NAM (Noth American Monsoon), and thunderstorms can form as early as 9 or 10 am. Always check the weather before you go out, especially since the destination is above treeline.
- Uncompahgre Peak can collect snow any time of the year. The first time I hiked it, I was wading through 3 inches of fresh powder in late August; seriously, check the weather, including temps, wind, and precip.
Mesa Verde National Park
Route Type: Depends on individual adventures, many possibilities
Stats & Difficulty: User discretion. Get a park map and see what you want to see. The Cliff Palace tour covers roughly 0.25 miles and gains/loses ~100 ft.
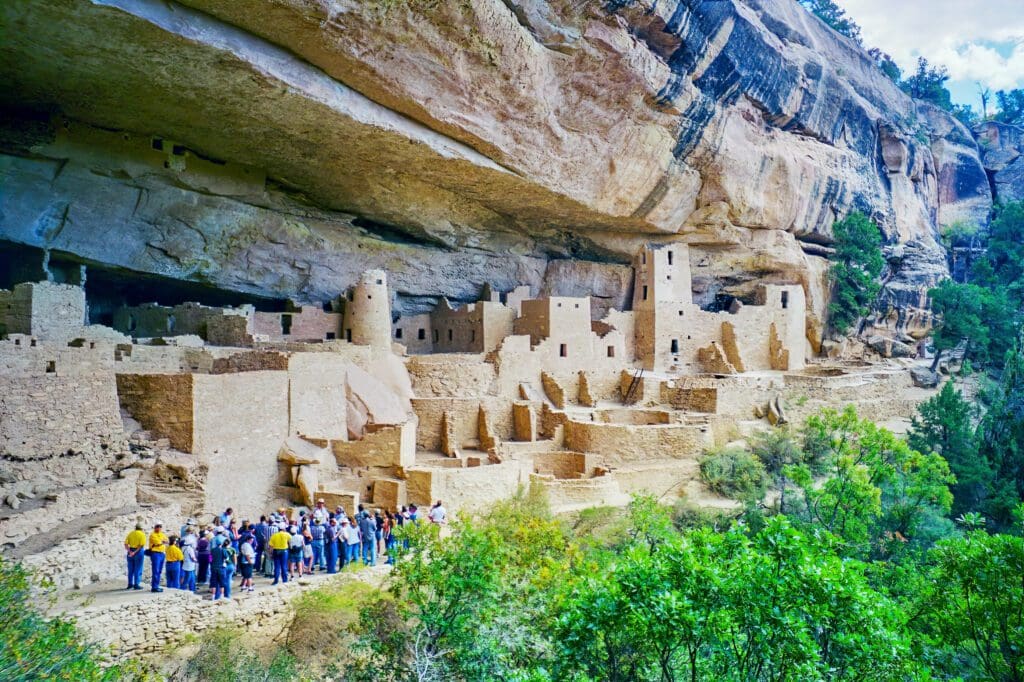
Cliff Palace in Mesa Verde National Park, Colorado.
Attraction: Ok, so Mesa Verde isn’t actually in the San Juans, but it occupies a very special region adjacent to it. The National Park is both beautiful and stark, with high desert vegetation, cliffs, and tons of Native American Artifacts. While availability often runs out, do yourself a favor and book a Cliff Palace tour; it’s a unique experience with ladders and cliffs that leads you to one of the best-preserved and largest cliff-dwelling cities in the region. It’s a very cool and very different experience. See our Adventurer’s Guide to Mesa Verde National Park for more information on the human history, geology and available attractions.
Popularity: Medium to High. Summer weekends and weekdays could be quite busy.
Important Notes:
- This is a national park. You need an entrance pass or an interagency pass to get in. If you don’t, you’ll need to pay for a day ticket or for however long you stay.
- Please stay on marked trails, backcountry wandering comes with steep slot canyons, snakes, and prickly plants.
- Be respectful of the ruins; they are old and can’t take a lot of human abuse. Follow your guide and the rules.<
- BRING WATER & SUNSCREEN; it gets hot in Mesa.
Sangre De Cristo Mountains
This impressive and sharp mountain range runs for roughly 400 miles from Santa Fe, New Mexico, to just outside of Salida, Colorado. It’s a thin and dramatic range known for complex mountaineering objectives and areas of conglomerate rock, which is grippy, sturdy, and features plentiful handholds. However, several sections of the range feature loose rock as well, so, as always, check every hold before putting weight on it if you’re climbing or scrambling.
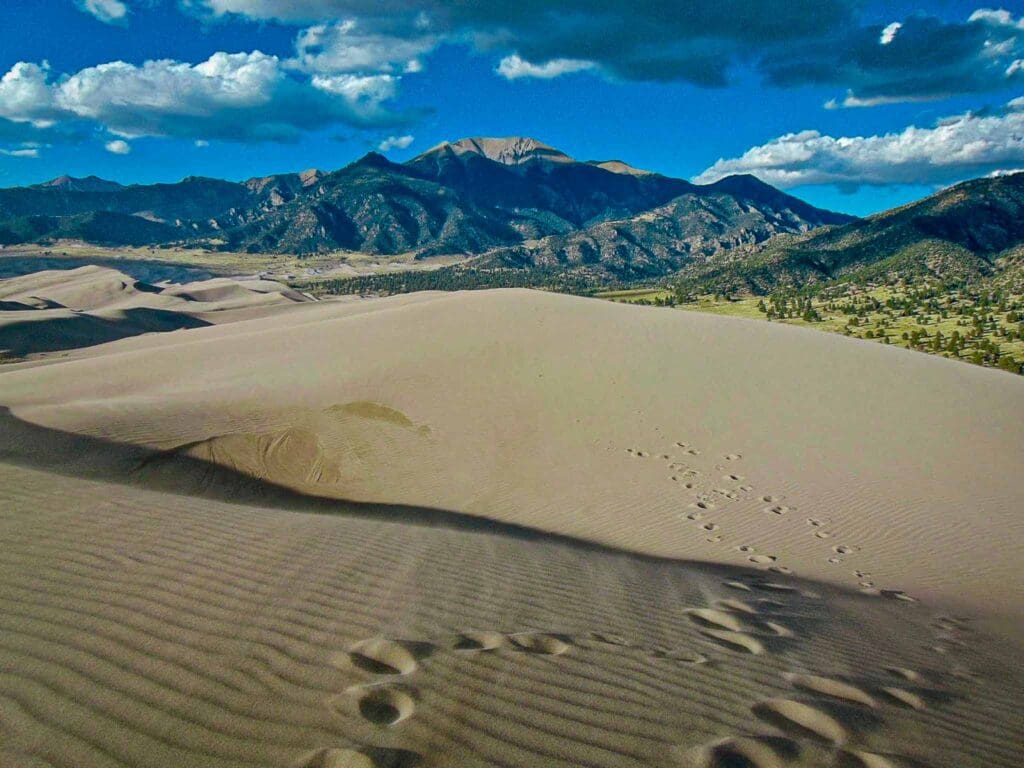
It’s nigh impossible to mention the Sangres without mentioning the Sand Dunes, which are nestled up against the western side of the range between its two bubbles of 14,000-foot mountains. They are the tallest sand dunes in the continental US and are worth a visit in every season.
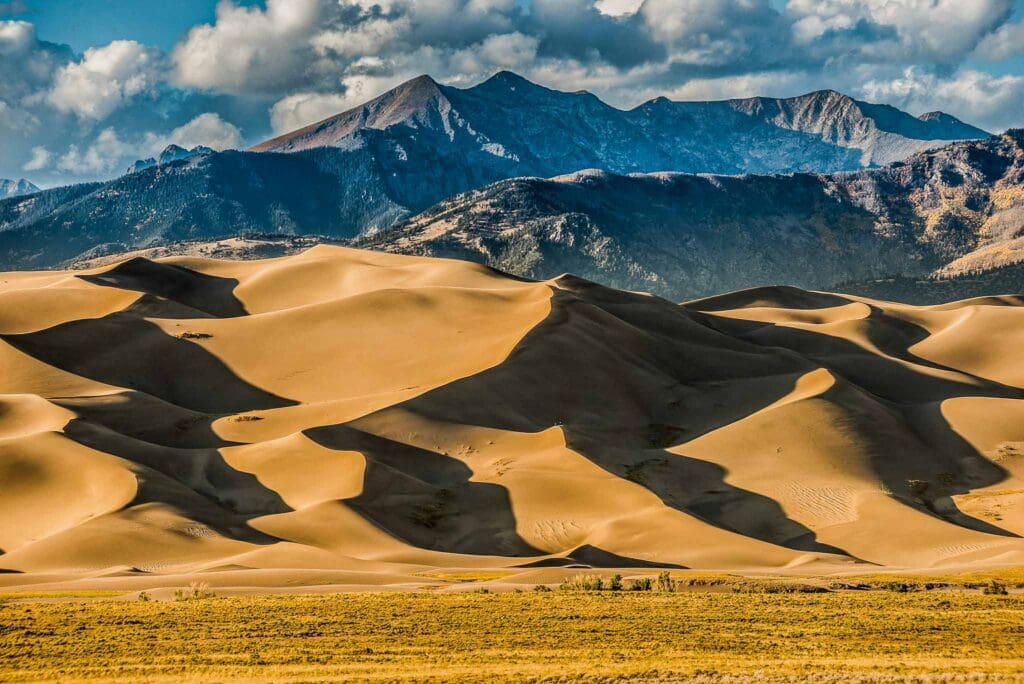
The Sand Dunes and the serrated mountains of the Sangre De Cristo Range at sunset.
Humboldt Peak via South Colony Lakes
Route Type: Trailed out and back
Stats & Difficulty:
- ~11 miles from the upper lot (~13 from the lower lot)
- +/- 4,175 ft.
- Difficulty: Very Hard. It’s all trailed, so easy to follow, but you will be working.
- YDS Class: Class 2 with most of it a Class 1 trail.
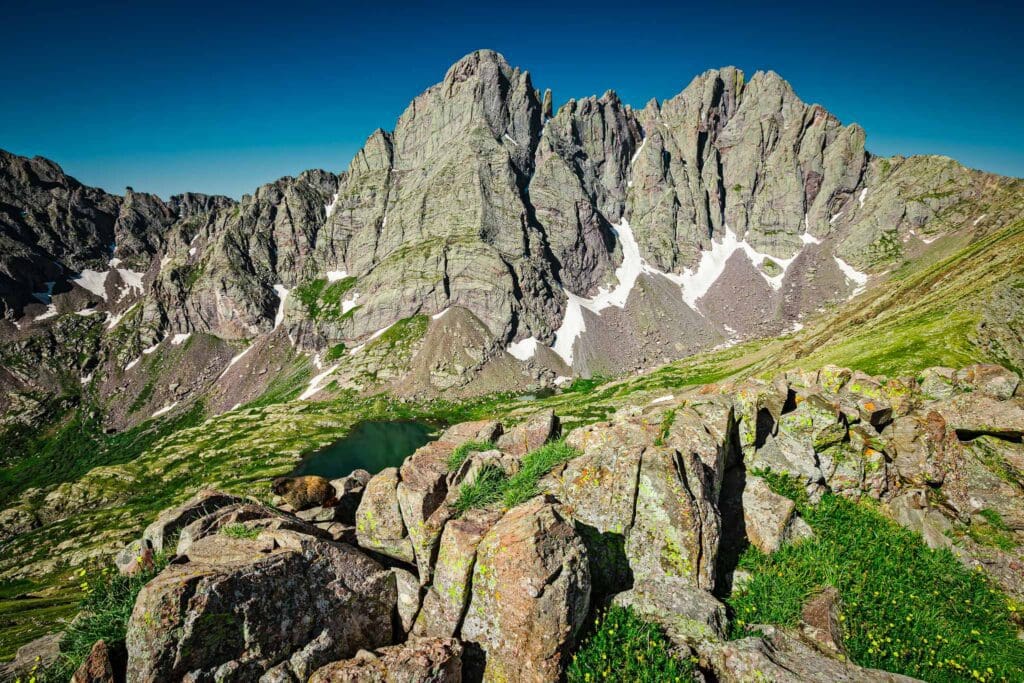
Marmot sits on rocks on a saddle of Humboldt Peak wtih Crestone Needle and Crestone Peak in distance rising above South Colony Lake.
Attraction: This is not only an absolutely gorgeous hike on its own; the views of the Crestones are almost beyond description. Along the way, you’ll tag a 14,00-foot mountain, pass beautiful lakes and jaw-dropping views while keeping the overall difficulty in the Class 2 range. The gorgeous, popular, and stunning Crestones are nearby, and they harbor a handful of superb mountaineering routes, including a wild traverse between them. However, Humboldt is a great area introduction, so it should be on your list regardless.
Popularity: Medium. This is a difficult range to get into for casual hikers, so you will likely see mountaineers, rock climbers, and campers. Having said that, it can still get crowded with peak baggers, so early is better and not on weekends if you can help it.
Important Notes:
- The Upper Trailhead needs a vehicle with some clearance and AWD or 4WD. Parking in the lower lot adds a couple of miles but may save the undercarriage of your car.
- This hike has a LARGE amount of elevation gain. Get there early, be diligent about nutrition and hydration, and watch for storms.
- There isn’t much shade above treeline.
- Bugs can be pretty aggressive early-mid summer. If there are snow patches left and stagnant water, expect mosquitos.
- Marmots (alpine beaver-looking creatures) will steal your food if you’re not watching. This is a personal observation, but Marmots in the Sangres seem more aggressive than in other parts of the state, guard your supplies!
- Practice leave no trace principles. Leave the place better than you found it so the magic can continue to inspire people for years.
The Great Sanddunes National Park (Sunset Dunes)
Route Type: Depends. If pressed for time, an out and back to Star Dune or High Dune is possible, although hiking up sand dunes is difficult as everything shifts underfoot.
Stats & Difficulty:
- Distance to Star Dune from Campground: ~6 miles (no trail)
- +/- ~750 ft.
- Difficulty: Medium. It can be frustrating climbing sand, and the sun can get hot, but it is not terribly taxing if you are prepared.
- YDS Rating: Class 2 because of the lack of trail.
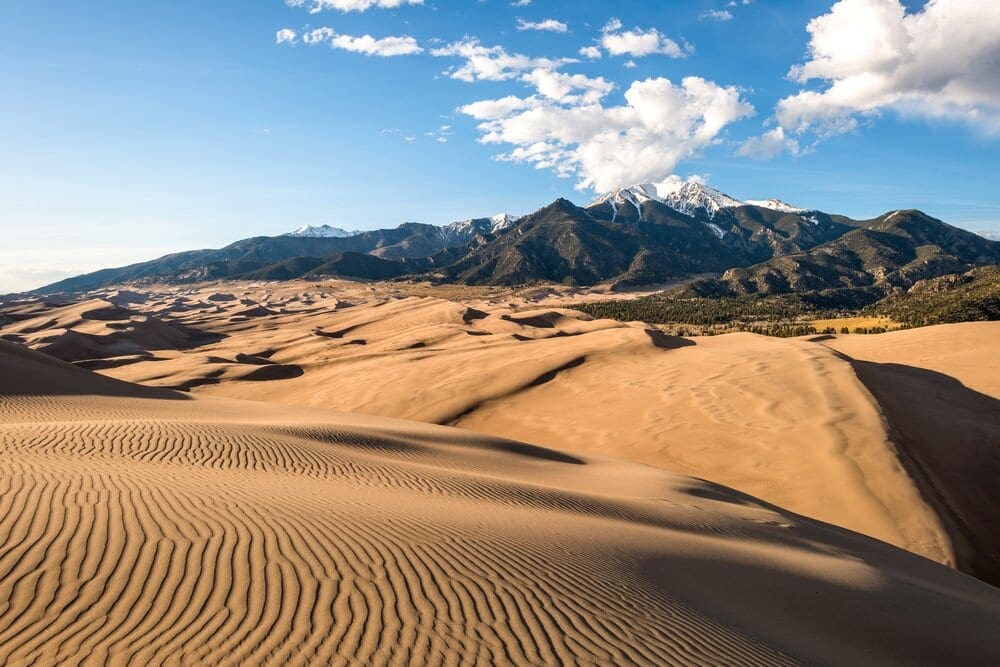
The Great Sand Dunes, which are, in fact, quite great.
Attraction: Giant sand dunes hundreds of feet high. There is an established campsite within the park with fantastic views. However, it sells out fast. There are dispersed camping options nearby, and the town of Alamosa is only about 30 minutes away.
Popularity: High, the campground in the park, Piñon Flats, sells out pretty quickly. Click here for information on the campground.
Important Notes:
- There isn’t much shade on the dunes. Sunburn is common, and as always, keep an eye on summer thunderstorms.
- BRING WATER
- Wind can blow sand into your eyes. Cover up if the forecast is windy!
- Bugs can be pretty aggressive early-mid summer, especially with areas of stagnant water.
- Practice leave no trace principles. Leave the place better than you found it so the magic can continue to inspire people for years.
- Consider going in the shoulder seasons (September/early Oct), the temps are better, and the crowds are lower. Be aware that nighttime temps can still drop into the 30s/40s.
Elk Mountains
These are incredibly beautiful and serious mountains. The most photographed mountain vista in the state is here, at the foot of the Maroon Bells. These iconic mountains have been featured on thousands of photography websites, company logos, various video platforms, social media, and blogs. I opted not to include anything near the Bells because of the combined tourist crush and lack of proper wilderness experience (unless you decide to actually climb the Bells, which is very difficult). Instead, enjoy the destinations below in relative solitude (Conundrum is hit or miss on the crowds) but know that, like the San Juans, you’ll be working to get to these places.

Snowmass and the Elk Range from Capitol Peak. Photo: Timo Holmquist
Capitol Lake
Route: Trailed Out and Back
Stats & Difficulty:
- ~13 miles
- +/- 2100 ft.
- Difficulty: Hard
- YDS Rating: Class 1 (any of the surrounding ridges will dramatically bump this rating up, stay on the trail unless you’re here for steep, exposed scrambling)
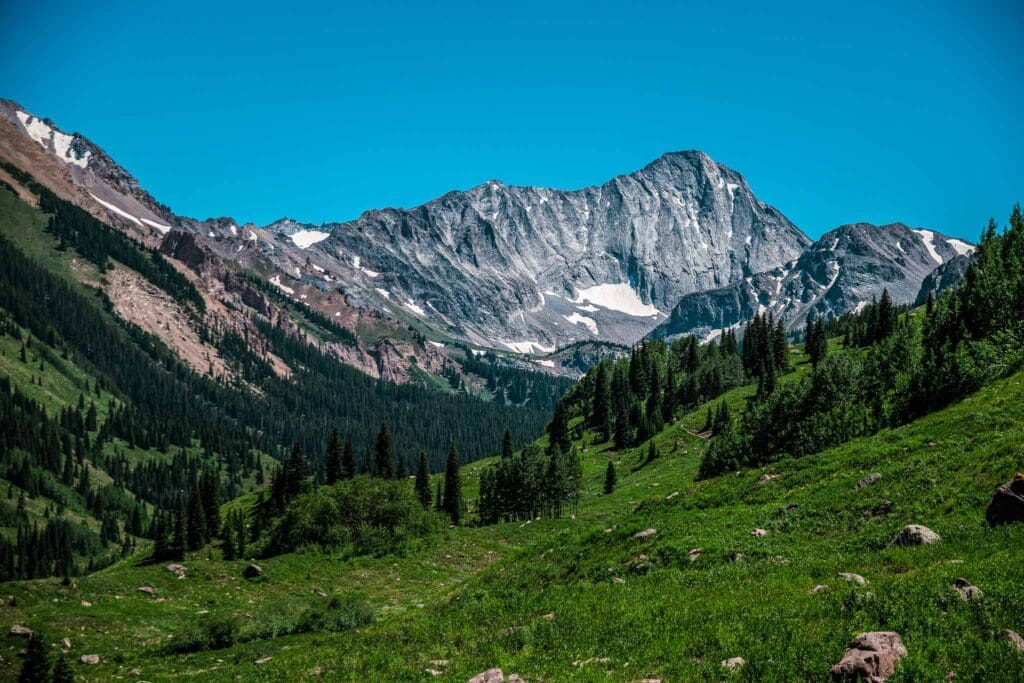
Capitol Peak
Attraction: Capitol Peak is often cited as the most difficult 14,000-foot mountain in Colorado by its standard route. It’s a monster and looks like it belongs in the Alps, Canadian Rockies, or even Patagonia. The best way to experience the area without committing to an exposed, long-duration Class 4 scramble is to make it to the gorgeous Capitol Lake, which sits right below the awesome walls of the mountain. It’s a long day full of generous scenery, aspens, stretches of vibrant meadows, and wildflowers in June/July.
Popularity: Medium. Most people that come out this way are interested in Capitol Peak. The lake and surrounding environs are often empty. From this vantage point, you can stare in awe at the mountain and may be able to site mountaineers with a pair of binoculars. If you camp in the area, follow all wilderness rules.
Capitol Lake from the top of Capitol Peak in the Elk Mountains, Colorado.
Important Notes:
-
- This is a long day; pace yourself.
- Bring water and sunscreen.
- Wildlife is abundant in the Elks; prepare for deer, chipmunks, birds, squirrels, and possibly foxes, big cats, bears, and coyotes.
- Watch for summer thunderstorms and if you camp, camp away from water sources and practice proper camping etiquette.
Conundrum Hot Springs
Route: Trailed Out and Back, possible camping
Stats & Difficulty:
-
-
- ~17 miles roundtrip
- +/- ~2,800 ft.
- Difficulty: Hard
- YDS Rating: Class 1
-
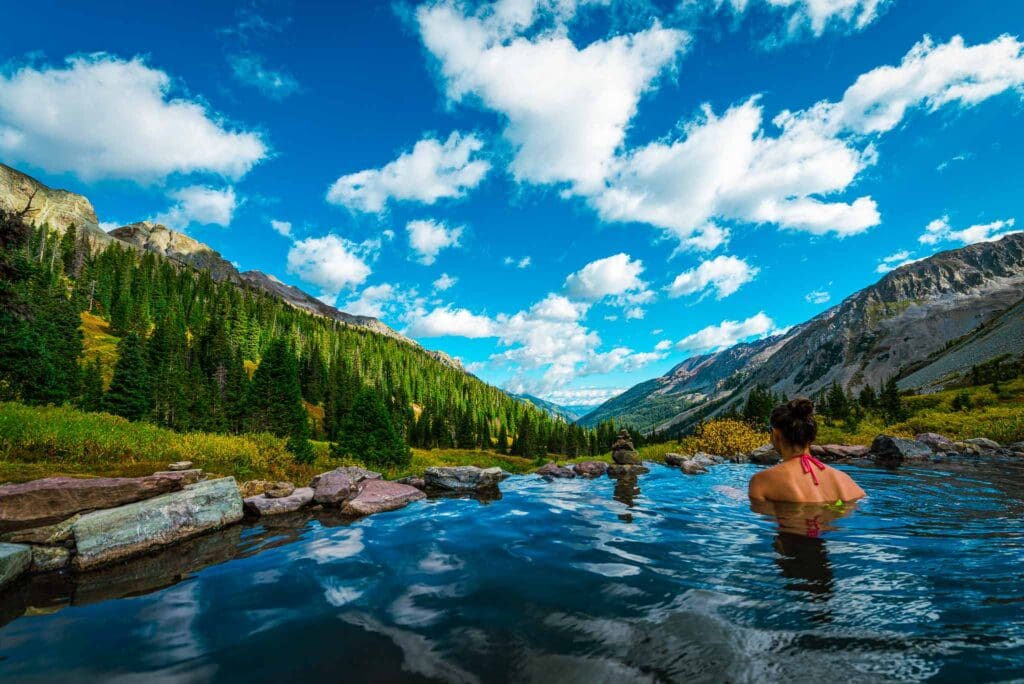
Relaxing in hot spring pool Conundrum Hot Springs near Aspen, Colorado.
Attraction: An undeveloped hot springs (i.e., free) nestled in the Elk Mountains. It’s a unique and rewarding journey with natural hot springs at the end!
Popularity: VERY POPULAR. I toggled with including this destination but ultimately put it on here because it’s just such a unique experience. DO NOT come onto this hike thinking you’ll get a bunch of solitude. If you understand this and understand (and accept) that younger folks will use this area for occasional partying, you’ll have a better time.
Important Notes:
-
-
- The best months are July-September. While it’s possible to hike in winter, it’s a lot harder
- You need reservations to camp; information is foundhere.
- Bring bug spray if it’s been rainy.
- Sunscreen and lots of hydration are mandatory.
- Bring bear canisters to store food. They are active in the area.
-
Black Canyon of the Gunnison
Route Type: Various trails and drives around the top of the Canyon. Going down to the river and back up is a workout.
Stats & Difficulty: Here’s a link to possible hikes
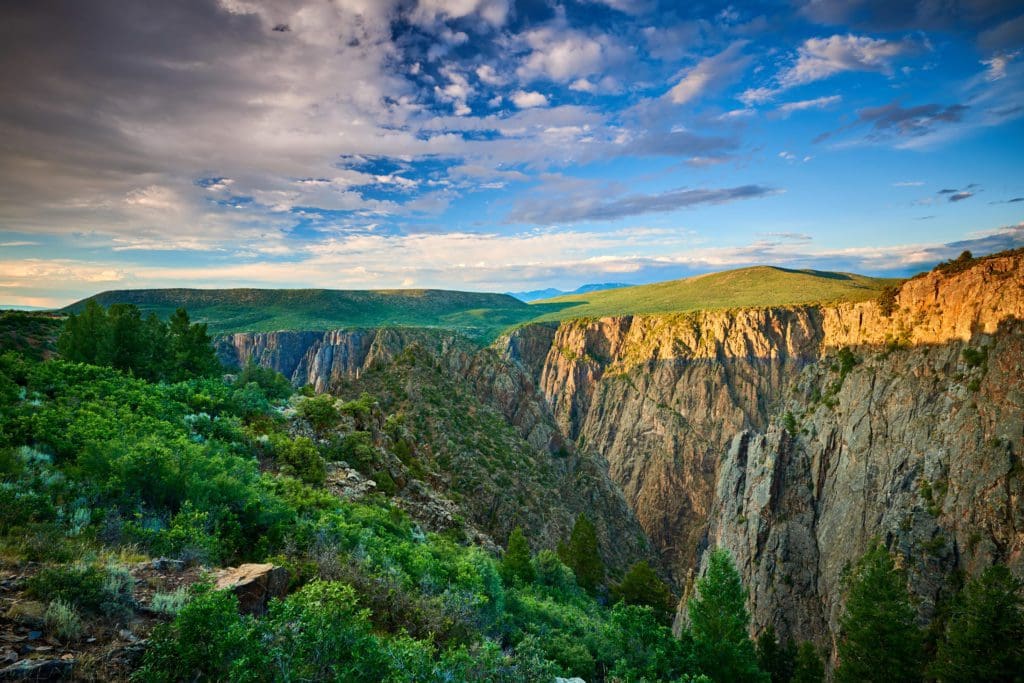
Black Canyon of the Gunnison.
Attraction: This deep canyon features beautiful black rock and an incredibly impressive drop down to it. Almost invisible from the outside, when you get on the rim and look down, you may feel vertigo. Several thousand feet below, the Gunnison River carves through the landscape on its way to eventually meet the Colorado River. It’s also a dark sky park, so the stargazing is first-rate.
Popularity: Medium. It is a national park, so there is interest, and many people make use of the south-rim road. If you take the trails into the canyon, you could have miles of solitude.
Important Notes:
-
-
- The canyon’s so deep that at the bottom, poison ivy grows, which is otherwise rare or non-existent in Colorado; be aware! A red stem and leaves of three means let it be. No touchy.
- Water and nutrition are important.
- Take caution if camping, lots of wildlife around (including snakes)
- There are also cacti; watch where you put your feet!
-
Sawatch Range
Lumpy, large, and in charge, the Sawatch Range has numerous 14,000-foot mountains, including the state’s highest in Mt. Elbert. They are larger and bulkier than many mountains in the state and don’t regularly feature the serrated ridges of the Sangres or San Juans, although a lot of wonder lies beneath the surface.
The Collegiate Peaks, a set of mountains outside of Buena Vista, often steal the most attention alongside Elbert. My favorite mountains in the range are in no way hidden but receive a lot less traffic and can offer a better wilderness experience. The distances and elevation gain, however, are not small. These are big days.
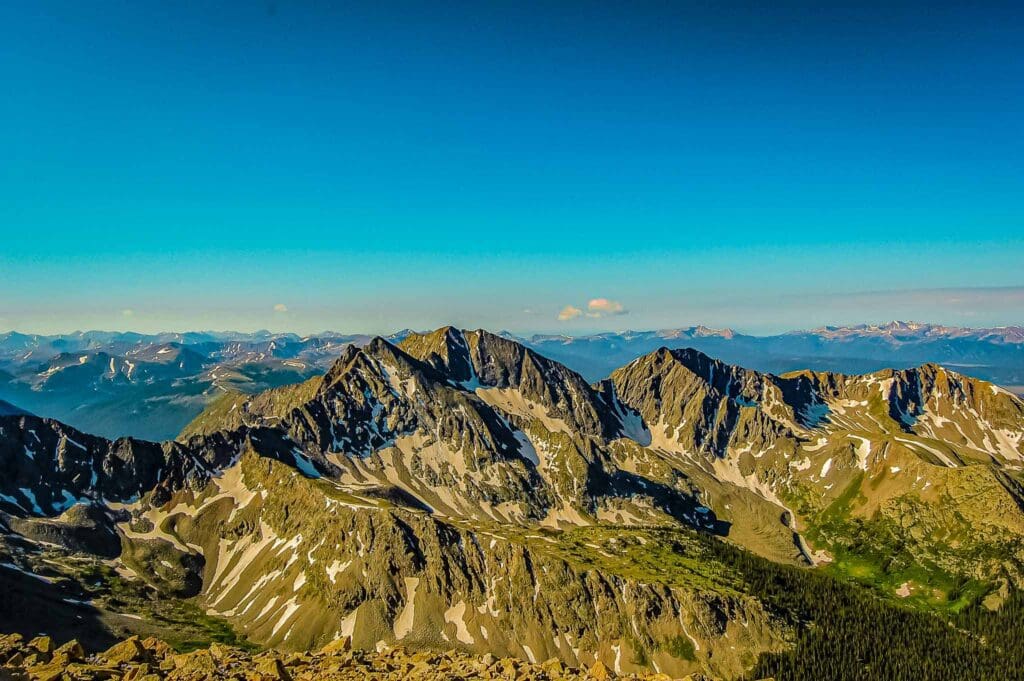
View from Huron Peak Summit near Leadville, Colorado.
Mt. Massive (Big and Tall Route)
Route Type: Car positioning hike (or a very very very long loop)
Stats & Difficulty:
- ~13 miles one way
- + 4850 ft. -5,575 ft.
- Difficulty: Very Hard
- YDS Rating: Class 2+, significant off-trail travel required and a little scrambling on North Massive
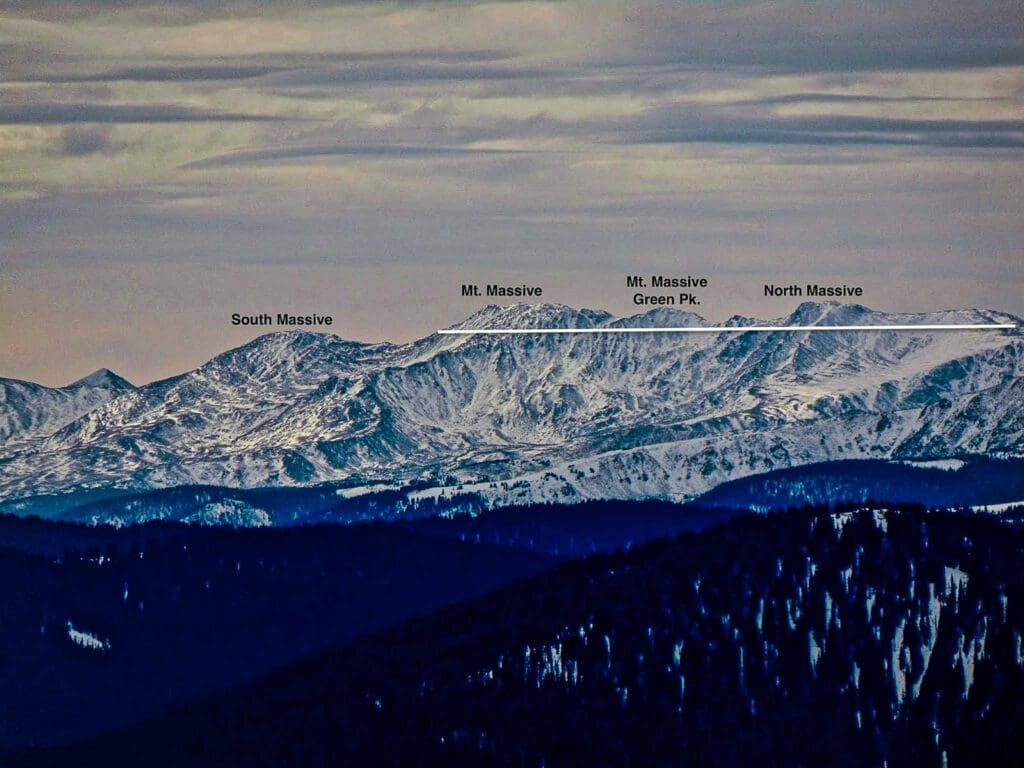
Every bit of terrain above the white line is above 14k. You’ll be coming from the right and staying high until after summiting. You’ll drop briefly below 14k after the summit, but South Massive is also above 14k. Photo: Timo Holmquist
Attraction: For those who want to hike the longest stretch of ridge above 14,000 feet in the United States, this is the way. The time spent above treeline is substantial, and even if you’ve never had an altitude sickness experience, this is the kind of adventure that could give it to you. Evaluate yourself and your group carefully. Start from Windsor Lake near Leadville (a steep trail leads to it from near Turquoise Lake) and hike across the backcountry southwest to the ridgeline. You’ll have to be creative here to avoid marshy areas and cliffs. Then, turn south and walk along the rising land until you break 14,000 feet. Continue over several sub-summits and the main summit until you drop down the south side. All said and done, you’ll spend nearly 2 miles above 14,000 feet in elevation and 4.5 miles above 13,000 feet. There is no other ridgeline in the state that offers this kind of high-elevation tomfoolery.
Popularity: Low. Massive itself is quite a popular mountain, but if you come from Windsor Lake, you’ll see few, if any, people between the lake and the summit.
Important Notes:
- This is a high hike, and altitude sickness is serious. If you or your partner is suffering, and the symptoms aren’t going away, you have to descend, or complications can occur.
- A version of this is called the Tour De Massive, which you can read about here. The difference is that you cut your time above 13k and won’t necessarily hit the northernmost topo line above 14k unless you hunt for it.
- This kind of route is what I would consider to be deviant behavior. The goal is to, in one fell swoop, hike the massive bulk of Massive. Traditional elevation rules only consider a mountain to be official if there is a gap between it and another that’s more than 300 feet deep. So, technically, the “official” Mount Massive continues even further north than my starting point. If you’re a challenge purist, and you can swing a ride up Hagerman Pass in a sturdy AWD/4WD vehicle (which you’ll need), you could feasibly start there and head south. Please note that you’ll also have to climb South Massive and the 13,600 ft. sub-summit to its SW if you’re going for everything. This is a ridiculous kind of day.
- There isn’t much shade above treeline.
- Bugs can be pretty aggressive early-mid summer, especially with areas of stagnant water.
- Practice leave no trace principles. Leave the place better than you found it so the magic can continue to inspire people for years.
- Afternoon thunderstorms can be severe.
- Due to the sheer time spent in the alpine, bring a lot of water, 4 liters at a minimum. Once you’re on the ridge, opportunities to refill are limited unless you’re attempting this earlier in the season and can take the time to melt snow.
Mt. Harvard
Route Type: Out and Back
Stats & Difficulty:
- ~14 miles roundtrip
- +/- ~4600 ft.
- Difficulty: Very Hard
- YDS Rating: Class 2
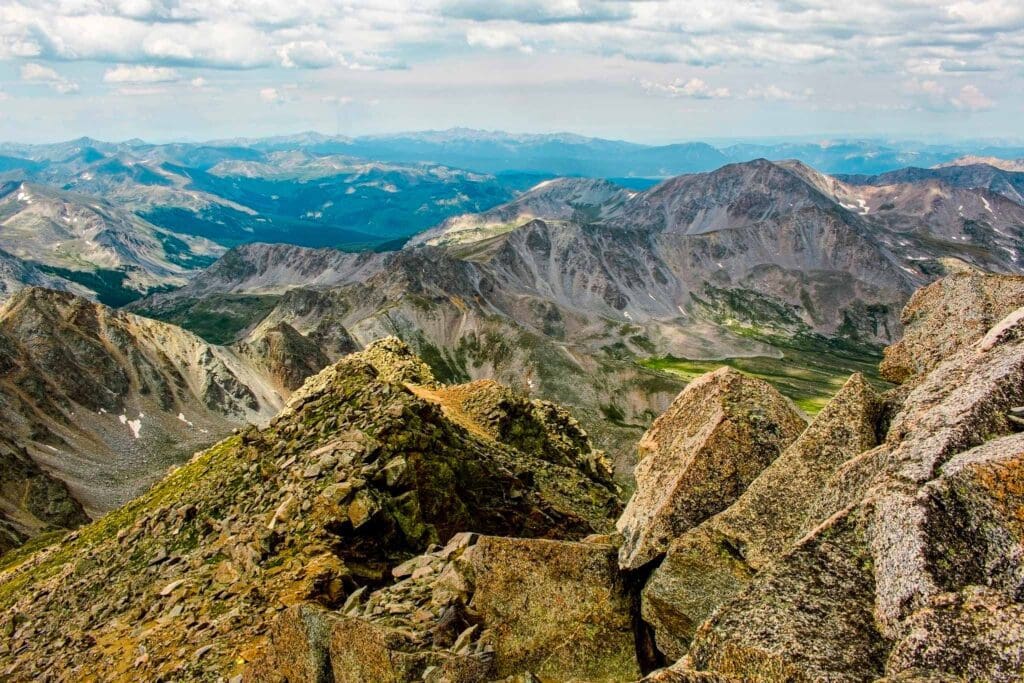
Summit of Mount Harvard, Colorado.
Attraction: While Massive and Elbert are taller, Harvard is much prettier. This is an expedition-style mountain with lots of camping potential and the option to connect with another 14er (Columbia) via a demanding ridge with a lot of elevation gain/loss. The hidden bowls and an amphitheater-like approach are second to none, borderline lyrical. There are cliffs, hidden lakes, lovely rock work, gorgeous stretches of alpine, and even a few easy scrambling options on the summit block. Harvard, while harder and longer than many similar Sawatch mountains, offers more of a complete experience. If the distance intimidates you, consider camping to break up the journey.
Popularity: Medium. Fairly popular amongst backpackers and peak baggers, you’ll nevertheless find some solitude on the trail. The trailhead leads to various other destinations, so it can get full.
Important Notes:
- There isn’t much shade above treeline. Sunburn is common, and keep an eye on summer thunderstorms.
- Bugs can be pretty aggressive early-mid summer, especially with areas of stagnant water.
- Practice leave no trace principles. Leave the place better than you found it so the magic can continue to inspire people for years.
- Afternoon thunderstorms can be severe, start and end early, or wait for clearer weather in August/September.
- Follow all wilderness rules when hiking and camping; wildlife is common out here.
10 Mile/Mosquito Range
For such a small range, the 10 Mile/Mosquitos see some regular traffic because they’re visible from I-70 in Summit County and form the skyline near popular ski destinations like Breckenridge. Summit County is one of the easiest mountain counties to access because of the highway and trails can get crowded. I’ve opted to skip popular peaks like Quandary and the area around Boreas Pass to alleviate some of the rush but expect crowds on the Mohawk Lakes Trail.
Father Dyer, Pacific Pk. & Mohawk Lakes
Route Type: Loop (large areas off-trail)
Stats & Difficulty:
- ~10 miles
- +/- ~4,350 ft.
- Difficulty: Hard
- YDS Rating: Class 3 with additional areas of Class 2
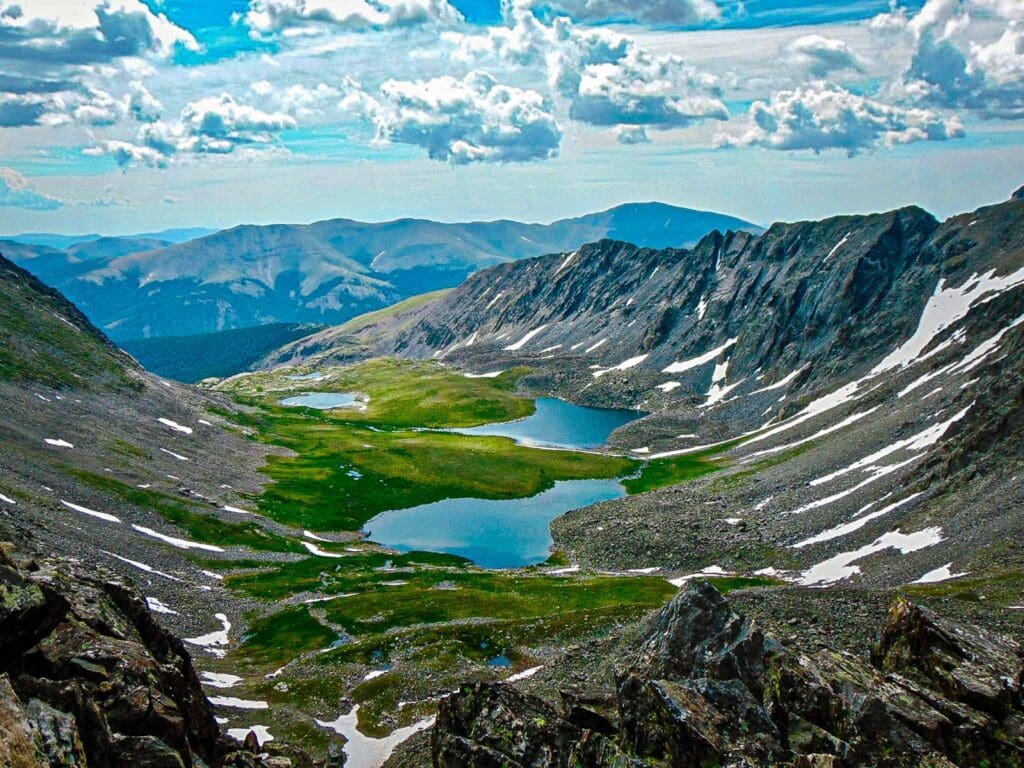
Three unnamed lakes above the regular Mohawk Lakes. The whole basin has a lot to offer, and if you have the energy, getting above the Mohawk Lakes puts you into this wonderland. Photo: Timo Holmquist
Attraction: This loop does it all. You get great intro 3rd class scrambling on Father-Dyer, where plenty of bail-out options keep the actual scrambling to a minimum. You also get a lovely ridge line stroll between Father-Dyer and Pacific Peak (with an option to tag Crystal Peak along the way). The final approach to Pacific Peak also involves some light scrambling and leads to an iconic and identifiable peak. From there, you loop down to the highest natural tarn (lake) in Colorado. Take a dip if you dare! Once that’s done, carefully pick your way down to the ethereal Mohawk Valley and enjoy the upper lakes before descending down a well-established trail beyond additional lakes and old mining ruins.
Popularity: Medium to High. From the summit of Father-Dyer to Upper Mohawk Valley, you’ll see few, if any, people. The crowds start showing up around the lower Mohawk Lakes and can continue back into the valley.
Important Notes:
- Watch your food. There are lots of curious critters on the lower parts of the trail.
- Wildlife viewing opportunities are high, with marmots and pikas in the alpine, foxes, deer, elk, moose, coyotes, and even Pine Martens down lower. NEVER try to pet wildlife.
- Large parts of this loop occur off-trail. Make sure you have the weather window to handle it.
- Watch for summer thunderstorms. The best time to do this loop is late July-early September.
10 Mile Traverse
Route Type: Car-positioning or long loop
Stats & Difficulty:
- Peaks 1-5 (~14 miles), Peaks 1-10 (~21 miles)
- Peaks 1-5 (~5,000 ft.), Peaks 1-10 (~7,750 ft.)
- Difficulty: Hard
- YDS Rating: Class 3+ with a decent amount of exposure
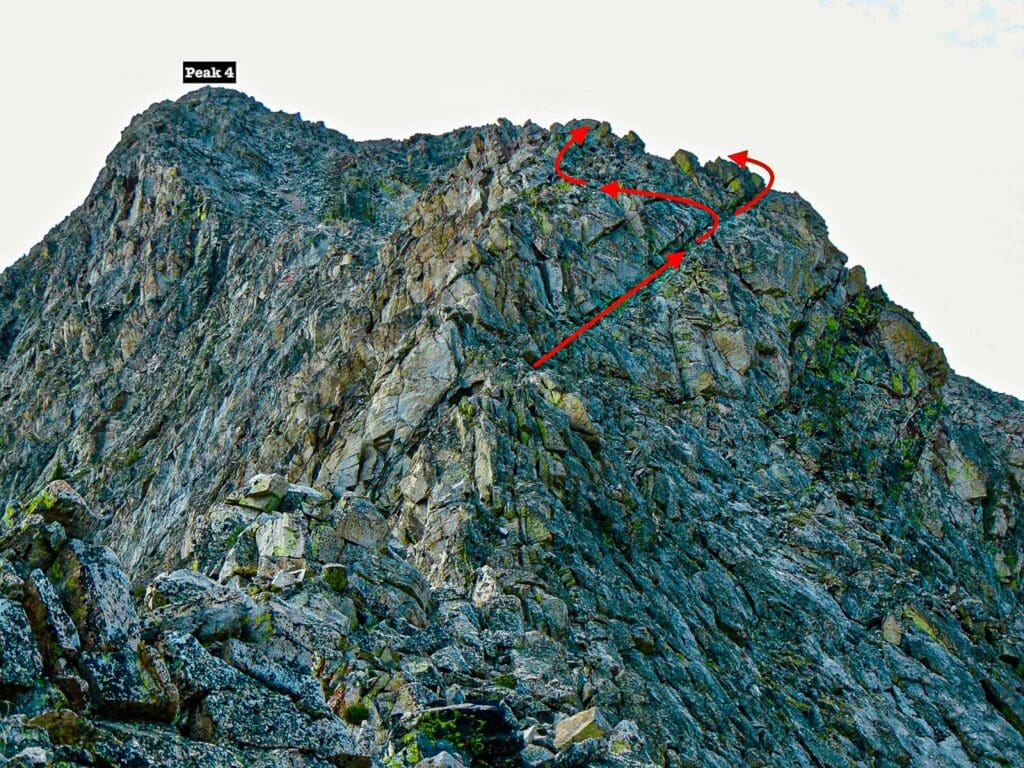
Route Crux (Class 3) on the 10-Mile Traverse between Peaks 3 & 4. Once you get beyond Peak 4, the terrain changes for the easier, although the overall distance for all 10 is no joke. Photo: Timo Holmquist
Attraction: This is one of the toughest scrambles on this list. It’s an epic ridge hike that features plenty of unique scenery, scrambling and long-range views of the central Colorado mountains. It’s a great workout, scramble, and long-distance endeavor at high elevations. Check out our article on the Peak 1-5 scramble, which features the most intense portions. The whole ridge traverse has a good description here.
Popularity: Medium to high on trailed sections. Low along the ridgecrest
Important Notes:
- Peaks 2, 3 and 4 require committing Class 3 scrambling and route finding. You cannot avoid this if you’re doing the whole thing.
- Peaks 5-10 are simple walkups with occasional Class 2 moves.
- Water is hard to come by on the ridge; plan accordingly.
- Watch for thunderstorms and signs of elevation sickness.
- Wear sunscreen.
Flattops
The Flattops are a significant uplift area with steep sides and (perhaps unsurprisingly) relatively flat…tops. The range only tops out in the 12,000-foot range and doesn’t draw a lot of attention from mountain climbers. It’s far from more established areas and in a more remote corner of the state. However, that doesn’t make it a hidden gem. People seem to toss that phrase around a lot these days, but if you ask anyone who’s into the outdoors from Grand Junction up to Steamboat, they’ll know about the Flattops.
Devil’s Causeway
Route Type: Trailed Loop
Stats & Difficulty:
- ~10 miles
- +/- 1,850 ft.
- Difficulty: Moderate
- YDS Rating: Class 2
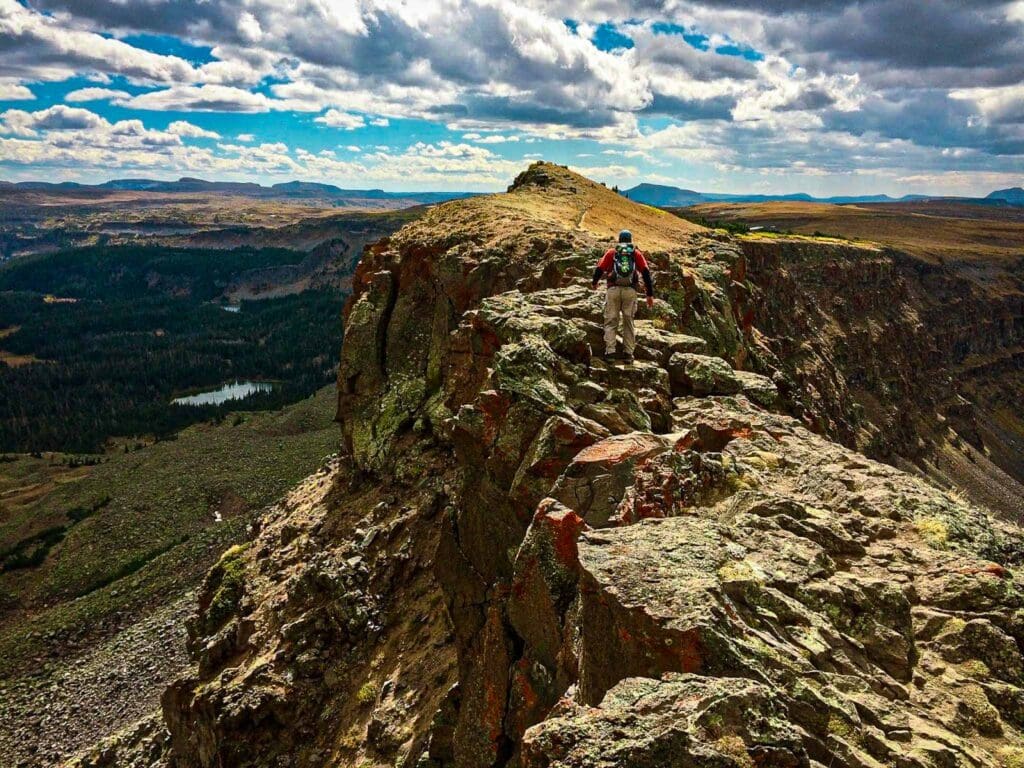
Devil’s Causeway
Attractions: A thin section of trail flanked by two dramatic cliffs. It’s not great for those with exposure fears, but the trail is well-trodden, and if you’re sure-footed, the passage is straightforward with some Class 2 moves at most. The top of the range also presents much differently than other ranges in the state. It feels very western, and it’s easy to imagine wild horses roaming the grassy tops of these mountains. Interestingly, the Flattops get A TON of snow in the winter, making snowmobiling, backcountry skiing, and cross-country skiing worthy adventures.
Popularity: Medium to High. You will see people on the weekends and at the height of summer.
Important Notes
- There isn’t much shade above treeline:
- Bugs can be pretty aggressive early-mid summer. If there are snow patches left and stagnant water, expect mosquitos.
- Practice leave no trace principles. Leave the place better than you found it so the magic can continue to inspire people for years.
- Afternoon thunderstorms can be severe. Always check the weather before you go out, especially since the destination is above treeline.
Gore Range
This rugged and impressive range rises just to the north of Vail Pass and is visible outside of Silverthorne on I-70. While no mountains reach the mythical 14,000-foot level, the scrambling and potential for an iconic wilderness experience here are notable. This is a serious mountain range with serrated peaks and long approaches. The few hikes I’ve included do a great job of framing up the range while avoiding the ruggedness that the Gore is known for. If you feel the pull to the Gore Range, like many mountain climbers and scrambles have before you, know that you’re in good company.
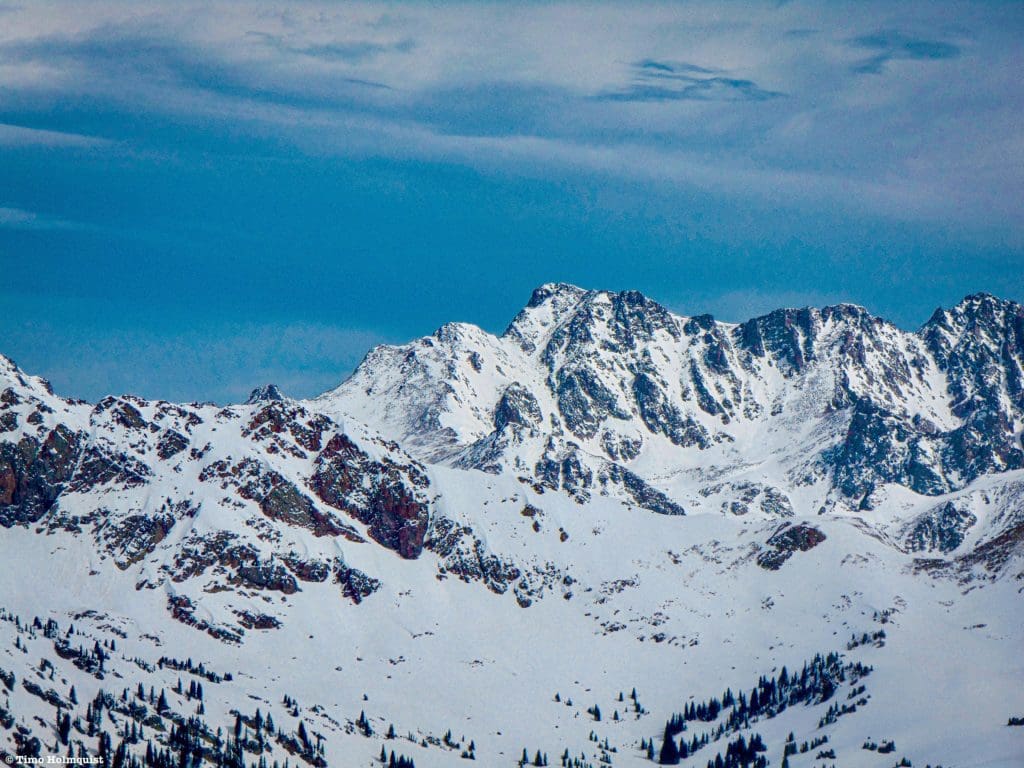
The impressive Gore Range from the summit of West Deming. Photo: Timo Holmquist
Deluge Lake
Route Type: Out and Back
Stats & Difficulty:
- ~9 miles
- +/- 3,450 ft.
- Difficulty: Hard
- YDS Rating: Class 1 (the ridgelines are much harder)
Looking south from Deluge Lake to the East Vail Chutes and the dominant profile of Mt. Of The Holy Cross. Photo: Timo Holmquist
Attraction: The Gore Range seems largely impenetrable upon first viewing. It’s gnarled and rugged and sports some of the best backcountry skiing, scrambling, and wilderness areas in the state. There are several ways to tip-toe into the range, and one of my favorites is Deluge Lake. From the Gore Creek Trailhead in East Vail, you get a trailed hike to a gorgeous lake rimmed by 13ers (including Grand Traverse Peak, which you can see from downtown Vail). Across the valley, you also get views of Mt. of the Holy Cross, Mt. Massive, and Mt. Elebrt. It’s a cool spot, and once you break away from the noise of I-70, blessedly quiet.
Popularity: Medium. The trail gets a fair amount of use from locals and their dogs, along with aspiring scramblers looking to take on Grand Traverse Peak and the Grand Traverse.
Important Notes:
- While trailed, dangerous terrain exists above Deluge Lake, evaluate conditions carefully.
- It’s a lot of elevation gain, take your time.
- Sunscreen, water, and nutrition should be with you at all times.
- Watch for afternoon thunderstorms; they’re sometimes hard to see, especially if they form behind some of the ridges you’ll be surrounded by.
Willow Lakes
Route Type: Trailed out and back
Stats & Difficulty:
- ~12 miles
- +/- ~2,750 ft.
- Difficulty: Hard
- YDS Rating: Class 1 (Class 2 if you explore the lakes off-trail)
Willow Lakes in the Gore Range’s Eagles Nest Wilderness, Colorado.
Attraction: This is a fantastic high mountain basin. Ringed by 13ers and the eye-popping Zodiac Spires, the area has all the trappings of an excellent backpacking destination. The thing is, a lot of people know that too, so be prepared to share the trail. Camping is dispersed, and no campfires are allowed, but that’ll clear up the air for some quality star gazing.
Popularity: High in the summer, Medium to Low by late autumn
Important Notes:
- If camping, follow all posted wilderness rules and practice leave no trace principles.
- Watch for afternoon thunderstorms.
- Be aware of wildlife and never approach it. Keep food in bear-proof canisters if camping.
Park Range
This northern Colorado range doesn’t offer much to those seeking the highest points in the state. In fact, only two mountains get above 12,000 feet (although geologically, the Gore Range is part of the Parks, both visually and logistically, it’s best to treat them as separate ranges). However, with relatively easy access from the mountain town of Steamboat Springs, you can craft a nice backpacking experience that won’t require the herculean effort needed to reach some of the more remote areas.
The Incisor and its spindly neighbors, part of the Park Range north of Big Agnes Mt. Photo: Timo Holmquist
Zirkel Circle
Route Type: Trailed Loop
Stats & Difficulty
- ~10.5 miles
- ~2,400 ft.
- Difficulty: Moderate, or hard with a backpacking pack
- YDS Rating: Class 1 if you stay on the trail, plenty of Class 2 and 3 on surrounding ridges
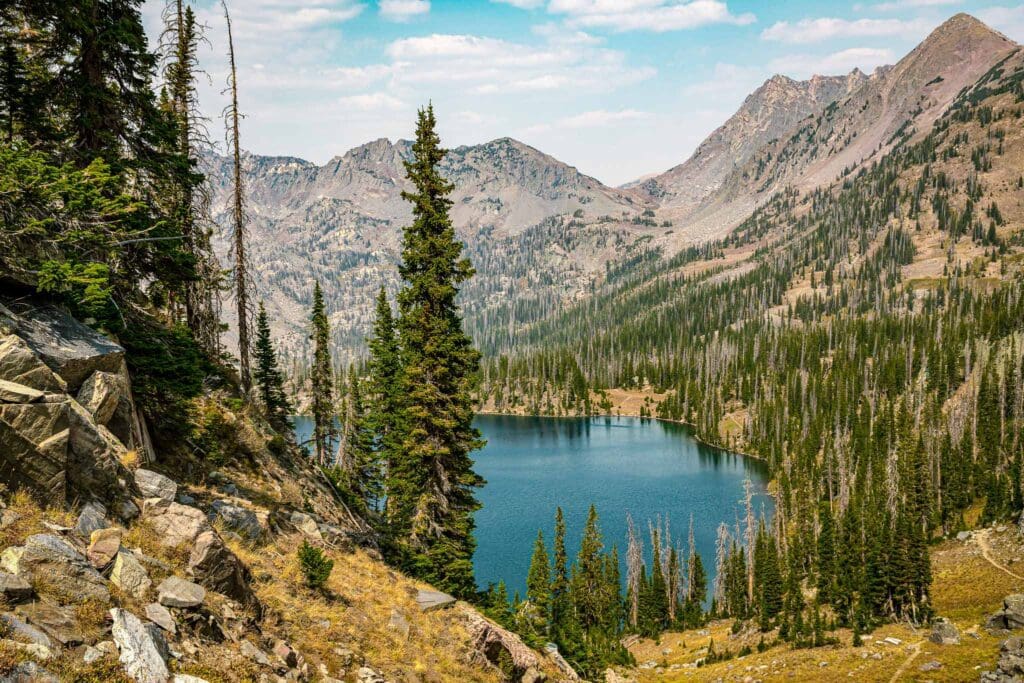
Gilpin Lake Loop near Steamboat Springs, Colorado.
Attraction: A couple of stunning alpine/subalpine lakes, including the star of the show Gilpin Lake. Also, well-established camping areas (although it’s still a backcountry experience, bring bear hangs, bear canisters, and practice leave no trace). This is also a great way to rope Steamboat into a trip and enjoy a part of the state that many don’t take the time to explore.
Popularity: High in the summer, moderate to low by early autumn
Important Notes:
- Bugs can be pretty aggressive early-mid summer, especially with areas of stagnant water.
- The Park Range can get A TON of snow. Parts of the range are the snowiest on average in the entire state. Target August to help get a snow-free experience.
- Practice leave no trace principles. Leave the place better than you found it so the magic can continue to inspire people for years.
- Afternoon thunderstorms can be severe. Always check the weather before you go out, especially since the destination is above treeline.
Front Range
The Front Range is the tallest set of mountains just west of the Front Range Urban Corridor. The urban corridor includes major Colorado cities like Fort Collins, Boulder, the Denver metro area, Colorado Springs, and Pueblo. Therefore, parts of the range are highly visible to millions of Coloradans. This is undoubtedly the most traveled mountain range in the state.
There are several trails (Emerald Lake, Herman Gulch, and Mt. Bierstadt, for example) that are so popular I’ve just elected to skip them. However, if you dig a little deeper with the maps and apps, you’ll find surprisingly dense wildernesses that pull you into the arms of the mountains.
The Front Range near Brainard Lake. Photo: Timo Holmquist
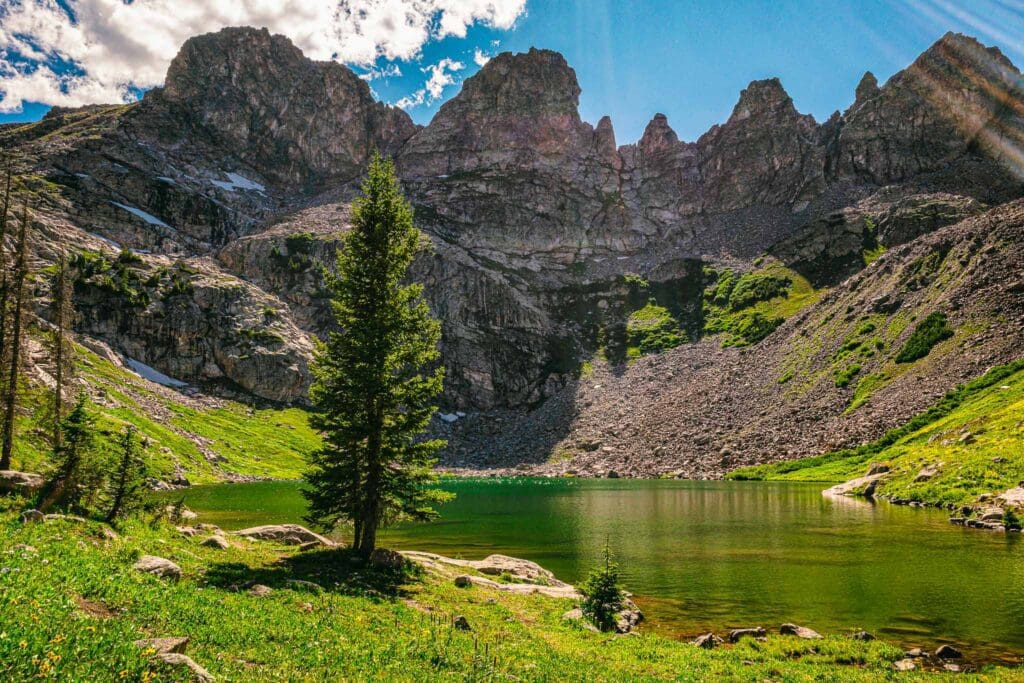
Crater Lake IPW
Route Type: Out and Back with an optional loop of Crater Lake
Difficulty:
- ~15 miles
- +/- ~2,710 ft.
- Difficulty: Hard
- YDS Rating: Class 1 (plenty of Class 2 if you circle the lake)
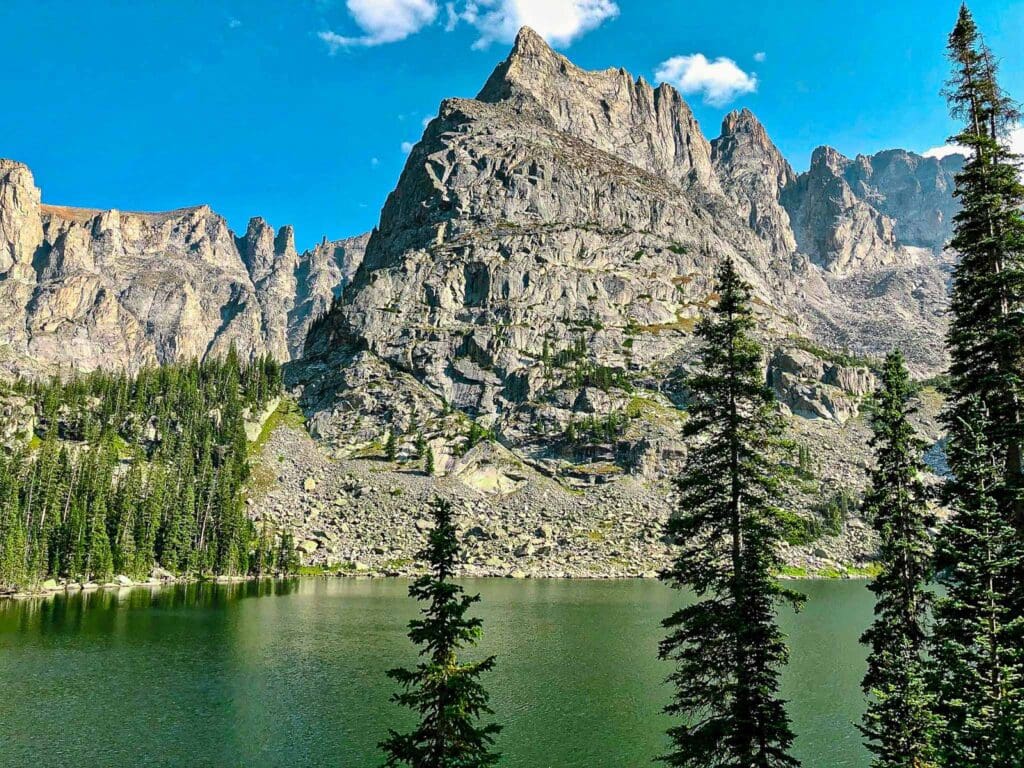
The surreal Crater Lake with Lone Eagle Peak behind it. Photo: Timo Holmquist
Attraction: Arguably the prettiest lake north of I-70, this is an extremely popular backpacking destination. In fact, I toggled with including it at all, but since you can make it a day hike from two directions, both Brainard (requires going up and over Pawnee Pass twice) or from Monarch Lake, it’s possible to visit without having to get a campsite. If you’re in the area and want a challenging day hike with waterfalls, prime moose-viewing meadows, iconic rocky mountains, and views of Lone Eagle Peak, whose summit seems to simply defy physics, give it a shot. If you’re determined to camp there, you need to find out when reservations open and hit refresh until you can grab one. They usually sell out very fast. There are also dedicated spots, don’t just create one and mess up the experience for others.Popularity: High
Important Notes:
- Very popular area for campers, do yourself a favor and do the day hike first.
- If you do camp, understand that you cannot just camp anywhere. There are designated sites. If those are full, you can camp further down Cascade Creek or by Pawnee Lake.
- Please leave no trace. This place is gorgeous and popular. Leave it beautiful for others.
- Bugspary is needed in June/July, and always have sun protection and plenty of hydration.
- There is an eastern approach that involves parking at Brainard Lake (fees necessary) and climbing over Pawnee Pass. This is a closer trailhead to the Front Range but involves more up and down.
Algonquin/Sawtooth
Route: Out and Back
Stats & Difficulty
- ~17 miles for both (~13.5 for Sawtooth)
- ~4,650 ft. for both (3,300 ft for just Sawtooth)
- Difficulty: Very Hard
- YDS Rating: Class 3 for South Algonquin, Class 2 for Sawtooth and Algonquin
Both Algonquin and its unofficial South Summit (requires Class 3 scrambling) have stupendous views into the heart of the western IPW. Photo: Timo Holmquist
Attraction: This is one of the last empty places in the eastern IPW, with gorgeous views of the rugged western side. These mountains aren’t on any lists (except Sawtooth, which has an iconic profile and harbors some great backcountry ski lines). It is likely you will have large stretches of trail to yourself. Once you get on Buchanan Pass and head south, the difficulty increases but never exceeds Class 2 unless you tack on Algonquin’s unofficial south summit. The view from either is phenomenal.
Popularity<: Low to Medium on Algonquin. Medium for Sawtooth.
Important Notes:
- You do not HAVE to summit Sawtooth to get to Algonquin. The guide I’m linking here has all the details of an east ridge Sawtooth approach, but the easiest method is to get to Buchanan Pass and tundra stroll south. By using this method, you can circle around Sawtooth if it’s not of interest.
- You NEED a lifted 4WD or AWD rig to make the closest trailhead. There are big rocks, gaps, and several water crossings to consider. If you don’t have one, park at Camp Dick or Beaver Reservoir and just walk the road. It’s boring, but you can make up a lot of distance if you start before sunrise and haul.
- No water or shade above treeline; plan accordingly.
- Watch for thunderstorms.
Bison Pk.
Route: Out and back
Stats & Difficulty:
- ~12 miles
- +/- 3,750 ft.
- Difficulty: Hard
- YDS Rating: Class 2
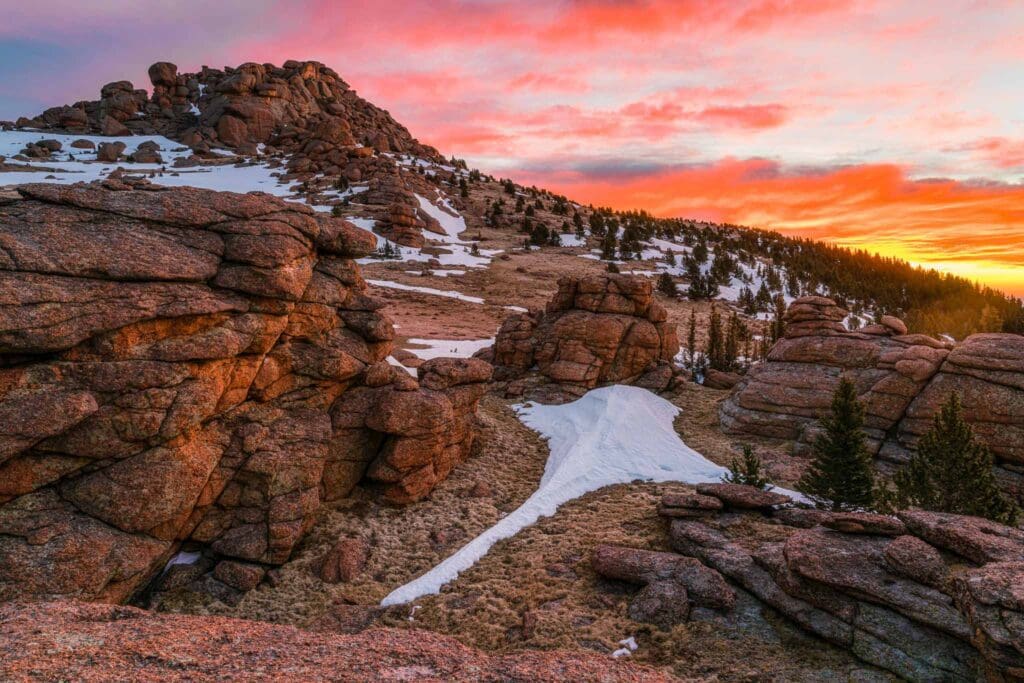
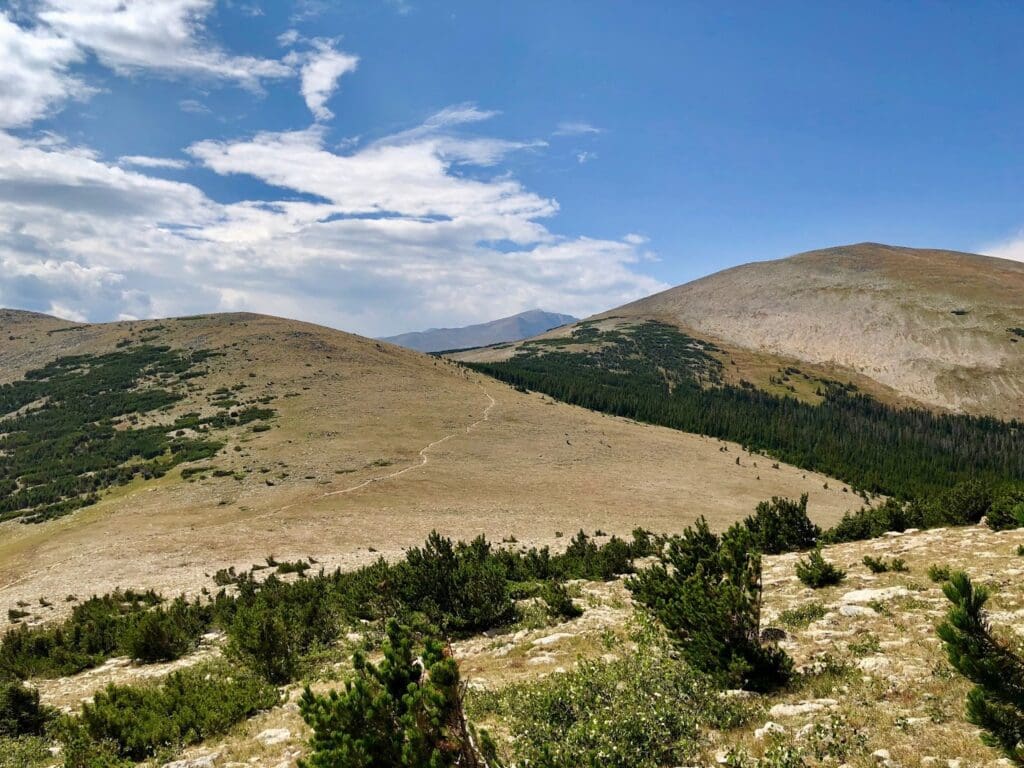
Sunrise on Bison Peak in the Lost Creek Wilderness near Tarryall, Colorado.
Attraction: A tough but unique mountain in the central Front Range that features many twisted rock pinnacles and towers strewn amongst the otherwise grassy summit. A very cool hiking feature for a beautiful mountain. It’s also in an area that gets visitors but not nearly like the inundation that happens along I-70, Rocky Mountain National Park, or the areas around Pikes Peak.
Popularity: High on summer weekends, moderate most other times.
Important Notes:
- Alpine weather can change dramatically
- Pack lots of water, nutrition, and sunscreen
- If you packed it in, you can pack it out, don’t leave trash
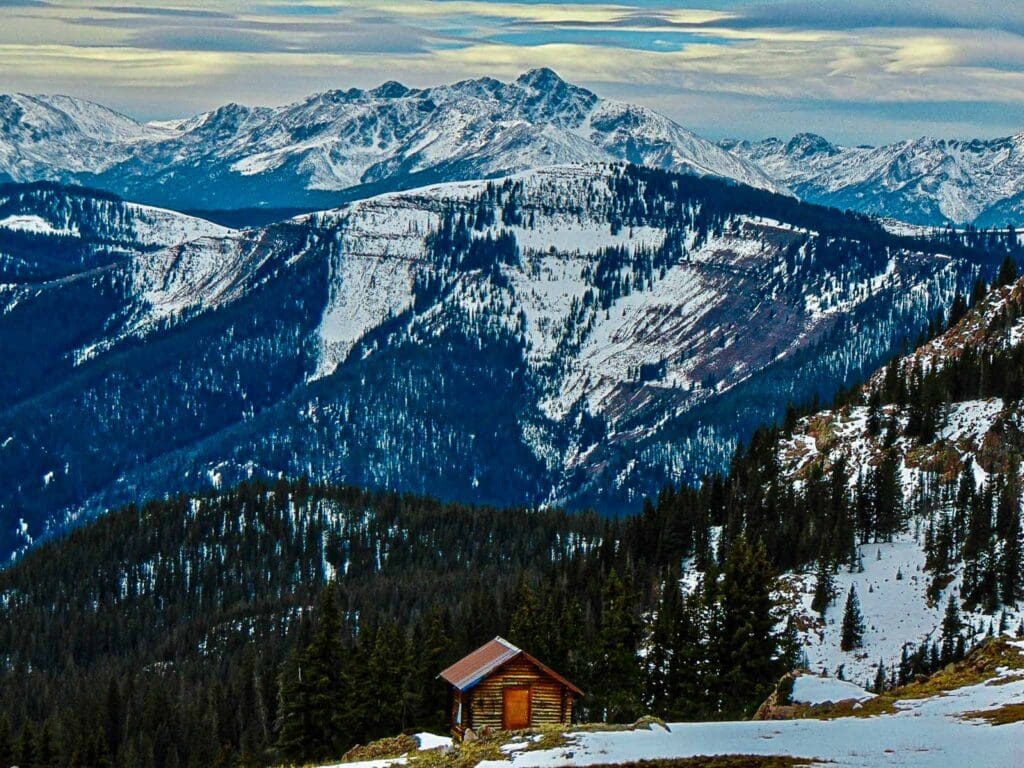
Rocky Mountain National Park (RMNP)
Iconic, easily accessible, and loaded with peaks, Rocky Mountain National Park is a stunning testament to glacial, geological, and ecologic history. It’s a hiker’s park, so while you may have heard of the crowds at Bear Lake Trailhead (it’s true) or the slow winding drive up Trail Rdige, the real gems of the park like a little deeper. If it’s your first time in the area, hit up the main attractions, Emerald Lake, Lake Haiyaha, Trail Ridge Road, and maybe Sky Pond, but if you want the real deal, check out the hikes below. They rock!
Check out my Adventurer’s Guide to Rocky Mountain National Park for comprehensive information on the area, from its cultural and ecological history to a list of all the activities available.
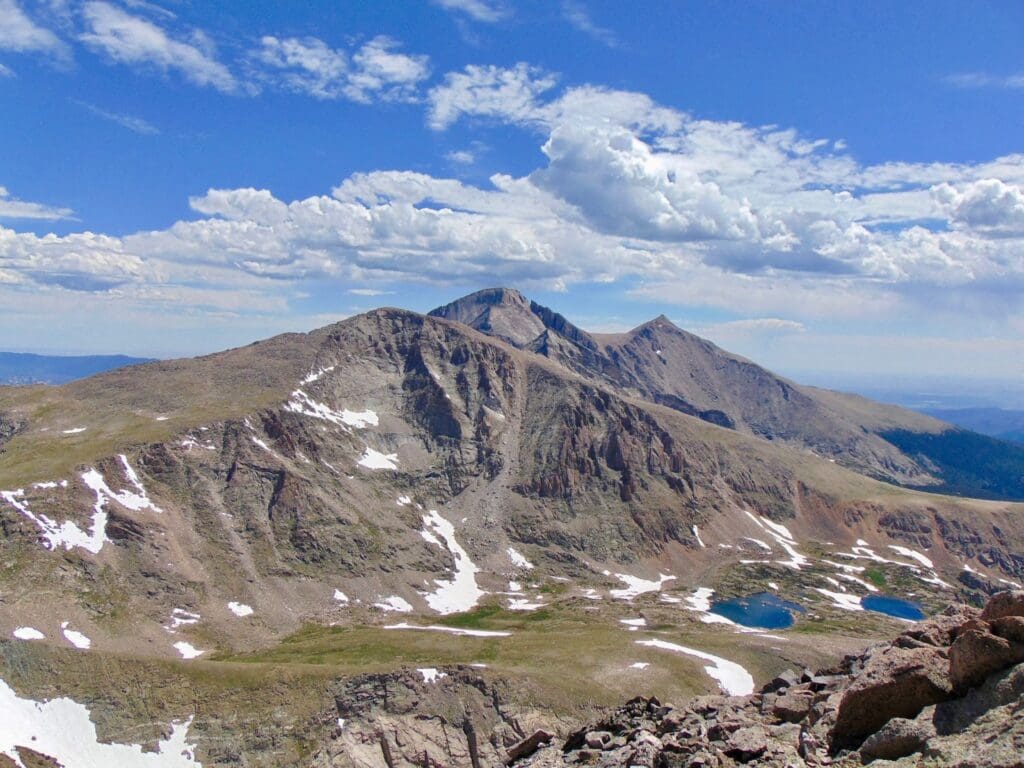
Mt. Alice from the trail to Mount St. Varin in Rocky Mountain National Park: Photo: Timo Holmquist
Mt. Alice
Route Type: Lollipop Loop
Stats & Difficulty:
- ~17 miles
- +/- ~4,800 ft.
- Difficulty: Very Hard
- YDS Rating: Class 2+/3
Summit views from Mt. Alice with Chiefs Head, a little bit of Pagoda, Longs and Meeker visible. Photo: Timo Holmquist
Attraction: This route has it all, but at 17 miles, it is long. You can break it up with a camp at Thunder Lake or down by the campsites trail near Ouzel Falls. Why go 17 miles into a remote corner of the park known as Wild Basin? Well, let me tell you. You get waterfalls (Copeland Falls, with side trails to Calypso Cascades and Ouzel Falls), you get stunning alpine lakes (Lion Lakes, Lake of Many Winds, and Thunder Lake), you get long stretches of alpine, and you get a great Class 2+-3 scrambling introduction on the Hourglass Ridge. The scenery is stunning, and as you’re climbing up to Mt. Alice, the summit block looks like a giant cube tilted to one side, giving it an immediately iconic profile. Plus, from the top, you get one of the best views of the mountains around Longs Peak and how large they are compared to the Great Plains below. This hike hits a ton of highlights in one go and is one of my favorites.
Popularity: Moderate. The distance really limits it from being more popular.
Important Notes:
- Getting into National Parks isn’t free. Check out the details here.
- There isn’t much shade above treeline. Watch for thunderstorms and sunburn.
- Bugs can be pretty aggressive early-mid summer, especially with areas of stagnant water.
- Practice leave no trace principles. Leave the place better than you found it so the magic can continue to inspire people for years.
- There are often Bighorn Sheep along the grassy slopes of the Continental Divide, do not approach wildlife! Especially animals with horns!
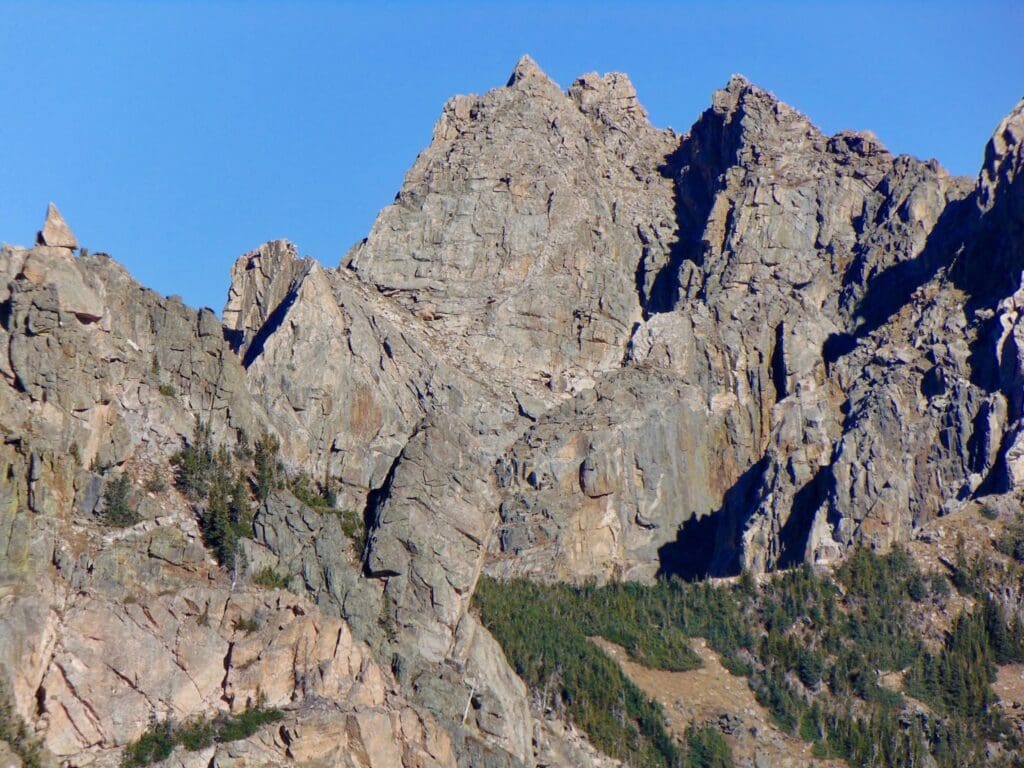
Upper Glacier Gorge Lakes
Route Type: Out and Back, potential for lollipop Loop
Stats & Difficulty:
- 10-17 miles depending on your specific objective
- ~1,850 ft to get into the Upper basin (over 4,000 ft. if you climb Pagoda, Chiefs head, or Mchenrys)
- Difficulty: Hard to Very Hard
- YDS Rating: Class 2 to get into the basin, Class 3 & 4 routes in abundance, along with rock climbing on Chiefs Head, Pagoda, Keyboard of the Winds, Arrowhead, Spearhead, and McHenrys Pk.
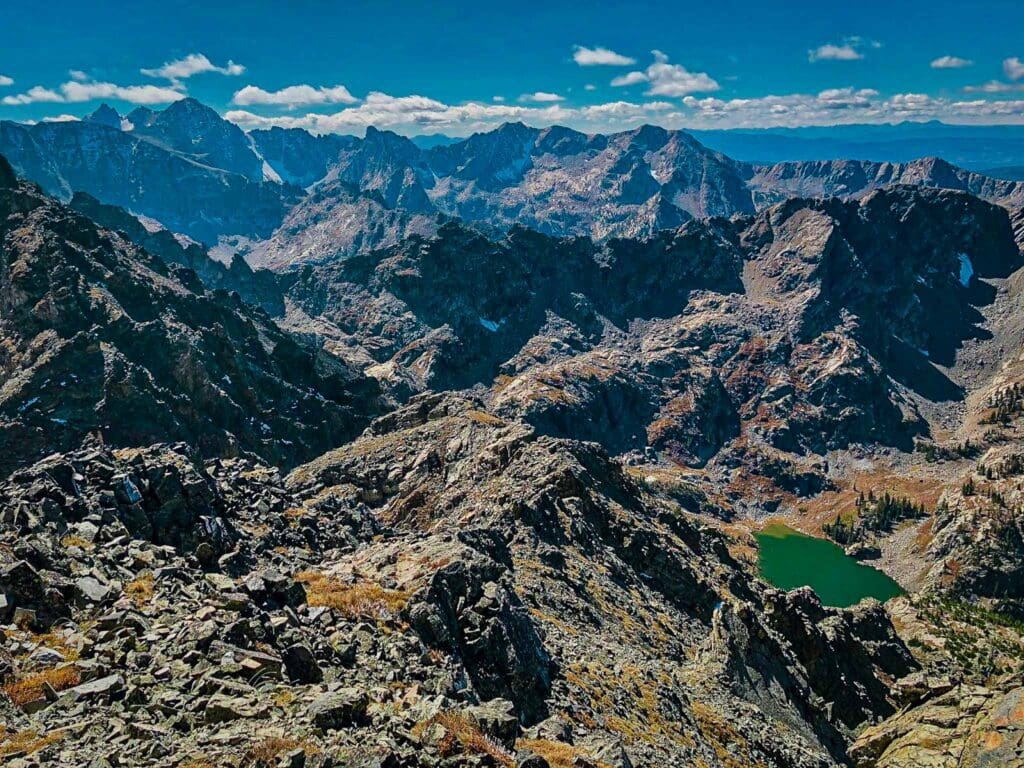
Stunning views begin to open up as you ascend into the Upper Gorge. Photo: Timo Holmquist
Attraction: Otherworldly location hemmed in by unbroken rock walls reminiscent of younger mountain ranges like the Sierra or Alps. This is a stunning place. It’s also popular. The Glacier Gorge Trailhead was full by 4:30 AM on my last hike there in July. The backup lot is Bear Lake, but you need to have the right passes to get here. The prerequisites may discourage you from attempting to get here but stick with it; I guarantee it’s worth it. The beauty begins around Mills Lake and continues intermittently until Black Lake, where the imposing cliffs of Arrowhead and McHenrys loom over. Once you hop up into Upper Glacier Gorge (an unofficial trail but well-used) you’ll get a massive view of the rock prow on the Spearhead, Keyboard of the Winds, Chiefs Head’s cliffs, and Longs Peak. Hidden up here are three alpine lakes along with numerous tarns and scrambling routes. For rock climbers, Chiefs Head, Spearhead, and Arrowhead offer numerous possibilities. This is one of those places that help you understand why this area became a national park.
Popularity: High near the parking lot, you’ll lose a lot of the crowds by Mills Lake and more once you ascend beyond Black Lake.
Important Notes:
-
-
- There isn’t much shade above treeline. Bring sunscreen.
- Keep an eye on summer thunderstorms.
- Bugs can be pretty aggressive early-mid summer, especially with areas of stagnant water.
- Practice leave no trace principles. Leave the place better than you found it so the magic can continue to inspire people for years.
- Afternoon thunderstorms can be severe. Always check the weather before you go out, especially since the destination is above treeline.
- Elk frequent the upper glacier, do not approach them, they are wild animals, and they are bigger than you.
-
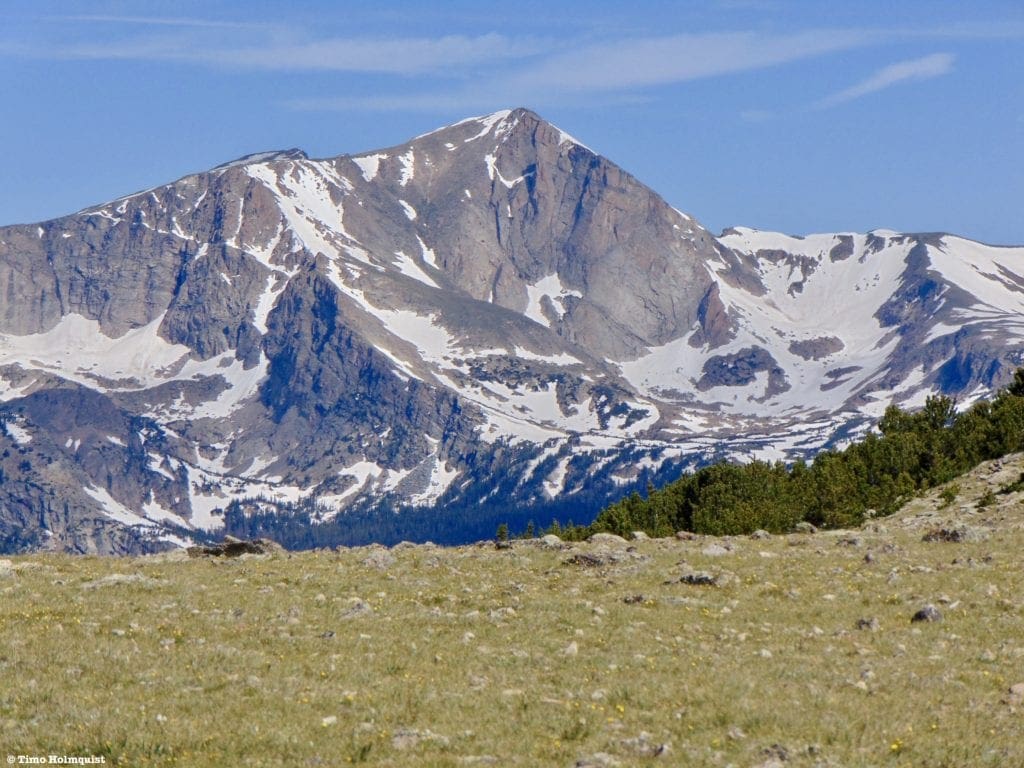
St. Vrain Mountain is the highest peak to the right. Photo: Timo Holmquist
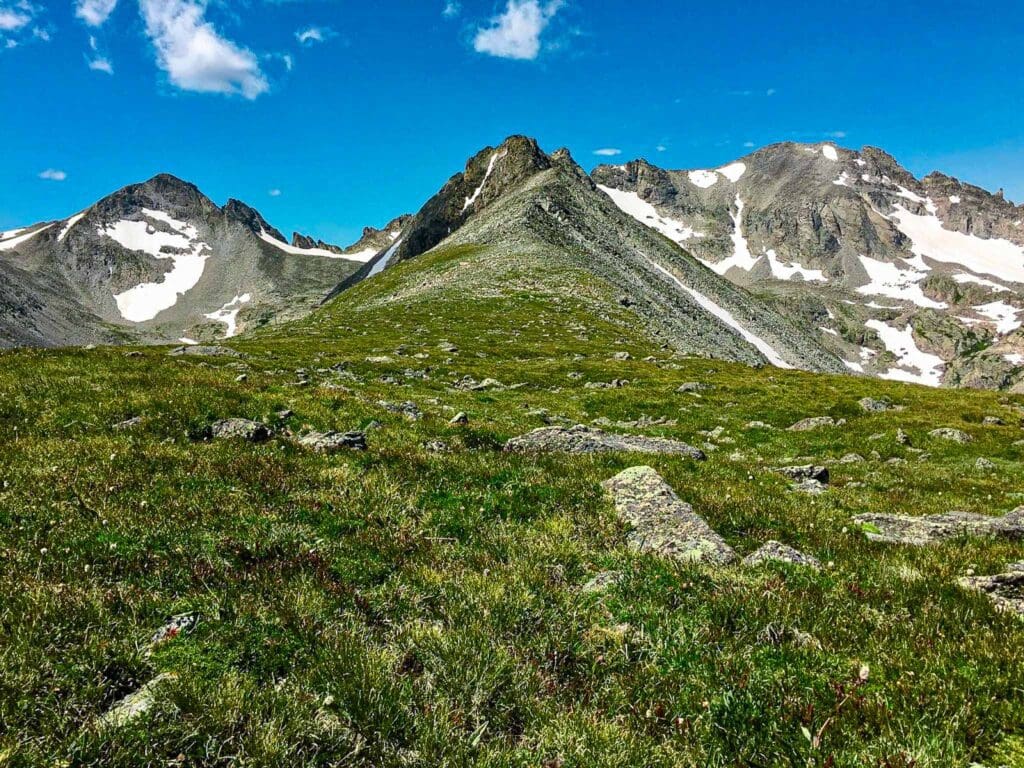
St. Vrain Mountain
Route Type: Out and Back
Stats & Difficulty:
-
-
- ~8 miles
- +/- 3,250 ft.
- Difficulty: Moderate to Hard
- YDS Rating: Class 2
-
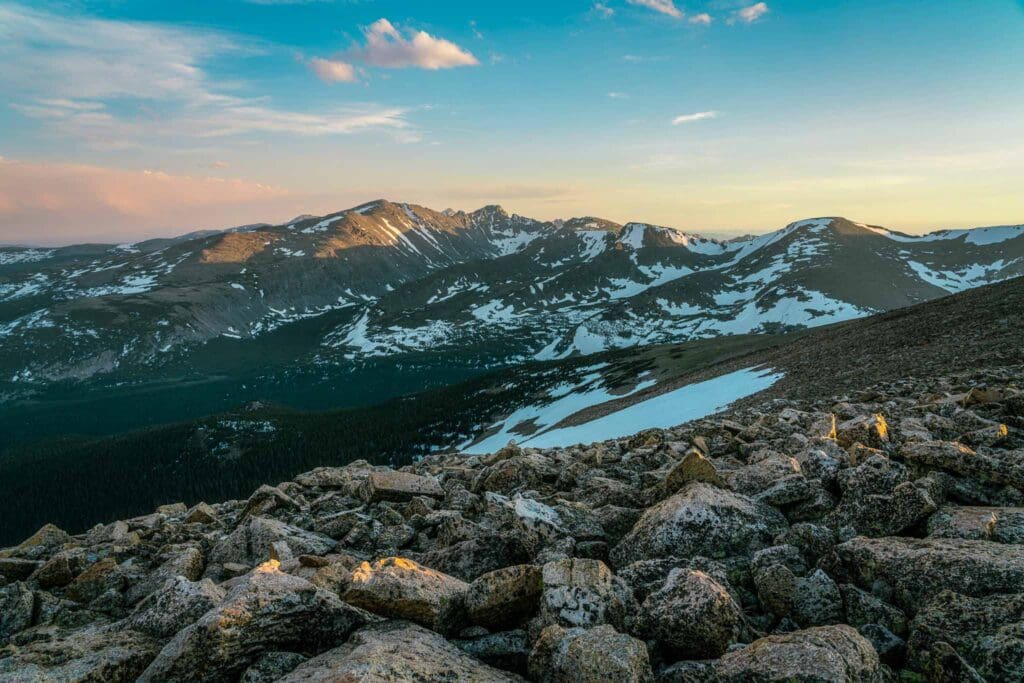
Sunset from the summit of St. Vrain Mountain in the Indian Peaks Wilderness.
Attraction: Beautiful alpine destination with minimal off-trail travel, big long-distance views, and gorgeous alpine meadows brimming with wildflowers in late June-July. The distance is also quite manageable at a little over 8 miles, although the elevation gain is significant. This is also a great springtime backcountry skiing area.
Popularity: Medium to High on summer weekends. Low to moderate when snow-covered and later in the autumn.
Other Notes:
-
-
- There are a lot of things called St. Vrain in this part of Colorado, including several braids of a river, the mountain, a park in Longmont, and I’m sure more that I’m forgetting. If someone asks, you’re going for Mount Saint Vrain.
- While this trail technically crosses into the national park, and its summit is within the boundaries, the trailhead is outside of it. The last time I hiked it, there was no fee collection at the trailhead.
- Sunburn is common in the alpine, and so are summer thunderstorms. Check the weather.
- Bugs can be pretty aggressive early-mid summer, especially with areas of stagnant water.
- Practice leave no trace principles. Leave the place better than you found it so the magic can continue to inspire people for years.
-
Wrap Up
Well, there you have it, 25 of my favorite intermediate to difficult hiking objectives in the state of Colorado. These destinations should help push you gradually into harder terrain, which blows the door open on gorgeous destinations within the state. They are not my only favorite hikes, and perhaps in the future, I’ll round up my favorite serious scrambles and backcountry ski adventures, but for now, remember a few key components.
-
-
- These hikes are not for beginners.
- Route finding is required.
- Some scrambling is required.
- There will be a bit of exposure on some routes.
- No legitimate hiker has ever made all of their objectives. If the weather is getting bad or you risk safety by continuing, turn around and try again later. It’s not worth your life.
- Do the research. Get into it. Don’t let fear and surprise drive your emotions when you’re moving through highly consequential terrain. Prepare early and often.
- Have fun! These places are hard to reach, and many don’t take the time to get there. Making one of these objectives is a testament to your outdoor enthusiasm and desire to become a more competent outdoor recreationist.
-
Happy trails, and maybe I’ll see you out there!

Enroll With Global Rescue Prior To Embarking On Your Next Adventure.
When a travel emergency arises, traditional travel insurance may not come to your aid, and a medical evacuation can cost up to $300,000.
The cost when you have a Global Rescue membership? $0. That’s why when the unexpected happens, you want the leader in rescue, evacuation and medical advisory behind you. You want Global Rescue.
Terms of Use:
As with each guide published on SKYBLUEOVERLAND.com, should you choose to this route, do so at your own risk. Prior to setting out check current local weather, conditions, and land/road closures. While taking a trail, obey all public and private land use restrictions and rules, carry proper safety and navigational equipment, and of course, follow the #leavenotrace guidelines. The information found herein is simply a planning resource to be used as a point of inspiration in conjunction with your own due-diligence. In spite of the fact that this route, associated GPS track (GPX and maps), and all route guidelines were prepared under diligent research by the specified contributor and/or contributors, the accuracy of such and judgement of the author is not guaranteed. SKYBLUE OVERLAND LLC, its partners, associates, and contributors are in no way liable for personal injury, damage to personal property, or any other such situation that might happen to individuals following this route.


