


High Point:
12,933 ft. on Tenmile Peak (aka Peak 2)

Total Ascent:
~4900 ft. (more than 5k if you tag Mt. Royal)

Difficulty:
Very Difficult (Class 3, options for Class 4)

Distance:
~13.6 miles

Waypoints:
39.41073°N, 106.08398°W

Route Type:
Loop
Overview
The numbered Tenmile Peaks are quite obvious from many points in Summit County and have attracted hikers, scramblers, and backcountry skiers for a long time. The ski resort of Breckenridge lies on the range’s eastern side, and the 14er Quandary Peak is the monarch of the range. The first ten peaks from north to south have numbers, and the first four have some prime scrambling on them. Many people opt to complete a hike of all 10 peaks with a pick-up in Breckenridge, but the last six are basically alpine walks. If you want scrambling variety and a fantastic adventure, you can lop off the first 4-5 and connect a loop with parts of the Colorado Trail, which is what this guide will describe.
The next time you head west on I-70 from the Front Range, pay attention to two diamond-shaped peaks as you head toward Silverthorne after the tunnel. They are on the left side of the highway, though appear to be in front of it at many points and are very, very hard to ignore. Those are Peak 1 and Tenmile Peak (aka peak 2), and the view of them from I-70 or behind Lake Dillon on US 6 is more than enough of a reason to climb them. It is a gorgeous, dramatic range, and it has a lot to offer the discerning scrambler, peak bagger, or backcountry skier.
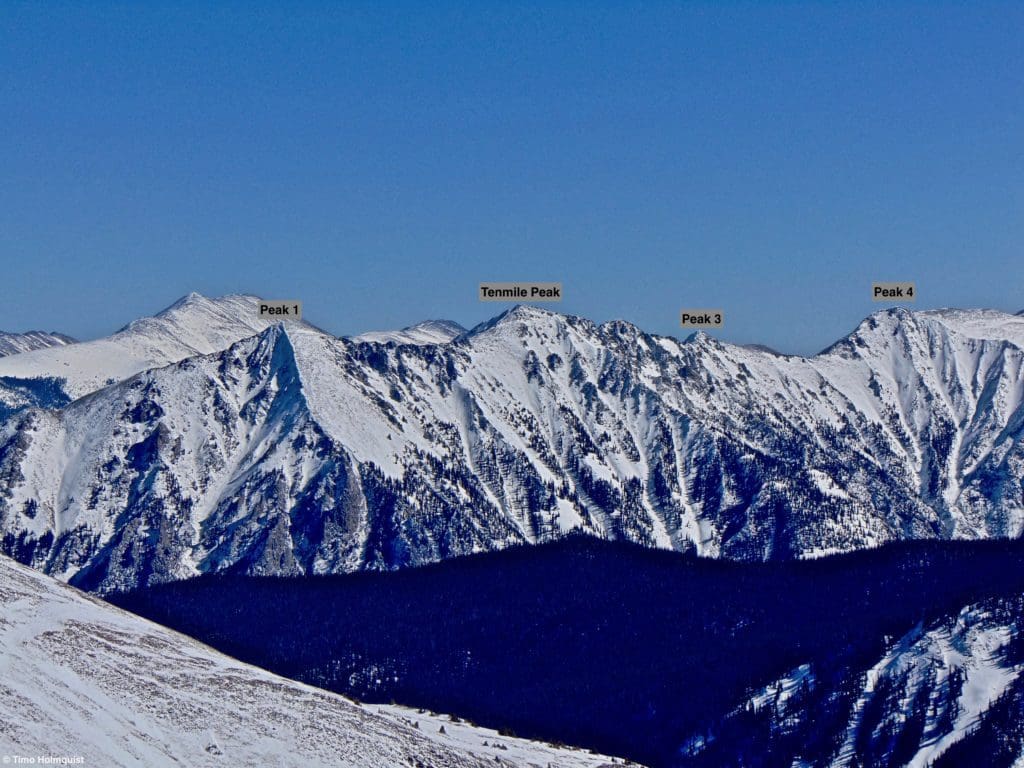
The bulk of the traverse from the west. A lot of scrambling occurs between Tenmile and Peak 3, with the crux moves on Peak 4.
Table of Contents
Article Navigation: Click on any of the listed items in the table of contents below to jump to that section of the article. Similarly, clicking on any large, white section header will jump you back to the Table of Contents.

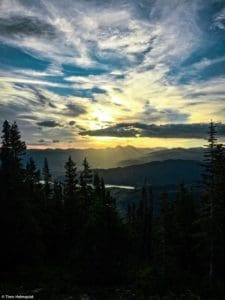
Sunrise from the lower parts of the Tenmile Traverse.
Best Alpine Scrambles in Colorado
Reach non-technical mountain summits while exploring low angle rock, traveling through talus and scree, crossing streams, navigating dense forest growth, and walking on snow-covered slopes.
Scales and Criteria
This article uses two metrics to calculate difficulty: overall distance and elevation gain. For winter ascents, a snow rating may be used, but this review covers the basic loop during snow-free summer and autumn months, so snow shouldn’t be more of a factor than a few isolated patches up high. Seeing as there are multiple places where scrambling is required, a technical rating is also employed, which uses the Yosemite Decimal System to calculate the difficulty of the moves required.
Difficulty Ratings:
- Easy: less than 5 miles, less than 500 ft. of elevation gain
- Moderate: 5-10 miles, 500-2000 ft. of elevation gain
- Difficult: 5-15 miles, more than 2000 ft. of elevation gain
- Very Difficult: 10+ miles, more than 3,500 ft. of elevation gain
Technical Rating:
- Class 1: Established hiking trail the entire length of the adventure. Low chance for injury.
- Class 2: Typically involves cross-country navigation, possibly using hands for balance but not required, steeper than Class 1.
- Class 3: Hands and feet used to scale areas; must use hands to proceed (either for balance of to help pull you up a section), increased exposure, a fall could be fatal. Helmet recommended, along with grippy hikers.
- Class 4: Climbing on very steep terrain just shy of vertical, falls could be fatal, hands employed for grip and balance continuously, ropes advised but scalable without. Helmets are highly recommended, along with grippy hikers.
- Class 5-5.4: Vertical climbing that involves technical rock-climbing moves, exposed, falls likely to be serious or fatal, possible to scale without ropes but only for very experience veterans. Helmets, grippy hikers, and/or rock-climbing shoes necessary.
- Class 5.5 and up: Not covered as scrambling, full-on rock climbing with ropes, helmets, etc.
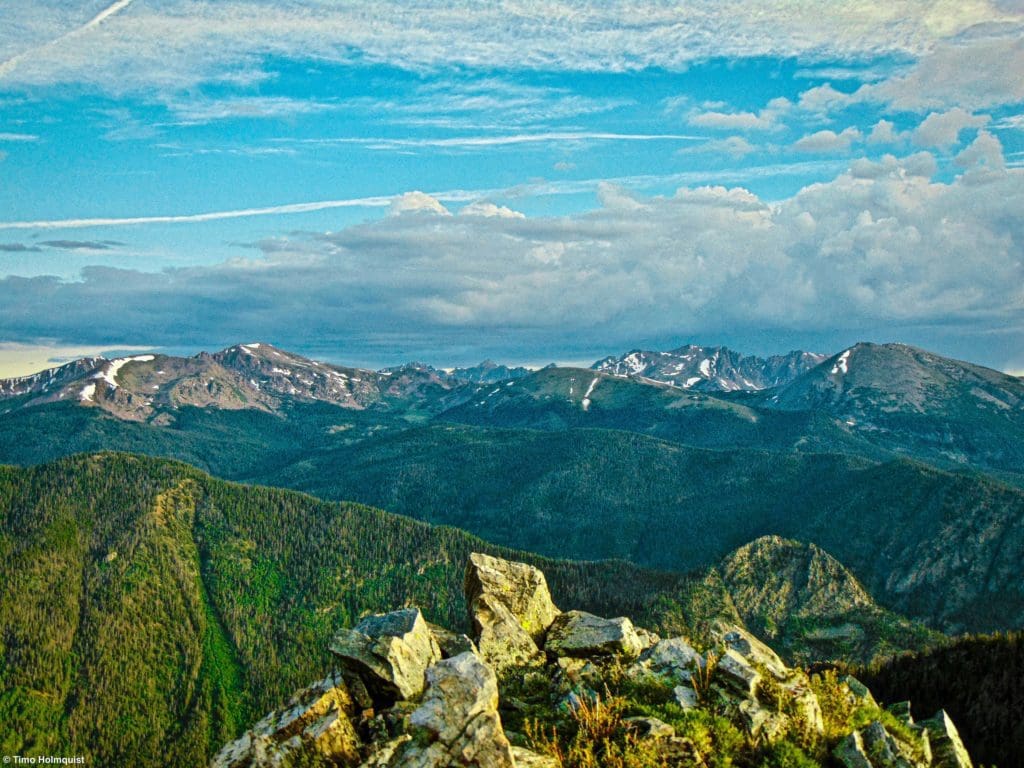
Views to the Gore Range from between Mt. Victoria and Peak 1.
Directions to Trailhead
Situated in the boisterous mountain forward Summit County and at the foot of the town of Frisco, access to this scramble is surprisingly easy. From Denver and the northern Front Range, the best way to get there is to use I-70 and head west beyond the Eisenhower/Johnson Tunnels. Take exit 201; at the end of the offramp, turn left onto West Main Road, drive underneath the highway and head into town. The first and farther parking option is to head into the Overnight Lot on the right-hand side of the road, just after you cross underneath the highway. The closer parking option will have you take West Main into town, looking for the intersection with 2nd avenue. When you find it, take a right. Drive 2nd until you see signs for Rainbow Lake Trailhead and park there.
From the west, you can take I-70 east, exit at 201 and follow the directions above. From the north (Granby or Grand Lake), take US 40 west to Kremmling and US 9 south to Silverthorne. From there, hook up with I-70 west and continue to exit 201. From Winter Park, head up over Berthoud Pass, connect with I-70 and head west, again, until exit 201.
From points south, there are a few ways to get here. If you’re driving from the area around Colorado Springs, you can head north through Denver until finding I-70, or head west on US 24 through Woodland Park and into South Park. From the intersection with US 9, take a right (north), continue through Fairplay, over Hoosier Pass, through Breckenridge, and toward Frisco. Take a left on West Main as you pass town, find 2ndavenue and take a left to the Rainbow Lake Trailhead.
The last variations are for people coming up from Leadville, Salida, Gunnison and the San Luis Valley. From Gunnison, take US 50 east over Monarch Pass, 285 North to US 24, continue north to Leadville, then take 91 north, hook up with I-70 at Copper, head east to Frisco and exit at 201. From Buena Vista, Salida and the San Luis Valley, head up US 24 to CO 91 and hit I-70 east by Copper, taking it to exit 201.
As you can see, the range’s convenience to I-70 allows for multiple access options, but ultimately (unless coming up from Hoosier Pass) depends on the highway being open and clear.
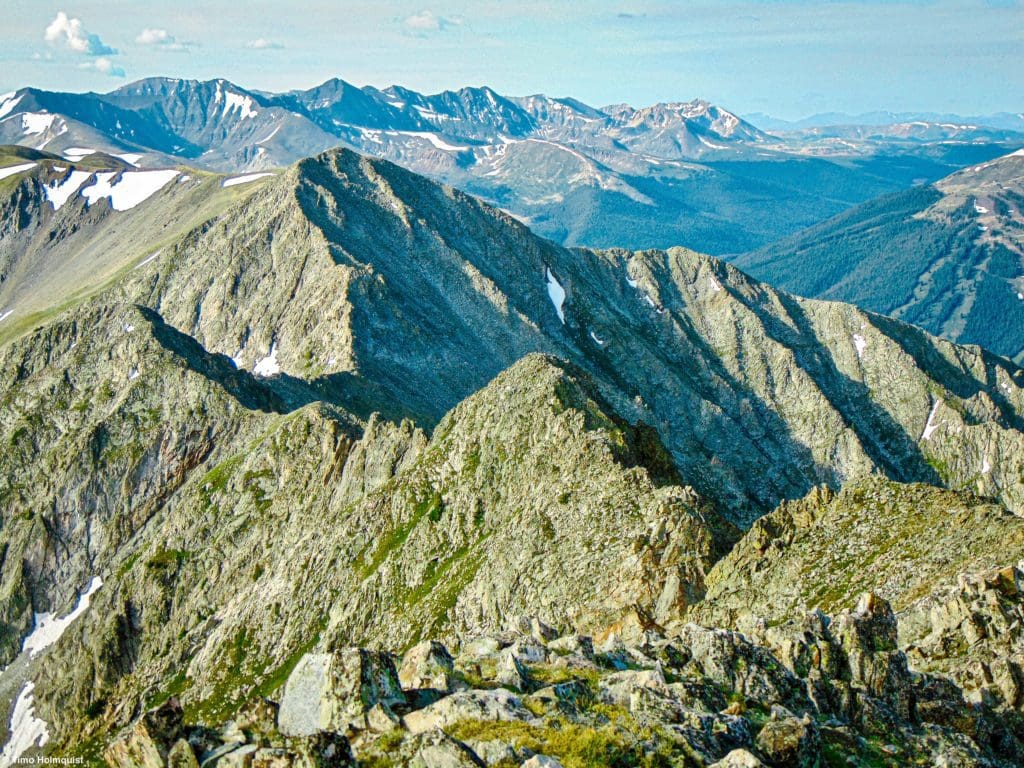
The dramatic character of the scramble from the top of Tenmile Peak.
Field Notes
Seeing as the majority of access requires at least a nominal stretch of I-70, checking traffic on the mountain thoroughfare should be a top priority in the days and hours before you launch. CDOT has a good site for monitoring road conditions with traffic maps, construction updates and multiple roadside cameras.
The Tenmile Range is not terribly far from many population centers, and you may have stretches of cell reception along the crest of the trail. However, it’s always advisable to bring navigation equipment and familiarize yourself with the area by using mapping software or carrying a map. As far as weather is concerned, the range is relatively exposed and not a place you want to be when a lightning storm materializes.
To start with, look at Frisco’s 7-day extended forecast since the town is very near the beginning of the trail. Opensummit has a forecast for Peak 1, which is quite handy. You need to pay to unlock all the Opensummit weather features, but it is absolutely worth it. For free forecasts, use this one for Crystal Peak. Numerically, Crystal Peak is Peak 11, not right next to your route, but in the same range and a good bellwether for the region. Pay attention to temperatures (highs and lows), wind gusts, precipitation and lightning potential.
Since a lot of the route is a scramble, bring appropriate gear, grippy shoes, optional helmet, and a first aid kit. You’re also going to be gaining a ton of elevation very quickly, so keep hydrated and apply sunscreen when you break treeline.
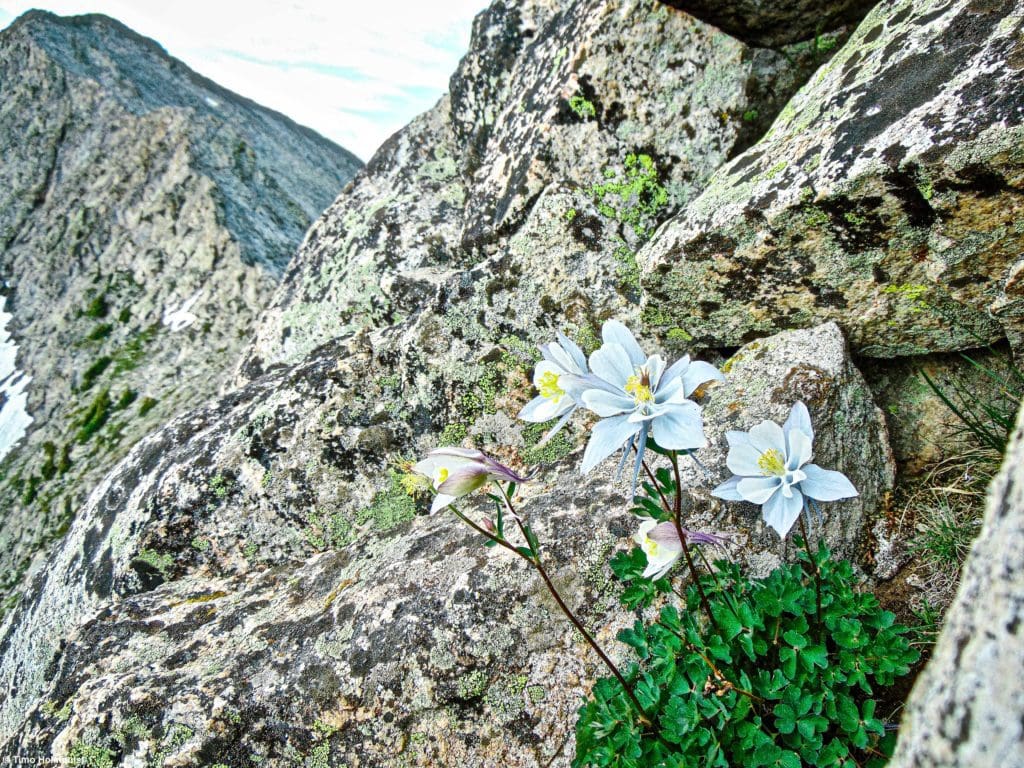
A hardy Columbine flower grows on the rocky traverse with Peak 4 looming in the background.
Journal
Once you’re parked at the trailhead, backtrack to the Frisco Bike Path, which is paved, and take it west (left). You’ll only be on it for 0.2 miles, breaking off when you see a signed trail for Mount Royal. Once sighted, take the well-marked trail and begin a thigh-burning climb into the hills. Here’s a town of Frisco trail map to help get you started (look at Map 2).
From the trailhead to the top of Peak 1, you gain more than 3700 feet in roughly 3.7 miles. That comes out to a little more than a thousand feet a mile. This is a tough ascent, but the rewards are superb once you get above treeline. Before you do that, however, you’ll pass by a side trail to Mt. Royal at roughly 1.6 miles. This is not a requirement for the scramble, but a short side trail (~0.4 miles and another 220 ft. of gain) gets you to the leading northern edge of the Tenmile Range. Mt. Royal does not have enough prominence to be a separate peak, but it is named and highly visible from I-70 as you pass Frisco.
The sun rising to the east as you begin your climb. The two twin peaks jus to the right of the sun are the 14ers, Torreys (left) and Grays (right).
The same situation goes for Mt. Victoria, which you’ll pass as well. It doesn’t have enough prominence to be a separate peak, but it is named and has some radio towers on it. Mt. Vic also sits at the edge of the trees, and beyond it, the views really start to take on a life of their own.
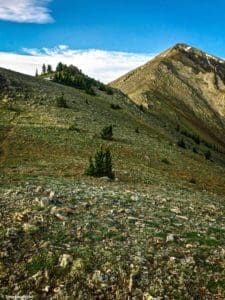
The character of the ridge beyond Mt. Victoria up to Peak 1.
While Peak 1 rears up like a formidable opponent, there isn’t a lot of scrambling on this peak. Yes, it’s a slog to the top, but the path is usually clear, and the rock-hopping near the top is an easily manageable light Class 2. There’s one area where you want to veer right of the ridgeline to avoid a few rock fins, but again, the path is relatively clear and if you’re having trouble, find the easiest way to traverse around any obstacles that you encounter. Make sure to try and stay off of any sensitive vegetation as well.
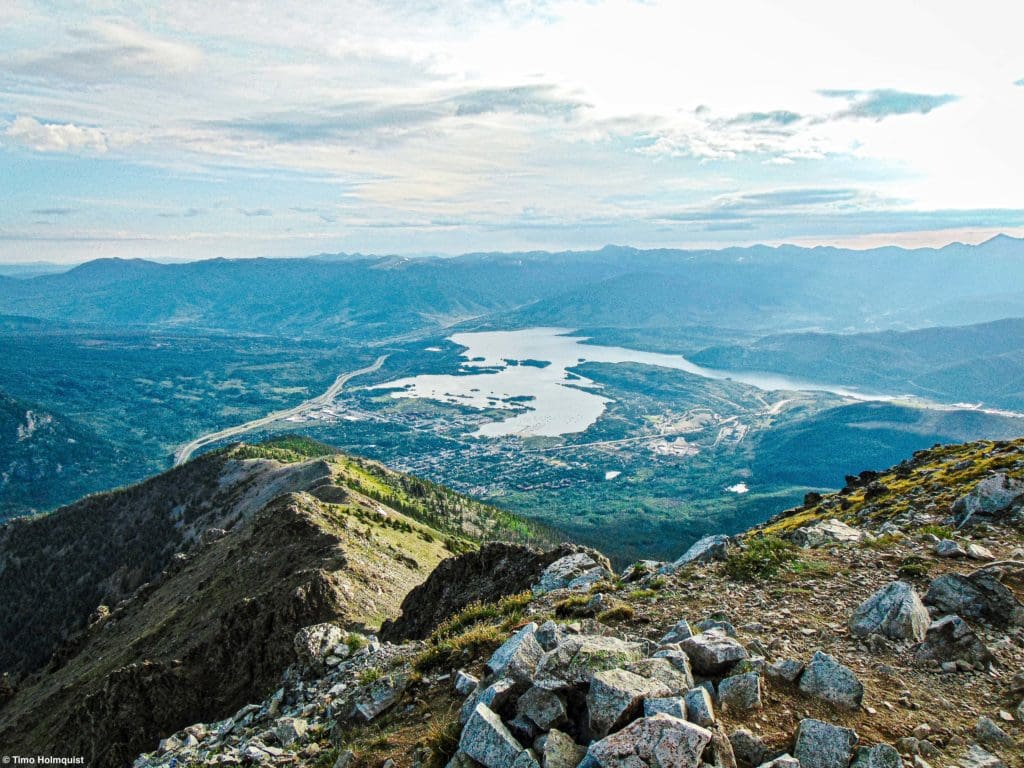
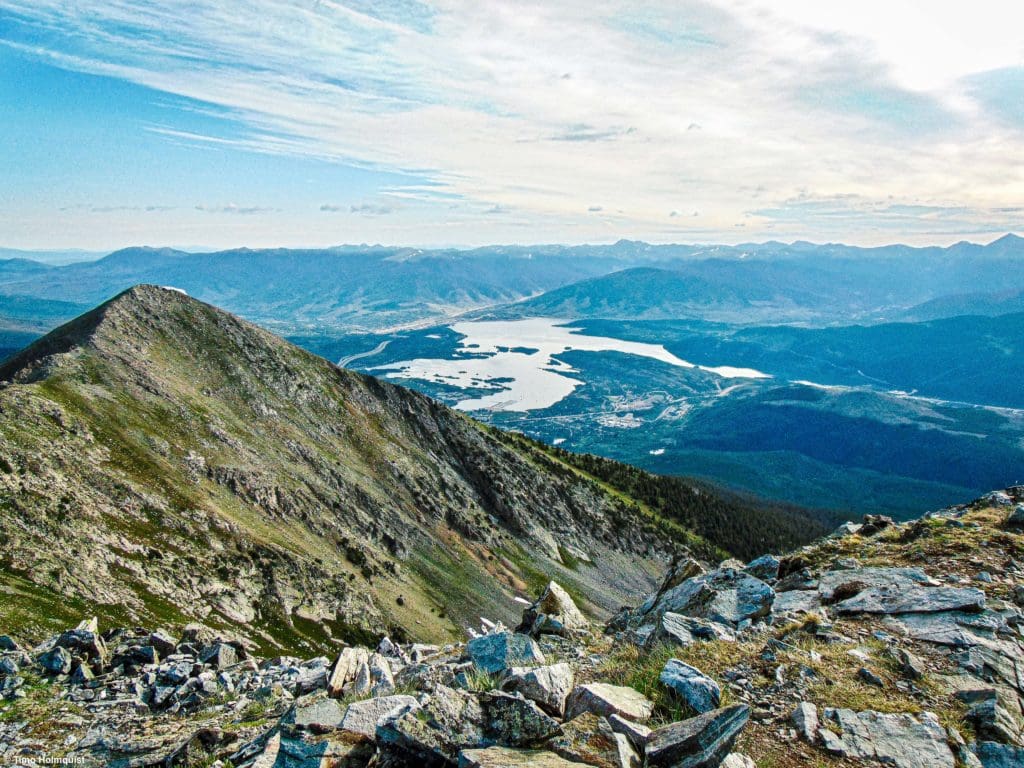
Looking back toward Mt. Victoria, Frisco, and Lake Dillon far below you from the top of Peak 1.
Summitting Peak 1 is quite an accomplishment on its own because of the relentless incline. The views are also superb, with seemingly endless mountain ranges punctuated by steep canyons and the shimmering shores of Lake Dillon. Once you’ve taken time to soak in the surround, set your sights ahead to the monarch of this scramble, Tenmile Peak.
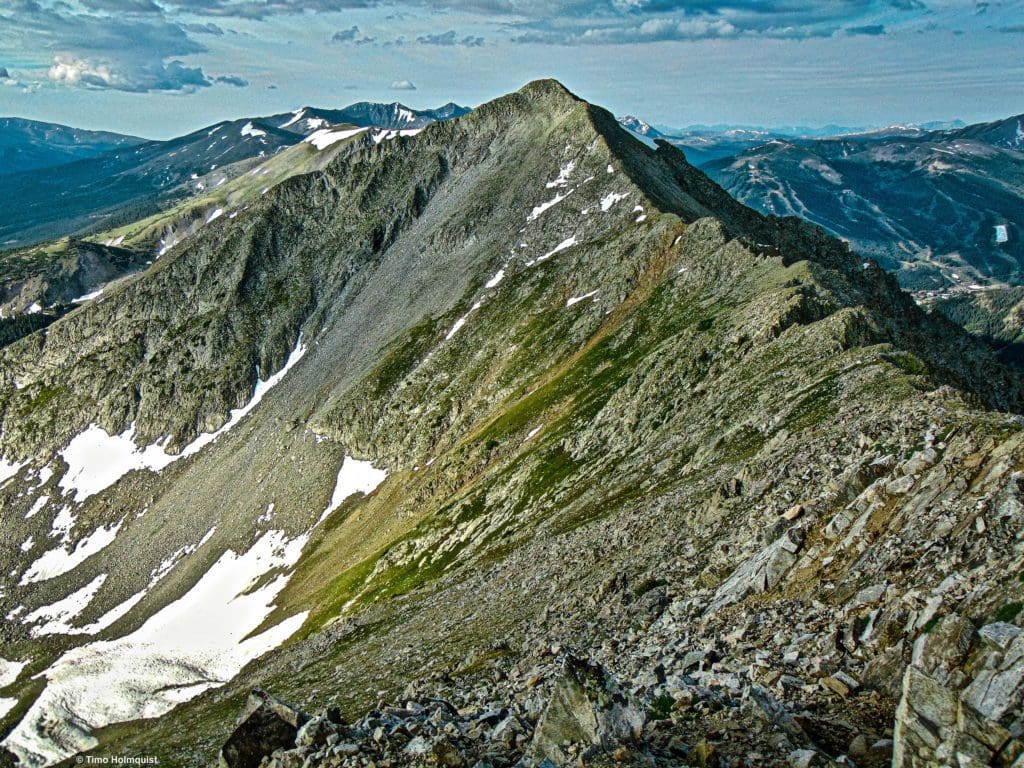
Tenmile Peak, your next target and the connecting ridge to it. The slopes of Copper Mountain are to the right.
The traverse to Tenmile is not difficult, following an aesthetic ridgeline with an occasional Class 2 move thrown in for good measure. Don’t let this section lull you into complacency: the scrambling is coming.
From the top of Tenmile, looking back to Peak 1.
When you’re ready, begin the initially easy descent from Tenmile’s summit west. The first stretch is reminiscent of the last traverse from Peak 1 and should keep you in high spirits. Once you begin descending into the first significant notch, the scrambling kicks in.
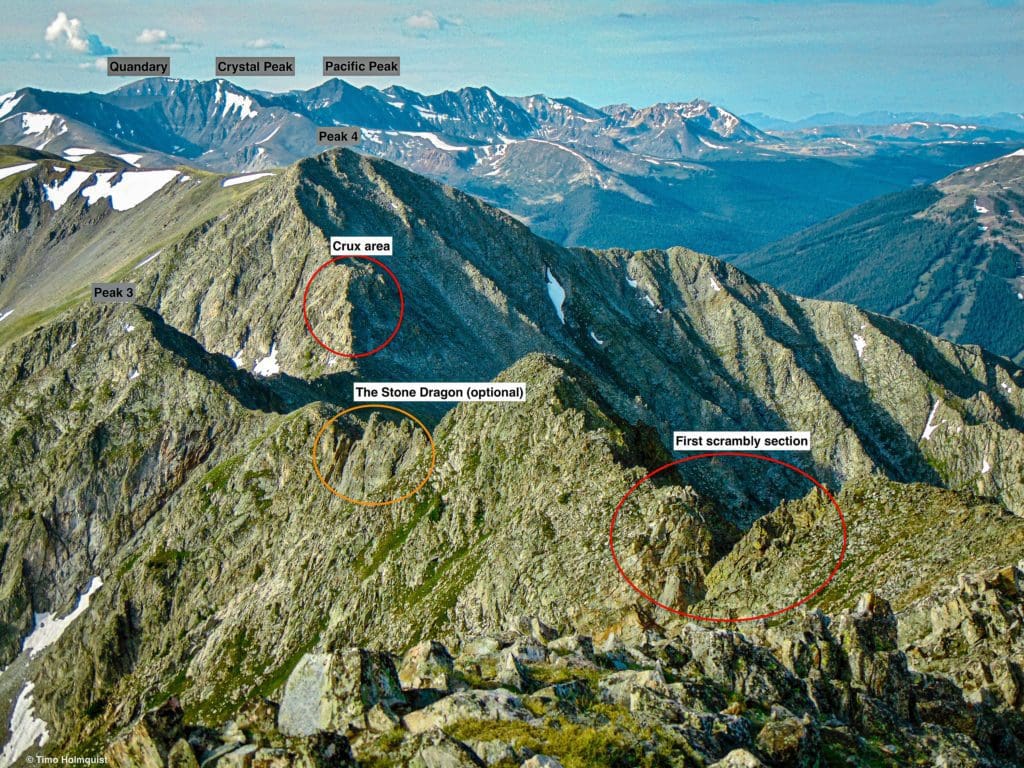
A preview of the next parts of the traverse. At multiple points, you’ll be hugging the western edge of the ridge, so not all sections are visible.
As you approach the notch, the ridge will thin significantly, and you’ll have to thread your way through a section of upturned rocks. There are some Class 3 moves thrown in here. Descend into the notch on angled Class 3 slabs and note that the Class 5 vertical wall on the other side of the notch can be passed on its western side.
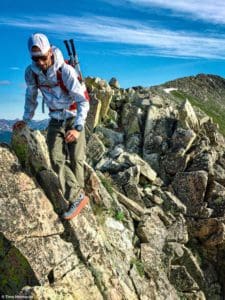
My scrambling buddy clambering over upturned rocks.
Once you pass the notch, traverse below the crest until finding a gully back up to the ridgeline and pop back onto the eastern side. From here, continue threading along the crest, where a smattering of Class 3 moves are present to aid in what seems like much harder scrambling.
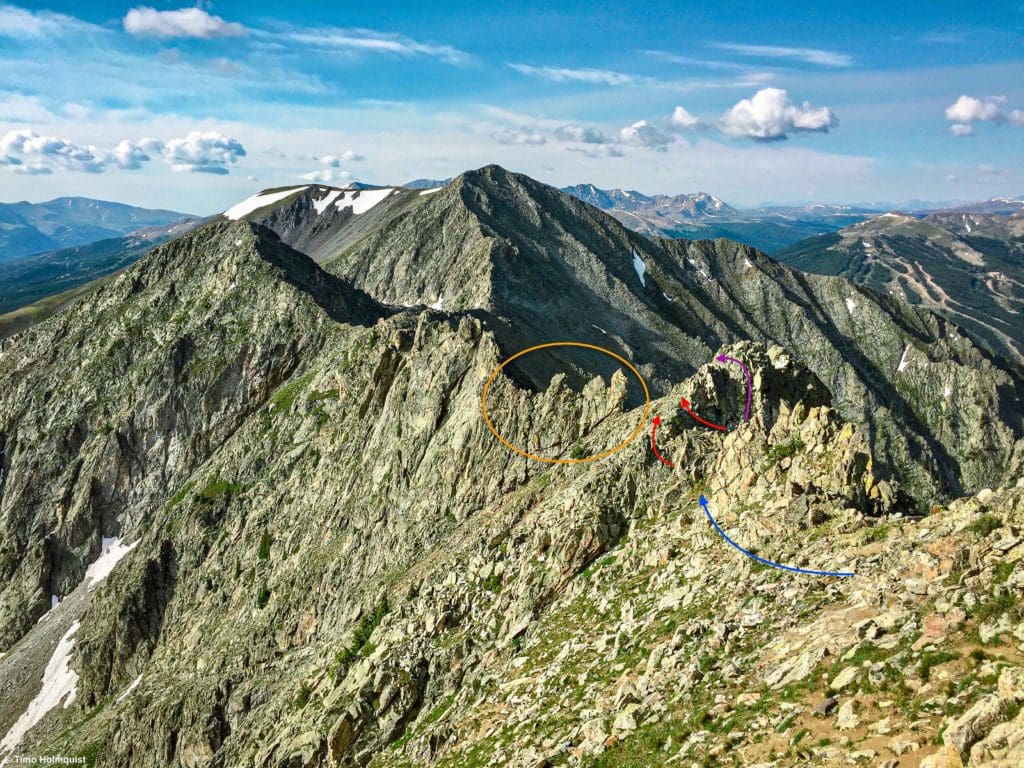
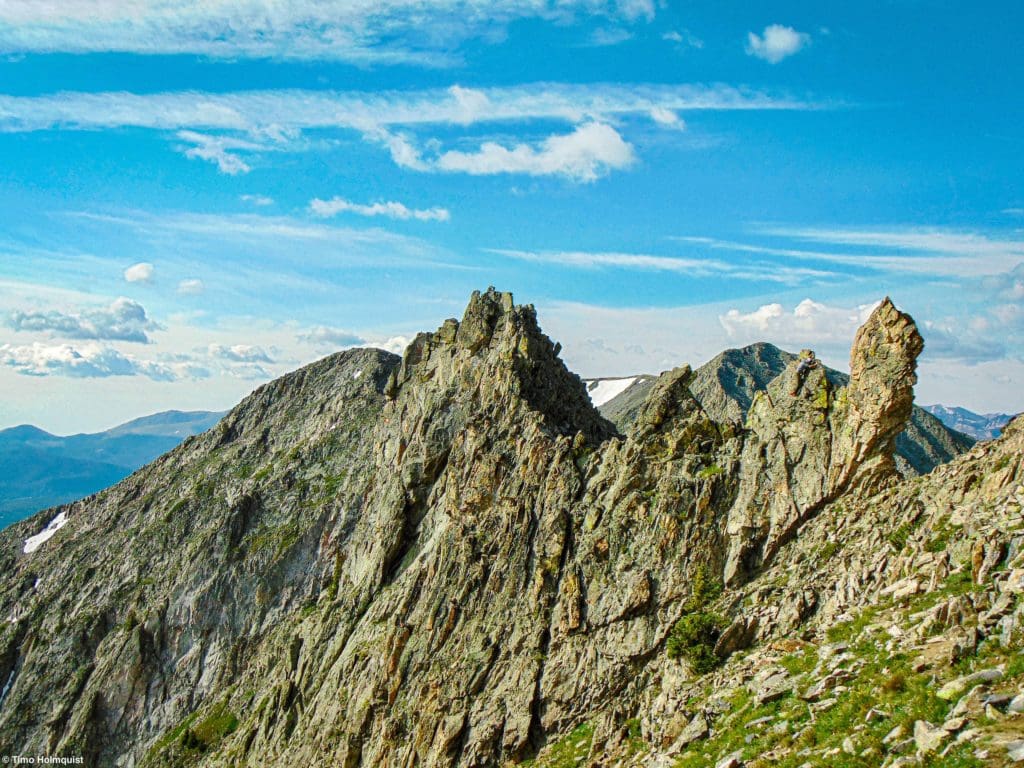
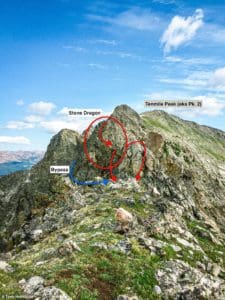
The ridge on the other side of the first notch difficulties. The orange circle is the Stone Dragon, the red lines are Class 3 options, and the purple is a Class 4 alternative.
There are likely some easier workarounds on either side of the ridge at points, but a lot of them require gaining and losing hundreds of extra feet of elevation, which is a big ask on a big day. The simplest method is to stay close to the crest and test out some scrambling. After you clamber over another knob on the ridge, you should come to the Stone Dragon.
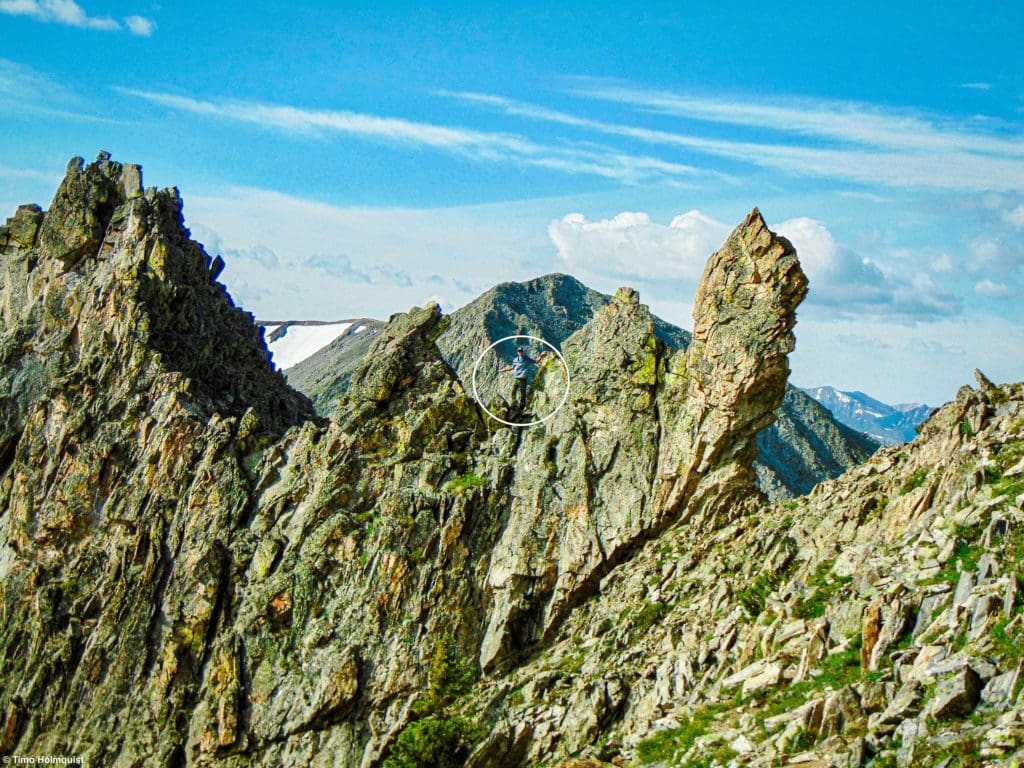
The Stone Dragon feature, see if you can spot my friend.
If you’re in no mood to mess around on the Dragon, traverse to the western side of the slope and use a gully system to bypass the feature. However, if you’re feeling good, there are a few Class 3-4 methods to scale the dragons back and a few Class 4-5 variations to get to either the tail or head, depending on what your eyes tell you you’re looking at. It’s called the Stone Dragon, but I saw everything from a dinosaur to a llama when I looked at it long enough.
What it looks like from the east when someone crests the lower (and more difficult) part of the Stone Dragon.
The basic gist is to pass beyond the Stone Dragon to the west side, turn around and find multiple Class 3 options to the ridge crest. Once there, you have some options. The larger back of the Dragon can be ascended by connecting several Class 3 sections. If you want to head to the front of the rock, you’ll need to traverse along the eastern edge of a large fin rock (Class 4 with exposure) that separates you from a saddle position. If you want to climb the eastern side of the Dragon from the slope below, it’s likely all Class 5.
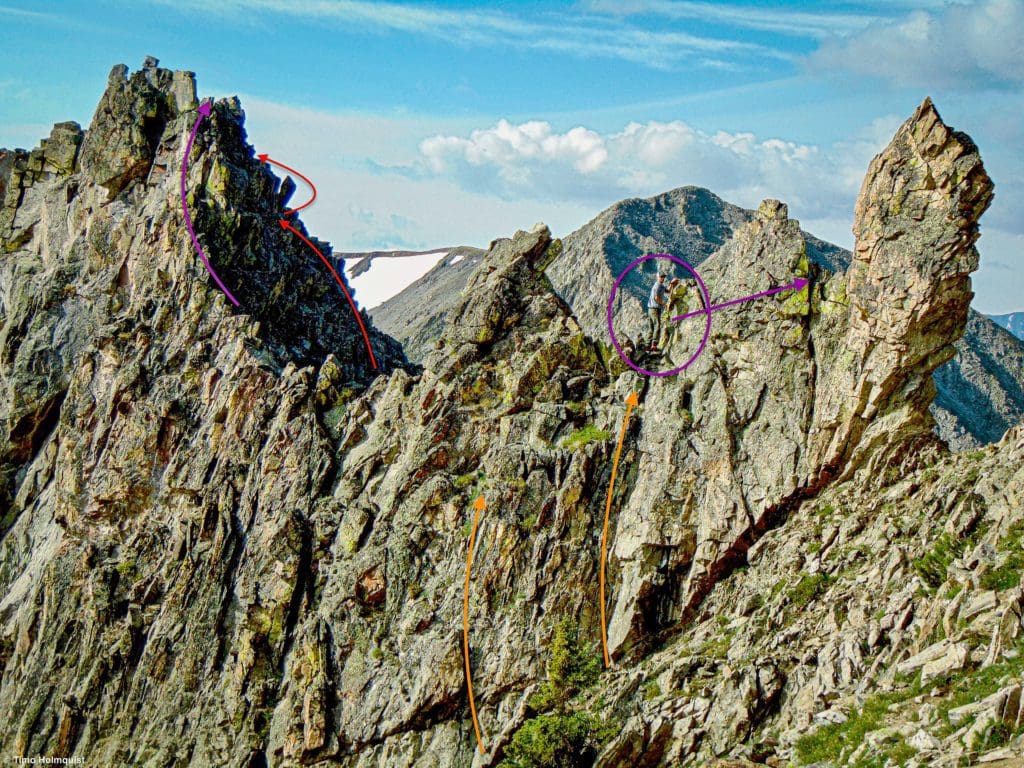
Red arrows=Class 3. Purple=Class 4. Orange=Class 5
Again, the Stone Dragon can be avoided, but with a series of Class 3 moves you can at least say that you summitted its back, not an insignificant accomplishment. From there, you can try to thread along the crest until the Dragon drops back down to the slope or descend and pick up the gully bypass on the western side of the ridge (the side with I-70 clearly visible below you).
The bypass.
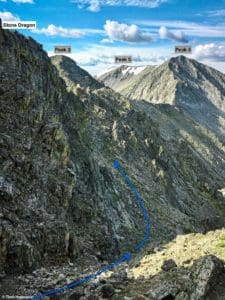
If you took the bypass, work your way back to the ridge crest, dodging another rock tower before getting to the saddle in front of Peak 3. Before you climb, take a look back at the Stone Dragon and some additional methods of running the crest from its back to where you are now.
Last look at the Stone Dragon with options along the ridge. The bypass is in blue.
From the saddle to the top of Peak 3 isn’t much more than a simple Class 2 affair. In fact, the peak only really looks like a peak once you get close to it. For the majority of the scramble it seems like a sub-peak at best.
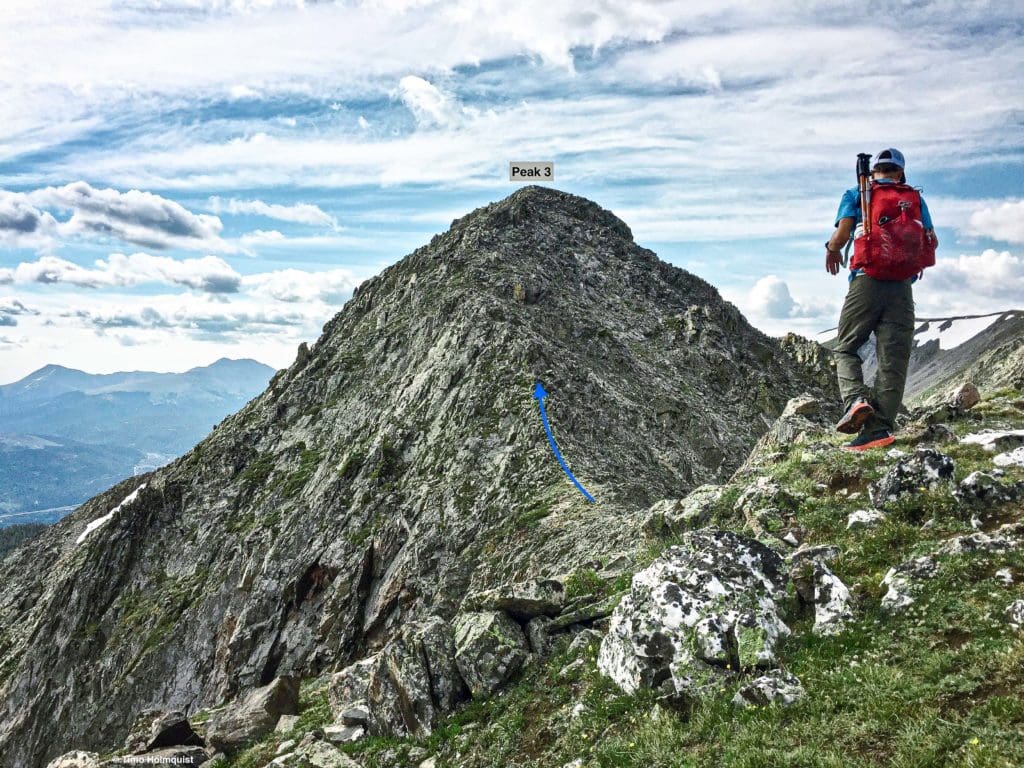
Peak 3, finally looking like a peak.
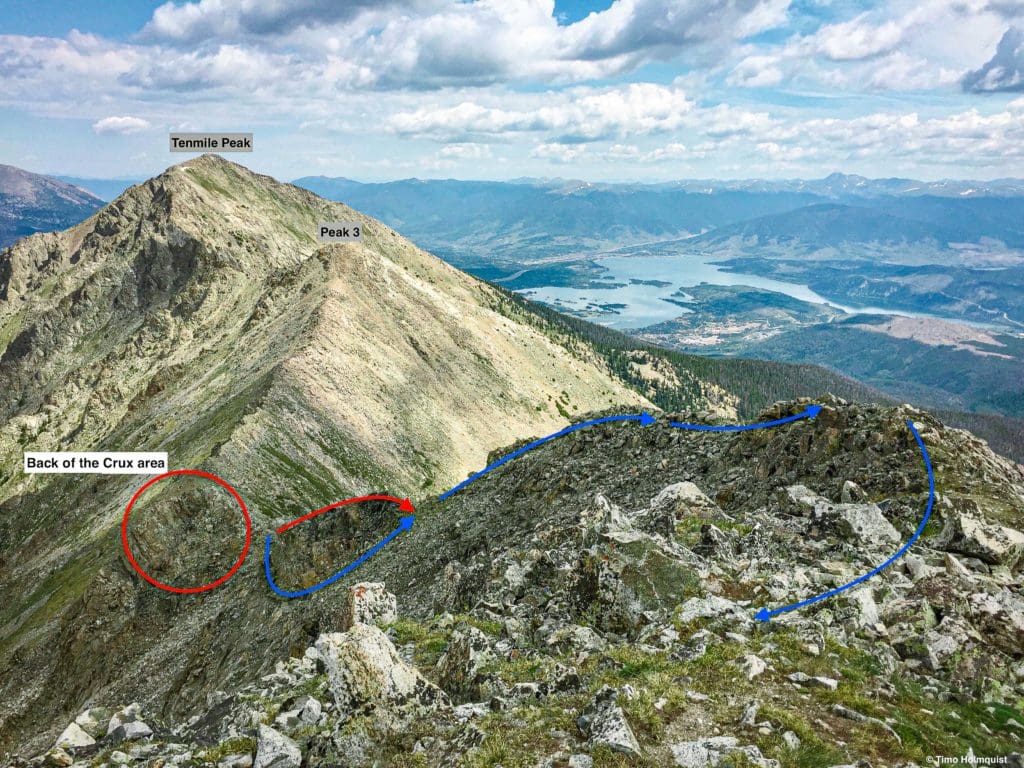
Once you top out on 3, take a good break and prepare for the lead-up to what’s certainly the hardest part of the scramble. At the crux area, there are numerous Class 3 and 3+ options, along with a ridge-direct Class 4 alternative. Unlike the Stone Dragon, there aren’t any simple bypasses, so if you’ve managed to avoid most of the scrambling so far, that ends on Peak 4.
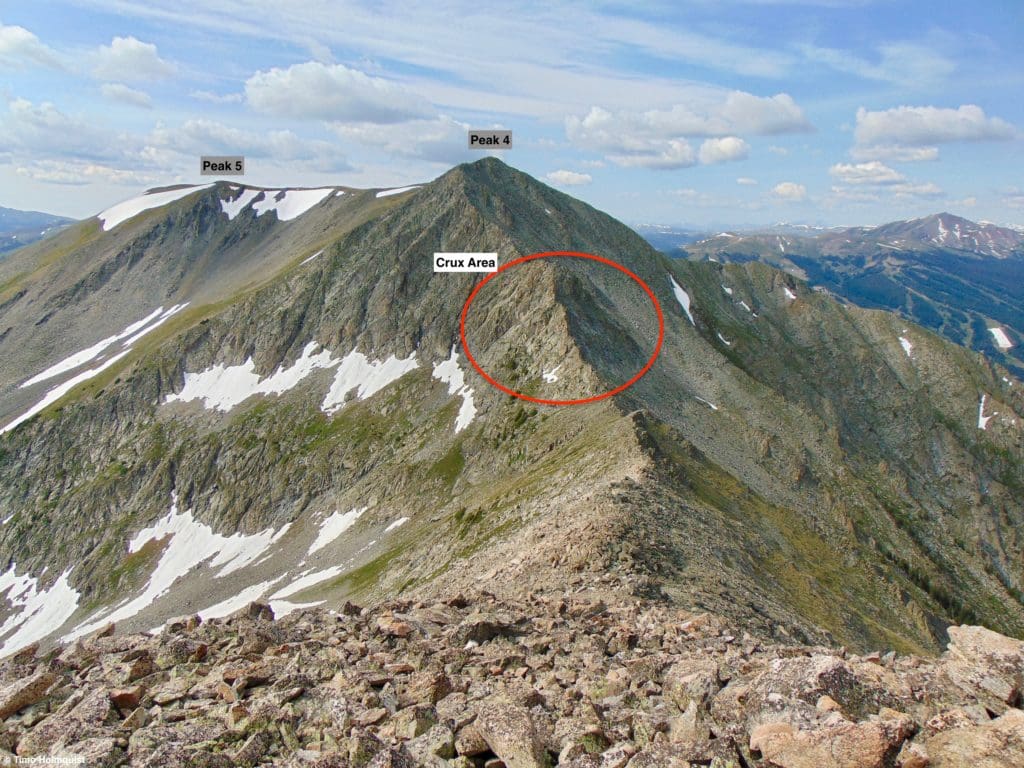
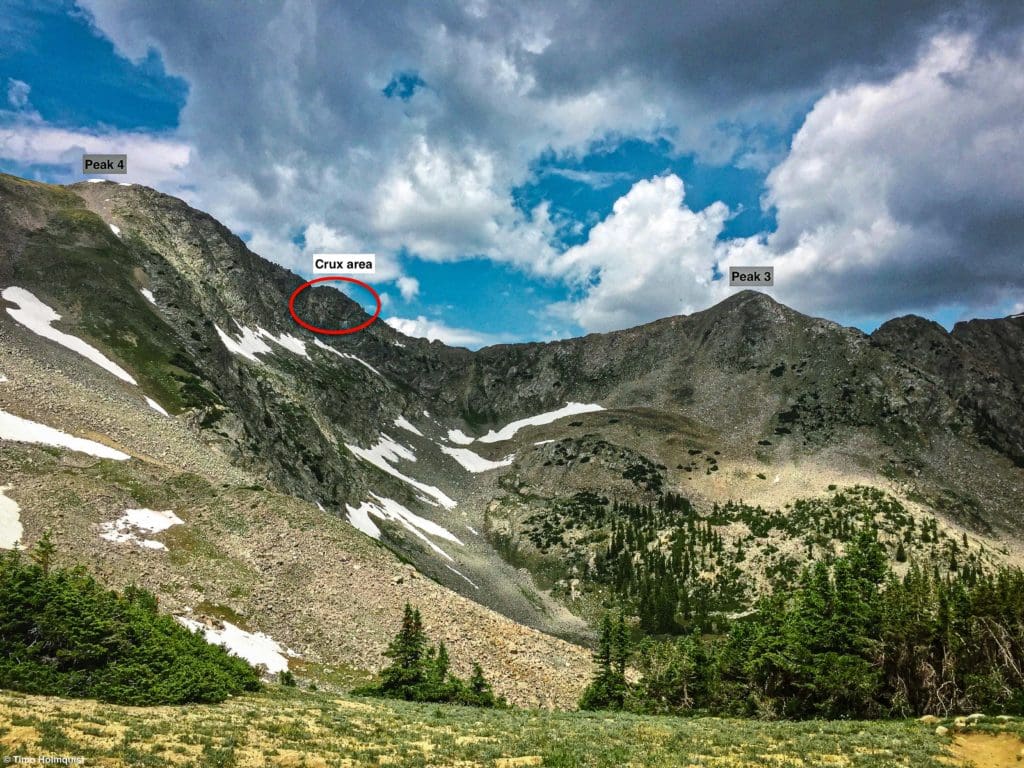
Looking ahead to Peak 4 and the Crux area.
From Peak 3, you can make tracks down to the saddle with 4 on a forgiving ridgeline. Once you reach the lowest point and begin to climb again, take a good look at what lies in front of you. The climb to Peak 4 can be separated into four parts. There’s a Class 2 intro, a long Crux area, a less severe but still scrambly third section, and the final jaunt from a sub-peak to the actual summit.
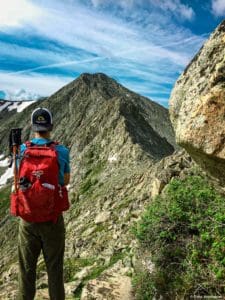
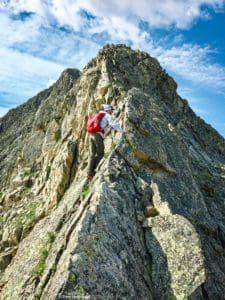
On the short intro section with the Crux area rearing up behind.
The Crux section is a lot of fun. Yes, it’s quite steep and has some serious exposure, but the holds are generally good, and the rock isn’t brittle, unlike what’s found on Pyramid or North Maroon in the Elks. There’s a lower and upper section, and they both come with some interesting moves.
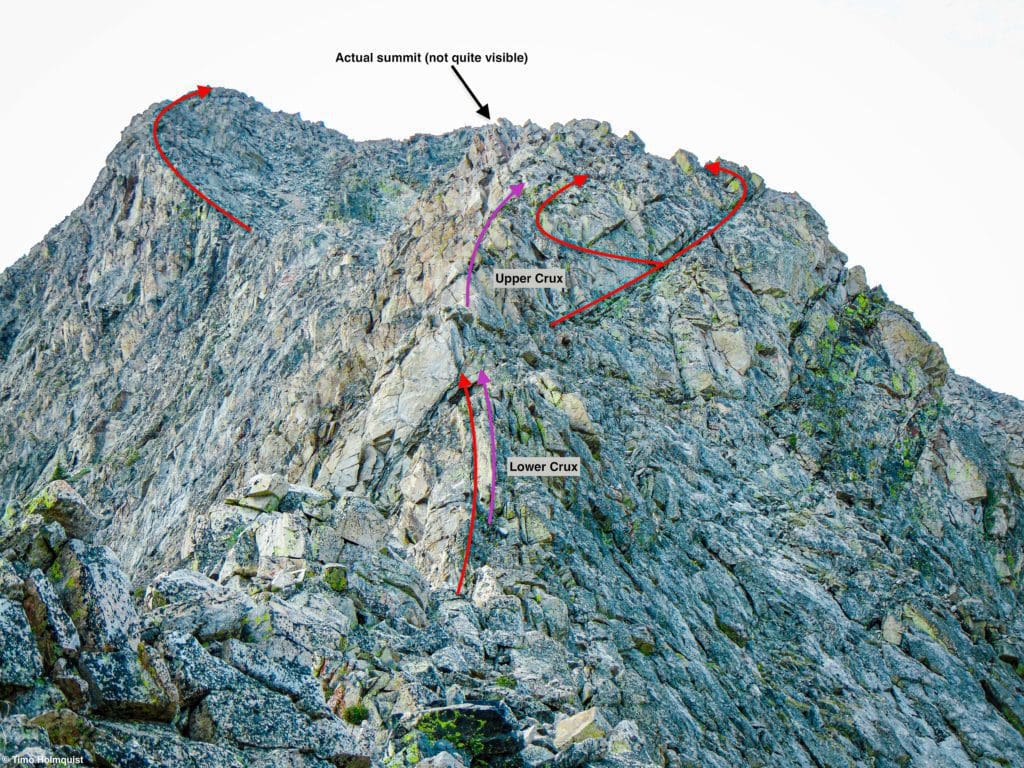
The Crux area and a bit of scrambling beyond it.
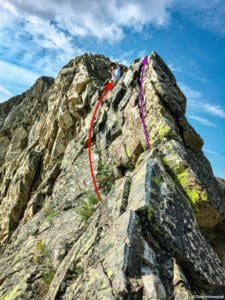
Approach on the ridgeline and find a thin slab of rock with a tough Class 4 ridge-direct option or work your way to the east (left) and climb alongside it with some good Class 3 hand and foot holds.
My scrambling buddy on the Class 3 section with his hand on the ridge-direct.
Perspective changes dramatically during this initial phase, so while the ridge-direct option doesn’t seem like Class 4 from before you get there, once you’re up against it, to my mind, it qualifies.
Getting up the lower Crux.
Once you pass this part, you’ll have a few steps of reprieve before needing to tackle the upper portion of the Crux. A ridge-direct ascent will require Class 4 moves at a minimum with some spine-tingling exposure on the eastern side. The most popular route is to take a diagonal ledge to the right (west) and get around the difficulties at Class 3. A hybrid option is to start on the diagonal ledge and then cut back to the ridgeline. The hybrid keeps the scrambling at Class3+ and is a nice in-between option.
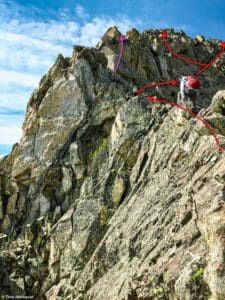
Upper Crux.
Once you get around this section, the difficulties drop back down to the occasional Class 3 move along the ridge crest, which has the most stable footing. Scramble along the snaky ridge until topping out on a sub-summit. From there, it’s an easy class 2 jaunt to the true summit.
Looking back at what you’ve scrambled from near the summit of Peak 4.
Congratulations! The scrambling is over. The final peak, Peak 5, is a grassy high point that you can more or less run to. On the other side of its summit ridge, you’ll be able to connect with Colorado Trail and take it (left) back down toward Frisco. True mountain masochists can always continue on to do the full Tenmile challenges (Peaks 1-10) but none force anything more than some light Class 2 talus hopping.
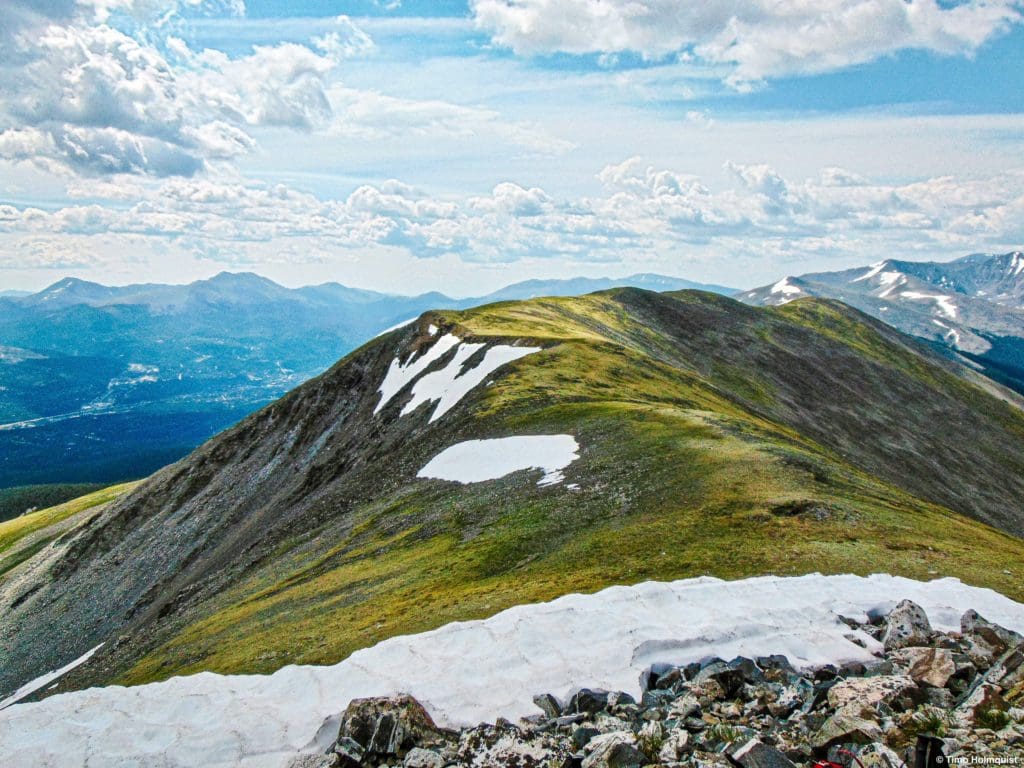
Peak 5 from the top of Peak 4.
There’s a good chance that between Tenmile and Peak 4, you’ll have the ridge to yourself. Once you get back onto the trail, you may be sharing it with multiple parties. Luckily the vast majority that’s left is downhill. You’ll also be given some great shots back to what you climbed earlier after about 1.4 miles on the trail.
A great look back as you descend.
Below treeline (~3.24 miles from where you hit the trail), you’ll come to an intersection where the trail veers right, and an old road called Miners Creek joins from the left. You can take Miners Creek Road down; it’s a bit faster, but less scenic. Chances are, the remaining scenery won’t matter too much since you’ve already finished the most dramatic sections. Be aware of off-road vehicles and roadside camps with potential dogs.
Eventually (~2.7 miles later), you’ll pass an intersection on your left for a trail network around Rainbow Lake. Take the spur and follow trail signs back to the Rainbow Lake Trailhead on 2nd avenue. You can also take a left on USFS road 284, which appears around 2.5 miles from the top of the road, and accomplishes the same thing, bringing you down to near the trailhead. Remember, it’s the trailhead on 2nd avenue, so you have to continue beyond Rainbow Lake about 0.8 of a mile west before finding the correct lot.


