


High Point:
11,476 ft. on Niwot Mountain

Total Ascent:
~1400 ft. gain

Difficulty:
Moderate

Distance:
~5 miles

Route Type:
Out and back
Nestled in Indian Peaks, Niwot Mountain offers stunning vistas. The trail weaves through forests and meadows before reaching the treeline and rocky ridge to the summit. A cairn marks your conquest.
Overview
Explore the beauty of Niwot Mountain in Colorado’s Indian Peaks Wilderness. Take on the popular Niwot Ridge Trail, a 5-mile round-trip journey with an elevation gain of 1,400 feet. This scenic trail winds through forests and meadows before reaching the rocky summit marked by a cairn and sign.
Enjoy this trail year-round, whether hiking or snowshoeing depending on weather conditions. Keep in mind strong winds may be present above the treeline, so dress accordingly.
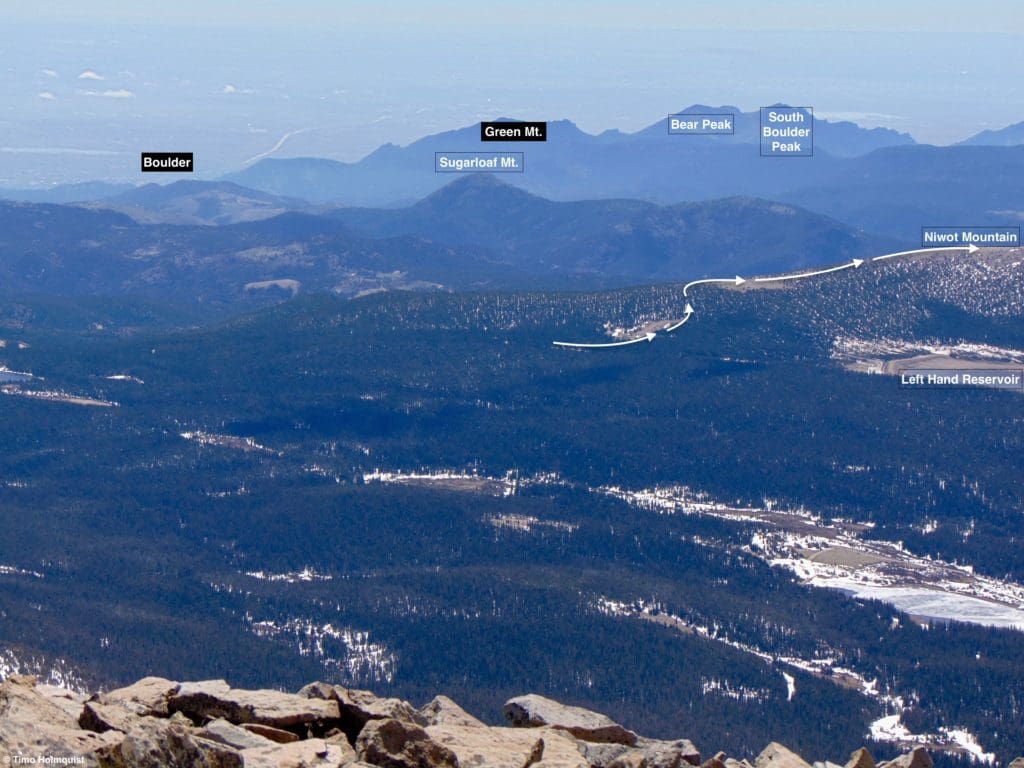
At the top, take in stunning views of Longs Peak, Mount Meeker, and Mount Audubon, as well as the serene plains and reservoirs below. Located near Boulder, Niwot Mountain is a hidden gem for peaceful hiking experiences.
It also serves as an off-season destination for outdoor enthusiasts to enjoy the Brainard Recreation Area throughout all four seasons. In summer, access various trailheads near Brainard Lake into Indian Peaks Wilderness. However, in winter, a closed gate blocks easy access and adds extra miles to your journey for backcountry skiing, cross-country skiing, or snowshoeing adventures.
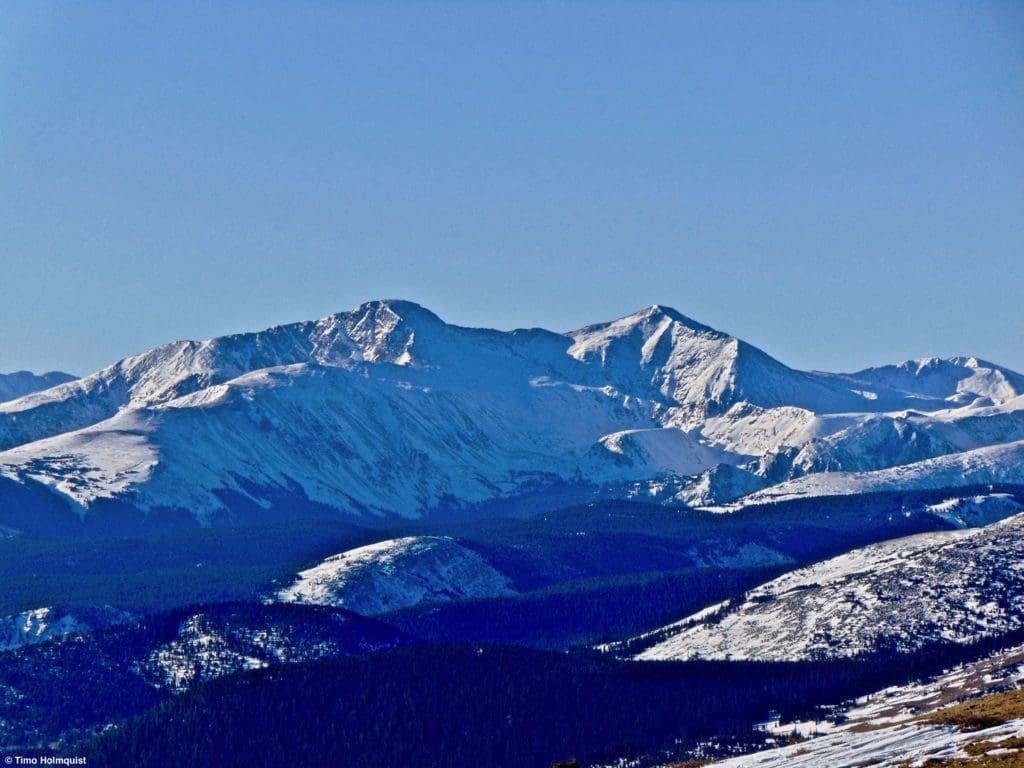
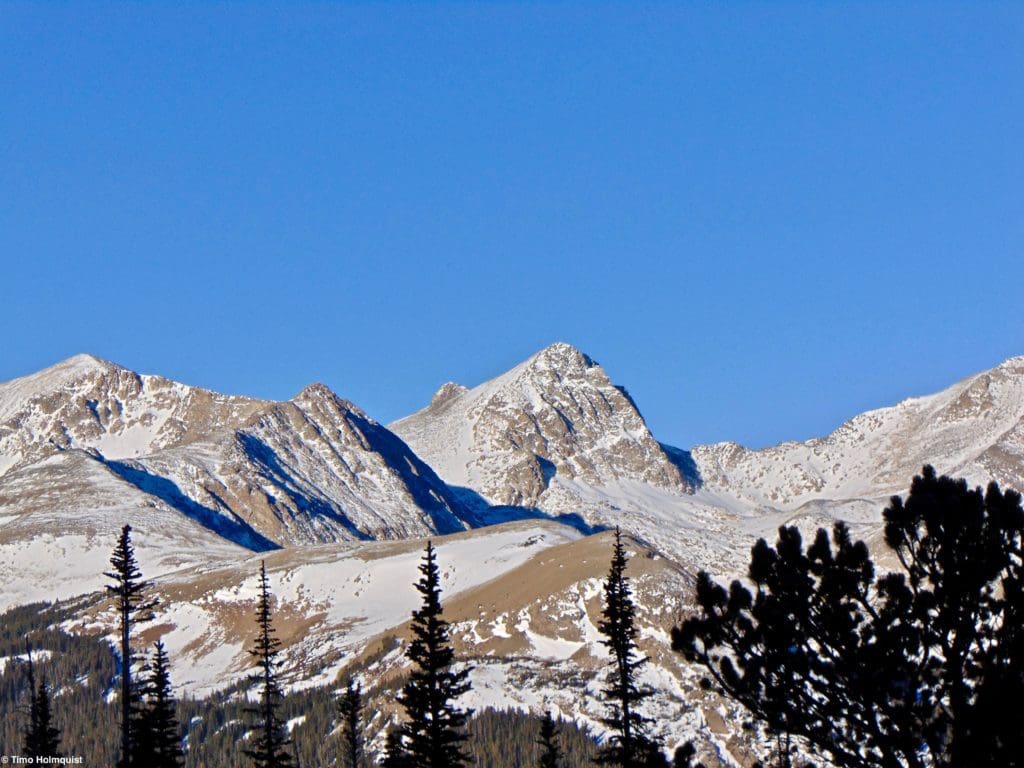
James Peak from points along Niwot Mountain.
Table of Contents
Article Navigation: Click on any of the listed items in the table of contents below to jump to that section of the article. Similarly, clicking on any large, white section header will jump you back to the Table of Contents.
Best Hikes Within An Hour Of Boulder, Colorado
Highlighting the best hiking options within an hour of Boulder, Colorado.
Scales and Criteria
This article uses two metrics to calculate difficulty: overall distance and elevation gain. For winter ascents, a snow rating may be used as well, but even during the dead of winter, the short length and modest ascent can be reasonably accomplished by most people with snowshoes. This review covers the basic ascent and descent of Niwot Mountain but also includes extensions and a possible loop options for those looking to get a little more distance out of any adventure.
Difficulty Ratings:
- Easy: less than 5 miles, less than 500 ft. of elevation gain
- Moderate: 5-10 miles, 500-2000 ft. of elevation gain
- Hard: 5-15 miles, more than 2000 ft. of elevation gain
- Very Hard: 10+ miles, more than 3,500 ft. of elevation gain
Snow Rating:
- Easy: Less than 30 degrees
- Moderate: 30-40 degrees
- Steep: 40-50 degrees
- Very Steep: More than 50 degrees
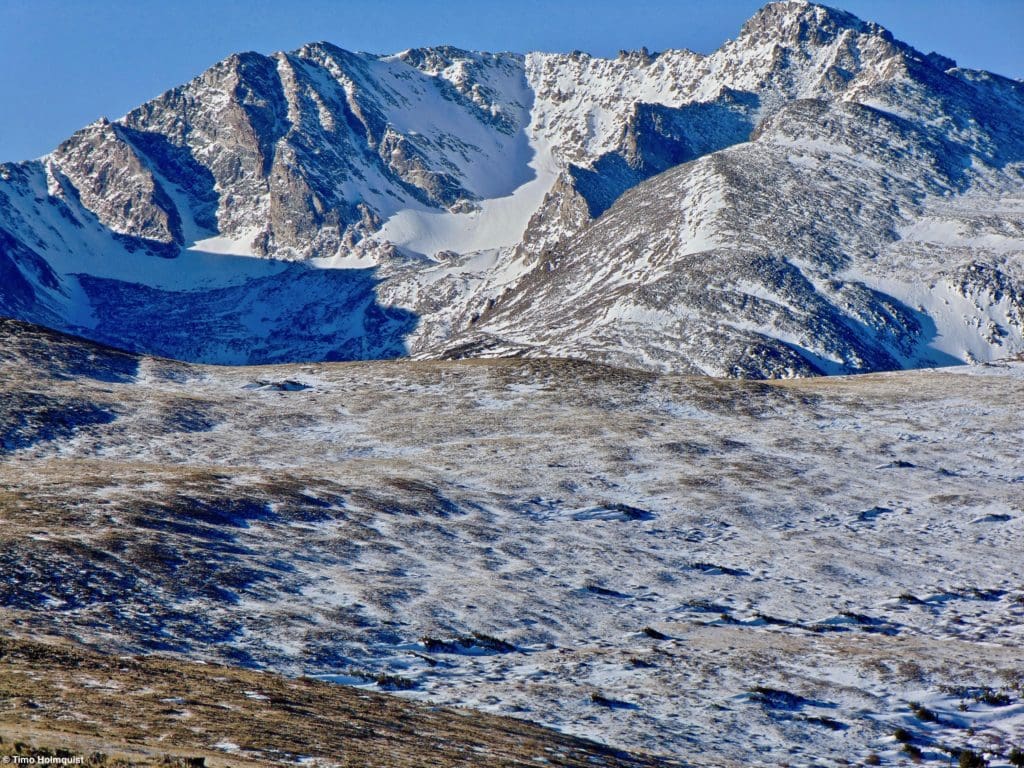
Niwot Mt. and its summit ridge from the flanks of Mt. Audubon.
The Ultimate Offline GPS Hiking & Ski Maps
See why onX Backcountry is the ultimate GPS navigation app for your outdoor pursuits. Try Today for Free. No credit card required.
Directions to Trailhead
Being such a well-known area, directions to the Brainard Winter Lot (aka Brainard Gateway Trailhead) aren’t very complicated.
From the east, you can take Boulder Canyon up to Nederland. At the first roundabout in town, take a right and head north on CO 72 (the Peak-to-Peak Highway). Near Ward, watch for signs signaling Brainard Recreation Area and take a left, climbing towards the Gateway Trailhead. You can also take Left Hand Canyon up to Ward, drive through town (slow down when signs indicate), and up to the Peak-to-Peak Highway. From that intersection, take a right (north) on the highway. Less than a minute later, take a left onto the Brainard Lake Road.
From the south, you can use Clear Creek Canyon or find the Peak-to-Peak highway after driving through Blackhawk. Once on it, drive north beyond Nederland and Ward, looking for the signs indicating when to turn left onto Brainard road. From the north, you can take Big Thompson Canyon to Estes Park and head south on the Peak-to-Peak, or head up CO7 from Lyons, take a left when signs point to Nederland (CO 72) and watch for the entrance on your right-hand side.
Once on Brainard Lake Road, continue driving until you see the Brainard Gateway Trailhead on the right side. It’ll be before you pass the entrance booths during the summer, or, if you head up in the winter as this guide will suggest, the winter gate blocks farther access; so, simply take a right when you see the gate, and it should pop you into the large parking lot.
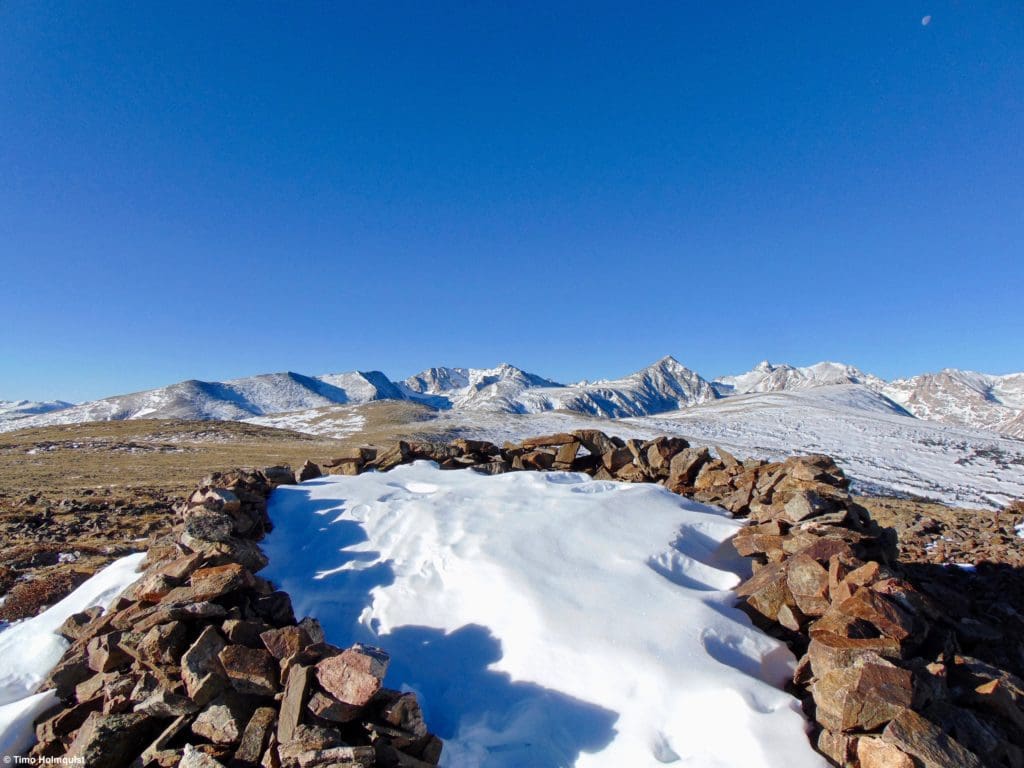
The summit windscreen on Niwot Mt.
The Ten Essentials: How to Equip Yourself for the Backcountry
Packing the “Ten Essentials” whenever you step into the backcountry, even on day hikes, is a good habit. When something goes awry, you’ll truly appreciate the value of carrying these items that could be essential to your survival.
Field Notes
While this is a surprisingly simple winter excursion, selecting an appropriate day is critical. This area is subject to strong winter wind gusts and can haul in a sizeable amount of snow. To pinpoint weather concerns, start by looking at the Brainard Lake Weather Forecast; pay special attention to any details regarding wind speed and, of course, precipitation. For a detailed breakdown of local mountains, head to Opensummit or Opensnow. Both sites require payment to unlock all the details, but there are hundreds of weather stations to really nail down specific forecasts. Opensummit has a forecast station for Brainard Lake, and Opensnow has detailed forecasts for Eldora ski resort which is only a few basins south of Niwot. You can also use the CU Tundra Cam, which is on Niwot Ridge just west of Niwot Mountain.
Journal
Once you park, get your gear and head to the entrance of the parking lot. Head west through the winter gate. You’ll see the entrance booths ahead of you; before making it to them, turn left and sight a dirt road with signs for Left Hand Reservoir. You’ll turn and head down this road as it meanders higher at an easy grade.
About 0.9 miles into the hike, the terrain around the road will flatten out. A quick look to your right should reveal the Little Raven Ski Trail as it intersects with the road.
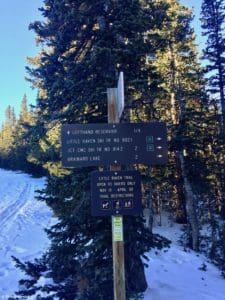
The junction with Little Raven Ski Trail.
The sign is a great marker; when you see it, turn to look across the other side of the road (the left side if you’re ascending), and you should see an open area behind a few lines of pine trees. This used to be an old quarry, and the open nature of the area stands in stark contrasts to the thick forests around it. Keen eyes will spot a thin USFS sign with a yellow middle section and NO CAMPING written below it. Hopefully, there will be footprints to see, but if not, exit the side of the road and walk behind the sign into the open area.
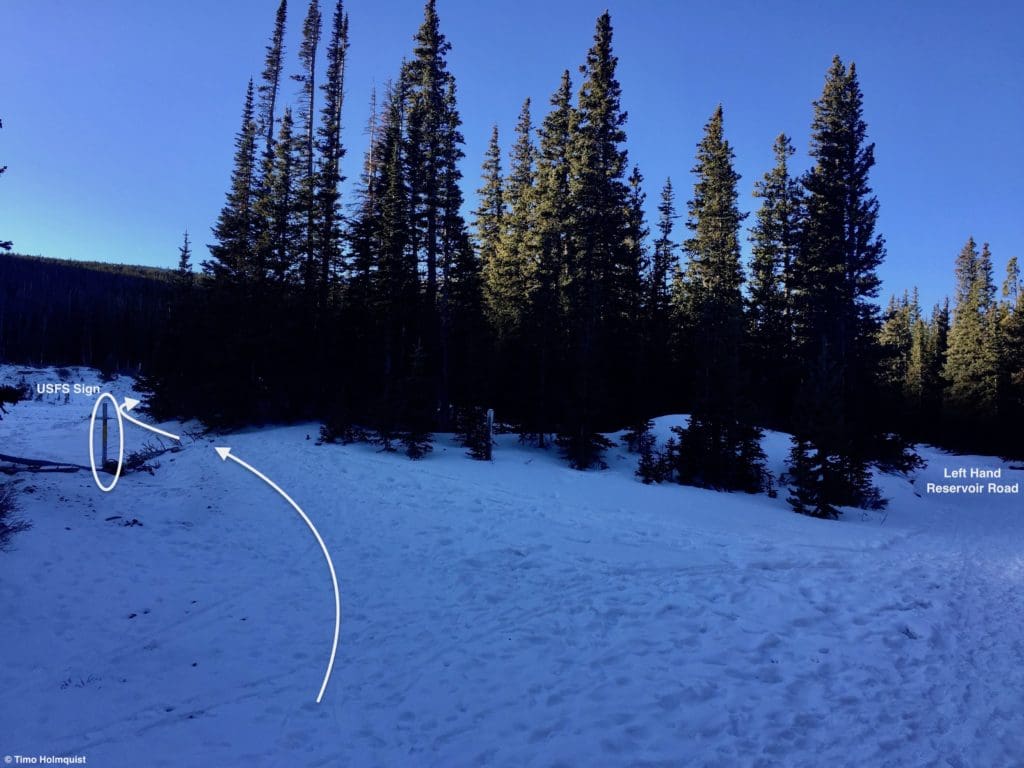
Where to leave the road.
Once you’re facing the old quarry, hug the right-hand side of the open area, again, hopefully following a plethora of tracks. If there are none to follow, stay on the right margin and begin to gain elevation.
As you begin to climb up from the quarry, turning around will reveal a great perspective of Mt. Toll.
While not an official trail, the path resembles an old logging road or trail and heads to a tree-covered ridge. When you reach the height of land, turn right.

The path as it reaches the treed height of land.
If you turn around to stare at where you came from, you should see the bulk of Mt. Audubon watching over the trail.
From the height of land, looking back.
From the saddle, continue threading through lessening stands of low trees until reaching treeline by walking south. After you break from the trees, views explode out to the west, featuring many of the Indian Peaks’ most famous mountains.
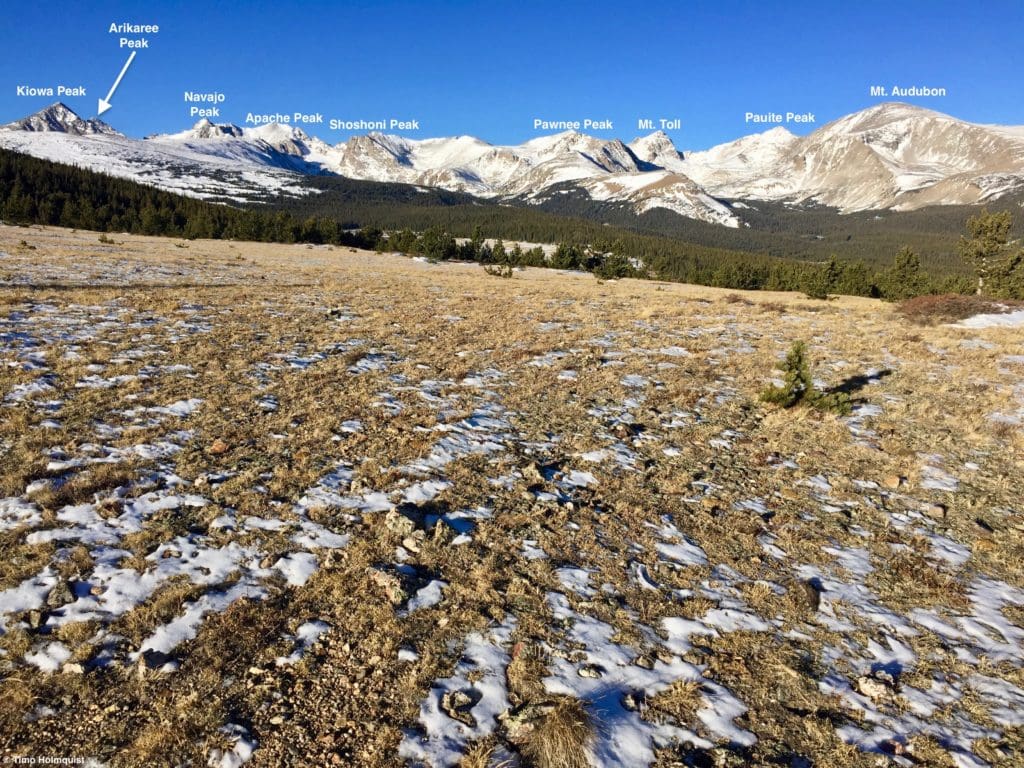
The skyline west as you head up Niwot.
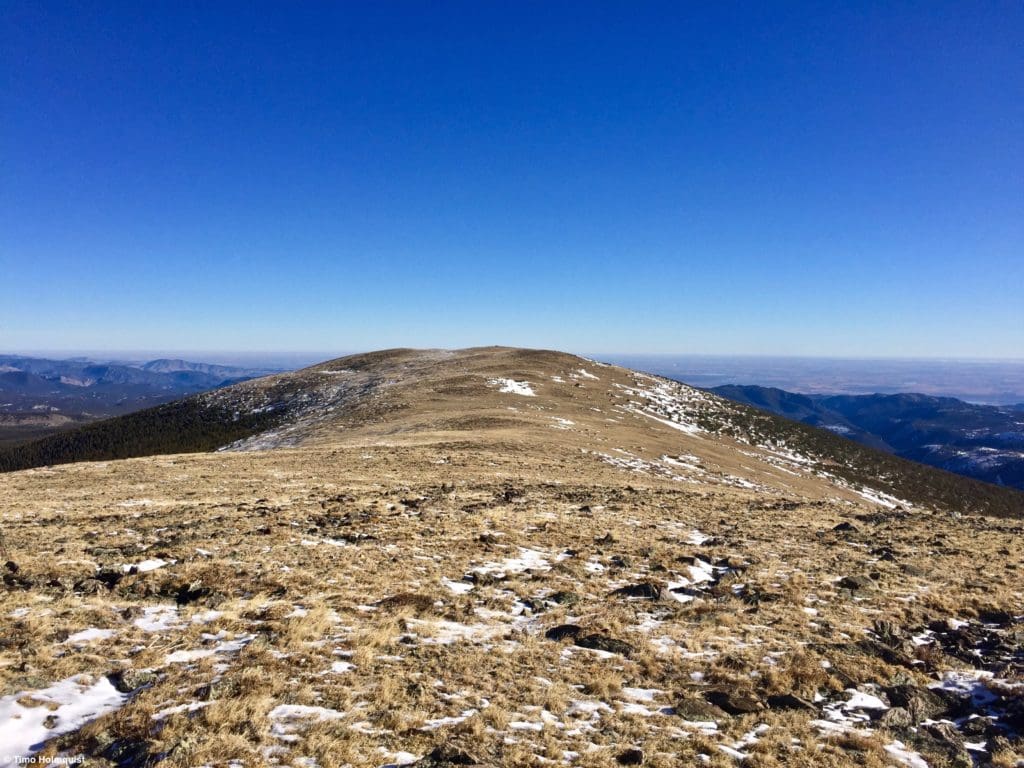
The directions to the top from here are straightforward: go up. The biggest lump near you is Niwot Mountain. Once you make it to the top, you should see a rock windscreen, which in winter may be covered by snow. Find a place to relax and enjoy the absolutely stellar views.
Zoomed in shot of North Arapahoe Peak to the right, South Arapaho Peak to the left, and Arapahoe Glacier in the middle, the largest glacier left in Colorado.
As far as short hikes go, this one isn’t difficult and yields some incredible views. However, if you find yourself wanting to get a larger adventure, there are a couple of options to continue the trek.
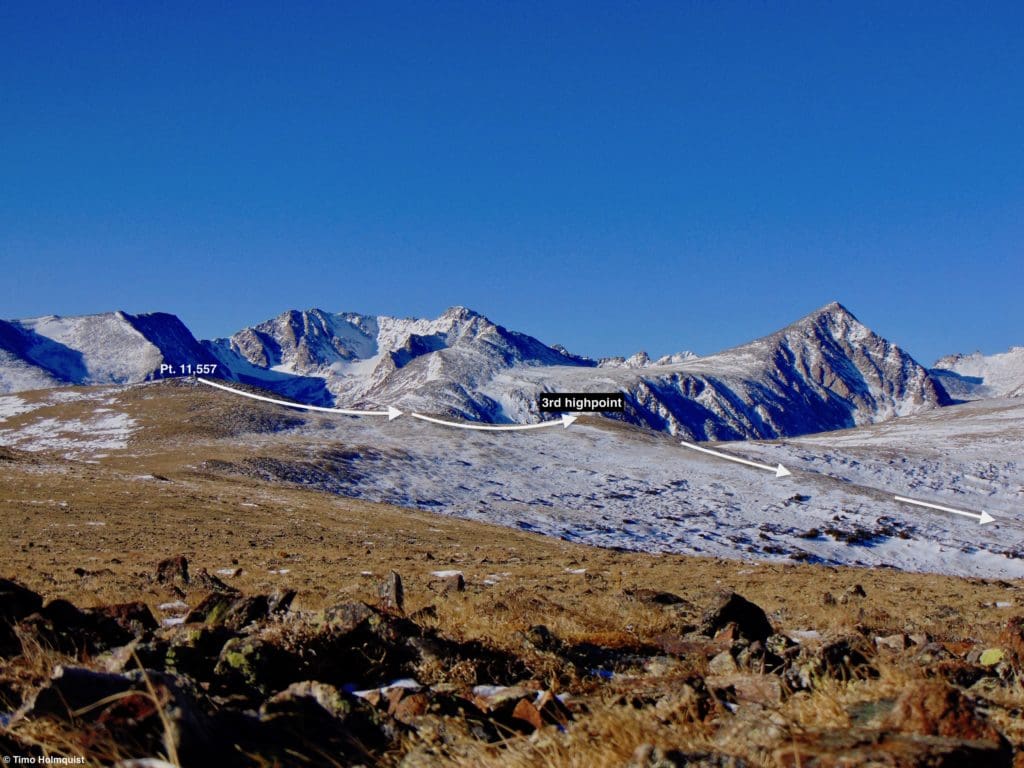
Once you finish at the top, follow the meandering ridge west above treeline until you crest the next large rise, which, at 11,557 ft., is actually taller than Niwot Mt.
Looking back at Niwot Mt. from Pt. 11,557.
To get there, just follow the ridge west until finding the next highpoint, adorned with another rock windscreen. The views seem to get better with every step.
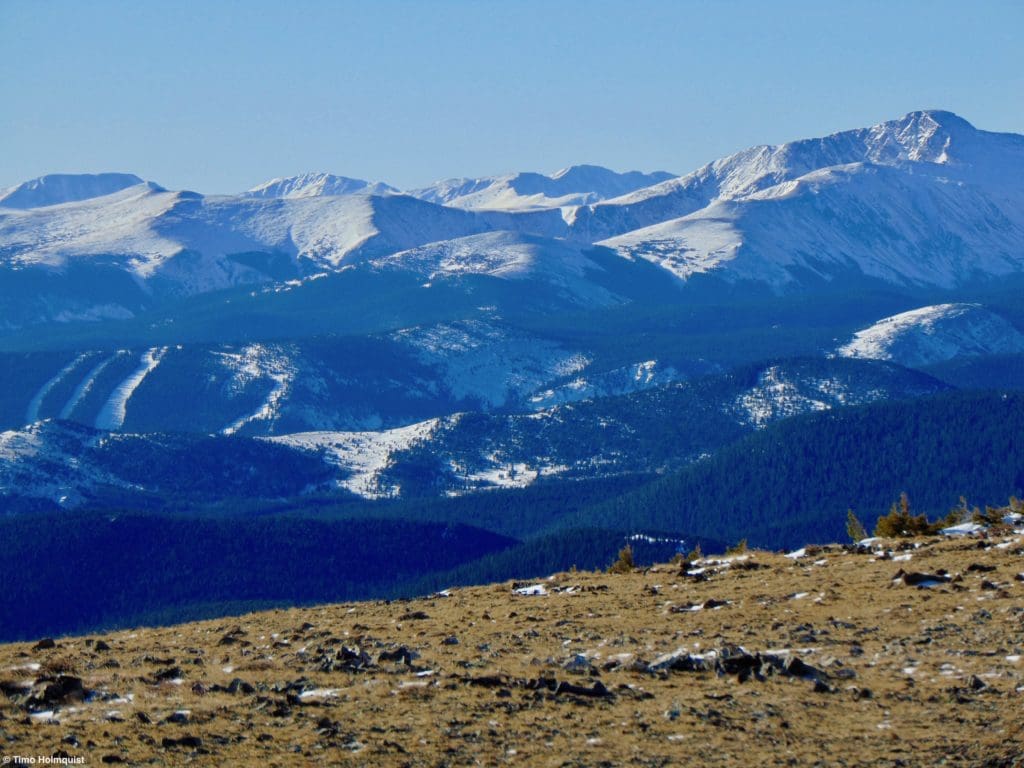
Looking southwest to the slopes of Eldora and James Peak.
Keep in mind that once you break treeline, there isn’t any real tree cover, so sunscreen will be your friend. A dangerous combination is a mid-winter day with cold temperatures and a lot of snow because it won’t feel like you need to protect your skin, but the powerful sun and reflective snow surface can direct sun into your face and give you a sneaky burn.
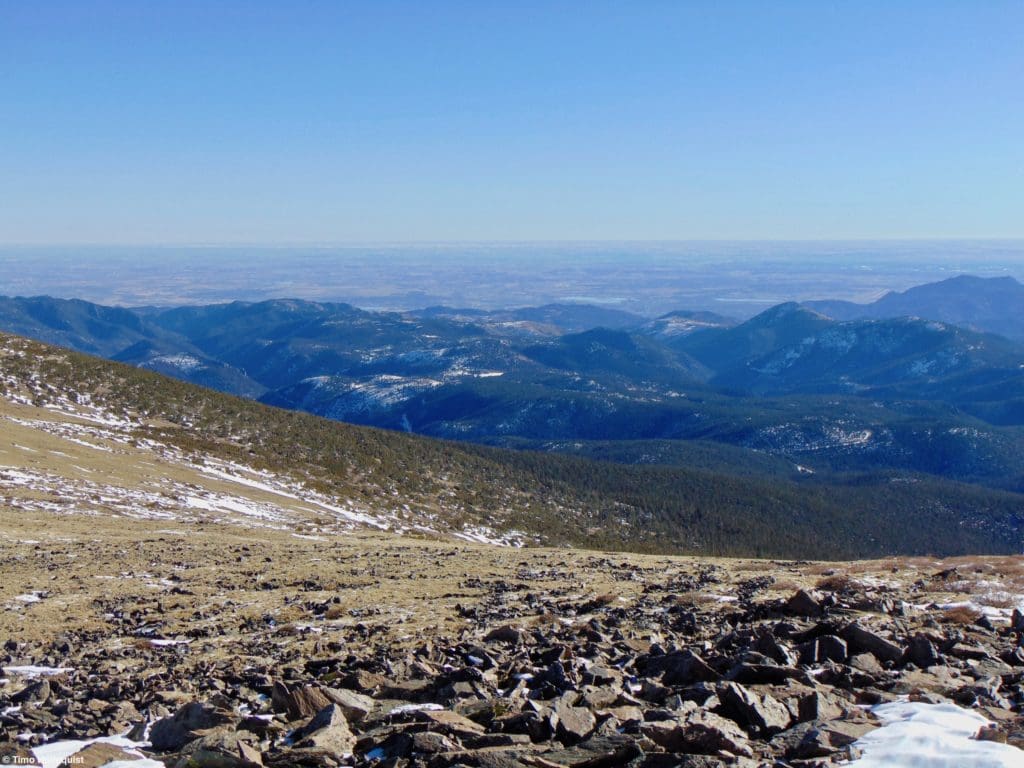
The view east back to the Boulder area and the high plains in the background.
From here, you can simply retrace your steps, which would be the easiest way back down by far. When retracing, just remember to re-crest Niwot, go down the ridge and then take a left at the saddle to get back to the quarry.
For the more adventurous, and only when its covered with enough snow, you can try to opt for the loop. If you attempt this in the summer, keep heading along the ridgeline until finding the Niwot Ridge Trail then, take it down to Brainard Road. From there, you’ll need to walk back east along the road for 2.5 miles until reaching the parking lot.
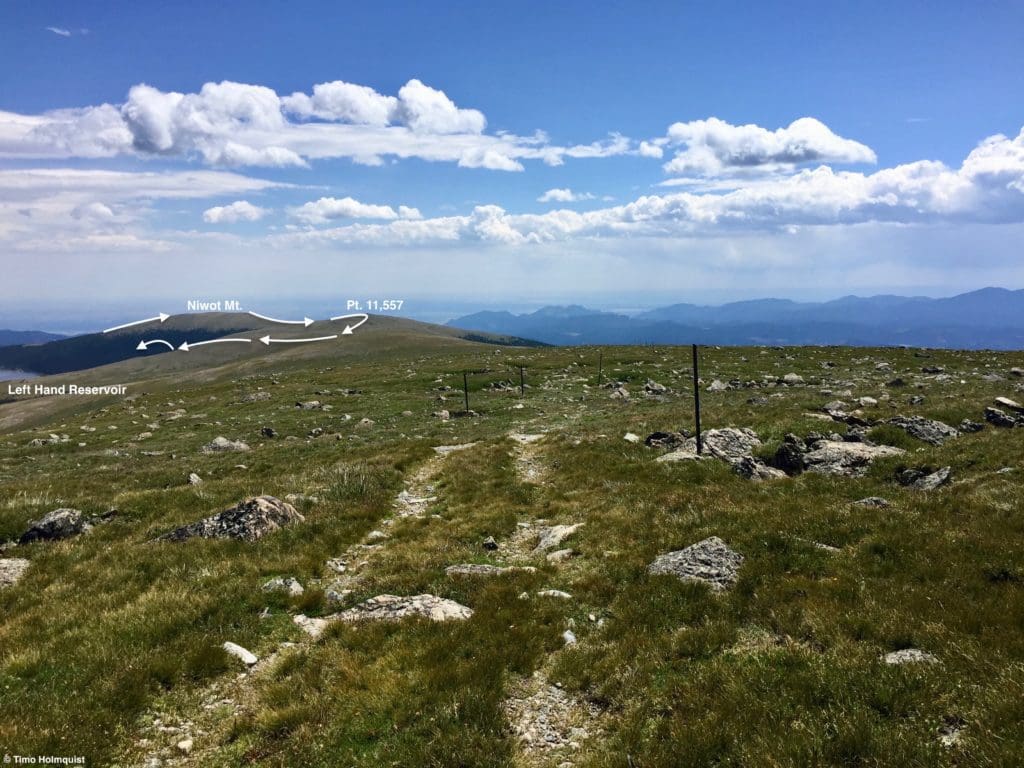
The general route of the loop option from higher up and farther to the west on Niwot Ridge.
The loop option is a nice winter addition if you came with snowshoes. With a healthy snow covering, you can continue along the ridge from Pt. 11,557 to the following highpoint. Once you descend off of that third highpoint, look to the right, and you’ll see Left Hand Reservoir, which has been visible for much of the tundra part of the hike. Angle a descent into the head of the bowl and make your way to the shore.
The general trajectory after you leave Pt. 11,557.
You want the easiest descent route so shoot for areas that minimize travel through the thick woods that rim the lake. You’ll have to pass through a short part of them, but with ample snow and a general downhill trajectory, snowshoe should make quick work of the distance, and before you know it, you’ll be at the edge of the lake.
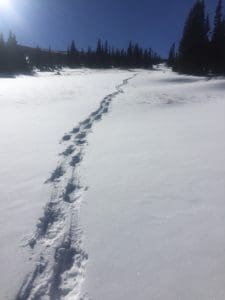
Looking back at my snowshoe tracks. Oftentimes the ridgelines are free of snow because of strong front range winds, so a lot of it gets deposited in the trees around the lake.
Keep in mind that the lake is drained every winter, so it will likely be empty. If the surface is frozen or snowed over, you can just cut across the lake bed to the northeast. At the edge of the lake, there will be a dam with the original Left Hand Road coming up behind it. Once you reconnect with the road, walk it back down to the Gateway Parking Area and your car.

Enroll With Global Rescue Prior To Embarking On Your Next Adventure.
When a travel emergency arises, traditional travel insurance may not come to your aid, and a medical evacuation can cost up to $300,000.
The cost when you have a Global Rescue membership? $0. That’s why when the unexpected happens, you want the leader in rescue, evacuation and medical advisory behind you. You want Global Rescue.
Popular Articles:
Best Hikes Within An Hour Of Boulder, Colorado
Top Adventure Sports Towns: Boulder, Colorado
Hiking The Shadow Canyon Trail to South Boulder Peak, Boulder, Colorado
Hiking To Flagstaff Mountain Summit, Boulder Mountain Park, Colorado
Hiking The Walker Ranch Loop Trail, Boulder, Colorado
Hiking The Five Peak Challenge, Boulder Colorado
Terms of Use:
As with each guide published on SKYBLUEOVERLAND.com, should you choose to this route, do so at your own risk. Prior to setting out check current local weather, conditions, and land/road closures. While taking a trail, obey all public and private land use restrictions and rules, carry proper safety and navigational equipment, and of course, follow the #leavenotrace guidelines. The information found herein is simply a planning resource to be used as a point of inspiration in conjunction with your own due-diligence. In spite of the fact that this route, associated GPS track (GPX and maps), and all route guidelines were prepared under diligent research by the specified contributor and/or contributors, the accuracy of such and judgement of the author is not guaranteed. SKYBLUE OVERLAND LLC, its partners, associates, and contributors are in no way liable for personal injury, damage to personal property, or any other such situation that might happen to individuals following this route.


