


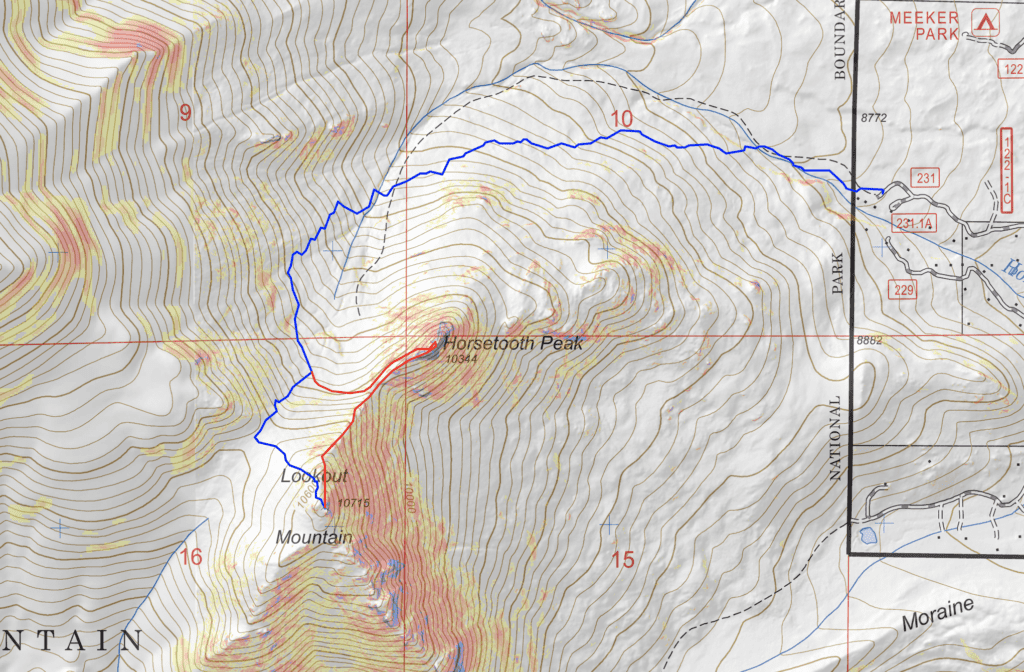
High Point:
10,715 feet

Total Ascent:
~2,015 feet

Difficulty:
Hard

Distance:
~5 miles to Lookout Mt. (~6 to include Horsetooth Pk.)

Waypoints:
40.23702, -105.54063

Route Type:
Out and Back (Loop options to Horsetooth Pk.)
Explore Lookout Mountain and Horsetooth Peak in Rocky Mountain National Park for a challenging and rewarding hike. With stunning views of the Front Range, these peaks offer a unique experience for outdoor enthusiasts.

Overview:
The Front Range is not exactly unknown. Of Colorado’s six million citizens, almost five million live along the eastern side of the range. The range is visible from nearly all the cities along this urban corridor and protected through various national forests and, of course, Rocky Mountain National Park. When the vast majority of Coloradans say they want to play in the mountains, the attention is usually directed to the Front Range or the national park. It’s a well-loved and busy area.
Despite Rocky Mountain National Park’s consistent ranking among the top five most popular National Parks in the US, there are still dozens of relatively unknown scrambling gems dotting the rocky landscape.
Experiencing the adrenaline rush of scrambling up Lookout Mountain and Horsetooth Peak in Rocky Mountain National Park, Colorado is a must for outdoor enthusiasts. These peaks are located along the park’s eastern boundary, offering breathtaking views of the Front Range and surrounding wilderness.
For those seeking a more strenuous journey, combining both hikes into one day can be a fulfilling challenge. The trail to Lookout Mountain begins through thick forests and Horse Creek before making its way up to the summit. From there, hikers can branch off onto the Horsetooth Peak trail which leads to the saddle between the two peaks. The final ascent to the top of Horsetooth Peak involves scrambling over rocky terrain.
Proper preparation is crucial for these hikes as they involve considerable elevation gain and technical scrambling. Adventurer’s should have suitable gear such as sturdy shoes, appropriate clothing, and plenty of water and snacks. It’s also important to stay aware of changing weather conditions and be prepared for unexpected temperature shifts or storms.
For those seeking a thrilling half-day excursion filled with a variety of routes and moments of peaceful solitude, Lookout Mountain and Horsetooth Peak are the perfect combination. These mountains offer a bountiful amount of strange rock formations to scramble on and breathtaking views to admire. Located in Rocky Mountain National Park, Colorado, this hike is a must-try for adventure seekers.
- Lookout Mt. (summit area): Class 2
- Lookout Mt. (summit tower): Class 4
- Horsetooth Peak (via easiest route): Class 2+
- Horsetooth Peak (via Bronco Ridge): Class 4
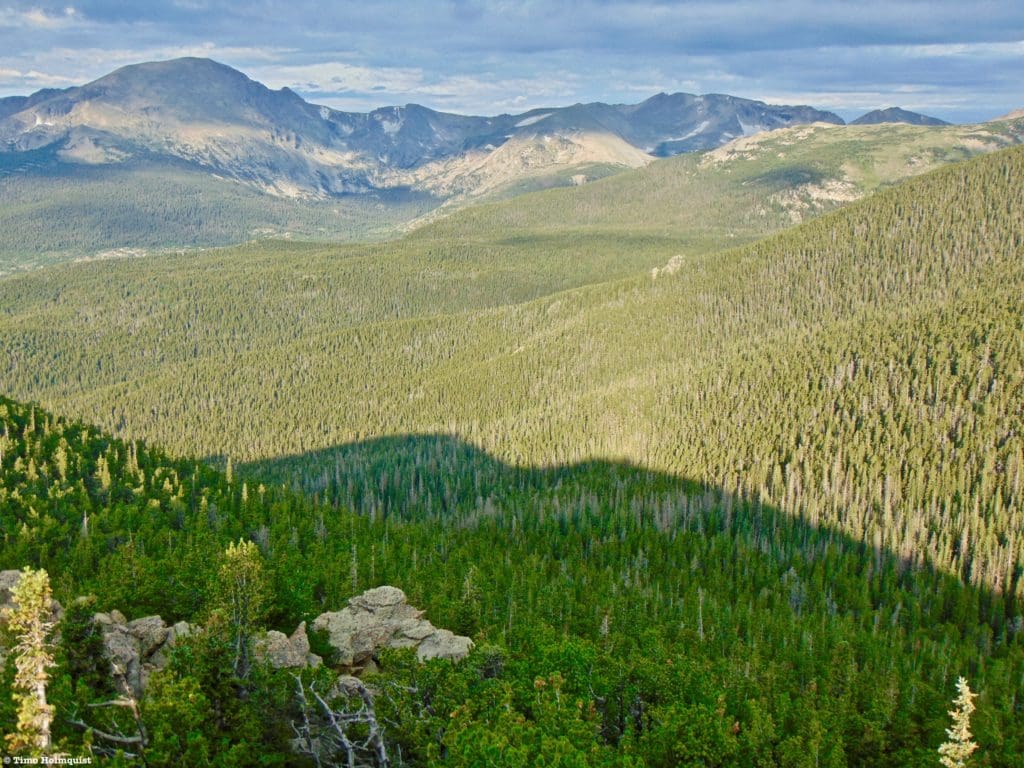
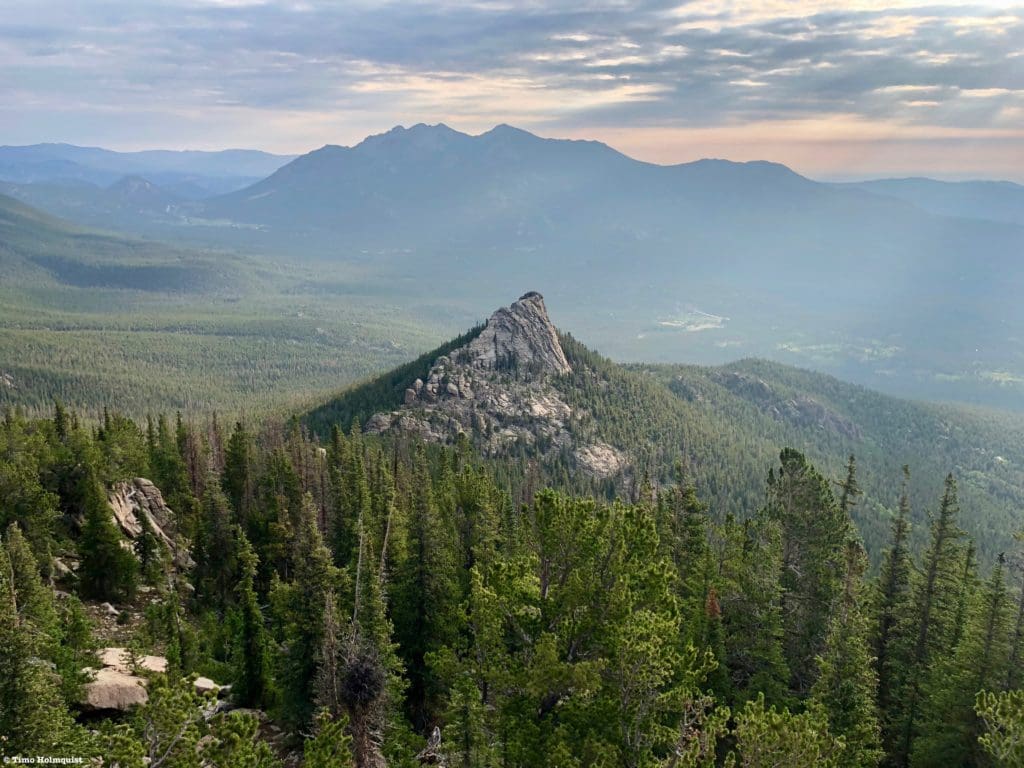
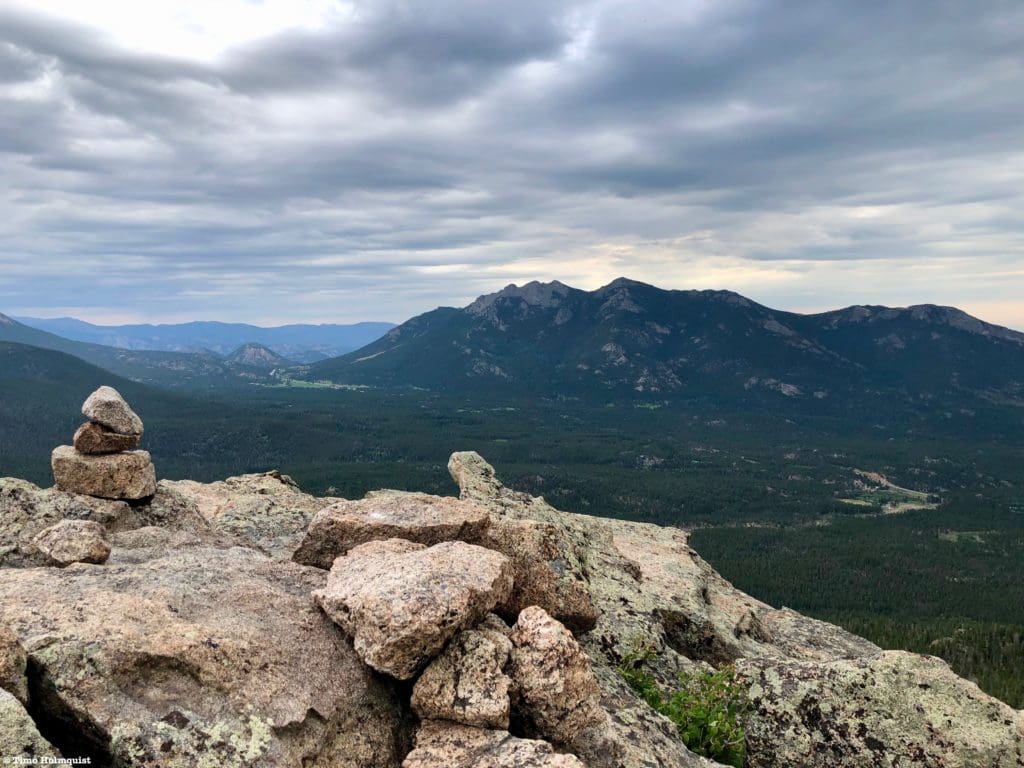
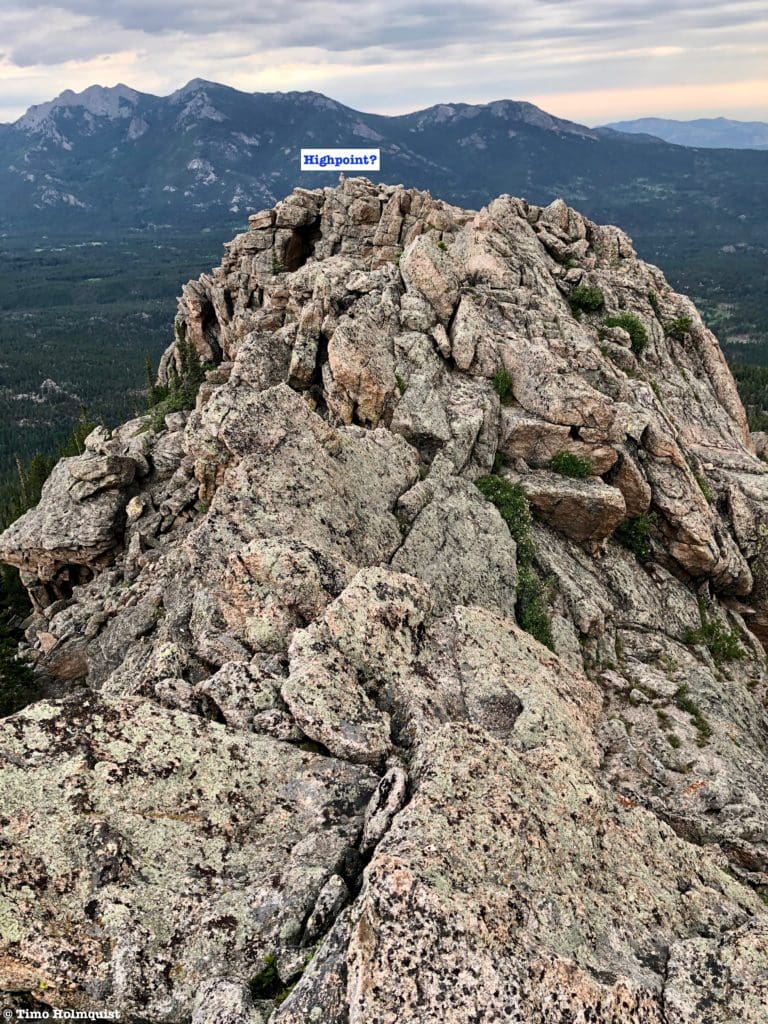
Looking into Wild Basin from the summit of Lookout Mountain.
Table of Contents:
Article Navigation: Click on any of the listed items in the table of contents below to jump to that section of the article. Similarly, clicking on any large, white section header will jump you back to the Table of Contents.
- Overview
- Scales and Criteria
- Directions to Trailhead
- Places to Stay
- Field Notes
- Journal: Lookout Mountain
- Journal: Horsetooth Peak (via Standard Route)
- Journal: Horsetooth Peak (via Bronco Ridge)
- Final Thoughts
- Acknowledgments
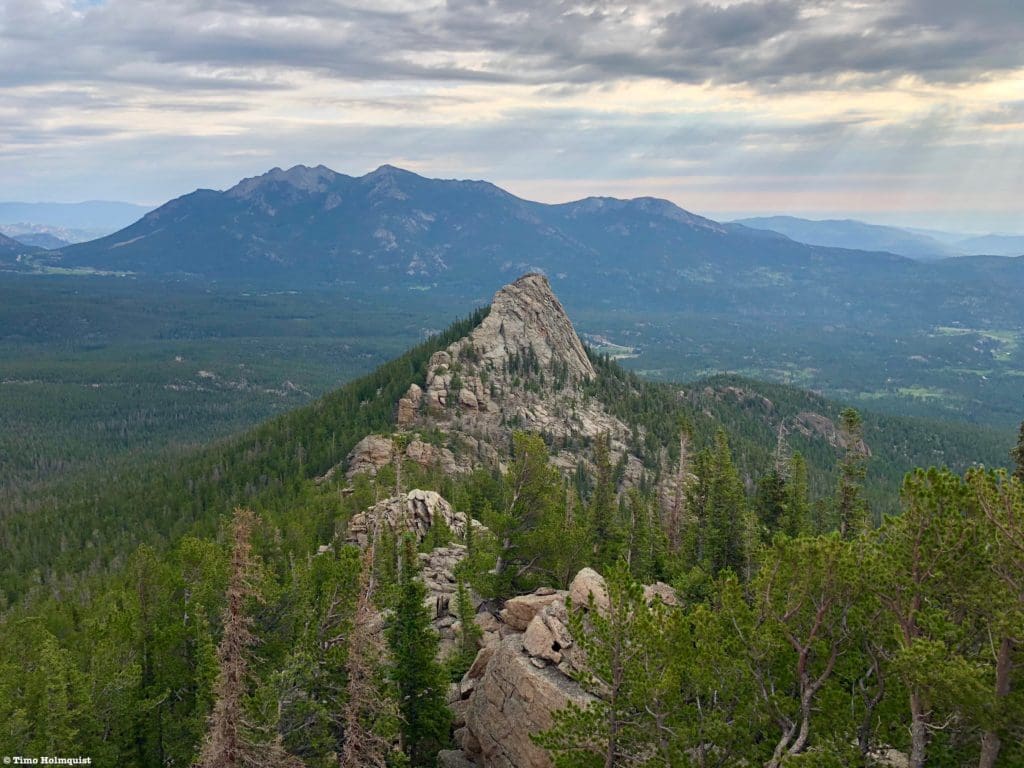
The view to Horsetooth Peak from below the summit of Lookout Mountain.
Scales and Criteria:
This article utilizes three separate rating systems: Difficulty, Popularity, and a Scramble Rating indicating the hardest move or set of moves encountered. The scramble rating employs the Yosemite Decimal System. By the easiest route (avoiding any sustained scrambling) both peaks can be completed at a Class 2 rating.
Difficulty Ratings:
- Easy: less than 5 miles, less than 500 ft. of elevation gain
- Moderate: 5-10 miles, 500-2000 ft of elevation gain
- Hard: 5-15 miles, more than 2000 ft. of elevation gain
- Very Hard: 10+ miles, more than 3,500 ft. of elevation gain
Popularity Ratings:
- Low: Large sections of trail all to yourself
- Moderate: Sizeable trail sections to yourself, crowding possible on busy summer weekends
- High: You’ll be seeing people, still a chance for solitude in spring/fall/winter.
- Very High: Almost always busy.
Scramble Rating:
- Class 1: Established hiking trail the entire length of the adventure. Low chance for injury.
- Class 2: Typically involves cross-country navigation, possibly using hands for balance but not required, steeper than Class 1.
- Class 3: Hands and feet used to scale areas, must use hands to proceed (either for balance or to help pull you up a section), increased exposure, a fall could be fatal. Helmet recommended, along with grippy hikers.
- Class 4: Climbing on very steep terrain just shy of vertical, falls could be fatal, hands employed for grip and balance continuously, ropes advisable but scalable without. Helmets are highly recommended, along with grippy hikers.
- Class 5-5.4: Near vertical and vertical climbing that involves technical rock-climbing moves, exposed, falls likely to be serious or fatal, possible to scale without ropes but only for very experienced veterans. Helmets, grippy hikers, and/or rock-climbing shoes necessary.
- Class 5.5 and up: Not covered as scrambling, full-on rock climbing with ropes, helmets, etc.
The YDS system is widely used in North America but can be quite subjective, so it is not perfect. The biggest differences I’ve encountered between Class 3 and Class 4 sections have to do with slope angle, exposure, and putting weight and pressure on hand grips (4) instead of using hands and feet interchangeably as supporting points of contact (3). It is not possible to climb a Class 4 section without using your hands to pull up some or all of your body weight. Typically, a Class 4 section will also require some type of rock-climbing move, like stemming, where hands or feet are pressed in opposition as if climbing the inside of a chimney. If downclimbing, a key difference is that most people will descend a Class 4 section facing inward, i.e., your back faces the exposure.

The scrambling routes up Horsetooth Peak are airy and awesome.
Places to Stay:
Camping near Rocky Mountain National Park will cost you. The options for free area camping are limited. On a positive note, there are plenty of options, and the National Park is within driving distance of Fort Collins, Boulder, and Denver.
- Estes Park: Known as the gateway to Rocky Mountain National Park, Estes sees nearly 80% of park traffic as opposed to the much quieter western entrance near Grand Lake. The town has a ton of lodging options.
- Allenspark: A small town near Wild Basin that has a few lodging options, including the Wild Basin Lodgeand the Sunshine Mountain Lodge and Cabins.
- Rocky Mountain National Park Camping
- Moraine Park Campground: $30 per site. $20 in winter. Established campground with perks, facilities, campfire grate, wood for sale in summer, and bear boxes to store food. Only loop B is open in the winter, and it’s first-come, first-serve.
- For summer, a reservation is needed quite a ways in advance to secure a spot.
- Glacier Basin Campground: $30 per site. Established campground with the same perks as Moraine Park. Reservation required.
- Backcountry Campsites: Rocky Mountain National Park has backcountry sites that you could book in advance. There is no open camping in the backcountry; it must be at designated backcountry sites. Please check the park website for more details. Backcountry sites require an overnight permit of $30.
- Camping near Estes Park
- Estes Park Campground at Mary’s Lake: Established campground, pricey $45-55. Good backup if other campgrounds are full.
- Hermit Park Open Space: $30 for a tent site, price increases if towing a trailer or for group spots.
- Estes Park Koa: Rates dependent on what you’re bringing with you but will run more than $50 a night in the busy season.
- Olive Ridge Campground in Roosevelt National Forest is the closest campground to the Lookout Mt. trail. ~$20 for a standard nonelectric site.
- Free or close to free: but a little farther (if you’re willing to drive)
- Ceran St. Vrain Trail Dispersed Camping ($1)
- County Road 47. Users have reported trash and ATV noise at this location, but it is free.
- Meeker Park Overflow Campground
Looking west to the massive Mount Meeker from the summit of Lookout Mountain.
The Ultimate Offline GPS Hiking & Ski Maps
See why onX Backcountry is the ultimate GPS navigation app for your outdoor pursuits. Try Today for Free. No credit card required.
Directions to Trailhead:
 Lookout Mountain has a trail up to its summit area that is easy to follow, but the entrance to it is a bit obscure. There’s a dirt road off US 7 between the Wild Basin entrance to the south and the East Longs Peak entrance to the north, located in the small hamlet of Meeker Pak; it’s a pretty easy entrance to miss.
From Estes Park, travel south on US 7 until seeing signs for the Meeker Park Lodge on the left side of the road, slow down. Across the road to the right, you’ll see a small dirt road with the sign “County Road 113N.” Turn right onto it.
From the south, pass Allenspark and the entrance to Wild Basin. After Wild Basin, slow down and start looking at road signs. Meeker Lodge will appear on your right; when you see it, scour the left side of the road for “County Road 113N”. That’s your road.
Things to keep in mind:
- 113N has a sister road 113S that is very nearby; the correct road is 113N.
- The dirt road has a “Dead End” sign on it, don’t worry, you’ll reach the trail before it dead ends.
- Horse tours frequent the area, so once you turn onto the dirt road, drive slowly and pay attention.
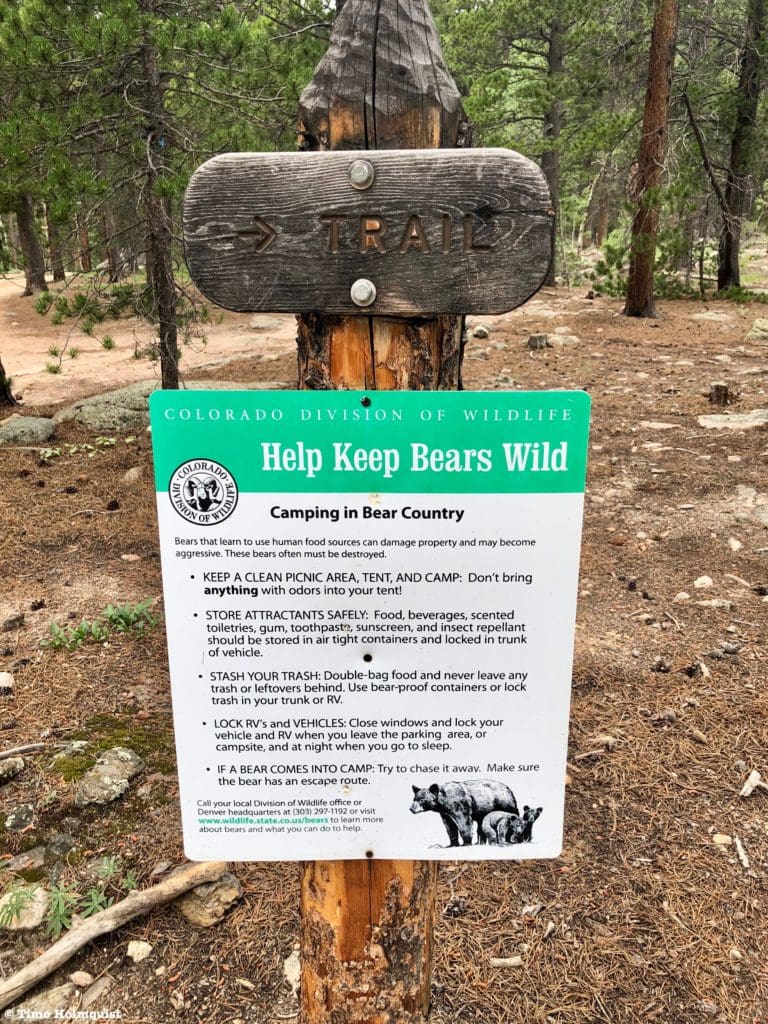
- Drive West on the dirt road for a little less than a mile, passing a few houses on either side. You’ll reach the trail when you see a small trail sign with a bear habitat notice underneath it on the right side.
- There is space for a handful of cars along the left side of the road if you park well, leave plenty of space for dirt road traffic and horses to walk around your car.
- This is a sleepy part of the National Park; if you arrive early, don’t blast music, or drive recklessly, you’ll pass a lot of private property before reaching the trail.
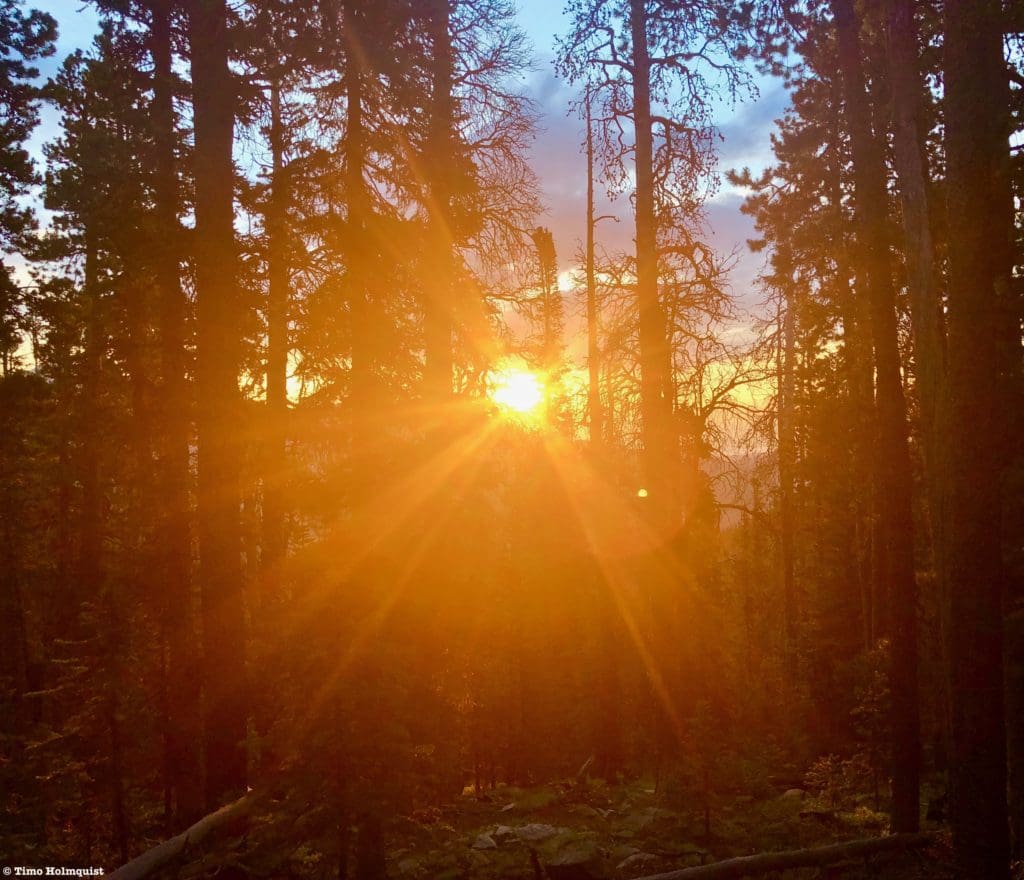
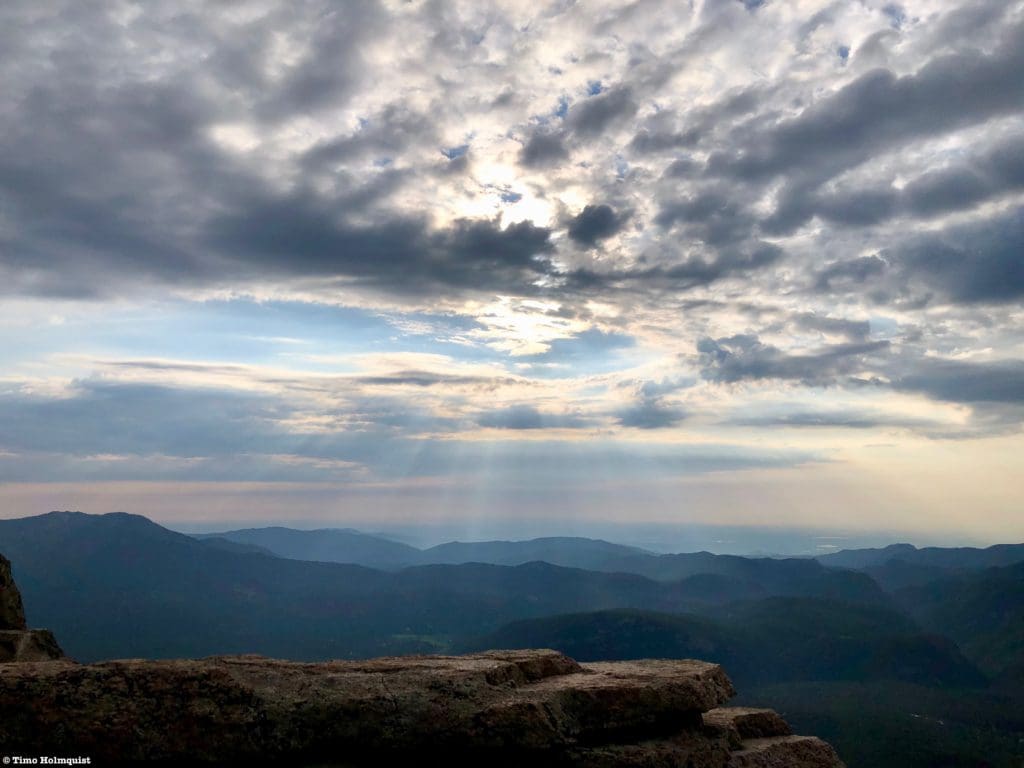
Mountain sunrises in the Front Range are spectacular.
Field Notes:
The deeper into the Colorado wilds you get, the more you realize that with thousands of summits in the state, there’s bound to be some naming overlap. This Lookout Mountain is not the Lookout Mountain near the town of Golden. Similarly, this Horsetooth Peak is not the more famous Horsetooth Rock near Fort Collins. Make sure your research specifies Rocky Mountain National Park as the location.
Lookout Mountain can be climbed without much scrambling as long as you don’t climb up the summit tower. If you do, be prepared for a short, stout class 4 scramble consisting of a handful of moves. There’s only one realistic way up without ropes, so be prepared to descend what you climb. Horsetooth Peak is technically off-trail, but the navigation component is not difficult. There’s also a sneaky Class 2+ way to the top that doesn’t involve any exposed scrambling; however, scrambling the ridge direct is fantastic and heart pumping.
Due to the area’s obscure approach, you could absolutely have the whole trail to yourself. Dwarfed by nearby Mt. Meeker, thousands of people drive past Lookout Mt. without even realizing that it’s there. The short mileage makes it a perfect half-day outing, and the lower elevation means you can climb it until deep into the autumn, while higher peaks deal with the first accumulating snows of the season. Winter hiking is possible, but the road to the trailhead is not plowed as consistently as other access points like Bear Lake Road, so if you attempt a winter hike, make sure it’s at least a couple of days after the latest snowfall. Because the trail begins outside the National Park boundary, there is no entrance fee or timed entry pass necessary to access it.
For your weather forecasting needs, start with the Allenspark extended forecast. You can also use the Mt. Meeker forecast, but make sure to toggle the forecast elevation to the “mid” category, or it will show summit temperatures for Meeker, which are generally much colder. The Olive Ridge Campground forecast on Opensummit is a good option as well.
Despite the short overall length, if you do end up scrambling around on these peaks, make sure you understand the dangers of scrambling in a remote setting. While the peaks can be soloed, you should always leave detailed instructions on where you’ve gone with a friend or loved one. It isn’t like these are the two hardest peaks in the world, but they are not well-traveled, so the likelihood of receiving help from nearby hikers is low.
Lookout Mountain:
For the best scrambling experience, you really want to combine Lookout Mt. with Horsetooth Peak. The overall distance of a loop between them is a little more than six miles. Individually, each peak has something unique to offer as well, so it’s worth adventuring a little off the beaten path.
Once you’ve found the small trail sign on the right-hand side of the dirt road, find a place to park. There are a few places on the left side of the road with room for a handful of cars depending on how cleverly you park. When ready, begin hiking west on a wide and easily identifiable trail.
Small trail sign next to the dirt road.
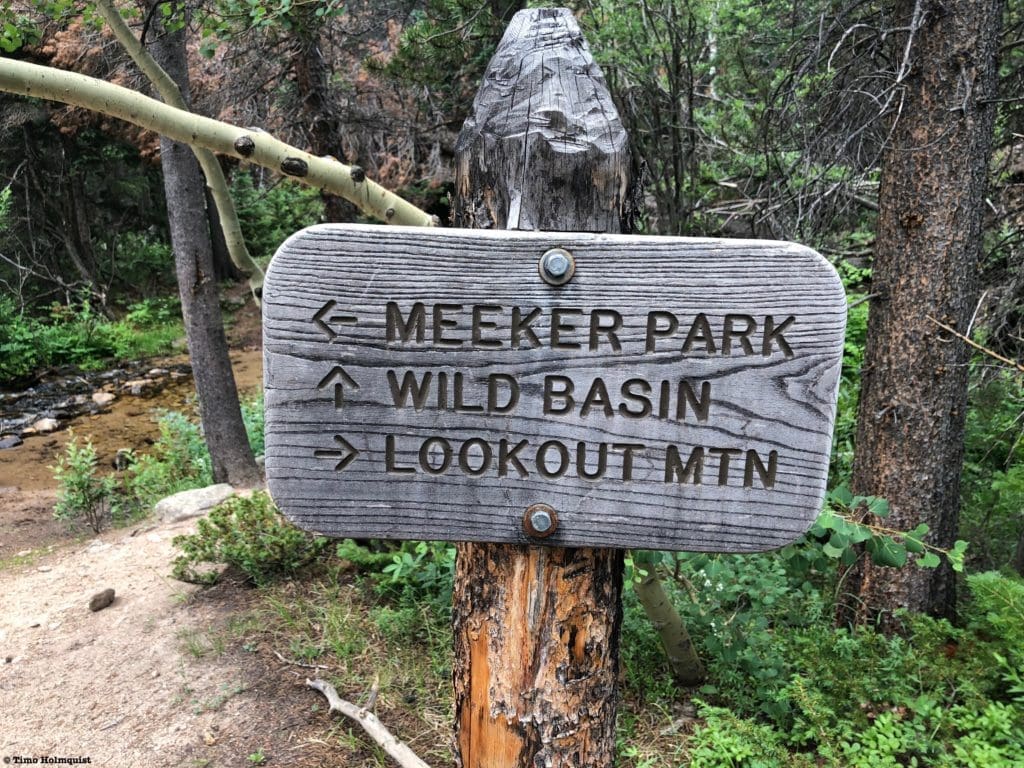
The first part of this hike overlaps with an equestrian trail, so you may see evidence of horses. The overlap doesn’t last long, and after a few points of a mile, you’ll reach a junction. Take a right, following the sign for Lookout Mountain. If you stay left and cross Horse Creek, you’ll eventually end up near Copeland Lake in Wild Basin.
Well-marked signage at the first junction eases any navigational question marks.
The trail will begin to rise before shuttling you across your first of three Horse Creek crossings. There are a handful of large sticks lying across the water.
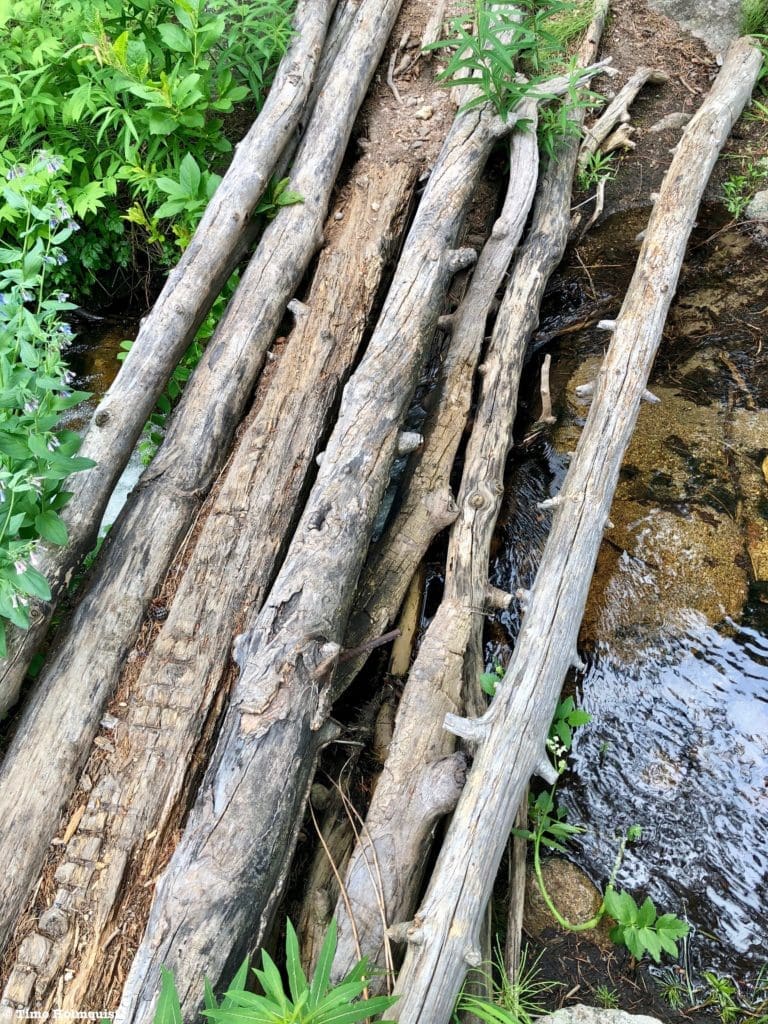
First Horse Creek crossing.
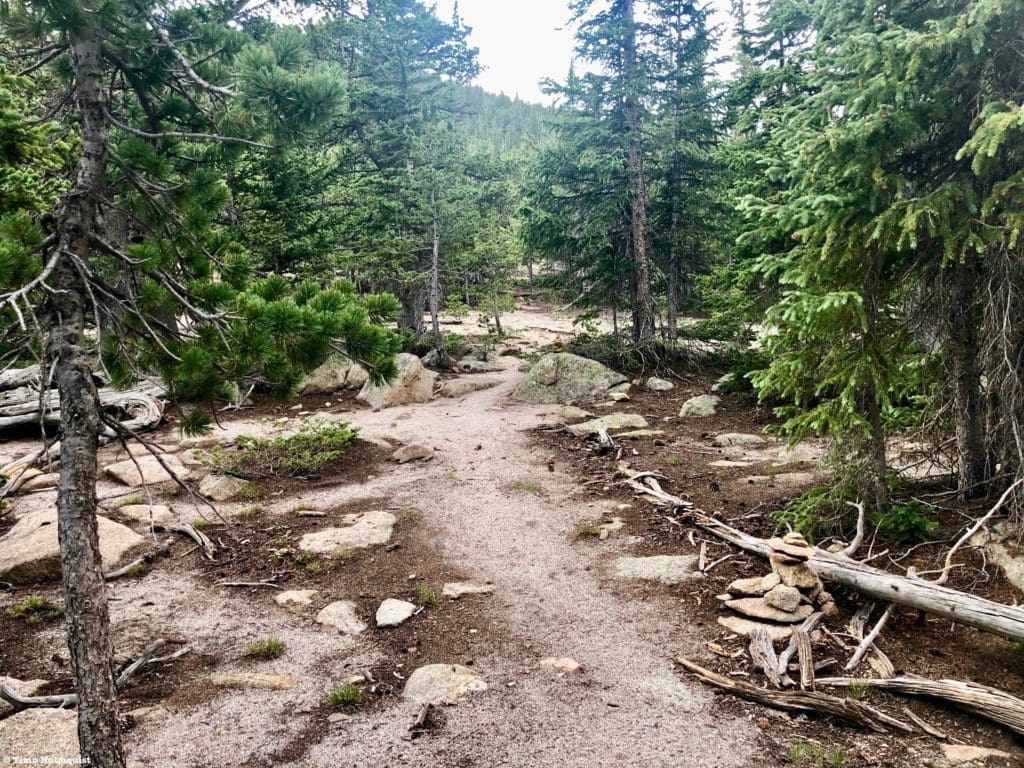
On the other side, the trail will rise more substantially, passing through a semi-arid Pine Forest with minimal underbrush. Not long after, the wide grade of the trail reduces in width.
Between now and your next creek crossing, the trail will perform an ascending traverse of the lower north ridge of Horsetooth Peak, although the dramatic summit rocks will remain hidden. The second crossing marks where the meandering trail takes a southward heading, and the elevation gain increases.
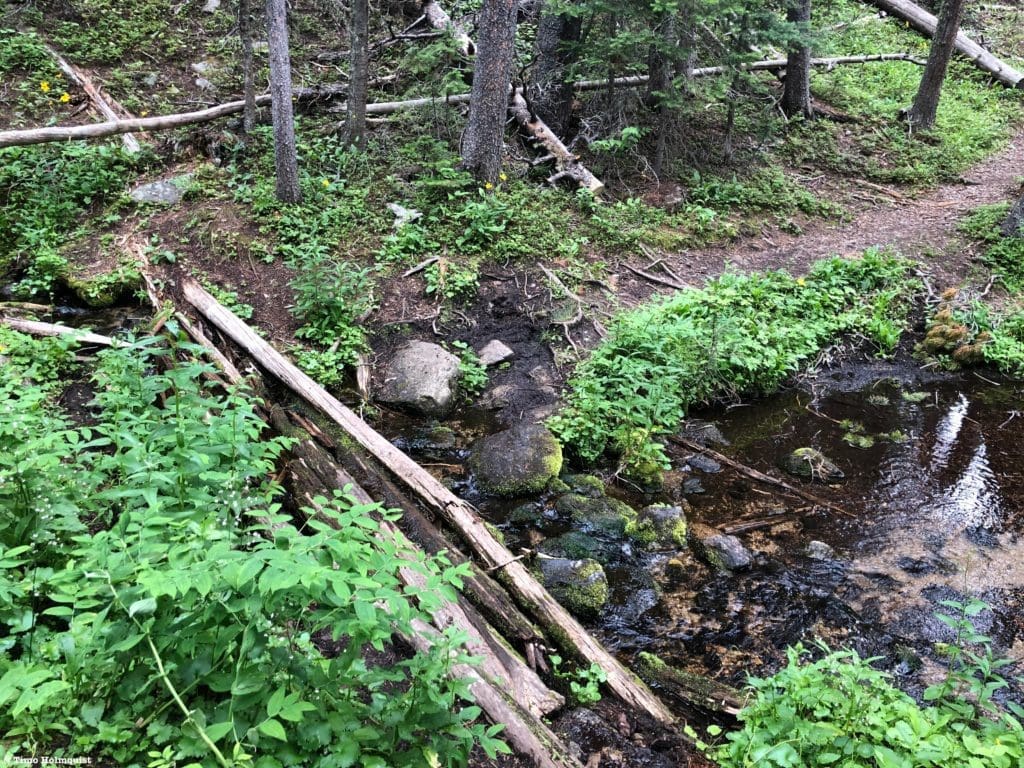
The second creek crossing consists of two water braids.
The trail grinds its way south along a rising slope with a few switchbacks to keep the angle down. There isn’t a lot to see during this section, but the forest is healthy, and I spotted a few different varieties of fungi. Every once in a while, you’ll catch glimpses of Horsetooth Peak to your east, but panoramic views remain elusive.
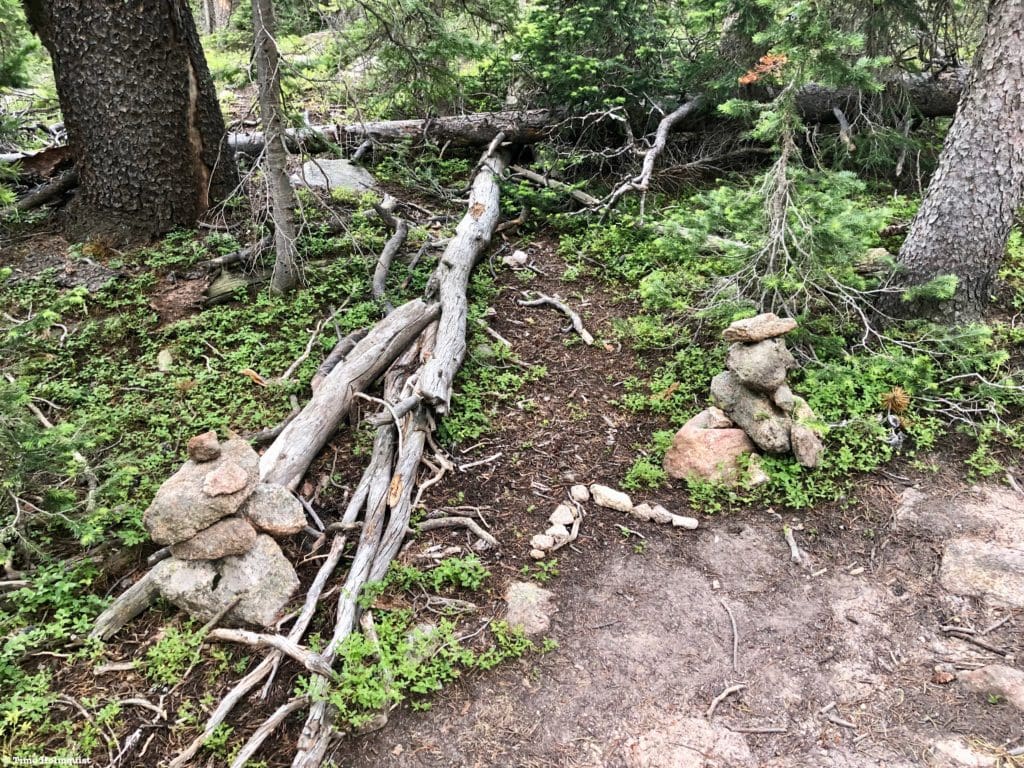
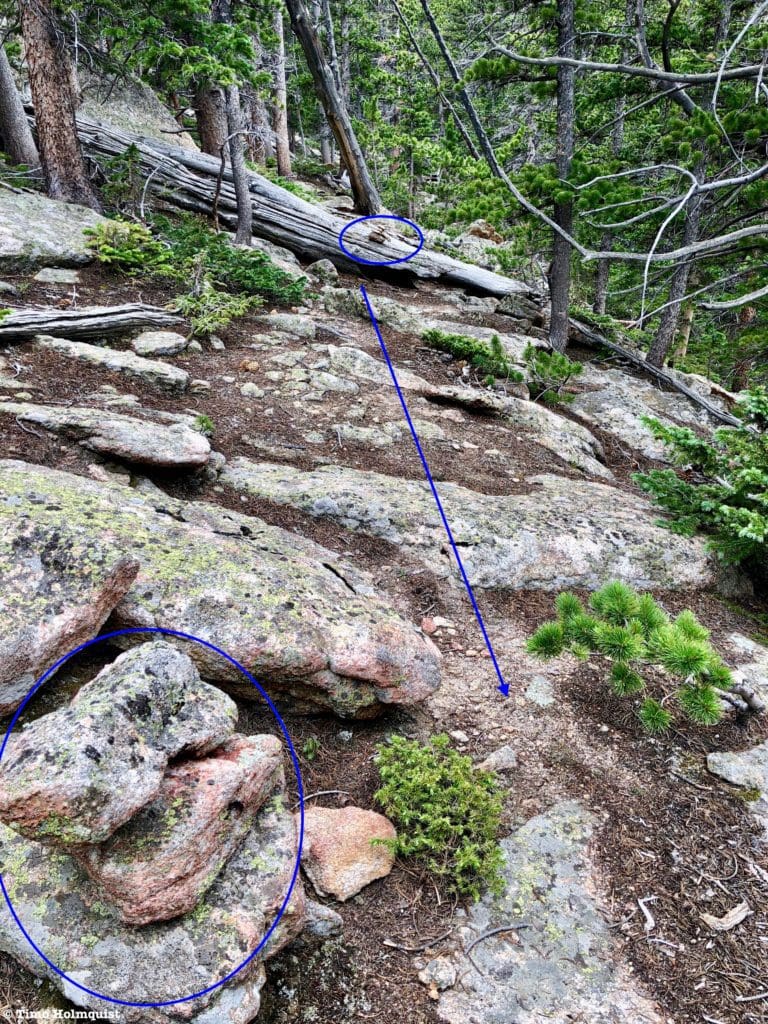
This section of the trail to the saddle is where most of the elevation gain takes place, so pace yourself and enjoy the quiet splendor of this forgotten slice of the National Park. As you near the saddle (after the third creek crossing), you may notice two rock cairns and a rock wedge (not unlike an arrow) on the left side of the trail. While unimportant now, this is the easiest way to reach Horsetooth Peak. It is not an official trail, but well-spaced cairns help keep the cross-country travel difficulties to a minimum.

Shortcut to Horsetooth Pk. if that is your primary goal.
To continue to Lookout Mountain, simply stay on the trail until the upward angle relents and the ground cover changes from soil to a sandier consistency. Cairns become more obvious here as well to help guide you.
Arriving at the saddle.
There is a large open space on the saddle itself where two sets of cairns should be visible, one leading left, and another smaller set angling to the right. Follow the more obvious cairns to the left in order to stay on the Lookout Mountain Trail.
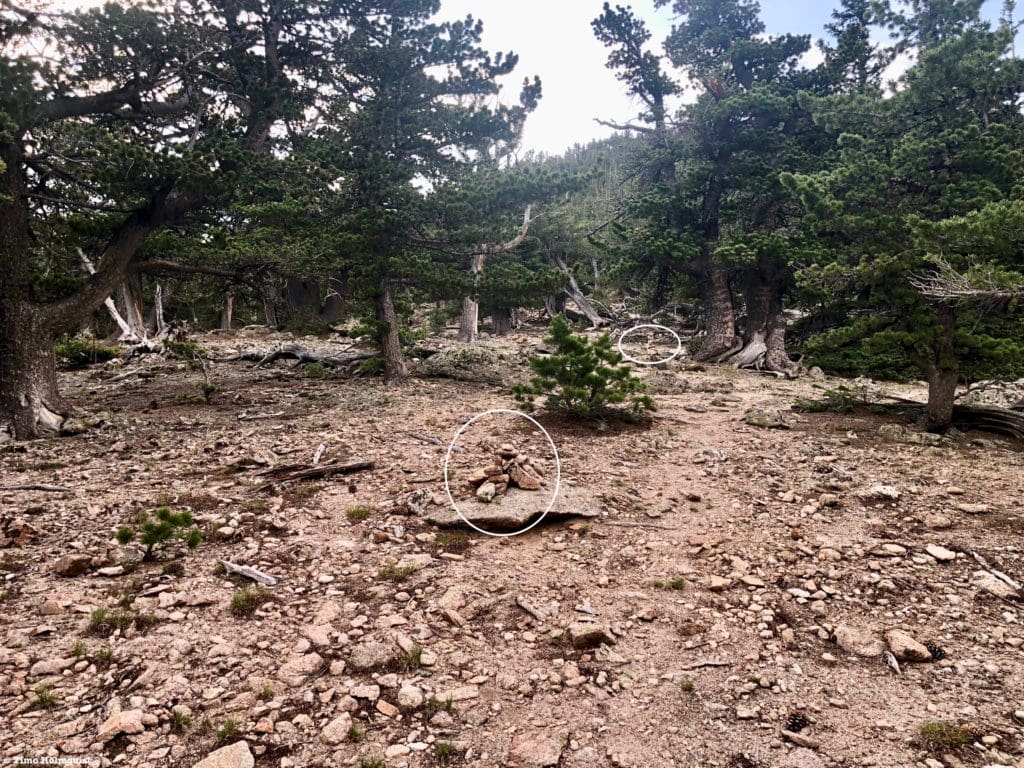
East to the summit, cairns are circled.
Despite the substantial gain over a short distance, if you’re cookin up the trail, you can make the saddle in less than an hour. Once you start veering towards Lookout, the last bit will only take 10-20 minutes.
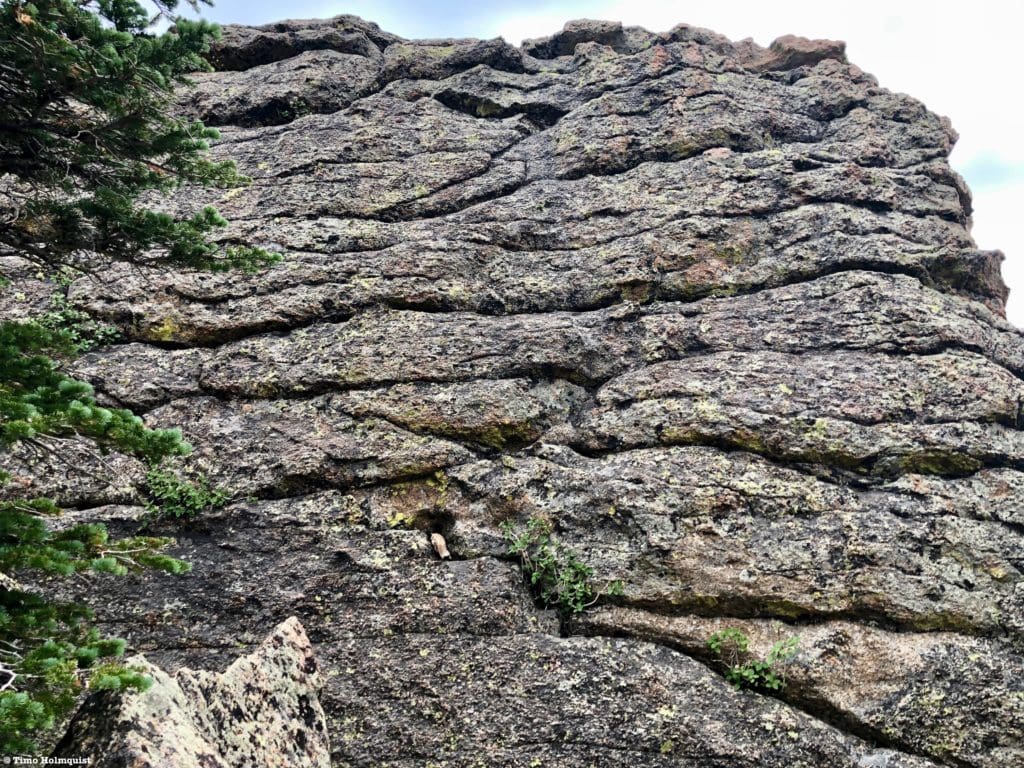
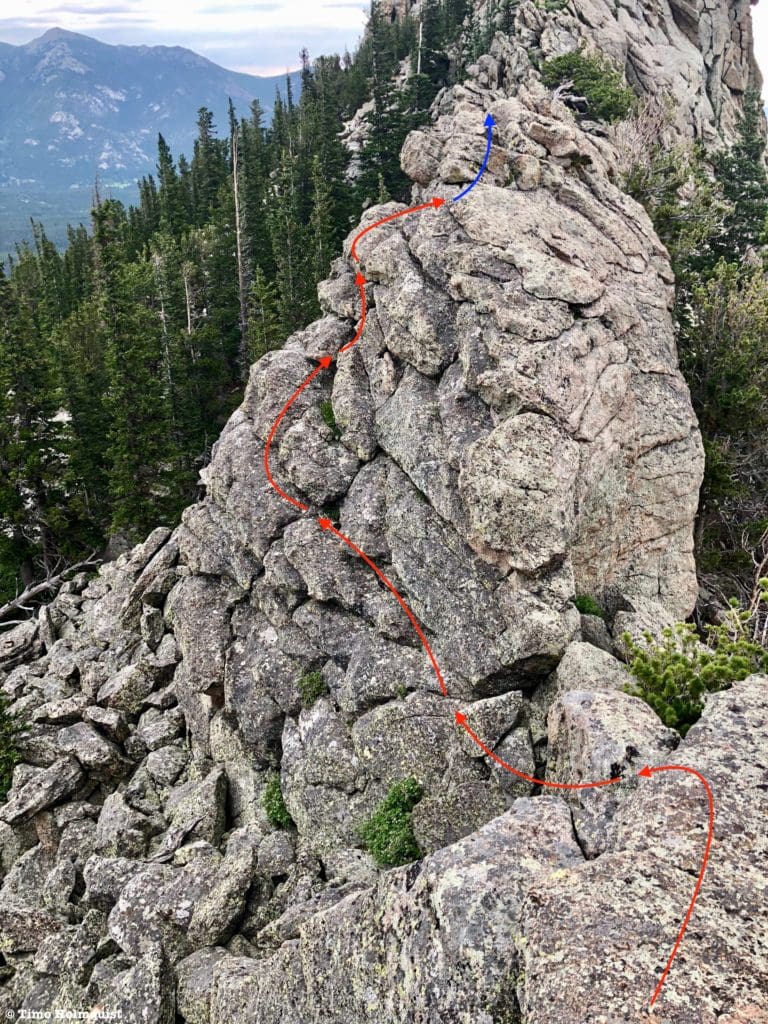
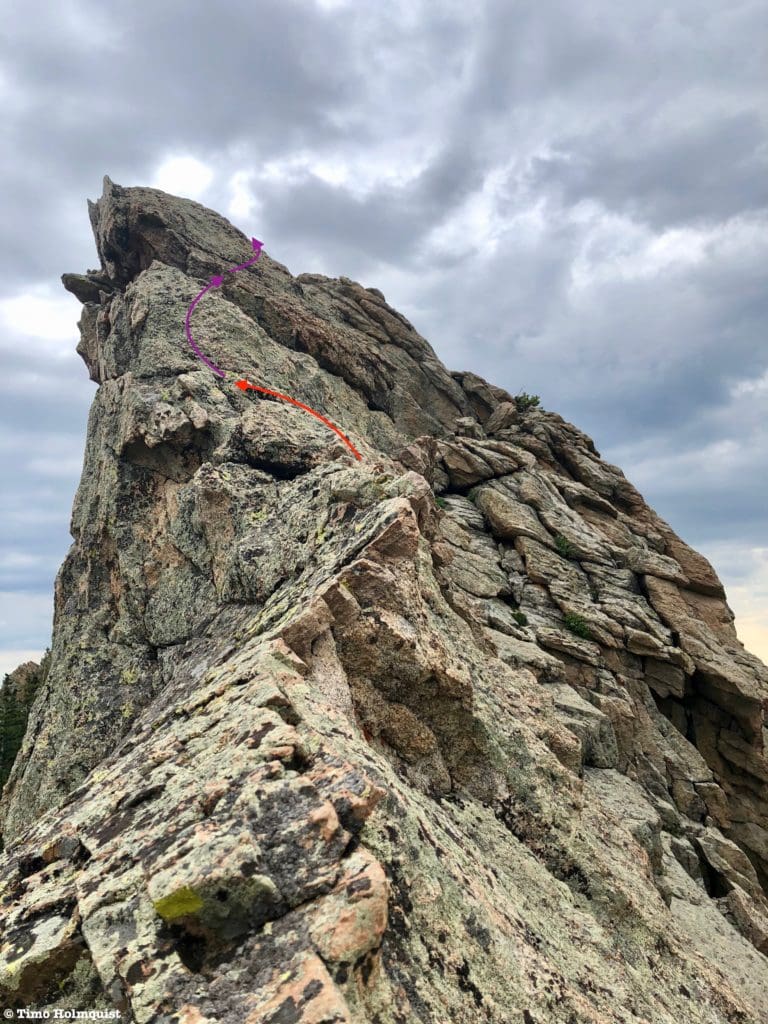
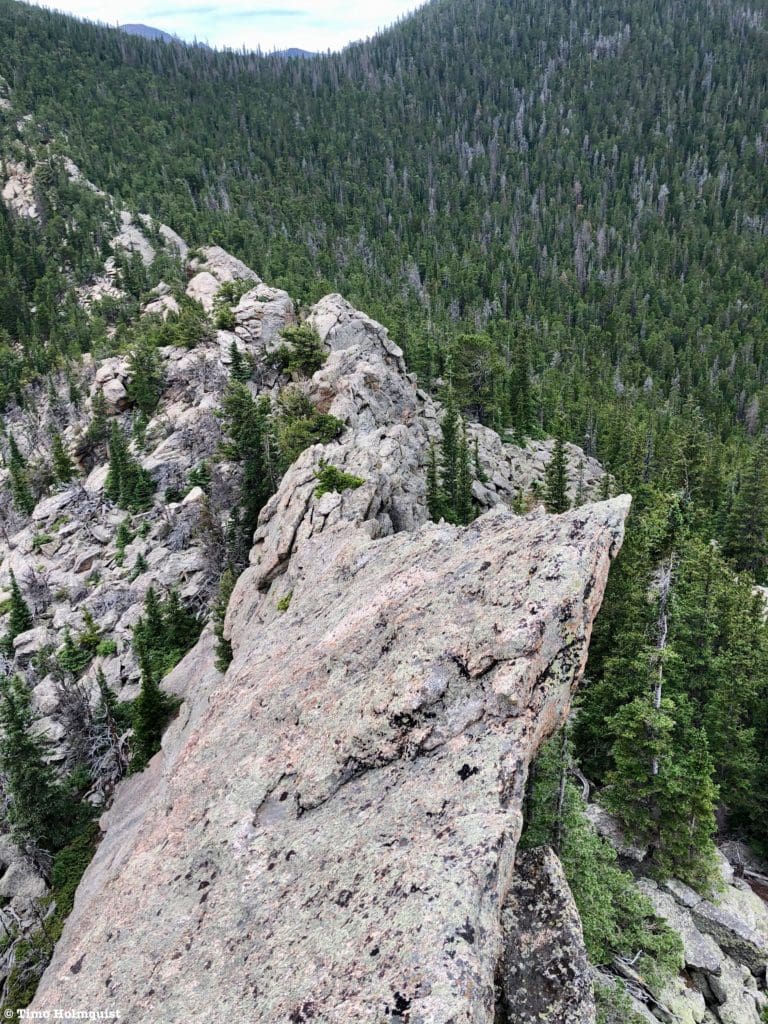
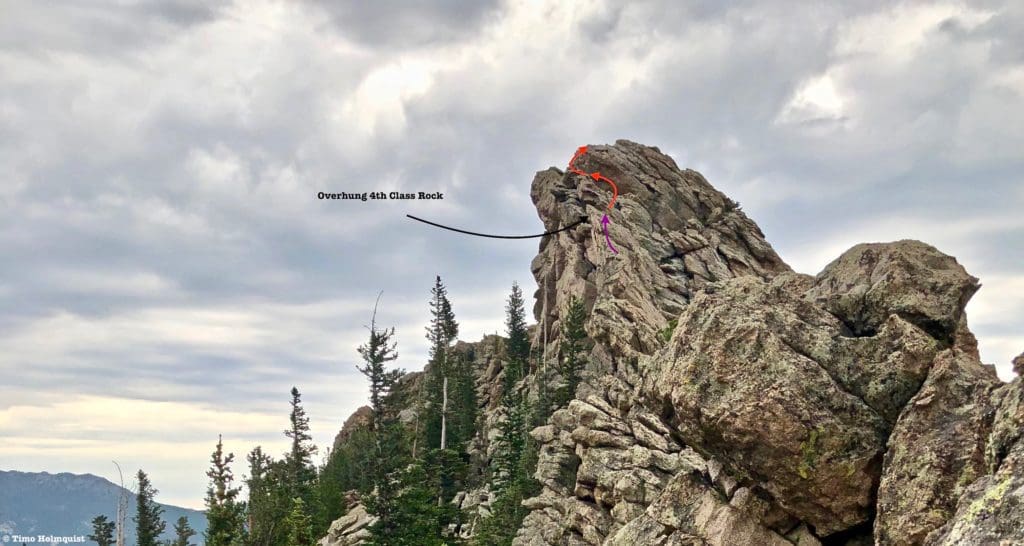
The rest of the trail is tree-covered until the last few yards when the rock tower marking the summit reveals itself. The rest of the summit plateau has a few other rocky outcroppings and pine trees, but the crazy-looking summit rocks stick well above the cover. The cairns will guide you right up to the rocks. Circle the tower until you are on its east side.
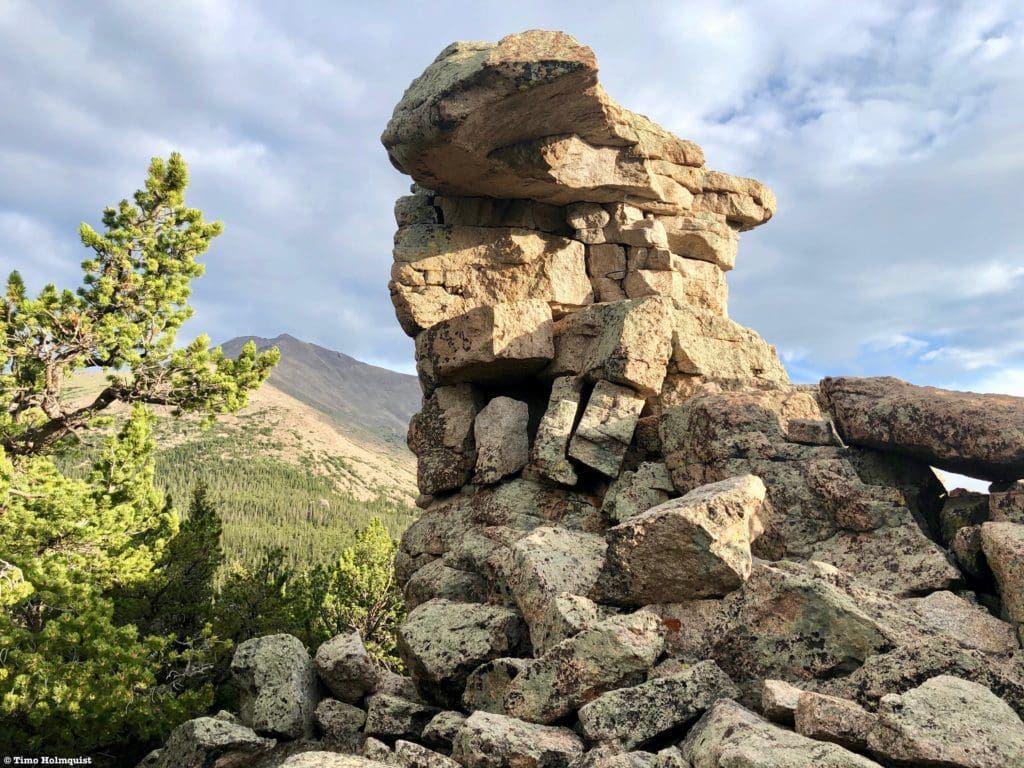
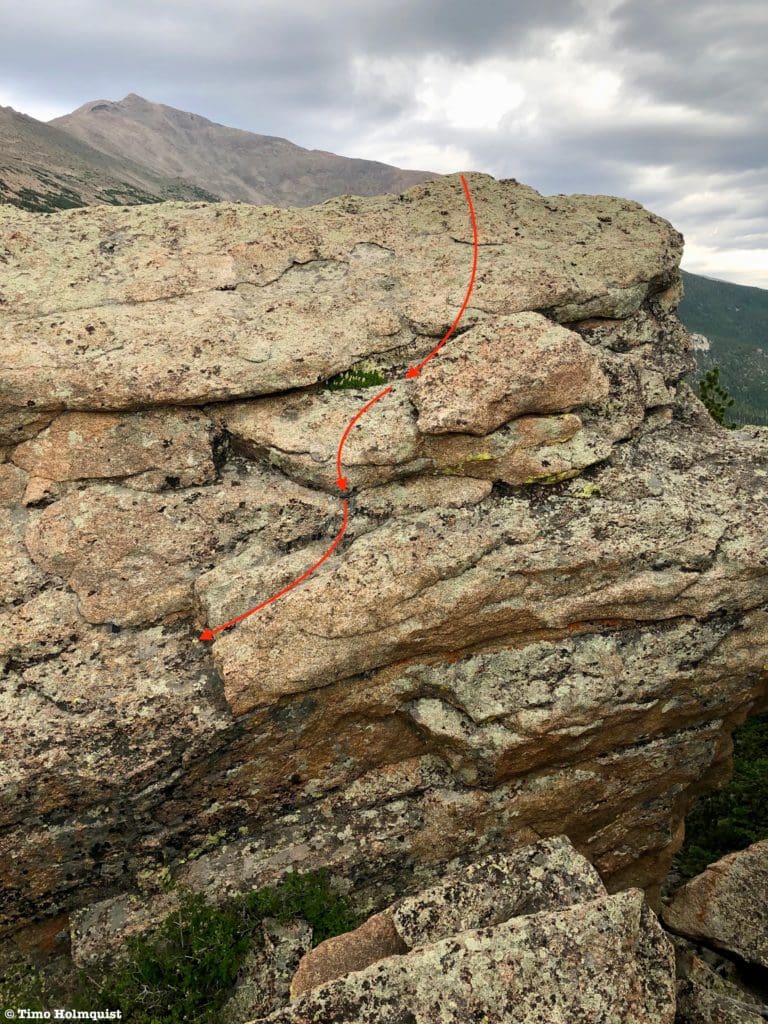
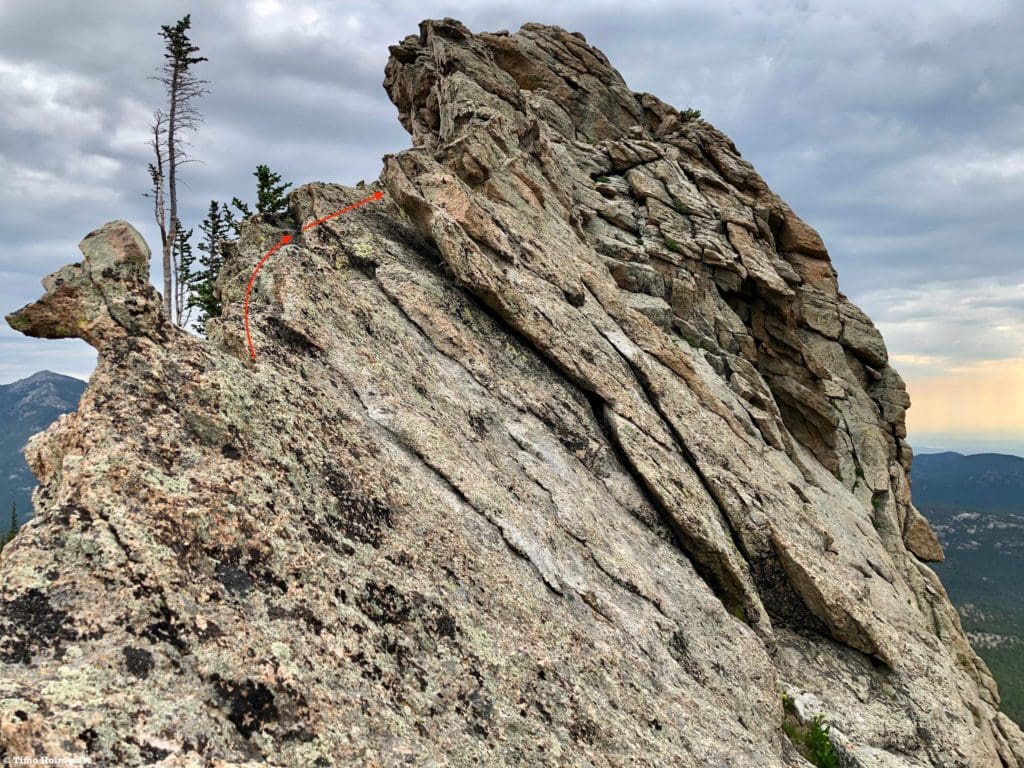
The dramatic and erosion defying summit of Lookout Mt.
There’s really only one way up to the very top without ropes so analyze the obstacles carefully before committing. For the hesitant, there are plenty of other rock ribs to the east that provide excellent vantage points and only require some Class 2 and Class 2+ rock hopping to reach. If the top of Lookout is your goal, get ready for some brief but decidedly Class 4 moves both up and down the tower.
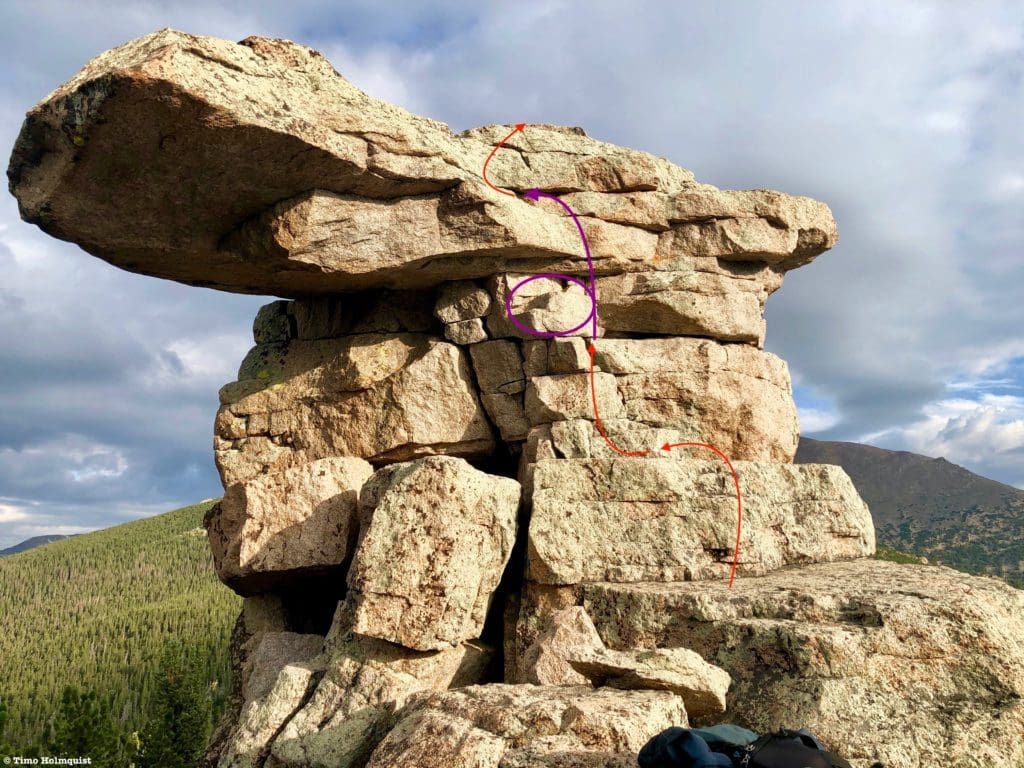
The scramble up to the diving board summit rock.
Despite being incredibly sturdy, the final lip you have to climb to get over the Class 4 section doesn’t offer much in the way of solid handholds. I used my flat palms as leverage to boost myself up but had to do so without my fingers wrapped around anything. The key to making these 2-3 moves manageable is to locate the in-step circled in the picture above. While obvious from below, when you are standing against the tower, you won’t be able to see this crucial foothold because it’s tucked underneath an overhanging rock. It is there though, and if you plant a solid left foot onto it, the extra height the step gives should be enough to wrap your other leg around to a higher lip on your right. From there, use the momentum from the step to clamber up the rest. Another 2-3 moves will bring you to the wide, flat top.
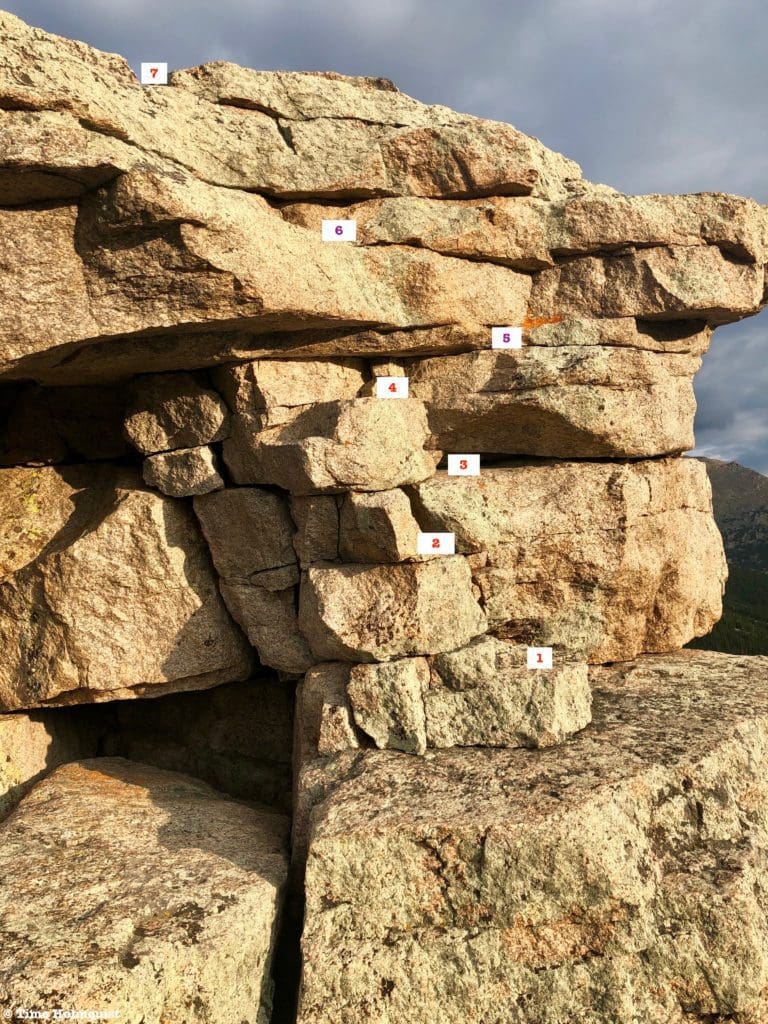
Numbered steps representing the moves I used to reach the top, with 5 and 6 representing the 4thClass section. Planting your left foot on number 4 makes it all possible. For size reference, when I stood on Step 3, my head was above Step 6; I am a little over 5’9.
For veteran scramblers, this isn’t a super difficult section and once you’re up, descending isn’t that bad. If you’re new to this kind of scrambling, stack advantages before committing: bring a friend to spot holds for you, wear a helmet, and drop your pack below the tower, there’s no need to have weight on your back pulling you away from the rock any time you may be off-balance. The easiest option for the hesitant is, of course, to avoid the rock tower and explore the summit area until you’ve given yourself the same views you would’ve gotten from the top. If you do get up to the top, bring a camera, the panorama opportunities are outrageous.
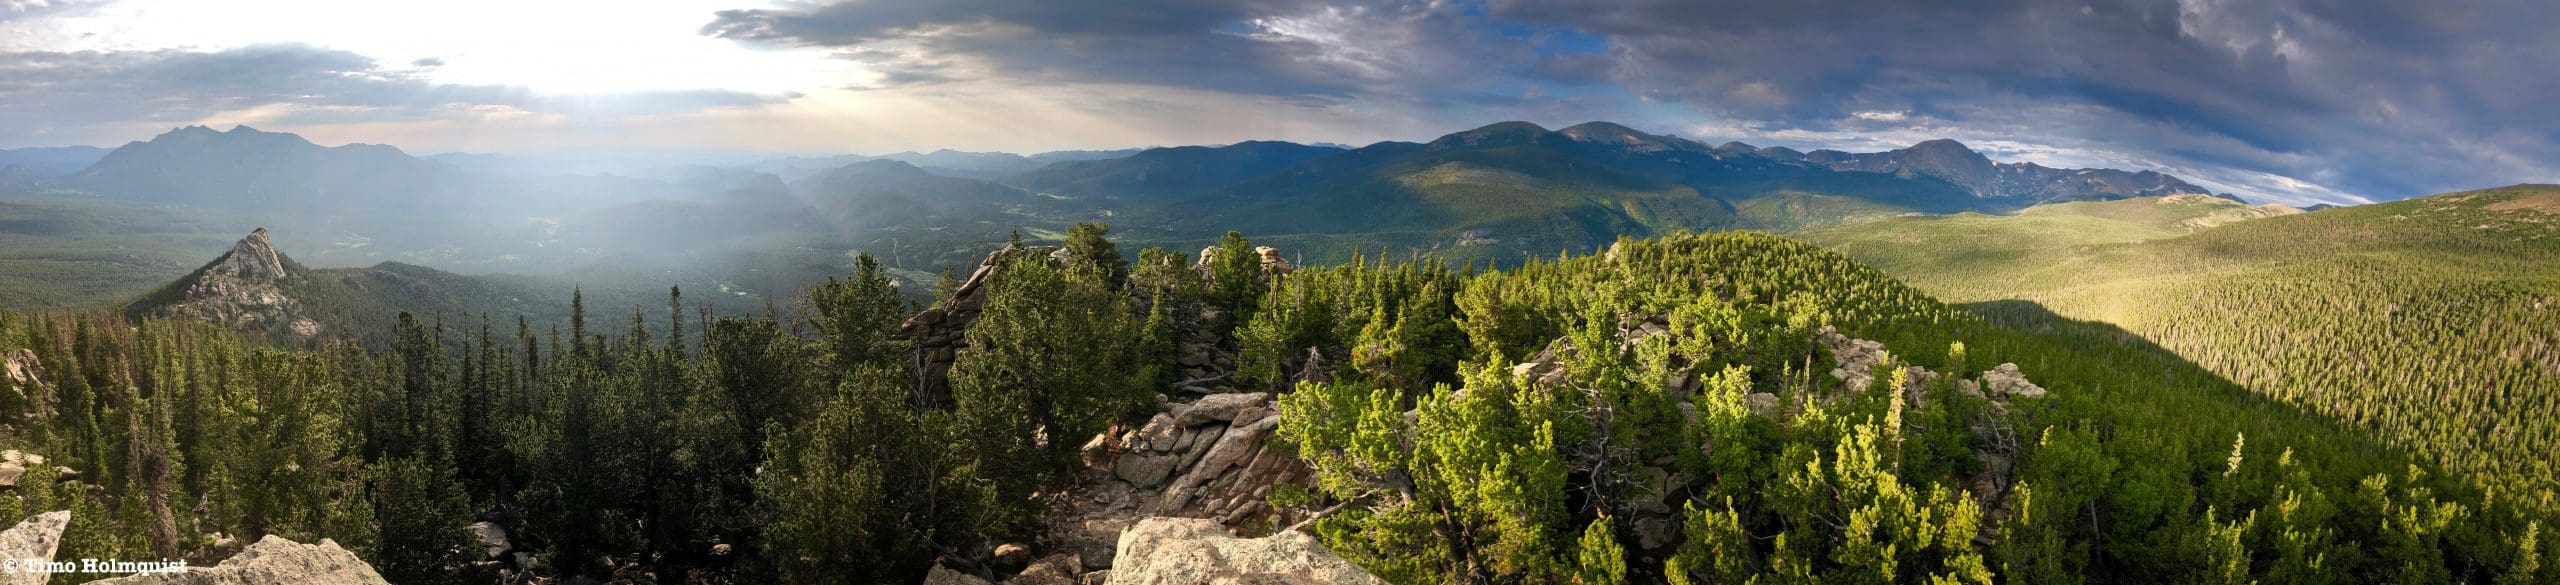
Left to Right: shadowed silhouette of Twin Sisters, Horsetooth Peak in front, the sun, and lower area where Allenspark sits. The first peak to the right that breaks treeline is Meadow Mt, followed by Mt. St. Vrain. The most obvious peak in the right third is Copeland Mt., the next highpoint is Mt. Isolation, and the green slopes leading off-screen belong to Mt. Meeker. Everything from roughly photo center to the right is within Rocky Mountain National Park.
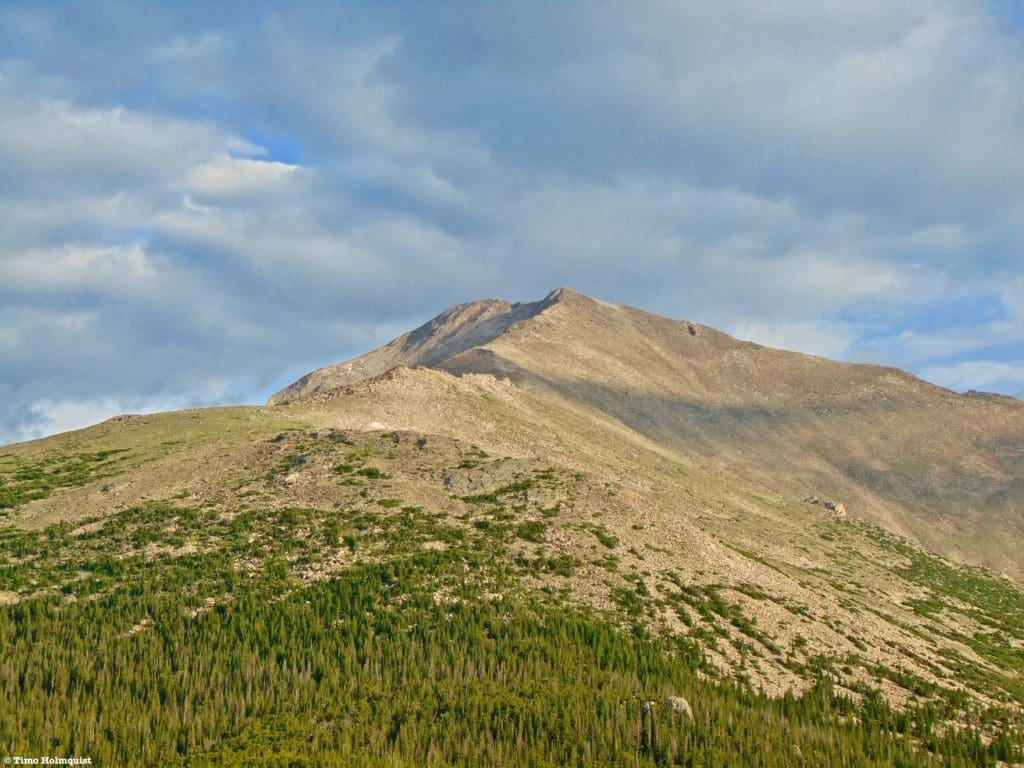
Panning right, it’s hard to ignore the absolute behemoth of Mt. Meeker. The slopes featured in the picture below are visible from as far away as Coors Field in Denver.
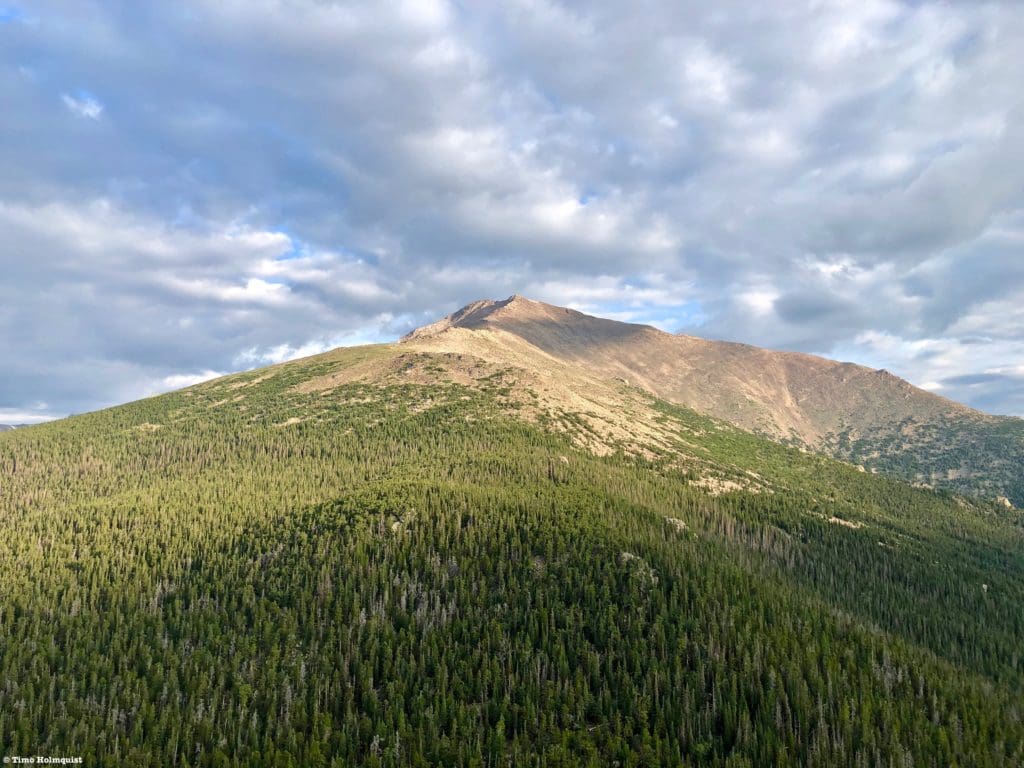
Mt. Meeker to the west.
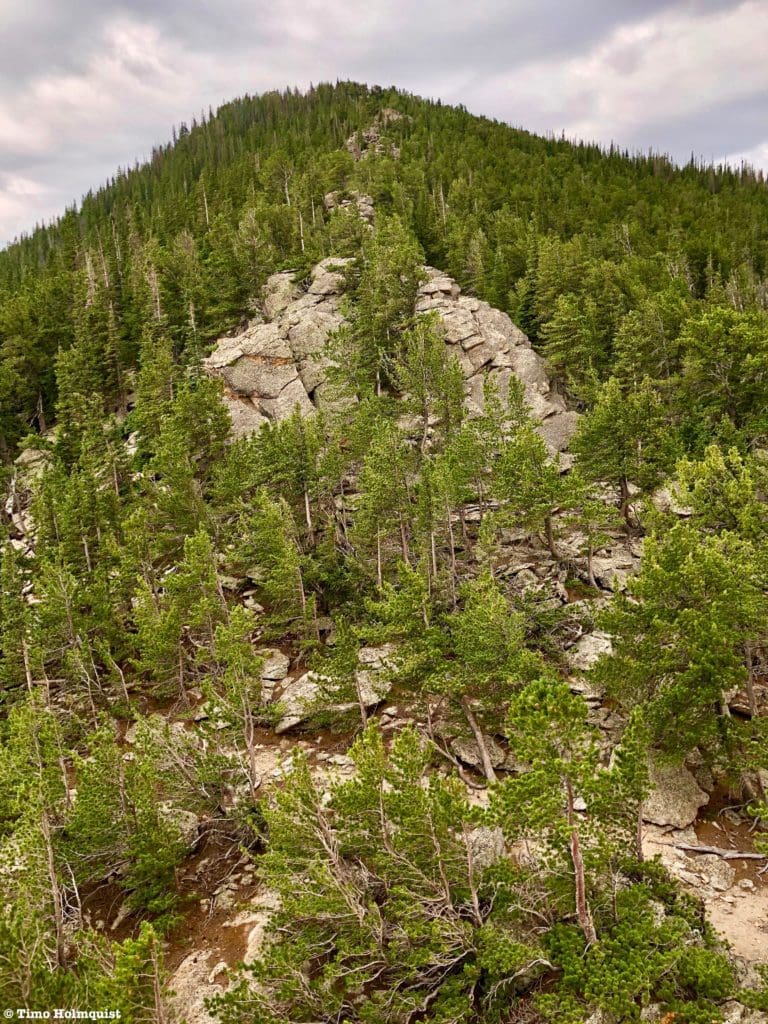
Looking down the ridge to the north, you can focus on Horsetooth Peak. While unimpressive in its overall height, Horsetooth Peak has some bomber scrambling routes and is a true Rocky Mountain National Park hidden gem.
Your next destination.
After digesting the views, start prepping for your steep descent of the summit rocks. The distance isn’t far, but falling down these rocks is inviting broken bones and head injuries, so it’s worth taking a moment to work up a plan. I ended up downclimbing facing away from the rock, which may not be the safest method, but did allow me to sit my butt on a nice lip. From there, I braced my left hand against a rock and used my other hand (palm down) on the lip I was sitting on. From there, I slowly lowered myself down a few feet until I was back off the tower. For the hesitant, descending with your back to the exposure may be easier, and if you have a partner with you, they can guide you to find the best foot and handholds.
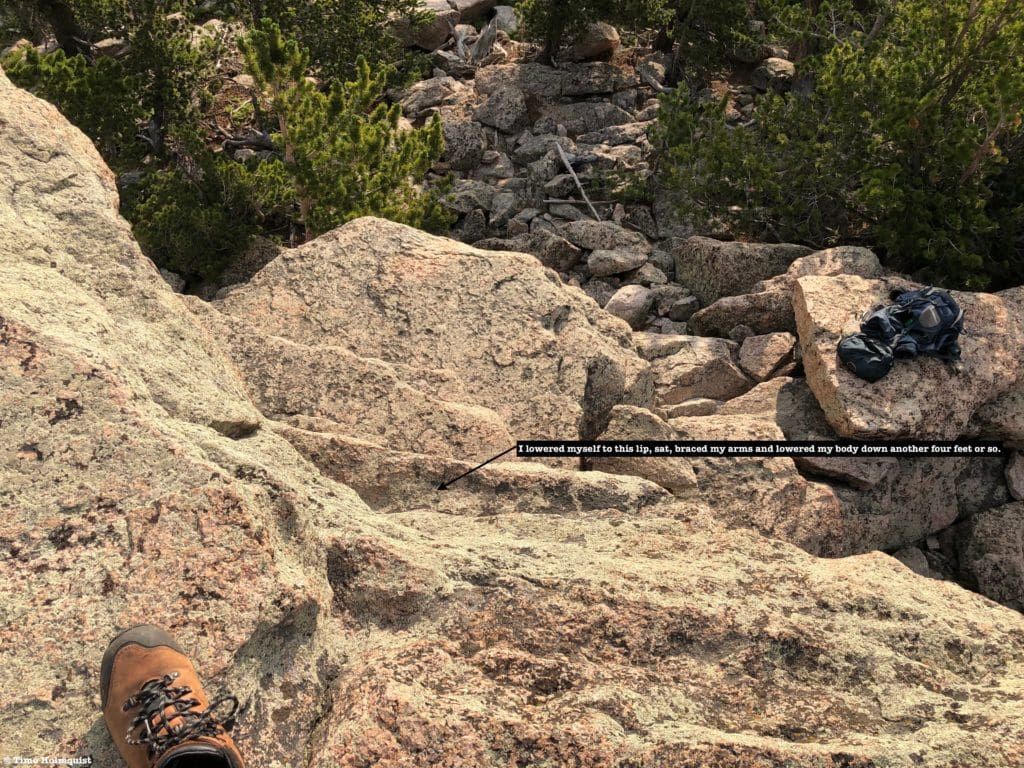
How I got down. Went up and down three times to test different methods and found front-facing to be easier for me. That doesn’t mean it’s the easiest or most graceful method, but it did work.
If you have the weather, spend some time hopping around on the summit plateau. Cliffs to the east offer superb views back down to the high plains in the distance, illustrating a more than 5,000-foot elevation difference.
Way down to the high plains in the distance.
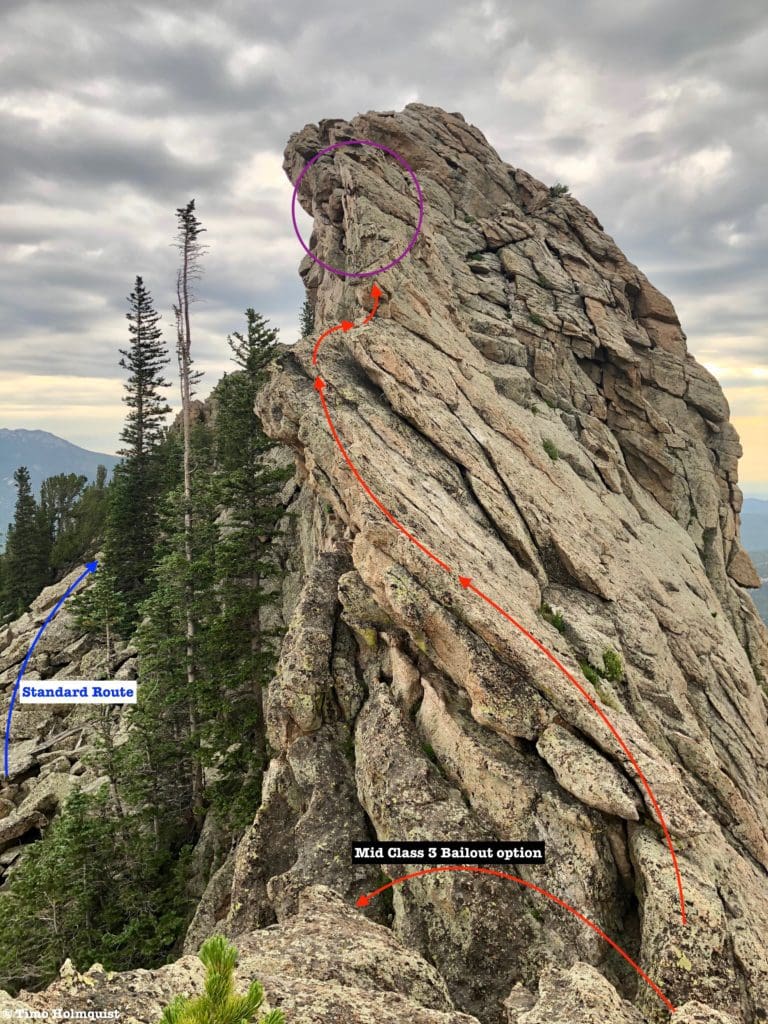
If Lookout Mountain was your ultimate destination, turn around and head back down the way you came. If you want to tackle Horsetooth Peak but want to do it via the easiest method (Class 2+), make your way back to the saddle between Lookout Mountain and Mount Meeker. Start descending the way you came up and look for the double cairns indicating the off-trail path to the peak. If you want to scramble the ridge between Lookout and Horsetooth and then scramble up the crest to Horsetooth (Class 4), hang tight; I’ll describe that method after outlining the simplest option.
Horsetooth Peak (via the Standard Route):
The start of the cairned route to Horsetooth Pk.
Once you find the cairned path to Horsetooth, begin traversing into the backcountry, keeping an eye out for the next cairn. You’ll essentially parallel your elevation gradient until circling towards the west side of the Horsetooth Peak summit rocks. The cairns stick to the drier side of the ridge to minimize difficult bushwhacking.
Typical terrain as you near Horsetooth, cairns are circled.
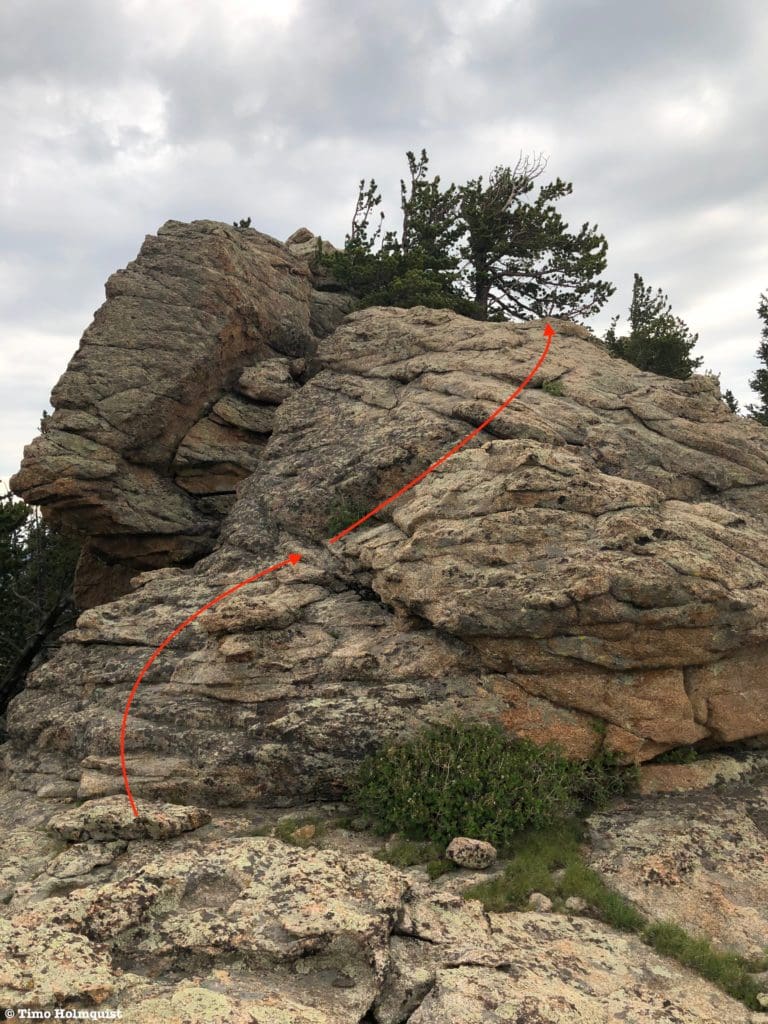
As you follow the cairns, you’ll notice sharp rock ridges and towers emerging on your right. You’ll parallel below these, eventually negotiating up a talus slope beneath them.
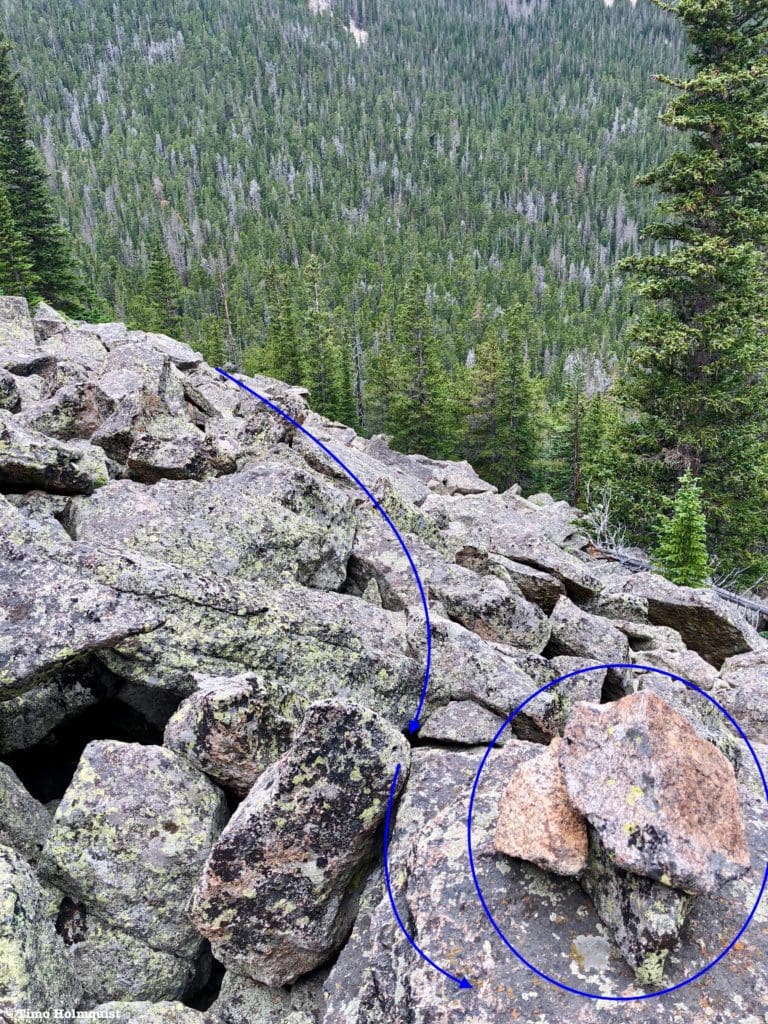
Getting rockier as you meander toward Horsetooth.
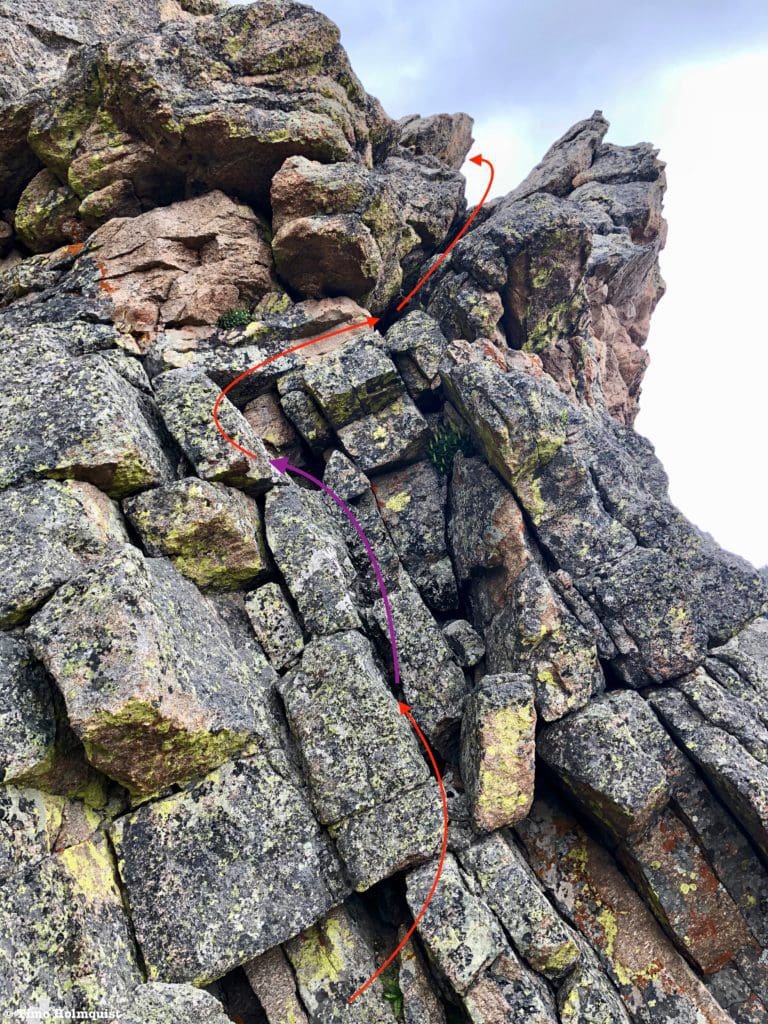
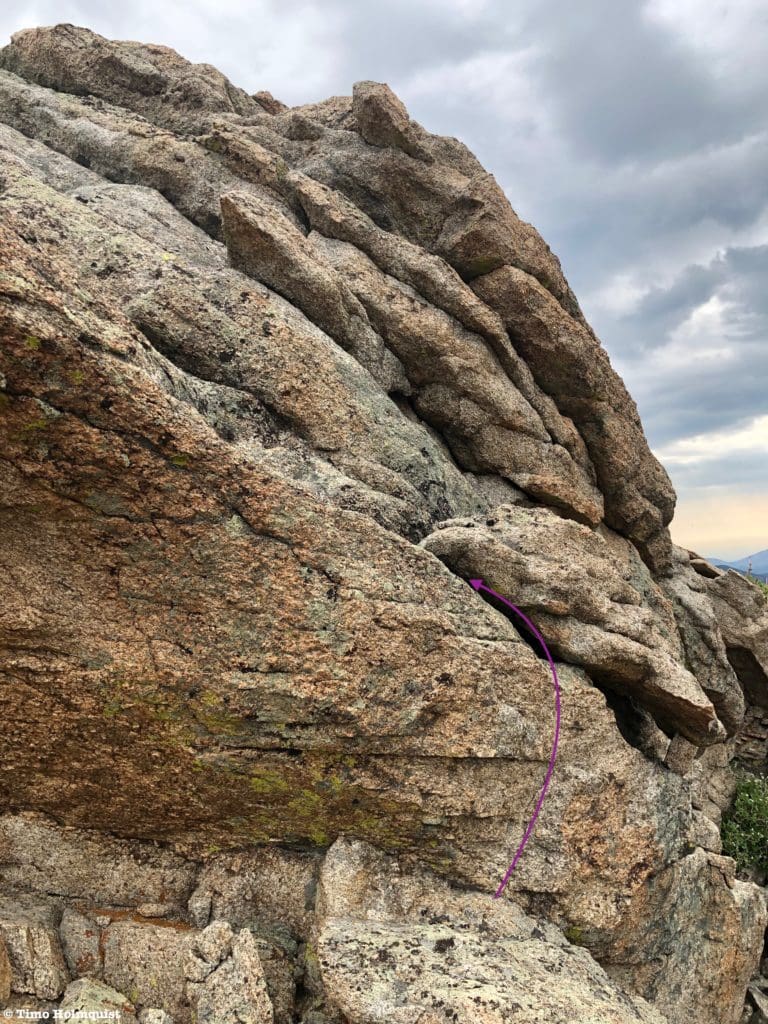
If you happen to lose cairns, walk up to the jagged Horsetooth ridge and rise alongside it. At one point, you’ll see a massive slanted boulder to your right; a quick Class 4 variation leads up this slot and through a small cave before emerging on the ridge if you’re interested.
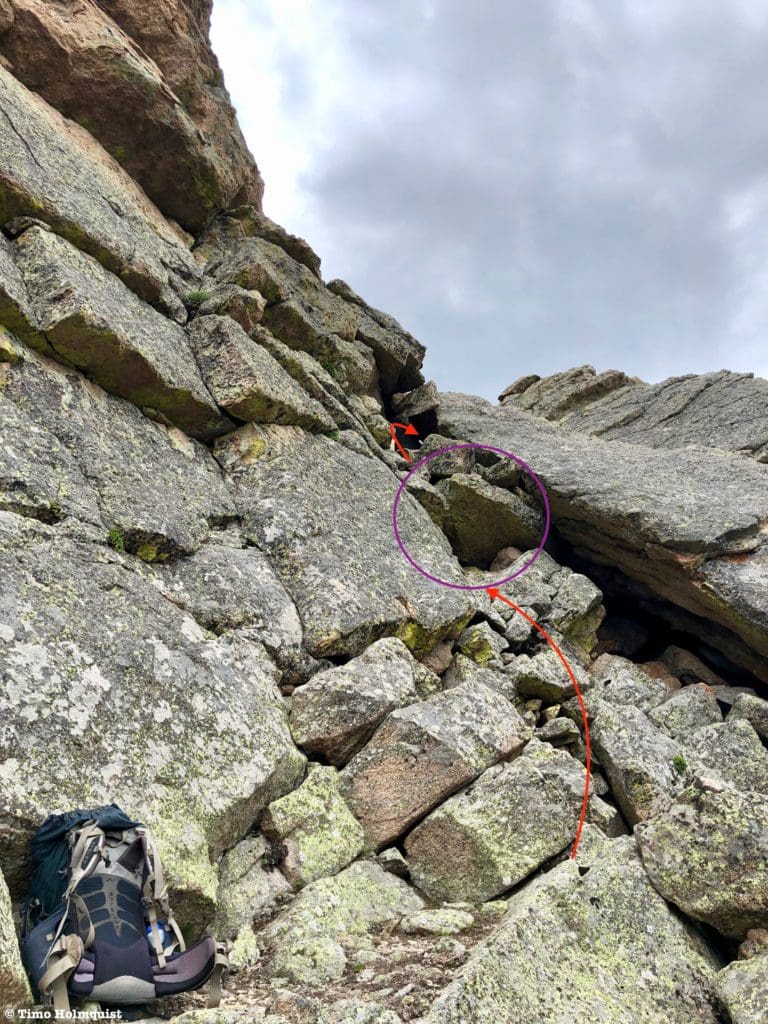
The purple circle is your one Class 4 section; the left side is easier.
Otherwise, continue ascending along the base of the now steep and overhung cliffs on your right. Eventually, you’ll be able to see the summit cairn.
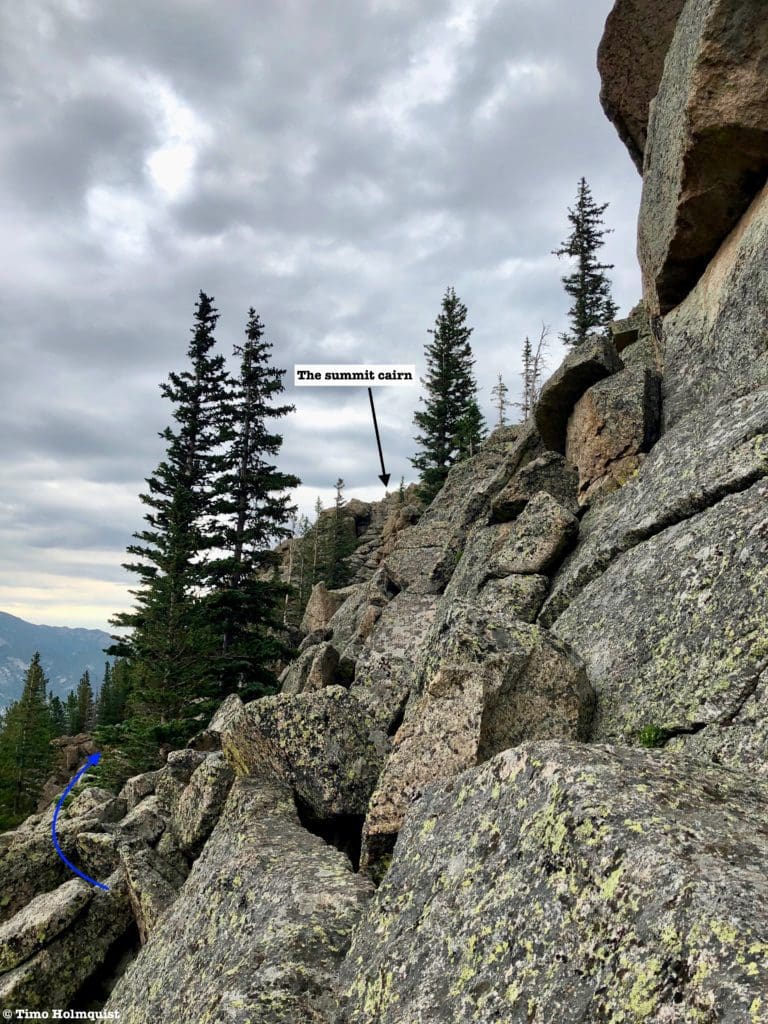
The rest of the journey alternates between Class 2+ and Low Class 3, depending on your individual route choice. It can be kept under Class 3 with careful navigation.
On the way to the summit, I found three optional ascent routes, including the Boulder/Cave variation, that could add some spice to the scramble. There are likely tons more, but they seemed more like low-mid 5thClass.
Options, options, options.
By the standard route, you’re going to make your way up to a gap in the rocky ridge just south of the summit cairn. The rise to the saddle can be kept at Class 2+. Before reaching the saddle, head left and over some Class 2+ talus to avoid dealing with anything tougher. Once you get over the Class 2+ talus, the summit cairn should be obvious. Make your way to it using the path of least resistance.

Make for this gap in the ridge and then veer left before hitting the ridge crest until you find the cairn.
Unlike the steep sides of the summit ridge, the top is wide and relatively flat, offering a good amount of space to soak in the views.
Summit Cairn.
Now, you’d think the summit cairn would put to bed any concerns about which part of the ridge is the highest. Unfortunately, it only made me question if it was truly the high point. I didn’t have any elevation gear on me that could definitively make a claim but looking south made me wonder if another ridge point was higher.
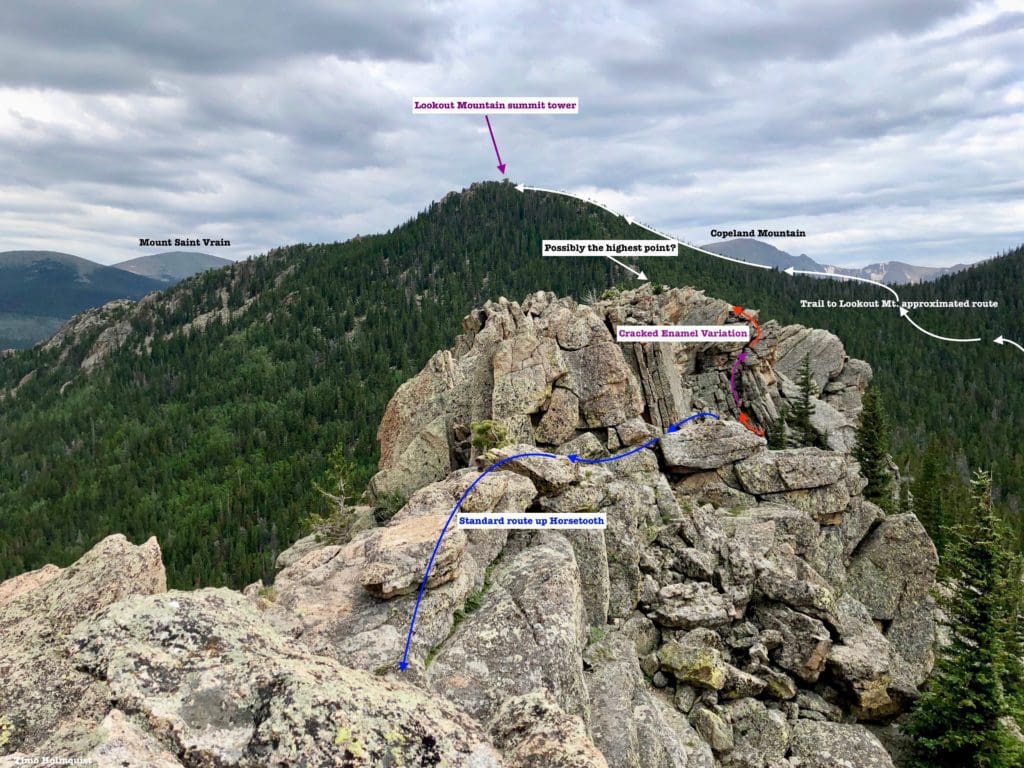
Am I on the highpoint? Or is it further south? To me, it seemed unclear.
Not one to let controversy win the day, I headed back down the ridge to see if I could get to what looked like a higher point along the ridge. The short version is that you can get to the other candidate for highest point on Horsetooth Peak, but it will bump the route up to a Class 3 adventure.
The Class 3 section looks improbable until you’re climbing up and over it. From the summit cairn, head south along the ridge crest (Class 3) or drop off the Class 2+ shoulder until you are back at the gap in the ridge. From the gap, a small cliff blocks easy passage along the crest, so look maybe 10 feet below the crest until you see the following view.
Sneaky ledges.
While it looks vertical in the picture, the route is set into the rock and uses a sneaky set of ledges. There are also great handholds along the left side for balance. Dropping your pack will make this passage simpler. Once you’re back on the crest, work your way south along the ridge until you stop gaining elevation. The ridge drops noticeably if you continue and increases to Class 4. Spin around and spy the summit cairn.
View back to the summit cairn, not convincing one way or the other. If you want to leave no stone unturned, tagging both points will cover your bases.
To get down via the easiest path, return to the gap in the ridge and descend on blocky talus until you can parallel the summit ridge while heading south. Scout for the cairns you used on your ascent. When you find them, continue south as they undulate in elevation until circling back to the established trail. Once on the trail, turn and burn to your car. I do not know of any descent route to the north, conceptually it could save some distance, but the terrain could also be much more challenging.
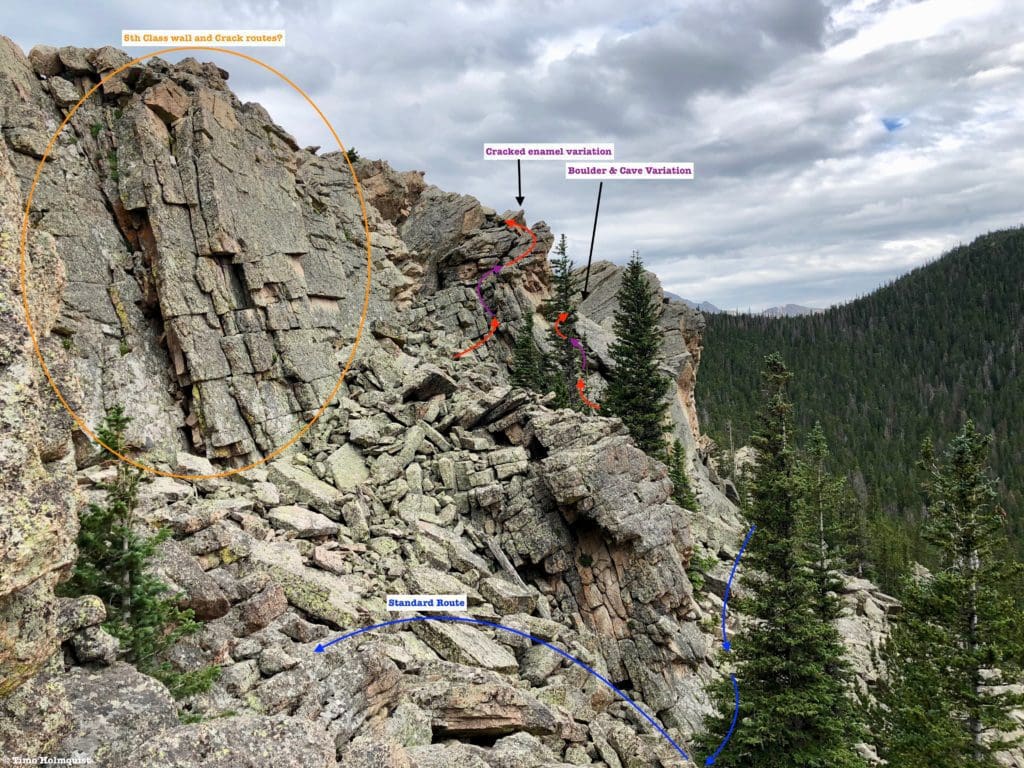
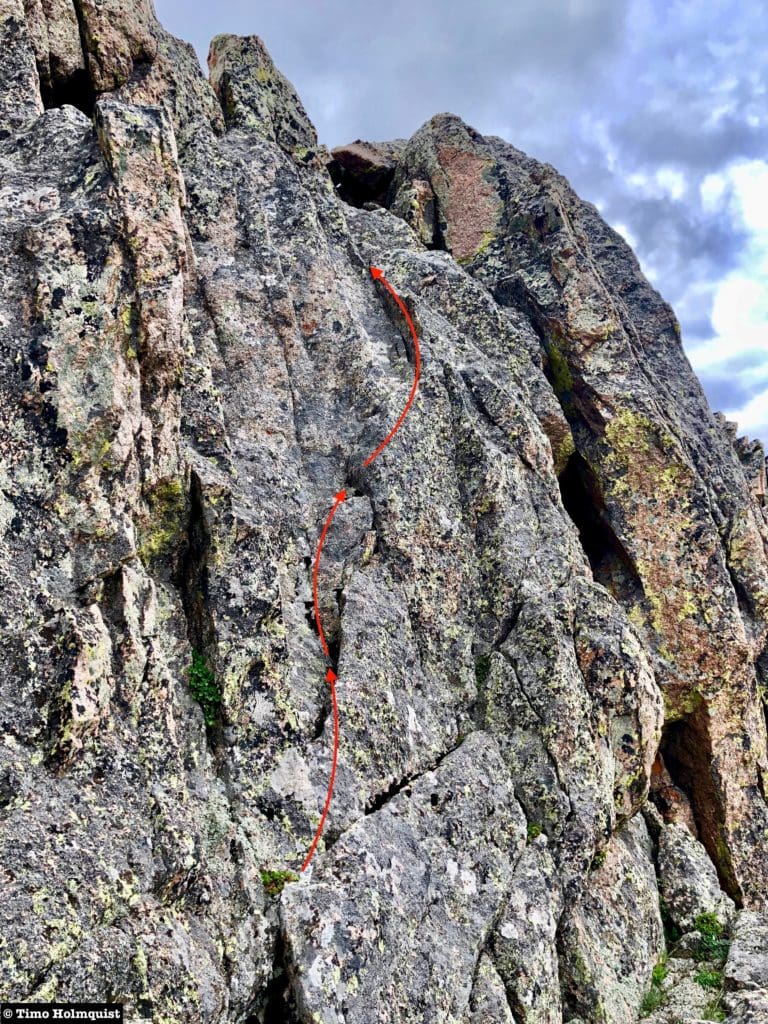
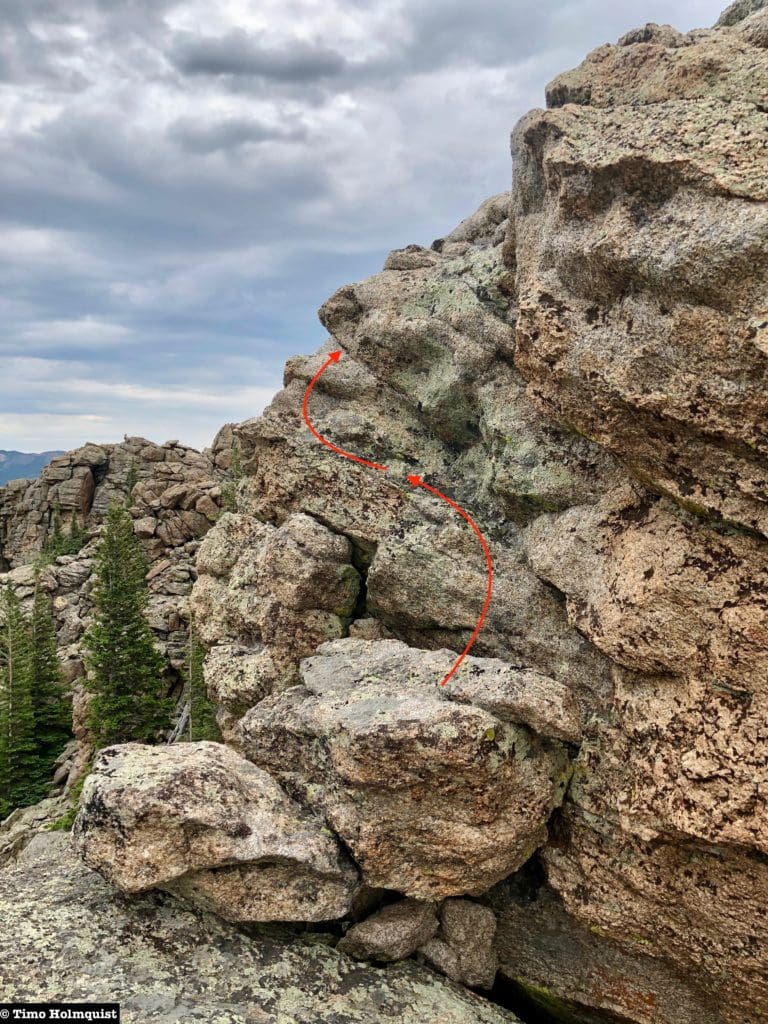
Since the distance to these peaks is not overly long, it’s worth poking around a bit near the summit for some scrambling routes. As mentioned before, I found and scrambled up a couple of different ways. The closest variation to the summit cairn was Cracked Enamel. The route heads up a wing of the summit ridge, making use of blocky rocks and a diagonal trench. The scrambling is steep, aesthetic, and features plenty of excellent holds.
Close up of the Cracked Enamel Variation.
The other option I utilized was the Boulder & Cave Route, which is a little further south.
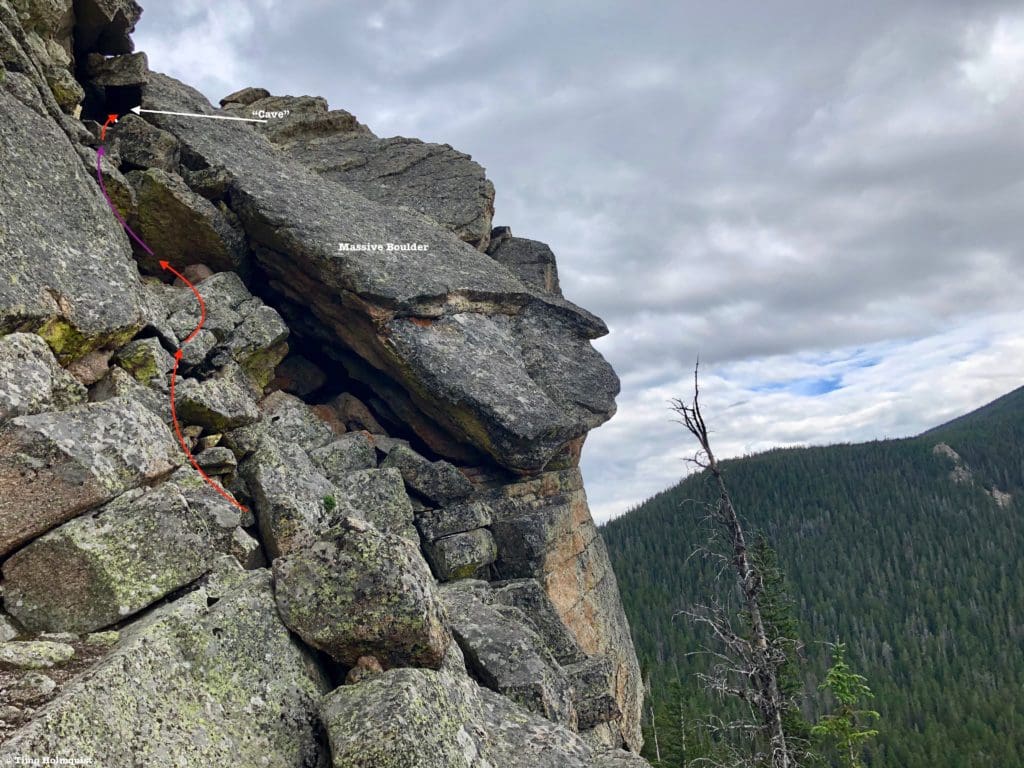
The massive slanted boulder should be very obvious as long as you’re looking up occasionally.
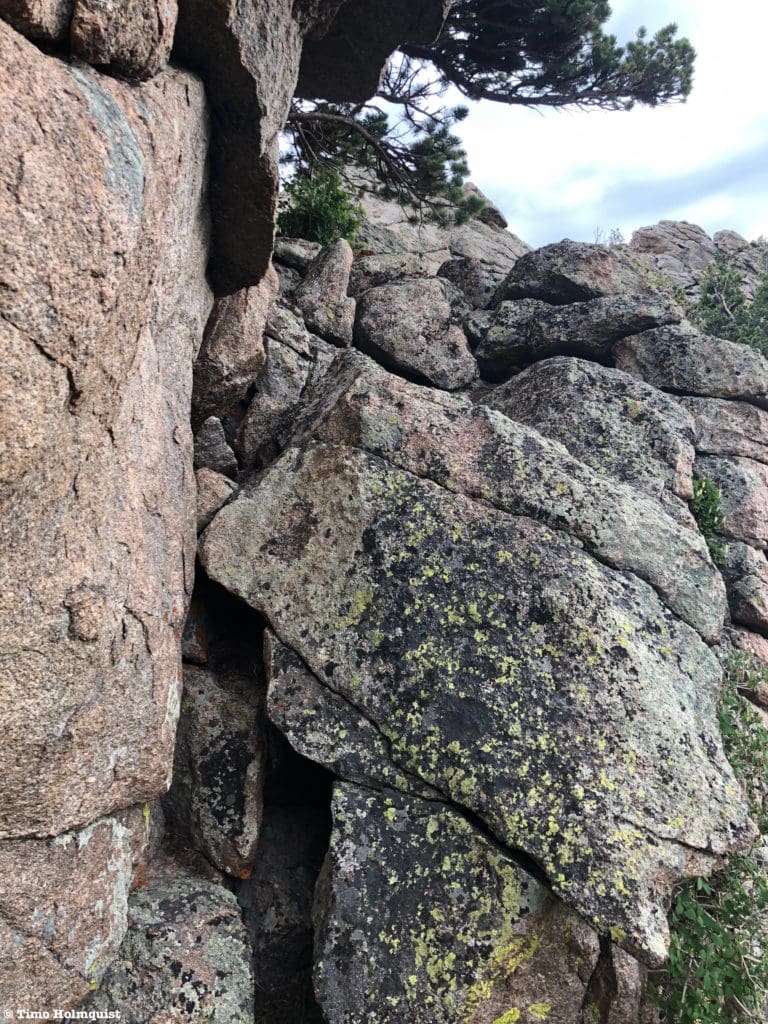
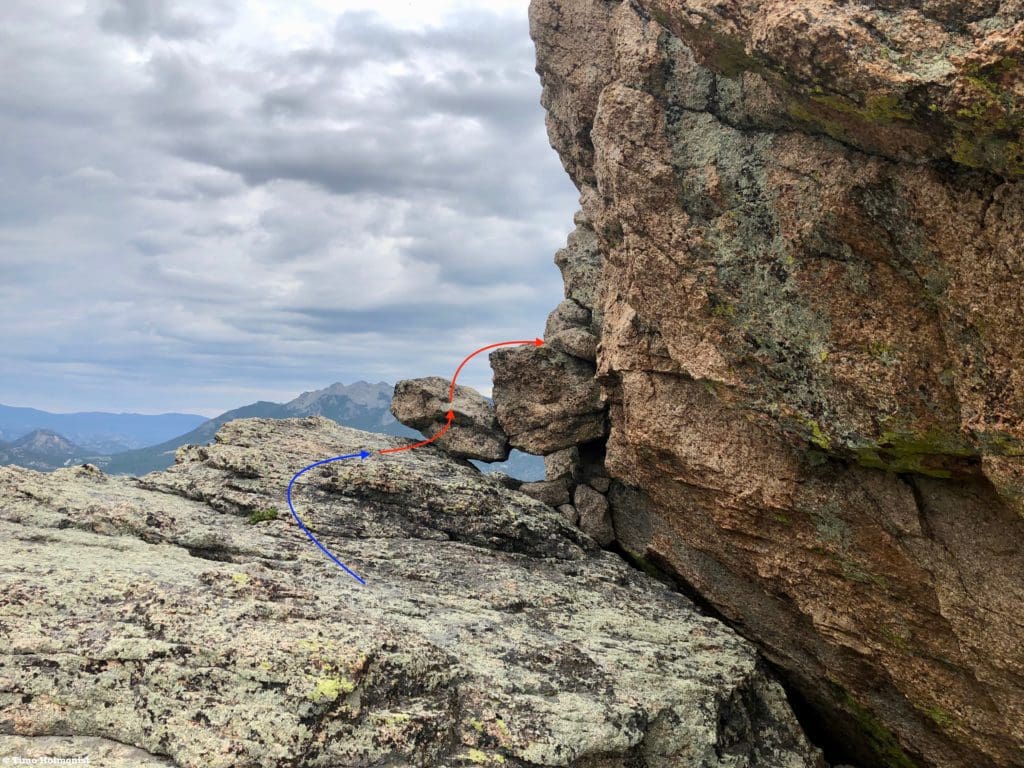
The slot approach is pretty self-explanatory, and the 4th Class section consists of only a couple of moves to get over some awkwardly placed rocks. On the other side, you have the option of either traversing over the top of the slanted boulder or opting for a short cave sneak.
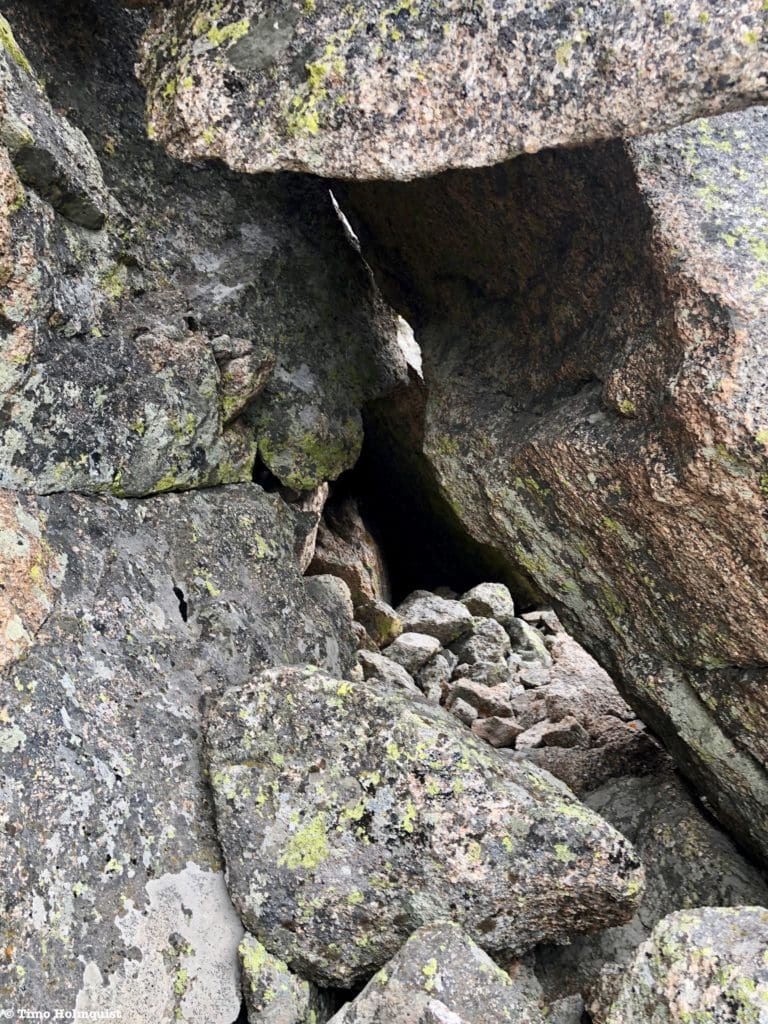
The cave sneak. This route is workable but probably uncomfortable if you have a bigger pack on.
Once you emerge from the cave, you can climb north for a minute or two before reaching the other candidate for highest point on Horsetooth Peak.
There seem to be a TON of ways to have fun on this peak, and I know I only scratched the surface. However, if you want an epic scramble worthy of inclusion in various best-of lists, taking the ridge crest (aka Bronco Ridge) is a Class 4 stunner.
Horsetooth Peak (via Bronco Ridge):
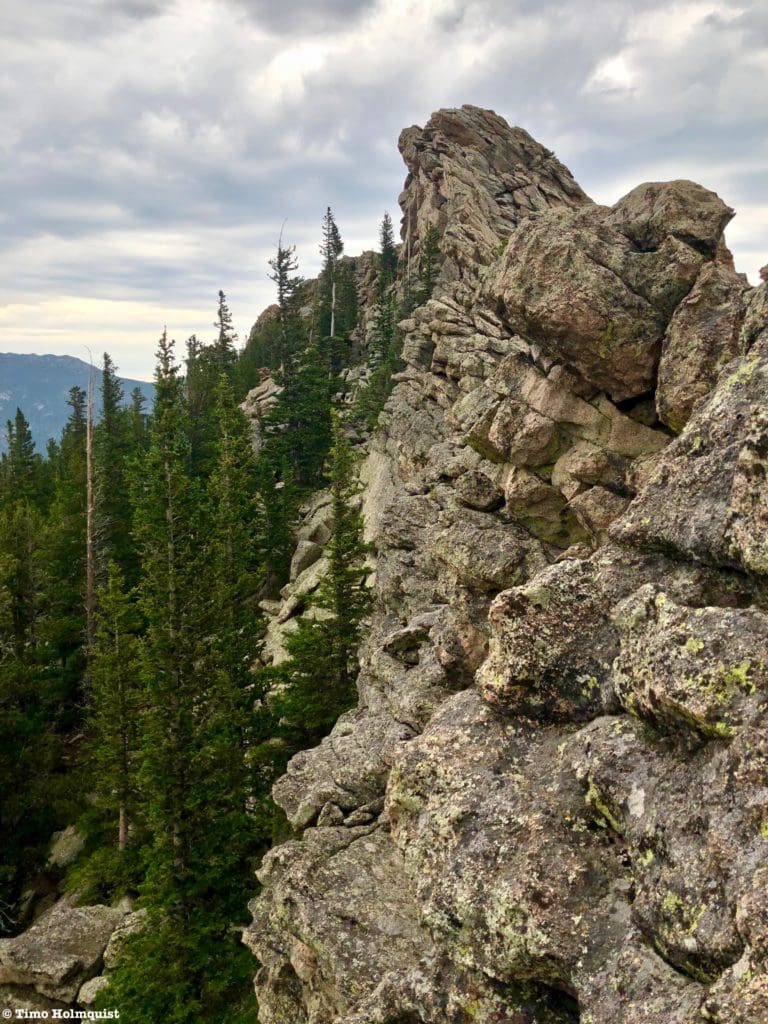
If you’re including a summit of Lookout, the easiest way to do this is to start from Lookout Mountain, ease to the north side of the summit area, spy Horsetooth and walk the ridge between you and it. For the most part, the descent from Lookout is easy, with a few Class 3 sections thrown in depending on how true to the ridge crest you decide to go. If you’re going for speed, drop to the west side of the ridge and zip by the various isolated rock towers along the crest. The eastern side is initially quite steep, but there are multiple opportunities to cross to the other side in between rock features.
The ridge descending from Lookout Mt.
Once you’ve bottomed out at the saddle, get into scrambling mode. Knowing there is an easier way to avoid this route means that you are actively seeking out this scramble. If that’s the case, strap in and enjoy the multiple options along the crest. Some areas can be skipped, but the ridge isn’t overly long, so you might as well hit everything that looks interesting.
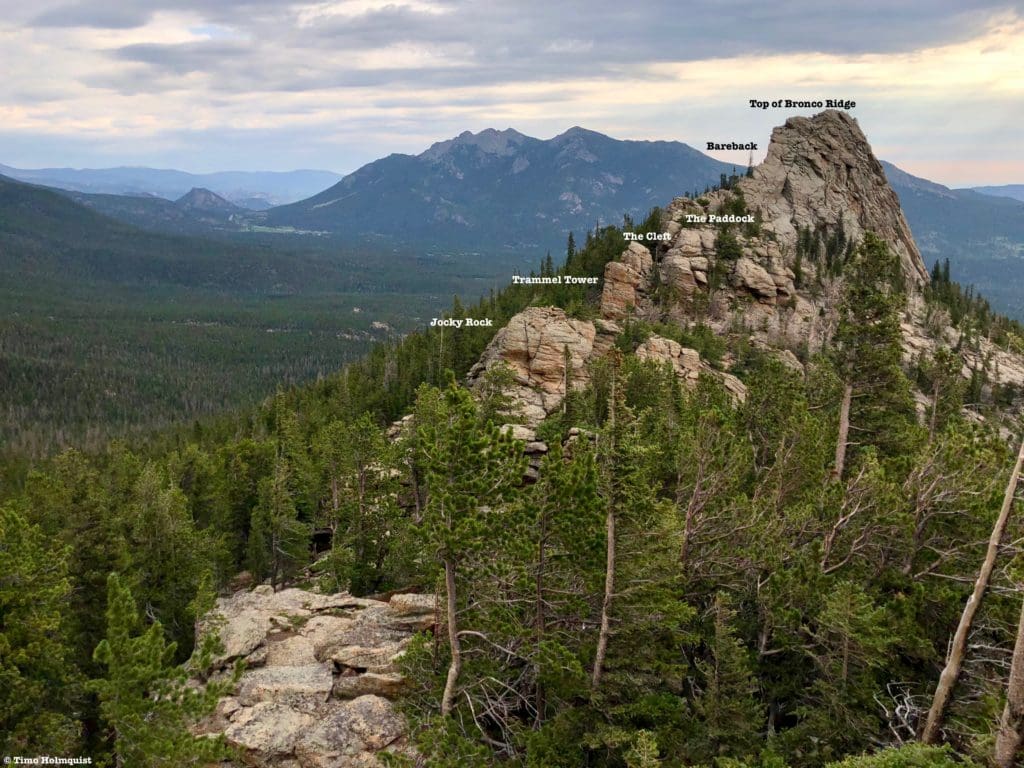
From near the start, most features along Bronco Ridge are identifiable. Once you drop into the saddle, Jockey Rock will end up blocking most of the view.
The first obstacle you’ll come across is Jockey Rock. It can be skipped by working your way east (right) until circumventing the rock and regaining the ridge crest. Similarly, you can skip it on the west. However, Jockey Rock can be conquered with a sneaky Class 3+ route that makes use of superbly grippy rock.
General route up Jockey Rock. The overhung and vertical portions on the right side are 5thClass.
Find the leading edge of Jockey Rock and veer slightly left until you can see this view.
Serpentine Class 3+ route that avoids a few Class 4 sections on the right.
The rock on this route is cracked and provides iron-tight hand and footholds. It’s hard not to have fun snaking your way up. If you want to get some Class 4 options in, slide to the western side of Jockey Rock and climb the wall directly.
A shot of Jockey Rocks western wall; countless variations are here for the taking.
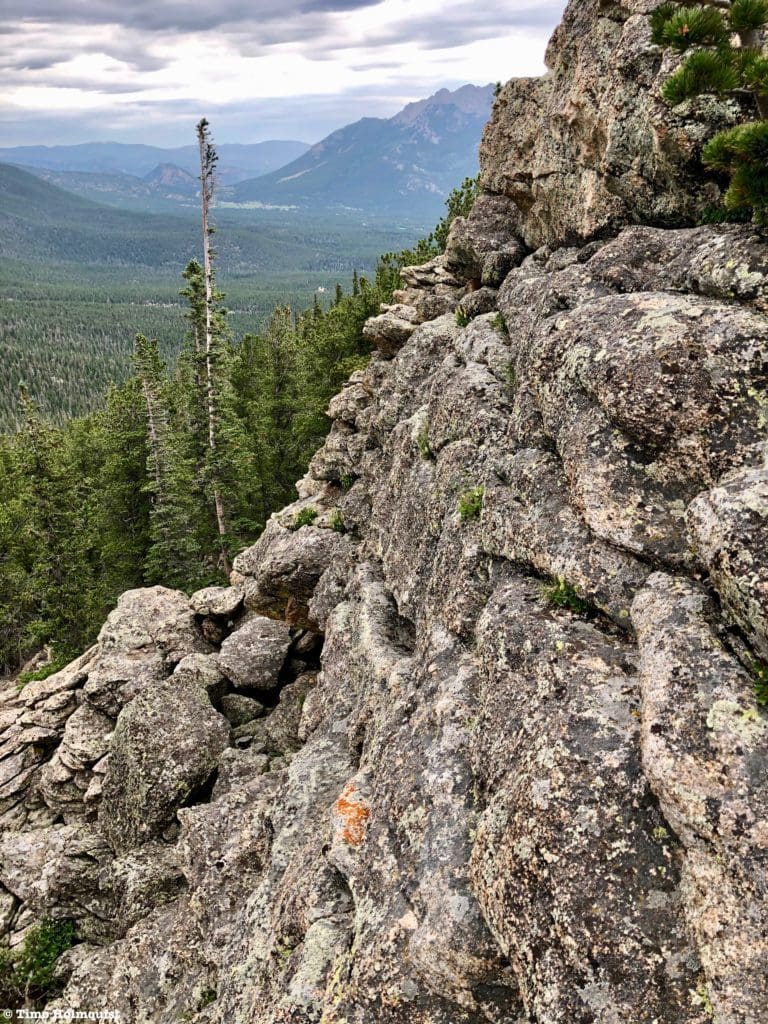
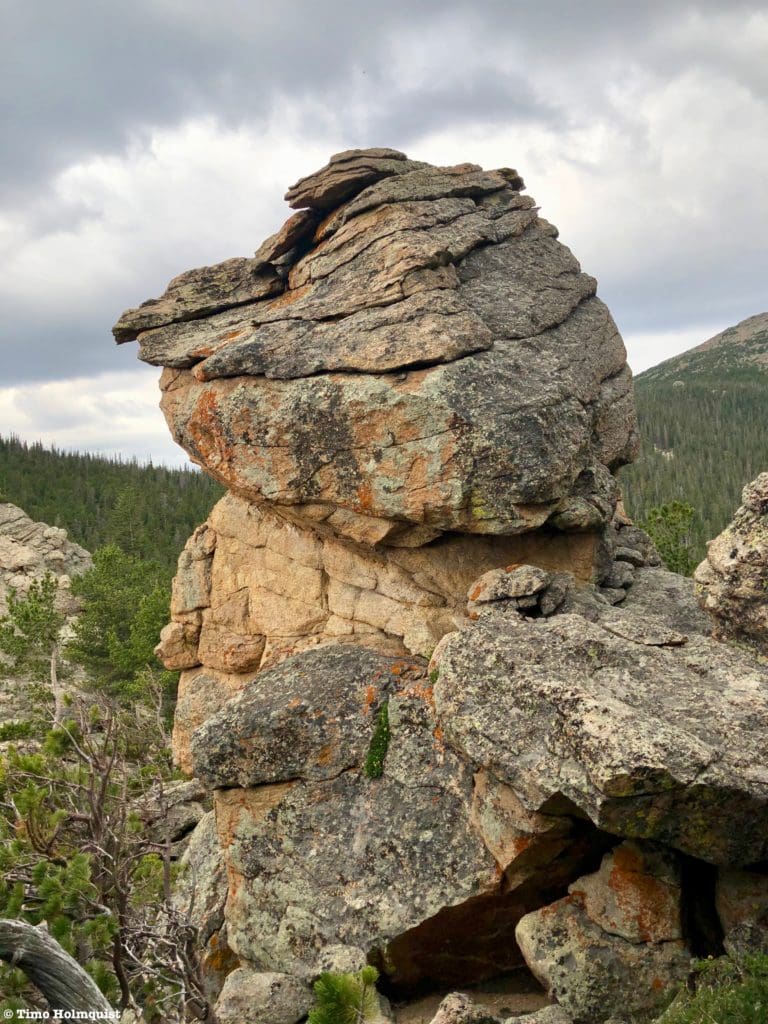
Despite its southern prominence, the back of Jockey Rock is basically flat. It’ll only take a few Class 2 moves to get off the high point and to your next area. The next features are Trammel Tower and the Cleft.
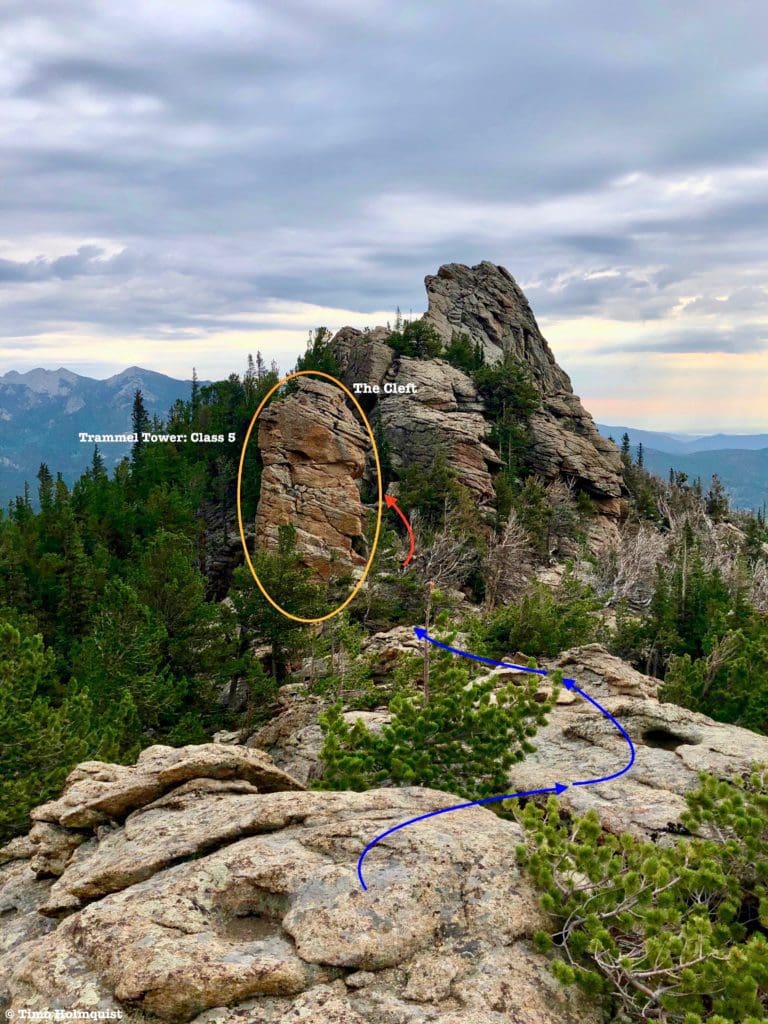
The view after Jockey Rock.
As indicated by the picture, you can skip around Trammel Tower to the right, which will lead you up to the Cleft. There is a lower 5th Class option to climb Trammel Tower, but it is a bit of an endeavor.
The back of Trammel Tower as you ascend into the Cleft. This side appears to have an exposed Class 5 way to the top.
The Cleft has two climbable walls. The left wall is hidden by Trammel Tower until you get around it.
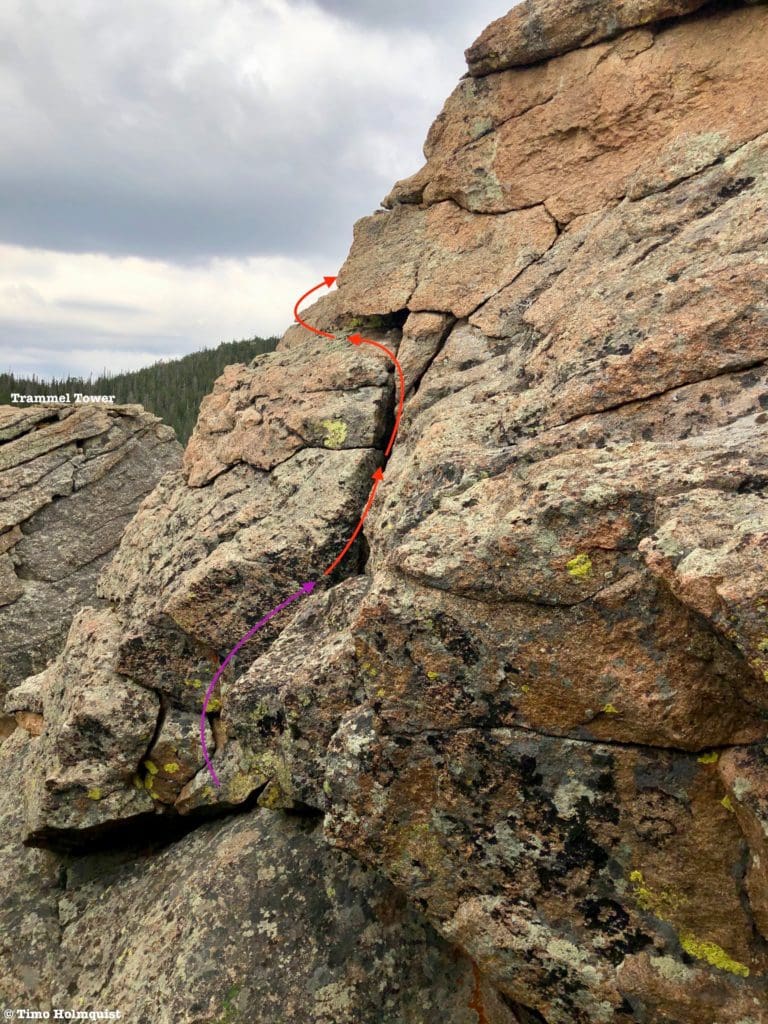
Left Cleft, one of two variations I found.
The Left wall also appears to be the most challenging of the two because you have to downclimb a Class 3+ section by the easiest method.
Descent from the Left. Below the bottom red arrow, either lower yourself down, hop, or do a combination of the two to make it back to the ground.
The right side has a few interesting wall variations on great rock, and the top is flat, so no real downclimbing is required.
Right Cleft. Notice how many grips and holds the rock contains.
If you proceed through the Cleft by the path of least resistance, you’ll eventually make a right turn, hop to the top of the Right Wall and scamper up a slanted face to move on to the next area.
Getting through the Cleft area.
Just like after Jockey Rock, the terrain flattens out for a bit. It’s the last point of calm before the ridge difficulties take off. I ascended the slot pictured below to regain the ridge crest.
Back to the crest.
The ridge crest, which had been wide and welcoming before, now thins back to a series of rolling rock stacks with sharp gaps in between them. Don’t be surprised if you find yourself gaining and losing some elevation between rocks on the ridgeline. Most gaps you can straddle or hop over, but exercise extreme caution in all scenarios.
The undulating crest. Use some quick route finding to keep the difficulties around Class 3.
One of the great things about Horsetooth is that it isn’t very big, so if you find an optional route that looks fun, go for it. There are plenty of variations on both sides of the crest that can bring scrambling bliss. One of those variations is Crooked Steps, which appears on the western side of the ridge. It’s a contained little Class 4 area with a crack option and a series of Crooked Steps, set slightly back from each other. It’s a fun detour if you have the gas and doesn’t cost much time.
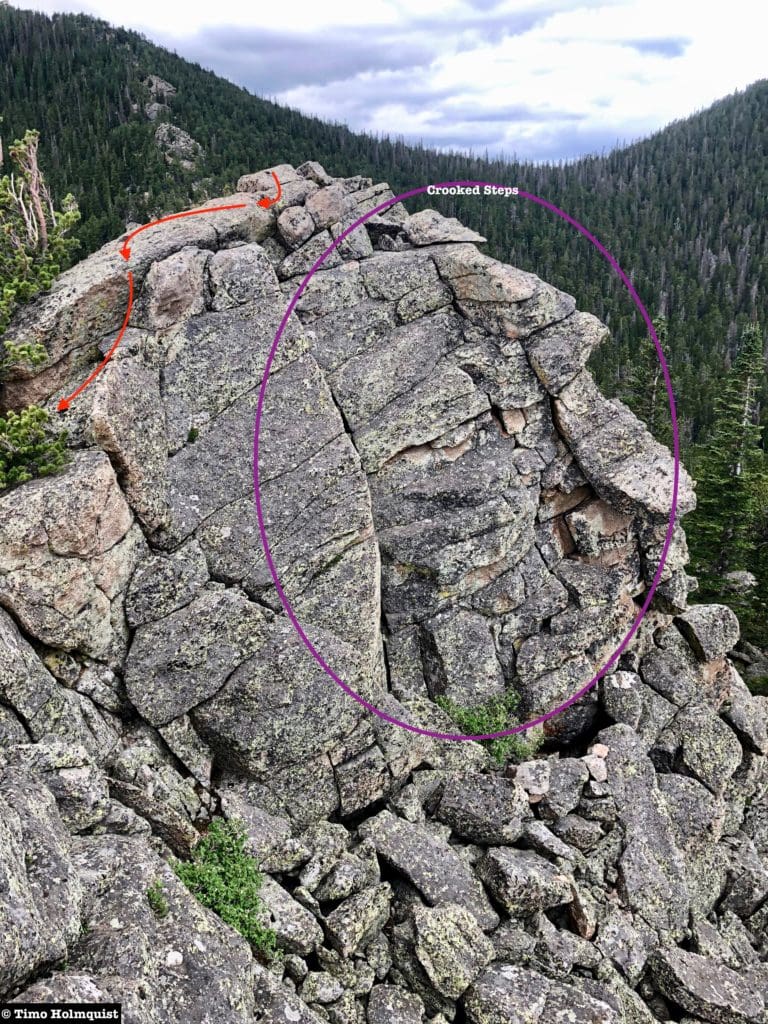
Crooked Steps zone.
If you’re feeling good, continue on. If the steep profile of the ridge is beginning to cause some internal panic, know that there is still one good bailout option still to come.
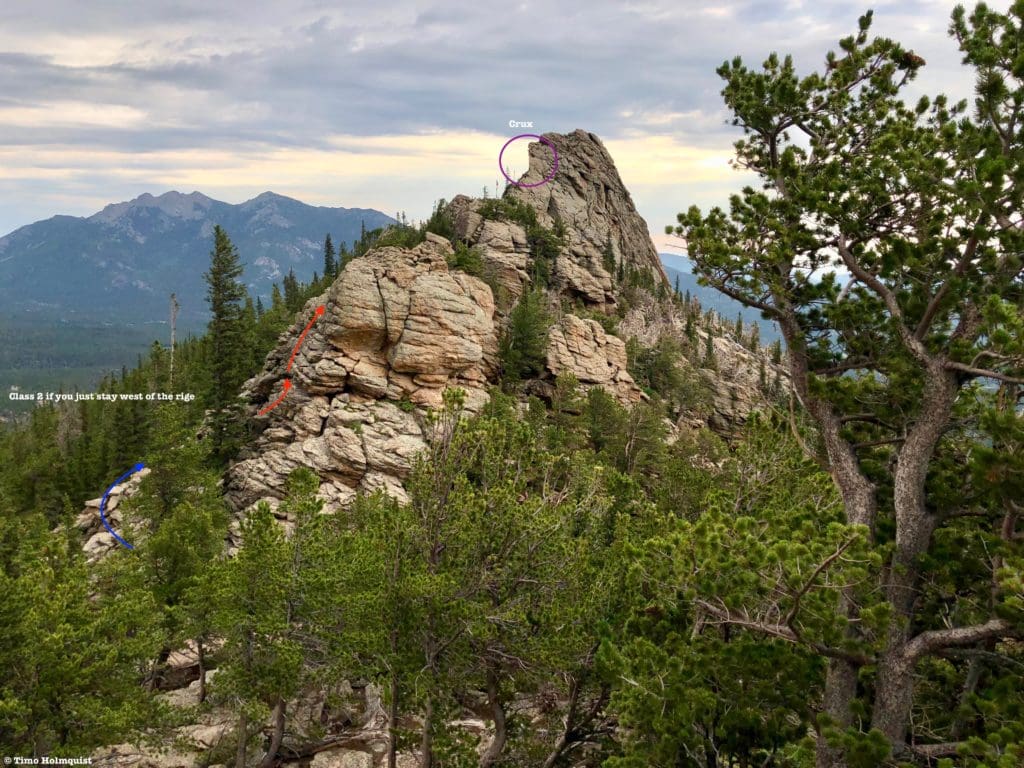
Firmly Class 3 from here on out with a few Class 4 moves at the Crux. Make sure you’re ready.
The blocky nature of the ridge suddenly starts to resemble more of a wave, with slanted rocks shooting up from the right and cresting to the left. The right side of the ridge gets near vertical, while the left side shows off some overhung sections. Look carefully at the picture below; one of your last and best bailout options is drawn in.
Bronco Ridge at its dramatic finest.
If you’re ready, hug the tip of the crest and work your way higher, using hands for support on nearly all of your moves. Traversing below the crest to the right is dangerous due to the steep slope angle and lack of footholds. Traversing on the left side is occasionally possible but only for a few feet before you’re forced back on top. Stay as close to the crest as you can, dealing with obstacles as they arise.
While steep, the rock is very grippy when dry.
The Crux moves can be separated into two sections with substantial exposure. As you move up, you’ll see a slanted rock on the crest, noticeable because its slanted top points to the right, while the rest of the slanted ridge points to the left. You can avoid the first part of the slanted rock on the right side by making use of a few small platforms, but you will eventually have to climb on top of it. This is the Bareback section. Like countless similar ridges, you could call this a “Knife-edge,” but staying on the horse theme makes Bareback seems appropriate.

The Bareback section is the lowest of the three purple arrows.
The short climb up the Bareback section and the awkward straddling shimmy you’ll have to perform are enough for a light Class 4 rating. It certainly feels like you’re riding some enormous unbroken stallion that could buck you at any moment. I did not pause for long on this part.
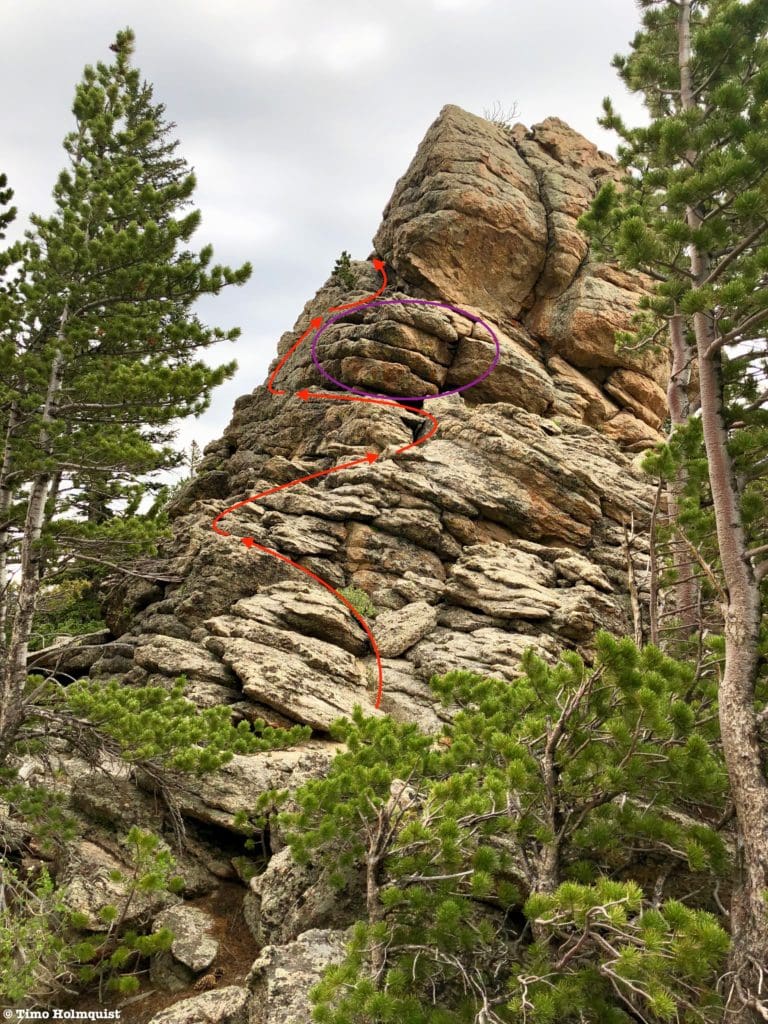
The upper crux on Bronco Ridge.
Once you shimmy off the Bareback, the scrambling eases briefly back into 3rd Class before jumping right back to 4th. This last 4th Class section is not as awkward as the Bareback part, but the climbing is steeper, and a fall here would be really, really bad. Stay close to the ridge crest, until running into a bumpy slab with no obvious workarounds. The crux is the set of moves required to climb up the first slab, onto a second one, and up that. Because the rock is grippy and outrageously solid, this part is utter scrambling bliss. It’s much shorter than the Crestone Traverse but reminds me of the feeling I got climbing the 4th Class wall up the Needle, that giddy excitement. Once you get to the higher slab, climb up the steep first part until the angle of the rock lessens back into 3rd Class terrain.
Looking down from just above the Bronco Ridge Crux. From this view, the Bareback section is hard to pick out but you can see how overhung the ridge crest is.
There is decent exposure to your left and while the scrambling eases, it is not over.
The crux section from further down the ridge.
Turning back to the remaining challenges, you’ll see that the slab you just climbed ends into a bit of broken terrain. Navigate your way through using some Class 3 moves until a wall blocks further progress. The wall gets lower to the right, where you could climb over, but it’s another Class 4 section made more difficult because the rocks are all sloping to your right. With an angled launch point for an exposed scramble, any big off-kilter move could send you spilling to the right and down into a rocky pocket.
The Step option.
Thankfully, you can skip this bit by turning to your left and following the wall. Improbably, a set of smaller rocks stacked like a step stool allow you to bypass the difficulties. The boulders are very close to the cliffs to the left, so make sure you are moving deliberately through here.
The best way.
Once you hop up to the second rock, you’ll see how to climb the rest of the portion. It’s steep but doesn’t feel like it’d make a Class 4. I’d call it serious Class 3, but it is way better than the alternative.
Zig-zagging up.
Once you get back on top of the ridge, you can take a peek back at what you’ve done. Bronco Ridge, while not terribly long, is no joke!
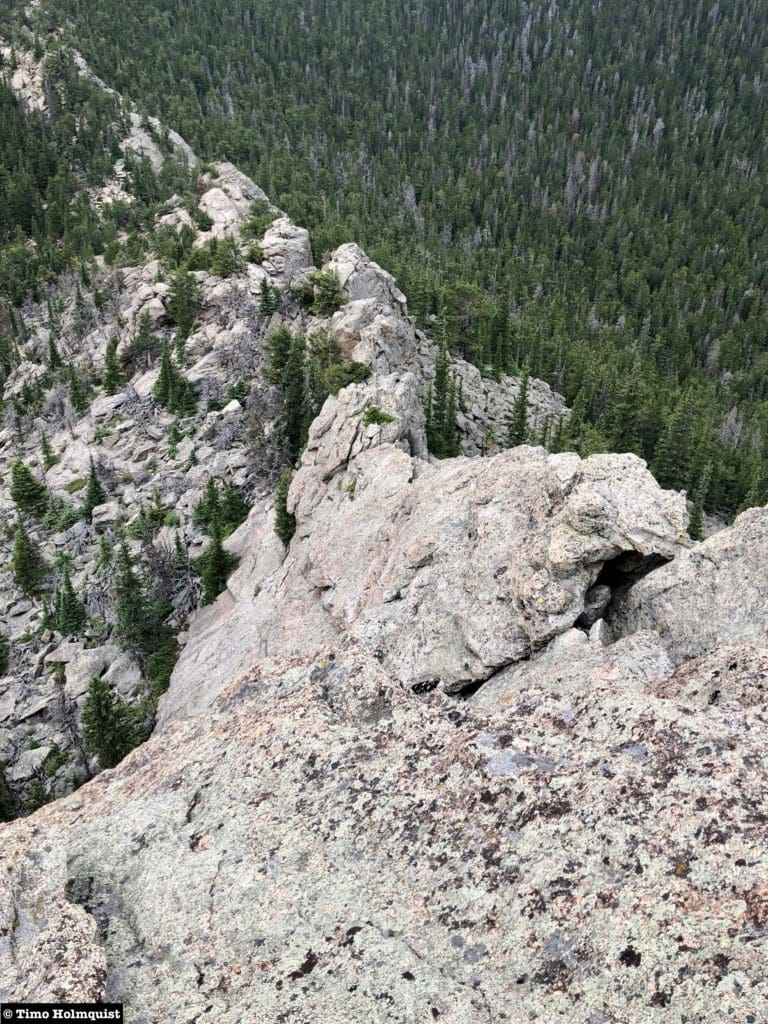
Bronco Ridge in all its glory.
The rock you’re now on is the end of the exposed difficulties, but a few Class 3 moves remain in order to get to the next point on the ridge, which is clearly higher than the one you’re standing on.
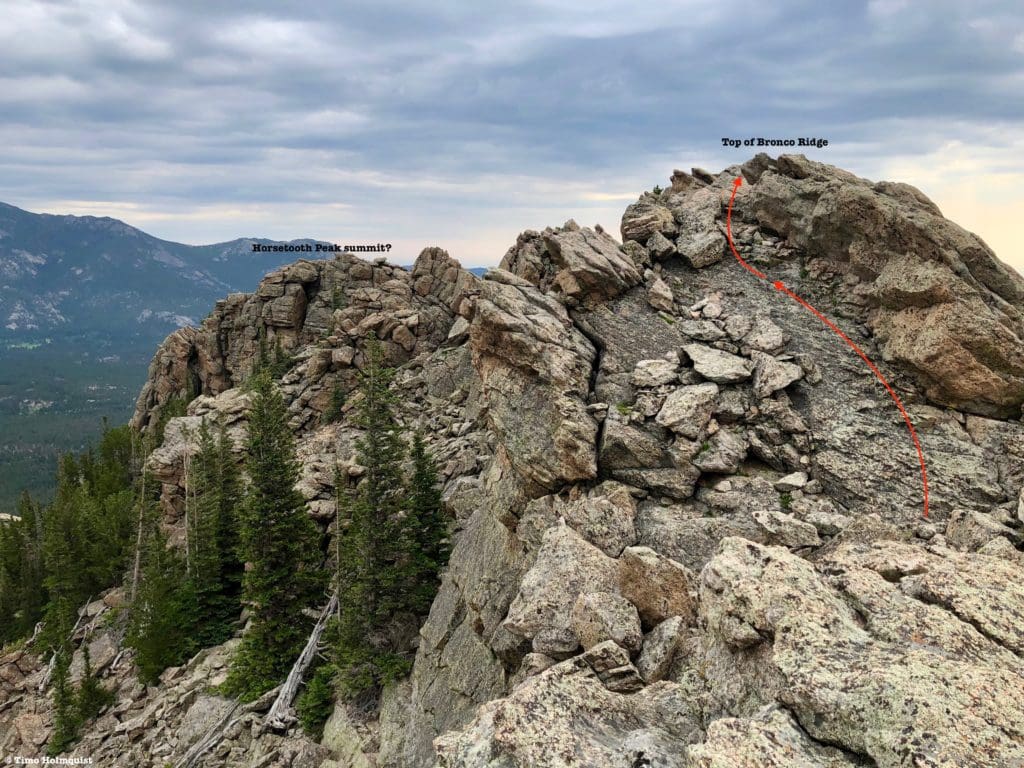
The top of Bronco Ridge. The summit cairn is visible in the background.
From the top of Bronco Ridge, a few Class 3 moves are necessary to traverse the ridge crest north to the summit cairn. Five minutes of scrambling later, and you’ll be standing next to the supposed summit cairn. Take a good look when you’re up there; I could see arguments for both summits, neither of which creates a strong enough case by itself (and without measuring instruments) to take the top spot.
Once you’ve had your fill of the area, scramble down the western side and proceed south, descending the talus slopes until finding the cairned route back to the Lookout Mountain trail. If you have trouble locating the cairns, drop into the talus, parallel the summit rocks south and when you’ve drawn even with the saddle between Horsetooth and Lookout, bushwhack SW, maintaining your elevation until running into the trail. There isn’t a lot of underbrush to fight through, and even without cairns, as long as you don’t drop too much, you should be able to find the main trail fairly quickly. Take the trail back down to your car, and call it a success.
Final Thoughts:
Lookout Mountain is a unique summit, made special by its dramatic summit tower and outstanding views of Wild Basin. While Lookout has the better panoramas into the park, Horsetooth has the elite scrambling routes and makes for one fantastic half-day outing. The quiet approach and low elevation almost guarantee solitude. The tourist crowd to Rocky Mountain will most likely make use of Trail Ridge, Bear Lake Road, and the East Longs Peak trailhead to knock off checklist items, which paves the way for these peaks to be given a hidden gem distinction. Despite the short distances, you gain over 2,000 feet to Lookouts summit, so be prepared to sweat, and don’t forget the bug spray; the mosquitos can be pretty nasty below treeline.
Acknowledgements:
The names I chose to use for the various scrambles are all made up (Cracked Enamel, Boulder & Cave, Trammel Tower, The Cleft, and Bronco Ridge). I tried to stay on a horse theme for Horsetooth Peak, and when I couldn’t, based the names on obvious features associated with the routes. If this is your backyard and you call these routes something different, keep on keeping on. Directionally there’s a standard route to Lookout and a standard route to Horsetooth which could be called a NW approach. The ridge-direct method between the two could be called Ridge Direct or Horsetooth’s South Ridge. The names Lookout Mountain and Horsetooth Peak are official and appear on various maps and mapping apps.
I’d like to thank a couple of different sources for getting me interested in these peaks; they appear in alphabetical order below.
Andy. (July 28, 2012). Lookout Mountain and Horsetooth Peak. Retrieved from http://www.hikingrmnp.org/2012/07/lookout-mountain-and-horsetooth-peak.html
Lookout Mountain. (n.d.) Retrieved from https://www.gaiagps.com/hike/13800/lookout-mountain/
Miztflip. (n.d.) Lookout Mountain-RMNP. Retrieved from https://www.summitpost.org/lookout-mountain-rmnp/152515
Miztflip. (n.d.) Horsetooth Peak. Retrieved from https://www.summitpost.org/horsetooth-peak/152502
NoCo Chris. (n.d.) Lookout Mountain 10715’ and Horsetooth Peak 10344’. Retrieved from http://nocochris.weebly.com/lookout-mtnhorsetooth-pk.html
I’m sure there are more out there, but these were the sources I used to prep for this adventure.
Popular Articles:
- Guide to the Best Hiking Trails in Rocky Mountain National Park, Colorado
- The Dyrt: The 10 Best Campgrounds In Colorado
- Top Adventure Sports Towns 2021: Boulder, Colorado
- Epic Adventures with the Best Guides In Colorado
- Sky Pond via Glacier Gorge Trail, Rocky Mountain National Park, Colorado
- Scrambling Hallett Peak’s East Ridge, Rocky Mountain National Park, Colorado
- Scrambling Mt. Alice via the Hourglass Ridge, Rocky Mountain National Park, Colorado
- Gorge Lakes Rim Scramble, Rocky Mountain National Park, Colorado
- Black Lake Via Glacier Gorge Trail, Rocky Mountain National Park, Colorado
- Scrambling To The Lake Of The Clouds, Rocky Mountain National Park, Colorado

Enroll With Global Rescue Prior To Embarking On Your Next Adventure.
When a travel emergency arises, traditional travel insurance may not come to your aid, and a medical evacuation can cost up to $300,000.
The cost when you have a Global Rescue membership? $0. That’s why when the unexpected happens, you want the leader in rescue, evacuation and medical advisory behind you. You want Global Rescue.
Terms of Use:
As with each guide published on SKYBLUEOVERLAND.com, should you choose to this route, do so at your own risk. Prior to setting out check current local weather, conditions, and land/road closures. While taking a trail, obey all public and private land use restrictions and rules, carry proper safety and navigational equipment, and of course, follow the #leavenotrace guidelines. The information found herein is simply a planning resource to be used as a point of inspiration in conjunction with your own due-diligence. In spite of the fact that this route, associated GPS track (GPX and maps), and all route guidelines were prepared under diligent research by the specified contributor and/or contributors, the accuracy of such and judgement of the author is not guaranteed. SKYBLUE OVERLAND LLC, its partners, associates, and contributors are in no way liable for personal injury, damage to personal property, or any other such situation that might happen to individuals following this route.


