


High Point:
11,586 feet

Total Ascent:
~2660 feet

Difficulty:
Hard

Distance:
9 miles

Route Type:
Out and Back
Little Matterhorn in Rocky Mountain NP offers challenging yet rewarding scrambling. Viewed from Odessa Lake, it resembles the famous Matterhorn. Reaching the summit ridge requires a mix of hiking and delicate, exposed moves. Final approach to the peak is most demanding.

Overview
Peak baggers use a lot of different criteria when constructing their list of mountain objectives. Due to the overwhelming number of mountains in Colorado, many choose to only focus on peaks within a certain elevation range. Statistically, it makes sense; there are over 2,200 peaks in Colorado with an elevation over 12,00 feet. That number balloons to over 3,000 when you count peaks between 11,000 and 12,000 feet. That is an entire lifetime of mountains.
Elevation is a tricky thing, however, because the summit elevation of a certain peak or ridge has little to no bearing on whether or not the experience is fun. Yet, a lot of people tend to put the blinders on when you start speaking about smaller mountains in a state commonly referred to as the roof of the lower 48. Thankfully, for the scramble-minded, Rocky Mountain National Park is loaded with challenging, inspiring, and largely ignored smaller summits like Little Matterhorn.
For those familiar with this jagged ridge top, Little Matterhorn has earned its place amongst other iconic scrambles in the Park. The peak is not altogether forgotten; its inclusion in various Rocky Mountain National Park and scrambling guidebooks is a testament to that. But, unless the wee mountain decides to grow thousands of feet in the next couple of months, it’ll always feel like a hidden scrambling gem. With sustained Class 3 scrambling, necessary route finding, and one thrilling leap-of-faith section with substantial exposure, Little Matterhorn always generates an immensely satisfying experience.
- Popularity: Low
- Scramble Rating
- Class 3+
- Class 4, if adding the East Summit
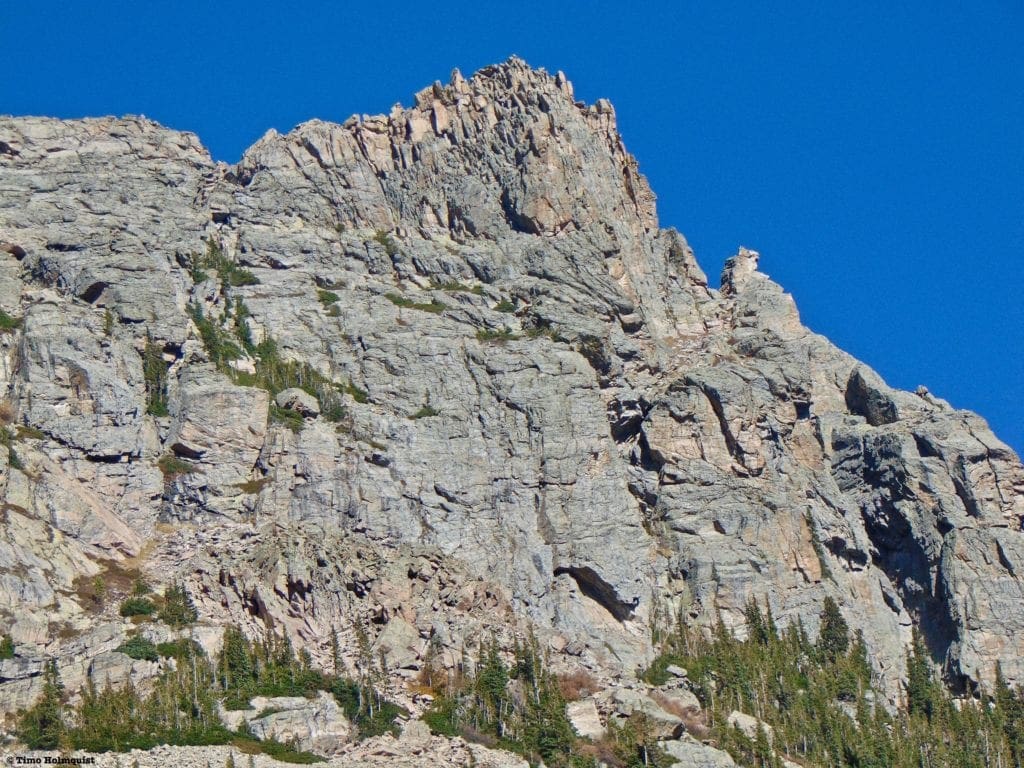
The summit of Little Matterhorn from below
Table of Contents:
Article Navigation: Click on any of the listed items in the table of contents below to jump to that section of the article. Similarly, clicking on any large, white section header will jump you back to the Table of Contents.
The Ultimate Offline GPS Hiking & Ski Maps
See why onX Backcountry is the ultimate GPS navigation app for your outdoor pursuits. Try Today for Free. No credit card required.
Scales and Criteria:
This article utilizes three separate rating systems: Difficulty, Popularity, and a Scramble Rating indicating the hardest move or set of moves encountered. The scramble rating employs the Yosemite Decimal System. This review focuses on a snow-free ascent of the Little Matterhorn; it does not, therefore, contain a snow rating which would apply from roughly November-May. If conducting this climb outside of a snow-free summer or early autumn, additional research is required.
Difficulty Ratings:
- Easy: less than 5 miles, less than 500 ft. of elevation gain
- Moderate: 5-10 miles, 500-2000 ft of elevation gain
- Hard: 5-15 miles, more than 2000 ft. of elevation gain
- Very Hard: 10+ miles, more than 3,500 ft. of elevation gain
Popularity Ratings:
- Low: Large sections of trail all to yourself
- Moderate: Sizeable trail sections to yourself, crowding possible on busy summer weekends
- High: You’ll be seeing people, still a chance for solitude in spring/fall/winter.
- Very High: Almost always busy.
Scramble Rating:
- Class 1: Established hiking trail the entire length of the adventure. Low chance for injury.
- Class 2: Typically involves cross-country navigation, possibly using hands for balance but not required, steeper than Class 1.
- Class 3: Hands and feet used to scale areas, must use hands to proceed (either for balance or to help pull you up a section), increased exposure, a fall could be fatal. Helmet recommended, along with grippy hikers.
- Class 4: Climbing on very steep terrain just shy of vertical, falls could be fatal, hands employed for grip and balance continuously, ropes advisable but scalable without. Helmets are highly recommended, along with grippy hikers.
- Class 5-5.4: Vertical climbing that involves technical rock-climbing moves, exposed, falls likely to be serious or fatal, possible to scale without ropes but only for very experienced veterans. Helmets, grippy hikers, and/or rock-climbing shoes necessary.
- Class 5.5 and up: Not covered as scrambling, full-on rock climbing with ropes, helmets, etc.
The YDS system is widely used in North America but can be quite subjective, so it is not perfect. The biggest differences I’ve encountered between Class 3 and Class 4 sections have to do with slope angle, exposure, and putting weight and pressure on hand grips (4) instead of using hands and feet interchangeably as supporting points of contact (3). It is not possible to climb a Class 4 section without using your hands to pull up some or all of your body weight. Typically, a class 4 section will also require some type of rock-climbing move, like stemming, where hands or feet are pressed in opposition as if climbing the inside of a chimney. If downclimbing, a key difference is that most people will descend a Class 4 section facing inward, i.e., your back faces the exposure.
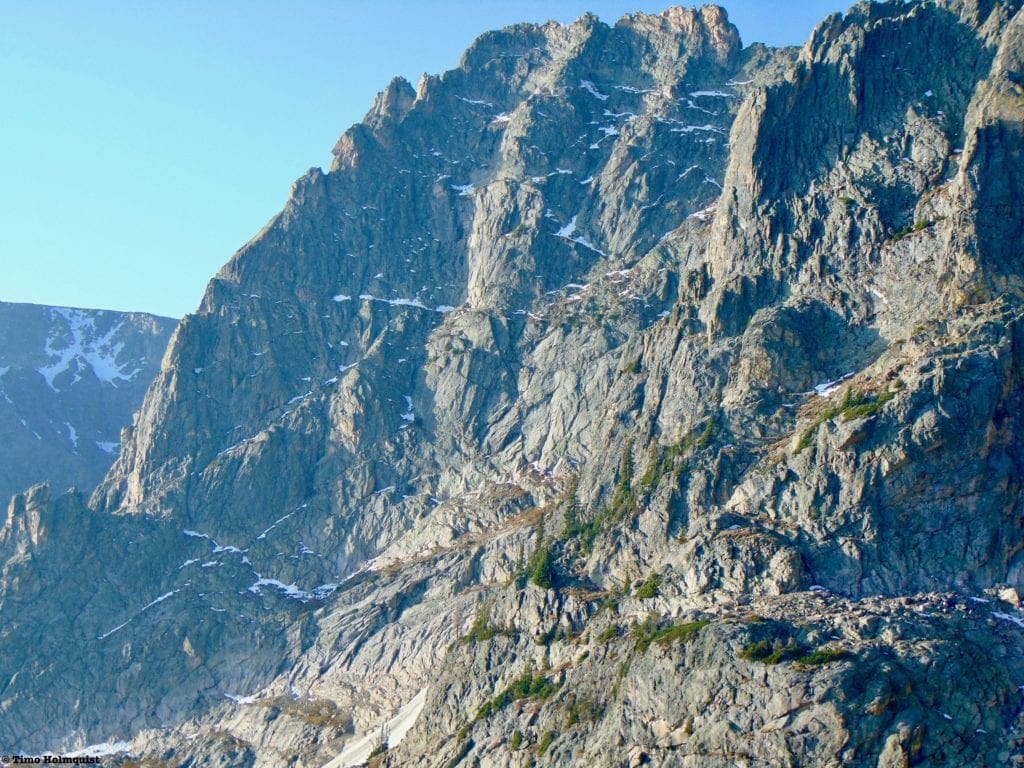
The jagged edge of Notchtop from halfway up Little Matterhorn.
Places to Stay:
Camping near Rocky Mountain National Park will cost you. The options for free area camping are limited. On a positive note, there are plenty of options, and the National Park is within driving distance of Fort Collins, Boulder, and Denver.
- Estes Park: Known as the gateway to Rocky Mountain National Park, Estes sees nearly 80% of park traffic as opposed to the much quieter western entrance near Grand Lake. The town has a ton of lodging options.
- Allenspark: A small town near Wild Basin that has a few lodging options, including the Wild Basin Lodgeand the Sunshine Mountain Lodge and Cabins.
- Rocky Mountain National Park Camping
- Moraine Park Campground: $30 per site. $20 in winter. Established campground with perks, facilities, campfire grate, wood for sale in summer, and bear boxes to store food. Only loop B is open in the winter, and it’s first-come, first-serve.
- For summer, a reservation is needed quite a ways in advance to secure a spot.
- Glacier Basin Campground: $30 per site. Established campground with the same perks as Moraine Park. Reservation required.
- Backcountry Campsites: Rocky Mountain National Park has backcountry sites that you could book in advance. There is no open camping in the backcountry; it must be at designated backcountry sites. Please check the park website for more details. Backcountry sites require an overnight permit of $30.
- Camping near Estes Park
- Estes Park Campground at Mary’s Lake: Established campground, pricey $45-55. Good backup if other campgrounds are full.
- Hermit Park Open Space: $30 for a tent site, price increases if towing a trailer or for group spots.
- Estes Park Koa: Rates dependent on what you’re bringing with you but will run more than $50 a night in the busy season.
- Free or close to free: but a little farther (if you’re willing to drive)
- Ceran St. Vrain Trail Dispersed Camping ($1)
- County Road 47. Users have reported trash and ATV noise at this location, but it is free.
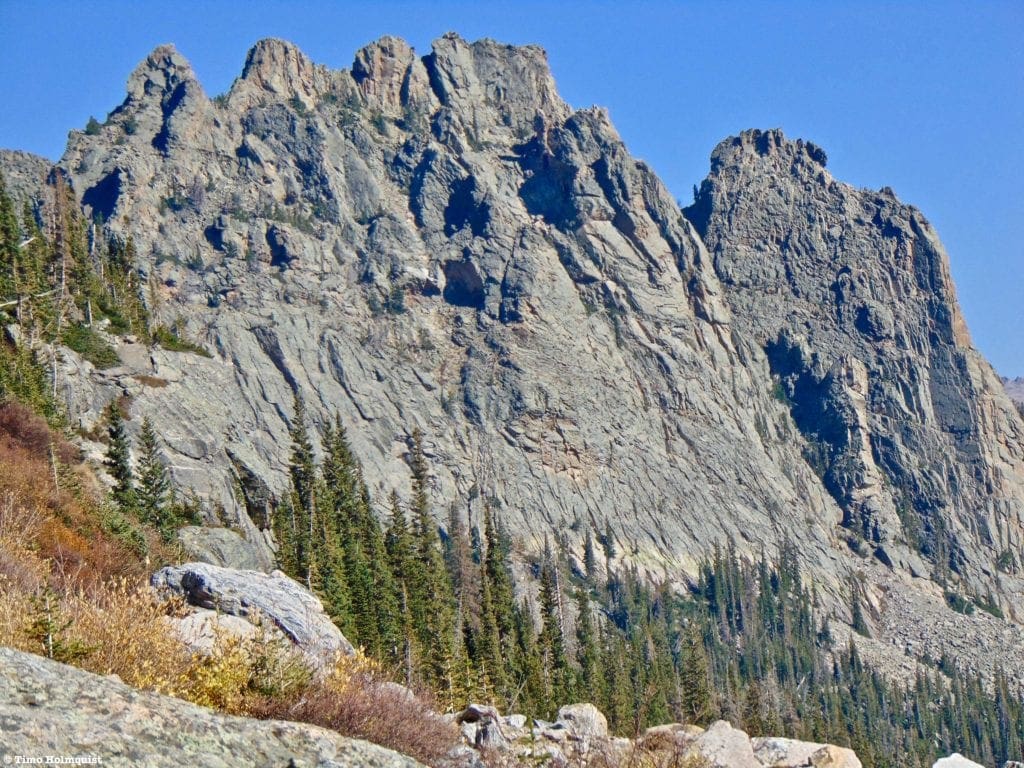
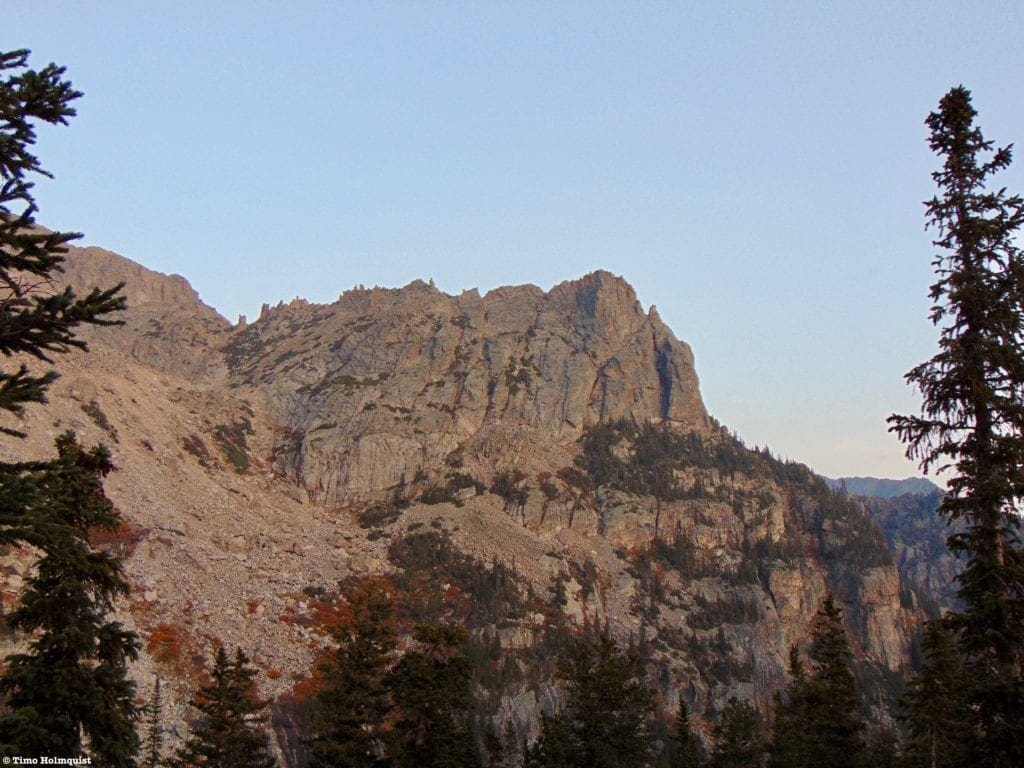
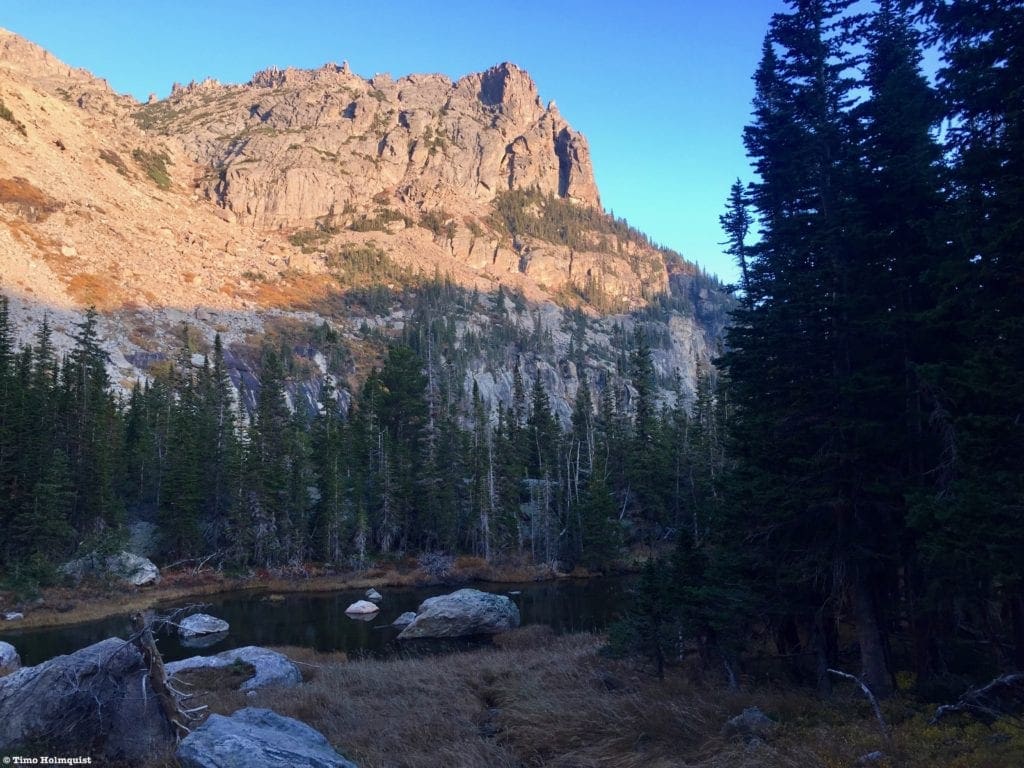
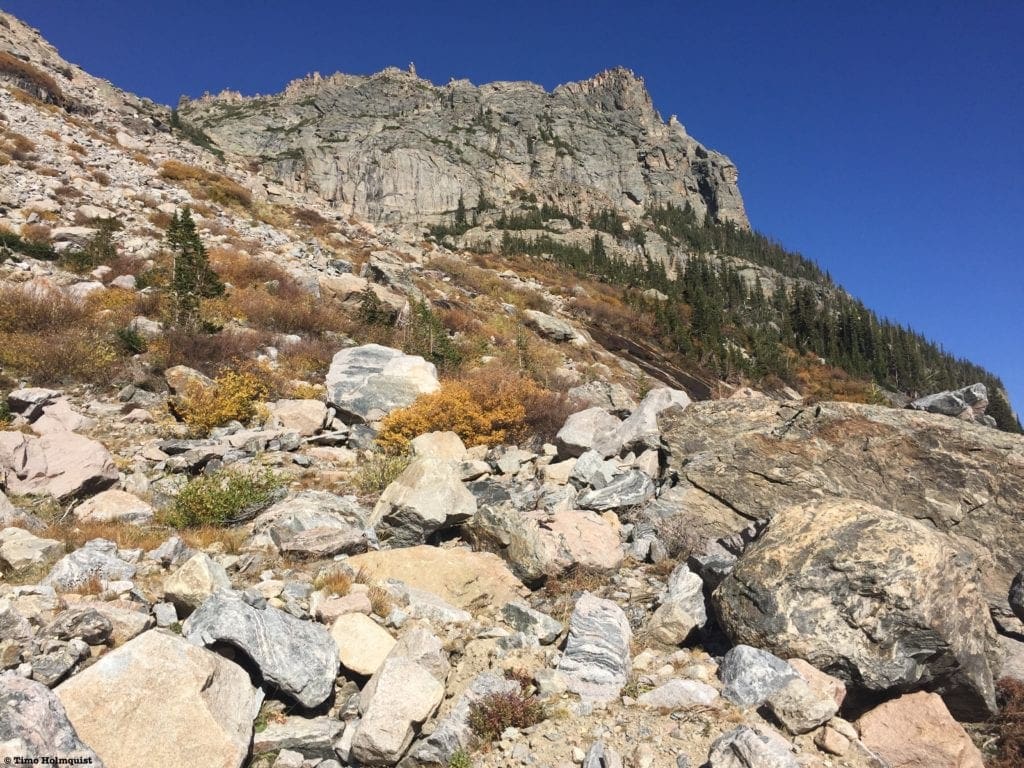
The Gables rock formation down valley from the Little Matterhorn.
Field Notes:
An active and extremely damaging fire season in 2020 closed large portions of the area around Little Matterhorn. Thanks to trail building crews from Rocky Mountain National Park, Rocky Mountain Conservancy Fire Corp, Larimer County Conservation Corps, and Rocky Mountain Youth Corp, along with support from National Park Service Southeast Utah Group: Fern Lake and Odessa Lake trails have been reopened. For additional details, please visit the fire information page here. If you see gals and guys in hard hats with trail tools, make sure to thank them for their efforts! If you want to contribute to trail maintenance throughout the state make sure to look up volunteer opportunities with all the organizations mentioned above, as well as Southwest Conservation Corp and the Colorado Fourteeners Initiative. Colorado has one of the best trail systems in the entire country, and it’s easy to give back by volunteering.
Little Matterhorn occupies the rugged end of a ridge that connects to Knobtop on the Continental Divide. Despite the proximity to the popular trailheads of Bear Lake and Fern Lake, the peak itself sees relatively few people. The most dramatic view of its summit appears from Odessa Lake, where visitors can see why the peak was named after the famous swiss alps summit. If you approach from the easier Bear Lake option, the summit will only appear as a fairly chaotic-looking ridge extension.
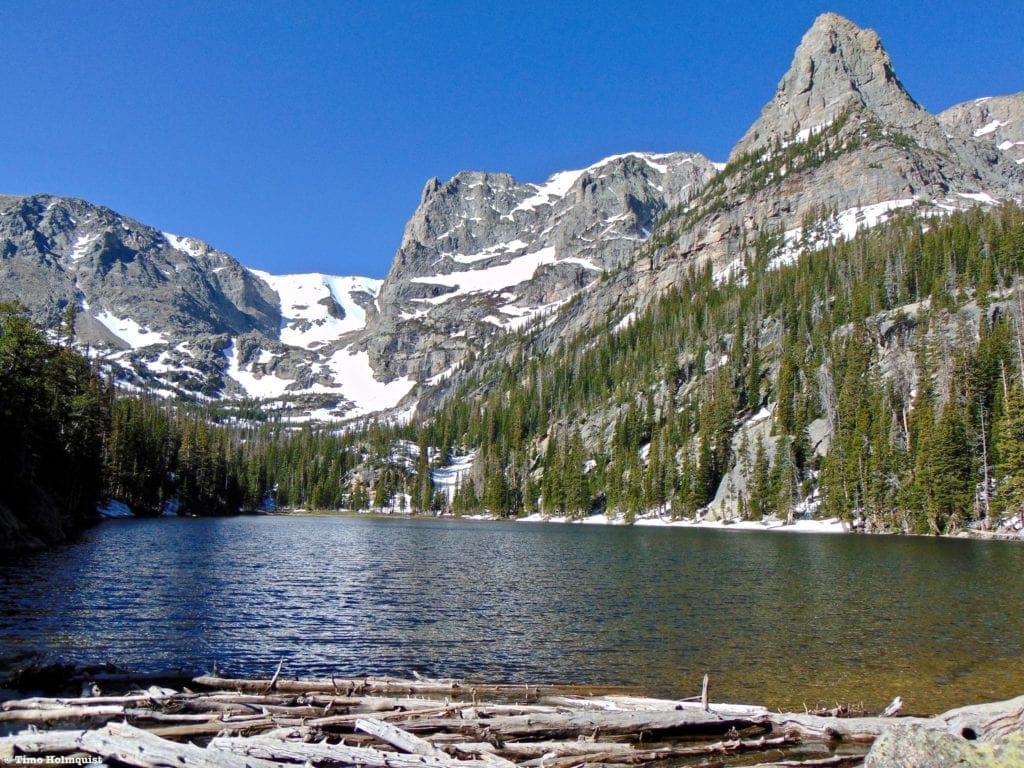
Little Matterhorn from Odessa Lake. It’s the pinnacle of rock above the right side of the lake.
For your weather forecasting needs, start with Estes Park. There aren’t many forecast stations for the area directly around Little Matterhorn, but the forecast for Hallett Peak is a good option. Remember to not only check weather chances but the wind forecast as well. Strong gusts while scrambling across knife-edge ridges with significant exposure is not a particularly enjoyable experience.
Since you will be starting inside Rocky Mountain National park, there are frees and passes to consider. For 2021, there is a two-component system in place between Memorial Day and October 11th. The first component and one always necessary for every visitor is an entrance pass. If you enter Bear Lake Road before 5 AM, the entrance pass is all you need. If you arrive after 5, you’ll need to secure a timeslot; visitors will be turned away that show up without the timeslot if arriving after 5 AM. Please visit the fees and passes page here for more information.
The easiest way to get to Bear Lake Road is to enter the park through the Beaver Meadows entrance center off US36, just outside of Estes Park. It is possible to enter on the western side near Grand Lake, but you will need to cross the width of the park on Trail Ridge road AND make sure you are beyond the Bear Lake Road booth by 5 AM.
Journal:
There are two ways to access Little Matterhorn, from Fern Canyon or Bear Lake. Bear Lake is shorter and easier, so the route will be described from there.
From the incredibly popular trailhead, proceed to Bear Lake and take a right to loop around the bottom of the lake. From the shore, you’ll be able to see the intimidating East Ridge of Hallett Peak. You can visit our other article on Hallett Peak’s East Ridge to see what goes into that route.

Hallett Peak from Bear Lake.
Before the Bear Lake trail takes a left-hand turn around the lake, you’ll come across a trail junction. Take a right, following signs for the Flattop Mountain trail. You’ll begin to gain some elevation before coming upon a second intersection. Take a left here, still following signs for Flattop Mt and Odessa Lake. There will be one additional intersection to consider, where the Flattop Mt. Trail takes off to the left. For this hike, you’ll want to continue straight.
The trail will circle around the lower bulk of Flattop Mountain, oscillating between pine forests and open fields. In the winter, this is one of the access points for the Banana Bowls backcountry ski zone. As the trail wraps around Flattop, you’ll be offered some long-distance views of your target. It isn’t the high point along the ridge but the dramatic right-hand portion.
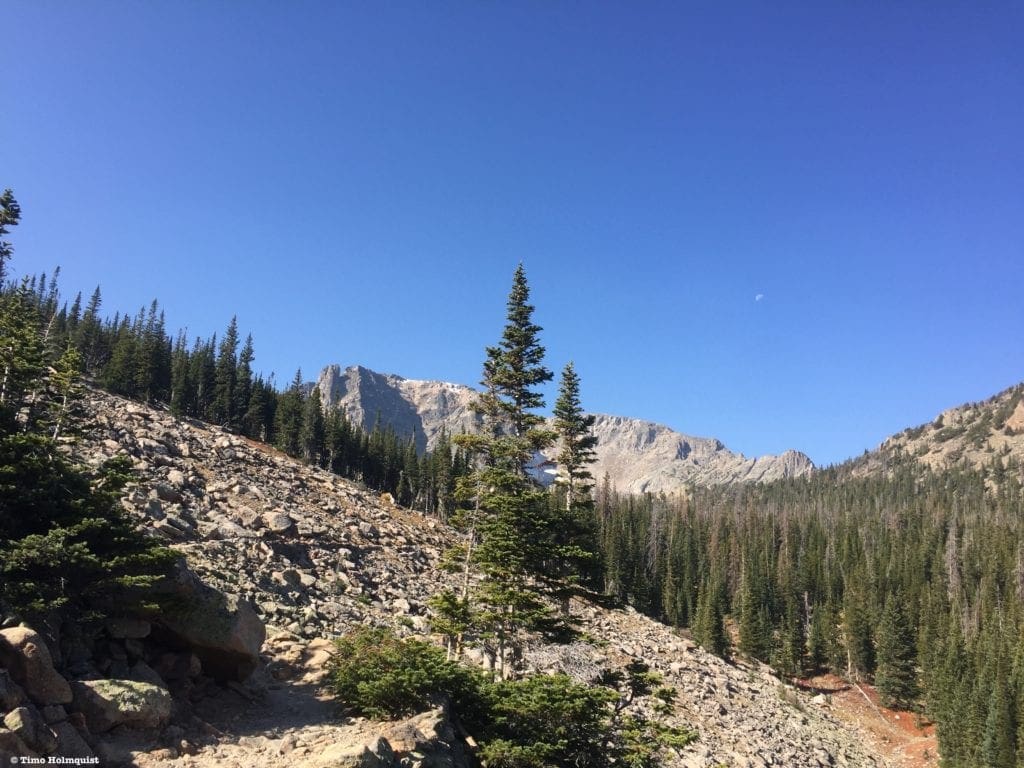
First views of the target ridge.
As you meander towards the ridge, better views of Little Matterhorn will present themselves.
Zoomed in on the summit.
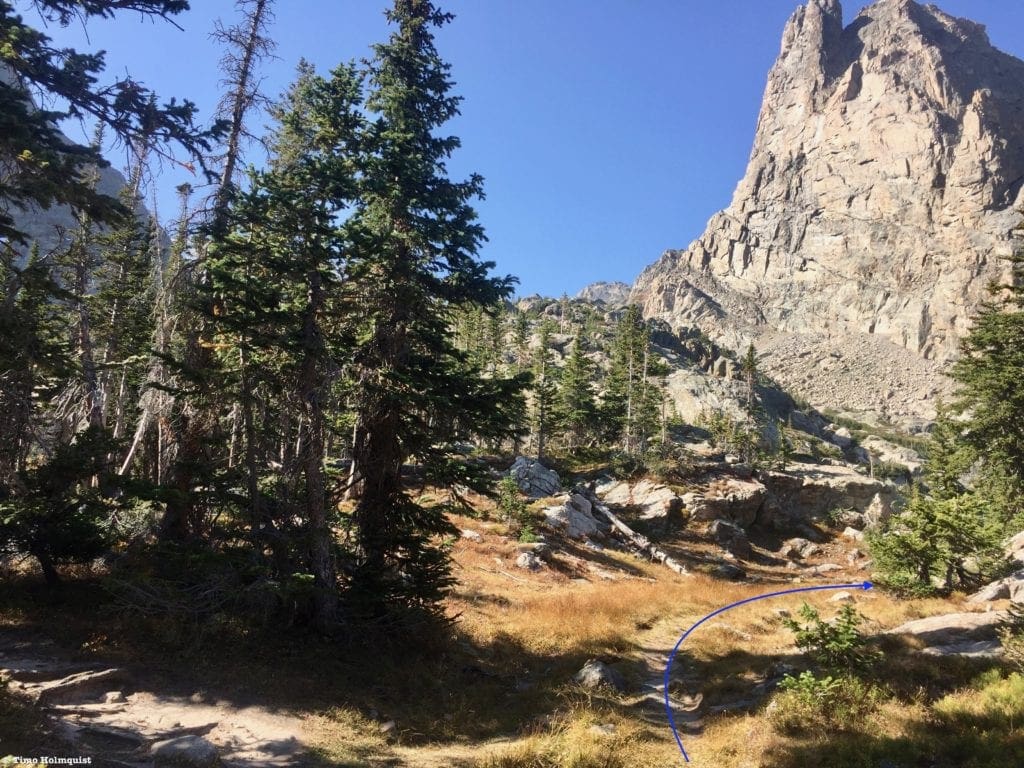
The trail will thread the gap between Flatttop to the left and Joe Mills Mountain to the right. Once beyond the gap, the trail will make a sharp turn north and begin descending towards Odessa Lake. For your hike, you want to avoid descending; instead, break left towards the shallow Lake Helene.
Take a left here with Ptarmigan Glacier in the background.
The unofficial trail will follow the edge of Lake Helene before gradually disappearing. There are a set of rocks on the right side of the social trail with stupendous views of Notchtop Mountain. Seeing the morning sun reflected off the near-vertical rock walls will certainly leave an impression.

Notchtop greeting the day.
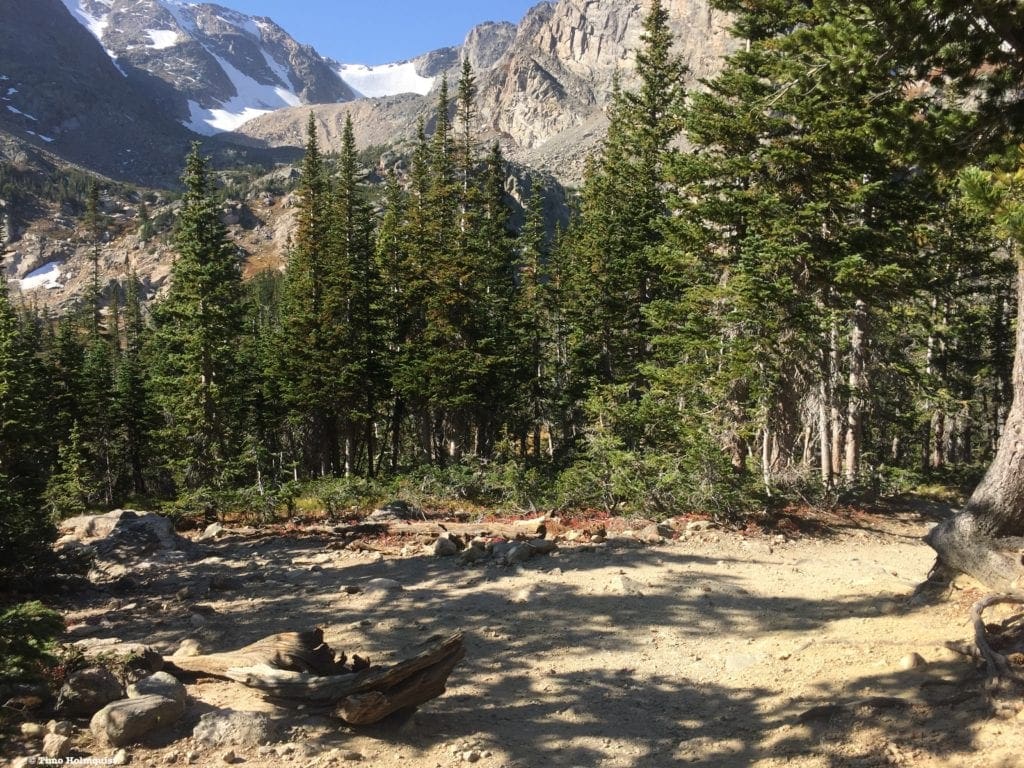
It’s a good idea to break here and get your bearings. The basin to the left of Notchtop will grant access to Ptarmigan Glacier. The ridge to the right of Notchtop heads to Knobtop (not visible from your position) and eventually out to the ridge endpoint where Little Matterhorn lies.
What your goal looks like…
The first obstacle is getting around the head of the valley to the base of the scree and talus ramp to the left of Little Matterhorn.
The route breaking from Lake Helene.
You want to lose enough elevation to circle below Grace Falls. There is a fairly obvious social trail heading down to the bottom of the valley.
What the upper part of the route looks like from the rocks by Lake Helene.
From Odessa Lake, the first part of your route can be seen, descending to the valley floor, and crossing below Grace Falls.
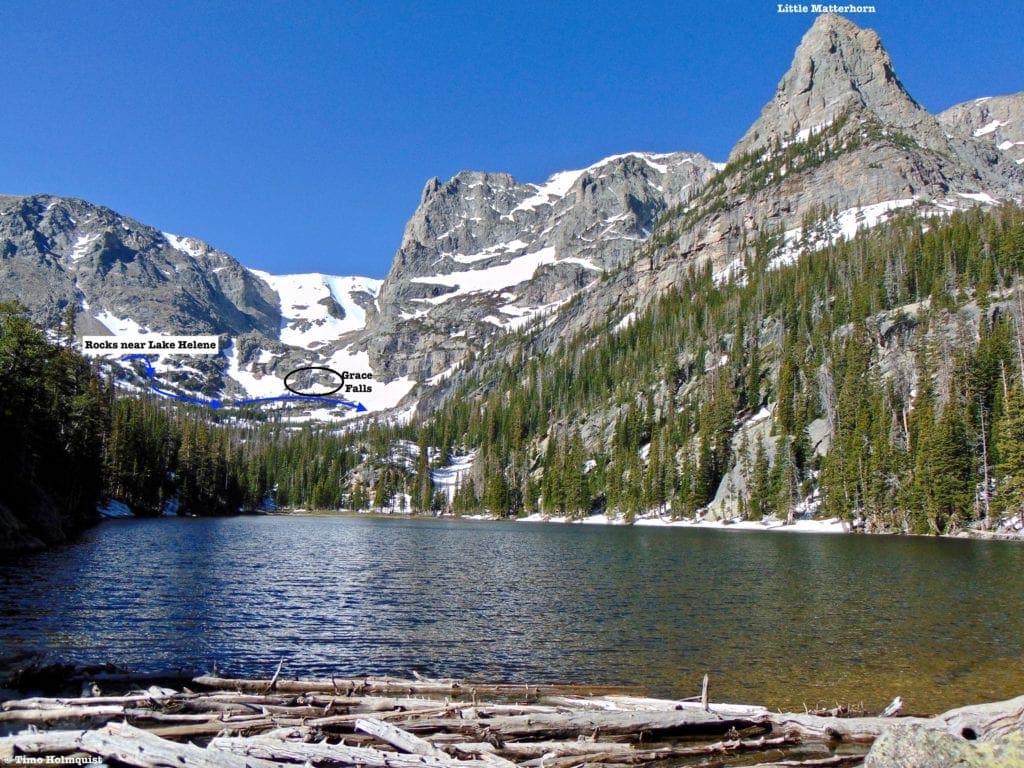
Odessa Lake perspective, early June with snow still present.
Without snow, the social trail descends between hidden rock bands and targets the ridgeline to the left of Little Matterhorn. If, for any reason, you lose the trail, aim for the ramp to the left of Little Matterhorn’s sharp summit ridge. Despite the pine trees, it should be easy to keep your goal in sight.
Passing some small ponds on the way to your ascent ramp.
You will need to cross the outflow from Grace Falls, but by July it should be a simple crossing. It may be tempting to angle more towards the right to line up your ascent with Little Matterhorn, but a set of cliffs will block easy passage down low, and the rocks below the summit will push the ascent quickly into Class 5 terrain.
About to begin the ascent.
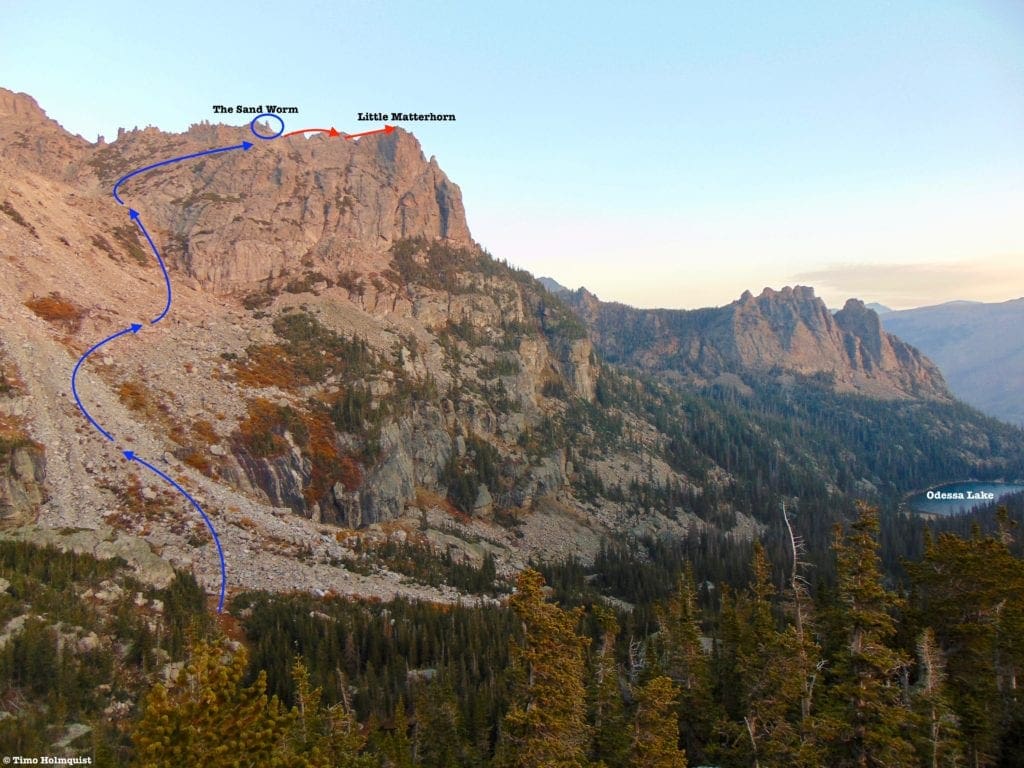
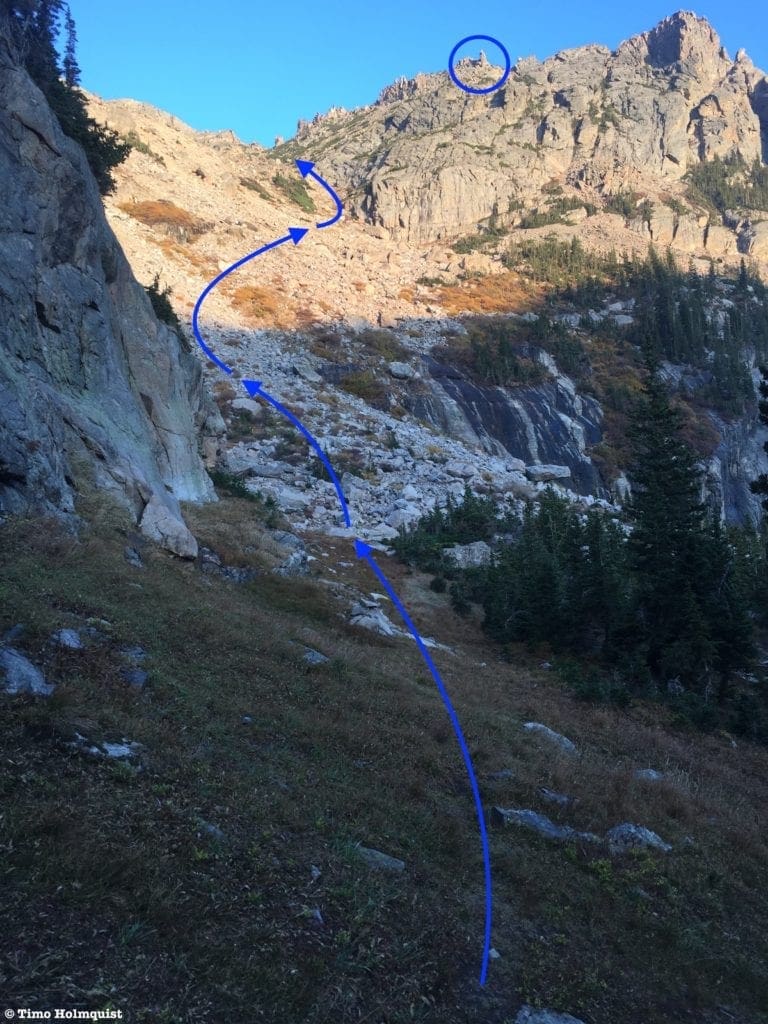
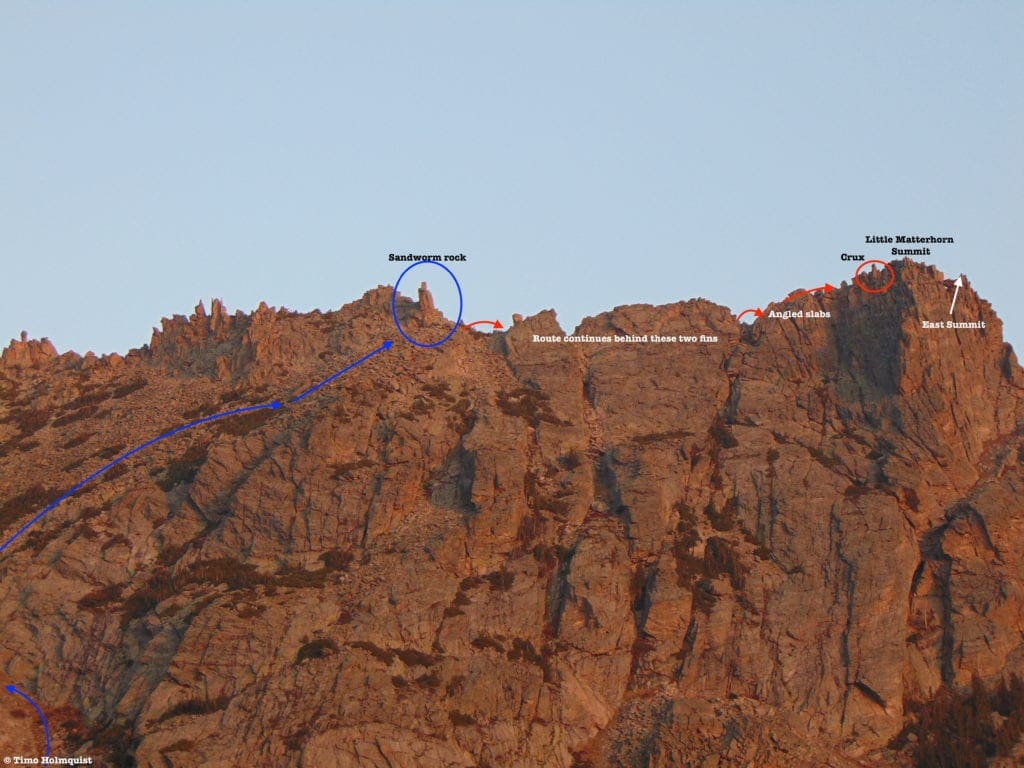
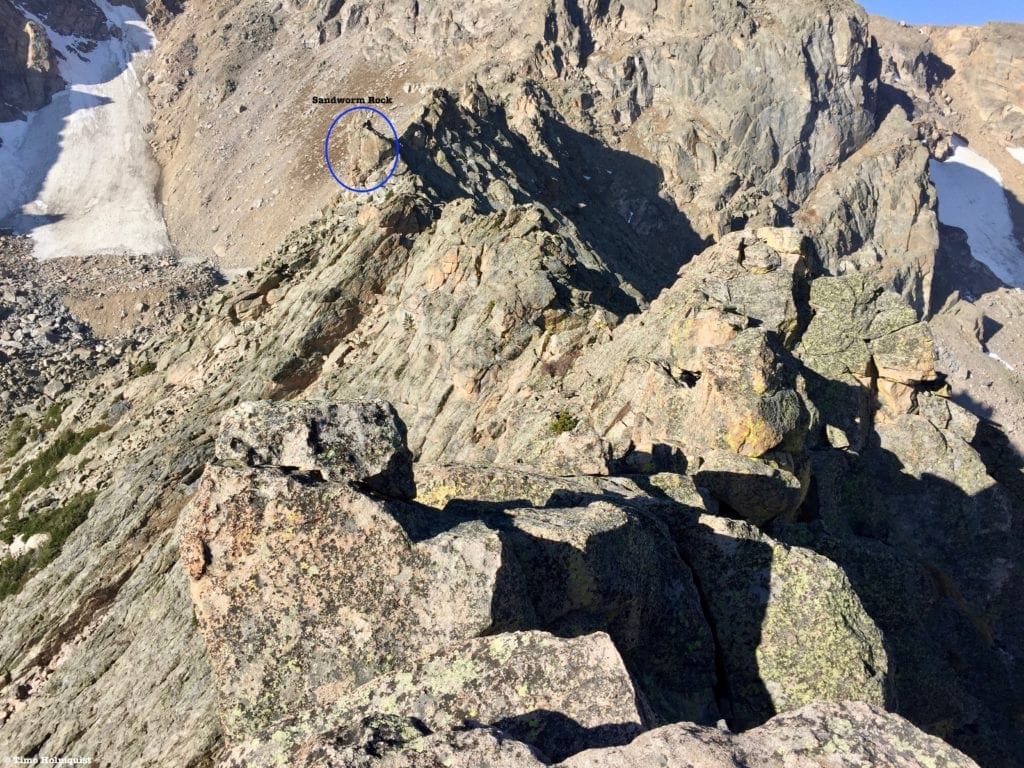
There is an obvious rock pillar on the ridgeline that will be key to later navigation. Up close, it looks like a Sandworm from Dune. While not important at the moment, it’s worth keeping in your sights as you begin talus hopping up the slope. This area, while not particularly difficult, is full of rocks that could shift under your weight. Carefully make your way higher, finding more stable terrain the higher you venture.
Ascending with views of the Sandworm and Little Matterhorn’s summit above.
Most of the elevation happens on this portion, so take your time and keep to the path of least resistance. The higher you climb, the less obvious the summit will become. You will, however, notice that the slabby rock to your right will eventually decrease in angle. If you’re feeling up to it, there are some great Class 3 variations up the rock. Otherwise, continue beyond the slabs and turn northeast, where a friendlier talus slope will take your ascending traverse to the right.
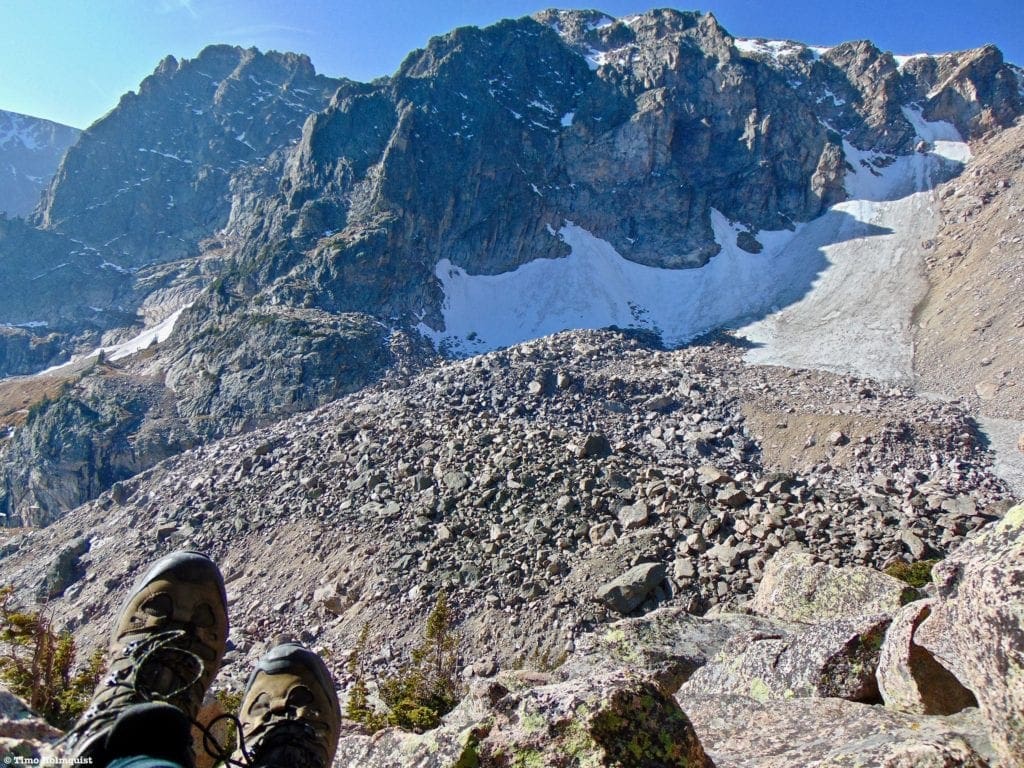
Resting below the main ridge to Little Matterhorn, Notchtop is to the left and Ptarmigan Point with its permanent snowfield are center.
Continue ascending in a northeastern direction until coming up to the Sandworm rock, which looks like this.

The Sandworm up close.
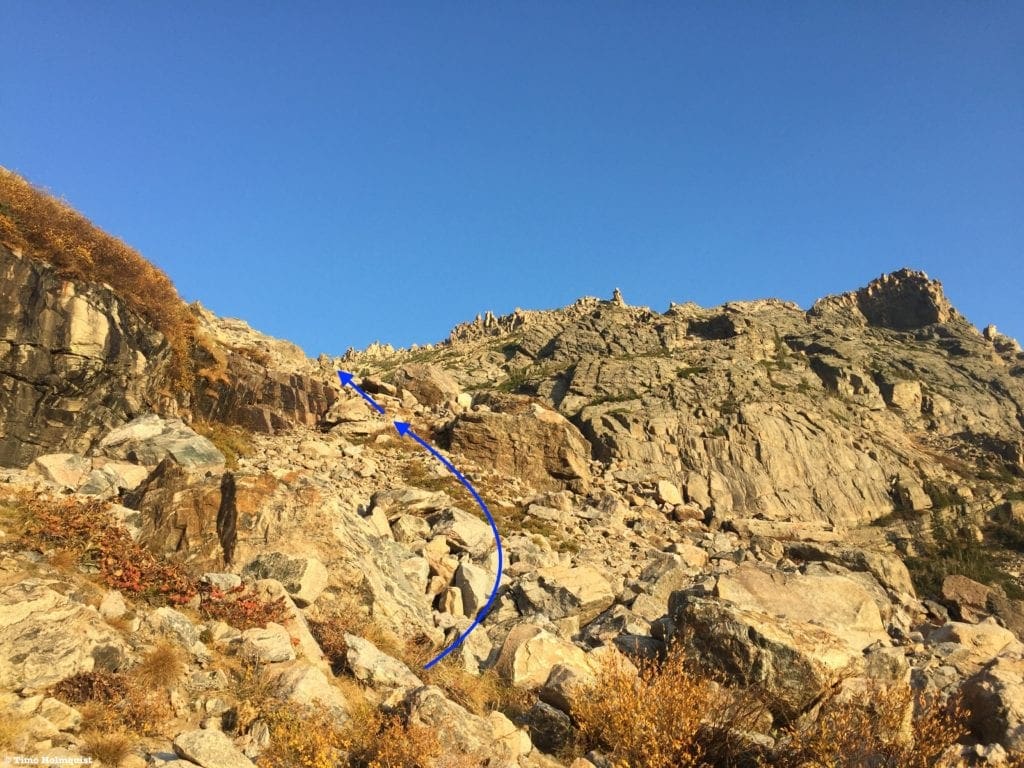
Find a path around the rock until you are on the ridge crest. Now, the route intensifies to a Class 3 scramble.
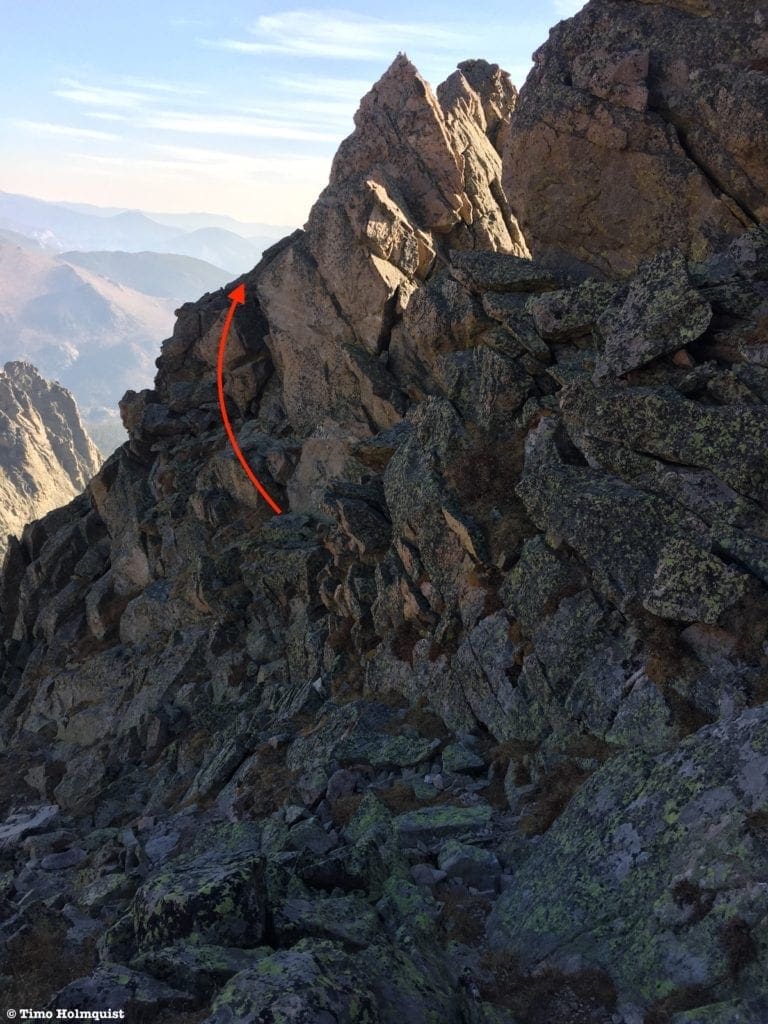
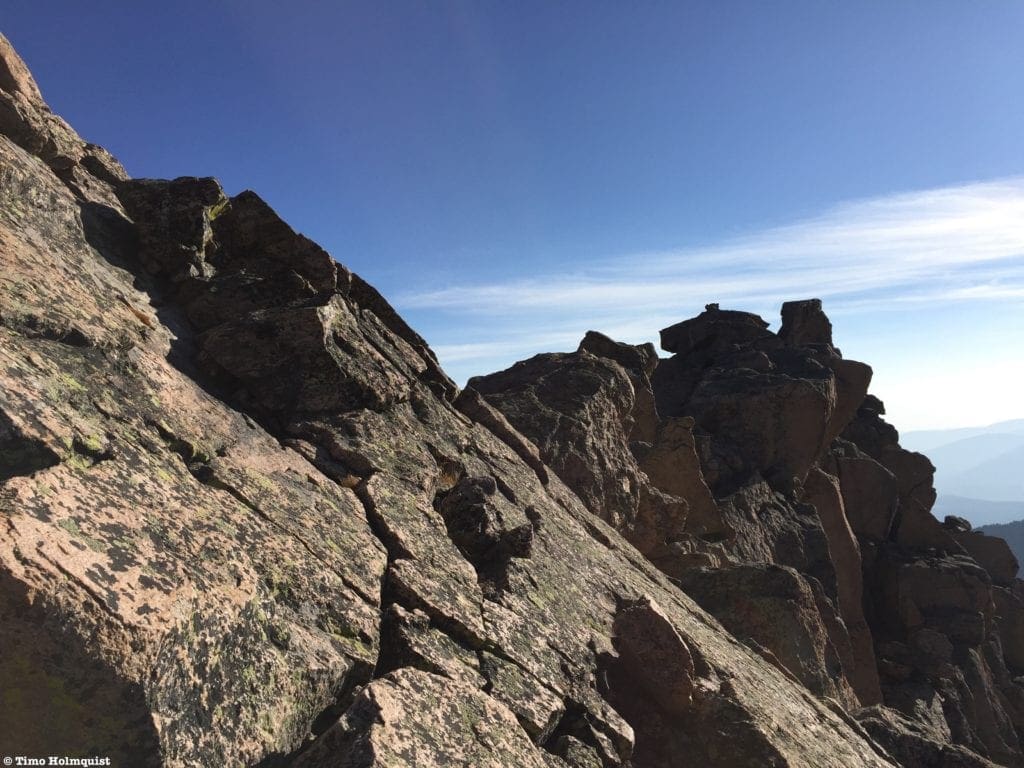
Despite the relatively short distance between you and the summit, the view down the ridge is fairly intimidating.
The rest of the scramble.
There is a way to conquer the ridge while remaining at a Class 3; however, there is one particular move that may be frightening due to the exposure.
For starters, approach the next ridge hump in front of you and bear left around the rocky pinnacles. There are a series of ledges that will grant safe passage.
Continue along the north side of the ridge to begin.
Most of these moves alternate between Class 2+ and lower Class 3, but the exposure is nothing to scoff at.
Circumventing the pinnacles on the ridge crest.
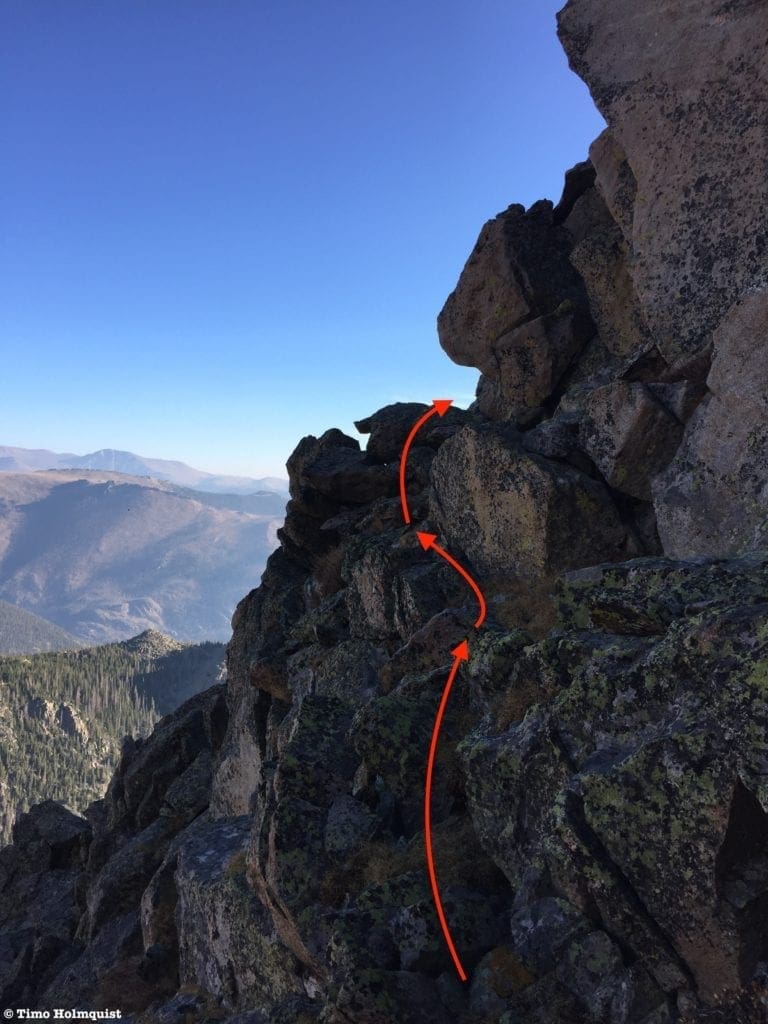
Once you round the first corner, ascend higher along the ridge, picking the path of least resistance as you move.
Slanted rocks along your ascending traverse.
As long as your ascending, you’ll eventually find a notch right back on the ridge crest.
The next set of moves once you regain the ridge. You can also see the summit cairn and the crux of the route ahead.
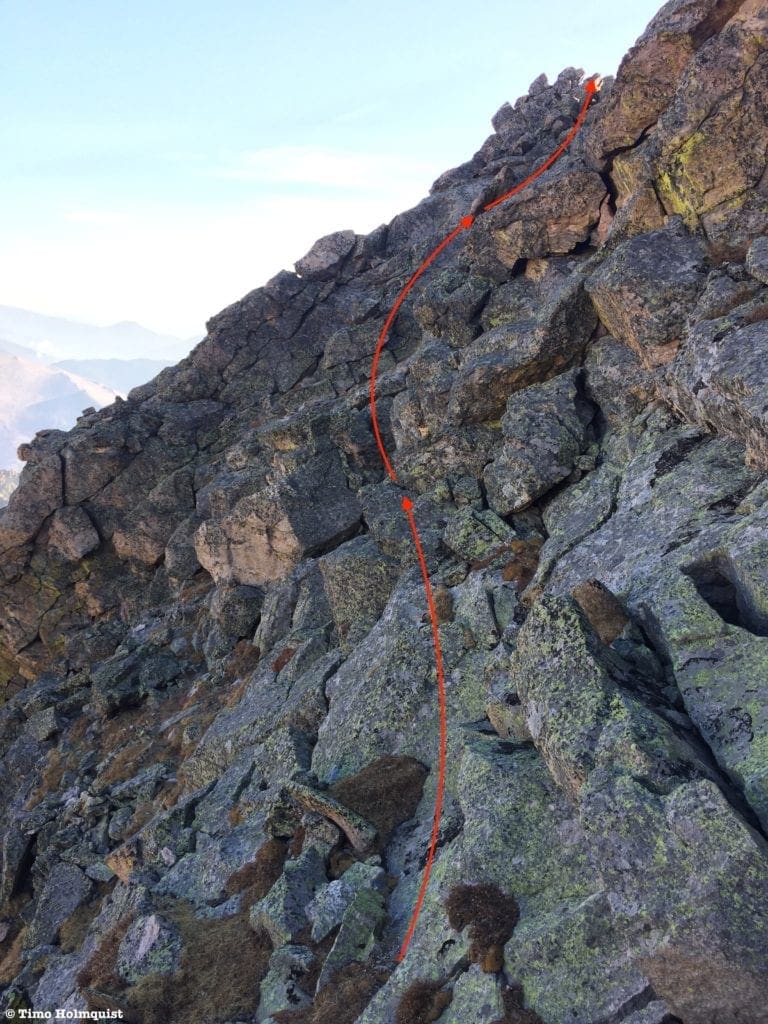
After climbing out of the notch, find a place to transition to the south side of the ridge. While exposed, the slanted rock is quite grippy when dry, and the slope angle is not as relentless as it first appears.
The slanted south side slabs. Find one of several variations utilizing cracks in the rock for safer moves.
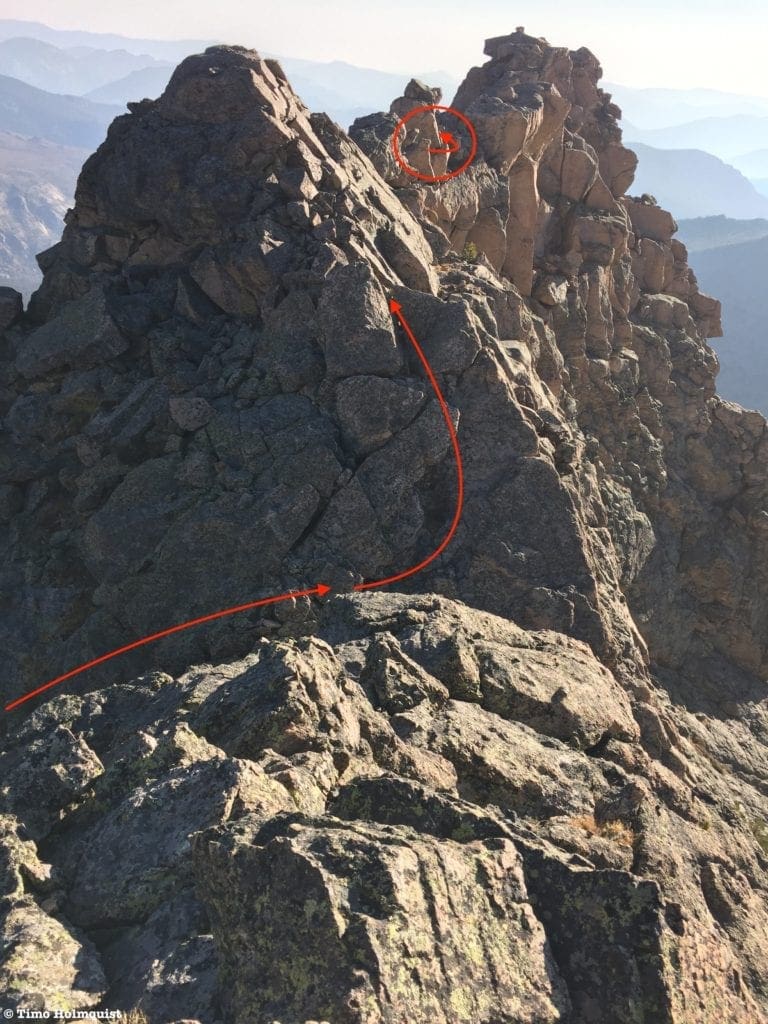
Once you get around the slab rocks, you’ll reach another small notch, where a first view of the East Summit cairn can be seen.
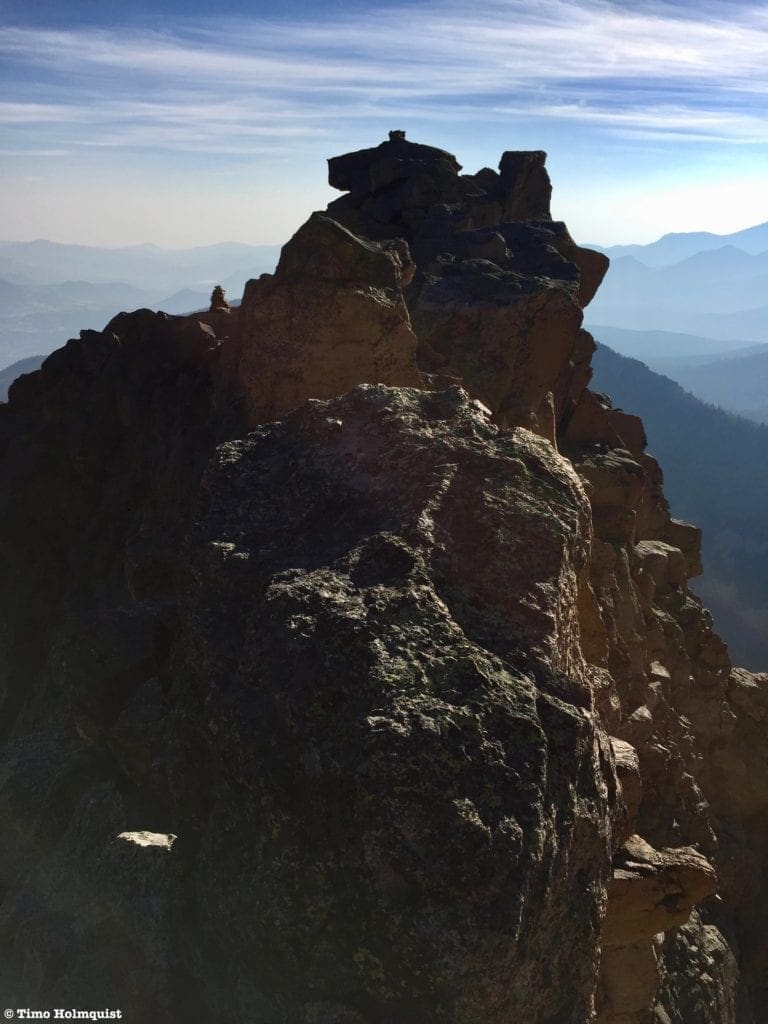
Summit cairn and east summit cairn behind and to the left.
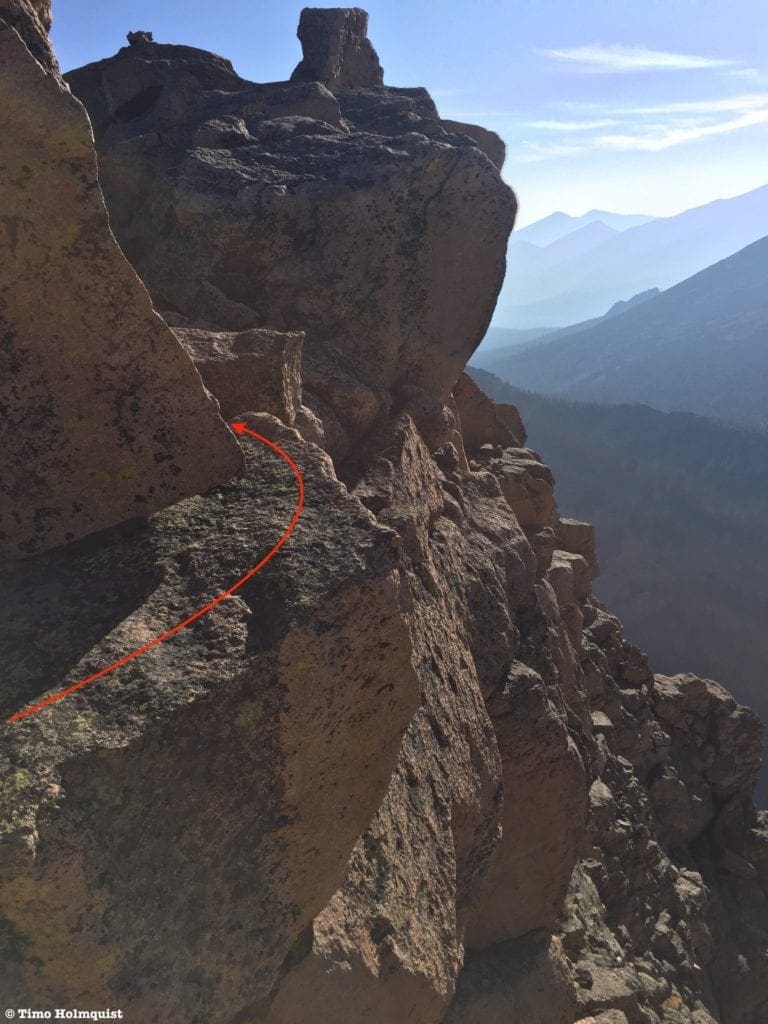
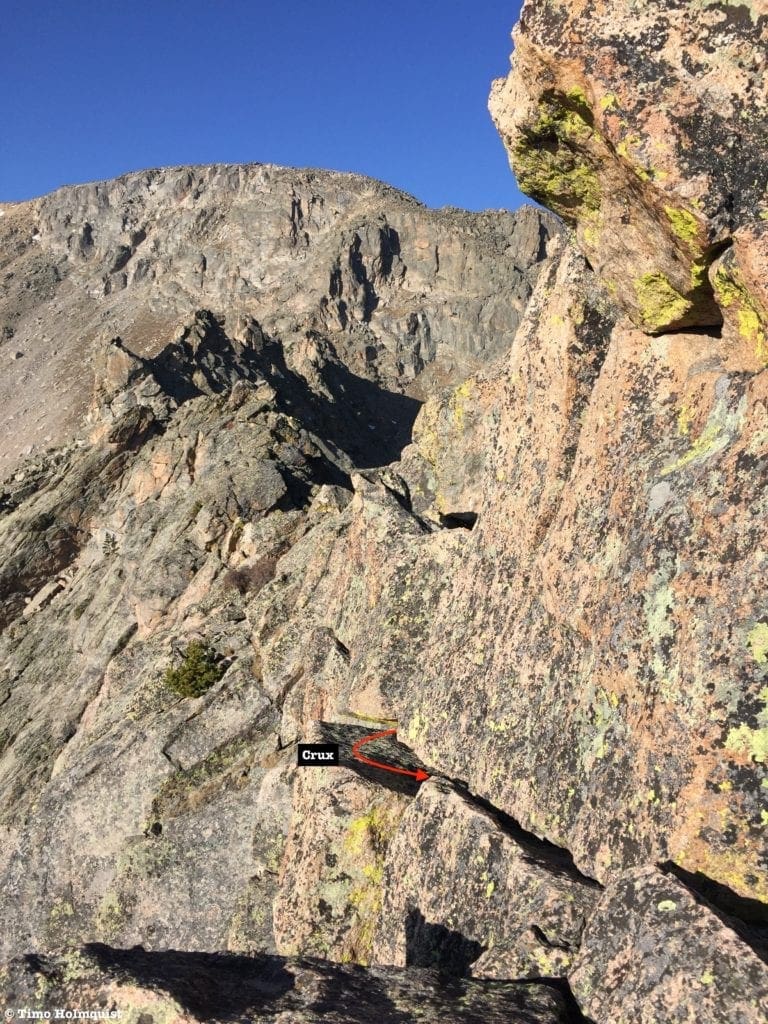
Now’s the time to prepare for the crux. It’s an exposed rock ledge that you have to squeeze around. The moves themselves are not difficult, but the ledge is thin and overhung, with nothing but hundreds of feet of air beneath you. It’s a very exposed section that may have you questioning why you decided to do this. The silver lining is that it’s quick, and there are good handholds available.
The route so far, as seen from below. You can see the sheer drop beneath the crux move.
Begin by traversing as much as possible along your current line. You’ll eventually be forced to feint slightly to the left (north) side of the ridge to get around a boulder. On the other side, you’ll be able to clamber through a gap to pop back to the south side.

Climb up through this notch back to the south side
Some trip reports have suggested that instead of climbing back to the crux, it is possible to descend a steep and loose gully to the north and reascend around. However, from where I tried to scout the route, it looked like the gully contained unstable rock and flirted heavily with 4th Class territory.
Once you’re back on the ridge crest, the Crux becomes obvious.
The exposed move. No wind here is preferable.
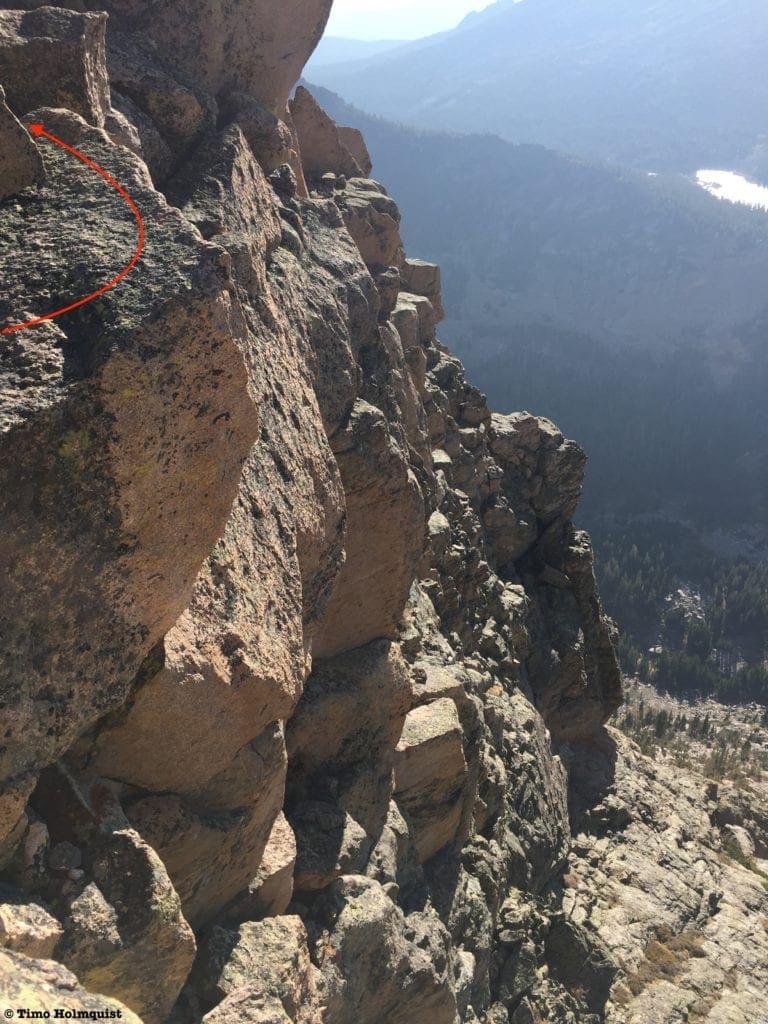
Another look, tilted down to show the drop-off.
After shimmying your way across, the summit will be within reach.
Looking back at the crux section once you’re safely across.
With a few final, low 3rd Class moves, you should be able to step out onto the summit rock.
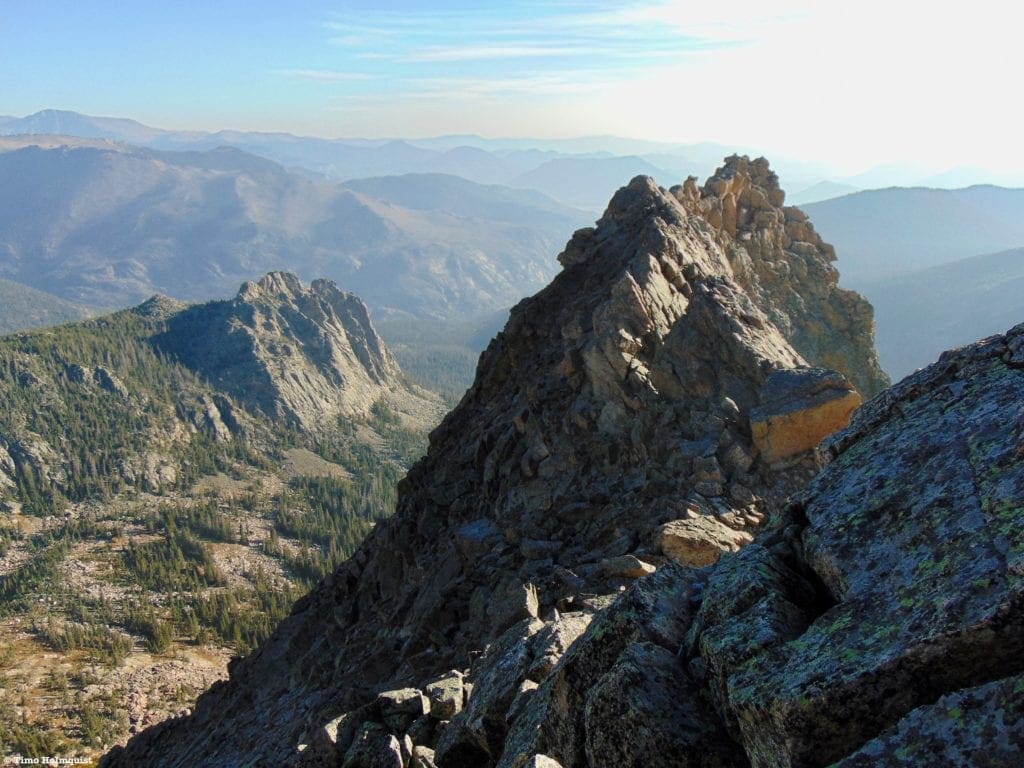
From the summit, looking back down the ridge you just scrambled across.
To the East, you can see the smaller summit with a more obvious cairn on top. It’s not far, but a sneaky Class 4 downclimb separates you from tagging it.

The downclimb is just to the left, sandwiched between two boulders. You’ll need to stem in order to make it down and up.
The East summit makes for a wonderful addition to a Little Matterhorn day but isn’t required to top out on this magnificent peak.
After digesting the commanding position you now occupy on the nose of the ridge, you’ll have to backtrack to the Sandworm to keep the scrambling firmly in the Class 3 category. The order from the summit is quick descent, flip to the north side for the Crux move, quick up and over to the south side, back to the crest, stay on the north side through the slabs, back to the south side around the ridge fins, regain the crest, and then walk comfortably back to the Sandworm.
From there, descend along the pass of least resistance, keeping an eye on where you set your feet. Once you make it down to the valley floor, pick up the social trail you used beforehand and rise up to Lake Helene, where you can reconnect with the main Odessa Lake Trail. Follow the trail back to Bear Lake and your car.
Little Matterhorn and the Sandworm Rock from below.
Final Thoughts:
If you’re into scrambling, it’s hard not to have fun on Little Matterhorn. The crux move by itself is reason enough to consider the rest of the route. Sweetening the pot is the promise of a view-ridden half-day adventure beyond the well-trafficked trails of the area.
Due to its lower elevation, the season for Little Matterhorn also extends a little longer than some of the higher peaks nearby. I’ve had snow-free ascents in mid-October before. The summit and ridge also offer views into the wild Tourmaline Gorge, where a plethora of additional routes exist up to Knobtop, Gabletop, the Gables, and the ridges connecting them. If you always lead with elevation first, you’ll miss out on some truly spectacular smaller summits like Little Matterhorn that dot the Colorado Mountains.

Enroll With Global Rescue Prior To Embarking On Your Next Adventure.
When a travel emergency arises, traditional travel insurance may not come to your aid, and a medical evacuation can cost up to $300,000.
The cost when you have a Global Rescue membership? $0. That’s why when the unexpected happens, you want the leader in rescue, evacuation and medical advisory behind you. You want Global Rescue.
Popular Articles:
- Guide to the Best Hiking Trails in Rocky Mountain National Park, Colorado
- The Dyrt: The 10 Best Campgrounds In Colorado
- Top Adventure Sports Towns 2021: Boulder, Colorado
- Epic Adventures with the Best Guides In Colorado
- Sky Pond via Glacier Gorge Trail, Rocky Mountain National Park, Colorado
- Scrambling Hallett Peak’s East Ridge, Rocky Mountain National Park, Colorado
- Scrambling Mt. Alice via the Hourglass Ridge, Rocky Mountain National Park, Colorado
- Gorge Lakes Rim Scramble, Rocky Mountain National Park, Colorado
Terms of Use:
As with each guide published on SKYBLUEOVERLAND.com, should you choose to this route, do so at your own risk. Prior to setting out check current local weather, conditions, and land/road closures. While taking a trail, obey all public and private land use restrictions and rules, carry proper safety and navigational equipment, and of course, follow the #leavenotrace guidelines. The information found herein is simply a planning resource to be used as a point of inspiration in conjunction with your own due-diligence. In spite of the fact that this route, associated GPS track (GPX and maps), and all route guidelines were prepared under diligent research by the specified contributor and/or contributors, the accuracy of such and judgement of the author is not guaranteed. SKYBLUE OVERLAND LLC, its partners, associates, and contributors are in no way liable for personal injury, damage to personal property, or any other such situation that might happen to individuals following this route.


