


|
Getting your Trinity Audio player ready...
|
Vail Pass, traversed by I-70, is the second highest interstate in the US. Often loved for its beauty or loathed for snow closures, it offers dependable and lower-angle backcountry lines with stunning mountainous scenery.
Overview
Vail Pass is the second highest piece of land traversed by an interstate in the US after the Eisenhower Tunnel (also in Colorado). I-70 passes through both areas. Depending on how many times you’ve been through, you may love it because of the scenic beauty or loathe it due to the frequent winter accidents and snow closures. What you may not have considered while driving over the pass is how many excellent backcountry lines exist on both its eastern and western sides. Vail Pass offers dependable, lower-angle, and often overlooked backcountry lines in a stunning mountainous setting.
The Pass is near the southern terminus of the Gore Range, which ranks among the most rugged and scenic in the state. Plenty of skiing exists on the western side in the USFS-managed Vail Pass Recreation Area but the main access points are heavily utilized by snowcats and snowmobilers. The sound of roaring engines may dampen the wilderness experience for some, which is why this article will focus on Vail Pass East, where motorized vehicular traffic is prohibited.
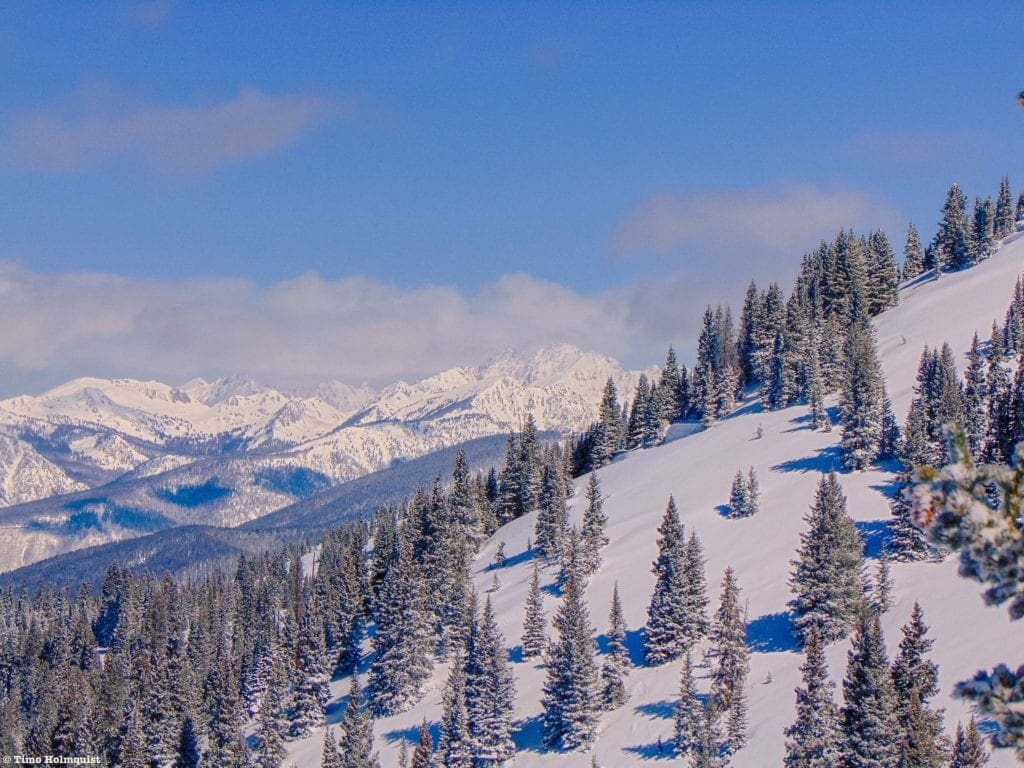
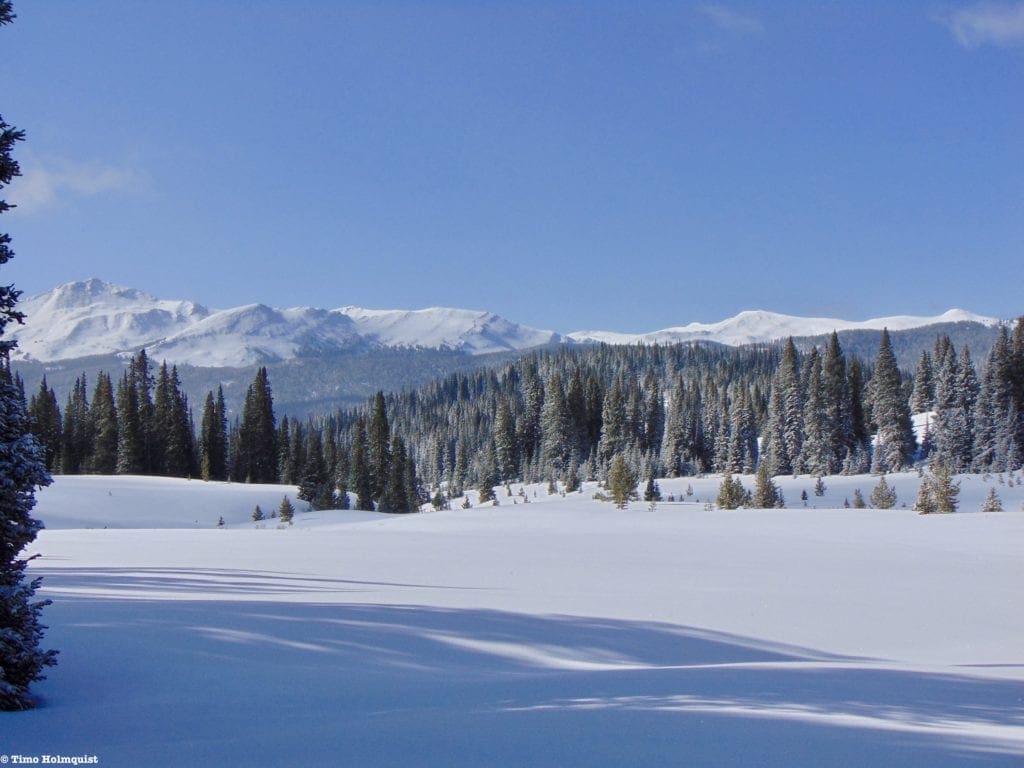
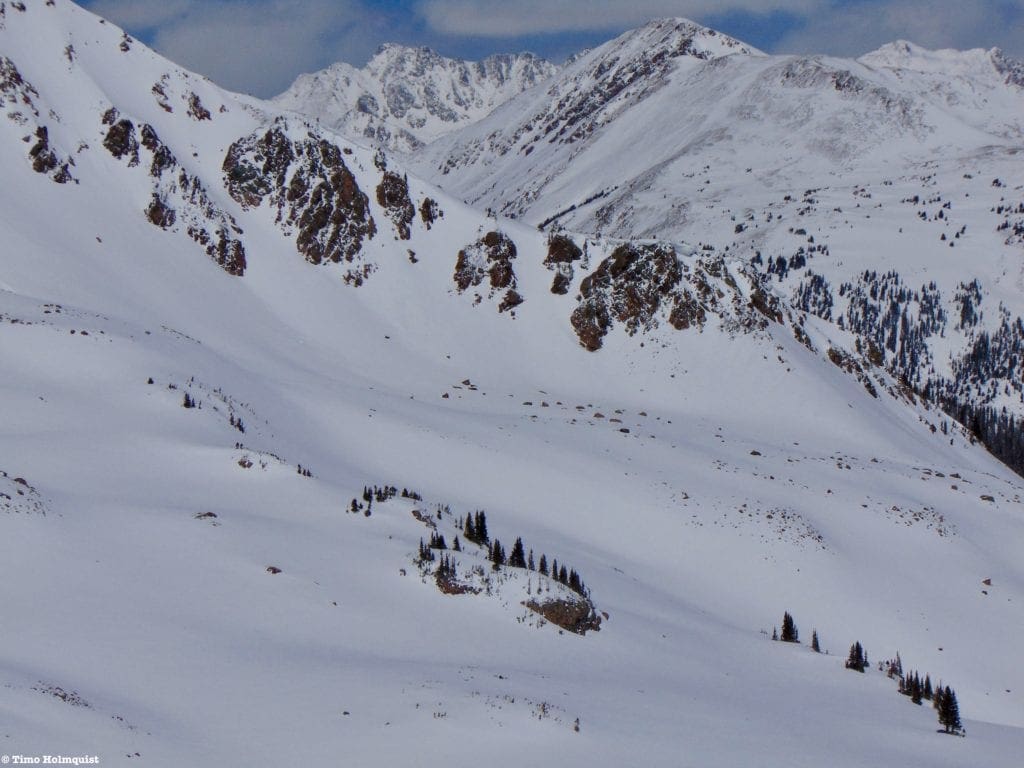
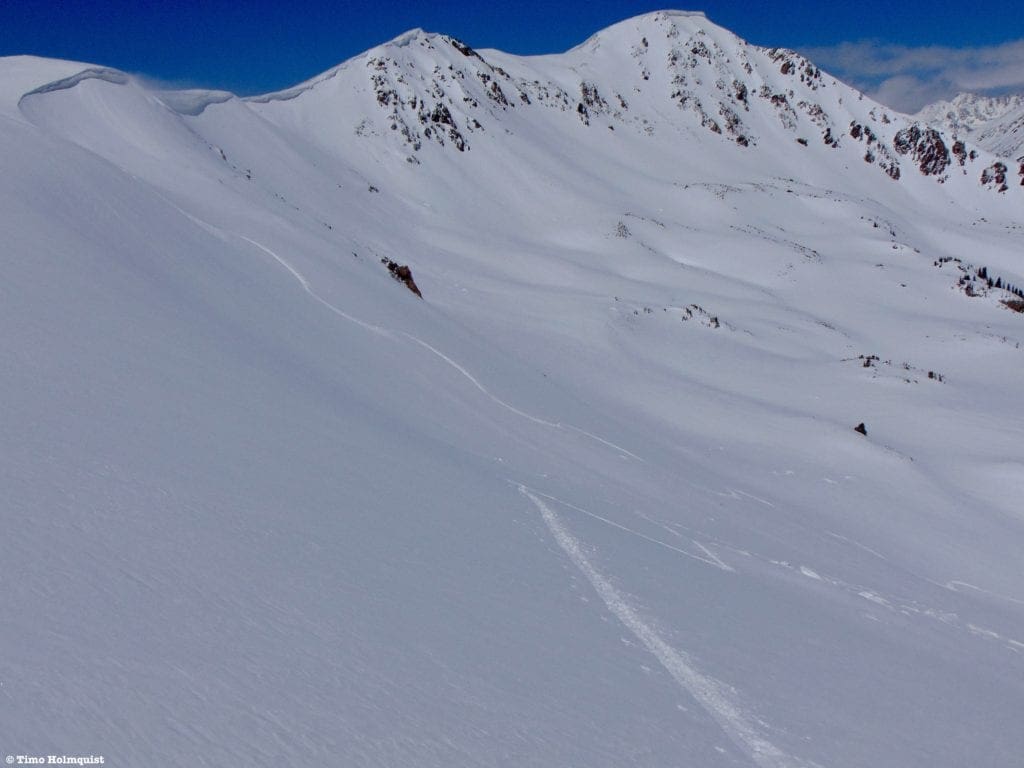
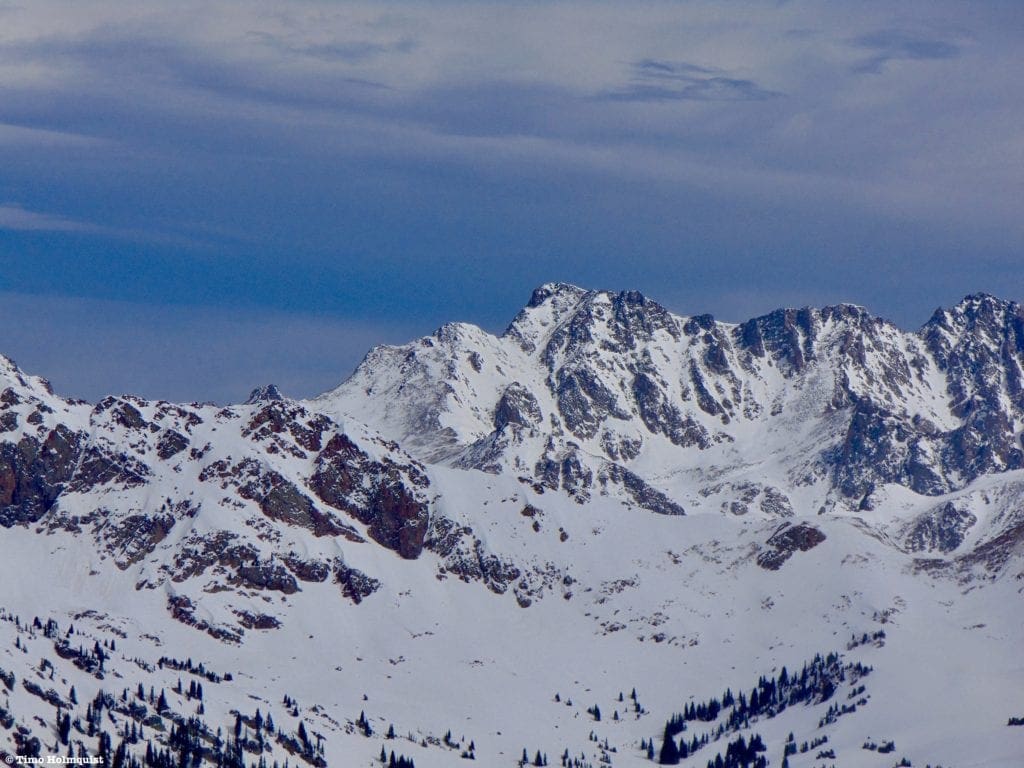
The lower reaches of Big bowl with the Gore range behind.
Quick Navigation
Article Navigation: Click on any of the listed items in the table of contents below to jump to that section of the article. Similarly, clicking on any large, white section header will jump you back to the Table of Contents.
- Overview
- Backcountry Gear
- Backcountry Planning
- Vail Pass Area Overview
- Area Weather
- Access
- Places to Stay
- Our Ratings
- Vail Pass East Overview
- The Claw
- Uneva North
- Big Bowl & Stump Top
- Dog Leg Bowl
- Uneva Ridge East
- Sneva South
(Please Note: Some of the parent lines listed above have add-ons and variations, which are also discussed)
Tenmile range from below The Claw.
Backcountry Gear
Before we begin, let’s lay out some quick backcountry gear knowledge (for a more comprehensive guide, check out our article, Backcountry Gear: Essentials for Human Powered Skiing). The list below is crucial, don’t skimp on gear when avalanches are in play.
- Skis/Helmet/Gloves/Goggles
- Winter Clothing: waterproof shells, thick ski socks, layers, puffy, beanie, hand warmers, etc.
- Skins
- AT Bindings (Frame or Tech)
- Avalanche Gear: Beacon, Shovel, Probe, and Radio
- Backcountry ski pack
- Food/Water/First-Aid Kit
- For multi-day adventures: 4-season tent, winter rated sleeping bag, avalanche airbag, orienteering equipment, batteries/rechargeable batteries
- Mountaineering Axe and Crampons. While there are dozens of lines that do not require these tools, some of the most epic lines in the Cameron Pass area do. Research which crampons fit over your alpine or tech boots before buying! Generally speaking, you do not need an “Ice” axe unless you are climbing an ice wall; a mountaineering axe should work fine for most couloirs. However, some of the hardest ski mountaineering routes in the area demand more. Analyze your skill level and the route of choice BEFORE settling on gear options.
Remember, it isn’t enough to simply own gear; take the time to figure out how to use it before heading out. Speed is key, especially in a backcountry avalanche rescue. Visit Backcountry Gear: Essential for Human Powered Skiing to get comfortable with the necessary gear and how to use it.
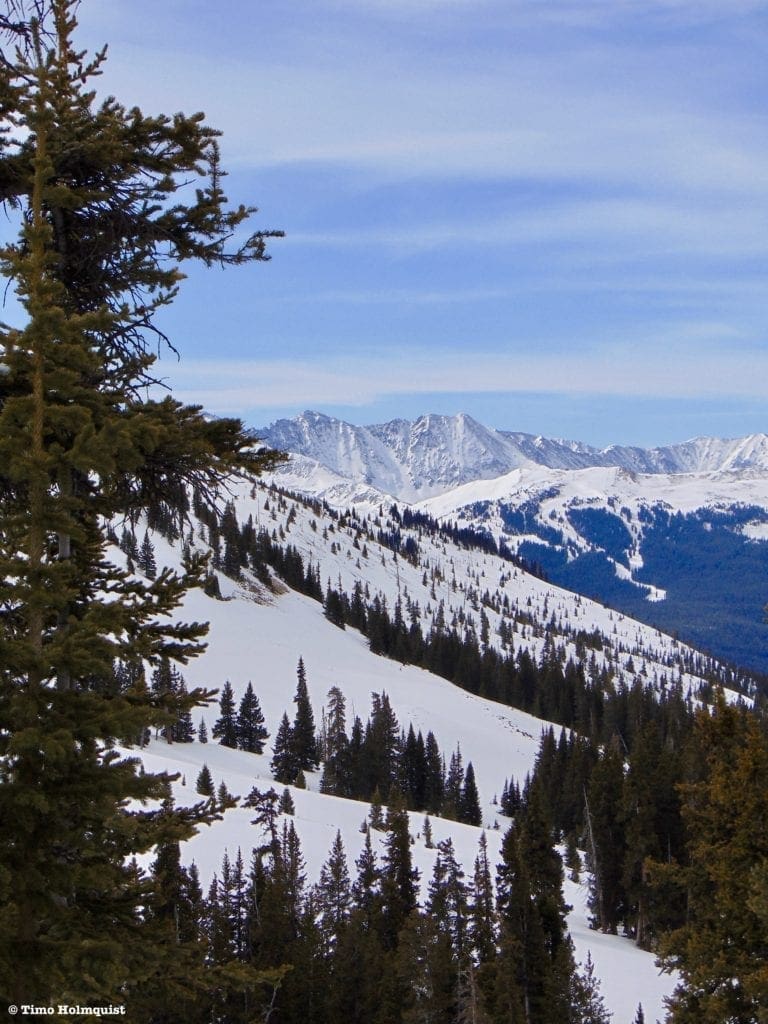
Uneva Peak from the ridgeline, Vail Pass East.
Backcountry Planning
Once you have the gear and know how to use it, it’s time to start planning. We’ll briefly break down the central components below, but check out our Guide to Planning a Backcountry Ski Adventure for an in-depth analysis of the planning process. A good plan can separate success from disaster. No outdoor activity is worth your life.
- 1) Pre-Planning
-
-
- Learn how to Ski at an EXPERT level before heading outside ski resort boundaries. Find a squad. Start backcountry gear research. Hone your craft. Get in shape.
-
- 2) Long-Term Planning
-
- Geographic reduction: where are you skiing? Start big, get small.
- Weather and snowpack research.
- Research ski lines using books, online resources, and forums. Key data:
- Total distance, total climb, total descent, slope angle
- Local Emergency contacts
- Unique factors: trees, cornices, couloirs, avalanche history
- Get into the maps and apps, know the area like the back of your hand.
- 3) Short-Term Planning
- Managing Expectations
- Constantly check weather updates until the morning you leave. Remember, snow reflects light; if it’s a sunny day, bring sunscreen!
- Popularity of your backcountry line.
- Tell people where you’re going and who to call if things go wrong.
- Have a back-up plan.
- Who’s got the medical training?
- Go over the plan in detail with your squad. CHECK FOR UNDERSTANDING.
- Packing
- Make sure everything fits, and you can access your avalanche gear quickly. Time is critical in a burial situation.
- Managing Expectations
- 4) On-site Planning
- What do you see when you get there?
- Watch out for tree-wells, wind-loaded slopes, cornices, bergschrunds, and other topographical considerations.
- Timing and snow surface i.e. environmental factors. Not all snow skis the same.
- What do you see when you get there?
- 5) Post-Planning
- Analyze
- What worked well? What didn’t?
- Ease into the harder stuff.
- Analyze
The steps listed above are only a skeleton outline; see our Guide to Planning a Backcountry Ski Adventure to iron out the critical details. Remember, you can always take an avalanche safety course through AIARE; it can absolutely save lives.
Looking up to the eastern ridge line from Corral Creek.
Vail Pass Area Overview
Vail Pass is frequently snowy, often collecting more than neighboring ski resorts. Due to its high elevation and location west of the Continental Divide, the pass starts accumulating early in the season. There are a handful of intermediate and difficult runs that set the area apart due to their scenic beauty, aesthetic skiing, and deep powder potential. The runs here average between roughly 300-1300 feet in vertical drop, setting you up nicely for repeat laps. Most approaches on either side can be made in roughly 3 miles or less, which helps increase the number of lines skied per day.
Unlike some areas in the Front Range, Vail Pass skiing starts high and stays high. Between the elevation of the pass itself and the highest nearby peak (Uneva), you’ll be spending your whole ski day above 10,000 feet. Pay attention to the signs of altitude sickness and drink lots of water.
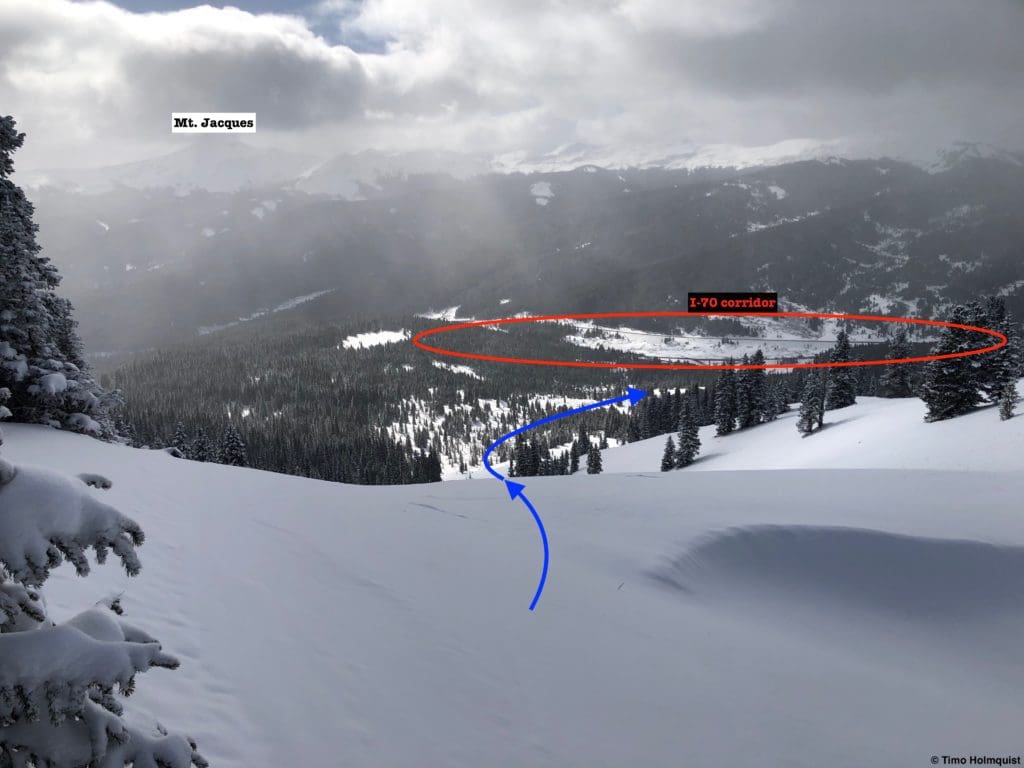
Mt. Jacque and the flats near Corral Creek.
While Vail Pass East does have some couloir skiing, it’s generally more mellow than some of the famous lines found in Rocky Mountain National Park, Cameron Pass, or the Indian Peaks. The main draws are ease of access, short relative elevation gain, open bowls, nicely spaced tree skiing, and big powder skiing potential in a less severe avalanche environment. You may not be skiing the steepest lines of your life here, but there’s a chance you could be skiing them in some of the best conditions of your life.
evoTrip Backcountry Ski & Snowboard Trip Packages
Whether you’re a beginner looking to get your AIARE 1 Avalanche certification, or an intermediate to advanced backcountry user looking for guided trips with famed traverses and epic big-mountain descents, they’ve got you covered.
Area Weather
There are many resources available to pinpoint weather around Vail Pass. The national weather service has a forecast location for the pass, and you can always check Vail Resorts summit weather which sits over 11,000 feet and only a few miles to the west. In addition, CDOT (Colorado Department of Transportation) runs road condition reports and hosts multiple cameras along I-70 near Vail Pass that help visualize weather conditions.
OpenSummit has a reasonably accurate forecast for Uneva Peak, although you have to upgrade to get all the interesting details. OpenSnow, the winter sibling of Opensummit, also covers snow and weather reports for Vail Pass. In these higher areas, just because it isn’t snowing doesn’t mean other factors won’t affect your experience; always check cloud cover and wind speeds.
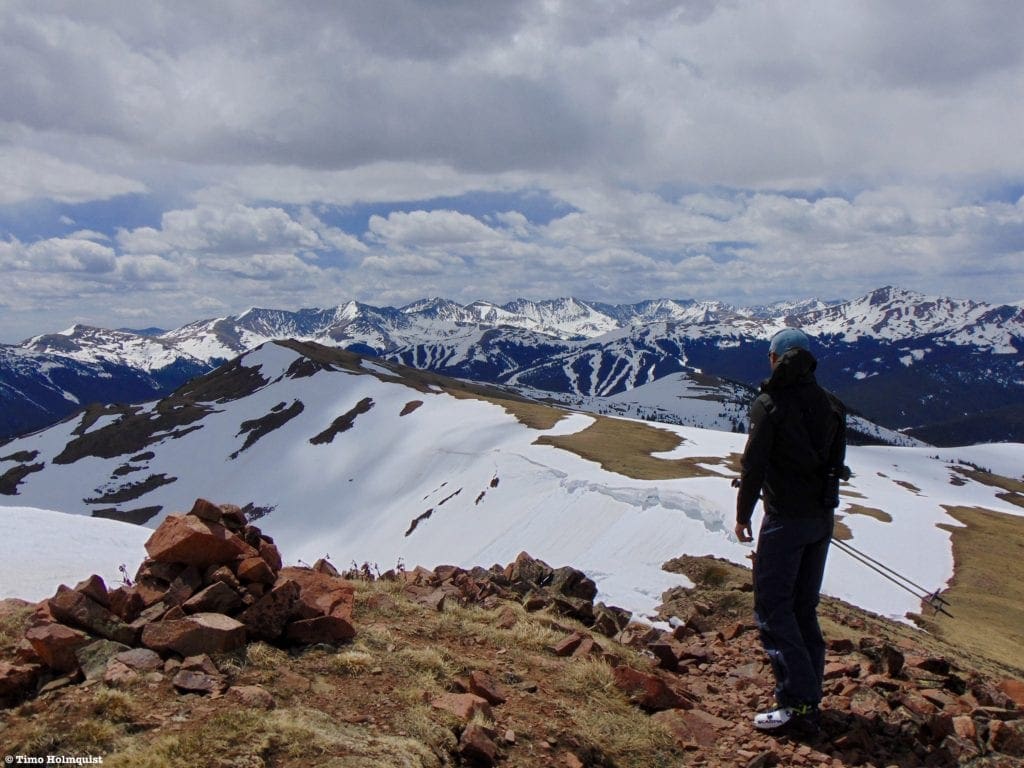
Looking south to Copper Mountain Resort and the Tenmile Range in late spring conditions.
Supplemental information, like snowpack data, can be obtained via Snotel weather station sites scattered throughout the backcountry. It can be a bit confusing to sort through the site, but here is the interactive map option. Use the menu on the right-hand side to create specific condition queries. The linked map will open with a window to the station at Copper Mountain ~5 miles southeast of the pass. Snowpack data is important; not only will it tell you if there is even enough snow to ski on, but it will also show you whether or not the area is experiencing an average winter. Any significant deviation from average is noteworthy. Deep winters create more pronounced avalanche conditions, but wimpy winters can as well, especially if a storm overloads weak and unstable snow. Snowpack science should be a critical component of planning.
As crucial as snowpack data is, the numbers would be incomplete without an avalanche forecast. This forecast is MANDATORY before heading out. In Colorado, we are lucky to have the CAIC (Colorado Avalanche Information Center). The information is easy to read, the maps are color-coded, and a flurry of explanations gives depth to the forecast. More specifically, Vail Pass is in the Vail and Summit County Zone; make sure you are checking the right area for the most accurate information. Do not go into the Colorado backcountry without checking CAIC.
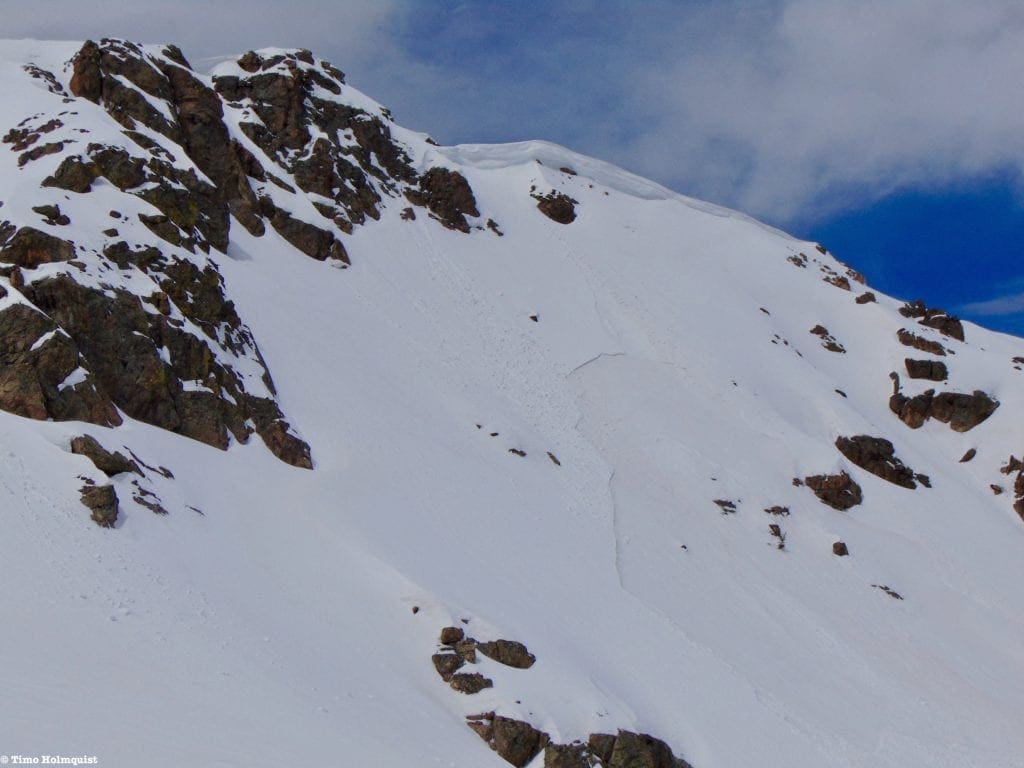
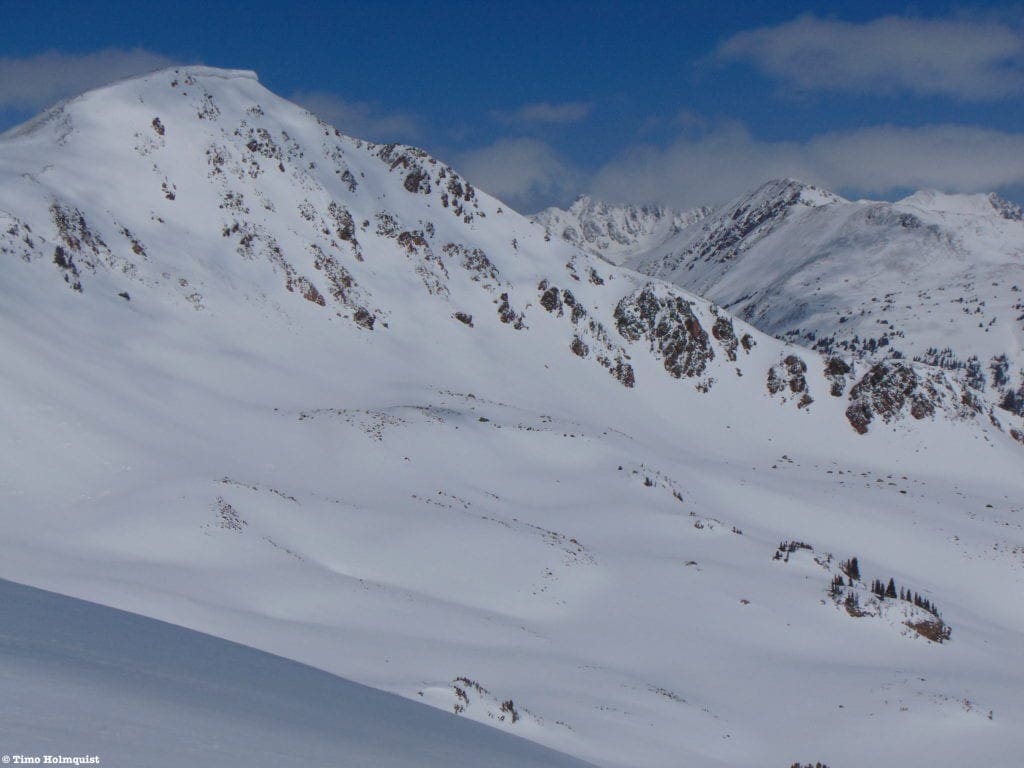
Cornices and recent avalanche evidence along the east side of Point 12089.
Access
Being so close to I-70 helps limit confusing navigation, but it doesn’t mean Vail Pass is close. It’ll take you roughly an hour and a half from Denver, two from Boulder, and two and a half from Fort Collins and Colorado Springs …when there’s no traffic. Despite I-70 being arguably one of the most scenic interstates in the country, it is a disastrous strip of asphalt on the weekends in the winter. Six large ski resorts rely on I-70 to bring people to their slopes BEFORE you even get to Vail Pass. The Pass is also frequently closed because of bad weather, experiences its fair share of weather-related accidents, and usually suffers an avalanche every year or two.
When there’s no traffic, it’s a breeze getting there, but plan your trip carefully or stay closer by. I-70 has two major traffic chokepoints if you’re coming from the Front Range: crossing the divide at the tunnels and Vail Pass. Depending on traffic levels, regular slowdowns also occur around Floyd Hill and Idaho Springs. The worst traffic times from Dec-April are Friday afternoons and Sunday afternoons. You may arrive with no issues, but if you’re fighting traffic all the way back home, the enjoyment may get sucked out of your experience.
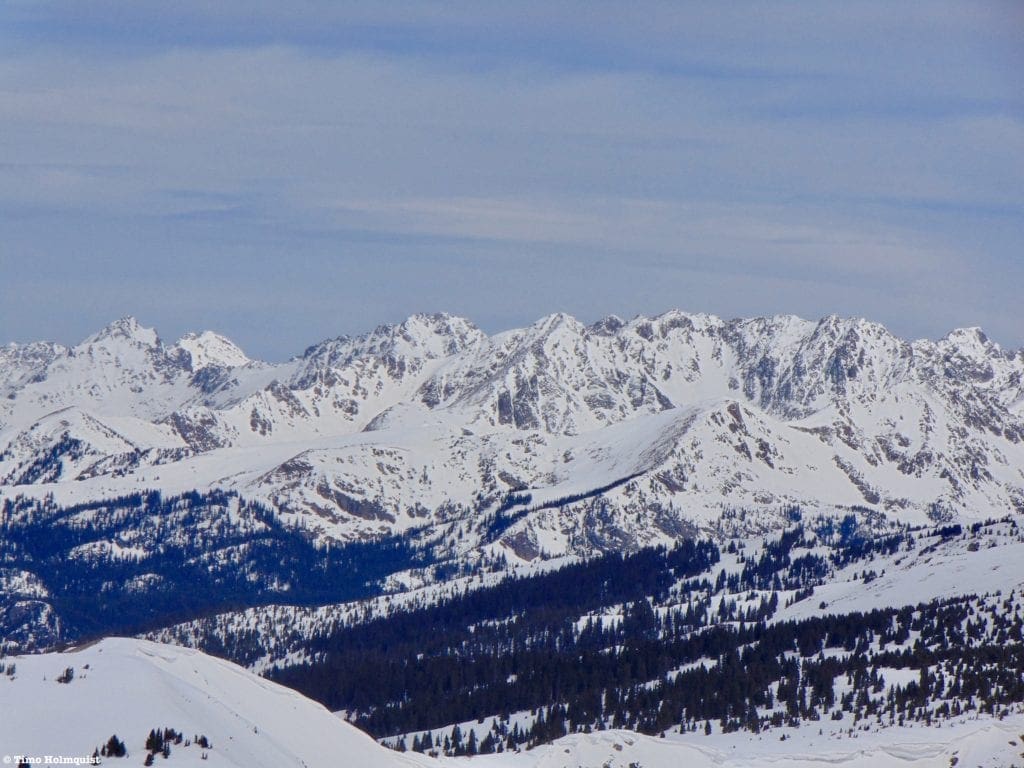
Looking to the Gore Range.
Mastering I-70 isn’t overly difficult, but it may take a little planning and some PTO. If you’re a weekend warrior, leave Friday morning or Thursday evening. Avoid Sunday afternoon by leaving earlier or on Monday. If you work remotely or have more flexibility, hitting Vail Pass on weekdays with a little fresh powder will really unlock the area. April and May are much better traffic-wise, but it can snow consistently through July. Check weather and traffic before going. If you’re in a hurry, pop over to Isvailpassopen.com, it’s a yes/no website, really simple.
Coming in from the west? While better, I-70 still has a few chokepoints to be aware of, including Glenwood Canyon and Dowd Junction (by the Minturn exit) that draw traffic and occasional accidents. Without traffic, the drive time from Grand Junction would be roughly two and a half hours.
Couloirs off of Uneva Peak.
No matter your origin, drive to Vail Pass and exit the highway, proceeding to the western side. The backcountry lot is along a frontage road next to the western offramp. If coming from the east, exit, cross the highway and take a right into the lot before the road curves around to the rest area. On busy weekends the lot is usually full by 10 am.
Parking will cost you during the winter. Part of Vail Pass’s popularity is that it’s plowed enough to guarantee winter recreation without charging a $200 lift ticket. Currently, it’ll run you $10, though this year (2021), they stopped the fee system after April 10th. Here’s the USFS page on Vail Pass and a Colorado Sun piece on how the area is managed.
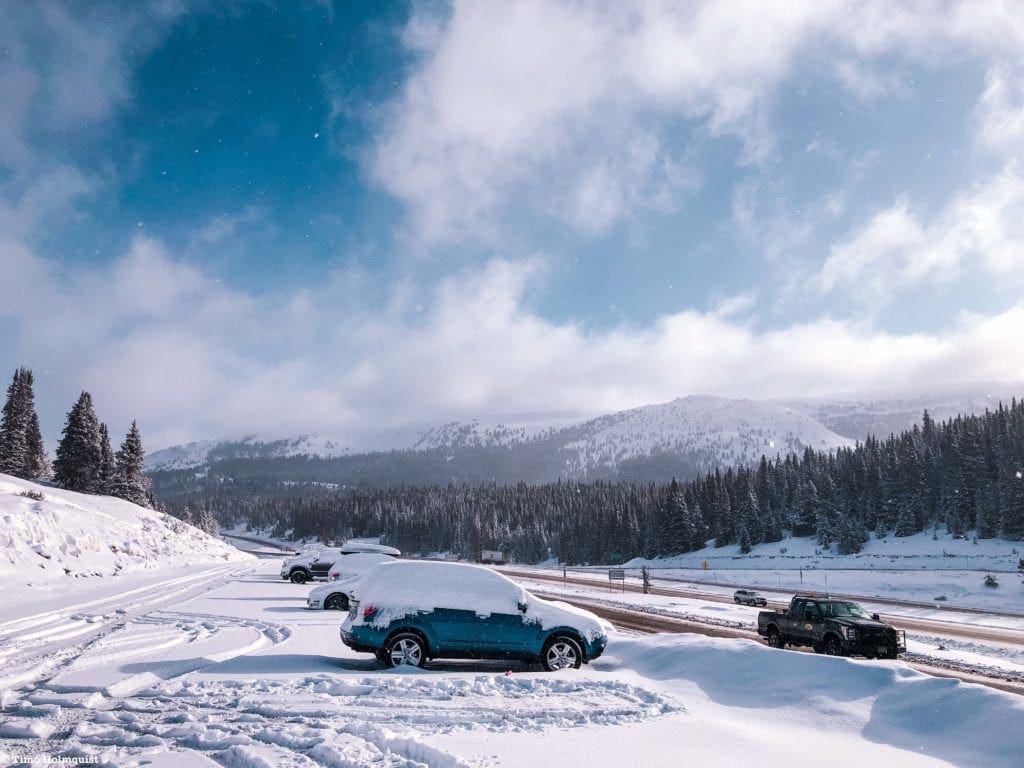
Vail Pass parking photo.
Places to Stay
Now that I’ve thoroughly vented about I-70, let’s talk about places to stay near Vail Pass. The town of Vail is always an option, and after the resort closes, you still have a month or two of skiing on the pass. The local government website can help you figure out things to do in town. Be aware, some of the restaurants close down for a month before opening for the summer crowd. Airbnb options are also nice. Further west, the towns of Minturn, Avon, and Edwards all have suitable accommodations. Edwards, the town farthest west from the pass that I’d consider staying in, is only half an hour away.
Many options exist in Summit County as well, including Frisco and Silverthorne. These towns are right in the thick of the mountains and usually draw descent crowds throughout the year but shave your drive time down to less than half an hour. Generally speaking, Frisco and Silverthorne may be cheaper than Vail.
There are also tons of national forest trails and trailheads that can support overnighters. According to the Forest Service, there is no overnight parking on Vail Pass itself, although I’ve seen evidence to the contrary. Please follow all recreation use area guidelines.
Skiing down some mellow glades in Vail Pass east.
Our Ratings
Below, you’ll find route descriptions, maps, and ratings as they pertain to the lines we cover. These articles cover some of the most reported and referenced lines, not all possible lines you could ski. We utilize a four-tier rating system illustrated as follows:
- Beginner (Green)
- Intermediate (Blue)
- Difficult (Maroon)
- Very Difficult (Black)
Some areas covered only exhibit a few tiers; others exhibit all of them. Regardless, it is important to understand that each rating does not ONLY correspond to the steepest slope angle skied. Some lower-angle Difficult terrain is simply difficult to access and requires an immense amount of effort to attain, hence the harder rating. Take the ratings seriously as the separation between Difficult and Very Difficult often involves many of the hallmarks of true ski mountaineering, ropes, legitimate ice axes, mountaineering crampons, etc. It is incumbent upon each reader to understand their limits. Always start small.
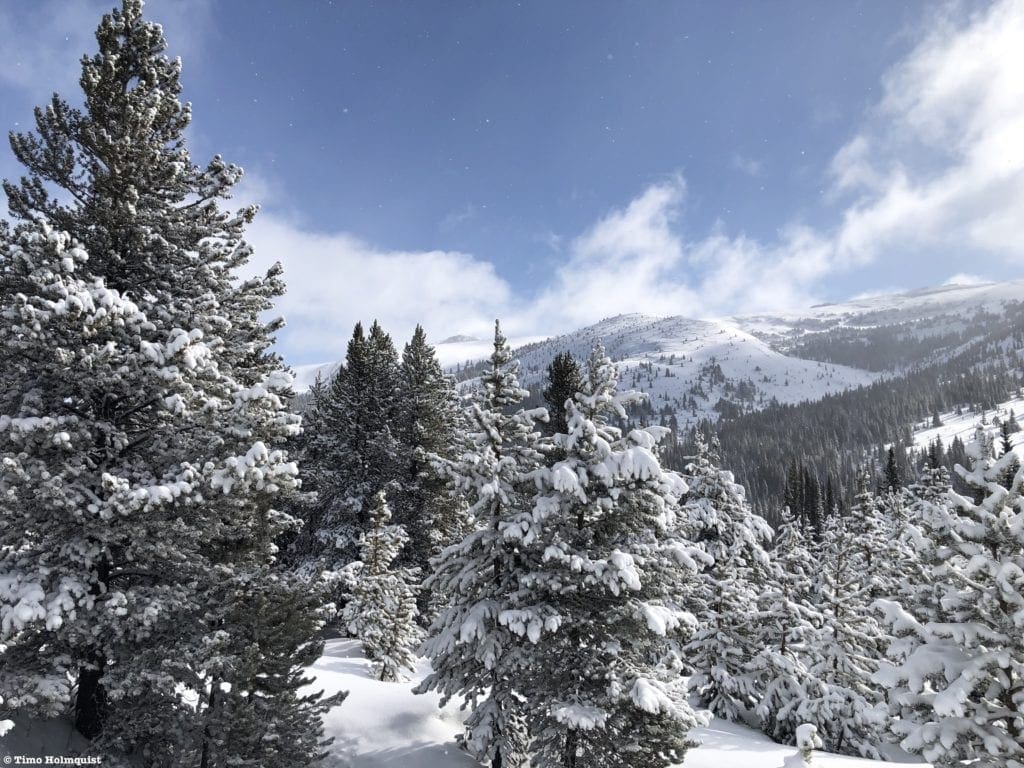
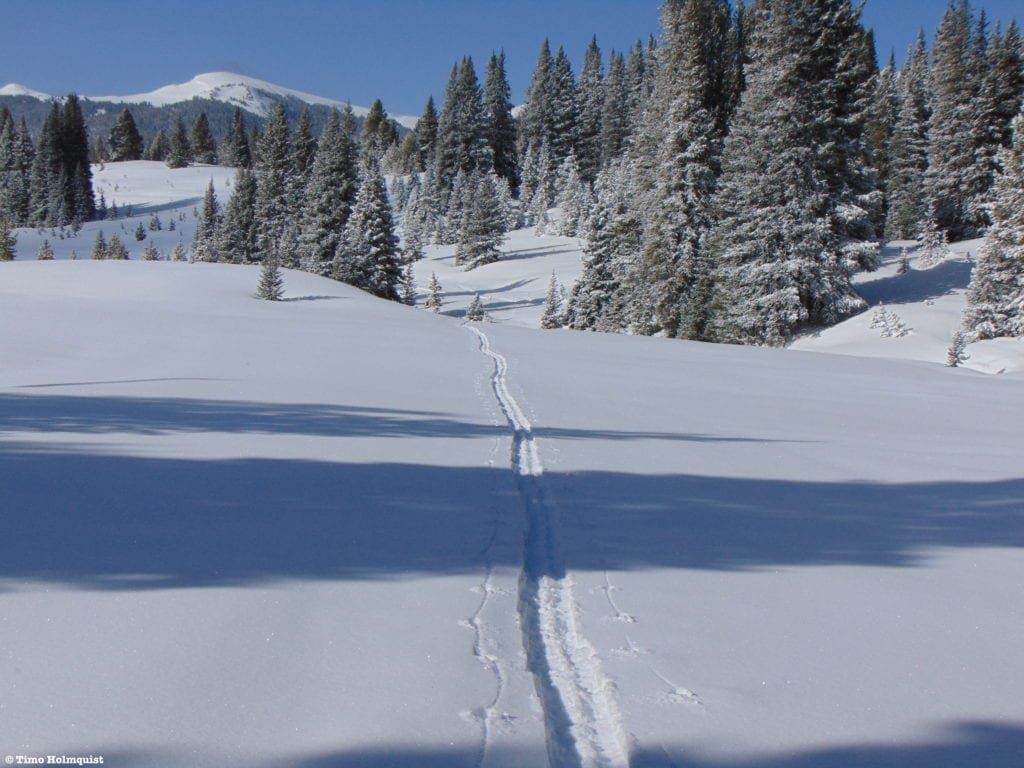
First Tracks in mid-April.
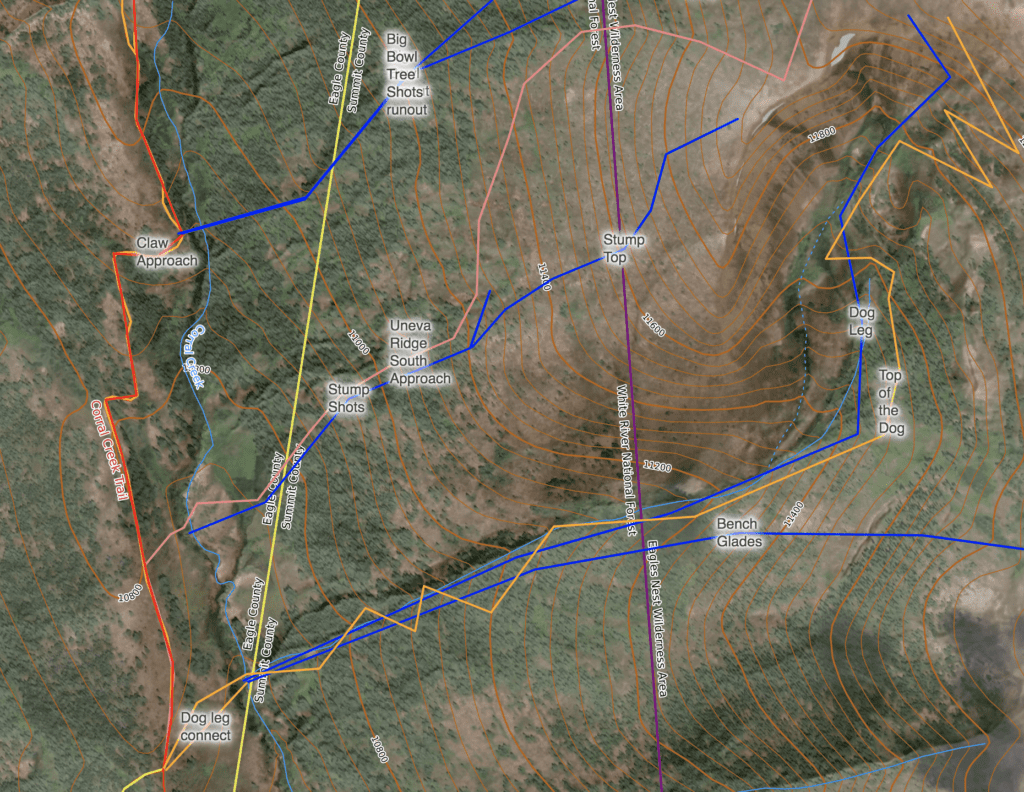
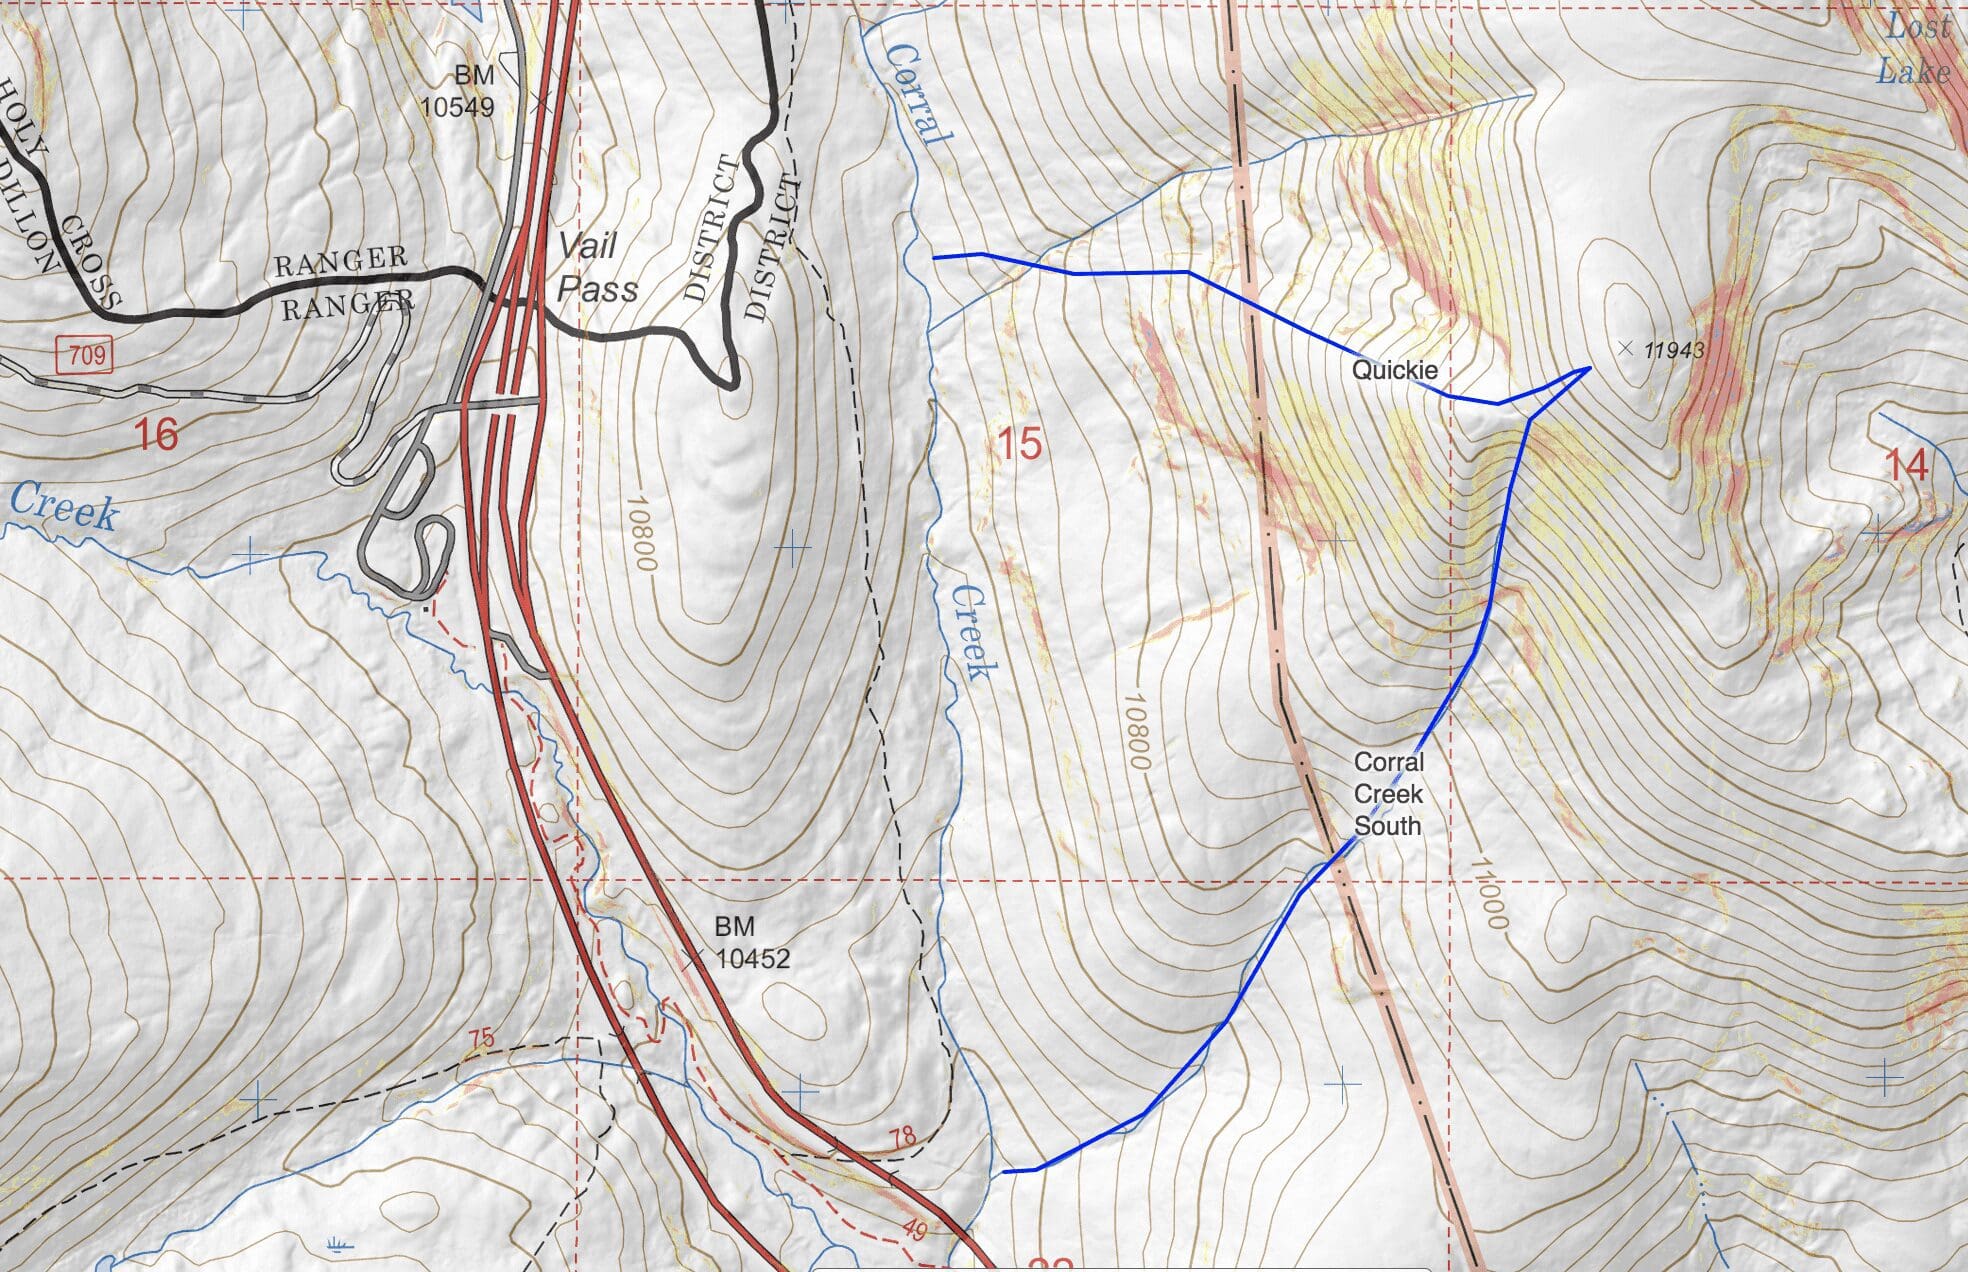
Vail Pass East Overview
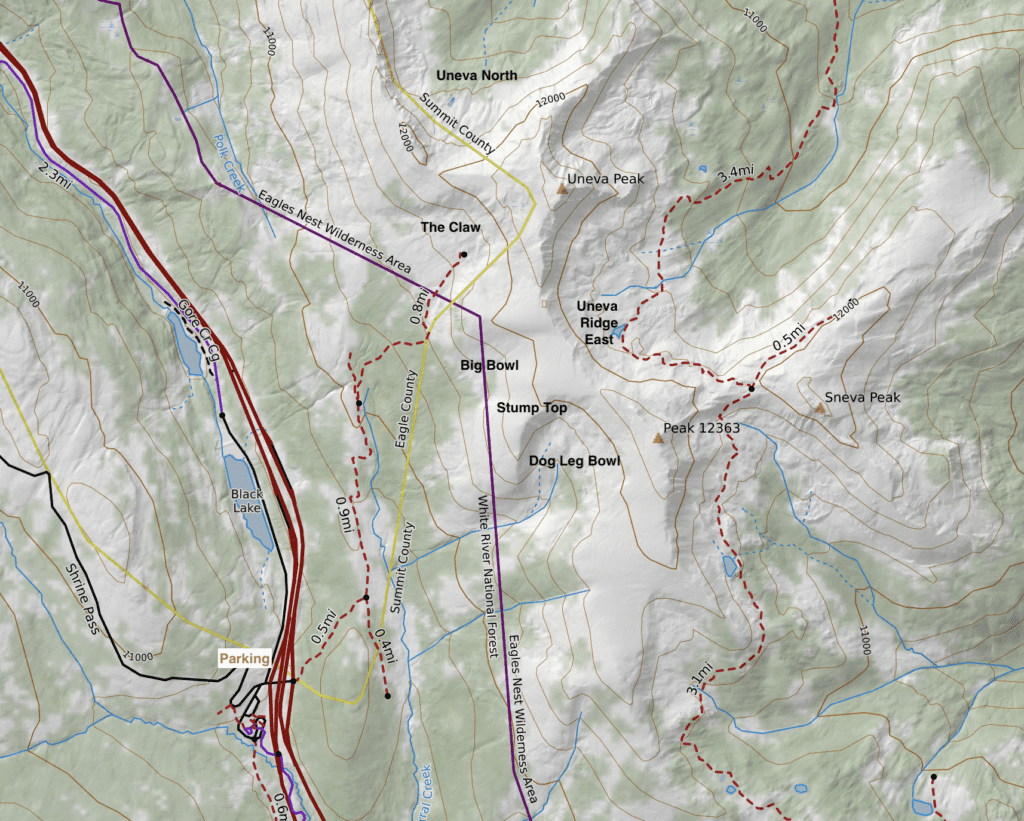
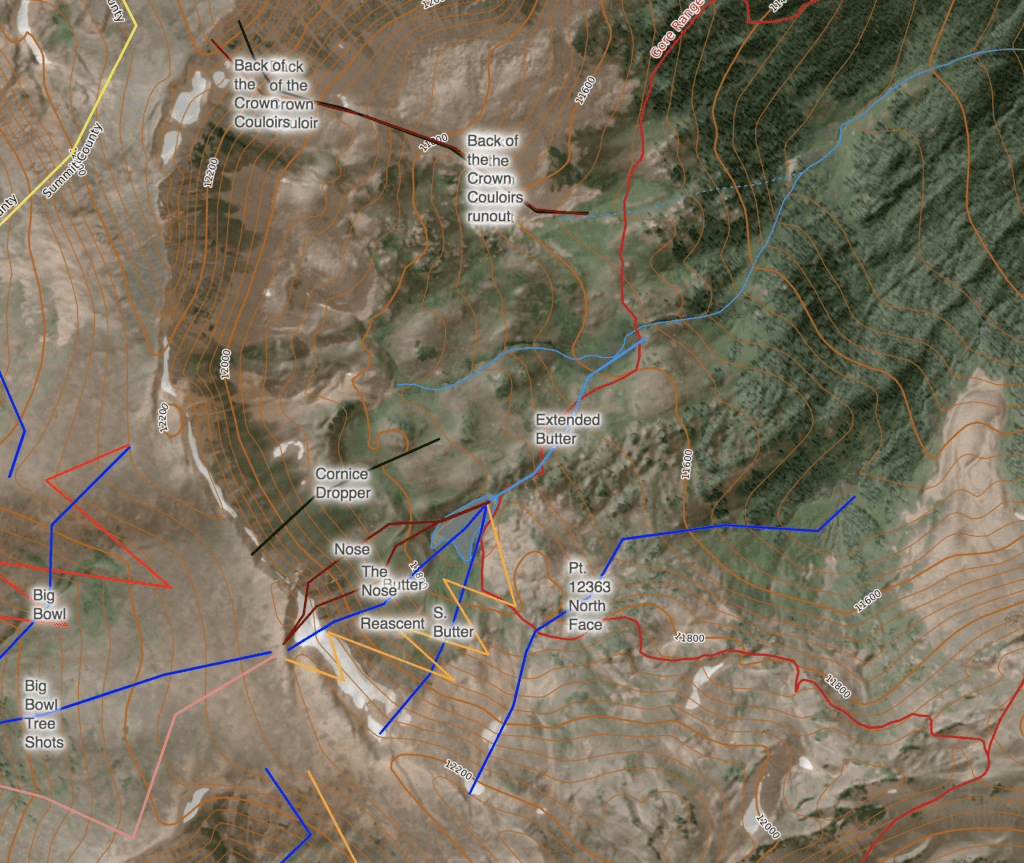
Overview Map
The Eastern side of Vail Pass is a fantastic place to ski. Much of the terrain is protected by the Eagles Nest Wilderness and therefore does not allow motorized traffic. The only way to get in there is to skin, cross country ski, or snowshoe.
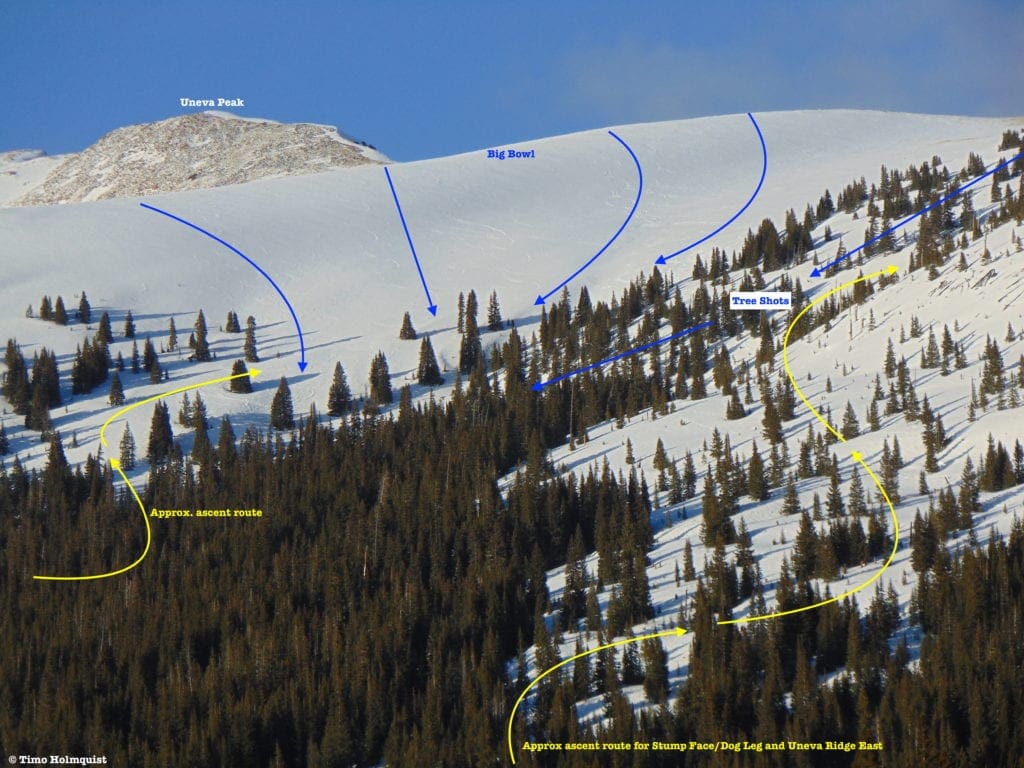
The terrain can be divided into a couple of generalized zones based on approach routes, although they all start from the same place. Geographically, there is a prominent north-south oriented ridge connecting the unnamed Point 12,363 to Uneva Peak and then continuing on to the central Gore Range; ski runs exist on both sides of this ridge. The closer side of the ridge to Vail Pass has three prominent bowls that can all be skied. The eastern side of the ridge has a few excellent routes but should be scouted thoroughly due to the seasonal presence of a long and dangerous cornice that forms along much of the ridgeline. For the dedicated, the north side of Uneva Peak has some lovely couloirs that descend towards the headwaters of the North Tenmile Creek. Options abound.
Vail Pass, despite its abundance of skiing, doesn’t offer too much in the way of names. Most winter attention is focused on the western side of the pass, where a 65,000-acre mixed-use recreation area, also called Vail Pass, exists. Comparably, the Eastern side often feels forgotten, but therein lies some of its undeniable charm. One of the bowls facing I-70 is known locally as The Claw (I’ve seen Lobster Claw as well), but for the rest, I tried to choose names that reflected either the area’s aspect, natural features, or geography. These are not official names, and if you know them by something else, keep on keeping on. The point of naming is to simply provide more information for prospective skiers because, despite its proximity to I-70, Vail Pass East is a large and complex area.
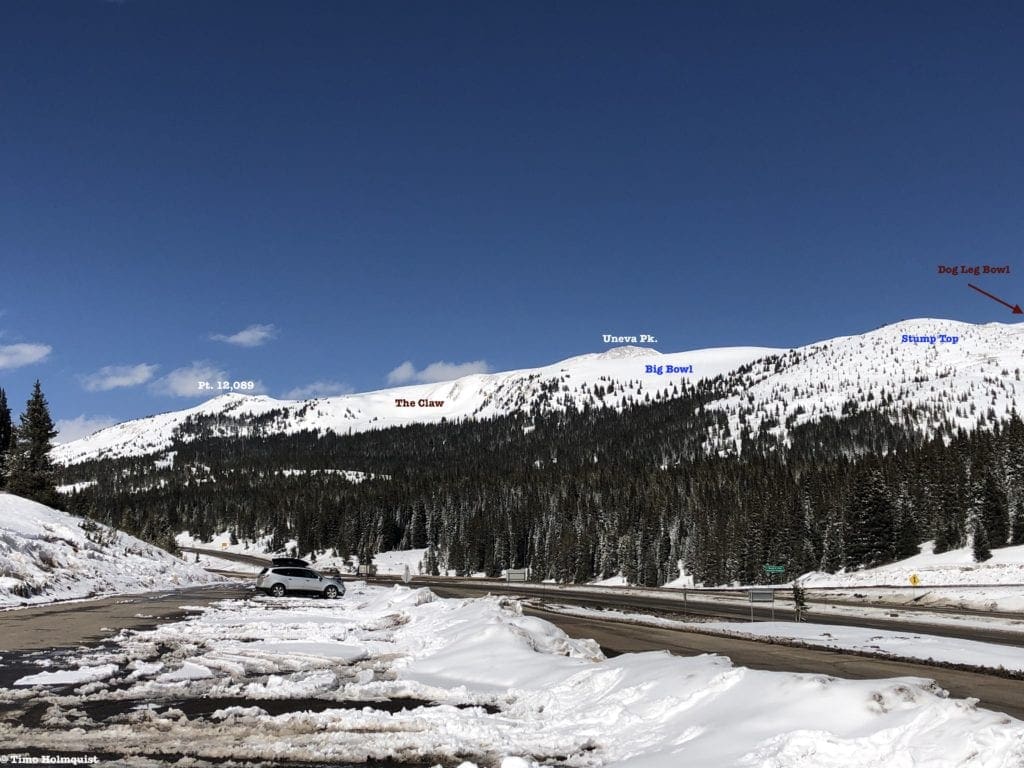
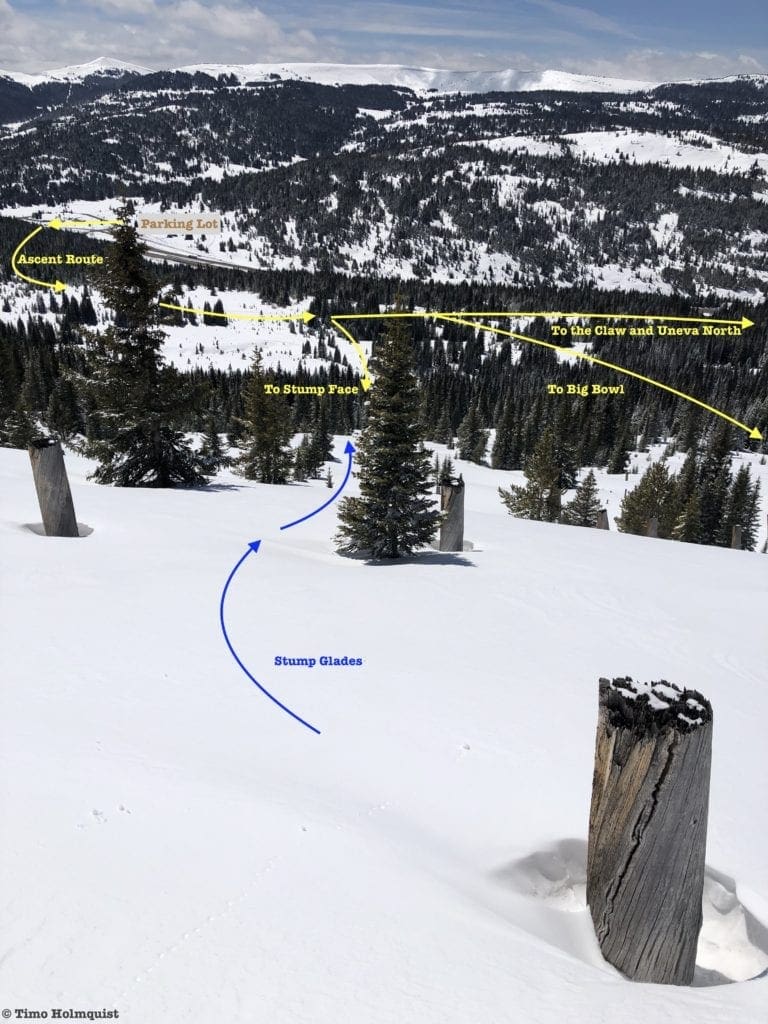
The view from the parking area reveals a lot of skiing potential. From left to right: The Claw, Big Bowl, Stump Top.
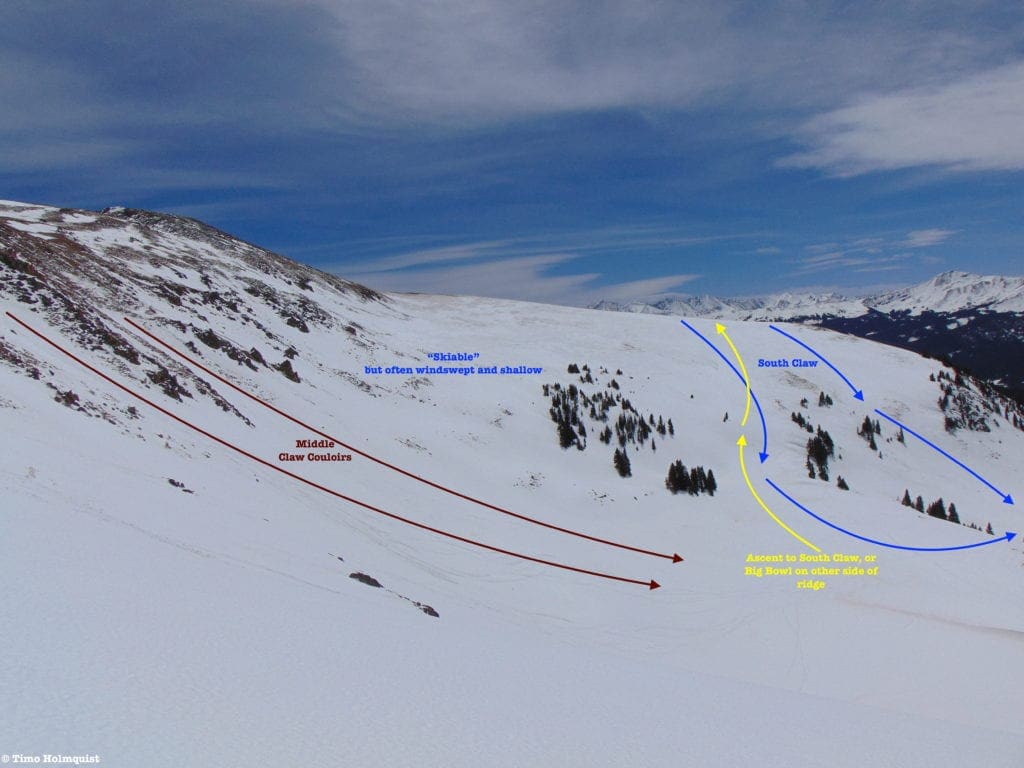
Vail Pass: The Claw
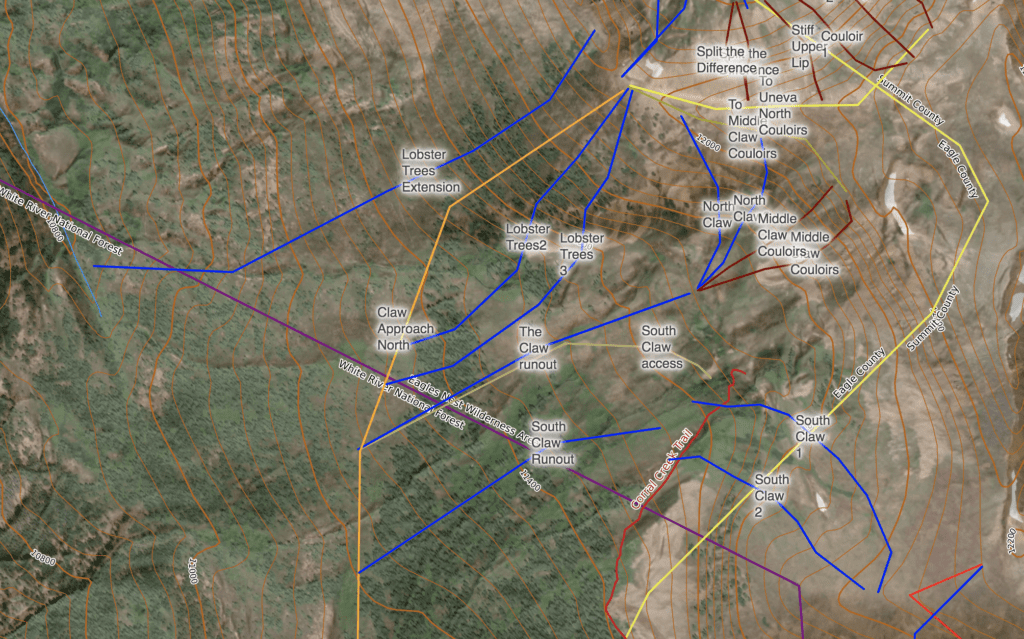
Map of The Claw/Uneva North.
From the parking lot, you’ll need to carry your skis across the bridge over the highway. On the opposite side, and behind the large berm that forms from repetitive snowplowing, should be a USFS trail sign with many stickers on it. If the sign is buried, follow what’s sure to be myriad skin tracks leading up and to the left (north). There are blue diamonds that lead the way, although the spacing between them is large. In general, perform an ascending traverse north around the treed lump of land that greets you from the side of the highway.

Blue Diamond signs.
Once you make it around the lump, you’ll descend slightly to Corral Creek, a beautiful area with large fields interspersed by some pine tree clumps. Start getting oriented here. To your East is a large mountain face, pot marked by fallen and cut trees (Stump Top). To its right is the Dog Leg Bowl, and to its left, you’ll be looking at Big Bowl. To the left of Big Bowl is an additional bowl known as The Claw. That’s your target.
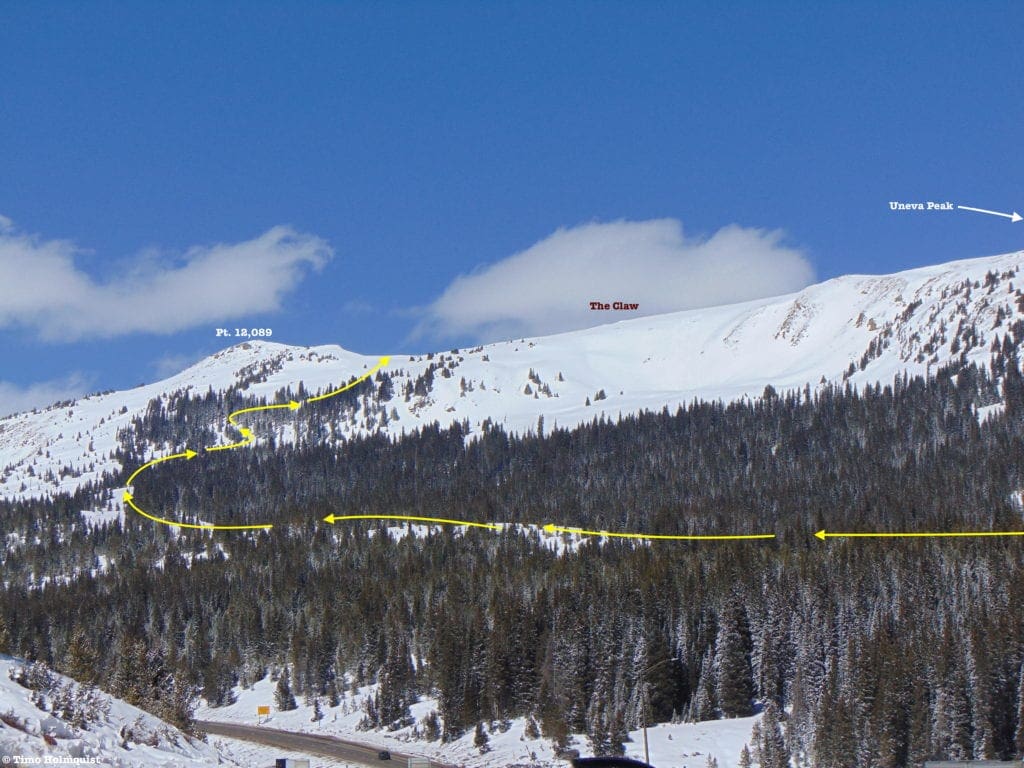
Ascent lines to the Claw.
While the Claw is the farthest north of the three main bowls, it may be the most skied because the winter trail funnels most skiers to the base of the bowl with little effort. Keep to the left side of Corral Creek and follow the Blue Diamonds north. The Diamonds do eventually disappear, don’t panic, keep skinning until you draw even with the Claw to your right. Instead of heading into the bowl, continue to the trees just west of the main open areas. Though it appears steep, this area has a great set of elevation gradients for easy switchbacks, and the trees help shield you on particularly windy days. Once you clear treeline, make for the ridge and ascend as high as you’d like before turning south and skiing into the Claw. There are a few reliable variations, and if you continue to skin up the south side of the Claw, you can either drop back into the bowl or pop over the other side to access Big Bowl.
- Stats to Saddle: ~2.5 miles, ~1477ft. of elevation gain.
- Stats to top of Middle Claw Couloirs: 2.78 miles, ~1675 ft. of elevation gain
- Stats to bottom of South Claw: 2.39 miles, ~1150 ft. of elevation gain
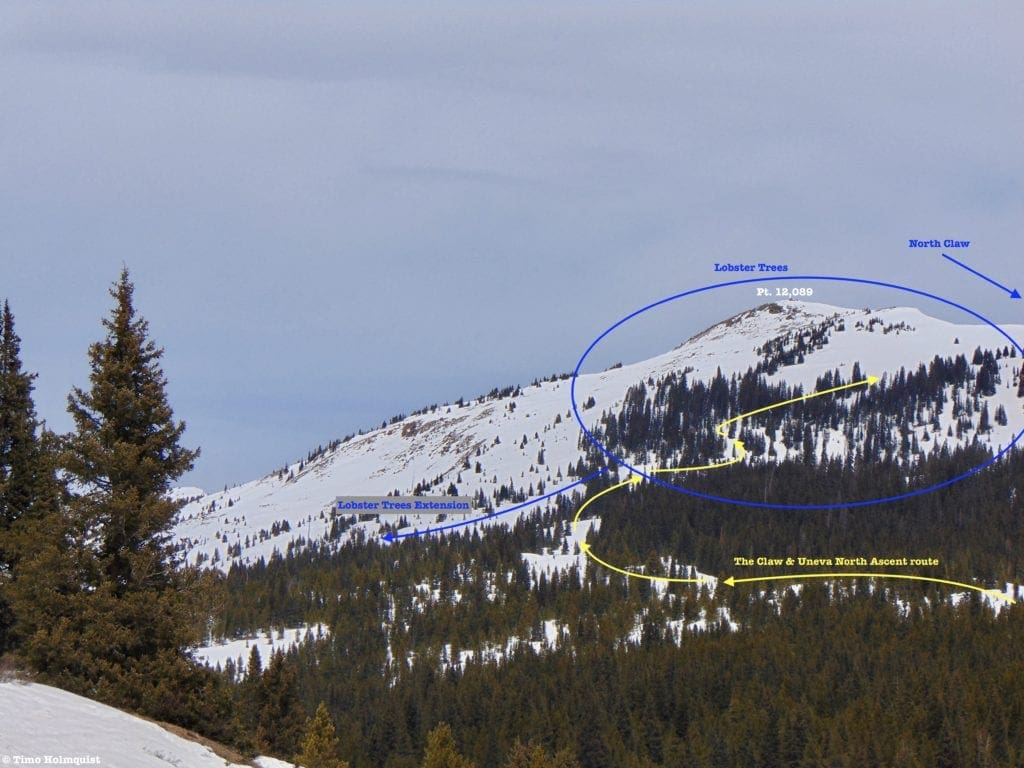
Photo of the Lobster Trees.
- Lobster Trees: The Claw
- Essentials: 0.4-0.47 miles, ~650-680 foot vertical
- Status: Intermediate
- Steepest slope angle: 35 degrees (brief)
- Good for: Moderate tree skiing with well-spaced trees and oscillating meadows. The easiest first run is to retrace your ascent route. Once you’re comfortable with the area, there are two gullies beneath the saddle connecting Pt. 12089 and Uneva Pk. Stay within clearly visible geographic features. There are a few small cliffs between the gullies which will push the difficulty limit to beyond comfortable. At the bottom, follow your ascent route out, or reclimb the ridge for more lapable fun.
- Accessed Via: Claw approach route. Ascend to the saddle just south of Point 12,089, turn around and thread your way through the trees, making sure to stay within gullies or retracing your ascent route.
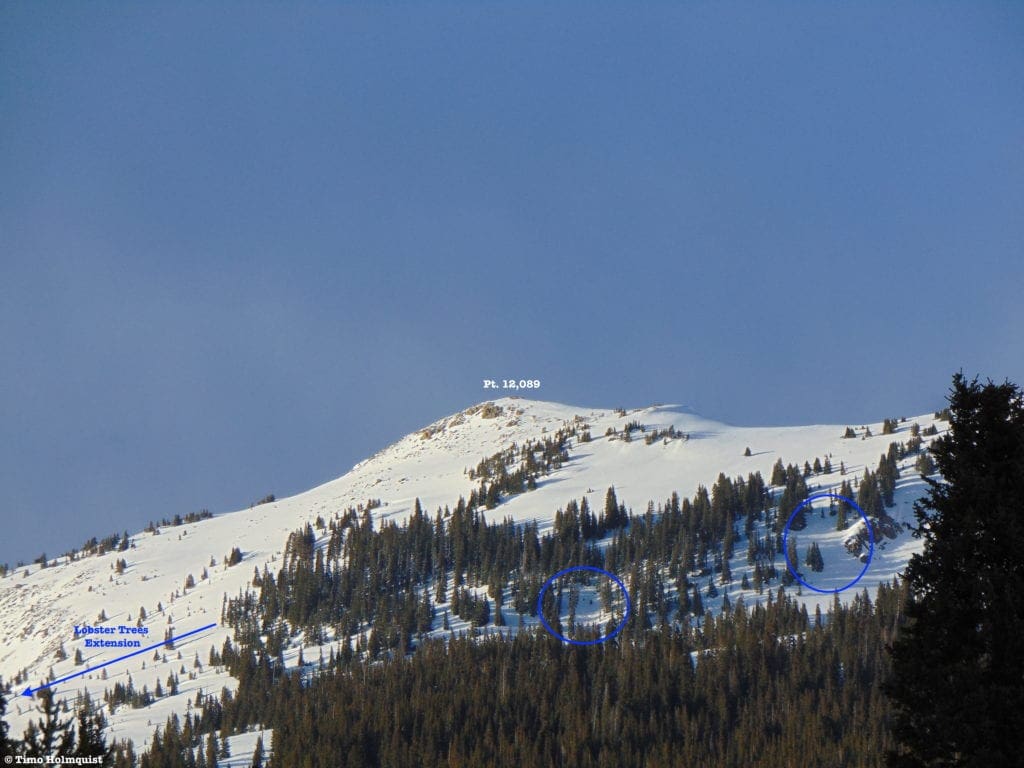
Lobster Trees with gully options circled.
- Lobster Trees Extension: Intermediate. This line starts from near the summit of Point 12,089 and points west-southwest. Moderate skiing with trees and open areas (watch for shallow-windswept areas), will take you below your ascent route. When you reach Polk Creek drainage and the treed slope in front of you, turn around and ascend back up the ridge, exiting via the Claw approach route.
- At a Glance: 0.65 miles, ~1200 feet.
- Steepest Slope Angle: 31 degrees
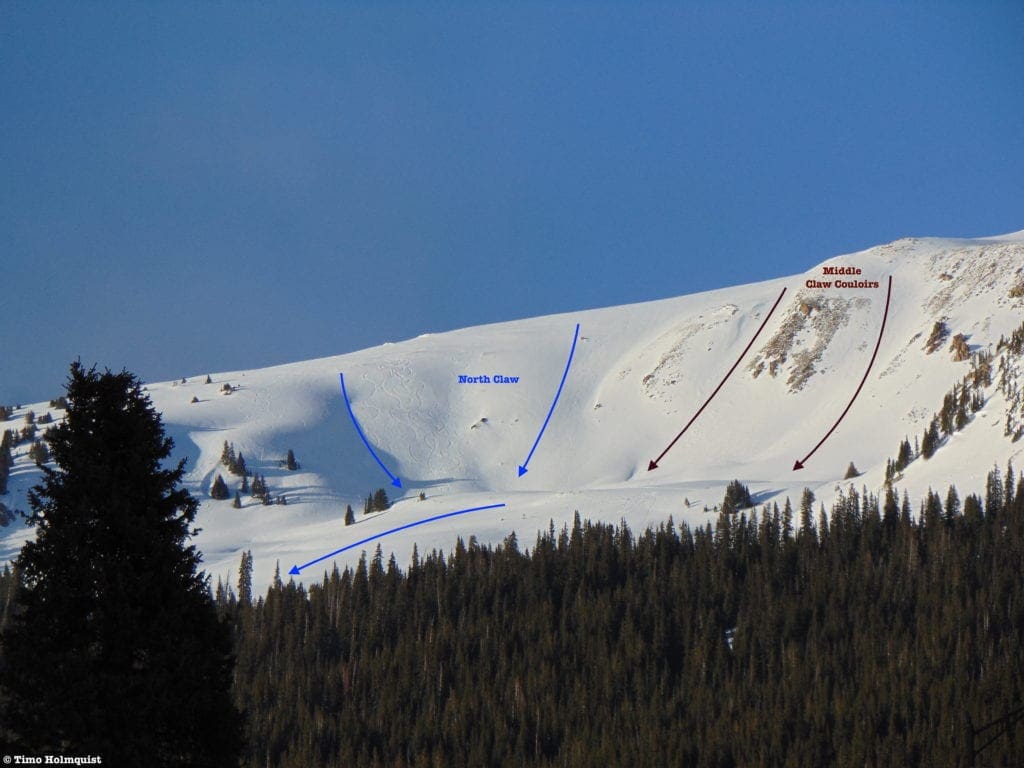
Photo of North Claw and Middle Claw Couloirs.
- North Claw: The Claw
- Essentials: ~0.2 miles, ~300-360 foot vertical (0.6 miles and ~740-800 foot vertical when combined with Claw runout to original ascent line)
- Status: Intermediate
- Steepest slope angle: 30-35 degrees (brief)
- Good for: Reliable snowpack and first forays into the area. While short, North Claw provides a great, easy to reach area of lapable bowl skiing with beautiful views. Perfect for warming up the legs and getting comfortable with the surrounding terrain. Slide risk mid-winter.
- Accessed Via: Claw approach route, ascend to the saddle just south of Point 12,089. Continue up the ridge for another 3-5 minutes, then bear east-southeast (right) until reaching an obvious change in slope angle, clip in and descend.
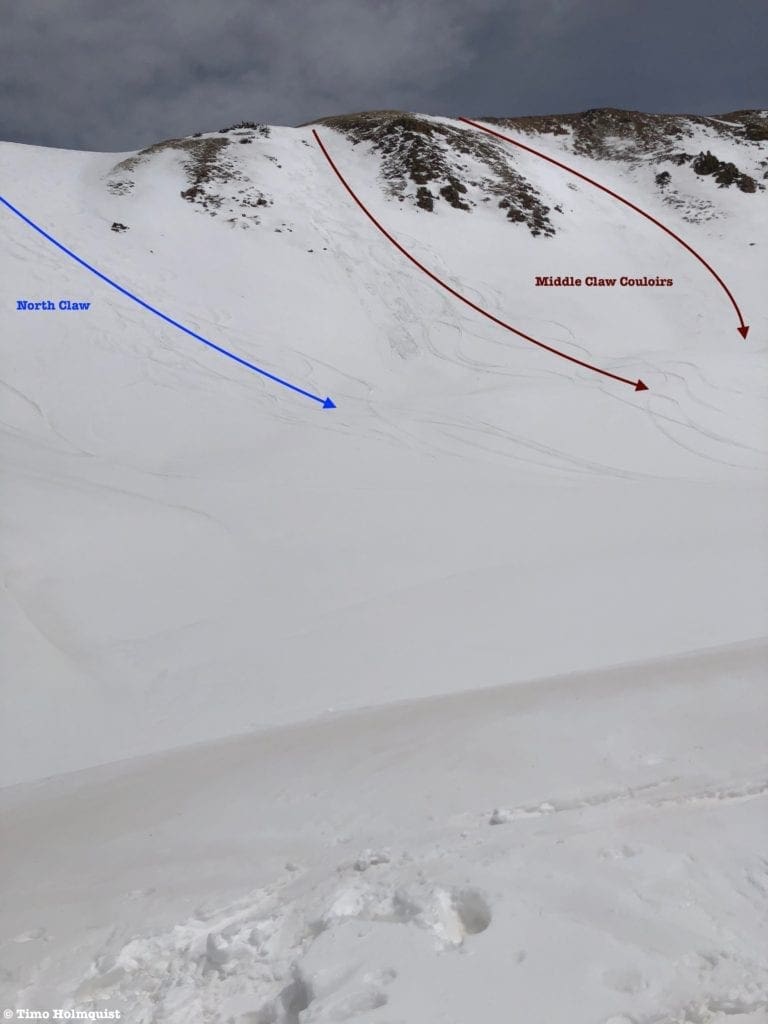
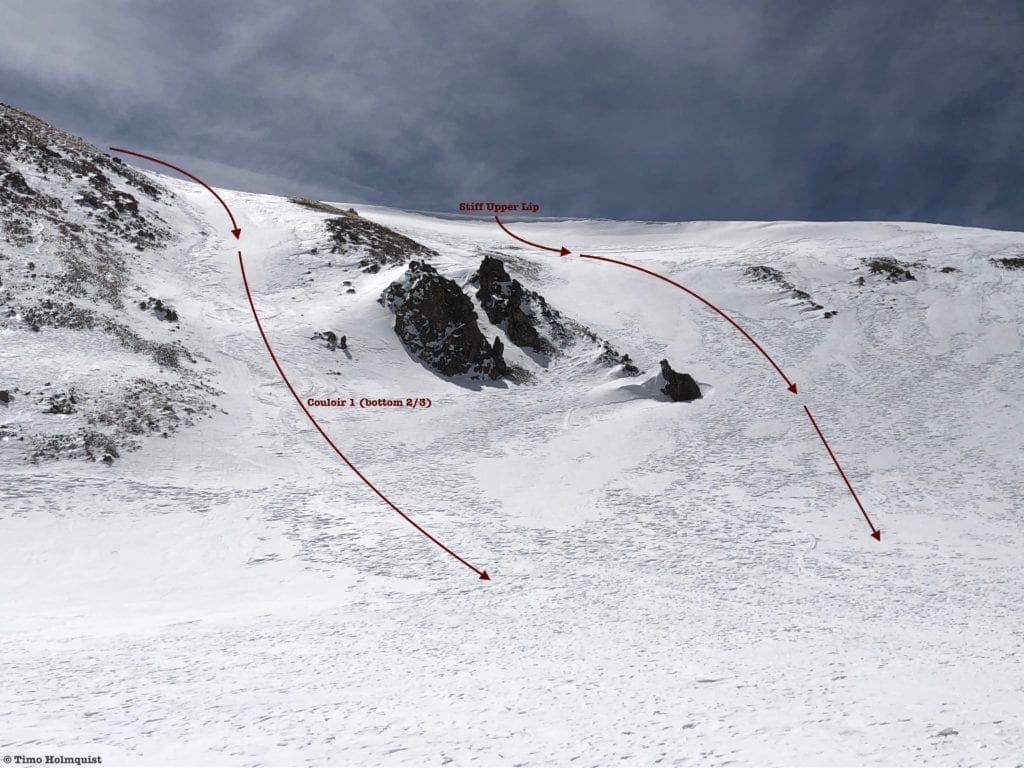
Both couloirs from the bottom of the Claw.
- Middle Claw Couloirs: The Claw
- Essentials: ~0.2 miles, ~300-450 foot vertical (0.6 miles and 740-890 foot vertical when combined with Claw Runout to original ascent line)
- Status: Difficult
- Steepest slope angle: 39 degrees
- Good for: A step up in difficulty after North Claw. Although still short, these couloirs are steeper with elevated wet avalanche risk in spring and rockfall potential. Both couloirs are on the low end of the difficult scale due to the lack of obstacles and short length. Exercise backcountry caution and evaluate conditions before committing. Not for beginners.
- Accessed via: Claw approach route, ascend to the saddle just south of Point 12,089. Continue ascending up the ridge, bearing east-southeast, and passing the start of the North Claw options. The closest couloir to your ascent route is shallow and has a darker line of rocks on its southern edge. To get to the farther couloir, you have to either climb over or traverse across the darker rock line.
South Claw photo.
- South Claw: The Claw
- Essentials: ~0.27-0.35 miles, ~400-450 foot vertical (0.66-0.74 miles and 762-812 foot vertical when combined with South Claw Runout to original ascent line)
- Status: Intermediate
- Steepest slope angle: 35 degrees (brief)
- Good for: Another set of great introduction runs for the hesitant. This aspect of the Claw is often overlooked because it’s usually utilized as a quick access skin between the Claw and Big Bowl. Obstacles are minimal to non-existent if you stick to the lower part of the ridge and descend between small clumps of pine trees. Between South Claw and Middle Claw is a large area that could be skiable after a large dump of snow, but once spring weather kicks in, is likely to be shallow, rocky, and windswept.
- Accessed via: Claw approach. ~2 miles from your car, look to the right and identify the head of the Claw Bowl with the Middle Claw Couloirs. Angle an approach to the northwest into the base of the bowl before reaching the Lobster Trees (if you ascend to the bottom of the Lobster Trees, you can always peel south before ascending into them, crossing the open bowl to your desired line). This ascent can also be simplified if you ski North Claw down to a flat, open bench in the middle of the bowl, slap on your skins, and climb directly south to the opposite side.
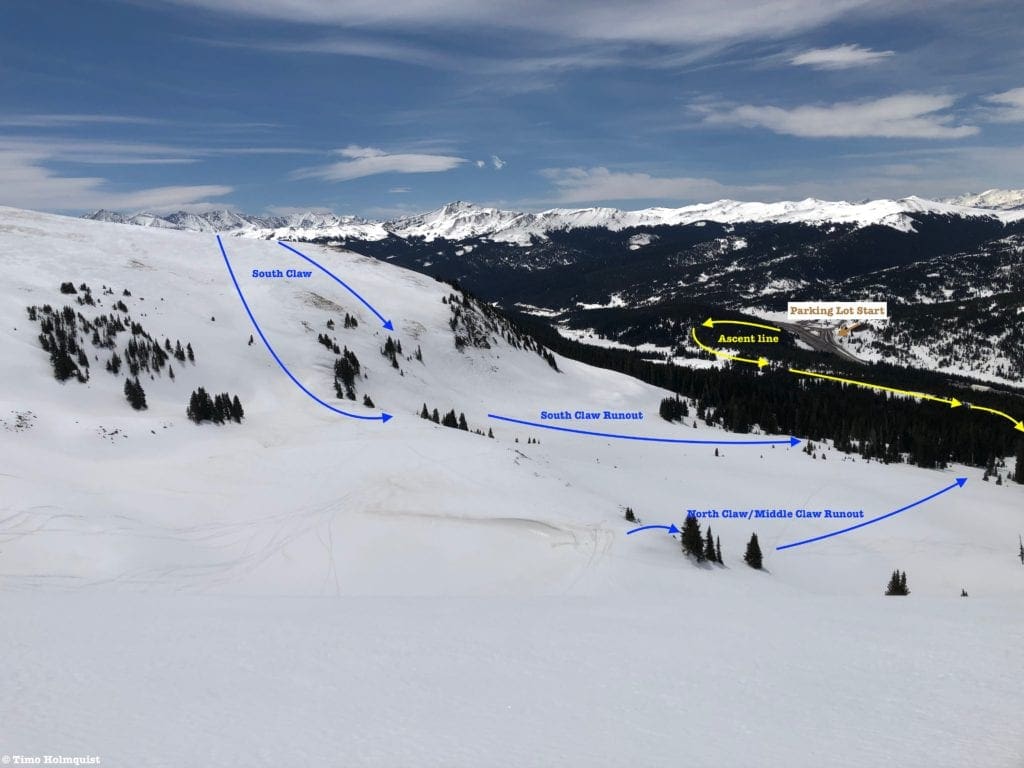
Claw Runout and Parking Lot Start from North Claw.
Uneva North
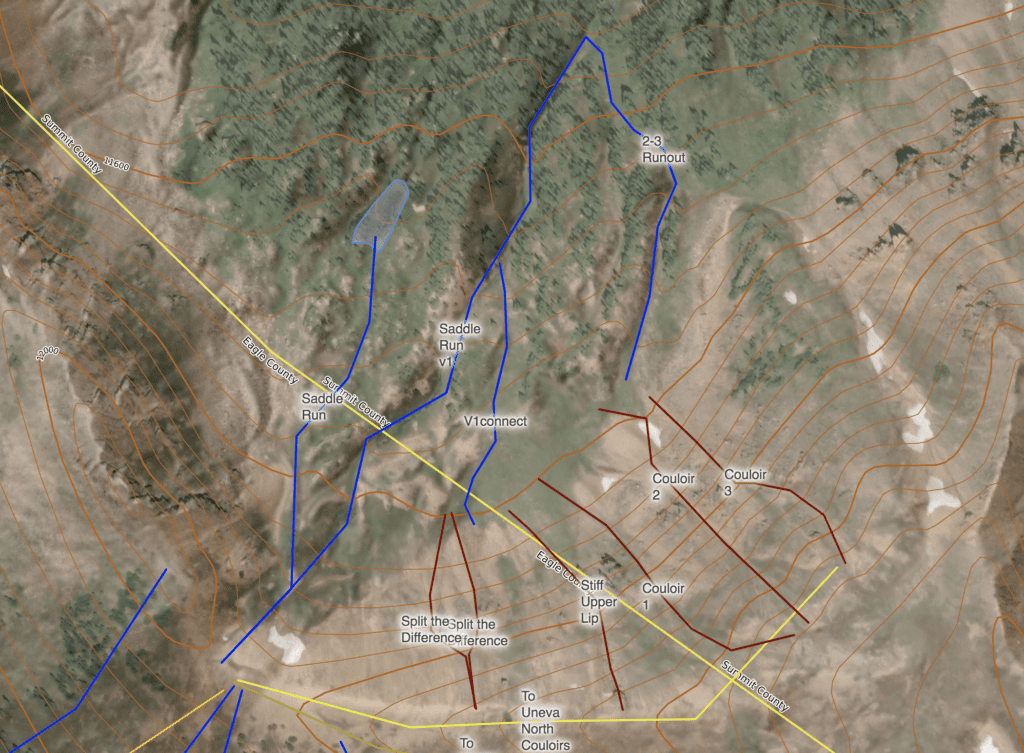
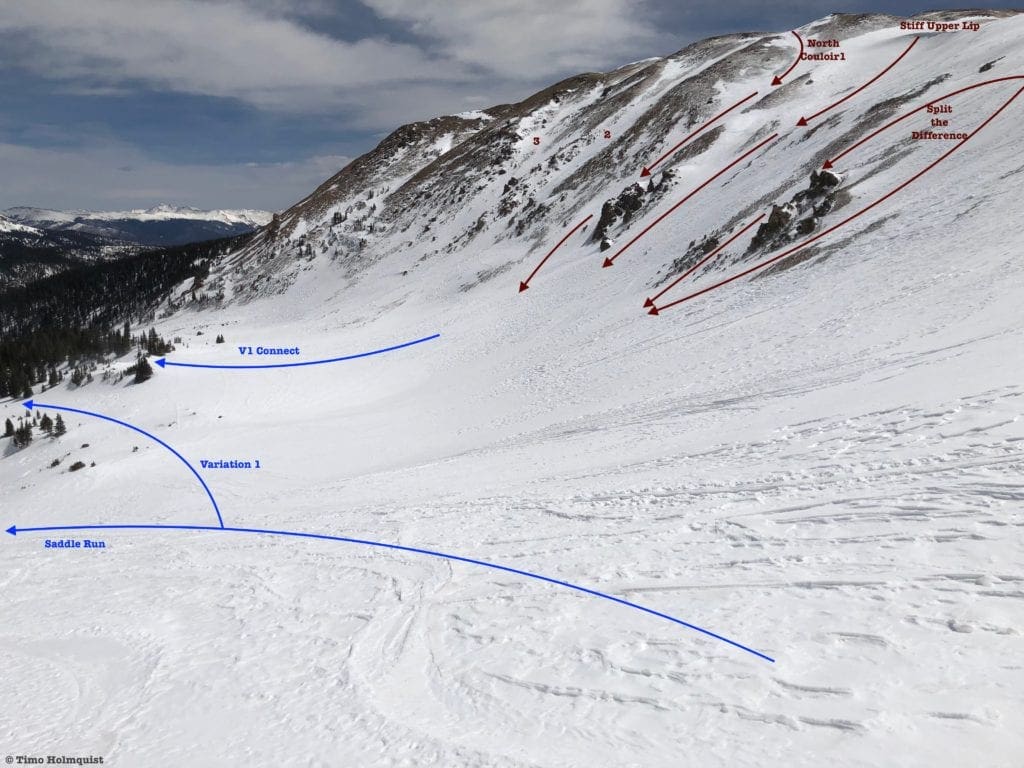
Uneva North Map
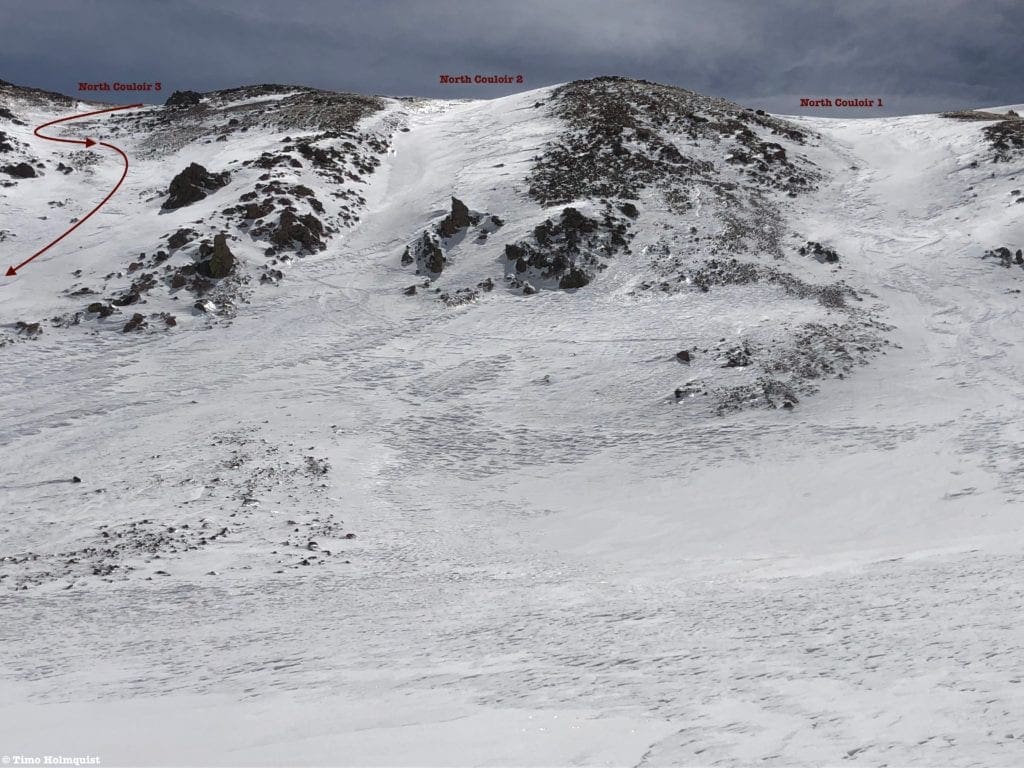
Not ready to leave the area yet? On your ascent route to North Claw, once you break out of the Lobster Trees, ascend to the saddle south of Point 12,089. From there, you can drop into the massive and impressive North Tenmile Drainage or continue up the ridge to the lumbering bulk of Uneva Pk. You won’t need to make it to the summit block, just far enough to clear the Eastern headwall of the Claw. There are a series of 3 couloirs, a mini cornice section, and a wider slope (all running north) that can be skied. These lines are steeper than the Claw, hold sizable slide potential after storms, and all head into the Eagles Nest Wilderness. You will need to climb back out of the drainage to ski back to your car.
North Uneva Couloirs from the ridge behind the Claw.
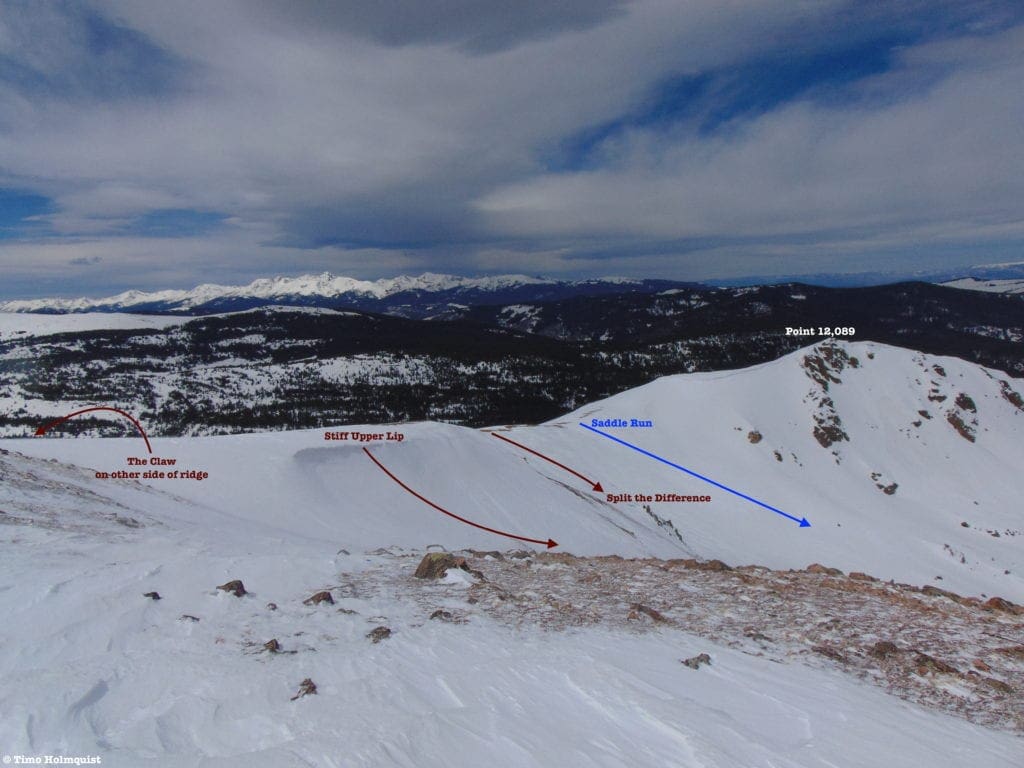
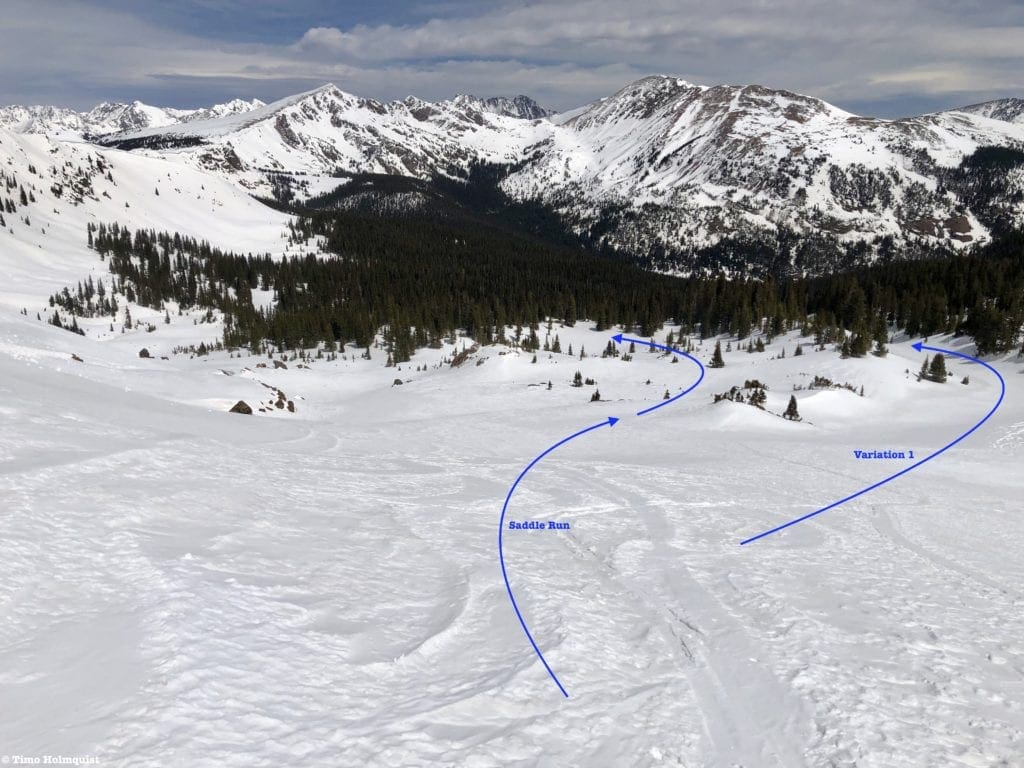
Access to these Uneva North runs depends on how far up the ridge you’re willing to walk. The Saddle is easiest to reach and easiest to ski. The next run up the ridge is Split the Difference, a wide slope that forces you to negotiate left or right around a prominent rock cluster. East of that is Stiff Upper Lip, which sports a small top cornice you’ll have to negotiate. The last three options are shallow, steep couloirs that drop to a snowy bench just above treeline. For simplicity, I’ve just numbered them, with North Couloir 1 being the first reached and North Couloir 3 being the closest to Uneva’s summit. If you maintain enough speed through the bench, you can continue skiing down into the trees below.
- Stats to Saddle: ~2.5 miles, ~1477ft. of elevation gain.
- Stats to top of Uneva North Couloir 3: 2.87 miles, ~1768 ft. of elevation gain
Looking back to Point 12,089 from half way up the ridge. Mount of the Holy Cross is the tallest mountain in the far background.
- Saddle Run: Uneva North
- Essentials: ~0.27 miles, ~360 foot vertical
- Status: Intermediate (part of this route passes near the lower reaches of an avalanche-prone slope on the eastern side of point 12,089, exercise appropriate caution, bring avalanche gear and a friend)
- Steepest slope angle: 25 degrees
- Good for: Best introduction to Uneva North. This pleasant, wide slope gives you consistently snowy turns, all while viewing the wild and wonderful North Tenmile Creek Drainage. As an added bonus, you stay above treeline the entire time, limiting navigation difficulties. Watch slide activity carefully on powder days, and also on warmer afternoons in late spring when collapsing cornices can impact the route.
- Accessed via: North Claw approach route to the saddle just south of point 12,089. Turn your skis north, clip in and descend the wide-open slope, staying slightly left, and chasing the alpine until tree cover increases. Turn and re-ascend to the saddle.
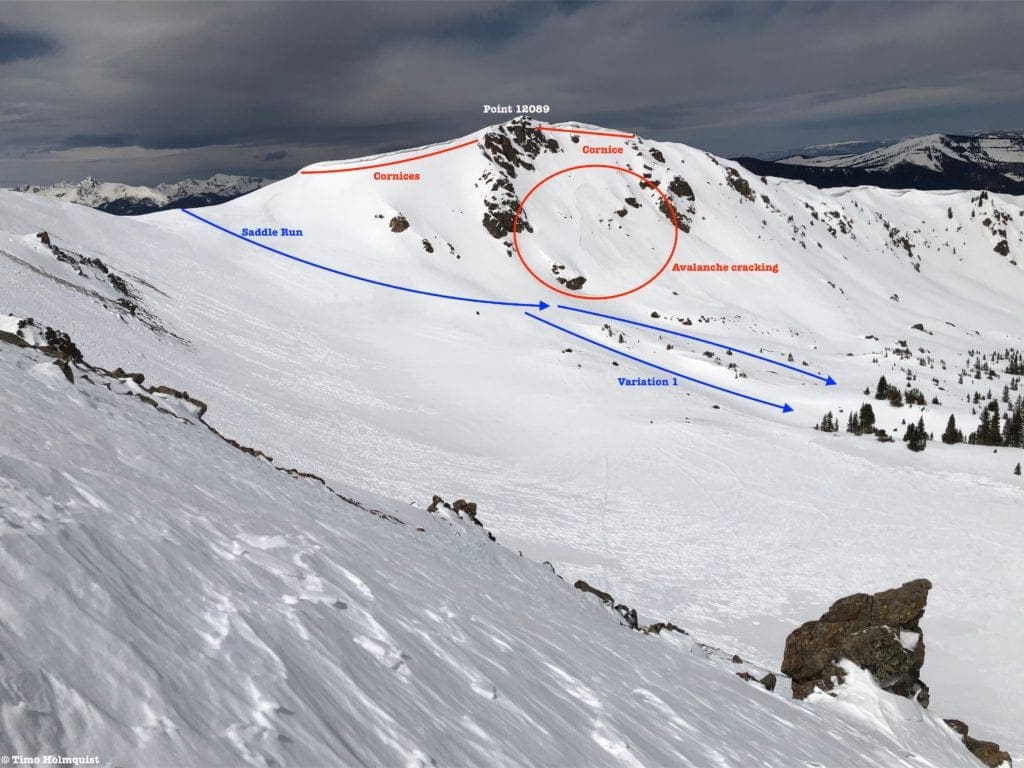
Saddle Run & variation from halfway down North Couloir 2. Notice the pronounced cornices on point 12,089 and the recent avalanche activity below them.
- Variation 1: Intermediate. This variation increases the overall length of the Saddle Run but leads into a funnel that will descend below treeline. While not a difficult ski, with trees present, risk factors increase, including descending farther than you may want, possibly leading to a difficult re-ascent to the saddle. Only ski as far as you’re willing to climb back up.
- At a Glance: 0.42 miles, ~465 foot vertical
- Steepest Slope: 31 degrees
Looking down to the run potential deeper into North Tenmile. Additional variations exist, but slide risk from above increases the closer you ski to the base of point 12,089.
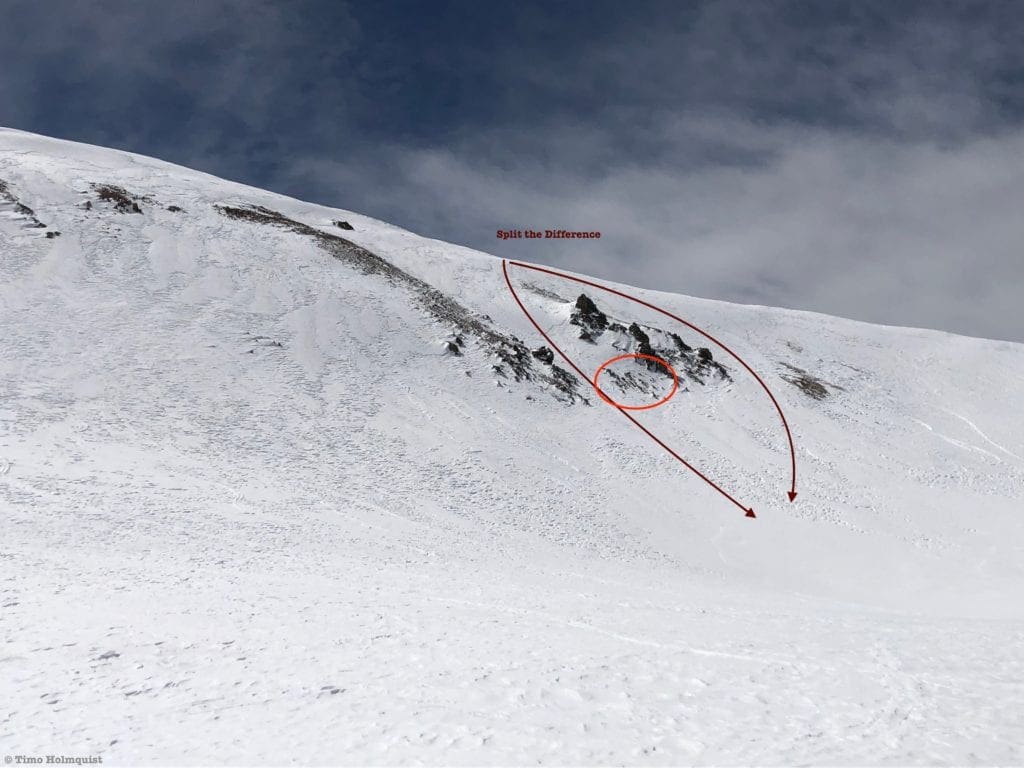
- Split the Difference: Uneva North
- Essentials: ~0.1 miles, ~300 foot vertical (0.27 miles, ~452 foot vertical when combined with V1 connect)
- Status: Difficult
- Steepest slope angle: 33-37 degrees (brief)
- Good for: A second or third helping near the saddle. Like the Middle Claw couloirs, Split the Difference is on the low end of the difficult scale. However, terrain obstacles increase, especially when traversing on either side of the rock cluster that splits the route. Later in the season, you may be threading a very narrow strip of snow before reaching the wide bench below. Skiers left is more mellow than skiers right. If descending skiers right, keep a sharp eye open for wind-revealed rocks near the bottom of the grouping. Preferable after a decent snow or a few days after.
- Accessed via: North Claw approach route to the saddle just south of point 12,089. Climb up the ridge towards Uneva, eyeing the obvious dark rock grouping closest to you; that’s the difference, split it.
Split the Difference from the bench below the North Couloir Runouts.
- Stiff Upper Lip: Uneva North
- Essentials: ~0.13 miles, ~380 foot vertical (0.28 miles and ~520 foot vertical when combined with V1 connect)
- Status: Difficult (Cornice danger, thoroughly check stability before jumping. Can ski on either side as well).
- Steepest slope angle: 40 degrees (brief, by the cornice. The rest is ~35 degrees)
- Good for: A little taste of flight. Not for beginners or intermediate skiers. Stiff Upper Lip sports a small cornice that can be jumped in good conditions and leads into a nice mid-30-degree slope down to the bench below. If you don’t have experience checking snowpack stability, forgo the cornice and slide down on either side. Once below, stay to skiers right, matching a windswept ridge with another dark rock cluster towards the bottom that separates this line from North Couloir 1.
- Accessed via: North Claw approach route to the saddle just south of point 12,089. Climb up the ridge towards Uneva, passing Split the Difference and sighting the small but prominent Cornice just below the ridgeline. That’s your line. If hesitant, you can drop down on either side.
Stiff Upper Lip and North Couloir 1 from the bottom.
- Couloir 1: Uneva North
- Essentials: ~0.18 miles, ~480 foot vertical (0.38 miles and ~700 foot vertical when combined with V1 connect)
- Status: Difficult
- Steepest slope angle: 38 Degrees (sustained in the lower portion)
- Good for: Longer, pleasant couloir descent with enough snow to last into late spring. NOT for beginners or intermediate skiers. The top strip may melt out first.
- Accessed via: North Claw approach route to the saddle just south of Point 12,089. Climb up the ridge toward Uneva, passing Split the Difference and the obvious cornice on Stiff Upper Lip. A windswept knoll will become apparent past Stiff Upper Lip. Ascend to the right of the knoll and wrap around the backside of it until you’re facing west again and can see the Stiff Upper Lip Cornice. Start skiing towards the cornice until the couloir makes a right-hand turn (north) and steepens. Of the three Couloirs on Uneva’s North Ridge, 1 & 2 hold snow the longest.
Uneva North Runs Covered so far.
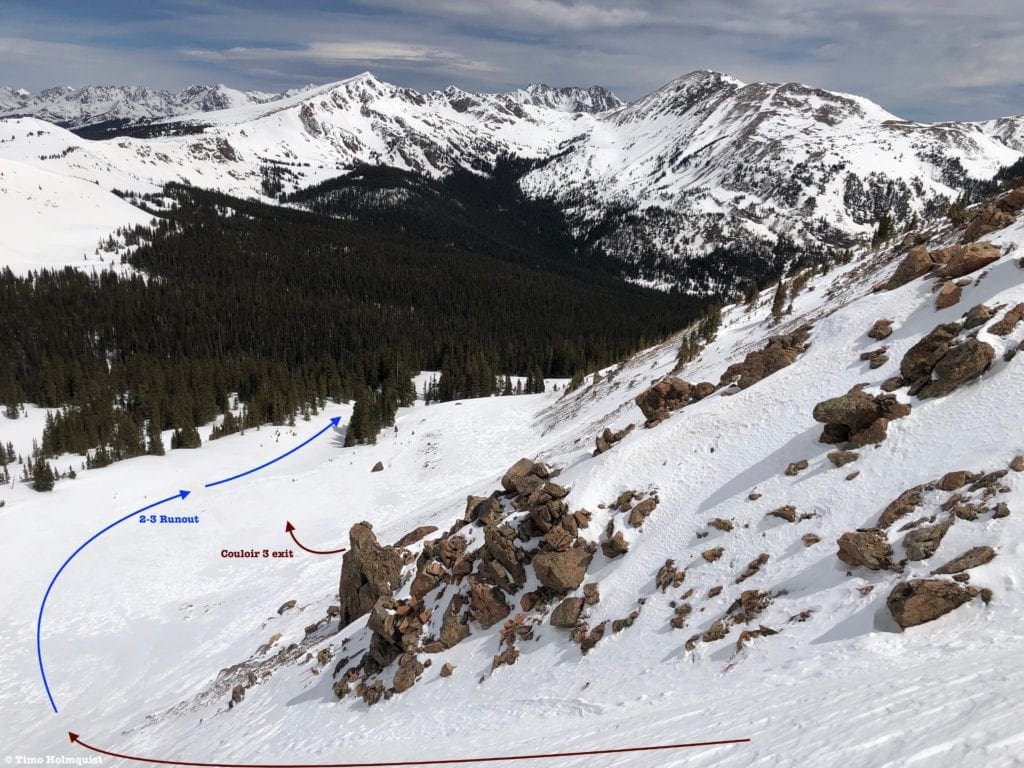
- Couloir 2: Uneva North
- Essentials: ~0.18 miles, ~503 foot vertical (~0.4 miles and ~740 foot vertical when combined with 2-3 Runout)
- Status: Difficult
- Steepest slope angle: 40 degrees
- Good for: Consistently steep and satisfying couloir skiing. Windswept snow collects on the couloirs right side in a trenched area, be aware of the double fall line when skiing. The couloir is much shallower on its left (west) side. You can continue skiing through the bench into another funnel that pours into the trees, eventually linking with other runout options. NOT for beginners or intermediate skiers. Of the three Couloirs on Uneva’s North Ridge, 1 & 2 hold snow the longest.
- Accessed via: North Claw approach route to the saddle just south of Point 12,089. Climb up the ridge toward Uneva, passing Split the Difference and the obvious cornice on Stiff Upper Lip. A windswept knoll will become apparent past Stiff Upper Lip. Ascend to the right of the knoll and work your way around it until you’re facing due north. To your left, you should see the Stiff Upper Lip Cornice and the start of Couloir 1. To access Couloir 2, find the snowiest strip heading due north and begin your descent.
2/3 of the way down Couloir 2, looking north to runout options.
- Couloir 3: Uneva North
- Essentials: ~0.35 miles, ~482 foot vertical (0.28 miles and ~716 foot vertical when combined with 2-3 Runout)
- Status: Difficult (Thin coverage due to windswept terrain and shallow couloir depth, hit early and after good snow coverage).
- Steepest slope angle: 38 degrees
- Good for: A twisty, shallow couloir that provides excellent turns post storms and when avvy danger is low. This couloir is the first to melt out as it is particularly susceptible to wind stripping. The ideal time to hit it is 1-3 days after a good snow and with minimal wind.
- Accessed via: North Claw approach route to the saddle just south of Point 12,089. Climb up the ridge toward Uneva, passing Split the Difference and the obvious cornice on Stiff Upper Lip. A windswept knoll will become apparent past Stiff Upper Lip. Ascend to the right of the knoll and work your way around it until you’re facing due north. To your left, you should see the Stiff Upper Lip Cornice and the start of Couloir 1. Below you is the start of Couloir 2; continue working your way east and slightly uphill until the shallow start of Couloir 3 becomes obvious. If you continue past the entrance, the ground becomes increasingly windswept and bare.
Steep bottom parts of all 3 couloirs.
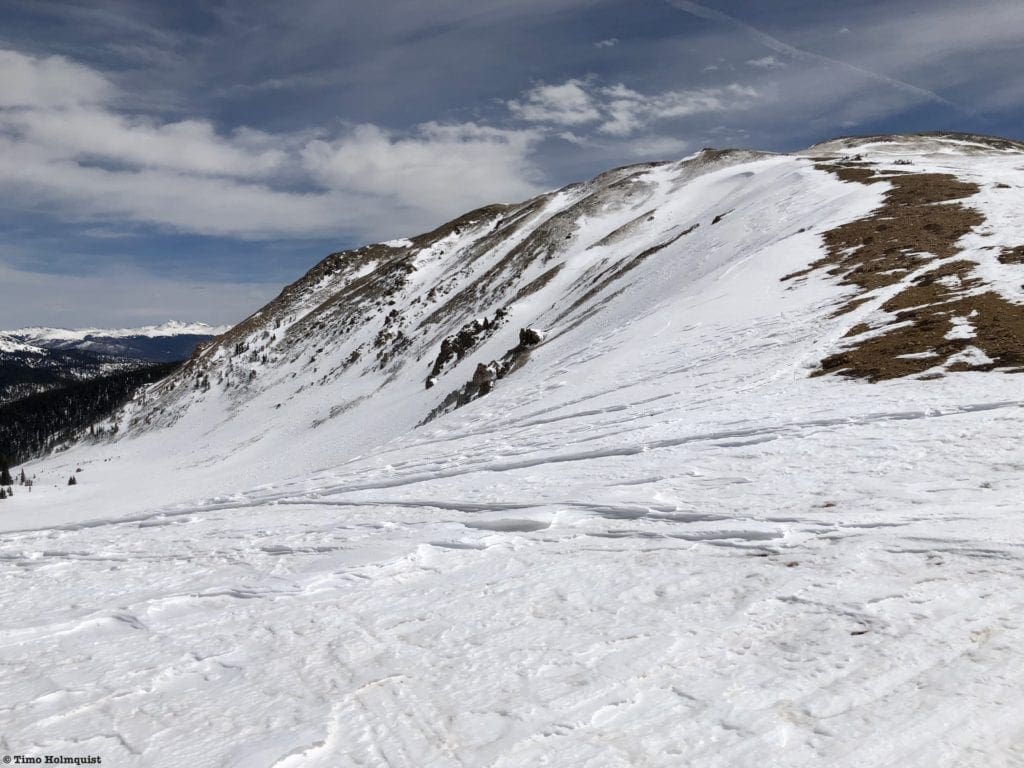
The runs covered on Uneva’s North Ridge account for the most obvious lines sighted; they do not cover all possibilities. Between Saddle Run and Split the Difference is a large snow-covered section of ridge that is ostensibly part of the Saddle Run and contains many descent options. Additionally, each line can be extended into the trees as far as you are willing to go, knowing you have to reclimb the saddle to exit back to your car. For the extreme oriented, the ridge north of, and including Point 12,089, is heavily corniced and steep, running all the way to West Demming. Dozens of ski lines exist along the ridge but with pronounced avalanche danger. Know what you’re doing before committing.
Uneva North Full Perspective shot with the Knoll at the start of Couloir 2 and 3 marked.
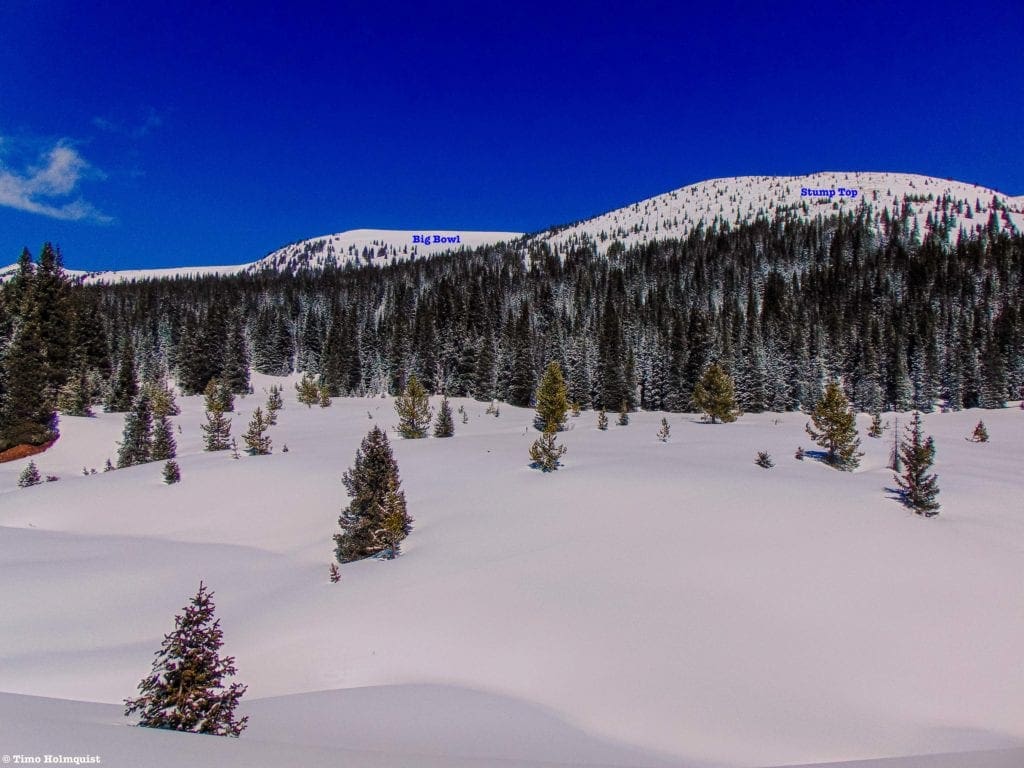
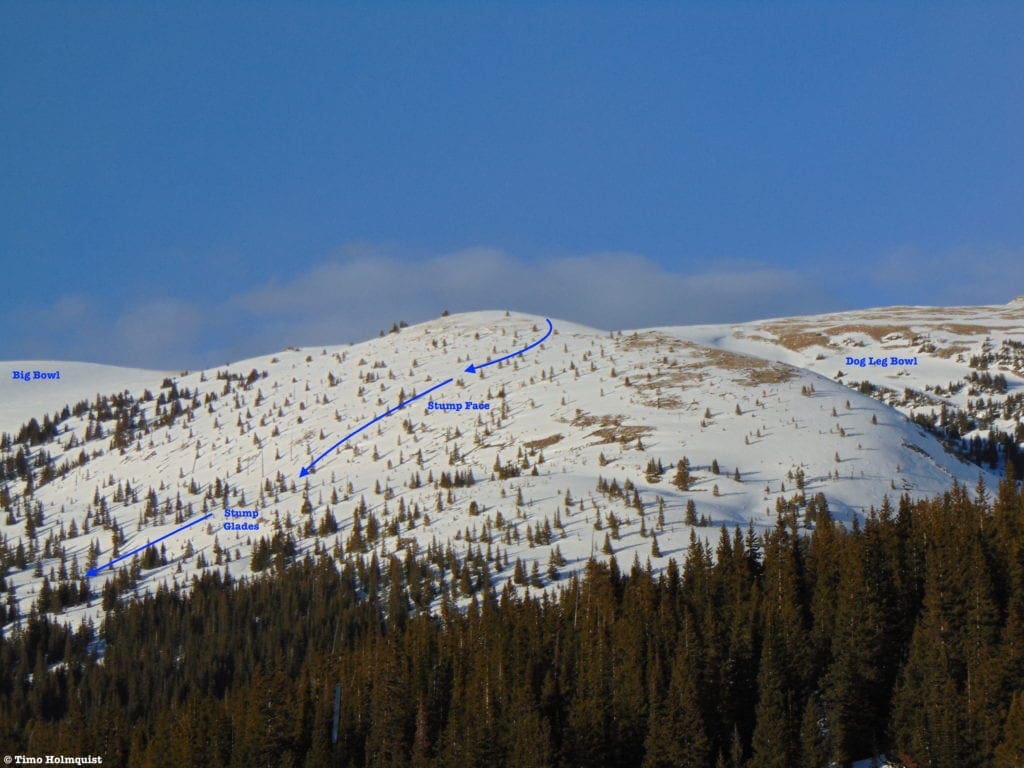
Big Bowl and Stump Top:
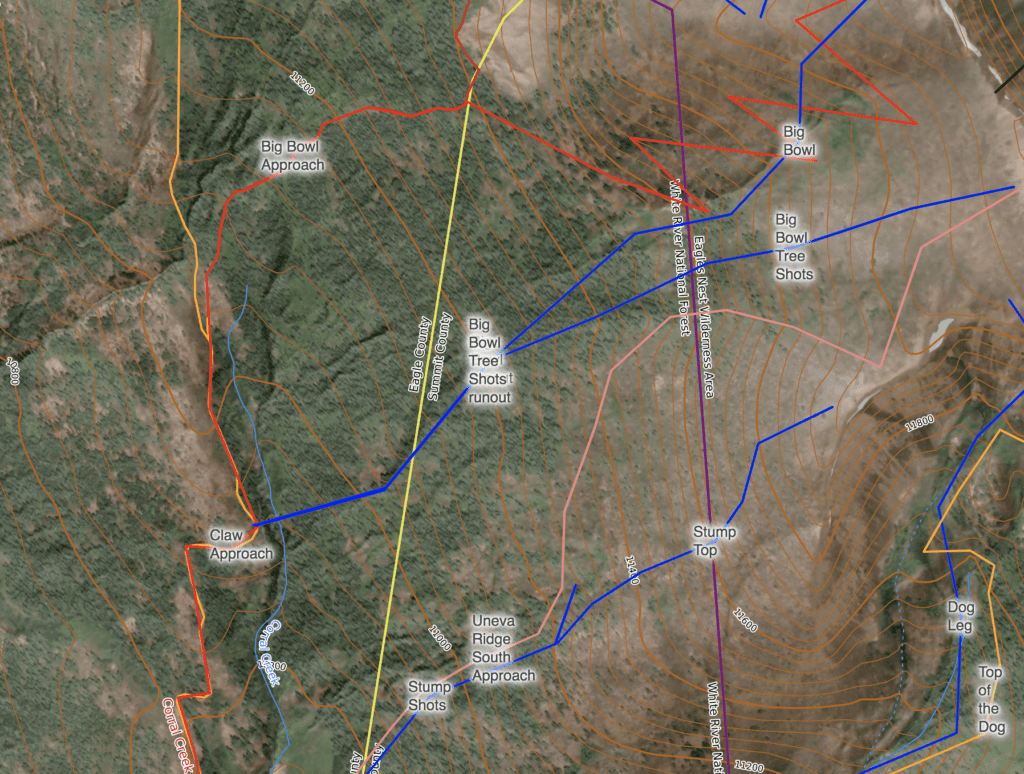
Big Bowl and Stump Top Map.
From the parking lot, you’ll need to carry your skis across the bridge over the highway. On the opposite side should be a USFS trail sign with many stickers on it. If the sign is buried, follow what’s sure to be myriad skin tracks leading up and to the left (north). There are blue diamonds that lead the way, although the spacing between them is large. In general, perform an ascending traverse north around the treed lump of land that greets you from the side of the highway.
Once you make it around the lump, you’ll descend slightly to Corral Creek, start getting oriented here. To your East is a large mountain face, pot marked by fallen and cut trees (Stump Top). To its right is the Dog Leg Bowl, and to its left, you’ll be looking at Big Bowl. Follow the creek north until finding a suitable place to cross. As described earlier in the article, continuing north on the winter trail will take you to The Claw and Uneva Peak North.
Looking back at the Corral Creek crossing on the way to Stump Top.
To access Stump Face and Dog Leg Bowl, cross a large field and climb up a semi treed slope, eventually ascending around the open part of Stump Face until you find a suitable ascent line to the ridge.
Stump Top and Big Bowl from Corral Creek.
To access Big Bowl, you cross at the same place as Stump Face, and instead of climbing directly, traverse north through the trees until you arrive at the bottom of Big Bowl. Alternatively, you can continue skinning on the left side of Corral Creek (likely following other skin tracks) until finding a suitable place to cross and climb almost directly east to the bottom of Big Bowl. Even in the trees, orientation is fairly simple. If you climb enough you’ll shed the coverage and have a better idea of where you are.
By whichever route you choose, eventually, you will top out on the ridge between Uneva and Point 12,363. Dog Leg Bowl is east of Point 12,363, and Big Bowl is visually obvious as a large, open, south-facing area. The last ascent to the ridgeline is very mellow and will melt out later in the season, usually before the bowls to the east and west. Big Bowl is a bit of a misnomer as the total area of the Claw is bigger; however, from the parking lot, it looks big and pulls more attention because it’s closer.
- Stats to the top of Stump Top: ~2 miles, ~1650 ft. of elevation gain.
- Stats to the top of Big Bowl: ~2.95 miles, ~1730 ft. of elevation gain.
Upper Big Bowl.
- Main Line: Big Bowl
- Essentials: 0.3 miles, ~500 foot vertical (0.87 miles and ~1250 foot vertical when combined with runout)
- Status: Intermediate
- Steepest slope angle: 26 degrees
- Good for: Open bowl skiing at an intermediate pitch and with plenty of opportunities to nab first tracks after a storm. Following the path of least gravitational resistance will pull you into the middle of the bowl and down into the trees below it, approximating your ascent route. This is highly lapable territory, either as a second run after The Claw, or as a launch area for exploration of Dog Leg Bowl or Uneva Ridge East. While sliding doesn’t occur often, the chances are not zero, evaluate conditions carefully before committing.
- Accessed via: Corral Creek winter trail, once you sight Stump Top and Big Bowl, angle a line of ascent towards the bottom of Big Bowl or Stump Top. Each route will get you where you need to go, aiming for Stump Top means crossing Corral Creek a little earlier, aiming for Big Bowl will allow you to ascend on the heavily used winter trail a little longer before breaking right (east). Skin up until breaking treeline. If ascending Stump Top, make sure to traverse left (north) around the mountain face to bring your ascent in line with Big Bowl.
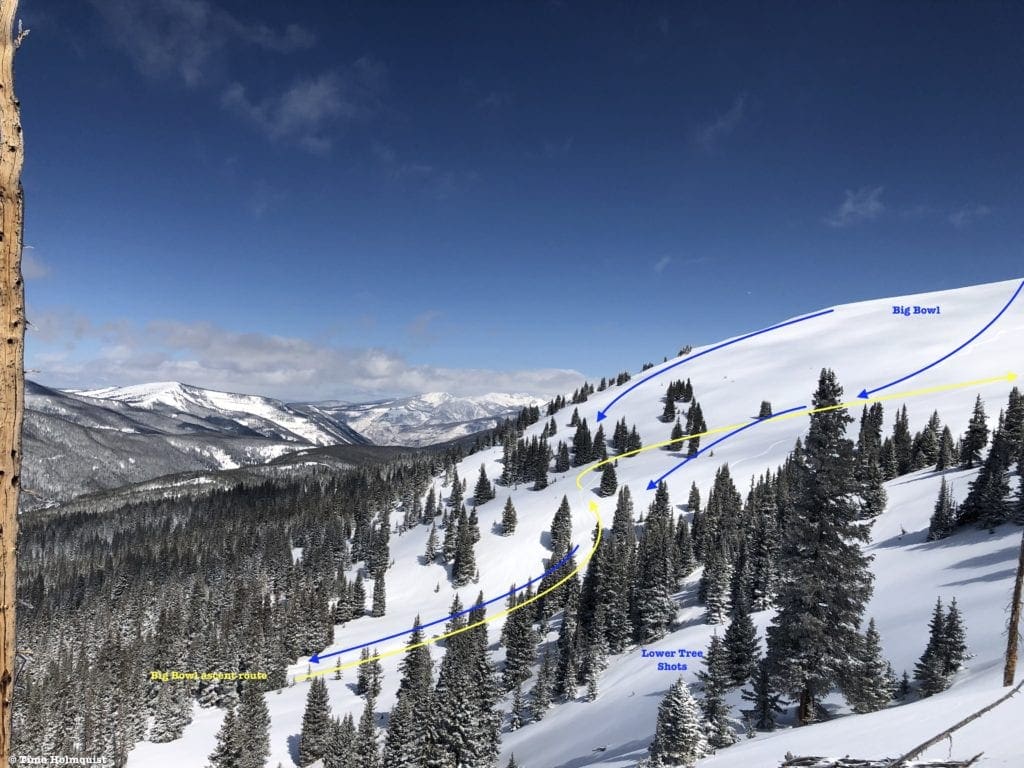
Lower Big Bowl & Lower Tree Shots
- Tree Shots: Big Bowl
- Essentials: 0.37 miles, ~620 foot vertical
- Status: Intermediate
- Steepest slope angle: 34 degrees
- Good For: Light, and well-spaced tree skiing adjacent to Big Bowl. Great place to practice tree skiing with tons of visibility and lots of room to make turns. Very lapable area, just like Big Bowl, with low avalanche risk.
- Accessed via: Corral Creek winter trail, once you sight Stump Top and Big Bowl, angle a line of ascent towards the bottom of Big Bowl or Stump Top. Each route will get you where you need to go, aiming for Stump Top means crossing Corral Creek a little earlier, aiming for Big Bowl will allow you to ascend on the heavily used winter trail a little longer before breaking right (east). Skin up until breaking treeline. If ascending Stump Top, make sure to traverse left (north) around the mountain face to bring your ascent in line with Big Bowl.
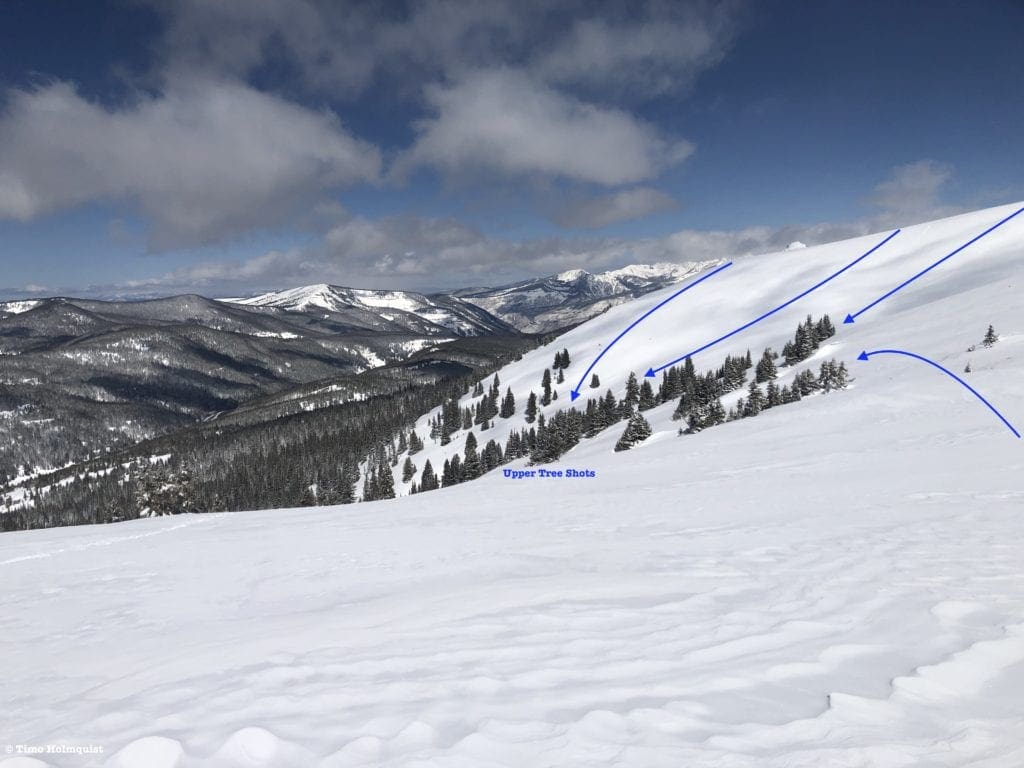
Upper Tree Shots.
- Stump Face: Stump Top
- Essentials: 0.38 miles, ~750 foot vertical
- Status: Intermediate (Fallen tree danger when coverage is light)
- Steepest slope angle: 32 degrees
- Good For: Skiing an open face with built in tree obstacles. Needs good coverage due to the number of downed trees and stumps. Recommended after a powder day. If it’s scraped off, consider the Stump Glades below, where snow tends to accumulate, or Big Bowl.
- Accessed via: Corral Creek winter trail. When you first sight Stump Top, angle an ascent towards the bottom of its open face. You’ll cross Corral Creek and ascend through the lower pine reaches before hitting the open face. Either traverse towards Big Bowl and wrap around to the top, or ascend up steeper slopes to attack the line directly.
Stump Top with Stump Face run
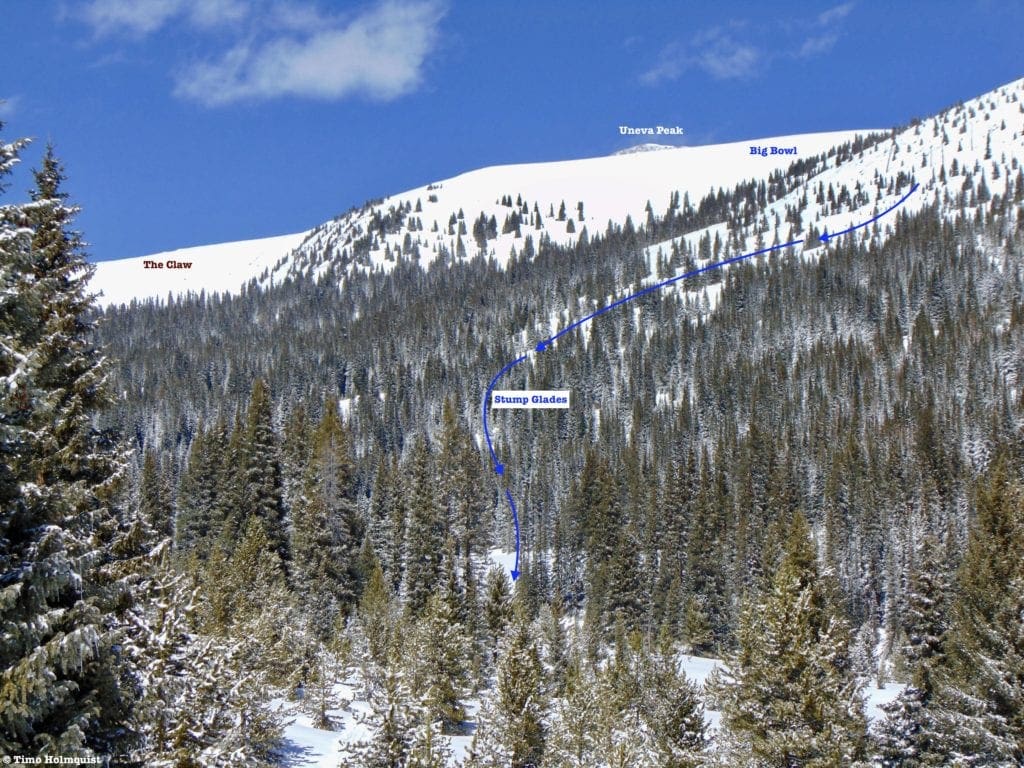
- Stump Glades: Stump Top
- Essentials: 0.42 miles, ~550 foot vertical
- Status: Intermediate
- Steepest slope angle: 28 degrees
- Good For: An easy and fun exit from the ridgeline, laps. After particularly windy days, Stump Face loses a decent amount of coverage, but snow tends to accumulate below in the glades. This is a great area for powder laps or as an exit from Stump Top and Big Bowl. Much less utilized than the direct approach to Big Bowl so multiple powder laps could be found in decent conditions.
- Accessed via: Corral Creek area. Once you make it to Corral Creek from the parking start, eye Stump Top, cross the creek and thread meadows together as you ascend through the pines. Once you break tree line, ascend to a steeper pitch with tons of fallen trees and stumps. Choose your starting point based on coverage and pitch. Turn around and enjoy light glade skiing back to the flats around Corral Creek.
Stump Glades from top, looking down to Vail Pass and across to Shrine Bowl
Stump Glades and Big Bowl from Corral Creek.
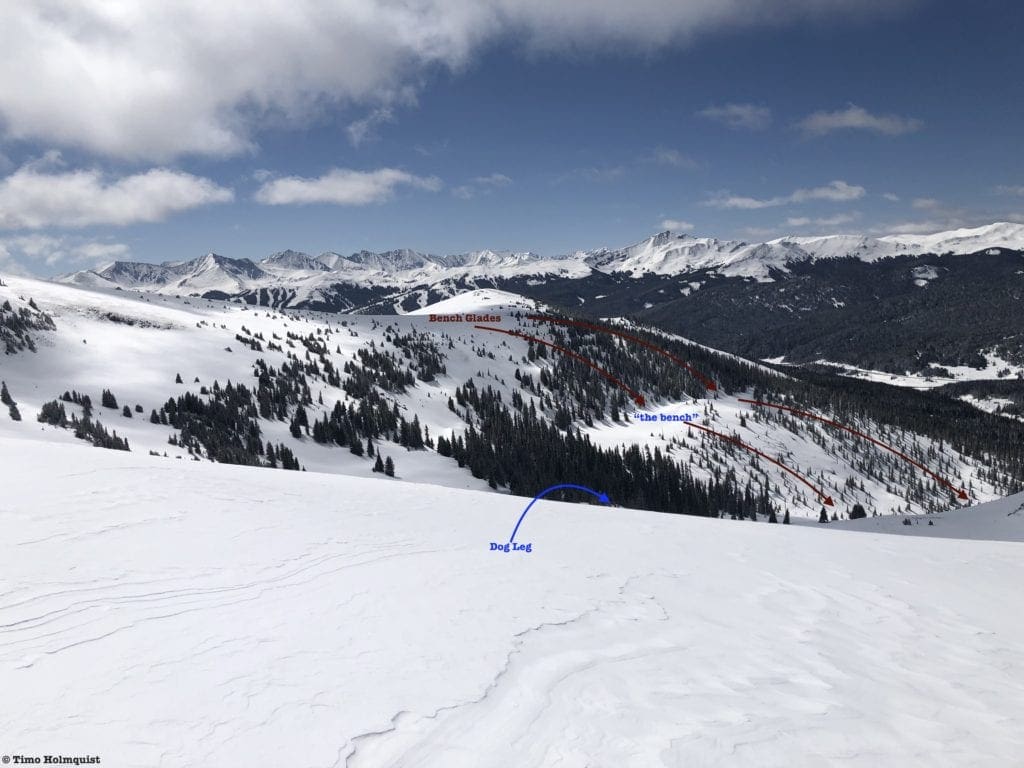
Dog Leg Bowl
Dog Leg Map
This underutilized area is loads of fun on a powder day and seldom draws the traffic of the Claw or Big Bowl. Part of its charm is hidden. When you glimpse the bowl from the parking lot, your eyes will probably focus on the windswept eastern headwall. If it looks bare, chances are you’ll skip the whole area, which is a shame because tucked in behind Stump Top is a long, satisfying run with plenty of coverage and access to additional tree skiing along the bowls southern rim. If you’ve been out a few times and are looking for a new area to sink your teeth into, try this bowl.
- Stats to the top of Dog Leg Bowl via Stump Top: ~2 miles, ~1650 ft. of elevation gain.
- Stats to the top of Dog Leg Bowl direct: ~2.3 miles, ~16560 ft. of elevation gain.
- Stats to top of Bench Glades: ~1.6 miles, ~1400 ft. of elevation gain.
Dog Leg Bowl from the Bottom (variable conditions).
- Dog Leg: Dog Leg Bowl
- Essentials: 1.18 miles, 1400 foot vertical
- Status: Intermediate
- Steepest slope angle: 34
- Good For: Longer ski run down the center of a seldom utilized bowl. Be careful when entering from the top, as a long cornice lines the northern edge of Dog Leg Bowl from the headwall down to the bottom edge of Stump Face. The key to keeping this run intermediate is ascending high enough to avoid the cornice.
- Accessed via: Corral Creek area. Once you make it to Corral Creek from the parking lot, turn your focus to the obvious Stump Top. Cross the Creek and thread meadows together as you ascend through the pines in a northern direction, as if heading to Big Bowl. Once you break tree line, perform an ascending traverse north and then east to get behind Stump Top. The ridge will mellow out, and the top of Dog Leg will appear on your right. Ascend high enough to look back and sight the end of the cornice before dropping in.
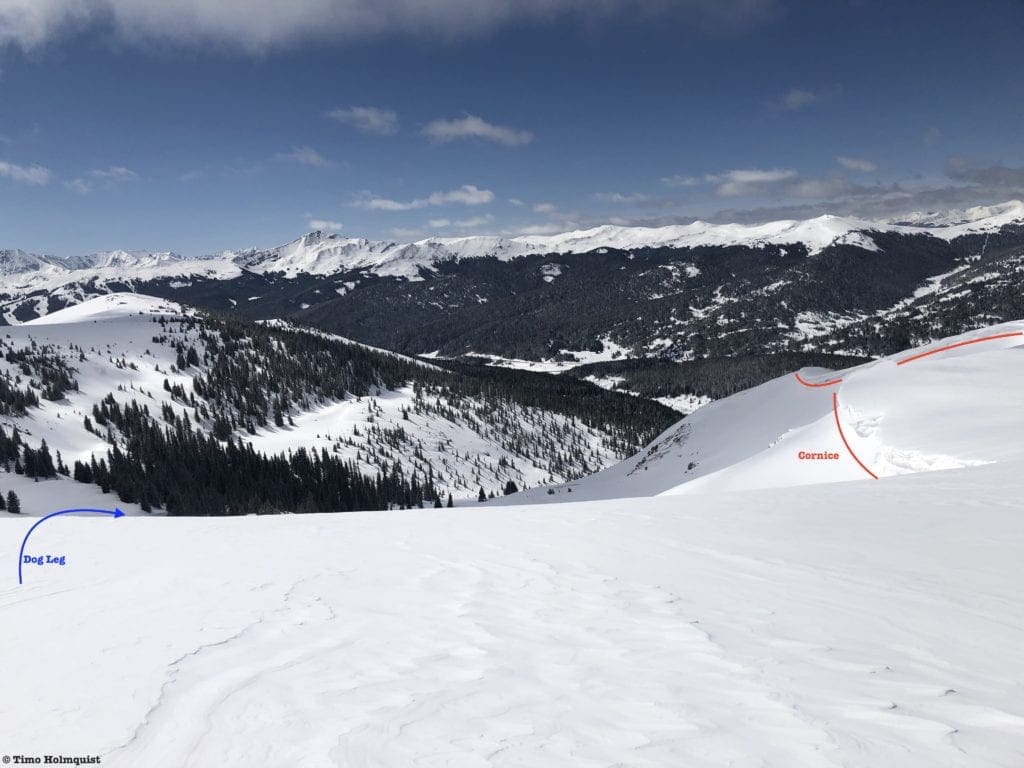
Beware the cornice that wraps around the northern edge of the Bowl.
- Dog Leg Cornice: Difficult/Very Difficult. While the skiing below the cornice is usually powdery and fun, when dealing with cornices, all backcountry precautions need to come into play. The cornice is usually stable through the morning, but hot afternoon sun can significantly weaken its structure and lead to collapse and/or avalanche. Evaluate conditions thoroughly. All cornice variations lead into the main Dog Leg Run.
Looking into Dog Leg Bowl from above.
- Bench Glades: Dog Leg Bowl
- Essentials: 0.92 miles, ~1250 foot vertical
- Status: Difficult
- Steepest slope angle: 37 (brief)
- Good For: This large area is full of quick run potential and retains snow better than the often-windswept areas of the bowl towards Point 12,633. The namesake “bench” is about 1/3 of the way down and requires a little speed to break through. Variations are many; enjoy the tree skiing!
- Accessed via: Stump Top ascent route to the ridgeline and a traverse south to the start, or a direct ascent up Dog Leg Bowl, switchbacking past the benched to the start.
Uneva Ridge East
Uneva Ridge East Map
This is a fantastic place to ski with dependable snow through the end of May, but there are significant risks. As with Dog Leg Bowl: there is a large cornice that graces most of the ridge south of Uneva Peak, limiting descent options. Scout your route from the ridgeline first. It’s immensely helpful to have the perspectives from Uneva’s summit ridge and those of Point 12,363. The cornice ends between Point 12,363 and the low point of the ridge, but that exact line is not set in stone and can vary season by season. Get eyes on your run before committing.
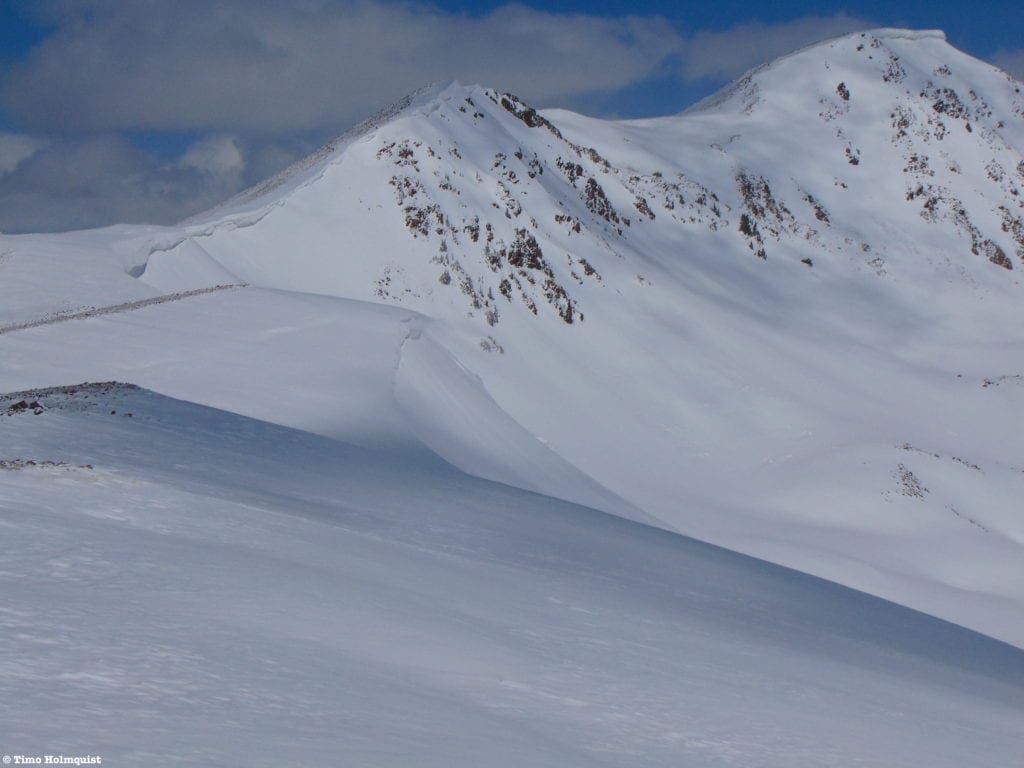
The cornice runs north and over the summit of Uneva’s sub-peak before breaking at the saddle. Notice the massive crown on top of Uneva Pk. as well.
The biggest issue with the Cornice is placement. It is highly visible from points east, north and south, but the main ascent routes have you approach from the west. If you ascend up Big Bowl to the ridge behind it, the last bit of the climb is low angle and mellow, offering little in the way of warning. If you’re not paying attention you might end up standing on top of it, which would be disastrous if the cornice suddenly collapsed. Stay on your toes and off the edge.

Uneva East’s resident cornice.
Once you manage to find the end of the cornice, the options open up. Despite their relatively short length, these runs have produced some of the most memorable turns in my Colorado backcountry experience. The ridge also receives early light in the spring due to its eastern aspect; make sure to get up there on the earlier side of things.
Eastern bowl from halfway up.
The northern part of the bowl towards Uneva Pk. is the most picturesque and therefore commands the most attention; however, a set of shallow couloirs and open slopes towards Point 12,363 actually offer the best introduction to the area with the lowest cornice and slide risk. Like the rest of the bowl, this area is highly lapable on a low-mid powder day and can satisfy days of exploration, depending on how many laps you pull off or how far you take your descent. Like Uneva North, at the end of you day, you have to climb back over the ridge to get to Vail Pass.
- Stats to the top of Uneva Ridge East via Stump Top: ~2 miles, ~1650 ft. of elevation gain.
- Stats to the top of Uneva Ridge East via Big Bowl: ~2.95 miles, ~1700 ft. of elevation gain.
Looking south to Point. 12,363 from the ridgeline.
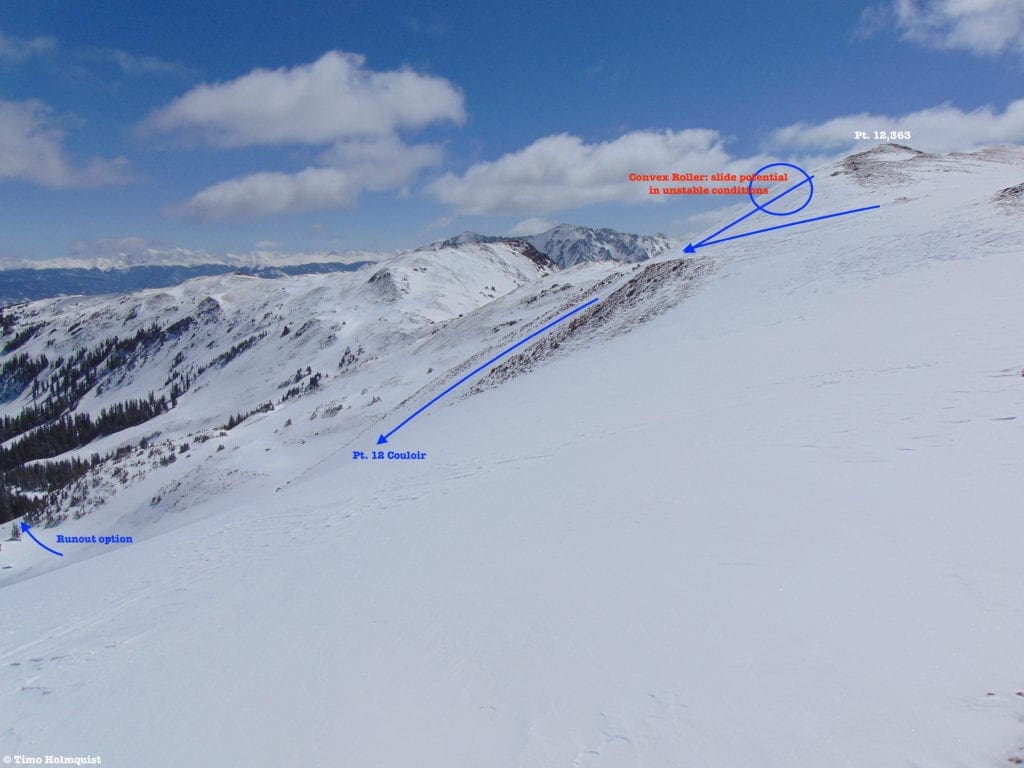
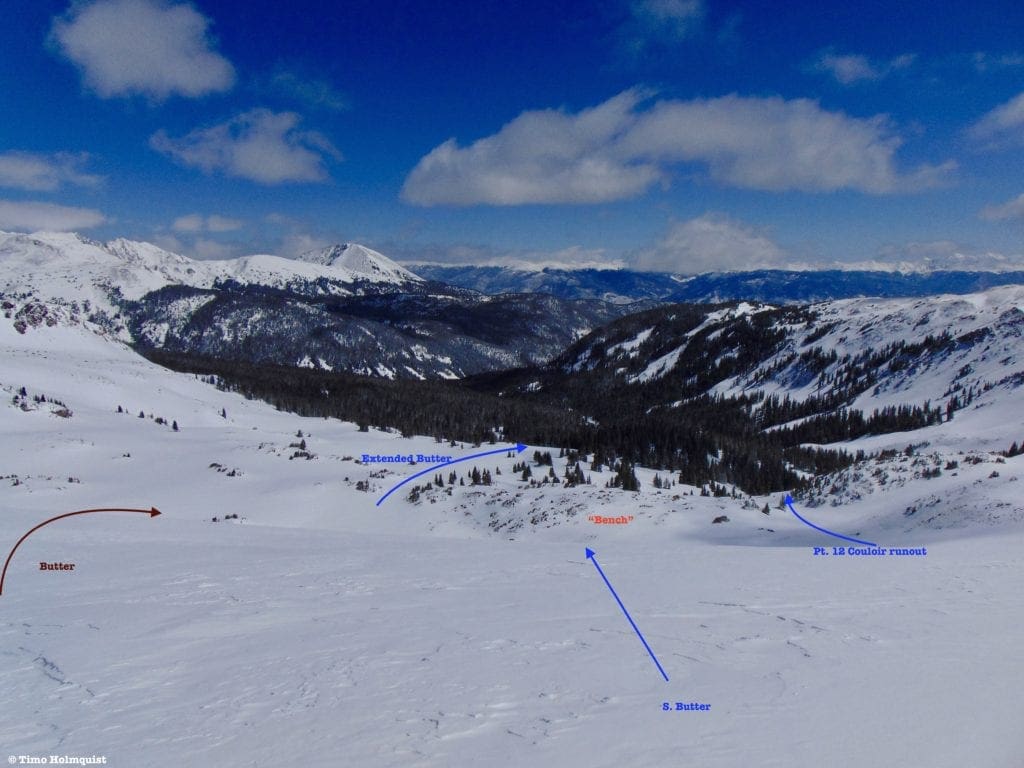
- Point 12 Couloir: Pt. 12,363
- Essentials: ~0.54 miles, ~800 foot vertical (or more, depends on how far you descend)
- Status: Intermediate
- Steepest slope angle: 33
- Good For: A longer descent off Pt. 12,363. Most runs in this area (corniced or otherwise) end up falling down to a bench. Speed is key if you want to plow through it. Due to this run’s placement south of the bench rim, you can connect the lower treed reaches of the basin to your line with little effort. Remember, unless you car-positioned, you’ll be hiking back over the ridge to Vail Pass.
- Accessed via: Either Stump Top or Big Bowl ascent route, up from Corral Creek. Climb to the top of Stump Top, then bear southeast to the ridgeline, keeping Dog Leg to your right and stopping short of ascending up the Pt. 12,363 summit block. Scout the top for slide risk and then drop in.
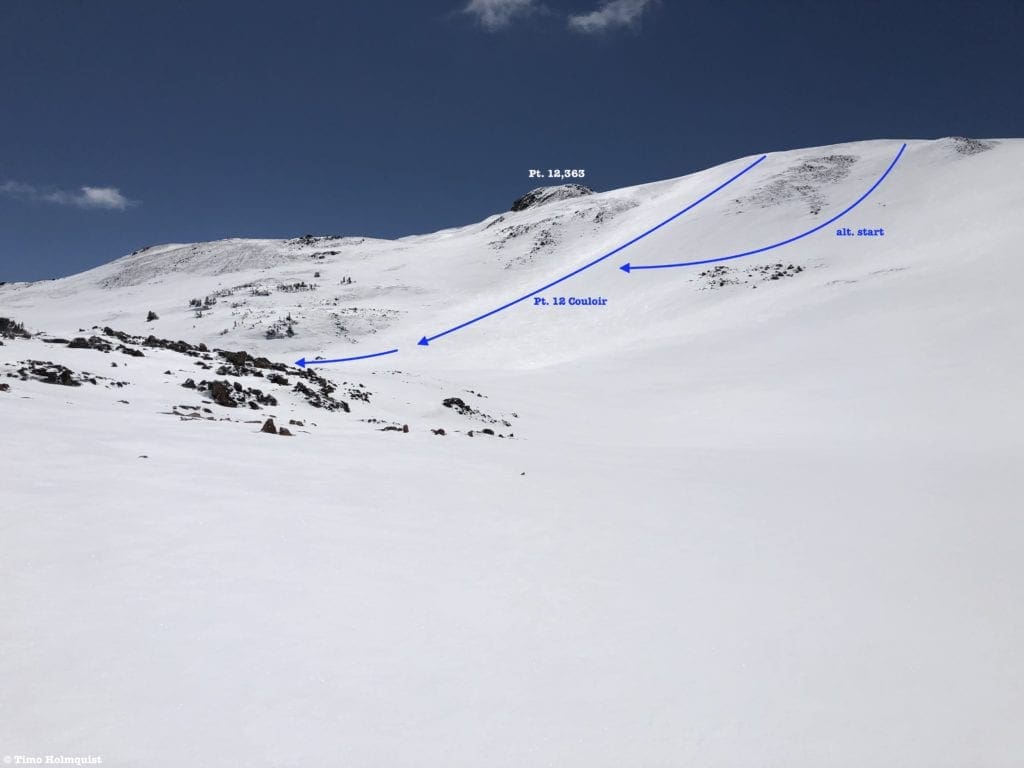
Top of Pt. 12 Couloir and variation.
- Butter: Pt. 12,363
- Essentials: ~0.25 miles, ~400 foot vertical (potential to extend if you maintain speed and clear the bench area)
- Status: Difficult (despite avoiding the cornice, convex rollers, and snowpack instability can make this area slide)
- Steepest slope angle: 35 degrees
- Good For: Powder laps in a beautiful setting, possible extension if you maintain speed. This area, while short, provides in more ways than one. On a powder day, the lines are epic, and the snow usually holds through May in the bowl, providing later spring/early summer turns for the dedicated. NOT for beginners or intermediate skiers.
- Accessed via: Either Stump Top or Big Bowl ascent route, up from Corral Creek to the top of the ridge. The easiest ascent route bears north around Stump Top, and either up through the Tree Shots run or Big Bowl itself to attain the ridgeline. It is not necessary to climb Stump Top directly, though if coverage is deep, you could. Once you hit the ridgeline, work your way slowly north to a bump on the ridge where the cornice danger usually starts. Butter is tucked into the slope just south of the start of the cornice. Scout the top for slide risk and then drop in.
Looking East from the start of Butter & S. Butter.
- South Butter Variation: Difficult. Rather than being one ski line, South Butter is more of an area that opens up the Butter variations. Pick a line and descend. This area is generally cornice-free but steep enough to toe the line with a difficulty rating.
- At a Glance: ~0.25 miles, ~400 foot vertical
- Steepest slope angle: 35 degrees
Butter and The Nose descent routes.
- The Nose: Uneva Ridge East
- Essentials: ~0.25 miles, ~400- foot vertical (or more, depends on how far you descend)
- Status: Difficult (pronounced cornice risk)
- Steepest slope angle: 38-40 degrees (skiing to the left of the Nose is steeper)
- Good For: A quick challenge that flirts with a set of rock obstacles and dives below a cornice. You can ski on either side of the nose; skiers left is steeper and more defined. If you are attacking this route, do it early, especially on warm spring days when the afternoon sun could significantly increase wet slide potential or collapse the cornice above you. Check cornice stability before descending.
- Accessed via: Either Stump Top or Big Bowl ascent route, up from Corral Creek to the top of the ridge. The easiest ascent route bears north around Stump Top and either up the Tree Shots route or Big Bowl itself to attain the ridgeline. It is not necessary to climb Stump Top directly, though if coverage is deep, you could. Once you hit the ridgeline, work your way slowly north to a bump on the ridge where the Cornice danger usually starts (quite visible). Descend just below the cornice, then skirt left until a small but prominent set of rocks is beneath you. Ski down either side of it. This run loses its difficulty rating later in the season when the cornice begins retreating.
The Nose from below.
- Cornice Dropper: Uneva Ridge East
- Essentials: ~0.25 miles, ~400- foot vertical (or more, depends on how far you descend)
- Status: Very Difficult (HIGH slide risk)
- Steepest slope angle: 36-42 degrees
- Good For: Pretending TGR will feature you in a ski video eventually. Rather than a single line, this is also a large area that covers the length of the cornice. In stable conditions, the slope below the cornice is smooth and lovely to ski, but in an unstable snowpack situation, or when spring temps increase avvy danger, it’s best to stay away. Only evaluate this route if you have extensive avalanche experience and can coherently respond to a wide variety of backcountry risks. NOT for beginner or intermediate skiers.
- Accessed via: Either Stump Top or Big Bowl ascent route, up from Corral Creek to the top of the ridge. The easiest ascent route bears north around Stump Top, and either up the Tree Shots route or Big Bowl itself to attain the ridgeline. It is not necessary to climb Stump Top directly, though if coverage is deep, you could. Once you hit the ridgeline, work your way slowly north to a bump on the ridge where the cornice danger usually starts (quite visible). The cornice extends north all the way over a high subpeak of Uneva before finally stopping. Be careful.
Cornice Dropper options.
- Back of the Crown Couloirs: Uneva Pk.
- Essentials: ~0.16-0.17- miles, ~500-foot vertical (0.42 miles and 900-925 foot vertical when combined with longer runout)
- Status: Very Difficult (HIGH slide risk)
- Steepest slope angle: 40-45 degrees
- Good For: Steep, aesthetic skiing off the main ramparts of Uneva Pk. There are two couloir options that bleed together; make sure to stay skiers left in either scenario; the best runout depends on skirting between a rock rib and a windswept, shallow area that will guarantee core shots if you’re not careful. While you can access the easier couloir without running afoul of the Crown Cornice on Uneva, eventually, you will be skiing below it. An avalanche here would be deadly. NOT for beginners or intermediate skiers.
- Accessed via: Big Bowl or The Claw ascent routes. From Big Bowl, hit the ridge and hike south (may involve ski carry) until you pass the saddle between Uneva and its prominent southern subpeak. Angle toward the eastern side of the ridge and climb until you see the Crown Cornice take shape. Drop in before the cornice. If attacking the harder variation, make your way carefully underneath the Crown Cornice to a larger and more well-defined couloir. If skiing this way, your whole route will be in an avalanche path. Remember to hug left as you reach the bottom to avoid sailing into a windswept and shallow area.
Back of the Crown Couloir Options.
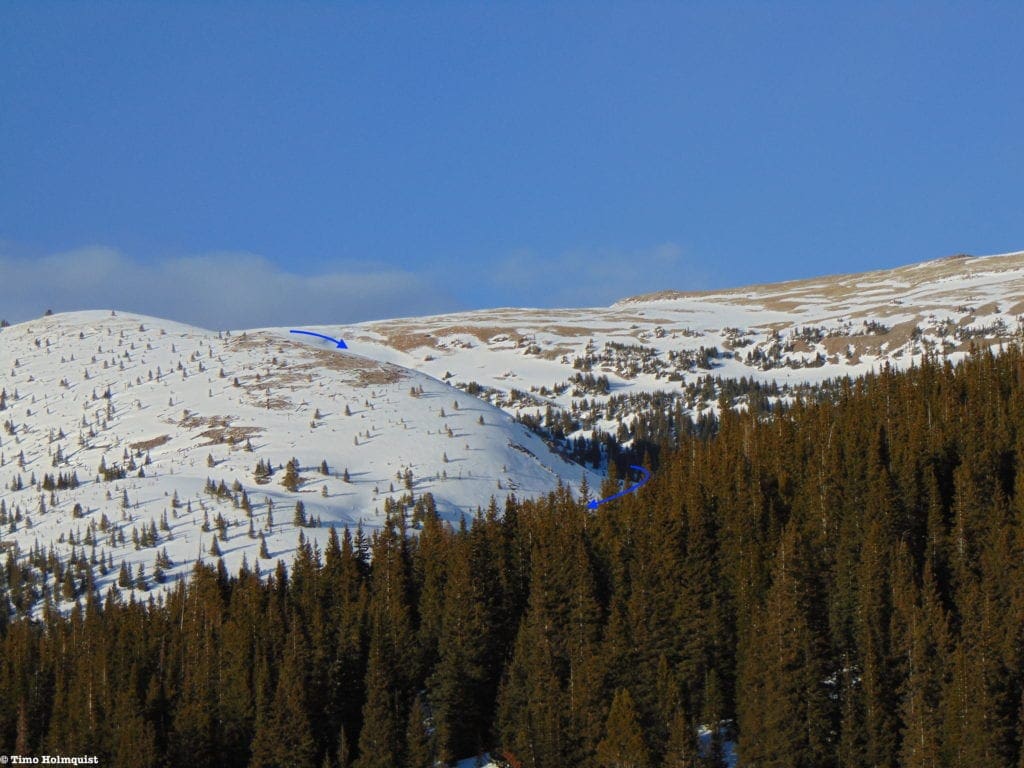
Sneva South
To the south of Dog Leg Bowl is another area that’s worth exploring. The benefit here is easy access. Given a solid skinning pace, you could be skiing an hour and change after leaving the parking lot.
- Stats to bottom of Sneva South Area: 0.8 miles (+182 ft., -144 ft.)
- Stat to the top of Sneva South Area: ~1.6 miles (+1448 ft., -152 ft.)
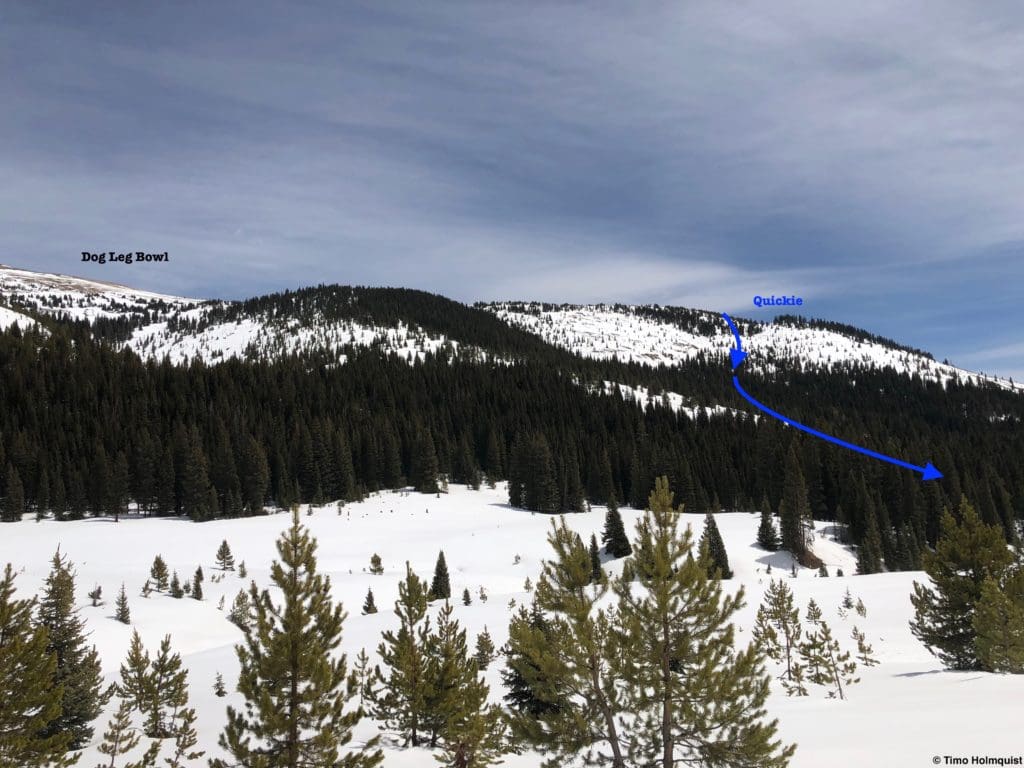
Quickie route photo
- Quickie
- Essentials: 0.8 miles, 1,264 ft. vertical
- Status: Moderate
- Steepest Slope Angle: ~32 degrees
- Good for: A quick backcountry run between activities. The ascent is fairly direct, and so is the descent, which can hold fantastic snow due to its northern orientation.
- Accessed via: Corral Creek. Once you skin around the initial hill on the winter trail, you’ll descend toward Corral Creek. Cross it and sight the line to your southeast. There should be an established skin track; if not, it’s easy to find. Skin up until you break treeline. Often the ridgecrest is quite windswept so go only as high as continuous deep snow lets you.
Corral Creek South route
- Corral Creek South
- Essentials: ~1.2 miles long, ~1550 ft. vertical
- Status: Moderate
- Steepest Slope Angle: ~33 degrees
- Good for: An unusual perspective for the area, with Mt. Jacques dominating the view. It’s also an open area that can support wonderful powder after a big storm. However, later in the season, this area will melt out first because it points south. Early-season skiers should beware of thing snowpack. The Prime window is mid-December-early April (dependent on conditions).
- Accessed via: Corral Creek. Once you skin around the initial hill on the winter trail, you’ll descend toward Corral Creek. Cross it and sight the line to your southeast. There should be an established skin track; if not, it’s easy to find. Only go as high as continuous snow will let you, which often means below the ridge line. This is not a summit descent. As you turn to descend, start veering left to make sure you pick up the south-facing gully. If you’re worried about missing your turn, start 100-200 feet lower at the head of the obvious south-facing gully. At the bottom, you will have to rejoin the Corral Creek valley and skin back uphill (north) to get to the original skin track. There is an old roadbed on the western side of the creek drainage, but it isn’t right next to the creek. To find it, you’ll need to skin up the other bank until the road bead becomes obvious. Some parts have new-growth trees, but there are also blue diamond markers to indicate the trail.
Sneva south map
There are several additional areas that require a little more scouting but could prove fruitful for skiing.
- From the top of Uneva Pk., a sharp and prominent ridge extends east, multiple couloir options exist here, with some starting underneath the Crown Cornice.
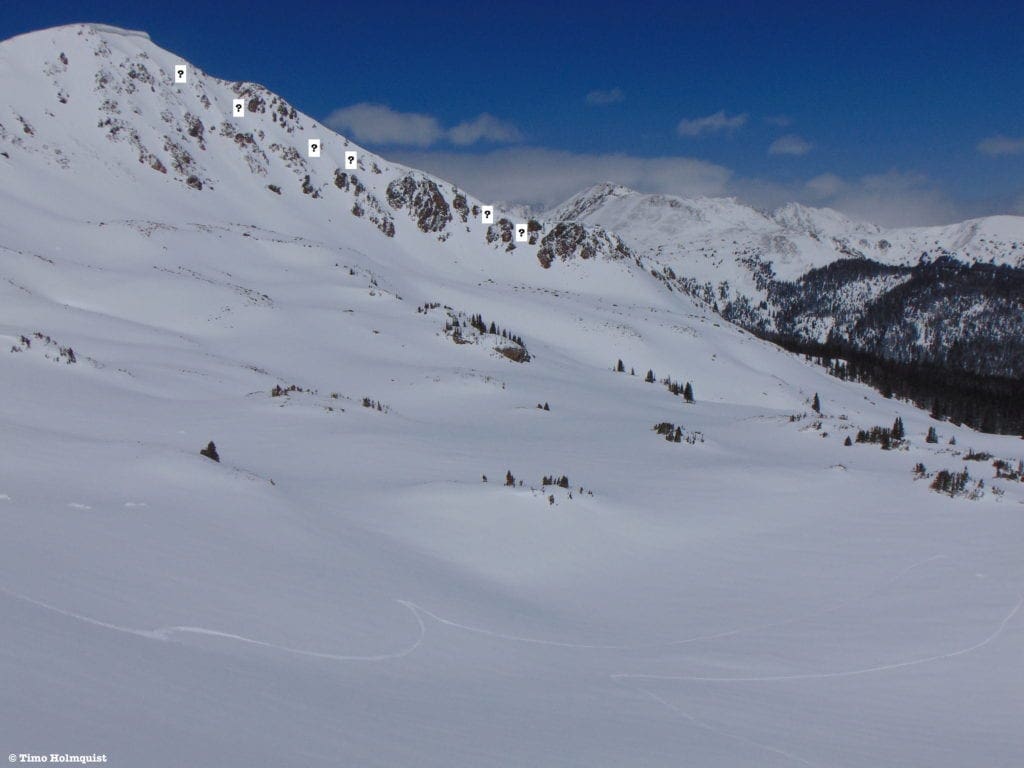
Couloirs aplenty, with likely serious avalanche potential
- Between this ridge and the Uneva North Couloirs is a seldom explored bowl that could harbor additional lines, there may be cornices here so a scouting trip is likely necessary.
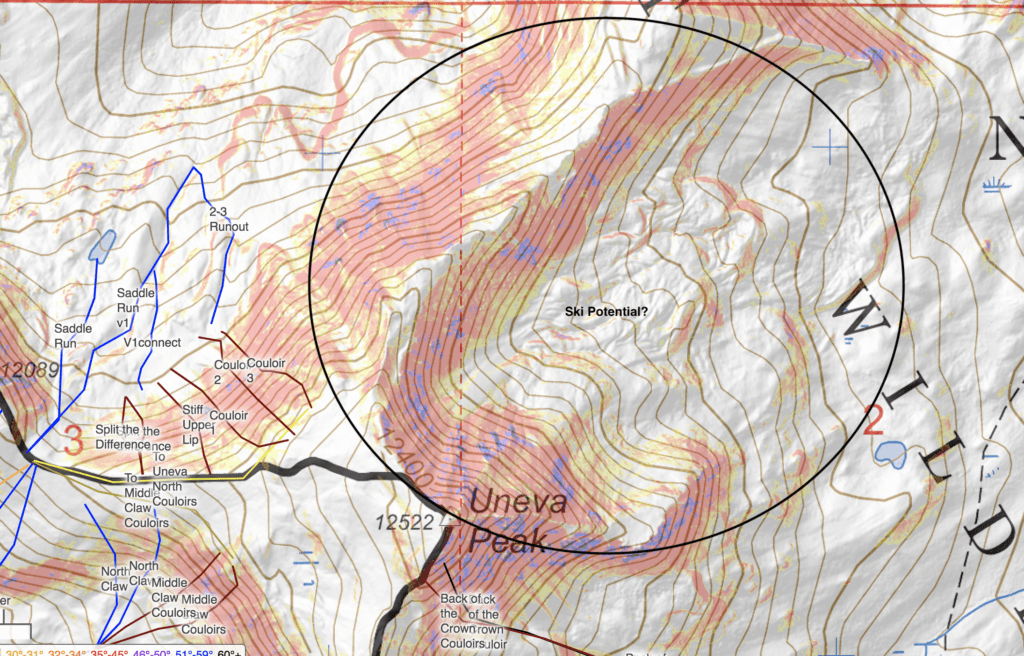
Map of Uneva’s Hidden Bowl.
- A long, corniced ridge connects Point 12,089 to West Demming. Ski line opportunities seem abundant here, though the cornice danger is especially pronounced.
A long ridge of possibilities, seen from the top of North Couloir 2.
- On the front side, an additional half bowl exists south of Dog Leg that looks like it holds snow well and would provide direct ascent and descent options.
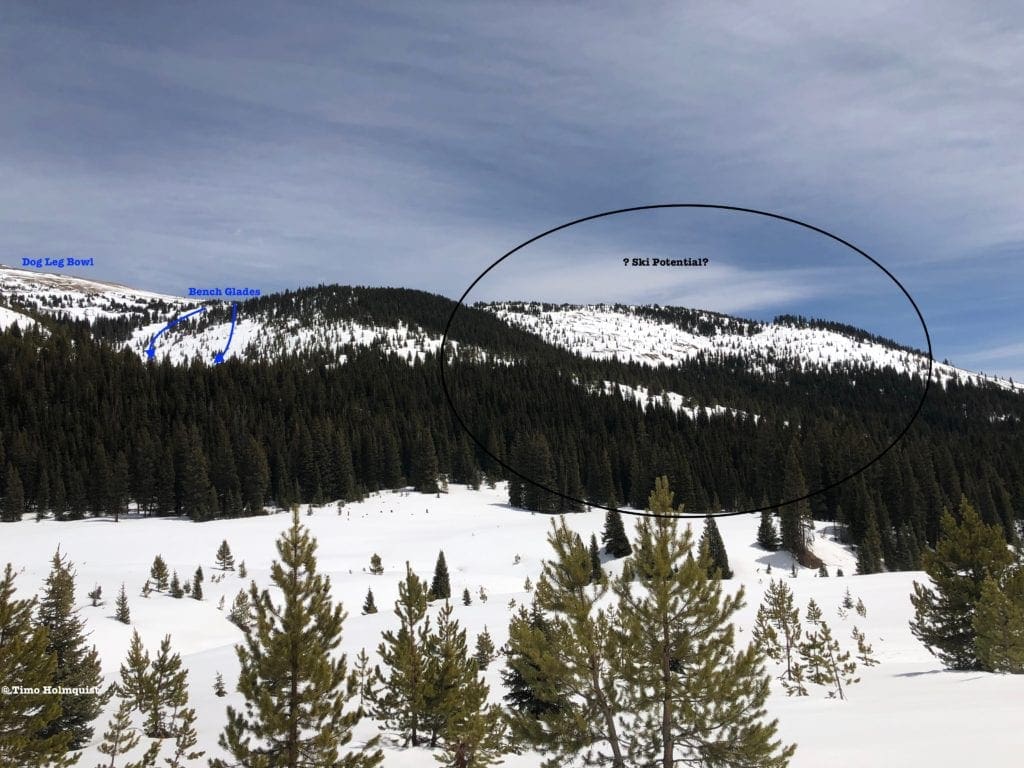
Unnamed bowl south of Dog Leg.
Quick Terminology Reference Guide
- Apron: An open section of a ski line, shaped roughly like an apron. It is generally shallower at the top, wider at the bottom.
- Bootpack: A way to gain elevation utilizing the tough exterior of ski boots, literally creating steps in the slope with your ski boots. Only effective in mid-winter conditions with softer snow. Once ice forms: crampons, and an axe are best.
- Breaking Trail: A backcountry skiing term that means to venture into untouched snowy territory. If you’re breaking trail, you are the only one out there, and your ski tracks are the only things you can see amongst a white canvas of snow.
- Buttress: A support structure in architecture. In mountain talk, it is a large, often steep set of rock walls that juts out from a mountain massif, acting as an impediment on an ascent or descent. A buttress does not have to be immediately connected to a summit, but it is abrupt.
- Bergschrund: Unlike a crevasse, which tends to form in the middle of a glacier, a bergschrund, or “schrund” for short, is a crack or separation that forms between the top of a glacier and the mountain slope or non-glaciated snow behind it.
- Chute: An inset area along a ridge that can hold great snow and presents like a natural ski run.
- Cirque: an amphitheater shaped head of a glacial valley, usually steep.
- Convex Rollers: From convex, indicating an outwardly curved surface and roller due to its resemblance to a rolling pin, convex rollers are steeply curved parts of a slope that may be prone to sliding.
- Cornice: An overhung area of snow that typically forms at the crest of a ridge or cirque. While the corniced ice and snow may look compact, there is usually nothing holding it up underneath; your weight alone can collapse a cornice. A collapsed cornice may also lead to avalanches. Do not stand on the edge of a cornice or climb directly beneath one.
- Couloir: Originally a French alpinist term, a couloir is a thin skiable chute. They are typically a no-fall zone and challenging to ski effectively.
- Crevasse: A large crack that usually forms on glaciers during warmer times of the year as the compact ice shifts. Very dangerous if fallen into.
- Crown: The vertical fracture line that appears after a slab avalanche, indicative of unstable terrain.
- Crux: Typically, the most dangerous section of an ascent or descent. Difficult routes can have multiple cruxes. A NO FALL ZONE.
- Glade: A treed area of a particular slope or line.
- Headwall: A topographical term used to mark where a basin, gorge, or alpine valley ends. Headwalls are usually steep and can sport multiple couloir options.
- Line: The chosen path of skiers and snowboarders.
- Runout: The bottom of a ski line, especially after a thin section or couloir, where the slope opens up. Similar to an apron.
- Skin track: The route you use to ascend a slope, very important for backcountry navigation.
- Terrain Trap: An area where snow from an avalanche can collect and bury a victim. More broadly, a difficult area to ski out of once entered.
- Wind-Slab: An area of compacted snow: formed by gusty winds, and often unstable. If near a steep slope, they can collapse and cause avalanches. Wind-slabs are often called wind-loaded slopes as well.
Uneva Ridge East, still holding snow well on May 23.
Final Thoughts
Vail Pass is a popular area, it has been for years, on crowded weekend mornings, you’re going to wonder why you came. Stick with it, especially if you have your eyes set on soft runs a little off the beaten path. Let the majority of crowds hit the West side while you play in a series of friendly bowls or take your craft down some of the couloirs and seldom explored faces to the North and East. The potential for this area is explosively large and seeing as it’s largely covered by the Eagles Nest wilderness, there’s no potential for motorized traffic to cross it. For those itching to see what a small taste of the Gore is like, start here.
Mount Silverthorne in the Central Gore.
Additional Resources:
AIARE, Avalanche Research Education. (n.d.)
Brown, Jennifer. (Jan. 29, 2021). As Colorado backcountry use soars, Vail Pass’ fee model could be a way to manage the crush.
Colorado Avalanche Information Center. (n.d.)
Colorado Tourism. (2021).
- Minturn Accommodations in Colorado.
- Edwards Accommodations in Colorado.
- Avon Accommodations in Colorado.
COTrip (CDOT Cameras and Road Conditions for i-70). (n.d.)
Drive Colorado. (n.d.)
National Weather Service
- Vail Pass Extended Forecast (n.d.)
O’Neil, Devin. (Feb. 10, 2017). Getting to Know Vail Pass.
OpenSnow
- Vail Pass (n.d.)
OpenSummit
- Vail Pass (n.d.)
Town of Vail. (2021). Welcome to Vail.
USDA: Natural Resources Conservation Service, National Water and Climate Center. (n.d.) Snotel Interactive Map.
USFS: White River National Forest. (n.d.) Vail Pass Recreation Area.
U.S. News & World Report. (2021). Best Hotels in Vail.
Vail Resort
- Snow and Weather Report. (2021).
Villacaren, Marie. (Jan. 21, 2020). Top 4 Cool & Unusual Hotels in Silverthorne.
Villaceran, Marie. (Jan. 26, 2020). Top 7 Cool & Unusual Hotels in Frisco.
-
Backcountry Ski Gear: Essentials for Human Powered Skiing
-
Guide To Planning A Backcountry Ski Adventure
-
The Minturn Mile: Colorado’s Most legendary Backcountry Ski Run
-
Backcountry Skiing in Rocky Mountain National Park: Bear Lake Area Ski Lines
-
Backcountry Skiing in Rocky Mountain National Park: Longs Peak Area Ski Lines
-
Backcountry Skiing in Rocky Mountain National Park, Colorado: Best of the Rest
Terms of Use: As with each guide published on SKYBLUEOVERLAND.com, should you choose to go backcountry skiing, do so at your own risk. Prior to setting out check current local weather, conditions, and land/road closures. While taking a trail, obey all public and private land use restrictions and rules, carry proper safety and navigational equipment, and of course, follow the #leavenotrace guidelines. The information found herein is simply a planning resource to be used as a point of inspiration in conjunction with your own due-diligence. In spite of the fact that this guide was prepared under diligent research by the specified contributor and/or contributors, the accuracy of such and judgement of the author is not guaranteed. SKYBLUE OVERLAND LLC, its partners, associates, and contributors are in no way liable for personal injury, damage to personal property, or any other such situation that might happen to individuals following this guide.


