


|
Getting your Trinity Audio player ready...
|
Timo Holmquist, a ski mountaineering expert with extensive experience in Rocky Mountain National Park’s Bear Lake Region, presents a comprehensive and informative guide for backcountry skiing. The guide includes multiple routes suitable for a variety of skiers and snowboarders.
Overview
Explore the backcountry skiing opportunities in the Bear Lake region of Rocky Mountain National Park with this guide.
This is the second installment of our four-part series on the top backcountry ski spots in Colorado’s famous national park. Before diving into the details of the Bear Lake area, we’ll provide an overview of the park as a whole. For those seeking a diverse range of ski routes within a compact area, Bear Lake is a must-visit destination in the Rocky Mountains.
Backcountry Skiing comes chock full of benefits and risks, almost in equal measure. It is a discipline that rewards methodical and purposeful learning with a deeper connection to nature. It can also be very dangerous for the uninitiated and seasoned veterans alike; avalanches don’t pick favorites. However, by arming yourself with the right gear and planning knowledge, backcountry skiing can satisfy the outdoor itch for multiple lifetimes.
It can be noted that this guide includes 3D interactive maps of each region described. Each ski line and their access routes are shown for convenience.
Warning: This is part of a four-part series on backcountry skiing in Rocky Mountain National Park and only encompasses a brief overview available ski lines in the Bear Lake Region. For tips and best practices for planning a backcountry skiing adventure, please refer to our Backcountry Ski Planner. For ANYONE traveling into avalanche territory, consider enrolling in an Avalanche training course by AIARE; it absolutely save lives.
Table Of Contents
Article Navigation: Click on any of the listed items in the table of contents below to jump to that section of the article. Similarly, clicking on any large, white section header will jump you back to the Table of Contents.
- Overview
- Backcountry Gear
- Backcountry Planning
- Rocky Mountain National Park Overview
- Bear Lake Area Overview
- Access to Bear Lake
- Places to Stay
- Our Rating System
- Bear Lake North
- Banana Bowls
- Joe Mills Glades
- Ptarmigan Glacier
- Notchtop Couloir
- Mini AK Couloir
- Bear Lake Main
- Emerald Basin Area Ski Lines
- Dream Lake Chutes
- Dragon Tail Couloir
- Dead Elk Couloir
- Hallett Peak: East Couloir
- Tyndall Glacier/Tyndall Gorge
- Chaos Canyon Area Ski Lines
- Terrain Park
- Haiyaha Couloir
- Hippy Trees
- Hallett Peak: Chaos Couloir
- Otis Peak Area Ski Lines
- Hourglass Couloir
- Otis Redding Couloir
- Emerald Basin Area Ski Lines
- Bear Lake South
- Andrews Glacier
- Quick Terminology Reference Guide
- Final Thoughts
- Additional Resources
(Please Note: Many of the parent lines listed above have add-ons and variations, which are also discussed)
Backcountry Gear
Before we begin, let’s lay out some quick backcountry gear knowledge (for a more comprehensive guide, check out our article, Backcountry Gear: Essentials for Human Powered Skiing). The list below is crucial, don’t skimp on gear when avalanches are in play.
- Skis/Helmet/Gloves/Goggles
- Winter Clothing: waterproof shells, thick ski socks, layers, puffy, beanie, hand warmers, etc.
- Skins
- AT Bindings (Frame or Tech)
- Avalanche Gear: Beacon, Shovel, Probe, and Radio
- Backcountry ski pack
- Food/Water/First-Aid Kit
- For multi-day adventures: 4-season tent, winter rated sleeping bag, avalanche airbag, orienteering equipment, batteries/rechargeable batteries
- Mountaineering Axe and Crampons. While there are hundreds of lines that do not require these tools, some of the most epic lines in Rocky Mountain National Park do. Research which crampons fit over your alpine or tech boots before buying! Generally speaking, you do not need an “Ice” axe unless you are climbing an ice wall, a mountaineering axe should work fine.
Remember, it isn’t enough to simply own gear; take the time to figure out how to use it before heading out. Speed is key, especially in a backcountry avalanche rescue.
Visit our Backcountry Gear Guide: Essential for Human Powered Skiing to get comfortable with the necessary gear and how to use it.
Backcountry Planning
Once you have the gear and know how to use it, it’s time to start planning. We’ll briefly break down the central components below, but check out our Guide to Planning a Backcountry Ski Adventure for an in-depth analysis of the planning process. A good plan can separate success from disaster. No outdoor activity is worth your life.
Pre-Planning
Learn how to Ski at an EXPERT level before heading outside ski resort boundaries. Find a squad. Start backcountry gear research. Hone your craft. Get in shape.
Long-Term Planning
- Geographic reduction: where are you skiing? Start big, get small.
- Weather and snowpack research.
- Research ski lines using books, online resources, and forums. Key data:
- Total distance, total climb, total descent, slope angle
- Local Emergency contacts
- Unique factors: trees, cornices, couloirs, avalanche history
- Get into the maps and apps, know the area like the back of your hand.
Short-Term Planning
- Managing Expectations
- Constantly check weather updates until the morning you leave. Remember, snow reflects light, if it’s a sunny day, bring sunscreen!
- Popularity of your backcountry line.
- Tell people where you’re going and who to call if things go wrong.
- Have a back-up plan.
- Who’s got the medical training?
- Go over the plan in detail with your squad. CHECK FOR UNDERSTANDING.
- Packing
- Make sure everything fits, and you can access your avalanche gear quickly. Time is critical in a burial situation.
On-site Planning
- What do you see when you get there?
- Watch out for tree-wells, wind-loaded slopes, cornices, bergschrunds, and other topographical considerations.
- Timing and snow surface i.e. environmental factors. Not all snow skis the same.
Post-Planning
- Analyze – What worked well? What didn’t?
- Ease into the harder stuff.
The steps listed above are only a skeleton outline;
See our Guide to Planning a Backcountry Ski Adventure to iron out the critical details.
Remember, you can always take an avalanche safety course through AIARE; it can absolutely save lives.
Rocky Mountain National Park Overview
Rocky Mountain National Park is the third most popular National Park in terms of visitation, right behind The Great Smokey Mountains and the Grand Canyon (nps.gov, 2020). Like the Smokies, Rocky Mountain has a road bisecting the park called Trail Ridge. In the winter, this road is closed to through traffic but remains open on either end of the park.

Rocky Mountain National Park Entrance
Bear Lake Road, accessed from the eastern fringe of Trail Ridge, is also plowed through the winter and provides another fantastic access point to backcountry glory. Most of the easily accessible backcountry skiing in Rocky Mountain takes place between Bear Lake and Hidden Valley (see our Guide to Backcountry Skiing at the Hidden Valley/Sundance Mountain article).
However, that doesn’t mean there aren’t tons of other worthwhile places to ski. With Rocky Mountain National Park clocking in at over 415 square miles, it’s easy to find new and exciting places to recreate.
Because it is a National Park, there are many options for weather forecasting. During the planning phase of any backcountry ski trip, it’s important to check the weather using multiple sources. The forecast for Estes Park is a good starting point. Estes sits right outside the eastern park boundary, only thirty minutes from Bear Lake.
There is also a forecasting station at the Alpine Center off of Trail Ridge. Between the forecasts for Estes and the Alpine center, you can usually lock in a good spectrum of possible weather factors. In addition, the mountain weather forecast for Hallett Peak is very handy. Hallett Peak is in the middle of the Bear Lake backcountry, and the mountain forecast is chock full of weather details reported from two different elevation gradients.
Keep in mind there are multiple components to the weather; it’s not just about precipitation. The temperature will dictate what layers to bring, and local weather patterns will help you figure out what’s important. For example, in Rocky Mountain and the larger Front Range in general, make sure to check the wind forecast. The Front Range is notorious for strong, blustery winds, and fighting your way up to a ski line in 50mph gusts is not fun.
There are also Snotel weather station sites scattered throughout the backcountry offering snowpack data. It can be a bit confusing to sort through the site, but here is the interactive map option. Use the menu on the right-hand side to create specific condition queries. The linked map will open with a window to the specific station at Bear Lake.
Snowpack data is really important for backcountry skiing; not only will it tell you if there is even enough snow to ski on, it will also show you whether or not the area is experiencing an average winter. Any significant deviation away from average is noteworthy. Deep winters create more pronounced avalanche conditions, but wimpy winters can as well, especially if a storm overloads weak and unstable snow. Snowpack science should be a critical component of planning.
As crucial as snowpack data is, the numbers would be incomplete without an avalanche forecast. This forecast is MANDATORY before heading out. In Colorado, we are lucky to have the CAIC (Colorado Avalanche Information Center). The information is easy to read, the maps are color-coded, and a flurry of explanations gives depth to the forecast. More specifically, Rocky Mountain is in the Front Range Zone; make sure you are checking the right area for the most accurate information. Do not go into the Colorado backcountry without checking CAIC.
Bear Lake Area Overview
Despite its immense size, Rocky Mountain National Park is known for a few specific areas. These include Longs Peak, the farthest north 14,000-foot mountain in Colorado, and the only one in a National Park; Trail Ridge, the alpine ribbon of asphalt that traverses the spine of the park, and Bear Lake, which provides access to some of the most beautiful areas in the park including Glacier Gorge.
3D Map Navigation Instructions
On desktop: Hold the ctrl key while you drag to rotate the map. Use your mouse scroll to zoom in and out.
On mobile: Rotate and zoom on mobile by pinching and moving two fingers.
The Bear Lake Backcountry is well documented and features numerous ski lines. Because of its popularity and wealth of options, it’s best to break down the area by the various approach routes.
The first area is Bear Lake North, which is approached via lower Flattop Mountain Trail and Fern Lake/Odessa Lake trail.
The second area is Bear Lake Main, which includes all of Emerald Lake Basin, Hallett Peak, Chaos Canyon, and some lines off the eastern edge of Otis Peak.
The final area is Bear Lake South, approached via Glacier Gorge and allows access to Andrews Glacier.
Skier and riders will love the sheer variety of the area.
Keep in mind: if this is your first-time backcountry skiing in Rocky Mountain National Park, it may be worth checking out Hidden Valley and Sundance Mountain before diving into the Bear Lake Region.
The lines around Bear Lake are all Intermediate and above. While many lines feature excellent vertical descents, some have pronounced avalanche risk, and everyone needs to have the appropriate gear.
Access to Bear Lake
Bear Lake is located southwest of Estes Park and can be accessed via Bear Lake Road. Because Trail Ridge is closed as a through road during the winter, it is only practical to approach from the East. Make your way to Estes Park, enter Rocky Mountain National Park on US 36, and take a left onto Bear Lake Road, located only a minute or two past the entrance booths.
Once on Bear Lake Road, continue driving for a little more than nine miles as the road climbs higher. The best parking option is Bear Lake Parking area at the very end of the road. The parking lot is massive and should hold all winter traffic. If the lot is full, which is possible from April onward, Glacier Gorge Junction Trailhead on your left-hand side, 8.4 miles from the start of the road, is a good alternative parking lot. Since the road is plowed, Bear Lake Trailhead is popular all year round.
In mid to late May, another option opens up. If both lots are full, you can head down to the Park and Ride lot near Glacier Gorge Campground and take a free shuttle to the trailhead. The shuttle service is seasonal; check the park website to find out when the shuttle opens.
Remember, an entrance pass is required to visit Rocky Mountain National Park. These passes can be purchased online. Please visit the official National Park website to ascertain what passes and entrance fees are required. Fines will be administered to those without proper passes.
Because of the ease of access, we highly recommend scouting your routes before committing to them. While conditions are generally great from March through mid-May, some of the lower routes melt out a lot faster than others. On the other hand, glacier skiing on Tyndall, Andrews, and Ptarmigan can offer year-round turns for the dedicated, but with increasingly variable conditions as the summer chugs on. It’d be a real shame lugging all your equipment up to a line that isn’t skiable.
Places to Stay
The best option for accommodations near Bear Lake is Estes Park. The town is a four-season playground offering myriad lodging opportunities. It is impractical to stay in Grand Lake on the western side of the park because of seasonal closures along Trail Ridge.

Estes Park on a Winter Night.
If you’re based in the Front Range, Bear Lake is only an hour and a half from Boulder and metro Denver. Loveland, the closest major town to Estes Park, is only 45 minutes away with no traffic. Due to the relative proximity of Hidden Valley to major population centers, it may be easier to day-trip up to the ski area.
If you want to stay in Estes, please visit the tourism bureau website here. The search filters on the site will help you narrow down options. Additionally, Airbnb frequently offers great options. Because winter is a down season in terms of visitation, many lodging establishments will be offering discounts and perks to attract clients.
Our Rating System
Below you’ll find route descriptions, maps, and ratings as they pertain to the lines we cover. These articles cover the most reported and referenced lines, not all possible lines you could ski. We utilize a four-tier rating system illustrated as follows:
- Beginner (Green)
- Intermediate (Blue)
- Difficult (Maroon)
- Very Difficult (Black)
Some areas covered only exhibit a few tiers; others exhibit all of them. Regardless, it is important to understand that each rating does not ONLY correspond to the steepest slope angle skied. Some lower-angle Difficult terrain is simply difficult to access and requires an immense amount of effort to attain, hence the harder rating. Take the ratings seriously as the separation between Difficult and Very Difficult often involves many of the hallmarks of true ski mountaineering, ropes, legitimate ice axes, mountaineering crampons, etc. It is incumbent upon each reader to understand their limits. Always start small.
Bear Lake North
Alright, let’s do this. Due to the well-documented and numerous runs accessible from Bear Lake, I’ve broken the area down into three general sections based on their approach routes. The first section is Bear Lake North.
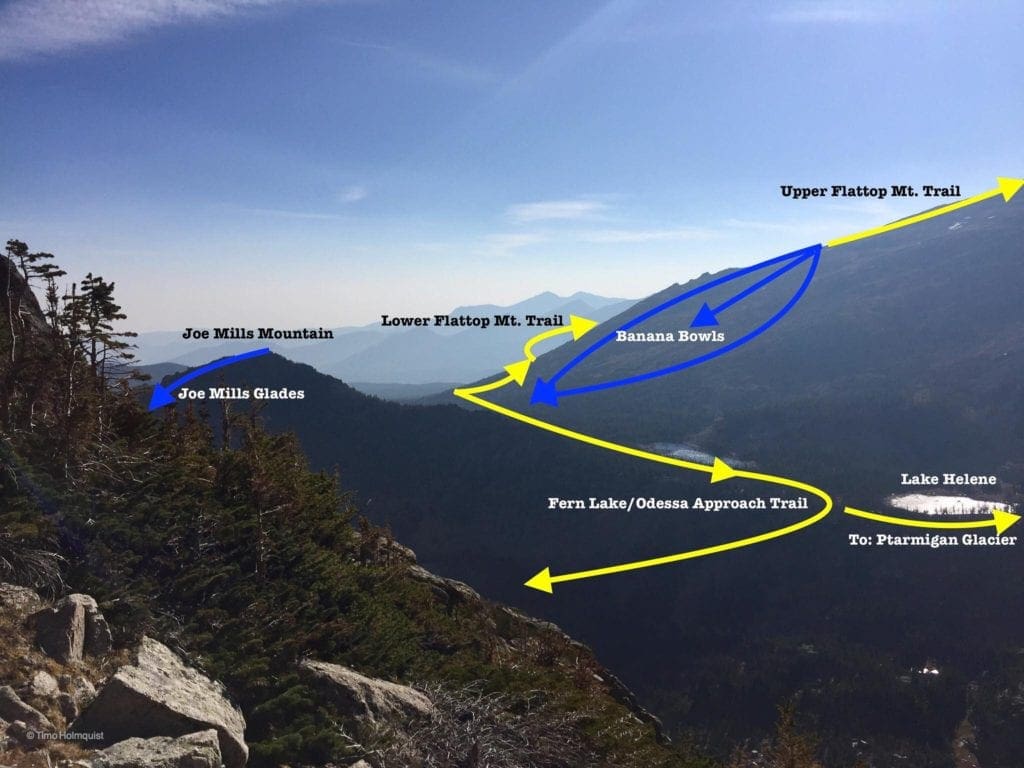
Map of the Backcountry Ski Lines in the Bear Lake North Area.
27-29 degrees 29-31 degrees 31-34 degrees 34-45 degrees 45+ degrees
3D Map Navigation Instructions
On desktop: Hold the ctrl key while you drag to rotate the map. Use your mouse scroll to zoom in and out.
On mobile: Rotate and zoom on mobile by pinching and moving two fingers.
Banana Bowls:
- Essentials: 0.52 miles, 901-foot vertical
- Status: Intermediate
- Steepest slope angle: 28 degrees
- Good for: Open alpine skiing in low-risk avalanche terrain, light trees.
- Accessed via: Fern Lake/Odessa Lake Trail to the bottom of the line. Flattop Mountain Trail beyond treeline to the top of the line. As the trail veers away from the edge of the ridge and heads north, find a suitable start and descend into the wide and inviting Banana Bowls to your right (NE). Stats to the top of Banana Bowls from Bear Lake parking lot: ~1.75 miles, 1650-foot ascent.
Rock Garden Variation: As you skin up the Flattop Mountain trail, and before clearing treeline, veer right towards a rocky ridge point. From the rocky ridge point, turn NE and ski down through moderate glades until intersecting with the Fern Lake/Odessa Lake trail. The entrance to this particular line has been reported as difficult to find. If you’re having trouble, continue beyond treeline and make your way to Banana Bowls.
-
- At a glance: 0.42 miles, 545-foot vertical
- Steepest slope angle: 30-32 degrees
Ascent/Access Routes to the Banana Bowls:
The main access route to Bear Lake North is to take the Bear Lake loop trail north around a small part of the lake until coming to a well-signed junction. Here, you’ll take a right and begin climbing. Another junction presents itself roughly a mile from the trailhead; take a left here, a right will take you to down Bierstadt Lake. You are now on the Flattop Mountain Trail. Continue north until reaching another junction. Here, if you take a left, you’ll start skinning up the bulk of Flattop Mountain.
You can use this trail to access the top of the Banana Bowls.
Alternatively: continue straight; now on the Fern Lake/Odessa Lake Trail and skin to the bottom of Banana Bowls. The approach to all lines in Bear Lake North can be accessed from the Fern Lake/Odessa Lake Trail.
Picture from little Matterhorn of Banana Bowls: no snow.
Joe Mills Glades
- Essentials: 0.21 miles, 665-foot vertical
- Status: Intermediate
- Steepest slope angle: 35 degrees (brief)
- Good for: Moderate glade skiing in a beautiful setting.
- Accessed via: Fern Lake/Odessa Lake Trail, then ascend up to Joe-Mills Mountain. Once you hit the summit ridge, follow it up to the high point. The line starts on the backside of the summit and heads in a northern direction (a right diagonal) to avoid cliffs, before veering left (northwest) and eventually reconnecting with Fern Lake/Odessa Lake Trail as it makes its way to Odessa Lake. Once you hit the trail, skin up to your left to exit the area.
View of the Joe Mills Glades and Banana Bowls from Bear Lake North.
Access Route to Joe Mills Glades:
To access more terrain, keep skinning along the Fern Lake/Odessa lake Trail past Flattop Mountain Trail. You’ll pass between a few open areas and tree groves. The track will make a gradual turn to the left, now bearing due East.
Once you emerge from the trees again, you’ll be given a view revealing the lower, tree-studded Joe Mills Mountain on your right. The steep and rocky slopes of Notch-top will be in front. This open area is a great place to start thinking about your ascent of Joe Mills mountain.
After passing the small junction for the Sourdough Backcountry Campsites (on your right), start looking for the path of least resistance up to the summit. The best ascent route will get you to the top in a quarter-mile with ~300 feet of elevation gain.
Make sure to head to the highest point along the ridge; there is a lower knob closer to you as you climb, but the skiing there is limited and leads to a steep and dangerous slope on the other side.
Ptarmigan Glacier:
- Essentials: 0.49 miles, 1166-foot vertical
- Status: Difficult
- Steepest slope angle: 40+ degrees
- Good for: Excellent, steep alpine turns on an active glacier. NOT for beginners. Seasonally dependent factors include cornices, crevasses, and rocky runouts. A mountaineering axe and crampons are HIGHLY recommended. Due to its perennial nature, it is possible to ski bits of Ptarmigan Glacier year-round, though the effort-to-pay-off ratio takes a dive the deeper into summer you get.
- Accessed via: Fern Lake/Odessa Lake Trail to lake Helene. From Lake Helene, ascend due south into the Ptarmigan basin. Ptarmigan Glacier sits in the middle of the basin. It is composed of two pieces (more or less together in winter/early spring). The top part is generally steeper and can develop cornices at the headwall. Climbers left (or skiers right) is less steep.
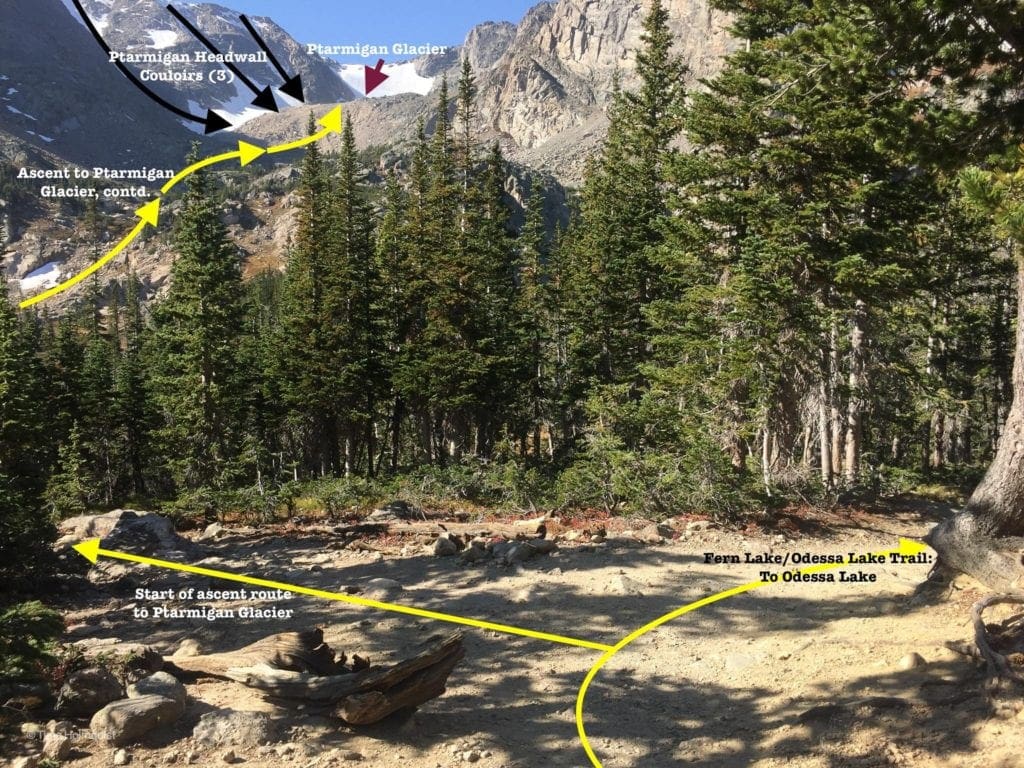
Ptarmigan Glacier: picture from height of land trail-break. Picture from height of land trail-break) AND (from Odessa lake for perspective.
Access Route to Ptarmigan Glacier:
If continuing into the Ptarmigan basin (aka Upper Odessa Gorge), once you pass the ascent route up Joe Mills Mountain, continue along a flat section of the Fern Lake/Odessa Lake Trail.
Eventually, the track will lose significant elevation and take an abrupt right, heading down to Odessa Lake. Before the abrupt right-hand turn and just past the height of land, take a left (south). Only a minute or two later, you’ll start paralleling the shoreline of the shallow lake Helene (most likely frozen).
Through the thinning trees, you’ll be looking at the lumpy bulk of Flattop Mountain (center-left) and a high basin to its right; getting in there is your target. Further to the right, you’ll be able to see the distinct shape of Notch-Top. Soon, you’ll shed the trees and have to find the easiest way into the basin (climbers left). Once you get up into it, a few steep and demanding ski lines present themselves.
Ptarmigan Glacier: picture from Odessa lake for perspective.
Ptarmigan Headwall Variations: There are three variations to the Ptarmigan Glacier Line: all three are harder. Instead of ascending to the center of the Glacier, find three obvious chutes descending towards you from Flattop Mountain to the left. They all require crampons and mountaineering axes to ascend.
- At a Glance: In ideal conditions… 0.4 miles, 1200-1300 foot-vertical.
- Steepest slope angle: 50-60 degrees. ***Uneven snowmelt can increase this angle. In the early summer, the runouts melt first, limiting enjoyment. ***
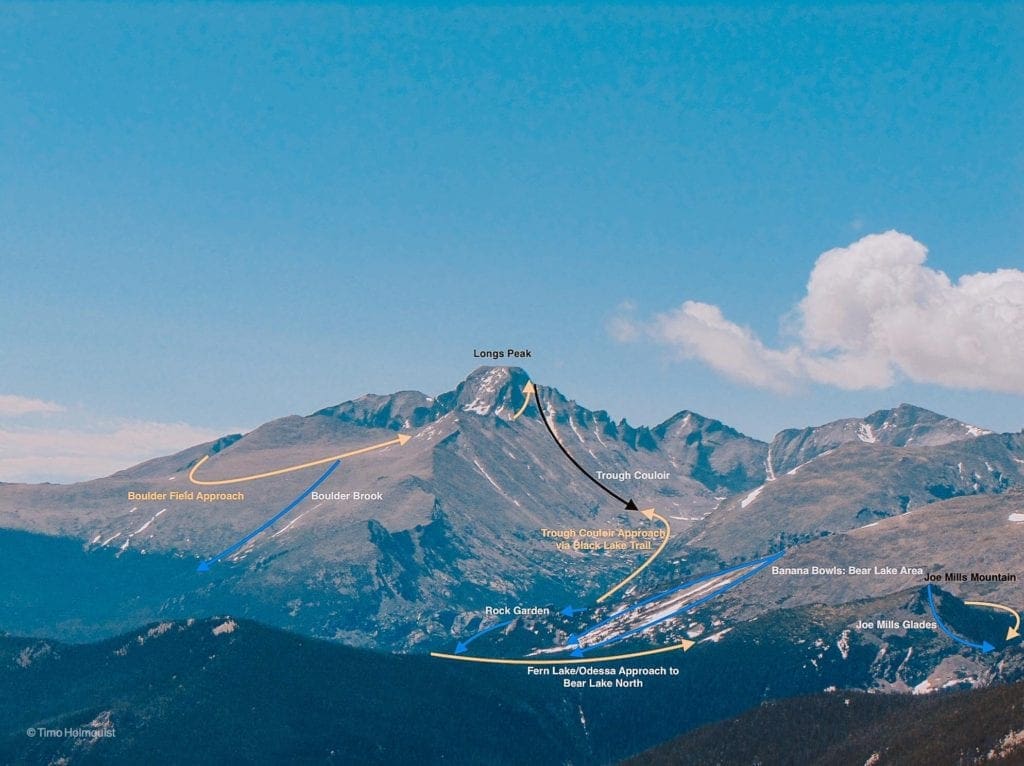
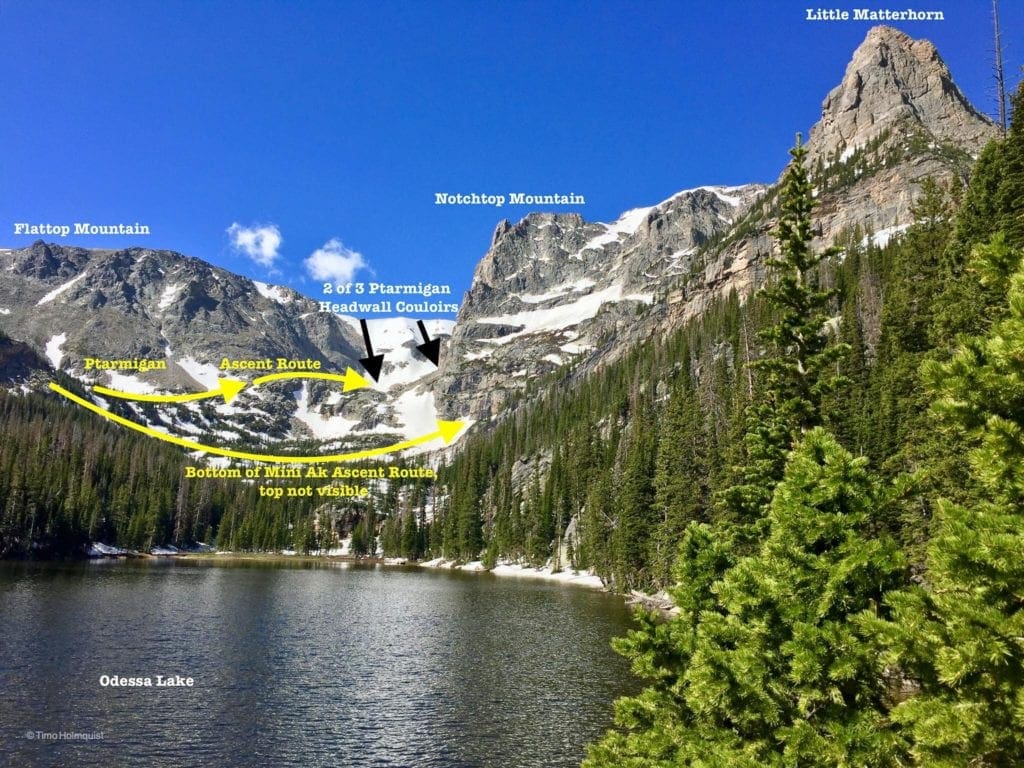
- Notchtop Couloir
- Essentials: 0.37 miles, 1272-foot descent.
- Status: Very Difficult
- Steepest slope angle: 45-50 degrees.
- Good for: Seasoned veterans with multiple years of experience dealing with steep slopes and dangerous avalanche conditions. Not a good place to push your limits, approach with extreme caution.
- Accessed via: Fern Lake/Odessa Lake trail to Lake Helene. From Lake Helene, ascend dues south into the Ptarmigan basin (aka Upper Odessa Gorge). Once in the basin, turn to your right and consider the bizarre shape of Notchtop Mountain. Follow the ridge to the left of the obvious rock spire near the summit. Roughly halfway between the rock spire and Ptarmigan Glacier is a long, thin couloir, that’s the line. Ascend at your own risk. Crampons/mountaineering axe required.
Notchtop Spire Couloir Variation: MOST DIFFICULT. This seldom skied route is only for the absolute best of the best. It is the couloir closest to the summit of Notchtop on its west side. If looking up at Ptarmigan Glacier from Upper Odessa Gorge, spin right 90 degrees to sight it. The line suffers from unstable rock, tight corridors, and extremely dangerous avalanche conditions. There is no bail-out option once you are in the couloir. NOT FOR BEGINNERS.
-
- At a Glance: 0.36 miles, 1333-foot vertical
- Steepest slope angle: 50-60 degrees.
Mini AK Couloir
- Essentials:
- 0.15 miles, 670-foot descent.
- Combined with ascent route: 0.93 miles, 1456-foot descent.
- Status: Very Difficult
- Steepest slope angle: 45-50 degrees.
- Good for: Seasoned veterans with multiple years of experience dealing with steep slopes and dangerous avalanche conditions. Not a good place to push your limits, approach with caution.
- Accessed via: Fern Lake/Odessa Lake trail to Lake Helene. From the Lake Helene area, continue on the trail, descending north towards Odessa Lake. As soon as is feasible, skin to the left and down to the bottom of the basin. You’ll ascend the opposite side, veering right to keep the low point between Little Matterhorn and Knobtop in sight. The approach is not too difficult until you come upon the cliff bands surrounding the start of the couloir. See variation below to keep the skiing manageable. Crampons/mountaineering axe required.
Halfway Variation: The ascent to the bottom of the Mini AK is a suitable run in and of itself. Turn around when it gets too steep or when you reach cliff bands that seem impassable and ski back towards Joe Mills Mountain across the basin.
- At a Glance: 0.77 miles, ~900-1000 feet depending on your starting point. Note: you will have to climb out of the low point in the basin to regain your exit route.
- Steepest Slope Angle: 35 degrees (relatively brief)
Access Route to Mini AK Couloir:
If nothings piqued your interest on the approach route so far, continue on the Fern Lake/Odessa Lake trail as it descends down to Odessa Lake. Only a few minutes after starting the descent, you’ll enter an open area where Odessa Lake should be visible below you and a high ridge will be visible to your left, connecting Knob-Top Mountain (not to be confused with Notch-Top) with its’ dramatic and rocky endpoint, Little Matterhorn.
The saddle between them can be skied. You’ll have to descend from the skin track into the basin and reclimb to the ridge saddle to get to the top of the line. (Picture from Odessa lake)
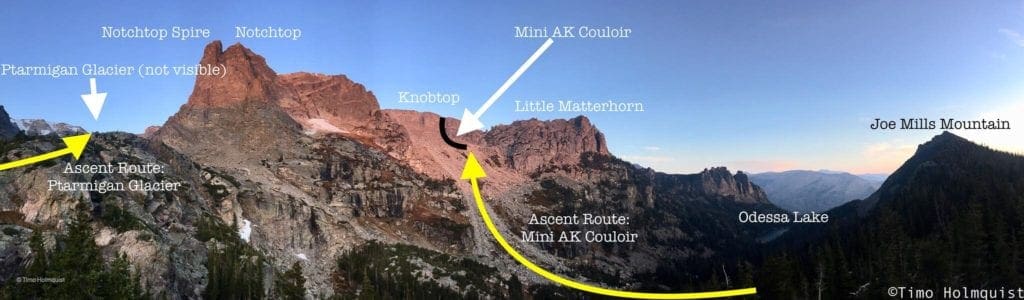
Odessa Gorge and Mini AK Basin Panorama.
Bear Lake Main
Bear Lake Main represents the largest concentration of lines in the area and by far the most popular. Famous lines like Dead Elk Couloir and the Dragon Tail, while legendary in the right conditions, may come with crowds. The ski lines stretch from the flanks of Flattop south across Emerald Lake Basin and Chaos Canyon.
Map of the Backcountry Ski Lines in the Bear Lake Main Area.27-29 degrees 29-31 degrees 31-34 degrees 34-45 degrees 45+ degrees
3D Map Navigation Instructions
On desktop: Hold the ctrl key while you drag to rotate the map. Use your mouse scroll to zoom in and out.
On mobile: Rotate and zoom on mobile by pinching and moving two fingers.
Emerald Basin Ski Lines
Dream Lake Chutes
- Essentials: 0.21 miles, 468-foot vertical
- Status: Difficult
- Steepest Slope Angle: ~35-40 degrees, depending on the specific line taken. Mini cliffs and thick trees are common, go slow on your first run.
- Good for: Powdery tree laps for expert skiers.
- Accessed via: Dream lake or Hallett ridge. Once you get to Dream Lake, skin around or across roughly half of it. Turning to your left, you should see a set of shallow, treed chutes that rise up to the ridge top. The chutes themselves are steep, so if climbing up them, make sure to bring crampons and a mountaineering axe or prepare to bootpack your way to the top. If you want to start at the top of the line, before arriving at Dream Lake, take a left on the trail to Lake Haiyaha and ascend to the trail’s height of land. When suitable, veer right and stay on the crest of the ridge separating Haiyaha and Dream Lakes. This ridge eventually gets up to Hallett Peak, but you only need to traverse it until sighting the chutes down to Dream Lake, on your right-hand side.
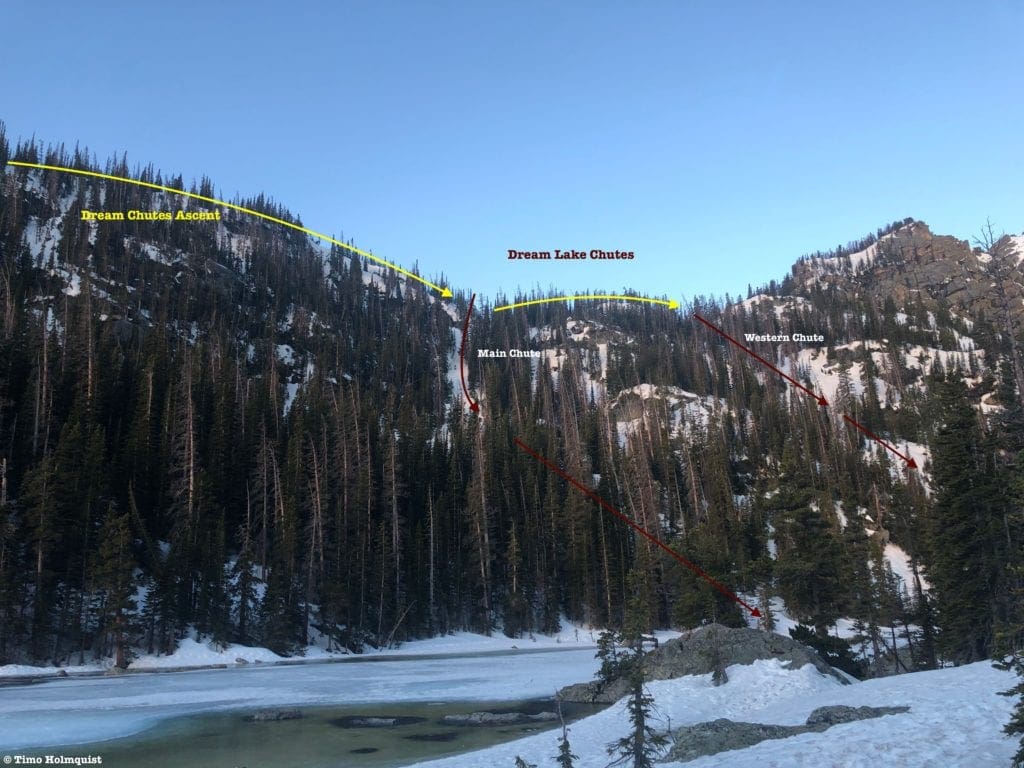
Dream Lake Chutes from the shores of Dream Lake.
Western Dream Lake Chutes Variation: Difficult. The main chute angles down to the central portion of Dream Lake; there is another chute further west that descends to the head of the lake. Continue skinning to the head of Dream Lake and locate it to your left. Or, if on the ridge approach, continue past the entrance to the main chute (maintaining the ridgeline) and spy the entrance once you draw even with the head of the Lake.
- At a Glance: 0.16 miles, 437-foot descent
- Steepest Slope Angle: ~35-40 degrees, depending on the exact line.
Dragon Tail Couloir
- Essentials: 0.49 miles, 1828-foot descent
- Status: Very Difficult
- Steepest Slope Angle: 47 degrees
- Good for: Seasoned veterans with proper avalanche gear.
- Accessed via: The western end of Dream Lake. Look to your right (north) and identify the couloir. It is the right (eastern) arm of two significant breaks through the dramatic, sharp rock towers. You can also use Flattop Mountain Trail to get to the top of the line. Once you ascend past tree-line, keep left, paralleling the sharp edge of the ridge for roughly half a mile. Dragons Tail will be the first major couloir option. There are two entrance options, the right entrance is less steep but requires a small, exposed traverse to get back to the main run. This is one of the greatest backcountry lines in Rocky Mountain National Park and is an exciting springtime descent. Mid-winter brings heightened avalanche and rockslide risk; it’s much better when snowpack consolidates. Waiting too late into the spring, however, will force some awkward rock traverses where snow cover is weak. This line is very, very popular. Plan accordingly.
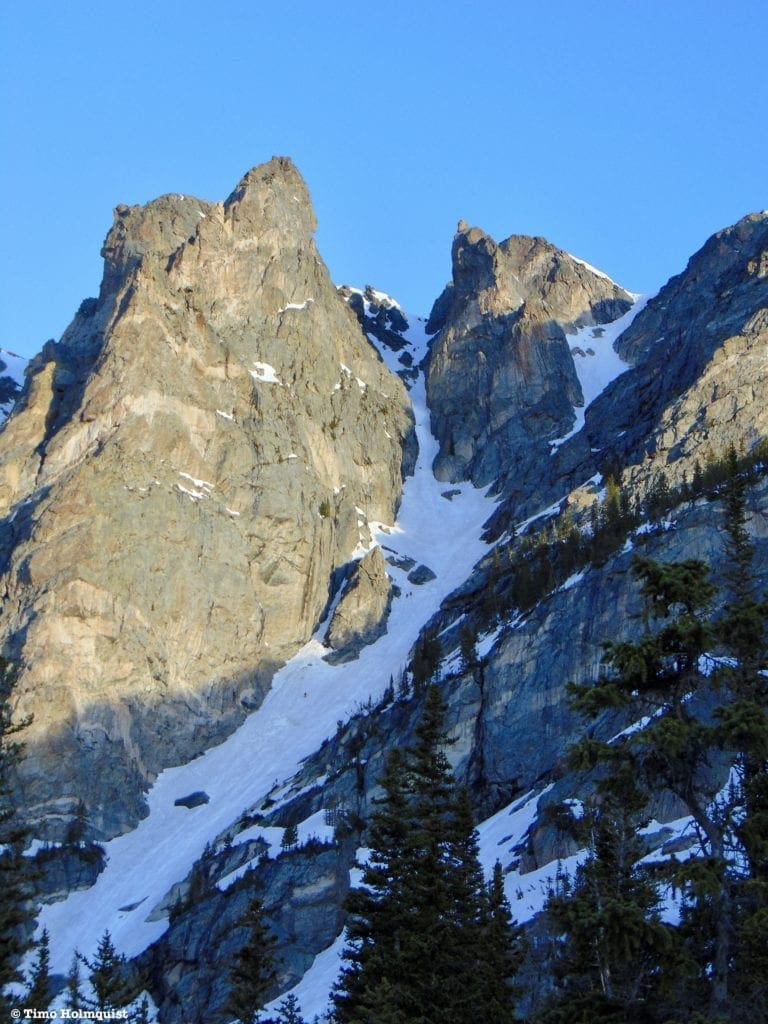
Dragon Tail Couloir in early morning light, you can see a few climbers scaling the lower portion.
Bottom-up variation: Instead of dropping in over the headwall, climb the couloir from the bottom (boot kicking or mountaineering axe/crampons required). The first 75% of the line is a beautiful 30-35 degrees, getting narrower as you ascend. Climb until conditions deteriorate, then strap in and head down. This variation keeps the difficulty down (relative only to the top, it is still a DIFFICULT descent hemmed in by rock towers) and lets you build confidence. There is a wide apron at the bottom near Emerald Lake that you can lap as well. Watch out for skiers above you!
Dead Elk Couloir
- Essentials: 0.5 miles, 1840-foot descent
- Status: Very Difficult
- Steepest Slope Angle: 40-45 degrees with a MANDATORY downclimb or rappel if approaching from the top. Bring a rope, ~30 feet.
- Good for: Expert technical skiers who are comfortable dealing with steep crux’s and technical couloir skiing. With the downclimb at the top, skiing this couloir top to bottom is even more immersive than Dragon Tail. As of Jan. 2020, users reported an anchor above the rappel on skiers right (Powder Project).
- Accessed via: Emerald Lake approach. From Emerald Lake, look to your right (north). Dead Elk is the western (left) of two couloirs splitting the impressive rock towers. The eastern couloir is Dragon Tail. From the top, approach via Flattop Mountain Trail, making sure to pass both entrances to Dragon Tail before hunting for Dead Elks entrance.
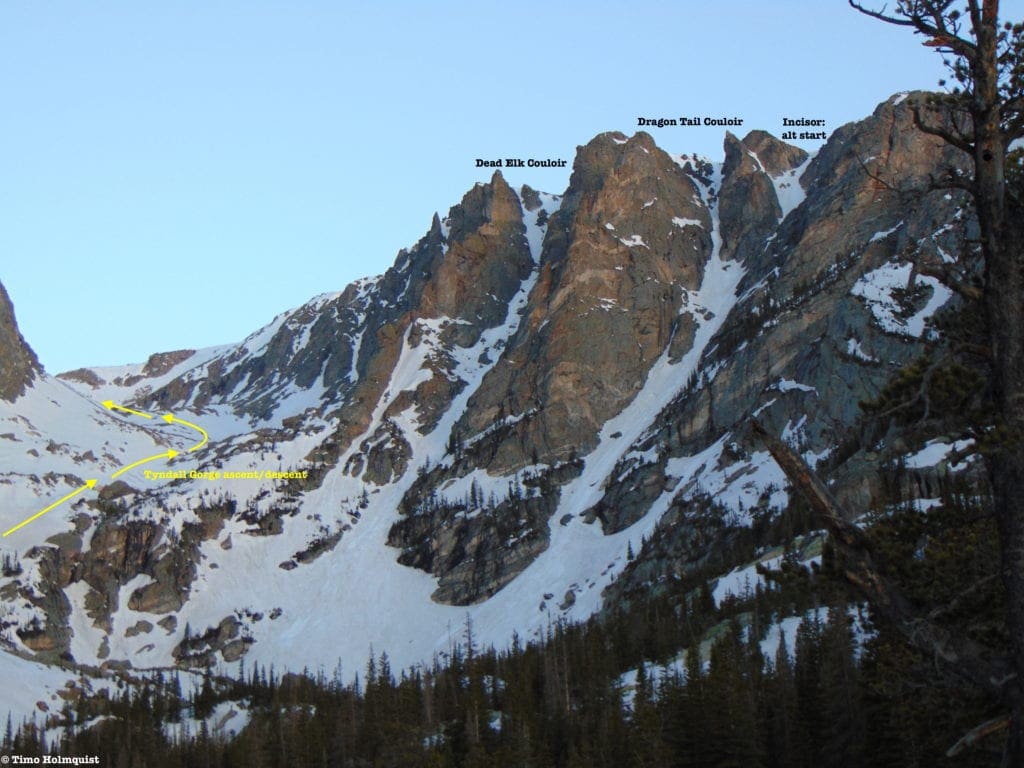
Dragon Tail, Dead Elk and the ascent to the upper part of Tyndall Gorge.
Bottom-up variation: Like its neighbor, Dead Elk can be climbed from the bottom. Work your way up with mountaineering axe and crampons until the slope angle steepens beyond your comfort zone, or you reach the bottom of the crux climb. Strap in and turn around. This variation keeps the slope angle a little lower (~40 degrees) and eliminates the roped component.
Smoke and Mirrors: This variation is NOT easier. It is approached from the Flattop Mountain Trail. Access is a small cut in the ridgeline between Dead Elk and Dragon Tail. The variation includes rappels and no set anchors. Bring a lot of gear if you want to include this variation.
- At a Glance: 0.25 miles, 999-foot descent, broken up by rappels. Think winter mountaineering with a skiing element, not an unbroken line until you funnel back into Dead Elk.
- Steepest Slope Angle: 45 degrees.
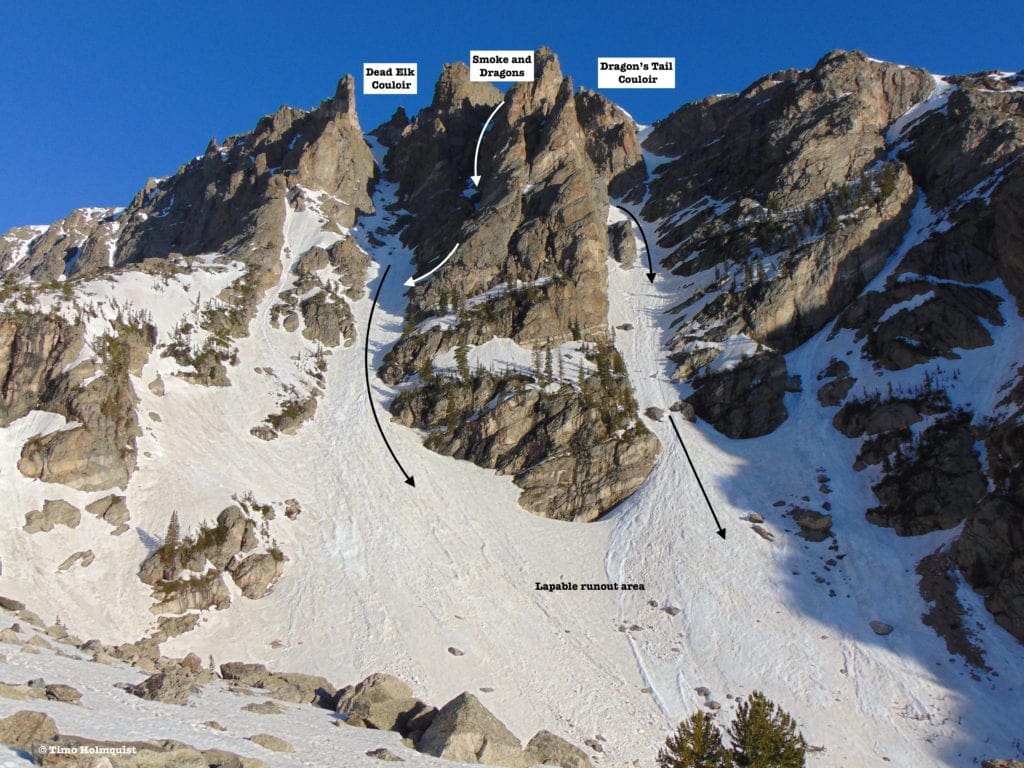
Dead Elk, Smoke and Dragons, Dragon Tail and the lapable runout area from above Emerald Lake.
East Couloir of Hallett Peak
- Essentials: 0.31 miles, 977-foot descent
- Status: Difficult
- Steepest Slope Angle: ~40 degrees
- Good For: Open couloir skiing, avoiding the clusters around Dragons Tail and Dead Elk. Expert skier required with backcountry experience.
- Accessed via: Emerald Lake approach. At the western end of Emerald Lake, instead of heading right towards Dragons Tail, pivot left and sight a broad, steep couloir ascending up to the ridge in front of the blocky summit area of Hallett Peak. Ascend. You can also approach via Hallett ridge. Find your way to the ridge crest and maintain it, passing the entrances to Dream Lake Chutes and continuing towards the blocky summit area of Hallett Peak. At the base of the giant block, sight the top of the line to your right.
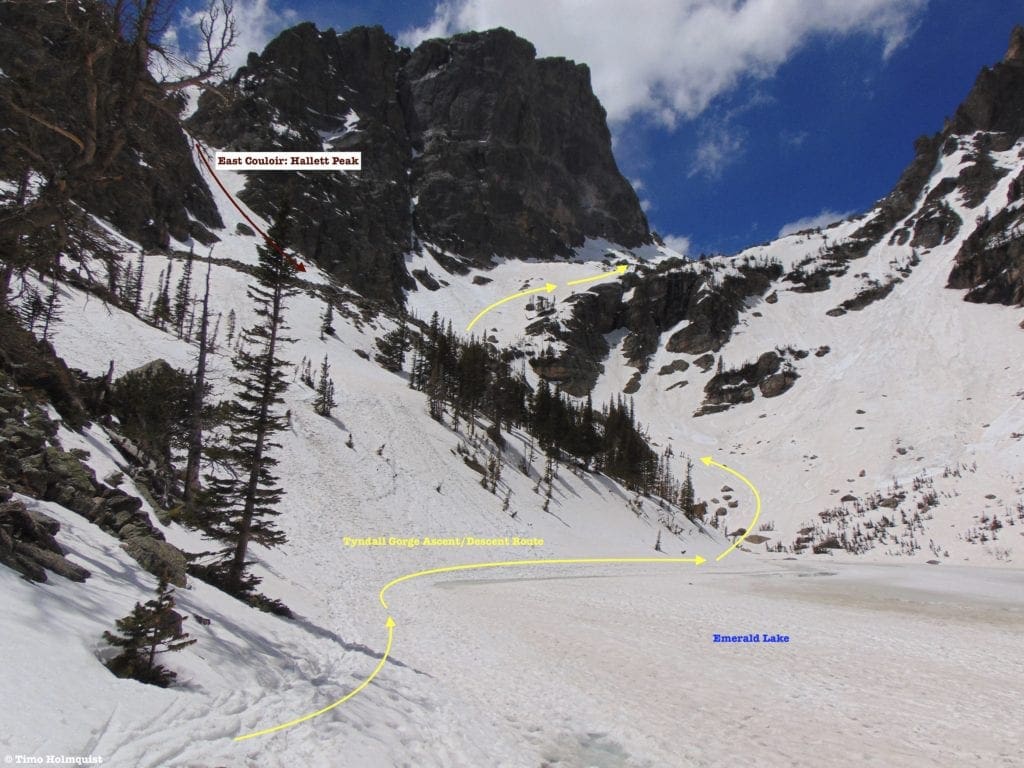
Looking up at the East Couloir of Hallett Peak and the Tyndall Gorge ascent from Emerald Lake.
Tyndall Glacier and Tyndall Gorge Descents
- Essentials: 1.4 miles, 2187-foot descent
- Status: Difficult
- Steepest Slope Angle: 40-45 degrees (brief, at the drop-in). 30-35 degrees if dropping in on the north side of the glacier.
- Good for: A nice, long descent into one of the prettiest basins in Rocky Mountain, with a glacier start to boot. Expert skier required with extensive backcountry experience.
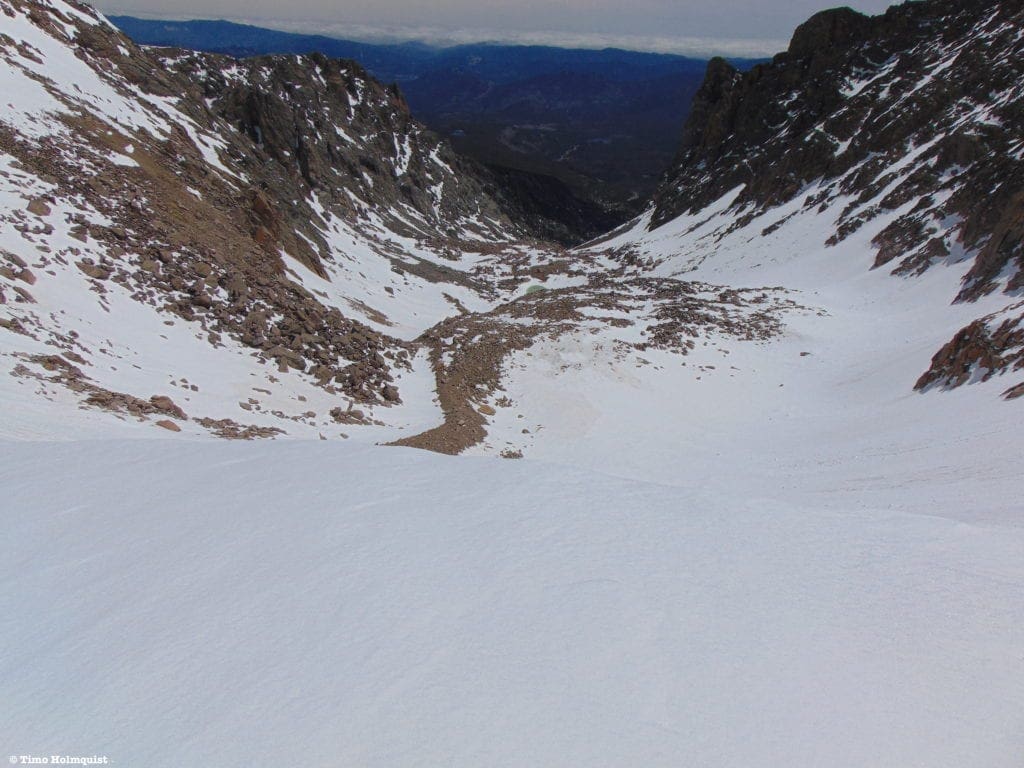
- Accessed via: Emerald lake approach. Pass Emerald Lake and continue into the Tyndall Gorge, eventually finding the headwall of the gorge. The line of least resistance is by the northern end of the gorge rim, climb up (axe and crampons help) and pick your line down. For an easier ascent, skin up Flattop Mountain Trail, passing its summit (marked by a horse-hitch rack), and skin south along the flat, alpine area behind it. Looking left, you’ll be able to stare into the head of Tyndall Gorge.
- Tyndall Glacier hugs the gorge rim at its most western point. Choose one of a few descent options to bring you down into the gorge. Keep in mind: in order to reach the top of this run, you will need to skin at least 4 miles on the Flattop Mountain Trail, or 3.7 miles if approaching via Emerald Lake Basin. In mid-winter, this is avalanche territory, and cornices form regularly on the rim of the glacier. Spring descents are recommended due to the glacial start and higher elevation. Snow typically lingers in the upper gorge through at least mid-summer and all year on Tyndall Glacier itself.
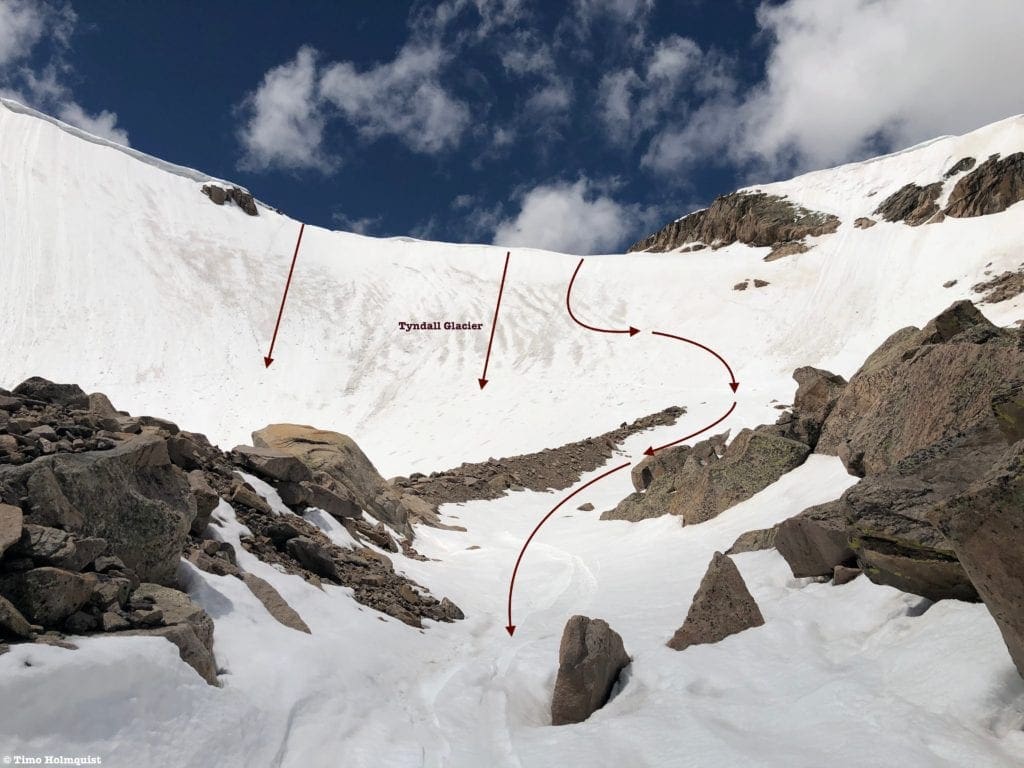
Tyndall Glacier from below.
Tyndall Gorge Variation: Difficult. Approach via Emerald Lake Basin. If Tyndall Glacier at the head of the gorge looks unstable or is too steep, stop your ascent before the going gets rough. There is a nice bench before the glacier ascent. Strap in and turn around; you’ll still be skiing for a long time through this gorgeous…uh, gorge.
- At a Glance: 1.22 miles, 1785-foot descent
- Steepest slope angle: 30-33 degrees. Keep to the right when approaching Emerald Lake; skiers left is a lot steeper. This area also tends to melt out first, when it does, the bushwhack through the willows is demanding.
Looking down Tyndall Gorge from atop the Glacier.
Tyndall Couloir Variation: Difficult. As you approach Tyndall Glacier, sight a steep, diagonal couloir to the south (left), angling up behind the summit lump of Hallett Peak. Later in season, it is separated from the Glacier by a long rock rib before rejoining a larger snowfield below. If approaching from Flattop Mountain Trail, skin around the head of the Gorge until finding the couloir entrance. The summit of Hallett Peak is a quick jaunt from the top of the couloir.
- At a Glance: 0.17 miles, 512-foot descent.
- Combined with Tyndall Gorge: 1.39 miles, 2297-foot descent.
- Steepest Slope: 45 degrees. This is a spring/summer specialty and should not be skied when there is ANY chance for avalanches.
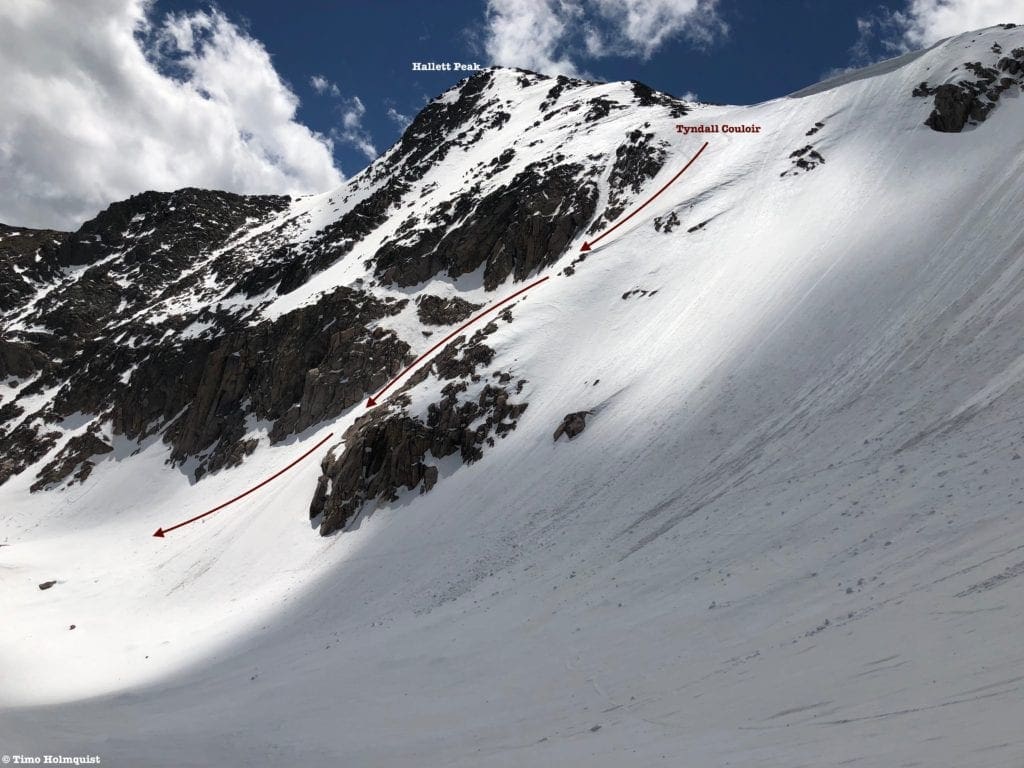
The steep and aesthetic Tyndall Couloir, with Hallett Peak behind it.
Corral Couloir Variation: Difficult. Located on the north side of Tyndall Gorge and roughly 0.4 miles east of Tyndall Glacier, Corral Couloir is a nice alternative descent into the gorge. You can approach it from either Emerald Lake Basin or the Flattop Mountain Trail. The couloir is surrounded by much steeper terrain, but a smart descent down the center keeps the difficulty down. Exit via the always fun Tyndall Gorge descent.
- At a glance: 0.28 miles, 512-foot descent
- Combine with Tyndall Gorge: 1.1 miles, 2100-foot descent
- Steepest Slope Angle: 40 degrees (can be kept in mid-30s with good line selection)
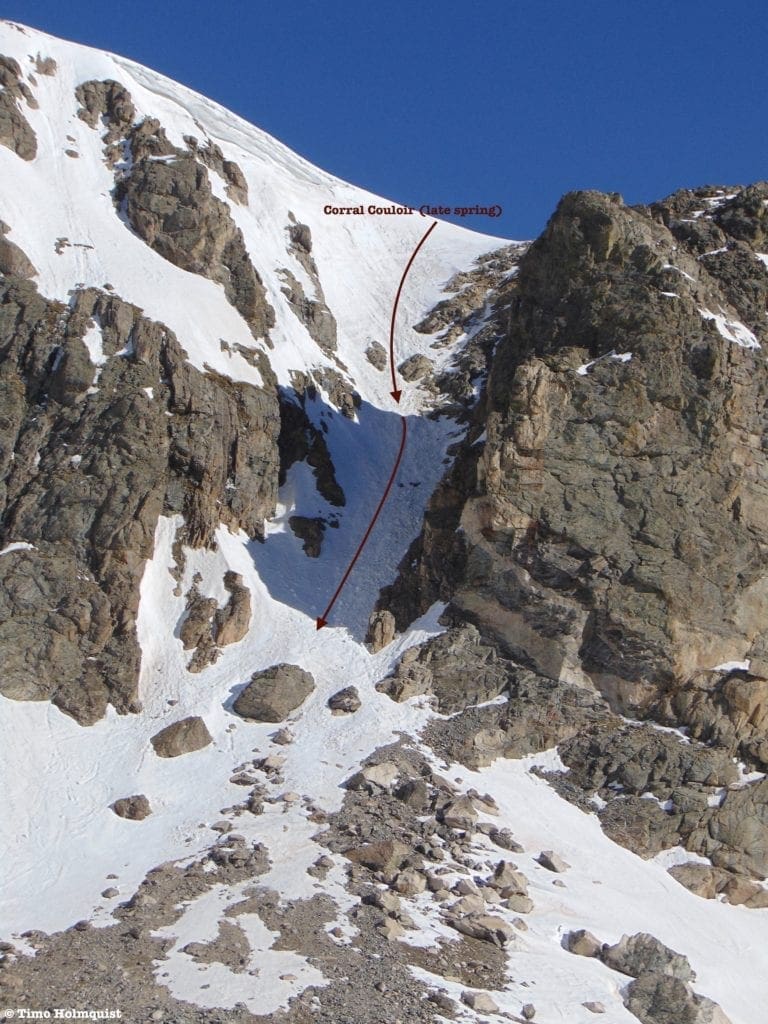
Corral Couloir in late spring conditions from Tyndall Gorge.
Access to Emerald Basin:
Owing to the area’s rampant popularity in the summer: it is fairly easy to get into Emerald Basin and explore its myriad options. From Bear Lake, walk to the head of the parking area, passing a connector trail to Alberta Falls. Almost immediately after, take a left on a wide skin track leading up to Nymph and Dream Lakes. This will be the main access track, passing Nymph, Dream, and eventually Emerald Lake on its way up the basin. Continuing past Emerald lake will get you to additional lines, including Tyndall Glacier.
Alternative access:
Most of the runs off the right side of Emerald Basin (north) can be accessed from the Flattop Mountain Trail. The main benefit is being able to reach the tops of many lines without having to climb up skinny couloirs. The main detractor is that entrances to some of the couloirs will have cornices and headwalls to deal with.
From Bear Lake, take a right as if circumventing the lake. At the next trail junction, take a right and begin ascending. At the following junction, take a left to stay on the Flattop Mountain Trail (a right will get you down to Bierstadt Lake). When you arrive at the final junction, take a hard left and begin climbing Flattop Mountain (a straight will lead to the Ptarmigan Glacier area of Bear Lake North).
You can get to a handful of trails from this route, and they all start by spilling off the southern (left) side of the Flattop Massif. Once you clear treeline, and pass the start of the Banana Bowls, edge left along the ridgeline and sight the couloirs as they come into view. The first one will be Dragons Tail, followed by Dead Elk Couloir. There is also a half-and-half run called Smoke and Dragons in-between them. Above these lines, you’ll be climbing along the edge of Tyndall Gorge, passing the top of Corral Couloir and, eventually, Tyndall Glacier.
In order to properly catalog all major zones, we’ll start from east to west, or lowest to highest.
Chaos Canyon Area Ski Lines
South of Emerald Lake Basin and Tyndall Gorge, Chaos Canyon reigns supreme.
Terrain Park
- Essentials: 0.25 miles, 493-foot descent
- Status: Difficult (numerous cliff bands need to be avoided)
- Steepest Slope Angle: 25-30 degrees
- Good for: Tree-skiing, laps, avoiding windy conditions up higher. Experienced skiers will enjoy this run, but sharp orientation skills are required to prevent cliffing out.
- Accessed via: Bear Lake to Dream Lake outflow, left on Haiyaha trail. Keep an eye out for a gully peeling off to the left (east) after a brief climb south, away from Dream Lake. Ski down, angling left. When you encounter a gladed bench, turn SHARPLY left (north) to avoid getting cliffed out. Pick your way down between cliff breaks and skirt along the base of some cliffs (still angled north), passing through a boulder field on your way back to the approach trail. You’ll rejoin the approach just west of Nymph Lake.
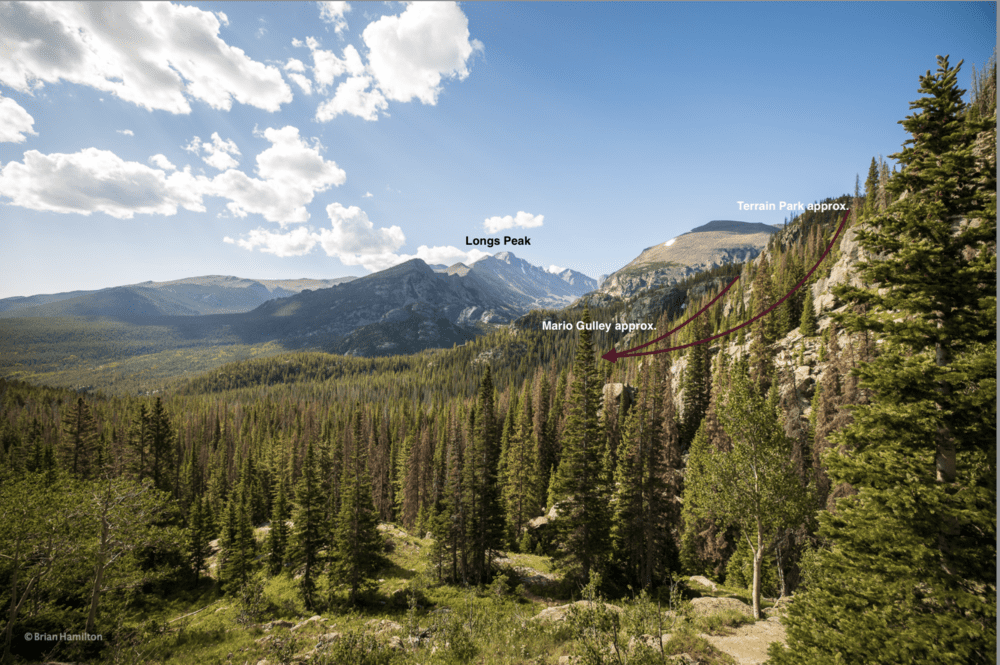
Picture of Mario Gully and Terrain Park.
Mario Gully Variation: Instead of skiing Terrain Park, continue on the Lake Haiyaha Trail for another few minutes until reaching Chaos Creek. Head left, following the creek and enjoying snow covered rock pillows in stable conditions. As with Terrain Park: veer hard left when the creek area becomes narrow and rocky, to reconnect with the approach trail near Nymph Lake.
- At a Glance: 0.31 miles, 443-foot descent
- Steepest slope angle: 25 degrees (hazards increase when snow melts and boulders become more prevalent. If you follow the creek all the way down, you will enter a terrain trap.)
Haiyaha Couloir
- Essentials: 0.21 miles, 632-foot descent
- Status: Difficult
- Steepest slope angle: 40 degrees
- Good for: Laps, steep couloir skiing, spring skiing. Heightened avalanche danger without snowpack consolidation. Expert skiers will enjoy this line. It can be combined with other lines in the area.
- Accessed via: Lake Haiyaha trail. You can approach two ways. Just after the entrance to Terrain Park, head right and uphill, maintaining the ridgeline. You’ll pass the starts to both Dream Lake Chutes on your right. After passing the western Dream Lake Chute, start looking to your left. The ridge will narrow, and you’ll gain some elevation before sighting a short, tree, and rock-lined couloir to your left BEFORE the entrance to East Couloir of Hallett Peak appears on your right. Descend. Alternatively, make your way to Lake Haiyaha. If frozen, skin across the lake in a west-northwest orientation, and look for the couloir snaking its way down to the opposite shoreline.
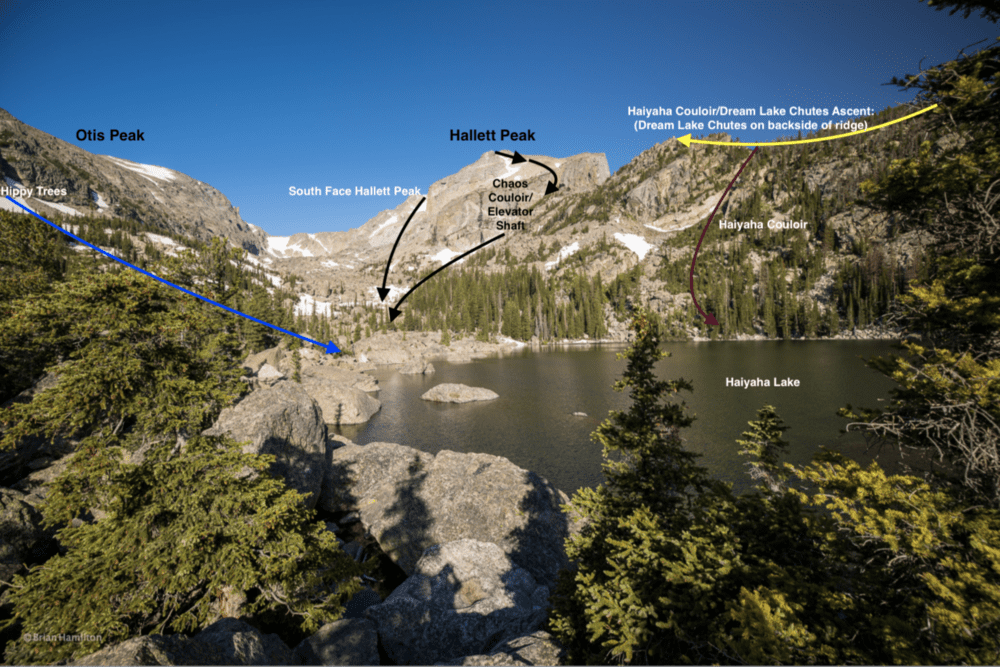
Picture of Haiyaha Couloir area.
Hippy Trees
- Essentials: 0.24 miles, 426-foot descent
- Status: Intermediate
- Steepest Slope Angle: 30-35 degrees depending on where you start
- Good for: Moderate glade skiing in lower risk avalanche terrain.
- Accessed via: Lake Haiyaha. Once you arrive at the lake, skin left around the southern shoreline, eyeing the ridge to the south. The line is mellow and oscillates between open slopes and shrubby trees. The upper start is marked by a notable increase in slope steepness and avalanche danger. Plan accordingly.
Hallett Peak: Chaos Couloir
- Essentials: 1.17 miles, 2246-foot descent
- Status: Very Difficult
- Steepest Slope Angle: 45 degrees
- Good for: Expert skiers wanting a route down Hallett Peaks eastern flank. Extreme avalanche danger mid-winter. The couloir holds snow through June.
- Accessed via: Lake Haiyaha. Cross the lake or skirt around its southern shore. The couloir is uphill from the Lakes western edge. It is a large couloir with a distinct left-hand turn nearly halfway up. From the top, you can continue up to Hallett Peak’s summit. In exceptional conditions, it is possible to ski from the summit down to Haiyaha, although the terrain above the Chaos Couloir tends to melt out first. It is possible to reach the top of Hallett Peak from the Flattop Mountain Trail, but it is not recommended unless you have scouted the couloir first and know how it fits with the rest of the route.
Hallett Peak South Face Variation: Very difficult. This dangerous line drops to the south from the top of Hallett Peak, eventually ending in Chaos Canyon just west of Lake Haiyaha. Like Chaos Couloir, it is extremely dangerous and should only be attempted by backcountry professionals in peak conditions. Cornices will be in play all winter.
- At a Glance: 1.6 miles, 2478-foot descent
- Steepest slope angle: 45 degrees.
Acesss to Chaos Canyon:
From the Bear Lake Parking area, ascend past Nymph Lake. Right before arriving at Dream Lake, you’ll see a trail junction, take a left (south) and begin ascending around the eastern ridge of Hallett Peak. If you break right along the ridgeline before crossing into Chaos Canyon, you can use the height of land to reach the start of Dream Lake Chutes, East Hallett Couloir, and Haiyaha Couloir.
Continuing on, the trail will parallel a chute heading to your east. That’s the start of the Terrain Park run. A couple of points of a mile later, you’ll cross Chaos Canyon and the start of Mario Gulley.
Past Mario Gully, the trail will reach another junction. If you stay straight, the trail will quickly hook right and deposit you at the rocky Lake Haiyaha. From here, additional line options exist. If at the junction you opt left, two additional line options present themselves along the eastern ridge of Otis Peak.
Otis Peak Area Ski Lines
Hourglass Couloir
- Essentials: 0.31 miles, 897-foot descent
- Status: Difficult
- Steepest Slope Angle: ~40 degrees
- Good for: Laps, couloir skiing, and part of a larger combination day with Otis Redding Couloir and the lines around Haiyaha. Significant avalanche risk mid-winter, expert skiers recommended.
- Accessed via: Lake Haiyaha approach. Pass the lake traveling south into Glacier Gorge and spy the couloir as it heads down Otis Peaks dramatic eastern ridge end.
Otis Redding Couloir
- Essentials: 0.22 miles, 524-foot descent
- Status: Difficult
- Steepest Slope Angle: 36 degrees
- Good for: Laps, couloir skiing, powder skiing, and moderate glades. Expert skiers recommended.
- Accessed via: Lake Haiyaha approach. Pass the lake traveling south into Glacier Gorge, keeping an eye on the abrupt end of Otis Peak’s eastern ridge to your right. The line is best approached as a southwest-facing ascent, keeping the obvious cliffs to your right.
Access to Otis Peak:
Act as if you are approaching Lake Haiyaha. Once you arrive in the Chaos Canyon area, you’ll see a junction. Don’t take the extension towards the Lake, instead, take a left and begin losing some elevation. The trail will continue on a southern trajectory with the abrupt end of Otis Peak’s eastern ridge to your right. You’ll lose about 300 feet in this section. Once you bottom out, look up towards your right to scout Hourglass Couloir. Otis Redding Couloir is a little further south and also descends from Otis Peak’s eastern ridge.
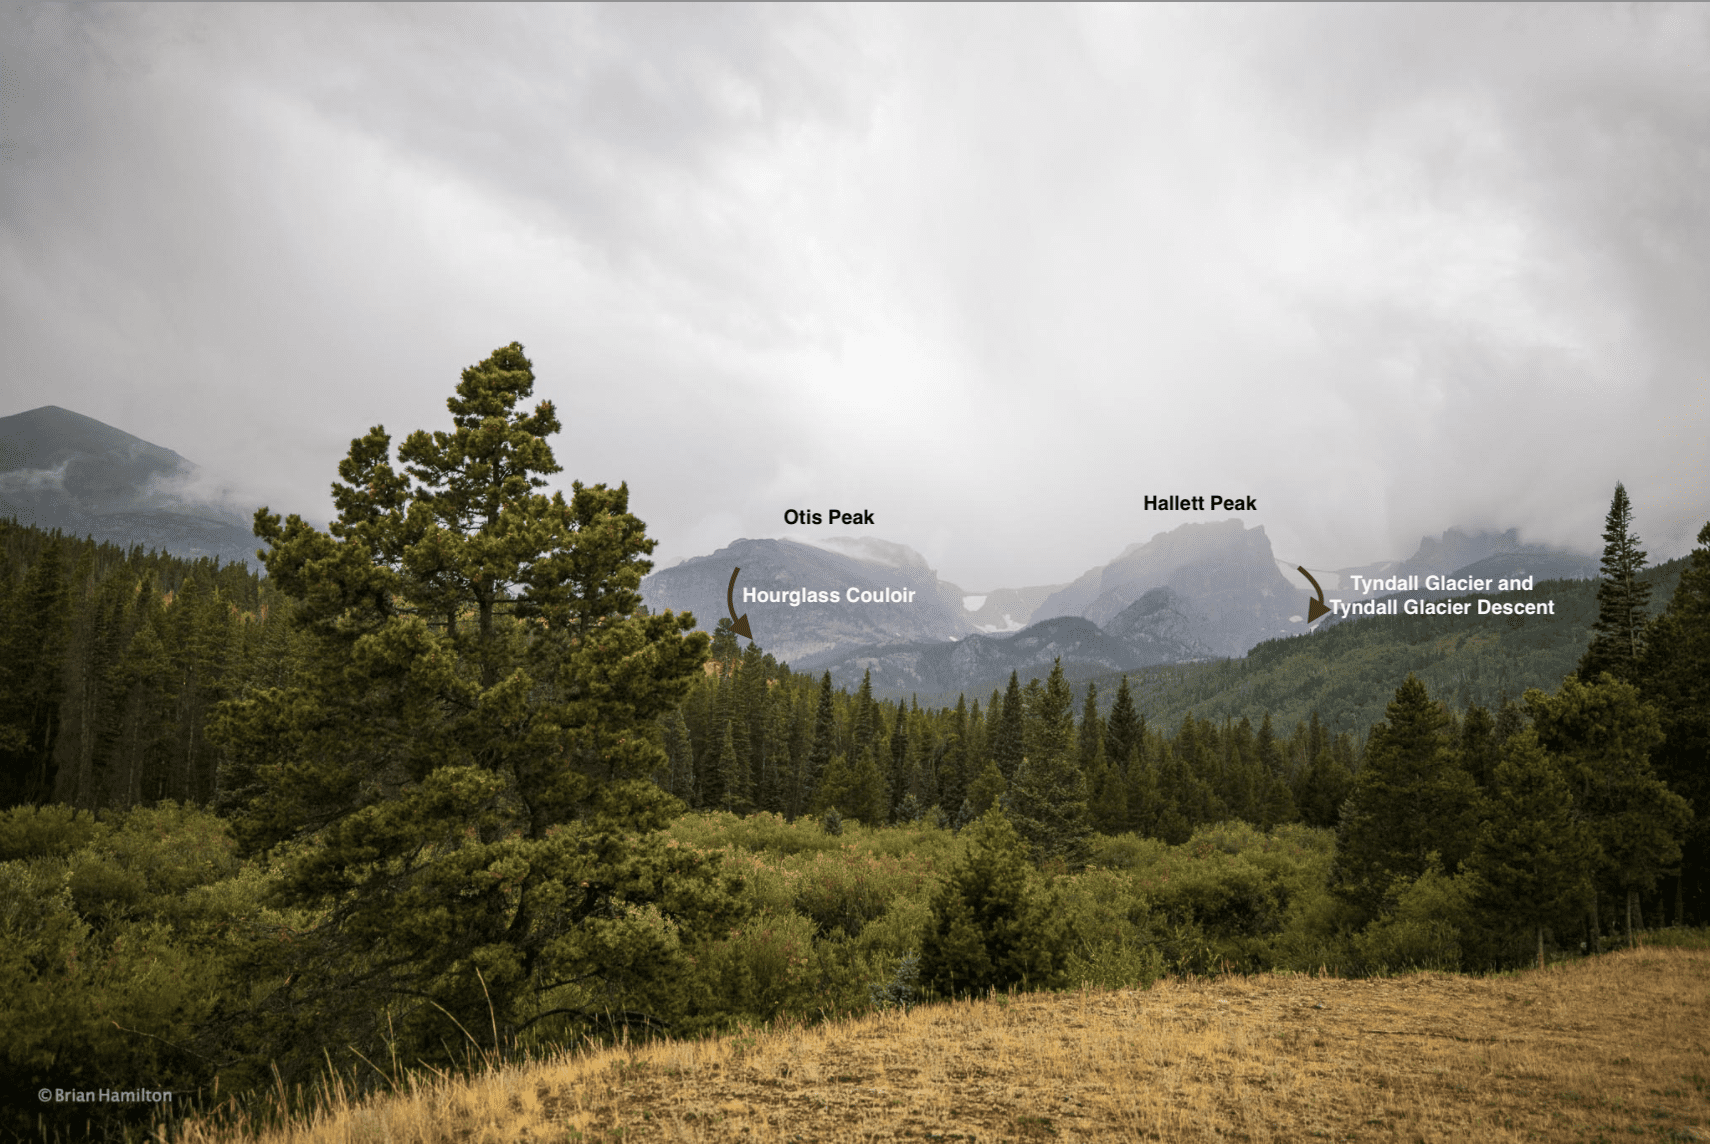
Picture of Hourglass Couloir route on Otis Peak (photo taken from Glacier Creek Trail).
Bear Lake South
As if all that wasn’t enough, there is also a fantastic ski line down Andrews Glacier. Because this line is approached from a slightly different angle and is located farther south than all lines mentioned above, I gave it a special category.
Map of the Backcountry Ski Lines in the Bear Lake South Area.
27-29 degrees 29-31 degrees 31-34 degrees 34-45 degrees 45+ degrees
3D Map Navigation Instructions
On desktop: Hold the ctrl key while you drag to rotate the map. Use your mouse scroll to zoom in and out.
On mobile: Rotate and zoom on mobile by pinching and moving two fingers.
Andrews Glacier
- Essentials: 0.71 miles, 1157-foot descent
- Status: Difficult
- Steepest Slope Angle: 36 degrees
- Good for: A workout, glacier skiing, alpine turns. Expert skier with avalanche tools required. Expect a long day out in the backcountry.
- Approached via: The Loch, as described above. From the Loch proceed west to a trail junction and take the right-hand extension up to Andrews Tarn and the Glacier behind. The avalanche danger is high during mid-winter, but snow lasts all year so summer turns can be had. The ideal time to ski is mid-spring, with enough coverage you can ski from the top of the glacier all the way down past the Loch. Check for wind-loaded slopes and cornices before attempting the top of the line.
Access to Andrews Glacier:
From the top of Bear Lake parking lot, take a sharp left on the connector trail toward Alberta Falls. Once you cross Chaos Creek, the winter approach leaves the normal summer route and takes a moderate line southeast along a creek drainage for a couple of points of a mile before wrapping right until you’re skinning southwest. The skin track should be obvious to follow unless breaking trail after a storm. Eventually, the track heads south, passing Glacier Knob.
Cut right (west) and ascend to the Loch. An alternative approach utilizes an unmaintained fire trail, which does not show on the official park maps but tracks roughly the same as the winter ascent. From the Loch, continue southwest, rising in elevation until arriving at a junction. Take a right and head into the upper part of the cirque housing Andrews Glacier.
Going straight at the junction will lead you south to the Sky Pond Area. This approach is longer than some of the lines for Bear Lake North and Bear Lake Main. It’ll cost you 3.32 miles of skinning (one-way) and an elevation gain of 1330 feet.
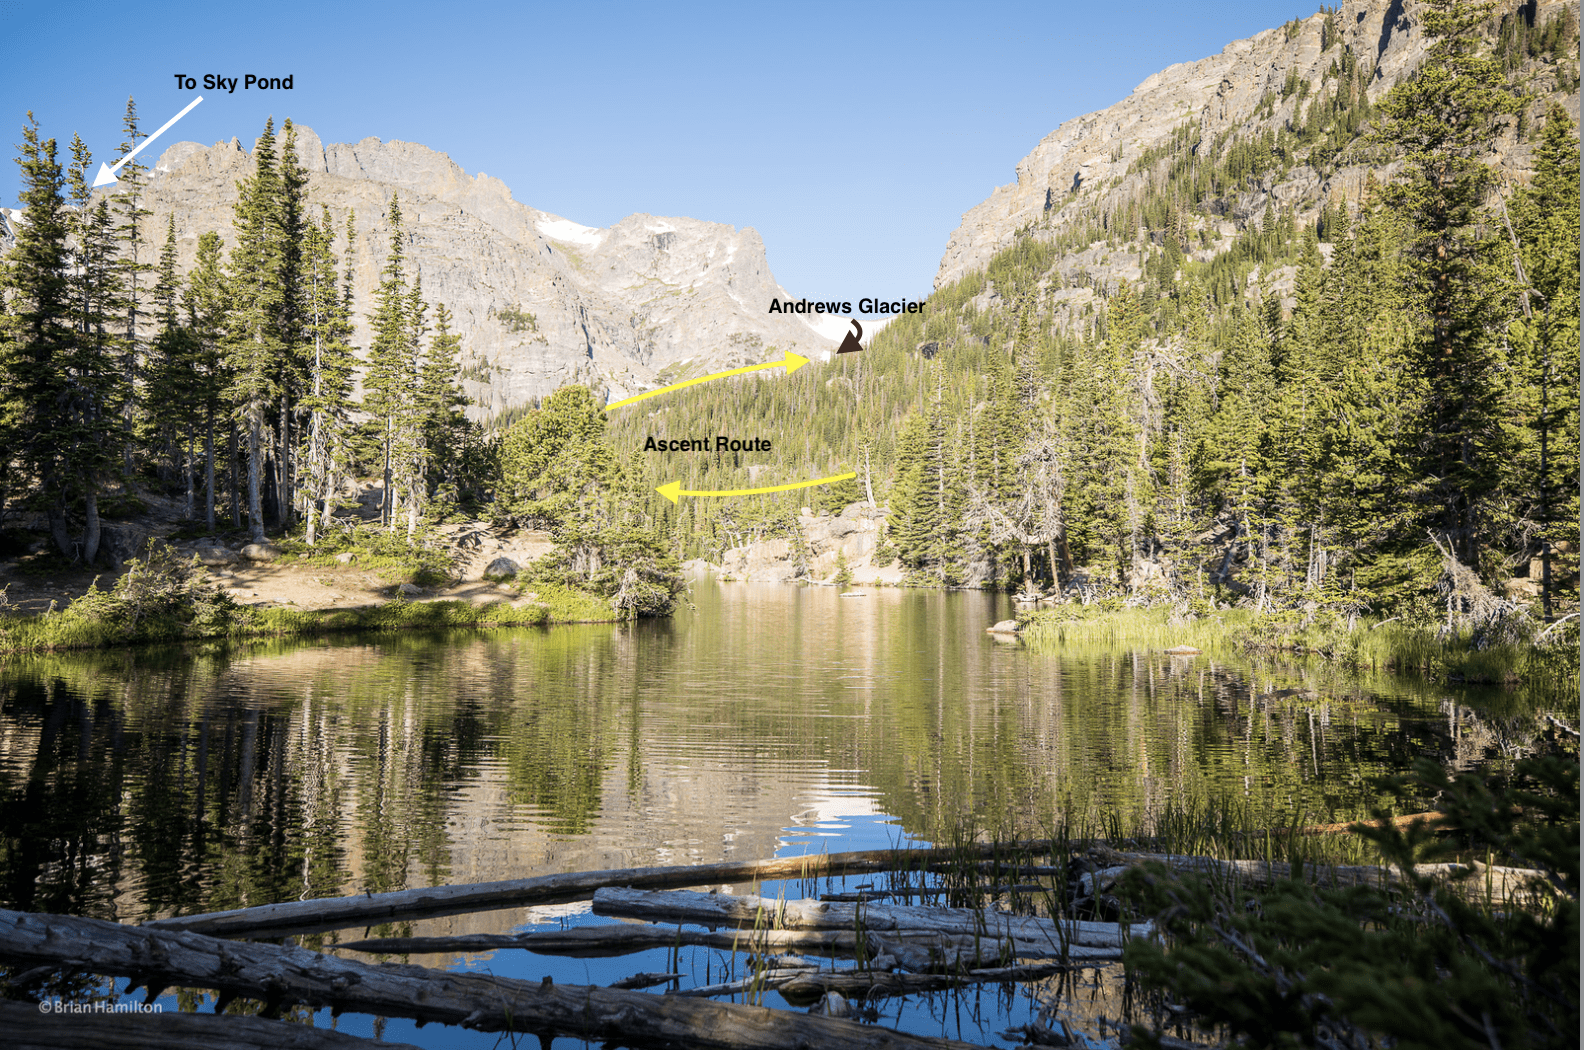
View of Andrews Glacier from E. end of The Loch.
Quick Terminology Reference Guide
Apron: An open section of a ski line, shaped roughly like an apron. It is generally shallower at the top, wider at the bottom.
Bootpack: A way to gain elevation utilizing the tough exterior of ski boots, literally creating steps in the slope with your ski boots. Only effective in mid-winter conditions with softer snow. Once ice forms, crampons, and an axe are best.
Bergschrund: Unlike a crevasse, which tends to form in the middle of a glacier, a bergschrund, or “schrund” for short is a crack or separation that forms between the top of a glacier and the mountain slope or stagnant snow behind it.
Chute: An inset area along a ridge that can hold great snow and presents like a natural ski run.
Cornice: An overhung area of snow that typically forms at the crest of a ridge or cirque. While the corniced ice and snow looks compact, there is usually nothing holding it up underneath; your weight alone can collapse a cornice. A collapsed cornice may also lead to avalanches. Do not stand on the edge of a cornice or climb up directly beneath one.
Couloir: Originally a French alpinist term, a couloir is a thin skiable chute. They are typically a no fall zone and challenging to ski effectively.
Crevasse: A large crack that usually forms on glaciers during warmer times of year as the compact ice shifts. Very dangerous if fallen into.
Crown: The vertical fracture line that appears after a slab avalanche, indicative of unstable terrain.
Crux: Typically, the most dangerous section of an ascent or descent. Difficult routes can have multiple cruxes. A NO FALL ZONE.
Glade: A treed area of a particular slope or line.
Headwall: A topographical term used to mark where a basin, gorge, or alpine valley ends. Headwalls are usually steep and can sport multiple couloir options.
Line: The chosen path of skiers and snowboarders.
Pillows: Created when deep snow buries boulders, super fun to bounce between.
Runout: The bottom of a ski line, especially after a thin section or couloir, where the slope opens up. Similar to an apron.
Skin track: The rote you use to ascend a slope, very important for backcountry navigation.
Terrain Trap: An area where snow from an avalanche can collect and bury a victim. More broadly an area where it is difficult to ski out of once entered.
Wind-Slab: An area of compacted snow: formed by gusty winds. If near a steep slope, they can collapse and cause avalanches. Wind-slabs are often called wind-loaded slopes as well.
Final Thoughts
Bear Lake offers some of the finest ski lines in northern Colorado. Late winter and spring are prime time, though many lines can be skied during the middle of winter with proper planning and avalanche gear. For those interested in skiing all year round, late summer and early fall can still offer turns on the glaciers and perennial snowfields common to the area.
Regardless of season, Bear Lake has something to offer. It is also the most popular area in the third-most-popular national park in the US. Arrive early, avoid weekends if possible, and always ski with at least one other partner. Remember, check avalanche conditions with CAIC before heading out. Enjoy this bountiful backcountry region!
Additional Resources
AIARE, Avalanche Research Education. (n.d.) Retrieved from https://avtraining.org/
Colorado Avalanche Information Center. (n.d.) Retrieved from https://www.avalanche.state.co.us/
Mini AK http://climbinglife.com/knobtop-mtn-mini-ak-couloir-v15-1271/
Mountain Forecast (n.d.) Hallett Peak Forecast. Retrieved from https://www.mountain-forecast.com/peaks/Hallett-Peak/forecasts/3875
National Park Service. (2020). Visitation Numbers. Retrieved from https://www.nps.gov/aboutus/visitation-numbers.htm
- Rocky Mountain National Park. (n.d.) Fees and Passes. Retrieved from https://www.nps.gov/romo/planyourvisit/fees.htm
- Rocky Mountain National Park. (n.d.) Park Roads. Retrieved from https://www.nps.gov/romo/planyourvisit/road_status.htm
- Rocky Mountain National Park. (n.d.) Shuttle Bus Routes.Retrieved from https://www.nps.gov/romo/planyourvisit/shuttle_bus_route.htm
National Weather Service
- Estes Park Extended Forecast. (n.d.) Retrieved from https://forecast.weather.gov/MapClick.php?lat=40.3772059&lon=-105.5216651&site=all&smap=1&searchresult=Estes%20Park%2C%20CO%2C%20USA#.YCbnzxNKjOS
- Alpine Center/Trail Ridge Extended Forecast. (n.d.) Retrieved from https://forecast.weather.gov/MapClick.php?lon=-105.76022675170898&lat=40.42810400402635#.YCboWRNKjOS
Outside Online. (Nov. 3, 2017). The Backcountry Skiers Dictionary. Retrieved from https://www.outsideonline.com/2257716/adventure-backcountry-skiers-dictionary
Powder Project. (n.d.) Dead Elk Couloir. Retrieved from https://www.powderproject.com/trail/7000637/dead-elk-couloir
USDA: Natural Resources Conservation Service, National Water and Climate Center. (n.d.) Snotel Interactive Map.
VisitEstesPark.com. (2021). Lodging. Retrieved from https://www.visitestespark.com/lodging/
Backcountry Ski Gear: Essentials for Human Powered Skiing
Guide To Planning a Backcountry Ski Adventure
Backcountry Skiing in Rocky Mountain National Park: Hidden Valley and Sundance Mountain Ski Lines
Backcountry Skiing in Rocky Mountain National Park: Longs Peak Area Ski Lines
Backcountry Skiing in Rocky Mountain National Park: Best of the Rest
Guide To Backcountry Skiing In The Brainard Recreation Area
Hiking To Black Lake Via The Glacier Gorge Trail, Rocky Mountain National Park
Guide To Backcountry Skiing Near Cameron Pass, Colorado
Terms of Use: As with each guide published on SKYBLUEOVERLAND.com, should you choose to go backcountry skiing, do so at your own risk. Prior to setting out check current local weather, conditions, and land/road closures. While taking a trail, obey all public and private land use restrictions and rules, carry proper safety and navigational equipment, and of course, follow the #leavenotrace guidelines. The information found herein is simply a planning resource to be used as a point of inspiration in conjunction with your own due-diligence. In spite of the fact that this guide was prepared under diligent research by the specified contributor and/or contributors, the accuracy of such and judgement of the author is not guaranteed. SKYBLUE OVERLAND LLC, its partners, associates, and contributors are in no way liable for personal injury, damage to personal property, or any other such situation that might happen to individuals following this guide.


