


|
Getting your Trinity Audio player ready...
|
Introduction
Although only an hour north of Boulder, Fort Collins is farther from major ski resorts than most of the Front Range, the closest options being Steamboat Springs and the Snowy Range Ski Area in southern Wyoming. Nevertheless, the citizens of Fort Collins, Loveland, and Greeley can all experience fantastic backcountry skiing near Cameron Pass. Located just north of the Rocky Mountain National Park boundary, Cameron Pass is consistently snowy, wild, and full of seldom explored mountains.
The lines near Cameron Pass are best skied from mid-winter through early spring, and while some routes can be skied through the end of May, a lot of the stellar, lower areas melt out sooner. Avalanche danger is also consistently high, which ratchets up the seriousness of the skiing. Despite its wild potential, the area is also home to a few well-documented and awesome ski lines that serve as great markers for the region. There’s a lot to unpack in this often-forgotten corner of the Front Range, so let’s get to it!
Table of Contents
Article Navigation: Click on any of the listed items in the table of contents below to jump to that section of the article. Similarly, clicking on any large, white section header will jump you back to the Table of Contents.
- Backcountry Gear
- Backcountry Planning
- Cameron Pass Area Overview
- Area Weather
- Access
- Places to Stay
- Cameron Pass North
- Cameron Pass South
(Please Note: Some of the parent lines listed above have add-ons and variations, which are also discussed)
Above Lake Agnes, looking north to the Medicine Bow Mountains
Backcountry Gear
Before we begin, let’s lay out some quick backcountry gear knowledge (for a more comprehensive guide, check out our article, Backcountry Gear: Essentials for Human Powered Skiing). The list below is crucial, don’t skimp on gear when avalanches are in play.
- Skis/Helmet/Gloves/Goggles
- Winter Clothing: waterproof shells, thick ski socks, layers, puffy, beanie, hand warmers, etc.
- Skins
- AT Bindings (Frame or Tech)
- Avalanche Gear: Beacon, Shovel, Probe, and Radio
- Backcountry ski pack
- Food/Water/First-Aid Kit
- For multi-day adventures: 4-season tent, winter rated sleeping bag, avalanche airbag, orienteering equipment, batteries/rechargeable batteries
- Mountaineering Axe and Crampons. While there are dozens of lines that do not require these tools, some of the most epic lines in the Cameron Pass area do. Research which crampons fit over your alpine or tech boots before buying! Generally speaking, you do not need an “Ice” axe unless you are climbing an ice wall; a mountaineering axe should work fine for most couloirs. However, some of the hardest ski mountaineering routes in the area demand more. Analyze your skill level and the route of choice BEFORE settling on gear options.
Remember, it isn’t enough to simply own gear; take the time to figure out how to use it before heading out. Speed is key, especially in a backcountry avalanche rescue. Visit Backcountry Gear: Essential for Human Powered Skiing to get comfortable with the necessary gear and how to use it.
Mt. Mahler from the top of Lake Agnes Bowl
Backcountry Planning
Once you have the gear and know how to use it, it’s time to start planning. We’ll briefly break down the central components below, but check out our Guide to Planning a Backcountry Ski Adventure for an in-depth analysis of the planning process. A good plan can separate success from disaster. No outdoor activity is worth your life.
- 1) Pre-Planning
-
-
- Learn how to Ski at an EXPERT level before heading outside ski resort boundaries. Find a squad. Start backcountry gear research. Hone your craft. Get in shape.
-
- 2) Long-Term Planning
-
- Geographic reduction: where are you skiing? Start big, get small.
- Weather and snowpack research.
- Research ski lines using books, online resources, and forums. Key data:
- Total distance, total climb, total descent, slope angle
- Local Emergency contacts
- Unique factors: trees, cornices, couloirs, avalanche history
- Get into the maps and apps, know the area like the back of your hand.
- 3) Short-Term Planning
- Managing Expectations
- Constantly check weather updates until the morning you leave. Remember, snow reflects light; if it’s a sunny day, bring sunscreen!
- Popularity of your backcountry line.
- Tell people where you’re going and who to call if things go wrong.
- Have a back-up plan.
- Who’s got the medical training?
- Go over the plan in detail with your squad. CHECK FOR UNDERSTANDING.
- Packing
- Make sure everything fits, and you can access your avalanche gear quickly. Time is critical in a burial situation.
- Managing Expectations
- 4) On-site Planning
- What do you see when you get there?
- Watch out for tree-wells, wind-loaded slopes, cornices, bergschrunds, and other topographical considerations.
- Timing and snow surface i.e. environmental factors. Not all snow skis the same.
- What do you see when you get there?
- 5) Post-Planning
- Analyze
- What worked well? What didn’t?
- Ease into the harder stuff.
- Analyze
The steps listed above are only a skeleton outline; see our Guide to Planning a Backcountry Ski Adventure to iron out the critical details. Remember, you can always take an avalanche safety course through AIARE; it can absolutely save lives.
Cameron Pass Area Overview
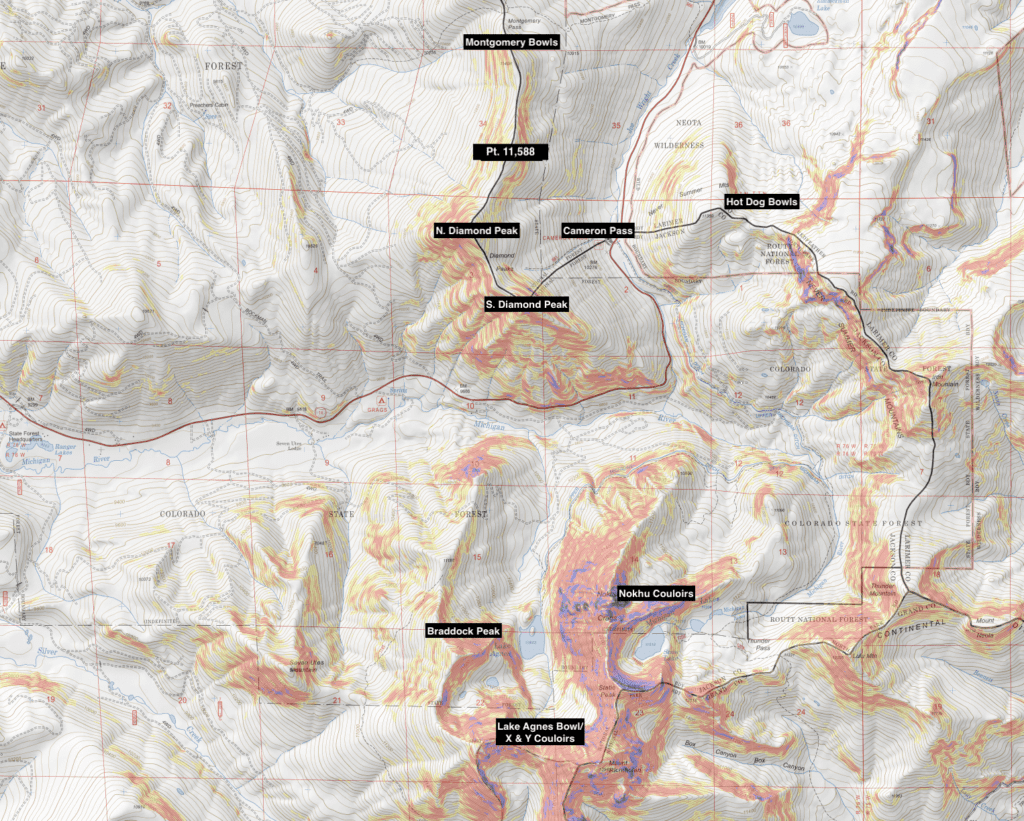
Cameron Pass Overview Map
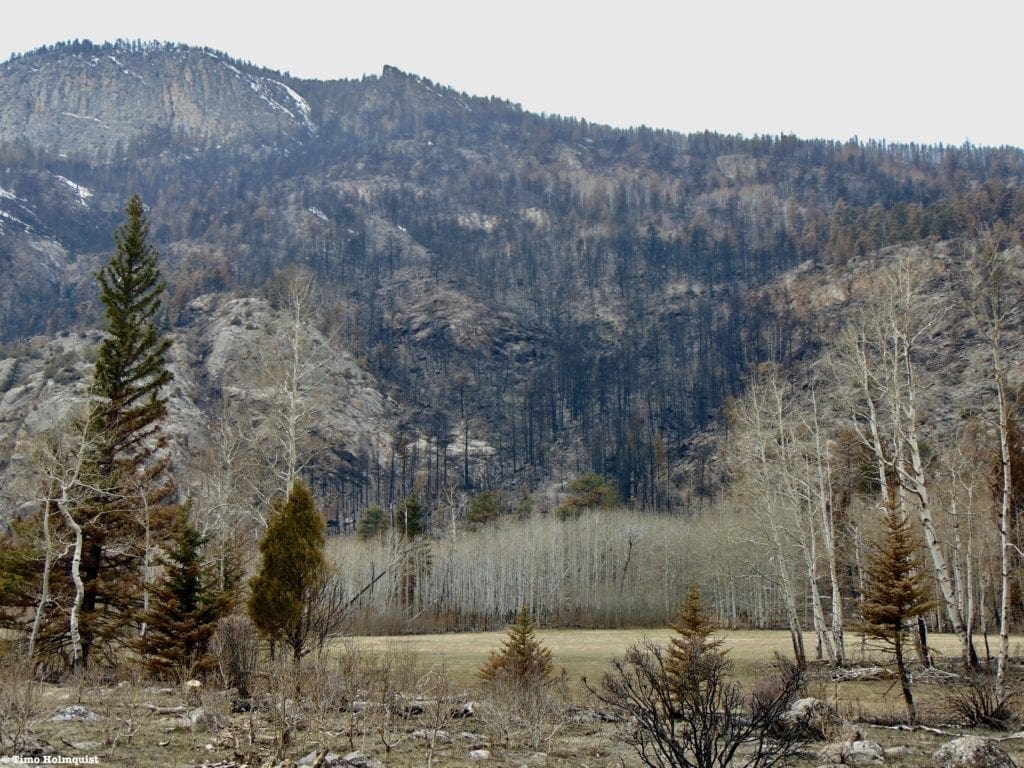
Including Berthoud Pass, there are only three ways to pierce the Colorado Front Range north of I-70. One of them, Trail Ridge, is seasonal, which leaves Colorado 14. The road travels west from Fort Collins and through the Poudre Canyon before a quick jaunt SW and over Cameron Pass, eventually merging with US 40 near Steamboat. The wilderness you pass on the way is deep and wild, although it was recently devastated by the Cameron Peak fire.

The fire in its early stages, seen from the Desolation Peaks in RMNP
The fire burned more than 208,000 acres, making it the largest in state history. A drive through the burn area is a very sobering event. PLEASE, respect fire bans and guidelines.
Aftermath
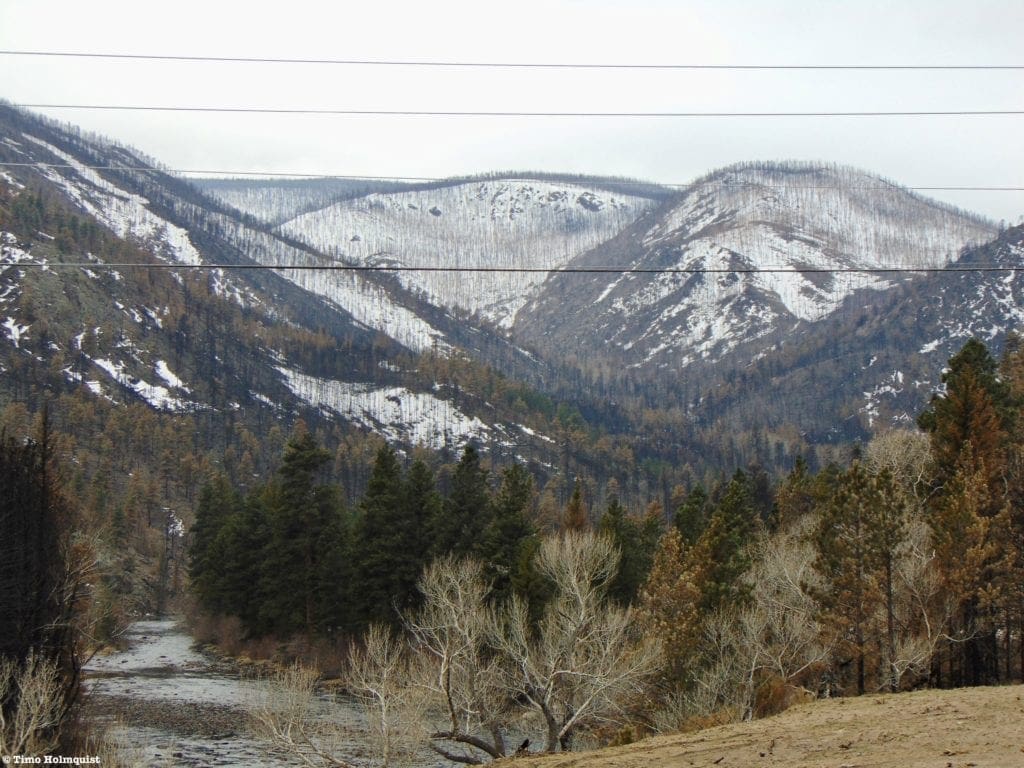
Entire valleys and mountainside burned
The fire started quite close to the Cameron Pass area and spread in a general east and south direction, sparing most of the alpine and subalpine areas near the pass. The potential for adventure in this region isn’t really realized until you get to Chambers Lake, where frequent glimpses of the Medicine Bow Range to the north and Neota Wilderness to the south should get the excitement going. The height of land is actually fairly mellow if coming from the east, but once you cross the pass and head into Jackson County, the scenery changes to feature the rugged and craggy north end of the Never Summers.
The lines here are not the longest in the world, but they are steep and often more aesthetic to ski than many places closer to Denver. Adding complexity to the narrative is the region’s high avalanche rate. Most, if not all, of the established lines in the region, have either experienced avalanches or are tangential to areas that have. It is critical that you take avalanche forecasts and weather reports seriously. If you are new to backcountry skiing, Cameron Pass should NOT be the first area you go to.
One of the cooler facts about the area involves the Diamond Peaks Ski Patrol. I wrote a previous article on Hidden Valley, which is currently a great introductory backcountry ski area near Estes Park but used to be a managed ski hill through the early 1990s. You can read that piece here. When Hidden Valley closed, many ski patrollers moved their operation to the Cameron Pass region and founded Diamond Peaks Ski patrol. The skiing history along Cameron Pass is substantial, and the organization was founded as an avalanche education and search and rescue asset for local authorities. If you ever get into trouble out there, chances are, Diamond Peaks Ski Patrol will be the ones trying to save you. You can read more about them here.
Clark Peak, highest summit in the Medicine Bow Range
Area Weather
Cameron Pass is often in the crosshairs of strong winter storms. Due to the area’s steep slopes and remote nature, it is imperative to keep weather and avalanche danger at the forefront of your risk calculus. When conditions are ripe, the area is almost untouchable in its variety, but the conditions have to be right. Spring skiing is fantastic on the higher peaks; however, a lot of the lines are at their best during the height of the winter and with low avalanche danger.
There are various weather forecasting options for the region, including the National Weather Service, which offers a forecast for Cameron Pass. Mountain forecasts for Mt. Richtofen, Clark Peak, and Braddock Peak provide useful weather information at different elevation gradients for the area at large. Additionally, the Cameron Pass Snow Report, which pools different reports to provide consistent updates on the regional weather, is a stellar source.
Supplemental information, like snowpack data, can be obtained via Snotel weather station sites scattered throughout the backcountry. It can be a bit confusing to sort through the site, but here is theinteractive map option. Use the menu on the right-hand side to create specific condition queries. The linked map will open with a window to the specific station at Joe Right Reservoir ~3 miles northeast of Cameron Pass. Snowpack data is important; not only will it tell you if there is even enough snow to ski on, but it will also show you whether or not the area is experiencing an average winter. Any significant deviation from average is noteworthy. Deep winters create more pronounced avalanche conditions, but wimpy winters can as well, especially if a storm overloads weak and unstable snow. Snowpack science should be a critical component of planning.
As crucial as snowpack data is, the numbers would be incomplete without an avalanche forecast. This forecast is MANDATORY before heading out. In Colorado, we are lucky to have the CAIC (Colorado Avalanche Information Center). The information is easy to read, the maps are color-coded, and a flurry of explanations gives depth to the forecast. More specifically, Cameron Pass is in the Front Range Zone; make sure you are checking the right area for the most accurate information. Do not go into the Colorado backcountry without checking CAIC.
The dramatic north end of the Never Summers
Access
Unless you live in Fort Collins or Walden, Cameron Pass is far. It is an hour and forty minutes west of Fort Collins and about 40 minutes southeast of Walden. From Boulder, you’re looking at a minimum 2.5-hour commute; from Denver, it’s around three hours and just shy of four hours from Colorado Springs. Get up early if you’re making a day trip.
Generally speaking, find your way to Colorado 14 and head west until you hit Cameron Pass. From Walden or Steamboat Springs, head east on Colorado 14. How you arrive at Co14 is a matter of personal preference or GPS recommendations, but it’s pretty straightforward once you’re on it.
Places to Stay
Fort Collins is the nearest large town on the eastern side of Cameron Pass with lodging options; click here to explore some of them. Walden is the closest town on the western side and has a few options as well; click here. Halfway between Fort Collins and Cameron Pass is the small town of Rustic, home to the Glen Echo Resort, which shaves your drive time down to just under forty minutes.
Colorado State Forest State Park, the largest State Park unit in Colorado, also offers yurts and cabins for winter lodging within the vicinity of Cameron Pass. Click here to explore some cabin options, and here for yurt options. Hardy folks can also camp out on the pass itself or at any of the trailheads, although a fee is required for parking on State Forest State Park lands; currently, it is $9.00 per vehicle.
If coming up from Fort Collins, consider stopping at the Mishawaka, or “Mish” and grabbing some food. There’s a great deck on the banks of the Poudre River, and a burger there is a great way to toast a successful outdoorsy day. The restaurant also doubles as a music venue, so keep an eye on their lineup schedules throughout the warmer months. Please visit their website for menus and hours of operation.
Rugged and remote
Our Ratings
Below, you’ll find route descriptions, maps, and ratings as they pertain to the lines we cover. These articles cover some of the most reported and referenced lines, not all possible lines you could ski. We utilize a four-tier rating system illustrated as follows:
- Beginner (Green)
- Intermediate (Blue)
- Difficult (Maroon)
- Very Difficult (Black)
Some areas covered only exhibit a few tiers; others exhibit all of them. Regardless, it is important to understand that each rating does not ONLY correspond to the steepest slope angle skied. Some lower-angle Difficult terrain is simply difficult to access and requires an immense amount of effort to attain, hence the harder rating. Take the ratings seriously as the separation between Difficult and Very Difficult often involves many of the hallmarks of true ski mountaineering, ropes, legitimate ice axes, mountaineering crampons, etc. It is incumbent upon each reader to understand their limits. Always start small.
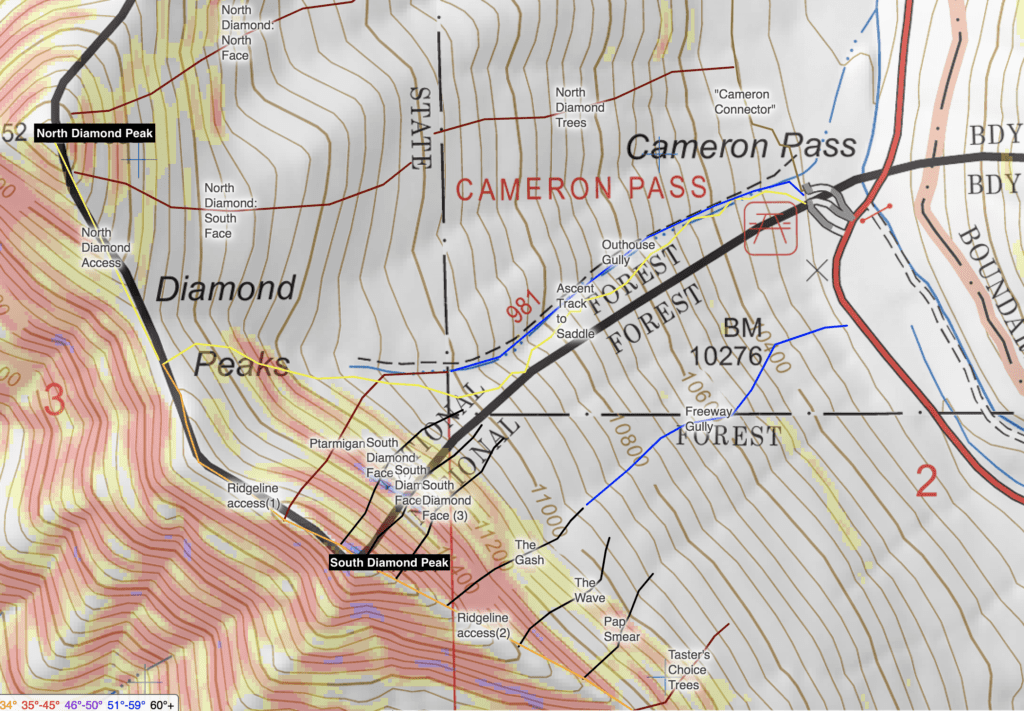
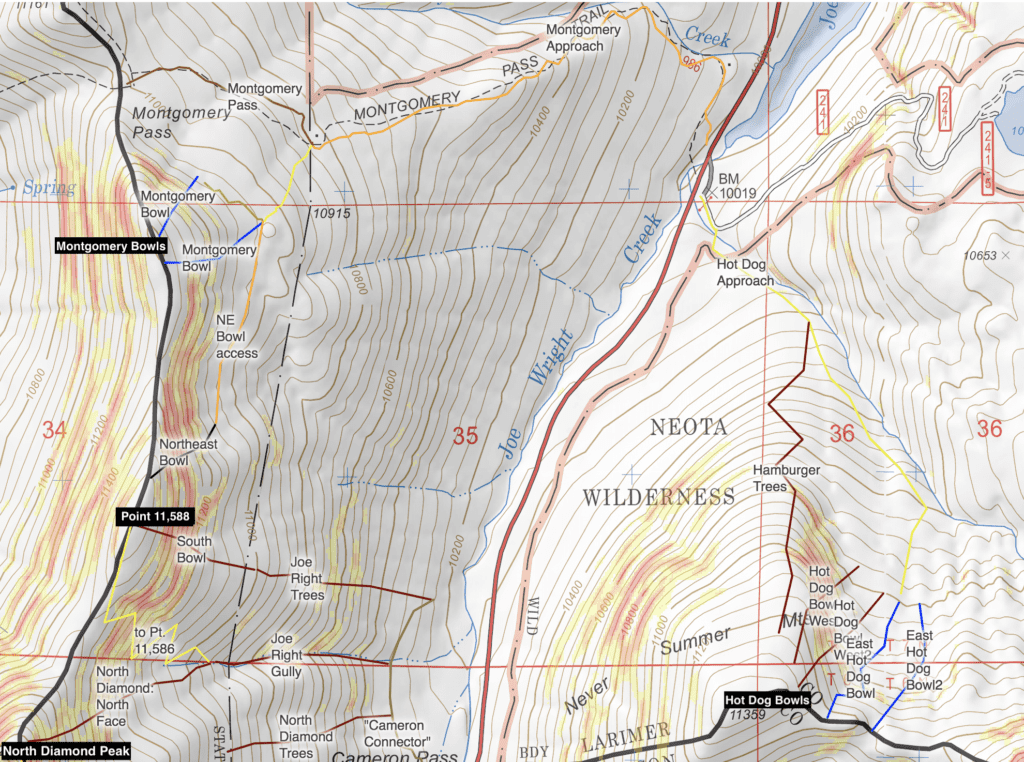
Cameron Pass North
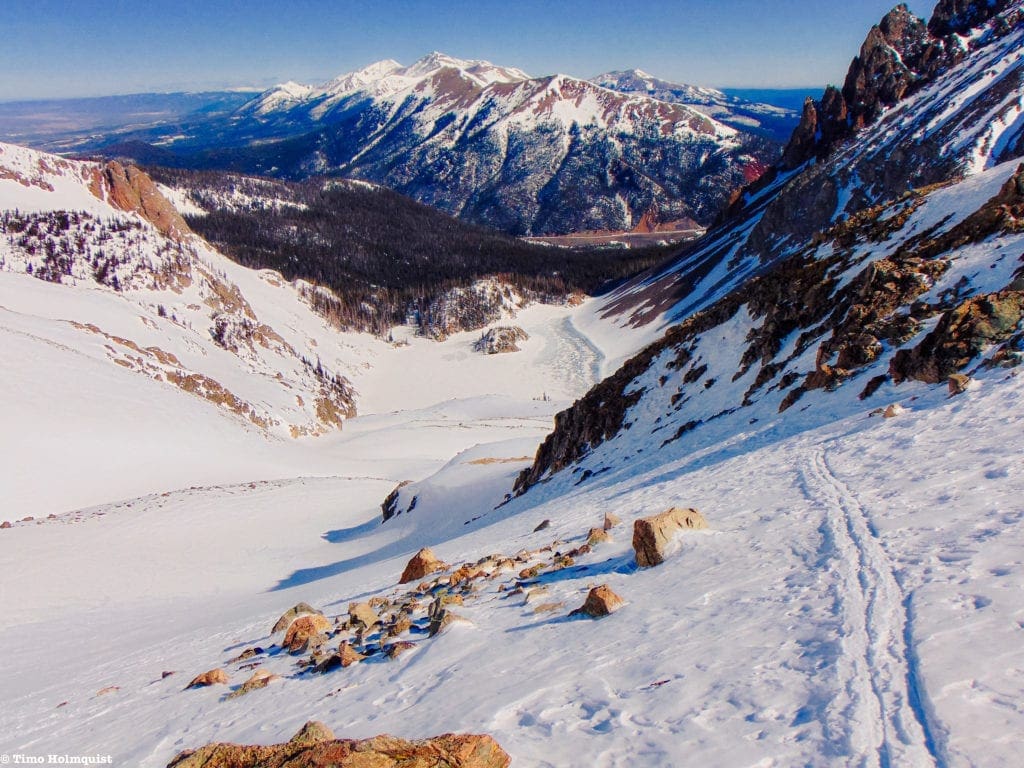
Once you arrive at Cameron Pass there is a large pullout to the north with space for multiple cars, this is your key access parking for South Diamond Peak, North Diamond Peak, and parts of Point 11,588. If trying to access Montgomery Pass, park at the Zimmerman Lake Trailhead roughly 3 miles east of the Pass, hop across the road and find the winter trail. The Diamond Peaks and Montgomery Pass are the most well-known backcountry ski zones, although Lake Agnes Bowl rivals it in popularity.
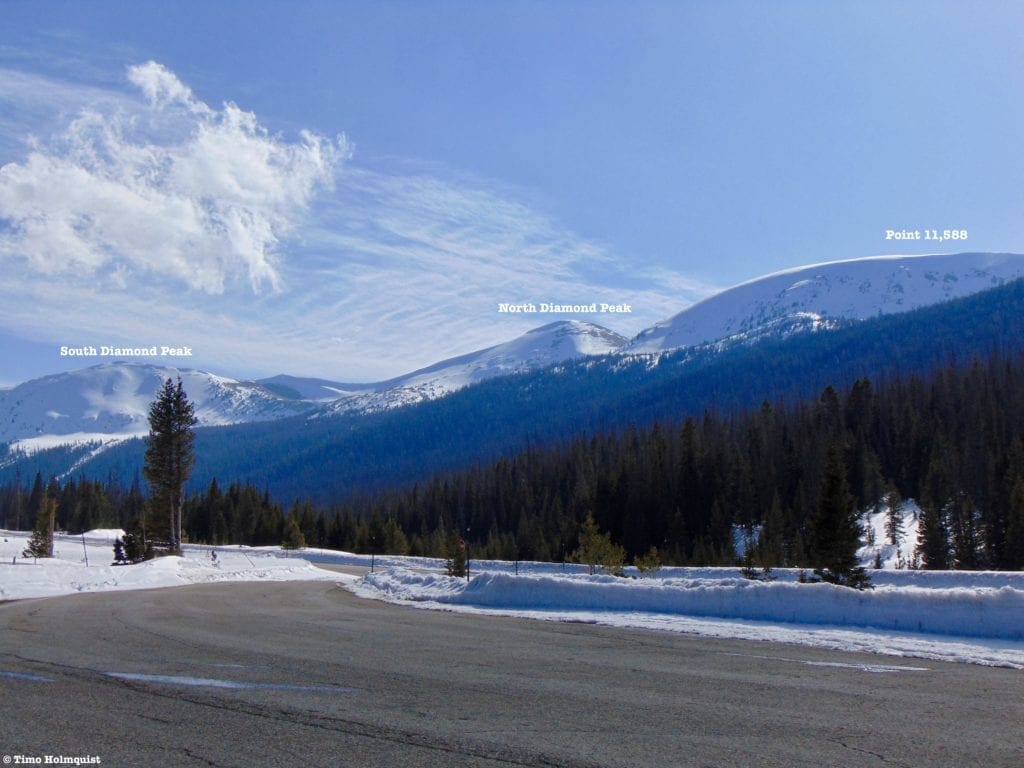
Overview photo from Zimmerman Trailhead
While the variety of lines here is substantial, the avalanche danger is also profound. Evaluate terrain features carefully and plan around local weather and avalanche forecasts. As a general rule, you can find lower-angle tree runs to play in after storms but stay off the corniced and very steep alpine sections unless the danger is low.
Due to the lower elevation of this area, the best time to ski here is actually from mid-winter through to the end of April, depending on snowpack. Occasionally lines can stay filled through a chunk of May, but a series of deep spring storms would be necessary to fill it beyond that.
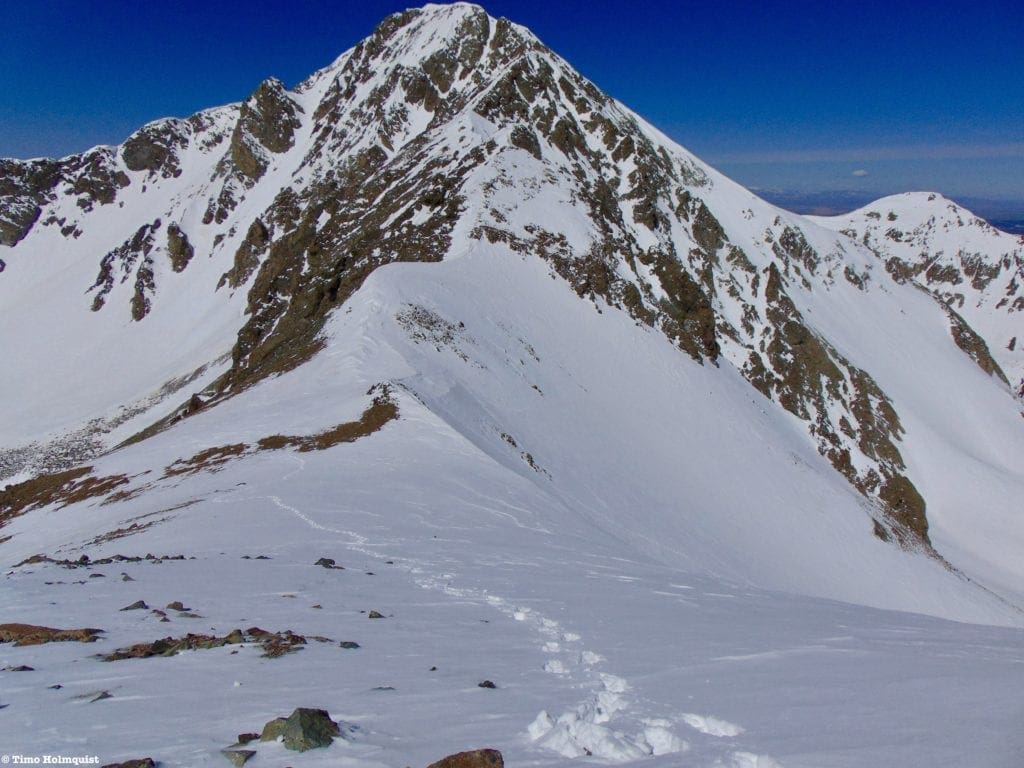
Ascent Lines: South Diamond Peak
The best way to get to the Diamond Peaks is to park at Cameron Pass. From your parking spot, turn southwest and begin switchbacking up the treed lower slopes, with a long avalanche chute to your right (north). Due to its popularity, there may already be a skin track available; if not, switchback SW to a bench just above tree line. From there, turn right (North-northwest), and parallel the steep, upper slopes until the grade mellows, and you can angle left up to the saddle between South Diamond and North Diamond Peak. From the saddle, survey your potential lines. Keep in mind, many South Diamond routes are not visible from the saddle and will require you to climb over the summit.
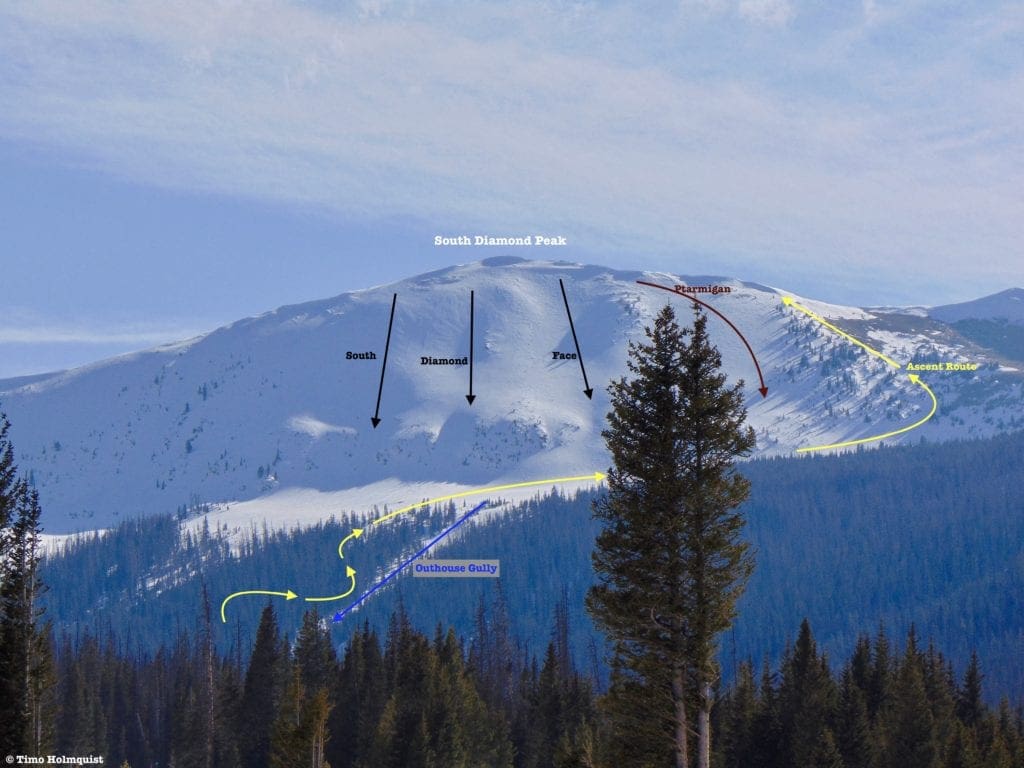
Ascent Line, relative to South Diamond Peak
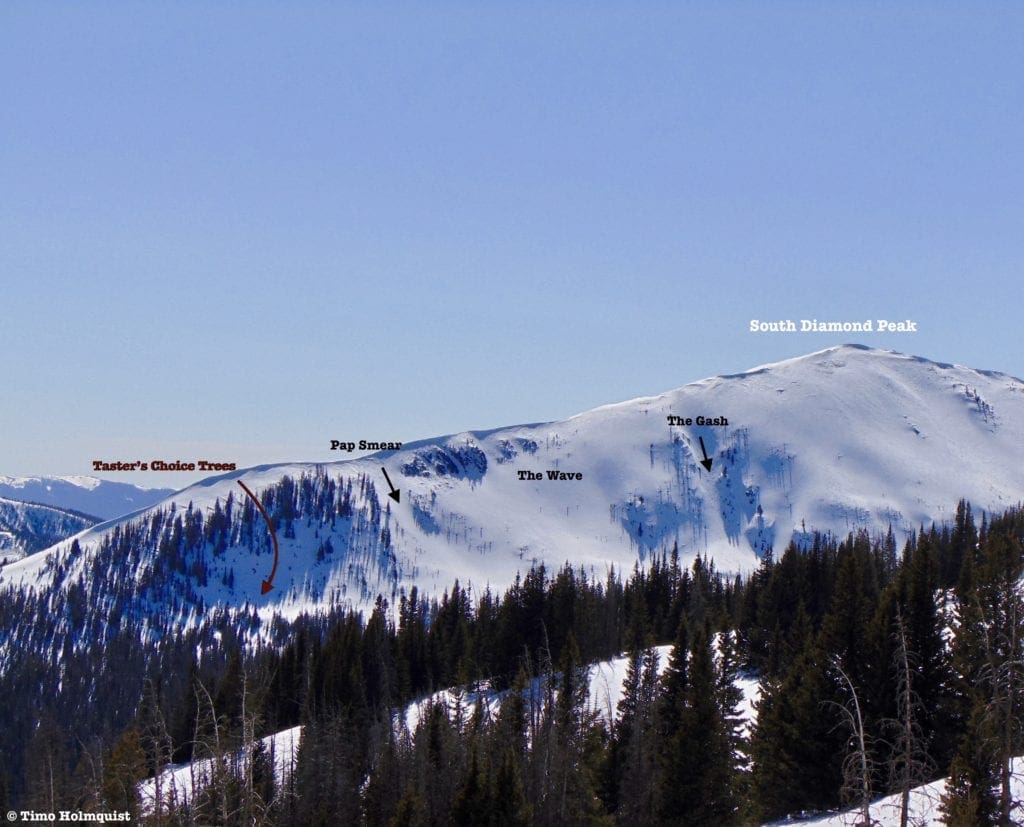
Since both North and South Diamond Peaks are accessed via the same ascent line, when discussing line selection, I’ll name them in order from how close they are to the ascent track. Starting with the lines on South Diamond, they’ll be ordered from north to south. All of these routes can be connected to the base via two large avalanche gullies, one of which will take you to the side of CO14, a little south of the pass proper. The other is called Outhouse Gully because it will take you down to the outhouse at the parking lot (this is the avalanche path on your right as your skinning up to tree line).
- Approach Stats to Saddle: ~1 mile, ~1220 ft. of elevation gain.
- Approach Stats to S. Diamond Summit: 1.26 miles, ~1450 ft. of elevation gain.
- Approach Stats to farthest line (Taster’s Choice Trees): 1.62 miles, ~1450 ft. of gain to summit, -450 feet to top of Taster’s Choice
South Diamond Map
- South Diamond Peak: Ptarmigan
- Essentials: 0.29 miles, ~610 foot vertical (combined with Outhouse Gully: 0.78 miles, ~1,334 foot vertical)
- Status: Difficult
- Steepest slope angle: 42 degrees (brief)
- Good for: Introduction to difficult terrain on the Diamond Peaks, popular route, easy navigation, short approach. Despite all the positives, this is a high avalanche danger zone. Only go in low-risk conditions or with experienced local vets who know what they’re doing and have extensive avalanche knowledge. Not for beginners. Avalanche gear is highly recommended.
- Accessed Via: Saddle between Diamond Peaks. Turn south and climb up the broad shoulder of South Diamond. Before reaching the summit, sight a broad and welcoming slope that looks down on your ascent route and the obvious Outhouse Gully, which extends all the way down to the parking lot.
- South Diamond Peak: South Diamond Face
- Essentials: 0.2-0.22 miles, ~650-680 foot vertical (with Outhouse Gully descent: 0.7 miles, ~1,400-foot vertical)
- Status: Very Difficult
- Steepest slope angle: 45-52 degrees
- Good for: Quick, steep faces with rock buttresses to thread between at the bottom. Not for beginners. High avalanche danger after storms. Go with friends. Multiple options and variations keep the skiing interesting. Avalanche gear is highly recommended.
- Accessed Via: The Saddle between North and South Diamond Peak. Turn south and climb up the broad shoulder of South Diamond to the summit. From here, the face is directly below you; pick one of many variations and pay attention to a set of steeper rock chunks just above the bench by tree-line.
South Diamond Peak and its long southern ridge provide ample, steep line opportunities
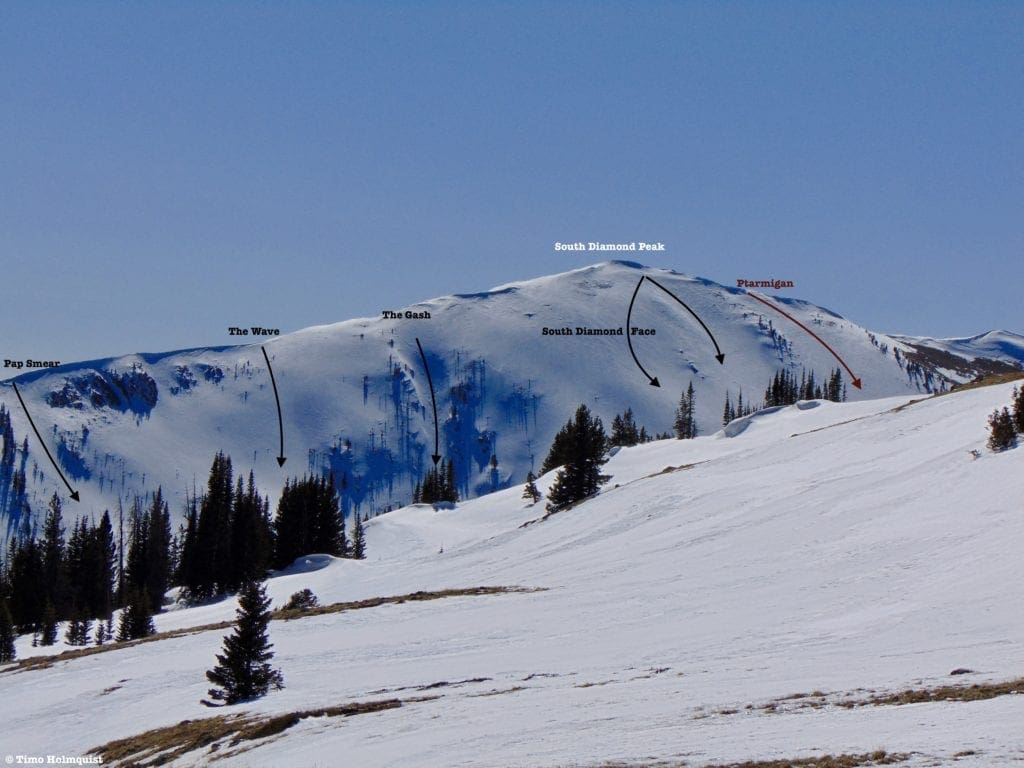
- South Diamond Peak: The Gash
- Essentials: 0.2 miles, ~600-foot vertical (combined with Freeway Gully: 0.6 miles, ~1,250 foot vertical)
- Status: Very Difficult
- Steepest slope angle: 43 degrees
- Good for: Tight turns in a steep gully. This run is also known as avalanche alley for obvious reasons. The Gash slides A LOT; check conditions thoroughly before committing. On great days, it’s a quick, steep drop into a narrow gully before hitting the bench above tree line. Avalanche gear is highly recommended. Not for beginners.
- Accessed Via: The Saddle between North and South Diamond Peak. Turn south and climb up the broad shoulder of South Diamond until hitting the summit. Continue south along the ridge, passing the broad area of South Diamond Face. Look left (being mindful of cornices) and scout the obvious gash between two rock protrusions. That’s your line. You can connect the bottom of the gash with another slide path that will take you all the way down to CO14.
- South Diamond Peak: The Wave
- Essentials: 0.18 miles, ~450-foot vertical (combined with Freeway Gully: ~0.58 miles, ~1,050 foot vertical)
- Status: Difficult to Very Difficult
- Steepest slope angle: 45 degrees
- Good for: A little calmer descent than the hemmed in Gash, although the slope angle is just as steep. This wider section is often corniced up top and, like all the other runs out here, has a history of sliding. Bring proper gear and attempt on low avalanche days. Avalanche gear is highly recommended. Hook left as you approach treeline to tie The Wave to Freeway Gully. Not for beginners.
- Accessed Via: The Saddle between North and South Diamond Peak. Turn south and climb up the broad shoulder of South Diamond until hitting the summit. Continue south along the ridge, passing the broad area of South Diamond Face. Look left (being mindful of cornices) and scout the obvious gash between two rock protrusions. That’s your line.
Ski lines at the end of the south ridge of South Diamond Peak
- South Diamond Peak: Pap Smear
- Essentials: 0.2 miles, ~490 foot vertical
- Status: Difficult (HIGH avalanche danger)
- Steepest slope angle: 40 degrees
- Good for: Fun, less steep turns than other options, but also consistently corniced at the top. Great for laps in combination with Taster’s Choice Trees. Not for beginners. Avalanche gear is highly recommended. The exit is a little thicker in the trees but can be skied. Alternatively, break hard left and get to Freeway Gully. The third option is to reclimb the ridge and ski a line that leads closer to Freeway or Outhouse Gully.
- Accessed Via: The Saddle between North and South Diamond Peak. Turn south and climb up the broad shoulder of South Diamond until hitting the summit. Continue south along the ridge, passing The Gash and The Wave. Just before the ridge descends to the Taster’s Choice Trees, turn left and descend. There will be a cornice to deal with.
- South Diamond Peak: Taster’s Choice Trees
- Essentials: 0.16 miles, ~400-foot vertical
- Status: Difficult
- Steepest slope angle: 35 degrees
- Good for: Nicely spaced tree skiing. Avalanche terrain despite trees. If you maintain the ridgeline, the slope angle is even less, but be careful of descending too far; the lower sides of the peak are steep. Options abound, but the further south you go, the farther you end up from the parking lot. Avalanche gear highly recommended. Not for beginners.
- Accessed Via: The Saddle between North and South Diamond Peak. Turn south and climb up the broad shoulder of South Diamond until hitting the summit. Continue south along the ridge, passing The Gash, The Wave, and Pap Smear. As you encounter the first trees on the ridge, look left and sight your preferred line.
- South Diamond Peak: Outhouse Gully
- Essentials: 0.49 miles, ~730-foot vertical
- Status: Intermediate (avalanche danger)
- Steepest slope angle: 30 degrees
- Good for: Easier turns, still not as safe as other locations in the area, but much better than the slide potential up high. Consider carefully that it is an avalanche chute, and naturally occurring avalanches above your line can sweep you away without warning. Avalanche gear is highly recommended.
- Accessed Via: The Parking lot. You can either take an existing skin track parallel to the gully or climb it directly. Once you break treeline, turn around and ride the gully down.
- South Diamond Peak: Freeway Gully
- Essentials: 0.4 miles, ~657-foot vertical
- Status: Intermediate (avalanche danger)
- Steepest slope angle: 25 degrees
- Good for: Easier turns, still not as safe as other locations in the area, but much better than the slide potential up high. Consider carefully that it is an avalanche chute, and naturally occurring avalanches above your line can sweep you away without warning. Avalanche gear is highly recommended.
- Accessed Via: Either a short walk south on CO14 and a bushwhack to find the gully or an ascent up the main skin track to treeline and a traverse south to below the Gash Line.
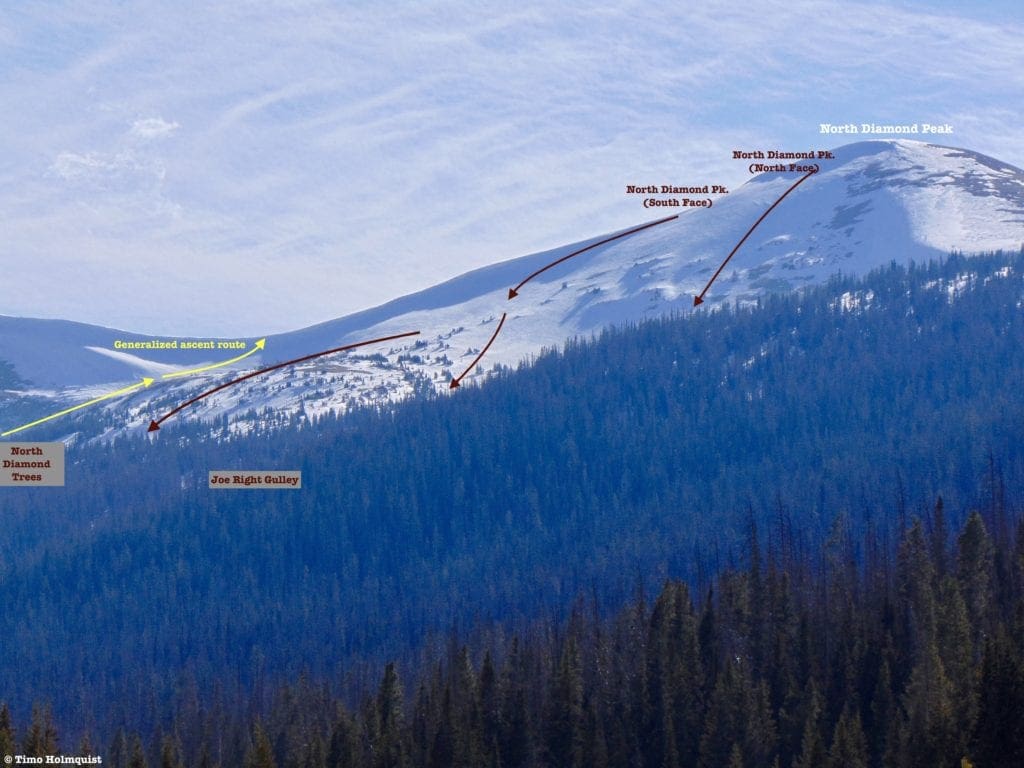
Ascent Line: North Diamond Peak
Gain the saddle between the Diamond Peaks, either following existing skin tracks or creating your own as you keep the Outhouse Gully to your right-hand side to treeline, and then perform a long ascending traverse northwest along the path of least resistance to near the saddle. From the saddle, if gunning for North Diamond, head north up the ridge towards the summit. Two large faces provide great alpine turns, while excellent (and lower avalanche risk) glades make a great finisher below treeline. As with its sister peak, avalanche danger is often pronounced; be careful and evaluate terrain frequently.
- Approach Stats to Saddle: ~1 mile, ~1220 ft. of elevation gain.
- Approach Stats to N. Diamond Summit: ~1.3 miles, ~1590 ft. of elevation gain.
North Diamond Peak ski lines from CO14
- North Diamond Peak: South Face
- Essentials: 0.42 miles, ~770-foot vertical
- Status: Difficult
- Steepest slope angle: 35 degrees
- Good for: Lower angle terrain than South Diamond, though also with plenty of dangers and top cornices to avoid. Draws fewer crowds and is a great way into the North Diamond Trees. Not for beginners. Bring avalanche gear.
- Accessed Via: The saddle between South and North Diamond Peaks. Once reached, head north along the ridge, taking care to avoid cornices. The South Face begins shy of the true summit and descends southeast to the North Diamond Trees. Avalanche gear is highly recommended.
- North Diamond Peak: North Face
- Essentials: 0.44 miles, 870-foot vertical
- Status: Difficult
- Steepest slope angle: 35 degrees (options to make it steeper)
- Good for: Similar angled terrain as the South Face, wide alpine turns, and a strong lead into Joe Wright Gulley. Not for beginners. Avalanche gear is highly recommended.
- Accessed Via: The saddle between South and North Diamond Peaks; once reached, head north along the ridge, taking care to avoid cornices. The North Face begins just past the true summit and descends to the Joe Right Gully.
- North Diamond Peak: North Diamond Trees
- Essentials: 0.37 miles, ~655-foot vertical
- Status: Difficult (expansive trees)
- Steepest slope angle: 24 degrees
- Good for: An expansive area of tree skiing that’s relatively low risk during high avalanche risk and powder days. While the slope angle is lower, the treed area is large, with many obstacles to avoid. Not for beginners. Bring navigation tools and avalanche gear.
- Accessed Via: Cameron Pass parking area. Two methods, up to the saddle in-between the Diamond Peaks. Down the North Diamond South Face line and into the trees. Option 2: follow a winter cross-country trail (Cameron Connector) north from the parking lot and peel left after a few points of a mile, climbing until either reaching treeline or earlier.
- North Diamond Peak: Joe Right Gully
- Essentials: 0.38 miles, ~580-foot vertical
- Status: Difficult (trees and terrain traps)
- Steepest slope angle: 25 degrees
- Good for: Easy exit point for North Diamond and Point 11,588. The bottom of the gully is narrow; it may be easier to stay above it to either side, depending on snowpack. The gully is a slide path, so like North Diamond Trees, although slope angle is low, environmental obstacles are high. Not for beginners. Avalanche gear is highly recommended.
- Accessed Via: The summit of North Diamond Peak, ski down the North Face and funnel into the gully. If you’ve been to the area before, find the Cameron Connector winter trail as it heads north from the parking lot, passing the North Diamond Trees and ultimately crossing the Joe Right Gully drainage. Turn left and begin skinning up.
North Diamond to Montgomery Bowls and east to Hot Dog Bowls
North Diamond to Montgomery Bowls and east to Hot Dog Bowls
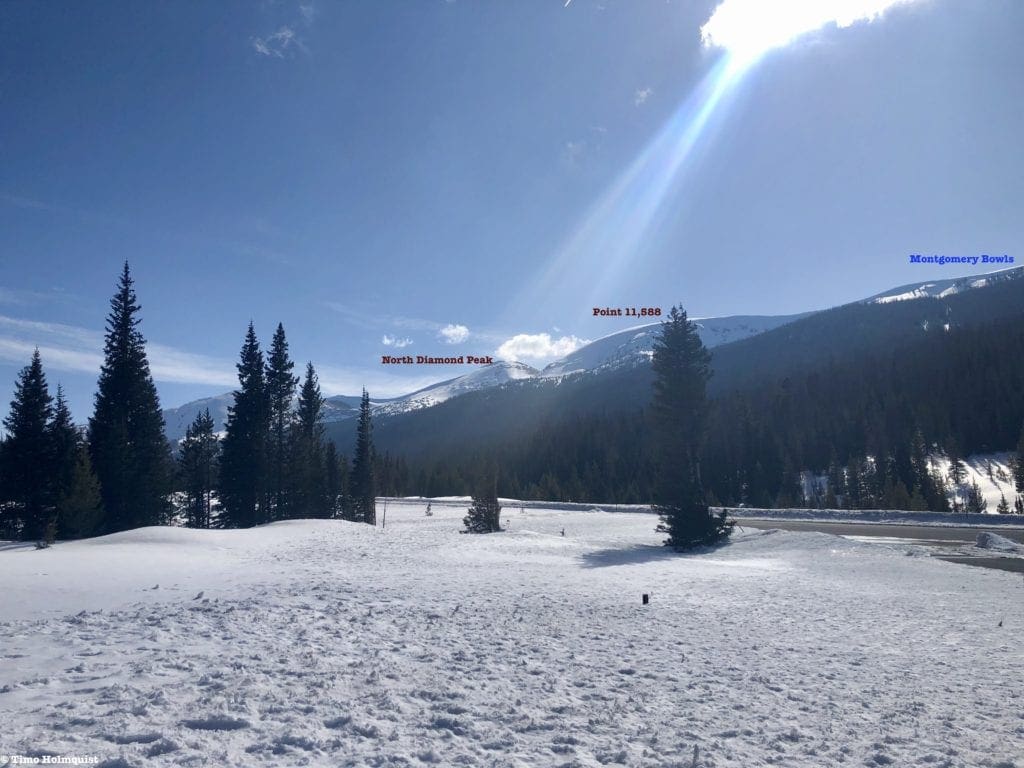
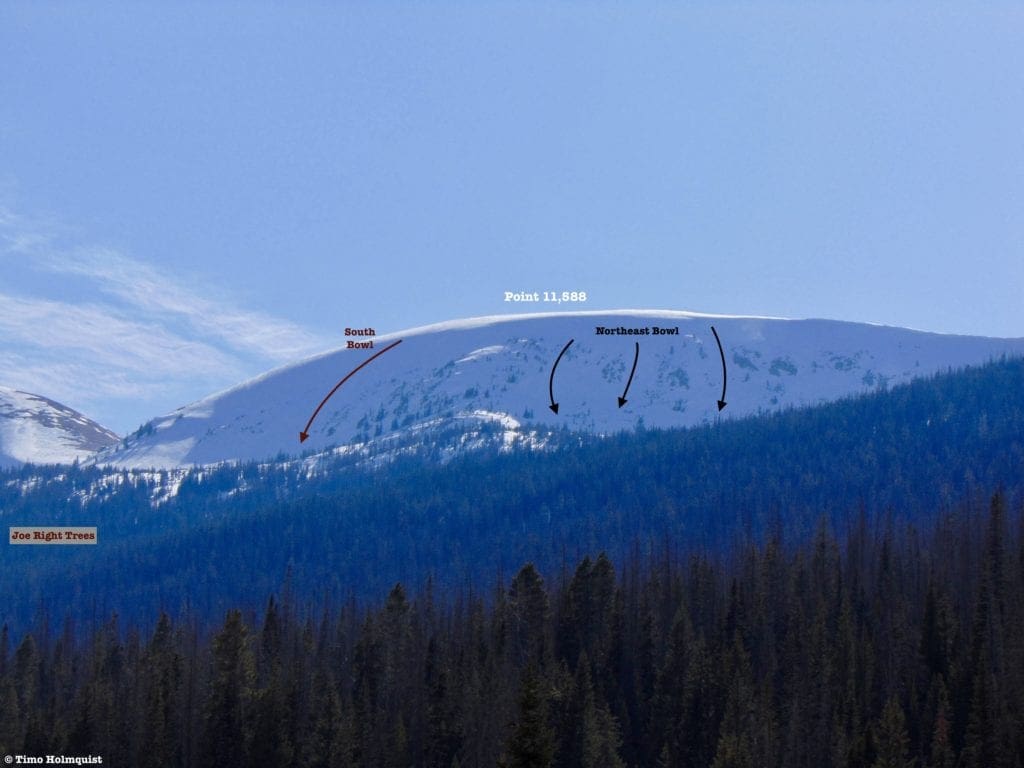
Ascent Lines: Point 11,588
This long, unnamed summit between North Diamond and Montgomery pass has some interesting routes similar to the North Diamond selection. It can be accessed three different ways. You can take the Montgomery Pass trail to the Montgomery Bowls and head south, where a good view of the Northeast Bowl awaits. You can climb up N. Diamond Peak, ski down the North Face to treeline, and climb back up to the South Bowl of Pt. 11,588. Or, if you’ve been to the area before, you can take the Cameron Connector north from the Cameron Pass parking area. Once you pass Joe Right Gully, you can ascend northwest into the trees on the right side of the Gully to scout the Joe Right Trees line and eventually pop up above treeline to evaluate the South Bowl.
- Stats to S. Bowl via N. Diamond: ~1.3 miles, ~1590 ft. of elevation gain to N. Diamond Summit. +0.44 miles & 870 vertical feet skied on North Face. +0.72 miles, 675 ft. of elevation gain to Pt. 11,588.
- Stats to bottom of NE Bowl via Montgomery Bowls: 1.98 miles, ~1125 ft. of elevation gain.
- Stats to bottom of S. Bowl via Joe Right Trees: ~1.14 miles, ~750 ft. of elevation gain.
Ski lines on Point 11,588
- Point 11,588: South Bowl
- Essentials: 0.29 miles, ~580-foot vertical
- Status: Difficult
- Steepest slope angle: 39 degrees
- Good for: Alpine turns in a beautiful setting. Skiers left is steeper, skiers right is often windswept and shallow. While the overall slope angle is lower than many routes on South Diamond, this line also has an avalanche history. Not for beginners. Bring avalanche gear.
- Accessed Via: Diamond Peaks saddle, climb North Diamond, ski the north face and climb up the South Bowl. You can also take the Cameron Connector past Joe Right Gully and climb to treeline to scout the south bowl. A third option is to climb south from the Montgomery Pass Trail until reaching the bowl.
- Point 11,588: Northeast Bowl
- Essentials: 0.19 miles, ~485-foot vertical
- Status: Very Difficult (complex avalanche terrain)
- Steepest slope angle: 42 degrees
- Good for: Experienced professionals who know the intricacies of snowpack science. Although not the steepest slope in Northern Colorado, the Northeast Bowl has a large convex roller, cornices, and a set of roughly five thin gullies, all of which could slide. NOT for beginners. Bring avalanche gear and coherent company if attempting.
- Accessed Via: Montgomery Pass Trail, pay attention to a sign before the Pass indicating how to get to the bowls. Break left and circumvent the Montgomery Bowls until arriving at the base of the area. Conversely, you can walk along the ridge from Montgomery Pass, although the wind loading on the east side will likely mean carrying your skis.
- Point 11,588: Joe Right Trees
- Essentials: 0.39 miles, ~750-foot vertical
- Status: Difficult (expansive tree area)
- Steepest slope angle: 30 degrees
- Good for: Relative safety during times of high snowfall or avalanche danger. A broad and fun area that bleeds down into Joe Right Gully. Typical tree skiing dangers occur. Not for beginners. Avalanche gear recommended.
- Accessed via: A descent from either bowl along Point 11,588. Or, climb up to Montgomery Pass, circumvent the bottom of the Northeast Bowl, and drop into the trees.
North Diamond, Point 11,588 and Montgomery Bowls from Zimmerman Lake Trailhead
Ascent Lines for Montgomery Pass and Hot Dog Bowls
Both areas are accessed from the Zimmerman Lake Trailhead parking area, roughly 3 miles northeast of Cameron Pass. To get to the Montgomery bowls, park, cross CO14 to the north side and locate the well-signed start to the Montgomery Pass Trail. The Hot Dog Bowls are accessed south of the parking area; you’ll start by taking the Zimmerman Lake trail for 3-5 minutes until finding a place to cross the creek bed to your right. From there, either follow existing skin tracks or break trail up the drainage, eventually reaching an armchair-shaped ridge to your right that houses the bowls.
-
- Stats to Montgomery Pass: ~1.82 miles, ~1045 ft. of elevation gain.
- Stats to bottom of Montgomery Bowl: ~1.7 miles, ~1100 ft. of elevation gain
- Stats to top of Hamburger Trees: ~1.17 miles, ~1,222 ft. of elevation gain
- Stats to bottom of Hot Dog Bowls: ~1.08 miles, ~770ft. of elevation gain.
- Montgomery Pass Area
- Essentials: 0.24 miles, ~350-400-foot vertical (~1.95 miles and ~1400 foot vertical to parking lot)
- Status: Intermediate (still in avalanche terrain)
- Steepest slope angle: 30 degrees
- Good for: Best introduction to the Diamond Peaks area of Cameron Pass. Laps. Although much less steep, the area can and will slide. ALWAYS evaluate terrain carefully before committing. Avalanche gear is recommended.
- Accessed via: Montgomery Pass Trail across the street from the Zimmerman Lake Parking area. Near treeline, watch for a sign indicating how to get to the bowls, break left to reach the base of the most skied areas. The runs are short, but the powder can be awesome.
Hot Dog Bowls West and Hamburger Trees
- Hamburger Trees
- Essentials: 0.74 miles, ~1010-foot vertical
- Status: Difficult (avalanche terrain and longer glade skiing)
- Steepest slope angle: 33 degrees
- Good for: Excellent tree skiing in a relatively mellow environment away from most area crowds. Avalanche danger is HIGH after storms; bring avalanche gear. NOT for beginners.
- Accessed via: Zimmerman Lake Trailhead. Proceed along the Zimmerman lake Trail for 3-5 minutes until you see a way to cross the creek to your right. Once crossed, parallel the drainage as it weaves its way higher, making sure to avoid the small gullies the drainage spills down. There is no official approach trail, but you may be able to follow some skin tracks from other users. For the Hamburger Trees, angle a steep climb almost directly due south and up an abrupt ridge. While initially difficult, this path will get you to the top of the trees fairly quickly, all while offering views of the possible lines back down. When you break out of the trees, turn around and ski your ascent line back to the creek and the trailhead. From the top, you will be able to see CO14 winding its way below you.
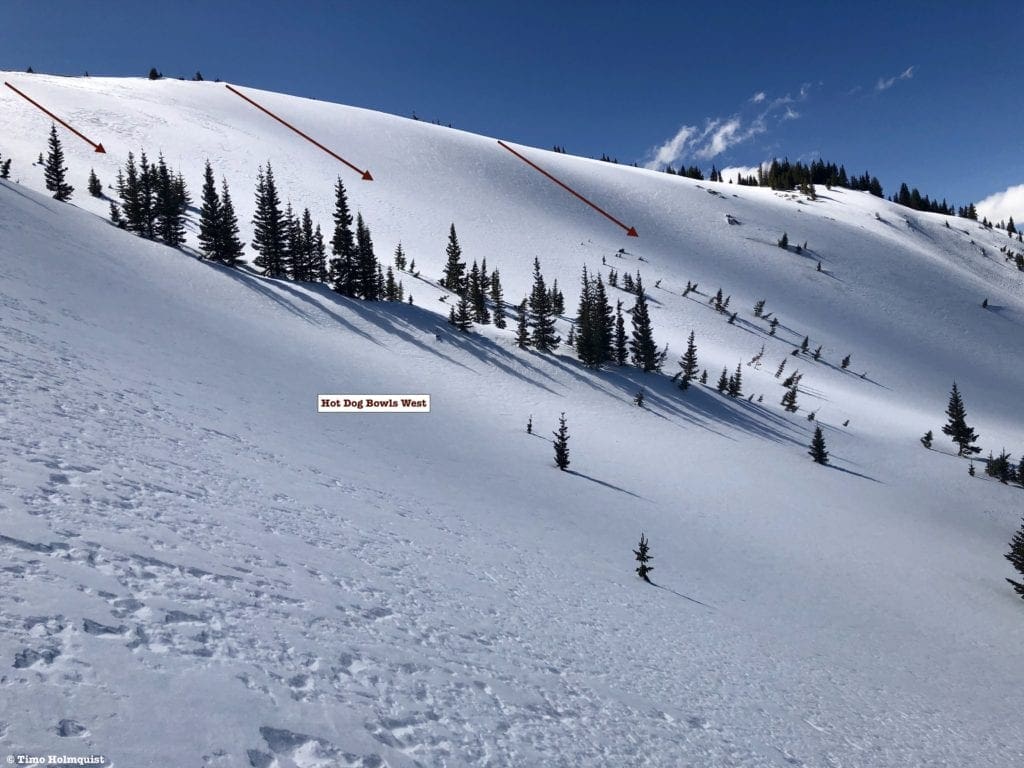
Hot Dog Bowls West
- Hot Dog Bowls West
- Essentials: 0.3-0.32 miles, ~540-foot vertical (~1.35 miles, ~1255-foot vertical back to parking lot)
- Status: Difficult (avalanche terrain)
- Steepest slope angle: 40-43 degrees
- Good for: Running laps in a beautiful setting with short, steep, and often powdery turns above the trees. At the risk of sounding like a broken record, Hot Dog Bowls can avalanche, evaluate terrain carefully. Not for beginners. If you attack this after a powder day, you may also be breaking trail with nothing to follow. Know the area and know where you are going.
- Accessed Via: Zimmerman Lake Trailhead. Proceed along the Zimmerman lake Trail for 3-5 minutes until you see a way to cross the creek to your right. Once crossed, parallel the drainage as it weaves its way higher, making sure to avoid the small gullies the drainage spills down. There is no official approach trail, but as you follow the drainage, you’ll notice the hulking ridge of Iron Mountain in front of you. Make for the low point in the ridge between Iron mountain and an unnamed spur to your right. The bowls along this ridge are the Hot Dog Bowls. Perform an ascending traverse of the ridge. The steeper lines between you and the Hamburger Trees are Hot Dog Bowls West.
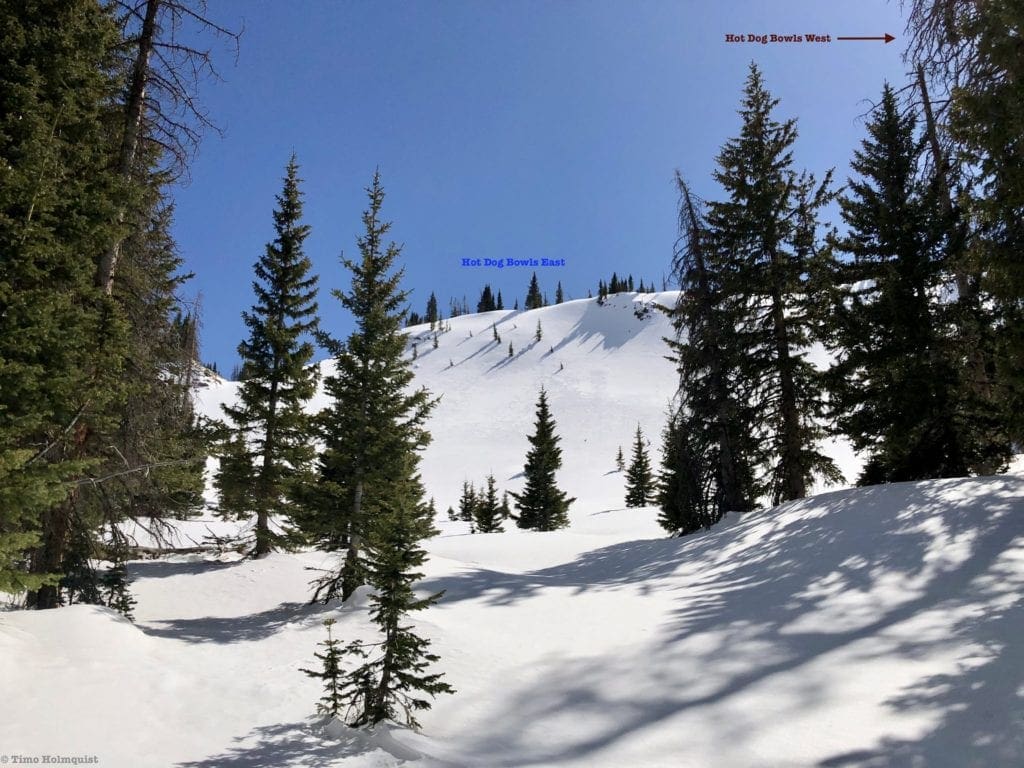
Hot Dog Bowls East
- Hot Dog Bowls East
- Essentials: 0.74 miles, ~360-400-foot vertical (~1.4 miles, ~1185-foot vertical back to parking lot)
- Status: Intermediate (avalanche terrain)
- Steepest slope angle: 25-30 degrees
- Good for: Laps, less slide risk and a generally mellower alternative to Hot Dog Bowls West and Hamburger Trees. Navigation and orientation skills may be necessary if there are no skin tracks to follow. Bring avalanche gear and good company. Not for beginners.
- Accessed via: Zimmerman Lake Trailhead. Proceed along the Zimmerman lake Trail for 3-5 minutes until you see a way to cross the creek to your right. Once crossed, parallel the drainage as it weaves its way higher, making sure to avoid the small gullies the drainage spills down. There is no official approach trail, but as you follow the drainage, you’ll notice the hulking ridge of Iron Mountain in front of you. Make for the low point in the ridge between Iron mountain and an unnamed spur to your right. The bowls along this ridge are the Hot Dog Bowls. The ridge is less steep ahead of you and to the left (east).
Cameron Pass South
Cameron Pass threads the gap between the Medicine Bow and the Never Summer Mountains. To the south side of the pass lies the craggy northern end of the Never Summers, and although they are smaller in height than hundreds of other summits in the state, they are steep, impressive, and provide a true mountaineering experience. Don’t take their modest elevations for granted; these are big mountains with dangerous factors attached to them, including cornices, convex rollers, and big-time avalanche potential.
Looking south from CO14
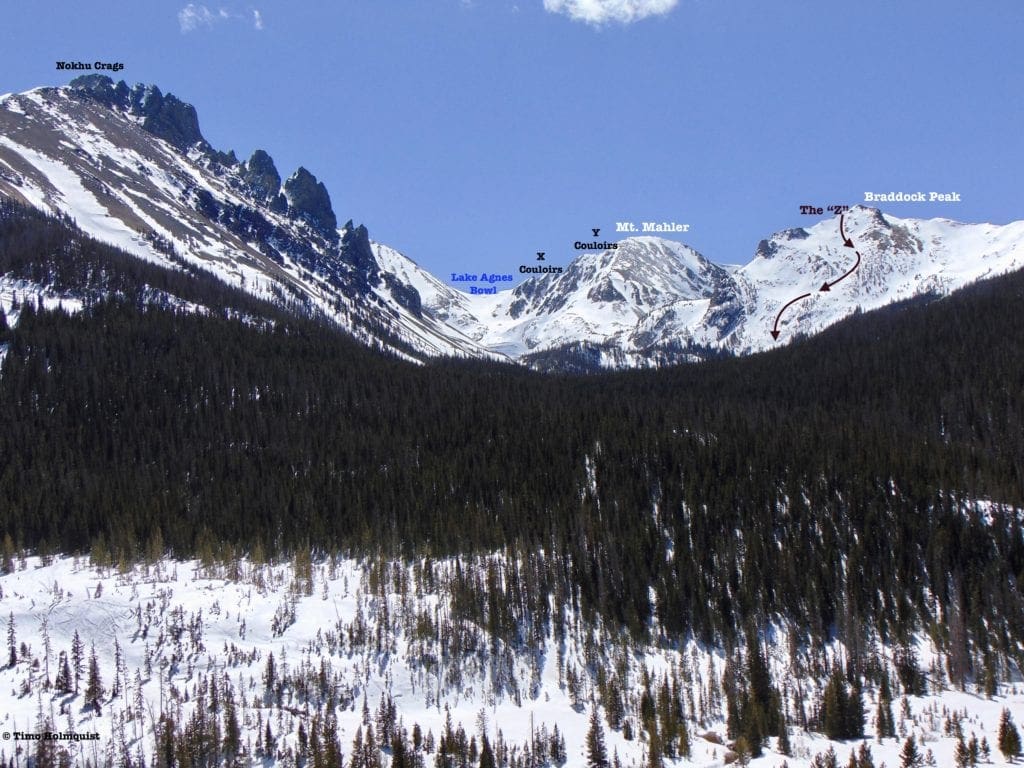
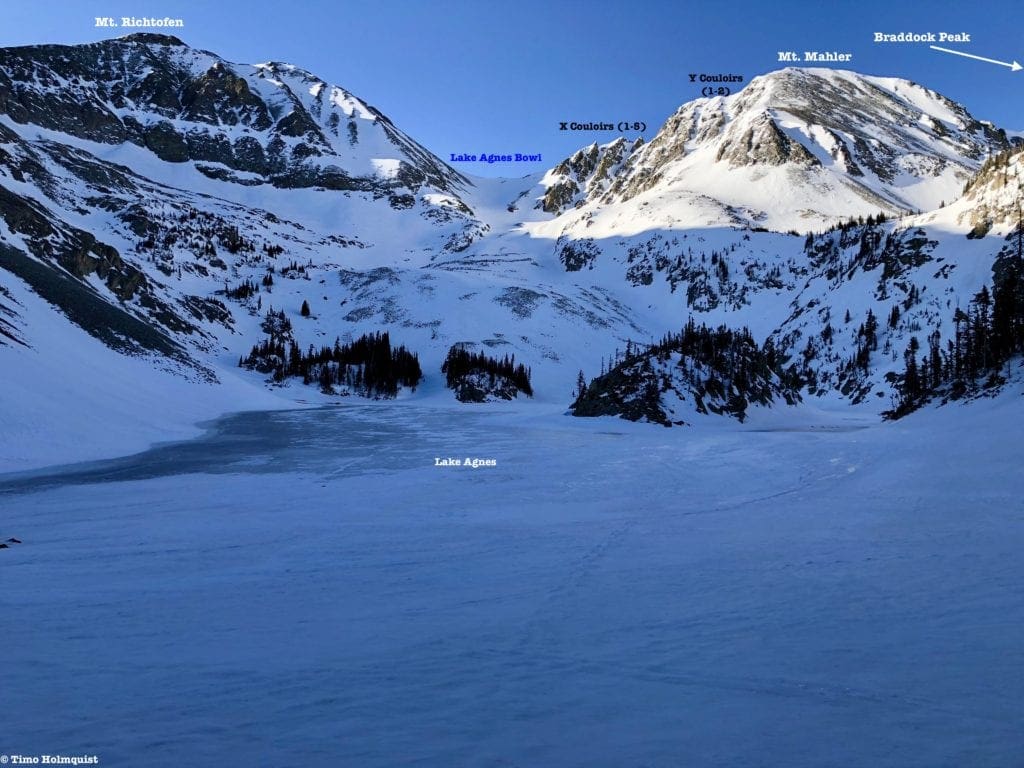
The lines to the south of Cameron Pass can be divided into three distinct sections. The first section is the Nokhu Crags and associated ski lines. It’s hard to miss Nokhu as you cross Cameron Pass; the beautiful and dangerous-looking rocks can pull your gaze from the road if you’re not careful. The next section to the west is the Lake Agnes Bowl, which is framed by the west side of Nokhu, Mt. Richtofen, Mt. Mahler, and Braddock Peak. This area contains a long intermediate descent in addition to multiple steep and deep couloirs. The final area is Braddock Peak itself, which offers a fantastic summit to base descent.

Cameron Pass South Overview
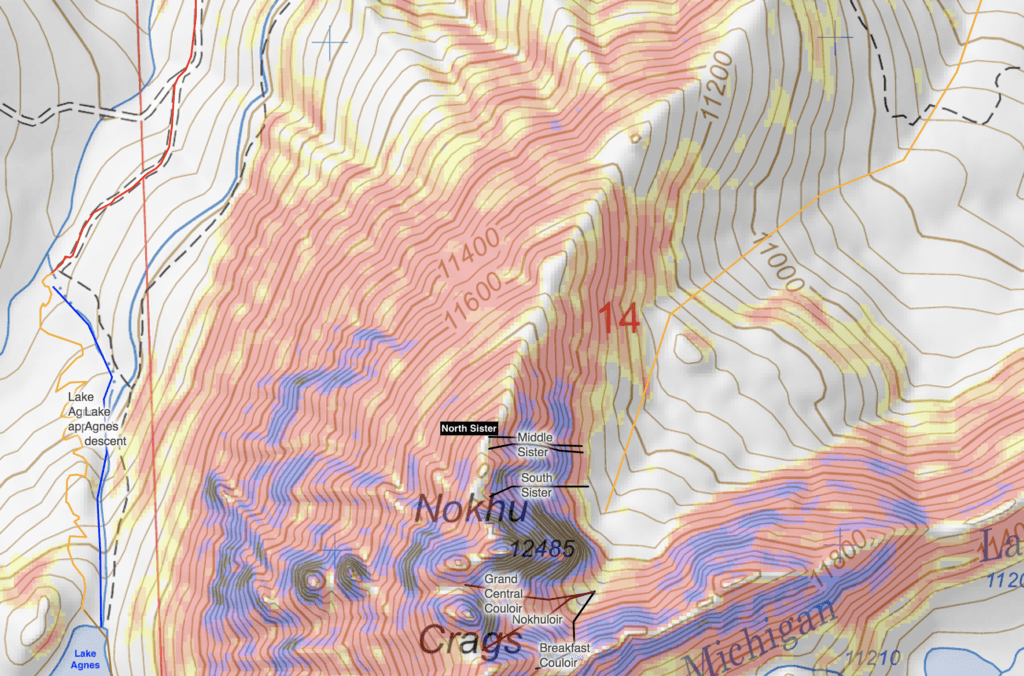
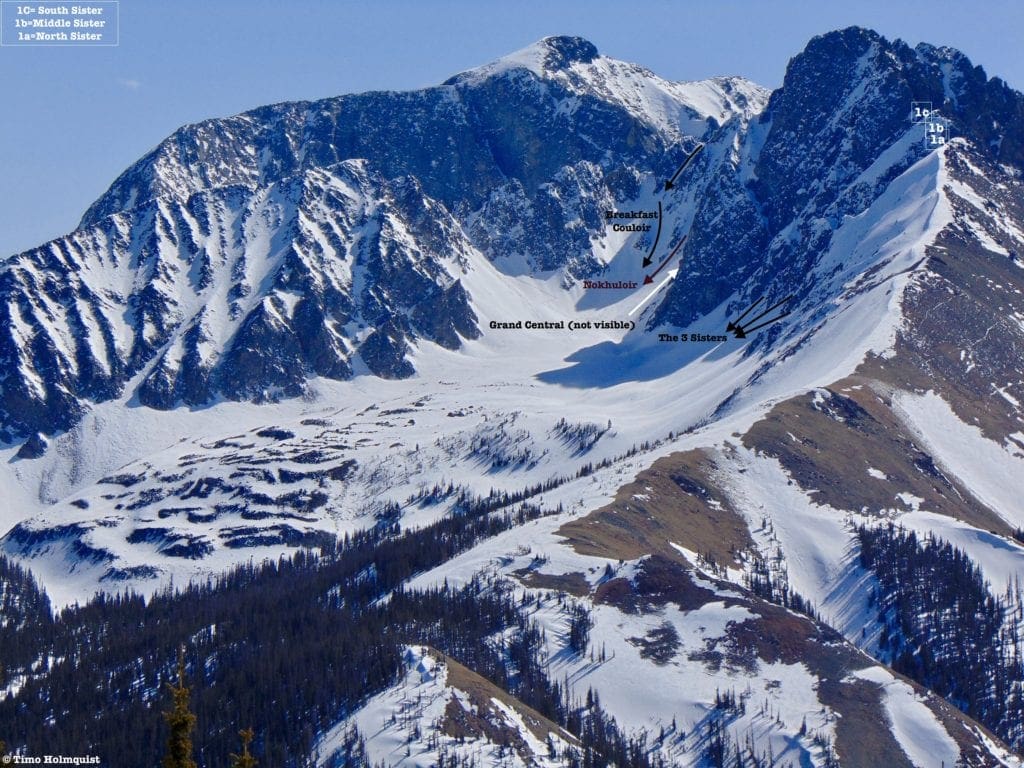
Ascent Lines: Nokhu Crags
This regal and imposing set of crumbly cliffs lies on a northern spur of a ridge leading to the Never Summers highest point of Mt. Richtofen. Its western side is often windswept and bare long before other aspects of the mountain, but its sheltered eastern bowl is where the epic couloirs lie. This is a remote and intimidating area; use every precaution for backcountry skiing when skiing these steep and aesthetic lines.
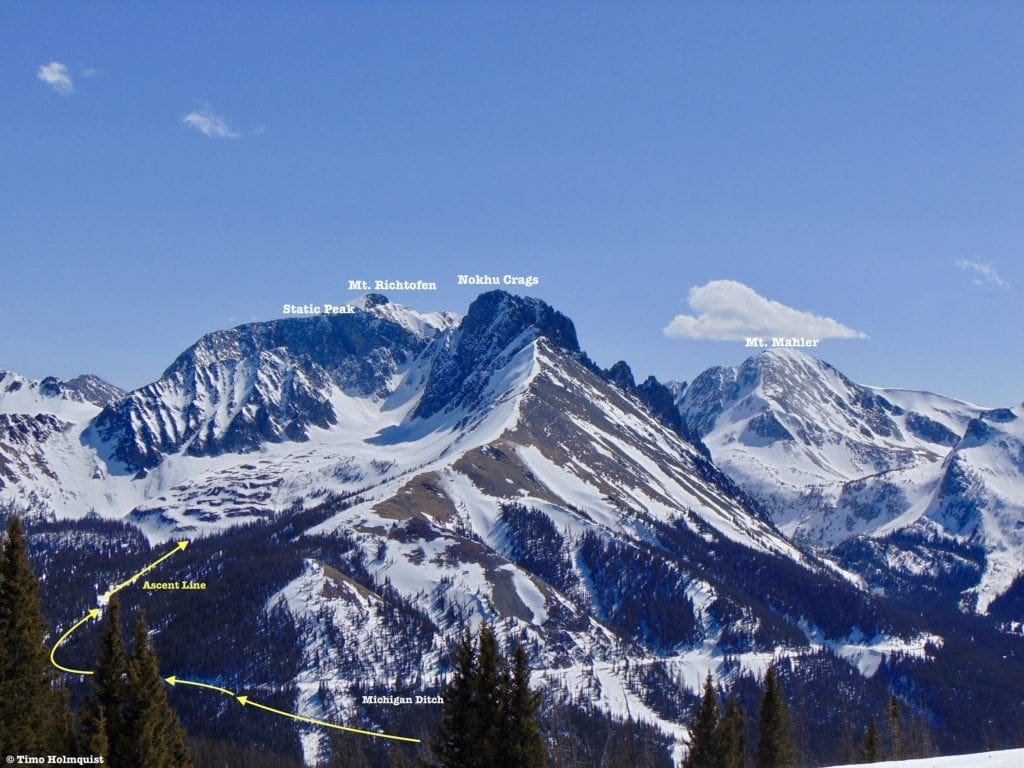
Access to Nokhu is a little more involved than most Cameron Peak North areas. Park at the winter lot off of CO14 near Wiley Lumber Camp. You should see cars to your left as your driving from Cameron Pass; if you see the State Forest State Park headquarters, you’ve gone too far west. Once parked, follow a gated dirt road down to the Michigan river drainage, and walk east on it for a little over half a mile. As you meander along, keep an eye out to your right for a bridge crossing the river: follow signs for the Lake Agnes and Nokhu Huts. Leave the road, cross the river and begin a mellow ascent up an open slope for less than 0.2 miles. On your left should be a gated road and signs for the Crags Campground. There should also be an obvious cut in the trees angling uphill, take the sloped climb (not the road to the Crags Campground) and begin an ascending traverse to the Michigan Ditch.
Once you hit the ditch, take a left and follow it around the lower flank of Nokhu’s northern ridge. You’ll only be on the Ditch trail briefly before sighting a use trail/skin track up to the right. Take this approach into the Nokhu basin and ascend until treeline breaks, and you can scout the couloirs pouring down from the impressive ridge.
- Approach Stats to bottom of Nokhu lines: ~2.86 miles, ~1970 ft. of elevation gain from the Michigan River lowpoint
Nokhu Crags from the NE
- Nokhu Crags: Three Sisters (South Sister)
- Essentials: 0.12 miles, ~600-foot vertical
- Status: Very Difficult
- Steepest slope angle: 50 degrees
- Good for: Steep, aesthetic couloir skiing. NOT for beginners or intermediate skiers. The couloir is a no-fall zone and is quite skinny. While South Sister is not as steep as its neighbors, it is still quite precipitous at the bottom. Bring avalanche gear and coherent company.
- Accessed via: Lake Agnes Trailhead on CO14, left towards Crags Campground, ascending traverse to Michigan Ditch Road. Once on Michigan Ditch, proceed East for a few minutes until sighting skin tracks or a path of least resistance into the basin to your right, climb until the trees break, and you can see the Nokhu crags above you.
- Middle Sister and North Sister: Very Difficult. Only for those who can handle South Sister and are looking for an additional challenge. These two skinny couloirs are deeply inset and can be skied later into the season, but like South Sister are no-fall zones and avalanche-prone mid-winter. NOT for anyone short of professional grade.
- At a Glance: 0.12 miles, ~575-foot vertical descent
- Steepest Slope Angle: ~55 degrees.
- Middle Sister and North Sister: Very Difficult. Only for those who can handle South Sister and are looking for an additional challenge. These two skinny couloirs are deeply inset and can be skied later into the season, but like South Sister are no-fall zones and avalanche-prone mid-winter. NOT for anyone short of professional grade.
Nokhu Couloirs Ski Lines Map
- Nokhu Crags: Grand Central Couloir
- Essentials: ~0.15 miles, ~615-foot vertical
- Status: Difficult (pronounced avalanche risk)
- Steepest Slope Angle: 47 degrees
- Good for: Laps, and aesthetic couloir skiing at a slightly easier pitch than the Three Sisters. High avalanche danger. NOT for beginners or intermediate skiers.
- Accessed Via: Lake Agnes Trailhead on CO14, left towards Crags Campground, ascending traverse to Michigan Ditch Road. Once on Michigan Ditch, proceed East for a few minutes until sighting skin tracks or a path of least resistance into the basin to your right, climb until the trees break, and you can see the Nokhu crags above you.
- Nokhu Crags: Nokhuloir
- Essentials: 0.15 miles, ~610-foot vertical
- Status: Difficult
- Steepest Slope Angle: 45 degrees
- Good for: Beautiful couloir skiing and least difficult introduction to Nokhu, still in high avalanche danger zone and NOT for beginners/intermediate skiers. Bring avalanche gear and evaluate terrain carefully before committing.
- Accessed via: Lake Agnes Trailhead on CO14, left towards Crags Campground, ascending traverse to Michigan Ditch Road. Once on Michigan Ditch, proceed East for a few minutes until sighting skin tracks or a path of least resistance into the basin to your right, climb until the trees break, and you can see the Nokhu crags above you.
- Nokhu Crags: Breakfast Couloir
- Essentials: 0.13 miles, ~600-foot vertical
- Status: Very Difficult
- Steepest Slope Angle: ~54 degrees.
- Good for: An excellent challenge on a crooked couloir in a beautiful setting. High avalanche danger and most of this route is a no-fall zone. Bring proper gear and partners in case something happens. Absolutely NOT for beginners or intermediate skiers.
- Accessed via: Lake Agnes Trailhead on CO14, left towards Crags Campground, ascending traverse to Michigan Ditch Road. Once on Michigan Ditch, proceed East for a few minutes until sighting skin tracks or a path of least resistance into the basin to your right, climb until the trees break, and you can see the Nokhu crags above you.
Nokhu Couloirs from the NE
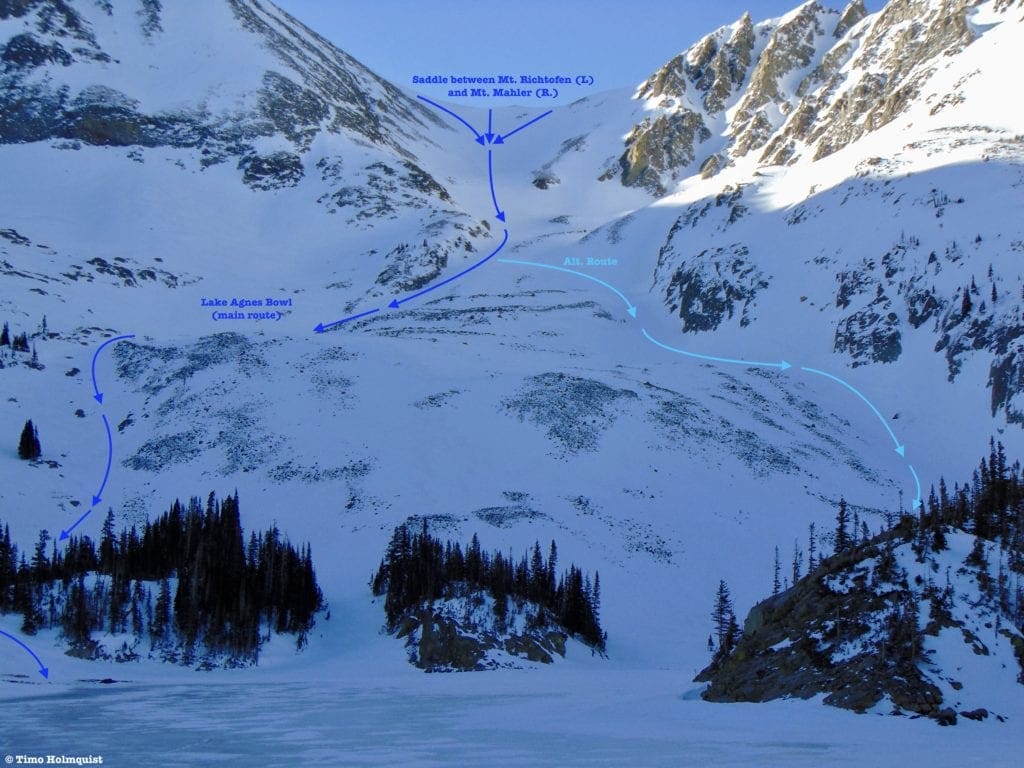
Ascent Line: Lake Agnes Bowl
The first part of this ascent is shared with Nokhu. From the winter Lake Agnes parking lot, proceed east on a wide dirt road/skin track until sighting a bridge across the Michigan River to your right. Descend to the bridge and begin climbing up the opposite side. Instead of taking a left towards Crags Campground, continue on the main road as it winds through a mixed spruce forest and crosses at least one avalanche path (well-signed). Once you reach the Old Agnes Cabin (marked by the historic cabin and a set of restrooms), proceed around it and stay on the left edge of a massive field. Don’t head into the field, or you’ll end up missing Lake Agnes. There will be signed indicating when to turn left into the trees and begin a steeper winter ascent up to Lake Agnes (blue winter trail markers are frequent). The ascent from the old cabin to the Lake is only 0.8 miles but is a significant climb, and the skin track can be difficult to follow at times; keep your head on a swivel. If you’ve been here before, you can climb the stream path to the left (east) of the field for a more direct approach.
View from Lake Agnes
Once you arrive at the shores of the lake, you’ll be treated to a fantastic view of the basin. The obvious saddle on the opposite side of the lake is the top of Lake Agnes Bowl. From the lake, proceed south across (or around) it and up the bowl for access to various lines.
- Stats to Lake Agnes: ~2.57 miles, ~1236 ft. of elevation gain from Michigan River lowpoint
- Stats to top of Lake Agnes Bowl: ~3.62 miles, ~2545 ft. of elevation gain from Michigan River lowpoint
Lake Agnes Bowl and variation
- Lake Agnes Bowl
- Essentials: 0.75 miles, ~1309-foot vertical to L. Agnes (+400 to old Agnes Cabin after lake traverse, +650 ft to Michigan River after brief traverse near Old Agnes Cabin). Grand total with 3 distinct downhill sections: ~2390-foot vertical.
- Status: Intermediate
- Steepest Slope Angle: ~39 degrees (briefly at the top)
- Good for: A long, beautiful, intermediate foray into the area. The snowfield at the top of the bowl lasts well into June. Like all lines, this route can slide, evaluate terrain carefully. Bring appropriate gear. The top few turns are steeper than they appear.
- Accessed via: L. Agnes winter parking to Michigan River, up to Lake Agnes. From the lake, look south and sight the obvious saddle between Mt. Richtofen and Mt. Mahler. That’s your target, varied ascent options, dealer’s choice depending on coverage. From the top, follow the path of least resistance; you’ll ski down and veer to the right before reaching the shore of the lake. If exiting the area, once you traverse back across the lake, instead of descending your ascent route, look for a chute to the right that you can ski down to the Old Agnes Cabin.
- Alternate Route: If you’re paying attention (difficult if you’re having a blast), look for an opportunity to cut left and find a parallel gully that descends down to the left (west) side of the lake. The bottom of this gully is steeper than the bottom of the main route but is less steep than the first few turns at the top of the bowl.
- At a Glance: 0.75 miles, ~1,300 foot vertical to the lakeshore.
- Steepest Slope Angle: ~39 degrees
- Alternate Route: If you’re paying attention (difficult if you’re having a blast), look for an opportunity to cut left and find a parallel gully that descends down to the left (west) side of the lake. The bottom of this gully is steeper than the bottom of the main route but is less steep than the first few turns at the top of the bowl.
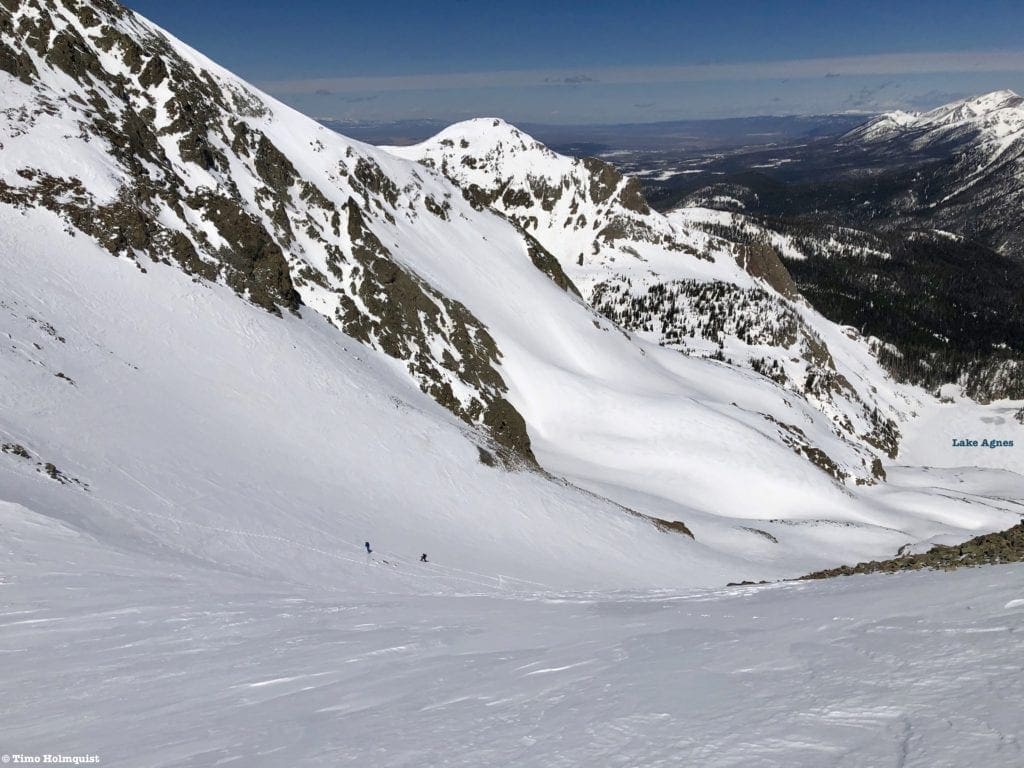
On top of Lake Agnes Bowl. You can see two backcountry skiers getting to the steeper part of the upper bowl.
Ascent line to Mt. Mahler’s X and Y Couloirs
Like Nokhu’s Couloirs, the X and Y couloirs on Mahler are quintessential skiing. They dominate the right (west) side of the Lake Agnes Bowl and command attention from as far away as CO14. Despite their relatively short length, the couloirs are very dangerous and should only be attempted by veteran backcountry skiers with proper equipment. If climbing up from the bottom, you’ll need proper mountaineering gear: axe, crampons, and helmet.
Follow the signs and trails to Lake Agnes. At the lake, traverse across and begin climbing up the center of the bowl. Roughly 2/3 of the way up is the best opportunity to peel right and climb the bottoms of the Y-Couloirs. The X Couloirs can be approached by climbing the mellower Lake Agnes Bowl and traversing the ridge or by climbing from the bottom.
- Stats to bottom of X Couloirs: ~3.47 miles, ~2143 ft. of elevation gain from Michigan River lowpoint
- Stats to bottom of Y Couloirs: ~3.37 miles, ~2150 ft. of elevation gain from Michigan River lowpoint
- Stats to top of Lake Agnes Bowl: ~3.62 miles, ~2545 ft. of elevation gain from Michigan River lowpoint
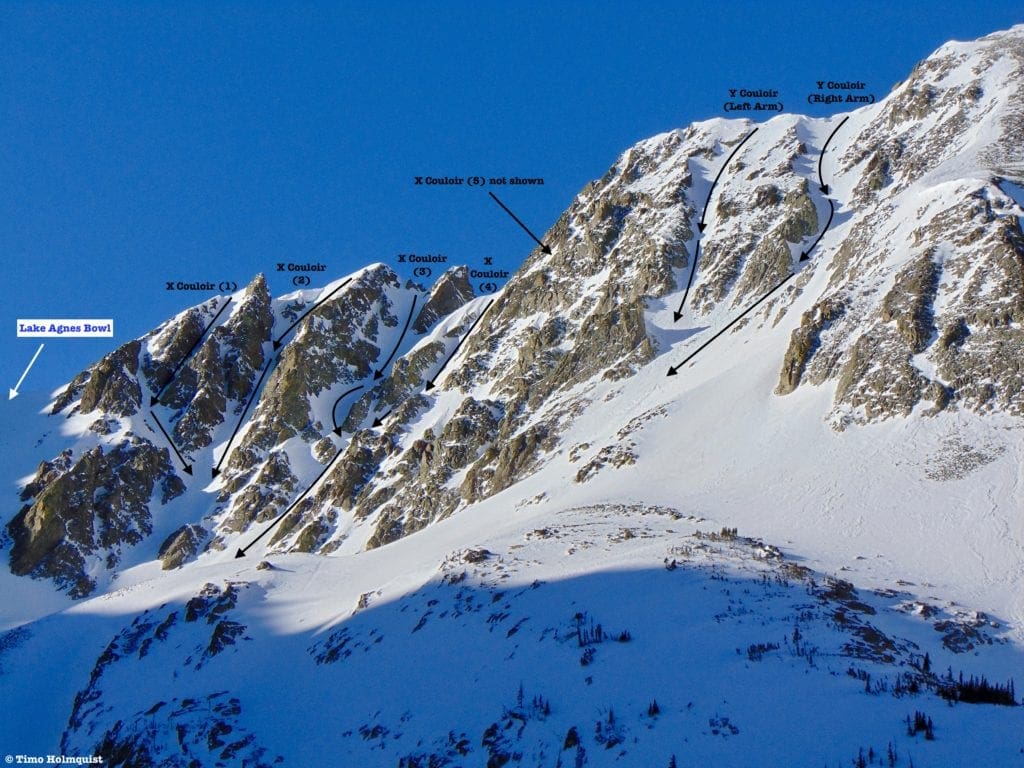
X and Y Couloirs in relation to the top of Lake Agnes Bowl
- Mahler: X Couloirs (1&2)
- Essentials: ~0.12 miles, 500-530 foot vertical
- Status: Very Difficult
- Steepest Slope Angle: 54 degrees
- Good for: Quick, steep, thin couloir skiing with high risk for injury. Multiyear veterans with proper avalanche gear and competent partners. NOT for beginner, intermediate, or even some advanced skiers. Both couloirs are often steeply corniced at the top and intersect about halfway down.
- Accessed via: Lake Agnes winter parking, descend to Michigan River and up to Lake Agnes. From the lake, traverse across (or around) and climb 2/3 of the way up lake Agnes Bowl, survey the couloirs. Either climb up from the bottom or ascend to the top of the bowl and traverse the sharp ridge to the start (substantial scrambling involved).
- Mahler: X Couloirs (3&4)
- Essentials: 0.11 miles, 500-530 foot vertical
- Status: Very Difficult
- Steepest Slope Angle: 45-50 degrees
- Good for: Challenging, aesthetic couloir skiing in a true mountaineering setting. While not as steep as 1&2, these are still very difficult and dangerous couloirs with cornice dangers up top and high rockfall potential. NOT for beginners, intermediate, or some advanced skiers. 3 and 4 intersect for the final 1/3 of the line. Couloir 4 can be considered the main X Couloir as it reaches for the low point between the sharp rocks to its east and the main bulk of Mt. Mahler to the west.
- Accessed via: Lake Agnes winter parking, descend to Michigan River and up to Lake Agnes. From the lake, traverse across (or around) and climb 2/3 of the way up lake Agnes Bowl, survey the couloirs. Either climb up from the bottom or ascend to the top of the bowl and traverse the sharp ridge to the start (substantial scrambling involved).

X Couloirs profile 1-5
- Mahler: X Couloirs (5)
- Essentials: 0.13 miles, 650-foot vertical
- Status: Very Difficult
- Steepest Slope Angle: 55 degrees
- Good for: Thin, steep couloir skiing, a longer descent than the other X Couloirs. This couloir is not as deeply inset and can therefore sport variable conditions, evaluate carefully before committing. The bottom of Couloir 5 intersects with 3&4. NOT for beginners, intermediate, or some advanced skiers. Avalanche gear is a must, along with competent ski mountaineering partners.
- Accessed via: Lake Agnes winter parking, descend to Michigan River and up to Lake Agnes. From the lake, traverse across (or around) and climb 2/3 of the way up lake Agnes Bowl, survey the couloirs. Either climb up from the bottom or ascend to the top of the bowl and traverse the sharp ridge to the start (substantial scrambling involved).
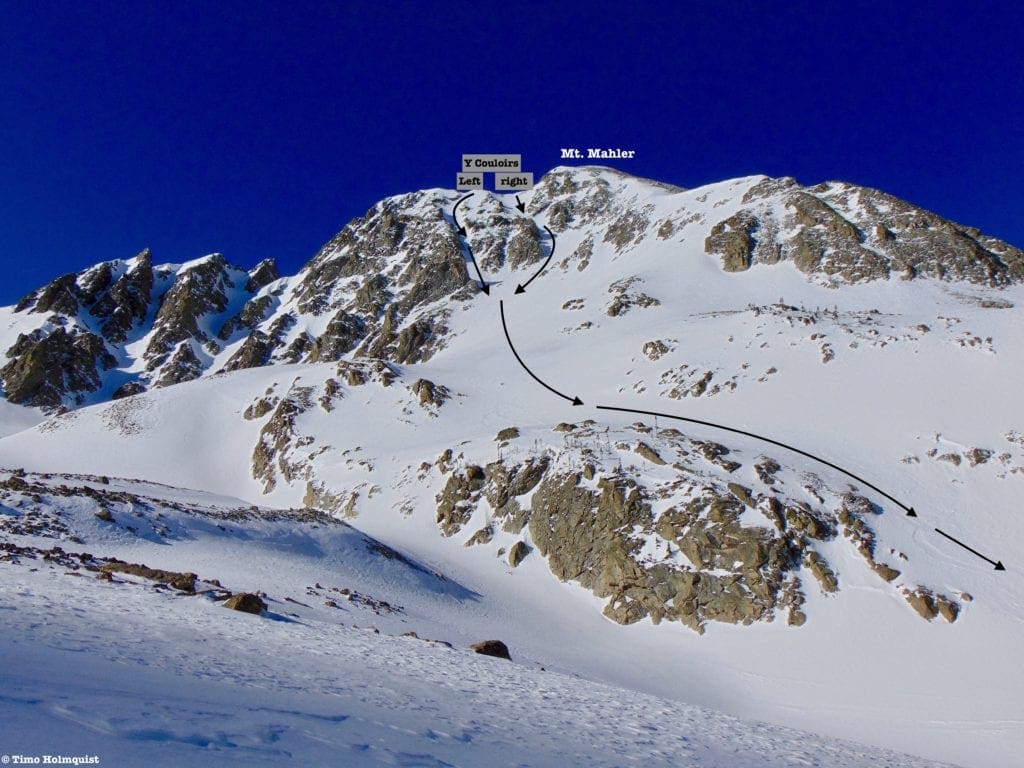
Y Couloirs and runout options
- Mahler: Y Couloir (Left Arm)
- Essentials: 0.16 miles, ~700-foot vertical
- Status: Very Difficult
- Steepest Slope Angle: 50 degrees
- Good for: Skiing a classic Never Summer couloir with similar aspect and challenge rating as the majority of the X Couloirs. Proceed with caution, this arm is surrounded by sharp rock, and the sun hits the snow early. NOT for beginners, intermediate, or some advanced skiers. Avalanche gear is a must, along with competent partners.
- Accessed via: Lake Agnes winter parking, descend to Michigan River and up to Lake Agnes. From the lake, traverse across (or around) and climb 2/3 of the way up lake Agnes Bowl, survey the couloirs. The Y-Couloirs lead up to just below Mahler’s summit. Veer to the west and climb up from the bottom; before the arm split, you will be climbing some steep, snowy terrain.
- Mahler: Y Couloir (Right Arm)
- Essentials: 0.17 miles, ~750-foot vertical
- Status: Very Difficult
- Steepest Slope Angle: 51 degrees
- Good for: A slightly mellower couloir descent that can hold snow through the early summer. The top few turns are what sends the rating over the edge; you could clip in before reaching the headwall to ease the difficulty back into the 40-degree territory. NOT for beginners or intermediate skiers. Avalanche gear is a must, along with competent ski partners.
- Accessed via: Lake Agnes winter parking, descend to Michigan River and up to Lake Agnes. From the lake, traverse across (or around) and climb 2/3 of the way up lake Agnes Bowl, survey the couloirs. The Y-Couloirs lead up to just below Mahler’s summit. Veer to the west and climb up from the bottom; before the arm split, you will be climbing some steep, snowy terrain.
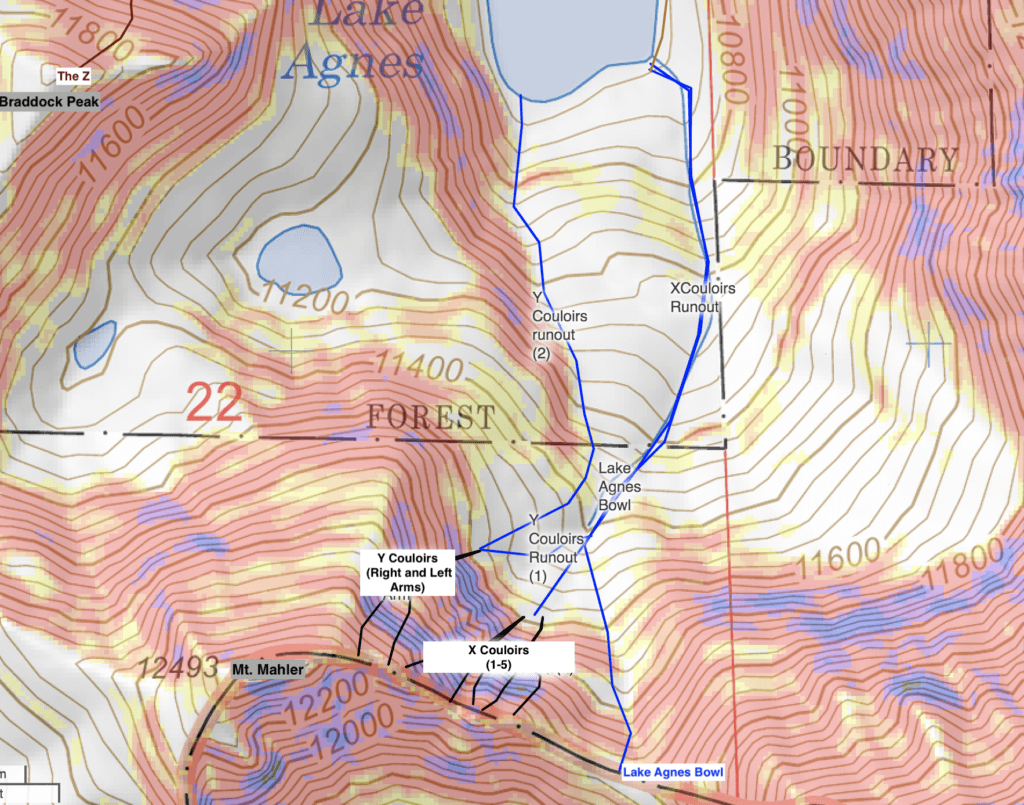
Agnes bowl, X and Y Couloirs Map
Ascent Line for Braddock Peak
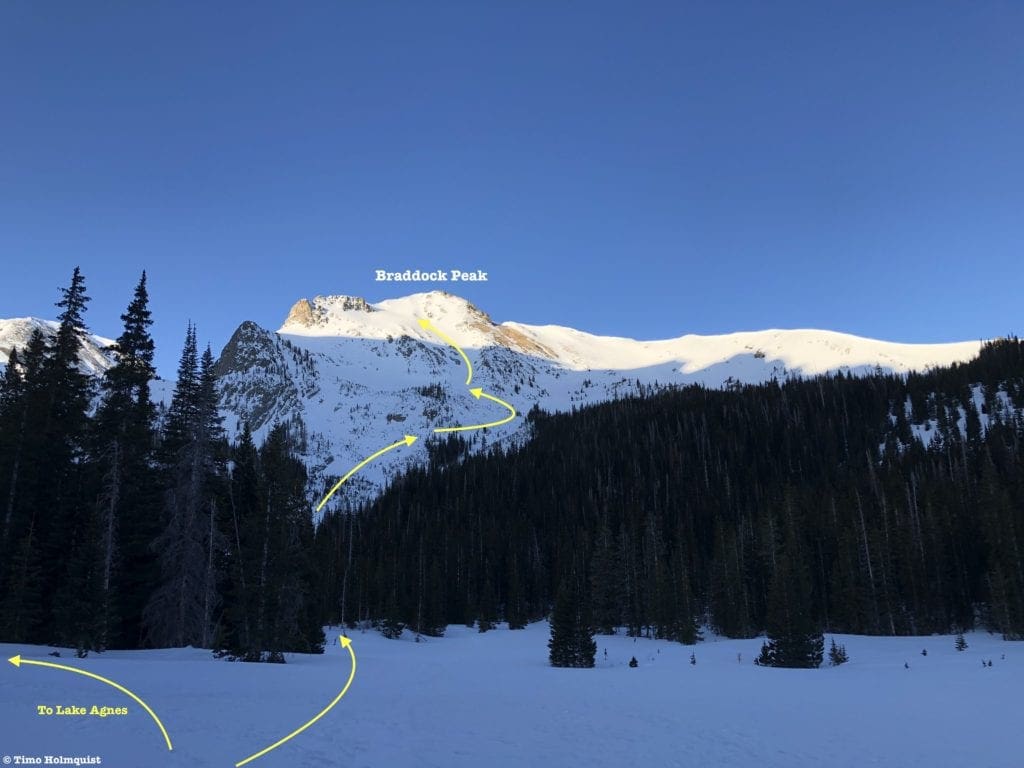
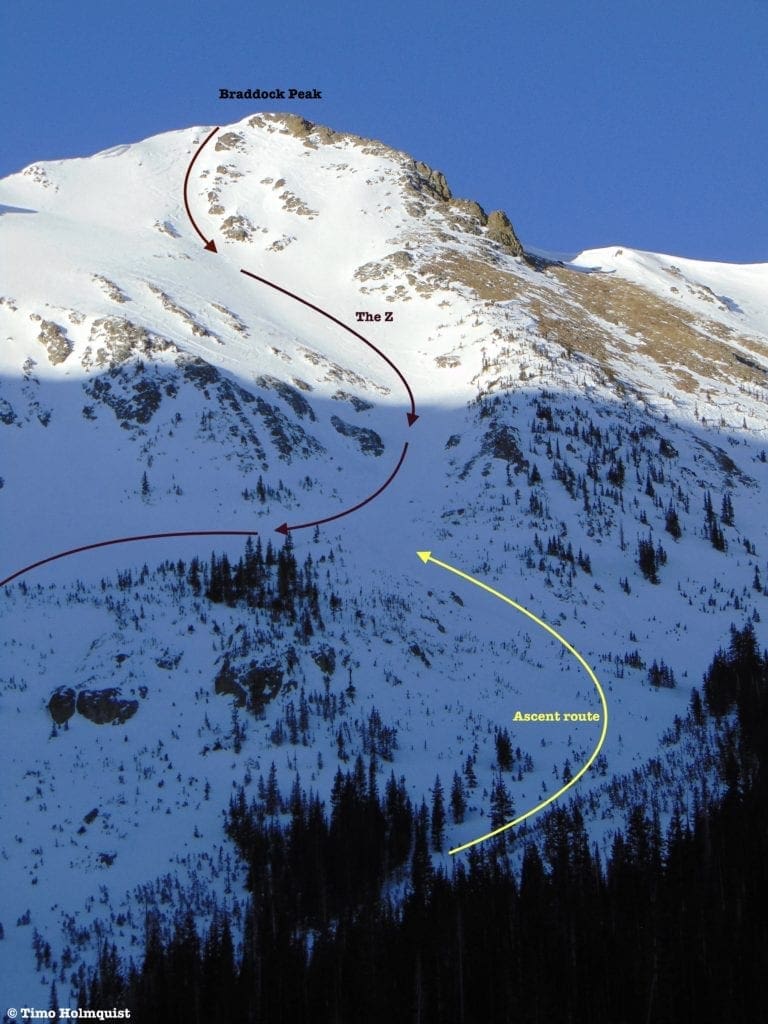
Braddock Peak, while shorter than Mahler and Richtofen, is still an intimidating peak. Its main draw, the “Z”, drops from its summit and skis you down 1650+ feet to a field below Lake Agnes. The line is in full view of CO14 and can either be inspiring or very daunting.
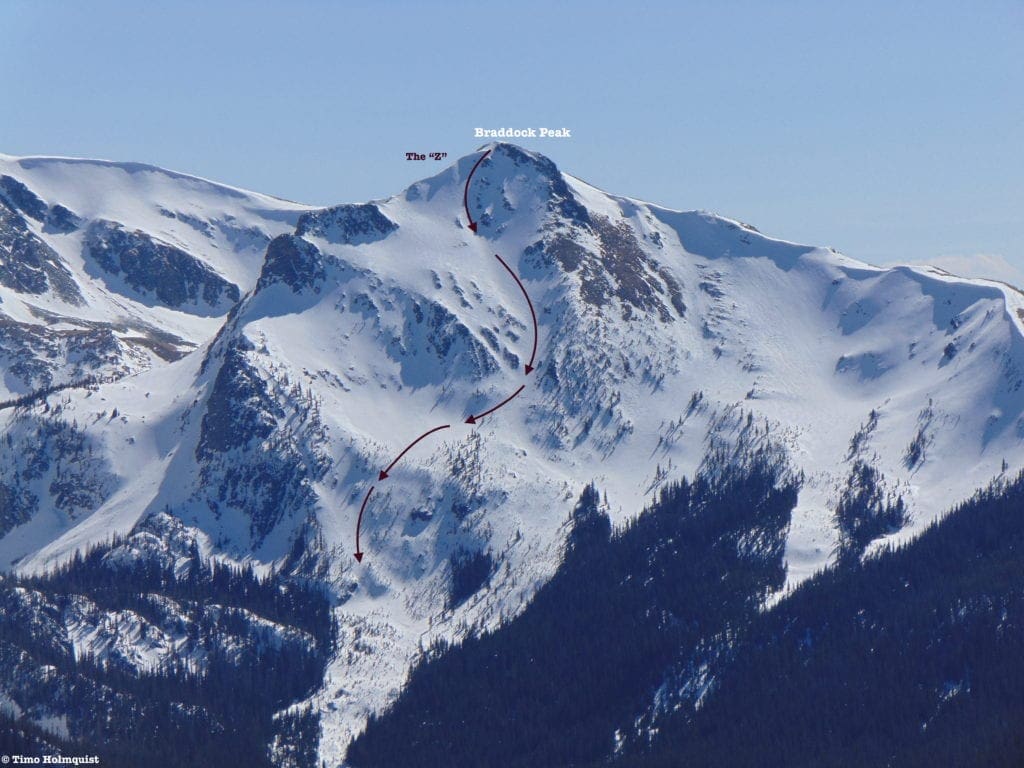
The Z from CO14
From the Lake Agnes Parking area along CO14, drop down to the Michigan River, and head west on a wide roadbed. Cross the Michigan River the first time you see a bridge to your right; there should be ample signage pointing you to Lake Agnes and the Nokhu Hut. Once you make it to the old Lake Agnes Cabin (summer parking area), you’ll see a massive field to the right of the cabin with Braddock Peak behind it. Instead of climbing to the lake, traverse across the field to the bottom of Braddock Peak and begin a climb along the path of least resistance.
- Stats to bottom of “Z”: ~1.84 miles, ~775 ft. of elevation gain from Michigan River lowpoint
- Stats to top of “Z”: ~2.67 miles, ~2432 ft. of elevation gain from Michigan River lowpoint
Ascending Braddock Peak from the field
- Braddock Peak: The “Z”
- Essentials: 0.83 miles, ~1650-foot vertical
- Status: Difficult
- Steepest Slope Angle: 43 degrees
- Good for: A long, graceful ski descent off of a big mountain. Bring avalanche gear; the slide risk is severe. NOT for beginners or intermediate skiers. This classic line can be skied through the meat of spring and often into early summer. The sun does hit this face at first light, so get an early start before the snow turns to slush.
- Accessed via: Old Lake Agnes cabin, proceed across the field to the base of Braddock. Ascend the path of least resistance, eventually climbing your descent route to just west of the summit. Strap in and descend.
The Z from below Lake Agnes
Quick Terminology Reference Guide
- Apron: An open section of a ski line, shaped roughly like an apron. It is generally shallower at the top, wider at the bottom.
- Bootpack: A way to gain elevation utilizing the tough exterior of ski boots, literally creating steps in the slope with your ski boots. Only effective in mid-winter conditions with softer snow. Once ice forms: crampons, and an axe are best.
- Breaking Trail: A backcountry skiing term that means to venture into untouched snowy territory. If you’re breaking trail, you are the only one out there, and your ski tracks are the only things you can see amongst a white canvas of snow.
- Buttress: A support structure in architecture. In mountain talk, it is a large, often steep set of rock walls that juts out from a mountain massif, acting as an impediment on an ascent or descent. A buttress does not have to be immediately connected to a summit, but it is abrupt.
- Bergschrund: Unlike a crevasse, which tends to form in the middle of a glacier, a bergschrund, or “schrund” for short, is a crack or separation that forms between the top of a glacier and the mountain slope or non-glaciated snow behind it.
- Chute: An inset area along a ridge that can hold great snow and presents like a natural ski run.
- Cirque: an amphitheater shaped head of a glacial valley, usually steep.
- Convex Rollers: From convex, indicating an outwardly curved surface and roller due to its resemblance to a rolling pin, convex rollers are steeply curved parts of a slope that may be prone to sliding.
- Cornice: An overhung area of snow that typically forms at the crest of a ridge or cirque. While the corniced ice and snow may look compact, there is usually nothing holding it up underneath; your weight alone can collapse a cornice. A collapsed cornice may also lead to avalanches. Do not stand on the edge of a cornice or climb directly beneath one.
- Couloir: Originally a French alpinist term, a couloir is a thin skiable chute. They are typically a no-fall zone and challenging to ski effectively.
- Crevasse: A large crack that usually forms on glaciers during warmer times of the year as the compact ice shifts. Very dangerous if fallen into.
- Crown: The vertical fracture line that appears after a slab avalanche, indicative of unstable terrain.
- Crux: Typically, the most dangerous section of an ascent or descent. Difficult routes can have multiple cruxes. A NO FALL ZONE.
- Glade: A treed area of a particular slope or line.
- Headwall: A topographical term used to mark where a basin, gorge, or alpine valley ends. Headwalls are usually steep and can sport multiple couloir options.
- Line: The chosen path of skiers and snowboarders.
- Runout: The bottom of a ski line, especially after a thin section or couloir, where the slope opens up. Similar to an apron.
- Skin track: The route you use to ascend a slope, very important for backcountry navigation.
- Terrain Trap: An area where snow from an avalanche can collect and bury a victim. More broadly, a difficult area to ski out of once entered.
- Wind-Slab: An area of compacted snow: formed by gusty winds, and often unstable. If near a steep slope, they can collapse and cause avalanches. Wind-slabs are often called wind-loaded slopes as well.
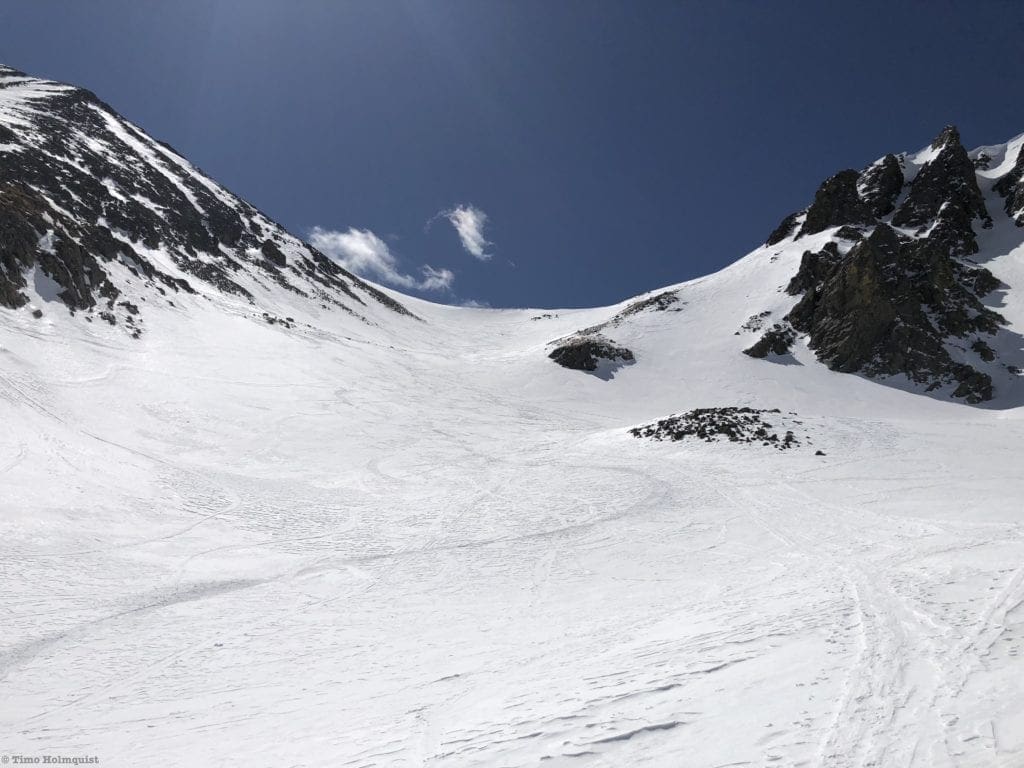
Upper Agnes Bowl
Final Thoughts
This article attempted to categorize the various lines in the Cameron Pass region. I am aware that there are many other skiable lines in the vicinity, including on Seven Utes Mountain. However, for the sake of information retention and article length, I’ve elected to omit them from this guide. In the future, Seven Utes and the more remote lines along the western flank of the Medicine Bow will belong to another ski article. Between the Diamond Peaks, Montgomery Pass, the Hot Dog Bowls, Nokhu Crags, Lake Agnes Bowl, Mt. Mahler, and Braddock Peak, there should be more than enough information to hold a backcountry skiers’ attention for dozens of excellent adventures.
Cameron Pass holds a special place in the hearts of Front Range backcountry skiers. While the area doesn’t sport the highest elevation in the state, the ski lines here are serious business with pronounced avalanche risks. Evaluate conditions scrupulously, and don’t bite off more than you can chew. Consider staying in one of the area huts to maximize time out there as Cameron Pass is far from major cities and has a distinct, remote feeling. Be safe and enjoy this spectacular corner of Colorado!
Additional Resources:
AIARE, Avalanche Research Education. (n.d.)
Cameron Pass Snow Report. 2021. Snow, Avalanche, Weather Conditions at Cameron Pass.
Colorado Avalanche Information Center. (n.d.)
Colorado Parks and Wildlife. (n.d.) State Forest.
Dawson, Lou. 2019. Rating Ski Descents-D System.
Diamond Peaks Ski Patrol. (n.d.)
Front Range Ski Mountaineering. (n.d.)
- Cameron Pass North. Retrieved from https://www.frontrangeskimo.com/cameron-pass-north
- Nokhu Crags. Retrieved from https://www.frontrangeskimo.com/nokhu-crags
- Mount Mahler. Retrieved from https://www.frontrangeskimo.com/mount-mahler
- Braddock Peak. Retrieved from https://www.frontrangeskimo.com/braddock-peak
Glen Echo Resort. (n.d.) Retrieved from https://www.glenechoresort.com/#/
InciWeb – Incident Information System. 2021. Cameron Peak Fire. https://inciweb.nwcg.gov/incident/6964/
Mishawaka Amphitheater-Classic Eats, River Beats. (n.d.) Retrieved from https://www.themishawaka.com/
Mountain Forecast. (n.d.)
National Weather Service
North Park Co. (n.d.) Community Links.
Powder Project (n.d.)
- DiGregorio, domenic. (2017). Nokhu Crags Ascent.
- Hird, Bryan. (2020). Lake Agnes Approach.
- K, garrett. Grand Central Couloir.
USDA: Natural Resources Conservation Service, National Water and Climate Center. (n.d.) Snotel Interactive Map.
Visit Fort Collins. 2021. Fort Collins Hotels.
-
Backcountry Ski Gear: Essentials for Human Powered Skiing
-
Guide To Planning A Backcountry Ski Adventure
-
Backcountry Skiing in Rocky Mountain National Park: Hidden Valley and Sundance Mountain Ski Lines
-
Backcountry Skiing in Rocky Mountain National Park: Bear Lake Area Ski Lines
-
Backcountry Skiing in Rocky Mountain National Park: Longs Peak Area Ski Lines
-
Best Places To Backcountry Ski in Rocky Mountain National Park, Colorado: Best of the Rest
SKYBLUEOVERLAND.com, should you choose to go backcountry skiing, do so at your own risk. Prior to setting out check current local weather, conditions, and land/road closures. While taking a trail, obey all public and private land use restrictions and rules, carry proper safety and navigational equipment, and of course, follow the #leavenotrace guidelines. The information found herein is simply a planning resource to be used as a point of inspiration in conjunction with your own due-diligence. In spite of the fact that this guide was prepared under diligent research by the specified contributor and/or contributors, the accuracy of such and judgement of the author is not guaranteed. SKYBLUE OVERLAND LLC, its partners, associates, and contributors are in no way liable for personal injury, damage to personal property, or any other such situation that might happen to individuals following this guide.


