


High Point:
12,662 feet

Total Ascent:
~5300 feet

Difficulty:
Very Difficult (Class 3-4 scrambling, and a June/July snow bridge)

Distance:
8.2 miles

Waypoints:
44.13239, -113.83492

Route Type:
Out and back
Overview
The roof of Idaho is no joke. Despite only reaching 12,662 feet tall, well outside the 100 highest in Colorado, Borah packs a punch that many taller mountains can’t match. It’s a gut-busting 5,300 feet of ascent over barely 4 miles, equating to a thousand feet climbed per mile. Additionally, you have Chicken Out Ridge, a doable but exposed scrambling section that will surely get the heart pumping. Routinely grouped within the top 10 toughest state high points out there, Borah is a magnificent, stark mountain with plenty to offer the dedicated hiker and scrambler.
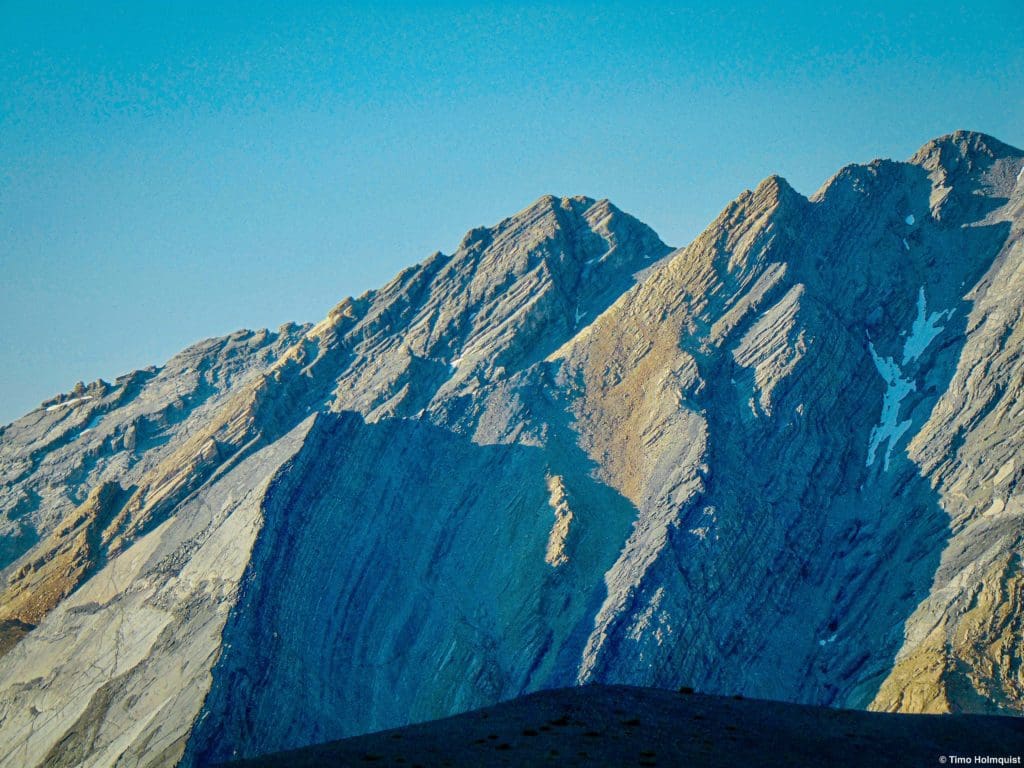
Fascinating geology on Mt. Morrison to the south of Borah.

Table of Contents
Article Navigation: Click on any of the listed items in the table of contents below to jump to that section of the article. Similarly, clicking on any large, white section header will jump you back to the Table of Contents.
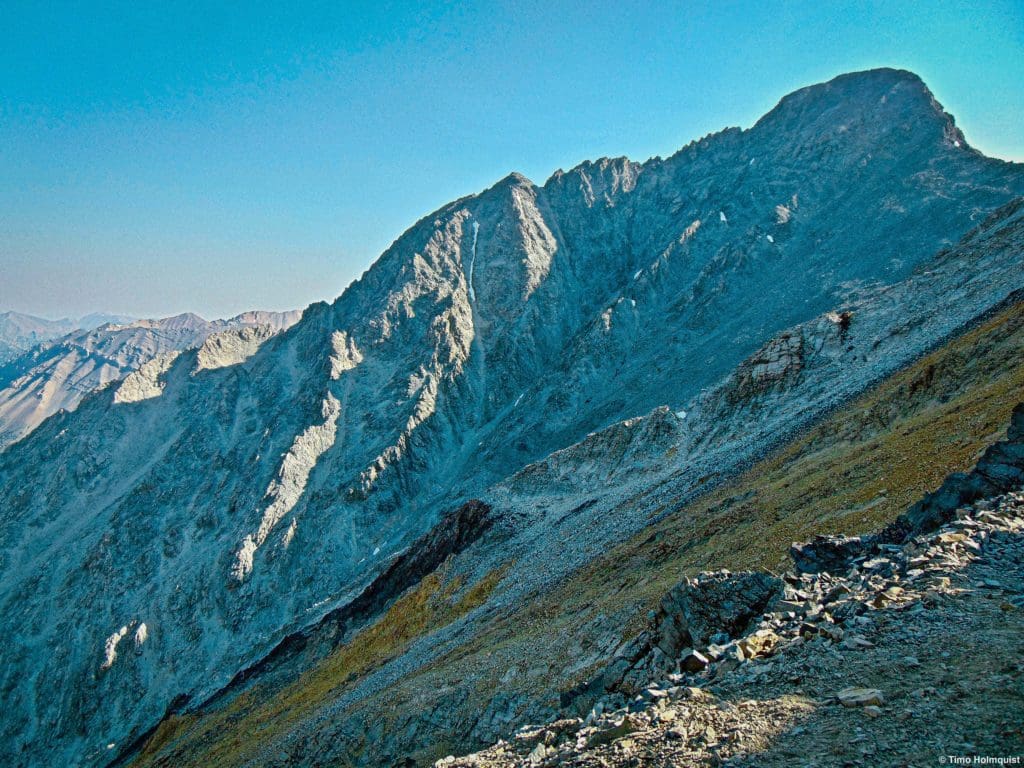
Borah Peak from just beyond Chicken Out Ridge.
Global Rescue is there whether you’re hiking, kayaking, snowmobiling, fishing or simply enjoying the outdoors and get ill or injured and you’re unable to get to safety on your own. Global Rescue is the red button you push in an emergency. Their team of medical and security experts come through for you when it matters most.
Scales and Criteria
This article uses two metrics to calculate difficulty: overall distance and elevation gain. Although winter ascents and skiing adventures have occurred on Borah, this review covers snow free scrambles. Seeing as there are multiple places where scrambling is required, a technical rating is also employed, using the Yosemite Decimal System to calculate difficulty.
Difficulty Ratings:
- Easy: less than 5 miles, less than 500 ft. of elevation gain
- Moderate: 5-10 miles, 500-2000 ft. of elevation gain
- Difficult: 5-15 miles, more than 2000 ft. of elevation gain
- Very Difficult: 10+ miles, more than 3,500 ft. of elevation gain
Technical Rating:
- Class 1: Established hiking trail the entire length of the adventure. Low chance for injury.
- Class 2: Typically involves cross-country navigation, possibly using hands for balance but not required, steeper than Class 1.
- Class 3: Hands and feet used to scale areas; must use hands to proceed (either for balance or to help pull you up a section), increased exposure, a fall could be fatal. Helmet recommended, along with grippy hikers.
- Class 4: Climbing on very steep terrain just shy of vertical, falls could be fatal, hands employed for grip and balance continuously, ropes advised but scalable without. Helmets are highly recommended, along with grippy hikers.
- Class 5-5.4: Vertical climbing that involves technical rock-climbing moves, exposed, falls likely to be serious or fatal, possible to scale without ropes but only for very experienced veterans. Helmets, grippy hikers, and/or rock-climbing shoes are necessary.
- Class 5.5 and up: Not covered as scrambling, full-on rock climbing with ropes, helmets, etc.
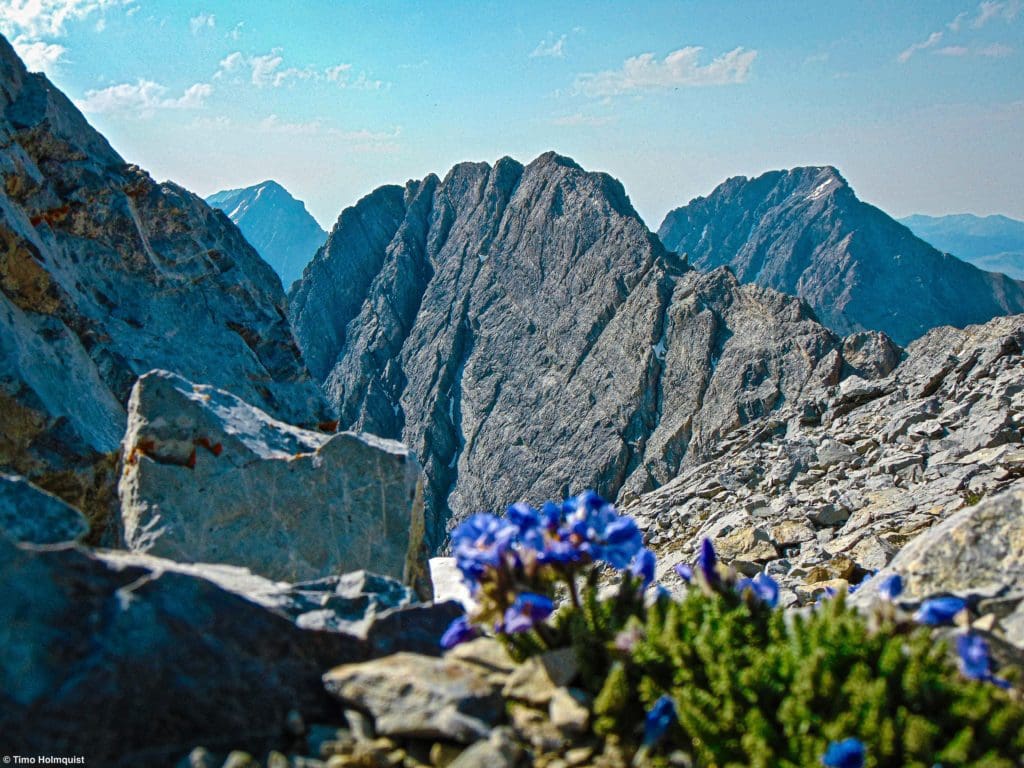
Sky Pilot grows in front of Sacajawea Peak on the Mt. Borah Trail.
The Ultimate Offline GPS Hiking & Ski Maps
See why onX Backcountry is the ultimate GPS navigation app for your outdoor pursuits. Try Today for Free. No credit card required.

Directions to Trailhead
Borah Peak is pretty far from major towns but there are several ways to get there. The southern approach is likely the most popular. From anywhere south, southwest, wets, east and southeast, you want to make your way to Arco, Idaho. This small nuclear age town sits at the southern margin of the Lost River Range, which houses Borah. From Arco, head north on US93 for about 45 minutes. It’s helpful to have GPS, google maps or some type of tracking device on, especially at night, so you don’t miss the turnoff, which is between milepost 129 and 130.
For those without, start paying attention after you pass the town of Mackay. The road will head up and around a reservoir before seemingly cresting a pass. The road you want is called Birch Springs road; it’s dirt and leaves US 93 at approximately ~6350 ft. above sea level. For navigation, you can plug in Borah Mt. Trail or Borah Campground.
If you’re coming from the north (Missoula, Coeur d’Alene), find US 93 outside of Missoula and take it south through Salmon and down to the trailhead, which will appear on your left before you pass the Mackay Reservoir.
Estimated distances from various cities (driving):
- Boise: ~4 hrs.
- Missoula: ~4.5 hours
- Salt Lake City: ~5-5.5 hours
- Portland: ~10 hours 45 min
- Denver: ~11 hrs. 20 minutes
- Los Angeles: ~14 hrs. 20 min.
For those further afield, you could fly into Salt Lake, Boise or Denver and drive, or try for one of the Montana cities (Missoula, Bozeman). It can end up becoming a complicated travel itinerary, budget time for the journey and the hike itself.
The heart of the Lost River Range from the Mt. Borah Trail.
The Ten Essentials: How to Equip Yourself for the Backcountry
Packing the “Ten Essentials” whenever you step into the backcountry, even on day hikes, is a good habit. When something goes awry, you’ll truly appreciate the value of carrying these items that could be essential to your survival.
Field Notes
Idaho is a state of contrasts, it has verdant valleys, barren lava fields, sagebrush plains and lush wilderness. Borah Peak is in a drier part of the state. The area sports a semi-arid environment with a small crown of sparse trees on the western side of Borah from ~7800-9600 ft. above sea level. There are more trees and some lakes on the range’s eastern side, but you won’t see them until you pass Chicken Out Ridge. For the standard route, once you get above the trees, you’ll be spending a lot of time in the open. Go extra early if the weather forecast is even marginally predicting thunderstorms; you don’t want to get caught out here.
Borah is usually done in one day, but with the campground right at the trailhead, you could set up shop the night before for an extra early start. As for the weather, check out the Mackay forecast, which will give you temperature ranges for the bottom parts of the hike. For subscribers of opensummit, you can check their detailed page on Borah Pk. here. If you don’t have a subscription and don’t plan on getting one, you can utilize the mountain-forecast site for Borah Peak.
Despite a lower elevation than mountains in MT, WY, CA, WA, UT, and CO, the sheer effort to get up here is notable. And anytime you change a ton of elevation quickly, you have a chance to get altitude sickness. Bring and drink a ton of water and anti-inflammatory medication. If symptoms persist (like headaches, nausea, lack of appetite), turn around, it’s the safest and best way to alleviate altitude sickness.
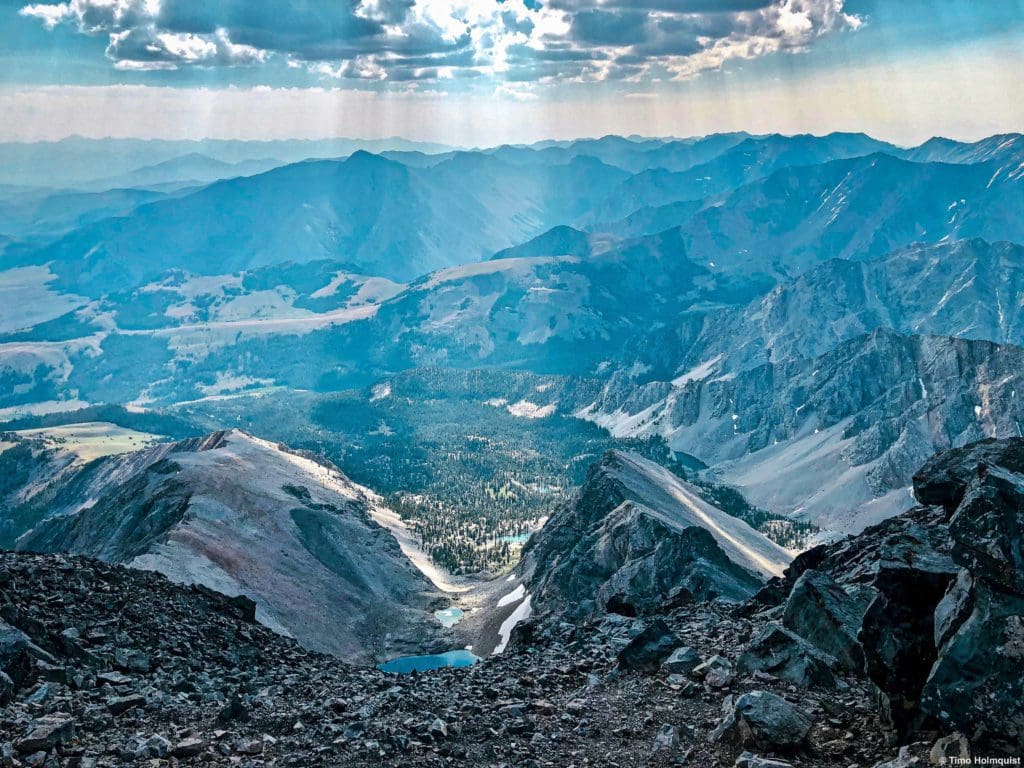
The view southeast from the summit.
Journal
The trail starts at the Borah Campground. The campground sits near a small grove of trees in an otherwise open and arid landscape. Once you park, find the trail and start heading uphill. After a couple hundred feet of vertical gain, trees begin to finally close in around the trail.
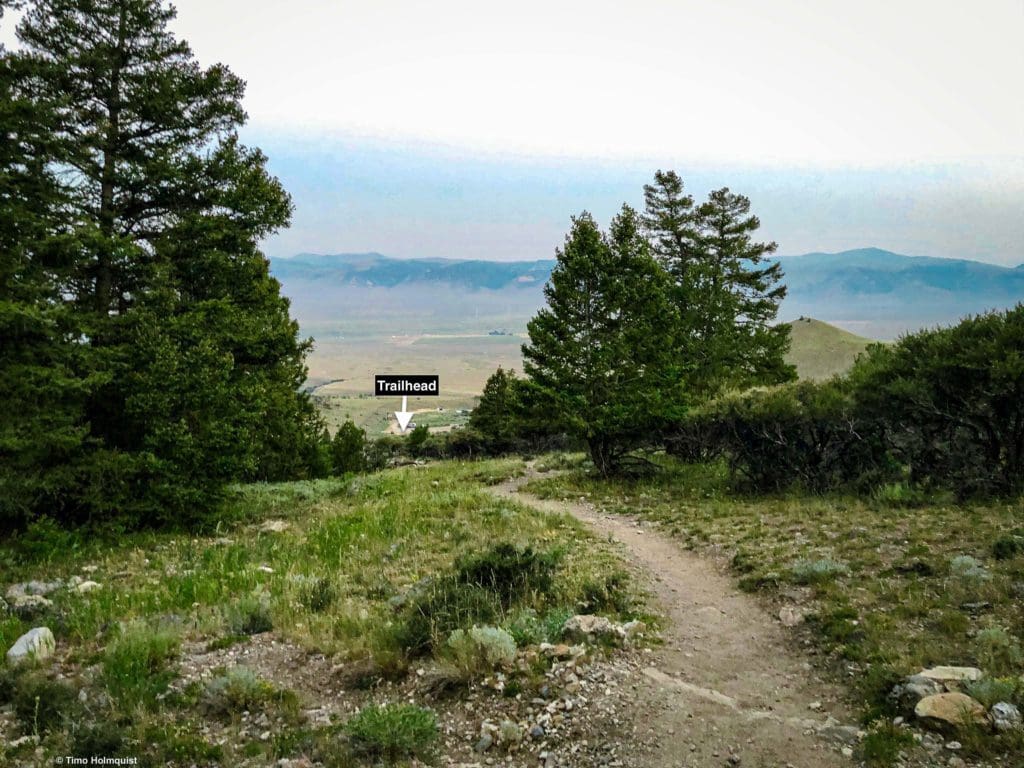
Looking back at the trailhead.
The first stretches of the trail are fairly unremarkable; it’s just a lot of up with trees blocking farther views. The trail hugs the right side of a small basin before circling to the left, where it meets another ridge shoulder. This is a decent rest spot and offers your first real views through the bristly trees. So far, you’ve traveled a little over one mile and gained ~1225 ft.
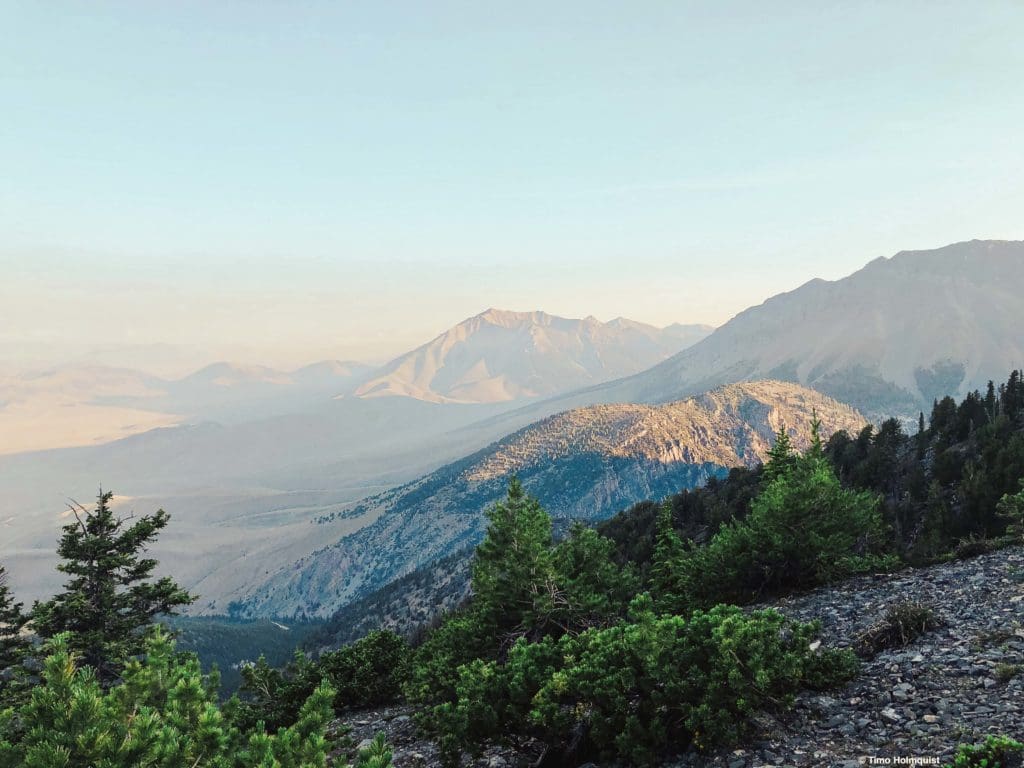
The view southwest. The mountains in the background are part of the Pioneer Range.
Once you continue, you’ll notice the trail zig-zagging up the nose of the ridge, with sparse trees and roots along the trail. This first part after the shoulder gains a lot of elevation quickly, and the trees begin to thin.
Looking north to Dickey Peak in the sun.
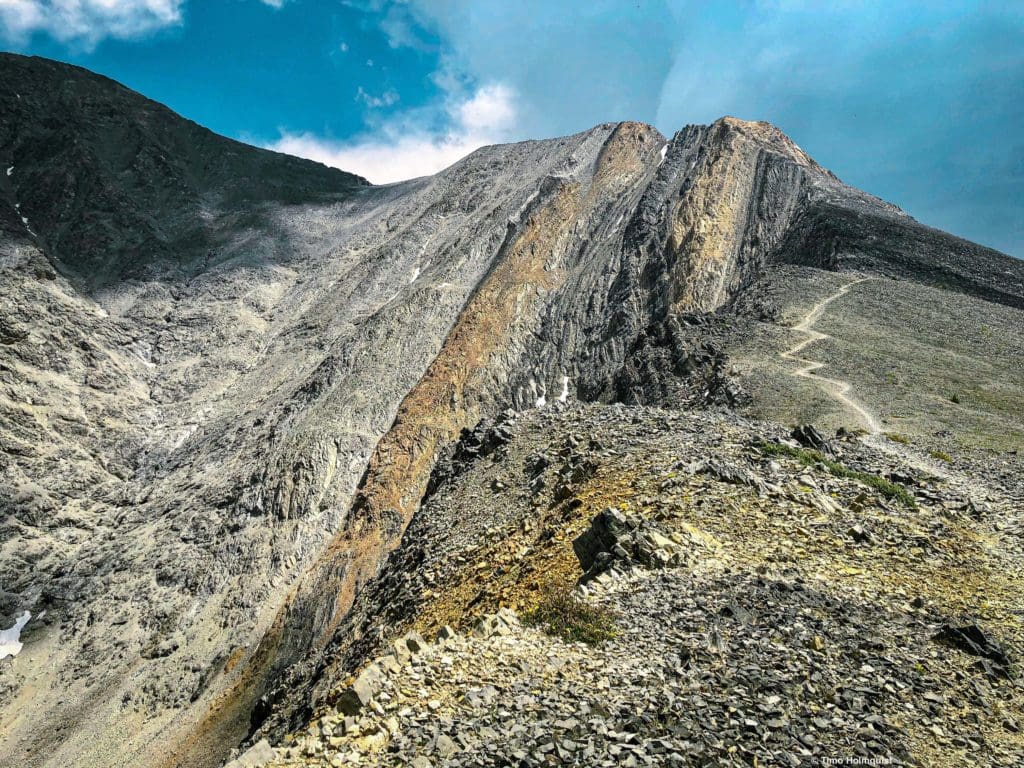
At this point, you’ve moved beyond most of the cohesive trees, although there are still a few holding on. To your right (south), if it’s a sunny morning, you’ll see the morning light reflecting off of Pt. 11,308, which is particularly striking because of its rock striations and colors.

Pt. 11,308, a part of the unofficially named Mt. Morrison.
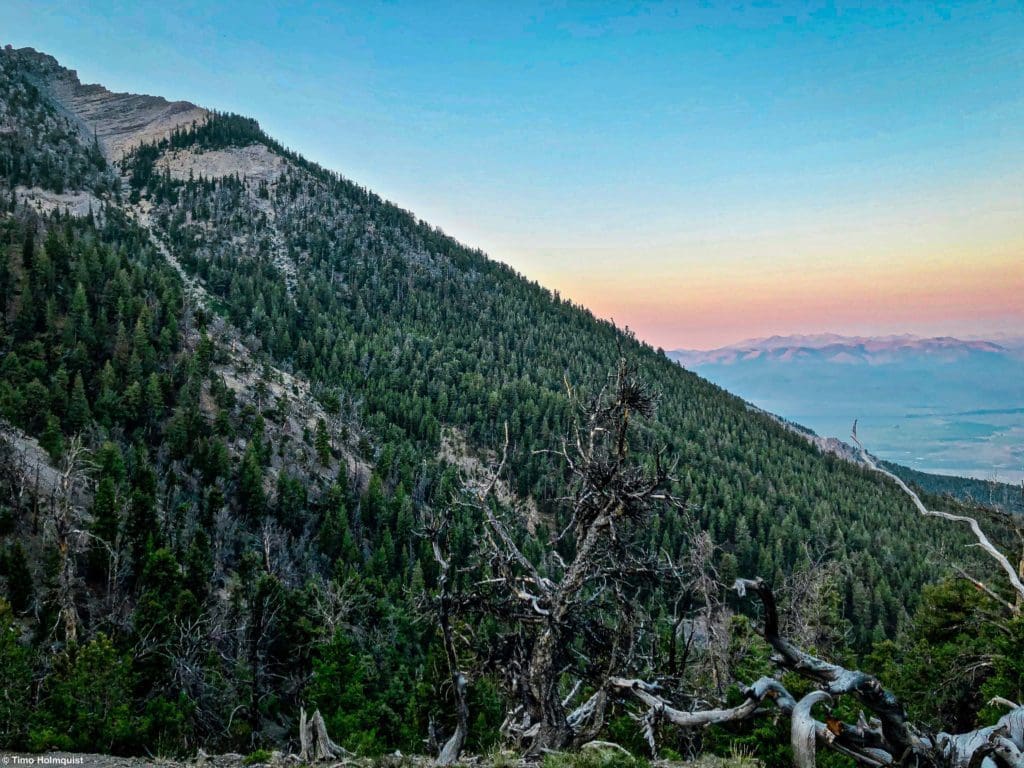
As you crest a large roll of land, you’ll be able to see what remains of your route.
There’s still quite a bit to go.
One of the benefits of starting this trail is that the sun has to work its way over the summit ridge before hitting the western side. On hot summer days, you can avoid direct sunlight until you’re near Chicken out Ridge, which helps keep you cooler.
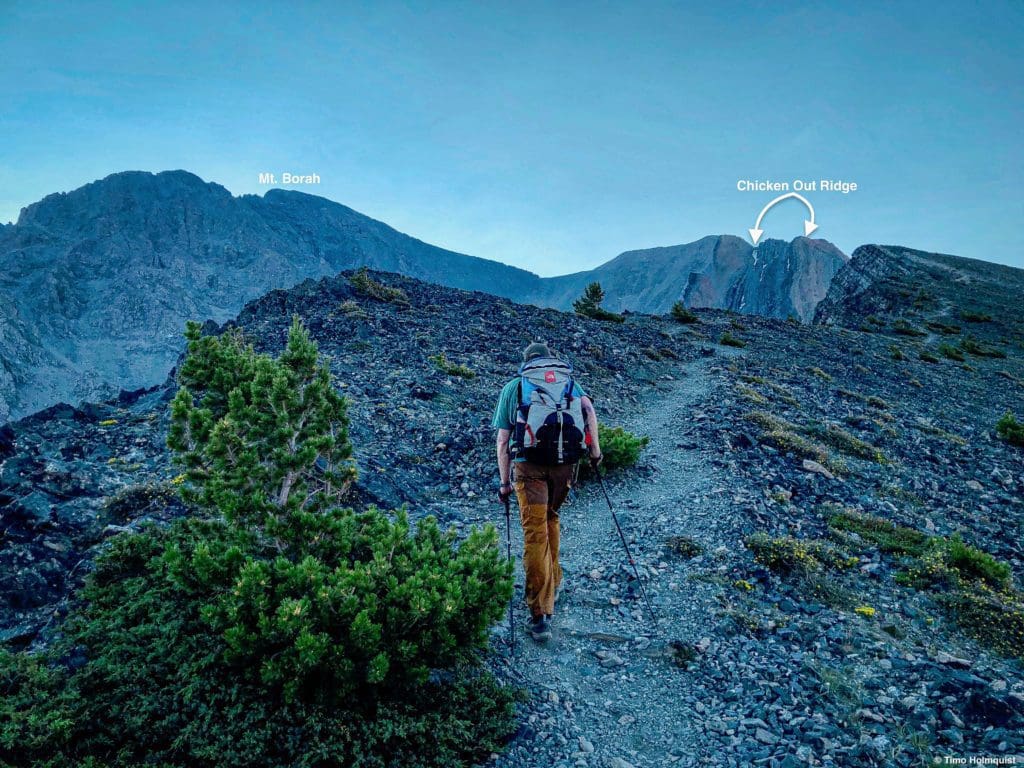
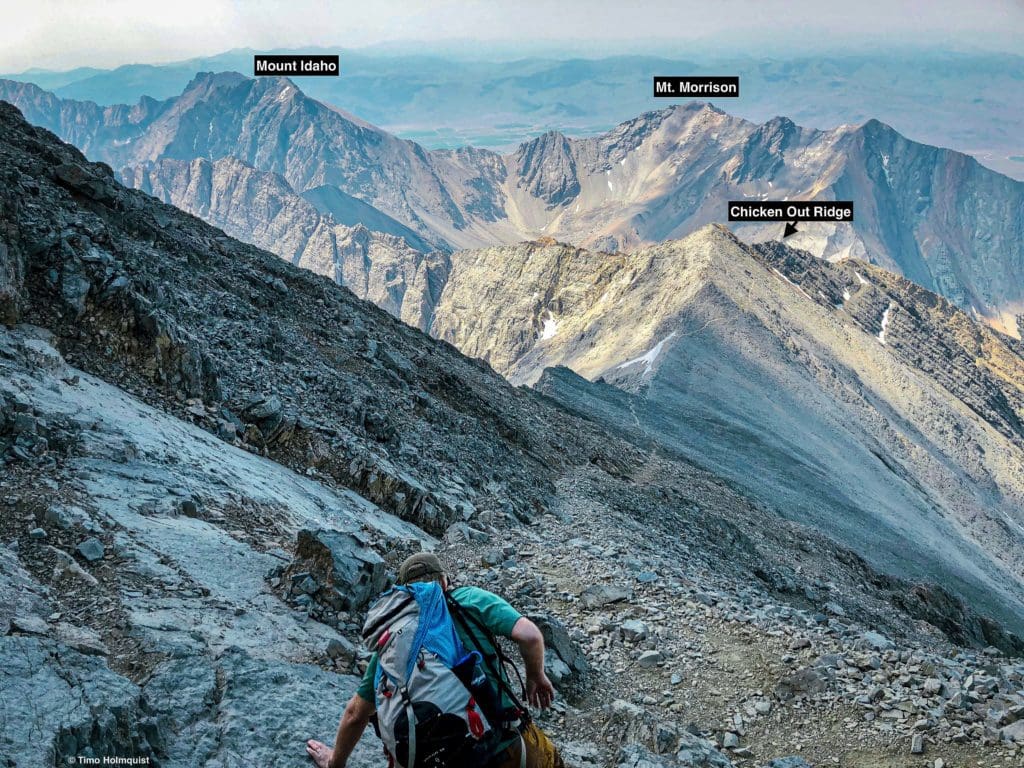
Continue on the trail as it slides up the ridge. Borah Peak starts to look like a behemoth across the basin to your left and will continue to reveal its final shape as you climb. You’ll hike across a fairly flat ridge before running into a quick rise up to Chicken Out Ridge.
Approaching the rise before Chicken Out Ridge.
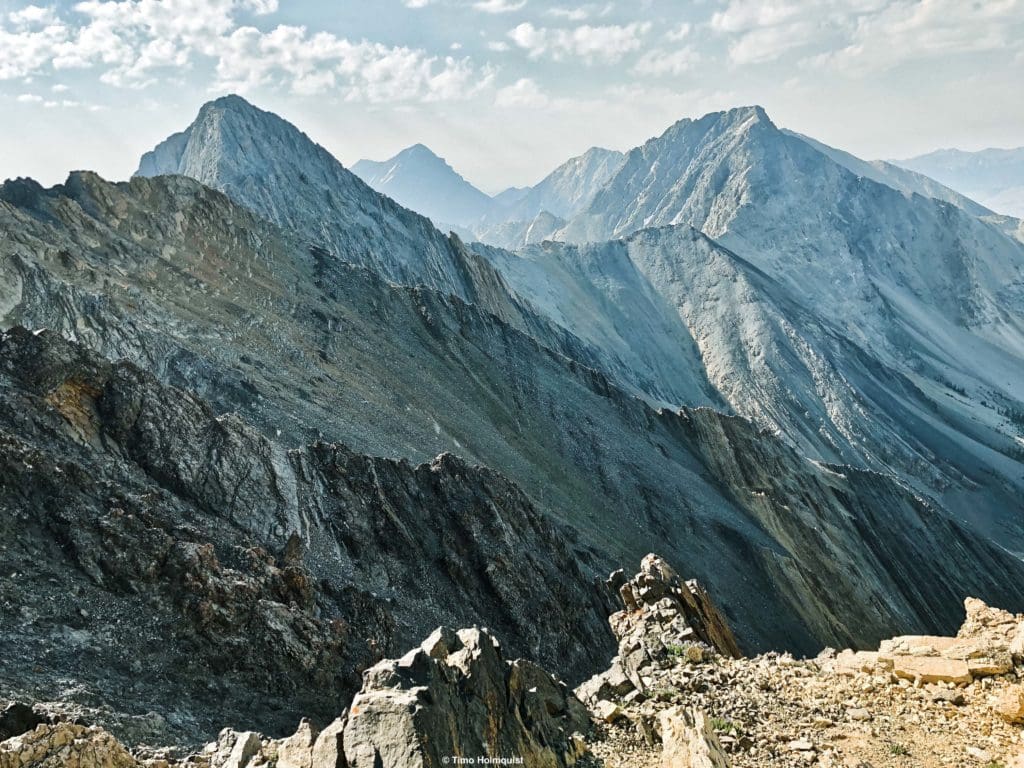
The basin to your right (south) also begins to look a lot more interesting with more craggy peaks revealing themselves the farther you hike.
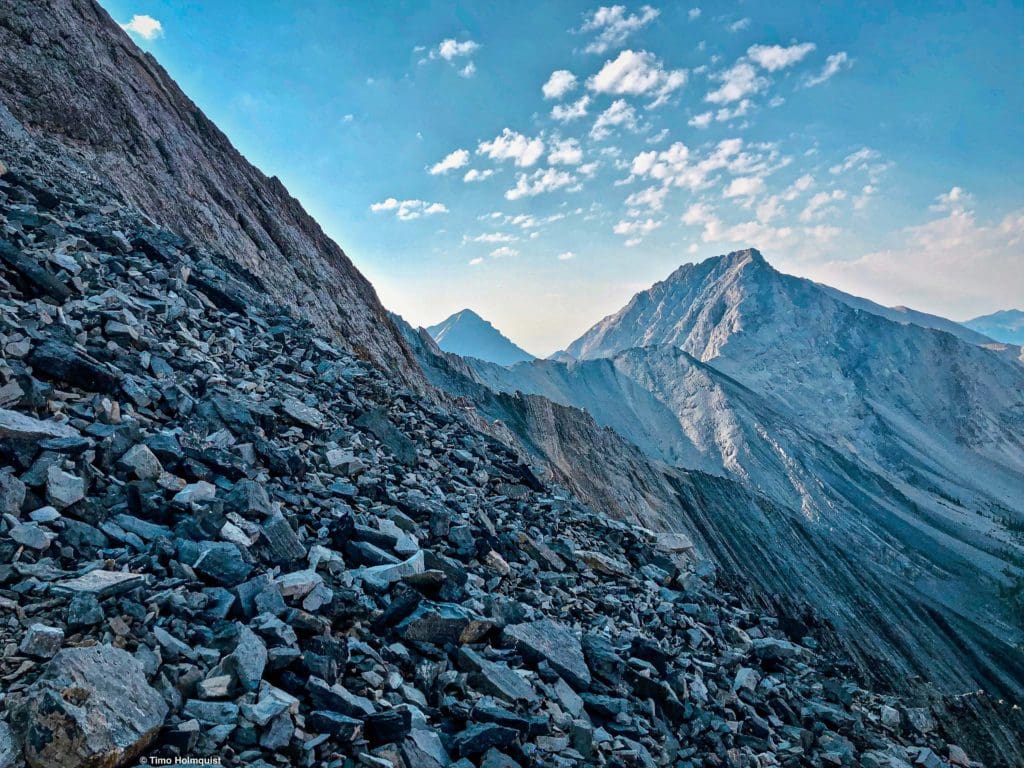
Looking south to two more 12ers, Idaho Pk. (right) and Leatherman Pk. (left), from just below where the scrambling begins.
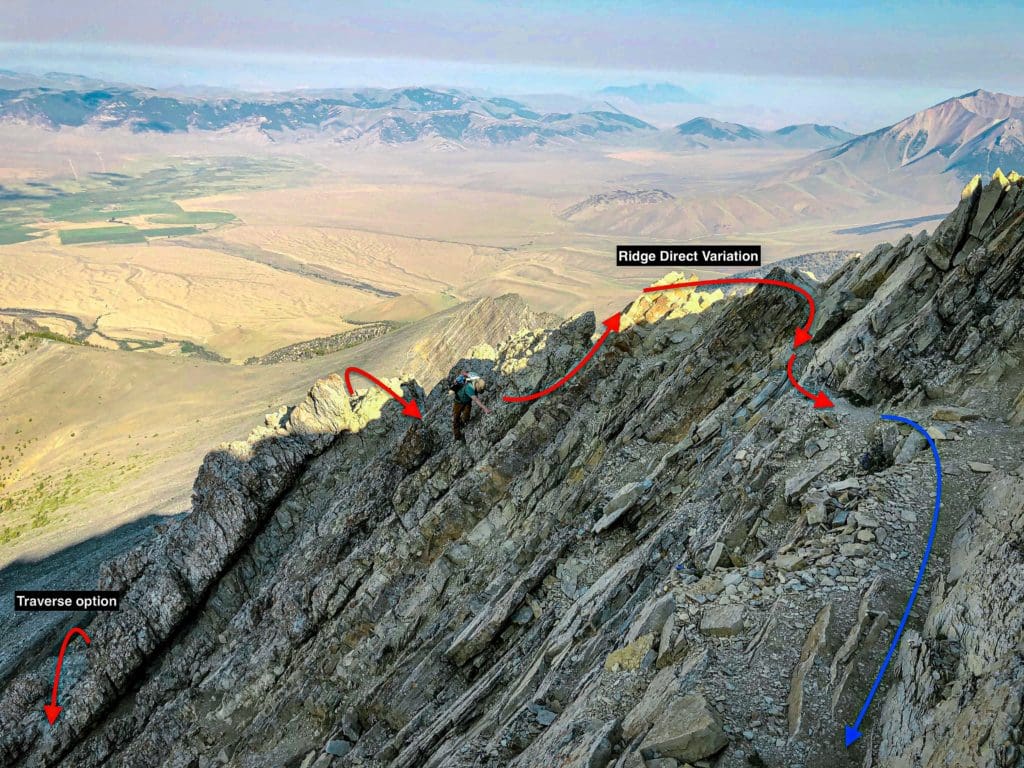
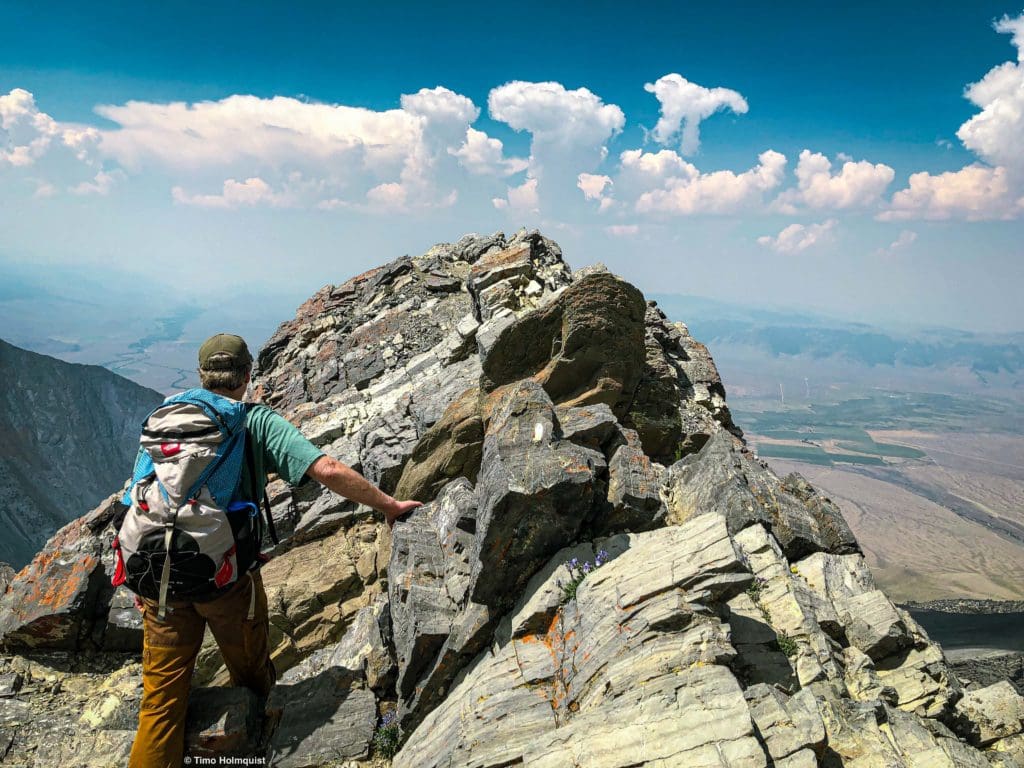
At this point, you’re roughly 3 miles into your journey and more than 4100 feet higher than the trailhead. There are two ways to begin the scramble up to Chicken Out Ridge, which features you’re first considerable bouts of exposure.
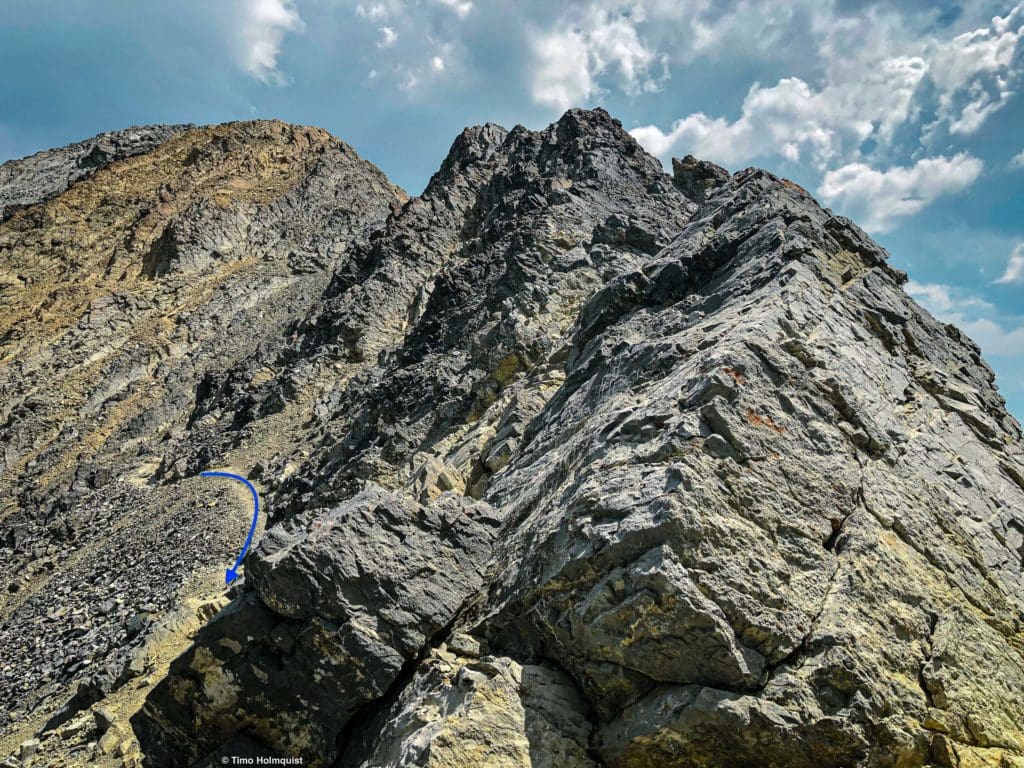
The easiest route is to perform an angling traverse across good rock with a lot of air beneath you to the south. The spicier route but with a ton of grippy rock is to stick close to the ridgeline. Most cairns in this area lead you to the angling traverse route.
The two options from below. The right arrow is probably the easiest but involves a section of uncomfortable traversing.
If you opt for the traverse, this is what that section looks like from up close.
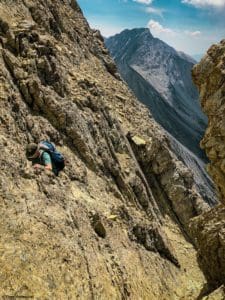
The traverse across this rocky Class 3 section.
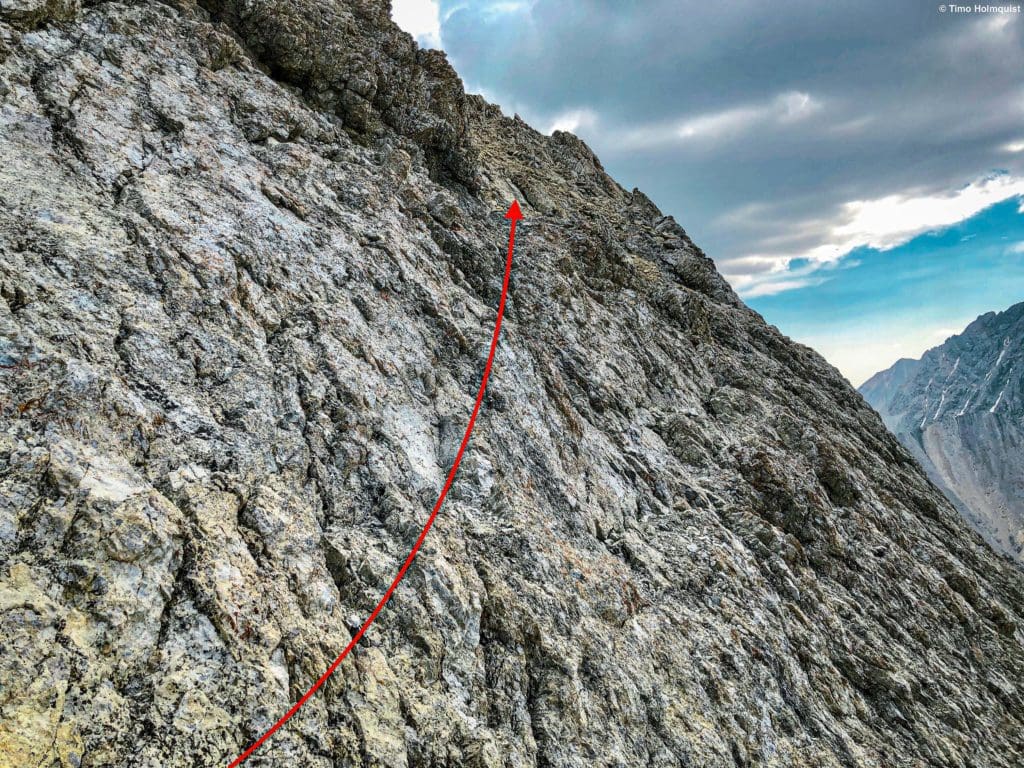
The ridge direct variation is interesting for a few reasons. It is initially steeper, think Class 3+ with a few optional Class 4 moves thrown. However, staying true to the ridgeline is spectacular if you don’t mind the exposure and you know that the grips and hold options number into the hundreds. The rock is really quite good. As always, double check all holds.
Looking back at the ridge-direct method.
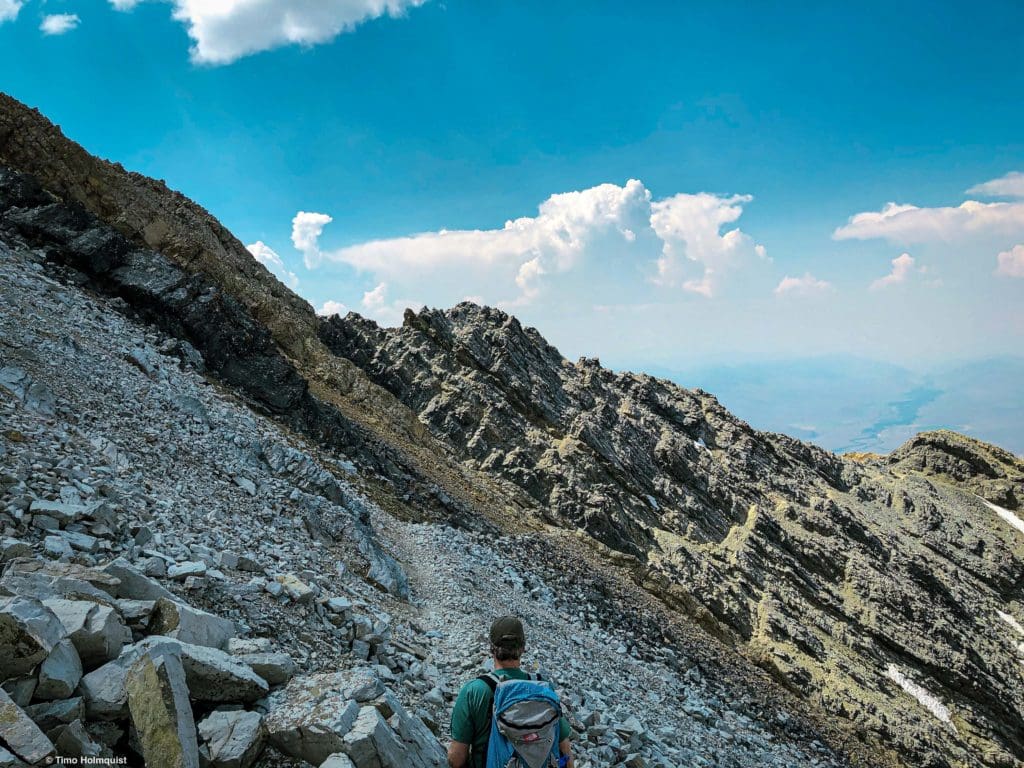
Once you finish this scrambly section by whatever route appeals to you more, you’re offered a brief reprieve as the route hits a small saddle. There are still a few small Class 3 moves here, and the exposure does not relent to the south, so keep moving slowly and purposefully.
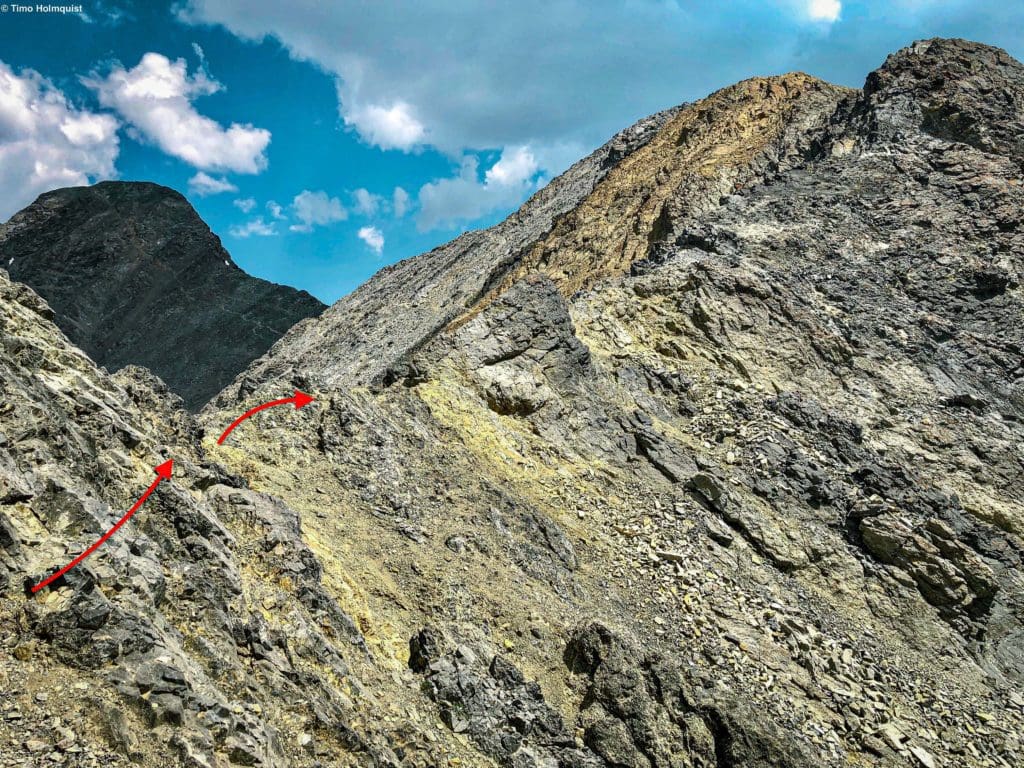
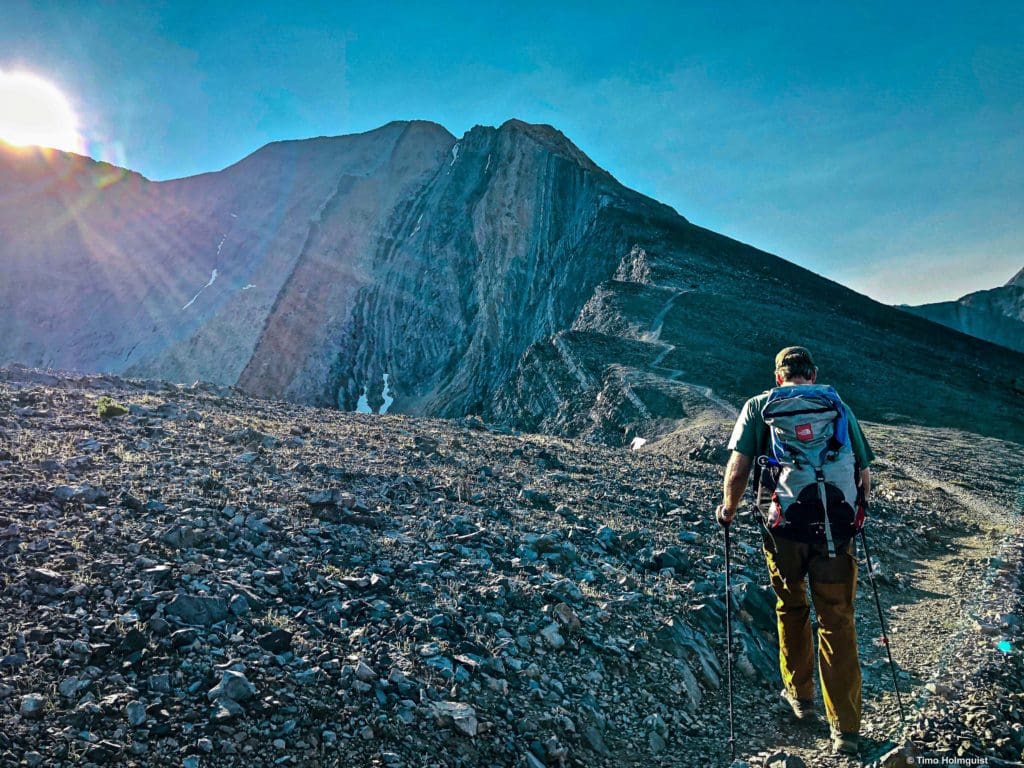
Approaching the next saddle with Chicken Out Ridge rearing up to the right and Borah’s summit in the background.
At the saddle, you pop back over to the left (northern) side of the ridge, where a strong hikers trail begins to traverse around the Chicken Out Ridge difficulties. Here’s the catch, though, up until late July, a snowy saddle and ice gully block easy passage on the traverse. When these melt (August/September), you can bypass most of the Chicken Out difficulties. Before it does, you have some options to consider.
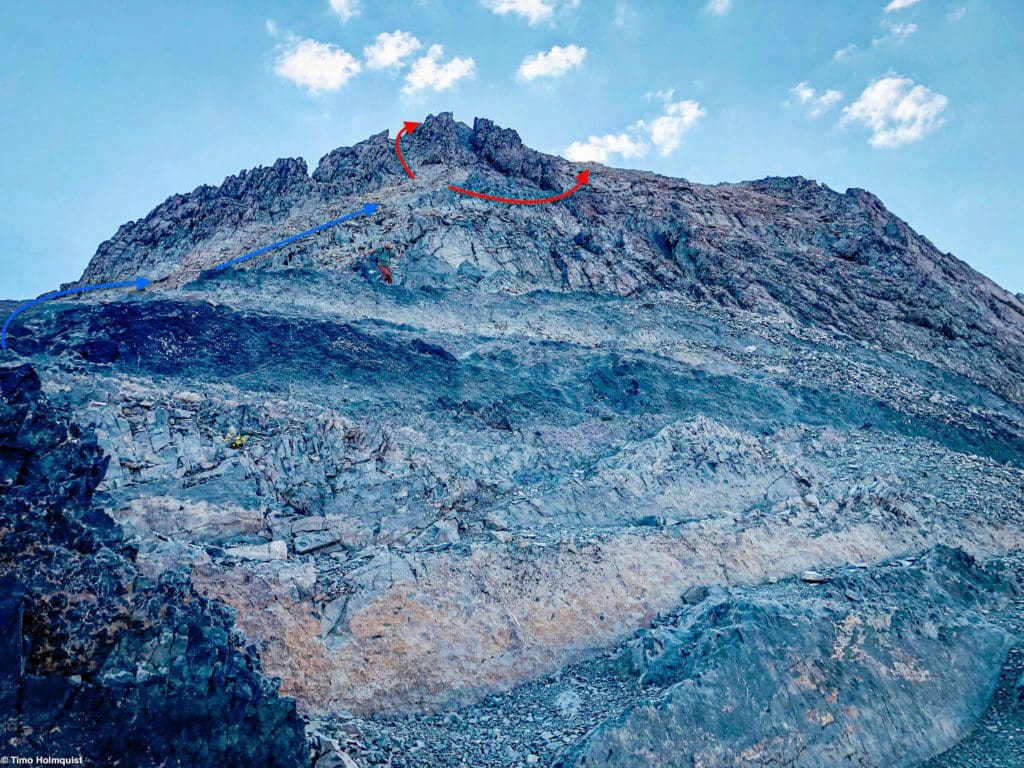
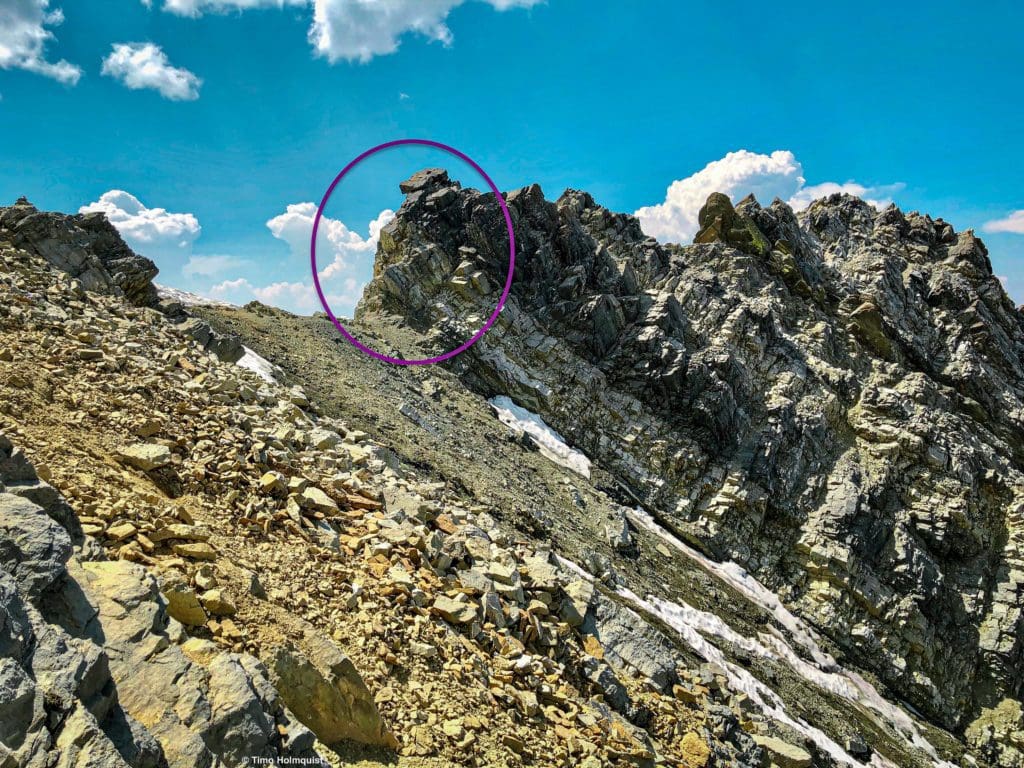
You can head into the Icey gully, put on some crampons and climb through, but this, of course, requires bringing extra gear on a 5,400 feet vertical gain day for use on a 25-foot-wide section at its widest. If the gully is partially melted, you can thread together a path but remember that any remaining snow is in a shadowed gully and will likely have frozen over. You slip on any of that, and you’re tumbling thousands of feet down the side of the mountain. If the snow gully has snow in it, the best option is to find a slot and climb up to the top of Chicken Out Ridge.
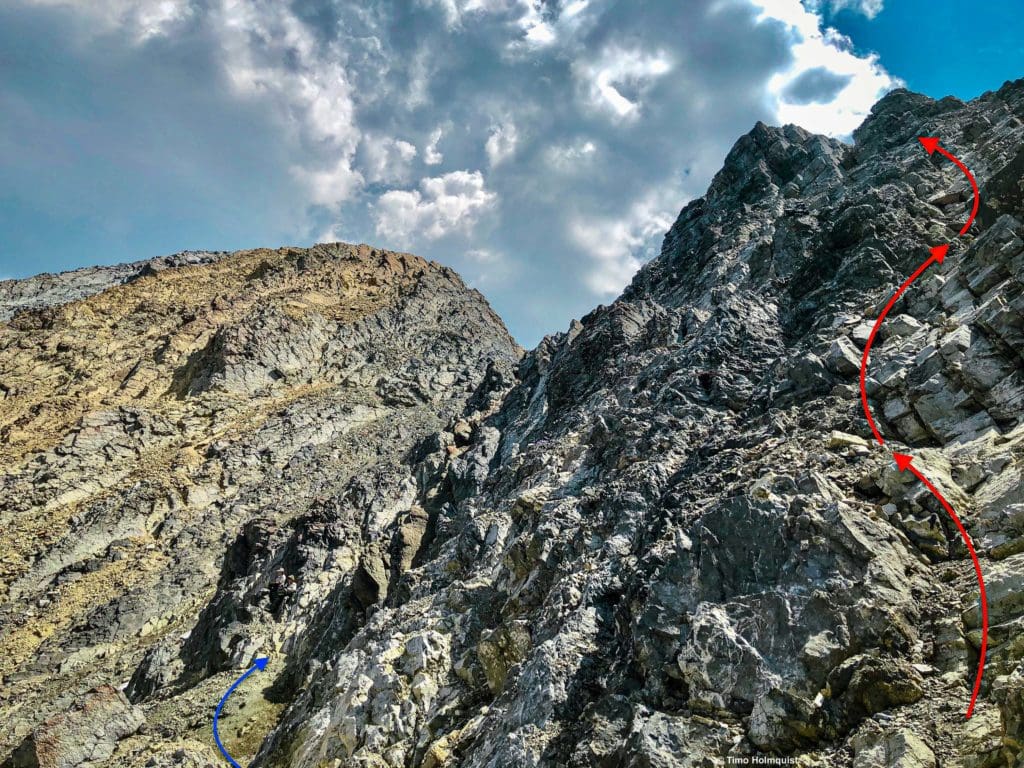
A possible ascent route. The snow gully is still hidden in this shot. The blue arrow is a traverse that’s available once all snow in the gully has melted.
Once on top of Chicken Out ridge, follow the crest until the crux of the route. There’s a Class 4 descent down to the head of the gully. In 2022, there was a brand-new rope there for support, but that isn’t a guarantee for future years.
What Chicken Out Ridge looks like once you’re beyond the difficulties.
The descent off the nose of the ridge is a bit intimidating at first, but the rock is solid, and the rope helps. If you arrive and there is no rope, know that the rock is very sturdy, and you should be able to scout hand foot holds. This section, specifically, elevates the danger of the hike.

A closer look at the nose of Chicken out Ridge, which you have to descend if the snow bridge and gully haven’t quite melted yet.
Once you figure out how to descend off of Chicken Out Ridge, or if you climbed around the difficulties once the snow recedes, the scrambling relents. Stay focused, however, because you still have a lot of elevation to gain before touching the summit.
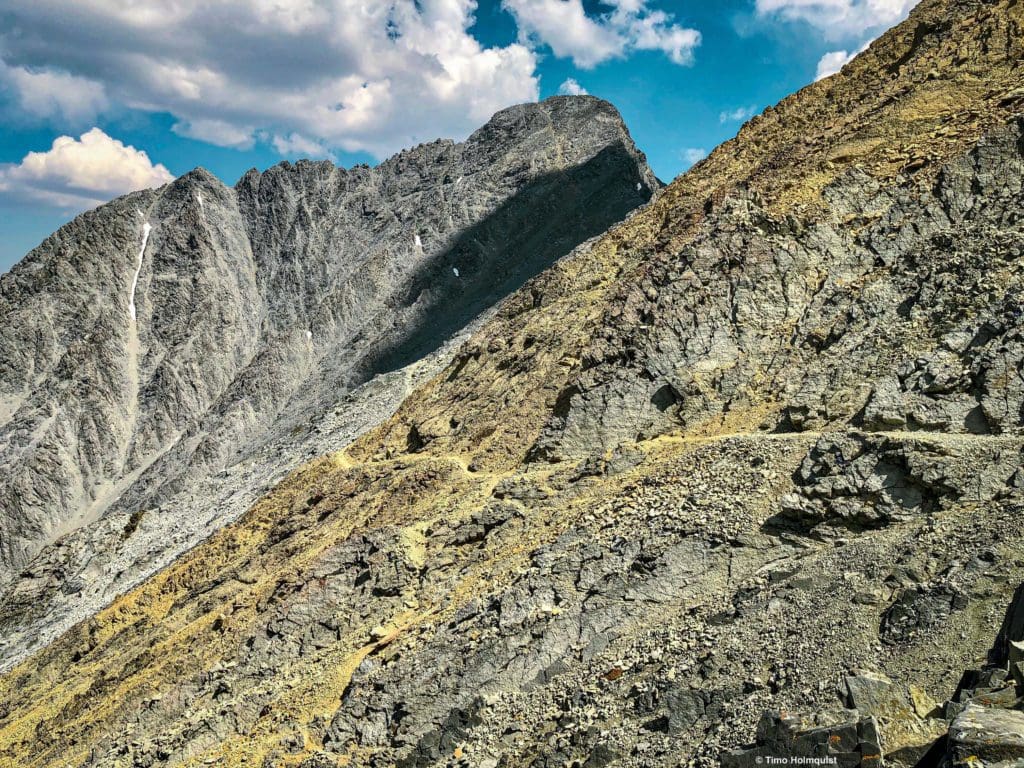
Borah still looms large once you’re beyond Chicken Out Ridge.
The trail performs an angling traverse around the next ridge high point before reading a saddle. From this saddle, the rest of the path becomes clearer.
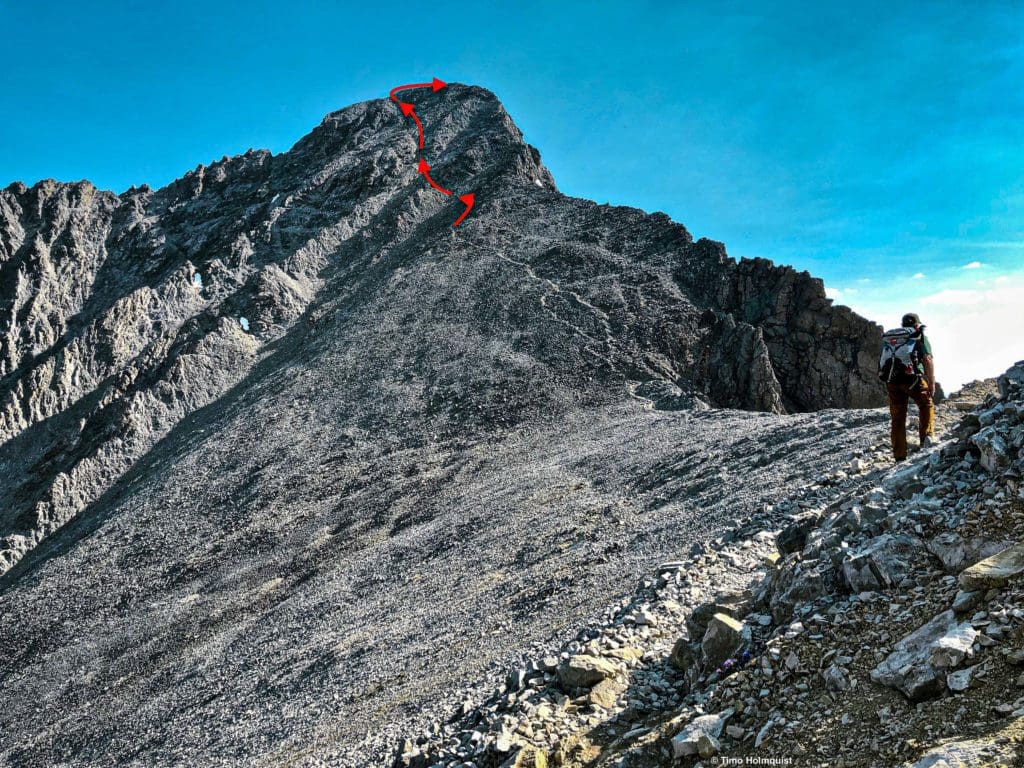
The rest of the route to the top.
From the saddle to the summit, you still have about 880 vertical feet to climb. While Chicken Out Ridge is usually an adrenaline pumper, by the time you get to the saddle and see what you have left, it may feel a bit disheartening. Although the scrambling difficulties are now behind you, this last slog up to the top is draining, loose and tedious.
For the ultra-motivated, you can stick close to the ridgeline and have your pick of any number of Class 3 slabs and Class 4 moves, all of which can be reasonably bypassed.

Some of the slabs and sturdier rock found near the ridgeline.
The ridgeline is a solid scramble with dizzying exposure to the east, but after all the work you’ve done so far, completely optional.

The east side of the summit ridgeline.
If you opt for the tried and true path, expect some loose sections with generally sturdier rock on your right-hand side as you ascend. You’ll veer into and out of 2-3 gullies on an ascending traverse to a high shoulder. Once you reach the shoulder, it’s only another 30 feet to the top.
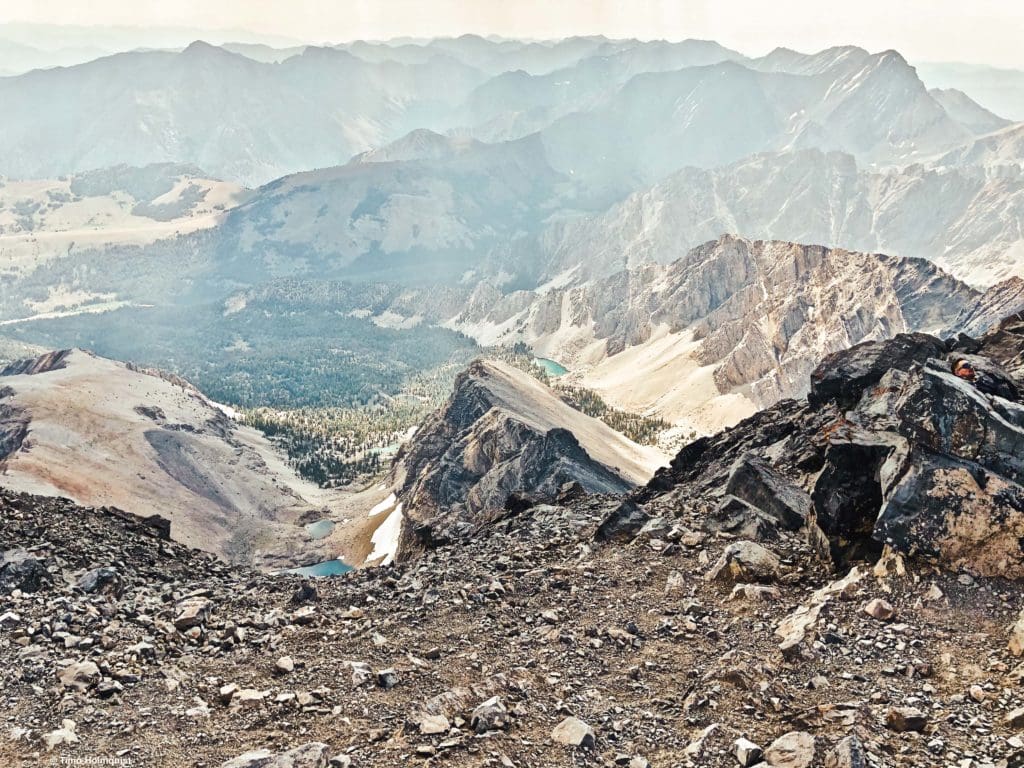
Summit views, looking southeast along the Lost River Range.
Take a good long break on top; you’ve earned it! There is a summit register you can sign, along with a wooden board with Borah peak written on it.
If the weather is even starting to threaten, make sure you begin descending quickly and carefully. There are still thousands of feet of elevation loss and some stout scrambling separating you from getting back into the trees. Like most mountains with vast alpine areas, the lightning threat is high if conditions are present for thunderstorm creation.
A good look down the summit push and all the way back to Chicken Out Ridge.
There are a few loose areas between the summit and the next saddle, so take your time and avoid descending right on top of someone else. Getting smacked with a rock on the way down the mountain is a recipe for disaster.
Getting back to the scrambling.
Once you find yourself back at Chicken Out Ridge, clamber back over. Since you’ve likely completed this scramble on the way up, going back over isn’t so bad. If you timed the climb right and missed the snow bridge and gully, just take the use trail as it circumvents difficulties below the ridge.
On top of Chicken Out Ridge.
Ridge scrambling or not; the key is to find the obvious trail on the other side of the snow saddle and gully. Once you’ve reconnected, descend past one more small saddle before getting back into mandatory scrambling territory.
Looking back at Chicken Out Ridge, the trail is marked to the left.
The last bit of scrambling involves some route decisions. Cairns lead you to the left (south side) of the ridge and cross underneath a slanted rib of rock. The path is a bit loose, and there is some substantial exposure below you. An alternative is to descend along the spine of the ridge until reconnecting on the other side. In either scenario, this section requires mandatory Class 3 scrambling and concentration.
Crossing through the last Class 3 area.
Once you’ve made it around the sandy-colored rock striations, the regular hiking trail begins to take shape once more. After you carefully exit the area, take heart because the rest is all back on an easily identifiable trail.
Looking back to the difficulties once you’re back on the trail.
Even though the rest of the hike is on a trail, you still need to lose thousands of feet in relatively short order. The likelihood of slips and trips is high after all the effort you expended getting to this point. Watch your footfalls and use poles if you brought them for added stability.
LOTS of additional descending on a good trail will bring you back to the trailhead. Congratulations, you just hiked to the roof of Idaho and back down!
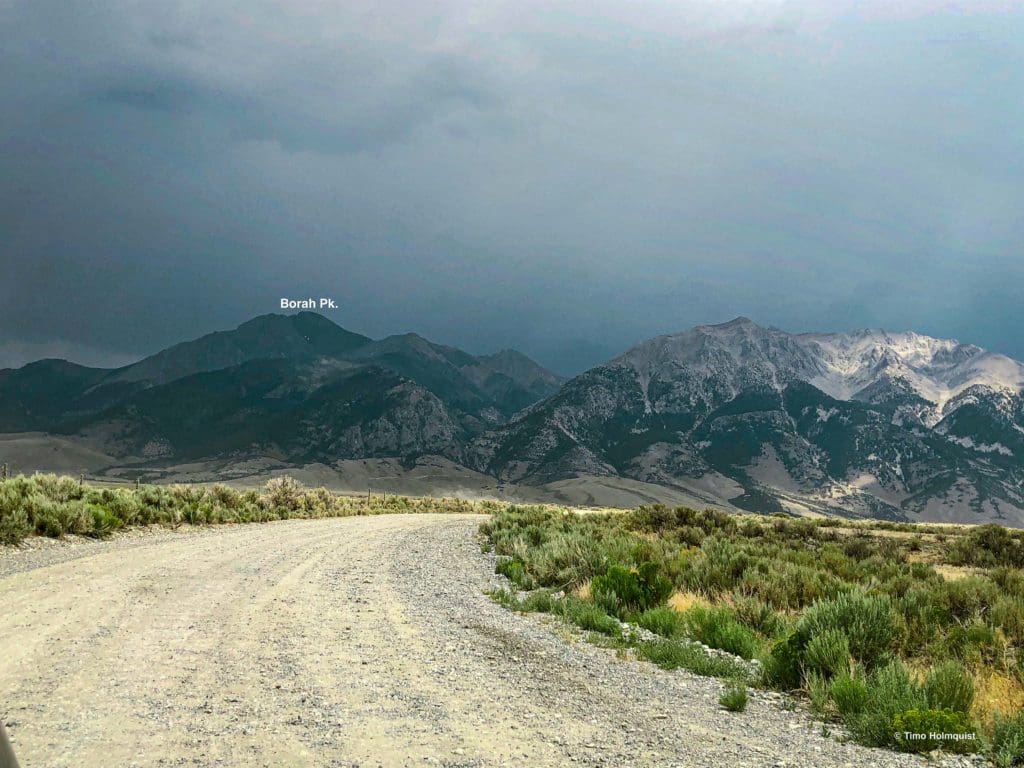
Borah Peak from the access road.
Skyblue Overland Strongly Recommends That You Enroll With Global Rescue Prior To Embarking On Your Next Adventure.
With more people outside now more than ever, Global Rescue expanded services to include field rescue within 100 miles of home. With Local Field Rescue — automatically included in any travel protection services membership — Global Rescue is there whether you’re hiking, kayaking, snowmobiling, fishing or simply enjoying the outdoors and get ill or injured and you’re unable to get to safety on your own. Purchase a Global Rescue membership for your next adventure and travel with peace of mind. Single trip, annual and family options are available.


