


High Point:
12,060 feet

Total Ascent:
3,616 feet

Difficulty:
Very Difficult

Distance:
10-13 miles (route dependent)

Route Type:
Out and Back, loop options available
There are 3 scrambling routes to the top of Big Agnes Mountain in the Mount Zirkel Wilderness near Steamboat Springs, Colorado. These three routes include (1) Big Agnes from Micah Basin, Class2+; (2) Big Agnes from Gilpin Lake Trail, Class 2+; and (3) Big Agnes via the West Ridge, a Class 4 scramble. See this photography heavy trail review of each of these routes.
Overview
If the name of this mountain sounds familiar, that’s because it was the inspiration for the name of an outdoor company based in Steamboat Springs called (drumroll please) Big Agnes. Other than this association, the mountain doesn’t really crop up on people’s radars. A decent amount of people climb the standard route due to its scenic nature, but in general, it’s not a super well-trafficked area, especially when you get off-trail. Mount Zirkel, the highest peak in the Northern Park Range, draws most of the crowds, along with Gilpin Lake.
Big Agnes Mountain is located in the Northern Park Range and is the third tallest mountain in the range after Flattop Mountain and Mt. Zirkel. Tall is a matter of perspective, though, and the mountains of the Northern Park Range barely scrape 12,000 feet. That’s right, no 13ers and 14ers. Due to the lower elevation, copious snowfall (the most in the state), and its location away from major interstates, the Northern Park Range is remote and wild.
The treeline here is quite low due to the range’s northern position within Colorado and yields large stretches of great alpine. The rock quality is also quite good (especially in areas of the Sawtooth subrange), which allows for superb (but often brief) scrambling on dramatic rock formations. Because of the blockbuster snow totals, the ridges around Big Agnes don’t thaw out until mid/late July, limiting the snow-free scrambling potential.
If you time your adventures for late summer or early fall, The Northern Park Range is worth a ton of exploration, and Big Agnes is a stunning mountain.

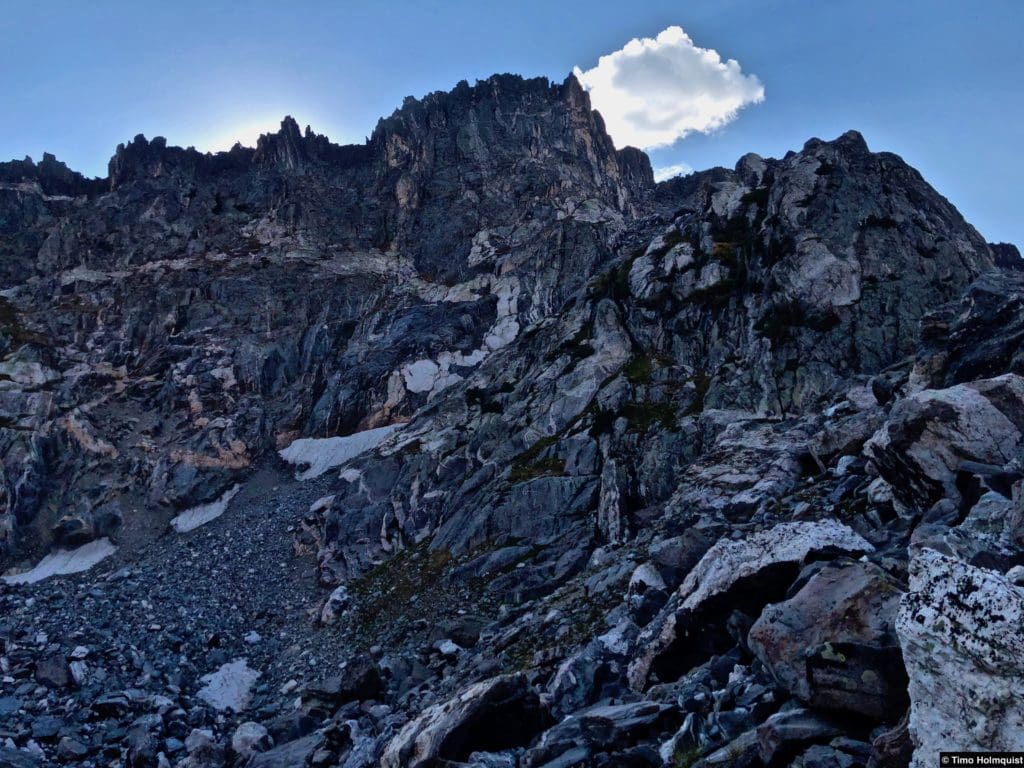
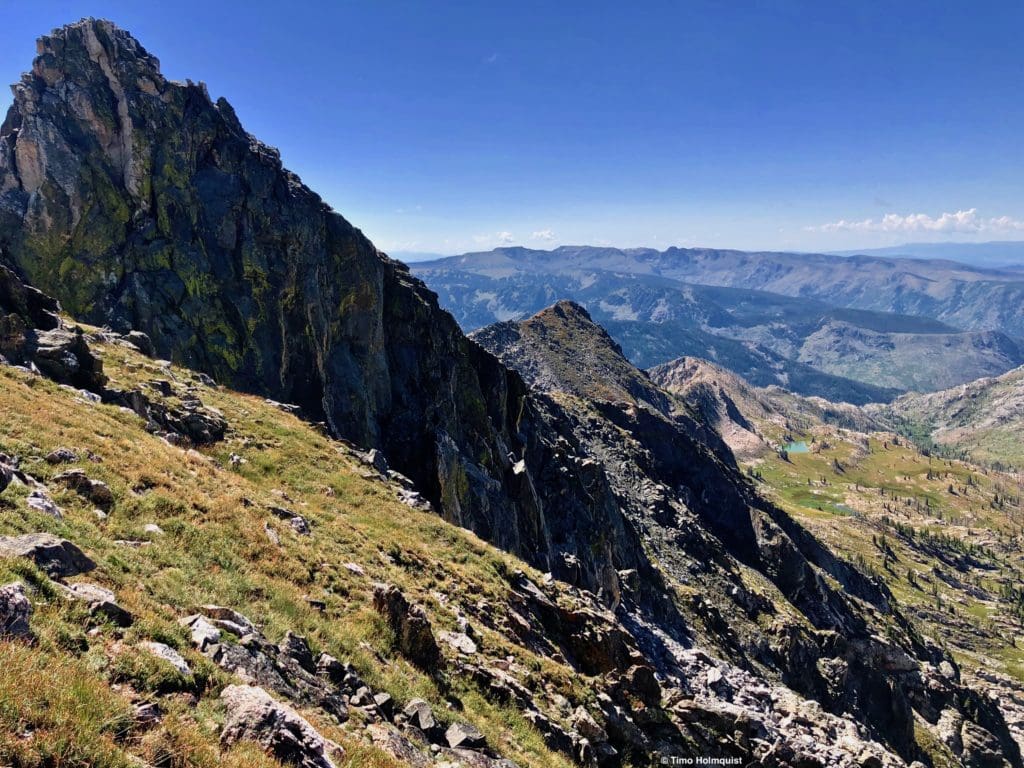
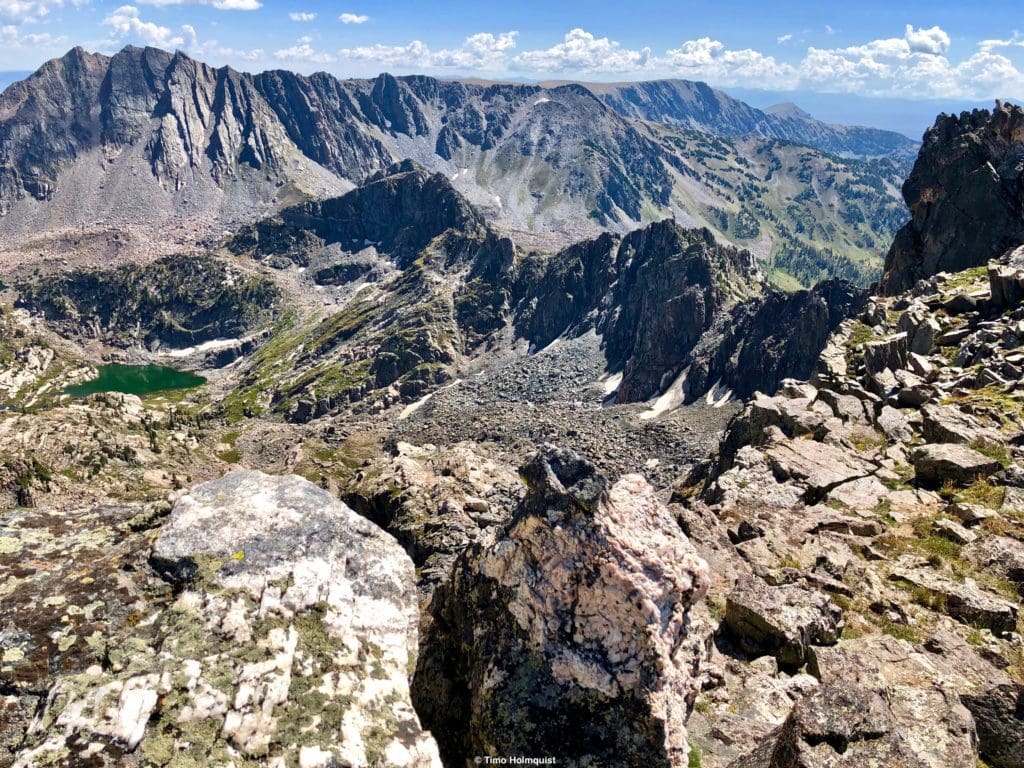
The dramatic Northern Summit of Big Agnes from high up in Micah Basin.
Table of Contents
Article Navigation: Click on any of the listed items in the table of contents below to jump to that section of the article. Similarly, clicking on any large, white section header will jump you back to the Table of Contents.
- Overview
- Scales and Criteria
- Directions to Trailhead
- Field Notes
- Journal: Big Agnes from Micah Basin (The Direct way) Class 2+
- Journal: Big Agnes from Gilpin Lake Trail (The Pretty Way) Class 2+
- Journal: Big Agnes via the West Ridge – Class 4
The seldom seen north side of Big Agnes from near the headwaters of the Elk River’s northern branch.
Support Skyblue Overland™ on Patreon!
If you’d like to support our efforts for a few dollars a month, please subscribe to our Patreon page. Every donation energizes our team to keep writing detailed trail reviews, gear reviews and adventure guides. Thank you!
Scales and Criteria
This article uses two metrics to calculate difficulty: overall distance and elevation gain. There’s also a technical scrambling scale included because the summit of Big Agnes requires Class 2 scrambling by its easiest routes, with a stunning west ridge that demands a short, exposed section of Class 4 scrambling. The mountain also has three “summits.” The true summit is the easiest to attain, while the South Summit and North Summit require Class 3 scrambling to reach. You may not think it at first, but the scrambling potential in the Sawtooth Range is explosive, and Big Agnes is a great way to get a good look at the surround. Camping opportunities near Gilpin Tarn (not to be confused with nearby Gilpin Lake) or Micah Lake also make multi-day exploration possible.
Difficulty Ratings:
- Easy: less than 5 miles, less than 500 ft. of elevation gain
- Moderate: 5-10 miles, 500-2000 ft. of elevation gain
- Difficult: 5-15 miles, more than 2000 ft. of elevation gain
- Very Difficult: 10+ miles, more than 3,500 ft. of elevation gain
Technical Rating:
- Class 1: Established hiking trail the entire length of the adventure. Low chance for injury.
- Class 2: Typically involves cross-country navigation, possibly using hands for balance but not required, steeper than Class 1.
- Class 3: Hands and feet used to scale areas; must use hands to proceed (either for balance or to help pull you up a section), increased exposure, a fall could be fatal. Helmet recommended, along with grippy hikers.
- Class 4: Climbing on very steep terrain just shy of vertical, falls could be fatal, hands employed for grip and balance continuously, ropes advised but scalable without. Helmets are highly recommended, along with grippy hikers.
- Class 5-5.4: Vertical climbing that involves technical rock-climbing moves, exposed, falls likely to be serious or fatal, possible to scale without ropes but only for very experienced veterans. Helmets, grippy hikers, and/or rock-climbing shoes are necessary.
- Class 5.5 and up: Not covered as scrambling, full-on rock climbing with ropes, helmets, etc.
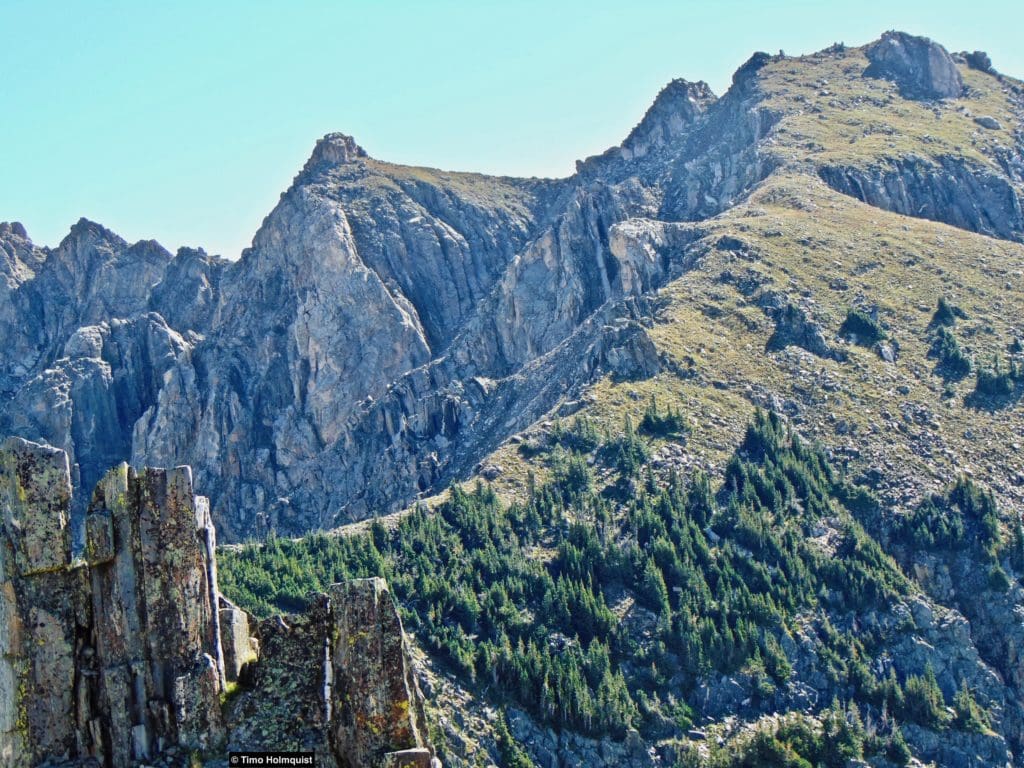
Looking to Mt. Zirkel and its dramatic rock flakes from just below the true summit of Big Agnes.
Directions to Trailhead
Most of the highest locations in Zirkel Wilderness (excluding the Ethel/Lost Ranger area) are reached via the Slavonia Trailhead. This trailhead is roughly an hour outside of Steamboat Springs. Keep in mind that because of the heavy regional snowfall, the trailhead may not be accessible until later June, and even when it is, the high peaks will have connected snow patches (during an average snowfall year) through early/mid-July.
From Boulder, Denver, and Colorado Springs, take I-70 west to Silverthorne, then 9 north to Kremmling. From Kremmling, take US 40 north, continuing up to Muddy Pass, Rabbit Ears Pass, and eventually down to Steamboat. From Fort Collins, take US 14 west through Cameron Pass all the way to Walden. Stay on US 14 as it banks south and then southwest before meeting US 40 at Muddy Pass. Take 40 west to Steamboat from there.
If you’re coming from the southwest (Grand Junction, Glenwood Springs, etc.), take I-70 east to the Wolcott exit (exit 157) and then take 131 north until connecting with 40 just outside Steamboat.
From Steamboat, take 40 through town, 129 (a slight right near the airport) north toward Clark, and a minute or two after passing the Clark Store, take a right on 64, better known as Seedhouse Road. Follow Seedhouse Road northeast until it dead ends into the trailhead (~11 miles).
A portion of the west ridge up Big Agnes. Part of the rugged Sawtooth Range is visible.
From the northeast (Laramie or Cheyenne), take 230 southwest through Mountain Home, crossing a low point of the Medicine Bow Mountains. On the other side of the border with Colorado, the road changes to 127 (heading south). Take this road (the number changes again to 125), and follow it until arriving in Walden. From Walden, take 14 south to muddy Pass and 40 over to Steamboat. Lastly, from the northwest (Green River, Jackson Hole), find I-80 and take it to exit 187, where you’ll head south on 789. Right before the Colorado border, take a left on 70 (not the interstate) and continue on this road towards Hahn’s Peak Village, Steamboat Lake, and, ultimately, the small town of Clark. Find Seedhouse road (a left) before passing the Clark Store and take that all the way to the trailhead.
Seedhouse Road is a long road that starts paved but turns to dirt; it is passable by most cars but watch out for a few ruts and washboard sections.
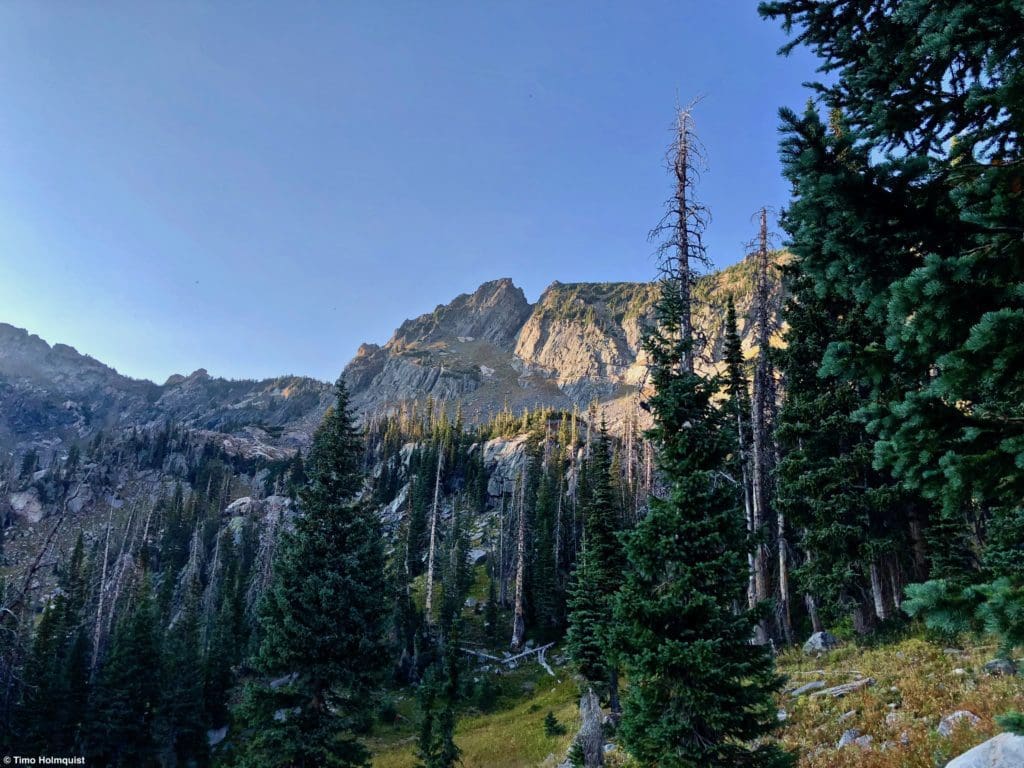
Beautiful backcountry scenery in the Mount Zirkel Wilderness.
Field Notes
Unless you’re a Routt County local, the Mount Zirkel Wilderness is pretty far. Any expedition into this part of the state should involve some studious route planning, first-aid kits, a ton of water, sunscreen, and bug spray for monsoon season. Due to the remote nature of this area (there are many unnamed peaks and seldom explored corners in this region), forecasting is an important component. For Big Agnes, you’ll be on easy-to-follow trails for the first part, but every approach to the peak involves off-trail navigation and some scrambling.
For general lower trail conditions, you can use the Clark 7-day forecast. For the higher portion of the hike, Mt. Zirkel is the most reliable forecast. For the exploration oriented, there’s plenty to love, but forecasting is especially variable, and you should be prepared for typical mountain weather extremes.
Again, if you’re local, you may be used to the typical weather patterns that assault these mountains, but seeing as the Northern Park Range is the snowiest range in the state, it goes without saying that there can be some intense snow/rain/thunderstorms throughout the year. If you’re approaching from far away, leave as detailed a hiking plan as you can with people to let them know where you’ll be, along with emergency contact numbers.
- Routt County Sheriff: 970-879-1090 (offices in Steamboat Springs)
- Routt National Forest: 970-723-2700 (offices in Walden)
Better safe than sorry!
Approaching the North Summit of Big Agnes with Micah Basin spilling out to the right.
You may also see on maps that there’s an area here known as the “Sawtooth Range.” The perimeters of this subrange are vague but generally extend west to east from Little Agnes to a low pass just to the west of Mt. Zirkel and include a few ancillary ridges heading north and south/southeast. Big Agnes Mountain is the tallest peak in the “Sawtooth Range,” which is a part of the Northern Park Range.
Because there are nearly 5,000 summits in Colorado (likely more, but this only considers identified high points), there are going to be repeat names. Sawtooth is one of these highly repeatable names. There’s the Sawtooth Traverse, a very popular and well-documented intro Class 3 scramble between Mt. Evans and Mt. Bierstadt. There’s also Sawtooth Mountain, a 12,300-foot peak in the Indian Peaks Wilderness. There’s even a Sawtooth Mountain in the remote Elkhead Mountains. The Sawtooth designation doesn’t end in Colorado either; Idaho’s Sawtooth Range is one of the prettiest in the western US; there’s even a set of Sawtooth Mountains in Minnesota. Understandably, this Sawtooth Range (the rugged subrange that includes Big Agnes) won’t pop up on the first few pages of a google search. However, that doesn’t mean there aren’t some absolutely epic hikes back here.
There are some resources that shed light on this region. Summitpost has a good Park Range pagewith mountain profiles, there are occasional Zirkel and Big Agnes reports on 14ers.com, and List of John has regional trail reports. The following photo journal is also a great resource for the Sawtooth Traverse, but it is a photo journal and doesn’t go into too many scrambling specifics. The definitive guidebook for the region was written by Joe Kramarsic, but it is not well distributed. You’ll have to hunt in local gear shops in Steamboat or perhaps Winter Park to find it. It’s listed on Amazon as “Mountaineering in the Park Range. A Guide to the Mountains of the Mount Zirkel-Dome Peak wilderness,” but has been unavailable every time I’ve checked. Hopefully, this guide helps fill in some knowledge gaps.
Journal: Big Agnes from Micah Basin Class 2+ (The Direct Route)

General area overview map
This is probably the most direct and uncomplicated way to tag Big Agnes. It is definitely not the prettiest way, but because of the slow regrowth in the area post-fire, navigation is surprisingly uncomplicated. You also follow established trails for longer, which helps with pace and speed.
For day trippers and those camping at Micah Lake, this route presents a moderate approach and scramble to the third highest peak in the Park Range and monarch of the rugged Sawtooth Range. It’s also easier than many of the other nearby routes.

The bottom part of the route to Big Agnes from Micah Lake.
This variation up Big Agnes from Micah Lake avoids the Class 4 scrambling on the west ridge, also accessed from Micah Lake.
Micah Lake is a little more than four miles from the Slavonia Trailhead on good trail. You can read about that approach in our Micah Lake trail guide.
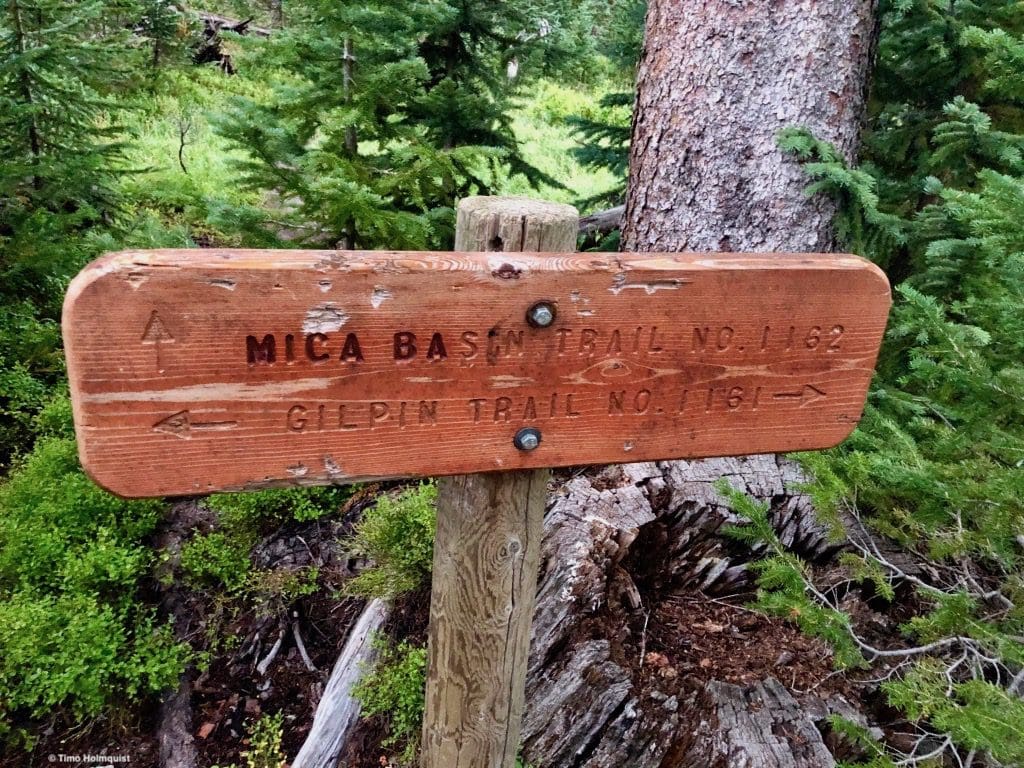
The sign at the second of two trail junctions. You’ll take a left at both if you’re heading up to the lake.
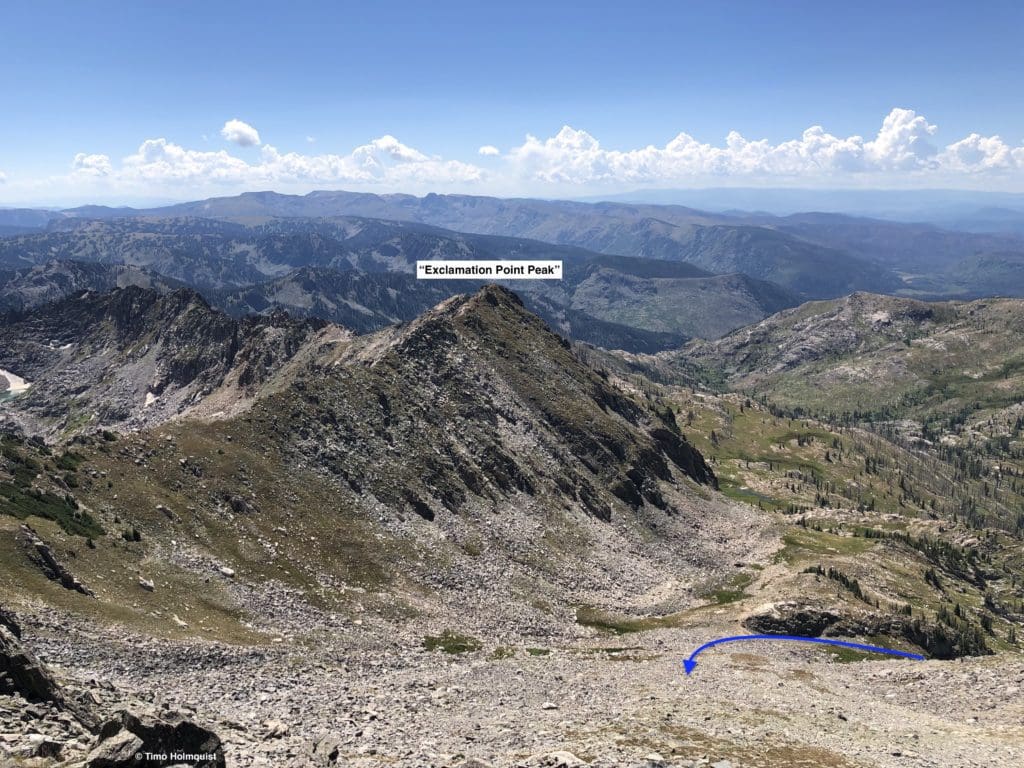
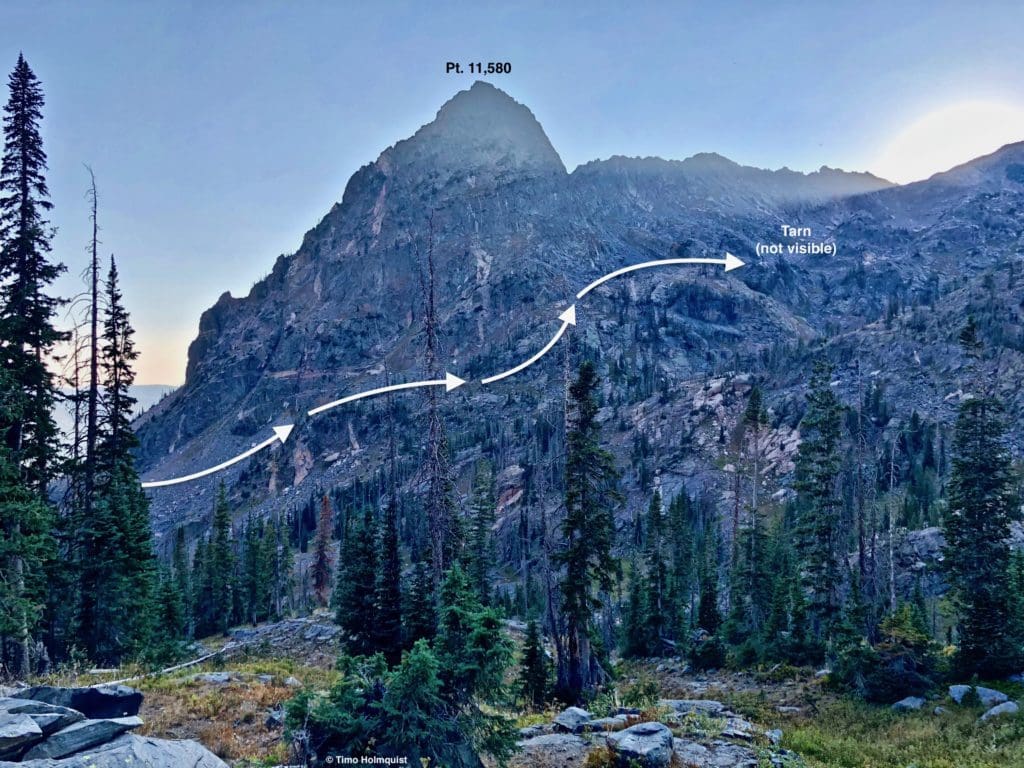
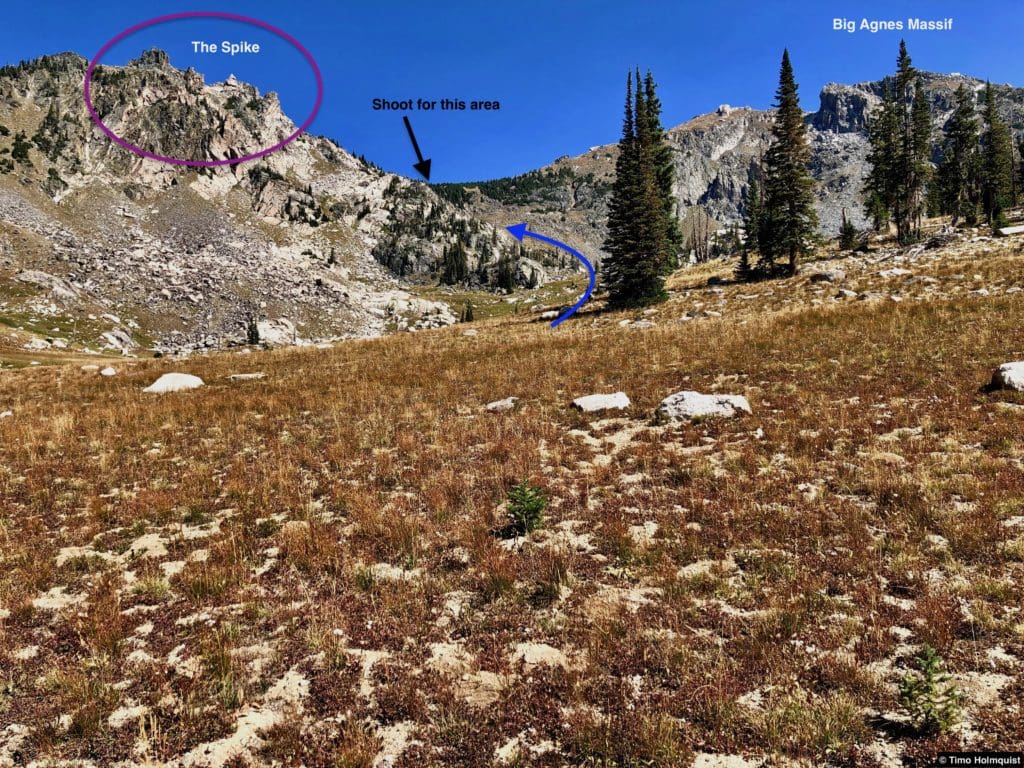
From Micah Lake, you’ll head northeast (right) and find a large bowl between Big Agnes and “Exclamation Point Peak,” which is also noted by its elevation as Pt. 11,777. If you’re looking for the easiest way up, don’t go for the low saddle directly north of Micah Lake, it leads to harder terrain.
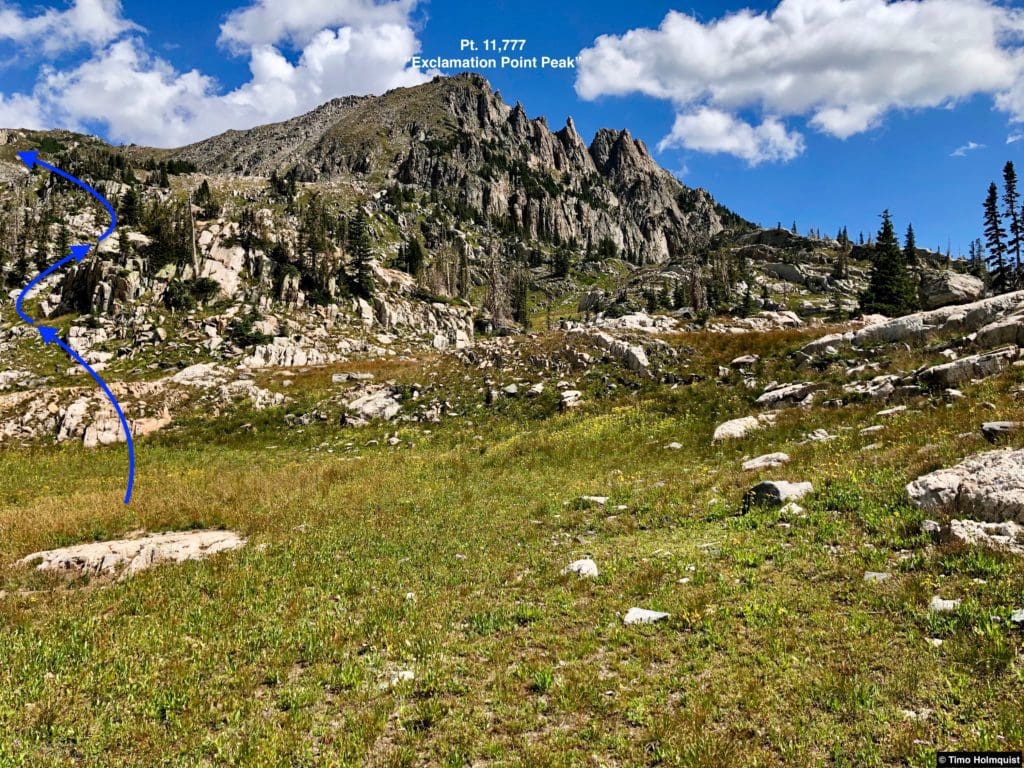
There are multiple routes into Micah Basin, the idea is to keep Pt. 11,777 to your right, which should be identifiable because of the sharp pinnacles to the right of its summit.
This is southeast of the route up to “Middle” Agnes, referenced in our Micah Lake Trail Guide.
The route seen from the approach to Big Agnes’s west ridge.
Once you’ve located the approach, scramble up this higher basin.
The higher basin.
Climbing up this new basin is fairly straightforward but does feature some loose rock, be careful and never ascend directly above someone else. The least steep part is to the east (right). You can also take a more direct line by hanging left and following a ridge crest.
This is likely the least steep approach.
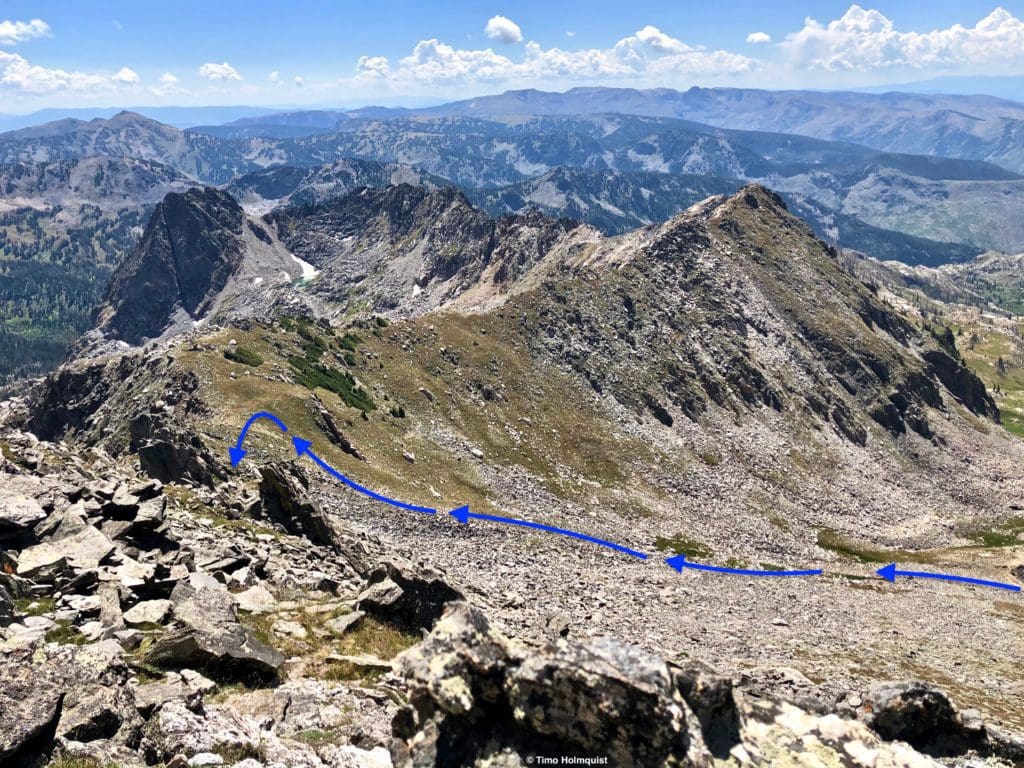
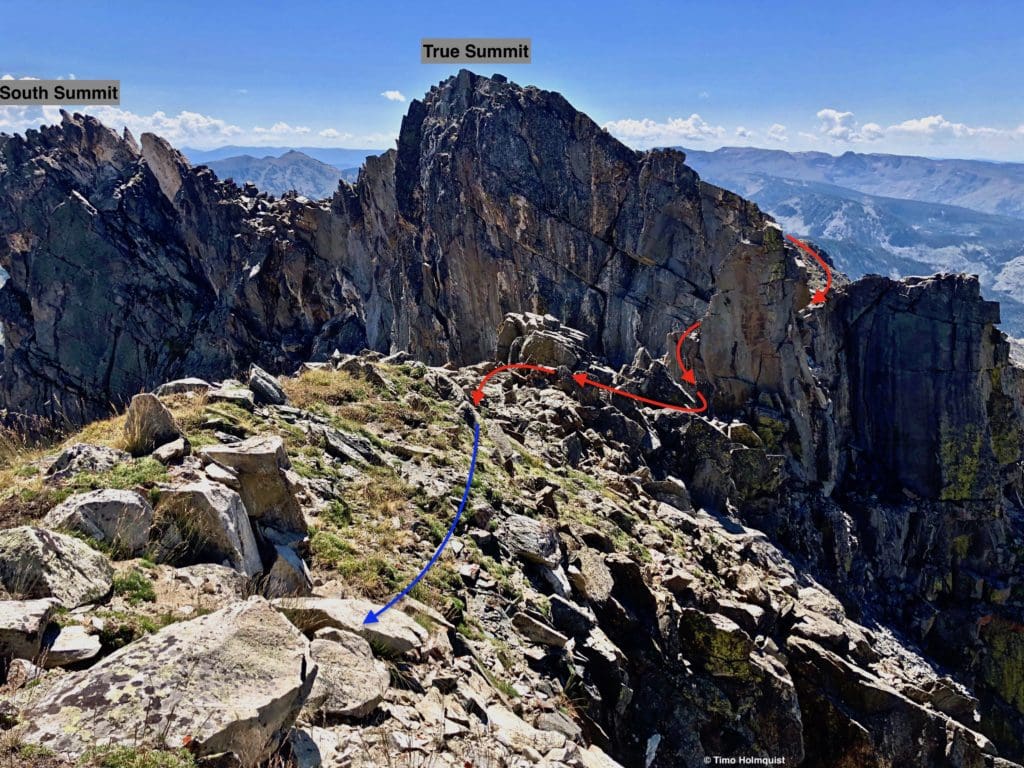
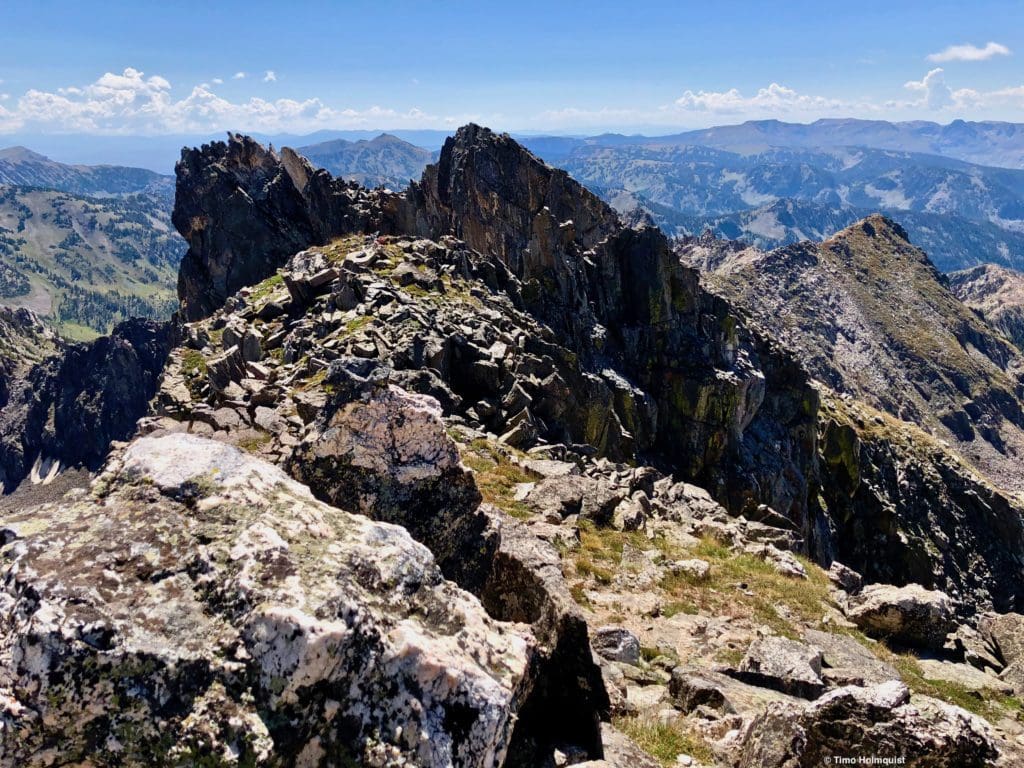
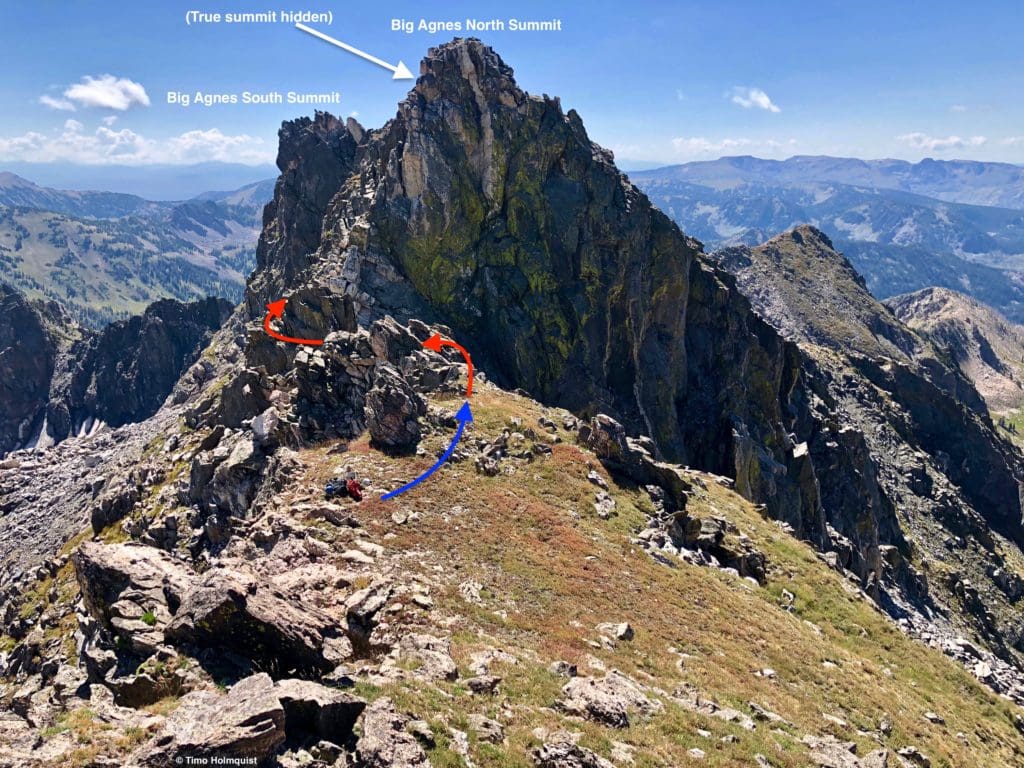
Once you make up to the highest area, you’ll notice the South and Central summits; the North summit is still hidden. The current consensus is that the central or middle summit is the highest. It is also the easiest to clamber up (Class 2+). All three are within a few feet of each other in elevation.
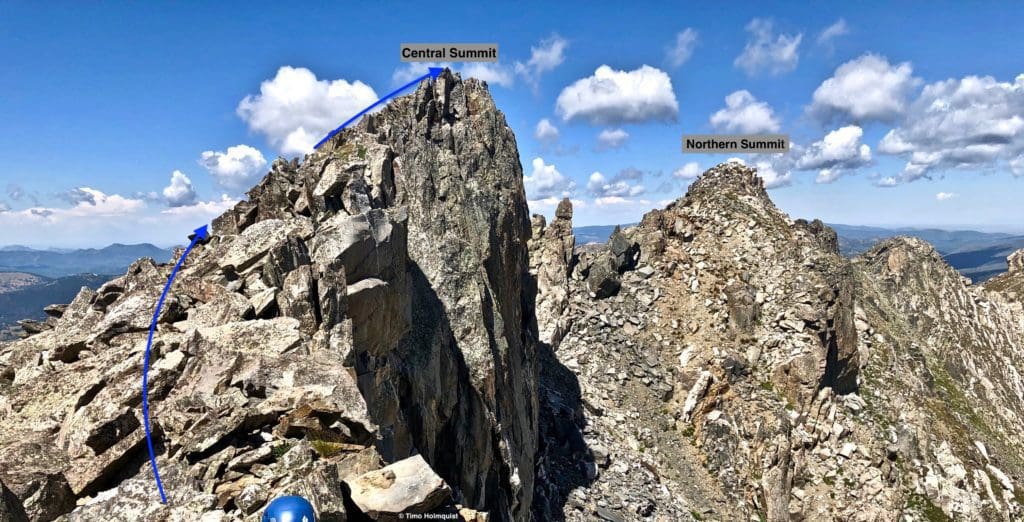
Central and the Northern Summit.
If you’re interested, there’s a fun, grippy and short scramble up the Southern summit that requires a bit of Class 3.
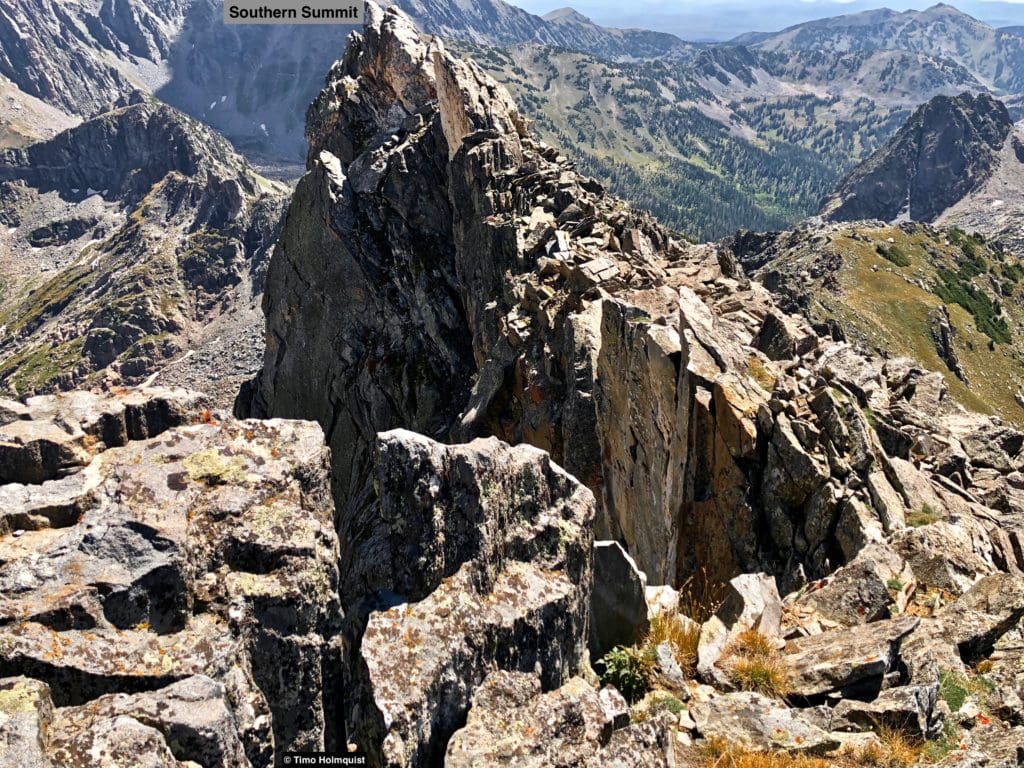
The Southern Summit, seen from below the Central summit.
The exposure while scrambling is low, but the northern drop from the summit is substantial.
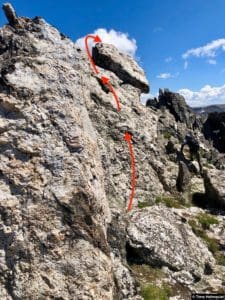
The rock is super grippy and a joy to scramble, it’s also very short, with only a handful of moves.
Retrace your steps to get off the rock. The Northern summit is a little farther away and also requires some brief Class 3 scrambling to reach.
Interestingly, as you’re coming off the Central summit on your way to the Northern one, there’s a small circular plaque.
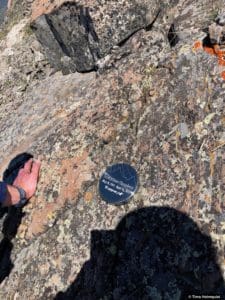
Plaque: See if you can find it when you’re up there!
The North Summit is a fun little jaunt from the main summit massif. Descend north along the ridge crest until coming to your Class 3 challenge section. It appears more difficult than it is, and there are solid ledges on the crest that help you avoid the sandy chutes on the northeast side. Again though, those gullies will be filled in with snow until well into the summer. Choose your summit bid in August/September to avoid snow.
At the first gully, drop down on slanted rocks on the right side of the ridge.
The first Class 3 moves are to take slanted rocks to the right of a fin on the ridge crest. You can bypass the fin to the right side (northeast). Once you do, make your way back to the ridge crest and enjoy the next few moments of Class 3 scrambling before the terrain relents back into Class 2.
General trajectory from the true summit to the grassy plateau that leads to the North Summit.
The North Summit has a remarkably gentle lead-up from this direction, considering it’s more or less one long-running cliff from the north. The view from the top is great, though.
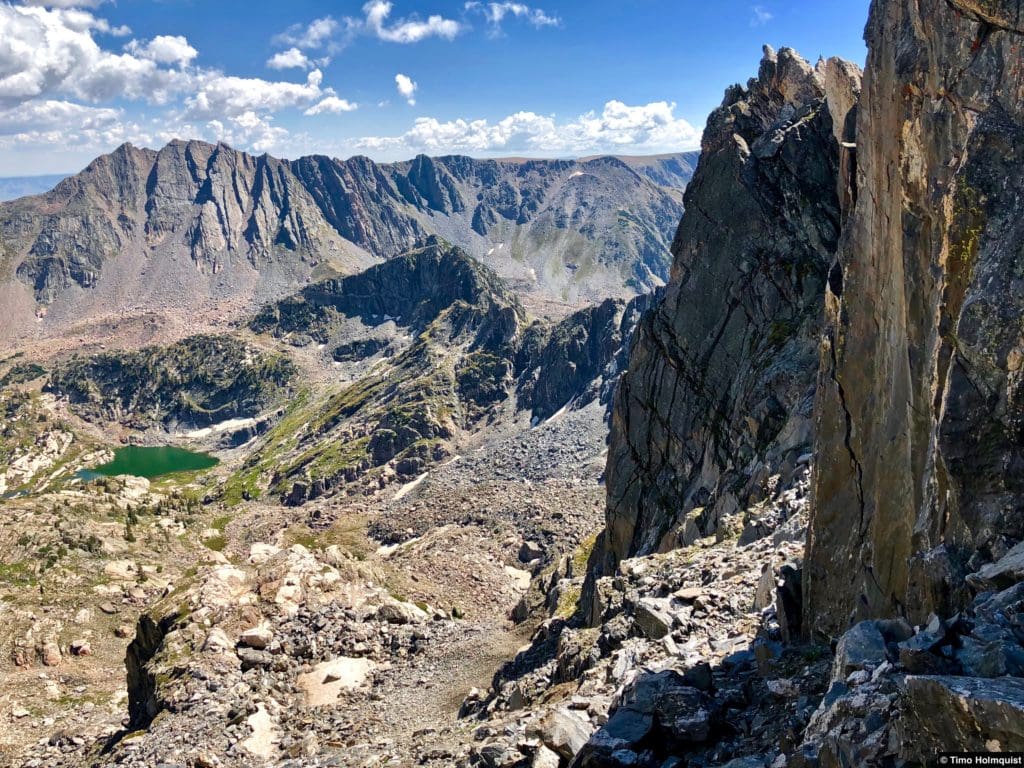
Mt. Zirkel and its huge flakes of rock are particularly striking. The south summit of Big Agnes sneaks into the shot on the right side.
Looking back to the south, you can see the double horns of the other two Big Agnes summits, along with Exclamation Point Peak to the right. Farther back, the next highest clump of land has peaks like Lost Ranger and Ethel. It’s a pretty commanding position and highlights a relatively untraveled part of the state.
Southward view.
When you’ve had your fill, return the way you came.
Journal: Big Agnes Class 2+ (The Pretty route)
This is not the shortest route (by roughly a mile), but it is quite pretty. Keep in mind that you’ll have to deal with long stretches of off-trail navigation. It isn’t too difficult, but there is lots of undergrowth, so watch for prickers and plants that cover up where uneven terrain may be. A twisted ankle off-trail could be very problematic.
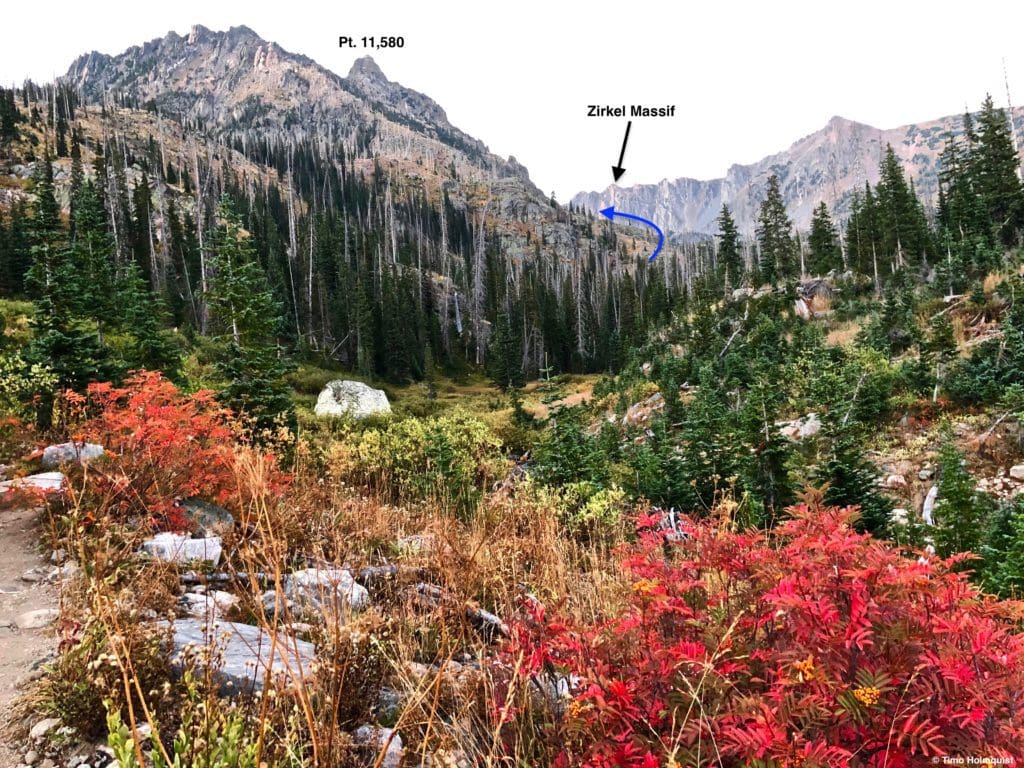
Start from the Slavonia Trailhead and head into the Mount Zirkel Wilderness on the Gilpin lake Trail. The first few miles are on a good trail. You’ll pass two trail junctions; keep right at both. Once you pass the junction with Micah Basin Trail (after ~1.25 miles), you’ll start seeing the prominent Pt. 11,580 and a substantial ridge connected to it. Your first goal is to get around Pt. 11,580 to access the basin behind it.
Your goal is to get around the right side of pt. 11,580 and circle up behind it.
Follow the trail for roughly 3.4 miles until it crosses Gilpin Creek on its way to Gilpin lake. For this approach, you do not want to cross the creek. Instead, you want to break from the trail and begin ascending some glacial knobs on the left (western) side of the drainage. The goal is to hike alongside and then up the foot of Pt. 11,580 because it’s an obvious marker to follow, and getting close to the peak reduces complex off-trail navigation closer to the creek.
Typical off-trail scenery as you make your way around Pt. 11,580.
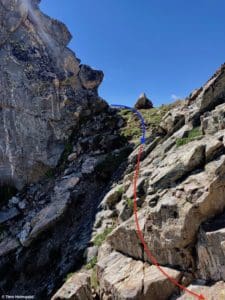
You’ll climb over some rocky shoulders as you ascend into a basin. With good path selection, you should be able to make it into the basin without doing any Class 3 scrambling. You want to stay closer to pt. 11,580 until arriving at a tarn.
The route is Class 2+, normally a blue color but white shows up better with this picture.
The tarn is a great place to fill up on water or take a break. From here, your goal is to find the most accommodating gully that leads to the head of the basin. It’ll appear to the right of Pt. 11,777 and shouldn’t involve any difficult scrambling. Keep in mind that with this area’s copious winter snowfall, you may be dealing with holdovers now until early August.
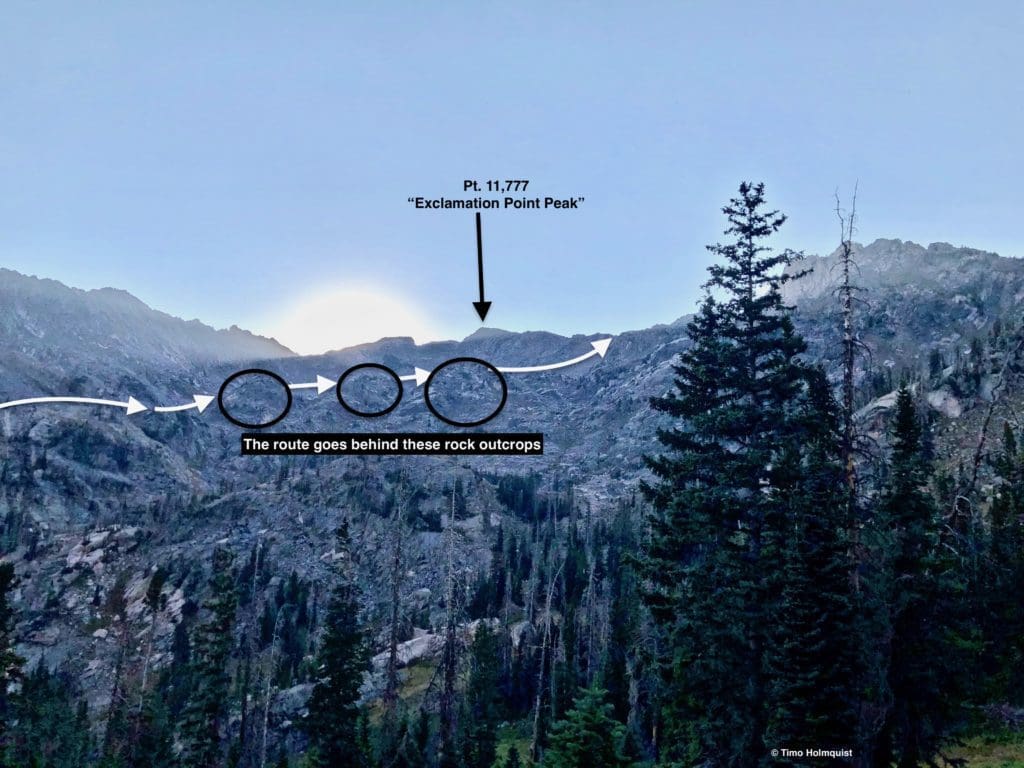
The easiest path forward.
Round the lake on its east side and travel north on steepening terrain as you make your way up to the top of the gully. At this point, you haven’t been able to glimpse Big Agnes yet.
Once you break onto the ridge, orientation becomes a lot easier. You’ll see a much larger lump of land in front of you; that’s Big Agnes. Follow the ridge higher (staying on the left side to avoid a series of rocky pinnacles) and ascend until reaching the summit plateau.
Looking back at the route once you crest the ridge.
Big Agnes has three summits, south, central and north. The central one is in-between the other two and likely the highest. The northern summit is farther away and not visible when you’re hiking up from this direction. After you either pass or scramble the Southern Summit, you’ll see the Northern one.

Two of three summits.
All summit variations are discussed above as part of the Direct Route from Micah Basin.
Journal: Big Agnes West Ridge (Class 3+/4)
This is a fun and serious scramble; it can also be made into a longer adventure that takes the Spike into account (Class 4), although that is completely optional, so I’ll just stick to describing a more direct West Ridge route.
You should have prior scrambling and route-finding experience before attempting this route.
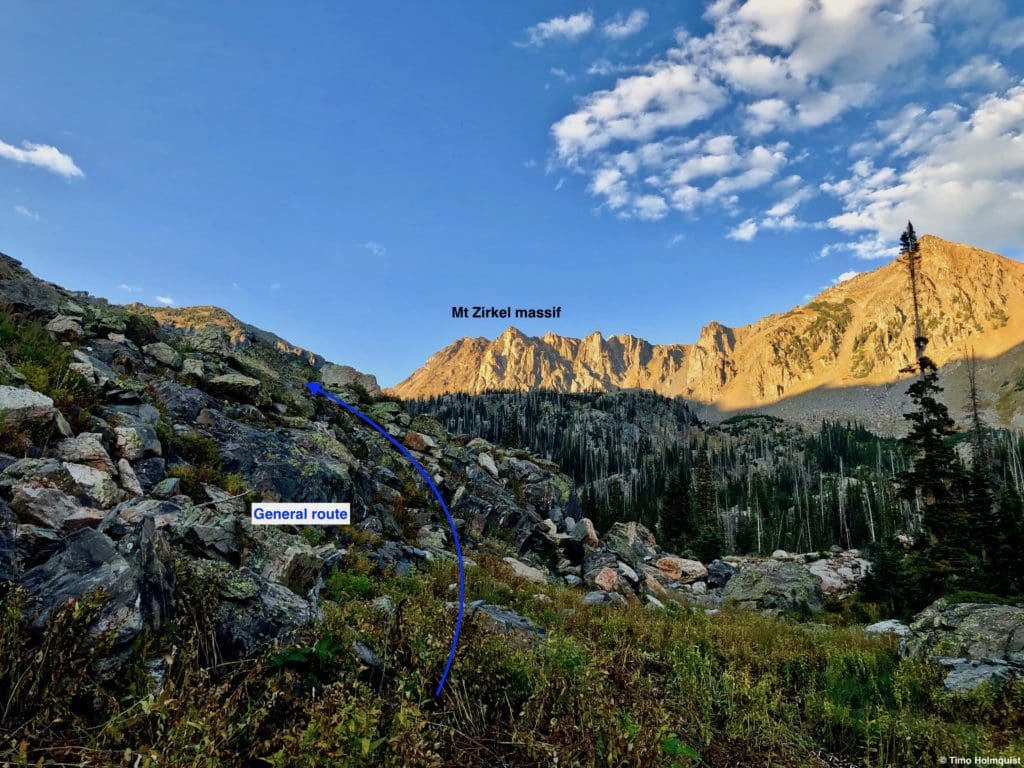
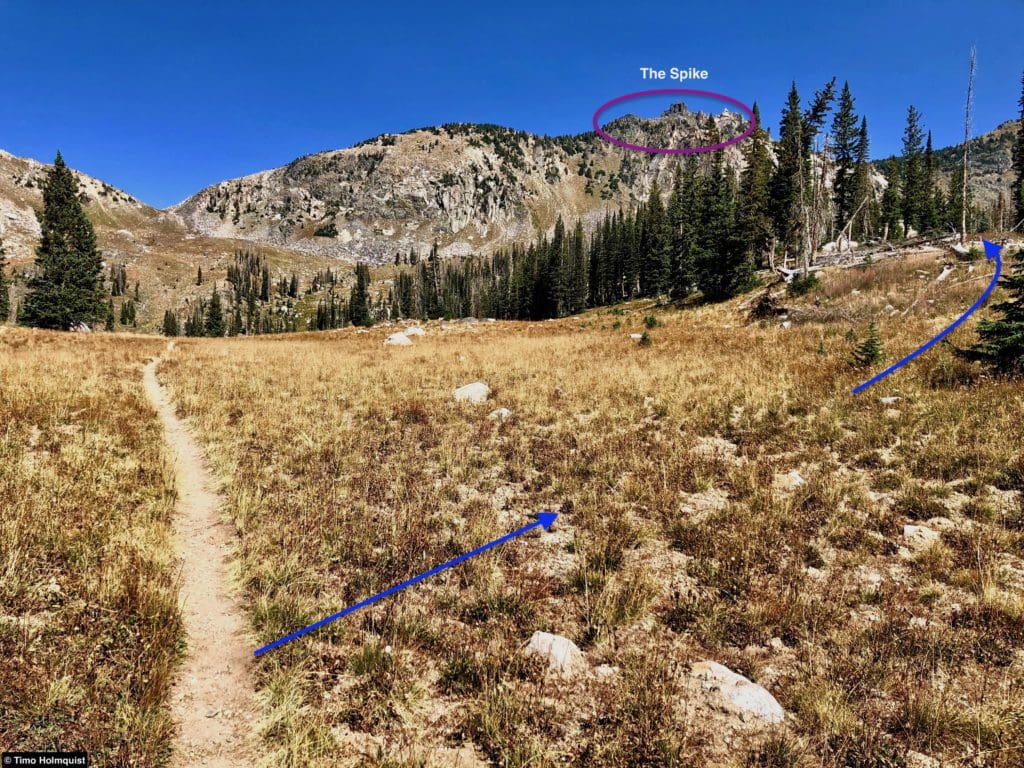
The best way to tackle the West Ridge is to ascend from Micah Lake like you’re heading to Middle Agnes. This involves finding the lake and heading right (northeast) through fields and a few sparse stands of trees.
The start is similar to the route taken for the more direct Big Agnes approach from Micah Basin.
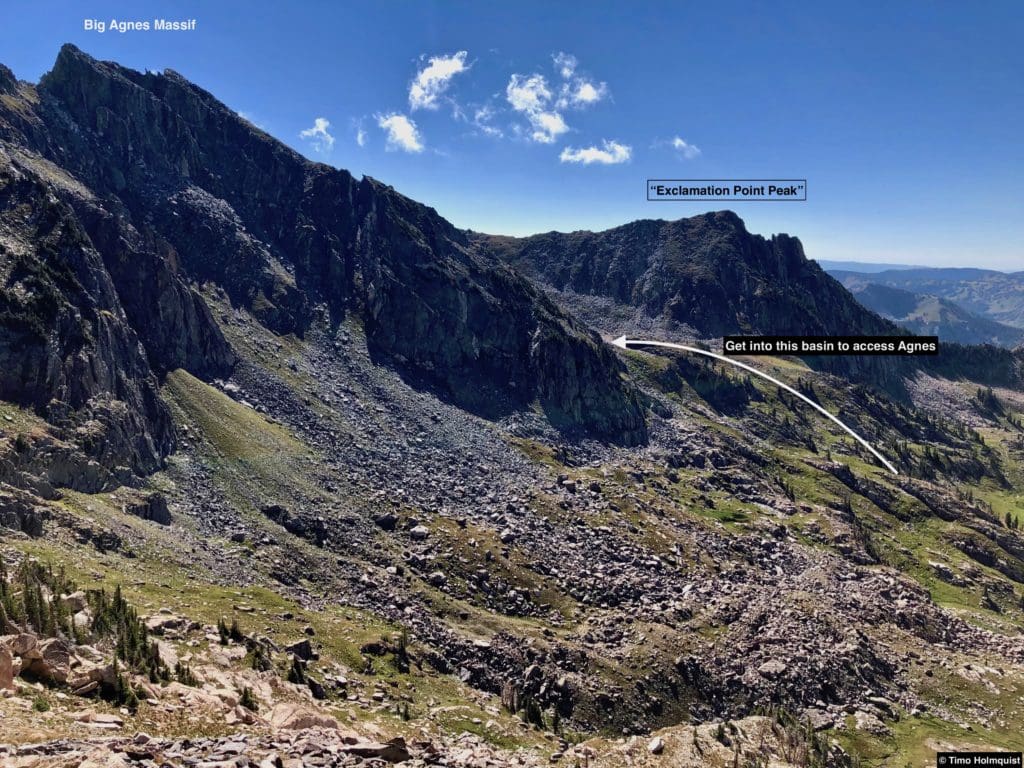
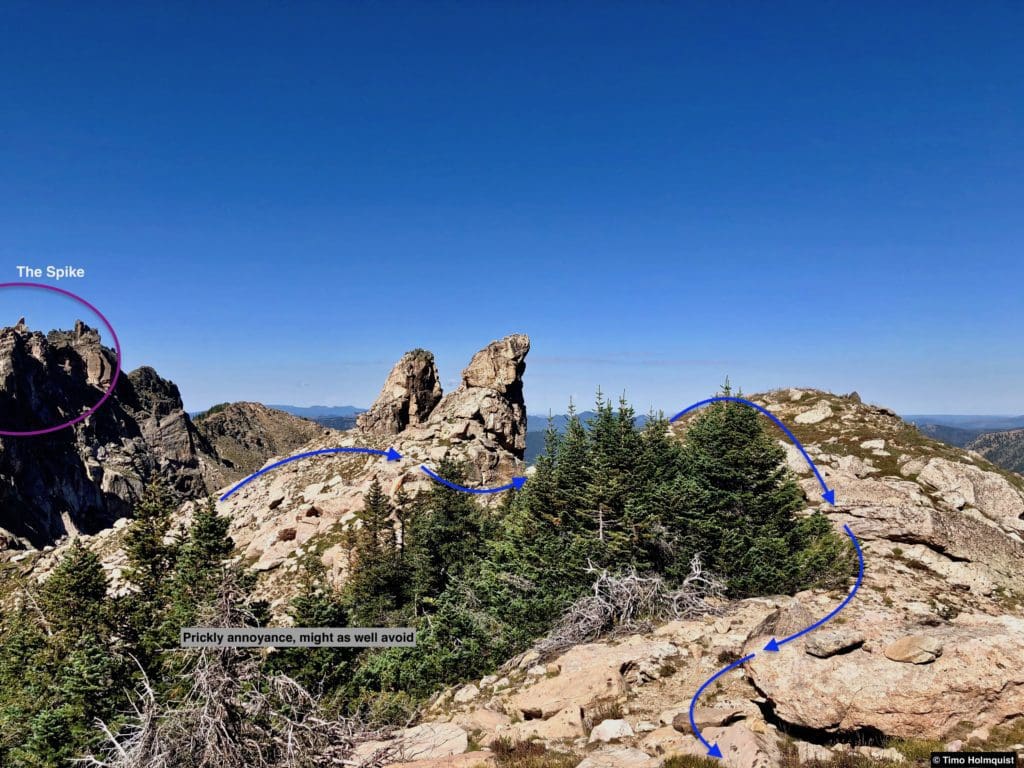
You’ll end up paralleling the Spike formation to your left, which looks like this.
A closer view of the Spike from the bottom.
Unlike the approach for the typical Big Agnes ascent from Micah Basin, you want to stay relatively close to the bottom of the Spike, following it east until you sight a more accommodating gully that runs north to the ridgeline. The gully is identifiable by open rocks and grasses to the left side and a thick smattering of krummholz guarding the top and upper right portions.
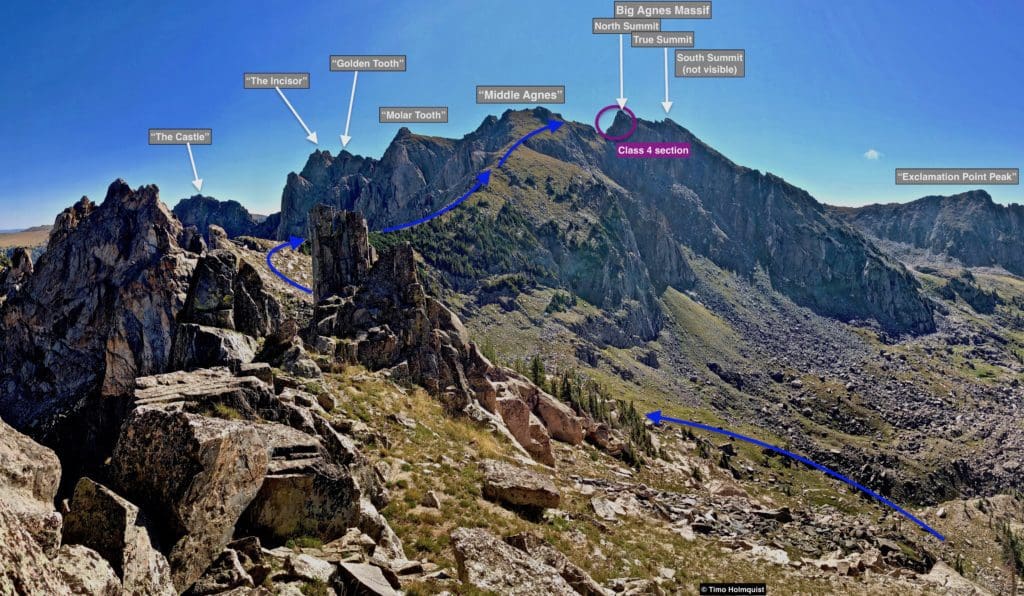
It’s a mostly Class 2 affair until you get to the headwall separating “Middle Agnes” from the rest of the Big Agnes Massif.
The West Ridge is a great introduction to what is typical of this area. You’ll deal with some areas recovering from fire on the approach, healthy stretches of alpine, short, intense bits of scrambling and generally solid rock.
After connecting with the ridge, ascend past the krummholz by sticking to the left side of the ridge. There is some decent exposure to the north, but the krummholz hasn’t grown completely across the ridge, so there is a relatively simple way through. Anything to the right (south) will involve bashing through the krummholz, which is decidedly unpleasant.
It’s a little circuitous but much faster than going through the vegetation.
Once you pass the krummholz section, enjoy the sweeping alpine rise in front of you. There’s one section where ridgeline direct could have you employing some optional Class 4 moves, but you can just as easily skip it by traversing to the right.
Options along the ridge. Just go around it if you don’t feel like scrambling yet.
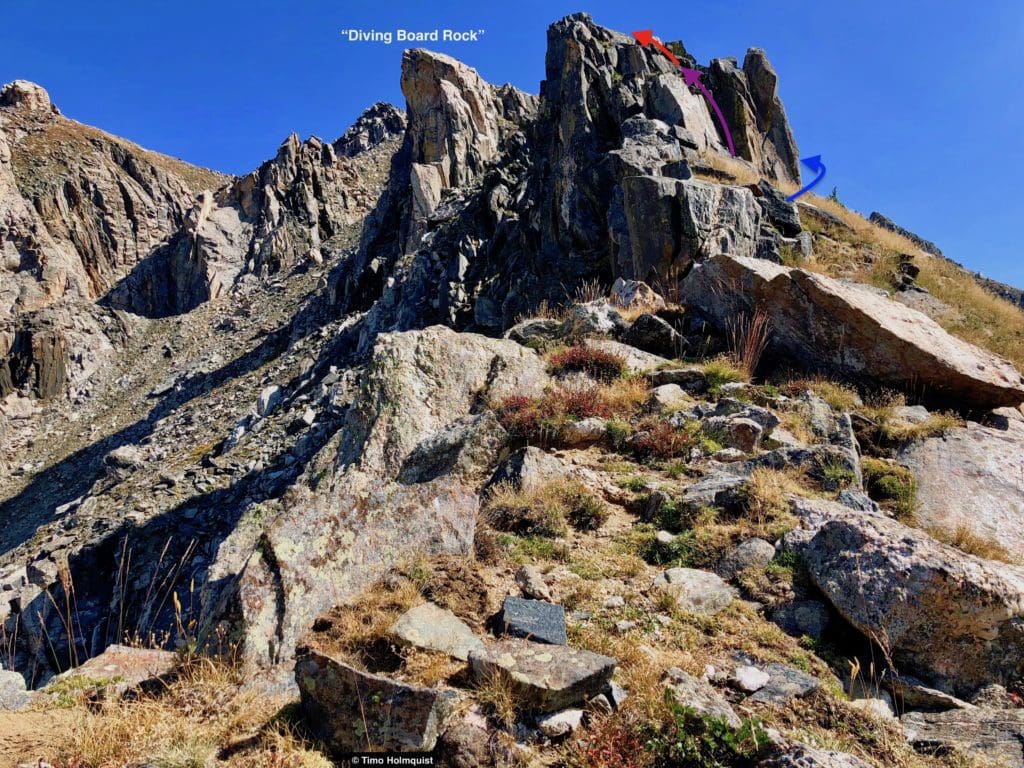
Once you get above the “Diving Board Rock,” you can take a more direct line up to touch “Middle Agnes” or perform an angled traverse to the right toward the cliffs surrounding the Big Agnes summit area.
In between “Middle Agnes” and the summit area, your route will attack a relative weakness on the left side of the big cliffs.
Take a good break here to study the route ahead, there’s a lot to consider, and not all of the moves are visible. Once you’re ready, you’ll continue on the ridge crest (now pointing south) as it narrows. There are some Class 3 moves required on the narrowing ridge before you draw up to the big wall.
As you approach the wall, you’ll notice a series of blocky white rocks. There are two strategies here. You can lose some quick elevation on a grassy bench to the left and bypass the white rocks (Class 3), or you can ascend and traverse through them (brief Class 4, grippy rock).
Two options, they both connect on the other side.
Depending on your energy level, there’s a safer way and a scrambling way; choose whatever looks most appealing. The scrambling here is short, and the rock is gloriously knobby with plenty of holds, but it is exposed and involves an awkward traverse.
A very zoomed-in shot, looking at the two options from below Big Agnes’s north face.
The next part of the scramble involves some grassy ledge traversing (Class 2+/3). There are plenty of opportunities to make this part harder, but ultimately, you’re hunting for a gully system that breaks through the next cliff band.

What the scramble looks like after the first moves. Head to the red circle.
The best strategy is to stay close to the cliffs above you to the right. You’ll be able to perform an angling traverse, using them as a guide. Sometimes you can’t follow right underneath the cliffs, which is ok; it’s just meant as an easy reference point to keep you on track. If you find yourself descending steeply, you’re off track. In this part, you need to be traversing and gaining elevation.

Where you want to go.
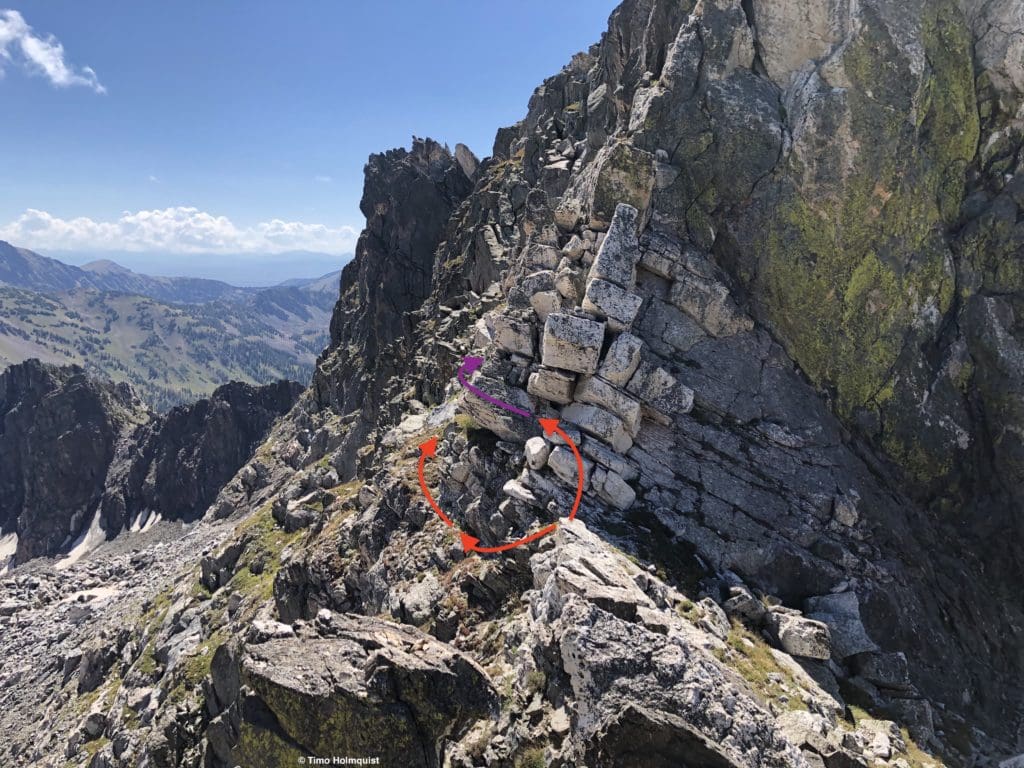
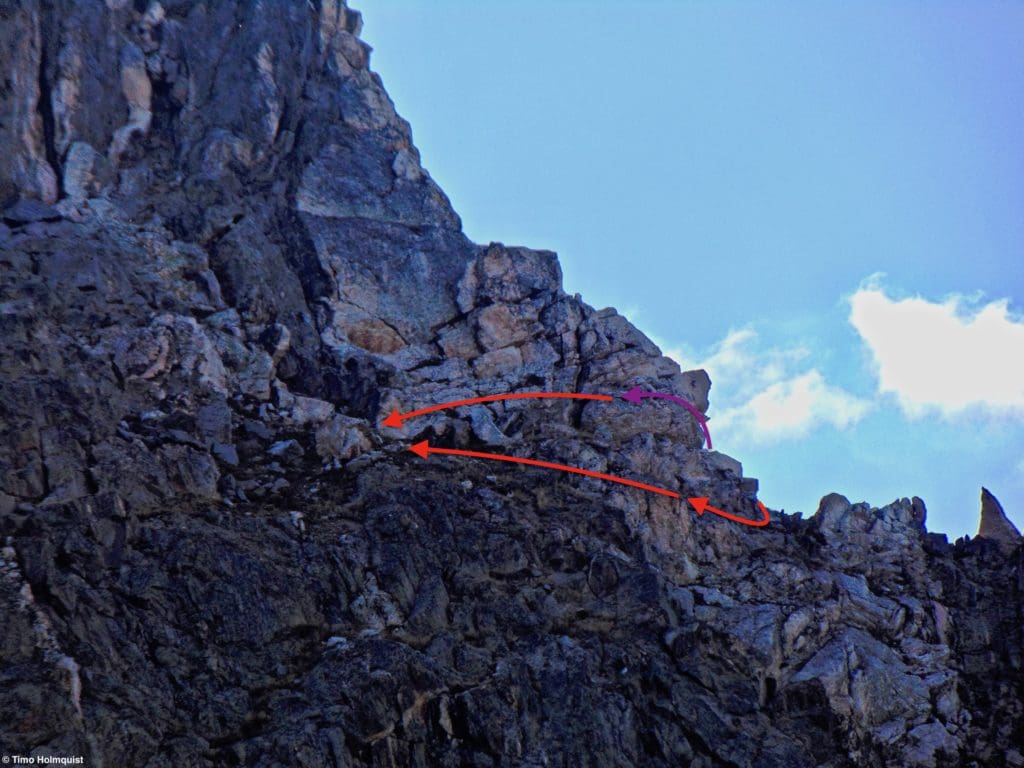
There’s one more place where you can take two paths, and merits a bit of a closer look. The higher version (closest to the cliffs on your right) will start with a little Class 3 scramble up to a solid rock ledge. You can also opt to traverse below and to the left of this step, ultimately reaching the same gully as the higher option.

Options to consider.
If you follow the upper route, you’ll cruise along until the ledge ends. Then, you’ll need to perform a semi-awkward Class 4 side shuffle into the gully you want. It’s only a move or two, but your butt will be hanging out over the edge, so consider it carefully before committing.
The lower route avoids the side shuffle but attacks the gully from the bottom and, depending on each individual move, could be considered Class 3+/4. There’s a grassy patch or two in the gully, be careful stepping on these as the traction isn’t that great. When possible, always opt for solid rock.

Where each option leads. The gully above the higher route is solid and doesn’t exceed Class 3.
Once the routes combine again, take the obvious gully higher and to the left as it comes to a natural end on some additional grassy slopes (Class 3). From here, the difficulties ease somewhat, and all that’s left is to find a suitable gully to breach the summit area. There are a few possibilities to consider. Take your time and pick the easiest route. Another 30 seconds of barely Class 3 scrambling, and you’ll break through to a surprisingly easy and gentle grassy summit area.
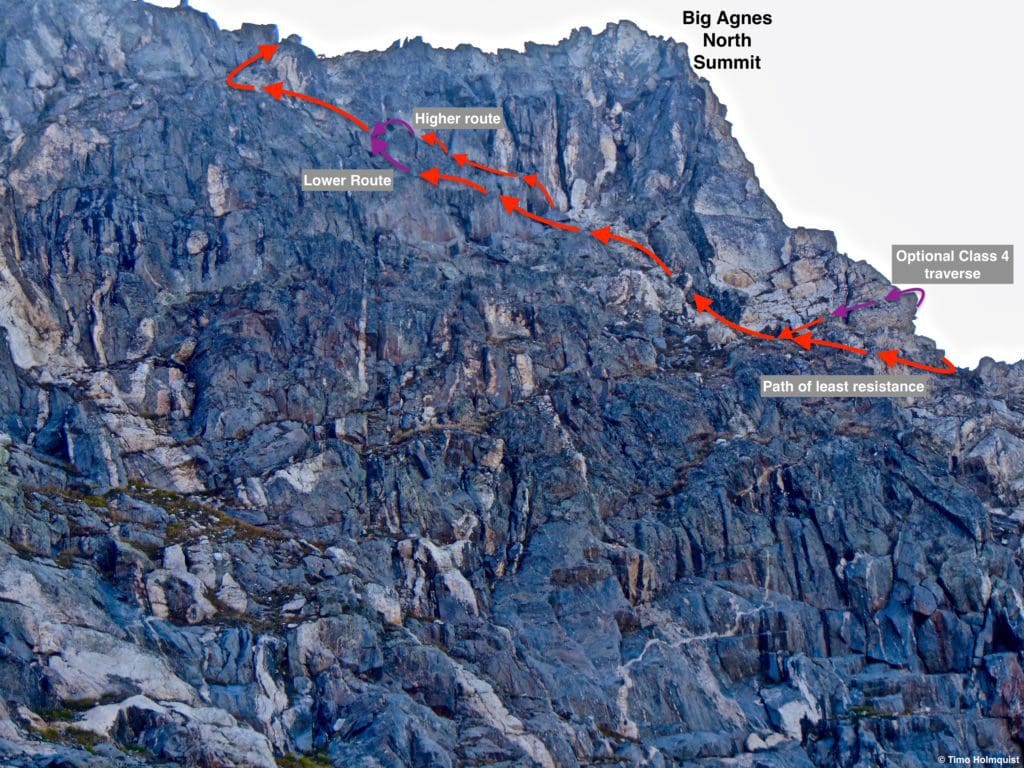
The whole route, seen from far below Big Agnes’s north slopes.
There are likely additional routes up this face; it’s a complicated area with lots of grassy ledges, some accommodating, and some that end in sheer cliffs. If you have the time, experiment around; if you don’t, the route described is quick, scrambly and more direct while keeping everything in the Class 3/low Class 4 range.
After you break out onto the summit area, a quick Class 2 jaunt back north nets you the North Summit. From the beginning of the first Class 3 portion in front of the big North Summit wall until touching the North Summit took less than 15 minutes.
From the North Summit (or if you skip it), you’ll look south and see this view.
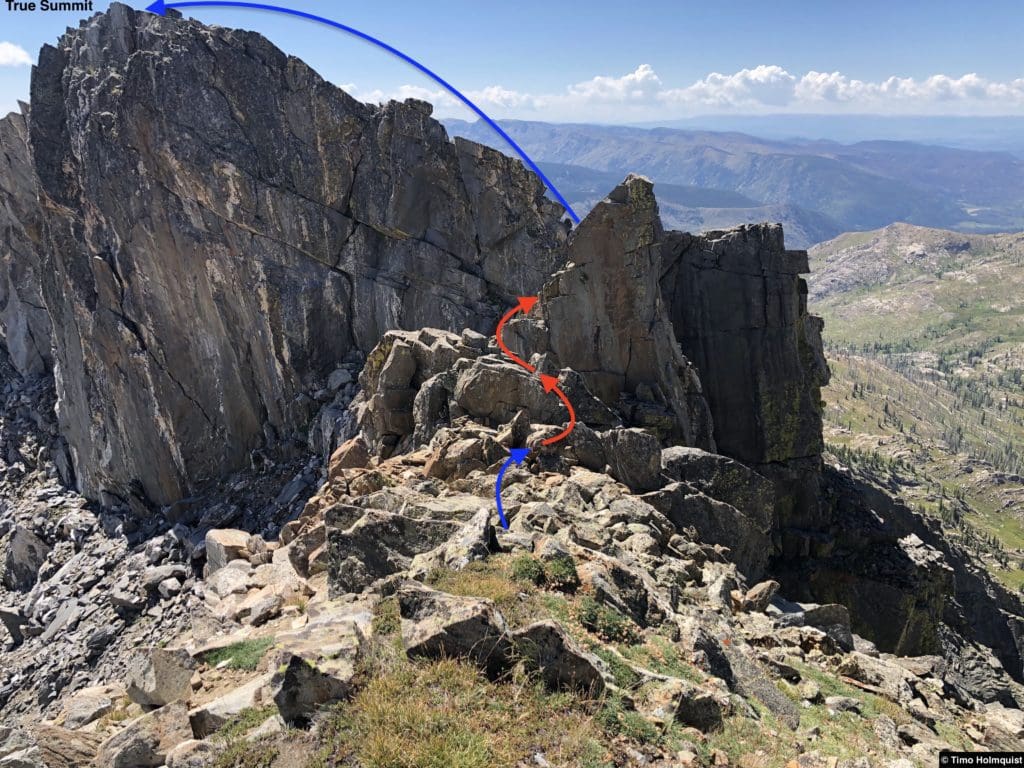
A few small sections of Class 3 traversing gets you beyond the next cliffy section.
The scrambling looks complicated with the gendarme in the middle, but you can bypass it to the left on sturdy ledges. You can also go completely around it to the left, but that requires some additional elevation loss/gain on sandy terrain. Once around it, rejoin the ridge crest, break through the cliffs at an easy weakness (Class 2+/3) and then attack the summit block from the south side. Boom, Big Agnes is yours.
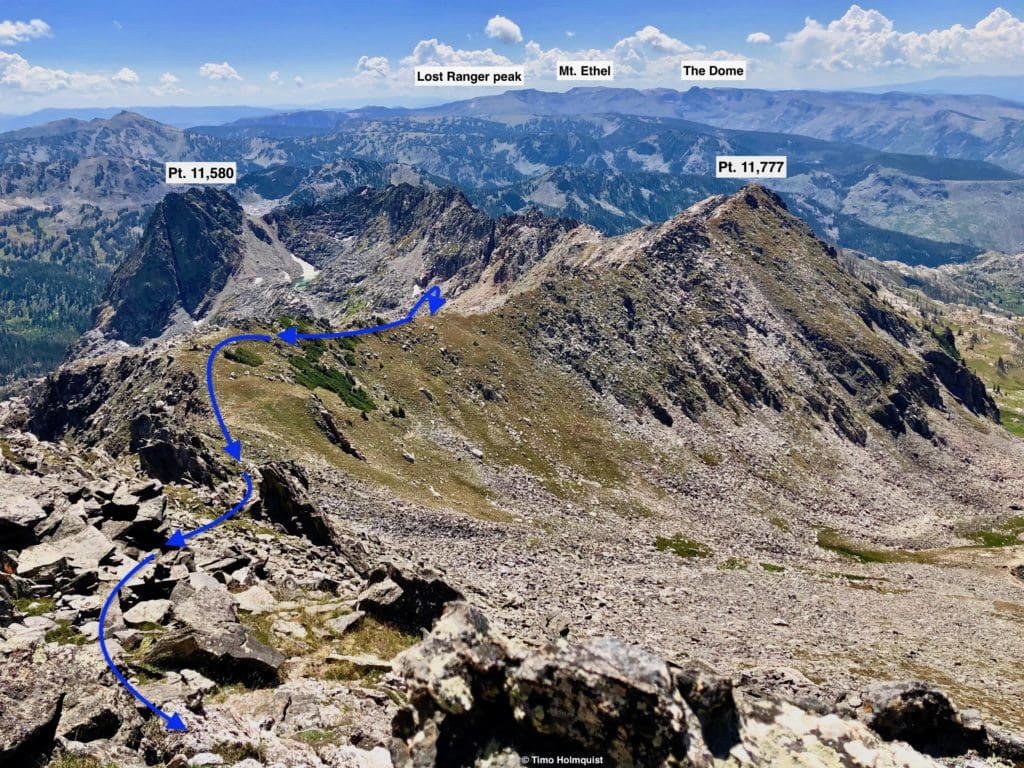
For the most expedient way down, descending the SW slopes back to Micah Basin (covered above as the direct route) will make a nice little lollipop loop. For a grander tour, you can descend the pretty route back into the basin to the east before connecting with the Gilpin Trail down lower. Options abound, and for such a compact mountainous area, there are a TON of routes to uncover.

General overview map.
Skyblue Overland Strongly Recommends That You Enroll With Global Rescue Prior To Embarking On Your Next Adventure.
With more people outside now more than ever, Global Rescue expanded services to include field rescue within 100 miles of home. With Local Field Rescue — automatically included in any travel protection services membership — Global Rescue is there whether you’re hiking, kayaking, snowmobiling, fishing or simply enjoying the outdoors and get ill or injured and you’re unable to get to safety on your own. Purchase a Global Rescue membership for your next adventure and travel with peace of mind. Single trip, annual and family options are available.


