


High Point:
Grays Peak (14,278 feet) and Torreys Peak (14,275 feet)

Total Ascent:
3,600 feet

Difficulty:
Hard

Distance:
8.5 miles from Upper Parking Lot

Waypoints:
39.66149, -105.78476

Route Type:
Out and Back or Loop
Conquer two fourteeners in one day on the Grays and Torreys Peak trail. 75-min drive from Denver, requires 4WD. Epic hike, lollipop-style, with stunning Front Range views as you ascend the Continental Divide.
Overview
Embark on the ultimate hiking challenge, tackling two fourteeners in a single day.
Hikers love Torreys Peak (14,267 feet) for its easy, well-established path and close proximity to the Denver area. It is often combined with Grays Peak (14,278 feet) to create a classic 14er adventure, making it one of Colorado’s most sought-after summits. The two peaks are only separated by less than a mile and can be reached via a pleasant Class 2 ridgewalk. The bragging rights of conquering two ranked 14,000-foot summits in one hike add to the appeal.
On average, 20,000 to 25,000 people visit Grays and Torreys Peaks each year. The most popular route is through Stevens Gulch, a beautiful hike that passes old mining ruins and climbs past willow trees to reach an open alpine basin above the treeline. From there, hikers can admire expansive views of the Rocky Mountains to the west and flat prairie land to the east from the high ridge on the Continental Divide. Most hikers summit Torreys Peak before continuing on to Grays Peak nearby.

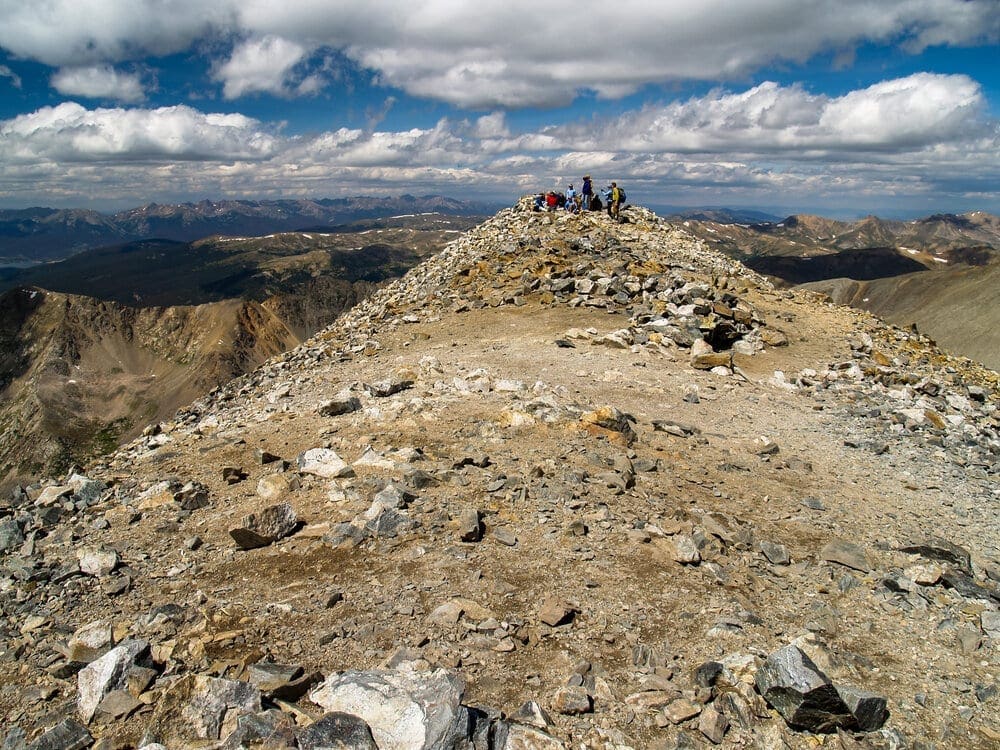
View from the summit of Grays Peak in Colorado. From Wikimedia Commons
While the standard route is popular and well-traveled, there are other options available for those seeking more challenge and solitude. For thrill-seekers, Kelso Ridge provides a Class 3 climb with a thrilling knife-edge traverse just below the summit.
Hikers looking for a longer trek can summit Torreys Peak via the west ridge, connecting it to 13,427-foot Grizzly Peak D, standing at 13,427 feet, gets its name from being the fourth-tallest mountain in Colorado with the moniker “Grizzly Peak.” Proceed cautiously on this 10.6-mile out-and-back trail with an elevation gain of 6,391 feet. It’s generally considered a very hard route; it should only be attempted by experienced adventurers.
Mount Edwards Traverse via Argentine Pass: For experienced hikers, another challenging option is to incorporate 13,850-foot Mount Edwards into the journey by trekking to or from Argentine Pass. The hike begins at the abandoned town of Waldorf and takes you over Mount Edwards and Grays Peak before reaching Torreys Peak.
Are you up for the challenge?
Hikers on the Trail to the Summit of Grays Peak in Colorado.
Scales and Criteria
This article uses two metrics to calculate difficulty: overall distance and elevation gain. For winter ascents, a snow rating may be used as well, but even during the dead of winter, the short length and modest ascent can be reasonably accomplished by most people with snowshoes. This review covers the basic ascent and descent of Niwot Mountain but also includes extensions and a possible loop options for those looking to get a little more distance out of any adventure.
Difficulty Ratings:
- Easy: less than 5 miles, less than 500 ft. of elevation gain
- Moderate: 5-10 miles, 500-2000 ft. of elevation gain
- Hard: 5-15 miles, more than 2000 ft. of elevation gain
- Very Hard: 10+ miles, more than 3,500 ft. of elevation gain
Snow Rating:
- Easy: Less than 30 degrees
- Moderate: 30-40 degrees
- Steep: 40-50 degrees
- Very Steep: More than 50 degrees

Morning on the Grays Peak trail – Grays Peak on the left, Torreys Peak on the right. From Wikimedia Commons
Directions to Trailhead
The best and most prudent way to get to the mountains is to take Exit 221 off I-70. The sign will say Bakerville. Once you complete the off-ramp, take a left across the highway and continue straight up Stevens Gulch Road (FS 189). Before crossing the highway, you’ll be able to see Torrey’s Peak, rising majestically in front of you (Photo 1: Torreys from I-70 Exit).
While relatively easy to find, there are some hurdles to take into consideration if attempting to park at the official trailhead. Stevens Gulch Road is very rocky and uneven. Please do not try bringing 2-wheel drive vehicles to the upper parking area. The carnage on the road is impressive; I’ve seen entire mufflers, detached fog lights, blown tires, long oil slicks, and bumpers strewn across its expanse. If you have a high clearance vehicle, it shouldn’t be hard to make it up, but if you’re in a rental or low clearance sedan, don’t push it. There is plenty of parking along the sides of the road (watch out for private property). While it adds a bit of overall distance (~2-3 miles), it saves you potentially hundreds, if not thousands of dollars of damage to non-mountain vehicles.
Alternate Trailheads:
- Loveland Pass: This approach starts high and stays high, passing a long chain of mountains en-route. Bring lots of sunscreen and only attempt this route on a bluebird day. There is no water (except melting snow) along the ridgelines and no place to shelter from storms.
- Argentine Pass Trailhead: This less used approach may be the best bet for solitude. It comes up the south side of Grays from Montezuma Road and USFS 260, near Keystone. From horseshoe basin, you’ll be able to access Grays, Torreys, and Mt. Edwards for a potential triple peak day.
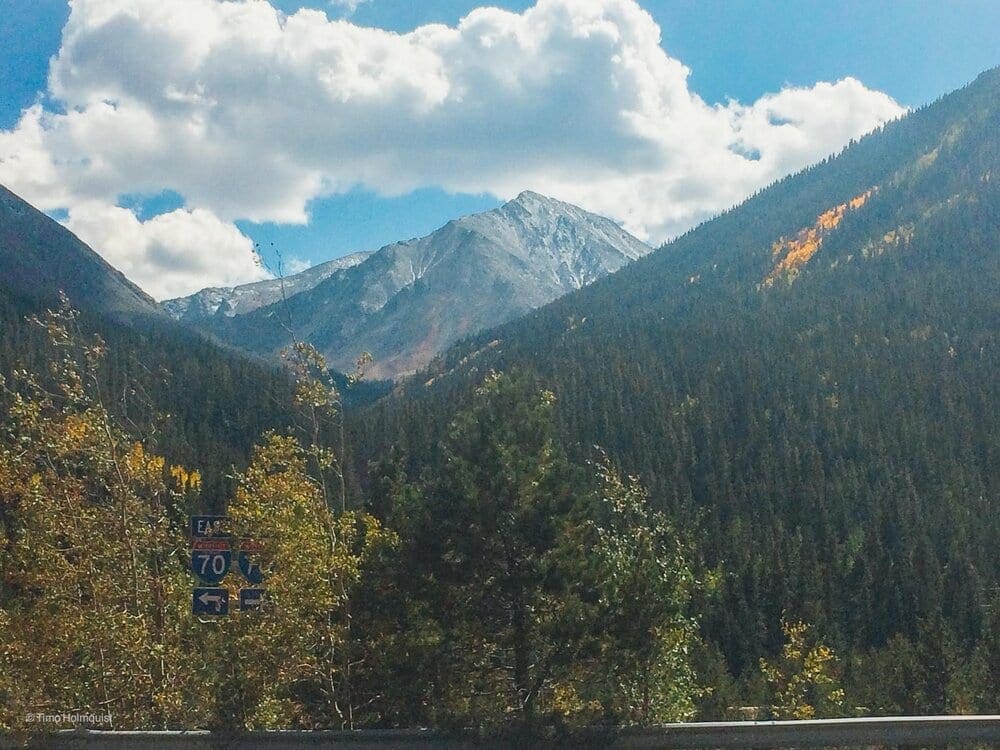
Torreys from I-70 Exit. Photo by Timo Holmquist.
Field Notes:
With 53 official peaks over 14,000 feet, the number of options for summitting a 14er in Colorado can be daunting. It’s helpful to break down the peaks by range and region. The Front Range is the closest to nearly all major population centers in the state and offers the simplest access to six stellar peaks breaching the 14,000-foot elevation line. Of those, Grays and Torreys offer the best combination for the least amount of effort. Though challenging, as all 14ers are, for the effort of climbing a standard 14er you can bag two.
The peaks, like all front range 14ers, are very popular. In all likelihood, you will not be the only person on the trail. However, what the peaks lack in solitude, they make up for in stunning alpine views. Located off of I-70: the main intermountain highway through Colorado; the mountains lie less than an hour from the western suburbs of Denver. If starting early, it is entirely possible to tag both mountains and make it back to Denver, Boulder, or Colorado Springs by late afternoon.
The ideal time to climb Grays and Torreys Peaks is between June and early October. To avoid the risk of afternoon thunderstorms, it is wise to start your hike before 6 a.m. On summer weekdays or during shoulder season, the constant flow of hikers can be minimized. An especially favorable time to climb would be mid-September; the temperature is cooler, there are fewer chances of thunderstorms, and the surrounding basin is adorned with vibrant shades of yellow, orange, and red thanks to autumn’s arrival. It’s worth noting that snow can stick around on the peak throughout the year, and it’s expected until at least mid-June in most years.
Starting from the trailhead, it is a 3.5-mile (5.6 km) hike with an ascent of 3,040 feet (930 m) to Grays Peak. The trail is clearly marked and well-worn, initially following the gulch for a gradual incline before becoming steeper. At the summit, there is a small U-shaped rock shelter where hikers can find a log book to sign. From here, you can enjoy expansive views of Pike’s Peak and the San Luis Valley to the south, the Great Plains to the east, Silverthorne to the west, and Longs Peak and Rocky Mountain National Park to the north. For those who want to continue their climb, the trail leads to Torreys Peak in the north. Descending down to 13,707 ft (4,178 m), hikers must then make their way back up to reach the summit of Torreys Peak at 14,274 ft (4,351 m).
Kelso Ridge Route via Steven’s Gulch: For those seeking a challenge on Class 3 terrain, Kelso Ridge is a popular choice. This route up Torreys Peak offers brief sections of increased exposure and is considered the classic scramble for a direct ascent. It’s also a great way to ease into the more difficult routes of Colorado.
While Grays and Torreys may be tougher than nearby 14ers like Bierstadt or Quandary, they do not require true alpine scrambling. However, if you’re looking to try your hand at alpine scrambling, Kelso Ridge is one of the most frequented options and promises an enjoyable climb overall. This ridge has been given a rating of Class 3 on the YDS scale and should only be attempted by experienced climbers with appropriate gear.
To start Kelso Ridge, follow the initial part of the Grays trail until reaching a flat rocky area at approximately 12,200 feet. From there, you’ll see Torreys Peak ahead of you. The ridge coming down from the right side towards you is Kelso Ridge. Rather than continuing up the main trail, veer right and follow a small sub-ridge until you reach the peak on your right. From there, take a left turn and begin your scramble upward.

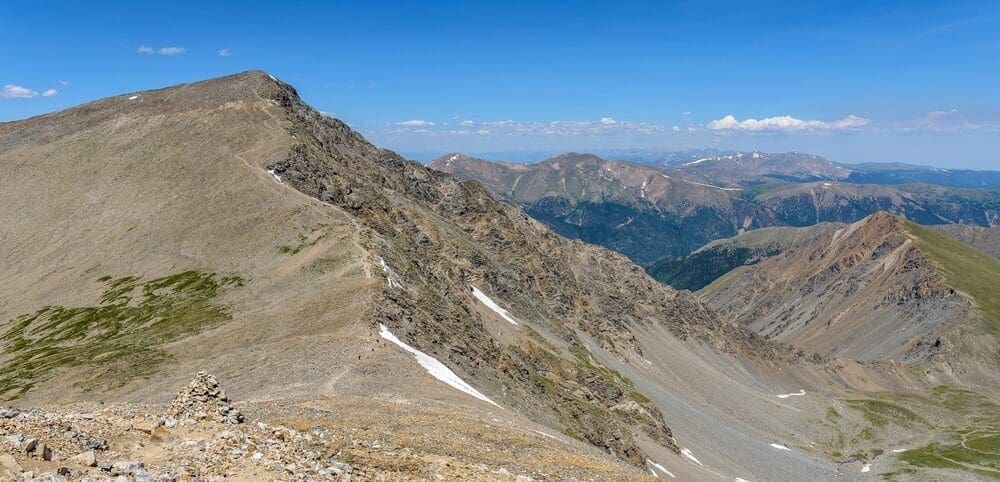
Kelso ridge seen from Torrey’s Peak.
Additional Notes: Here are a few additional notes on completing your 14er climb:
The top is not the end, don’t burn out before you get back to your car.
Slips, trips and falls are much more likely to occur on the return journey, especially if you’re gassed. Go slow, the work is not over.
If you have weaker knees, trekking poles can be a lifesaver on the way down. Knee braces and hikers with good tread also help.
Remember, although the elevation gain is 3,600 feet, double it to include the elevation loss needed to get back to the car. All said and done, your total gain/loss is over 7,000 feet! This hike is not a walk in the park.
High Elevation Hiking: From the trailhead, the entire duration of the hike is in the alpine, which means you do not have much shelter in a lightning storm. Please plan accordingly and don’t forget to check the weather!
Snow: Because of the high elevation nature of the trail, snow will not melt off the route until at least late June, and in some seasons all the way through July. While crowds aren’t as prevalent when snow is on the ground, additional challenges exist. Don’t attempt these peaks with snow on the ground unless you are with capable climbing partners or are experienced in alpine snow hiking.
Altitude Sickness: As for every high elevation hike, understanding the signs of altitude sickness is an important step in managing your health on the trail.
Preparedness: Don’t skimp on snacks, water, and especially layers. The Front Range has notoriously powerful winds. Hypothermia and frostbite aren’t all that difficult to get in adverse weather. Checkout our article on The Ten Essentials: How to Equip Yourself for the Backcountry.
Dogs: Grays and Torreys are fantastic peaks to bring dogs on as they don’t require difficult scrambling or technical components. However, please pick up after them and make sure to be respectful of the wild animals that call the mountain home. It is not required to leash pets on these peaks, but it may be a good idea.
Popularity: Weekends in the summer are the busiest times; plan to be there before 6 AM if you want to find parking. Weekdays are less crowded. However, because the peaks are so close to Denver, they’re crowded nearly all year. Anticipate other hikers.
Fun Fact: Grays Peak is the highest point on the Continental Divide. The Divide is a continuous line of peaks and elevated land, dividing watersheds throughout the North American Continent. To the East, all water finds its way into the Atlantic Ocean. To the west, all water finds the Pacific. Surprisingly, many 14ers, while close, do not exist on the actual Divide, making Grays unique in its position.
Journal:
Embark on the Grays and Torreys Trail, crossing a sturdy wooden bridge and entering a landscape filled with willow trees and shrubs. The towering summits of both peaks are immediately visible. The trail leads above the treeline, gradually switchbacking up to reach Grays Peak. From there, continue on to Torreys Peak with clear trails guiding the way. After reaching the summit of Torreys, return to the saddle and follow an access trail that cuts through some distance before reconnecting with the main trail back to the parking lot.
To your left is a long and obvious ridge wall connecting Ganley Mountain to Mount Edwards. To your right is the bulk of Kelso Mountain. The alpine valley you’ll enter is quite picturesque and will offer fantastic views of your target summits as you continue on.

Crossing Stevens gulch at trailhead. Photo by Timo Holmquist.
The first 14er you’ll see is Grays, though views of Torreys appear shortly after. Unless you are hiking in thick fog, the trail is tough to lose, with enormous rock cairns and wide tread to help you out. The trail has gone through some extensive restoration thanks to the Colorado Fourteeners Initiative and dozens of volunteers. If you see some of them, make sure to thank them for the work!
The alpine valley is quite picturesque and will offer fantastic views of your target summits. Photo by Timo Holmquist.
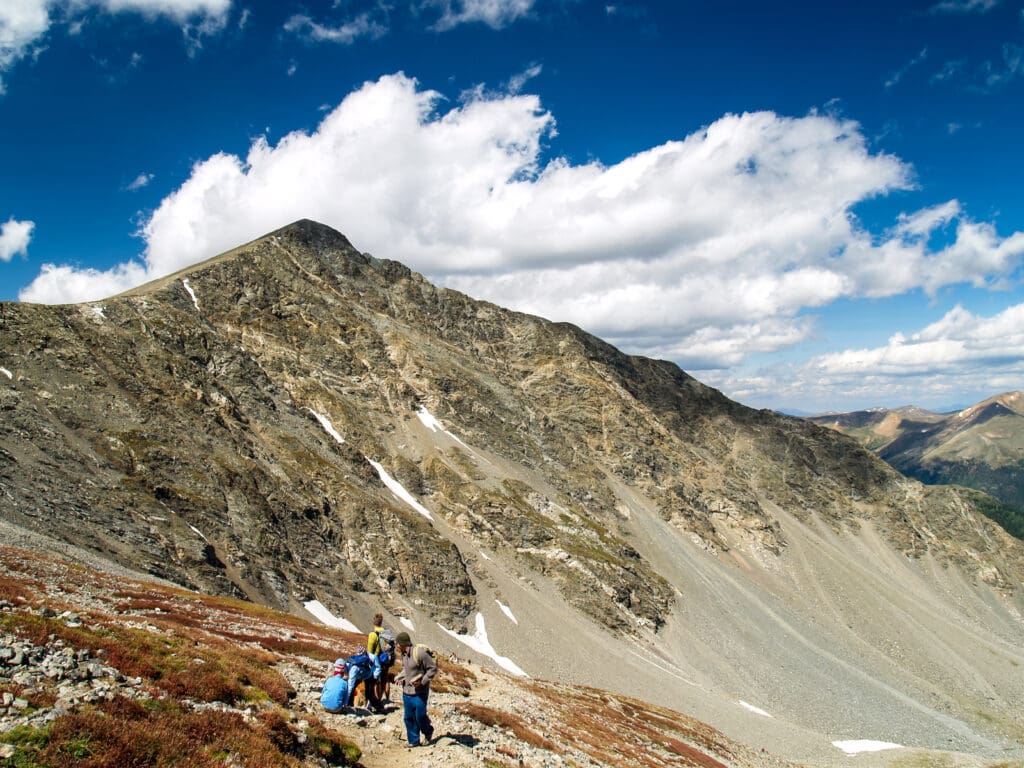
Eventually, the trail will round Kelso Mountain to your right before entering a flatter rocky area around 12,200 feet. When the trail curves back to the left, the ascent really begins, targeting a spur ridge between the impressive faces of Grays and Torreys. Work your way up the spur ridge, taking breaks as needed.

Up the spur ridge. Photo by Timo Holmquist.
The terrain will slowly change to an all talus and rock affair. Keep in mind that once you cross 13,000 feet, you’ll stay above that elevation until after descending off Torrey’s. Translation: it’s a long time to be in the alpine. Go slow, eat food, and drink water. If you aren’t allergic to Tylenol or Ibuprofen, they may help with headaches and light nausea; however, if altitude sickness symptoms increase, the best option is always to descend.
As you work your way up to Grays, you’ll pass a trail sign at roughly 13,500 feet. If doing both, the easiest option is to head up Grays first. Take the obvious left extension and switchback your way up the face of Grays. This section is longer than it appears; pace yourself. The final summit approach puts you on the Continental Divide with impressive 360-degree views. Keen observers will be able to look west and spot Quandary Pk., the slopes of the Breckenridge ski resort, and additional 14ers like Democrat, Lincoln, and Bross.
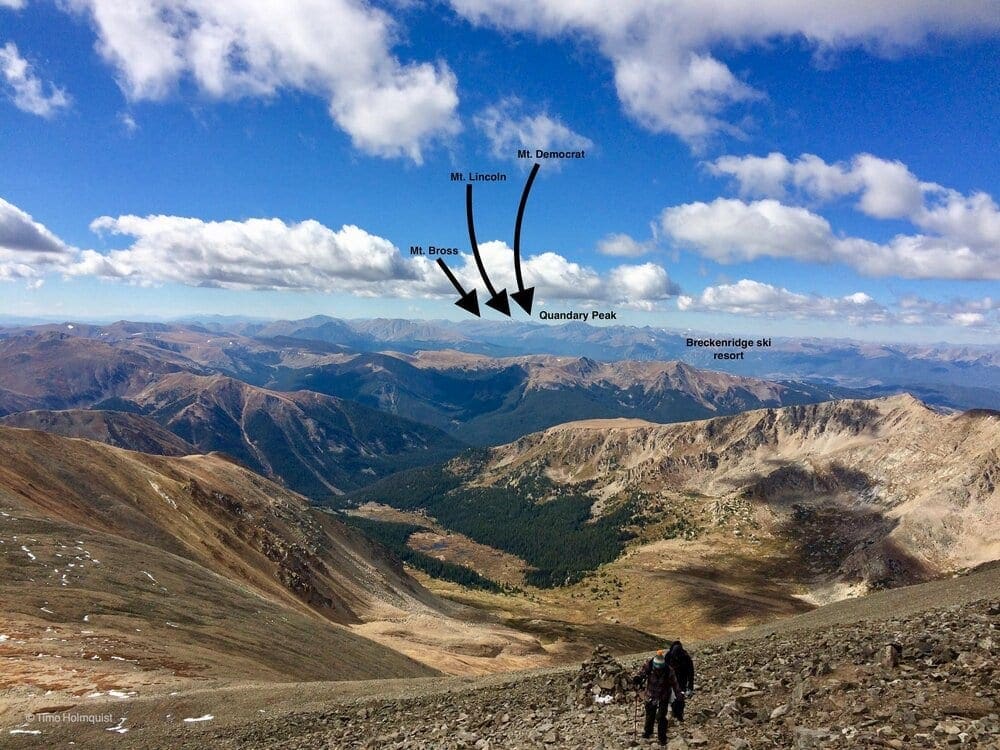
Westward view to Breck & Quandary. Photo by Timo Holmquist.
Resting on the Summit of Fourteener Grays Peak.
At the summit, enjoy your commanding position. While there, scout the approach to Torreys. Even though the peaks are quite close to each other, you’ll need to descend more than five hundred feet to a prominent saddle and re-climb the elevation lost to get to Torreys summit. Continue pacing yourself and watch for loose rocks.
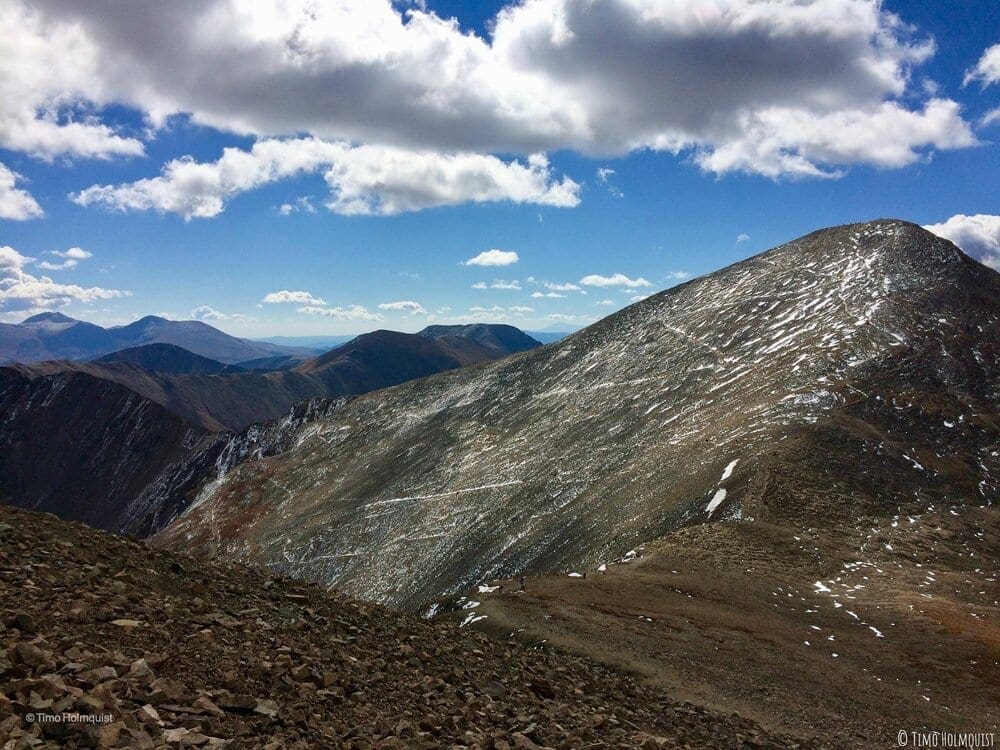
View of steep south slopes of Torreys Peak (14,275 ft), seen from summit of Grays Peak (14,278 ft).
Once you’ve descended the rough slopes down to the saddle between the two peaks, follow the use trail up to Torreys.
Looking back to Grays across the saddle. Photo by Timo Holmquist.
The Torrey’s push involves staying close to the height of land, where you can peer to the right down a much steeper slope. About 1/3 of the way up, the trail begins switchbacking to the left along less exposed terrain. The trail stays to the left of the ridgeline and continues climbing with the occasional switchback until depositing you at the top. Congratulations! Two 14ers in one day! Looking east, you’ll be able to spot most of your ascent route below you. Further, you’ll be able to pick out Mt. Evans, Mt. Bierstadt, and on a good day, Pikes Peak lurking in the distance.
In order to complete the combination, head back down the way you came up until reaching the saddle between the two peaks. At the saddle, you’ll notice another trail descending to the left (north). Instead of climbing back up Grays, take this extension and descend to the sign you first passed on the way up Grays. Once you reach the small signed junction, you will have completed the upper circuit, and the rest of the hike is of an out and back nature. Continue descending on the now-familiar trail.
Final Thoughts:
Grays and Torreys are stately peaks, visible from numerous points in summit county and on I-70. They offer a fun but tiring twofer. Being close to major metro areas, they are incredibly popular, so get to the trailhead early! As with all 14ers, the views on a good day are fantastic, and seeing so many peaks around you may inspire repeat visits. Enjoy this convenient two for one slice of mountain majesty, less than an hour from suburban Denver.
Terms of Use: As with each guide published on SKYBLUEOVERLAND.com, should you choose to this route, do so at your own risk. Prior to setting out check current local weather, conditions, and land/road closures. While taking a trail, obey all public and private land use restrictions and rules, carry proper safety and navigational equipment, and of course, follow the #leavenotrace guidelines. The information found herein is simply a planning resource to be used as a point of inspiration in conjunction with your own due-diligence. In spite of the fact that this route, associated GPS track (GPX and maps), and all route guidelines were prepared under diligent research by the specified contributor and/or contributors, the accuracy of such and judgement of the author is not guaranteed. SKYBLUE OVERLAND LLC, its partners, associates, and contributors are in no way liable for personal injury, damage to personal property, or any other such situation that might happen to individuals following this route.


