


|
Getting your Trinity Audio player ready...
|
Ready for a backpacking adventure? Choose the perfect pack with capacity, style, and fit in mind. Master its adjustments and functions to fully immerse yourself in the thrill. Conquer the unknown with our Skyblue Guide to Picking the Right Backpack.
Looking to purchase a new backpack for your next backpacking trip? There are three key factors you’ll need to consider. First is the capacity of the pack, which depends on the length of your trip and how much weight and bulk you want to carry. Next are the features of the pack, which can greatly affect its functionality for your needs. And finally, it’s important to find a good fit for your torso length, rather than just your overall height.

When choosing a pack, consider volume, features, and fit. Pack size depends on trip length and preferences.
Types of Backpacks (Capacity, Weight)
For weekend trips lasting 1-3 nights, efficient packers with newer, compact gear can greatly reduce their load by using a pack within the range of 30-50 liters. However, it takes self-discipline and careful planning to pack light successfully. If you can manage it, the feeling of being unburdened on your adventures is truly rewarding.
Best Backpack for Weekend Trips: In this guide, the one smaller-volume pack that is great for overnight trips is the Gregory Maven 45 (women’s, $229.95) and Gregory Paragon 48 (men’s, $229.95).
Best Backpack for Weekend Trips: Osprey Aura AG 65 (women’s, $340) and Osprey Atmos AG 65 (men’s, $340)
Shop weekend packs at REI Co-op.
Ideal for trips lasting 3-5 nights, typically carrying 50-80 liters, these backpacking packs are a top choice for warm weather excursions. They’re also well-suited for shorter trips where you can pack more comfortably, or for activities like backcountry skiing that require multi-purpose gear.
Best Backpack for Weeklong Trips: Mystery Ranch Glacier 70 (Women’s, $399 and Men’s, $399)
Among our favorites, most packs fall in this range: the Osprey Aura AG 65 (women’s, $340) and Osprey Atmos AG 65 (men’s, $340), Mystery Ranch Glacier, Hyperlite Mountain Gear Southwest 55 ($379) and REI Co-op Traverse 60 (women’s, $259 and men’s, $259).
Shop multiday packs at REI Co-op.
For trips lasting five or more nights, a pack with a capacity of 70 liters or larger is recommended. These packs are also ideal for winter treks that last longer than one night. They can comfortably hold extra clothing, a warmer sleeping bag, and a 4-season tent that typically requires additional poles. These packs are also suitable for parents carrying gear for young children on backpacking trips.
Best Backpack for Extended Trips: The Osprey Aether Plus 85 (men’s; $440) /Ariel Plus 85 (women’s; $440) backpack is perfect for extended trips lasting five or more nights. With an 85-liter capacity and custom-molded hip belt, it offers comfort and compatibility with hydration systems. It’s a stable close-to-body carry that can manage the heaviest of loads, even when the trail gets technical. It has multiple sections, versatile pockets, and a sturdy design. The backpack is ideal for extended duration hikes, gear-heavy weekends, or big adventures. Its Custom Fit-on-the-Fly Hipbelt and Shoulder Strap ensure a stable carry, while the detachable top lid can be used as a daypack. Made with high-quality materials that are environmentally friendly.
Osprey Aether Plus 85 and Ariel Plus 85 Packs. Photo: Osprey
Shop extended-trip packs at REI Co-op.
Best All-Around Backpack: For those seeking a versatile backpack for typical backcountry camping trips in three seasons, we suggest selecting one with a capacity of 55-65 liters and a weight of 2-4lbs. This will provide an optimal balance between carrying capacity and weight.
In 2024, the top-rated backpack for overall backpacking is the Osprey Aura AG 65 (women’s, $340) and Osprey Atmos AG 65 (men’s, $340). This backpack has received high praise for its comfort, sturdiness, and ingenious characteristics. Its Anti-Gravity suspension system sets it apart by offering superior ventilation and weight distribution, making it the perfect choice for extended backpacking journeys.
The storage system of the Osprey Atmos/Aura AG 65 are well-crafted, featuring a spacious main compartment, a detachable floating top lid, and various pockets for efficient organization. Crafted from durable yet lightweight materials, this backpack is designed to withstand numerous adventures without weighing you down.
What Type of Backpacker Are You?
Everyone has their own reasons for heading out to the backcountry. “Hike your own hike” is a popular motto amongst long-distance hikers. What type of hiking do you prefer? By considering how you want to experience the wilderness with your pack, you can narrow down your options and focus on the features that are most important to you.
Are you someone who values comfort over reducing weight, and likes to have a few extra items to make camp more enjoyable? A deck of cards, a flask, a pillow, an extra tarp, camera equipment, or a hammock? Do you want the freedom to carry these extra comforts into the woods, even if it means carrying some extra weight? Maybe you don’t plan on pushing yourself to hike 20 miles a day and are content with eight. Perhaps you enjoy taking longer breaks and leisurely strolls on the trail. If this sounds like you, then you’ll likely gravitate towards a slightly larger pack with good weight-carrying capacity and plenty of external pockets.
On the other hand, would you rather sacrifice luxury items in order to lighten your load and move faster through the trees? If you thrive on challenging yourself and take pride in covering big distances each day, then a lighter pack with smaller capacity is more suitable for you. When searching for packs for this style of backpacking, look for accessibility while wearing the pack. Since speed is key, having to take off your pack every time you need a snack or sunscreen can be inconvenient. Instead of features like a lid or zippers, opt for packs with large hip pockets and easily accessible water bottle pockets. These packs may also have stretch mesh front pockets where you can store your lunch or stash away a layer as the day warms up.
What type of backpacker are you?
Key Backpack Features
When preparing for a trip, choosing the right backpack is crucial. After all, you’ll be carrying it with you almost constantly during your journey. Each model has its own unique features and purpose; some have advanced suspension systems to ensure a comfortable fit while also allowing for airflow behind your back. Others have a simpler design with minimal features to reduce weight.
Some are built to carry everything but the kitchen sink, while others prioritize being lightweight and efficient. While comfort is key, having the right pockets and features to suit your needs can greatly impact your overall satisfaction with the pack. Since selecting a backpack often relies on personal preference, our guidelines can help narrow down your options based on how you plan to use the backpack, the duration of your trip, and most importantly, finding the most comfortable pack for you specifically.
Ventilation: Certain backpacks include a mesh back panel that helps to prevent the unpleasant sweaty-back effect often experienced with internal-frame packs that sit directly against your body. This type of design, also known as a “tension-mesh suspension,” creates a small gap between your back and the packbag, allowing for better airflow and ventilation through the highly breathable mesh. Alternatively, some packs may have ventilation channels, also referred to as “chimneys,” built into the back panel to address this same issue.
Pack Access: Most backpacks have top-loading openings, which is a common design. However, experienced packers know to place items they will need throughout the day towards the top and store overnight gear near the bottom and sides, as those areas are harder to access. There are also packs with panel access, allowing you to unzip the main compartment without having to unload from the top. However, keep in mind that these extra features usually come with added weight and cost.
Pockets: Different people have different preferences when it comes to the number and placement of pockets on a backpack. When considering pockets, pay attention to their size and location. For example, side pockets that are elasticized may seem flat when they’re empty, but they can stretch out to hold items like a water bottle, tent poles, or other loose objects. These pockets are also easily accessible when the backpack is being worn. On the other hand, hipbelt pockets are perfect for storing small items you may need while hiking, such as a phone, snacks, lip balm, or sunscreen. Another type of pocket called a shovel pocket is essentially a flap attached to the front of the backpack with a buckle closure at the top. Originally designed for holding snow shovels, these pockets are now commonly found on 3-season packs and can be used to stash items like maps, jackets, or other lightweight belongings.
Whether a top lid pocket (also known as a “pack’s brain”) is necessary really just depends on personal preference. Some people prefer a single opening for items like sunglasses and a headlamp, while others may prefer a top lid with multiple compartments.
Removable Daypack: Certain backpacks come with a detachable daypack, ideal for quick excursions from your base camp such as summit attempts or gathering supplies on a long-distance hike. This additional pack is typically located in the top lid or reservoir pocket of the larger overnight pack. It can be removed and transformed into a hipbelt pack or a lightweight backpack for easy carrying.
Sleeping Bag Compartment: Conveniently located at the bottom of the packbag, this zippered stash spot is perfect for storing your sleeping bag or other easily accessible items. No need for a separate stuff sack or having to unload all your gear just to get to your sleeping bag. But don’t limit yourself to just a sleeping bag – this space can hold any necessary items you may need quick access to while on the go.
Padding: Carrying a lightweight pack with a minimalistic hipbelt and lumbar pad can result in soreness on your hips, lower back, or shoulders. To alleviate this issue, try switching to a more padded hipbelt after ensuring that your pack is properly sized and fitted.
Attachment Points: For those who frequently travel with an ice axe or trekking poles, it is important to find a pack with suitable tool loops on the exterior. Most packs offer at least a pair of tool loops.
Additionally, look for a daisy chain, which is a length of webbing stitched onto the outside of the pack that provides multiple gear loops for attaching items such as helmets, wet gear, or other items that may not fit inside the main compartment.
A reinforced crampon patch is also beneficial to prevent punctures in the packbag from crampon points. Some packs may also have extra gear loops on the hipbelt or lower portion of the pack body, making it easier to clip on larger items like skis.
Raincover: In case of potential rain on your journey, it’s wise to bring along this item. Most backpacks have a fabric interior that has been treated with waterproof coating, but water can still seep through seams and zippers.
Another option is to use waterproof stuff sacks to pack your gear inside the backpack. This may be preferable in windy conditions, as strong gusts could potentially remove a cover from the backpack. For a do-it-yourself version, you could line the inside of your backpack with a plastic garbage bag.
Hydration Reservoir: Most backpacks come equipped with an inner compartment designed to fit a hydration pack (usually sold separately), as well as one or two openings for the drinking tube.
Backpack Fit Considerations
Fit should always be the top priority, regardless of other factors. Every customer has a unique body shape and size, which means not every pack will fit every customer perfectly. That’s why pack manufacturer’s typically offer adjustable packs, so customers can customize the fit for optimal carrying performance.
After selecting the desired backpack, it is essential to ensure a proper fit. The pack should be tailored to your torso length (not your overall height) and hip measurement, according to the following diagram:
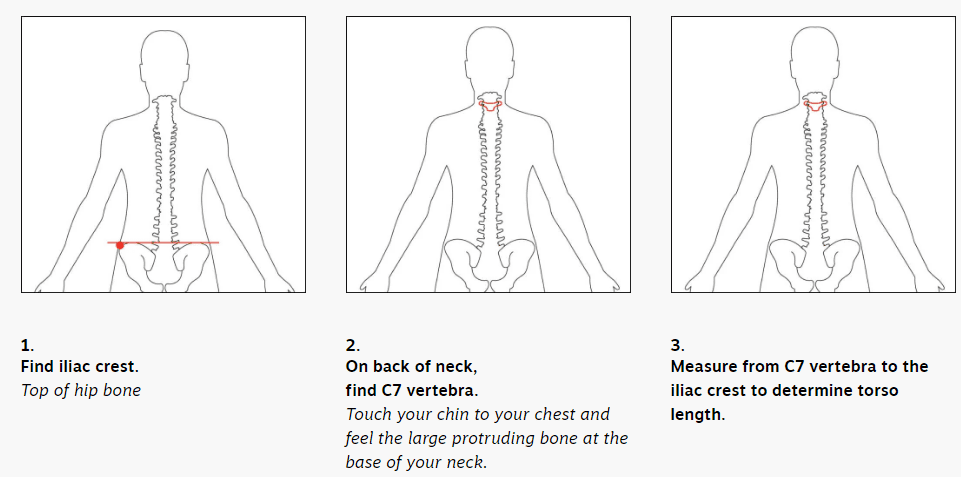
Photo: Osprey
Torso Length: Different brands offer packs in a range of sizes, including extra small and large, to accommodate different torso lengths. These size ranges may differ depending on the manufacturer and target audience. To find out the specific size details of a particular pack, refer to the product specifications section. Some packs also come with adjustable suspensions that can be customized to fit your torso, which is especially useful if you fall between two sizes. This feature also makes it convenient for families who may share a pack among members. However, keep in mind that an adjustable harness adds extra weight to the pack.
Waist Size: To avoid straining your shoulders and back, the bulk of a backpack’s weight (80% or more) should be supported by your hips. Most backpack hipbelts can fit a variety of hip sizes, typically ranging from mid-20 inches to mid-40 inches. However, those with smaller waists may struggle to tighten a standard hipbelt and may need to purchase a smaller size. Some packs offer interchangeable hipbelts, allowing for easy swapping of sizes if needed.
To find the correct hipbelt size, measure around your hips at the iliac crest, not at the waist. Make sure that the padded portion fits snugly around your hips, with a gap of 3″ to 6″ between the tips of both hip pads when they are securely fastened.
Additional Adjustments for a Better Backpack Fit
Load-lifter straps: There are two of these, attached to the top of the pack frame and stitched into the top of the shoulder straps. By tightening them while wearing the pack, they will pull the top of the pack closer to your body, creating a more comfortable carry and taking pressure off your lower back. Ideally, the load lifters should form a 45-degree angle between your shoulder straps and the pack.
Sternum strap: This strap goes across your chest and allows you to connect the shoulder straps, providing extra stability. It can come in handy when trekking through uneven terrain, as it helps prevent sudden shifts in your pack that could throw off your balance.
Compression Straps: The straps on the sides and sometimes the front of the pack can be tightened or loosened, depending on the weight inside. This feature allows for a balanced pack, even if it is not fully loaded. It’s a useful quality that allows an overnight pack to also serve as a daypack in case of emergency.
Hipbelt Stabilizer: By adjusting this strap around the hip belt, you can achieve better balance and increased comfort.
Give it a try before you buy
If you’ve finally found the perfect pack at the store, don’t rush to buy it just yet. First, try it on and load it up with your gear. If possible, use your own items, but if not, most stores have weights available for testing. Wear the pack around for a bit and make sure to fill it with the maximum amount of weight you would normally carry. Take note of how well it distributes the load across your hips and shoulders and get a feel for how comfortable it is.
After packing everything you need, the next task is to get the heavy pack onto your back. First, make sure the shoulder and waist straps are not tight. Stand with your feet slightly apart, keeping your knees bent. Face the front of the shoulder straps and grab them with both hands. Use your leg muscles to lift the pack as you slide one arm through one strap and then the other. Lean forward a bit so you can fasten the hip belt around your pelvis in the correct position – typically higher than where you would wear pants. The belt should be centered over your iliac crest, which is the bone you measured when determining your torso length. Once that is securely tightened, adjust the shoulder and sternum straps, followed by the load lifters.
When considering which pack to choose, it is crucial to pay attention to weight distribution. The value and advantage of a well-fitted pack should become evident as soon as you put it on your back. Ideally, your hips should carry about 60-80% of the pack’s weight, with the rest evenly distributed across your shoulders and chest.
Conclusion
With careful consideration of its capacity, style, and fit, you will find the ultimate pack (or packs) to accompany your daring adventures. And once you’ve made your selection, be sure to master every adjustment and function available to truly harness its power and fully immerse yourself in the thrill and excitement of your journeys. The perfect pack is waiting for you – seize it and conquer the unknown.
Skyblue Featured Video: How to Choose a Backpacking Pack | REI
Popular Articles:
My Three Keys to Life-Long Performance
Filson’s Scout Shirt Is An Ideal Layering And Transitional Piece
Mountainsmith Tanuck 40L Camera Backpack


