


High Point:
12,949 feet on top of East Desolation

Total Ascent:
2,904 feet

Difficulty:
Hard (large parts of this route are off-trail)

Distance:
~10 miles

Route Type:
Out and back

Table of Contents:
Article Navigation: Click on any of the listed items in the table of contents below to jump to that section of the article. Similarly, clicking on any large, white section header will jump you back to the Table of Contents.
Looking For An Amazing Adventure? Book A Hiking Tour in Rocky Mountain National Park
Overview:
East and West Desolation Peaks epitomize the joys of the lesser-known locations in Rocky Mountain National Park. They are far from established trailheads, require off-trail navigation to get to, and, because they sit hundreds of feet lower than the more obvious and well-known Mummy Range, only attract a handful of backcountry enthusiasts each year. However, East and West Desolation contain some of the most interesting and enjoyable scrambling I’ve found north of Trail Ridge Road. Despite falling short of 13,000 feet, these mountains are serious, and the scrambling required to attain their summits is substantial. If complex route navigation and scrambling options on relatively stable rocks are things you seek out, the Desolations may be the perfect addition to a Rocky Mountain adventure.
- 2021 Status: Temporarily closed; check Fire Closures here.
- Popularity: Low
- Technical Rating:
- West Desolation: Class 3 with substantial route finding
- East Desolation: Class 4 via the standard route, Class 3+ via cave passage
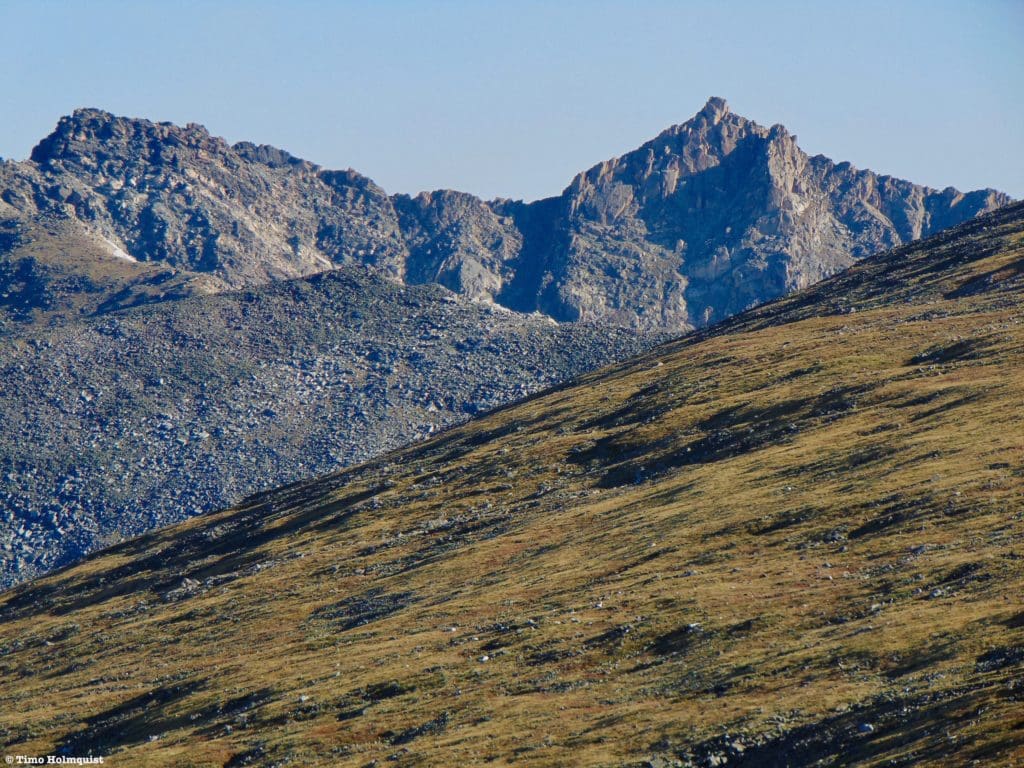
West and East Desolation as seen from the side of Mt. Ypsilon.
Scales and Criteria:
This article utilizes three separate rating systems: Difficulty, Popularity, and a Technical Rating indicating the hardest move or set of moves encountered. The technical rating employs the Yosemite Decimal System.
Difficulty Ratings:
- Easy: less than 5 miles, less than 500 ft. of elevation gain
- Moderate: 5-10 miles, 500-2000 ft of elevation gain
- Hard: 5-15 miles, more than 2000 ft. of elevation gain
- Very Hard: 10+ miles, more than 3,500 ft. of elevation gain
Popularity Ratings:
- Low: Large sections of trail all to yourself
- Moderate: Sizeable trail sections to yourself, crowding possible on busy summer weekends
- High: You’ll be seeing people, still a chance for solitude in spring/fall/winter.
- Very High: Almost always busy.
Technical Rating:
- Class 1: Established hiking trail the entire length of the adventure. Low chance for injury.
- Class 2: Typically involves cross-country navigation, possibly using hands for balance but not required, steeper than Class 1.
- Class 3: Hands and feet used to scale areas, must use hands to proceed (either for balance or to help pull you up a section), increased exposure, a fall could be fatal. Helmet recommended, along with grippy hikers.
- Class 4: Climbing on very steep terrain just shy of vertical, falls could be fatal, hands employed for grip and balance continuously, ropes advisable but scalable without. Helmets are highly recommended, along with grippy hikers.
- Class 5-5.4: Vertical climbing that involves technical rock-climbing moves, exposed, falls likely to be serious or fatal, possible to scale without ropes but only for very experienced veterans. Helmets, grippy hikers, and/or rock-climbing shoes necessary.
- Class 5.5 and up: Not covered as scrambling, full-on rock climbing with ropes, helmets, etc.
The YDS system is widely used in North America but can be quite subjective, so it is not perfect. The biggest differences I’ve encountered between Class 3 and Class 4 sections have to do with slope angle, exposure, and putting weight and pressure on hand grips (4) instead of using hands and feet interchangeably as supporting points of contact (3). It is not possible to climb a Class 4 section without using your hands to pull up some or all of your body weight. Typically, a Class 4 section will also require some type of rock-climbing move, like stemming, where hands or feet are pressed in opposition as if climbing the inside of a chimney. If downclimbing, a key difference is that most people will descend a Class 4 section facing inward, i.e., your back faces the exposure.
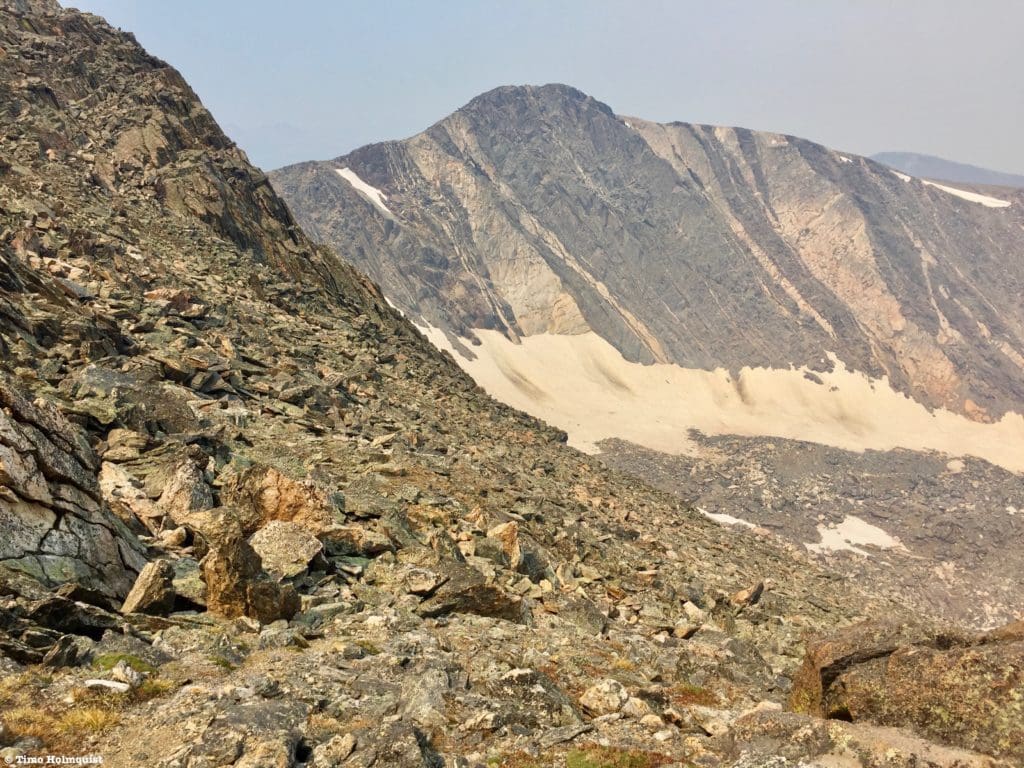
Point 12795, from the saddle between the two Desolation Peaks.
The Ultimate Offline GPS Hiking & Ski Maps
See why onX Backcountry is the ultimate GPS navigation app for your outdoor pursuits. Try Today for Free. No credit card required.
Directions to Trailhead:
Despite the Desolation Peaks seeing little to no traffic every year, the access is fairly simple once Old Fall River Road opens. Please note it usually takes until July every year for Old Fall River Road to open, and it will close after the first heavy snowfall, which frequently occurs between September and October.
From the east, enter the park via US 34, passing the Fall River visitor center. It’s possible to enter via US 36 at Beaver Meadows, but it takes a little longer. The key is to make it Horseshoe Park, where at a large bend in the road surrounded by fields, you’ll notice a road heading west into a deep canyon. Signs will indicate Old Fall River Road and the Endovalley Picnic Area along with Alluvial Fan. Take a right if coming from the Fall River entrance and head west on the long, windy, one-way road. It is a primarily gravel road, so expect 30 minutes to get to Chapin Pass Trailhead.
From the west, enter the park, and traverse Trail Ridge all the way down to its intersection with US 36 (well past the alpine portions). Take a left on US 34 and make your way down to Horseshoe Park. Take a left on Old Fall River Road after seeing signs for Endovalley and Alluvial Fan. Drive up to Chapin Pass Trailhead.
Chapin Pass is close to the alpine but still below it; if you break out of the trees, you’ve gone too far. If this is your first time in the area, the best practice is to go a little slower. Since it’s a one-way road, there aren’t really opportunities to backtrack. The road will follow Fall River for most of the route with the occasional switchback. From Willow Park (a meadowed area frequented by elk), the road begins a series of switchbacks north up the slope. After the third switchback, start paying attention. The trailhead is on the right side of the road, and there will likely be cars parked alongside the road on the left- and right-hand sides. Carefully find a place to park (there are no guardrails) and find the trailhead leading north to start your journey. It is about 7.7 miles from Endovalley to Chapin Pass.
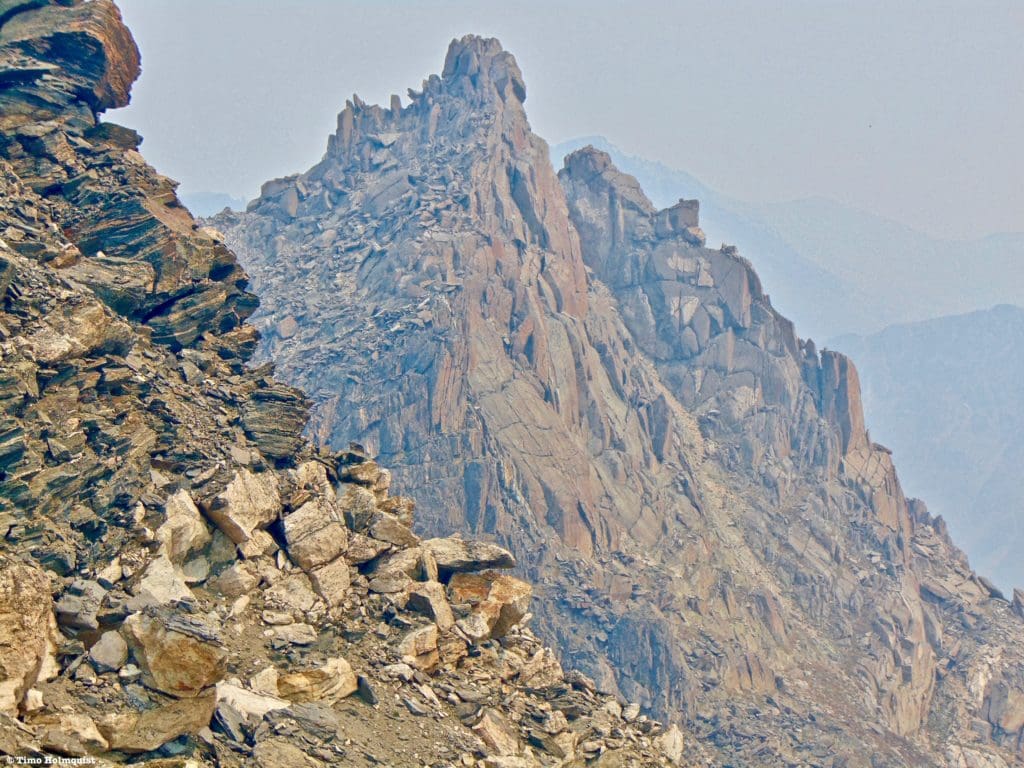
The intimidating summit of East Desolation.
Places to Stay:
Find a Hotel in Estes Park, Colorado
Support Skyblue Overland by booking your hotel or cabin through one of our links.
Camping
Camping near Rocky Mountain National Park will cost you. The options for free area camping are limited. On a positive note, there are plenty of options, and the National Park is within driving distance of Fort Collins, Boulder, and Denver.
- Estes Park: Known as the gateway to Rocky Mountain National Park, Estes sees nearly 80% of park traffic as opposed to the much quieter western entrance near Grand Lake. The town has a ton of lodging options.
- Grand Lake: Located near the sleepier western entrance, Grand Lake sits on the edge of the deepest natural lake in Colorado and within half an hour of two more lakes (Shadow Mountain and Lake Granby).
- Rocky Mountain National Park Camping
- Moraine Park Campground: $30 per site. $20 in winter. Established campground with perks, facilities, campfire grate, wood for sale in summer, and bear boxes to store food. Only loop B is open in the winter, and it’s first-come, first-serve.
- For summer, a reservation is needed quite a ways in advance to secure a spot.
- Glacier Basin Campground: $30 per site. Established campground with the same perks as Moraine Park. Reservation required.
- Backcountry Campsites: Rocky Mountain National Park has backcountry sites that you could book in advance. There is no open camping in the backcountry; it must be at designated backcountry sites. Please check the park website for more details. Backcountry sites require an overnight permit of $30.
- Camping near Estes Park
- Estes Park Campground at Mary’s Lake: Established campground, pricey $45-55. Good backup if other campgrounds are full.
- Hermit Park Open Space: $30 for a tent site, price increases if towing a trailer or for group spots.
- Estes Park Koa: Rates dependent on what you’re bringing with you but will run more than $50 a night in the busy season.
- Free or close to free: but a little farther (if you’re willing to drive)
- Ceran St. Vrain Trail Dispersed Camping ($1)
- County Road 47. Users have reported trash and ATV noise at this location, but it is free.
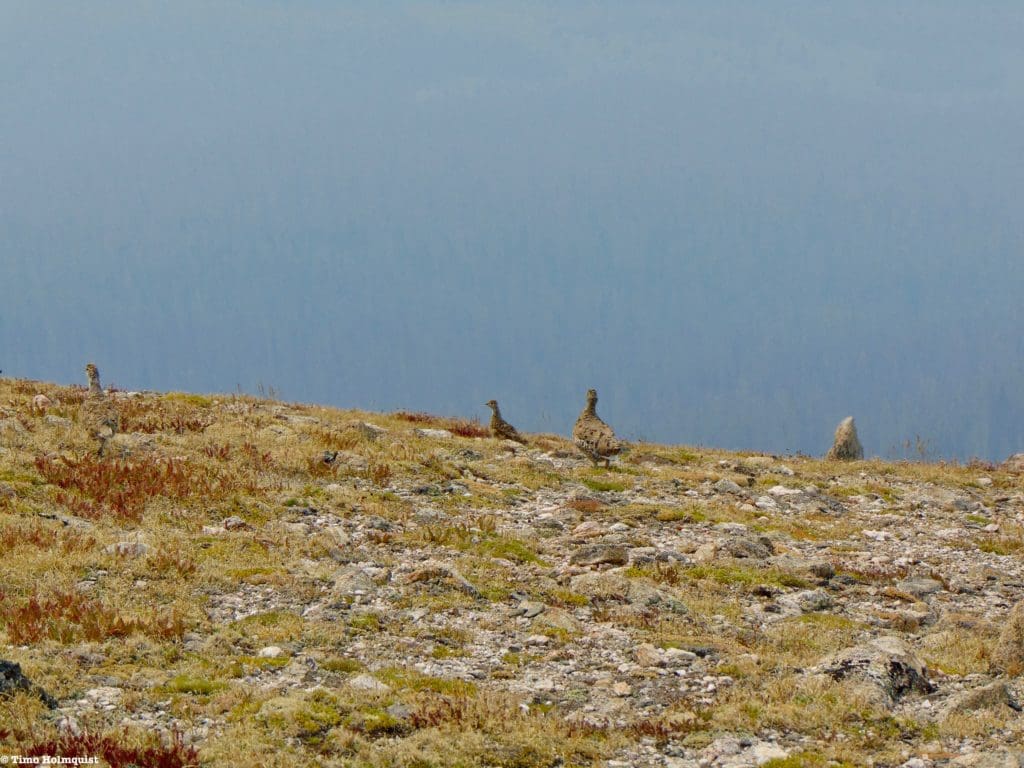
A group of Ptarmigans on the approach ridge to the Desolations.
Field Notes:
Due to the Cameron Peak fire, areas to the north and west of the main Mummy Range crest, including the Desolations, are temporarily closed. It is unknown when they will reopen. Please click here to assess the status of the area, which includes access to the Desolations. I’m releasing this review a year after I scrambled there for multiple reasons: to showcase an awesome scramble, to point out how devastating fire damage can be in mountainous terrain, and in the hopes that the area will reopen to foot traffic soon.
The majority of this hike is above treeline, so you really need a good weather day. From certain points on the trail, it’s possible to bail into the Chapin Creek drainage to find tree cover, but you will have to climb back out of it to exit the area. Bring sunscreen, lots of water, and know the signs of altitude sickness should they surface.
Geographic orientation is also a component of this hike as a lot of it occurs in a trail-less environment and on seldom climbed peaks. Since the majority of the hike is above treeline, orientation isn’t very difficult, but in inclement weather, the ability to orient is a must. Take care when traversing across the alpine, the vegetation is very sensitive up here, and off-trail hiking leads to a higher risk for twisted ankles. Hikers with good ankle support are much better for off-trail travel than low-rise trail runners.
Forecasting is a great way to set yourself up for success when entering seldom-traveled areas. While long-range forecasts in the mountains are pretty fickle, checking a few sources up to the minute you leave for the trailhead will help you get the latest and greatest weather predictions. Due to its relative proximity to the Alpine Center, I’d start by checking the weather for Trail Ridge. From there, I’d utilize mountain forecasts for Mt. Chiquita and Ypsilon Mountain, which you’ll pass on your way to the Desolations. Pay special attention to temperature, thunderstorm chances, and wind speed, as the Front Range alpine is notorious for experiencing persistent and powerful wind gusts.
Journal:
Please note: The Cameron Peak Fire exploded in growth on the day I hiked the Desolations in August 2020, so the smoke will impact some pictures. It makes the name Desolation seem very appropriate.
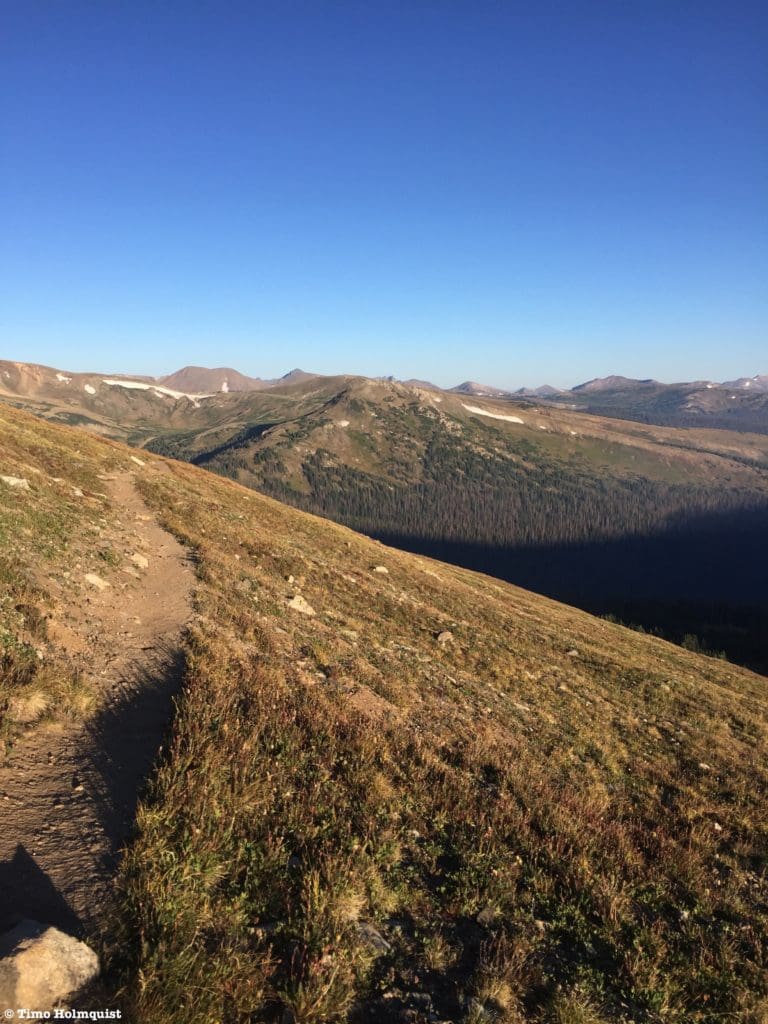
There are still many places in Rocky Mountain National Park to get away from the crowds; this is one of them. Chapin Pass Trailhead is the main way to access a large portion of the southern Mummy Range, including the summits of Mt. Chapin, Mt. Chiquita, and Ypsilon mountain. You are likely to see other cars at the trailhead, but once you get off the Mummy Crest, solitude will reign.
Begin by heading north on a wide trail to the Chapin Pass saddle. There, look to the right and find a trail, initially heading east. Follow this trail as it meanders toward treeline and up the slopes of Mt. Chapin. At various points, you’ll be able to look northeast and see the profiles of your targets.

The Desolations with smoke from the Cameron Peak Fire.
Once you get to the base of Chapin’s double humped-summit block, two strong hiker trails traverse the mountain on its’ left-hand side. Take the higher or right-hand variation.
Looking northwest from the higher trail variation.
If you want to tag Chapin, the easiest and quickest access is to traverse around to the next saddle between Chapin and Chiquita. Then, pivot right and follow cairns and an intermittent hiking path to the summit.
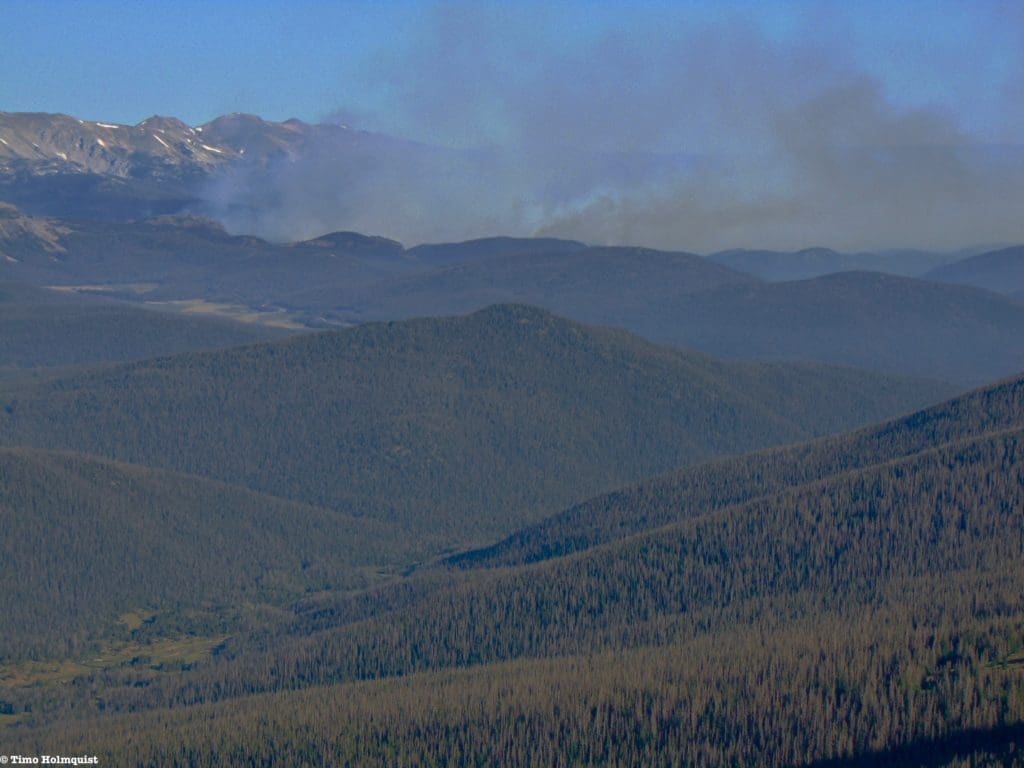
The Cameron peak fire raging to the north. Roughly a week after this hike, it would burn into the park, and the area would around the Desolations would close.
From the saddle between Chiquita and Chapin, the most obvious hiking trail continues northwest near the ridge crest, getting close to but ultimately skirting around the summit of Chiquita. The detour to touch the top is minimal. It’s from the saddle between Chiquita and Ypsilon that you want to start thinking about off-trail.
Approaching the saddle between Chiquita and Ypsilon with the Desolations to the north.
Proceed towards Ypsilon initially, gaining roughly 100-200 feet before beginning a traverse left into the alpine. The extra few hundred feet from the saddle is necessary. If you begin your traverse from the saddle and maintain your elevation, you’ll run into loose and complicated rocky terrain. Starting the traverse a little higher removes that obstacle.
Looking back to Chiquita from about 100-150 feet above the saddle. This is when you want to start bearing northward towards the Desolations.
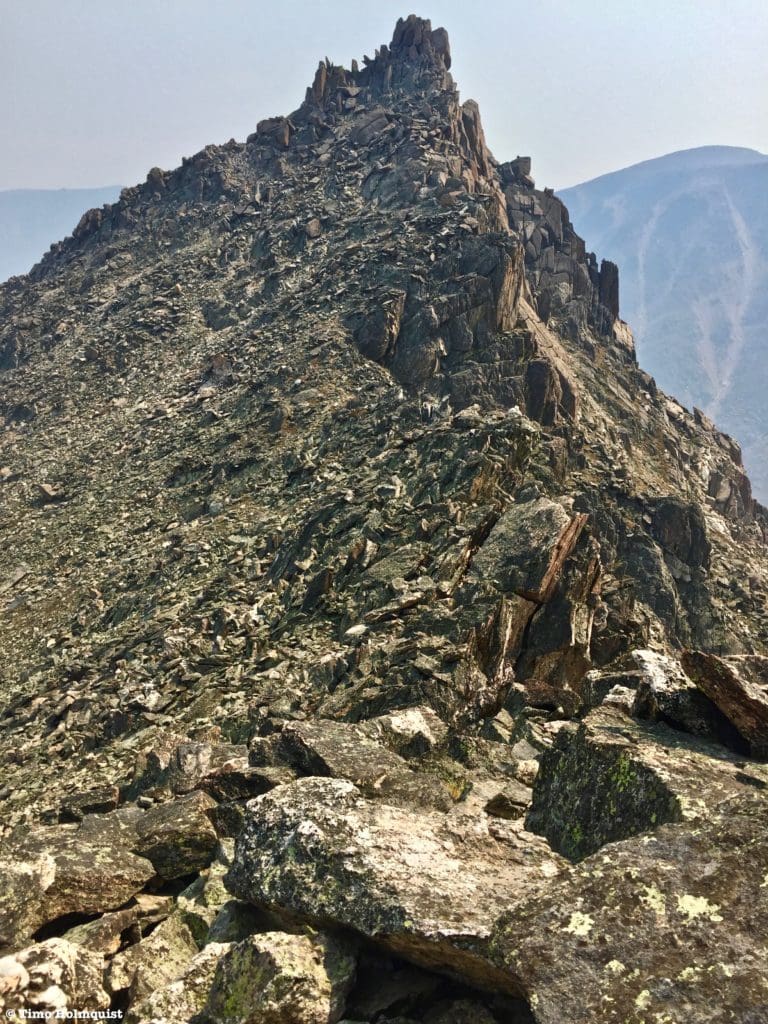
As you round the bulbous northside of Ypsilon, you’ll be able to see the more clearly defined summits of West and East Desolation. East Desolation’s summit is quite distinct and can be used as a geographic marker.

The Desolations as you approach the saddle with Ypsilon and the ridge connecting to them.
Aim for the saddle between Ypsilon and the north running ridge that leads to the Desolations. You may lose some elevation here, but it’s worth it to avoid unnecessary difficulties below you.
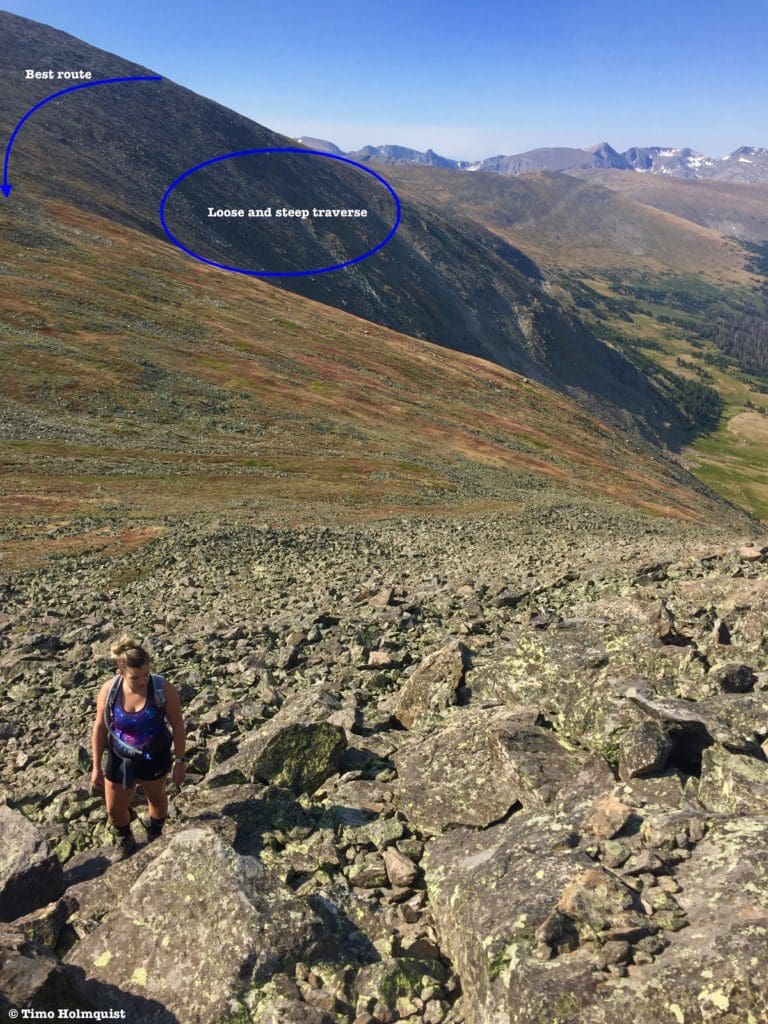
Looking back at the bulk of Ypsilon and illustrating why it’s best to go a little higher than you think before traversing.
From the saddle, orientation is fairly simple. Head north across multiple mini high points, traversing around harder sections as they appear.
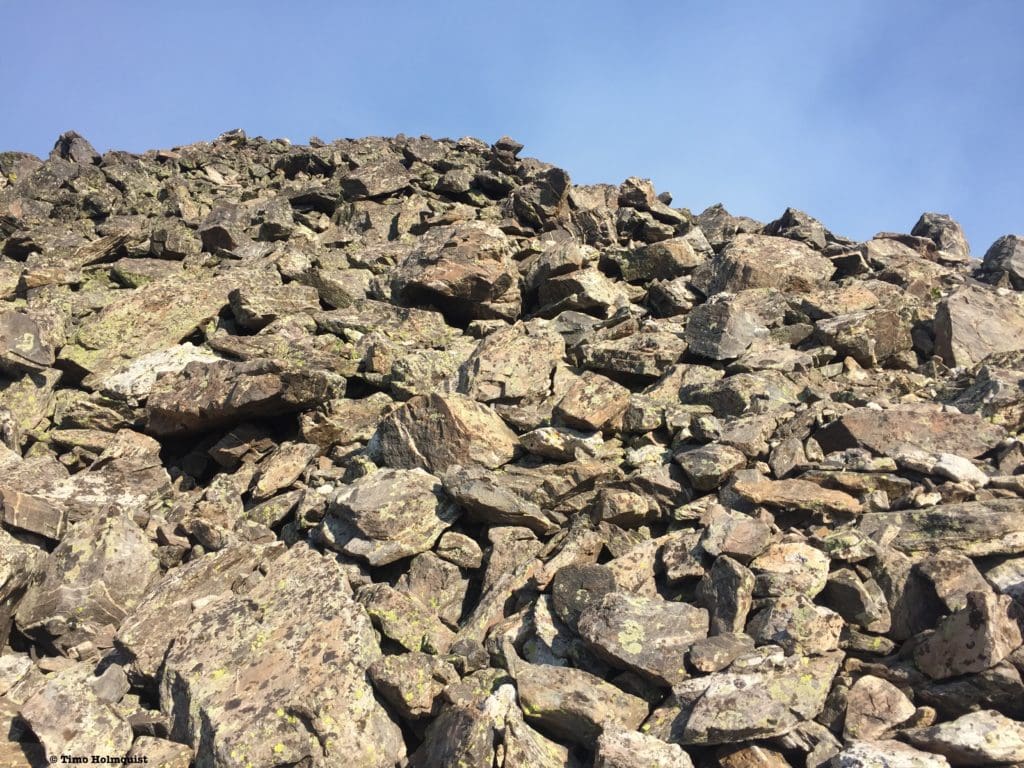
Rock quality on the ridge highpoints, careful when moving, things will shift underfoot.
The high points are generally all talus, so watch where you plant your feet and always check to make sure rocks aren’t going to move before putting weight on them. Your pace will inevitably slow during this section, but since you’re now decidedly off-trail and moving farther from help, safety has to come first.
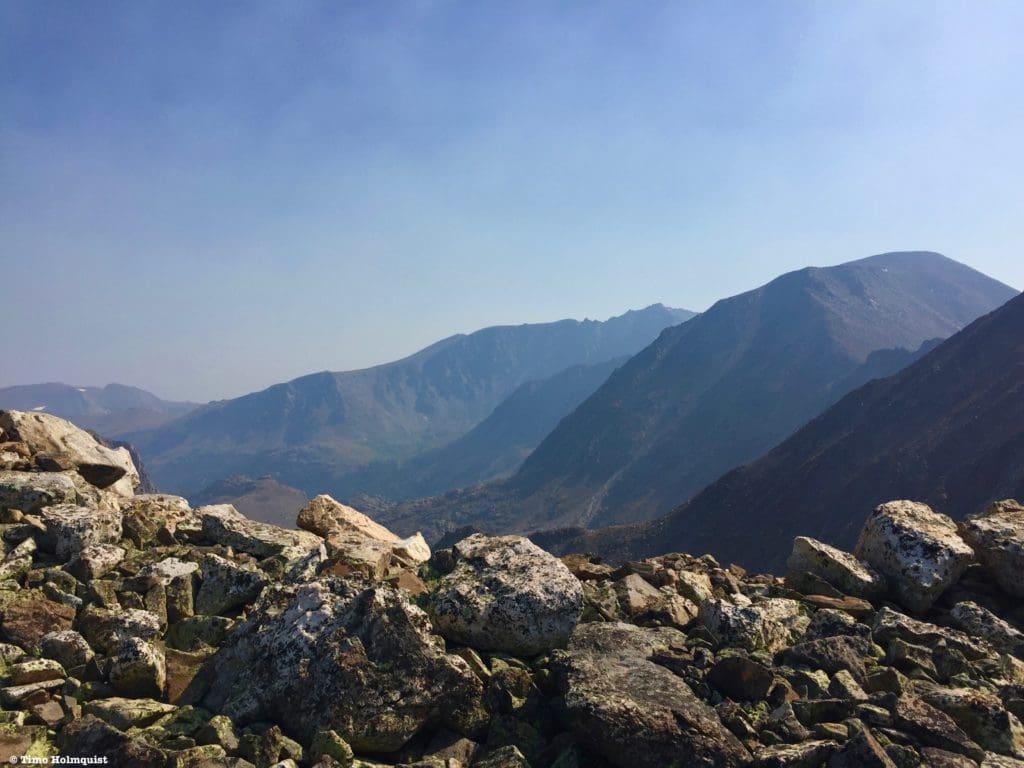
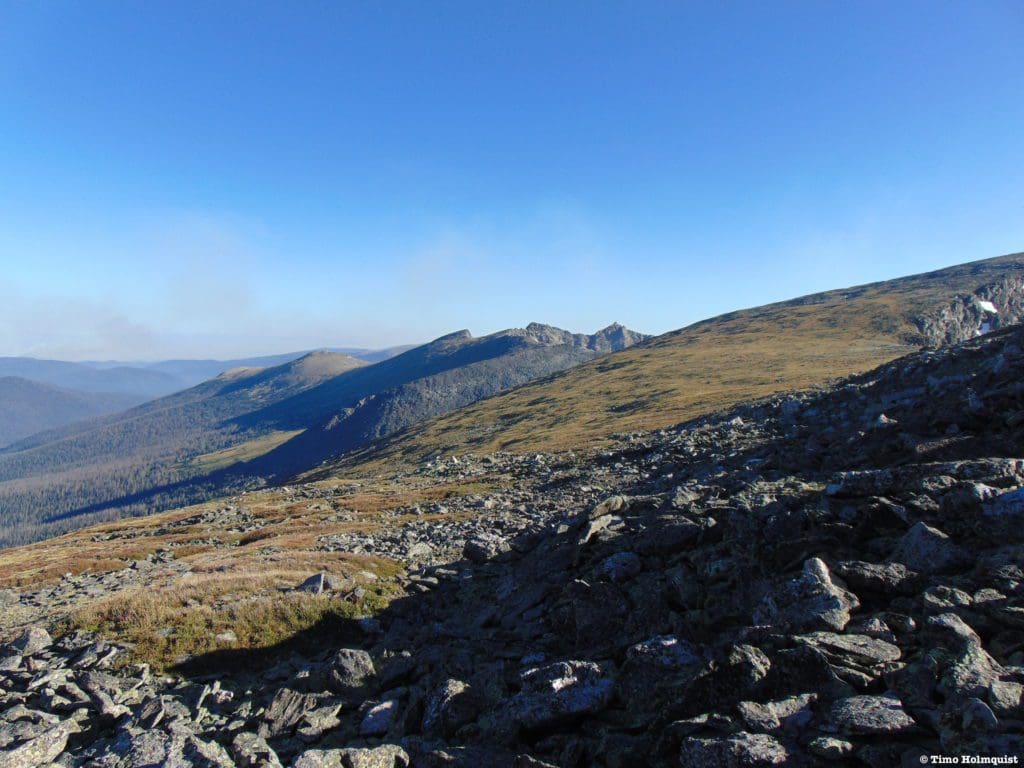
Looking east to the Mummy Range with Mt. Fairchild and Hagues Peak behind it.
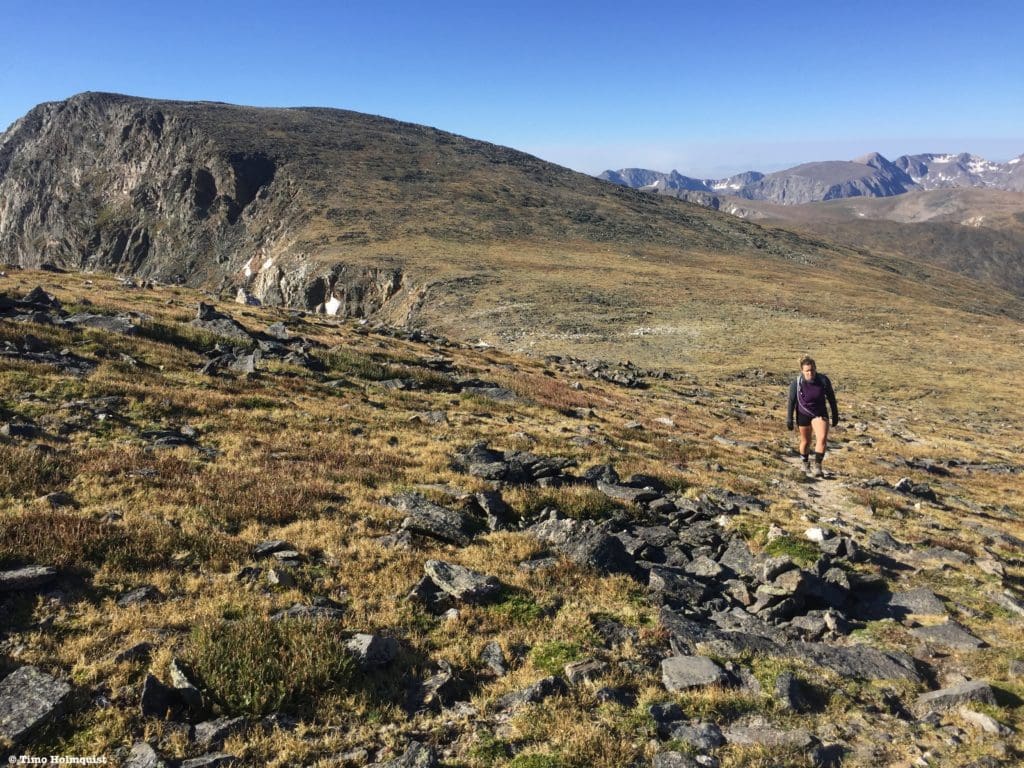
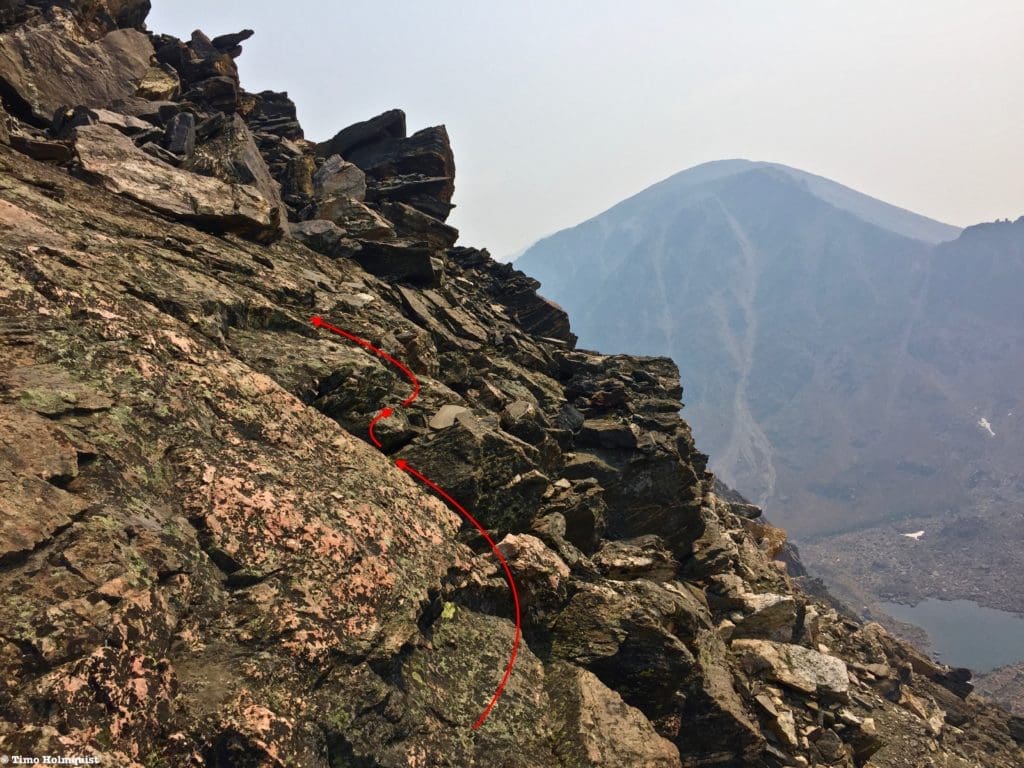
After some ridge walking, you’ll draw even with West Desolation. Turn to your right and assess the first parts of this route. Both Desolation peaks are off-center from the main ridgeline.
The last stretch of ridge up to the turnoff for West Desolation.
Proceed east towards the rocky buttress of West Desolation as the hike becomes increasingly scrambly.
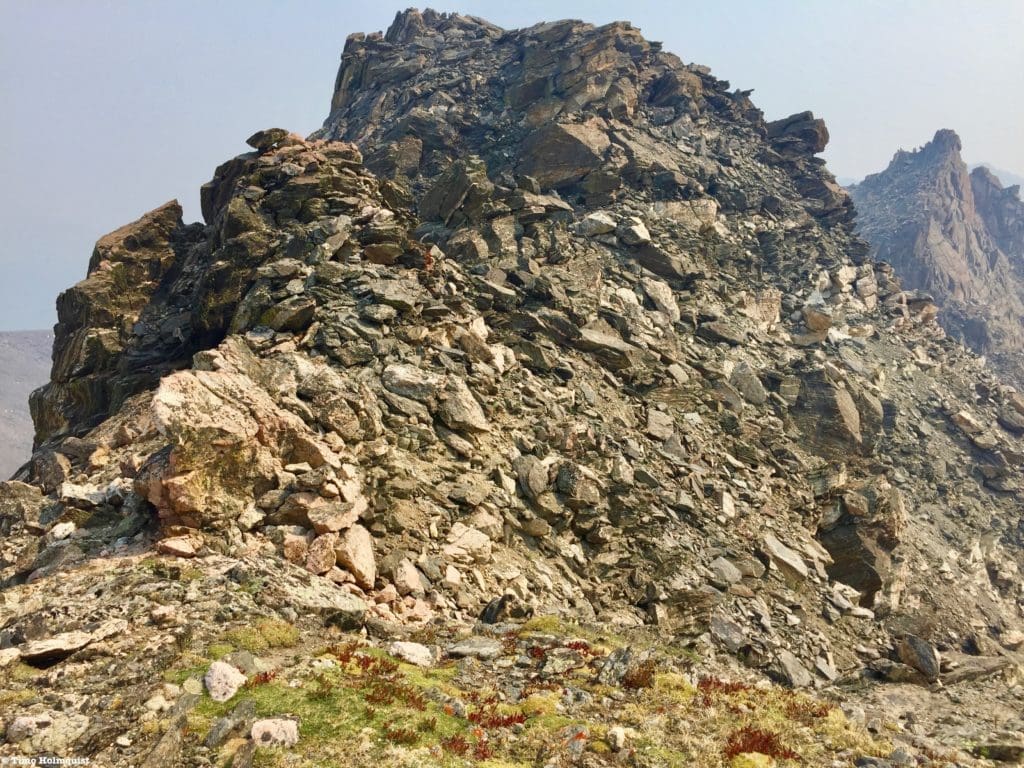
West Desolation with East Desolation poking out from behind it.
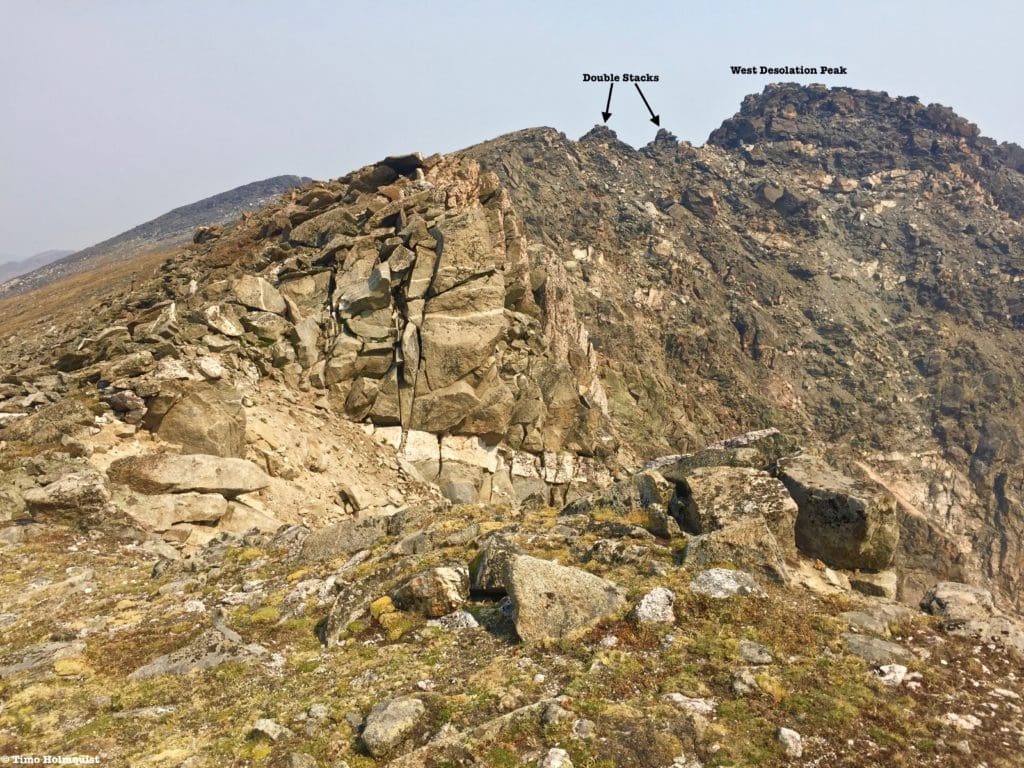
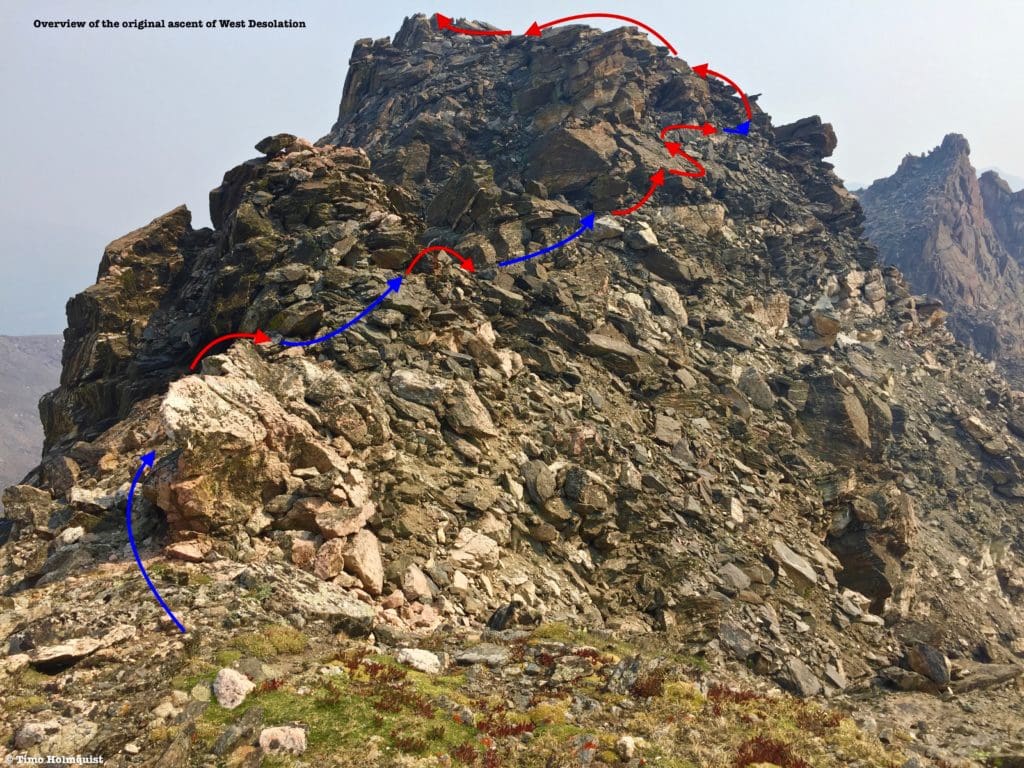
Scramble around the Double Stacks on the ridge until you are directly in front of the vertical West Desolation summit block.
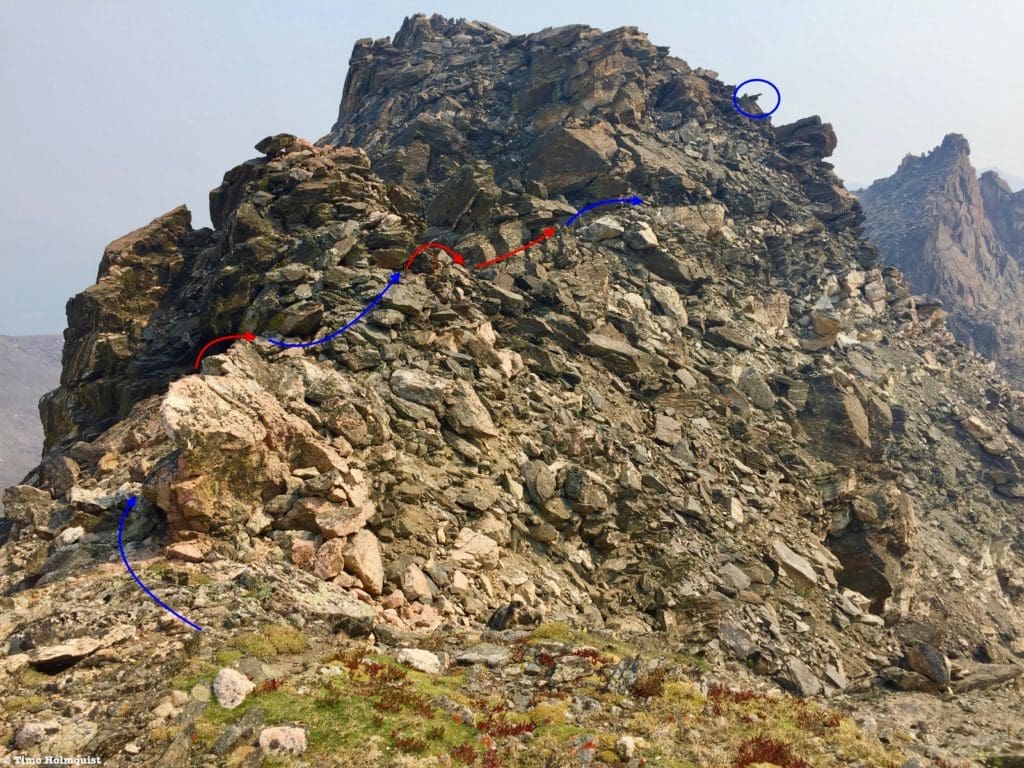
Marked up first portion, keep the phallic-looking rock in the blue circle in your sight, you’ll eventually end up next to it.
This is where the whole route gets into solid Class 3 territory and becomes much more interesting.
If you’re looking directly at the rock walls in front of you, skirt right, hugging the base of the cliffs until you see a large, flat-topped boulder that looks like a hardcover book.
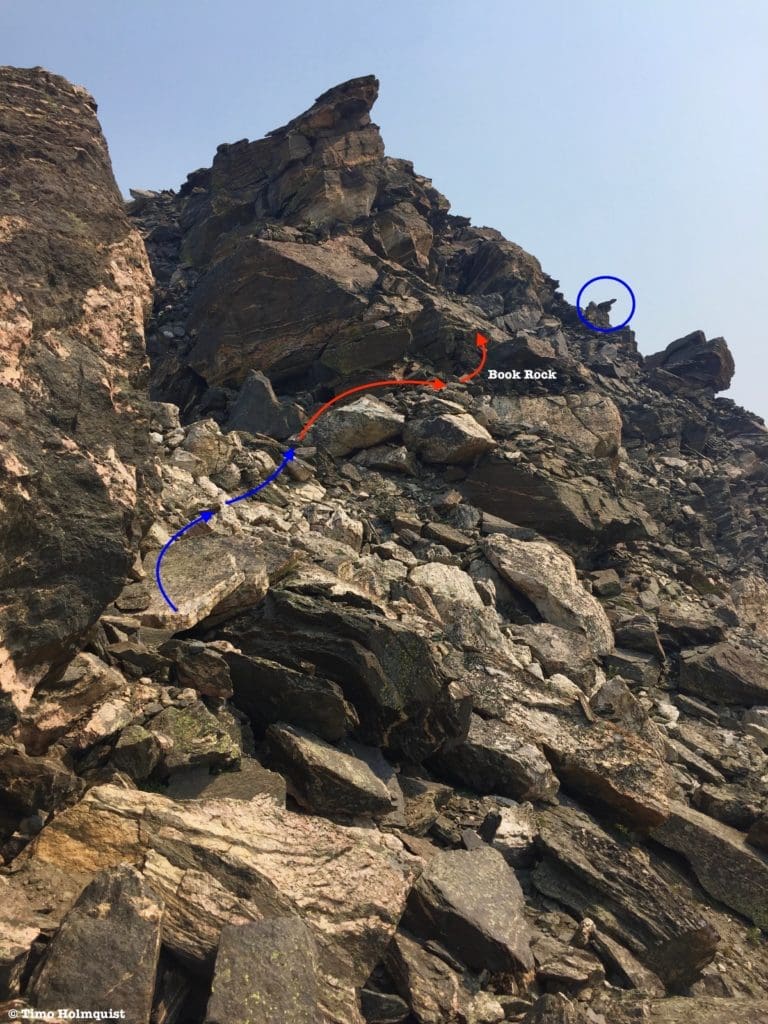
The next section of the route.
Ascend a crack to the left of the Book Rock, and you may find a cairn on top.
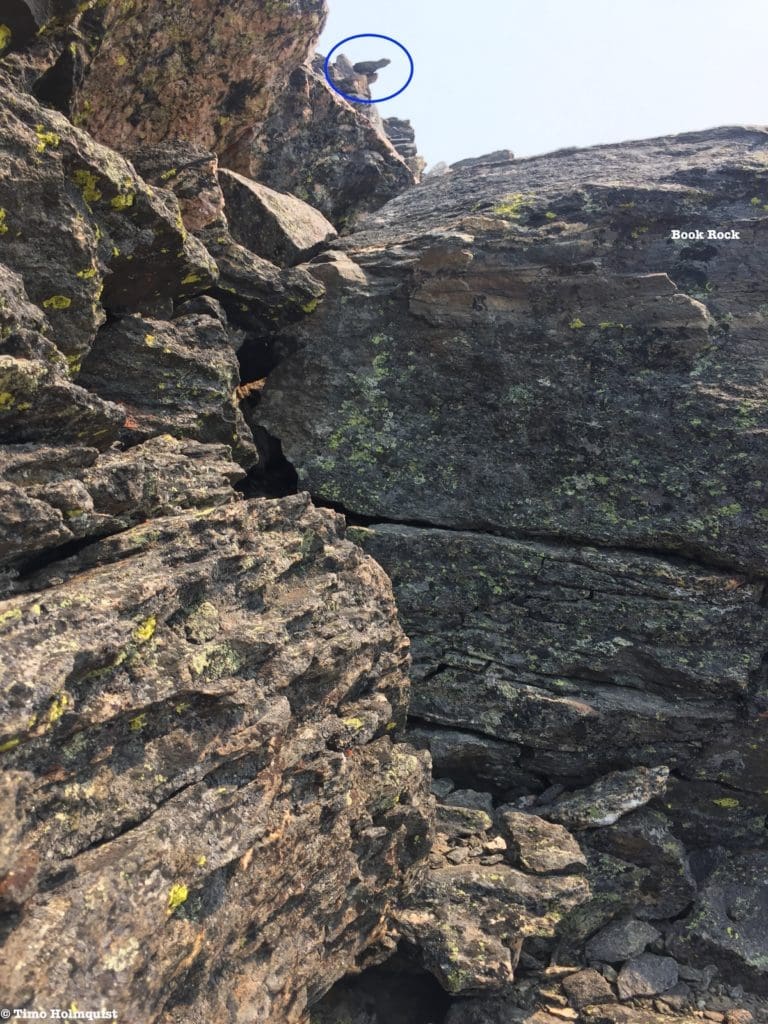
Where to ascend the Book Rock.
From here, move to a broken, south angled slab.
Along the bottom of the slab.
Traverse the bottom of the slab until finding a large crack; ascend it to the top of the slab.
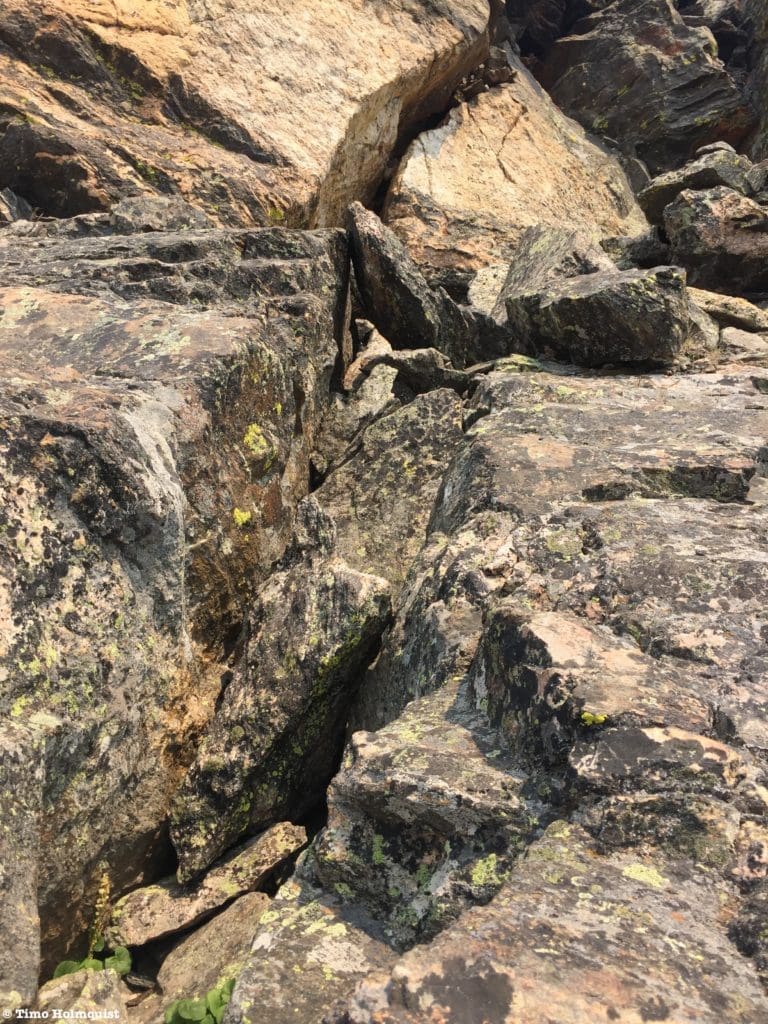
The crack in the south angled slab.
Traverse right across the top of the slab, finding the path of least resistance and dispensing with some small Class 3 moves along the way.
Traversing below the summit cliffs.
While initially vertical, the rock walls to your left will eventually break into a series of climbable gullies.
Keep heading towards the phallic rock until options open up to your left.
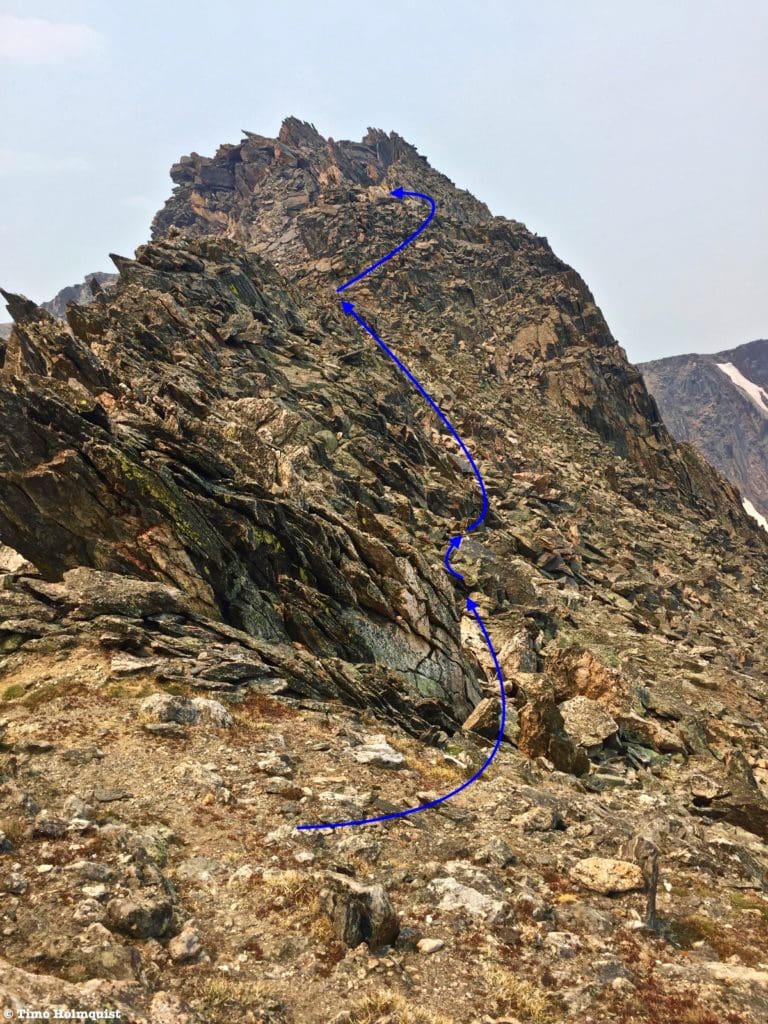
Wait until you find a Class 3 chute with good foot and handholds; there are multiple options. The first Class 3+ option is what I climbed and looks like this from the bottom.
My ascent route.
When sighted, turn left and climb up the block toward the summit plateau. After this fun Class 3 climb, you’ll be deposited on a larger flat summit area. The true summit is a little west and higher than where you are. Stay on the slanted slabs and work your way towards the summit rib. A few easy third-class moves will get you to the top. The summit is a rock finger sticking up, touch it, and you’ve climbed West Desolation.
Looking at the tops of multiple Class 3 gullies you can use to get to the summit plateau.
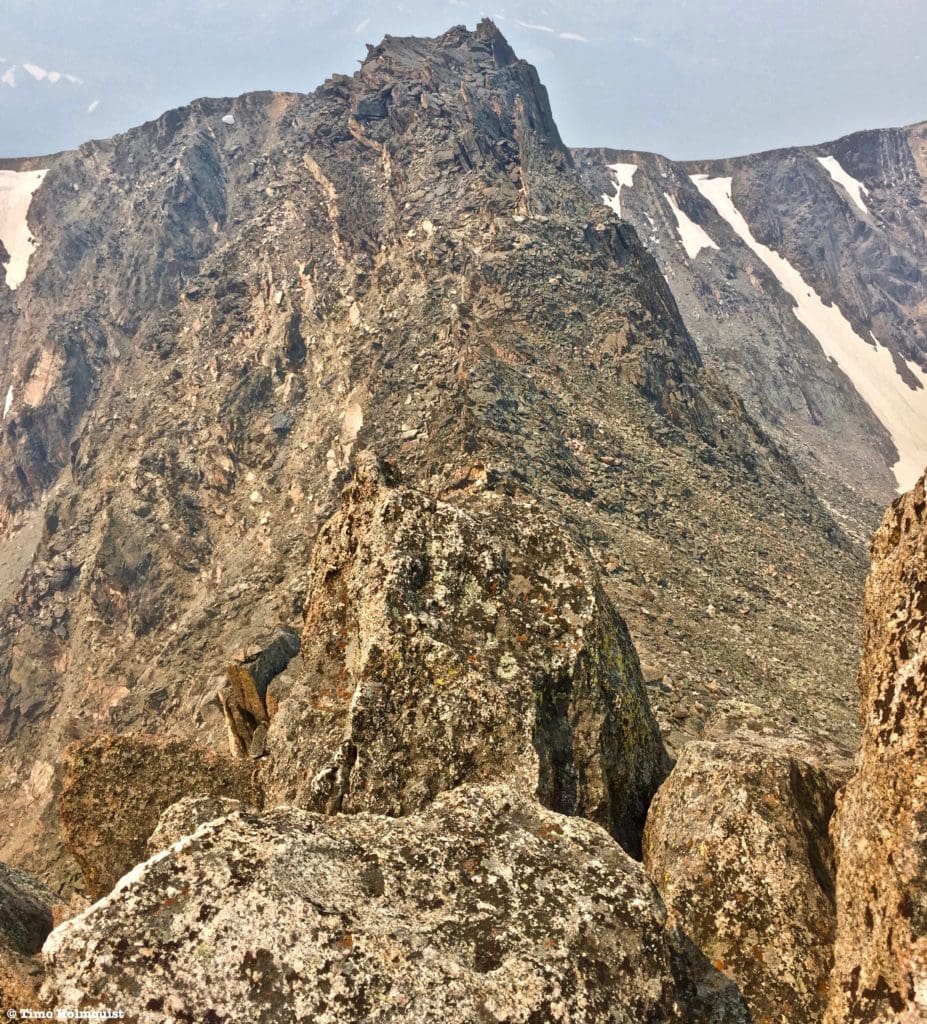
From the summit, take a good look at the intimidating profile of East Desolation. You’ll be up there soon! The climbing on East Desolation is fairly straightforward, but you have to get there first, and the difficulties on West Desolation are not over yet.
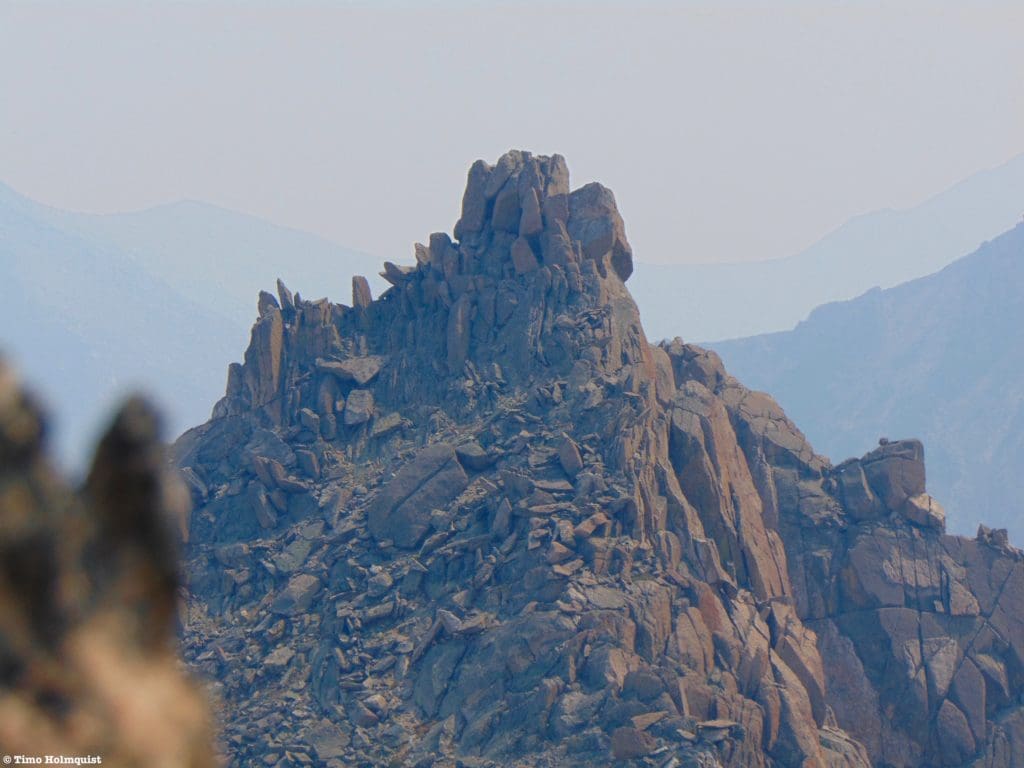
Zoomed in look of East Desolations summit area, which reminds me a bit of Sunlight Peak’s summit block in the San Juans.
Drop down from the summit rib to the summit plateau. Hike east until sighting a path to the left that drops down.
Moving away from the summit plateau.
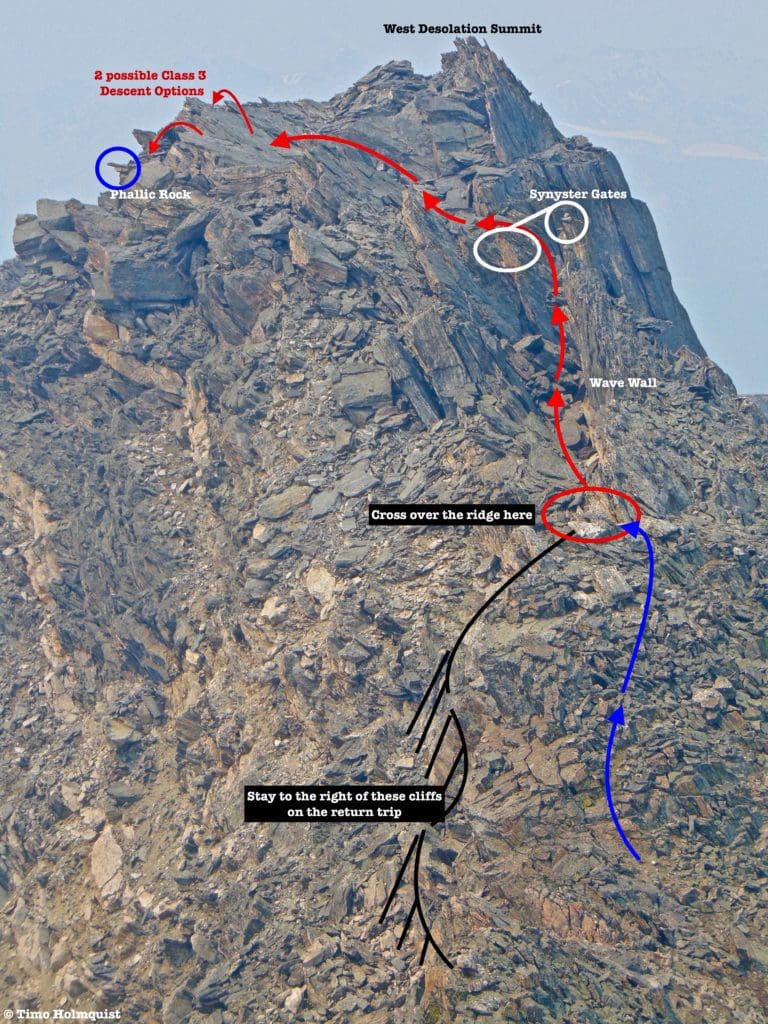
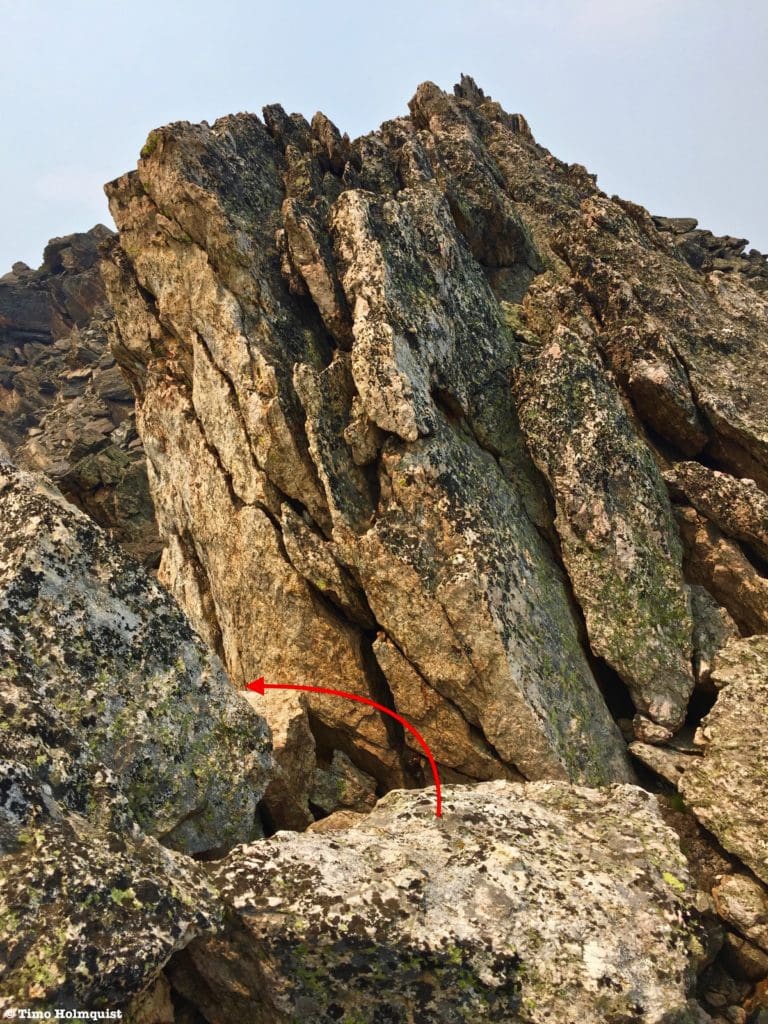
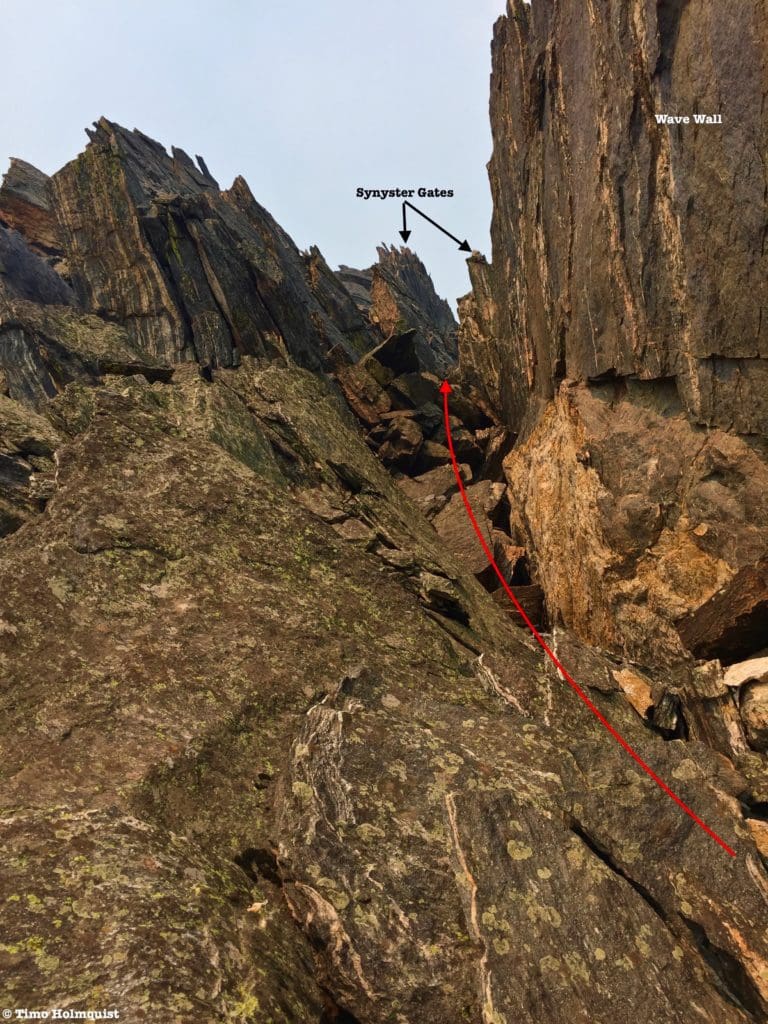
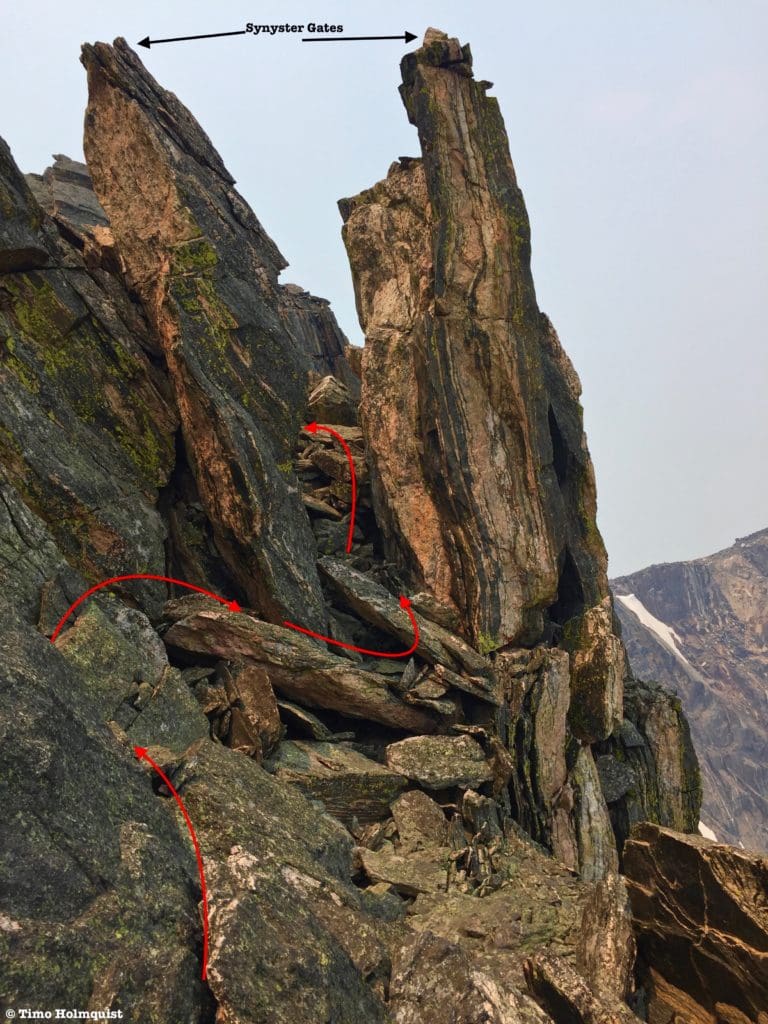
Carefully drop down and pass between two evil-looking gates that guard either side.
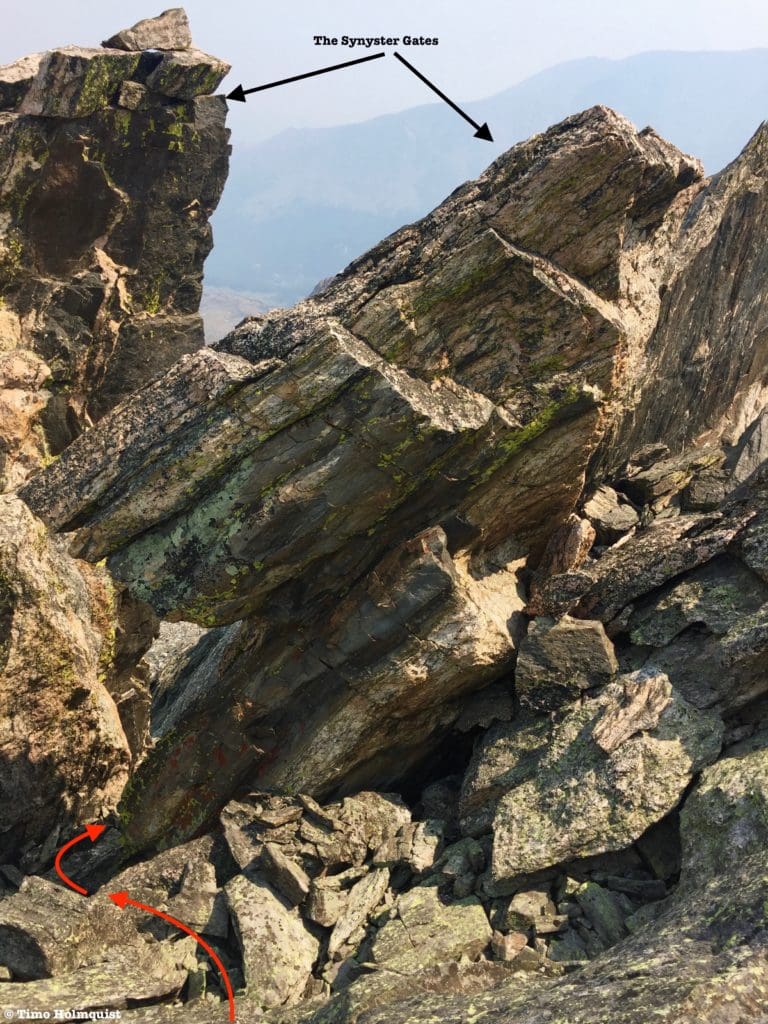
Passing through the Synyster Gates.
Don’t rush; the rock features here contain deep openings between them that a foot or leg could plunge into. After passing between the gates, turn to the right until you’ve matched the ridge to East Desolation. From here, you should be able to see the Wave Wall, a striking and obvious rock feature that frames the left side of your path. Carefully rock hop through this section.
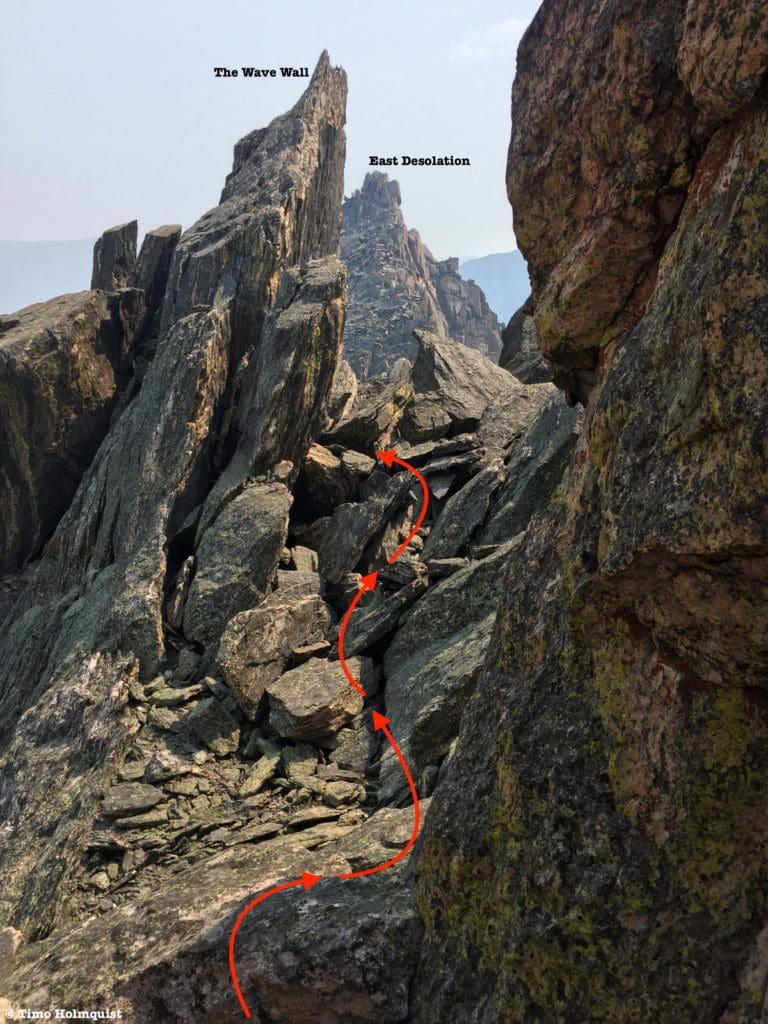
The Wave Wall and East Desolation in the background.
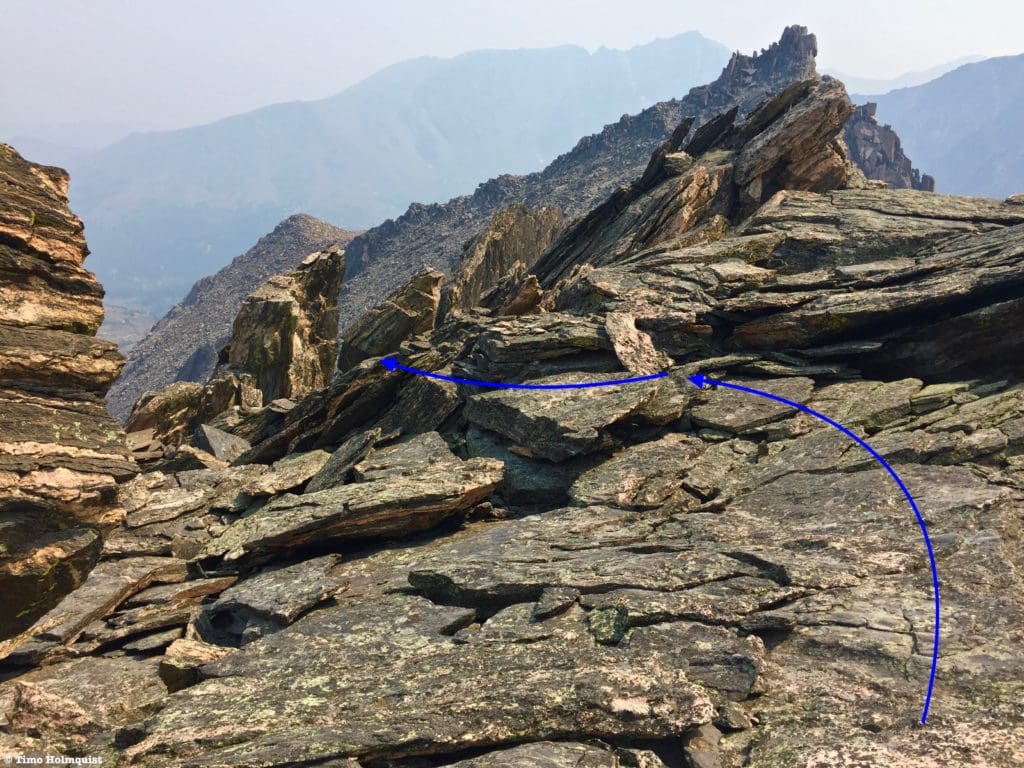
On the other side, the Wave Wall begins to push you into a southeast direction. If you stay on this trajectory, you’ll drop off the ridge and find no easy passage forward. Crank your head to the left and look for a weakness in the Wave Wall, which you will ascend into.
The correct path has you ascend back over the ridgeline.
Once you’ve climbed over the wall, hook right and follow the easier ridgeline down to the saddle between the two summits.
Easier movements down to the saddle.
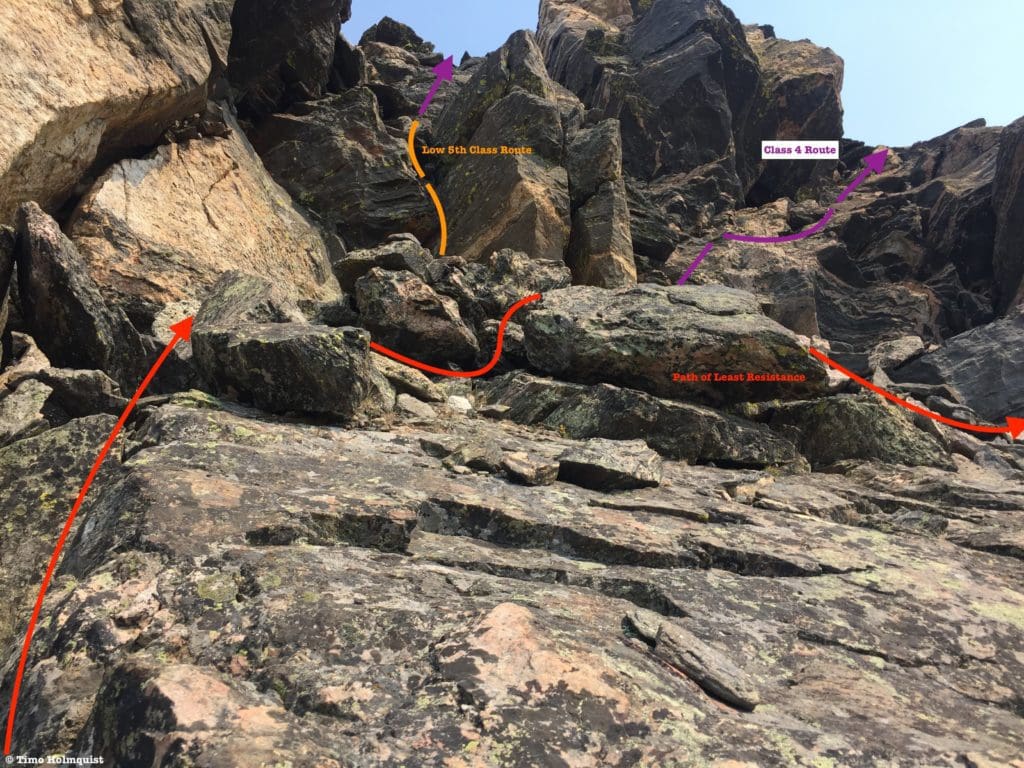
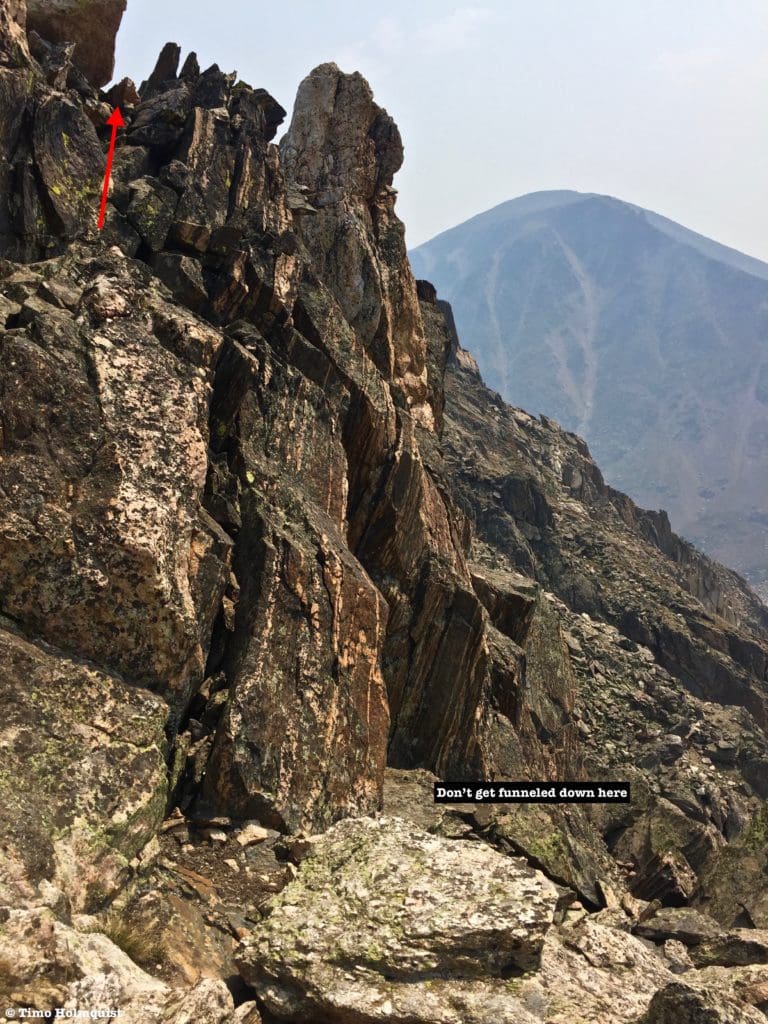
Despite only being 3rd Class, the orientation component is critical. It’s easy to get off route here, so keep your head on a swivel. From the saddle, begin a moderate scramble up to the pointy summit boulders. There are multiple ways to do this, generally speaking, heading a little left of the ridgeline is easier (Class 2), but the ridgeline contains the best and grippiest rock. You could stick to the ridgeline and ascend low Class 3 rocks as an alternative route. Once you arrive underneath the rock fortress that guards East Desolation, it’s worth taking a good look at the most difficult moves on the standard route.
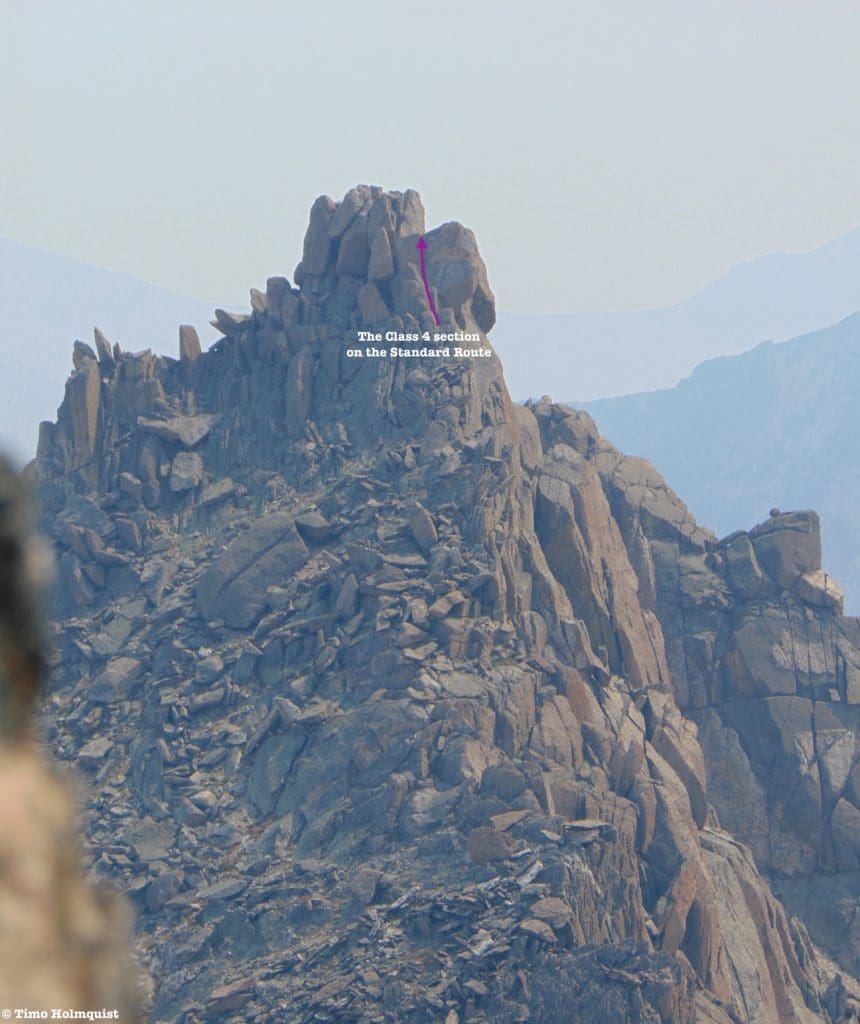
The 4th class section from West Desolation.
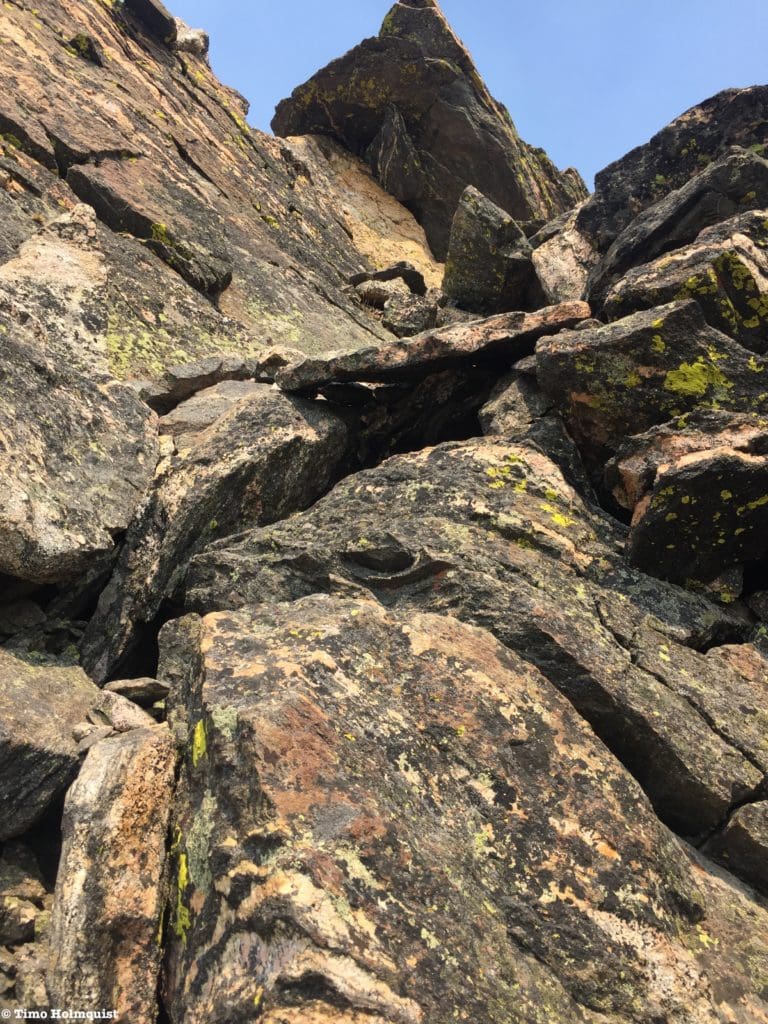
You’ll start on the ridgeline, squeeze up a crack, and into a notch with a huge cliff on the right-hand side to keep you company. You have to climb a crack system between two angled rocks to get through.
The hardest moves. While not apparent from this picture, there is only sky to the right. Any fall will push you into a notch and off a cliff.
This is Class 4 territory; any fall here will funnel you into the open hole leading south, dropping you hundreds of feet onto sharp rocks. The moves themselves aren’t impossible, but do yourself a favor and don’t look down.
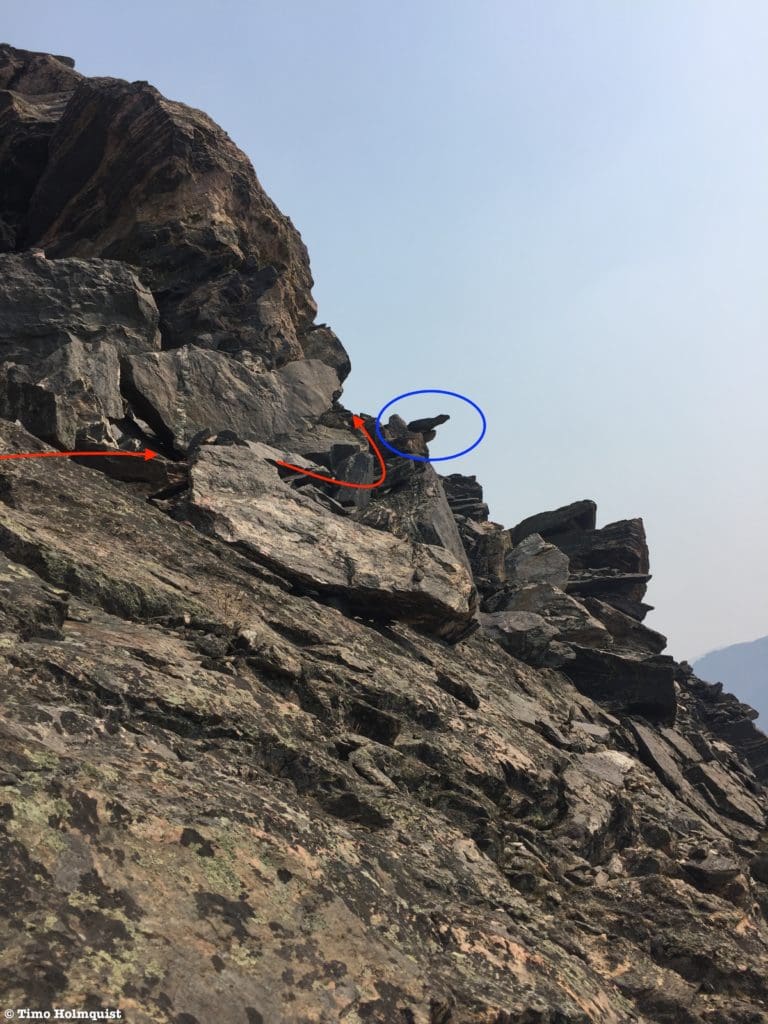
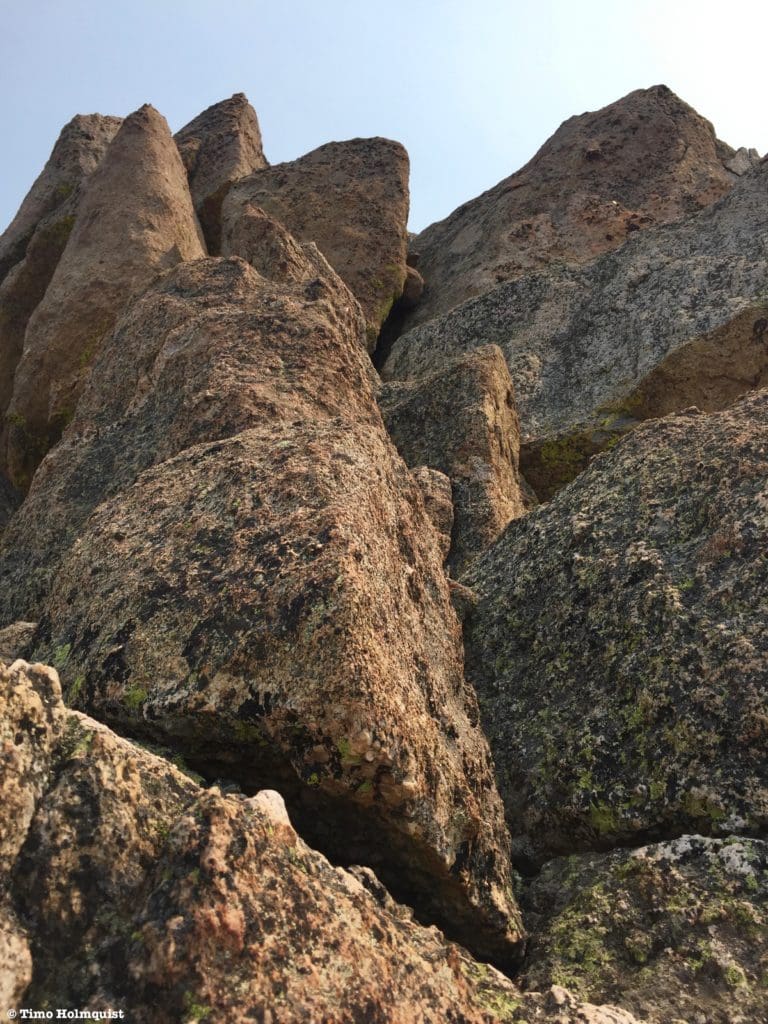
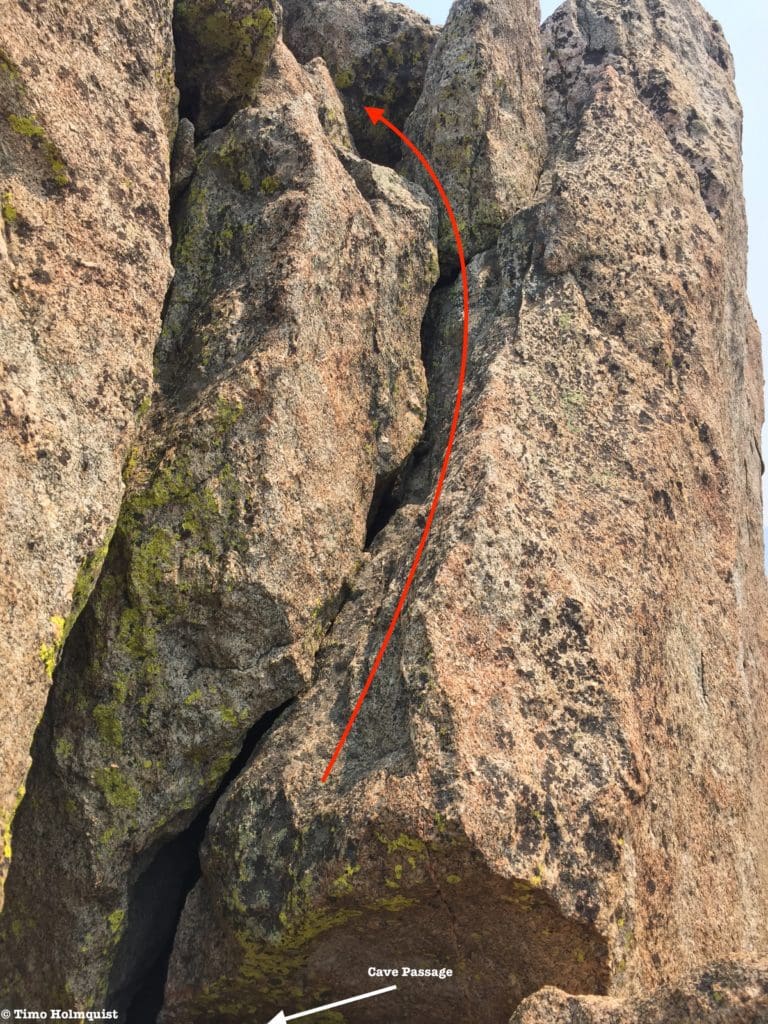
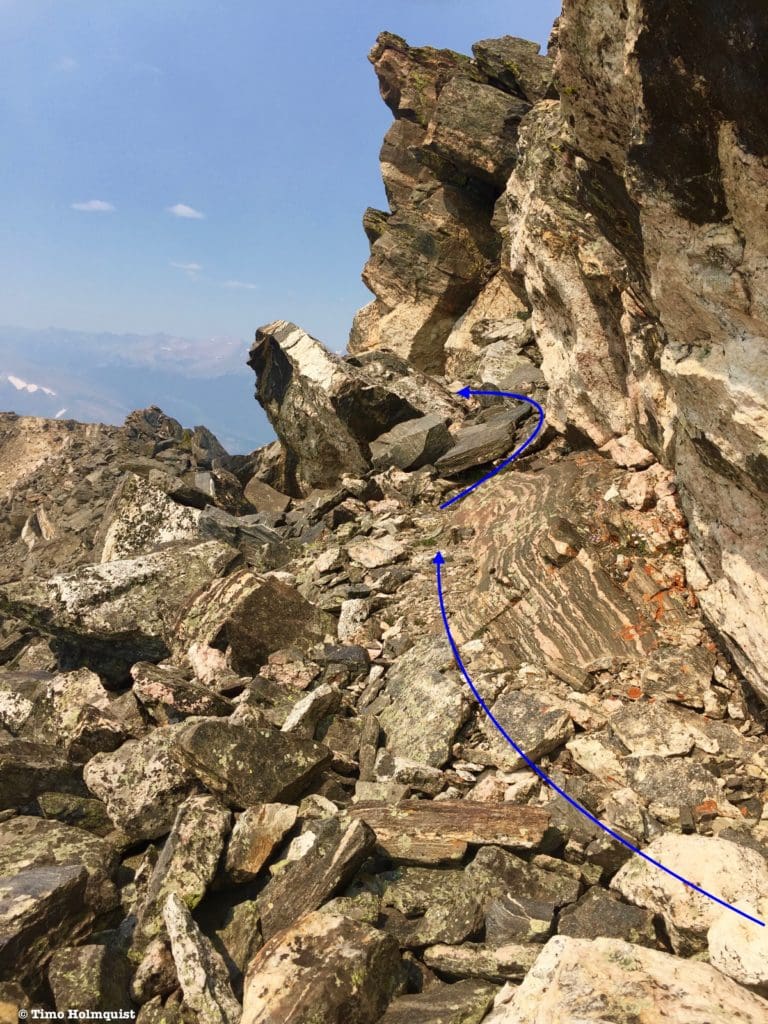
After spending some time exploring the area, I managed to find an alternative way to bypass the Class 4 section. The summit rocks on East Desolation are massive, and all lean against each other in various ways. The gaps between the rocks are open, which can lead to a small cave workaround.
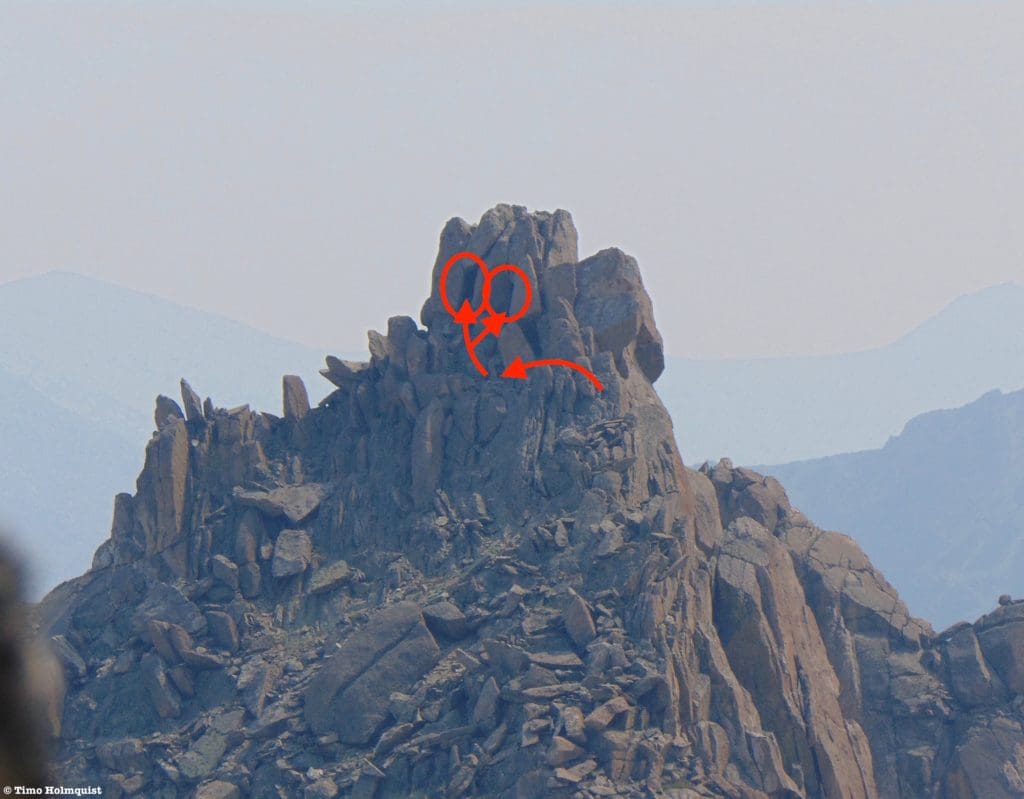
The cave entrance is one of these two circles. Explore both before committing.
Be warned: if you are over six feet tall, this may be an uncomfortable set of moves. For fun-size individuals, you should be able to find a cave entrance, work your way into it, and before it ends, turn to the right. Crawl forward into another slot and carefully stand up.
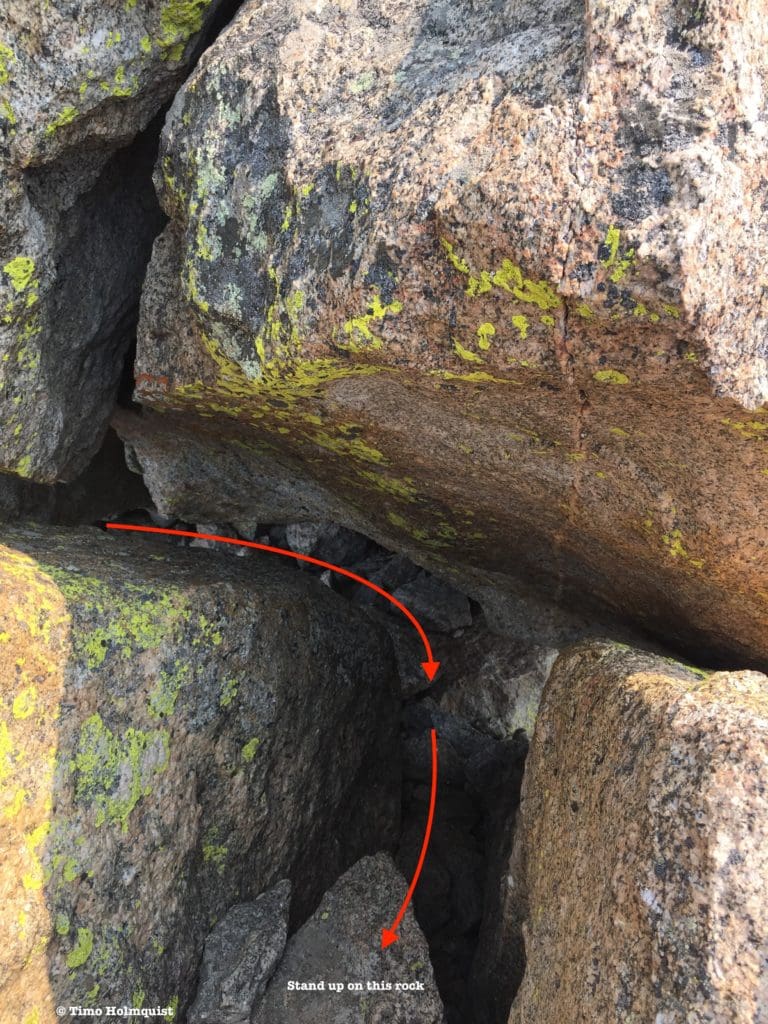
Looking down into the cave moves after squeezing into the notch beyond Class 4 climbing.
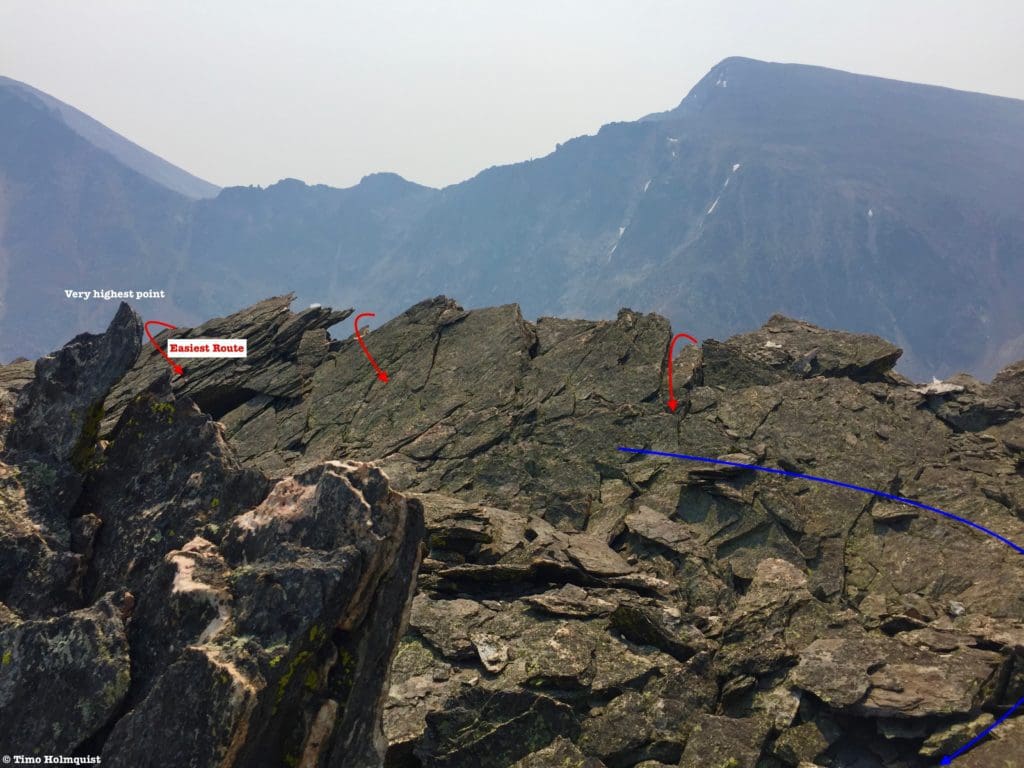
From here, turn around 180 degrees until facing east and sight a 10-foot angled rock section that is on the higher end of Class 3 but doesn’t quite feel like a 4.
From the end of the cave passage, panning up to the final moves to the summit.
Exposure is still pronounced, so focus on one move at a time. Once you clamber up, the summit is only a couple of feet away. Sit down, relax and enjoy this exposed, blocky, and altogether remote summit.
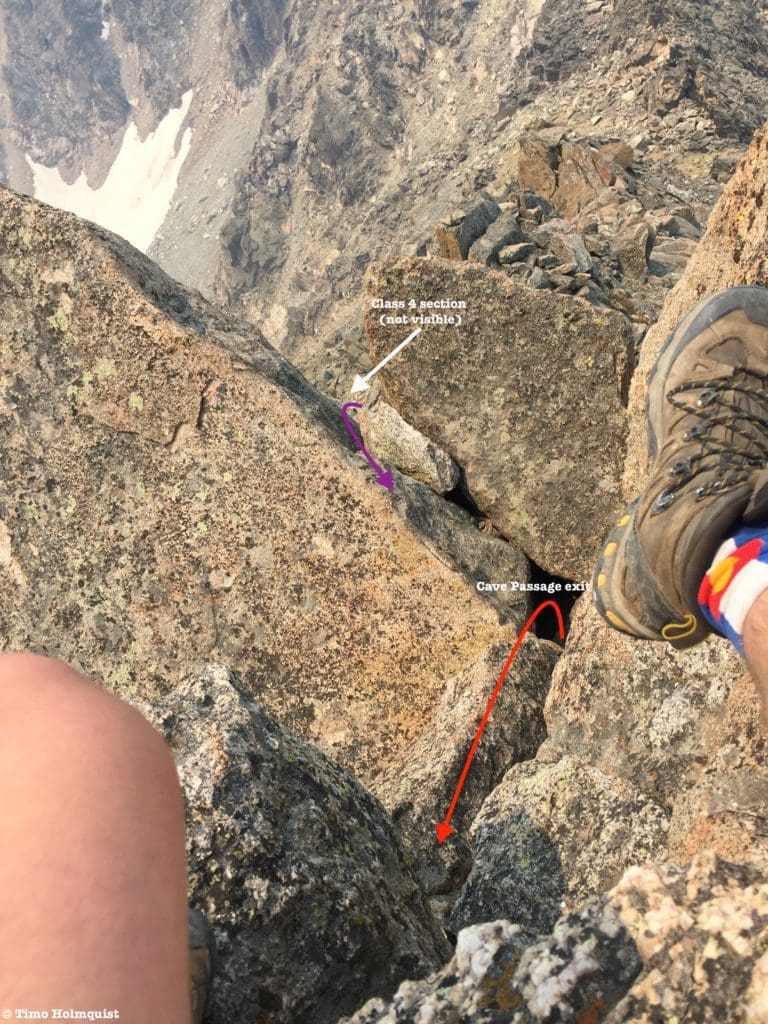
Looking back down to where the standard Class 4 route meets the cave passage.
The view back to West Desolation is fascinating; the entire mountain looks like a geologic wave rising from right to left before crashing down into a compressed chaotic mess.
West Desolation from East.
An added benefit of this perspective is that you can make out the features you encountered descending West Desolation.
Overview of your route back.
From the summit of East Desolation, edge your way back down the angled rock section to a mini notch. To reach the Class 4 section, continue up and over the next rock. If you want to retrace your ascent through the secret passage, step into the notch, turn 180 degrees, duck down and work your way forward under the section you just climbed down. After a few seconds of ducking and shuffling, break left around the bottom edge of another large rock and work your way to the secret passage entrance. From here, you can descend on easier terrain to the saddle between the peaks, using either the ridge crest or the slopes to the right of it.
At the saddle, survey what lies ahead.
General Class 2 option from the saddle.
You’ll either travel on the ridge crest (light Class 3) or to the right of the crest (Class 2), rising around or over a couple of ridge bumps. Remember, you’ll need to get onto the left side of the ridge crest, which turns into the Wave Wall. If you’re worried about where to climb back over, it’s best to stay close to, or on top of, the ridge crest, checking weaknesses as you come across them.
This is where you need to drop down. Initially, the route looks passable on the right side, but it will eventually cliff out.
Once you drop down into a trench with the Wave Wall on your right side, continue ascending.
Back on the southside of the ridge.
After the Wave Wall ends, ascend between the two Synyster Gates, and rise back up to West Desolations summit plateau.
The route back up West Desolation.
Work your way to the left edge of the summit plateau and find the 3rd Class gully you used to climb up. Descend until you are at the base of the summit block. This is a short but enjoyable descent.
Once out of the gully, turn west and sight an easy line parallel to the cliffs now on your right.
Break right and walk along the base of the summit cliffs until you see the angled slab to your left. Find the large crack to your left, carefully move down to the edge of the slab and take another right, paralleling the slope. With a few last Class 3 moves, you’ll pass over the flat-topped Book Rock and drop back to easier terrain. Continue to walk the ridgeline back to its confluence with another. Where the ridges meet, the scrambling ends. From there, retrace your steps south across the various ridge points.
Overview of West Desolation Ascent.
For an added variation, when you reach the saddle with Ypsilon, descend down a west-facing gully to a series of meadows.
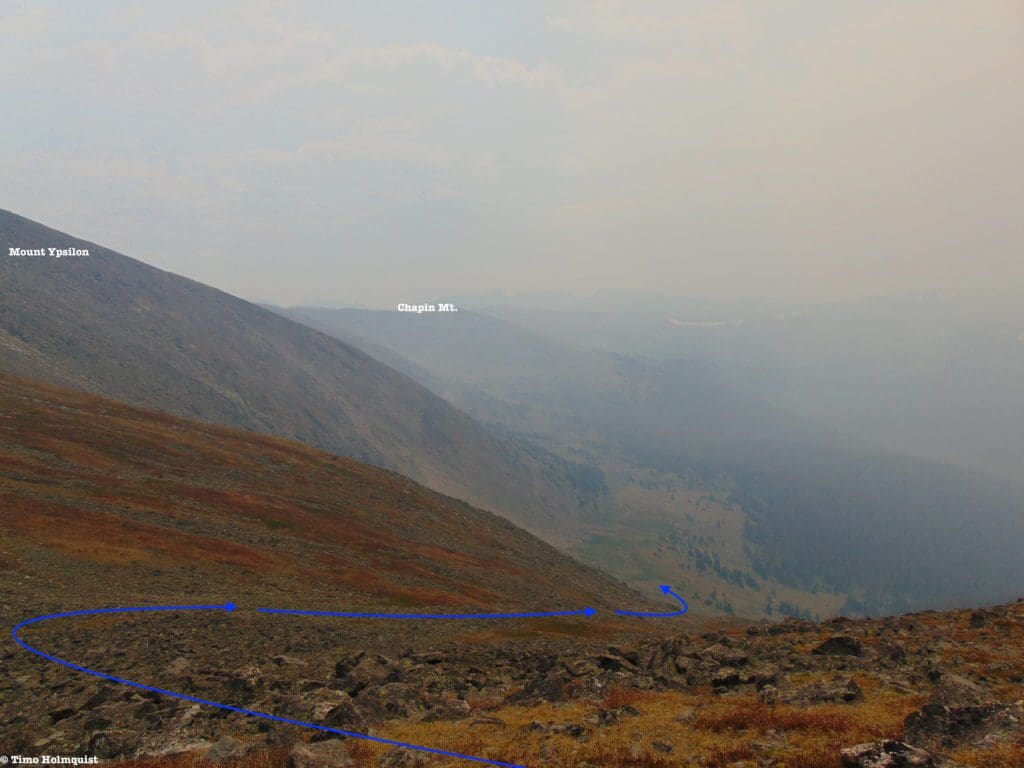
Beginning the variation with thick wildfire smoke visible.
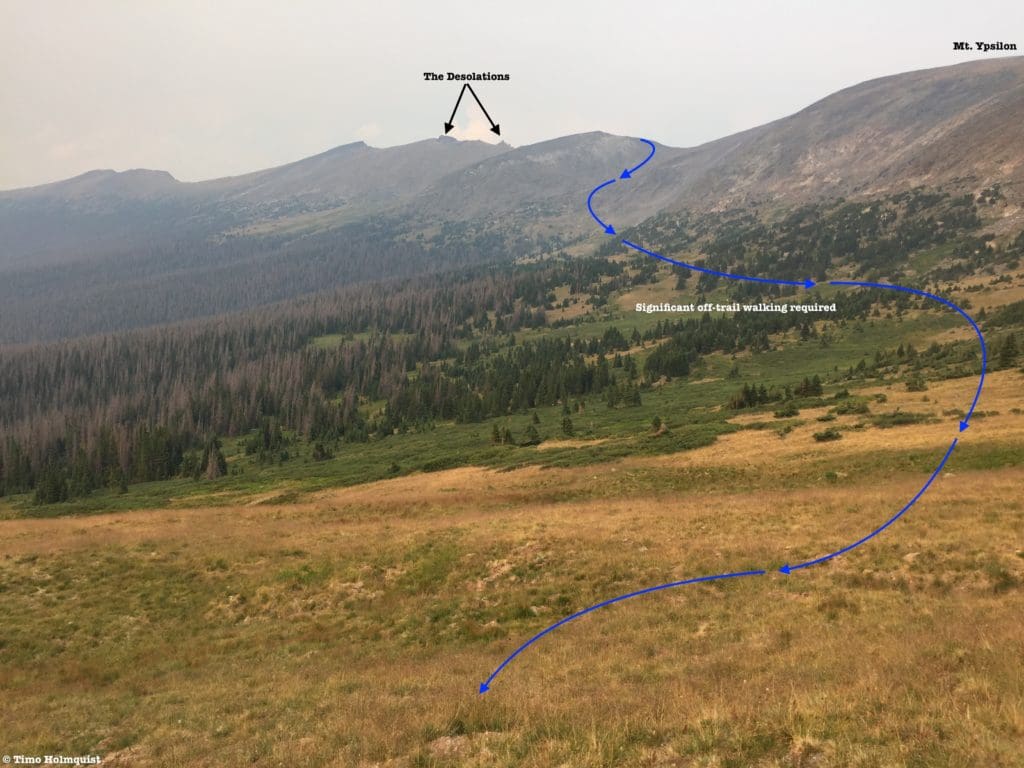
Proceed north, contouring the land and passing through several meadows with bouncy tussock-like grass.
Looking back at the variation.
Eventually, if you keep your northward bearing, you’ll rise up the slopes of Mt. Chapin and intersect a strong hikers trail. Take it to the right until it joins with your original ascent route.
Final Thoughts:
Despite its relatively modest length, this is no walk in the park. Once you leave the main Mummy Range crest, it’s all off-trail, and the scrambling is more or less continuous up and over West Desolation. The final push up the summit block of East Desolation is also challenging and adrenaline-pumping. Keep in mind that the main access point to these peaks is unavailable when Old Fall River Road closes, so the season to tag these mountains runs from roughly July-September.
This kind of adventure will not appeal to all outdoor recreationists. You need to be competent in off-trail travel, have experience tackling remote peaks, and understand the risks of alpine scrambling. The peaks are a wonderful and well-hidden area of the park, so for those looking to increase their scrambling experience in a place likely to grant solitude, consider visiting the Desolations.
Popular Articles:
- Guide to the Best Hiking Trails in Rocky Mountain National Park, Colorado
- The Dyrt: The 10 Best Campgrounds In Colorado
- Top Adventure Sports Towns 2021: Boulder, Colorado
- Epic Adventures with the Best Guides In Colorado
- Sky Pond via Glacier Gorge Trail, Rocky Mountain National Park, Colorado
- Scrambling Hallett Peak’s East Ridge, Rocky Mountain National Park, Colorado
- Scrambling Mt. Alice via the Hourglass Ridge, Rocky Mountain National Park, Colorado
- Gorge Lakes Rim Scramble, Rocky Mountain National Park, Colorado
- Black Lake Via Glacier Gorge Trail, Rocky Mountain National Park, Colorado
- Scrambling To The Lake Of The Clouds, Rocky Mountain National Park, Colorado

Skyblue Overland Strongly Recommends That You Enroll With Global Rescue Prior To Embarking On Your Next Adventure.
With more people outside now more than ever, Global Rescue expanded services to include field rescue within 100 miles of home. With Local Field Rescue — automatically included in any travel protection services membership — Global Rescue is there whether you’re hiking, kayaking, snowmobiling, fishing or simply enjoying the outdoors and get ill or injured and you’re unable to get to safety on your own. Purchase a Global Rescue membership for your next adventure and travel with peace of mind. Single trip, annual and family options are available.
Memberships start at $119.
Terms of Use:
As with each guide published on SKYBLUEOVERLAND.com, should you choose to this route, do so at your own risk. Prior to setting out check current local weather, conditions, and land/road closures. While taking a trail, obey all public and private land use restrictions and rules, carry proper safety and navigational equipment, and of course, follow the #leavenotrace guidelines. The information found herein is simply a planning resource to be used as a point of inspiration in conjunction with your own due-diligence. In spite of the fact that this route, associated GPS track (GPX and maps), and all route guidelines were prepared under diligent research by the specified contributor and/or contributors, the accuracy of such and judgement of the author is not guaranteed. SKYBLUE OVERLAND LLC, its partners, associates, and contributors are in no way liable for personal injury, damage to personal property, or any other such situation that might happen to individuals following this route.


