


|
Getting your Trinity Audio player ready...
|
The Minturn Mile is a must-do for powder lovers in the Vail Valley. This sidecountry run spans over 3 miles and drops 3,000 vertical feet from 11,000 to 8,000 feet. Skip the village and hit the Mile for an unforgettable adventure.
Overview
While many backcountry enthusiasts relish the early morning start and uphill battle against the elements, there are other, much friendlier ways of experiencing the benefits of backcountry skiing without the dogged commitment of days in remote territory. That isn’t to say runs like the Minturn Mile don’t come with risks. As a reminder, every run outside a ski resort boundary needs to be taken seriously; all participants must have the proper equipment, know-how, and competent partners to attempt it with. However, if stoke is high and your skiing at an expert level, the Minturn Mile may be the perfect test to see if backcountry is something you’re interested in.
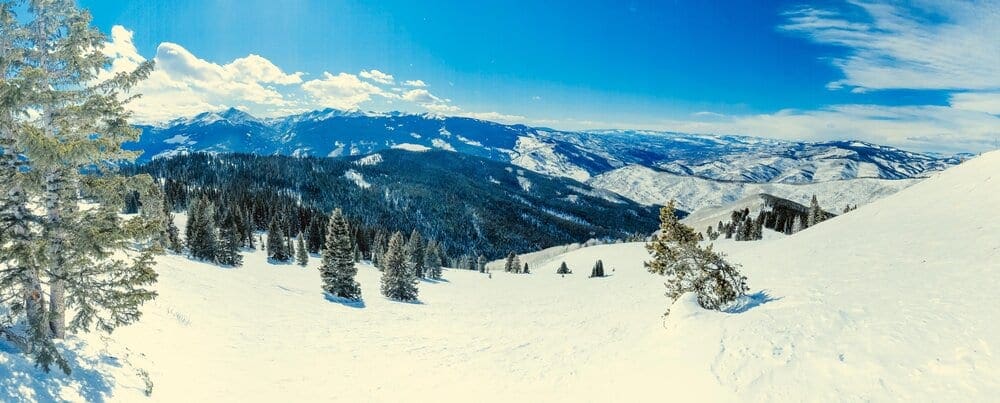
Picture: Panorama of the Upper part of Minturn Mile. Photo by Timo Holmquist.
Table of Contents
-
Sidecountry vs. Backcountry
-
Gear for the Mile
-
Backcountry Planning
-
What is The Minturn Mile?
-
When to Ski It
-
Access
-
Places to Stay
-
Run Analysis
o Getting to the Start
o Upper Bowl
o The Funnel
o The Luge
o Bottom Traverse
-
Final Thoughts
-
Resources
Sidecountry vs. Backcountry
These terms have been used interchangeably, with backcountry winning out as a blanket statement for skiing or riding outside a ski resort. Technically, it’s all backcountry. Sidecountry, however, is a useful term to describe runs like the Minturn Mile because you can get to the start of it using ski resort lifts. It is absolutely possible to skin up the Mile and ski down, but you do not have to. The upper access utilizes a backcountry gate to step outside ski patrolled areas.
For the purposes of the Minturn Mile, a sidecountry distinction is appropriate. The top of the run is reached via two backcountry gates from within Vail Resort (aka lift service to the start) and follows a valley that runs parallel to the inbounds runs at Game Creek Bowl. There is no lift service at the bottom, so car positioning or skins are a must for anyone trying to make it back to Vail.
Please note: in order to take part in the Mile, we HIGHLY recommended familiarizing yourself with Vail Resort, especially the thousands of acres of bowls within the resort boundaries. At 5,289 acres of skiable terrain, Vail is one of the largest resorts in North America (Onthesnow). It contains a large front side with two main areas (Vail Village and Lionshead), five back bowls, and an entire additional ridge with three separate areas (Blue Sky Basin, Earl’s Bowl, and Pete’s Bowl). It’s a big place! Chances are, you’ve probably heard of either the resort or the company, but it is super helpful to take some time and get to know the area.
Gear for the Mile
Before we begin, let’s lay out some quick backcountry gear knowledge (for a more comprehensive guide, check out our article, Backcountry Gear: Essentials for Human Powered Skiing). The list below is crucial, don’t skimp on gear when avalanches are in play.
-
Skis/Helmet/Gloves/Goggles
-
Winter Clothing: waterproof shells, thick ski socks, layers, puffy, beanie, hand warmers, etc.
-
Skins (useful if you don’t have an Epic Pass and want to ski the Mile anyway)
-
Epic Pass/Lift Ticket (required if you want to ski Vail and get to the start of the Mile via inbound lifts)
-
AT Bindings (Frame or Tech, if you are skinning up from the bottom)
-
Regular resort bindings will suffice if you ski from Vail resort down to the bottom
-
-
Avalanche Gear: Beacon, Shovel, Probe, and Radio
-
Backcountry ski pack
-
Food/Water/First-Aid Kit
-
Headlamp. A quick run of the Mile still takes about an hour, with stops and pictures it can easily take between 2-3. In the dead of winter, make sure you can see, especially if the Mile is the last run of the day.
Remember, it isn’t enough to simply own gear; take the time to figure out how to use it before heading out. Speed is key, especially in a backcountry avalanche rescue. Visit Backcountry Gear: Essential for Human Powered Skiing to get comfortable with the necessary gear and how to use it. While some of the gear may seem like overkill, the Minturn Mile has experienced avalanches before, don’t become a statistic.
Backcountry Planning
Once you have the gear and know how to use it, it’s time to start planning. We’ll briefly break down the central components below, but check out our Guide to Planning a Backcountry Ski Adventure for an in-depth analysis of the planning process. A good plan can separate success from disaster. No outdoor activity is worth your life.
-
1) Pre-Planning
-
-
-
Learn how to Ski at an EXPERT level before heading outside ski resort boundaries. Find a squad. Start backcountry gear research. Hone your craft. Get in shape.
-
-
-
2) Long-Term Planning
-
-
Geographic reduction: where are you skiing? Start big, get small.
-
Weather and snowpack research.
-
Research ski lines using books, online resources, and forums. Key data:
-
Total distance, total climb, total descent, slope angle
-
Local Emergency contacts
-
Unique factors: trees, cornices, couloirs, avalanche history
-
Get into the maps and apps, know the area like the back of your hand.
-
-
-
3) Short-Term Planning
-
Managing Expectations
-
Constantly check weather updates until the morning you leave. Remember, snow reflects light, if it’s a sunny day, bring sunscreen!
-
Popularity of your backcountry line.
-
Tell people where you’re going and who to call if things go wrong.
-
Have a back-up plan.
-
Who’s got the medical training?
-
Go over the plan in detail with your squad. CHECK FOR UNDERSTANDING.
-
-
Packing
-
Make sure everything fits, and you can access your avalanche gear quickly. Time is critical in a burial situation.
-
-
-
4) On-site Planning
-
What do you see when you get there?
-
Watch out for tree-wells, wind-loaded slopes, cornices, bergschrunds, and other topographical considerations.
-
-
Timing and snow surface i.e. environmental factors. Not all snow skis the same.
-
-
5) Post-Planning
-
Analyze
-
What worked well? What didn’t?
-
-
Ease into the harder stuff.
-
The steps listed above are only a skeleton outline; see our Guide to Planning a Backcountry Ski Adventure to iron out the critical details. Remember, you can always take an avalanche safety course through AIARE; it can absolutely save lives.
What Is The Minturn Mile?
The Minturn Mile is a sidecountry classic and a Vail Valley special, although the name is a bit of a misnomer. The run itself is more than three miles long and descends from a high point of 11,000 feet to just below 8,000 feet for a total vertical descent of 3,000 feet. The elevation can be shortened a couple hundred feet if you exit the resort via the lower Lost Boy Gate, but that takes away from some usually excellent powder stashes along the top.
The origins of the run are unknown, though it has been around at least as long as Vail, which opened in the early 1960s. One of the appealing aspects of the run is that it can act as a perfect capstone to a day at Vail. With the right car positioning (necessary unless you are skinning up), you can shred the Vail Back Bowls and hit the Mile for an epic last run down to Minturn. With its wide-open start, no two adventures along the Mile are the same, adding to its infinitely repeatable allure. Keep in mind, all backcountry gates close by 2:30 PM unless otherwise specified; get to the gates before ski patrol closes them for the day.
There are a couple of unofficial/official ways to ski the Mile, though they actually have nothing to do with the specific line you take. First, take the group and individual photos at the backcountry gate. Second, once you make it down to the Beaver Ponds, cross them and find a spot on the other side to sit and enjoy a beer. I’ve skied the Mile numerous times and all except once, did I see people enjoying the fruits of their labor. The Ponds are in a relatively flat section and mark a perfect way to split the run up while (responsibly and legally) enjoying a cold one. The last traditional aspect of the Mile involves heading to the Minturn Saloon (just a quarter-mile away from the end of the ski run) and enjoying a celebratory Margarita.
When To Ski The Minturn Mile
Technically, you can ski the Mile whenever Vail is open; you can even attempt it once the resort closes, but there are prime times to go, and it all depends on conditions. With proper avalanche gear and radios, the Mile makes for a perfect end to a powder day; many areas of the Upper Bowl hold stashes of fluff long after snowstorms push through. However, when the sun angle increases around mid-March, parts of the run can melt out. The Beaver Ponds are especially irritating to cross if there’s no snow bridge to take advantage of. Similarly, the myriad obstacles underfoot require good coverage to be skied upon, so early season (Nov-Dec) is usually out unless you want to destroy your skis.
If the area is having an average to above-average winter, mid-January through the end of February is the best window to go. The days are shorter, colder and the lower sun angle helps keep even the exposed parts of the trail covered. In a below-average winter, wait until a series of multiple storms drops powder before you consider giving it a go; again, you can go earlier, but it’s not much fun portaging skis when you could be skiing the whole thing.
The Mile is a low-angle run and doesn’t usually slide, but absolutely has in the past. It is never wise to risk safety without the proper gear and a coherent plan. As always, check CAIC for current avalanche conditions before attempting. The Minturn Mile is in the Vail and Summit County zone, make sure you are checking conditions for the correct zone!
Being so close to Vail Resort, the Mile benefits from multiple forecasts. You can use Vail resorts weather report for starters. I also recommend checking out the town of Minturn’s forecast for conditions more applicable to the bottom of the run. One of my other favorite sites to check out is Opensnow. Opensnow has lots of radar maps and easy-to-digest general weather discussions that give you the bigger picture of Colorado’s winter and how individual storms will affect certain parts of the state. They also have a paid subscription service for more in-depth weather analysis for those interested.
Since many people use sidecountry runs, like the Mile, as their first forays outside ski resorts, make sure you are checking weather forecasts up until right before you ski. It is much better to give the Mile a try on a bluebird day when markers and terrain features are obvious. Despite the run being so close to Vail, people get lost on it all the time. Pick your day carefully.
Access:
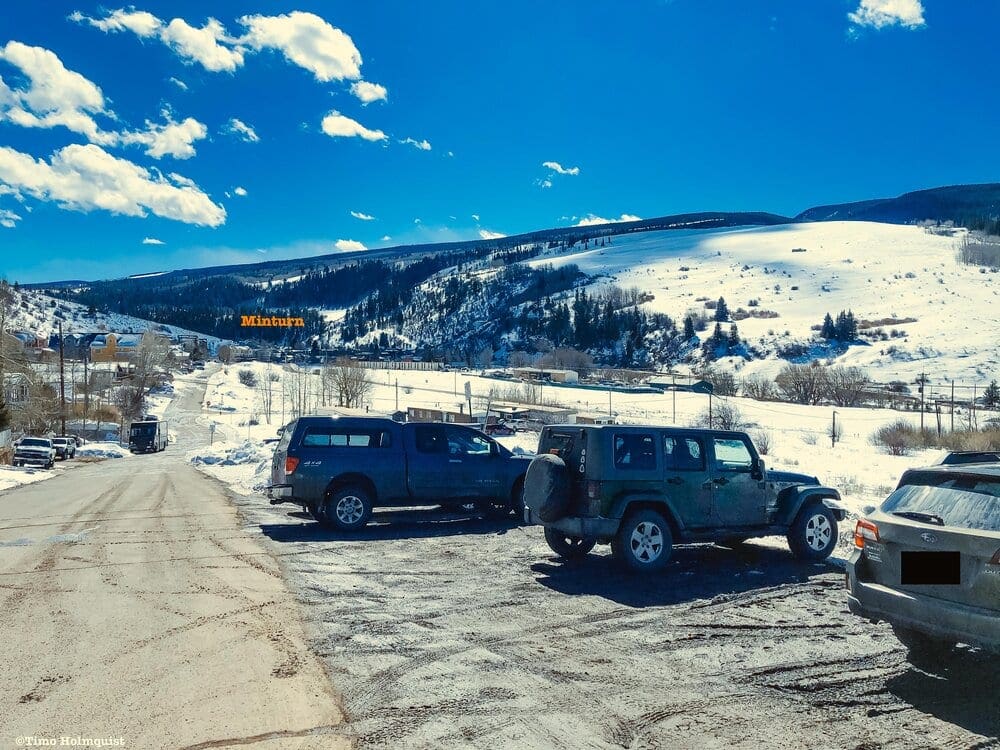
Picture: Looking down Taylor Street from the parking area. Photo by Timo Holmquist.
For all who want to ski the Mile, the best option is to park a car at the end of Taylor Street in Minturn. If driving, use exit 170 off of I-70 to get to Minturn. From the highway exit, take US 24 south until arriving in the downtown area. At the first opportunity, take a hard left on N. Main street, crossing the Eagle River. The Minturn Saloon will be immediately on your right. Just beyond the Saloon building, take a right onto Rail Road Ave, crossing the tracks. At the next three-way intersection, take an additional right onto Taylor Street and continue driving until it dead ends. On the left-hand side is a dirt area with space for about ten cars. If the lot is full, there is additional public parking down by the Minturn Saloon.
The run is located about two hours from Denver or 2.5 from Boulder and Fort Collins. Despite the longer access from populated areas, blasting past the perennially congested Summit County ski resorts will help you shed the crowds. It also helps to pick a weekday. If you’re forced to use the weekends, park in Minturn early.
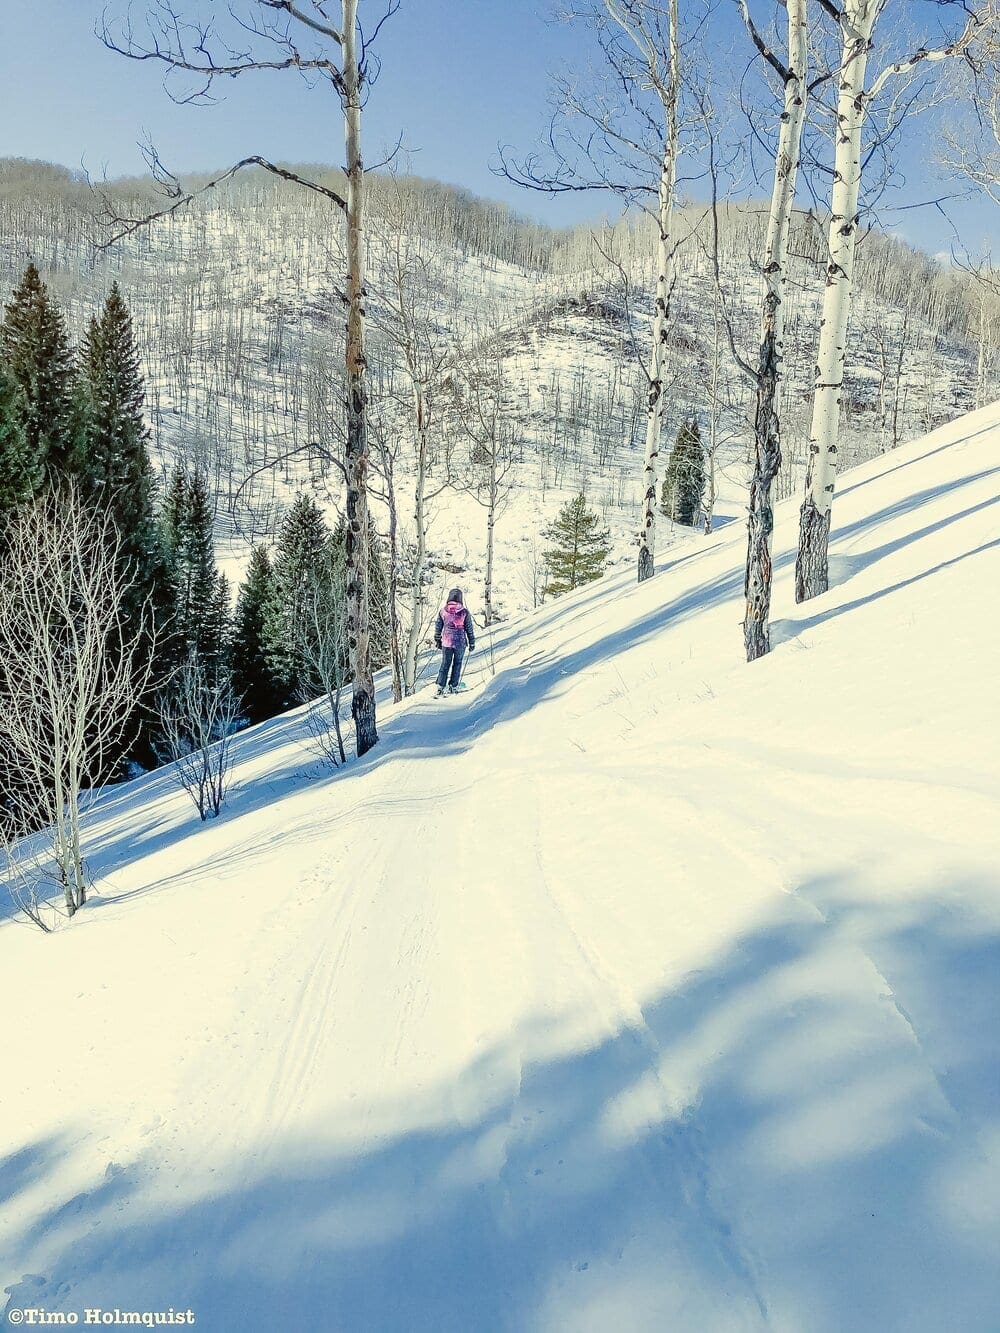
From the parking area, hitch an Uber/Lyft/Taxi or plan a ride back to Vail (remember, you need a lift ticket or Epic Pass to ski Vail). If you’re skinning up to ski down, cross the end of Taylor Street and find the well-trodden ski line, which follows Game Creek Trail (Picture: Where the Mile comes out from the woods behind). As long as you don’t cross into the resort at the top, you can ski the whole thing without a lift ticket. This variation does demand quite a workout.

Places to Stay
The Minturn Mile is doable as a day trip from the Front Range but can also be combined with a resort trip to Vail or Beaver Creek. Lodging in the Vail Valley is notoriously expensive, but Airbnb options are also plentiful. If you’re planning to stay near the Mile, check out lodging options in the towns of Minturn, Vail, Avon, Eagle-Vail, and Edwards. If you’re ok driving a bit farther, Leadville and the town of Eagle also have some options.
Run Analysis:
Getting to the Start
Having launched from both gates, I prefer to start from the highest point (Ptarmigan Point/Ricky’s Ridge) and will describe the line from there. From the bottom of the main Vail Village, take Gondola 1 to Mid-Vail, strap in, and head to Wildwood Express (Lift 3). At the top, shuffle to the top of the Game Creek Lift unload area (visible in front and slightly to the right of you) and pass it on the left.
If starting in Lionshead, take Eagle Bahn Gondola to the top. Look for the Game Trail green trail and descend into Game Creek Bowl. At the bottom, hop on Game Creek Lift (Lift 7) and ride it to the top.
At the top of Game Creek Lift, you should see signs for Ricky’s Ridge (to the right if riding Game Creek lift, straight-ahead if coming from Wildwood Express). Follow the signs. After half a minute, the trail splits. A traverse left will take you to the lower part of Ricky’s Ridge, while a right will lead you down Lost Boy, a wide, green run. At the split, a ridge rises, and pink flagging should be visible. Once you lose speed, unstrap, and hike up the spine of the ridge. This hike is still part of the resort, so you’ll most likely see other people here as well.
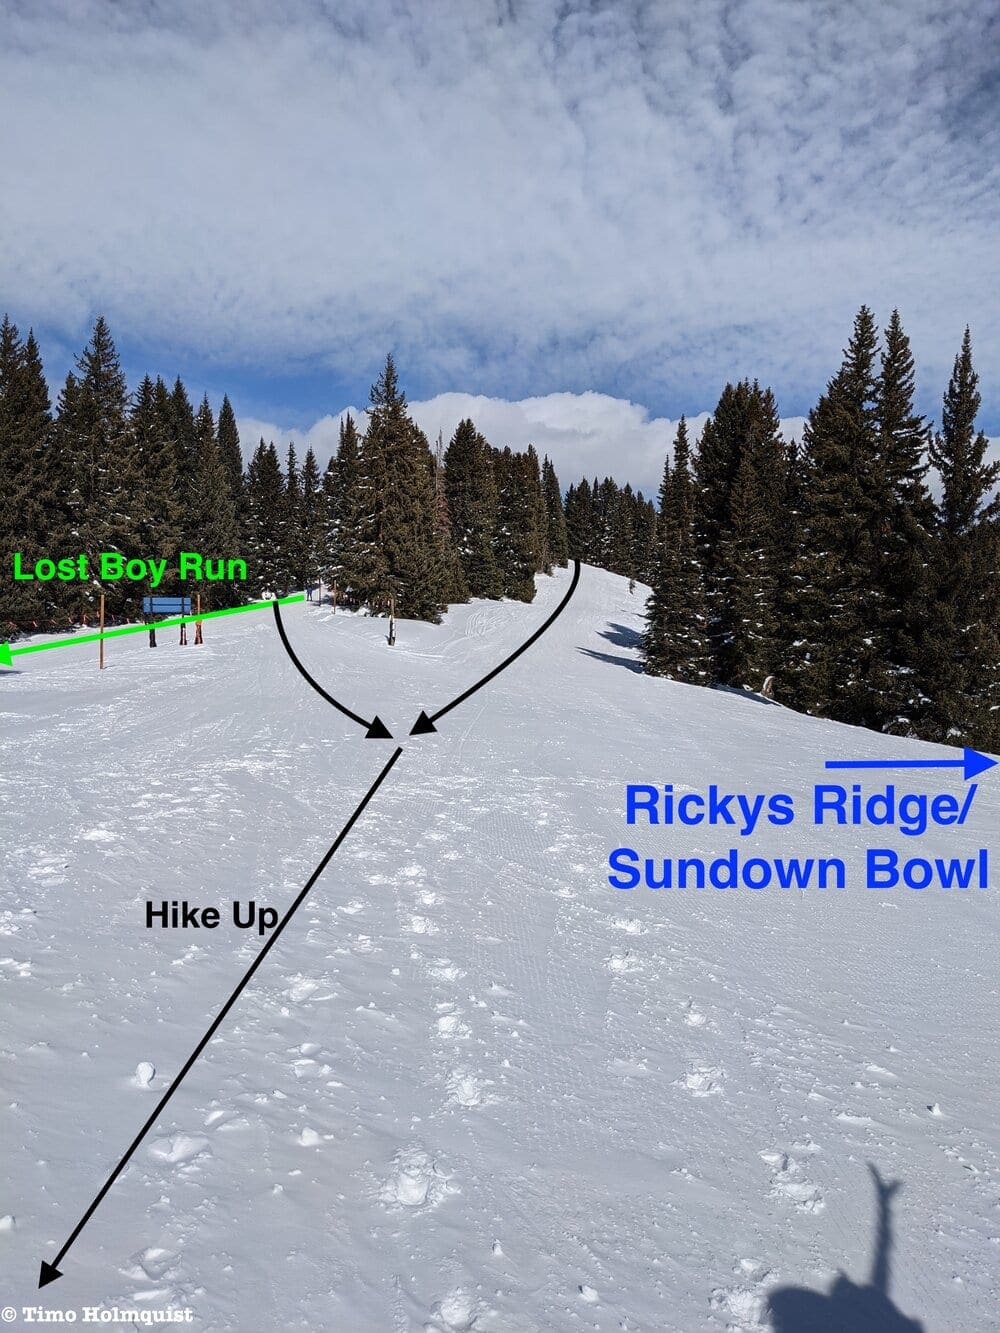
Picture: Looking back at the trail split. Photo by Timo Holmquist.
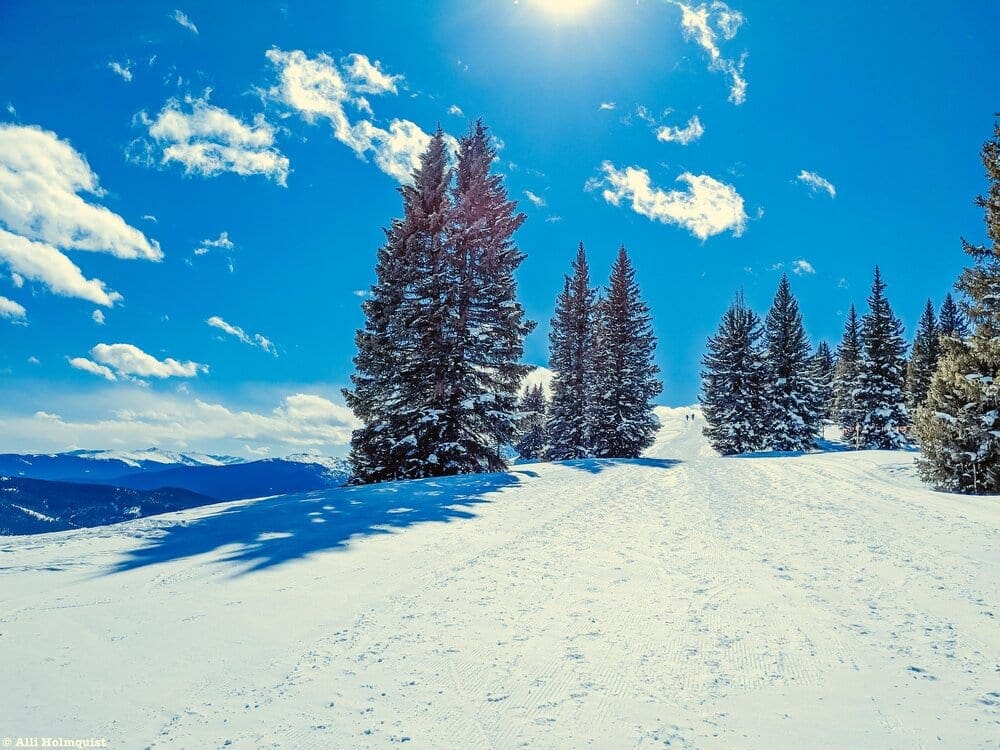
Picture: Ridge Walk. Photo by Alli Holmquist.

Map: To the Gates.
At the apex of the climb, you’ll be rewarded with stellar views. Turn to your right, following the flagging, until you see the gate. At this point, check all of your gear (first-aid, radios, avvy gear, bindings, etc.). Once you cross through the gate, you’ll officially be outside of Vail Resort.
**Note: If you miss the top gate, take Lost Boy down a few hundred feet. Once the ridge to your left lessens, bolt left towards the ropes and the Lost Boy Gate (aka the lower gate). If you accidentally take Ricky’s Ridge, ski down to the bottom of Sundown Bowl, take Chair 5 up, ski down the front side to Mid-Vail, and take Chair 3 back up again.
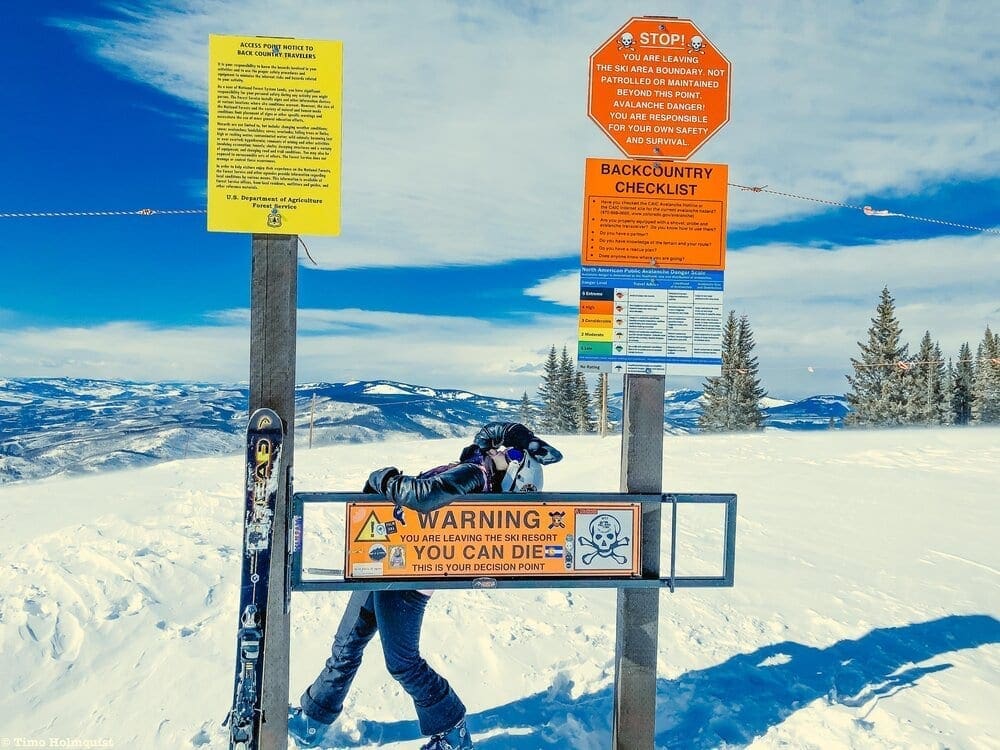
Ricky’s Ridge Gate photo. Photo by Timo Holmquist.
Map: Minturn Mile
Section 1: Upper Bowl

Picture: Upper Bowl. Photo by Timo Holmquist.
From the other side of Ricky’s gate, if coverage is good, strap in and slide your way over the ridge crest to get a better view of the Upper Bowl. On a bluebird day, Mount of the Holy Cross will dominate the view to the left. The options for your descent line are varied. Most commonly, (and a good idea if it’s your first time) skiers descend down the middle of the Upper Bowl, with the ski resort boundary visible to your right-hand side.

Minturn Ridgeline Photo. Photo by Timo Holmaquist.
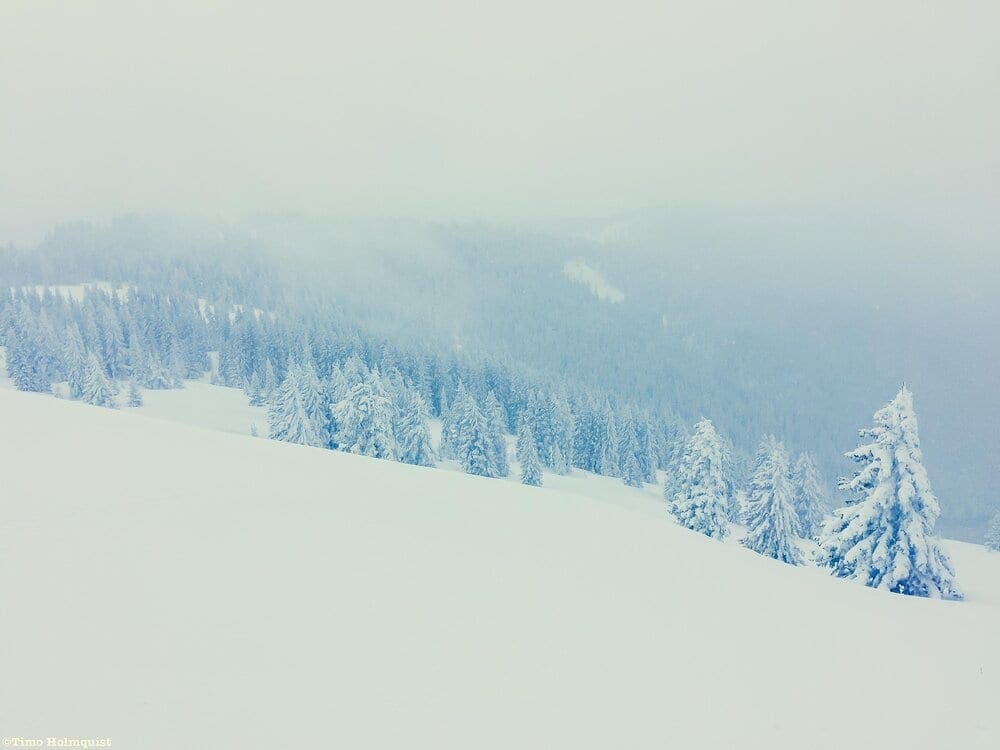
Photo of cloudy day contrast. Photo by Timo Holmaquist.
If you’re keen on exploring, once able, a hard left into scattered lines of pine trees should yield some hidden powder stashes. If doing this variation, make sure that the slope ALWAYS descends to your right. If you veer too hard to the left, it’s possible to inadvertently enter an adjacent basin. While easy to avoid on a bluebird day, many reports exist of people getting lost here when visibility is an issue. The adjacent basin is full of cliff bands and does not have a good run out to Minturn. Things look a lot different when clouds are in play.
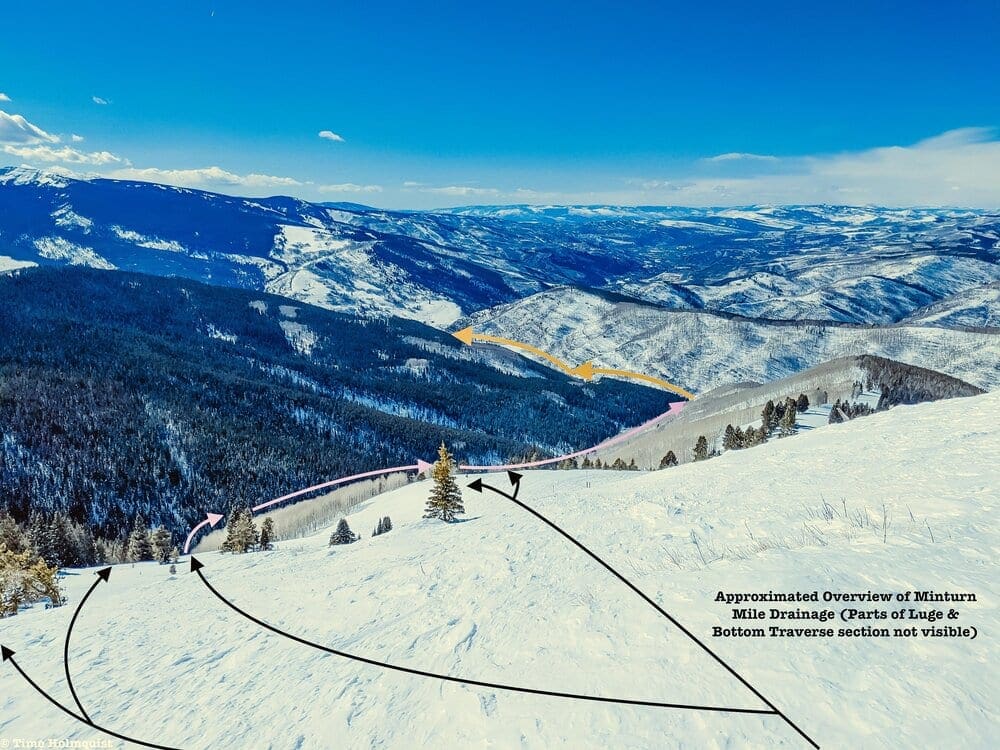
Route Overview picture. Photo by Timo Holmquist.
The goal of this first part is to keep descending into the open upper area. On a bluebird day, it’s easy to stay within the basin; just follow the line of least resistance. If you’re nervous, keep the resort boundary visible to your right until you pass the Lost Boy Gate. Below the Lost Boy Gate, make some wide turns angling left as the drainage becomes more defined. There is a cluster of two or three pine trees in the middle of the drainage that can easily act as markers.
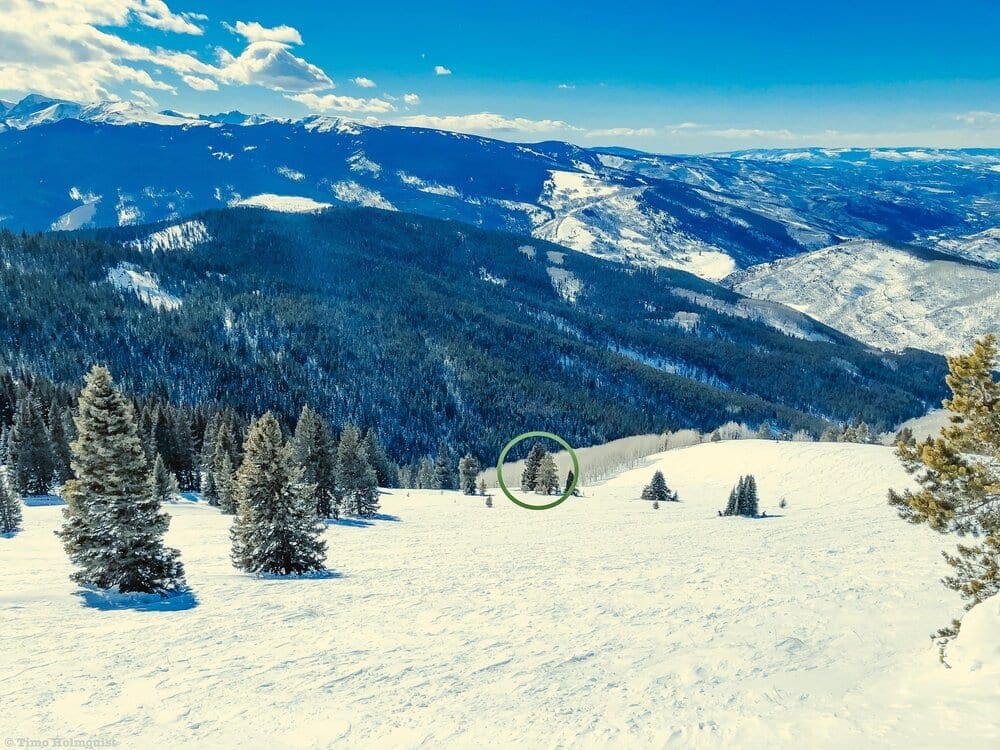
Photo of Pine Tree Markers. Photo by Timo Holmquist.
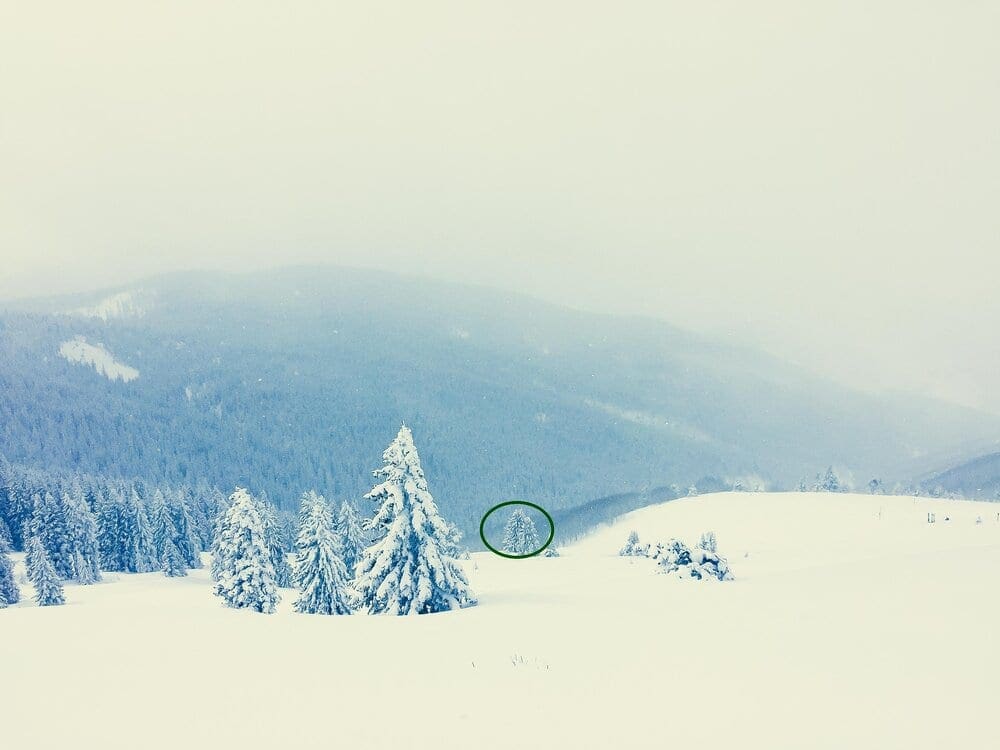
Pine Tree Markers in deep powder. Photo by Timo Holmquist.
Beyond the pine trees, the slope angle increases, and you’ll be funneled towards the center (Tightening drainage). Once the trees close in on either side, you’ll enter the second section, which I’ve been calling the Funnel.
Tightening drainage. Photo by Timo Holmquist.
Section 2: The Funnel
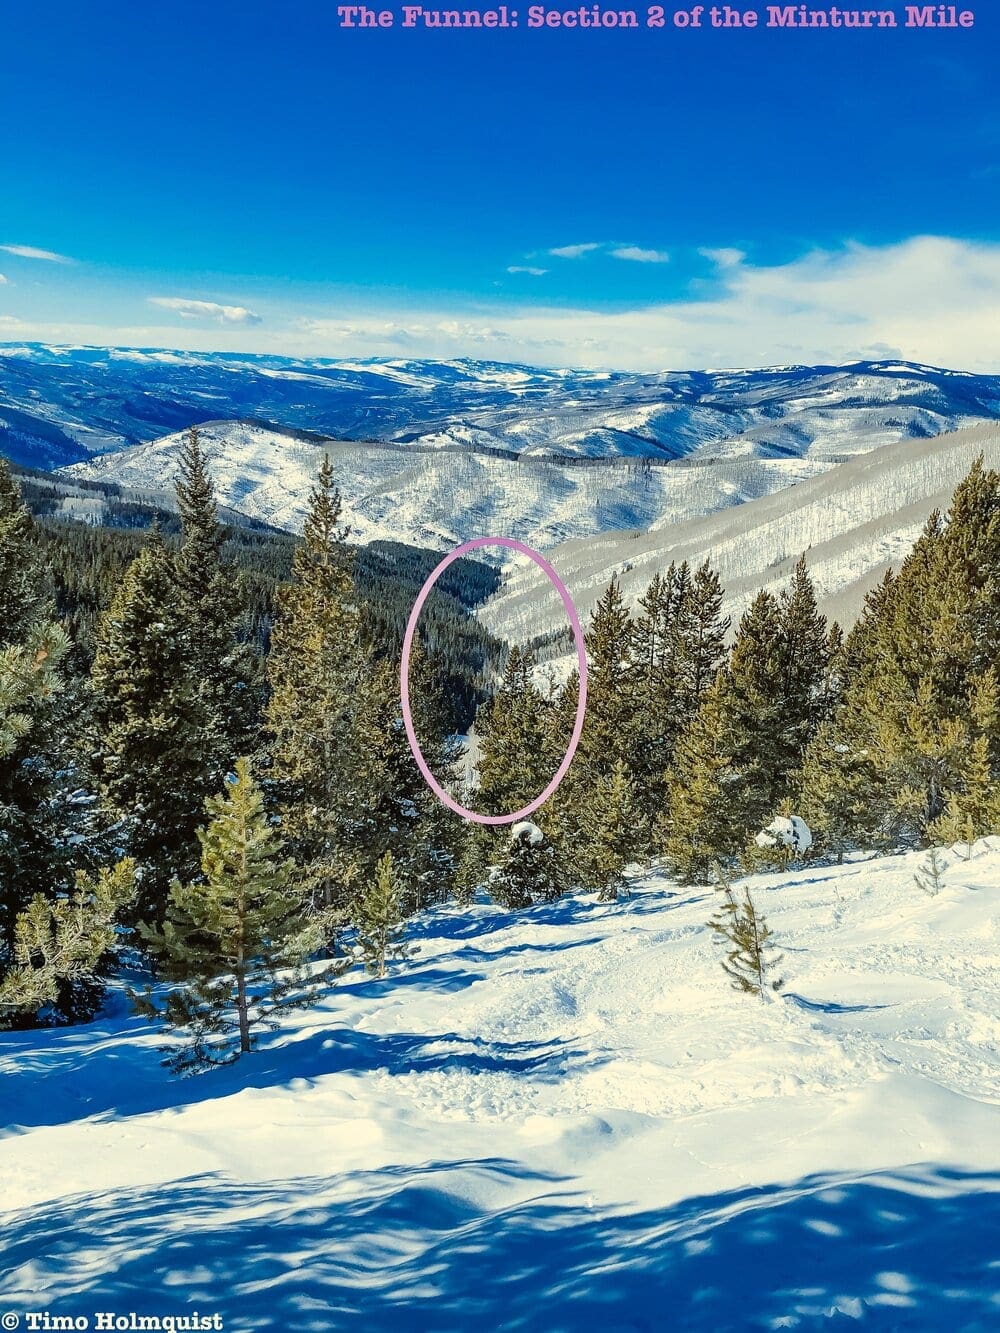
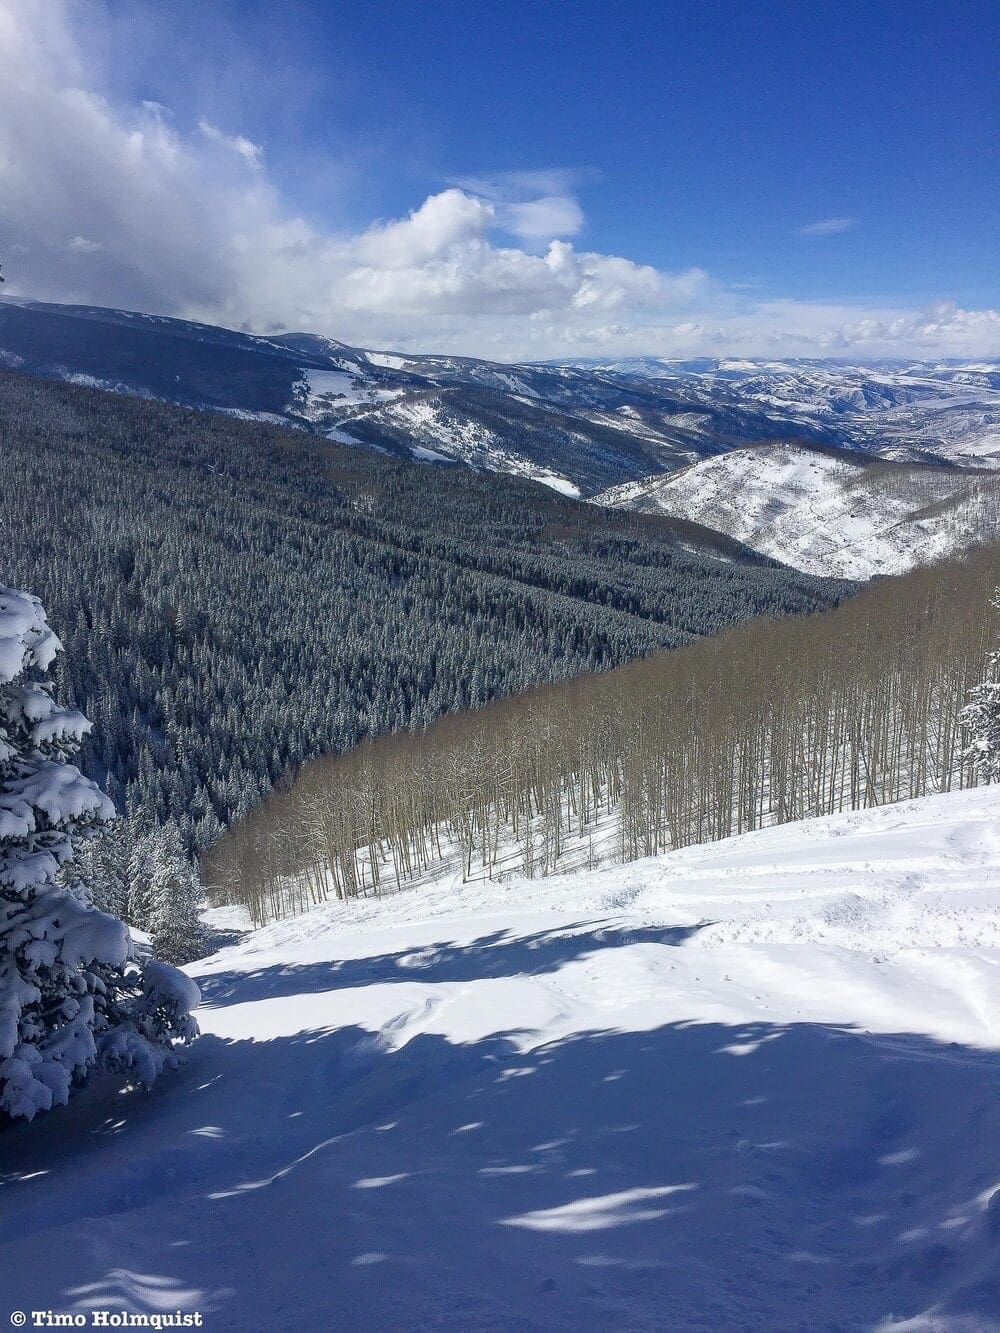
Picture looking down the Funnel. Photo by Timo Holmquist.
For exploration’s sake, you can peel left into more pine trees or head right (paralleling the resort boundary) for some fun aspen tree skiing. A helpful visual queue is noticing that the bottom of the drainage acts as a border between pine trees (left) and aspens (right). Regardless of your approach, eventually, the Funnel will push you towards the middle of the drainage.
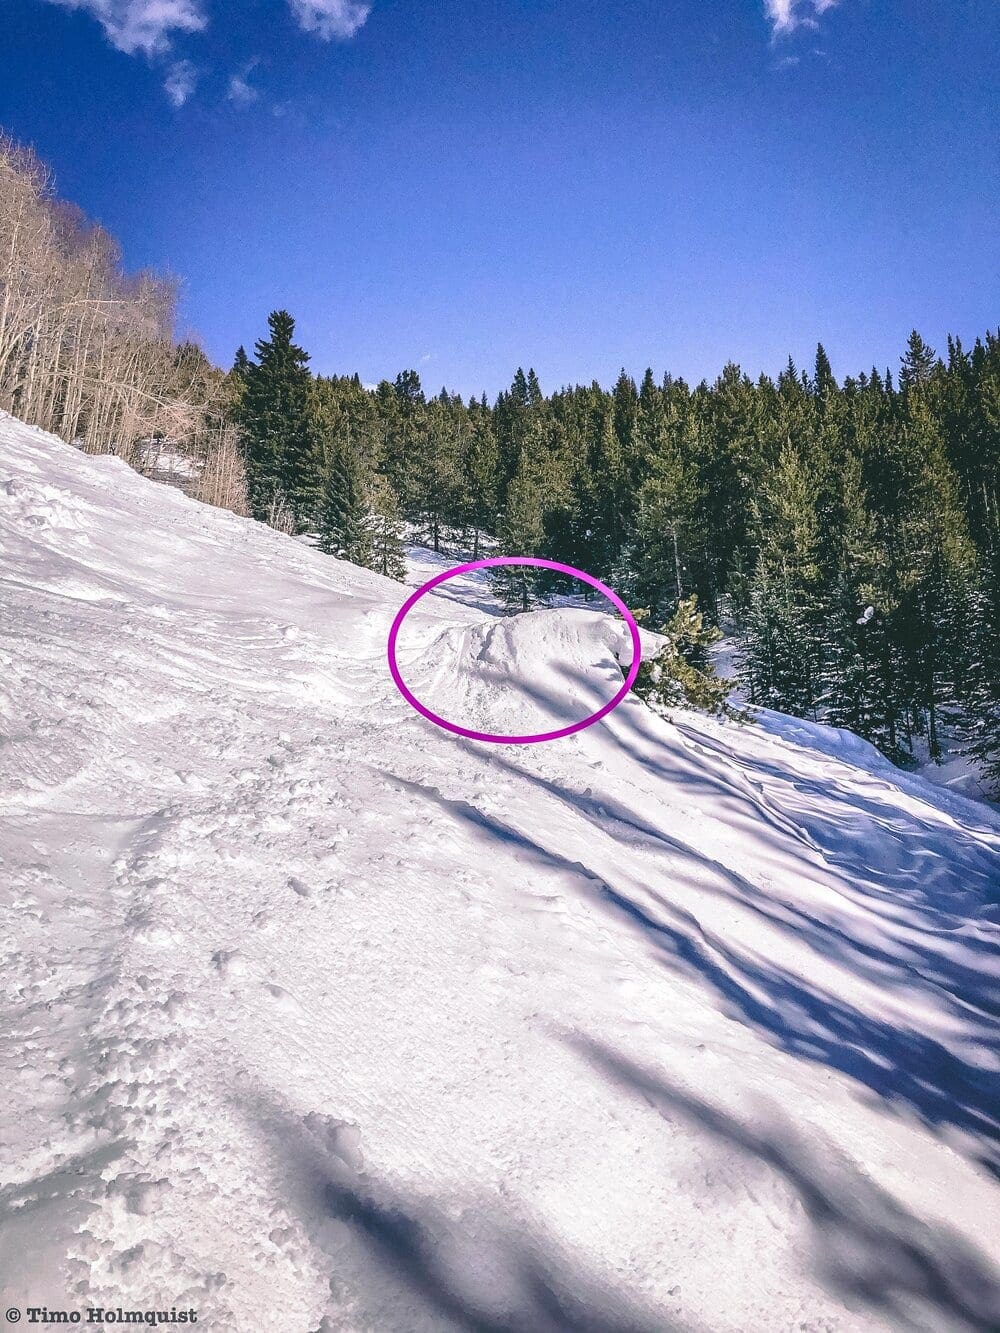
Looking uphill at the jump. Photo by Timo Holmquist.
Depending on coverage, once the drainage becomes more well-defined and you drift into it, there will be a fun jump between the last line of aspens and the low point of the gulley. Beyond that, you’ll ski through a series of dispersed trees and open fields, which often hold powder on their periphery long after it stops snowing. If you’re skiing on a powder day, make sure to keep pointing your ski tips downhill to maintain momentum.
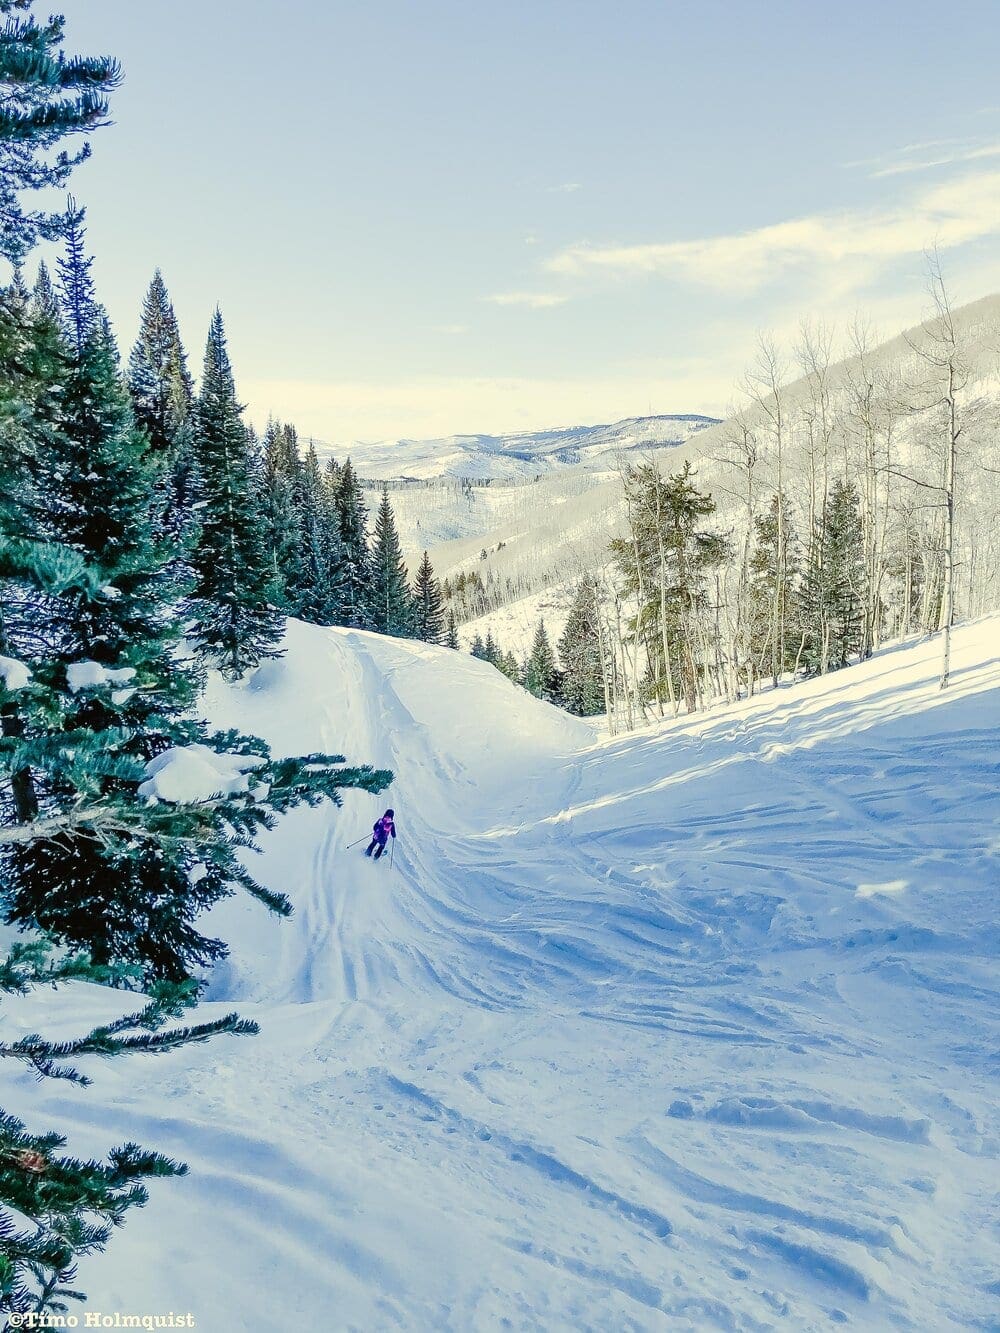
Typical terrain in the Funnel. Photo by Timo Holmquist.
After long minutes of joyous skiing, the ski line will narrow down to one obvious route, which crisscrosses the bottom of the Funnel a few times. These crisscrosses are important because they mark the easiest path through without losing speed. A good rule of thumb is to take a quick pause after every tree section so you can sight where the most obvious ski tracks lead you. This section is usually well-defined and at one point, crosses a side stream descending from the right. On an unusually warm year or with minimal snow coverage, the snow bridge over the creek can melt out, creating your first hazard.
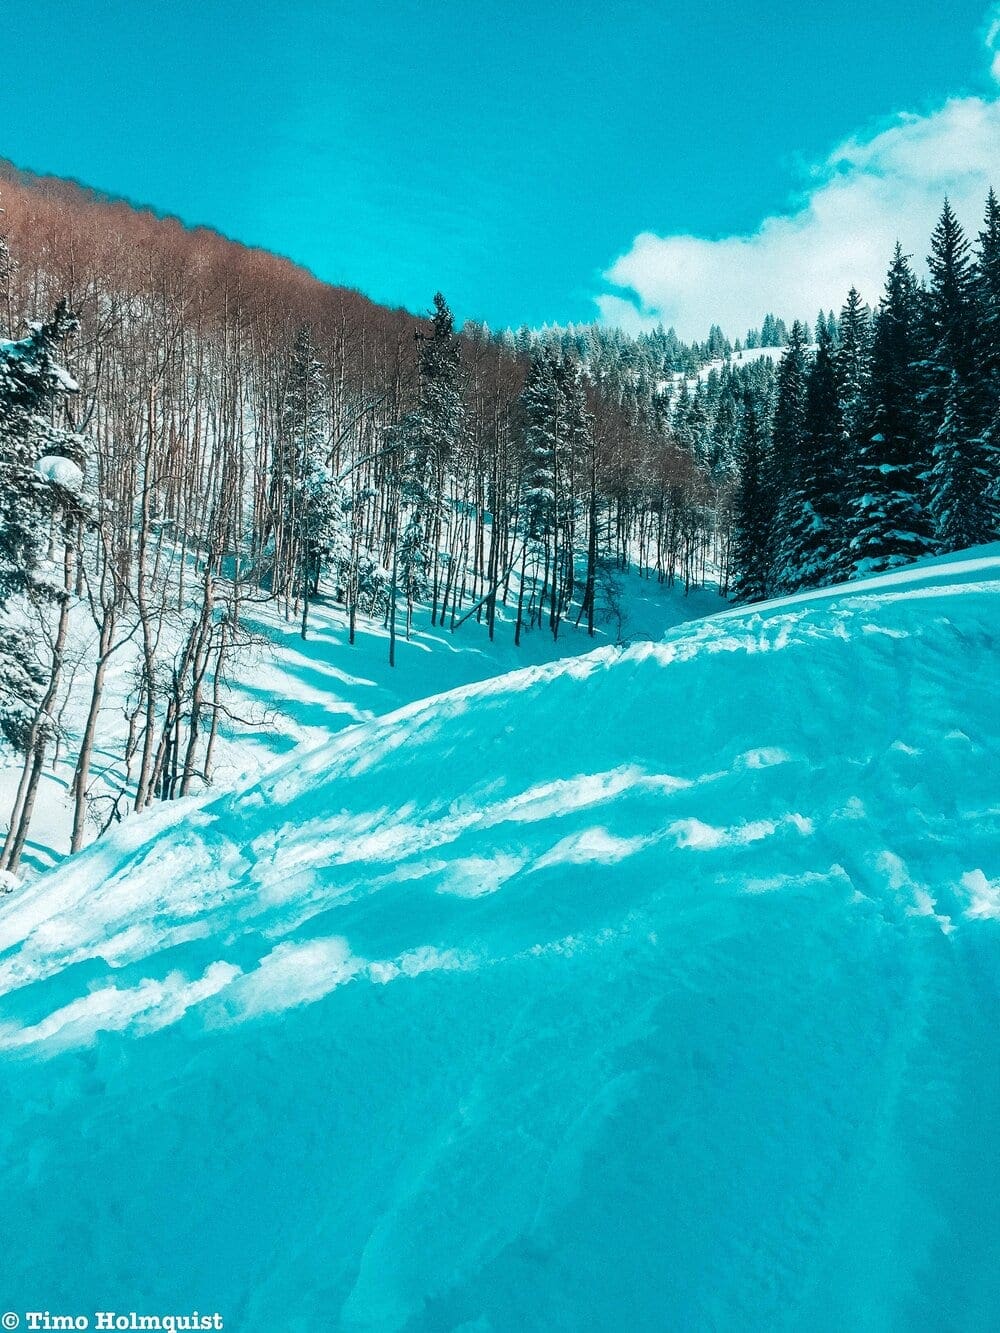
Looking back up the Funnel. Photo by Timo Holmquist.
After the mini creek, the well-defined track will traverse the ridge to the right-hand side of the main drainage (aspen trees are plentiful here). Once you round the ridge, you’ll be within sight of the Beaver Ponds. Try not to lose too much speed because you’ll need it to cross the ponds. Again, with minimal coverage or later in the season, the snow bridge over the ponds may be melted out, creating your second and largest obstacle. Those ponds are deeper than your boots are tall.
Coming up to the beaver ponds. Photo by Timo Holmquist.
Looking back across the ponds after crossing them. Photo by Timo Holmquist.
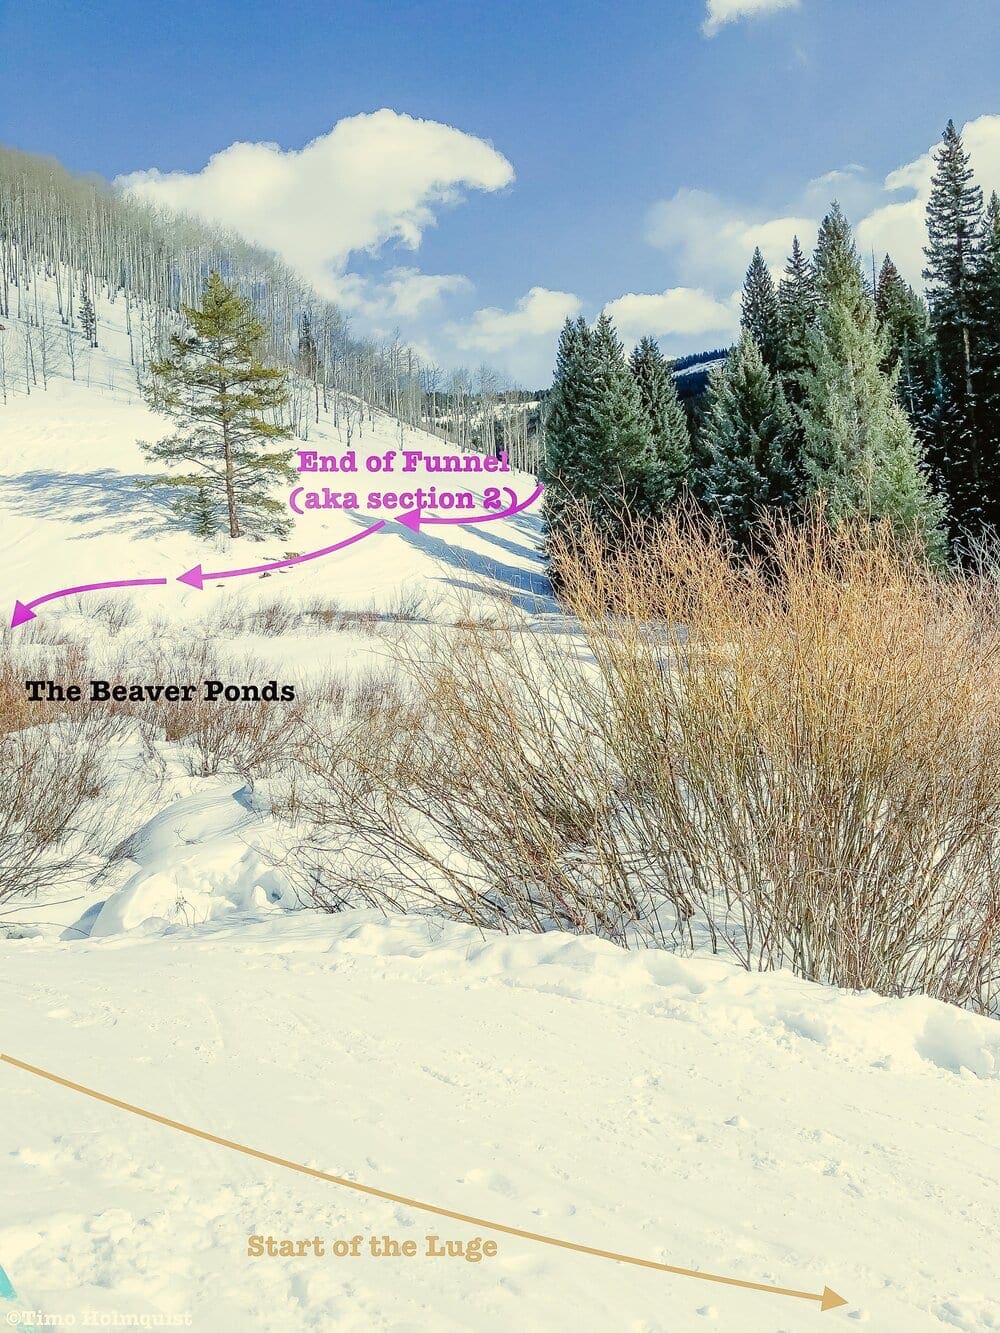
Section 3: The Luge
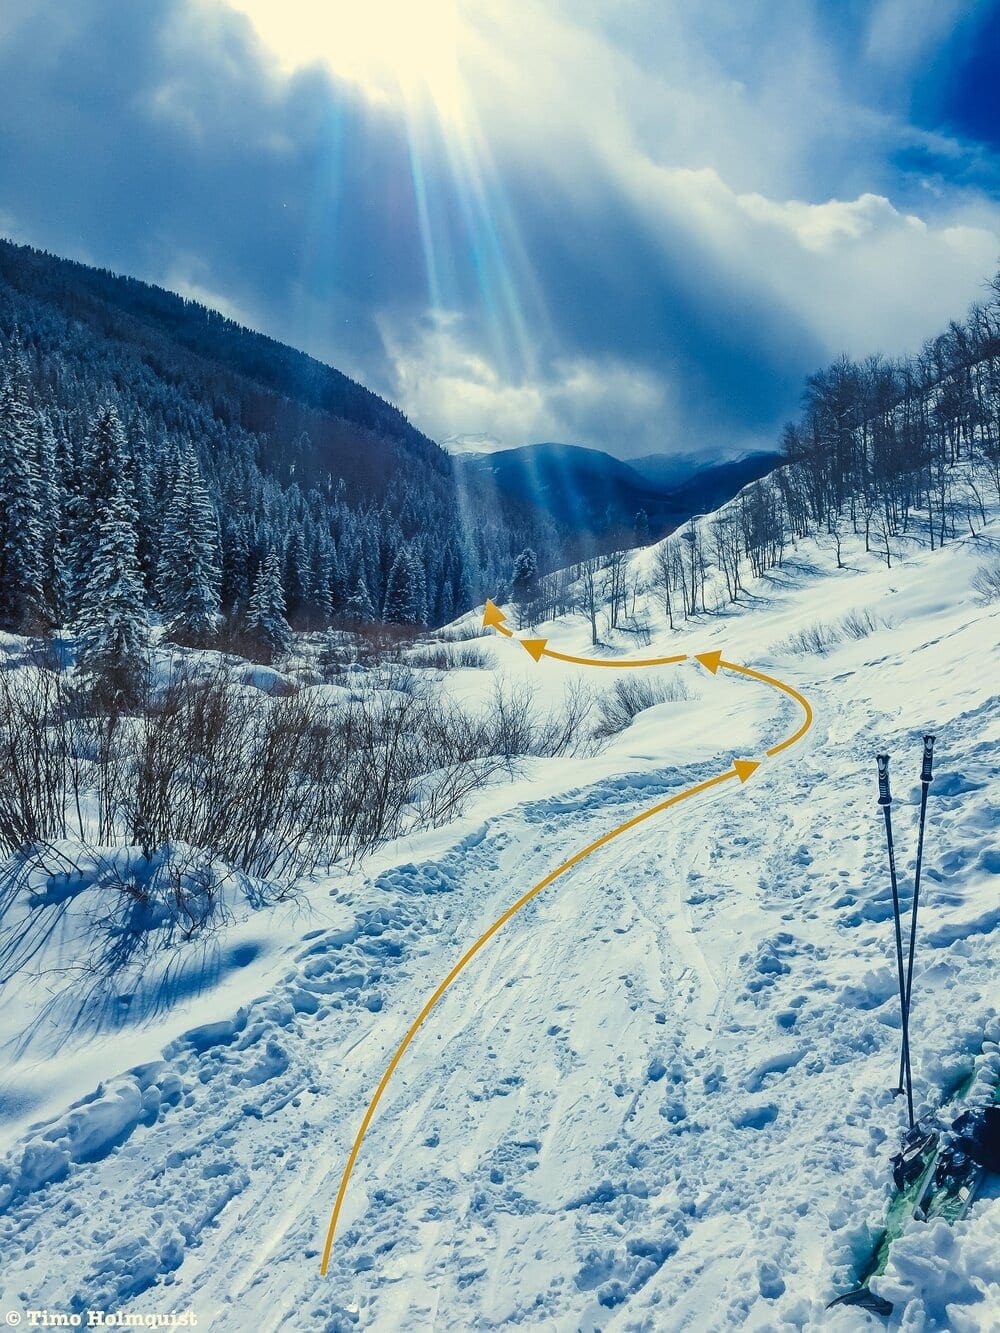
Beaver Ponds and the flat start to the Luge. Photo by Timo Holmquist.
Once you’ve successfully navigated the ponds, you’ll arrive at a flat benched area. Take a hard left and find a place to relax. Traditionally, here is where you’ll encounter other groups sipping on drinks and enjoying a successful first-half descent. Geographically, it’s also a good rest stop because once you progress beyond the Ponds (and the flats behind it), you’ll enter the Luge, a 1.5-2-mile section that is fast, wild, and thin.
Quick drops and runouts. Photo by Timo Holmquist.
After the ponds, traverse the flat area, which may require some quick sidesteps or a duck walk uphill if you lose speed. Once beyond it, the Luge begins. The first part of the Luge is a great introduction, a few fast sections with longer and flatter areas behind to keep the thrills at a manageable level. From this point on, there is really only one route because the gulley steepens dramatically on either side. You’ll be on the right side of the drainage.
Creekside mellow section. Photo by Timo Holmquist.
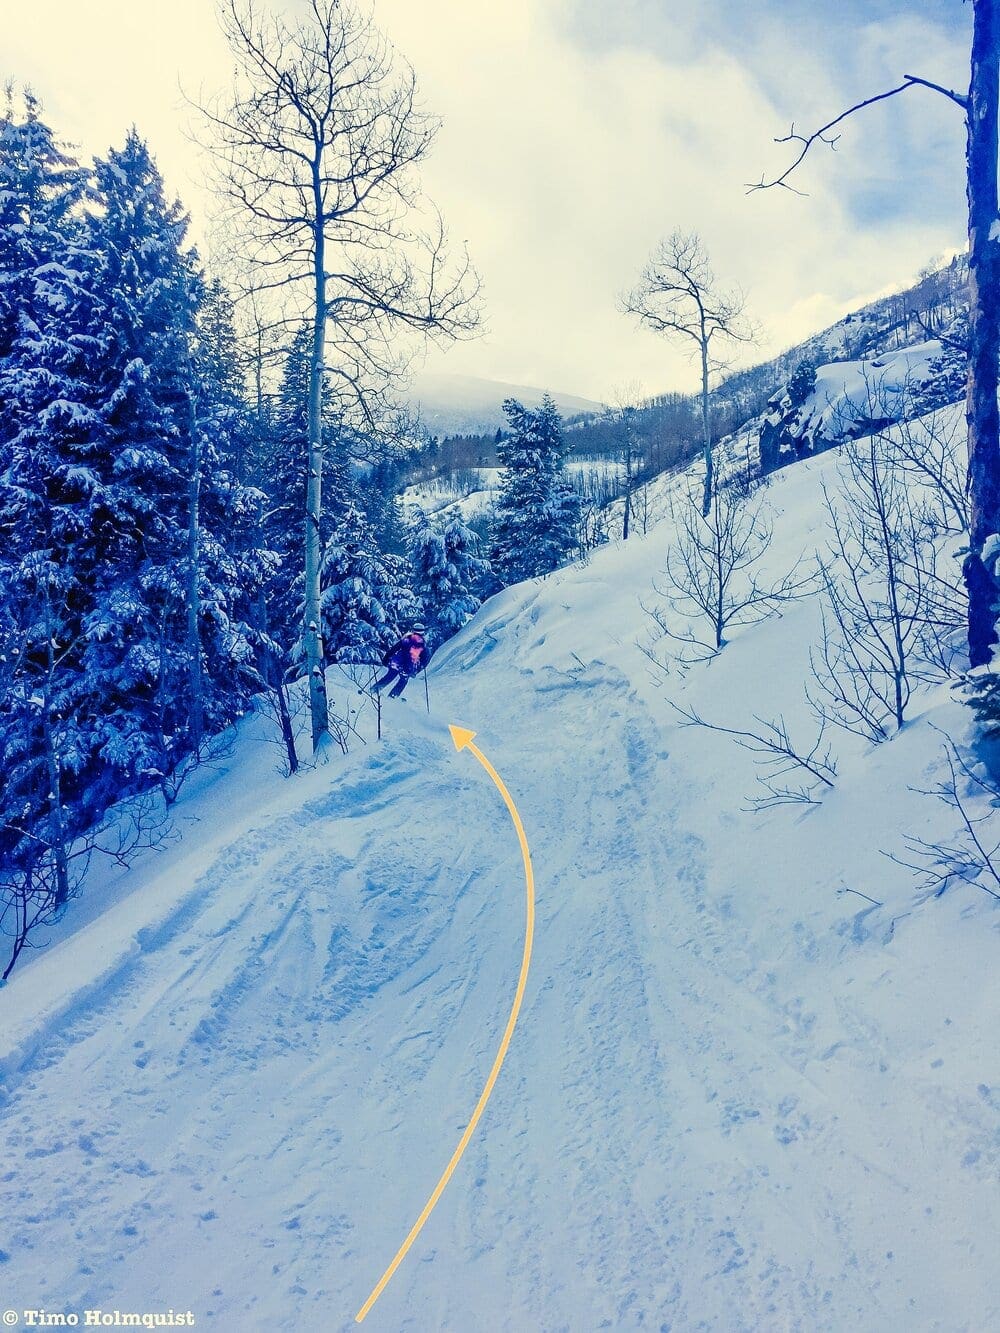
Next up is the steepest part of the Luge. Once you get here, it’s short-turn-city, or you’ll be wedging to slow down. There is not a lot of room to turn or get out of the way if someone is ascending up to you. About 30-40 yards after you start cruising, a frozen waterfall spills over the trail. Check your speed here; the ice has wiped people out that aren’t expecting it. Conversely, in less than ideal conditions, this particular downhill is in full view of the afternoon sun and can completely melt out. Again, check your speed: rocks and dirt are decidedly unkind to skis.
Luge: Down Gulley view. Photo by Timo Holmquist.
Luge: Steeper view. Photo by Timo Holmquist.
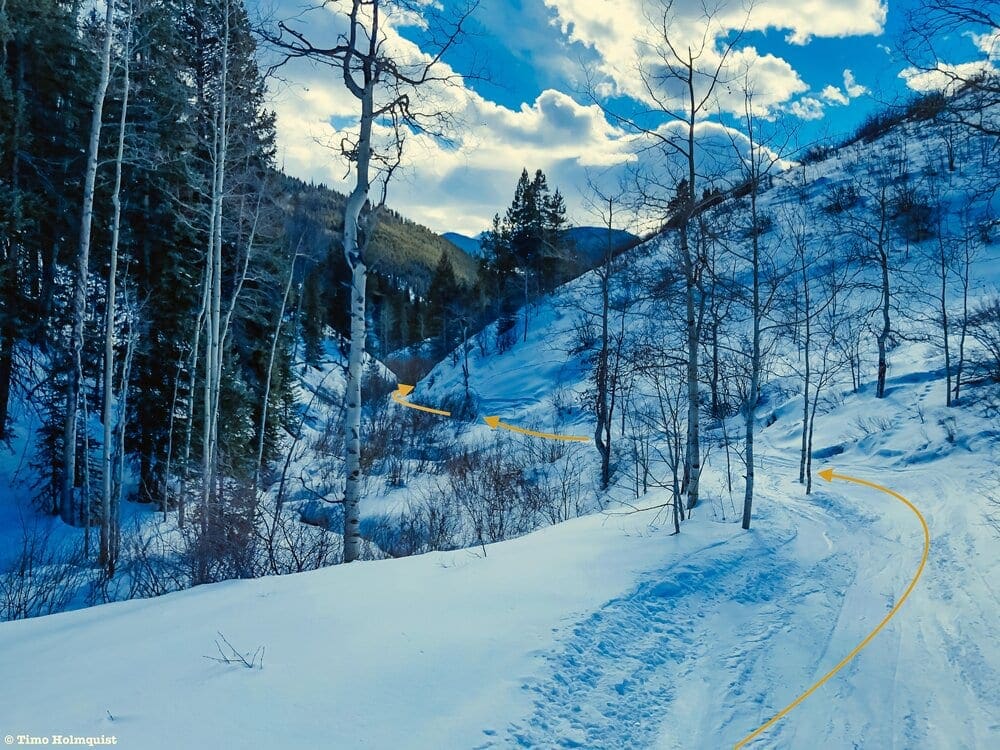
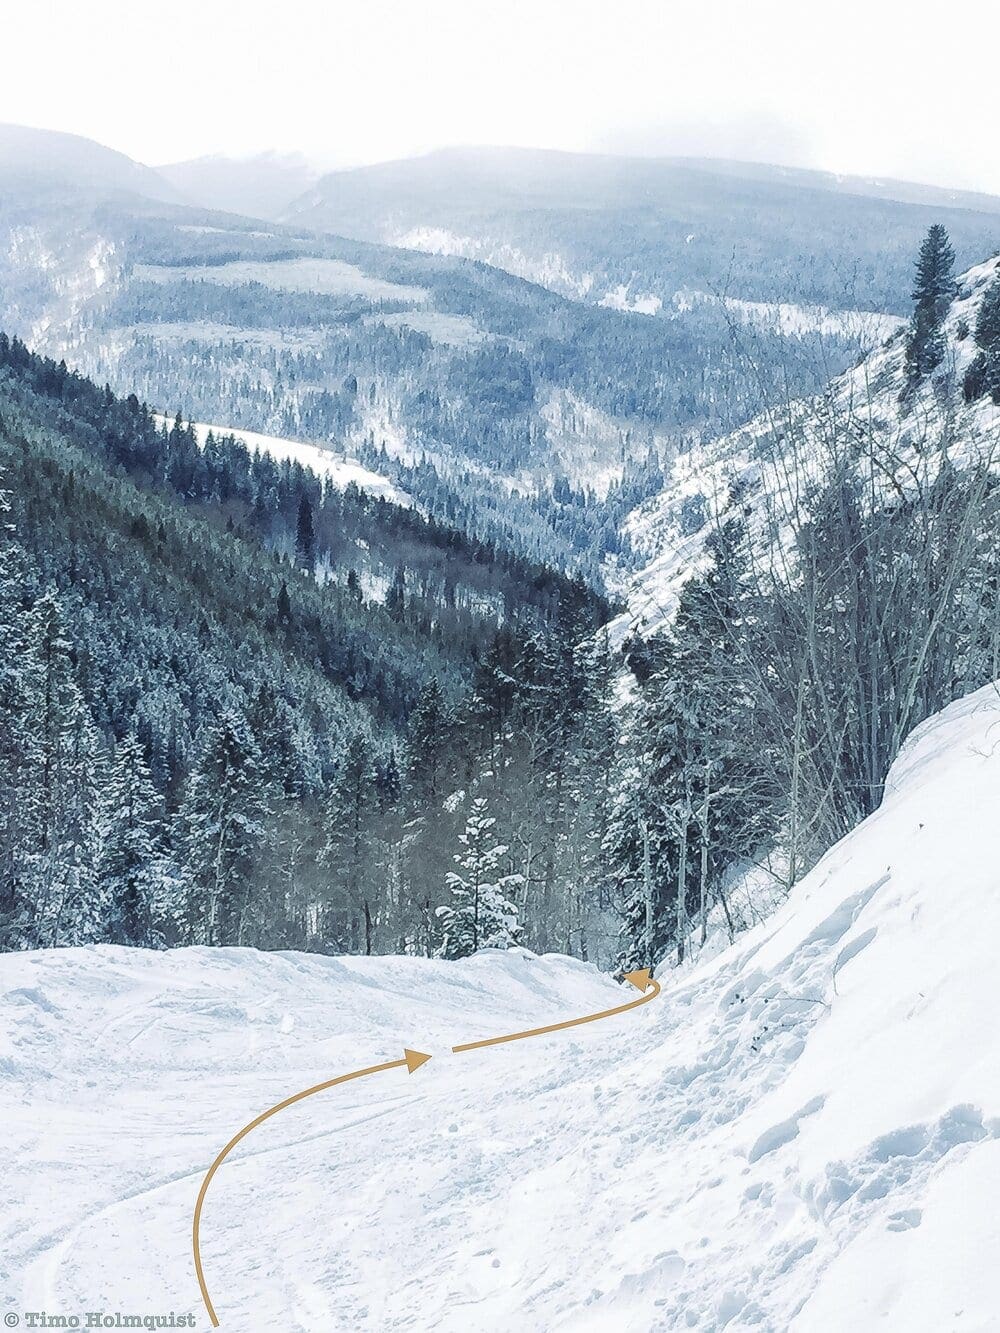
Once the run descends back into the trees, you’ll have a little more real estate to make turns but not much. The Luge continues, passing under tree tunnels and the summer trail junction with Cougar Ridge. If you slow down, you’ll see the trail sign on your left; if you’re hauling, just know that it’s there. Beyond this section, you’ll enter a quick open area before the run jaunts left across the creek and continues down to an obvious fence line and private property sign. At this point, in order to finish the Mile, you have to veer left and uphill to avoid someone’s house/property. This is where the Luge section ends, and the Bottom Traverse begins.
Bottom of the Luge. Photo by Timo Holmquist.
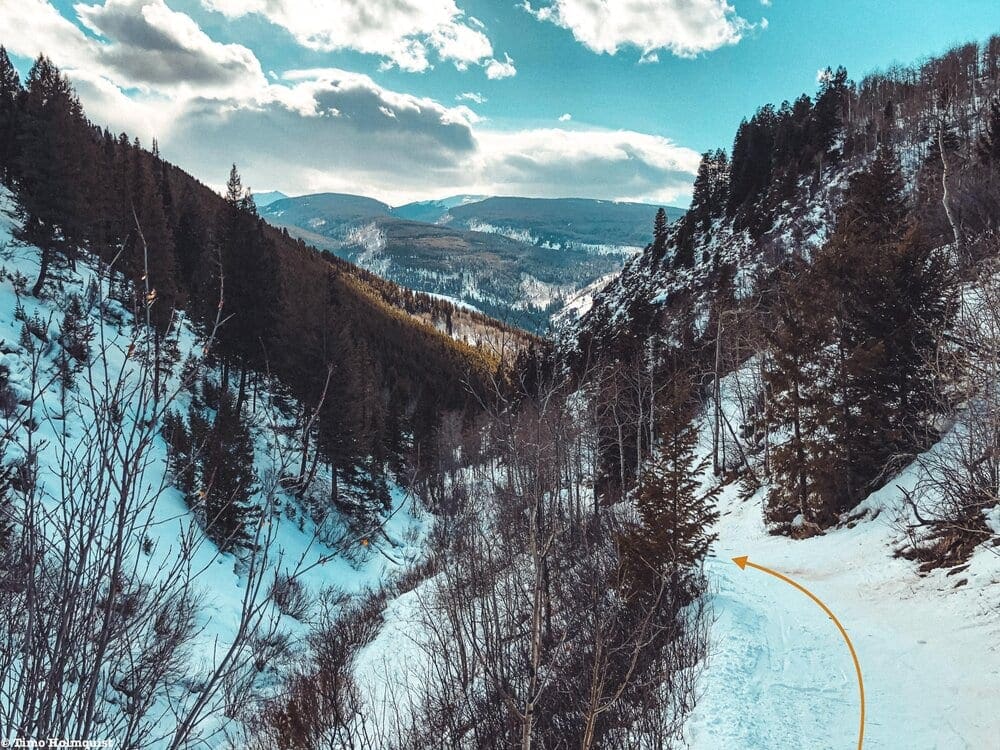
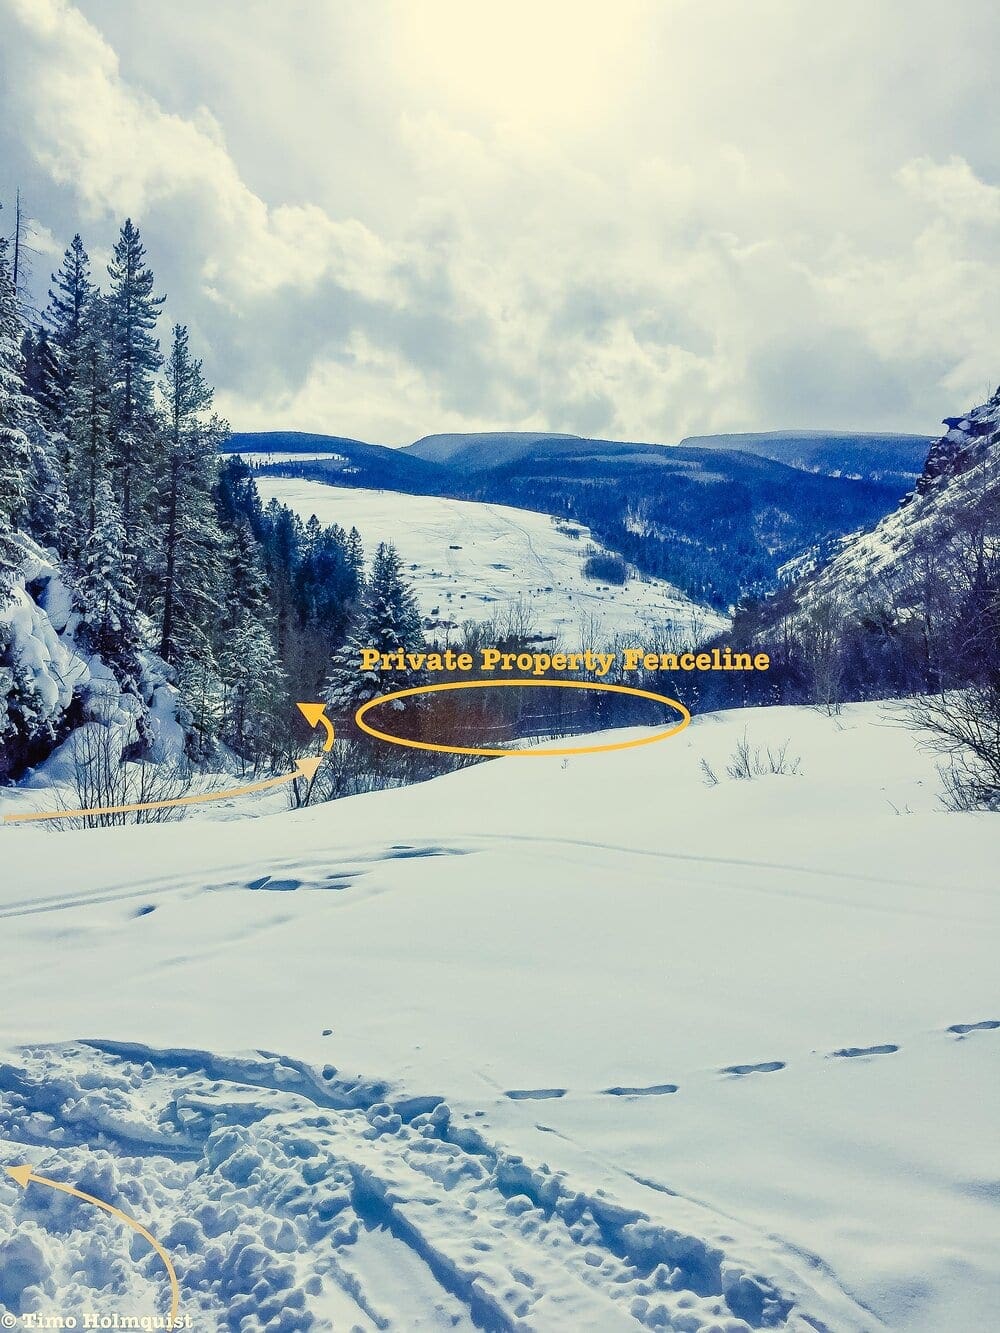
Section 4: Bottom Traverse
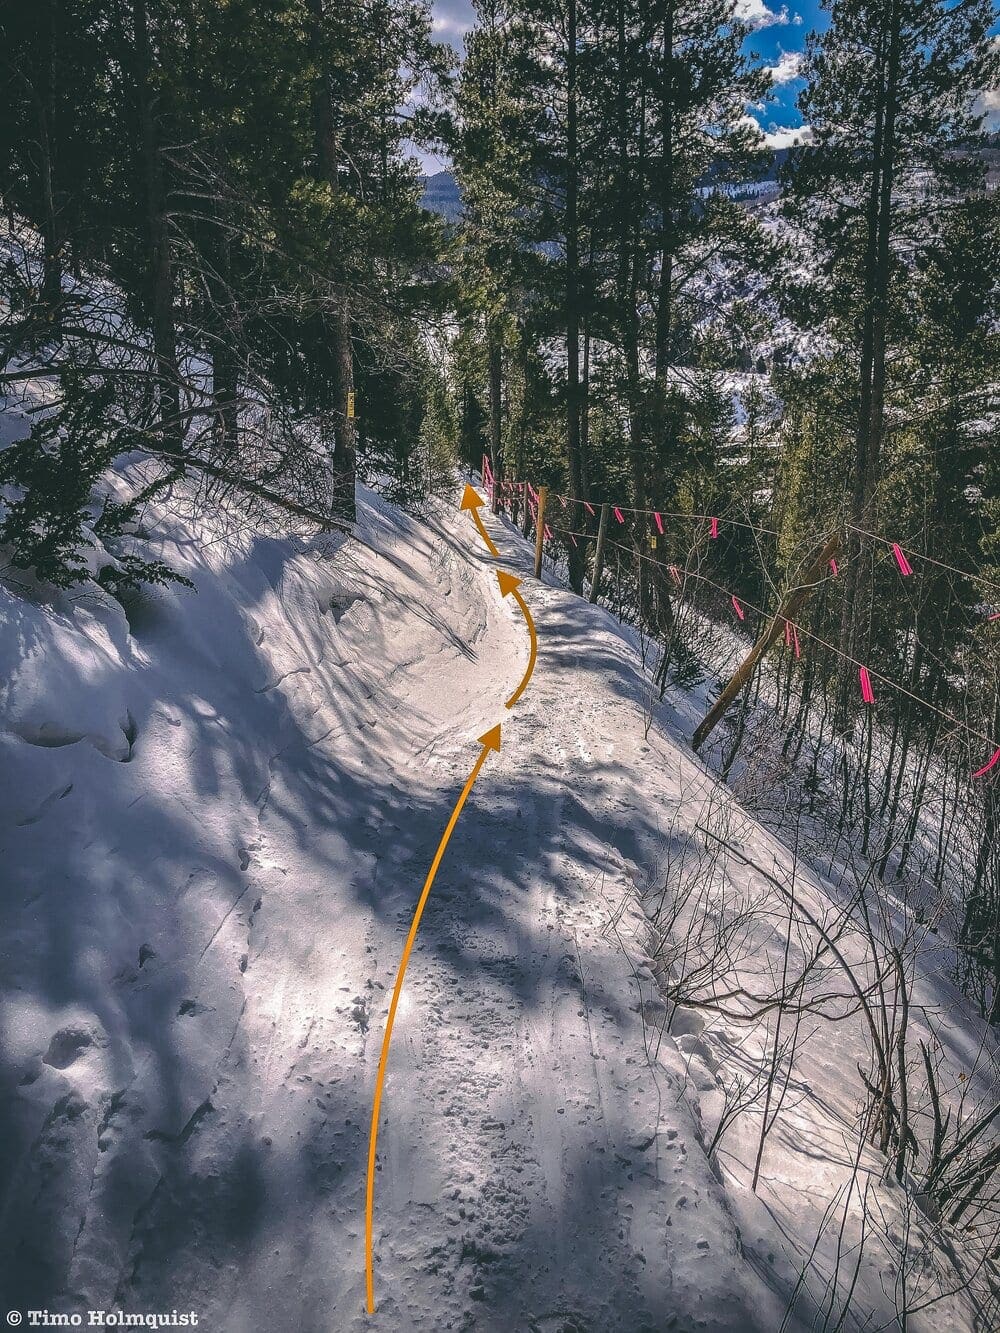
Bottom of the Traverse. Photo by Timo Holmquist.
The traverse isn’t hard, but it is an unfortunate way to avoid private property issues. Use your momentum, or sidestep up the rise until topping out a minute or two later. There is very obvious pink flagging on your right-hand side. Once you begin picking up speed again, pay attention; the last little bit involves a sharp S-turn lined by trees. Again: in less than ideal conditions, this area may melt out, exposing a gravelly layer of rocks. Once you handle the S-curve, you’ll be deposited at the very end of Taylor Street. With enough snow/ice coverage, you should be able to slide back to your car. Otherwise, step out of your bindings and carry your skis the last 50 yards.
Congratulations! You skied the Minturn Mile! Either pile into your car and head home, or journey to the Saloon for a celebratory round.
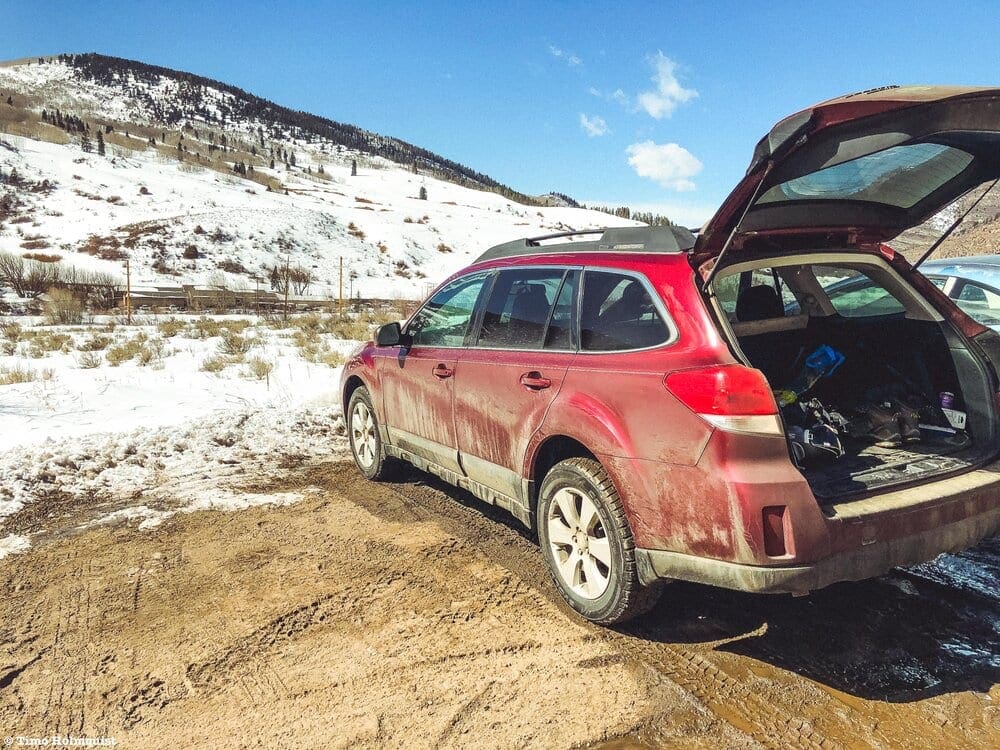
Picture: back at the car. You skied the Minturn Mile! Photo by Timo Holmquist.
Final Thoughts
The Minturn Mile is a legendary sidecountry run for numerous reasons.
1. It provides the perfect end to a long day skiing at Vail. (Note: Backcountry gates close at 2:30 PM unless otherwise posted).
2. It’s a thigh crunching 3,000-foot descent over three miles (Assuming you start from the higher gate).
3. The Upper Bowl holds powder a lot longer than many resort runs.
4. Don’t have an epic pass? No problem, the skin track is easy to follow from the bottom.
5. Variety: The Minturn Mile offers…
a. An open upper bowl with stellar views
b. Intermediate tree skiing
c. A lovely drainage with powder stashes and jumps
d. A great halfway point for a rest at the Beaver Ponds
e. A thin, heart-pumping Luge section
f. A bottom traverse that (in good conditions) will ski you right to your car
6. In the realm of backcountry/sidecountry, the Minturn Mile’s low angle profile makes it a great destination in MOST conditions. As always, complacency leads to accidents; check those avalanche forecasts before heading out.
I’ve skied the Mile many times and in many different conditions, from bluebird days to epic two-foot powder days. With many line options (especially in the first half), no run of the Mile is identical. There always seems to be another variation to discover, and that’s part of what makes it great. Treat the run with respect and utilize the information above to help guarantee success. While not as difficult as many other backcountry runs out there, injury on the Mile still puts you far from help. NEVER go alone, refine your plan, have the gear, and tell people where you’re going and when you expect to be back.
Happy adventures!
Ski Bum Glossary
(only as it pertains to this article, not a complete list)
o Beaver Ponds: The traditional halfway descent point of the Minturn Mile, near a bunch of Beaver Dams that have created a deep, marshy area
o Bench: A section of trail or a ski run that flattens out against an otherwise steeper slope
o Bluebird Day: A crystal clear, blue sky day
o Bowl: An open area of land between high ridges.
o Flagging: Brightly colored flags or ropes indicating off-limit areas or ski resort boundaries
o Fluff: Light, wonderful snow, common in drier mountain areas where humidity hasn’t made the snow thicker and harder to push through
o Funnel: An area that is hemmed in by stepper slopes to either side, often pushing the more obvious tracks to the center
o Gates: Officially designated entrance points to areas outside resort boundaries
o Lines: The literal lines your skis leave in the snow when you ski
o Luge: Like the winter sport, a thin, fast and often dangerous area of ski run
o Powder Stashes: Areas of a ski run that hold untracked powder
o Sidecountry: A backcountry run (not patrolled or groomed) that can be accessed from an established ski resort
o Sidestep/Duckwalk: Strategies used to dispense with flat or uphill sections, involves getting onto your ski edges and using them as leverage to move uphill, either in a side-step motion, or by opening up the skis and walking like a duck.
o Tracks: An area where others have skied before, obvious in comparison to an untracked area, which looks like undisturbed canvas
Resources
§ AIARE, Avalanche Research Education. (n.d.) Retrieved from https://avtraining.org/
§ Colorado Avalanche Information Center. (n.d.) Retrieved from https://www.avalanche.state.co.us/
o Vail and Summit County Zone. Retrieved from https://www.avalanche.state.co.us/forecasts/backcountry-avalanche/vail-summit-county/
§ National Weather Service. Extended forecast for Minturn/Dowd Junction Forecast. (n.d.) Retrieved from https://forecast.weather.gov/MapClick.php?CityName=Minturn&state=CO&site=GJT&textField1=39.5843&textField2=-106.426&e=0#.YD1Mi5NKjOQ
§ Graetz, Joel. Colorado Daily Snow. (Updated daily during winter months). Retrieved from https://opensnow.com/dailysnow/colorado
§ Vail Acreage and Info. https://www.onthesnow.com/colorado/vail/ski-resort.html#:~:text=Vail%20is%20arguably%20one%20of,something%20for%20every%20ability%20level.
§ Vail Ski Resort. (n.d.) Snow and Weather Report. Retrieved from https://www.vail.com/the-mountain/mountain-conditions/snow-and-weather-report.aspx
Terms of Use:
As with each guide published on SKYBLUEOVERLAND.com, should you choose to go backcountry skiing, do so at your own risk. Prior to setting out check current local weather, conditions, and land/road closures. While taking a trail, obey all public and private land use restrictions and rules, carry proper safety and navigational equipment, and of course, follow the #leavenotrace guidelines. The information found herein is simply a planning resource to be used as a point of inspiration in conjunction with your own due-diligence. In spite of the fact that this guide was prepared under diligent research by the specified contributor and/or contributors, the accuracy of such and judgement of the author is not guaranteed. SKYBLUE OVERLAND LLC, its partners, associates, and contributors are in no way liable for personal injury, damage to personal property, or any other such situation that might happen to individuals following this guide.
Guide To Backcountry Skiing Near Vail Pass East, Colorado
Guide To Backcountry Skiing Near Cameron Pass, Colorado
Backcountry Ski Gear: Essentials for Human Powered Skiing
Guide To Planning A Backcountry Ski Adventure
Backcountry Skiing in Rocky Mountain National Park: Hidden Valley and Sundance Mountain Ski Lines
Backcountry Skiing in Rocky Mountain National Park: Bear Lake Area Ski Lines
Backcountry Skiing in Rocky Mountain National Park: Longs Peak Area Ski Lines
Best Places To Backcountry Ski in Rocky Mountain National Park, Colorado: Best of the Rest


